Loading ...
Loading ...
Loading ...
en Accessories
12
Cooking compartment functions
The functions in the cooking compartment make your
appliance easier to use. This, for example, enables the
cooking compartment to be well lit and a cooling fan to
prevent the appliance from overheating.
Opening the appliance door
If you open the appliance door during an on-going
operation, the operation is paused. The operation
continues to run when you close the door.
Interior lighting
When you open the appliance door, the interior lighting
switches on. If the door remains open for longer than
around 15 minutes, the lighting switches off again.
For most operating modes, the interior lighting switches
on as soon as the operation is started. When the
operation has finished, the lighting switches off.
Note: You can set the interior lighting not to come on
during the operation in the basic settings. ~ "Basic
settings" on page 22
Cooling fan
The cooling fan switches on and off as required. The
hot air escapes above the door.
Caution!
Do not cover the ventilation slots. Otherwise, the
appliance may overheat.
So that the cooking compartment cools down more
quickly after the operation, the cooling fan continues to
run for a certain period afterwards.
Note: You can change how long the cooling fan
continues to run in the basic settings. ~ "Basic
settings" on page 22
Water tank
The appliance is fitted with a water tank. The water tank
is behind the panel. For operations with steam, fill the
water tank with water. ~ "Steam" on page 18
_Accessories
Acc essor i es
Your appliance is accompanied by a range of
accessories. Here, you can find an overview of the
accessories included and information on how to use
them correctly.
Accessories included
Your appliance is equipped with the following
accessories:
--------
Only use original accessories. They are specially
adapted for your appliance.
You can buy accessories from the after-sales service,
from specialist retailers or online.
Note: The accessories may deform when they become
hot. This does not affect their function. Once they have
cooled down again, they regain their original shape.
Inserting accessories
The cooking compartment has five shelf positions. The
shelf positions are counted from the bottom up.
In some appliances, the highest shelf position is
marked on the cooking compartment with the grill
symbol.
Always insert the accessory between the two guide bars
for a shelf position.
Accessories can be pulled out approximately halfway
without tipping.
Notes
■ Make sure that you always insert the accessories
into the cooking compartment the right way round.
■ Always insert accessories fully into the cooking
compartment so that they do not touch the appliance
door.
■ Take any accessories that you will not be using out
of the cooking compartment.
( Tank cover
0 Filling opening
8 Handle for removing and inserting the water tank
Wire rack
For ovenware, cake tins and ovenproof
dishes.
For roasts, grilled items and frozen
meals.
Universal pan
For moist cakes, pastries, frozen meals
and large roasts.
It can be used to catch dripping fat when
you are grilling directly on the wire rack.
Accessories en
13
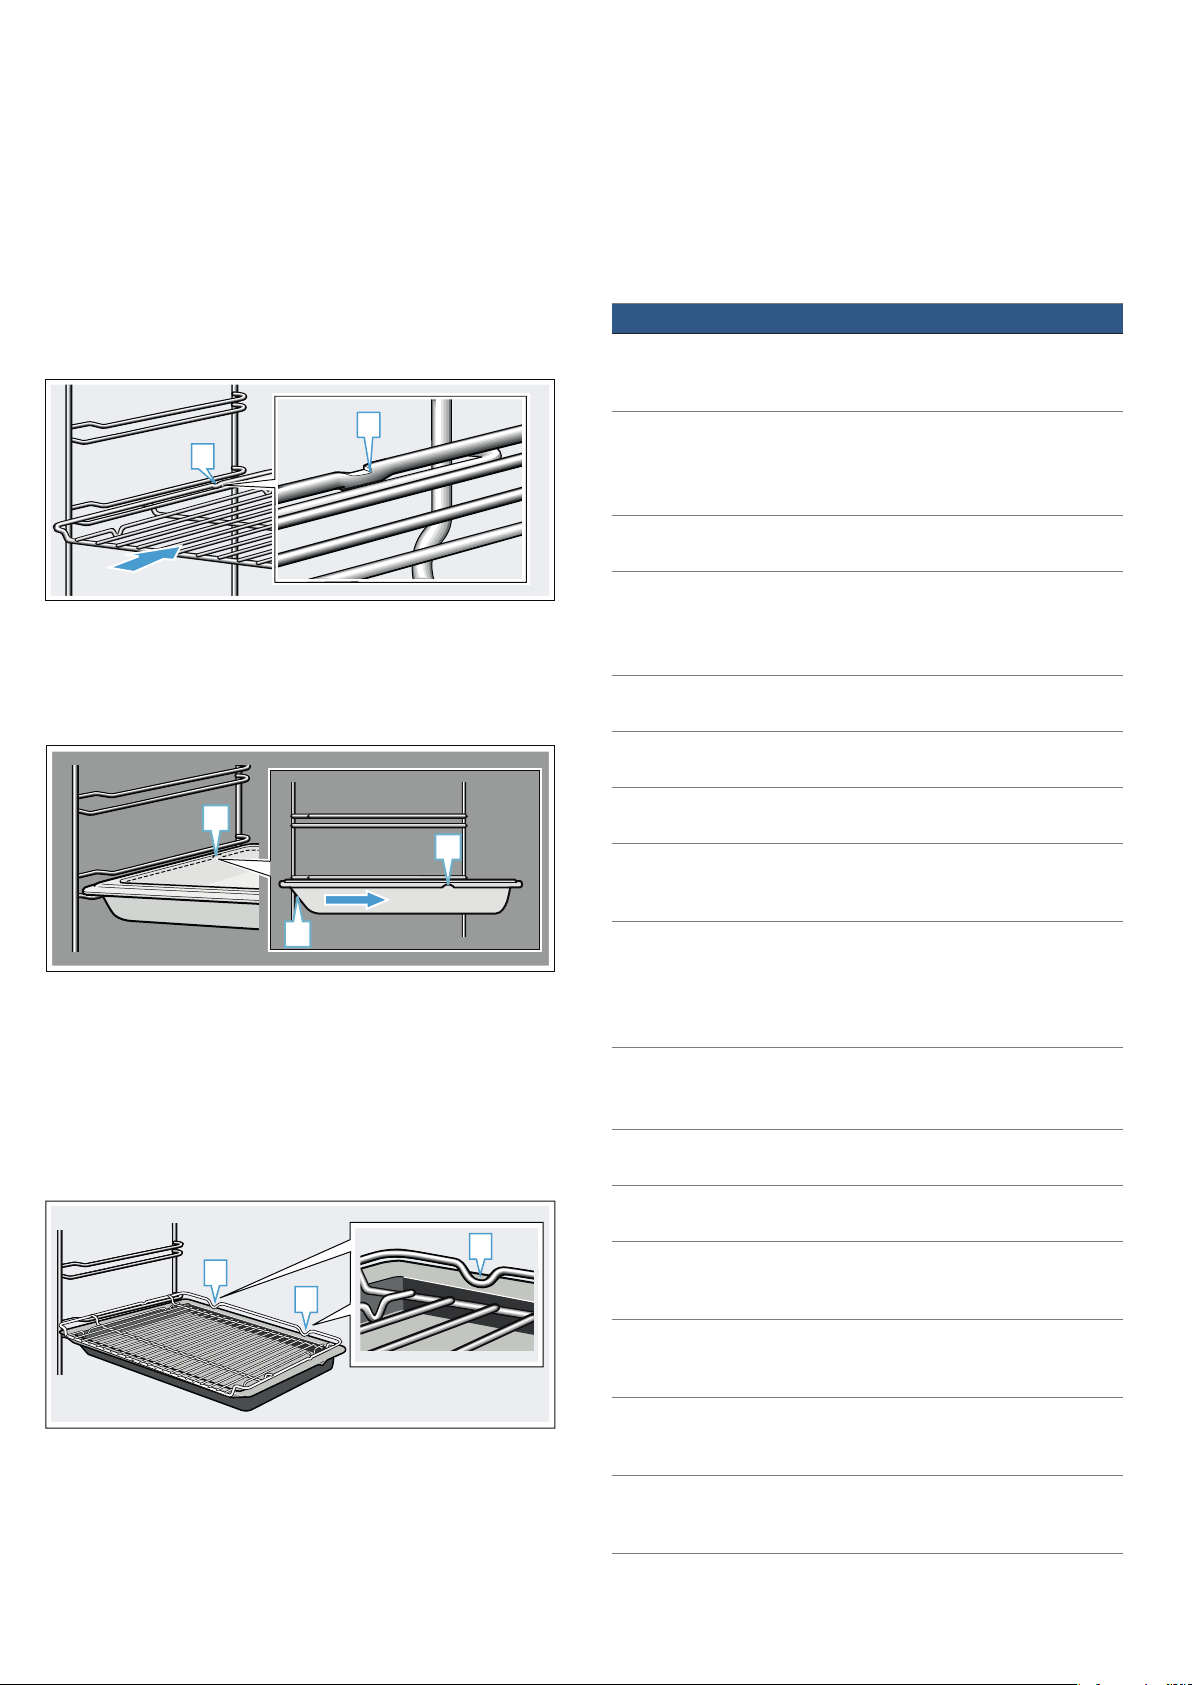
Locking function
The accessories can be pulled out approximately
halfway until they lock in place. The locking function
prevents the accessories from tilting when they are
pulled out. The accessories must be inserted into the
cooking compartment correctly for the tilt protection to
work properly.
When inserting the wire rack, ensure that lug ‚ is at the
rear and is facing downwards. The open side must be
facing the appliance door and the outer rail must be
facing downwards ¾.
When inserting baking trays, make sure that the recess
‚ is at the rear and is facing downwards. The sloping
edge of the accessory ƒ must be facing towards the
appliance door.
Example in the picture: Universal pan
Combining accessories
You can insert the wire rack and the universal pan at
the same time to catch drops of liquid.
When inserting the wire rack, ensure that both spacers
‚ are at the rear edge. When inserting the universal
pan, the wire rack is on top of the upper guide rod of
the shelf position.
Example in the picture: Universal pan
Optional accessories
You can buy optional accessories from the after-sales
service, from specialist retailers or online. *You will find
a comprehensive range of products for your appliance
in our brochures and online.
Both availability and whether it is possible to order
online differ between countries. Please see your sales
brochures for more details.
Note: Not all optional accessories are suitable for every
appliance. When purchasing, please always quote the
exact identification number (E-no.) of your appliance.
~ "Customer service" on page 33
--------
D
D
D
D
E
D
D
D
Optional accessories
Wire rack
For ovenware, cake tins and ovenproof dishes, and for roasts and
grilled food.
Universal pan, Pyrolytic
For moist cakes, pastries, frozen meals and large roasts.
It can be used to catch dripping fat when you are grilling directly on
the wire rack.
Baking tray, Pyrolytic
For tray bakes and small baked products.
Wire insert
For meat, poultry and fish.
For inserting into the universal pan to catch dripping fat and meat
juices.
Profi pan
For preparing large quantities.
Lid for the Profi pan
The lid turns the Profi pan into a Profi roasting dish.
Pizza tray
For pizzas and large round cakes.
Grill tray, Pyrolytic
Use for grilling in place of the wire rack or as a splatter guard.Only use
in the universal pan.
Bread-baking stone, Pyrolytic
For home-made bread, bread rolls and pizzas that require a crispy
base.
The baking stone must be preheated to the recommended tempera-
ture.
Glass roasting dish (5.1 litres)
For stews and bakes.
Particularly suitable for the "Meals" operating mode.
Glass tray
For large roasts, moist cakes and bakes.
Glass tray
For bakes, vegetable dishes and baked goods.
Pull-out system, 1 level, Pyrolytic,
The pull-out rails at level 2 allow you to pull the accessories out further
without them tipping.
Pull-out system, 2 levels, Pyrolytic
The pull-out rails at levels 2 and 3 allow you to pull the accessories out
further without them tipping.
Pull-out system, 3 levels, Pyrolytic
The pull-out rails at levels 1, 2 and 3 allow you to pull the accessories
out further without them tipping.
Decorative trims
For concealing the lower shelf of the unit and the base of the appli-
ance.
Loading ...
Loading ...
Loading ...