Documents: Go to download!
User Manual
- User Manual - (English, Spanish)
- Energy Guide - (English)

- Installation
- Operations
- Maintenance
- Troubleshooting
- Specifications
Table of contents
User Manual Washer
Installation
Follow these instructions carefully to ensure proper installation of the washer and to prevent accidents when doing laundry.
WARNING
Certain internal parts are intentionally not grounded and may present a risk of electric shock only during servicing. Service personnel – Do not contact the following factors while the appliance is energized: Control board, heat sink, motor, inlet valve, and pump.
Unpacking your washer
Unpack your washer and inspect it for shipping damage. Make sure you have received all the items shown on the next page. If your washer was damaged during shipping, or you do not have all of the items, call 1-800-SAMSUNG (1-800-726-7864). To prevent personal injury or strain, wear protective gloves whenever lifting or carrying the unit.
WARNING: Packing materials can be dangerous to children; Keep all packing material (plastic bags, polystyrene, etc.) well out of children’s reach.
CAUTION
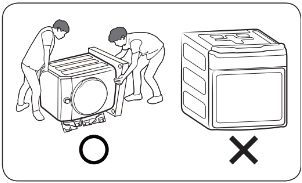
You must have at least 2 people unpack the washer. To remove the cushion bottom of the packing materials, do not tip the washer over on its front side.
When you lay the washer down to remove the carton base, protect the side of the washer and lay it down carefully. Never lay your washer on its back or front.
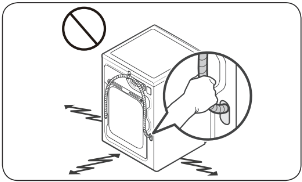
CAUTION
Do not grab or pull the drain hose to drag and move the product.
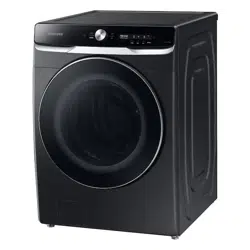
See other models: WA44A3205AW/A4 WA41A3000AW/A4 WA44A3405AV/A4 DVG41A3000W/A3 DVE41A3000W/A3
What's included
Make sure all the parts are included in the product package. If you have a problem with the washer or the parts, contact a local Samsung customer center or retailer.
Parts supplied

Parts not supplied
Tools needed for installation

NOTE
- Bolt caps: The number (3 to 6) of bolt caps provided depends on the model.
- The appearance of the washer and provided accessories may differ from the model.
- To purchase an accessory or lost part, contact a local Samsung service center or retailer.
CAUTION
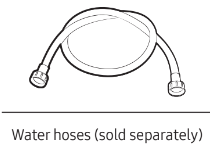
- Do not reuse old water hoses, which may leak or burst, causing flooding and/or property damage.
- Make sure rubber washers are inserted in each coupling of both water hoses.
Installation requirements
Electrical supply and grounding
- AC 120 V / 60 Hz / 15 AMP fuse or circuit breaker is required.
- Use an individual branch circuit. Connect only the washer to the circuit.
To ensure proper grounding, the washer comes with a power cord featuring a three-prong grounding plug for use in a properly installed and grounded outlet.
Check with a qualified electrician or service person if you are not sure about the grounding.
Do not modify the provided plug. If it does not fit the outlet, call a qualified electrician to install a proper outlet.
WARNING
- Do NOT use an extension cord.
- Use only the power cord that comes with the washer.
- Do NOT connect the ground wire to plastic plumbing, gas lines, or hot water pipes.
- Improperly connected grounding conductors may cause electric shock.
- To prevent unnecessary risk of fire, electrical shock, or personal injury, all wiring and grounding must be done in accordance with local codes, or in the absence of local codes, in accordance with the National Electrical Code, ANSI/NFPA No. 70-Latest Revision (for the U.S.) or the Canadian Electrical Code CSA C22.1 – Latest Revisions and local codes and ordinances. It is your responsibility to provide adequate electrical service for your washer.
Water supply
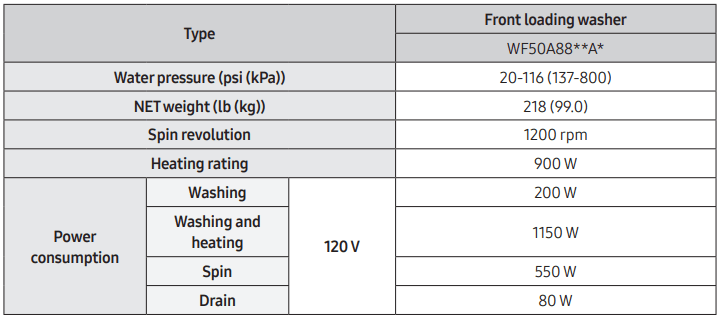
The proper water pressure for this washer is between 20-116 psi (137-800 kPa). Water pressure of less than 20 psi (137 kPa) may cause the water valve not to close completely. Or, it may take longer to fill the drum, causing the washer to turn off. Water taps must be within 4 ft. (122 cm) from the rear of the washer so that the provided inlet hoses reach the washer.
To reduce the risk of leaks:
- Make sure water taps are easily accessible.
- Turn off the taps when the washer is not in use.
- Check for any leaks at the water inlet hose fittings on a regular basis.
CAUTION
Before using the washer for the first time, check all connections at the water valve and taps for any leaks.
Drain
Samsung recommends a standpipe 18 in. (460 mm) high. The drain hose must be connected through the hose clip to the standpipe, and the standpipe must fully cover the drain hose.
Flooring
For best performance, the washer must be installed on a solid floor. Wood floors may need to be reinforced to minimize vibration and/or unbalanced loads. Carpeting and soft tile surfaces do not provide good resistance to vibrations and may cause the washer to move slightly during the spin cycle.
CAUTION
Do NOT install the washer on a platform or a poorly supported structure.
Water temperature
Do not install the washer in areas where water may freeze as the washer always retains some water in its water valves, pumps, and/or hoses. Frozen water can cause damage to belts, the pump, and other components of the washer.
Dimensions
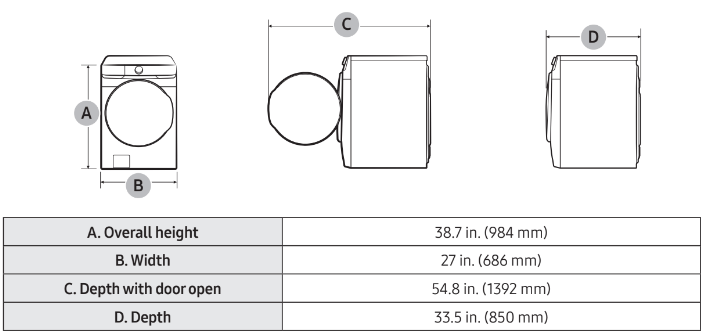
Clearance requirement
This clearance requirement is applicable for washers only.
NOTE
- For the dryer’s clearance requirement, see the dryer’s user manual.
- If the washer and dryer have different clearance requirements, use the one with the larger value.
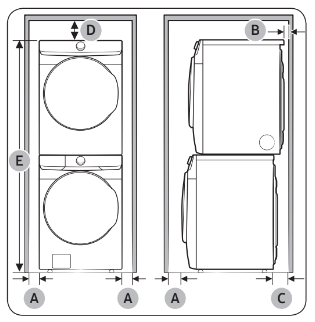
Alcove or closet installations
Minimum clearance for stable operation:

If both the washer and the dryer are installed in the same location, the front of the alcove or closet must have two unobstructed air openings for a combined minimum total area of 72 in.2(465cm2).
Undercounter installation

Pedestal installation

This clearance requirement is applicable for washer and dryer pair installation.

Side-by-side installation
WARNING
- Samsung’s washers and dryers can be stacked to maximize usable space.
- The dryer feet need to be removed to stack the washer and dryer. You can purchase an optional stacking kit from your Samsung retailer.
- You must purchase the MultiControl KIT (Model: DV-MCK) if you want a multi-control connection.
Stacked installation (Model: SKK-8K )
Step-by-step installation
STEP 1 Select a location
Location requirements:
- A solid, level surface without carpeting or flooring that may obstruct ventilation
- No direct sunlight
- Adequate room for ventilation and wiring
- The ambient temperature is always higher than the freezing point (32 °F / 0 °C)
- Away from heat sources
STEP 2 Remove the shipping bolts
Unpack the product package and remove all shipping bolts.
- Loosen all shipping bolts on the rear of the machine using the spanner. NOTE: Use the enclosed end of the supplied wrench to remove the shipping bolts.
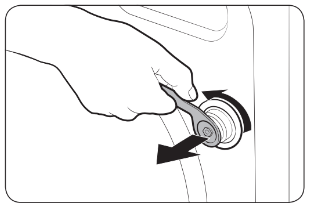
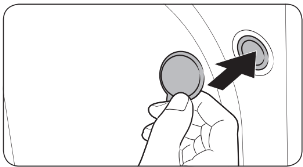
- Fill the holes with the supplied plastic bolt caps. Keep the shipping bolts for future use.
WARNING
- The shipping bolts secure the tub during product transportation and reduce the chance of suspension damage. Remove the shipping bolts before using the product and only reassemble them back in case you need to move the product.
- Packaging materials can be dangerous to children. Dispose of all packaging material (plastic bags, polystyrene, etc.) out of children’s reach.
STEP 3 Adjust the leveling feet
- Gently slide the washer into position. Excessive force may damage the leveling feet.
- Using a wrench, turn the leveling feet clockwise or counterclockwise to adjust the height until the washer is level.
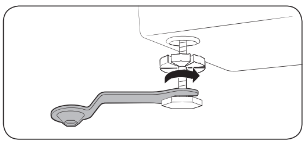
- Using a flathead screwdriver, tighten the locking nuts (A).
NOTE: Use the open end of the supplied wrench to adjust the leveling feet.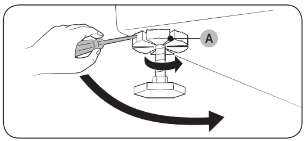
STEP 4 Connect the water hose
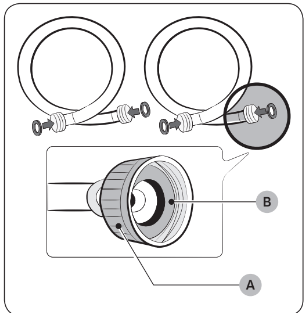
CAUTION
- Make sure to use new water hoses and that rubber gasket (B) are inside the couplings (A) at both ends of the hoses. Water hoses without gaskets may leak.
- Allow 5 in. (127 mm) of space between the back of the washer and the wall to prevent water hoses from being kinked. Kinked hoses may cause water leaks.
- If there is a water leak, stop using the washer and contact a local Samsung service center. A water leak may cause electric shock.
- Do not stretch the water hoses by force. If a hose is too short, replace the hose with a longer hose.
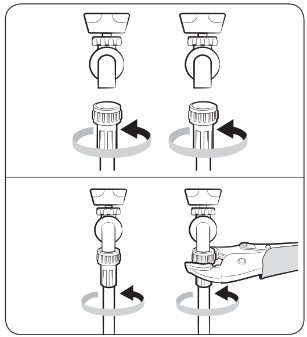
- Attach the water hoses to the hot and cold water taps, and then hand tighten the water hose fittings until they are tight. Then, use pliers to tighten the fittings by an additional two-thirds of a turn. To avoid damaging the fittings, do not overtighten them.
- Pull the water hoses to check if they are firmly connected.
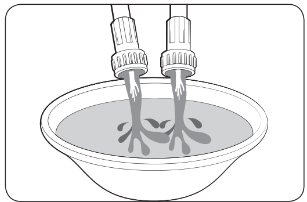
- Put the other ends of the hoses into a bucket, and then open the water taps for 10 - 15 seconds to remove impurities. When done, close the taps.
- Attach the water hoses to the hot and cold water inlets on the back of the washer, and then hand tighten the water hose fittings until they are tight. Then, use pliers to tighten the fittings by an additional two-thirds of a turn.
NOTE
If you do not want to use the hot water supply hose, attach the water intake cap to the hot water supply intake. When you do a wash, press Temp. to select Cold.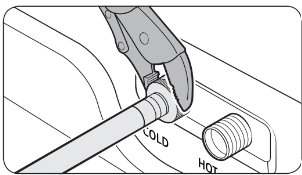
- Open the water taps, and check for leaks.
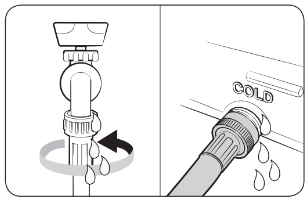
STEP 5 Connect the drain hose
To a Laundry Tub or Drain Pipe
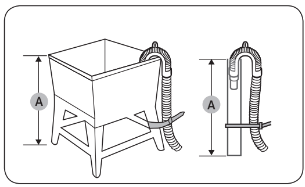
- Check the height (A) of your drain system and make sure the minimum and maximum heights shown below are met. Minimum: 18 in. (46 cm); Maximum: 96 in. (245 cm).
 NOTE
NOTE
• Make sure to measure the height from the floor where the washer is placed.
• Draining efficiency may be reduced if the drain system is at the maximum height.
• To prevent the washer from siphoning water, do not use a drain system below the minimum height. - Attach the drain hose to the plastic hose guide (B).
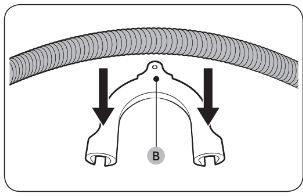
- Route the drain hose to the drain system.
CAUTION
• If using a standpipe, make sure the standpipe and drain hose connection is not airtight.
• If using a standpipe, make sure the drain hose is inserted at least 6 in. (152 mm) but no more than 8 in. (203 mm) into the standpipe.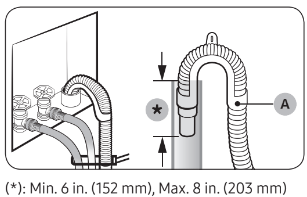
- Secure the drain hose with cable ties.
Over the edge of a wash basin
The drain hose must be placed no lower than 24 in. (60 cm) and no higher than 35 in. (90 cm) from the floor. To keep the spout of the drain hose bent, use the supplied plastic hose guide (A). Secure the guide to the wall using a hook to ensure stable drainage.
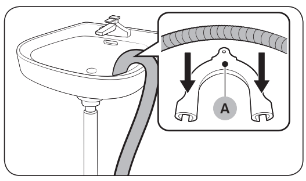
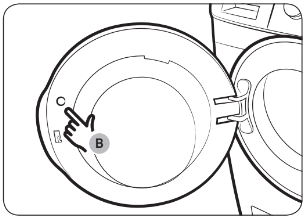
STEP 6 Remove the film inside the door
Remove the small circle of the film (B) above the door latch before use.
STEP 7 Power on
Plug the power cord into an AC 120 V / 60 Hz / 15 AMP-approved electrical outlet protected by a fuse or circuit breaker. Then, press Power to turn on the washer.
Operations
Multi-control panel

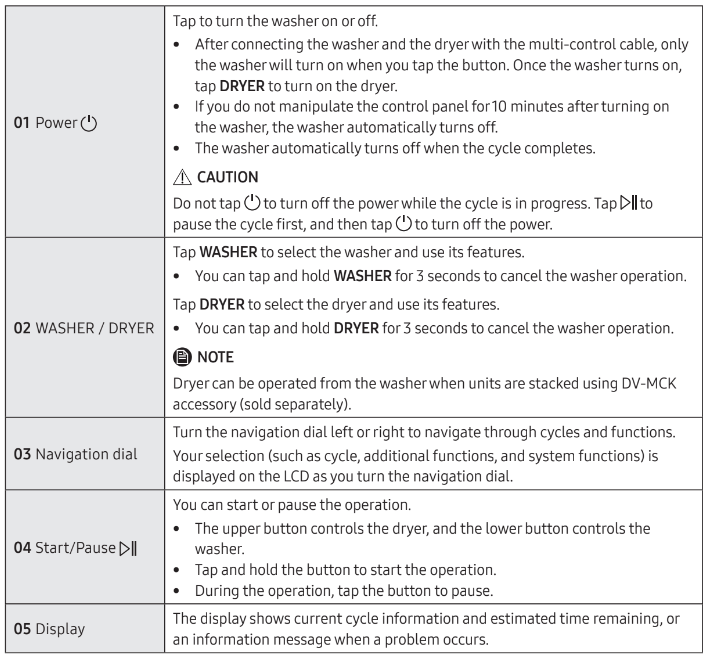
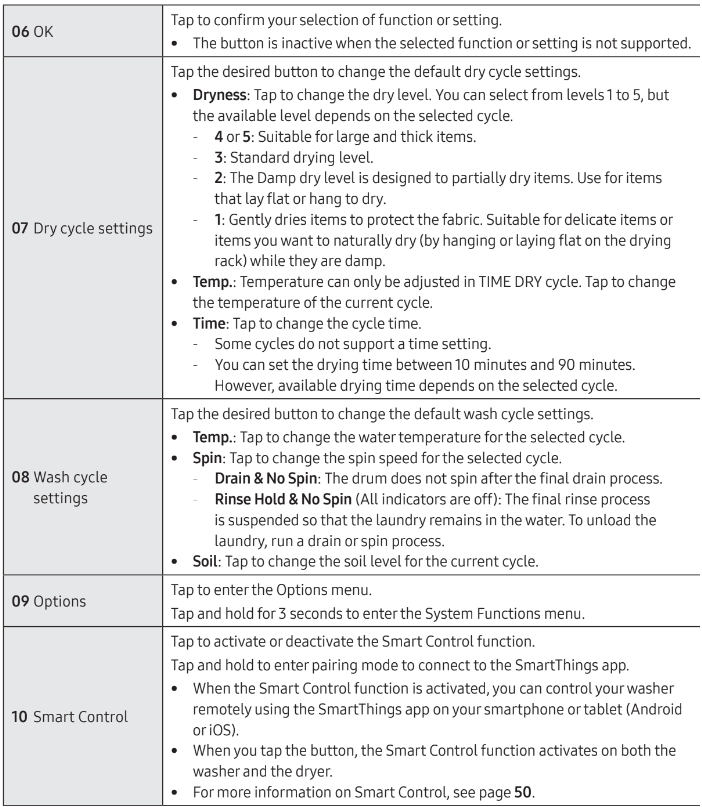
Icon descriptions

Operating a cycle

- Tap
 to turn the power on.
 - Tap DRYER or WASHER.
- Tap WASHER to select the washer and use its features.
- Tap DRYER to select the dryer and use its features. - Turn the Navigation dial to select the cycle you want.
- For more information on Cycle overview.
- For more information on the dryer’s cycles, please see the dryer’s user manual. - Change the default cycle options.
- For the washer, tap Temp., Spin, or Soil to change the default cycle settings.
- For the dryer, tap Dryness, Temp., or Time to change the default cycle settings. - Tap Options, and then turn the Navigation dial to select the desired additional function.
- For more information on Options.
- For more information on the dryer’s additional functions, please see the dryer’s user manual. - Tap OK to change the settings for the selected additional function.
- Not all cycles have additional functions available. - Tap and hold
 to start the operation.
- Once you set the cycle you want, the screen displays a brief cycle description, and cycle time. You can also check the cycle progress, remaining cycle time, and information codes.
NOTE
For detailed information on the dryer's cycles and using the dryer, please see the dryer's user manual.
Cycle Overview
NOTE
For more information on the dryer’s cycles, please see the dryer’s user manual.
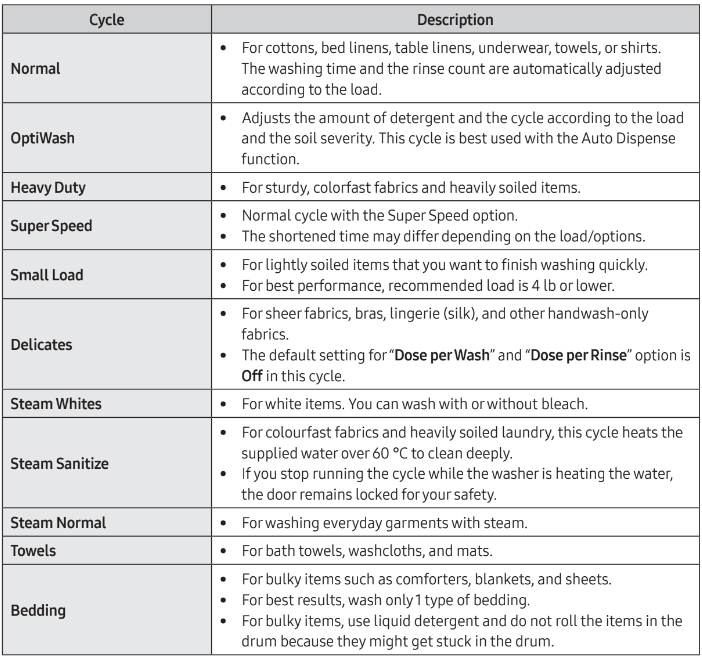
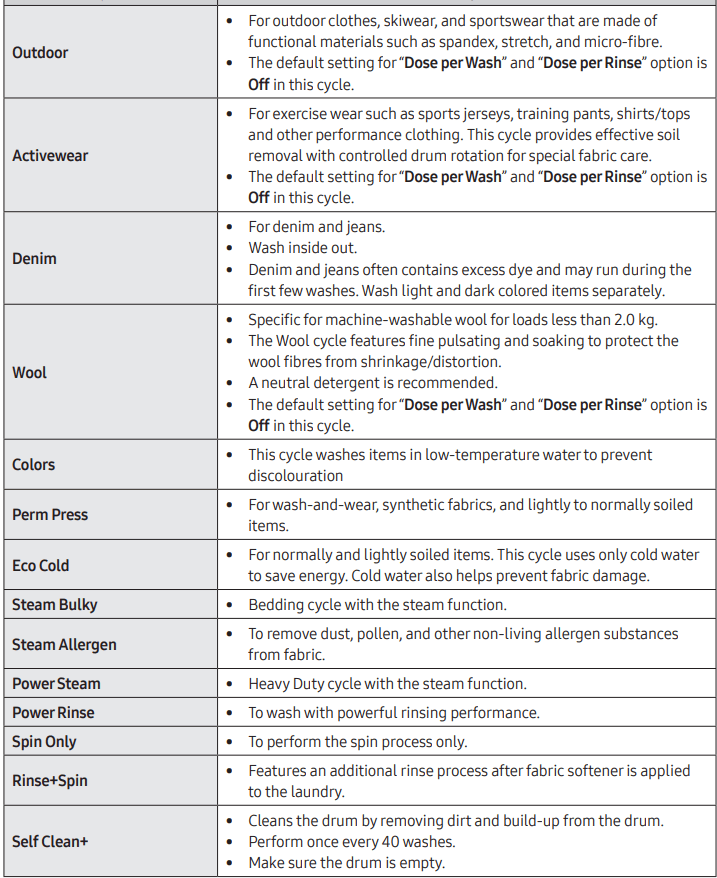
Cycle descriptions
You can add or delete cycles to personalize the cycle list in the My Cycles option.
Cycle chart
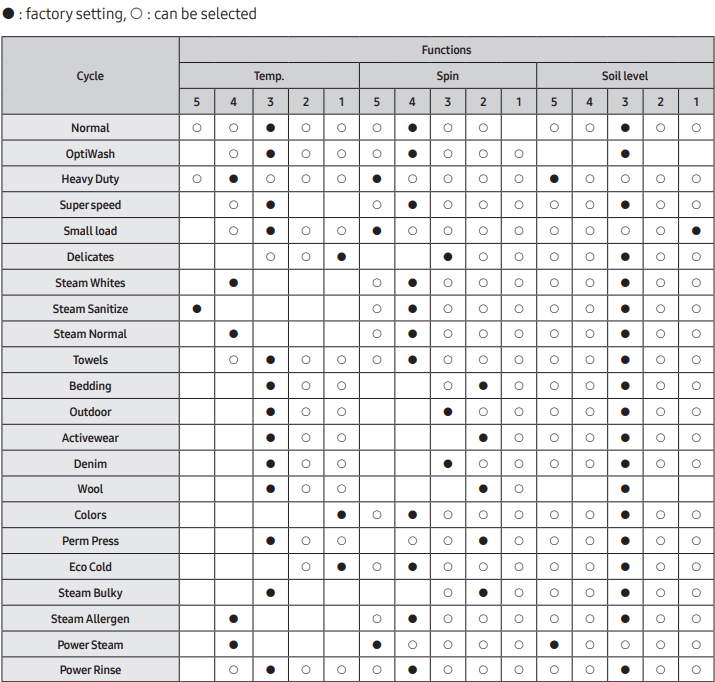
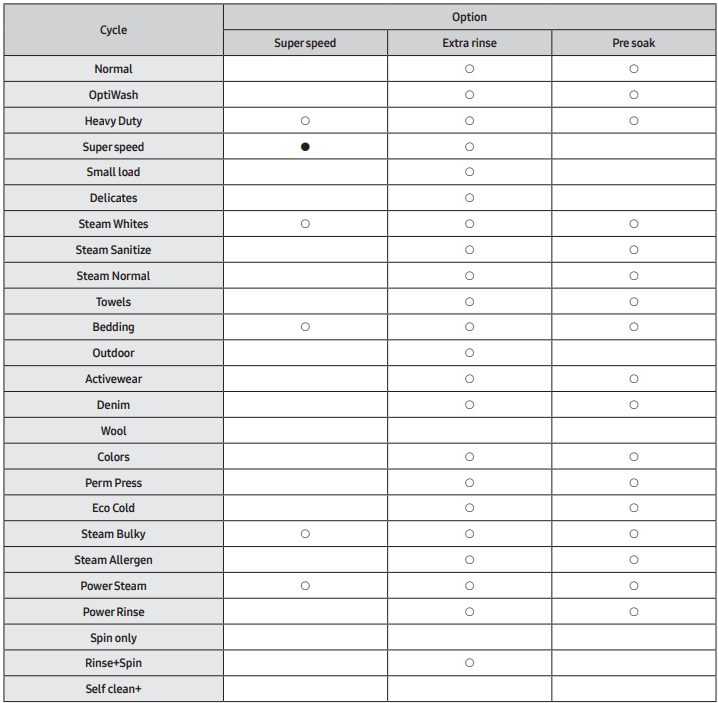
Use this chart to set the best cycle and options for your laundry.


Options
Using Options
- Tap Options.
- Turn the Navigation dial to select the desired additional function.
- Tap OK to change the selected function’s settings or start the function.
NOTE
- To return to the main screen, tap Options again or turn the Navigation dial to select Back and tap OK.
- If the selected function is not supported, the "Currently not supported" message is displayed, and the OK button is not activated.
- When you select an additional function, a brief help message appears for the first ten times of use.
Super Speed
Use this function if you need to shorten the washing time.
- Tap Options.
- Turn the Navigation dial to select Super Speed, and then tap OK.
- Tap OK to select On or Off.
- Only available with Super Speed, Heavy Duty, Power Steam, Bedding, Steam Bulky, and Steam Whites cycles.
- The shortened time may differ depending on the load/options.
Extra Rinse
Adds an additional rinse at the end of the cycle to remove laundry additives more thoroughly.
- Tap Options.
- Turn the Navigation dial to select Extra Rinse, and then tap OK.
- Tap OK to select On or Off.
Pre Soak
This adds 30 minutes of soaking time at the start of the wash cycle for better stain removal.
- Select a cycle and change the cycle settings as necessary.
- Tap Options.
- Turn the Navigation dial to select Pre Soak, and then tap OK.
- Tap OK to select On or Off.
Dose per Wash
You can increase or decrease the amount of detergent dispensed automatically.
- Tap Options.
- Turn the Navigation dial to select Dose per Wash, and then tap OK.
- Tap OK to select the desired setting.
- The default setting is Med. (Medium).
- You can select from Med., High, Off, or Low.
Dose per Rinse
You can increase or decrease the amount of softener dispensed automatically.
- Tap Options.
- Turn the Navigation dial to select Dose per Rinse, and then tap OK.
- Tap OK to select the desired setting.
- The default setting is Med. (Medium).
- You can select from Med., High, Off, or Low.
My Cycles
Add or remove cycles to create a personal cycle list.
- Tap Options.
- Turn the Navigation dial to select My Cycles, and then tap OK. You can only edit a cycle to create a personal cycle when the washer is not operating.
- Turn the Navigation dial to select the desired cycle.
- Tap OK to add or remove the selected cycle. The addition and removal of the course are saved automatically.
- Once you finish creating My Cycles, tap Options to return to the cycles screen.
NOTE
- The Normal and Self Clean+ cycles cannot be removed from the cycle's list.
- You can also edit My Cycles in the SmartThings app.
Drum Light
This turns on the light inside the drum so you can check the status of the items inside.
- Tap Options.
- Turn the Navigation dial to select Drum Light, and then tap OK.
- Even if the washer is turned off, the drum light will turn on as long as the power cable is connected.
- Once the Drum Light function is enabled, the drum light will turn off automatically after 2 minutes.
- Opening the washer door automatically turns on the drum light. The light will then turn off automatically after 2 minutes.
- Water droplets on the surface of the drum light can scatter light such that it resembles a yellow stain. This is merely an optical illusion and not a malfunction.
Delay End
You can set the washer to finish your wash automatically at a later time, choosing a delay of between 1 to 24 hours (in 1-hour increments). The hour displayed indicates the time the wash will finish.
- Select a cycle and change the cycle settings as necessary.
- Tap Options.
- Turn the Navigation dial to select Delay End, and then tap OK.
- Turn the Navigation dial to select the desired time, and then tap OK.
- Tap and hold
 .
.
- Status shows in the display and the washer tumbles the drum to sense the weight of the load (if load sensing is preset for the selected cycle). When load sensing is complete, the display shows the remaining time until the end of the wash cycle.
- To cancel Delay End, tap  to restart the washer.
Child Lock
To prevent children or infants from accidentally starting or setting the washer, Child Lock locks all buttons except for  and Options.
- Tap Options.
- Turn the Navigation dial to select Child Lock, and then tap OK.
- Tap OK to select On or Off.
NOTE
- When Child Lock is on, all buttons are disabled except
 for Options. The washer door also locks.
 - Tapping a button while Child Lock is on triggers an alarm with the “Child Lock On” message.
- You cannot open the door after a wash cycle when the Child Lock is on. Turn the function off before opening the door to take out the laundry.
- Setting Child Lock on the multi-control panel applies the function to both the washer and the dryer. - You can individually change the Child Lock setting for the dryer on the dryer's control panel
System Functions
Using System Functions
- Tap and hold Options for 3 seconds.
- Turn the Navigation dial and select the desired system function, and then tap OK.
- Tap OK to change the selected function’s settings or start the function.
NOTE
To return to the main screen, tap Options again or turn the Navigation dial to select Back and tap OK.
Detergent
You can change the concentration level of the detergent.
- Tap and hold Options for 3 seconds.
- Turn the Navigation dial to select Detergent, and then tap OK.
- Tap OK to select the desired setting.
- The default setting is 1x.
- You can select from 1x., 2x, or 3x.
NOTE
The dispensed amount of detergent decreases as the concentration level increases.
Softener
You can change the concentration level of the softener.
- Tap and hold Options for 3 seconds.
- Turn the Navigation dial to select Softener, and then tap OK.
- Tap OK to select the desired setting.
- The default setting is 1x.
- You can select from 1x, 2x, or 3x.
NOTE
The dispensed amount of softener decreases as the concentration level increases.
AI Pattern
This function saves frequently used cycles and settings. When you turn the function on, the washer remembers the cycles you use most and their settings (Temp., Rinse, Spin) and displays them in frequency order.
- Tap and hold Options for 3 seconds.
- Turn the Navigation dial to select AI Pattern, and then tap OK.
- Tap OK to select On or Off.
- The default setting is On. Set it to Off if you do not want to use this function.
- When you turn off the function, all the saved data reset.
Alarm
You can turn on or off the sound from the washer. When this function is set to Off, the melody of cycle completion and the power-off beep does not sound. However, the other sounds stay active.
- Tap and hold Options for 3 seconds.
- Turn the Navigation dial to select Alarm, and then tap OK.
- Tap OK to select On or Off.
- The default setting is On.
NOTE
- The setting remains unchanged even if you restart the washer.
- If you turn on the Alarm after connecting your washer and the dryer with the multi-control connection cable, the sound only plays on the multi-control panel.
- If you disconnect the multi-control connection, the sound plays on each appliance that you manipulate.
Calibration
You can run the calibration again for accurate weight detection.
- Tap and hold Options for 3 seconds.
- Turn the Navigation dial to select Calibration, and then tap OK. - Calibration does not start if the door is not closed properly. - The drum rotates clockwise and anticlockwise for about 3 minutes.
- When calibration is complete, the “Calibration complete” message appears on the display and the washer turns off automatically.
Wi-Fi
You can turn the washer's Wi-Fi on or off.
- Tap and hold Options for 3 seconds.
- Turn the Navigation dial to select Wi-Fi, and then tap OK.
- Tap OK to select On or Off.
- The washer's Wi-Fi is off as a factory default setting. However, the washer's Wi-Fi turns on automatically when you turn it on the washer for the first time. Then, the final Wi-Fi setting maintains regardless of the washer power status.
- Once you turn on the washer's Wi-Fi and connect to a network, the washer remains connected to the network even when you turn off the power.
- The Wi-Fi  indicates that the washer is connected to the router through the Wi-Fi connection.
Language
You can change the system language.
- Tap and hold Options for 3 seconds.
- Turn the Navigation dial to select Language, and then tap OK.
- Turn the Navigation dial to select the desired language, and then tap OK.
Self-Diagnosis
You can use this function to check if there are any abnormal signs on your washing machine.
- Tap and hold Options for 3 seconds.
- Turn the Navigation dial to select Self Diagnosis, and then tap OK.
- Self Diagnosis starts immediately and "Testing..." is displayed during the self-diagnosis process.
- Once the self-diagnosis process starts, only the  button remains active.
- If the washing machine detects any errors, an information code and the solution are displayed on the control panel.
Factory Reset
You can reset the washer.
- Tap and hold Options for 3 seconds.
- Turn the Navigation dial to select Factory Reset, and then tap OK.
- Your washer resets to the factory setting.
Special features
Smart control
You can connect to the SmartThings app and control your washer remotely.
Connecting your washer
- Download and open the SmartThings app on your smartphone or tablet (Android & iOS).
- Tap
 to turn on the washer.
 - Tap and hold Smart Control.
a. The washer enters AP mode and connects to your smartphone or tablet.
b. Tap Smart Control to authenticate your washer.
c. Once the authentication process is complete, your washer is successfully connected to the app.
- You can use various features available in the SmartThings app.
NOTE
- If your washer fails to connect with the SmartThings app, try again.
- Check your router if you experience any Internet connection problems after connecting your washer with the SmartThings app.
- If the Wi-Fi is off, tap and hold Options for 3 seconds to enter the System functions menu, and select Wi-Fi to turn it on.
- Turning the washer's Wi-Fi on allows you to connect to the washer via SmartThings app on your smartphone or tablet, regardless of the power status of the washer. However, the washer appears offline on the SmartThings app if the washer's Wi-Fi is off.
- Close the door before starting the Smart Control function.
- If you use your washer for a while without connecting it to the SmartThings app, a pop-up message about Smart Control will show for 3 seconds on the 20th, 40th, and 60th use.
- If the washer's Wi-Fi is not connected to an AP (access point), the Wi-Fi will turn off when you turn off the power.
- You can turn on or off the Smart Control function simultaneously for both the washer and the dryer on the multi-control panel. However, you must complete EasySetup on both appliances prior.
- If you turn on the Smart Control function on the multi-control panel after you complete EasySetup for both appliances, Smart Control icons for both appliances appear on display.
Stay Connect
Set up the Stay Connect function in your SmartThings app to keep Smart Control turned on at the end of a cycle. Your washer stays connected to the app so you can send additional instructions, whether you are at home or away.
- If you turn on the Stay Connect function on the SmartThings app, the washer will stay in standby power-saving mode after completing a cycle. - The Stay Connect function will remain active for up to 24 hours if the door remains closed.
- When the Stay Connect function is active, the Smart Control, Door Lock, and Wi-Fi icons are illuminated on your washer display.
- You can conveniently control your washer, adding rinse, and spin cycles using the SmartThings app.
NOTE
- The washer switches to standby power saving mode when an operation is paused even if the machine is not connected to the SmartThings app.
- In some circumstances, only the Door Lock icon may be illuminated.
SmartThings
Wi-Fi connection
On your smartphone or tablet, go to Settings and turn on the wireless connection and select an AP (Access Point).
- This appliance supports the Wi-Fi 2.4 GHz protocols.
Download
On an app market (Google Play Store, Apple App Store, Samsung Galaxy Apps), find the SmartThings app with the search term “SmartThings”. Download and install the app on your device.
NOTE
The app is subject to change without notice for improved performance.
Log in
You must first log into SmartThings with your Samsung account. To create a new Samsung account, follow the instructions on the app. You don’t need a separate app to create your account.
NOTE
If you have a Samsung account, use the account to log in. A registered Samsung smartphone or tablet user automatically logs in.
To register your appliance to SmartThings
- Make sure your smartphone or tablet is connected to a wireless network. If not, go to Settings and turn on the wireless connection and select an AP (Access Point).
- Open SmartThings on your smartphone or tablet.
- If a message of “A new device is found.”, select Add.
- If no message appears, select + and select your appliance in a list of devices available. If your appliance is not listed, select Device Type > Specific Device Model, and then add your appliance manually.
- Register your appliance to the SmartThings app as follows.
a. Add your appliance to SmartThings. Make sure your appliance is connected to SmartThings.
b. When registration is complete, your appliance appears on your smartphone or tablet.
Maintenance
Keep the washer clean to prevent deteriorated performance and to preserve its life cycle. WARNING
Certain internal parts are intentionally not grounded and may present a risk of electric shock only during servicing. Service personnel – Do not contact the following factors while the appliance is energized: Control board, heat sink, motor, inlet valve, and pump.
Self Clean +
Specific usage and environmental conditions may result in some residue build-up or odor in the washer drum. To prevent this build-up or odor and keep your washer drum fresh and clean, perform the Self Clean+ cycle at least once a month or every 40 cycles. Perform the recommended procedure below when using the Self Clean+ cycle.
- Tap
 .
. - Turn the Navigation dial to select Self Clean+.
- Tap and hold
 .
.
CAUTION
If there is chlorine bleach left in the washer drum for an extended period of time, rust can occur.
NOTE
- The water temperature for Self Clean+ defaults to Extra Hot. This temperature cannot be changed.
- In the case where the residue is present in the washer drum, add liquid chlorine bleach to the MAX level line in the Manual detergent compartment before starting the Self Clean+ cycle. Do not add the liquid chlorine bleach to the other compartments (This is only the case for the Self Clean+ cycle).
- Do not exceed the max line. Do not use or mix any other detergent or chemicals during the Self Clean+ cycle. If necessary, run a Rinse+Spin cycle after the Self Clean+ cycle has been completed helping remove any remaining residue.
Self Clean+ reminder
- After every 40 cycles, the washer displays the “Drum Clean needed” message for an hour to alert you to run the Self Clean+ cycle.
- It is recommended to run the cycle regularly for hygienic purposes.
- You will see the Self Clean+ alert message when the washer completes a cycle. If you open the door, the message disappears, and the display shows the Self Clean+ cycle setting screen automatically. At this time, the dryer control panel displays the recommended drying cycle.
- The reminder will appear on the control panel for 5 additional consecutive cycles before turning off. The next reminder will not appear until another 40 cycles have been completed.
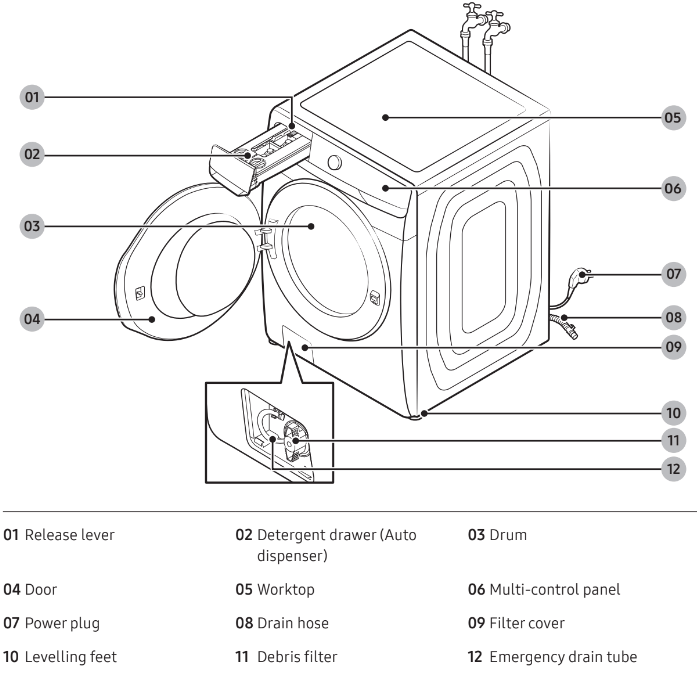
Emergency drain
In case of a power failure, drain the water inside the drum before taking out the laundry.
- Power off and unplug the washer from the electrical outlet.
- Gently press the top area of the filter cover to open.
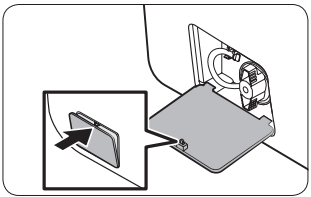
- Put an empty, spacious container around the cover, and stretch the emergency drain tube to the container while holding the tube cap (A).
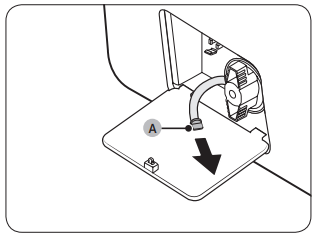
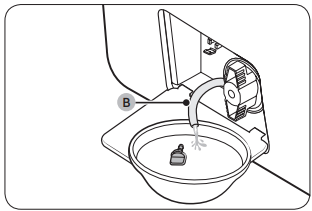
- Open the tube cap and let water in the emergency drain tube (B) flow into the container.
- When done, close the tube cap, and reinsert the tube. Then, close the filter cover. NOTE Use a spacious container because the water in the drum may be more than expected.
Cleaning
The surface of the washer
Use a soft cloth with a nonabrasive household detergent. Do not spray water onto the washer.
Mesh filter
Clean the mesh filter of the water hose once or twice a year.
- Turn off the washer, and unplug the power cord.
- Close the water tap.
- Loosen and disconnect the water hose from the back of the washer. Cover the hose with a cloth to prevent water from gushing out.
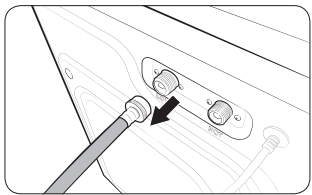
- Use pliers to pull out the mesh filter from the inlet valve.
- Submerge the mesh filter deeply in water so that the threaded connector is also submerged.
- Dry the mesh filter completely in the shade.
- Reinsert the mesh filter into the inlet valve, and reconnect the water hose to the inlet valve.
- Open the water tap.
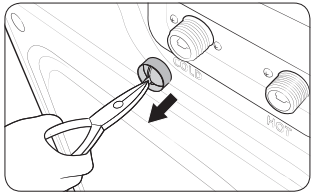
NOTE
If the mesh filter is clogged, an information code of “4C” appears on the screen.
Debris filter
It is advisable to clean the debris filter every 2 months to prevent clogging. A clogged debris filter may reduce the bubble effect.
- Turn off the washer, and unplug the power cord.
- Drain the remaining water inside the drum. See the Emergency drain section.
- Gently press the top area of the filter cover to open.
- Turn the debris filter knob to the left, and drain off the remaining water.
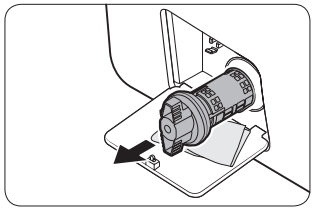
- Clean the debris filter using soft brushes. Make sure the drain pump propeller inside the filter is unclogged.
- Reinsert the debris filter, and turn the filter knob to the right.
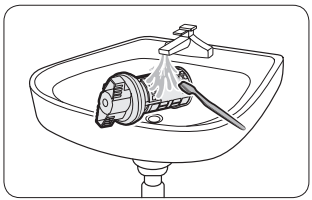
NOTE
- Some debris filters feature a safety knob that is designed to prevent accidents by children. To open the safety knob of the debris filter, push in and turn it anticlockwise. The spring mechanism of the safety knob helps open the filter.
- To close the safety knob of the debris filter, turn it clockwise. The spring makes a rattling sound, which is normal.
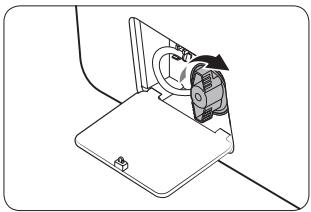
NOTE
If the pump filter is clogged, an information code of “5C” appears on the screen.
CAUTION
- Make sure the filter knob is closed properly after cleaning the filter. Otherwise, this may cause a leak.
- Make sure the filter is inserted properly after cleaning it. Otherwise, this may cause an operational failure or a leak.
Detergent drawer
To prevent the detergent residue buildup in the detergent drawer, clean the detergent/softener compartments once or twice a month, and whenever you refill or change the detergent or softener.
CAUTION
- Make sure to turn off the washer and unplug the power cord before cleaning.
- If you will not use the washer for a long time, empty the detergent/softener compartments and clean them thoroughly.
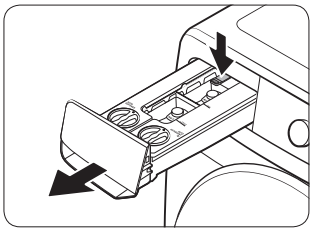
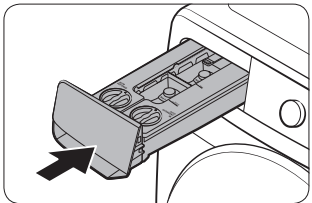
- While holding down the release lever on the inner of the drawer, pull the detergent drawer to remove it.
- Remove the tops of both compartments using the pull tabs located on the back of the lid, then clean inside the compartments under warm running water with a soft brush.
- Clean the drawer components in warm running water using a soft brush. - Wipe all components with a dry towel or cloth after cleaning.
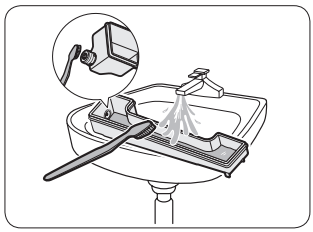
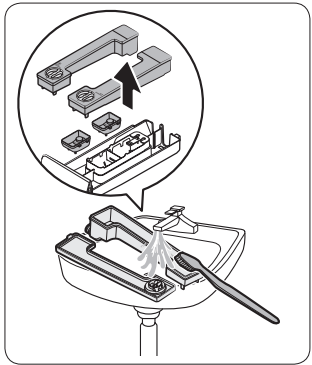 NOTE If the cleaning agent in the compartment is hardened, open the compartment, and pour lukewarm water into the compartment to dissolve the hardened agents. Then, clean the compartment and its rear valve thoroughly.
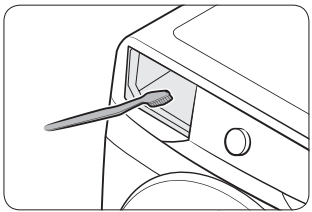
- Clean the drawer recess using a soft brush to remove detergent residues and limescale on the drawer recess.
- Insert the detergent drawer back into the washer.
NOTE
- Make sure the drawer recess is completely dry before inserting the detergent drawer.
- Tightly attach the tops of both compartments before inserting them back into the drawer.
CAUTION
Do not spray water into the detergent drawer recess. It may cause electric shock or fire.
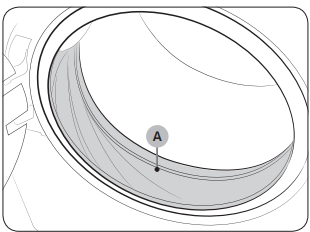
Door diaphragm
- Open the door, and then empty the drum.
- Combine 3/4 cup of liquid chlorine bleach and 1 gallon of warm tap water.
- Wearing rubber gloves, use a soft, clean cloth dipped in the water and bleach solution to clean the diaphragm.
- Let stand for 5 minutes, and then wipe up and dry well.
CAUTION
Use bleach carefully and be sure to follow the bleach manufacturer’s use and care instructions.
Recovery from freezing
The washer may freeze when the temperature in its location drops below 32 °F (0 °C).
- Turn off the washer, and then unplug the power cord.
- Pour warm water over the water tap to loosen the water hose.
- Disconnect the water hose, and then soak it in warm water.
- Pour warm water into the drum and leave it for about 10 minutes.
- Reconnect the water hose to the water tap.
NOTE If the washer still doesn’t operate normally, repeat the steps above.
Care for an extended period of non-use
Avoid leaving the washer unused for an extended time. However, if you intend to leave the washer unused for a long period of time, follow the directions below:
- Tap
 .
. - Turn the Navigation dial to select Rinse+Spin.
- Empty the drum, and then tap and hold
 .
. - When the cycle is complete, close the water taps and disconnect the hoses.
- Turn off the washer, and then unplug the power cord.
- Open the door to let air circulate through the drum.
Cleaning the exterior
- Turn off the water taps after finishing the day’s washing. This will shut off the water supply to your washer and prevent the unlikely possibility of damage from escaping water. Leave the door open to allow the inside of your washer to dry.
- Use a soft cloth to wipe up all detergent, bleach, or other spills as they occur. Clean the following as recommended below:
- Control Panel – Clean with a soft, damp cloth. Do not use abrasive powders or cleaning pads. Do not spray cleaners directly on the panel.
- Cabinet – Clean with soap and water.
Cleaning the interior
Clean the interior of your washer periodically to remove any dirt, soil, odor, mold, mildew, or bacterial residue that may remain in your washer as a result of washing clothes.
CAUTION
Failure to follow these instructions may result in unpleasant conditions, including odors and/or permanent stains on your washer or laundry.
NOTE
Hard water deposits may be removed if needed. Use a cleaner labeled “Washer safe”
Troubleshooting
If there is any problem, check the information message on the LCD screen and follow the on-screen instructions.
If the problem persists, please contact the service center.
Checkpoints
If you encounter a problem with the washer, first check the table below and try these suggestions.
Does not start.
- Make sure the washer is plugged in.
- Make sure the door is properly closed.
- Make sure the water taps are open.
- Tap and hold
 to start the washer.
 - Make sure Child Lock is not activated.
- Before the washer starts to fill, it will make a series of clicking noises to check the door lock and will do a quick drain.
- Check the fuse or reset the circuit breaker.
- Check if power is supplied properly.
- Low voltage detected. - Check if the power cord is plugged in.
- Make sure laundry is not caught in the door.
Water supply is insufficient, or no water is supplied.
- Fully open the water tap.
- Make sure the door is properly closed.
- Make sure the water supply hose is not frozen.
- Make sure the water supply hose is not kinked or clogged.
- Make sure there is sufficient water pressure.
- Make sure that the cold water tap and the hot water tap are properly connected.
- Clean the mesh filter as it may be clogged.
After a cycle, detergent remains in the detergent drawer.
- Make sure the washer is running with sufficient water pressure.
- Make sure the detergent is added to the center of the detergent drawer.
- Make sure the rinse cap is inserted properly.
- If using granular detergent, make sure the detergent selector is in the upper position.
- Remove the rinse cap and clean the detergent drawer.
Excessive vibrations or makes noise.
- Make sure the washer is installed on a level, solid floor that is not slippery. If the floor is not level, use the leveling feet to adjust the height of the washer.
- Make sure the shipping bolts are removed.
- Make sure the washer is not in contact with any other object.
- Make sure the laundry load is balanced.
- The motor can cause noise during normal operation.
- Overalls or clothes with metallic decorations can cause noise while being washed. This is normal.
- Metal objects such as coins can cause noise. After washing, remove these objects from the drum or filter case.
- Redistribute the load. If only one item of clothing needs washing, such as a bathrobe or pair of jeans, the final spin result might be unsatisfactory, and a “Unbalanced laundry detected” check message will be shown on the display.
Does not drain and/ or spin.
- Make sure the drain hose is straightened all the way to the drain system. If you encounter a drain problem, call for service.
- Make sure the debris filter is not clogged.
- Close the door and tap and hold
 . The washer will not tumble or spin for your safety unless the door is closed.
 - Make sure the drain hose is not frozen or clogged.
- Make sure the drain hose is connected to a drain system that is not clogged.
- If the washer is not supplied with sufficient power, the washer will temporarily not drain or spin. As soon as the washer regains sufficient power, it will operate normally.
- Make sure the drain hose is positioned correctly, depending on the connection type.
- Clean the debris filter as it may be clogged.
The door does not open.
- Tap
 to stop the washer.
 - It may take a few moments for the door lock mechanism to disengage.
- The door will not open until 3 minutes after the washer has stopped or the power has been off.
- Make sure all the water in the drum is drained.
- The door may not open if water remains in the drum. Drain the drum and open the door manually.
- Make sure the door lock light is off. The door lock light turns off after the washer has drained.
Excessive suds.
- Make sure you use the recommended types of detergent as appropriate.
- Use high efficiency (HE) detergent to prevent oversudsing.
- Reduce the detergent amount for soft water, small loads, or lightly soiled loads.
- Non-HE detergent is not recommended.
Cannot add additional detergent.
- Make sure the remaining amount of detergent and fabric softener is not over the limit.
Stops.
- Plug the power cord into a live electrical outlet.
- Check the fuse or reset the circuit breaker.
- Close the door, and tap and hold to start the washer. The washer will not tumble or spin for your safety unless the door is closed.
- Before the washer starts to fill, it will make a series of clicking noises to check the door lock and will do a quick drain.
- There may be a pause or soak period in the cycle. Wait briefly, and the washer may start.
- Make sure the mesh filter of the water supply hose at the water taps is not clogged. Periodically clean the mesh filter.
- If the washer is not supplied with sufficient power, the washer will temporarily not drain or spin. As soon as the washer regains sufficient power, it will operate normally.
Fills with the wrong water temperature.
- Fully open both taps.
- Make sure the temperature selection is correct.
- Make sure the hoses are connected to the correct taps. Flush water lines.
- Make sure the water heater is set to supply a minimum of 49 °C hot water at the tap. Also, check the water heater capacity and recovery rate.
- Disconnect the hoses and clean the mesh filter. The mesh filter may be clogged.
- While the washer fills, the water temperature may change as the automatic temperature control feature checks the incoming water temperature. This is normal.
- While the washer fills, you may notice just hot and/or just cold water going through the dispenser when cold or warm temperatures are selected. This is a normal function of the automatic temperature control feature as the washer determines the water temperature.
The load is wet at the end of a cycle.
- Use the High or Extra High spin speed.
- Use high efficiency (HE) detergent to reduce oversudsing.
- The load is too small. Small loads (one or two items) may become unbalanced and not spin completely.
- Make sure the drain hose is not kinked or clogged.
Leaks water.
- Make sure the door is properly closed.
- Make sure all hose connections are tight.
- Make sure the end of the drain hose is correctly inserted and secured to the drain system.
- Avoid overloading.
- Use high efficiency (HE) detergent to prevent oversudsing.
- Check the drain hose.
- Make sure the end of the drain hose is not placed on the floor.
- Make sure the drain hose is not clogged.
Has odors.
- Excessive suds collect in recesses and can cause foul odors.
- Run cleansing cycles to sanitize periodically.
- Clean the door seal (diaphragm).
- Dry the washer interior after a cycle has finished.
A message appears on the display to alert that dispenser is open.
- Check if the detergent drawer is closed properly.
- Open the detergent drawer and close it again. Make sure it’s closed properly.
The "Refill detergent", "Refill softener", or "Refill detergent & softener" message does not disappear after refilling the detergent/softener.
- After refilling the auto detergent/softener compartments, close the detergent drawer, and then tap and hold
 . Then, the washer will start to detect the detergent/softener, and the message will disappear.
 - Depending on the type of detergent/softener, the message may not disappear immediately.
Detergent/softener is not dispensed.
- Check if the “Dose per Wash” or “Dose per Rinse” option is set to Off.
- Auto detergent/softener compartment does not dispense the detergent/softener if the option is set to Off.
- Tap Options, select Dose per Wash or Dose per Rinse, and then tap OK to select the desired input level of detergent/softener.
- The “Dose per Wash” and “Dose per Rinse” options automatically turn off in the Wool, Delicates, Outdoor, and Activewear cycles. To dispense detergent/softener in the Wool, Delicates, Outdoor, and Activewear cycles, tap Options, select Dose per Wash or Dose per Rinse and then tap OK to select the desired input level of detergent/softener.
An excessive or insufficient amount of detergent/softener is dispensed.
- Check the "Dose per Wash" and "Dose per Rinse" settings.
- Tap Options, select Dose per Wash or Dose per Rinse, and then tap OK to select the desired input level of detergent/softener.
If a problem persists, contact a service center. The number of the service center is on the label attached to the product.
Information codes
If the washer fails to operate, you may see an information code on the screen. Check the table below and try the suggestions.
Code Check drainage.
- Water is not draining.
- Make sure the drain hose is not frozen or clogged.
- Make sure the drain hose is positioned correctly, depending on the connection type.
- Clean the debris filter as it may be clogged.
- Make sure the drain hose is straightened all the way to the drain system.
- If the information code remains, contact a customer service center.
Code Check water supply
- Water is not supplied.
- Make sure the water taps are open.
- Make sure the water hoses are not clogged.
- Make sure the water taps are not frozen.
- Make sure the washer is operating with sufficient water pressure.
- Make sure that the cold water tap and the hot water tap are properly connected.
- Clean the mesh filter as it may be clogged.
- All buttons will be disabled for 3 minutes after the information code appears.
- When the "Check water supply" message appears, the machine drains water for 3 minutes. In the meantime, the Power button will be disabled.
Code Check water lines.
- Make sure the cold water supply hose is firmly connected to the cold water tap. If it is connected to the hot water tap, the laundry may be deformed with some cycles.
Code Unbalanced laundry detected.
- Spinning does not work.
- Make sure laundry is spread out evenly.
- Make sure the washer is on a flat, stable surface.
- Redistribute the load. If only one item of clothing needs washing, such as a bathrobe or pair of jeans, the final spin result might be unsatisfactory, and an “Unbalanced laundry detected” check message will be shown on the display.
Code Door is open.
- Operating the washer with the door open.
- Make sure the door is properly closed.
- Make sure laundry is not caught in the door.
Code OC.
- Water has overflowed.
- Restart after spinning.
- If the information code remains on the display, contact a local Samsung service center.
Code LC, LC1.
- Check the drain hose.
- Make sure the end of the drain hose is not placed on the floor.
- Make sure the drain hose is not clogged.
- If the information code remains, contact a customer service center.
Code 3C.
- Check the drum motor for operation.
- Try restarting the cycle.
- If the information code remains, contact a customer service center.
Code HC.
- High-temperature heating check.
- If the information code remains, contact a customer service center.
Code 1C.
- The Water Level sensor is not working properly.
- Turn the machine off, and restart the cycle.
- If the information code remains, contact a customer service center.
Code AC.
- Check communications between main and sub-PBAs.
- Turn the machine off, and restart the cycle.
- If the information code remains, contact a customer service center.
Code AC6.
- Check communications between the main and the inverter PBAs.
- Depending on the state, the machine may automatically return to normal operation.
- Turn the machine off, and restart the cycle.
- If the information code remains, contact a customer service center.
Code DC1.
- The Main Door lock/unlock is not working properly.
- Turn the machine off, and restart the cycle.
- If the information code remains, contact a customer service center.
If any information code keeps appearing on the screen, contact a local Samsung service center.
Specifications
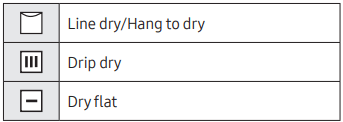
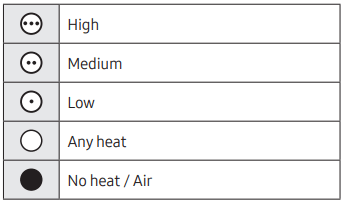
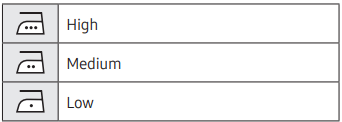
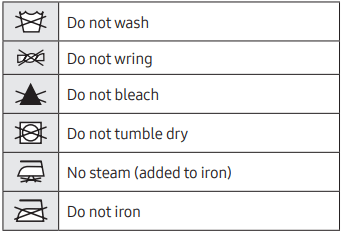
Fabric care chart
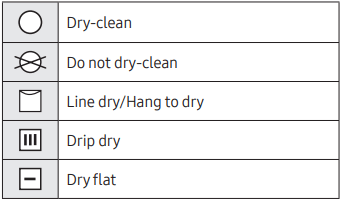
The following symbols provide garment care direction. The clothing care labels include symbols for drying, bleaching, drying, and ironing, or dry cleaning when necessary. The use of symbols ensures consistency among garment manufacturers of domestic and imported items. Follow care label directions to optimize garment life and reduce laundering problems.
Wash cycle
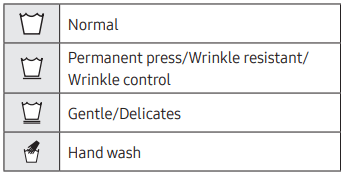
Water temperature

NOTE
The temperature range for Hot is 135 °F (57 °C) or below, 95 °F (35 °C) or below for Warm, and 68 °F (20 °C) or below for Cold. Wash water temperature must be a minimum of 60 °F (16 °C) for detergent activation and effective cleaning.
Bleach
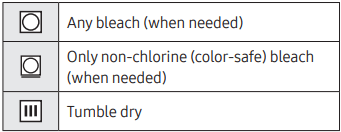
Normal

Special instructions
Heat setting
Iron dry or steam temperatures
Warning symbols for laundering
Dry-clean
Protecting the environment
- This appliance is manufactured from recyclable materials. If you decide to dispose of it, please observe local waste disposal regulations. Cut off the power cord so that the appliance cannot be connected to a power source. Remove the lid so that animals and small children cannot get trapped inside the appliance.
- Do not exceed the detergent quantities recommended in the detergent manufacturers’ instructions.
- Use stain removal products and bleaches before the wash cycle only when necessary.
- Save water and electricity by only washing full loads (the exact amount depends upon the program used).
Declaration of conformity
This appliance complies with UL2157.
Specification sheet
