.User Manual
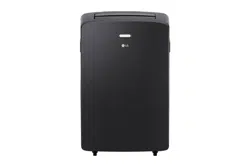
Key Features and Parts
Features:
- Brand new generation condensate self-evaporation design, environment friendly and more energy-saving.
- L type evaporator design, enabling more compact and efficient body.
- Ultrahigh loading quantity, greatly saving logistics cost.
- Downsizing and compact design of the whole air conditioner.
- Simple and convenient installation of accessories such as exhaust pipe, etc.
- Self-diagnosis function and 24h on/off timer function.
- Design of universal wheel with convenience for movement.
- Quiet design, applicable to use during sleep.
- Low noise and powerful air supply.
- Protective function of automatic restart of compressor after 3min time delay.
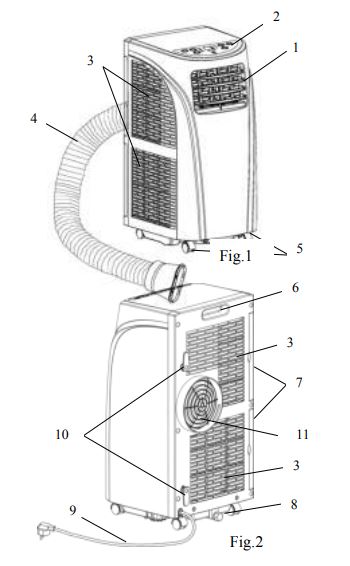
Name of parts:
- Guide strip
- Control panel
- Inlet grid
- Exhaust pipe
- Corner wheel
- Handle
- Strainer
- Drainage outlet
- Power line with plug
- Buckle of power line
- Exhaust outlet
|
|
|
Control panel
Attention: if the air conditioner is restarted immediately after shutdown in COOL or HEAT mode, 3min protection time is necessary before automatic start.
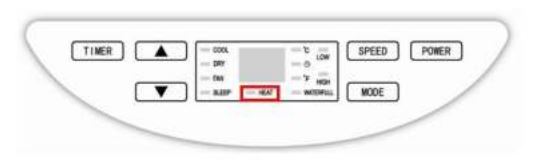
Instructions of panel
1. Buttons and display
POWER: Press this button to turn on or off the air conditioner.
MODE:During on or timer on pressing this button can select COOL, DEHUMIDIFY, FAN and HEAT modes, etc. (the HEAT mode only exists in COOL/HEAT YPZ-H model).
The corresponding indicator lamp to the selected mode is on.
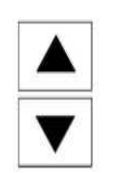
UP and DOWN:If the timer on or timer off is set, pressing UP or DOWN can adjust on/off time; in running state of COOL or HEAT mode or timer state, pressing UP or DOWN can adjust the set temperature; and pressing UP and DOWN simultaneously can realize conversion between ℃ and ℉.
SPEED:Pressing this button can select different speeds in cycle of LOW and HIGH; the corresponding indicator lamp to the selected speed is on.
TIMER: Press this button to enter timer setting state, and the indicator lamp is on.
DUAL 88: This pattern displays the set temperature in COOL and HEAT modes, and displays room temperature in FAN and DEHUMIDIFIES modes; display of ℃ shows current centigrade temperature, and display of ℉ shows current Fahrenheit temperature. 88 when displayed as E2 means abnormal sense of room temperature sensor; 88 when displayed as E3 means abnormal sense of evaporator temperature sensor; 88 when displayed as df means the cooling system is in anti-freezing state or defrosting state; and 88 when displayed as FL means the air conditioner is in water full alarm state currently.
SLEEP: This indicator lamp is normally on when SLEEP state is started.
WATER FULL: In water full state this indicator lamp flickers with buzzer to prompt drainage.
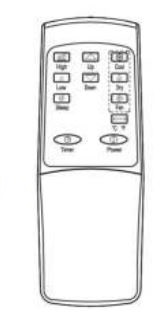
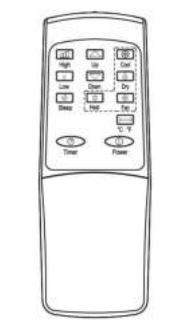
Remote control
POWER
Press this button to turn on/off the air conditioner. |
 |
TIMER
Press this button to set timer |
 |
TEMPERATURE CONVERSION BUTTON
Temperature is converted from ℃ to ℉. |
 |
COOL
Press this button to select COOL mode. |
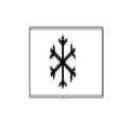 |
HEAT
Press this button to select HEAT mode |
 |
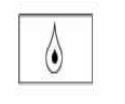
DEHUMIDIFY
Press this button to select DEHUMIDIFY mode |
 |
FAN
Press this button to select FAN mode. |
 |
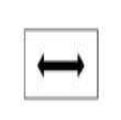
UP/DOWN
Press UP or DOWN to set temperature or adjust timer. |
 |
HIGH
Press this button to select HIGH speed. |
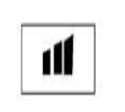 |
LOW
Press this button to select LOW speed. |
 |
SLEEP
Press this button to set SLEEP mode. At the moment the speed of upper and lower fans is fixed at LOW speed, in SLEEP mode temperature and speed cannot be changed. Press this button again to cancel. |
 |
|
|
|
|
| Single cool remote control |
|
Cool - warm remote control |
Operating methods
Timer setting
1. Setting of timer off
When the air conditioner is running, press this button, the timer LED lamp is on, and meanwhile 88 Nixie tube will flicker “ ” for 5 times, at the moment, press UP and DOWN to adjust time from 0.5h to 24h. Within 3h of timer, up/down adjustment once only changes 0.5h, between 3~24h of timer, up/down adjustment once changes 1h. When the set time expires, the air conditioner turns off automatically.
2. Setting timer on
When the air conditioner is in standby state, press TIMER, the timer LED lamp is on, and meanwhile 88 Nixie tube will flicker “ ” for 5 times, at the moment press UP/DOWN to adjust the desired time, and the method of adjustment is the same as that during timer off. During setting of timer, the operating modes after start can be selected, if COOL or HEAT mode is selected, the set temperature can be adjusted simultaneously; after the set time expires, the air conditioner starts automatically and runs in the selected operating mode.
3. Change of the set time
In the running process of timer, if you are intended to change the existing timer, you can press TIMER once, at the moment 88 Nixie tube will flicker and display the remaining time, during flicker pressing UP/DOWN can increase/decrease time on the basis of the original time. If you press TIMER again during flicker, the set time will be cancelled, namely timer quits.
Operation of operating modes
1. COOL and HEAT modes
- In on or timer on state press MODE to select COOL or HEAT mode. At the moment the corresponding LED on panel displays.
- Press UP/DOWN to set appropriate temperature in a range of 18~30℃ (64-86℉). When UP or DOWN is pressed once, temperature will go up or down by 1℃ or 1℉ every time.
- Press SPEED to select appropriate speed, and LOW and HIGH speeds can be circularly selected.
- After selecting COOL or HEAT mode, press SLEEP on remote control (or press UP and TIMER on operating panel simultaneously) to enter SLEEP mode, both upper and lower fans are forcibly set at LOW speed. Setting the timing time from 0.5 to 12 hours based on your requirements, after which it will be automatically turned off. If SLEEP is to be cancelled, press SLEEP again or conversion mode to cancel the sleep functions.
2. DEHUMIDIFY mode
- In on or timer on state press MODE to select DEHUMIDIFY mode. At the moment the corresponding indicator lamp is on.
- Temperature and speed are not adjustable.
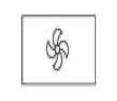
3. FAN mode
- In on or timer on state press MODE to select FAN mode. At the moment the corresponding indicator lamp is on.
- Press SPEED to select appropriate speed, and LOW and HIGH speeds can be circularly selected.
- Temperature is not adjustable.
CAUTIONS!
- When full water indication is displayed, the air conditioner will stop work, you should drain water in time. After drainage the air conditioner will start automatically.
- In DEHUMIDIFY and FAN modes, you need not use exhaust pipe.
- If your room faces the sun directly, please draw the curtains.
Installation
1. Select mounted place
Install in a flat and dry place, and 50cm must be left around the air conditioner to enable smooth circulation of air (before connection of exhaust pipe).

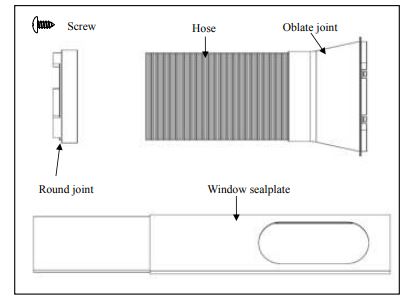
2. Assembly method of exhaust pipe
- Connect exhaust pipe assembly with round joint
- Fix the round end of the connected exhaust pipe assembly at air outlet of the air conditioner

- Connect the oblate joint of the connected exhaust pipe assembly with sealplate of window.
- Install sealplate on the nearest window. No Obstacles at a distance of 50cm around the Window should be ensured to guarantee unimpeded air exhaust.
Cautions!
- Exhaust pipe is 60cm~170cm long (including adapter). We recommend using the minimum length so as to save energy for you.
- The length of exhaust pipe is especially designed in accordance with the specification of the air conditioner. Please do not use other exhaust pipes of different lengths or materials, in such way failure may be caused.
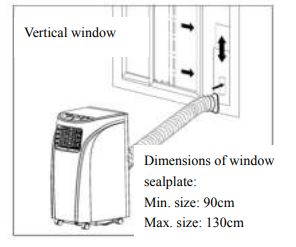
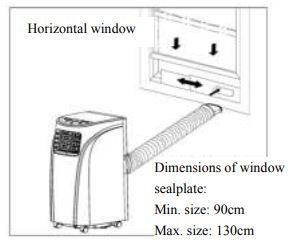
3. Installation of window sealplate
Design of window sealplate complies with most standard horizontal or vertical windows. Installation methods:
Dimensions of window sealplate: Min. size: 90cm Max. size: 130cm
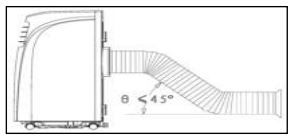
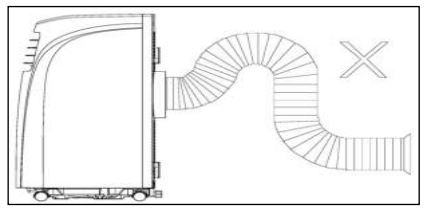
4. Illustration of installation
|
1. Wall mounted
|
|

|
| 2. Bow alignment |
|
 |
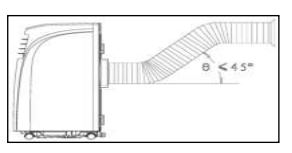 |
| 3. Incorrect bending |
|
 |
Drainage operation
Drainage operation
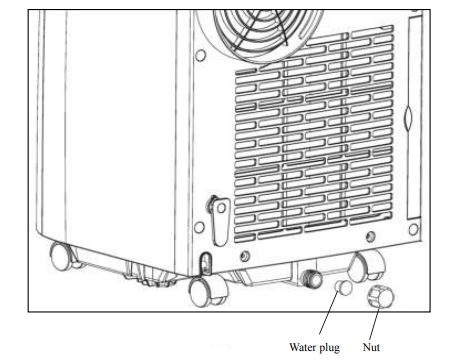
- When COOL or DEHUMIDIFY or HEAT is run in humid weather, more condensate is produced, water full alarm will be issued as he level in water pan reaches a certain location, compressor stops operation. Water full indication on display screen will light up and an audible alarm will be issued simultaneously for 10 times per 5min till the level in water pan is lower than alarm level or water in water pan has been drained manually. When the alarm is relieved, the air conditioner will resume normal operation automatically.
- When the air conditioner issues water full alarm, please drain water in time. You can move the air conditioner to the site where water can be drained directly (such as toilet or sewer), unscrew nut and pull out water plug to drain all water. Install water plug and nut before use.
Caution!
When water is full, please move the air conditioner steadily, otherwise, water may overflow from inside.
Maintenance
Cleaning
Caution! Before cleaning please turn off the air conditioner and pull out the plug.
1. Cleaning surface
Clean surface of the air conditioner with duster or semi-wet soft cloth.
Do not use chemical reagents, such as benzene, alcohol and gasoline, etc.
Otherwise surface of the air conditioner will be damaged, and even the whole air conditioner is damaged.
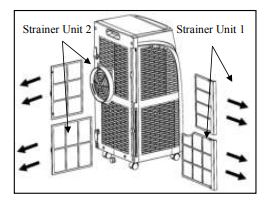
2. Cleaning of strainers
- If strainers are blocked by dust, air circulation will be impeded to reduce efficiency of the air conditioner.
- On condition that the air conditioner is used for long time, cleaning strainers once per two weeks is recommended.
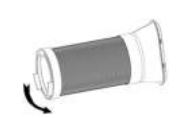
- Pull out strainers in the direction
- Put strainers into warm water with neutral detergent (about 40℃) and clean up, and after that dry in shade place.
- Install strainers to the original position in the direction
- Process of taking out strainers: first take out strainer 1 and then strainer 2; process of installing strainers: first install strainer 2 and then strainer 1.
Postseason storage
When the air conditioner is out of season or not used for long time, corresponding maintenance measures should be taken.
- Drain all water in water pan from outlet (water can be poured out by slowly leaning the body backward during drainage), and adjust operating mode to FAN mode, and then press SPEED for 5s till fan works, keep this operating mode for 2~3h. This method can dry inside of the body and prevent mildew.
- Turn off the air conditioner and pull out power plug.
- Wind up, fasten and put away power line.
- Remove exhaust pipe and keep properly.
- Set the air conditioner into plastic bag and put it in a dry place.
- Take out of cells of remote control and keep properly.
Fault removal
Please check the following before contact with professional electricians:
| Faults |
Check |
Solutions |
| The air conditioner does not work |
Power off? Plug not inserted? Fuse burnt out or power supply turned off? Time set properly? Water full alarm? |
Normal phenomenon. Insert power plug steadily. Replace fuse or turn on power supply. Change time setting. Pour water. |
| COOL/HEAT effect not good |
Air inlet/outlet blocked? Other heating sources available in room? Strainers too dirty? Temperature setting appropriate? Fan speed set at LOW? |
Remove blocking. Remove other heat sources. Clean strainers. Change temperature. Select appropriate speed. |
| Noise too large and shake |
Body inclined? Ground uneven? |
Put the air conditioner on even ground. |
Caution: When the following abnormalities occur to the air conditioner, shut down and pull out the plug, and then contact a professional electrician.
- Fuse and switch are often broken.
- Power line is overheating or its coat is naked.
- The body produces abnormal odour.
Intelligent detection functions
| Detection codes |
Meaning |
| E2 |
Abnormal sense of room temperature sensor |
| E3 |
Abnormal sense of coil pipe sensor |
| FL |
The air conditioner is in water full alarm state |
Caution!
When “df” is displayed, the air conditioner is in anti-freezing or defrosting state, and this is a normal phenomenon.
List of fittings
- Exhaust hose: 1 pc
- Outer diameter and extended length φ15cm 28cm~150cm
- Oblate joint: 1 pc
- Round joint: 1 pc
- Adjustable window mounting plate: 1 set
- Length 90cm~130cm
- Screw (length 10mm): 1 pc
|
|
|