Documents: Go to download!
User Manual
- Owner's manual - (English, Spanish)
- INSTALLATION
- OPERATION
- MAINTENANCE
- TROUBLESHOOTING
Table of contents
OWNER’S MANUAL Air Conditioner for LG LP0621WSR
INSTALLATION
Electrical Information
Power cord may include a current interrupter device. TEST and RESET buttons are provided on the plug case. The device should be tested on a periodic basis by first pressing the TEST button and then the RESET button. If the TEST button does not trip or if the RESET button will not stay engaged, discontinue use of the air conditioner and contact a qualified service technician.
for 120 V

Use Wall Receptacle 
Standard 120V , 3-wire grounding receptacle rated 15A / 120 VAC / 60 Hz
Power Supply: Use 15 A, timedelay fuse or 15 A , 3-wire circuit breaker.
WARNING
- This appliance should be installed in accordance with the National Electrical Code.
- Use of extension cords could cause serious injury or death. Do not use an extension cord with this portable air conditioner. Do not use surge protectors or multi-outlet adapters with this portable air conditioner.
- Never push the TEST button during operation. Doing so can damage the plug. Do not remove, modify, or immerse this plug. If this device trips, the cause should be corrected before further use.
CAUTION
- The conductors inside this cord are surrounded by shields, which monitor leakage current. These shields are not grounded. Periodically examine the cord for any damage. Do not use this product in the event the shields become exposed. Avoid shock hazard. This unit cannot be user-serviced. Do not open the tamperresistant sealed portion. All warranties and performance will be voided. This unit is not intended to be used as an ON/OFF switch.
Wireless Remote Control
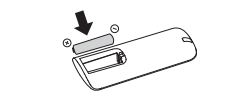
Inserting Batteries: If the display screen of the remote control begins to fade, replace the batteries. Insert AAA (1.5 V) batteries before using the remote control.
- Remove the cover on the back of the remote control.

- Insert the new batteries and make sure that the + and - terminals of the batteries are installed correctly
NOTE
- New batteries are supplied with the air conditioner for use in the remote control.
- Do not use a rechargeable battery. Make sure that the battery is new.
- In order to prevent discharge, remove the battery from the remote control if the air conditioner is not going to be used for an extended period of time.
- Keep the remote control away from extremely hot or humid places.
- To maintain optimal operation of the remote control, the remote sensor should not be exposed to direct sunlight.
- The remote control will not work properly if the unit is exposed to direct light or there is any obstacle between the unit and the remote controller.
Contents of Installation Kit

Selection of Installation Location
-
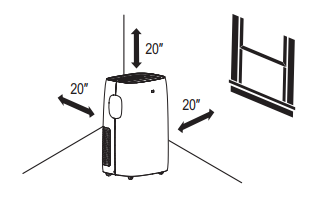
Place the unit on a level flor.
-
For best performance. allow at least 20” of air space on all sides ofthe unit for good air circulation
-
Place the unit near a window. The hose and diffuser will be used to connect the ait conditioner to the window installation kit to vent exhaust air outside.
NOTE: The length of the flexible vent hose is specially designed according to the specification of this product. Do not replace or extend it with a hose that is not specifically designed for use with this product as this could cause malfunction.
Assembling the Flexible Vent Hose Set
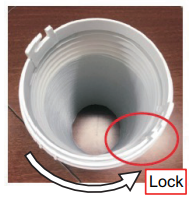

- Pull evenly on the folds to extend one end of the flexible vent hose.
- Insert the mounting bracket on to the end of the vent hose, aligning the mounting bracket threads with the notch on the flexible vent hose.
- Turn the mounting bracket counterclockwise though 5 rotations or until the flexible vent hose is firmly attached.
- Repeat the process to attach the diffuser to the other end of the flexible vent hose.
Attaching the Flexible Vent Hose Set
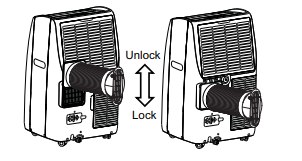
- Round Type: Insert the mounting bracket and rotate it to lock it in place.
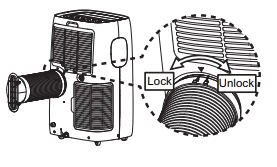
- Square Type: Insert the mounting bracket and slide it to lock it in place.
Window Vent Panel and Extensions
The window installation kit allows you to install the air conditioner in most vertical-sliding windows 18″ to 50″ wide, or horizontal-sliding windows from 18″ to 50″ high.

- Select the panels required based on the window opening, as shown above.
- For longer window openings, assemble and adjust the panels to fit the window opening. Use type A screws (included) to fix the panels together at the proper length.
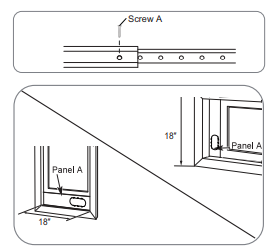
For an 18″ window opening, use the window vent panel (Panel A) by itself.
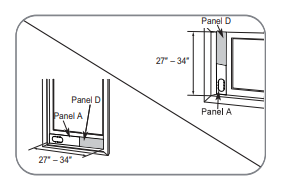
For window openings from 27″ to 34″, use the window vent panel (Panel A) and extension Panel D.
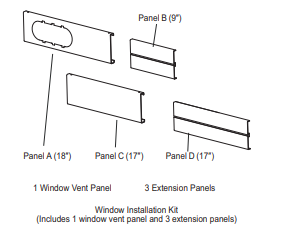

For window openings from 19″ to 25″, use the window vent panel (Panel A) and extension Panel B.
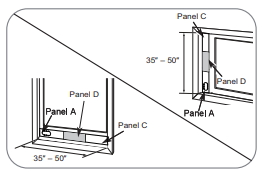
For window openings from 35″ to 50″, use the window vent panel (Panel A) and extension Panel C and Panel D.
Installing Vent Panels
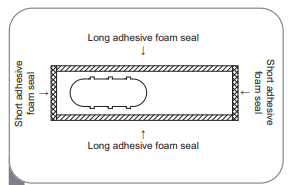
1. Attach the long adhesive foam weather seals to the top and bottom sides of the window vent panel assembly. Attach the short foam weather seals to the right and left sides of the panel assembly. (Attaching the foam weather seals to the panel assembly rather than the window sash and frame makes for easier cleanup when removing the panel assembly.)
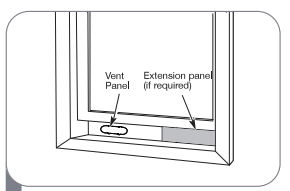
2. Insert the panel assembly in the bottom sash channel. Use care when installing the assembly, which will now fit very tightly in the opening. Close the sash tightly against the top of the panel assembly.
3. If needed, install the included security bracket with type B screws.

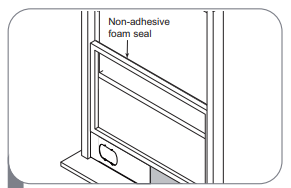
4.Measure and cut the included non-adhesive foam to fit the window opening. Stuff it between the window sashes to prevent air and insects from getting into the room.
5. Align the tabs on the diffuser with the slots in the vent panel. Insert the diffuser into the opening in the vent panel and slide the diffuser all the way over to lock the tabs in place. Position the diffuser with the round opening above the bottom of the vent panel to avoid interference from the window sill.
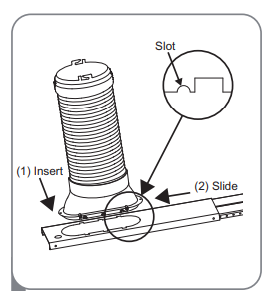
6. Insert the type C screw in the hole in the diffuser to prevent the diffuser from sliding out of the vent opening. If the diffuser is positioned correctly, the screw should just clear the edge of the opening in the vent panel. You should not have to drill through the vent panel.

NOTE:
- For a tighter seal, use "no residue" duct tape (not provided) to seal any gaps around the installed panel assembly, around the diffuser, and between the sashes.
- For best results, keep the vent hose as short and straight as possible. However, shape the diffuser end of the vent hose into an inverted U shape just inside the window to allow any rain or condensation to drain out the window.

Drain Hose Installation for Heating (On Some Models)
CAUTION
- If you use the Heat mode, you must install the drain hose. If only the Cool mode is used, the drain hose is not needed.
- If the outside temperature is at or near freezing 32 °F (0 °C) follow the indoor drainage instructions.
- When the weather is above freezing, the unit can be set up to drain to the outside. Make sure the outlet of the hose is aimed away from nearby surfaces that could be stained or damaged by the draining water.
Indoor Drainage
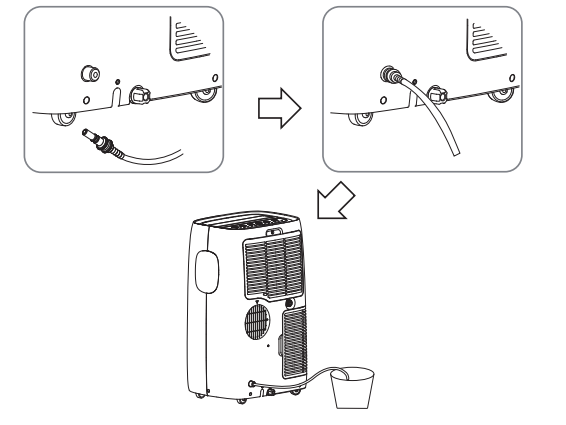
- To attach the drain hose, insert the connector into the pump drain port at the back of the unit until it snaps into place.
- Place the other end of the drain hose in a bucket that holds at least 28 ounces. Remember to check and empty the bucket frequently to avoid overflows.
- To detach the drain hose from the product, push the outer ring of the pump drain port in and pull the connector out.
NOTE: Inserting the drain hose into the unit will automatically activate the drain function
Outdoor Drainage
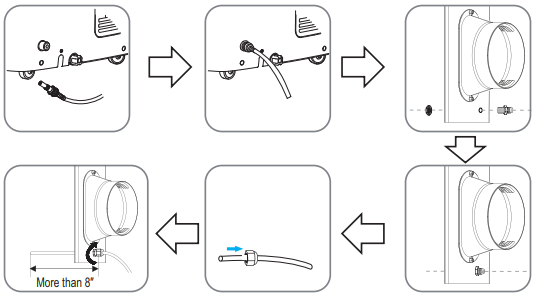
- To attach the drain hose, insert the connector into the pump drain port at the back of the unit until it snaps into place.
- Unscrew the nut at the bottom of the locking nut. Insert the locking nut into the hole in the front of the window vent panel and reassemble the nut. Unscrew the top part of the locking nut until you can easily insert the drain hose through the opening.
- Make sure to insert the drain hose at least 8 inches (20 cm).
- Turn the top of the locking nut to tighten it and secure the drain hose in place.
- To detach the drain hose from the product, push the outer ring of the pump drain port in and pull the connector out.
NOTE: Inserting the drain hose in the unit will automatically activate the drain function.
Garden Hose Installation for Dehumidifying (Dry Mode Only)
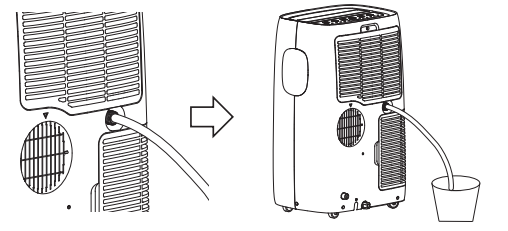
- Remove the drain plug when using the Dry (dehumidifying) mode.
- Install a 1/2" (12.7 mm) inside diameter garden hose (not provided) into the continuous drain port and place the open end of the hose over a floor drain or bucket.
NOTE
- Install the garden hose when you need dehumidification in high humidity.
- This product has a self-evaporative system. The condensing water will be recycled to cool the condenser. This not only improves cooling efficiency, but also saves energy for you.
OPERATION
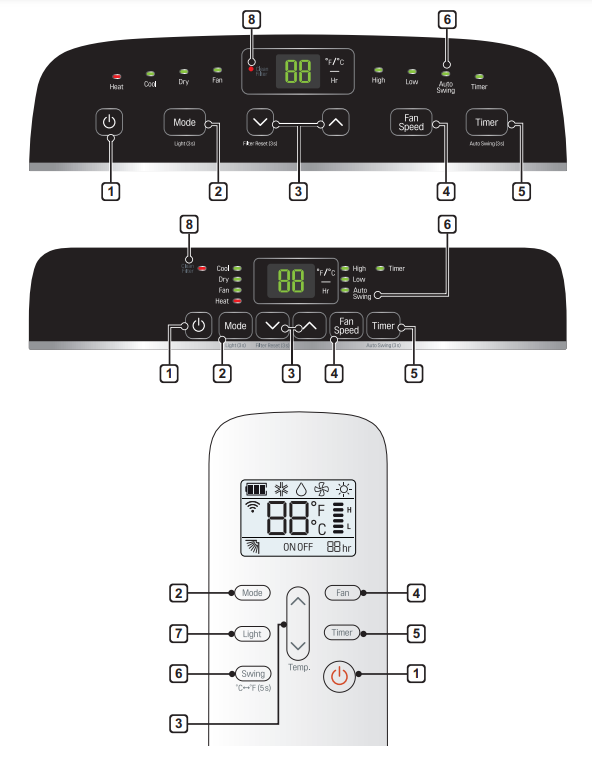
Control Panel and Remote Control
NOTE
- Available functions may vary by model.
- The number and location of LEDs on the control panel may vary by model.
1. Power ( ): Turns the air conditioner on and off. A chime sounds to confirm you have turned it on or off.
2. Mode: Press this button repeatedly to toggle through and select the operating mode. Modes include Cool, Dry (dehumidify), Fan, and Heat. An LED illuminates to indicate the selected mode. The default mode is Cool.
- Cool (
 ) Compressor runs and cools the room. Use the ∧/∨ and Fan Speed buttons to set the desired temperature and fan speed.
 - Dry (
 ) Use the Dry mode to remove humidity from the room without additional cooling. The fan speed is preset and cannot be adjusted.
 - Fan (
 ) Fan circulates air but compressor does not run. Use the Fan Speed button to set the desired fan speed to either High or Low.
 - Heat (
 ) Compressor runs and heats the room. Use the ∧/∨ and Fan Speed buttons to set the desired temperature and fan speed.
NOTE
- To protect the compressor, the fan and compressor may stop for a short time if you switch modes from Cool to Heat or vice versa.
3. Temperature Control ∧/∨
- In Cool, Dry and Heat mode, the ∧/∨ buttons adjust the set temperature up to 86 °F (30 °C) or down to 60 °F (16 °C), in one-degree increments.
- NOTE: To switch the temperature units on the display between Fahrenheit (°F) and Celsius (°C), press and hold the ∧ and ∨ buttons on the control panel at the same time for 5 seconds.
4. Fan Speed
- Press repeatedly to toggle the fan speed between High and Low settings. An LED illuminates to indicate the selected fan speed. The fan speed can be changed in the Cool, Fan, and Heat modes. The fan speed is preset in the Dry mode. After pressing the button, there is a brief delay before the fan motor changes speed.
5. Timer
- Delay ON - When the air conditioner is off, set it to automatically turn on from 1 to 24 hours later, at its previous mode and fan settings.
- Delay OFF - When the air conditioner is on, set it to automatically turn off from 1 to 24 hours later.
- NOTE: Each press of the Timer button advances the timer by 1 hour. Once you have finished setting the Delay OFF Timer, the display returns to the temperature setting after a short delay.
- To cancel the Timer function, press the Timer button on control panel.
- Press and hold the Timer button on the control panel for 3 seconds to set Auto Swing.
6. Auto Swing
- This function automatically moves the louvers to adjust the direction of the air flow. Press the Auto Swing button repeatedly to select the desired direction.
- NOTE: To switch the temperature units on the display between Fahrenheit (°F) and Celsius (°C), press and hold the Swing button on the remote control for 5 seconds.
7. Light
- Sets the display screen brightness:

- NOTE: Press and hold the Mode button on the control panel for 3 seconds to adjust the brightness.
8. Clean Filter: The Clean Filter LED lights up to notify you that the filter needs to be cleaned. After cleaning the filter, press and hold the ∨ button on the control panel for 3 seconds to turn off the Clean Filter light. NOTE
- The filter reset must be done using the control panel, not the remote control.
- This feature is a reminder to clean the air filter for more efficient operation. The LED light turns on after 250 hours of operation.
9. Removing Condensation Buildup: Condensation can build up inside the unit when the Cool and Dry modes are used. The fan can be set to run for a short period after the product is turned off to help keep the inside of the appliance dry. This option is off by default.
Turning Condensation Fan On
- Turn on the product, set it to Cool mode and let it run for at least 10 seconds.
- Press and hold the Mode and Fan Speed buttons on control panel for 3 seconds until On appears in the display.
- The condensation fan is now turned on. When the appliance is turned off, Co appears in the display and the fan will continue to run for 10 minutes. The appliance will then shut down as normal.
Turning Condensation Fan Off
- When the product is powered on, press and hold the Mode and Fan Speed buttons on control panel for 3 seconds until OF appears in the display.
- The condensation fan is now turned off. The appliance will shut down immediately when it is turned off.
NOTE: Some functions cannot be used while this option is turned on.
MAINTENANCE
WARNING: Before cleaning or performing maintenance, unplug the product and wait until the fan stops.
Emptying the Water Collection Tank: When the internal water collection tank is full, the LED display will show FL and the air conditioner will turn off until the tank is emptied.
- Unplug the air conditioner, disconnect the exhaust hose from the back, and move the air conditioner to a suitable drain location or outdoors. You may also place a pan under the drain that will hold up to 2 pints of water.
- Remove the drain cap from the bottom drain outlet.
- Once the water collection tank is drained, reinstall the drain cap, making sure it is on securely.
- Place the air conditioner in the desired location, reconnect the exhaust hose, and plug in the air conditioner.

Cleaning the Case
Wipe the case with a slightly damp cloth, then wipe dry with a dry cloth or towel.
- To prevent damage to the finish, do not use gasoline, benzene, thinners or any abrasive cleansers to clean the air conditioner
- Never pour water onto or into the air conditioner. It could damage internal components and create a shock and fire hazard.
Cleaning the Air Filter
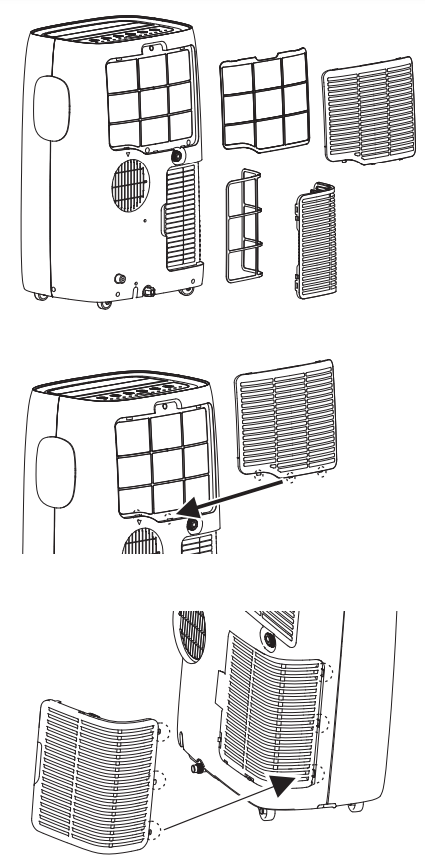
The air filters should be cleaned every two weeks. Depending on indoor air quality, more frequent cleaning may be needed. A dirty air filter will decrease airflow and reduce efficiency.
- Pull out each air filter by the handle.
- Use a vacuum cleaner to clean the filters. If the filters are heavily soiled, they can be washed in warm water using a mild detergent. Do not use harsh cleaners or very hot water. Do not wash in a dishwasher.
- Dry the filters in the shade.
- Reinsert the filters.
TROUBLESHOOTING
Before Calling for Service
The appliance is equipped with an automatic error-monitoring system to detect and diagnose problems at an early stage. If the appliance does not function properly or does not function at all, check the following before you call for service.
1. Air conditioner does not start.
- The air conditioner is unplugged. Make sure the air conditioner plug is pushed completely into the outlet.
- The fuse is blown/circuit breaker is tripped. Check the house fuse/circuit breaker box and replace the fuse or reset the breaker.
- Power failure. If power failure occurs, turn the mode control to off. When power is restored, wait 3 minutes to restart the air conditioner to prevent tripping of the compressor overload.
- The current interrupter device is tripped. Press the RESET button located on the power cord plug. If the RESET button will not stay engaged, discontinue use of the air conditioner and contact a qualified service technician.
- FL appears in the display. The water collection tank is full. Drain the tank and reset your settings.
- Mode switched from Cool to Heat or vice versa. To protect the compressor, the fan and compressor will momentarily stop if you switch modes from Cool to Heat or vice versa. After a few minutes, the product will resume operating in the new mode.
2. Air conditioner does not cool as it should.
- Airflow is restricted. Make sure there are no curtains, blinds, or furniture blocking the front of the air conditioner.
- The temp control may not be set correctly. Set the desired temperature to a level lower than the current temperature.
- The air filter is dirty. Clean the filter at least every 2 weeks. See the 'MAINTENANCE' section
- The room may have been hot. When the air conditioner is first turned on, you need to allow time for the room to cool down.
- Cold air is escaping. Check for open furnace floor registers and cold air returns.
- Cooling coils have iced up. See 'Air conditioner freezing up' below
3. Air conditioner freezing up.
- The cooling coils are iced over. Ice may block the air flow and obstruct the air conditioner from properly cooling the room. Set the mode control at High Fan or High Cool.
4. Water collects in base pan.
- Moisture removed from air and drains into base pan. This is normal for a short period in areas with little humidity; normal for a longer period in very humid areas.
5. Air conditioner turns on and off rapidly.
- dirty air filter air restricted. Clean air filter
- Outside temperature extremely hot. Refer to installation instructions or check with installer.
6. Noise when unit is cooling.
- Air movement sound. This is normal. If too loud, adjust the fan speed to low.
7. Remote sensing deactivating prematurely
- Remote control not located within range. Place remote control within 20 feet & 120° radius of the front of the unit.
- Remote control signal obstructed. Remove obstruction.
8. Room too cold.
- Set temperature too low. Increase set temperature.
See other models: LP0821GSSM LAN120HSV2 60LN549E LGMT310 ARNU123TRC4
