Documents: Go to download!
User Manual
- User Manual - (English)
- Specification - (English)
- PART AND FEATURES
- HOW TO USE
- INSTALLATION INSTRUCTIONS
- CARE AND CLEANING
- TROUBLESHOOTING
Table of contents
USER MANUAL AIR CONDITIONER
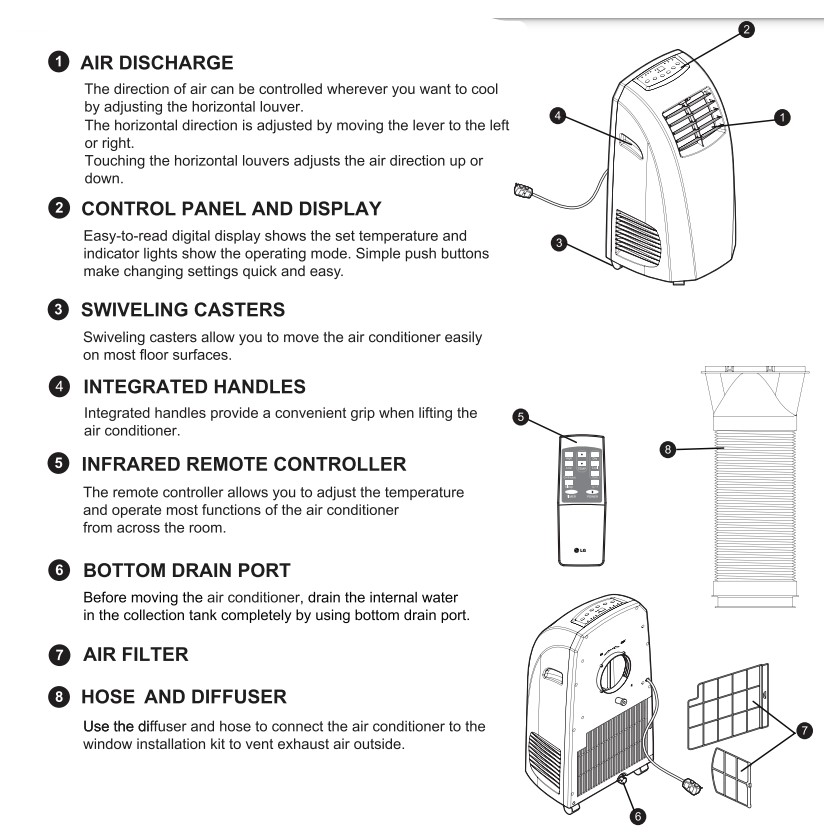
PART AND FEATURES
Key Parts and Components
HOW TO USE
BEFORE USING YOUR AIR CONDITIONER
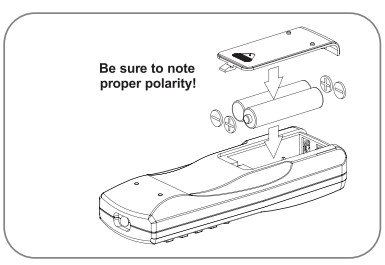
INSERTING BATTERIES IN THE REMOTE
Before using your remote. install the provided AAA batteries.
- Press and glide the battery cover on the back of the remote. then you can remove the cover.
- Insert two new alkaline AAA batteries into the battery compartment. being sure to note the proper polarity.
- Reattach the battery cover.
NOTE:
- Use only alkaline batteries. Do not use rechargeable batteries.
- When replacing batteries. always replace both batteries with new batteries. Do not mix old and new batteries.
- If the air conditioner will not be used for an extended period of time. remove the batteries from the remote.
HOW TO USE : CONTROL PANEL AND REMOTE
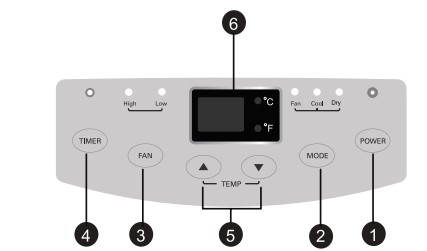
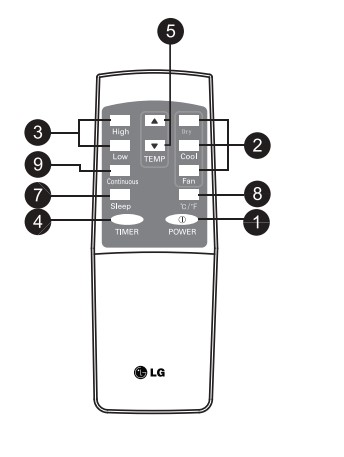
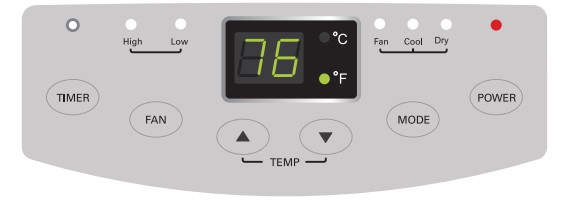
Operation of functions is the same when using the remote or the control panel. unless otherwise stated.
NOTE:
The remote sensor is located under the LED display.
Point the remote anywhere at the sensor. The remote may not work if the sensor is in bright light or if there is not a clear path between the remote and the sensor.
- Power
Press the POWER button to turn the air conditioner ON or OFF. Any control settings such as Cool. Dry. Fan. and Fan Speed will be retained in memory when the power is off. When turned on after being unplugged. the air conditioner will automatically reset. Any settings will need to be re-entered. move - MODE
Press this button to select the operating mode such as Cool. Dry (Dehumidify). or Fan for the air conditioner.And you can see the active mode through the indicator lights. The default setting is Cool. Press theMODE button to change to Dry (Dehumidify). press again to change to Fan. and again to change to Cool.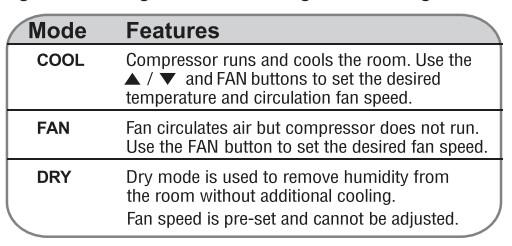
- Fan
Adjusts the circulation fan speed between High and Low fan speed. The selected fan speed will be shown through the indicator lights. The function can be used in Cool and Fan modes. When changing fan speeds. there is a brief delay before the fan motor changes speed. - TIMER
When the TIMER function is selected. you can set the air conditioner to either automatically turn OFF or turn ON after a delay of up to 24 hours. The display will show 0. Use the buttons to adjust the delay time from 1 to 24 hours. in one hour increments. To set an automatic off delay. press the TIMER button while the air conditioner is running and use
  the buttons to adjust the delay time. air conditioner will automatically turn off after the set delay. To set an automatic on delay. press the TIMER button while the air conditioner is off and use
  the buttons to adjust the delay time. The display will show the number of hours remaining until the unit is set to come on. The air conditioner will automatically turn on after the set delay. If you want to know how many hours you have setted. press the TIMER button and then you can see the time through the LED display. If you want to change the set timer. press the TIMER button and adjust the time when the number is flickering.
To cancel the Timer function. press the TIMER button and adjust the number to 0 when the number is flickering. then the function will be canceled in a few seconds. Another better method is press the TIMER button and press this button again when the number is still flickering. Operation of functions is the same when using the remote or the control panel. unless otherwise stated.  (TEMP/TIMER)
In COOL modes. the buttons adjust the set temperature up to 86°F(30°C) or down to 62°F(17°C). in one degree increments. The temperature can be switched between degrees Fahrenheit and degrees Celsius. pressing
  the button and
  button at the same time. or pressing °F /°C button on the remote. When the TIMER function is selected. use the
  buttons to adjust the delay time from 1 to hours. in one hour increments. If you press and hold the & / © buttons. the set temperature or time will change automatically after a few seconds.
NOTE: The displayed temperature is the SET temperature. not the room temperature. In COOL mode. the thermostat in the air conditioner will run the compressor until the set temperature is reached. then cycle the compressor on and off to maintain the set temperature.- LED Display
LED display shows the set temperature. fan speed. or the selected TIMER delay.
Indicators will light to show active mode and additional settings. The LED display will show the FL to indicate when the internal water drain tank needs to be emptied. - SLEEP
Increases the temperature by 1 °F every 2 hours to allow a more comforable adjustment for the user. - ºC/ºF (CELSIUS AND FAHRENHEIT EXCHANGE BUTTON)
When the displayed temperature is °C (or °F). you can press this button to switch to °F (or °C). - Continuous
After setting continuous. the unit will keep running no matter what temperature is selected.
NOTICE:
AUTO RESTART During operation in failure of electric power. the unit runs as previous setting operation.
Plug in. the LED display will light
When you plug the power cord into grounded outlet. LED display will show room tempreature and power indicator(red light) After push power button to operate the product. red light above the power button will be changed gree light
INSTALLATION INSTRUCTIONS
PREPARING FOR INSTALLATION
WARNING: The air conditioner is heavy! Use two or more people to lift and install the unit! Failure to do so could result in back injury or other injuries.
EXHAUST COMPONENTS
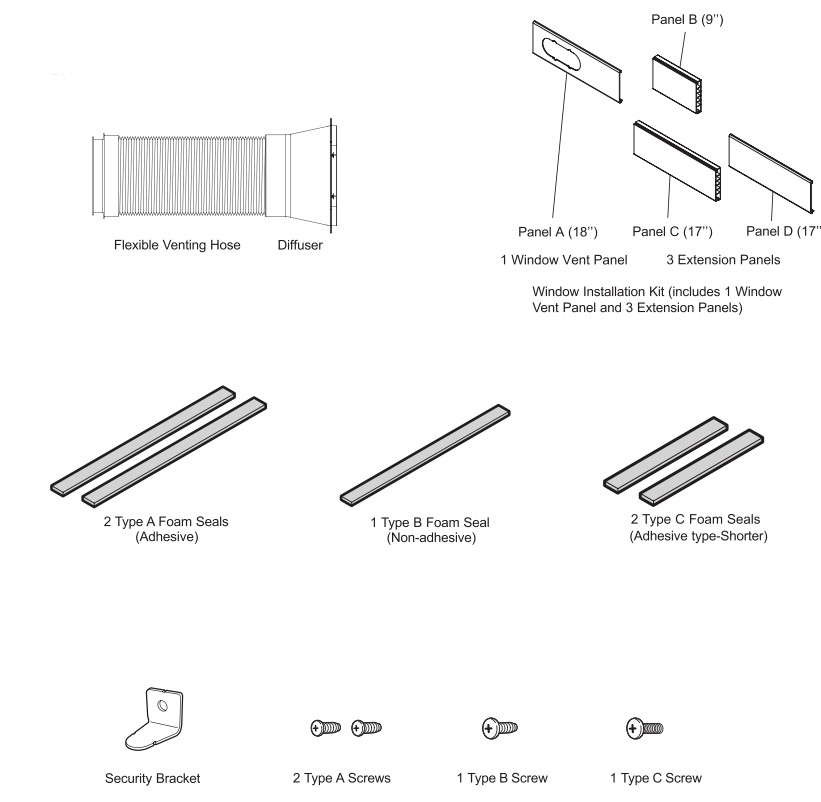
The following components are used for window venting. Not all components are used for every installation.
SELECTION OF INSTALLATION LOCATION
- Place the unit on a level floor.
- For best performance. allow at least 20 in of air space on all sides of the unit for good air circulation.
- Place the unit near a window. The hose and diffuser will be used to connect the air conditioner to the window installation kit to vent exhaust air outside.
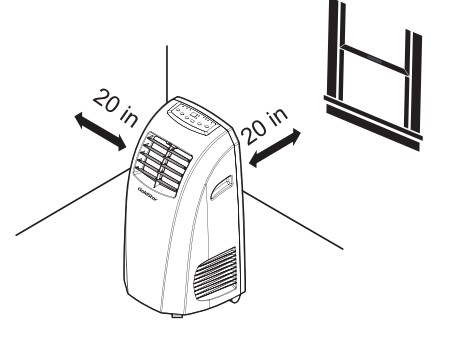
WARNING
The length of the exhaust hose is specially designed according to the specification of this product.
Do not replace or extend it with your own private hose as this could cause malfunction.
ATTACHING THE HOSE AND DIFFUSER
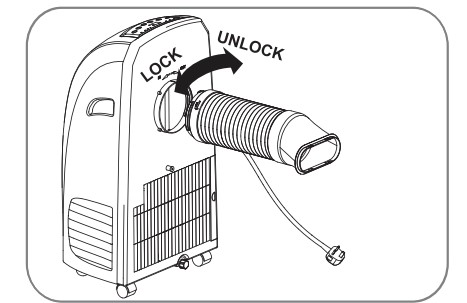
Insert the vent hose into the hole on the back of the air conditioner and rotate counter clockwise.
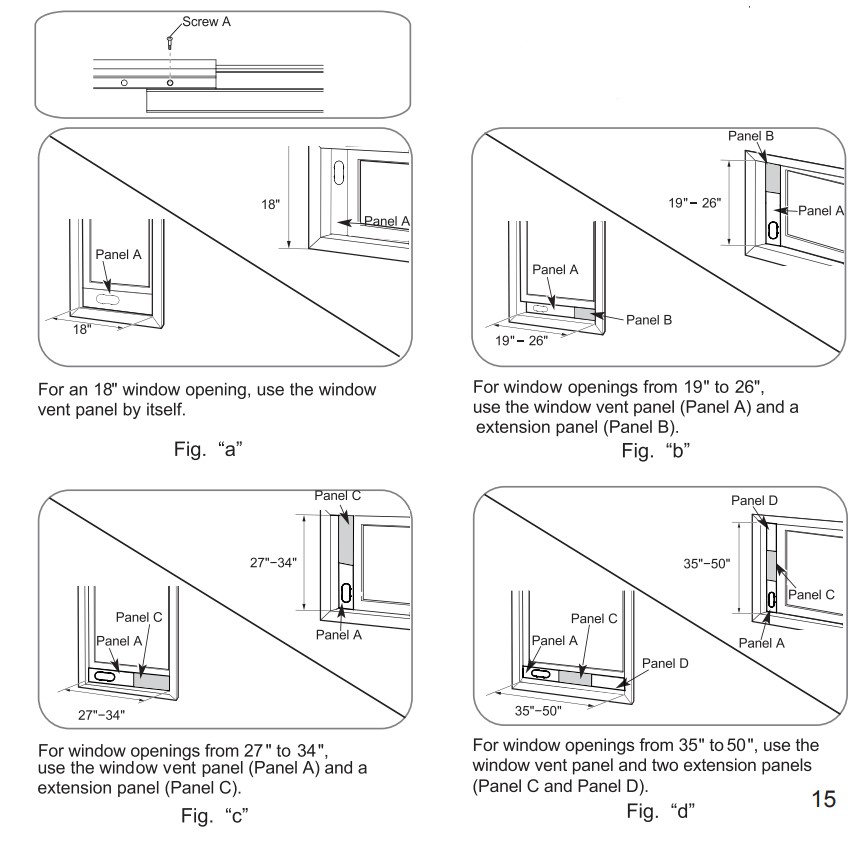
WINDOW VENT PANEL AND EXTENSIONS
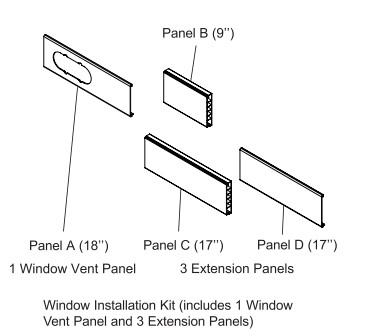
The window installation kit allows you to install the air conditioner in most vertical-sliding windows to 50" wide. or casement-style windows from 18" to 50" high.
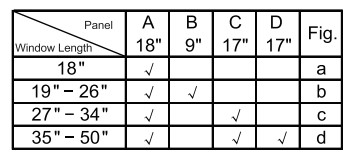
- Please check your window length and choose the fit panels from the above tabel.
- If your window length need more than 2 panels. after adjust the length. please use type A screw to fix them.
INSTALLATION IN VERTICAL SLIDING WINDOWS
NOTE: The window installation kit can be used with vertical sliding windows between and 50" wide.
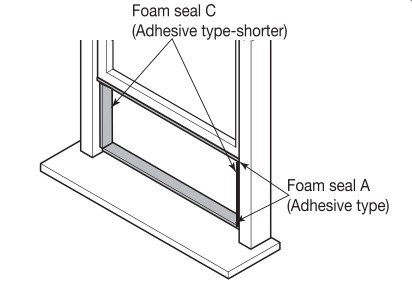
- Cut the foam seal A (adhesive type) &C (adhesive type-shorter) to the proper length. and attach it to the window sash and frame.
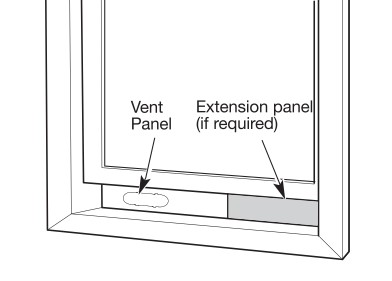
- Insert the vent panel assembly. including extension panels. if needed. into the window opening. Extend the extension panels. if used.
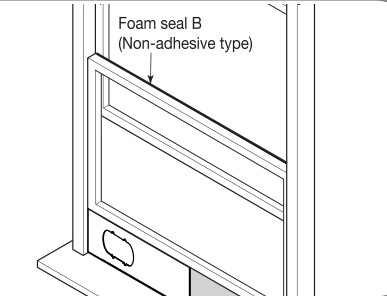
- Cut the foam seal B (Non-adhesive type) to the window width. Stuff the foam seal B between the glass and the window to prevent air and insects from getting into the room.
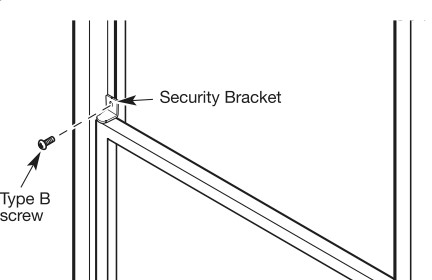
- Install the security bracket with a type B screw as shown if you need.
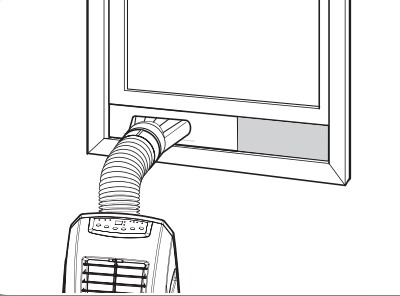
- Insert the diffuser then slide.
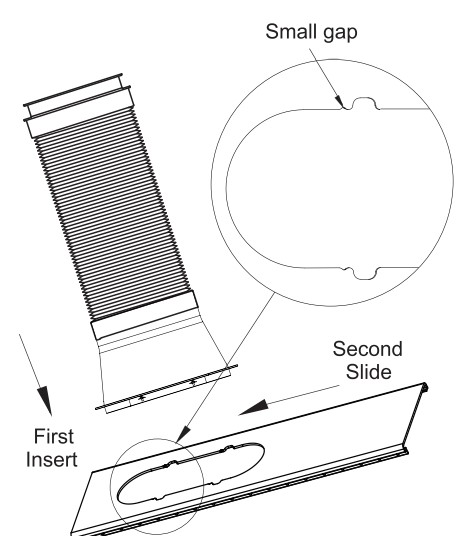
First insert to the vent panel fully and then slide for locking.
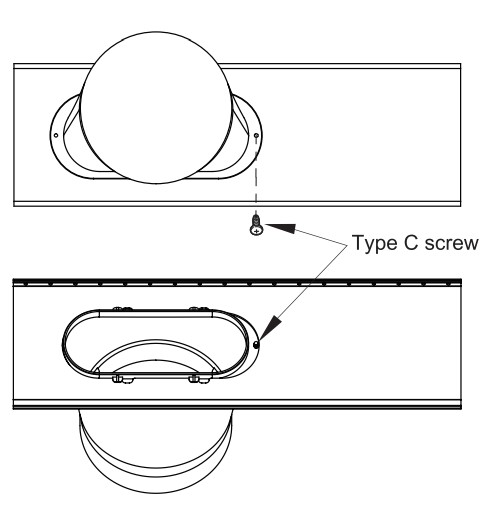
If you want fix the diffuser more firmly. use the type C screw.
INSTALLATION IN CASEMENT STYLE WINDOWS
NOTE: The window installation kit can be used with casement windows between 18 "and 50 “tall.
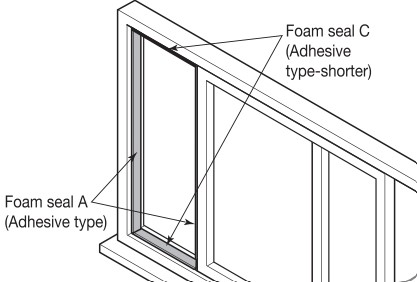
- Cut the foam seal A (adhesive type) & C (adhesive type-shorter) to the proper length. and attach it to the window sash and frame.
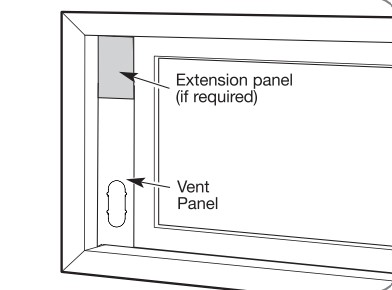
- Insert the vent panel assembly. including extension panels. if needed. into the window opening. Extend the extension panels. if used.
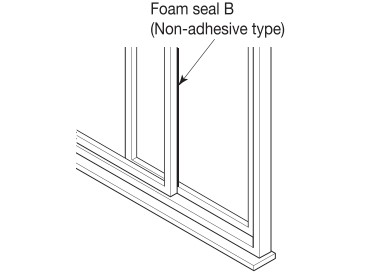
- Cut the foam seal B (Non-adhesive type) to the window height. Stuff the foam seal B between the glass and the window to prevent air and insects from getting into the room.
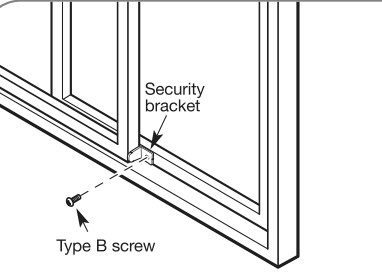
- Install the window security bracket with a ty pe B screw as shown.
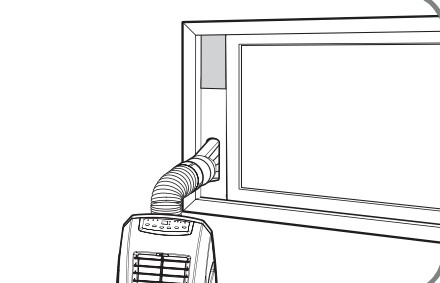
- Insert the diffuser into the Vent Panel. And then slide.
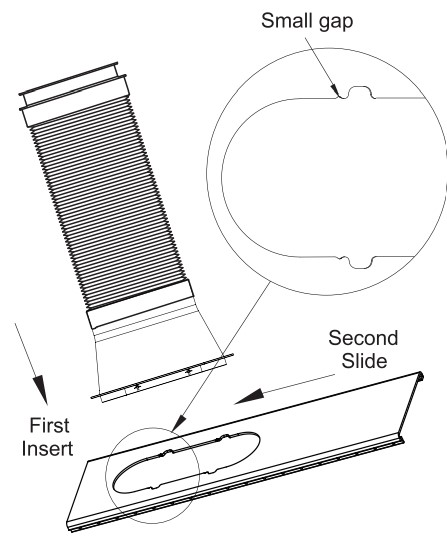
First insert to the vent panel fully and then slide for locking.
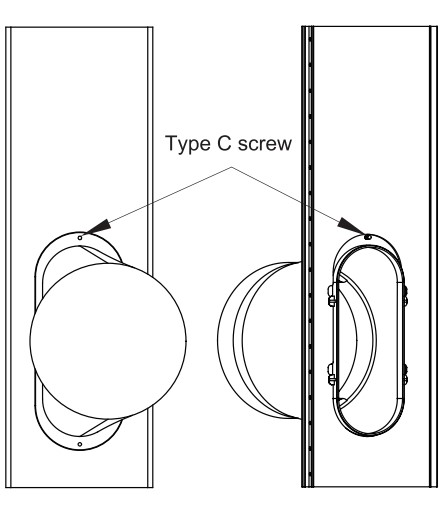
If you want fix the diffuser more firmly. use the type C screw.
CARE AND CLEANING
Your air conditioner is designed for year-round For maximum efficiency. it is recommended operation with only minimal cleaning and that you have the cooling coils inspected and maintenance. cleaned annually. Your local LG Authorized Service Center can provide this inspection and cleaning service for a nominal fee.
WARNING
- Unplug the air conditioner before cleaning or performing any maintenance or servicing.
- Be careful when cleaning coils or removing or reinstalling the filter—the cooling fins are sharp!
Failure to follow the above precautions could result in electrical shock or personal injury.
WATER DRAINAGE
This product has a self-evaporative system. The condensing water will be recycled to cool the condenser. This can not only improve cooling efficiency. but also save energy for you.
Using the Upper Drain Port (Dry Mode Only)
- This can be used when you need dehumidification in high humidity.
- Under the Cool or Fan mode. there's no need of using the upper drain port.
- During DRY(dehumidifying) mode. remove the drain plug and the exhaust hose from the back of the unit.
- Install a drain hose (12mm [1/2] inside diameter) and place the open end of the hose at a suitable drain location or outdoors.
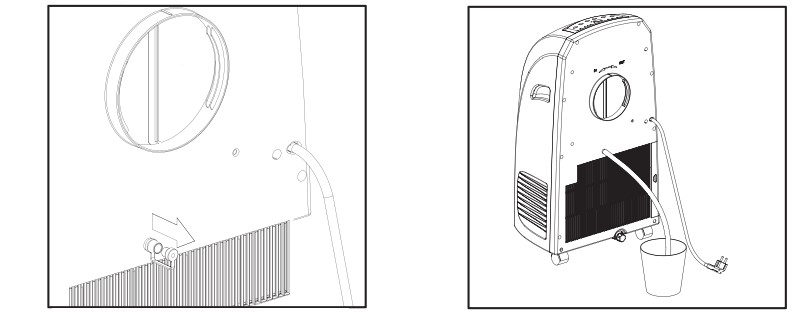
Using the Bottom Drain Port
When the internal water collection tank is full. the LED display will show FL and the air conditioner will turn off until the tank is emptied.
- Unplug the air conditioner. disconnect the exhaust hose from the back. and move the air conditioner to a suitable drain location or outdoors. You may also place a pan under the drain that will hold up to 2 pints of water.
- Remove the drain cap from the drain outlet.
- Once the water collection tank is drained. reinstall the drain cap. making sure it is on securely.
- Place the air conditioner in the desired location. reconnect the exhaust hose. and plug in the air conditioner.
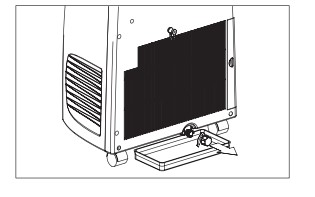
NOTICE: FL apperars in the display
The water collection tank is full. drain the tank and restart the air conditioner.
NOTES: When turned on after being unplugged. the air conditioner will automatically reset to COOL mode. with a temperature setting of 72°F.
CLEANING THE CASE
Wipe the case with a slightly damp cloth. then wipe dry with a dry cloth or towel.
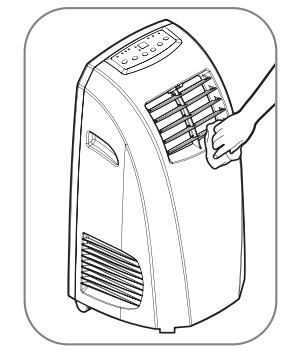
- To prevent damage to the finish. do not use gasoline. benzene. thinner. etc. or any abrasive cleansers to clean the air conditioner; they may damage the finish.
- Never pour water onto or into the air conditioner. It could damage internal components and create a shock and fire hazard.
CLEANING THE AIR FILTER
The air filter should be cleaned every two weeks; depending on indoor air quality. more frequent cleaning may be needed. A dirty air filter will decrease airflow and reduce efficiency.
Do not operate the air conditioner without the air filter in place.
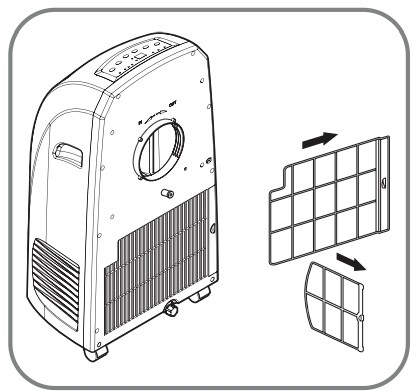
- Pull out the air filter by the handle.
- Use a vacuum cleaner to clean the filter. If the filter is heavily soiled. it can be washed in warm water using a mild detergent.
Do not use harsh cleaners or very hot water. - Do not wash in a dishwasher.
- Allow the filter to dry completely before reinstalling.
- Reinsert the filter.
STORING THE AIR CONDITIONER
If the air conditioner will not be used for an extened period of time:
- To drain the water collection tank completely. leave the bottom drain cap off long enough to allow any residual water to drain out. Once the tank is completely drained and no more water flows out. reinstall the cap.
- Remove and clean the filter. allow it to dry completely. then reinstall it.
- Remove the batteries from the remote.
- Store the air conditioner in a cool. dry location. away from direct sunlight. extreme temperatures. and excessive dust.
Before using the air conditioner again:
- Make sure the filter and drain cap are in place
- Check the power cord to make sure it is in good condition. with no cracks or damage.
- Place new batteries in the remote.
- Install the air conditioner as described in the Installation Instructions.
TROUBLESHOOTING
BEFORE CALLING FOR SERVICE
Before you call for service. review this list. It may save you time and expense. This list includes common occurrences that are not the result of a defect in workmanship or materials.
| Self Diagnosis | Possible Causes | What To Do |
| Air conditioner does not start | The air conditioner is unplugged. | Make sure the air conditioner plug is pushed completely into the outlet. |
| The fuse is blown/circuit breaker is tripped | Check the house fuse/circuit breaker box and replace the fuse or reset the breaker. | |
| Power failure | If power failure occurs. turn the mode control to Off. When power is restored. wait 3 minutes to restart the air conditioner to prevent tripping of the overload | |
| The current interrupter device is tripped. | Press the RESET button located on the power cord plug. If the RESET button will not stay engaged. discontinue use of the air conditioner and contact a qualified service technician. | |
| FL appears in the display. | The water collection tank is full. Drain the tank and reset your settings. | |
| Room temperature is less than the set temperature. | This is normal. The air conditioner automatically shuts off when the room equals or is less than the set temperature. Adjust the temperature setting. if needed. | |
| Air conditioner does not cool as it should | Airflow is restricted. | Make sure there are no curtains. blinds. or furniture blocking the front of the air conditioner. |
| The temp control may not be set correctly. | In COOL model, press the DECREASE Pad Pad | |
| The air filter is dirty | Clean the filter at least every 2 weeks. See the Care and Cleaning section. | |
| The room may have been hot. | When the air conditioner is first turned on. you need to allow time for the room to cool down. | |
| Air conditioner freezing up | The cooling coils are iced over. | ce may block the air flow and obstruct the air conditioner from properly cooling the room. Set the mode control at High Fan or High Cool. |
| Air conditioner runs too often or too long | Area to be cooled is too large for the air conditioner. | Consult your dealer for the air conditioner capacity necessary to cool the desired area. |
| Doors or windows are open. | Make sure doors and windows are closed. | |
Code appears in the display.
|
|
|
See other models: LMVM2085ST LMVM2085SB LGVK700 LDE3037SB BH5140S
