Installation Instructions
If you are unsure about the installation of this timer please contact a licensed electrician.
1. Turn power off at circuit breaker or fuse box before installation.
2. Remove current wallplate and switch from wall box.
3. Wires should be stripped to 5/8". (16mm).
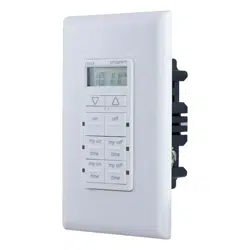
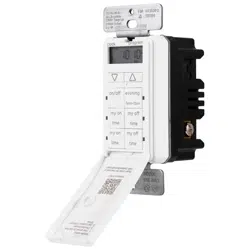
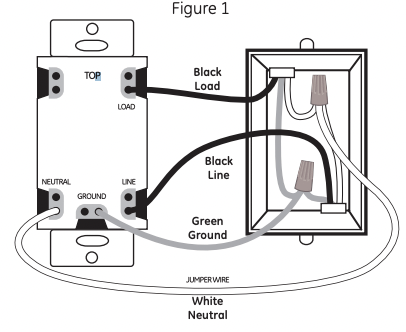
4. Remove timer from package. Look at the back of the timer and you will see LINE, LOAD, NEUTRAL and GROUND.
5. Loosen the LINE and LOAD screws with either a flat-blade or Phillips screwdriver. When loosening terminal screws, stop when you feel resistance.
NOTE: Do not remove terminal screws.
6. Insert the line side wire from the wire box into hole marked LINE and tighten the LINE screw.
7. Insert the load side wire from the wire box into hole marked LOAD and tighten the LOAD screw.
8. Attach ground wire from box to the ground lug on the timer.
9. Remove white jumper wire from the package. Insert and tighten jumper wire into the hole marked NEUTRAL.
10. Connect the neutral wire from the timer to the neutral wire in the box. Often the neutral wire (white) can be found in the back of the wire box connected with a wire nut. There may be several neutral wires bound together. Add the neutral wire to all neutral wires bound together and retighten the wire nut, making sure that the wire nut is tight.
11. Tug each wire to verify connection, retighten if needed.
NOTE: Be sure that all wires and wire nuts are secure.
12. Insert timer into the 2 1/2" wall box, being careful not to pinch any wires. Be sure the TOP (indicated on yoke of timer) is facing up. Fasten the timer to the wall box using the screws provided.
13. Place rocker/decorator wallplate on timer, being careful to not overtighten wallplate screws.
14. Turn the power on at the circuit breaker or fuse box.
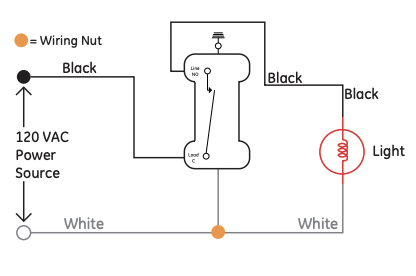
Typical SPST Installation
WARNING
RISK OF ELECTRIC SHOCK
•SHUT OFF POWER AT FUSE BOX OR CIRCUIT BREAKER BEFORE INSTALLATION
•DO NOT USE IN WET LOCATIONS
•USE INDOORS ONLY
RISK OF FIRE
•DO NOT USE TO CONTROL APPLIANCES THAT CONTAIN HEATING ELEMENTS (COOKING APPLIANCES, HEATERS, IRONS, ETC.)
•DO NOT EXCEED ELECTRICAL RATINGS
•USE COPPER WIRE ONLY WITH THIS DEVICE
•DO NOT USE TO CONTROL RECEPTACLES
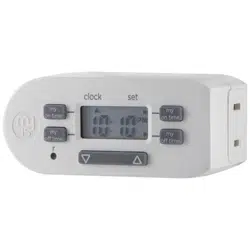
Fast, easy setup!
1. After installation
For first use, press the reset button ( ) below the arrow buttons using a toothpick or pencil.
2. Set the time
Use up ( ) and down (
 ) arrows to set current time.

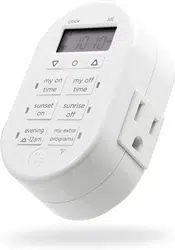
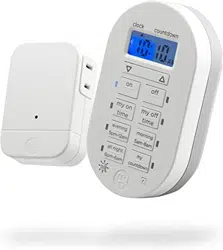
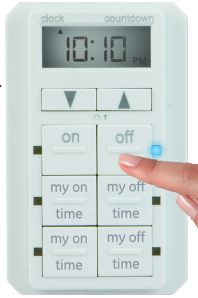
3. Choose your custom on/off times
Press “my on time,” then use up () and down () arrows to set on time. Press “my off time,” then use up () and down () arrows to set off time. If the blue LED is on the program is set. If the LED is off the program will not operate. Repeat for each additional “my on”/“my off” button. All programmed times will run simultaneously in a 24 hour day.

4. Manual/Override
Press “on” and “off” buttons to manually control your lights.
Note: When daylight savings time occurs use the down () and up () arrows to adjust the time by 1 hour.
Specifications
120VAC 60 Hz
15A General/Resistive
1200W Tungsten
1200VA Ballast
1/2 HP