Setup
Note: If numbers are not visible on-screen, plug timer into an outlet and
charge for 30 minutes.
1. Connect the two segments of the stake, screw stake into the bottom of
the timer.
2. Select a sunny, outdoor location near a GFCI outlet. Light sensor must
have direct access to sunlight.
• If using sunset options, ensure the sensor is shielded from nighttime
light sources, such as ood lights.
3. Connect the stake segments and attach the stake to the bottom of
the timer.
4. Firmly push the stake into the ground.
5. Plug in the cord directly to a GFCI outlet.
6. Open self-closing outlet cover.
7. Plug in device to be controlled.
8. If the device has a power switch, it must be in the ON position.
9. Repeat steps 7-9 for additional devices — DO NOT EXCEED
ELECTRICAL RATINGS.
Programming
1. Press the reset button with a toothpick or
other nonmetal, ne-tipped object — this
also clears all programmed settings and
restores factory defaults.
2. Use the up (
) and down ( ) arrow
buttons to set the time — note AM/PM
indicator.
• Time can be adjusted when the clock is
displayed — note indicator arrow moves
to set mode and back to clock when time
is set.
3. Press the mode button to select the desired
operation — note indicator dot position
above selected mode.
• Timer (default) — operates using the my
on/my off settings.
• ON – all connected devices are powered.
•
+6hr — timer activates at sunset and
remains on for six hours.
•
to
— timer turns on at sunset
and off at sunrise.
4. Create up to two custom my on/my off
settings.
• With timer mode selected, press
my on time 1 button.
• Use the up (
) and down ( ) arrow
buttons to set the desired on time —
indicator arrow appears on-screen next
to my on time 1 when setting is active.
Default on setting is 5PM.
• Press OFF TIME 1 button.
• Use the up (
) and down ( ) arrow
buttons to set the desired off time —
indicator arrow appears on-screen next
to my off time 1 when setting is active.
Default off setting is 12AM.
• Repeat these steps to create a custom
my on time 2 and my off time 2 program.
Default on setting is 6PM. Default off
setting is 6AM.
FCC/IC - EN
SPECIFICATIONS
MADE IN VIETNAM
Distributed by Jasco Products Company LLC, 10 E. Memorial Rd.,
Oklahoma City, OK 73114.
This Jasco product has a 1-year limited warranty. For warranty
details, visit www.enbrightenme.com/warranty.
Questions? Contact our U.S.-based Consumer Care at
1-800-654-8483, M-F.
PATENTS/PATENTS PENDING
WWW.BYJASCO.COM/PATENTS
7/26/2024 v1
WARNING
RISK OF ELECTRIC SHOCK
• PLUG DIRECTLY INTO A GFCI-PROTECTED
ELECTRICAL OUTLET
• KEEP AWAY FROM CHILDREN
• SUITABLE FOR INDOOR AND OUTDOOR
LOCATIONS, STORE INDOORS WHILE NOT IN
USE
RISK OF FIRE
• DO NOT USE TO CONTROL APPLIANCES THAT
CONTAIN HEATING ELEMENTS (COOKING
APPLIANCES, HEATERS, IRONS, ETC.)
• DO NOT EXCEED ELECTRICAL RATINGS
• USE ONLY WITH EQUIPMENT HAVING A 12A
MAXIMUM
• IF USING DECORATIVE LIGHTING NOT MARKED
WITH AN AMPERE RATING, CONNECT NO MORE
THAN 140 SCREW-BASED LAMPS (C7 OR C9) OR
12 STRINGS WITH PUSH-IN LAMPS
• IF USED FOR MORE THAN 90 DAYS, CONTACT A
LICENSED ELECTRICIAN TO HARDWIRE A
PERMANENT OUTDOOR OUTLET RATED FOR
YEAR-ROUND USE
• TIMER OUTLETS MUST REMAIN AT LEAST 6
INCHES ABOVE THE GROUND
MODEL #74516
my on
time 1
on
to
timer
clock set
powersensor
+6hr
my o
time 1
my on
time 2
my o
time 2
mode
R
PM
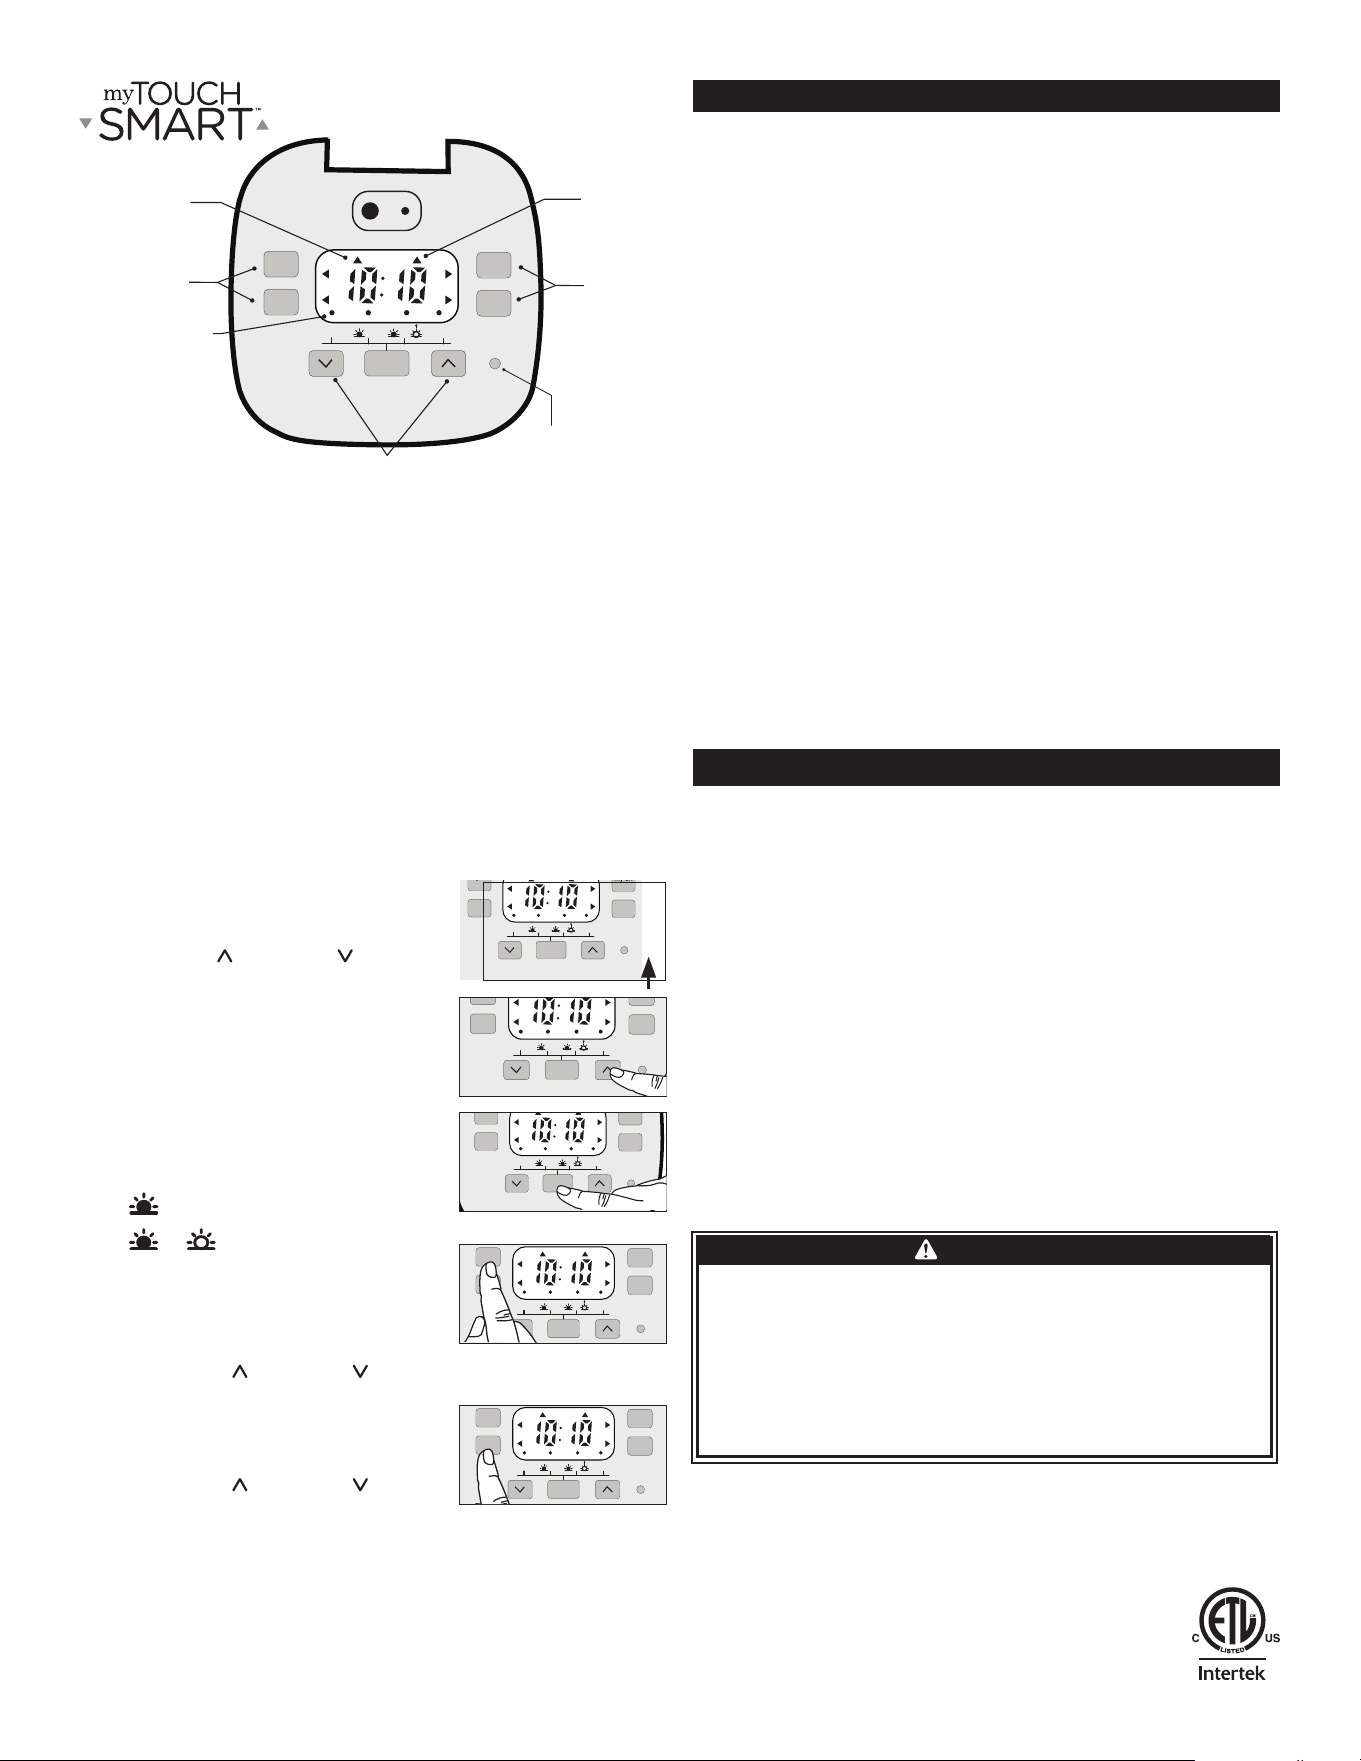
Reset button
Clears time and all schedules
— resets timer to factory settings
my on/
my off times
Set custom
ON/OFF times
Clock mode
indicator
Set mode
indicator
Active program
indicator arrow
Indicates if program
is set
Up and down arrows
Scroll to set and schedule times
2nd my on/
my off times
my on
time 1
on
to
timer
clock set
powersensor
+6hr
my o
time 1
my on
time 2
my o
time 2
mode
R
PM
my on
time 1
on
to
timer
clock set
powersensor
+6hr
my o
time 1
my on
time 2
my o
time 2
mode
R
PM
my on
time 1
on
to
timer
clock set
powersensor
+6hr
my o
time 1
my on
time 2
my o
time 2
mode
R
PM
my on
time 1
on
to
timer
clock set
powersensor
+6hr
my o
time 1
my on
time 2
my o
time 2
mode
R
PM
my on
time 1
on
to
timer
clock set
powersensor
+6hr
my o
time 1
my on
time 2
my o
time 2
mode
R
PM
Supplier Declaration of Conformity | Model #: 74516 | Jasco Products Co., 10
E. Memorial Rd., Oklahoma City, OK 73114, www.byjasco.com
This device complies with Part 15 of the FCC and Industry Canada license-
exempt RSS standards. Operation is subject to the following two conditions: (1)
this device may not cause harmful interference, and (2) this device must accept
any interference received, including interference that may cause undesired
operation.
FCC NOTE: The manufacturer is not responsible for any radio or TV
interference caused by unauthorized modications to this equipment. Such
modications could void the user’s authority to operate the equipment.
NOTE: This equipment has been tested and found to comply with the limits for
a Class B digital device, pursuant to Part 15 of the FCC Rules. These limits
are designed to provide reasonable protection against harmful interference
in a residential installation. This equipment generates, uses and can radiate
radio frequency energy and, if not installed and used in accordance with
the instructions, may cause harmful interference to radio communications.
However, there is no guarantee that interference will not occur
in a particular installation. If this equipment does cause harmful interference to
radio or television reception, which can be determined by turning the equipment
off and on, the user is encouraged to try to correct the interference by one or
more of the following measures:
• Reorient or relocate the receiving antenna.
• Increase the separation between the equipment and receiver.
• Connect the equipment into an outlet on a circuit different from that to which
the receiver is connected.
• Consult the dealer or an experienced radio/TV technician for help.
Important note: To comply with the FCC RF exposure compliance
requirements, no change to the antenna or the device is permitted. Any change
to the antenna or the device could result in the device exceeding the RF
exposure requirements and void user’s authority to operate the device.
CAN ICES-003(B)/NMB-003(B)
Ratings
125VAC, 60Hz
15A 1875W general purpose/resistive
10A 1250W tungsten
1/2HP
Suitable for indoor and outdoor use
Works with LED, CFL, incandescent and halogen bulbs
Conguración
Nota:
si los números no aparecen en la pantalla, conecte el temporizador a un
tomacorriente y cárguelo durante 30 minutos.
1. Conecte los dos segmentos de la estaca y atornille la estaca en la parte
inferior del temporizador.
2. Elija una ubicación exterior soleada cerca de un tomacorriente con
interruptor de puesta a tierra (GFCI, por sus siglas en inglés). El sensor
de luz debe tener acceso directo a la luz solar.
• Si utiliza opciones de anochecer, asegúrese de que el sensor esté
protegido de fuentes de luz nocturnas, como reectores de luz general.
3. Conecte los segmentos de la estaca y je la estaca en la parte inferior del
temporizador.
4. Empuje la estaca con rmeza para enterrarla.
5. Conecte el cable directamente a un tomacorriente GFCI.
6. Abra la cubierta de salida de cierre automático.
7. Conecte el dispositivo a controlar.
8. Si el dispositivo tiene un interruptor de encendido, debe estar en la
posición ON (ENCENDIDO).
9. Repita los pasos 7 a 9 para dispositivos
adicionales: NO EXCEDA LAS
CLASIFICACIONES ELÉCTRICAS.
Programación
1. Presione el botón de reinicio con un palillo
u otro objeto no metálico de punta na; esto
también borra todas las conguraciones
programadas y restaura los valores
predeterminados de fábrica.
2. Utilice los botones de echa hacia arriba
(
) y hacia abajo ( ) para congurar la
hora, tenga en cuenta el indicador AM/PM.
• La hora se puede ajustar cuando se
muestra el reloj. Tenga en cuenta que la
echa indicadora se mueve al modo de
conguración y regresa al reloj cuando se
congura la hora.
3. Presione el botón de modo para seleccionar
la operación deseada, observe que la
posición del punto indicador esté sobre el
modo seleccionado.
• Temporizador (predeterminado): funciona
usando la conguración de encendido/
apagado.
• ON – all connected devices are powered.
•
+6hr: el temporizador se activa al
anochecer y permanece encendido
durante seis horas.
•
to
— el temporizador se enciende
al anochecer y se apaga al amanecer.
4. Cree hasta dos conguraciones de my
on/my off (ENCENDIDO/APAGADO)
personalizadas.
• Con el modo de temporizador
seleccionado, presione el botón my on
time 1 (HORA DE ENCENDIDO 1).
• Utilice los botones de echa hacia
arriba (
) y hacia abajo ( ) para
congurar la hora de encendido deseada.
La echa indicadora aparecerá en la
pantalla junto a my on time 1 (HORA DE
ENCENDIDO 1) cuando la conguración
esté activa. La conguración de encendido
predeterminada es 5 p.m.
• Presione el botón my off time 1 (HORA DE APAGADO 1).
• Utilice los botones de echa hacia arriba
(
) y hacia abajo ( ) para congurar la hora de apagado deseada.
La echa indicadora aparecerá en la pantalla junto a my off time 1
(HORA DE APAGADO 1) cuando la conguración esté activa. La
conguración de apagado predeterminada es 12 a.m.
• Repita estos pasos para crear un programa personalizado de my on
time 2 (HORA DE ENCENDIDO 2) y my off time 2 (HORA DE APAGADO
2). La conguración de encendido predeterminada es 6 p.m. La
conguración de apagado predeterminada es 6 a.m.
FCC/IC - ES
ESPECIFICACIONES
MODELO #74516
my on
time 1
on
to
timer
clock set
powersensor
+6hr
my o
time 1
my on
time 2
my o
time 2
mode
R
PM
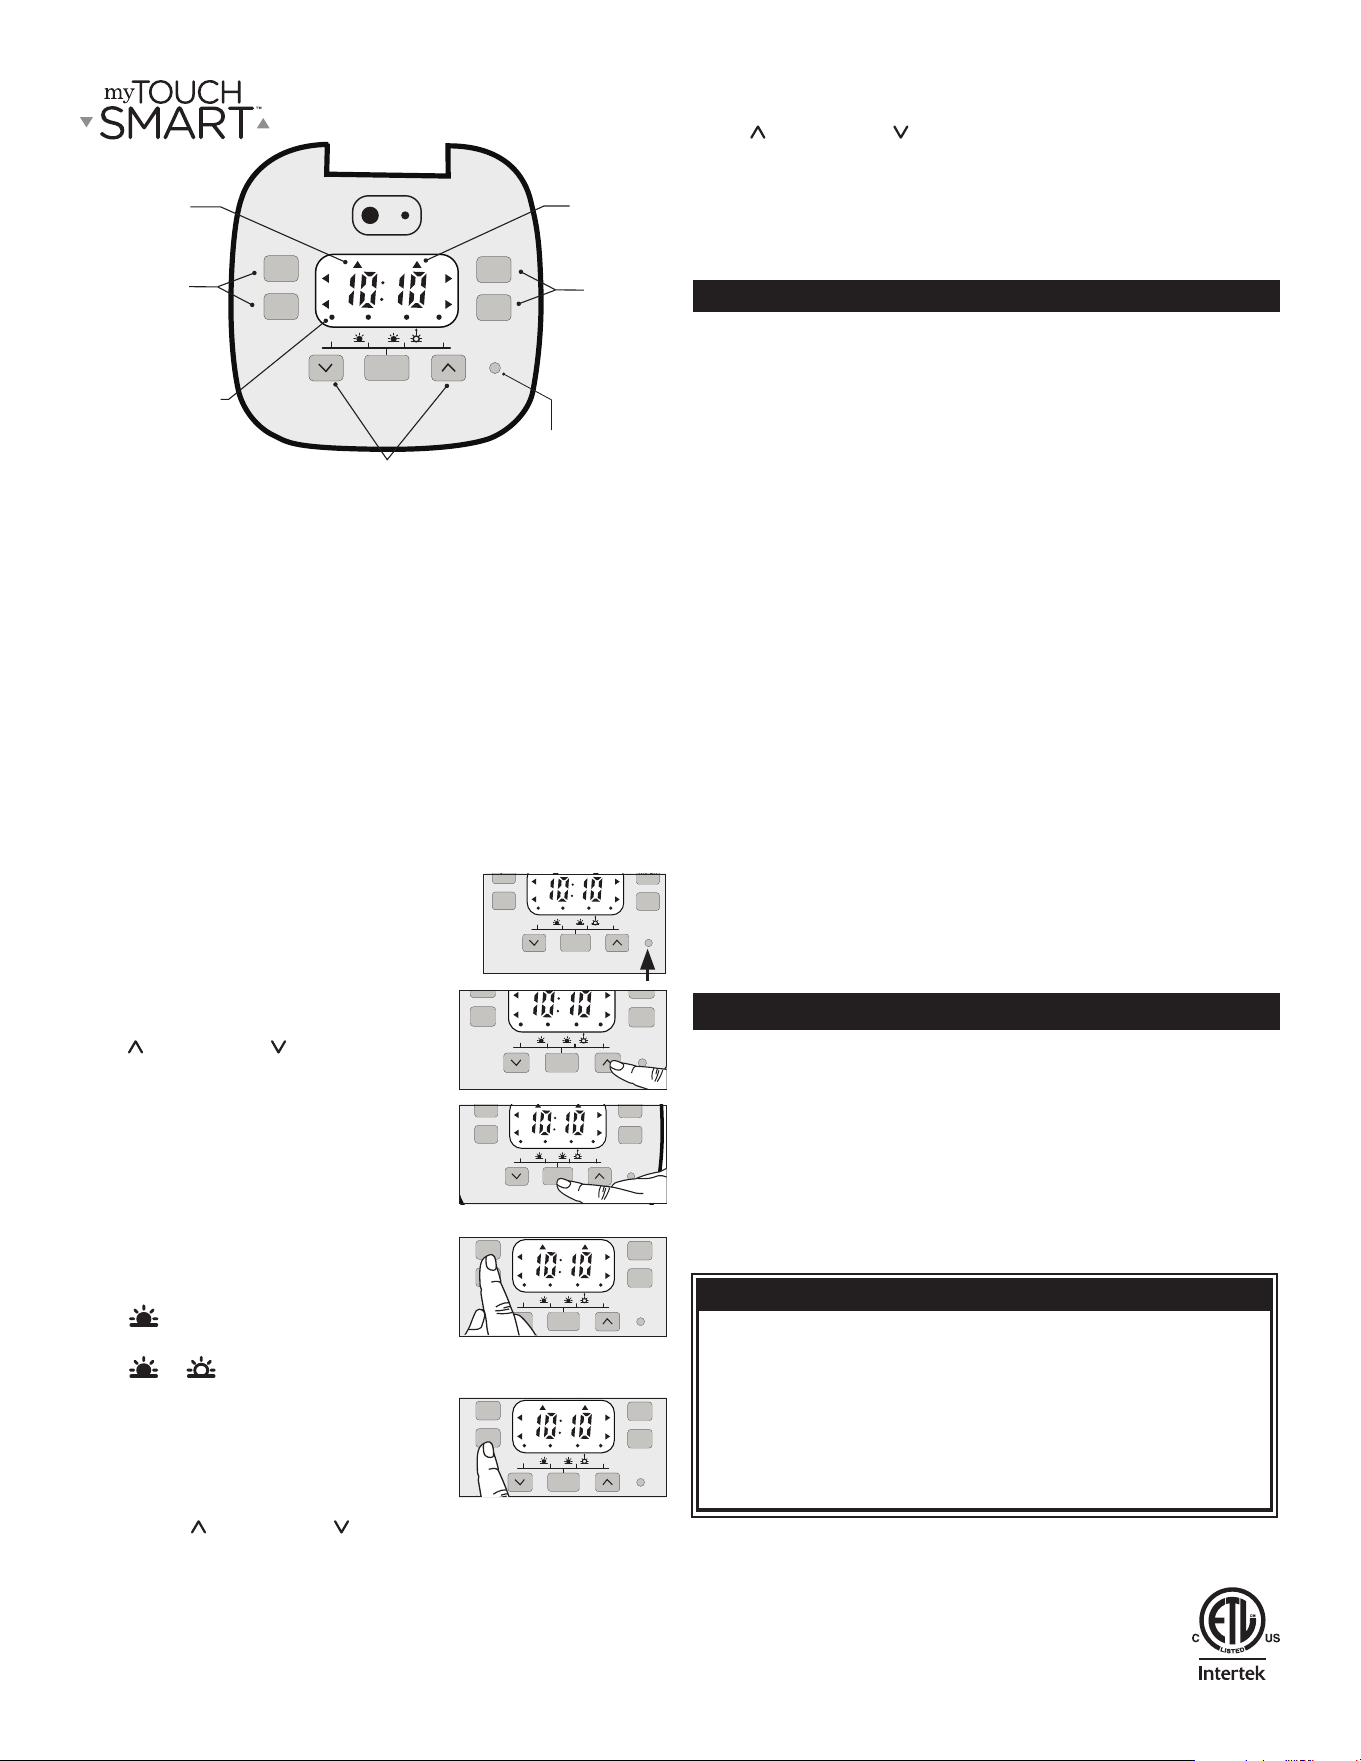
Botón de reinicio
Borra la hora y todos los
horarios, restablece el
temporizador a la
configuración de fábrica
Horas de
encendido/apagado
Configura horas de
encendido/apagado
personalizadas
Indicador de
modo reloj
Indicador de
programación
de modo
Flecha indicadora
de programa
activo
Indica si el
programa está
configurado
Flechas arriba y abajo
Use para desplazarse y
configurar y programar horarios
Segunda hora
de encendido/
apagado
RIESGO DE DESCARGA ELÉCTRICA
• ENCHÚFELA DIRECTAMENTE EN UN
TOMACORRIENTE PROTEGIDO POR GFCI
• MANTENGA LEJOS DEL ALCANCE DE LOS NIÑOS
• ADECUADO PARA SU USO EN INTERIORES Y
EXTERIORES. SE DEBE GUARDAR EN
INTERIORES CUANDO NO SE USE
• RIESGO DE INCENDIO
• NO UTILICE EL PRODUCTO PARA CONTROLAR
ELECTRODOMÉSTICOS QUE CONTENGAN
ELEMENTOS DE CALEFACCIÓN
(ELECTRODOMÉSTICOS DE COCINA,
CALENTADORES, PLANCHAS, ETC.).
• NO EXCEDA LA CAPACIDAD ELÉCTRICA NOMINAL
• USE SOLO CON EQUIPOS QUE TIENEN UN
MÁXIMO DE 12 A
• SI UTILIZA LUCES DECORATIVA SIN MARCAS DE
UNA CLASIFICACIÓN DE AMPERIOS, NO
CONECTE MÁS DE 140 LÁMPARAS ROSCA (C7 O
C9) O 12 CUERDAS CON LÁMPARAS A PRESIÓN
• SI SE UTILIZA DURANTE MÁS DE 90 DÍAS,
CONTACTE A UN ELECTRICISTA CON LICENCIA
PARA CONECTAR UN TOMACORRIENTE
EXTERIOR PERMANENTE CLASIFICADO PARA
USO DURANTE TODO EL AÑO
• LOS TOMACORRIENTES DEL TEMPORIZADOR
DEBEN PERMANECER AL MENOS A 15.24
CENTÍMETROS DEL SUELO
ADVERTENCIA
HECHO EN VIETNAM
Distribuido por Jasco Products Company LLC, 10 E Memorial Rd.,
Oklahoma City, Oklahoma 73114.
Este producto de Jasco tiene una garantía limitada de 1 año.
Visite www.byjasco.com para conocer los detalles de la garantía.
¿Tiene preguntas? Comuníquese con nuestro servicio de atención al
consumidor de EE. UU. al 1-800-654-8483, de lunes a viernes.
Visite www.byjasco.com/patents para
información sobre la patente del producto.
my on
time 1
on
to
timer
clock set
powersensor
+6hr
my o
time 1
my on
time 2
my o
time 2
mode
R
PM
my on
time 1
on
to
timer
clock set
powersensor
+6hr
my o
time 1
my on
time 2
my o
time 2
mode
R
PM
my on
time 1
on
to
timer
clock set
powersensor
+6hr
my o
time 1
my on
time 2
my o
time 2
mode
R
PM
my on
time 1
on
to
timer
clock set
powersensor
+6hr
my o
time 1
my on
time 2
my o
time 2
mode
R
PM
my on
time 1
on
to
timer
clock set
powersensor
+6hr
my o
time 1
my on
time 2
my o
time 2
mode
R
PM
Declaración de conformidad del proveedor | Modelo #: 74516 | Jasco Products Co., 10 E.
Memorial Rd., Oklahoma City, OK 73114, www.byjasco.com
Este dispositivo cumple con la sección 15 de la FCC y las normas RSS sin licencia
del Ministerio de Industria de Canadá. Su funcionamiento está sujeto a las siguientes
condiciones: (1) este dispositivo no debe causar interferencia perjudicial, y (2) debe
aceptar cualquier interferencia recibida, incluida la interferencia que pudiese causar
un funcionamiento no deseado.
NOTA DE LA FCC: el fabricante no es responsable por ninguna interferencia de
radio o TV causada por modicaciones no autorizadas a este equipo. Dichas
modicaciones podrían anular la autorización del usuario para utilizar el equipo.
NOTA: Este equipo se probó y se vericó que cumple con los límites para un
dispositivo digital de clase B, conforme a la sección 15 de las reglas de la FCC.
Estos límites están diseñados para proporcionar una protección razonable contra
interferencias perjudiciales en una instalación residencial. Este equipo genera,
utiliza y puede irradiar energía de radiofrecuencia y, si no se instala ni se usa de
acuerdo con las instrucciones, puede causar interferencias perjudiciales para las
comunicaciones de radio. Sin embargo, no se garantiza que no se producirán
interferencias en una instalación en especial. Si este equipo genera una interferencia
perjudicial para la recepción de radio o televisión, que se puede determinar al
encender y apagar el equipo, se recomienda al usuario que intente corregir la
interferencia con una o más de las siguientes medidas:
• Reorientar o reubicar la antena de recepción.
• Aumentar la separación entre el equipo y el recibidor.
• Conectar el equipo a un tomacorriente de un circuito distinto al que usa el
receptor.
• Solicitar ayuda al distribuidor o a un técnico con experiencia en
radio/TV.
Nota importante: para cumplir con los requisitos de cumplimiento con las
regulaciones de exposición a radiofrecuencia de la FCC, los cambios a la antena o al
dispositivo no están permitidos. Cualquier cambio en la antena o el dispositivo podría
provocar que el dispositivo exceda los requisitos de exposición a radiofrecuencia y
anular la autoridad del usuario para operar el dispositivo.
CAN ICES-3(B)/NMB-3(B)
Clasicaciones
125VCA, 60Hz
15A 1875 vatios resistivo, para uso general
10A 1250 vatios de tungsteno
1/2HP
Apto para uso en interiores y exteriores
Funciona con bombillas LED, CFL, incandescentes y halógenas