Loading ...
Loading ...
Loading ...
8
EN
2
26
12c
12a
7.1
12a
7.1
Fixing the Lower Brackets
• Screw the brackets 7.1 to the front of the Hood Canopy using the screws 12a provided.
• Before tightening the Brackets completely, make all the adjustments to allow them to rest on
the lower base of the worktop to avoid deformation of the upper brackets 7.2 as shown in the
figure.
• With the aid of a spirit level, set the Hood Canopy level vertically and fix it to the Lower
Surface using 2 screws 12c provided.
• Tighten the screws 12a completely.
3
• Insert the Brackets 7.2, as
indicated in the gure, into
the slots provided and x them
with the screws 12a provided.
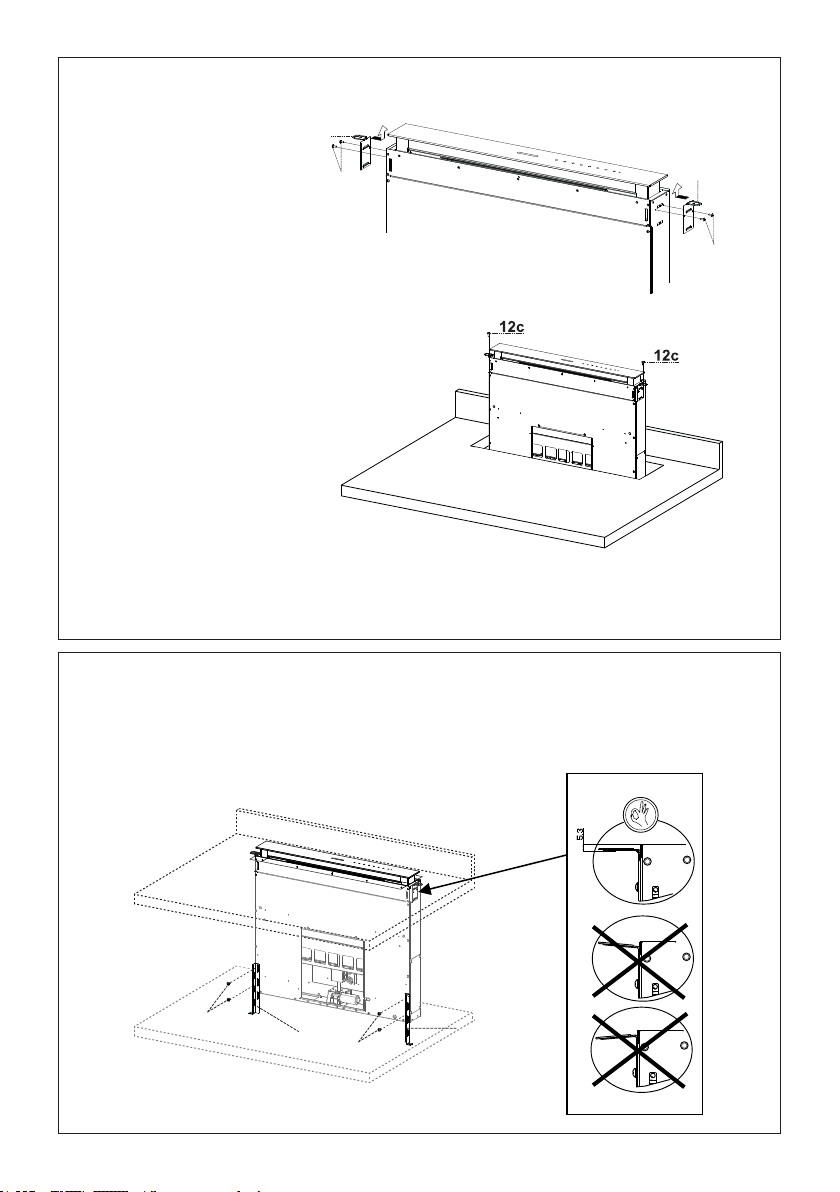
Inserting the Hood Canopy into the countertop from above
• Insert the Hood Canopy into the
countertop, drilled as described
above.
• Center the Hood Canopy with
respect to the cooktop slot.
• Secure the Hood Canopy with
the 2 screws 12c provided.
Warning:
If the countertop is made from a material that does not allow the screws 12c to be inserted,
use a small amount of silicone to glue the Brackets 7.2 to the top and allow it to dry completely
before proceeding with installation.
EN
2
25
Inserting the Hood Canopy into the support surface from above
• Insert the Brackets 7.2, as
indicated in the figure, into the
slots provided and fix them with
the screws 12a provided.
• Insert the Hood Canopy into the
cooker top, drilled as described
above.
• Centre the Hood Canopy with
respect to the Cooking Hob slot.
• Fix the Hood Canopy with the 2
screws 12c provided.
Warning:
If the cooker top is made from a material that does not allow the screws 12c to be inserted, use
a small amount of silicone to glue the Brackets 7.2 to the top and allow it to dry completely
before proceeding with installation.
4
Securing the Lower Brackets
• Screw the brackets 7.1 to the front of the Hood Canopy using the screws 12a provided.
• Before tightening the Brackets completely, make all the adjustments to allow them to rest on
the lower base of the Cabinet Base to avoid deformation of the upper brackets 7.2 as shown
in the gure.
Loading ...
Loading ...
Loading ...