Loading ...
Loading ...
Loading ...
34
8
EN
2
28
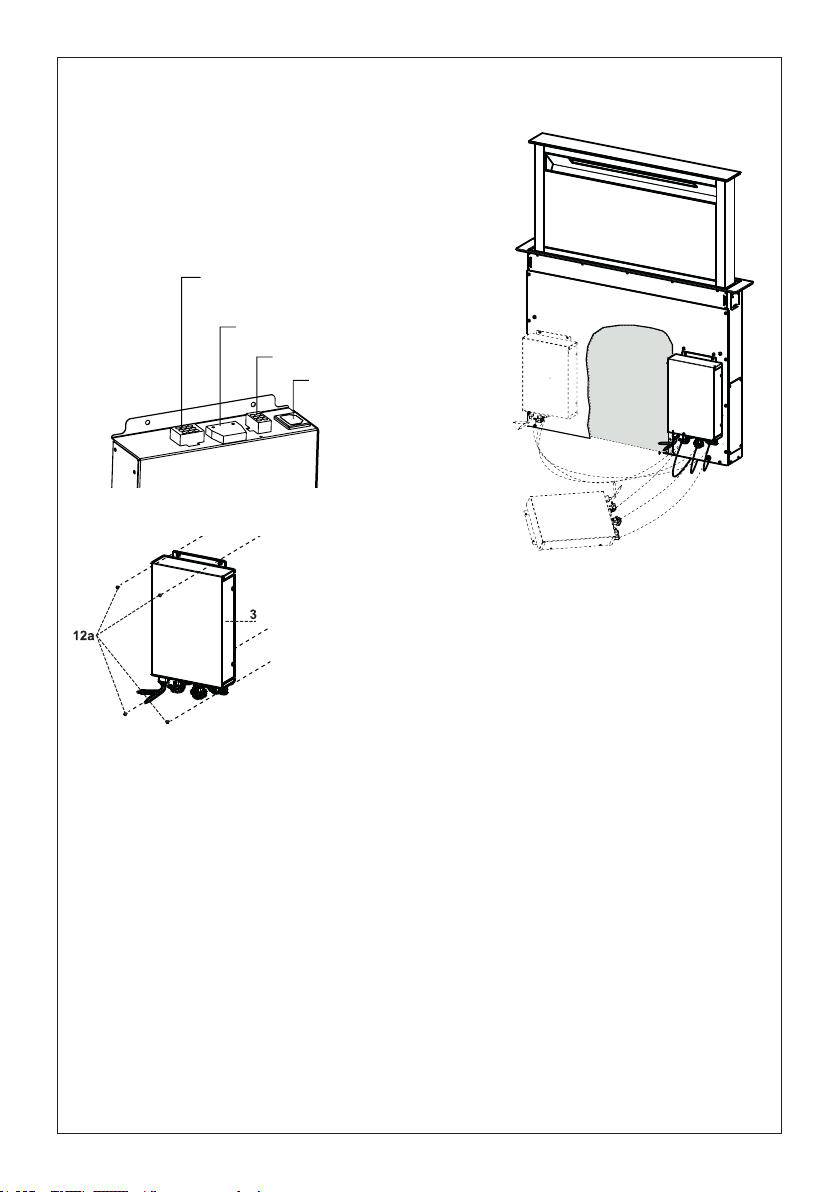
Fixing the Electric Unit
• Connect the wires coming out of the bottom
right part of the Hood Canopy to the
corresponding connector on the Electric
Unit, taking care not to make any wrong
connections.
• Fix the Electric Unit to the Hood Canopy
using the screws 12a provided.
• The position indicated in the figure is only
an option, as if necessary it may also be
fitted on the left of the Hood Canopy or
even left free on the base of the unit if there
are no structural or safety problems
involved.
Warning..: Do not install the product in such a way that the wiring box is in contact with the
floor.
• Branchez les ls provenant de la partie inférieure
droite du cadre de la hotte au connecteur
correspondant sur le module électrique, en prenant
soin d'éviter de faire des connexions erronées. Voir
la gure ci-dessous.
• Fixez le module électrique au cadre de la hotte à l'aide des
vis 12a fournies.
• Le module électrique peut être installé à droite ou à gauche
sur l'avant du cadre de la hotte, comme illustré ci-dessus.
Il peut aussi être installé à la base des placards, si l'espace
le permet.
EN
2
28
Fixing the Electric Unit
• Connect the wires coming out of the bottom
right part of the Hood Canopy to the
corresponding connector on the Electric
Unit, taking care not to make any wrong
connections.
• Fix the Electric Unit to the Hood Canopy
using the screws 12a provided.
• The position indicated in the figure is only
an option, as if necessary it may also be
fitted on the left of the Hood Canopy or
even left free on the base of the unit if there
are no structural or safety problems
involved.
Warning..: Do not install the product in such a way that the wiring box is in contact with the
floor.
« INSTRUCTIONS DE MISE À LA TERRE
Cet appareil doit être mis à la terre. La mise à la terre réduit le risque de choc électrique en cas
de court-circuit, car elle fournit un l d'évacuation au courant électrique. Cet appareil est muni
d'un cordon présentant un l de mise à la terre, avec une che de mise à la terre. La che doit
être insérée dans une prise correctement installée et mise à la terre.
AVERTISSEMENT - Une mise à la terre inadéquate peut entraîner un choc électrique.
Consultez un électricien qualié si vous ne comprenez pas parfaitement les instructions de mise
à la terre ou si vous avez des doutes quant à la mise à la terre de l'appareil.
N'utilisez pas de rallonge. Si le cordon d’alimentation est trop court, demandez à un électricien
qualié d’installer une prise à proximité de l'appareil. »
Avertissement : N'installez pas ce produit de façon à ce que le module électrique se trouve en
contact avec le sol.
Installation du module électrique
Raccordez le conduit au registre et scellez toutes les connexions à l'aide de ruban.
Mettez l'alimentation sous tension. Mettez le ventilateur et l'éclairage en marche. Si la hotte ne
fonctionne pas, assurez-vous que le disjoncteur ou le fusible du domicile n'a pas sauté. Si l'unité ne
fonctionne toujours pas, débranchez l'alimentation et vériez si les branchements ont été réalisés
correctement.
Câble électrique
Connecteur de moteur
Commande Connecteur plat
9 pôles Système
Connecteur
Loading ...
Loading ...
Loading ...