
Loading ...
Loading ...
Loading ...
14
8
EN
2
28
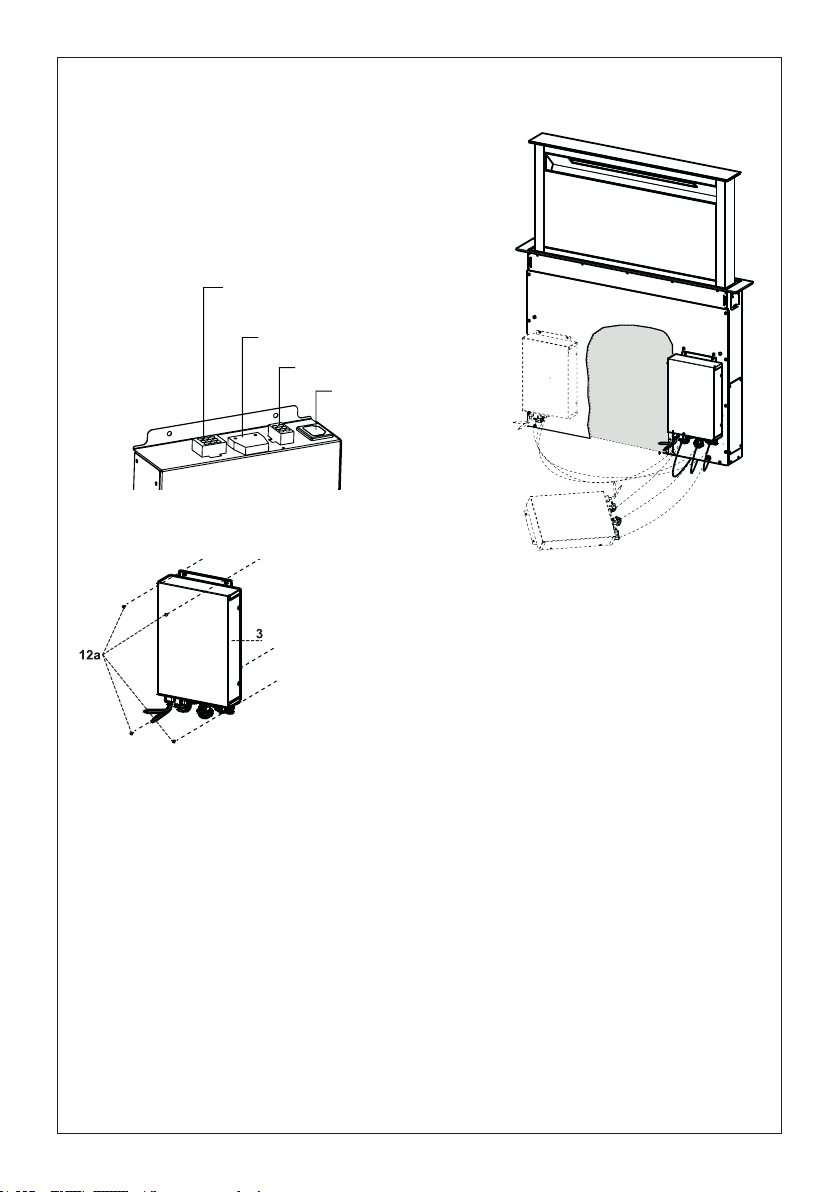
Fixing the Electric Unit
• Connect the wires coming out of the bottom
right part of the Hood Canopy to the
corresponding connector on the Electric
Unit, taking care not to make any wrong
connections.
• Fix the Electric Unit to the Hood Canopy
using the screws 12a provided.
• The position indicated in the figure is only
an option, as if necessary it may also be
fitted on the left of the Hood Canopy or
even left free on the base of the unit if there
are no structural or safety problems
involved.
Warning..: Do not install the product in such a way that the wiring box is in contact with the
floor.
• Connect the wires coming out of the bottom right part
of the Hood Canopy to the corresponding connector
on the Electric Unit, taking care not to make any
wrong connections. Check the picture below.
• Secure the Electric Unit to the Hood Canopy using the
screws 12a provided.
• The Electric Unit can be installed on the left or right of the
front of the hood canopy as shown above. It can also be
installed on the cabinet base if space allows.
EN
2
28
Fixing the Electric Unit
• Connect the wires coming out of the bottom
right part of the Hood Canopy to the
corresponding connector on the Electric
Unit, taking care not to make any wrong
connections.
• Fix the Electric Unit to the Hood Canopy
using the screws 12a provided.
• The position indicated in the figure is only
an option, as if necessary it may also be
fitted on the left of the Hood Canopy or
even left free on the base of the unit if there
are no structural or safety problems
involved.
Warning..: Do not install the product in such a way that the wiring box is in contact with the
floor.
"GROUNDING INSTRUCTIONS
This appliance must be grounded. In the event of an electrical short circuit, grounding reduces
the risk of electric shock by providing an escape wire for the electric current. This appliance is
equipped with a cord having a grounding wire with a grounding plug. The plug must be plugged
into an outlet that is properly installed and grounded.
WARNING - Improper grounding can result in a risk of electric shock.
Consult a qualied electrician if the grounding instructions are not completely understood, or if
doubt exists as to whether the appliance is properly grounded.
Do not use an extension cord. If the power supply cord is too short, have a qualied electrician
install an outlet near the appliance."
Warning..: Do not install the product in such a way that the electric unit is in contact with the oor.
Installation of Electrical Module
Connect the ductwork to the damper and seal all connections with duct tape.
Turn the power supply on. Turn on the blower and light. If the rangehood does not operate, check that
the circuit breaker is not tripped or the house fuse blown. If the unit still does not operate, disconnect
the power supply and check that the wiring connections have been made properly.
Power supply
Blower Connector
Command Flat
Connector
9 poles System
Connector
Loading ...
Loading ...
Loading ...