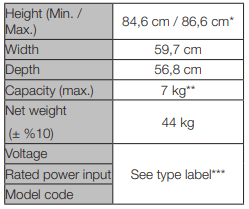
* Min. height: Height with adjustable feet are closed.
Max. height: Height with adjustable feet are opened maximum.
** Dry laundry weight before washing.
*** Type label is located behind the loading door.
NOTE
Technical specifications of the dryer are subject to change without notice to improve the quality of the product.
Figures in this manual are schematic and may not match the product exactly.
Values stated on markers on the dryer or in the other published documentation accompanying with the dryer are obtained in laboratory in accordance with the relevant standards. Depending on operational and environmental conditions of the dryer, these values may vary.
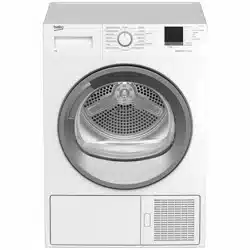
Your Dryer
Overview
Top panel
Control panel
Loading door
Kick plate opening button
Ventilation grids
Adjustable legs
In models where the tank is placed below, the water tank is inside the toe board
Type label
Lint filter
Water tank drawer (in models where the tank is placed above)
Power cord
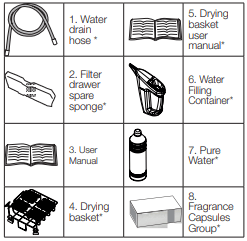
Package Contents
*Optional - may not be included, depends on mode
Installation
Before the calling the nearest Authorized Service for the installation of the dryer, ensure that electrical installation and water drain is appropriate referring to the user’s manual. If they are not suitable, contact a qualified electrician and technician to make necessary arrangements.
NOTE: Preparation of the dryer’s location as well as the electrical and waste water installations is under customer’s responsibility.
WARNING!
Prior to installation, visually check if the dryer has any defects on it. If the drier is damaged, do not have it installed. Damaged products cause risks for your safety.
Let your dryer wait for 12 hours before starting to use it.
Appropriate installation location
Install the dryer on a stable and level surface. Dryer is heavy. Do not move it by yourself.
Operate your dryer in a well ventilated, dust-free environment.
The gap between the dryer and the surface should not be reduced by the materials such as carpet, wood and tape.
Do not cover the ventilation grills of the dryer.
There must not be a lockable, sliding or hinged door that may block the opening of the loading door in the place where your dryer is to be installed.
Once the dryer is installed, it should stay at the same place where its connections have been made. When installing the dryer, make sure that its rear wall does not touch anywhere (tap, socket, etc.).
Place the dryer at least 1 cm away from the edges of other furniture.
Your dryer can be operated at temperatures between +5°C and +35°C. If the operating conditions fall outside of this range, operation of the dryer will be adversely affected and it can get damaged.
The rear surface of the tumble dryer shall be placed against a wall.
DANGER!
Do not place the dryer on the power cable.
* Ignore following warning if your product’s system does not contains R290.
DANGER!
Dryer contains R290 refrigerant.*
R290 is an environment-friendly, but flammable refrigerant.*
Ensure that the air inlet of the dryer is open and it is well-ventilated.*
Keep potential flame sources away from the dryer.*
Removing the transportation safety assembly
WARNING!
Remove the transportation safety assembly before using the dryer for the first time.
Connecting to the drain
You can directly drain accumulated water through the water drain hose supplied with the product instead of periodically draining the water collected in the water tank.
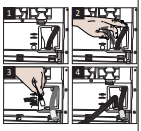
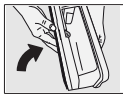
Connecting the water drain hose
1-2. Pull hose at the behind of the dryer by hand in order to disconnect it from where it is connected. Do not use any tools to remove the hose.
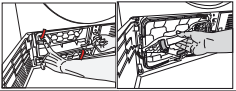
3. Connect one end of the drain hose supplied with the dryer to the connection point from where you removed the hose of the product in previous step.
4. Connect the other end of the drain hose directly to the wastewater drain or to the washbasin
NOTE
Water drain hose should be attached to a height of maximum 80 cm.
Make sure that the water drain hose is not stepped on and it is not folded between the drain and the machine.
If there is an accessories pack supplied with your product, please see the detailed description.
Adjusting the feet
Turn the feet to left or right until the dryer stands level and firmly
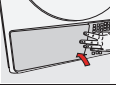
Transportation of the dryer
Drain all water that has remained in the dryer. If direct water drain connection is made, then remove the hose connections.
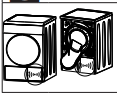
WARNING!
We recommend carrying the dryer in upright position. If it is not possible to carry the machine in the upright position, we recommend carrying it by tilting towards the right side when looked from the front.
Warnings about sounds
NOTE
It is normal to hear a metallic noise from the compressor sometimes during operation.
Water collected during operation is pumped to water tank. It is normal to hear pumping noise during this process.
Changing the illumination lamp
In case an illumination lamp is used in your laundry dryer. To change the Bulb/LED used for illumination of your tumble dryer, call your Authorized Service. The lamp(s) used in this appliance is not suitable for household room illumination. The intended purpose of this lamp is to assist the user to place laundry in the tumble dryer in a comfortable way. The lamps used in this appliance have to withstand extreme physical conditions such as vibrations and temperatures above 50 °C
Preparation
Laundry suitable for drying in the dryer
Always obey the instructions given on the garment tags. Dry only the laundry having a label stating that they are suitable for drying in a dryer.
Laundry not suitable for drying in the dryer
Items with this symbol should not be dried in the dryer.
NOTE: Delicate embroidered fabrics, woollen, silk garments, delicate and valuable fabrics, airtight items and tulle curtains are not suitable for machine drying.
Preparing laundry for drying
Laundry may be tangled with each other after washing. Separate the laundry items before placing them into the dryer.
Dry garments having metal accessories such as zippers, inside out.
Fasten the zippers, hooks and buckles and button sheets.
Things to be done for energy saving
Spin your laundry at the highest speed possible when washing them. Thus, the drying time is shortened and energy consumption is reduced.
Sort out the laundry depending on their type and thickness. Dry the same type of laundry together. For example thin kitchen towels and tableclothes dries earlier than thick bathroom towels.
Follow the instructions in the user manual for programme selection.
Do not open the loading door of the machine during drying unless necessary. If you must open the loading door, do not keep it open for a long time.
Do not add wet laundry while the dryer is in operation
For models with a condenser unit: clean the condenser once in a month or after every 30 operations regularly. .
Clean the filter periodically.Read the Maintenance and cleaning of filters for detalied information.
For models with flue unit: comply with the flue connection instructions and clean the flue.
During the drying process, air the room well where your tumble dryer is operating.
Correct load capacity
Follow the instructions in the “Programme selection and consumption table”. Do not load more than the capacity values stated in the table.
Following weights are given as examples.
Laundry
Approximate weights (g)*
Laundry
Approximate weights (g)
Cotton quilt covers (double)
1500
Blouses
150
Cotton quilt covers (single)
1000
Cotton shirts
300
Bed sheets (double)
500
Shirts
250
Bed sheets (single)
350
Cotton dresses
500
Large tablecloths
700
Dresses
350
Small tablecloths
250
Jeans
700
Tea Towels
100
Handkerchiefs (10 pieces)
100
Bath towels
700
T-Shirts
125
Hand towels
350
*Dry laundry weight before washing.
Operating the product
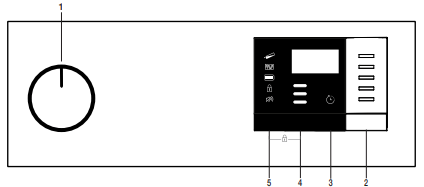
Control Panel
On/Off/Program selection button
Start/Stand-by button
End Time button
Drying Level Button
Buzzer volume/Time programs selection button
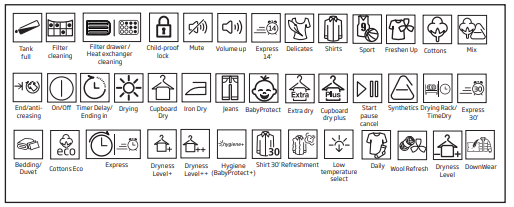
Symbols
Preparation of drying machine
Plug the drying machine.
Open the loading door.
Place the laundry to the drying machine without jamming them.
Push and close the loading door.
WARNING!
Ensure that no laundry is jammed to the loading door.
Select the desired program using the On/Off/ Program selection knob, the machine will turn on.
NOTE
Selecting a program using the On/Off/ Program selection button does not mean that the program started. Press the Start / Stand-by button to start the program.
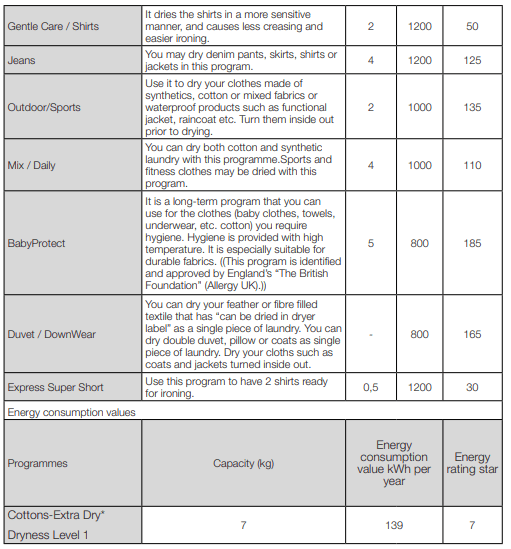
Program selection and consumption chart
* : Energy Label standard program (AS/NZS 2442) “All the filters must be cleaned prior to test series.”
All values given in the table have been fixed according to standard laboratory conditions.
These values may deviate from the table according to the laundry type, laundry spin speed, environmental conditions and voltage fluctuations
Allergy UK is the brand of the British Allergy Association. Seal of Approval is created to guide people that require recommendation about a product that the related product restricts / reduces / eliminates the allergens or reduces the allergen content significantly in the ambient where allergy patients exist. It aims to provide assurance that the products are tested scientifically or examined in a way to provide measurable results.
Auxiliary functions
Buzzer / time
Drying machine makes an audible warning when the program is completed. If you don’t want the machine to make an audible warning, press the “Buzzer / Time” button. When you press the Buzzer/Time button, a light will illuminate and no audible warning will be made when the program ends.
NOTE
You can select this function before or after the program starts.
Buzzer/Time button is used to adjust program duration while the Rack/Time programs are selected.
Drying Level
Drying Level button is used for adjusting to desired dryness level. Program duration may change depending on the selection.
NOTE: You can activate this function only prior to start of program.
End time
You can delay the end time of the program up to 24 hours with End time function.
Open the loading door and place the laundry.
Select the drying program.
Press the End Time selection button and set the delay time you wish. End Time LED will illuminate. (When pressed and hold the button, End Time proceeds nonstop).
Press the Start / Stand-by button. End Time countdown starts. “:” Separator in the middle of displayed delay time flashes.
NOTE: You can add or remove laundry within end time. Displayed time is the sum of normal drying time and end time. End Time LED will turn off at the end of countdown, drying starts and drying LED will illuminate.
Changing the end time
If you want to change the duration during the countdown:
Cancel the program by turning the On/Off/ Program selection knob. Select the program you want and repeat the End Time selection process.
Cancelling the end time function
If you want to cancel the end time countdown and start the program immediately:
Cancel the program by turning the On/Off/ Program selection knob. Select the program you want and press the Start/Stand-by button.
Warning indicators
NOTE: Warning indicators may vary depending on the model of your dryer.
Filter cleaning
When the program is completed, the warning indicator for filter cleaning turns on.
Water tank
When the program is completed, the warning indicator to empty the water tank turns on. If the water tank fills up while the program continues, the warning indicator starts flashing and the machine goes into stand-by. In this case, empty the water tank and start the program by pressing the Start / Stand-by button. Warning indicator turns off and program resumes.
Filter drawer /Heat exchanger cleaning
When the programme is finished, the cleaning symbol of the heat exchanger or filter drawer may light up.
Starting the program
Press the Start/Stand-by button to start the program.
Start/Stand-by and Drying indicators will illuminate to indicate that program started.
Child Lock
The drying machine has a child lock which prevents the program flow from being interrupted when the buttons are pressed during a program. When the child lock is activated, all buttons on the panel except the On/Off/Program selection knob are deactivated.
Press the Drying Level and Buzzer buttons simultaneously for 3 buttons to activate the child lock.
The child lock has to be deactivated to be able to start a new program after the current program is finished or to be able to interfere with the program. To deactivate the child lock, keep the same buttons pressed for 3 seconds.
NOTE
When the child lock is activated, the child lock warning indicator on the screen turns on.
Child lock deactivates when the drying machine is turned off and on by the On/ Off/Cancel knob.
NOTE: When the drying machine runs and the child lock is active, it beeps twice when the program selection knob is turned. If the child lock is deactivated without returning the program selection knob to its previous position, program will terminate due to the change in the program selection knob position.
Changing the program after it is started
You can change the program you selected to dry your laundry with a different program after the drying machine starts running
For instance, select Extra Dry program by turning the On/Off/Program selection knob to select Extra Dry instead of Iron Dry.
Press the Start/Stand-by button to start the program.
Adding and removing clothes during stand-by
If you want to add or remove clothes to/from the drying machine after the drying program starts:
Press the Start/Stand-by button to put the drying machine in Stand-by state. The drying operation stops.
Open the loading door while in Standby state, and close the door after you remove or add laundry.
Press the Start/Stand-by button to start the program.
NOTE
Adding laundry after the drying operation starts may cause the dried laundry inside the machine to mix with wet laundry and leave the laundry damp at the end of operation.
Adding or removing laundry during drying may be repeated as many times as you wish. But this operation continuously interrupts the drying operation, and thus increases program duration and energy consumption. So, it is recommended to add laundry before the program starts.
If a new program is selected by turning the program selection knob while the drying machine is in stand-by, the running program terminates.
WARNING! Do not touch the inner surface of the drum while adding or removing clothes during a continuing program. The drum surface is hot
Cancelling the program
If you want to cancel the program and terminate the drying operation for any reason after the drying machine starts running, turn the On/Off/Cancel knob, the program will be cancelled.
WARNING! The inside of the drying machine shall be extremely hot when you cancel the program during machine operation, so run the refresh program to allow it to cool down.
End of program
When the program ends, the Fibre Filter Cleaning and Water Tank warning symbols on the program observation indicator turn on. Loading door may be opened and the dryer machine becomes ready for another run. Bring the On/Off/Program selection knob to On/Off position to turn the drying machine off.
NOTE: If the laundry is not removed after the program is completed, the wrinkle prevention function activates for 2 hours to prevent the laundry inside the machine to get wrinkled. The program tumbles the laundry with 10- minute intervals to prevent them from wrinkling.
Maintenance and cleaning
Service life of product extends and frequently experienced problems will be reduced if it is cleaned at regular intervals
WARNING! Please unplug your product before performing maintenance and cleaning instructions. (eg control panel, body, etc.)
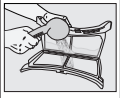
Cleaning Lint Filter / Loading Door Inner Surface
Lint and fiber released from the laundry to the air during the drying cycle are collected in the Lint Filter.
NOTE: You can clean the lint filter housing with a vacuum cleaner
WARNING! Always clean the lint filter and the inner surfaces of the loading door after each drying process.
To clean the lint filter:
Open the loading door.
Remove the lint filter by pulling it up and open the lint filter.
Clean lint, fiber, and cotton raveling by hand or with a soft piece of cloth.
Close the lint filter and place it back into its housing.
A layer can build up on the filter pores that can cause clogging of the filter after using the dryer for a while. Wash the lint filter with warm water to remove the layer that builds up on the lint filter surface. Dry the lint filter completely before reinstalling it.
Clean the entire inner surface of the loading door and loading door gasket with a soft damp cloth.
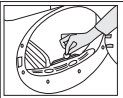
Cleaning the sensor
There are dampness sensors in the dryer that detect whether the laundry is dry or not.
To clean the sensors:
Open the loading door of the dryer.
Allow the machine to cool down if it is still hot due to the drying process.
Wipe the metal surfaces of the sensor with a soft cloth, dampened with vinegar and dry them.
NOTE
Clean metal surfaces of the sensors 4 times a year.
Do not use metal tools when cleaning metal surfaces of the sensors.
WARNING! Never use solvents, cleaning agents or similar substances for cleaning due to the risk of fire and explosion!
Draining the water tank
Dampness of the laundry is removed and condensed during drying process and the water that arise accumulates in the water tank. Drain the water tank after each drying cycle.
WARNING!
Condensed water is not drinkable!
Never remove the water tank when the program is running!
If you forget to drain the water tank, the machine will stop during the subsequent drying cycles when the water tank is full and the Water Tank warning symbol will flash. If this is the case, drain the water tank and press Start / Pause button to resume the drying cycle.
To drain the water tank:
1. Remove the water tank in the drawer or container carefully
2. Drain the water in the tank.
If there is lint accumulation in the funnel of the water tank, clean it under running water.
Place the water tank into its seat.
NOTE: If the direct water draining is used as an option, there is no need to empty the water tank.
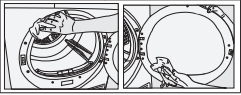
Cleaning the filter drawer
Lint and fiber that could not be captured by the lint filter are blocked in the filter drawer behind the kick plate. Clean the filter periodically when there is visible air collection on it or when the symbol lights up, if there is a filter drawer cleaning warning symbol available.
There is a one stage filter. This one stage filter is made from sponge
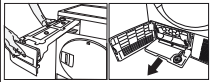
To clean the filter drawer:
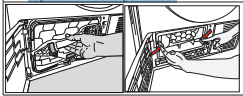
Press the kick plate button to open the kick plate.
Open the filter drawer cap turning the cap lock on it and pull it out..
Open the filter drawer by pressing the red button.
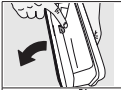
Take out the filter drawer sponge.
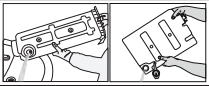
Clean the fluff and lint over the filter sponge washing it with your hands. Remove the moisture squeezing the sponge with your hands after washing it.
Clean the fluff, lint and cotton pellets with your hands or with a soft cloth.
If you observe a layer over the filter which can block the filter, remove the layer washing with a water and then cleaning it. Dry the filter cloth properly before replacing the filter drawer.
NOTE:
There may be no cloth in the filter cassette of your drying machine, depending on its model.
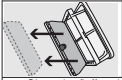
Place the sponge back into its place.
NOTE
Please place the sponge carefully inside the frame of the filter cassette shown by arrows in order to avoid squeezing when filter drawer closed”.:
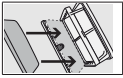
Close the filter drawer as to lock the red button.
Replace the filter drawer and tighten the cap turning the filter drawer lock turning it in the arrow direction.
Close the kick plate cover.
WARNING! Drying without the filter drawer sponge in place will damage the machine!
NOTE: A dirty lint filter and filter drawer will cause longer drying periods and higher energy consumption.
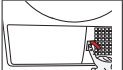
Cleaning the evaporator
Clean the lint accumulated on the fins of the evaporator located behind the filter drawer with a vacuum cleaner.
WARNING!
You can also clean by hand provided that you wear protective gloves. Do not attempt to clean with bare hands. Evaporator fins can harm your hand.
Troubleshooting
Drying operation takes too long.
Fibre filter pores might be clogged. >>> Wash the filter with warm water.
Filter drawer might be clogged. >>> Clean the sponge and filter cloth (if any) in the filter drawer. (for the products with a heat pump)
The condenser might be blocked. >>> Wash the condenser.(for the products with a condenser )
The ventilation grills in front of the machine may be closed. >>> Remove any objects in front of the ventilation grills that blocks air.
Ventilation may be inadequate because the area the machine is installed in is too small. >>> Open the door or windows to prevent the room temperature from rising very high.
A lime layer may have accumulated on the humidity sensor. >>> Clean the humidity sensor.
Excessive amount of laundry might be loaded. >>> Do not load the drying machine excessively.
Laundry might not have been wrung adequately. >>> Perform a higher speed wringing on the washing machine.
Clothes come out damp after drying.
A program not suitable for the laundry type may have been used.>>> Check the maintenance labels on the clothes and select a program suitable for the clothes’ type or use time programs as extra.
Fibre filter pores might be clogged. >>> Wash the filter with warm water.
The condenser might be blocked. >>> Wash the condenser. (for the products with a condenser)
Filter drawer might be clogged. >>> Clean the sponge and filter cloth (if any) in the filter drawer.(For the products with a heat pump)
Excessive amount of laundry might be loaded. >>> Do not load the drying machine excessively.
Laundry might not have been wrung adequately. >>> Perform a higher speed wringing on the washing machine.
Drying machine does not turn on or program cannot be started. Drying machine does not run after it is configured.
Power plug might be unplugged. >>> Make sure the power cord is plugged in.
Loading door might be open. >>> Ensure that the loading door is properly closed.
A program might not be set or Start/Stand-by button might not be pressed. >>> Check that the program is set and it is not in Stand-by position.
Child lock may be activated. >>> Turn off the child lock.
Program terminated prematurely for no reason.
Loading door might not be closed completely. >>> Ensure that the loading door is properly closed.
There might be a power outage. >>> Press the Start/ Stand-by button to start the program.
Water tank may be full. >>> Empty the water tank.
Clothes have shrunk, hardened or spoiled.
A program not suitable with the laundry type might have been used. >>> Check the maintenance labels on the clothes and select a program suitable for the clothes.
The lighting inside the drying machine does not turn on. (For models with a lamp)
Drying machine might not be turned on with the On/Off button or program might not be selected for machines without an On/Off button. >>> Make sure that the drying machine is turned on.
Lamp might be malfunctioning. >>> Contact your Authorised Service Agent to replace the lamp.
Filter cleaning warning symbol/LED is on/flashing.
Fibre filter might not be cleaned. >>> Clean the filter.
The filter slot might be clogged with lints. >>> Clean the filter slot.
A layer of fluff might have accumulated clogging up the lint filter pores. >>> Wash the filter with warm water.
The condenser might be blocked. >>> Wash the condenser.
Water drips from the loading door.
Fibres might have gathered on the inner sides of the loading door and the loading door gasket. >>> Clean the inner surfaces of the loading door and the loading door gasket surfaces.
Loading door opens by itself.
Loading door might not be closed completely. >>> Push the loading door until the closing sound is heard.
Water tank warning symbol / led is on/flashing.
Water tank may be full. >>> Empty the water tank. Water discharge hose might have collapsed. >>> If the product is connected directly to the water drain check the water discharge hose.
Steam symbol is flashing.(For the products with a steam function)
Steam tank may be empty => Fill the steam tank with distilled or condensed water.
Steam programs do not start (For the products with a steam function)
Steam tank may be empty, steam tank warning icon may light up on the screen => Fill the steam tank until the steam icon goes off.
Wrinkles are not removed with wrinkle removing program. (For the products with a steam function)
Excess amount of laundry may have been placed => Place specified amount of laundry.
Steam application time may be selected in low level => Choose a program with high amount of steam.
After completion of the program, the laundry may have stayed in the machine for a long time => Take the laundry out as soon as the program finishes, and hang it out.
Laundry odour not lessened with the odour removal program.(For the products with an odour removal program)
Excess amount of laundry may have been placed => Place specified amount of laundry.
Steam application time may be selected in low level => Choose a program with high amount of steam.
WARNING! If the problem persists after following the instructions in this section, contact your vendor or an Authorised Service Agent. Never try to repair your product yourself.
NOTE
In an event that you encounter an issue on any part on your appliance, you can ask for a replacement by contact the authorised service agent service with the appliance model number.
Operating the appliance with non-authentic parts may lead the appliance to malfunction.
Manufacturer and distributor are not liable for malfunctions resulting from using nonauthentic parts.
 NOTE
NOTE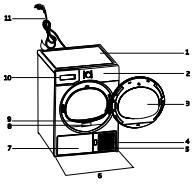
 WARNING!
 DANGER!
 DANGER!
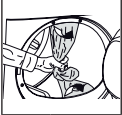
 NOTE
NOTE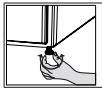
 should not be dried in the dryer.
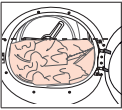
 WARNING!
 NOTE
NOTE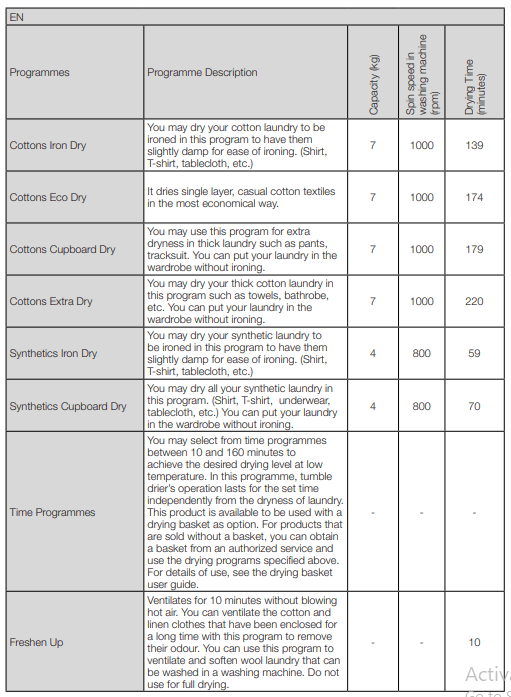

 NOTE
NOTE WARNING! Do not touch the inner surface of the drum while adding or removing clothes during a continuing program. The drum surface is hot
 WARNING! The inside of the drying machine shall be extremely hot when you cancel the program during machine operation, so run the refresh program to allow it to cool down.
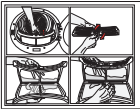

 WARNING! Drying without the filter drawer sponge in place will damage the machine!
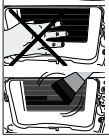
 WARNING! If the problem persists after following the instructions in this section, contact your vendor or an Authorised Service Agent. Never try to repair your product yourself.
 NOTE
NOTE