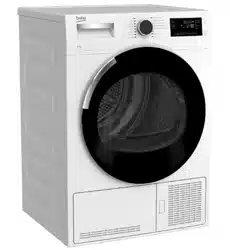
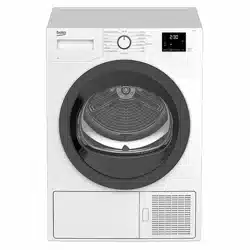
Beko BDC710W 7kg Condenser Dryer
Product's Documents
Below are documents related to this product, you can read online or download:
- User Manual - (English) Read Online | Download pdf
Dryer User Manual
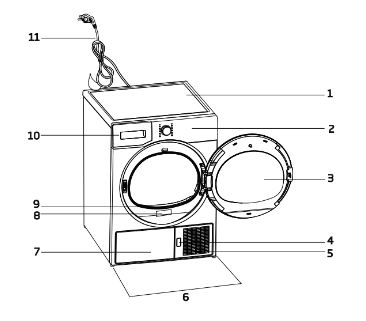
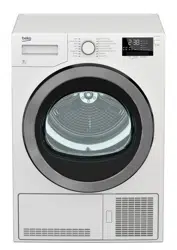
1. Top panel
2. Control panel
3. Loading door
4. Kick plate opening button
5. Ventilation grids
6. Adjustable legs
7. In models where the tank is placed below, the water tank is inside the toe board
8. Type label
9. Lint filter
10. Water tank drawer (in models where the tank is placed above)
11. Power cord
Before installation, ensure that electrical installation and water drain is appropriate referring to the user’s manual. If they are not suitable, contact a qualified electrician and technician to make necessary arrangements.
NOTE
Preparation of the dryer’s location as well as the electrical and waste water installations is under customer’s responsibility.
WARNING!
Install the dryer on a stable and level surface.
Dryer is heavy. Do not move it by yourself.
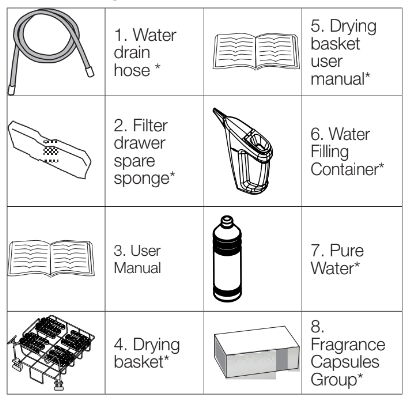
You can directly drain accumulated water through the water drain hose supplied with the product instead of periodically draining the water collected in the water tank.
 | 1-2 Pull hose at the behind of the dryer by hand in order to disconnect it from where it is connected. Do not use any tools to remove the hose. |
3 Connect one end of the drain hose supplied with the dryer to the connection point from where you removed the hose of the product in previous step. 4 Connect the other end of the drain hose directly to the wastewater drain or to the washbasin. | |
NOTE
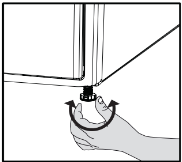 | Turn the feet to left or right until the dryer stands level and firmly. |
Drain all water that has remained in the dryer.
If direct water drain connection is made, then remove the hose connections.
WARNING We recommend carrying the dryer in upright position. If it is not possible to carry the machine in the upright position, we recommend carrying it by tilting towards the right side when looked from the front.
In case an illumination lamp is used in your laundry dryer.To change the Bulb/LED used for illumination of your tumble dryer, call your
Authorised Service Agent.The lamp(s) used in this appliance is not suitable for household room illumination. The intended purpose of this lamp is to assist the user to place laundry in the tumble dryer in a comfortable way. The lamps used in this appliance have to withstand extreme physical conditions such as vibrations and temperatures above 50 °C.
Laundry suitable for drying in the dryer
Always obey the instructions given on the garment tags. Dry only the laundry having a label stating that they are suitable for drying in a dryer.
Laundry not suitable for drying in the dryer
Items with this symbol  Do not dry with dryer should not be dried in the dryer.
NOTE
Preparing laundry for drying
Things to be done for energy saving
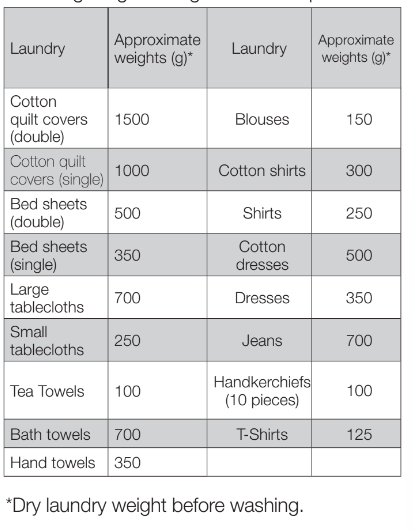
Correct load capacity
 | Follow the instructions in the “Programme selection and consumption table”. Do not load more than the capacity values stated in the table. |
Following weights are given as examples.
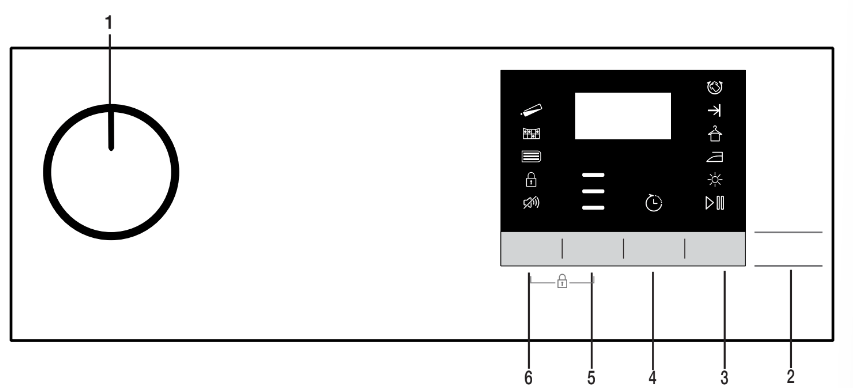
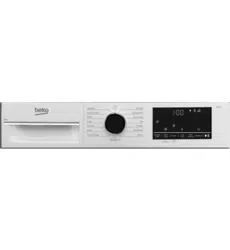
1. On/Off/Program selection button
2. Start/Pause button
3. Time Program button
4. End Time button
5. Drying Level Button
6. Buzzer volume button
Symbols

Preparation of drying machine
Select the desired program using the On/Off/ Program selection knob, the machine will turn on.
NOTE
Selecting a program using the On/Off/Program selection button does not mean that the program started. Press the Start/Stand-by button to start the program.
Auxiliary functions
Buzzer / time
Drying machine makes an audible warning when the program is completed. If you don’t want the machine to make an audible warning, press the “Buzzer / Time” button. When you press the Buzzer/Time button, a light will illuminate and no audible warning will be made when the program ends.
NOTE You can select this function before or after the program starts.
Drying Level
NOTE You can activate this function only prior to start of program.
End time
NOTE
Changing the end time
If you want to change the duration during the countdown:
If you want to cancel the end time countdown and start the program immediately:
Warning indicators
NOTE Warning indicators may vary depending on the model of your dryer.
Filter cleaning
When the program is completed, the warning indicator for filter cleaning turns on.
Water tank
If the water tank fills up while the program continues, the warning indicator starts flashing and the machine goes into stand-by. In this case, empty the water tank and start the program by pressing the Start / Stand-by button. Warning indicator turns off and program resumes.
Filter drawer /Heat exchanger cleaning
When the programme is finished, the cleaning symbol of the heat exchanger or filter drawer may light up.
The drying machine has a child lock which prevents the program flow from being interrupted when the buttons are pressed during a program. When the child lock is activated, all buttons on the panel except the On/Off/Program selection knob are deactivated.
Press the Drying Level and Buzzer buttons simultaneously for 3 buttons to activate the child lock.
The child lock has to be deactivated to be able to start a new program after the current program is finished or to be able to interfere with the program. To deactivate the child lock, keep the same buttons pressed for 3 seconds.
NOTE
NOTE
When the drying machine runs and the child lock is active, it beeps twice when the program selection knob is turned. If the child lock is deactivated without returning the program selection knob to its previous position, program will terminate due to the change in the program selection knob position.
You can change the program you selected to dry your laundry with a different program after the drying machine starts running
Adding and removing clothes during stand-by
If you want to add or remove clothes to/from the drying machine after the drying program starts:
NOTE
Adding laundry after the drying operation starts may cause the dried laundry inside the machine to mix with wet laundry and leave the laundry damp at the end of operation.
C NOTE
WARNING!
If you want to cancel the program and terminate the drying operation for any reason after the drying machine starts running, turn the On/Off/Cancel knob, the program will be cancelled.
WARNING!
The inside of the drying machine shall be extremely hot when you cancel the program during machine operation, so run the refresh program to allow it to cool down.
When the program ends, the Last/Anti-Wrinkle and Fibre Filter Cleaning Warning LEDs on the program follow up indicator will illuminate. Loading door may be opened and the dryer machine becomes ready for another run. Bring the On/Off/Program selection knob to On/Off position to turn the drying machine off.
C NOTE
If the laundry is not removed after the program is completed, the wrinkle prevention function activates for 2 hours to prevent the laundry inside the machine to get wrinkled. The program tumbles the laundry with 10-minute intervals to prevent them from wrinkling.
Service life of the product extends and frequently faced problems decrease if cleaned at regular intervals.
WARNING!
Please unplug your product before performing maintenance and cleaning instructions. (eg control panel, body, etc.)
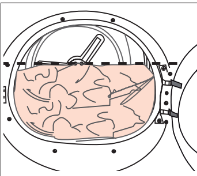
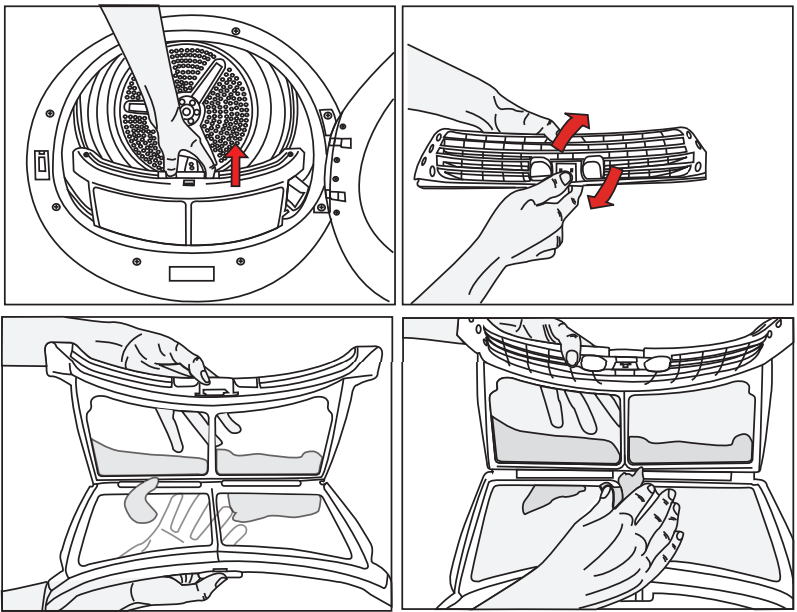
Lint and fiber released from the laundry to the air during the drying cycle are collected in the Lint Filter.
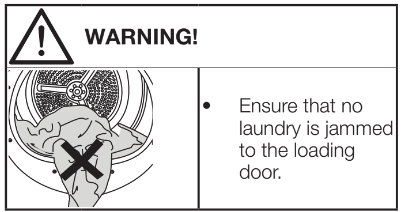
WARNING!
Always clean the lint filter and the inner surfaces of the loading door after each drying process.
NOTE
You can clean the lint filter housing with a vacuum cleaner.
To clean the lint filter:
 |
|
| |
| |
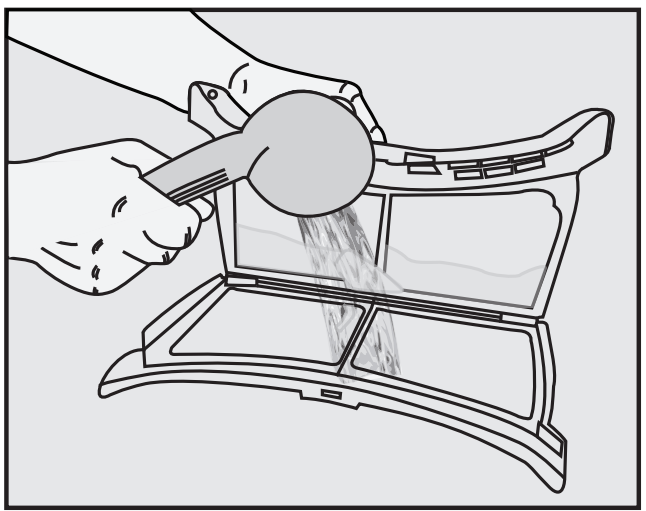 | A layer can build up on the filter pores that can cause clogging of the filter after using the dryer for a while. Wash the lint filter with warm water to remove the layer that builds up on the lint filter surface. Dry the lint filter completely before reinstalling it. |
Clean the entire inner surface of the loading door and loading door gasket with a soft damp cloth.
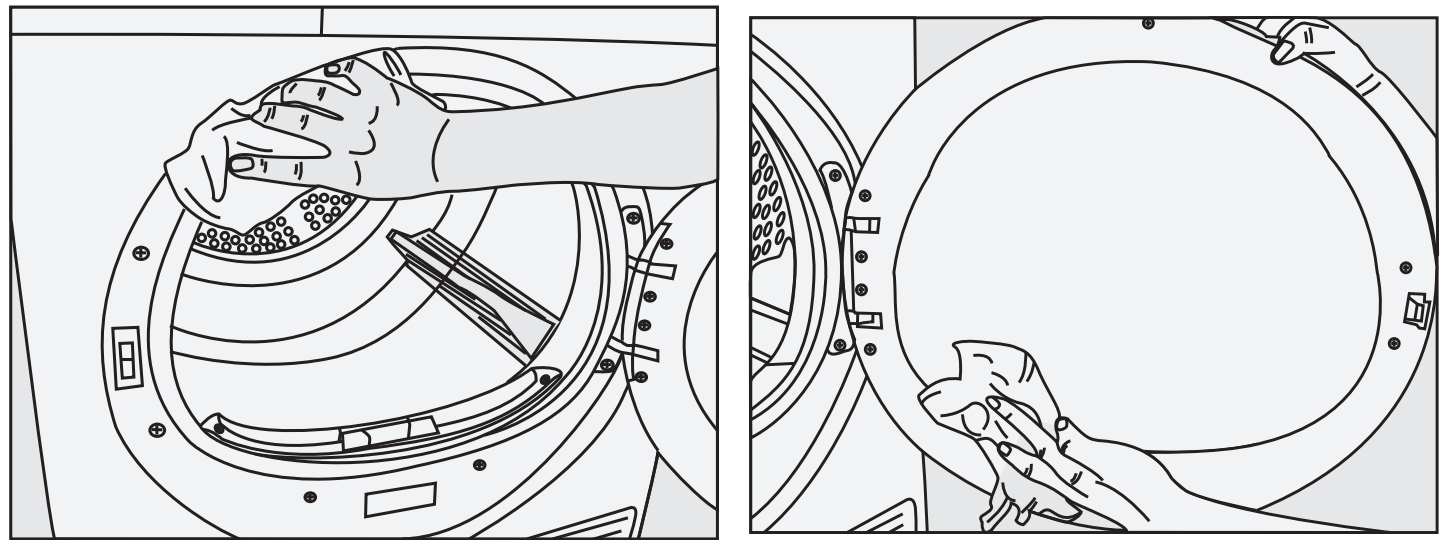
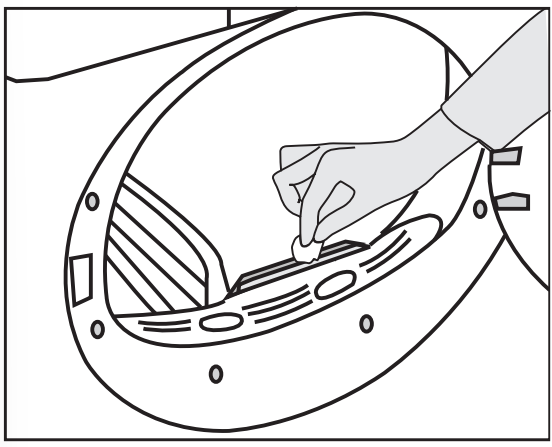 | There are dampness sensors in the dryer that detect whether the laundry is dry or not. To clean the sensors: |
| |
NOTE
Clean metal surfaces of the sensors 4 times a year.
Do not use metal tools when cleaning metal surfaces of the sensors.
WARNING!
Never use solvents, cleaning agents or similar substances for cleaning due to the risk of fire and explosion!
Dampness of the laundry is removed and condensed during drying process and the water that arise accumulates in the water tank.
Drain the water tank after each drying cycle.
WARNING!
| 1. Remove the water tank in the drawer or container carefully. |
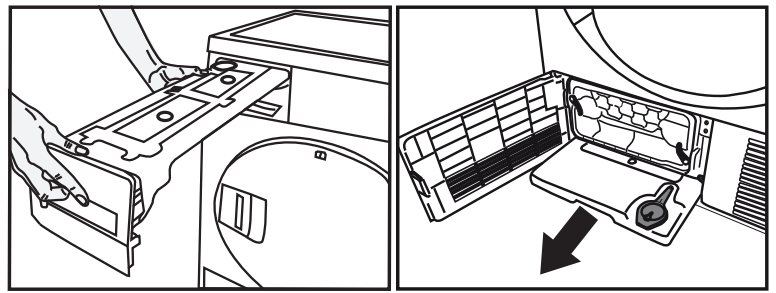 |
| 2. Drain the water in the tank. |
 |
|
NOTE
If the direct water draining is used as an option, there is no need to empty the water tank.
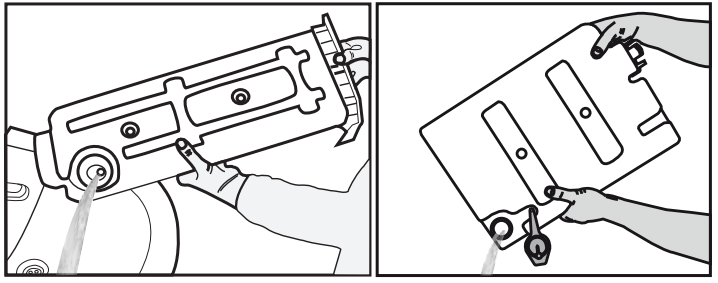
NOTE Clean the condenser after every 30 drying cycles or once a month.
To clean the condenser:
 |
|
| |
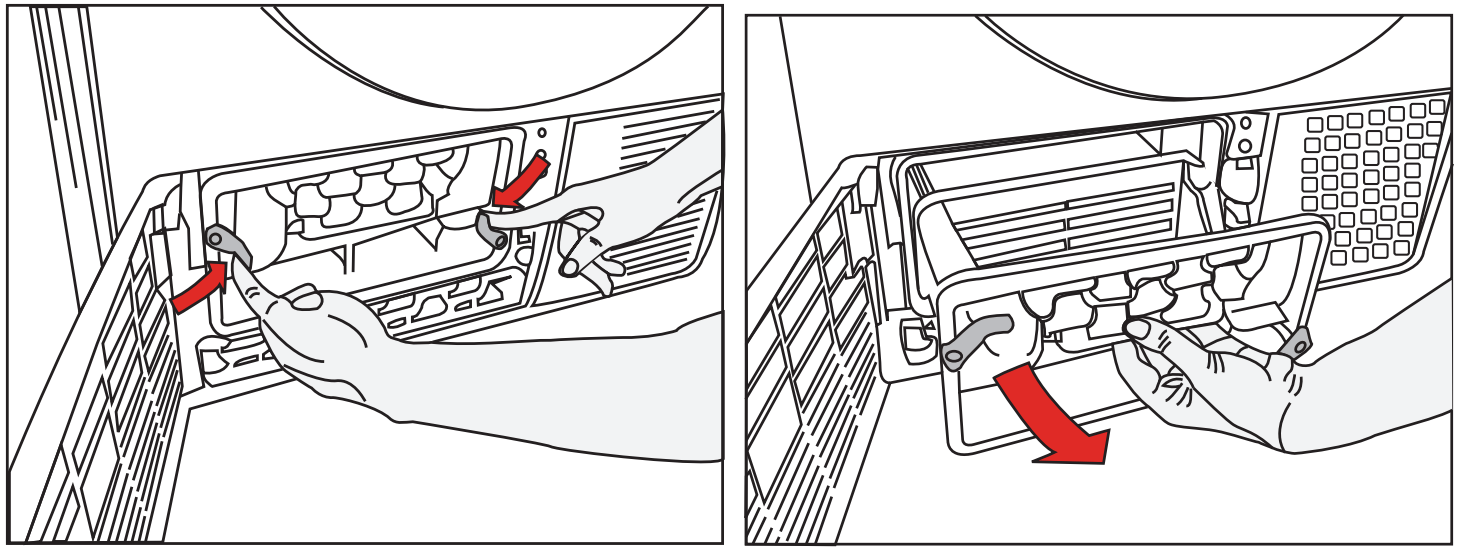 | |
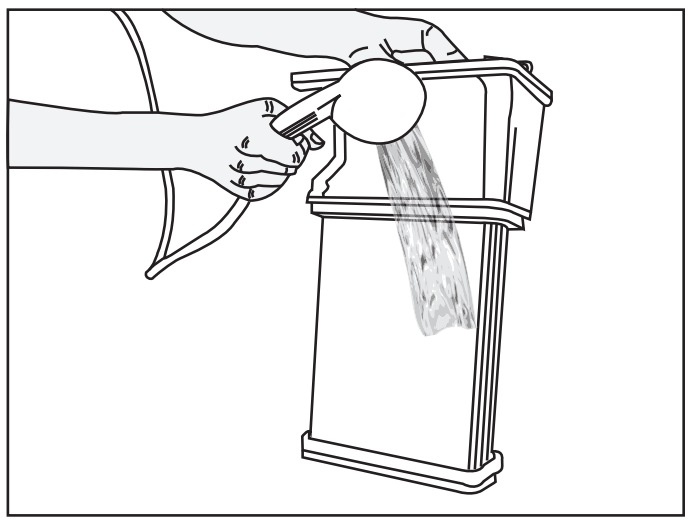 | Clean the condenser by applying pressurized water with a shower armature and wait until the water drains. |
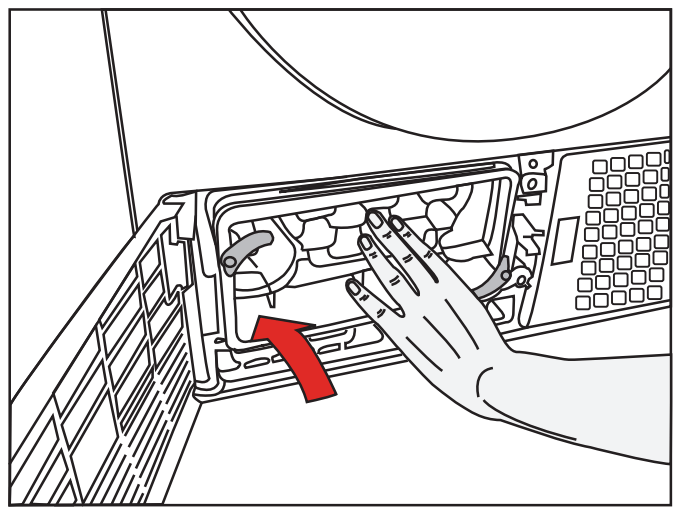 | Place the condenser in its housing. Fasten the locks and make sure that they are seated securely. |
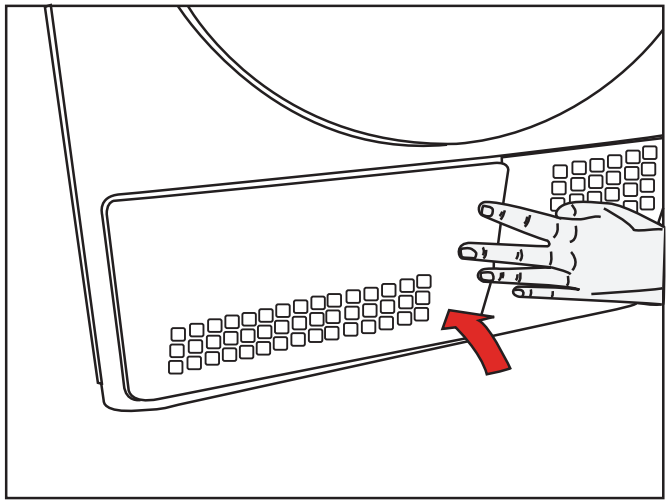 | Close the kick plate cover. |
Fibre filter pores might be clogged.
>>> Wash the filter with warm water.
Filter drawer might be clogged.
>>> Clean the sponge and filter cloth (if any) in the filter drawer. (for the products with a heat pump)
The condenser might be blocked.
>>> Wash the condenser.(for the products with a condenser )
The ventilation grills in front of the machine may be closed.
>>> Remove any objects in front of the ventilation grills that blocks air.
Ventilation may be inadequate because the area the machine is installed in is too small.
>>> Open the door or windows to prevent the room temperature from rising very high.
A lime layer may have accumulated on the humidity sensor.
>>> Clean the humidity sensor.
Excessive amount of laundry might be loaded.
>>> Do not load the drying machine excessively.
Laundry might not have been wrung adequately.
>>> Perform a higher speed wringing on the washing machine.
A program not suitable for the laundry type may have been used.
>>> Check the maintenance labels on the clothes and select a program suitable for the clothes’ type or use time programs as extra.
Fibre filter pores might be clogged.
>>> Wash the filter with warm water.
The condenser might be blocked.
>>> Wash the condenser. (for the products with a condenser)
Filter drawer might be clogged.
>>> Clean the sponge and filter cloth (if any) in the filter drawer.(For the products with a heat pump)
Excessive amount of laundry might be loaded.
>>> Do not load the drying machine excessively.
Laundry might not have been wrung adequately.
>>> Perform a higher speed wringing on the washing machine.
Power plug might be unplugged.
>>> Make sure the power cord is plugged in.
Loading door might be open.
>>> Ensure that the loading door is properly closed.
A program might not be set or Start/Stand-by button might not be pressed.
>>> Check that the program is set and it is not in Stand-by position.
Child lock may be activated.
>>> Turn off the child lock.
Loading door might not be closed completely.
>>> Ensure that the loading door is properly closed.
There might be a power outage.
>>> Press the Start/Stand-by button to start the program.
Water tank may be full.
>>> Empty the water tank.
A program not suitable with the laundry type might have been used.
>>> Check the maintenance labels on the clothes and select a program suitable for the clothes.
Drying machine might not be turned on with the On/Off button or program might not be selected for machines without an On/Off button.
>>> Make sure that the drying machine is turned on.
Lamp might be malfunctioning.
>>> Contactyour Authorised Service Agent to replace the lamp.
Fibre filter might not be cleaned.
>>> Clean the filter.
The filter slot might be clogged with lints.
>>> Clean the filter slot.
A layer of fluff might have accumulated clogging up the lint filter pores.
>>> Wash the filter with warm water.
The condenser might be blocked.
>>> Wash the condenser.
Fibres might have gathered on the inner sides of the loading door and the loading door gasket.
>>> Clean the inner surfaces of the loading door and the loading door gasket surfaces.
Loading door might not be closed completely.
>>> Push the loading door until the closing sound is heard.
Water tank may be full.
>>> Empty the water tank.
Water discharge hose might have collapsed.
>>> If the product is connected directly to the water drain check the water discharge hose.
Steam tank may be empty
=> Fill the steam tank with distilled or condensed water.
Steam tank may be empty, steam tank warning icon may light up on the screen => Fill the steam tank until the steam icon goes off.
(For the products with a steam function)
Excess amount of laundry may have been placed
=> Place specified amount of laundry.
Steam application time may be selected in low level
=> Choose a program with high amount of steam.
After completion of the program, the laundry may have stayed in the machine for a long time
=> Take the laundry out as soon as the program finishes, and hang it out.
(For the products with an odour removal program)
Excess amount of laundry may have been placed
=> Place specified amount of laundry.
Steam application time may be selected in low level
=> Choose a program with high amount of steam.
WARNING!
If the problem persists after following the instructions in this section, contact your vendor or an Authorised Service Agent. Never try to repair your product yourself.
NOTE