Loading ...
Loading ...
Loading ...
11
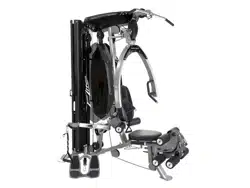
STEP 4 LEG EXTENSION AND SEAT ASSEMBLY
1. Attach the R and L LEG EXTENSION ARMS (21R & 21L) along with RATCHET (32)
to the preassembled LEG EXTENSION ASSEMBLY (20) as shown. Secure by
tightening both of the preinstalled 5/16" X 1/2" SET SCREW (157), one located in
the RATCHET (32) and one in the R LEG EXTENSION ARM (21R).
2. Slide a PLASTIC CAP (104) (domed side first) and FOAM PAD (65) onto each side
LEG EXTENSION ARMS (21R & 21L), and secure with ALUMINUM CAPS (105) and
5/16" X 1-1/4" COUNTER ALLEN BOLTS (149) on each side. Tighten.
3. Insert and center the 1" FOAM ROLLER HOLDER (40) into the LEG EXTENSION
ASSEMBLY (20). Tighten the two preinstalled 5/16" X 1/2" SET SCREWS (157).
Slide a PLASTIC CAP (104) (domed side first) and FOAM PAD (65) onto each side
1" FOAM ROLLER HOLDER (40), and secure with ALUMINUM CAPS (105) and
5/16" X 1-1/4" COUNTER ALLEN BOLTS (149) on each side. Tighten.
4. NOTE! For this step. The seat pad has two sets of holes. Use the first and third holes
from the REAR of the SEAT PAD (63). Attach the SEAT PAD (63) to the SEAT ADJ.
HANDLE (11), using two 3/8" X 1-3/4" HEX THREADED BOLTS (135) and two 3/8"
LARGER WASHERS (163). Attach the SEAT ADJ. FRAME (12) to the SEAT ADJ.
HANDLE (11) using two SPECIAL 3/8" X 1" ROUND INNER ALLEN BOLTS (145).
Tighten both sets of bolts.
5. Insert the SEAT SPRING (99) into the MAIN FRAME (1), then slide the SEAT ADJ.
FRAME (12) over top of the SEAT SPRING (99) and into the MAIN FRAME (1). You
may need to loosen the pre-installed TIGHTEN KNOB (127) to allow the SEAT ADJ.
FRAME (12) into the MAIN FRAME (1).
6. See Figure 1. Remove one of the two small nuts on the loose end of the LONG
CLUTH CABLE (71). Simultaneously slide the small threaded shaft through the
opening in the L-Bracket welded to the MAIN FRAME (1) and completely thread and
tighten the large Pop-Pin into the Barrel welded to the Seat Post Receiver. To start
threading to get the pin to seat into one of the holes in the SEAT ADJ. FRAME (11).
Reinstall and tighten the small nut removed from the beginning of the step.
7. Slide a PLASTIC CAP (104) (domed side first) and FOAM PAD (65) onto each side of
the 1" shafts welded to the SEAT ADJ. HANDLE (11), and secure with ALUMINUM
CAPS (105) and 5/16" X 1-1/4" COUNTER ALLEN BOLTS (149) on each side.
Tighten.
TIP!
TIP! You can use TIGHTEN KNOB (127) to eliminate play in
the seat after you have adjusted the seat to the desired height.
TO EASE THE ASSEMBLY PROCESS, spray window cleaner or water
into the holes of the FOAM ROLLERS (40) before sliding onto shafts.
Loading ...
Loading ...
Loading ...