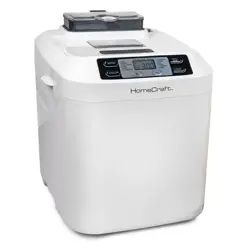
HomeBaker™
Breadmaker
Machine à pain
HomeBaker
MC
Máquina
Panificadora
HomeBaker™
English ...................... 2
Français ................... 32
Español ................... 62
READ BEFORE USE
LIRE AVANT UTILISATION
LEA ANTES DE USAR
Visit www.hamiltonbeach.com for our
complete line of products and Use and
Care Guides – as well as delicious recipes,
tips, and to register your product online!
Rendez-vous sur www.hamiltonbeach.ca
pour notre liste complète de produits et de
nos manuels utilisateur – ainsi que nos
délicieuses recettes et nos conseils !
¡Visite www.hamiltonbeach.com (
EE. UU.)
o
www.hamiltonbeach.com.mx (México)
para ver otros productos de Hamilton Beach
o para contactarnos!
Questions?
Please call us – our friendly
associates are ready to help.
USA: 1.800.851.8900
¿Preguntas?
Por favor llámenos – nuestros
amables representantes están
listos para ayudar.
EE. UU.: 1.800.851.8900
MEX: 01 800 71 16 100
Le invitamos a leer cuidadosamente este
instructivo antes de usar su aparato.
Questions ?
N’hésitez pas à nous appeler –
nos associés s’empresseront
de vous aider.
CAN : 1.800.267.2826
840194103 ENv04.indd 1 12/15/14 4:27 PM

2
Table of Contents
Important Safeguards .............................................................................. 3
Parts and Features .................................................................................... 4
Quick-Start Guide ..................................................................................... 5
Control Panel ............................................................................................ 6
Program Cycles ........................................................................................ 8
Detailed Instructions .............................................................................. 9
Timetable for Cycles .............................................................................. 11
Removing Bread .................................................................................... 12
Cleaning .................................................................................................. 12
Tips: Bread Basics ................................................................................. 13
Tips: Use Exact Measurements ............................................................ 14
Frequently Asked Questions ................................................................. 15
Troubleshooting ..................................................................................... 16
Recipes ................................................................................................... 19
Table des matières
Précautions importantes ....................................................................... 32
Pièces et caractéristiques ...................................................................... 34
Guide de démarrage rapide .................................................................. 35
Panneau de contrôle .............................................................................. 36
Cycles de programmation ..................................................................... 38
Instructions détaillées ............................................................................ 39
Tableau des durées des cycles .............................................................. 41
Retrait du pain ........................................................................................ 42
Nettoyage ............................................................................................... 42
Conseils : Notions élémentaires sur le pain ........................................ 43
Conseils : Mesurer avec précision ....................................................... 44
Foire aux questions ................................................................................ 45
Dépannage ............................................................................................. 46
Recettes ................................................................................................. 49
Tabla de contenidos
Salvaguardias Importantes ................................................................... 62
Partes y Características .......................................................................... 64
Guía de Inicio Rápido ............................................................................. 65
Panel de Control...................................................................................... 66
Ciclos de Programa ................................................................................ 68
Instrucciones Detalladas ....................................................................... 69
Tiempos de los Ciclos ............................................................................ 71
Cómo Quitar el Pan ................................................................................ 72
Limpieza .................................................................................................. 72
Consejos: Lo Esencial Sobre el Pan ..................................................... 73
Consejos: Utilice Mediciones Exactas .................................................. 74
Preguntas Frecuentes ............................................................................ 75
Resolviendo Problemas ......................................................................... 76
Recetas ................................................................................................... 79
840194103 ENv04.indd 2 12/15/14 4:18 PM

3
Other Consumer Safety Information
This product is intended for household use only.
w WARNING
Electrical Shock Hazard: This product is provided
with a polarized plug (one wide blade) to reduce the risk of electric
shock. The plug fits only one way into a polarized outlet. Do not
defeat the safety purpose of the plug by modifying the plug in any
way or by using an adapter. If the plug does not fit fully into the
outlet, reverse the plug. If it still does not fit, have an electrician
replace the outlet.
The length of the cord used on this appliance was selected to reduce
the hazards of becoming tangled in or tripping over a longer cord.
If a longer cord is necessary, an approved extension cord may be
used. The electrical rating of the extension cord must be equal to
or greater than the rating of the appliance. Care must be taken to
arrange the extension cord so that it will not drape over the counter-
top or tabletop where it can be pulled on by children or accidentally
tripped over.
To avoid an electrical circuit overload, do not use another high-
wattage appliance on the same circuit with your breadmaker.
IMPORTANT SAFEGUARDS
1. Read all instructions.
2. This appliance is not intended for use by persons (including
children) with reduced physical, sensory, or mental capabilities,
or lack of experience and knowledge, unless they are closely
supervised and instructed concerning use of the appliance by a
person responsible for their safety.
3. Close supervision is necessary when any appliance is used by or
near children. Children should be supervised to ensure that they
do not play with the appliance.
4. Do not touch hot surfaces. Use handles or knobs. Always use
oven mitts to handle hot bread pan or hot bread.
5. Do not put hand inside oven chamber after bread pan is
removed. Heating unit will still be hot.
6. To protect against electrical shock, do not immerse cord, plug,
or breadmaker in water or other liquid.
7.
Unplug from outlet when not in use and before cleaning. Allow to cool
before putting on or taking off parts, or before cleaning the appliance.
8. Do not operate any appliance with a damaged cord or plug, or
after the appliance malfunctions or is dropped or damaged in
any manner. Call our toll-free customer service number for
information on examination, repair, or adjustment.
9. The use of accessory attachments not recommended by the
appliance manufacturer may cause injuries.
10. Do not use outdoors.
11. Do not let cord hang over edge of table or counter or touch
hot surfaces.
12. Do not place on or near a hot gas or electric burner or in a
heated oven.
13. Extreme caution must be used when moving an appliance
containing hot oil or other hot liquids.
14. To disconnect, turn all controls off (O/STOP); then remove plug
from wall outlet.
15. Use extreme caution when removing bread pan.
16. To turn breadmaker OFF, press and hold the START/STOP button
for 2 seconds. See “Control Panel” section for more information.
17. Do not place eyes or face in close proximity with tempered
glass viewing window, in the event that the safety glass breaks.
18. Do not use appliance for other than intended use.
19. Clean oven interior carefully. Do not scratch or damage heating
element tube.
20. CAUTION: Risk of Electric Shock. Cook only in removable Bread
Pan.
When using electrical appliances, basic safety precautions should always be followed to reduce the risk of fire, electric shock, and/or injury to
persons, including the following:
SAVE THESE INSTRUCTIONS!
840194103 ENv04.indd 3 12/15/14 4:18 PM
4
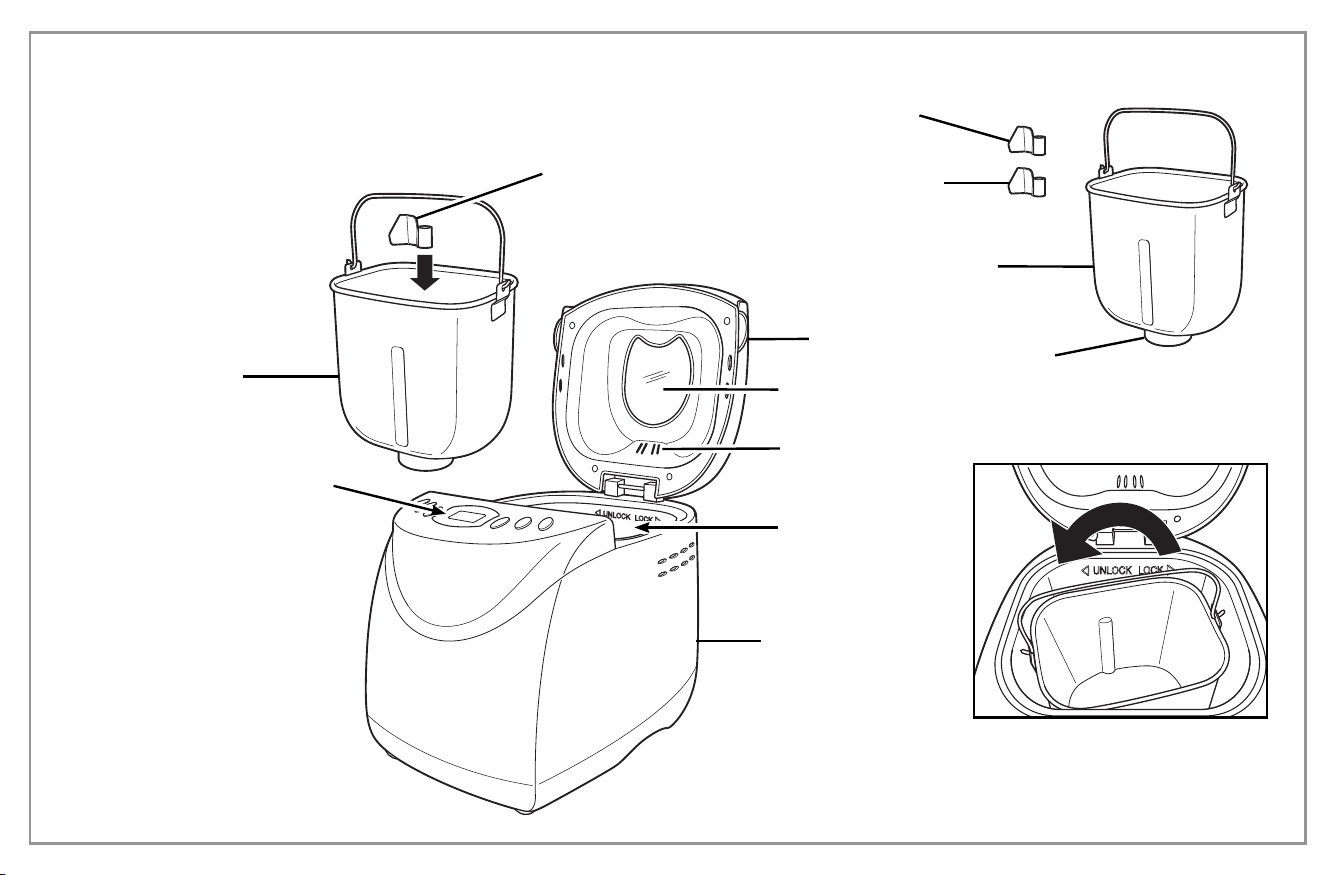
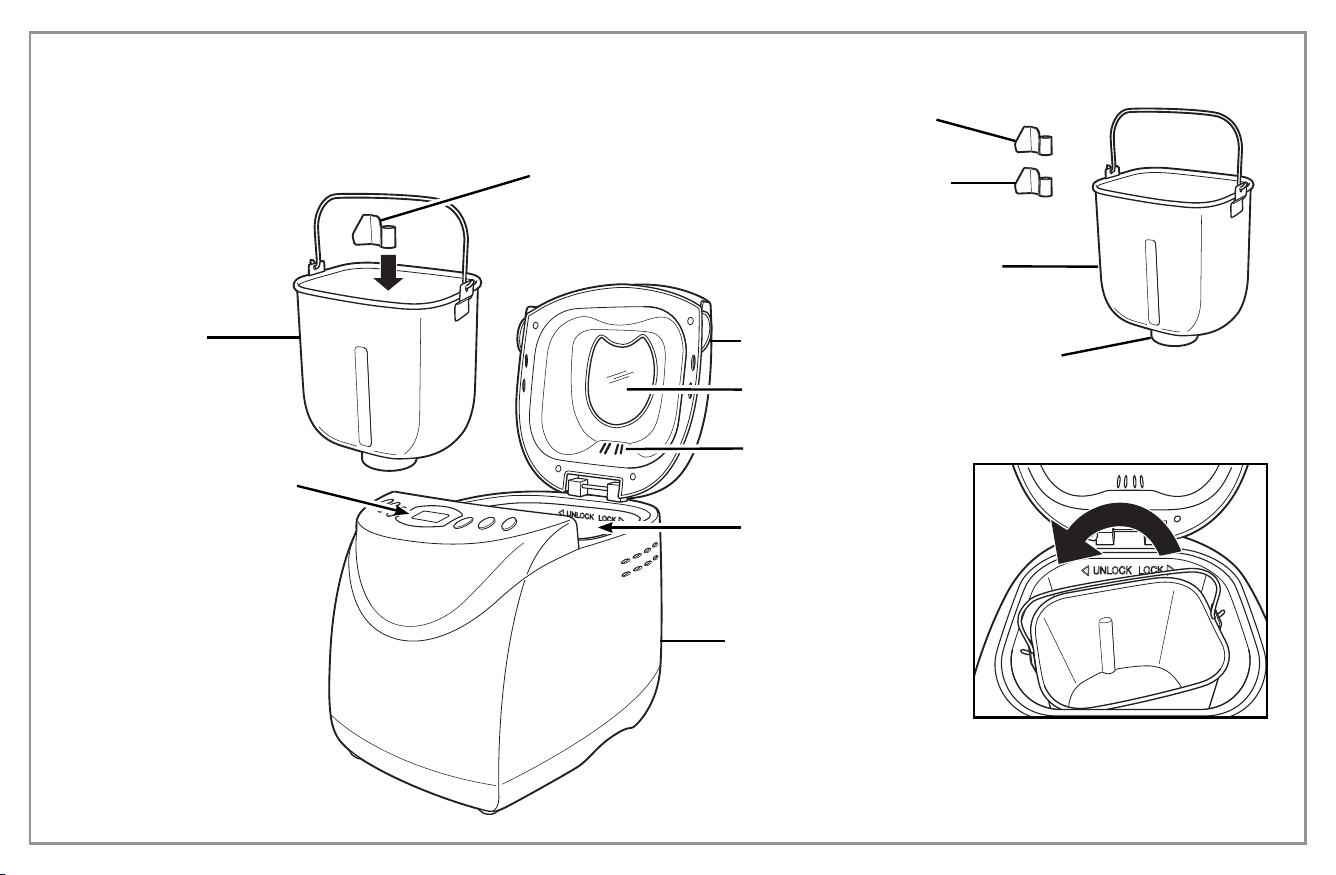
Parts and Features
Top Lid
TO REMOVE BREAD PAN:
Viewing
Window
Kneading
Paddle*
Ventilation Holes
Housing
Nonstick
Bread Pan*
Control Panel
Using the bread pan handle, turn the
bread pan counterclockwise to unlock
it. Lift up and remove bread pan from
baking chamber.
Base
Baking Chamber
Spare
Kneading
Paddle
Kneading Paddle*
(unit includes 2
kneading paddles)
*To order parts:
US: 1.800.851.8900
www.hamiltonbeach.com
Canada: 1.800.267.2826
Mexico: 01 800 71 16 100
Nonstick
Bread Pan*
840194103 ENv04.indd 4 12/15/14 4:18 PM

5
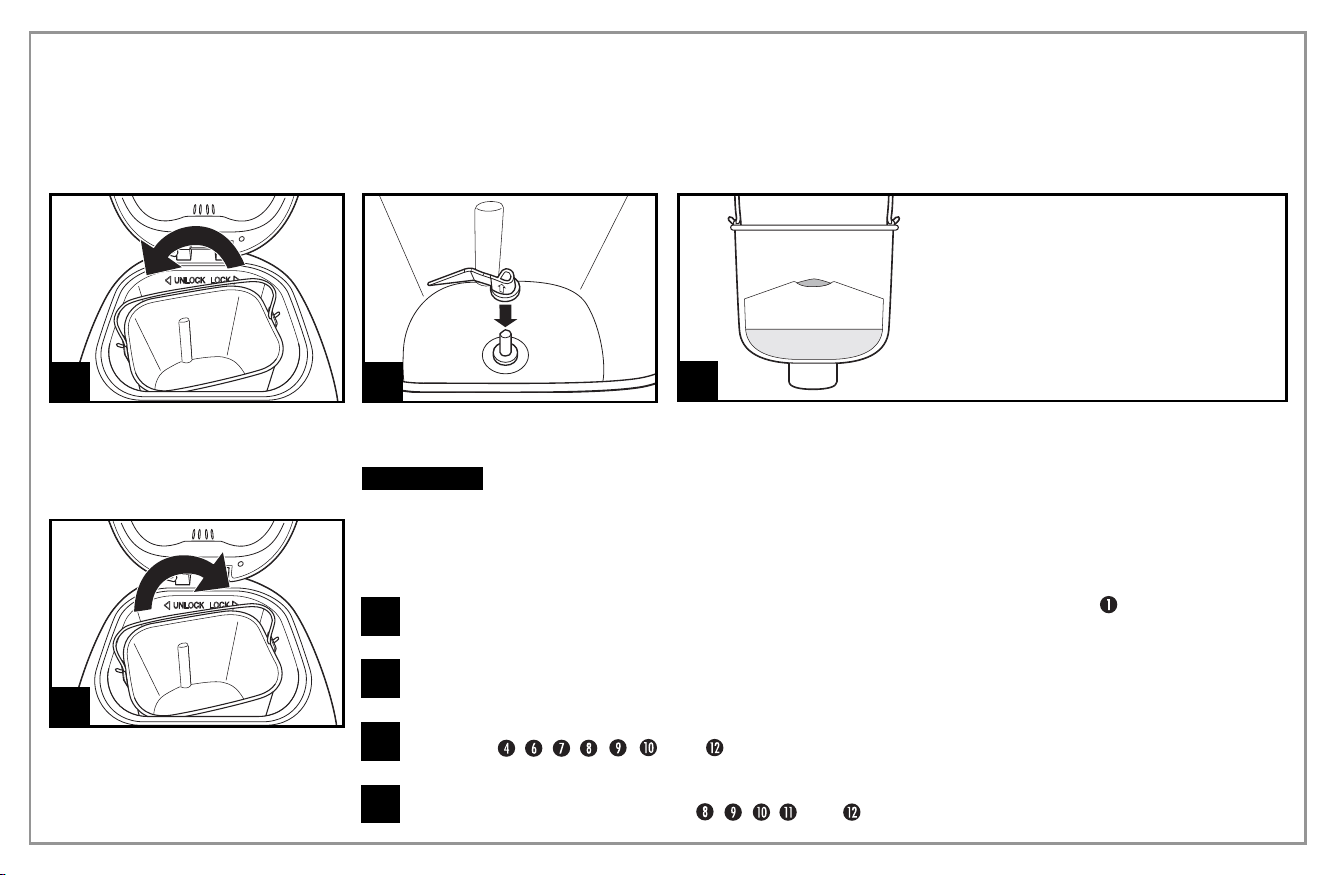
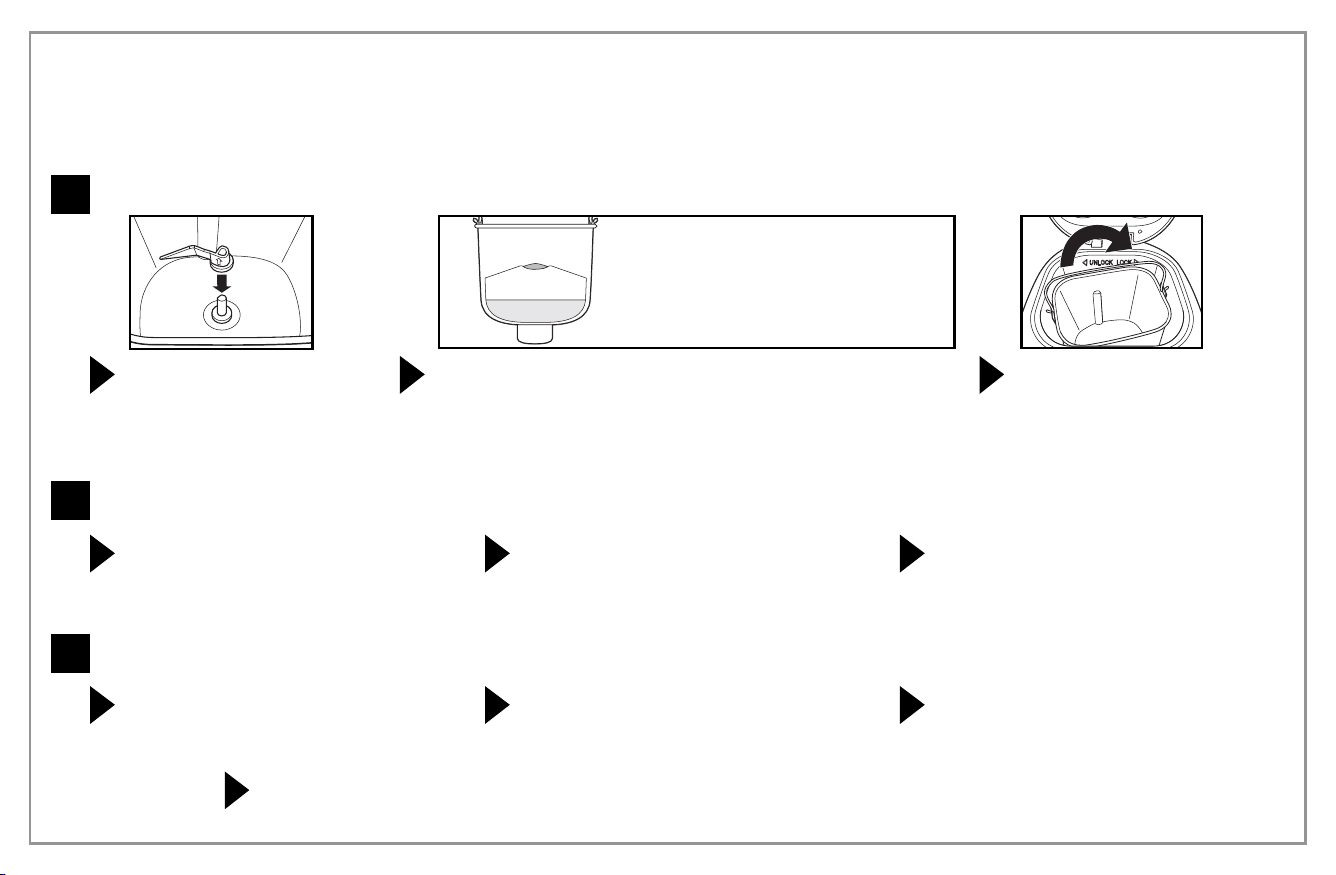
Place kneading paddle on
shaft, with arrow pointing
up, pushing down as far as
it will go, making sure flat
surfaces are lined up.
Quick-Start Guide
BEFORE FIRST USE: Wash and dry bread pan and kneading paddle.
NOTE: Do not use metal utensils in bread pan since they may damage the
nonstick surface.
CAUTION! Falling Object Hazard. Breadmaker can wobble and walk during
kneading cycle. Always position it in the center of the counter away from
the edge.
Carefully measure and add ingredients to the bread pan in
the EXACT order given in the recipe.
TIP: Premeasure all ingredients, including add-ins (nuts,
raisins), prior to beginning.
LAST: Yeast. MUST be separate
from wet ingredients
SECOND: Dry ingredients (sugar,
salt, shortening, flour)
FIRST: Liquid ingredients – room
temperature
Place bread pan in the
breadmaker, turning clockwise
until it locks into place. Close
cover.
NOTE: Bread pan must lock
into place for proper mixing
and kneading.
1
See “Detailed Instructions” section for additional information.
Add Ingredients
2
Select Cycle
Press CYCLE button until desired
program number appears on the digital
display.
To program a Delayed Start, use the
DELAY TIMER + or – buttons to add up
to 12 hours before Cycle will start. Refer
to page 10 for additional information.
Press CRUST and LOAF SIZE buttons to
ADJUST to desired setting (not adjustable
in some cycles).
3
Start Making Bread
Press START/STOP. The digital display
will show the time remaining in the cycle.
Once complete, breadmaker will beep
and begin Keep Warm cycle for up to
1 hour.
Press START/STOP button for 2 seconds
to cancel the Keep Warm cycle and turn
off breadmaker.
Add-ins: After the second kneading cycle,
10 beeps will signal you to add fruit, nuts,
etc.
Using oven mitts, turn counterclockwise to unlock the bread pan,
and pull bread pan straight up. Still using oven mitts, shake loaf
from pan and let cool for 10 minutes.
840194103 ENv04.indd 5 12/15/14 4:18 PM
6
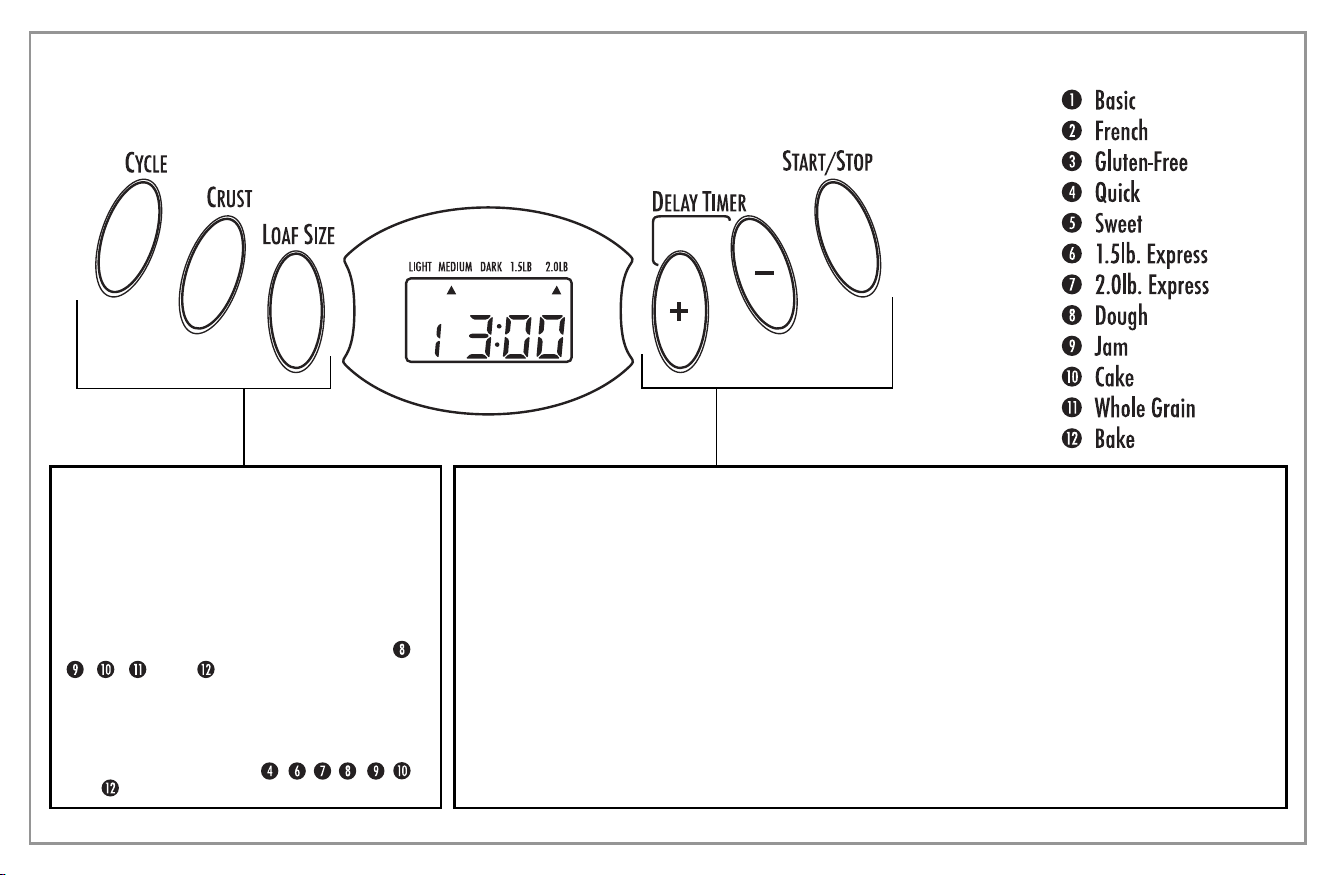
Control Panel
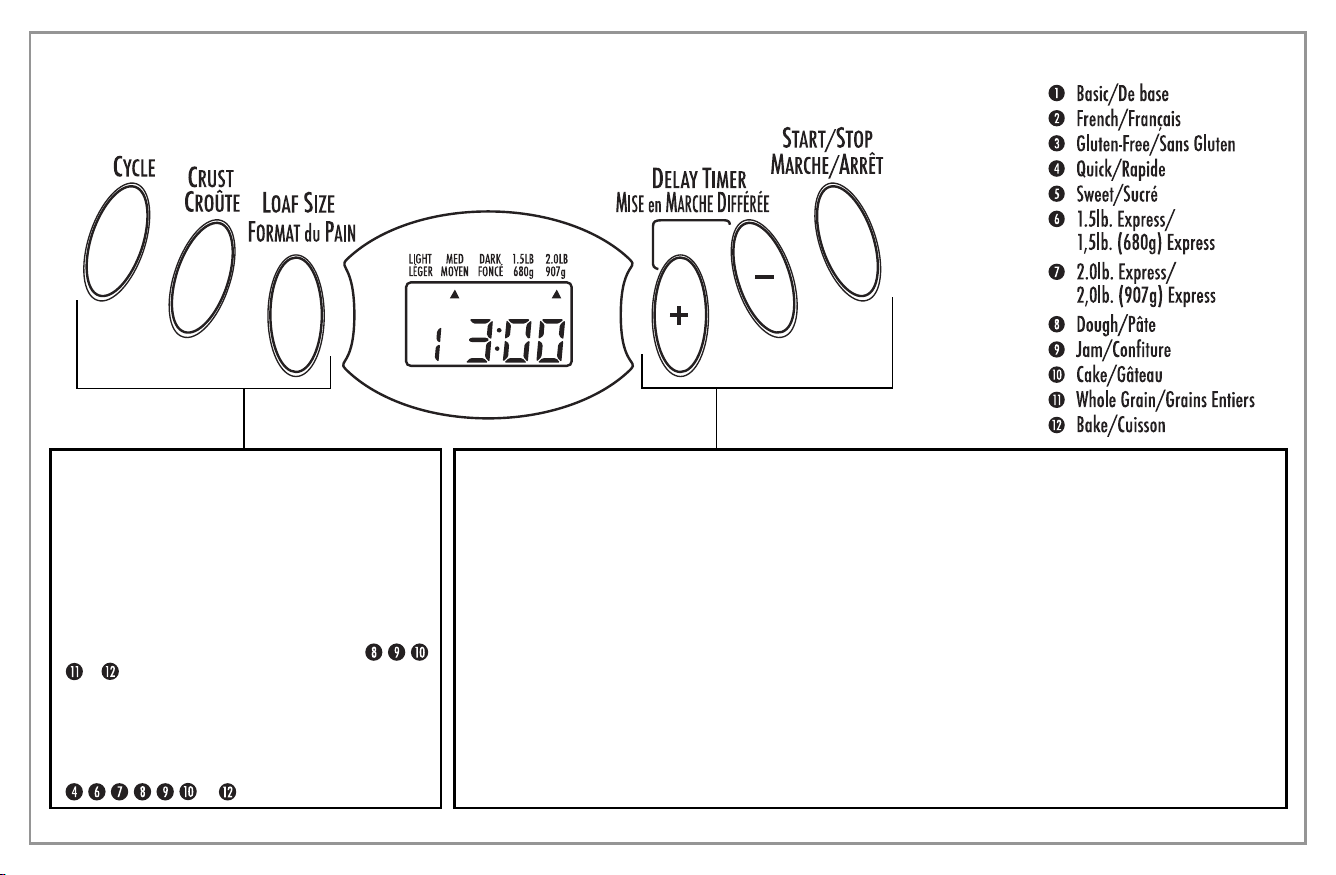
CYCLE
Press CYCLE button to select your desired
cycle. The corresponding cycle number is
shown on the display.
CRUST COLOR
Press CRUST button to move the arrow
to desired setting: Light, Medium, or Dark
crust. (Crust is not adjustable in Cycles ,
, , , and .)
LOAF SIZE
Press the LOAF SIZE button to move the
arrow to 1.5- or 2-lb. loaf size. (Loaf size is
not an option in Cycles , , , , , ,
and .)
DELAY TIMER
Use the Delay Timer feature to start the breadmaker at a later time. Press the + and – buttons
to increase the cycle time shown on the display. Add up to 13 hours including the delay time
and breadmaking cycle.
NOTES:
• Set the Delay Time after selecting Cycle, Loaf Size, and Crust Color.
• The 1.5 lb. Express, 2 lb. Express, and JAM cycles do not have a delay function.
• Do not use the timer function with recipes that include dairy or other ingredients, such as
eggs, milk, cream, or cheese.
START/STOP BUTTON
Press the START/STOP button once to start a cycle. A short beep will be heard, the colon
in the time display will begin to flash, and the cycle will start. To remove bread, press the
START/STOP button to end the baking cycle.
To cancel a cycle, press the START/STOP button for at least 2 seconds.
Preprogrammed Cycles
840194103 ENv04.indd 6 12/15/14 4:18 PM

7
Control Panel
(cont.)
POWER INTERRUPTION
In the event of a power outage, the process of making bread will continue automatically within 5 minutes. If the
interruption time is longer than 5 minutes, the unit will not continue running and the display will revert back to
the default setting (Cycle , Medium Color, and 2-lb. loaf). If the dough has started rising, discard the ingredients
in the bread pan and start over. If the dough has not entered the rising phase, you can press the START/STOP
button to continue the cycle from the beginning.
WARNING DISPLAY
“HHH” – This warning means that the temperature inside of the bread pan is too high. Stop the program, unplug
the power cord, open the cover, and let the machine cool down completely before restarting.
“LLL” – This warning means that the temperature inside of the bread pan is too low. The room temperature is too
low for the breadmaker to function.
KEEP WARM
After baking cycle is complete, the bread machine will shift to the Keep Warm setting for 1 hour.
To cancel the Keep Warm process, press the START/STOP button for 2 seconds.
TIP: Removing bread immediately after baking cycle is complete will prevent crust from becoming darker.
Preprogrammed Cycles
840194103 ENv04.indd 7 12/15/14 4:18 PM

8
Program Cycles
Basic
For white and mixed breads consisting mainly of basic
bread flour.
French
For light breads made from fine flour. Normally, the bread
is fluffy and has a crispy crust. This is not a suitable setting
for recipes requiring butter, margarine, or milk.
Gluten-Free
For gluten-free breads and mixes.
Quick
For quick-bread recipes that do not use yeast for rising and
instead may use baking powder or soda. Kneading, rising,
and baking loaf within a time less than for basic bread.
Sweet
For breads with additives such as fruit juices, grated
coconut, raisins, dry fruits, chocolate, or added sugar.
Due to a longer phase of rising, the bread will be light and
airy.
1.5 lb. Express
Kneading, rising, and baking a 1.5-lb. (680-g) loaf occurs in
58 minutes using a quick-rising yeast. Loaf will be smaller
and rougher than that made with the Basic cycle.
2.0 lb. Express
Same as 1.5 lb. Express, but yields a 2-lb. (907-g) loaf.
Dough
This cycle prepares the yeast dough for buns, pizza crust,
etc., to be baked in a conventional oven. There is no baking
in this cycle.
Jam
For making jams with fresh fruit.
Cake
Kneading, rising, and baking occurs, but with the aid of soda
or baking powder.
Whole Grain
For breads with heavy varieties of flour that require a longer
phase of kneading and rising (whole wheat flour, rye flour).
Bread will be more compact and heavy.
Bake
When additional baking of breads is needed because a loaf
is too light or not baked through. There is no kneading or
resting.
840194103 ENv04.indd 8 12/15/14 4:18 PM
9
Press the CRUST button to move the arrow to desired setting: Light, Medium, or Dark crust.
(Crust is not adjustable in Cycles , , , , and .)
8
1
Using the bread pan handle,
turn the bread pan counter-
clockwise and then pull it out of
the appliance.
Detailed
Instructions
BEFORE FIRST USE:
• Check for any missing or damaged parts.
• Clean all the parts according to the Cleaning
section.
• Set the breadmaker on Bake mode and bake
empty for about 10 minutes. Let unit cool
down and clean all the detached parts again.
The appliance may emit a little smoke and/or
odor when you turn it on for the first time.
This is normal and will subside after the first
or second use. Make sure the appliance has
sufficient ventilation.
• Dry all parts thoroughly. The appliance is ready
for use.
2
Push the kneading paddle onto
the drive shaft inside the bread
pan.
w CAUTION Falling Object
Hazard: Breadmaker can wobble
and walk during kneading cycle.
Always position it in the center of
the counter away from the edge.
3
Add the ingredients to the bread pan in the order listed in the recipe.
First, add the liquids, sugar, and salt; then the flour; and last the yeast.
NOTE: Make sure that yeast does not come into contact with salt or
liquids.
LAST: Yeast. MUST be separate
from wet ingredients
SECOND: Dry ingredients (sugar,
salt, shortening, flour)
FIRST: Liquid ingredients – room
temperature
4
Place the bread pan into the
appliance and make sure it is
firmly locked in place by turning
it clockwise. Close the lid.
Plug in the appliance. A beep will be heard and the display will default to Cycle .
Press the CYCLE button until your desired cycle is displayed.
5
6
Press the LOAF SIZE button to move the arrow to 1.5- or 2-lb. loaf size. (Loaf size is not an option
in Cycles , , , , , , and .)
7
840194103 ENv04.indd 9 12/15/14 4:18 PM

10
Detailed Instructions
(cont.)
Once the cycle is complete, the machine will beep 10 times and shift to the Keep Warm setting for 1 hour.
12
To stop the machine, press the START/STOP button for 2 seconds and the Keep Warm setting will end. Unplug the power cord and then
open the lid using oven mitts.
13
14
Let the bread pan cool down slightly before removing the bread. Using oven mitts, carefully turn the bread pan counterclockwise to
unlock and lift up on the handle to remove from the machine.
15
Using oven mitts, turn the bread pan upside down (with the bread pan handle folded down) onto a wire cooling rack or clean cooking
surface and gently shake until bread falls out. Use a nonstick spatula to gently loosen the sides of the bread from the bread pan.
16
If kneading paddle remains in the bread, gently pry it out using a spatula or small utensil. When not in use or when operation is complete,
unplug the power cord.
NOTE: Store remaining bread in a sealed plastic bag for up to three days at room temperature. To store for a longer time, place sealed plastic
bag in refrigerator for up to 10 days.
If desired, set the DELAY TIMER with the + and – buttons. (Delay function is not available in Cycles , , and .)
NOTE: Do not use this feature when using dairy, eggs, etc.
9
Press the START/STOP button to begin the cycle. Breadmaker will beep once and the “:” in the digital display will begin to flash indicating
the timer is counting down. The kneading paddle will begin to mix your ingredients. If Delay Timer was activated, kneading paddle will
not mix ingredients until cycle is set to begin.
10
For add-ins (nuts, raisins), the machine will beep at the start of the second kneading. Open the lid and pour in your add-ins. This timing
varies by cycle. (Refer to the Timetable for Cycles chart.)
11
840194103 ENv04.indd 10 12/15/14 4:18 PM

11
Timetable for Cycles
Each of the cycles of the bread maker have different amounts of time
devoted to kneading, rising, and/or baking. The chart below shows
how many minutes are in each phase for specific cycles.
NOTE: Total Time adds all of those phases together. It does not
include any delayed start time.
CYCLE
Basic – 1.5 lb.
2 lb.
French – 1.5 lb.
2 lb.
Gluten-Free – 1.5 lb.
2 lb.
Quick
Sweet – 1.5 lb.
2 lb.
1.5-lb. Express
2.0-lb. Express
Dough
Jam
Cake
Whole Grain – 1.5 lb.
2 lb.
Bake
FIRST
KNEADING
9 min.
10 min.
16 min.
18 min.
9 min.
10 min.
7 min.
10 min.
10 min.
12 min.
9 min.
20 min.
–
10 min.
15 min.
15 min.
–
FIRST
DOUGH
RISE
20 min.
20 min.
40 min.
40 min.
25 min.
25 min.
5 min.
5 min.
5 min.
11 min.
9 min.
30 min.
–
5 min.
40 min.
40 min.
–
ADD
INGREDIENTS
AT BEEP
–
–
–
–
–
–
–
–
–
–
–
–
–
–
–
–
–
SECOND
KNEADING
14 min.
15 min.
19 min.
22 min.
18 min.
20 min.
8 min.
20 min.
20 min.
–
–
–
–
20 min.
5 min.
5 min.
–
SECOND
DOUGH
RISE
25 min.
25 min.
30 min.
30 min.
35 min.
35 min.
30 min.
30 min.
–
–
40 min.
–
30 min.
25 min.
25 min.
–
THIRD
DOUGH
RISE
45 min.
45 min.
50 min.
50 min.
1 hr. 10 min.
1 hr. 10 min.
55 min.
50 min.
–
–
–
–
35 min.
40 min.
40 min.
–
BAKE
1 hr.
1 hr. 5 min.
1 hr. 5 min.
1 hr. 10 min.
55 min.
1 hr.
1 hr. 20 min.
50 min.
1 hr.
35 min.
40 min.
–
1 hr. 20 min.
1 hr. 10 min.
50 min.
55 min.
1 hr.
KEEP
WARM
(1 HOUR)
Yes
Yes
Yes
Yes
Yes
Yes
Yes
Yes
Yes
Yes
Yes
No
No
Yes
Yes
Yes
Yes
TOTAL
TIME
2 hrs. 53 min.
3 hrs.
3 hrs. 40 min.
3 hrs. 50 min.
3 hrs. 32 min.
3 hrs. 40 min.
1 hr. 40 min.
2 hrs. 50 min.
2 hrs. 55 min.
58 min.
58 min.
1 hr. 30 min.
1 hr. 20 min.
2 hrs. 50 min.
2 hrs. 55 min.
3 hrs.
1 hr.
840194103 ENv04.indd 11 12/15/14 4:18 PM
12
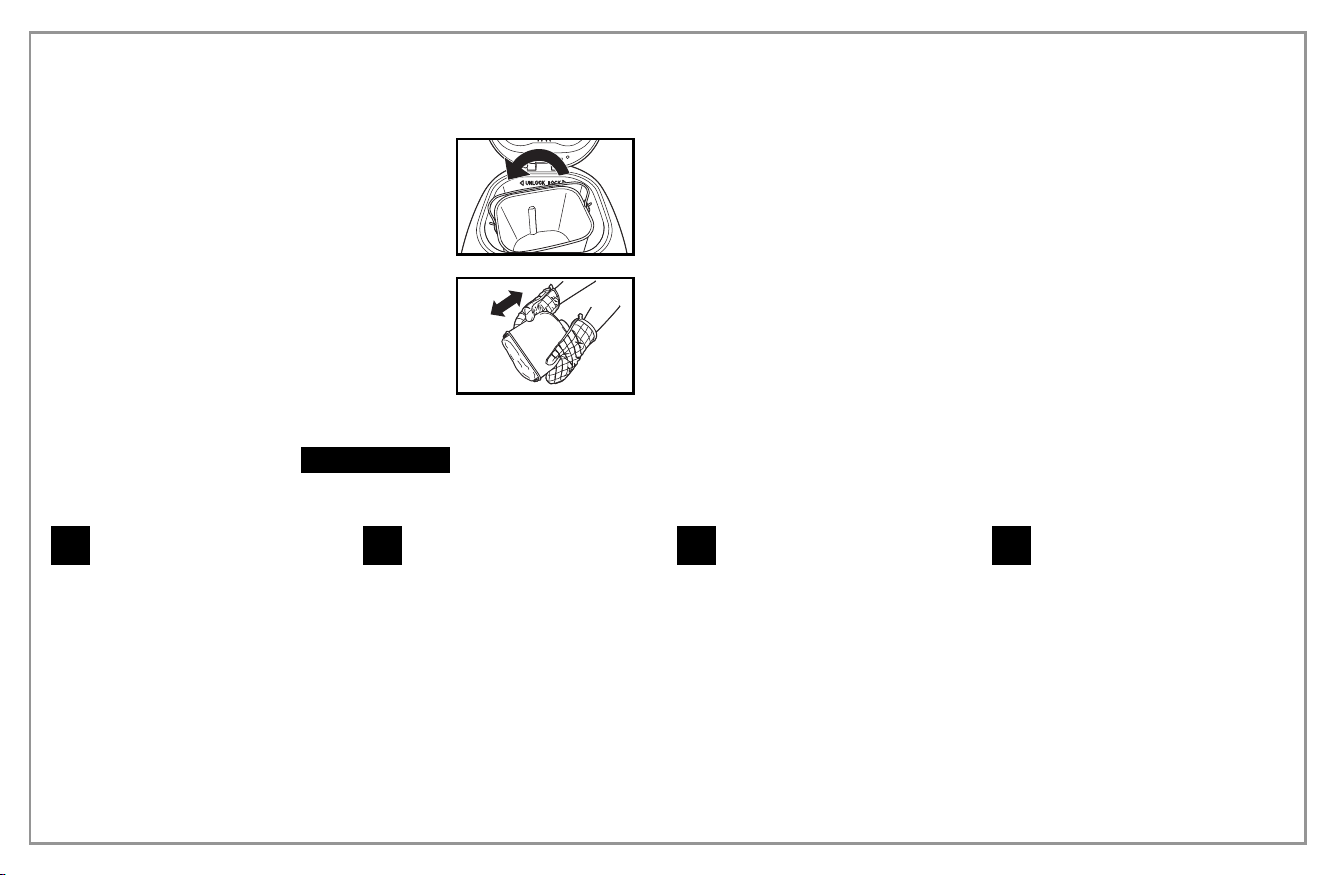
Cleaning
To clean kneading paddle:
If the kneading paddle is difficult
to remove from the bread, add
water to the bottom of the bread
pan and allow to soak for up to
1 hour.
Wipe the paddle carefully with a
damp cloth. The kneading paddle
is dishwasher-safe.
1
To clean bread pan:
Remove the bread pan by turning
it counterclockwise. Wipe inside
and outside of bread pan with
a damp cloth. Do not use any
abrasive agents, in order to
protect the nonstick coating.
The bread pan must be dried
completely before installation.
NOTE: The bread pan and kneading
paddles are dishwasher-safe. The
outside of the bread pan and base
may discolor. This is normal.
2
To clean housing and top lid:
After use, allow unit to cool. Use
a damp cloth to wipe lid, housing,
baking chamber, and interior of
viewing window. Do not use any
abrasive cleaners for cleaning,
since this will degrade the high
polish of the surface. Never
immerse the housing into water
for cleaning.
3
Before the breadmaker is packed
for storage, ensure that it has
completely cooled down, is clean
and dry, and the top lid is closed.
4
Removing Bread
Bread pan and baking chamber will be hot
and oven mitts should be used. Remove the
bread pan by lifting the handle and turning it
counterclockwise to unlock it from the base
of the chamber.
Carefully shake the bread upside down until
the loaf falls out of the bread pan. Allow to
cool on a wire rack for 10 minutes before
slicing.
TIP: If the kneading paddle comes out in the
loaf, remove it with a spatula or small utensil.
Slicing
Allow to cool for 10 minutes and slice with a bread knife.
Storing Homemade Bread
Fresh-baked bread is best when consumed as soon as possible.
To store, wrap cooled loaf in foil or a plastic bag to preserve
freshness. Bread can be frozen for up to 6 months.
When baking is complete, the unit will switch to the Keep Warm setting for up to
1 hour.
Press and hold the START/STOP button for 2 seconds to end this cycle before
removing bread pan.
Electrical Shock Hazard:
Disconnect power before cleaning. Do not immerse cord, plug, or housing in any liquid. Allow breadmaker
to cool down completely before cleaning.
w WARNING
840194103 ENv04.indd 12 12/15/14 4:18 PM

13
Tips: Bread Basics
Two things can ensure a perfect loaf of bread: using fresh, quality ingredients and measuring them accurately.
Flour
All-Purpose Flour
Flour that contains no baking powder, suitable for “quick” breads or
bread made with the Quick settings. Bread flour is better suited for
yeast breads.
Bread Flour
Bread flour is the most important ingredient of making bread and
is recommended in most yeast-bread recipes. It has a high gluten
content and can keep the size of the bread from collapsing after rising.
Flour varies by region. For example, American flour is milled from hard
spring wheat; Canadian flour is milled from hard winter wheat.
Self-Rising Flour
Flour that contains baking powder, used especially for making cakes.
Do not use self-rising flour in combination with yeast.
Whole-Wheat Flour
Whole-wheat flour is ground from the entire wheat kernel. Bread made
with all or part whole-wheat flour will have higher fiber and nutritional
content. Whole-wheat flour is heavier and, as a result, loaves may be
smaller in size and have a heavier texture.
Other Ingredients
Egg
Eggs can improve bread texture and make the bread larger in size.
The egg must be whisked in with the other liquid ingredients.
Salt
Salt is necessary to improve the bread flavor and crust color. It is also
used to restrain yeast activity.
Shortening, Butter, and Vegetable Oil
Shortening and butter should be cut into small pieces before adding to
liquid.
Sugar
Sugar is “food” for the yeast and also increases the sweet taste and
color of bread. It is a very important element of making the bread
rise. White sugar is normally used; however, brown sugar, powdered
sugar, or cotton sugar may also be called for in some recipes.
Water and Other Liquids (always added first)
Water is an essential ingredient for making bread. Generally speaking,
water should be at room temperature. Some recipes may call for milk
or other liquids. Never use dairy with the Delay Timer option.
Yeast
Yeast is a living organism and should be kept in the refrigerator to remain
fresh. It needs carbohydrates found in sugar and flour as nourishment.
Yeast used in breadmaker recipes will be sold under several different
names: Bread machine yeast (preferred), active-dry yeast, and instant
yeast.
Before using, check the expiration date of the yeast. Return to
refrigerator immediately after each use.
Tip:
To check whether the yeast is fresh and active:
• Pour 1 cup (237 ml) hot tap water into a measuring cup.
• Add 1 teaspoon (5 ml) white sugar and 1 Tablespoon (15 ml)
yeast.
• Place the measuring cup in a warm place for about 5 minutes.
• Fresh, active yeast will begin to bubble or “grow.” If it does not,
the yeast is dead or inactive.
Ingredients
840194103 ENv04.indd 13 12/15/14 4:18 PM

14
Tips: Use Exact Measurements
One of the most important steps of making good bread is the proper measurement of ingredients. Measure each ingredient carefully and add to
your bread pan in the order given in the recipe.
Adding Sequence
Always add ingredients in the order given in the recipe.
FIRST: Liquid ingredients
SECOND: Dry ingredients
LAST: Yeast
The yeast should only be placed on the dry flour and never come
in contact with the liquid or salt.
When you use the Delay Timer function for a long time, never add
perishable ingredients such as eggs or milk.
Liquid Ingredients
Water, fresh milk, or other liquids should be measured with a glass
measuring cup with clear markings and a spout. Set the cup on the
counter and lower yourself to check the liquid level. When measuring
cooking oil or other ingredients, clean the measuring cup thoroughly
in between.
Dry Measurements
Measure dry ingredients by gently spooning flour, etc., into the
measuring cup and then, once filled, leveling off with a knife. Never
use the measuring cup to scoop your dry ingredients directly from a
container as this could add up to one tablespoon of extra ingredients.
Do not tap the bottom of the measuring cup or pack down.
HINT: Before measuring, stir the flour to aerate it.
When measuring small amounts of dry ingredients, such as salt or
sugar, use a measuring spoon, making sure it is leveled off.
Weighing dry ingredients with a digital scale will provide better baking
results.
Liquid Measurement Conversion Chart
Fluid Ounce(s)
8
7
6
5
4
3
2
1
Cup
1
7/8
3/4
5/8
1/2
3/8
1/4
1/8
Tablespoon(s)
16
14
12
10
8
6
4
2
1
1/2
Teaspoons
48
42
36
30
24
18
12
6
3
1 1/2
1 cup of:
All-purpose flour
Bread flour
Whole-wheat flour
Rye flour
Ounces
4.4
4.5
4.2
3.6
Grams
125
128
119
102
Dry Measurement Weight Equivalents
840194103 ENv04.indd 14 12/15/14 4:18 PM

15
Frequently Asked Questions
May I use a sugar substitute in place of sugar?
Sugar is necessary for the yeast to produce a light loaf with a good
height. Results may vary with the type and amount of sugar substitute
used. If you are going to use an artificial sweetener, choose one that is
aspartame-based rather than saccharin-based.
May I omit the salt or sugar from the recipe?
No, both the sugar and salt play an important role in the breadmaking
process. Salt prevents the yeast from overreacting and the bread from
overrising. The combination of sugar, salt, and yeast is a key part of
the breadmaking process. Remember that the total sugar and salt
amounts are divided among all the slices, so the amount of sugar
and salt per serving is small.
When do I add raisins, nuts, etc., to the bread?
This breadmaker will beep at the start of the second kneading to let
you know when to add raisins, nuts, seeds, etc. This timing varies by
cycle. (Refer to the Timetable for Cycles chart.) If you are using the
Delay Start timer and it is more convenient, you may add ingredients
at the start.
Can I open the lid while the breadmaker is operating?
This breadmaker is designed with a window in the lid to let you watch
your bread’s progress. Quick checks are OK in the early stages of
kneading and to add ingredients when the beeper sounds. However,
the temperature in the baking chamber adjusts for the Rising and
Baking stages. Opening the lid during these steps could cause the loaf
to fall or not bake properly. Sometimes condensation forms on the
window after initial mixing and kneading. It usually disappears once
the baking cycle starts so you should be able to get a clear view of
your loaf.
Can I use my favorite bread recipes in my breadmaker?
Yes, but you will need to experiment to get the right proportion of
ingredients. Become familiar with the unit and make several loaves of
bread with recipes provided before you begin experimenting. Never
exceed a total amount of 4 1/4 (1 L) cups of dry ingredients (that
includes flours, oats, cornmeal, etc.). Use the recipes in this book to
help determine the ratio of dry ingredients to liquid and amounts of
yeast, sugar, salt, and butter/margarine to use.
What will happen if I leave the bread in the bread pan after baking?
This unit has a 60-minute Keep Warm cycle that lets you leave the
bread in the pan for up to an hour after baking is complete. Once the
warming cycle is over, it is best to remove the bread immediately or
the bottom of your loaf will absorb moisture and become soggy.
Can the recipe be cut in half?
No, it is not recommended. The ingredient proportions work better in
the full amounts.
How can bread mixes be used in the machine and at what setting?
The package instructions will list the amount of water and amount
of yeast to use. Be sure to add liquid, then dry ingredients, followed
by yeast. Do not allow the yeast to sit in the liquid. The bread type
setting is dependent upon the type of bread mix being used (i.e., White
bread uses the Basic bread setting; Sweet Bread setting is for use with
dried fruit, cheese, or nuts; whole-wheat or multigrain should use the
Whole Grain setting; Crust setting, either Light or Dark, is a personal
preference). Do not use bread mixes that exceed 2-lb. (907-g) loaf size.
What is the difference between American flour and Canadian Flour?
Canadian flour has a higher protein or gluten content than American
flour. You can substitute US flour in even amounts for Canadian flour.
However, Canadian flour may absorb more moisture. Check your
dough during the first kneading cycle. If it appears dry, you may add
up to 1 Tablespoon (15 ml) of additional water per cup of flour in the
recipe. Add the water 1 Tablespoon (15 ml) at a time until desired
consistency of a soft and supple dough is reached.
840194103 ENv04.indd 15 12/15/14 4:18 PM

16
PROBLEM
Odor or burning smell.
Ingredients not blending;
can hear motor turning.
“HHH” displays when
START/STOP button
is pressed.
Window is cloudy
or covered with
condensation.
Kneading paddle comes
out with the bread.
PROBABLE CAUSE
• Flour or other ingredients have spilled into the
baking chamber.
• Bread pan or kneading paddle may not be
installed properly.
• Too many ingredients.
• Internal temperature of breadmaker is too high.
• May occur during mixing or rising cycles.
• Thicker crust with dark crust setting.
SOLUTION
• Stop the breadmaker and allow to cool completely.
Wipe excess flour, etc., from the baking chamber
with a paper towel.
TIP: Measure ingredients over the counter, adding
them to the bread pan prior to insertion into the
machine.
• Make sure kneading paddle is set all the way on
shaft.
• Measure ingredients accurately.
• Allow unit to cool down in between cycles.
Unplug unit, open lid, and remove bread pan.
Allow to cool 15–30 minutes before beginning
new cycle.
• Condensation usually disappears during baking
cycle. Clean window well in between uses.
• It is not uncommon for the kneading paddle to
come out with the bread loaf. Once the loaf cools,
remove the paddle with a spatula.
• Choose a lighter crust (Cycles – only).
Troubleshooting
840194103 ENv04.indd 16 12/15/14 4:18 PM

17
Troubleshooting
(cont.)
PROBLEM
Dough is not blending
thoroughly; flour and
other ingredients are
built up on sides of pan;
bread loaf is coated with
flour.
Bread rises too high or
pushes lid up.
Bread does not rise; loaf
is short.
Bread has a crater in
the top of the loaf once
baked.
Crust color is too light.
Crust color is too dark.
PROBABLE CAUSE
• Bread pan or kneading paddle may not be
installed properly.
• Too many dry ingredients.
• Gluten-free dough is typically very wet. It may
need additional help by scraping sides with a
rubber spatula.
• Ingredients not measured properly (too much
yeast, flour).
• Kneading paddle not in bread pan.
• Forgot to add salt.
• Inaccurate measurement of ingredients or inactive
yeast.
• Lifting lid during cycles.
• Dough has risen too fast.
• Too much yeast or water.
• Incorrect cycle chosen for the recipe.
• Opening the lid during baking.
• Too much sugar in the recipe.
SOLUTION
• Make sure bread pan is securely set in unit and
kneading paddle is firmly on shaft.
• Make sure ingredients are measured accurately
and added in the proper order.
• Excess flour can be removed from loaf once
baked and cooled. Add water, one tablespoon at
a time, until dough has formed into a ball.
• Measure all ingredients accurately and make sure
sugar and salt have been added.
• Try decreasing yeast by 1/4 teaspoon (1.2 ml).
• Check installation of kneading paddle.
• Measure all ingredients accurately.
• Check expiration date of yeast and flour.
• Liquids should be room temperature.
• Measure all ingredients accurately.
• Decrease yeast or water slightly.
• Do not open lid during baking.
• Select a darker crust option (Cycles – only).
• Decrease sugar amount slightly.
• Select a lighter crust option (Cycles – only).
840194103 ENv04.indd 17 12/15/14 4:18 PM

18
Troubleshooting
(cont.)
PROBLEM
Bread loaf is lopsided.
Loaves made are
different shapes.
Bottom of loaf is soggy.
Bread is hollow or holey
inside.
Underbaked or sticky,
doughy bread.
Bread mashes down
when slicing.
Bread has a heavy, thick
texture.
Base of bread pan has
darkened or is spotted.
PROBABLE CAUSE
• Too much yeast or water.
• Kneading paddle pushes dough to one side
before rising and baking.
• Varies by the type of bread.
• Bread has remained in bread pan on Keep Warm
setting too long and absorbed moisture.
• Dough too wet, too much yeast, no salt.
• Water too hot.
• Too much liquid; incorrect cycle chosen.
• Bread is too hot.
• Too much flour, old flour.
• Not enough water.
• After washing in dishwasher.
SOLUTION
• Measure all ingredients accurately.
• Decrease yeast or water slightly.
• Some loaves may not be evenly shaped, particularly
with whole-grain flour.
• Whole-grain or multigrain is denser and may be
shorter than a basic white bread.
• End Keep Warm setting by pressing START/STOP
for 2–3 seconds.
• Remove bread from bread pan using oven mitts.
• Measure all ingredients accurately.
• Decrease yeast or water slightly. Check salt
measurement.
• Use room-temperature water.
• Decrease liquid and measure ingredients carefully.
• Check cycle chosen for recipe.
• Allow to cool on a wire rack for 15–30 minutes
before slicing.
• Try increasing water or decreasing flour.
• Whole-grain breads will have a heavier texture.
• This is normal and will not affect the bread pan.
840194103 ENv04.indd 18 12/15/14 4:18 PM

19
Recipes – Basic
(Cycle )
White
1.5-lb. (680-g) Loaf
1 cup (237 ml) water
1 1/8 teaspoons (5.5 ml) salt
1 Tablespoon (15 ml) sugar
3 Tablespoons (44 ml) butter or
vegetable oil
3 1/2 cups (828 ml) bread flour
1 1/2 teaspoons (7.4 ml) bread
machine yeast
2-lb. (907-g) Loaf
1 1/3 cups (315 ml) water
1 1/2 teaspoons (7.4 ml) salt
2 Tablespoons (30 ml) sugar
1/ 4 cup (59 ml) butter or
vegetable oil
4 1/2 cups (1.1 L) bread flour
1 3/4 teaspoons (8.6 ml) bread
machine yeast
White Wheat
1.5-lb. (680-g) Loaf
1 1/4 cup (296 ml) water
1 1/2 teaspoons (7.4 ml) salt
1 Tablespoon (15 ml) sugar
2 Tablespoons (30 ml) butter or
vegetable oil
2 Tablespoons (30 ml) nonfat
dry milk
2 cups (473 ml) bread flour
1 cup (237 ml) whole-wheat flour
1 1/2 teaspoons (7.4 ml) bread
machine yeast
2-lb. (907-g) Loaf
1 1/2 cups (355 ml) water
2 teaspoons (10 ml) salt
2 Tablespoons (30 ml) sugar
3 Tablespoons (44 ml) butter
or vegetable oil
3 Tablespoons (44 ml) nonfat
dry milk
2 1/2 cups (591 ml) bread flour
1 1/2 cups (355 ml) whole-wheat
flour
2 teaspoons (10 ml) bread
machine yeast
Onion
1.5-lb. (680-g) Loaf
1 cup (237 ml) water
1 1/8 teaspoons (5.5 ml) salt
1 Tablespoon (15 ml) sugar
2 Tablespoons (30 ml) butter
or vegetable oil
2 Tablespoons (30 ml) dried
minced onion
3 1/2 cups (828 ml)
bread flour
2 teaspoons (10 ml) bread
machine yeast
2-lb. (907-g) Loaf
1 1/3 cups (315 ml) water
1 1/2 teaspoons (7.4 ml) salt
2 Tablespoons (30 ml) sugar
1/4 cup (59 ml) butter or
vegetable oil
3 Tablespoons (44 ml) dried
minced onion
4 1/2 cups (1.1 L) bread flour
2 1/2 teaspoons (12.3 ml) bread
machine yeast
Onion Poppy Seed
1.5-lb. (680-g) Loaf
1 cup (237 ml) water
1
1/8 teaspoons (5.5 ml) salt
1 Tablespoon (15 ml) sugar
3 Tablespoons (44 ml) butter
or vegetable oil
3 1/2 cups (828 ml) bread flour
1 1/2 teaspoons (7.4 ml) onion
flakes
2 teaspoons (10 ml) poppy seeds
2 teaspoons (10 ml) bread
machine yeast
2-lb. (907-g) Loaf
1 1/3 cups (315 ml) water
1
1/2 teaspoons (7.4 ml) salt
2 Tablespoons (30 ml) sugar
1/4 cup (59 ml) butter or
vegetable oil
4 1/2 cups (1.1 L) bread flour
2 teaspoons (10 ml) onion flakes
1 Tablespoon (15 ml) poppy
seeds
2 1/4 teaspoons (11.1 ml) bread
machine yeast
NOTE: Canadian flour has a higher protein or gluten content than American flour.
You can substitute US flour in even amounts for Canadian flour. However, Canadian
flour may absorb more moisture. Check your dough during the first kneading cycle.
If it appears dry, you may add up to 1 Tablespoon (15 ml) of additional water per
cup of flour in the recipe. Add the water 1 Tablespoon (15 ml) at a time until desired
consistency of a soft and supple dough is reached.
840194103 ENv04.indd 19 12/15/14 4:18 PM

20
Recipes – Basic
(Cycle )
Oatmeal-Buttermilk
1.5-lb. (680-g) Loaf
1 cup (237 ml) buttermilk
1 teaspoon (5 ml) salt
2 Tablespoons (30 ml) sugar
3 Tablespoons (44 ml) butter or
vegetable oil
3/ 4 cup (177 ml) regular oats
(old-fashioned oats)
2 1/2 (591 ml) cups bread flour
2 teaspoons (10 ml) bread
machine yeast
2-lb. (907-g) Loaf
1 1/4 cups (296 ml) buttermilk
1 1/4 teaspoons (6.2 ml) salt
2 Tablespoons (30 ml) sugar
1/4 cup (59 ml) butter or
vegetable oil
1 cup (237 ml) regular oats
(old-fashioned oats)
2 3/4 cups (651 ml) bread flour
2 1/2 teaspoons (12.3 ml) bread
machine yeast
Maple Wheat
1.5-lb. (680-g) Loaf
1 cup (237 ml) buttermilk
1 teaspoon (5 ml) salt
2 Tablespoons (30 ml) nonfat
dry milk
2 Tablespoons (30 ml) maple
syrup
2 Tablespoons (30 ml) butter or
vegetable oil
1 cup (237 ml) whole-wheat flour
2 cups (473 ml) bread flour
1 1/2 teaspoons (7.4 ml) bread
machine yeast
2-lb. (907-g) Loaf
1 1/3 cups (315 ml) buttermilk
1 teaspoon (5 ml) salt
2 Tablespoons (30 ml) nonfat
dry milk
3 Tablespoons (44 ml) maple
syrup
2 Tablespoons (30 ml) butter or
vegetable oil
1 1/2 cups (355 ml) whole-wheat
flour
2 1/2 cups (591 ml) bread flour
2 teaspoons (10 ml) bread
machine yeast
Italian Parmesan Bread
1.5-lb. (680-g) Loaf
1 cup (237 ml) + 2 Tablespoons
(30 ml) water
1 1/8 teaspoons (5.5 ml) salt
1 Tablespoon (15 ml) sugar
3 Tablespoons (44 ml) olive oil
3 1/2 cups (828 ml) bread flour
1 teaspoon (5 ml) dried, crushed
basil
1 teaspoon (5 ml) dried, crushed
oregano
3 Tablespoons (44 ml) grated
Parmesan cheese
1 1/2 teaspoons (7.4 ml) bread
machine yeast
2-lb. (907-g) Loaf
1 1/3 cups (315 ml) water
1 1/2 teaspoons (7.4 ml) salt
2 Tablespoons (30 ml) sugar
1/4 cup (59 ml) olive oil
4 1/2 cups (1.1 L) bread flour
1 1/2 teaspoons (7.4 ml) dried,
crushed basil
1 1/2 teaspoons (7.4 ml) dried,
crushed oregano
1/4 cup (59 ml) grated Parmesan
cheese
2 1/4 teaspoons (11.1 ml) bread
machine yeast
Light Rye
1.5-lb. (680-g) Loaf
1 cup (237 ml) water
1
1/2 teaspoons (7.4 ml) salt
2 Tablespoons (30 ml) sugar
1 Tablespoon (15 ml) butter or
vegetable oil
2 teaspoons (10 ml) caraway
seed
2 cups (473 ml) bread flour
1 cup (237 ml) rye flour
1 1/2 teaspoons (7.4 ml) bread
machine yeast
2-lb. (907-g) Loaf
1 1/2 cups (355 ml) water
1
1/2 teaspoons (7.4 ml) salt
2 Tablespoons (30 ml) sugar
1 Tablespoon (15 ml) butter or
vegetable oil
2 teaspoons (10 ml) caraway
seed
3 cups (710 ml) bread flour
1 1/2 cups (355 ml) rye flour
2 teaspoons (10 ml) bread
machine yeast
840194103 ENv04.indd 20 12/15/14 4:18 PM

21
Recipes – French
(Cycle )
NOTE: Dark crust setting is recommended.
French
1.5-lb. (680-g) Loaf
1 cup (237 ml) + 2 Tablespoons
(30 ml) water
1 teaspoon (5 ml) salt
1 teaspoon (5 ml) sugar
3 1/2 cups (828 ml) bread flour
1 1/2 teaspoons (7.4 ml) bread
machine yeast
2-lb. (907-g) Loaf
1 1/2 cups (355 ml) water
1 1/2 teaspoons (7.4 ml) salt
1 1/2 teaspoons (7.4 ml) sugar
4 1/2 cups (1.1 L) bread flour
2 teaspoons (10 ml) bread
machine yeast
Recipes – Basic
(Cycle )
Honey Granola
1.5-lb. (680-g) Loaf
1 cup (237 ml) + 2 Tablespoons
(30 ml) water
1 1/8 teaspoons (5.5 ml) salt
1 Tablespoon (15 ml) sugar
3 Tablespoons (44 ml) butter or
vegetable oil
1 1/2 cups (355 ml) bread flour
1 cup (237 ml) whole-wheat flour
1 cup (237 ml) granola
1 1/4 teaspoons (6.2 ml) bread
machine yeast
2-lb. (907-g) Loaf
1 1/2 cups (355 ml) water
1 1/2 teaspoons (7.4 ml) salt
1/4 cup (59 ml) honey
2 Tablespoons (30 ml) butter or
vegetable oil
2 1/2 cups (591 ml) bread flour
1 cup (237 ml) whole-wheat flour
1 cup (237 ml) granola
2 teaspoons (10 ml) bread
machine yeast
840194103 ENv04.indd 21 12/15/14 4:18 PM

22
Recipes – Gluten-Free
(Cycle )
1.5-lb. (680-g) Loaf
1 1/2 cups (355 ml) warm milk
(cow, rice, soy, or nut)
3/ 4 cup (177 ml) whole egg (must
measure 3/4 cups)
1/4 cup (59 ml) vegetable oil
1 teaspoon (5 ml) cider vinegar or
lemon juice
3/4 teaspoon (3.7 ml) sea salt
2 Tablespoons (30 ml) sugar
1 Tablespoon (15 ml) xanthan
gum
1 teaspoon (5 ml) guar gum
3/ 4 teaspoon (3.7 ml) lecithin
granules (plain soy)
1 Tablespoon (15 ml) potato flour
3 cups (710 ml) gluten-free
all-purpose baking flour
2 teaspoons (10 ml) active dry
yeast
Have all ingredients at room temperature. Whisk together liquid
ingredients until very smooth. Add liquid ingredients to bread pan.
In separate bowl, whisk together dry ingredients, except yeast, until
thoroughly blended. Pour the dry ingredients on top of the wet. Make a
small well on the top middle of the dry ingredients and add the yeast.
Recipe Courtesy of Bob’s Red Mill Natural Foods, copyright 2010.
Visit Bob’s Red Mill online at www.bobsredmill.com for more bread machine
recipes or to find out where Bob’s Red Mill products are sold.
Gluten-Free Sandwich Bread
1.5-lb. (680-g) Loaf
1 1/2 cups (355 ml) hot water
(150°F/66°C)
3 large eggs, lightly beaten
1 teaspoon (5 ml) cider vinegar
1/4 cup (59 ml) canola oil
2 cups (473 ml) brown rice flour
1/2 cup (118 ml) tapioca flour
1/2 cup (118 ml) potato starch
1/2 cup (118 ml) garbanzo bean
flour
1 1/2 teaspoons (7.4 ml) sea salt
4 1/2 teaspoons (22.2 ml) xanthan
gum
3 Tablespoons (44 ml) sugar
3 Tablespoons (44 ml) nondairy
creamer
2 1/4 teaspoons (11.1 ml) active
dry yeast
In a bowl, whisk together the hot water, eggs, vinegar, and oil. Place the
liquid ingredients in the bread pan. In a separate bowl, stir together
rice flour, tapioca flour, potato starch, garbanzo bean flour, sea salt,
xanthan gum, nondairy creamer, and sugar. Pour the dry ingredients
on top of the liquid. Make a small well on the top middle of the dry
ingredients and add the yeast.
Recipe Courtesy of Bob’s Red Mill Natural Foods, copyright 2010.
Visit Bob’s Red Mill online at www.bobsredmill.com for more bread machine
recipes or to find out where Bob’s Red Mill products are sold.
Whole-Grain Bread
This gluten-free recipe is over 50% whole grain using the
brown rice flour.
840194103 ENv04.indd 22 12/15/14 4:18 PM

23
Recipes – Quick
(Cycle )
Banana-Nut Quick Bread
1.5-lb. (680-g) Loaf
1 cup (237 ml) water
1/4 cup (59 ml) butter or
vegetable oil
2 eggs, slightly beaten
14-ounce (397 g) package banana
quick-bread mix
1/2 cup (118 ml) finely chopped
nuts
Cornbread
NOTE: Light crust setting is
recommended.
1.5-lb. (680-g) Loaf
2 eggs, slightly beaten
1 cup (237 ml) milk
1/ 2 teaspoon (2.4 ml) bread
machine yeast
2 8.5-ounce
(241-g)
packages corn
muffin mix
Moist Devil’s Food Cake
NOTE: Light crust setting is
recommended.
1.5-lb. (680-g) Loaf
12-ounce (340-g) can evaporated
milk
1/2 cup (118 ml) butter or
vegetable oil
3 eggs, slightly beaten
18-ounce (510-g) package
Devil’s Food cake mix
Yellow Pound Cake
1.5-lb. (680-g) Loaf
1 1/3 (315 ml) cups water
1/3 cup (79 ml) butter or
vegetable oil
3 large eggs, slightly beaten
3.9-ounce (111-g) vanilla instant
pudding mix
18-ounce (510 g) package yellow
cake mix
840194103 ENv04.indd 23 12/15/14 4:18 PM

24
Cinnamon-Raisin
1.5-lb. (680-g) Loaf
1 cup (237 ml) water
1 1/2 teaspoons (7.4 ml) salt
1/4 cup (59 ml) sugar
2 Tablespoons (30 ml) nonfat dry
milk
2 Tablespoons (30 ml) butter or
vegetable oil
2 3/4 cups (651 ml) bread flour
1 1/2 teaspoons (7.4 ml) cinnamon
2 teaspoons (10 ml) bread
machine yeast
3/4 cup (177 ml) raisins
2-lb. (907-g) Loaf
1 1/4 cups (296 ml) water
2 teaspoons (10 ml) salt
1/3 cup (79 ml) sugar
2 1/2 Tablespoons (37 ml) nonfat
dry milk
2 1/2 Tablespoons (37 ml) butter
or vegetable oil
4 cups (946 ml) bread flour
2 1/2 teaspoons (12.3 ml)
cinnamon
2 1/2 teaspoons (12.3 ml) bread
machine yeast
1 cup (237 ml) raisins
Add raisins at Add Ingredient signal. Breadmaker will beep 10 times
about 30 minutes after the cycle begins.
Recipes – Sweet
(Cycle )
NOTE: Light crust setting is recommended.
Cranberry Orange Pecan
1.5-lb. (680-g) Loaf
3/4 cup (177 ml) water
1/4 cup (59 ml) orange juice
1 1/2 teaspoons (7.4 ml) salt
1/4 cup (59 ml) sugar
2 Tablespoons (30 ml) nonfat dry
milk
2 Tablespoons (30 ml) butter, cut
in small pieces
3 1/2 cups (828 ml) bread flour
1 1/2 teaspoons (7.4 ml) orange
zest
2 teaspoons (10 ml) bread
machine yeast
1/3 cup (79 ml) dried cranberries
1/3 cup (79 ml) chopped pecans
2-lb. (907-g) Loaf
1 cup (237 ml) water
1/4 cup (59 ml) orange juice
2 teaspoons (10 ml) salt
1/3 cup (79 ml) sugar
2 1/2 Tablespoons (37 ml) nonfat
dry milk
2 1/2 Tablespoons (37 ml) butter,
cut in small pieces
4 cups (946 ml) bread flour
2 1/2 teaspoons (12.3 ml) orange
zest
2 1/2 teaspoons (12.3 ml) bread
machine yeast
1/2 cup (118 ml) dried cranberries
1/2 cup (118 ml) chopped pecans
Add cranberries and pecans at Add Ingredient signal. Before adding
them, place in a resealable bag with 1 teaspoon (5 ml) flour to coat.
840194103 ENv04.indd 24 12/15/14 4:18 PM

25
Recipes – 1.5 lb. Express
(Cycle )
NOTE: The Express cycle has only one rising time. Bread will be heavier and not as high as bread in other cycles. Using the Dark setting
is recommended for best browning.
White
1.5-lb. (680-g) Loaf
1 cup (237 ml) warm water
1/2 teaspoon (2.4 ml) salt
3 Tablespoons (44 ml) sugar
2 Tablespoons
(30 ml)
butter or
vegetable oil
2 Tablespoons (30 ml) nonfat dry
milk
3 1/4 cups (769 ml) bread flour
1 Tablespoon (15 ml) instant
yeast
Pepper-Dill
1.5-lb. (680-g) Loaf
1 cup (237 ml) warm water
1 teaspoon (5 ml) salt
1/2 teaspoon (2.4 ml) black
pepper
1/2 teaspoon (2.4 ml) dried
dillweed
3 Tablespoons (44 ml) sugar
2 Tablespoons
(30 ml)
butter or
vegetable oil
2 Tablespoons (30 ml) nonfat dry
milk
3 cups (710 ml) bread flour
1 Tablespoon (15 ml) instant
yeast
840194103 ENv04.indd 25 12/15/14 4:18 PM

26
Recipes – 2.0 lb. Express
(Cycle )
NOTE: The Express cycle has only one rising time. Bread will be heavier and not as high as bread in other cycles. Using the Dark setting
is recommended for best browning.
White
2-lb. (907-g) Loaf
1 1/2 cups (355 ml) warm water
2 teaspoons (10 ml) salt
1/4 cup (59 ml) sugar
2 1/2
Tablespoons
(37 ml)
butter or
vegetable oil
2 Tablespoons (30 ml) nonfat dry
milk
4 1/4 cups (1 L) bread flour
1 Tablespoon
(15 ml)
instant yeast
Pepper-Dill
2-lb. (907-g) Loaf
1 3/4 cups (414 ml) warm water
1 teaspoon (5 ml) salt
1/2 teaspoon (2.4 ml) black
pepper
1 teaspoon (5 ml) dried dillweed
1/4 cup (59 ml) sugar
3
Tablespoons
(44 ml)
butter or
vegetable oil
2 Tablespoons (30 ml) nonfat dry
milk
4 1/2 cups (1.1 L) bread flour
1 Tablespoon
(15 ml)
instant yeast
840194103 ENv04.indd 26 12/15/14 4:18 PM

27
Recipes – Dough
(Cycle )
Dinner Rolls
1 cup (237 ml) milk
1/4 cup (59 ml) butter, room
temperature
1 egg, slightly beaten
1/4 cup (59 ml) sugar
1 teaspoon (5 ml) salt
4 cups (946 ml) all-purpose flour
2 teaspoons (10 ml) bread
machine yeast
At the end of the Dough cycle, remove the dough from the breadmaker.
Press and hold the START/STOP button for several seconds to end
the cycle. Place on floured counter. Grease a 9- x 13-inch (23- x 33-cm)
baking pan. Cut dough in half; then divide each half into 8 pieces. Place
in greased pan. Let rise until almost double in size, about 45 minutes.
Bake at 375°F (190°C) for 15 to 20 minutes or until done. Makes 16
rolls.
Pizza Crust
1 cup (237 ml) water
1 teaspoon (5 ml) salt
1 Tablespoon
(15 ml)
butter or
vegetable oil
3 cups (710 ml) bread flour
2 teaspoons (10 ml) bread
machine yeast
At the end of the Dough cycle, remove the dough from the breadmaker.
Press and hold the START/STOP button for several seconds to end the
cycle. Place on floured counter and let the dough rest for 10 minutes.
Shape into a 15- to 16-inch (38- x 40-cm) round pizza pan. Add favorite
pizza ingredients. Bake at 475°F (246°C) for 20 to 25 minutes or until
done. Makes one 16-inch (40-cm) pizza.
Focaccia
Dough
1 cup (237 ml) water
1 teaspoon (5 ml) salt
2 Tablespoons (30 ml) olive oil
3 1/4 cups (769 ml) bread flour
1 Tablespoon (15 ml) Italian
seasoning
2 teaspoons (10 ml) active dry
yeast
Toppings
1 to 2 Tablespoons (15 to 30 ml)
cornmeal
2 Tablespoons (30 ml) olive oil
3 Tablespoons (44 ml) fresh basil,
coarsely chopped
1/4 cup (59 ml) grated Parmesan
cheese
At the end of the Dough cycle, remove the dough from the breadmaker.
Press and hold the START/STOP button for several seconds to end the
cycle. Place on floured counter and let the dough rest for 10 minutes.
Sprinkle cornmeal on a jelly roll pan or cookie sheet. Roll dough into
a large rectangle. Place rectangle onto pan. Using your fingers, make
dents in the dough about 1 to 2 inches (2.5 to 5 cm) apart. Brush oil
over top of dough. Let rise 30 to 45 minutes. Sprinkle dough with
basil and cheese. Bake at 400°F (204°C) for 20 to 25 minutes. Makes
1 focaccia.
840194103 ENv04.indd 27 12/15/14 4:18 PM

28
Recipes – Dough
(Cycle )
Cinnamon Raisin Buns
Dough
1/ 2 cup (118 ml) plus
1 Tablespoon (15 ml) warm milk
2 eggs, slightly beaten
1 teaspoon (5 ml) salt
1/2 cup (118 ml) sugar
1/4 cup (59 ml) butter, room
temperature
4 cups (946 ml) all-purpose flour
2 1/2 teaspoons (12.3 ml) bread
machine yeast
Filling
1/3 cup (79 ml) butter, softened
3/4 cup (177 ml) brown sugar
Icing
3- ounces (85 g) cream cheese,
room temperature
3 Tablespoons (44 ml) butter,
room temperature
1 cup (237 ml) confectioners
sugar
1 teaspoon (5 ml) vanilla extract
Pinch salt
2 Tablespoons (30 ml) cinnamon
3/4 cup (177 ml) raisins
At the end of the Dough cycle, remove the dough from the breadmaker.
Press and hold the START/STOP button for several seconds to end the
cycle. Place on floured counter and let the dough rest for 10 minutes.
Roll dough to a large rectangle about 14” x 16” (36 cm x 41 cm). Spread
with softened butter. Mix the brown sugar and cinnamon; then sprinkle
over the butter. Scatter the raisins over the butter and sugar. Roll up
dough from the longest side. Cut into rolls about 1-inch (2.5-cm) thick.
Place in a greased 10- x 14-inch (25- x 36-cm) baking pan.* Cover and
let rise until almost doubled, about 1 hour. Bake at 375°F (190°C) for 20
to 25 minutes, or until done. Let cool slightly; then ice.
Icing: Combine the cream cheese, butter, confectioners sugar, vanilla,
and salt.
Makes about 16 large cinnamon rolls.
*Can also use a 9- x 13-inch (23- x 33-cm) baking pan plus a 9- x 5-inch
(23- x 13-cm) loaf pan.
840194103 ENv04.indd 28 12/15/14 4:18 PM

29
Recipes – Jam
(Cycle )
Strawberry Jam
6 cups (1.4 L) strawberries,
capped, cut into small pieces
(approx. 2 lbs. [907 g] fresh)
1 1/2 cups (355 ml) sugar
1 box low-sugar fruit pectin
1 Tablespoon (15 ml) lemon juice
In a large mixing bowl, combine all ingredients. Pour into bread pan.
Start breadmaker. After cycle has finished, allow jam to cool about 1
hour before transferring into storage containers. Store in refrigerator
for up to 3 weeks or in freezer for 1 year. Makes 6 cups (1.4 L).
Recipes – Cake
(Cycle )
Use entire box of any brand or flavor of 18-ounce (510-g) or
18 3/4-ounce (532-g) Cake Mix. Follow package directions using
Cycle .
840194103 ENv04.indd 29 12/15/14 4:18 PM

30
Recipes – Whole-Grain
(Cycle )
Whole-Wheat
1.5-lb. (680-g) Loaf
1 1/4 cups (296 ml) water
2
Tablespoons (30 ml) vegetable oil
1 1/2 teaspoons
(7.4 ml)
salt
2 Tablespoons (30 ml) sugar
2 Tablespoons (30 ml) nonfat dry
milk
4
teaspoons
(20 ml) vital wheat
gluten
3 1/2 cups (828 ml) whole-wheat
flour
1 1/2 teaspoons (7.4 ml) bread
machine yeast
2-lb. (907-g) Loaf
1 3/4 cups (414 ml) water
3
Tablespoons (44 ml) vegetable oil
1 1/2 teaspoons
(7.4 ml)
salt
3 Tablespoons (44 ml) sugar
2 Tablespoons (30 ml) nonfat dry
milk
2 Tablespoons (30 ml) vital wheat
gluten
4 1/2 cups (1.1 L) whole-wheat
flour
2 teaspoons (10 ml) bread
machine yeast
High-Fiber Bran
1.5-lb. (680-g) Loaf
1 1/4 cups (296 ml) water
1/2 teaspoon (2.4 ml) salt
2 Tablespoons (30 ml) honey
2 Tablespoons (30 ml) butter or
vegetable oil
1 cup (237 ml) whole bran cereal
1 1/2 cups (355 ml) whole-wheat
flour
1 1/2 cups (355 ml) bread flour
2 teaspoons (10 ml) bread
machine yeast
2-lb. (907-g) Loaf
1 1/2 cups (355 ml) plus
1 Tablespoon (15 ml) water
1 teaspoon (5 ml) salt
3 Tablespoons (44 ml) honey
2 Tablespoons (30 ml) butter or
vegetable oil
1 cup (237 ml) whole bran cereal
1 3/4 cups (414 ml) whole-wheat
flour
1 3/4 cups (414 ml) bread flour
2 1/2 teaspoons (12.3 ml) bread
machine yeast
Vital wheat gluten can be found in the baking aisle of your supermarket. It helps bread to rise when using ingredients such as whole grain flours that normally produce very heavy,
dense breads.
840194103 ENv04.indd 30 12/15/14 4:18 PM

31
Limited Warranty
This warranty applies to products purchased and used in the U.S. and Canada. This is the only express warranty for this product and
is in lieu of any other warranty or condition.
This product is warranted to be free from defects in material and workmanship for a period of five (5) years from the date of original
purchase in Canada and one (1) year from the date of original purchase in the U.S. During this period, your exclusive remedy is repair
or replacement of this product or any component found to be defective, at our option; however, you are responsible for all costs
associated with returning the product to us and our returning a product or component under this warranty to you. If the product or
component is no longer available, we will replace with a similar one of equal or greater value.
This warranty does not cover glass, filters, wear from normal use, use not in conformity with the printed directions, or damage to
the product resulting from accident, alteration, abuse, or misuse. This warranty extends only to the original consumer purchaser or
gift recipient. Keep the original sales receipt, as proof of purchase is required to make a warranty claim. This warranty is void if the
product is used for other than single-family household use or subjected to any voltage and waveform other than as specified on the
rating label (e.g., 120V ~ 60 Hz).
We exclude all claims for special, incidental, and consequential damages caused by breach of express or implied warranty. All
liability is limited to the amount of the purchase price. Every implied warranty, including any statutory warranty or condition
of merchantability or fitness for a particular purpose, is disclaimed except to the extent prohibited by law, in which case such
warranty or condition is limited to the duration of this written warranty. This warranty gives you specific legal rights. You may have
other legal rights that vary depending on where you live. Some states or provinces do not allow limitations on implied warranties or
special, incidental, or consequential damages, so the foregoing limitations may not apply to you.
To make a warranty claim, do not return this appliance to the store. Please call 1.800.851.8900 in the U.S. or 1.800.267.2826 in Canada
or visit hamiltonbeach.com in the U.S. or hamiltonbeach.ca in Canada. For faster service, locate the model, type, and series numbers
on your appliance.
840194103 ENv04.indd 31 12/15/14 4:18 PM

32
PRÉCAUTIONS IMPORTANTES
1. Lire toutes les instructions.
2. Cet appareil n’est pas destiné à être utilisé par des personnes (y
compris les enfants) dont les capacités physiques, sensorielles
ou mentales sont réduites, ou manquant d’expérience et de
connaissance, sauf si elles sont étroitement surveillées et
instruites sur l’utilisation de l’appareil par une personne
responsable de leur sécurité.
3. Une surveillance étroite est requise pour tout appareil utilisé par
ou près des enfants. Surveiller que les enfants ne jouent pas
avec l’appareil.
4. Ne pas toucher les surfaces chaudes. Utiliser les poignées ou
boutons. Utiliser toujours des gants isolants pour manipuler
le moule ou le pain chauds.
5. Ne mettre pas la main à l’intérieur de la chambre de cuisson une
fois le moule à pain retiré. L’élément chauffant est encore chaud.
6. Pour vous protéger contre les chocs électriques, n’immerger pas
le cordon, la fiche, ou la machine à pain dans l’eau ou un autre
liquide.
7. Débrancher l’appareil de la prise de courant électrique lorsqu’il
n’est pas utilisé et avant un nettoyage. Le laisser refroidir avant
le nettoyage et avant d’y placer ou d’y enlever des pièces.
8. Ne pas faire fonctionner un appareil électroménager avec un
cordon ou une fiche endommagée, ou lorsque l’appareil ne
fonctionne pas bien ou a été échappé ou endommagé d’une
manière quelconque. Appeler notre numéro sans frais de service
à la clientèle pour des renseignements concernant l’examen, la
réparation ou l’ajustement.
9. L’utilisation d’accessoires non recommandés par le fabricante
d’appareil peut causer des blessures.
10. Ne pas utiliser à l’extérieur.
11. Ne pas laisser le cordon pendre du bord d’une table ou d’un
comptoir, ou toucher des surfaces chaudes.
12. Ne pas placer l’appareil sur ou près d’un brûleur chaud à gaz ou
d’un élément électrique, ou dans un four chauffé.
13. Une précaution extrême doit être employée lors du déplacement
d’un appareil électroménager contenant de l’huile chaude ou
autre liquide chaud.
14. Pour débrancher, mettre toutes les commandes à la position
d’arrêt (O/STOP) ; ensuite retirer la fiche de la prise de courant
murale.
15. User de la plus grande prudence lors du retrait du moule à pain.
16. Pour éteindre la machine à pain, maintenir enfoncé le bouton
START/STOP (marche/arrêt) pendant 2 secondes. Voir la section
« Panneau de commande » pour de plus amples renseignements.
17. Ne placer ni les yeux ni le visage trop près de la fenêtre
d’observation en verre trempé, dans l’éventualité d’un bris du
verre.
18. Ne pas utiliser l’appareil électroménager à une fin autre que celle
prévue.
19. Nettoyer minutieusement l’intérieur du four. Veiller à ne pas rayer
ni endommager le tube de l’élément chauffant.
20. ATTENTION : Risque de choc électrique. Cuire uniquement dans
le moule à pain amovible.
Pour utiliser un appareil électroménager, vous devez toujours prendre des mesures élémentaires de sécurité pour réduire le risque d’incendie,
d’électrocution et/ou de blessure corporelle, en particulier les mesures suivantes :
CONSERVER CES INSTRUCTIONS !
840194103 FRv03.indd 32 12/15/14 4:18 PM

33
Autres consignes de sécurité pour le consommateur
Cet appareil est destiné à l’utilisation domestique seulement.
w
AVERTISSEMENT
Risque de choc électrique : Ce produit est
fourni avec une fiche polarisée (une broche large) pour réduire le
risque d’électrocution. Cette fiche n’entre que dans un seul sens dans
une prise polarisée. Ne contrecarrez pas l’objectif sécuritaire de cette
fiche en la modifiant de quelque manière que ce soit ou en utilisant
un adaptateur. Si vous ne pouvez pas insérer complètement la fiche
dans la prise, inversez la fiche. Si elle refuse toujours de s’insérer,
faire remplacer la prise par un électricien.
La longueur du cordon installé sur cet appareil a été sélectionnée afin
de réduire les risques d’enchevêtrement ou de faux pas causés par
un fil trop long. L’utilisation d’une rallonge approuvée est permise si
le cordon est trop court. Les caractéristiques électriques de la rallonge
doivent être équivalentes ou supérieures aux caractéristiques de
l’appareil. Prendre toutes les précautions nécessaires pour installer
la rallonge de manière à ne pas la faire courir sur le comptoir ou sur
une table pour éviter qu’un enfant ne tire sur le cordon ou trébuche
accidentellement.
Pour éviter une surcharge du circuit électrique, n’utilisez pas d’autres
appareils haute puissance sur le même circuit que la machine à pain.
840194103 FRv03.indd 33 12/15/14 4:18 PM
34
Pièces et caractéristiques
Couvercle supérieur
POUR RETIRER LE MOULE
À PAIN :
Fenêtre
d’observation
Moule à pain
antiadhésif*
Palette de
pétrissage*
Orifices
d’aération
Boîtier
Moule à
pain antiadhésif*
Panneau
de contrôle
En agrippant la poignée du moule à pain,
tournez celui-ci dans le sens contraire
des aiguilles d’une montre pour le
déverrouiller. Soulever puis retirer le
moule de la chambre de cuisson.
Base
Chambre
de cuisson
Palette de
pétrissage
de rechange
Palette de
pétrissage*
(l’appareil est
muni de 2 palettes)
*Pour commander des pièces :
Canada : 1.800.267.2826
840194103 FRv03.indd 34 12/15/14 4:18 PM
35
Placer la palette de pétrissage
sur l’arbre, flèche pointant vers
le haut, et pousser-la à fond
en veillant à ce que les surfaces
planes soient alignées.
Guide de démarrage rapide
AVANT LA PREMIÈRE UTILISATION : Laver et assécher le
moule à pain et la palette de pétrissage.
NOTE : N’utiliser pas d’ustensiles métalliques dans le moule au
risque d’endommager la surface antiadhésive.
ATTENTION ! Risque de chute d’objet. La machine à pain
peut
branler et se déplacer durant le cycle de pétrissage. Veiller à
toujours la placer au centre du plan de travail, à distance des bords.
Mesurer avec soin et ajoutez les ingrédients dans le moule à pain dans
l’ordre EXACT prescrit dans la recette.
CONSEIL : Mesurer les ingrédients à l’avance, y compris les ajouts
(noix, raisins).
DERNIER : Levure. DOIT être séparé des
ingrédients humides
SECOND : Ingrédients secs (sucre, sel,
shortening, farine)
PREMIER : Ingrédients liquides – température
ambiante
Placer le moule dans la machine
à pain en le tournant dans le sens
des aiguilles d’une montre pour
le verrouiller en place. Fermer le
couvercle.
NOTE : Le moule doit se verrouiller
en place pour obtenir un mélange et
un pétrissage adéquats.
1
Voir la section « Instructions détaillées » pour des renseignements supplémentaires.
Ajouter les ingrédients
2
Sélectionner le cycle
Appuyer sur le bouton CYCLE jusqu’à ce que
le numéro de programme désiré apparaisse sur
l’afficheur numérique.
Pour programmer un démarrage différé (DELAY
TIMER), utiliser les boutons + ou – du retardateur
pour ajouter jusqu’à 12 heures de délai avant le
démarrage du cycle. Reportez-vous à la page
40 pour des renseignements supplémentaires.
Appuyer sur les boutons CRUST (croûte) et LOAF
SIZE (miche) pour ajuster le réglage (impossible
pour certains cycles).
3
Commencez à faire le pain
Appuyer sur START/STOP (marche/arrêt).
L’afficheur indiquera le temps qu’il reste pour
compléter le cycle.
Une fois le cycle terminé, la machine émet un bip
et démarre le cycle Réchaud (Keep Warm) pendant
jusqu’à 1 heure.
Appuyer sur le bouton START/STOP (marche/
arrêt) pendant 2 secondes pour annuler ce cycle
et éteindre la machine à pain.
Ajouts : Après le second cycle de pétrissage,
10 bips signaleront le moment d’ajouter des fruits,
des noix, etc.
En portant des gants isolants, tourner le moule dans le sens contraire des aiguilles
d’une montre pour le déverrouiller et soulevez le moule en ligne droite. En portant
toujours les gants, secouer la miche dans le moule et laissez refroidir 10 minutes.
840194103 FRv03.indd 35 12/15/14 4:18 PM
36
Panneau de contrôle
CYCLE
Appuyer sur le bouton CYCLE pour sélectionner le
cycle désiré. Le numéro de cycle correspondant
apparaît sur l’afficheur.
COULEUR DE LA CROÛTE
Appuyer sur le bouton CRUST (Croûte) pour déplacer
la flèche au réglage voulu : croûte pâle (Light),
moyenne (Medium) ou foncée (Dark). (Le réglage de
couleur n’est pas disponible pour les cycles , , ,
et .)
POIDS DE LA MICHE
Appuyer sur le bouton LOAF SIZE (Format du pain)
pour déplacer la flèche sur 1,5 ou 2 lb. (Le réglage du
poids de la miche n’est pas disponible pour les cycles
, , , , , et .)
RETARDATEUR
Utiliser le retardateur (Delay Timer) pour différer le démarrage de la machine à pain. Appuyer sur les boutons
+ et – pour augmenter la durée du cycle qui apparaît sur l’afficheur. Ajouter jusqu’à 13 heures, retardateur et
cycle de préparation du pain compris.
NOTES :
• Régler le retardateur après la sélection du cycle, du poids de la miche et de la couleur de la croûte.
• Le retardateur n’est pas disponible pour les cycles 1,5 lb. Express, 2 lb. Express et JAM.
• N’utiliser pas le retardateur pour des recettes comprenant des produits laitiers ou d’autres produits
sensibles, tels que œufs, lait, crème ou fromage.
BOUTON START/STOP (démarrage/arrêt)
Appuyer sur le bouton START/STOP (marche/arrêt) une seule fois pour démarrer un cycle. Un bip court se fera
entendre, le deux-points sur l’afficheur se mettra à clignoter et le cycle démarrera. Pour retirer le pain, appuyer sur
le bouton START/STOP (marche/arrêt) pour mettre fin au cycle de cuisson.
Pour annuler un cycle, appuyer sur le bouton START/STOP (marche/arrêt) pendant au moins 2 secondes.
Cycles préprogrammés
840194103 FRv03.indd 36 12/15/14 4:18 PM
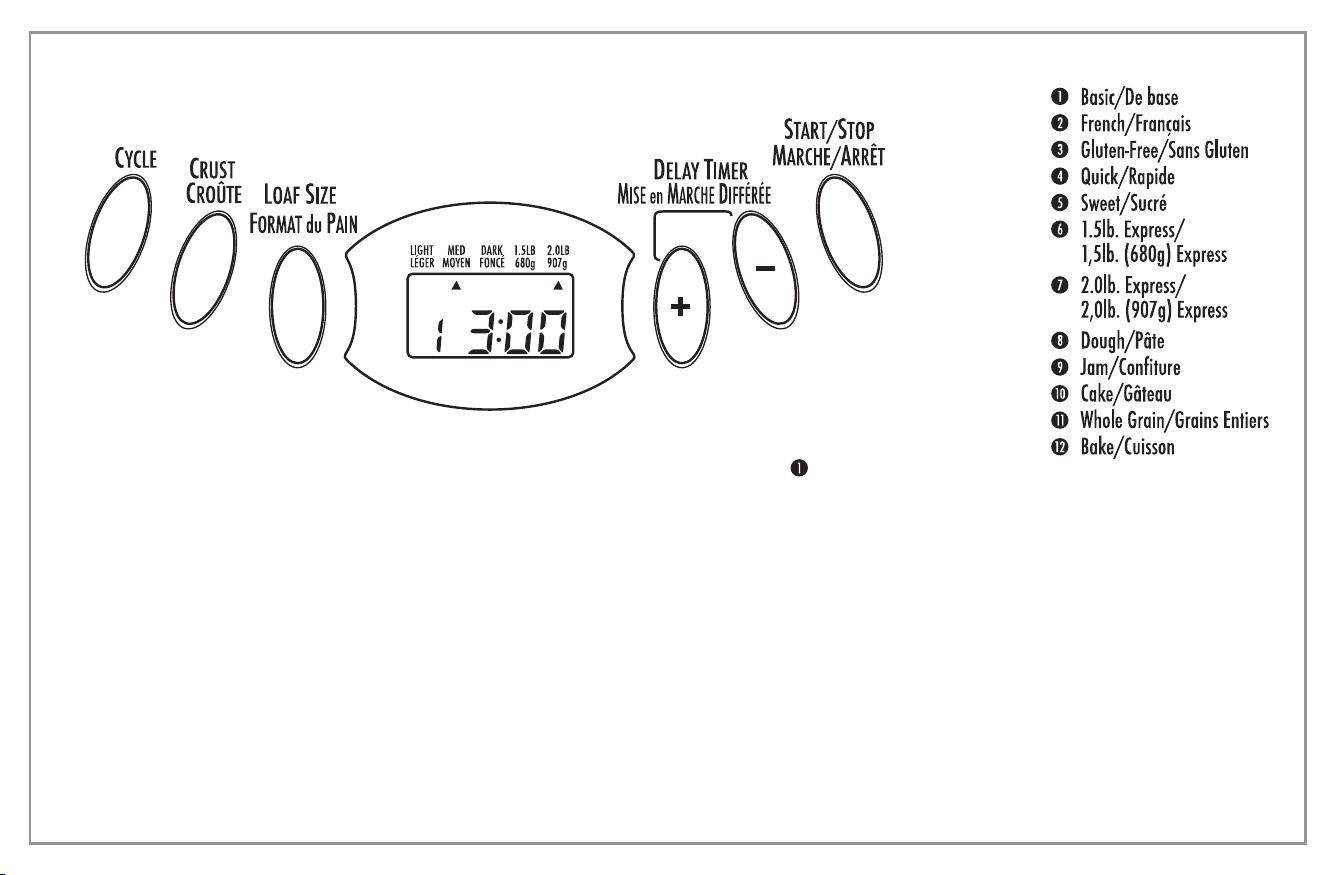
37
Panneau de contrôle
(suite)
Cycles préprogrammés
PANNE DE COURANT
Dans l’éventualité d’une panne de courant, la fabrication du pain se poursuivra automatiquement pendant 5 minutes. Si l’interruption dure
plus de 5 minutes, l’appareil cessera de fonctionner et l’afficheur reviendra aux réglages par défaut (cycle , couleur moyenne et miche
de 2 lb). Si la pâte a commencé à lever, jeter les ingrédients du moule et recommencer. Si ce n’est pas le cas, vous pouvez appuyez sur
le bouton START/STOP (marche/arrêt) pour continuer le cycle à partir du début.
AFFICHAGE D’ALERTE
« HHH » – Cette alerte signifie que la température à l’intérieur du moule à pain est trop élevée. Arrêter le programme, débrancher le cordon,
ouvrer le couvercle et laisser la machine refroidir complètement avant de redémarrer.
« LLL » – Cette alerte signifie que la température à l’intérieur du moule à pain est trop basse. La température de la pièce est trop basse pour
permettre le fonctionnement de la machine à pain.
RÉCHAUD
Une fois le cycle de cuisson terminé, la machine à pain passera au réglage Réchaud (Keep Warm) pendant 1 heure.
Pour annuler la fonction Réchaud, appuyez sur le bouton START/STOP (marche/arrêt) pendant 2 secondes.
CONSEIL : Le retrait immédiat du pain après le cycle de cuisson empêchera la croûte de devenir plus foncée.
840194103 FRv03.indd 37 12/15/14 4:18 PM

38
Cycles de programmation
Basic (De base)
Pour les pains blancs et mélangés faits à partir d’une farine
à pain ordinaire.
French (Français)
Pour les pains légers faits à partir d’une farine fine. En règle
générale, le pain est léger et sa croûte est croustillante. Ce
réglage ne convient pas aux recettes qui demandent du
beurre, de la margarine ou du lait.
Gluten-Free (Sans gluten)
Pour les pains et les mélanges sans gluten.
Quick (Rapide)
Pour les recettes de pain rapides qui n’exigent pas de levure
organique mais possiblement de la poudre à pâte (levure
chimique) ou du bicarbonate de soude. Le temps requis
pour le pétrissage, la levée et la cuisson est moindre que
pour le pain ordinaire.
Sweet (Sucré)
Pour les pains auxquels on ajoute des ingrédients tels que
jus de fruit, noix de coco râpée, raisins, fruits secs, chocolat
ou sucre. La phase de levée étant plus longue, le pain sera
léger et aéré.
1.5 lb. Express (1,5 lb [680 g] Express)
Le pétrissage, la levée et la cuisson d’une miche de 1,5 lb
(680 g) prend 58 minutes en utilisant une levure à levée
rapide. La miche sera plus petite et moins consistante que
celle réalisée au cycle Basic (Pain ordinaire).
2.0 lb. Express (2,0 lb [907 g] Express)
Semblable au cycle 1,5 lb. Express, mais donne une miche
de 2 lb (907 g).
Dough (Pâte)
Ce cycle sert à préparer la pâte pour des aliments à cuire au
four conventionnel tels que brioches, pizzas, etc. Ce cycle
ne comporte aucune cuisson.
Jam (Confiture)
Pour faire de la confiture à partir de fruits frais.
Cake (Gâteau)
Le pétrissage, la levée et la cuisson s’effectuent, mais à
l’aide de bicarbonate de soude ou de poudre à pâte.
Whole Grain (Grains entiers)
Pour les pains faits à partir de farines plus denses qui
requièrent une phase de pétrissage et de levée plus longue
(farine de blé entier, farine de seigle). Le pain sera plus
dense et plus lourd.
Bake (Cuisson)
Lorsqu’une cuisson prolongée est nécessaire parce que la
miche est trop légère ou insuffisamment cuite. Le cycle ne
comporte ni pétrissage ni délai.
840194103 FRv03.indd 38 12/15/14 4:18 PM
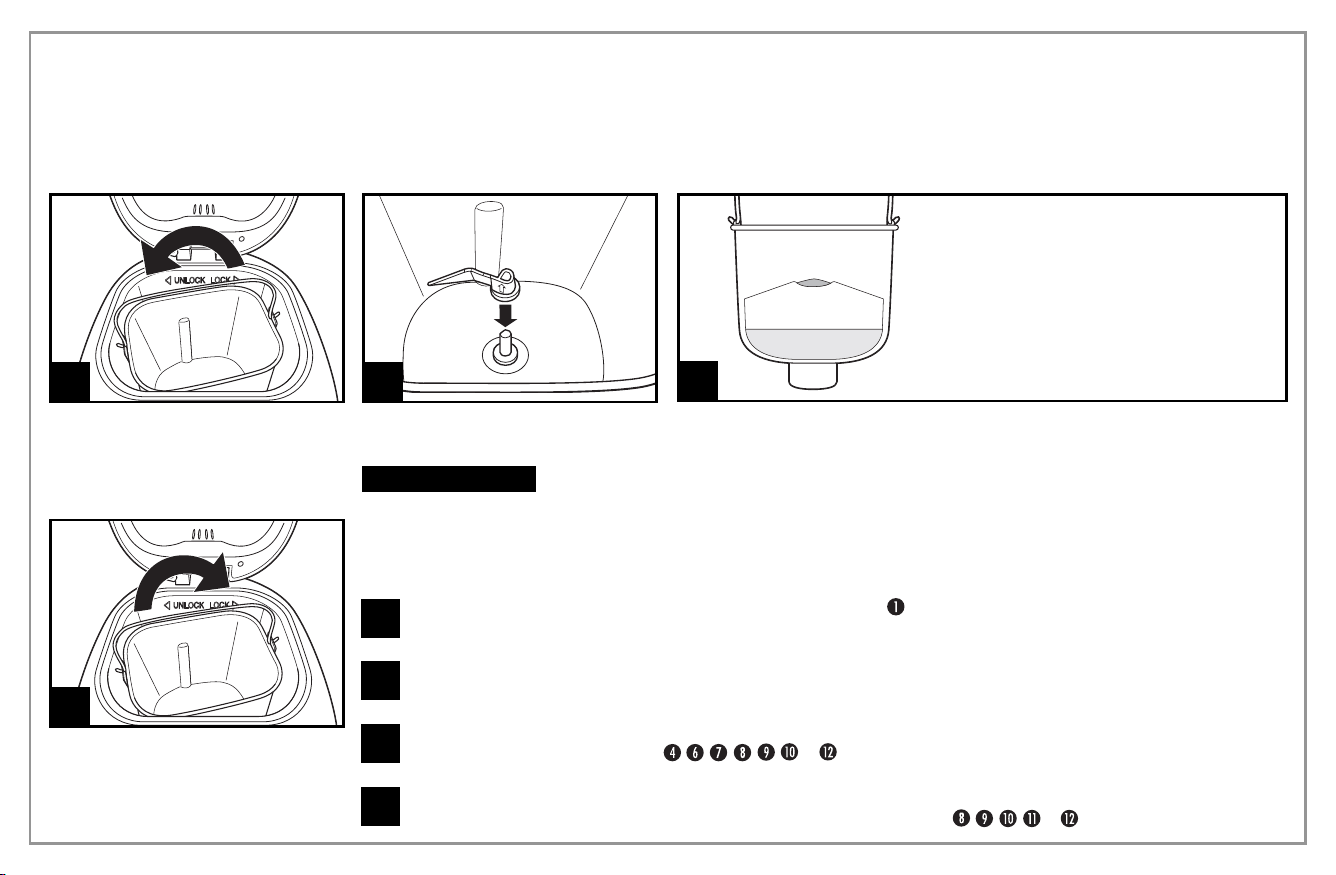
39
Appuyer sur le bouton CRUST (Croûte) pour déplacer la flèche au réglage voulu : croûte pâle (Light), moyenne (Medium)
ou foncée (Dark). (Le réglage de couleur n’est pas disponible pour les cycles , , , et .)
8
1
En agrippant la poignée du moule à pain,
tourner celui-ci dans le sens contraire
des aiguilles d’une montre puis retirer-le
de l’appareil.
Instructions
détaillées
AVANT LA PREMIÈRE UTILISATION :
• Vérifier qu’aucune pièce n’est manquante ou
endommagée.
• Nettoyer toutes les pièces selon la section « Nettoyage ».
• Régler la machine au mode Bake (Cuisson) et laissez cuire
à vide pendant 10 minutes. Laisser l’appareil refroidir et
nettoyer toutes les pièces détachées une nouvelle fois.
L’appareil peut dégager un peu de fumée et/ou une odeur
lorsque vous l’allumez pour la première fois. Ce phénomène
est normal et il disparaîtra après la première ou la seconde
utilisation. Assurez-vous de ventiler l’appareil suffisamment.
• Sécher toutes les pièces à fond. L’appareil est prêt à
l’emploi.
2
Pousser la palette de pétrissage sur
l’arbre d’entraînement à l’intérieur du
moule à pain.
w
MISE EN GARDE
Risque de
chute d’objet : La machine à pain
peut branler et se déplacer durant le
cycle de pétrissage. Veiller à toujours
la placer au centre du plan de travail, à
distance des bords.
3
Ajouter les ingrédients dans le moule dans l’ordre indiqué dans la recette. D’abord,
ajouter les liquides, le sucre et le sel ; ensuite la farine ; et enfin la levure.
NOTE : Assurez-vous que la levure n’entre pas en contact avec le sel ou les liquides.
DERNIER : Levure. DOIT être séparé des
ingrédients humides
DEUXIÈME : Ingrédients secs (sucre, sel,
matière grasse, farine)
PREMIER : Ingrédients liquides – température
ambiante
4
Placer le moule à pain dans l’appareil et
vérifier qu’il est bien verrouillé en place
en le tournant dans le sens des aiguilles
d’une montre. Fermer le couvercle.
Brancher l’appareil. Un bip retentira et l’afficheur indiquera le Cycle par défaut.
Appuyer sur le bouton CYCLE jusqu’à ce que le numéro de programme désiré apparaisse sur l’afficheur numérique.
5
6
Appuyer sur le bouton LOAF SIZE (Format du pain) pour déplacer la flèche sur 1,5 ou 2 lb. (Le réglage du format du pain
n’est pas disponible pour les cycles , , , , , et .)
7
840194103 FRv03.indd 39 12/15/14 4:18 PM

40
Instructions détaillées
(suite)
Une fois le cycle terminé, la machine émet 10 bips et passe au réglage Réchaud (Keep Warm) pendant 1 heure.
12
Pour arrêter la machine, appuyer sur le bouton START/STOP (marche/arrêt) pendant 2 secondes et le mode Réchaud prendra fin. Débrancher le cordon d’alimentation
puis ouvrer le couvercle en portant des gants isolants.
13
14
Laisser le moule refroidir légèrement avant de retirer le pain. Toujours en portant des gants isolants, tournez avec précaution le moule dans le sens contraire des
aiguilles d’une montre pour le déverrouiller. Soulever ensuite le moule par la poignée pour le retirer de la machine.
15
En portant des gants isolants, renverser le moule (poignée du moule rabattue) sur une grille de refroidissement ou une surface de cuisson propre, puis secouer
légèrement pour extraire le pain. Utiliser une spatule antiadhésive pour dégager délicatement du moule les côtés du pain.
16
Si la palette de pétrissage reste prise dans le pain, dégager-la délicatement à l’aide d’une spatule ou d’un petit ustensile. Lorsque la cuisson est terminée ou si
l’appareil est inutilisé, débrancher le cordon d’alimentation.
NOTE: Conserver le pain restant dans un sac de plastique hermétique jusqu’à trois jours à température ambiante. Pour une conservation prolongée, placer le sac hermétique
au réfrigérateur jusqu’à 10 jours.
Si vous le désirez, régler le retardateur (Delay Timer) à l’aide des boutons + et –. (La fonction Retardateur n’est pas disponible pour les cycles , et .)
NOTE: N’utiliser pas le retardateur si la pâte contient des produits laitiers, des oeufs, etc.
9
Appuyer sur le bouton START/STOP (marche/arrêt) pour démarrer le cycle. La machine à pain émettra un bip et le deux-points (:) de l’afficheur commencera à
clignoter pour indiquer que la minuterie est en marche. La palette de pétrissage commencera à mélanger les ingrédients. Si le retardateur est activé, la palette
de pétrissage ne mélangera les ingrédients que lors du démarrage du cycle.
10
Pour les ajouts (noix, raisins), la machine émettra un bip au début du second pétrissage. Ouvrer le couvercle et verser les ajouts. Ce moment varie selon le cycle.
(Reportez-vous au tableau de la durée des cycles.)
11
840194103 FRv03.indd 40 12/15/14 4:18 PM

41
Tableau des durées
des cycles
Chaque cycle de la machine à pain comprend des durées différentes
allouées pour pétrir, lever et cuire le pain. Le tableau ci-dessous indique
les durées de chaque étape selon les cycles précis.
REMARQUE : La durée totale s’ajoute à toutes ces phases et n’inclut
pas la durée de démarrage différé.
CYCLE
De base – 1,5 lb.
2 lb.
Français – 1,5 lb.
2 lb.
Sans gluten – 1,5 lb.
2 lb.
Rapide
Sucré – 1,5 lb.
2 lb.
1,5-lb. Express
2.0-lb. Express
Pâte
Confiture
Gâteau
Grain entier – 1,5 lb.
2 lb.
Cuisson
1
ER
PÉTRISSAGE
9 min.
10 min.
16 min.
18 min.
9 min.
10 min.
7 min.
10 min.
10 min.
12 min.
9 min.
20 min.
–
10 min.
15 min.
15 min.
–
1
ER
LEVÉE
20 min.
20 min.
40 min.
40 min.
25 min.
25 min.
5 min.
5 min.
5 min.
11 min.
9 min.
30 min.
–
5 min.
40 min.
40 min.
–
BIP POUR
LES AJOUTS
–
–
–
–
–
–
–
–
–
–
–
–
–
–
–
–
2
E
PÉTRISSAGE
14 min.
15 min.
19 min.
22 min.
18 min.
20 min.
8 min.
20 min.
20 min.
–
–
–
–
20 min.
5 min.
5 min.
–
2
E
LEVÉE
25 min.
25 min.
30 min.
30 min.
35 min.
35 min.
–
30 min.
30 min.
–
–
40 min.
–
30 min.
25 min.
25 min.
–
3
E
LEVÉE
45 min.
45 min.
50 min.
50 min.
1 hr. 10 min.
1 hr. 10 min.
–
55 min.
50 min.
–
–
–
–
35 min.
40 min.
40 min.
–
CUISSON
1 hr.
1 hr. 5 min.
1 hr. 5 min.
1 hr. 10 min.
55 min.
1 hr.
1 hr. 20 min.
50 min.
1 hr.
35 min.
40 min.
–
1 hr. 20 min.
1 hr. 10 min.
50 min.
55 min.
1 hr.
RÉCHAUD
(1 HEUR)
Oui
Oui
Oui
Oui
Oui
Oui
Oui
Oui
Oui
Oui
Oui
Non
Non
Oui
Oui
Oui
Oui
TEMPS
TOTAL
2 hrs. 53 min.
3 hrs.
3 hrs. 40 min.
3 hrs. 50 min.
3 hrs. 32 min.
3 hrs. 40 min.
1 hr. 40 min.
2 hrs. 50 min.
2 hrs. 55 min.
58 min.
58 min.
1 hr. 30 min.
1 hr. 20 min.
2 hrs. 50 min.
2 hrs. 55 min.
3 hrs.
1 hr.
840194103 FRv03.indd 41 12/15/14 4:18 PM
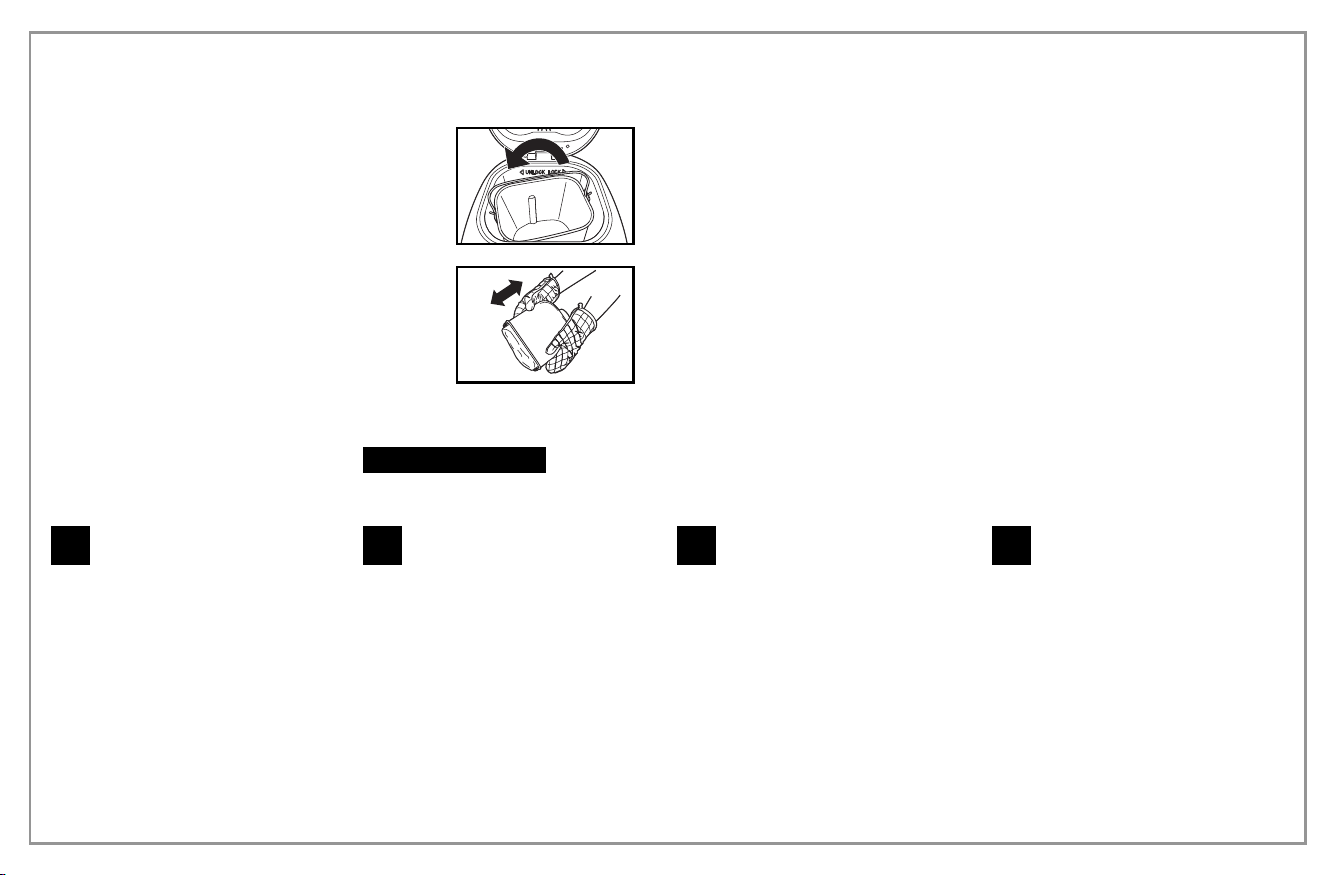
42
Nettoyage
Pour nettoyer la palette de pétrissage :
Si la palette s’extirpe difficilement du
pain, ajouter de l’eau dans le fond du
moule et laisser tremper pendant
1 heure.
Essuyer la palette avec soin à l’aide d’un
chiffon humide. La palette de pétrissage
va au lave-vaisselle.
1
Pour nettoyer le moule : Retirer le moule
à pain en le tournant dans le sens
contraire des aiguilles d’une montre.
Essuyer l’intérieur et l’extérieur du moule
à l’aide d’un chiffon humide. N’utiliser pas
de substances abrasives afin de protéger
l’enduit antiadhésif. Le moule doit être
séché à fond avant l’installation.
NOTE : Le moule à pain et la palette
de pétrissage vont au lave-vaisselle.
L’extérieur du moule et la base peuvent
se décolorer. Il s’agit d’un phénomène
normal.
2
Pour nettoyer le boîtier et le couvercle
supérieur : Après l’utilisation, laisser
l’appareil refroidir. Utiliser un chiffon
humide pour essuyer le couvercle,
le boîtier, la chambre de cuisson et
l’intérieur de la fenêtre d’observation.
N’utiliser pas de substances abrasives
pour le nettoyage, ce qui risquerait de
dégrader le poli de la surface. N’immerger
jamais le boîtier dans l’eau pour le
nettoyer.
3
Avant de ranger la machine à pain dans
un emballage, celle-ci doit être totalement
refroidie, propre et sèche, couvercle
supérieur fermé.
4
Retrait du pain
Le moule à pain et la chambre de cuisson deviennent
chauds et des gants isolants doivent être portés. Retirer
le moule en levant d’abord la poignée puis en tournant
le moule dans le sens contraire des aiguilles d’une
montre pour le déverrouiller de la base de la chambre
de cuisson.
Secouer délicatement le pain à l’envers jusqu’à ce que
la miche se dégage du moule. Laisser refroidir sur une
grille pendant 10 minutes avant de trancher le pain.
CONSEIL : Si la palette de pétrissage reste prise dans
la miche, dégager-la à l’aide d’une spatule ou d’un petit
ustensile.
Tranchage
Laisser refroidir pendant 10 minutes puis trancher à l’aide d’un couteau à pain.
Conservation du pain
Il est préférable de consommer le pain frais aussi tôt que possible.
Pour le conserver, envelopper le pain refroidi dans une pellicule d’aluminium
ou un sac plastique pour en préserver la fraîcheur.
Le pain congelé peut se conserver jusqu’à 6 mois.
Une fois la cuisson terminée, l’appareil passe au mode Réchaud pendant 1 heure. Maintener enfoncé le bouton
START/STOP (marche/arrêt) pendant 2 secondes pour mettre fin à ce cycle avant de retirer le moule à pain.
Risque de choc électrique :
Débrancher l’appareil avant le nettoyage. Ne pas immerger le cordon, la fiche ou le boîtier dans un liquide.
Laisser la machine à pain refroidir complètement avant de la nettoyer.
w AVERTISSEMENT
840194103 FRv03.indd 42 12/15/14 4:18 PM

43
Conseils : Notions élémentaires sur le pain
Deux facteurs contribuent à obtenir une miche parfaite : des ingrédients frais de qualité et des dosages mesurés avec précision.
Farine
Farine tout-usage
Farine qui ne contient pas de poudre à pâte, convenant à la cuisson de pains
« rapides » ou de pains préparés à partir du réglage Quick (Rapide). La farine à pain
convient mieux aux pains à levure organique.
Farine panifiable
La farine à pain (ou panifiable) est l’ingrédient le plus important dans la fabrication du
pain et elle est recommandée dans la plupart des recettes de pain à levure. Elle a une
teneur élevée en gluten et conserve le volume du pain après la levée. La farine varie
selon les régions. Par exemple, la farine américaine est moulue à partir de blé de
printemps dur et la canadienne, de blé d’hiver dur.
Farine auto-levante
La farine auto-levante contient de la poudre à pâte (ou levure chimique), utilisée
spécialement pour les gâteaux. N’utiliser pas de farine auto-levante avec de la
levure organique.
Farine de blé entier
La farine de blé entier est moulue à partir du grain de blé entier. La teneur en fibres et
la valeur nutritive seront plus élevées si le pain est préparé en totalité ou en partie avec
cette farine. La farine de blé entier est plus dense, de sorte que les miches peuvent
présenter une taille réduite et une texture plus consistante.
Autres ingrédients
Oeufs
Les oeufs peuvent améliorer la texture du pain et augmenter sa taille. Les oeufs doivent
être battus et intégrés aux autres ingrédients liquides.
Sel
Le sel est nécessaire pour rehausser la saveur du pain et la couleur de la croûte. Il sert
aussi à restreindre l’activité de la levure.
Matière grasse, beurre et huile végétale
Le shortening et le beurre doivent être incorporés en petits morceaux avant d’ajouter
le liquide.
Sucre
Le sucre constitue de la « nourriture » pour la levure et il accentue le goût sucré et la
couleur du pain. C’est un élément très important pour la levée du pain. Le sucre blanc
est normalement utilisé ; cependant, la cassonade ou le sucre en poudre peuvent aussi
faire partie de certaines recettes.
Eau et autres liquides (toujours ajouter en premier)
L’eau est un ingrédient essentiel dans la préparation du pain. En règle générale, l’eau
doit être à température ambiante. Certaines recettes peuvent demander du lait ou
d’autres liquides. N’utiliser jamais l’option Retardateur avec du lait.
Levure (organique)
La levure est un organisme vivant et elle doit être conservée au réfrigérateur pour préserver
sa fraîcheur. Elle a besoin des hydrates de carbone du sucre et de la farine pour se nourrir.
La levure utilisée dans les recettes pour machine à pain est vendue sous différentes
désignations : levure pour machine à pain (meilleur choix), levure sèche active ou levure
à action rapide.
Avant l’utilisation, vérifier la date d’expiration de la levure. Remettre immédiatement
au réfrigérateur après chaque usage.
Conseils :
Pour vérifier la fraîcheur et l’efficacité de la levure :
• Verser 1 tasse (237 ml) d’eau chaude du robinet dans une tasse à mesurer.
• Ajouter 1 cuillerée à thé (5 ml) de sucre blanc et 1 cuillerée à table (15 ml)
de levure.
• Placer la tasse à mesurer dans un endroit chaud pendant environ 5 minutes.
• La levure fraîche devrait commencer à dégager des bulles ou à « grossir ».
Le cas contraire indique que la levure est stérile ou inactive.
Ingrédients
840194103 FRv03.indd 43 12/15/14 4:18 PM
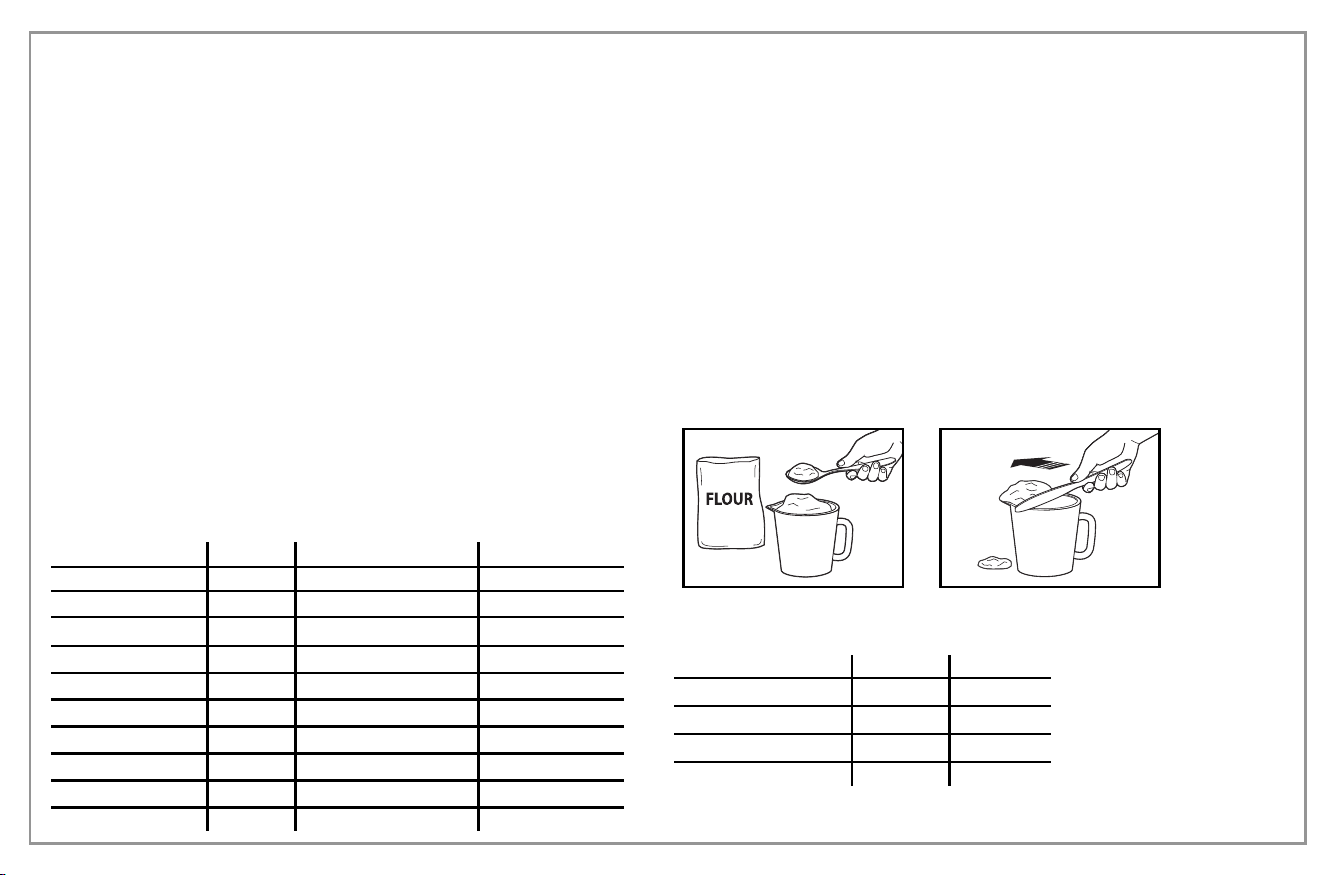
44
Conseils : Mesurer avec précision
Un des plus importantes étapes de la préparation du pain consiste dans le dosage des ingrédients. Mesurer chaque ingrédient avec minutie et ajoutez-les au moule à pain
dans l’ordre prescrit dans la recette.
Séquence d’ajout des ingrédients
Ajouter toujours les ingrédients dans l’ordre prescrit dans la recette.
PREMIER : Ingrédients liquides
SECOND : Ingrédients secs
DERNIER : Levure
La levure doit toujours être déposée sur la farine sèche et ne jamais entrer en contact
avec le liquide ou le sel.
Si vous utilisez la fonction Retardateur pendant une longue période de temps, n’ajouter
jamais d’ingrédients périssables tels que des œufs ou du lait.
Ingrédients liquides
L’eau, le lait frais ou les autres liquides doivent être mesurés à l’aide d’une tasse à
mesurer munie d’une graduation nette et d’un bec verseur. Placer la tasse sur le plan de
travail et baissez-vous pour vérifier le niveau du liquide. Lorsque vous mesurez de l’huile
de cuisson ou d’autres ingrédients, nettoyer la tasse à mesurer à fond entre
les mesures.
Mesures sèches
Mesurer les ingrédients secs (farine, etc.) en les répandant délicatement dans la
tasse à mesurer avec une cuillère, puis égaliser la quantité requise avec un couteau.
N’utiliser jamais la tasse à mesurer pour ramasser vos ingrédients secs directement
dans un contenant puisque vous pourriez ainsi ajouter jusqu’à une cuillerée à table
de trop. Ne taper pas le fond de la tasse à mesurer et ne chercher pas à tasser son
contenu.
CONSEIL : Avant de mesurer, brasser la farine pour l’aérer.
Lorsque vous mesurez de petites quantités d’ingrédients secs comme du sel ou du
sucre, utiliser une cuillère à mesurer, en vous assurant que son contenu est égalisé.
Les meilleurs résultats sont obtenus en pesant les ingrédients secs à l’aide d’une
balance numérique.
Tableau de conversion des unités de mesure des liquides
Onces liquides
8
7
6
5
4
3
2
1
Tasse
1
7/8
3/4
5/8
1/2
3/8
1/4
1/8
Cuillers à soupe
16
14
12
10
8
6
4
2
1
1/2
Cuillers à café
48
42
36
30
24
18
12
6
3
1 1/2
1 tasse de :
Farine tout-usage
Farine à pain
Farine de blé entier
Farine de seigle
Onces
4,4
4,5
4,2
3,6
Grammes
125
128
119
102
Équivalences en poids des mesures sèches
840194103 FRv03.indd 44 12/15/14 4:18 PM

45
Foire aux questions
Puis-je utiliser un substitut au lieu du sucre ?
Le sucre est nécessaire à la levure pour produire une miche légère d’une bonne
hauteur. Les résultats peuvent varier selon le type et la quantité de substitut du sucre
utilisée. Si vous utilisez un édulcorant artificiel, choisissez celui à base d’aspartame
plutôt que de saccharine.
Puis-je omettre d’ajouter du sucre ou du sel dans la recette ?
Non, le sucre et le sel jouent un rôle important dans la préparation du pain. Le sel
empêche la levure d’agir trop fortement et le pain de trop lever. La combinaison de
sucre, de sel et de levure constitue une composante cruciale de la préparation du pain.
N’oublier pas que la quantité totale de sucre et de sel est répartie entre les tranches,
de sorte que la quantité par portion n’est pas très élevée.
À quel moment dois-je ajouter les raisins, les noix, etc., dans le pain ?
Cette machine à pain émettra un bip au début du second pétrissage pour vous faire
savoir qu’il est temps d’ajouter ce type d’ingrédients (raisins, noix, graines, etc.). Ce
moment varie selon le cycle choisi. (Reportez-vous au tableau de la durée des cycles.)
Si vous utilisez la fonction Retardateur et que cela est plus pratique, vous pouvez
ajouter ces ingrédients au début.
Puis-je ouvrir le couvercle pendant le fonctionnement de la machine ?
Cette machine à pain comporte une fenêtre dans le couvercle pour vous permettre
d’observer l’évolution de votre pain. Des ouvertures rapides sont correctes lors des
premières étapes du pétrissage ou pour ajouter des ingrédients lorsque le signal se
fait entendre. Cependant, la température dans la chambre de cuisson s’ajuste lors des
phases de levée et de cuisson. L’ouverture du couvercle durant ces phases peut nuire
à levée ou à la cuisson du pain. De la condensation se forme parfois sur la fenêtre
d’observation après le mélange et le pétrissage initiaux. Elle disparaît habituellement
une fois le cycle de cuisson démarré de sorte que vous apercevez alors nettement votre
miche.
Puis-je utiliser ma recette favorite avec cette machine à pain ?
Oui, mais vous devez expérimenter pour obtenir la bonne proportion d’ingrédients.
Familiarisez-vous avec l’appareil et préparez plusieurs miches de pain à l’aide des
recettes fournies avant d’expérimenter. Ne dépasser jamais 4 1/4 tasses (1 L)
d’ingrédients secs (c.-à-d. farine, avoine, semoule de maïs, etc.). Utiliser les recettes de
ce manuel pour vous aider à déterminer le rapport entre les ingrédients secs et liquides,
ainsi que les quantités de levure, de sucre, de sel et de beurre ou margarine à utiliser.
Qu’adviendra-t-il si je laisse le pain dans le moule après la cuisson ?
Cet apparail est doté d’un cycle Réchaud de 60 minutes qui vous permet de laisser
le pain dans le moule pendant jusqu’à une heure après la cuisson. Une fois le cycle
Réchaud terminé, il est préférable de retirer le pain immédiatement, sinon le bas de
votre miche absorbera de l’humidité et se ramollira.
La recette peut-elle être réduite de moitié ?
Non, cela n’est pas recommandé. Les proportions d’ingrédients fonctionnent mieux
avec des quantités pleines.
Comment peut-on utiliser les mélanges à pain dans la machine, et avec quels
réglages ?
Les instructions sur l’emballage vont énumérer les quantités d’eau et de levure à
utiliser. Assurez-vous d’ajouter le liquide en premier, suivi des ingrédients secs et
finalement de la levure. Ne laisser pas la levure entrer en contact avec le liquide. Le
réglage dépend du type de mélange à pain utilisé (p.ex. le réglage Régulier vaut pour
le pain blanc ; le réglage Sucré est approprié pour les fruits secs, le fromage ou les
noix ; un mélange blé entier ou multigrain nécessitera le réglage Grain entier ; le réglage
de la couleur de la croûte—pâle, moyenne ou foncée—est une question de préférence
personnelle). N’utiliser pas de mélanges à pain dont le poids de miche excède 2 lb (907 g).
Quelle est la différence entre une farine américaine et une farine canadienne ?
La farine canadienne contient beaucoup plus de gluten que la farine américaine. La
farine américaine peut être substituée par des quantités égales de farine canadienne.
Toutefois, la farine canadienne absorbe plus l’humidité. Vérifier la pâte pendant le cycle
de levée. Si la pâte semble trop sèche, ajouter 1 c. à soupe (15 ml) d’eau par tasse de
farine demandée par la recette. Ajouter 1 c. à soupe (15 ml) à la fois pour obtenir une
pâte douce et souple.
840194103 FRv03.indd 45 12/15/14 4:18 PM

46
PROBLÈME
Odeur de brûlé ou autre.
Les ingrédients ne se
mélangent pas ; on entend
le moteur tourner.
« HHH » s’affiche lorsque
le bouton START/STOP
(marche/arrêt) est enfoncé.
La fenêtre d’observation
est embuée ou recouverte
de condensation.
La palette de pétrissage
sort avec le pain.
CAUSE POSSIBLE
• De la farine ou d’autres ingrédients sont tombés
dans la chambre de cuisson.
• Le moule à pain ou la palette de pétrissage n’a pas
été installés correctement.
• Il y a trop d’ingrédients.
• La température interne de la machine est trop
élevée.
• Peut survenir durant les phases de mélange ou
de levée.
• La croûte est plus épaisse avec le réglage de
couleur foncée.
SOLUTION
• Éteindre la machine à pain et laisser refroidir
complètement. À l’aide d’une serviette de papier,
essuyer l’excès de farine, etc., qui se trouve dans la
chambre de cuisson.
CONSEIL : Mesurer les ingrédients au-dessus du
plan de travail, en les ajoutant dans le moule avant
d’insérer celui-ci dans la machine.
• Veiller à ce que la palette soit insérée à fond sur
l’arbre.
• Mesure les ingrédients adéquatement.
• Laisser l’appareil refroidir entre les cycles.
Débrancher l’appareil, ouvrir le couvercle et retirer
le moule. Laisser refroidir de 15 à 30 minutes
avant de lancer un nouveau cycle.
• La condensation disparaît habituellement lors de
la phase de cuisson. Bien nettoyer la fenêtre entre
les utilisations.
• Il arrive que la palette soit prise dans le pain. Une
fois la miche refroidie, dégager la palette à l’aide
d’une spatule.
•
Choisir une croûte plus pâle (cycles – seulement).
Dépannage
840194103 FRv03.indd 46 12/15/14 4:18 PM

47
Dépannage
(suite)
PROBLÈME
La pâte n’est pas bien
mélangée ; la farine et
les autres ingrédients
s’accumulent sur un côté
du moule ; la miche est
enduite de farine.
Le pain lève trop haut et
pousse sur le couvercle.
Le pain ne lève pas ;
la miche est courte.
Une fois cuit, le pain
présente un cratère sur
le sommet de la miche.
La couleur de la croûte
est trop pâle.
La couleur de la croûte
est trop foncée.
CAUSE POSSIBLE
• Le moule à pain ou la palette de pétrissage n’est
pas été installés correctement.
• Il y a trop d’ingrédients.
• La pâte sans gluten est généralement très humide.
Il peut s’avérer nécessaire de gratter les côtés avec
une spatule.
• Les ingrédients n’ont pas été mesurés correctement
(trop de levure, de farine).
• La palette de pétrissage n’est pas dans le moule.
• On a oublié d’ajouter le sel.
• Mesure imprécise des ingrédients ou levure
inactive.
• Le couvercle a été ouvert pendant les cycles.
• La pâte a levé trop vite.
• Trop de levure ou d’eau.
• Le cycle choisi ne convient pas à la recette.
• Le couvercle a été ouvert durant la cuisson.
• Trop de sucre dans la recette.
SOLUTION
• S’assurer que le moule est bien verrouillé dans
l’appareil et que la palette est insérée à fond sur
l’arbre.
• Veiller à ce que les ingrédients soient mesurés
avec précision et ajoutés dans l’ordre approprié.
• Le surplus de farine peut être enlevé une fois
la miche cuite et refroidie. Ajouter de l’eau, une
cuillerée à table à la fois, jusqu’à ce que la pâte
forme une boule.
• Mesurer tous les ingrédients avec précision et ne
pas oublier le sucre et le sel.
• Diminuer la quantité de levure de 1/4 de cuillerée
à thé (1,2 ml).
• Vérifier l’installation de la palette.
• Mesure tous les ingrédients avec précision.
• Vérifier la date d’expiration de la levure et de la
farine.
• Les liquides doivent être à température ambiante.
• Mesurer tous les ingrédients avec précision.
• Diminuer légèrement la quantité de levure ou d’eau.
• Ne pas ouvrir le couvercle durant la cuisson.
• Sélectionner un réglage de couleur plus foncée
(cycles – seulement).
• Diminuer légèrement la quantité de sucre.
• Sélectionner un réglage de couleur plus pâle (cycles
– seulement).
840194103 FRv03.indd 47 12/15/14 4:18 PM

48
Dépannage
(suite)
PROBLÈME
La miche de pain est
inégale.
Les miches ont des formes
différentes.
Le bas de la miche est
ramolli.
Le pain est creux ou plein
de trous à l’intérieur.
Le pain n’est pas assez cuit
ou il est collant, pâteux.
Le pain s’effondre lors du
tranchage.
La texture du pain est
dense, épaisse.
La base du moule à pain est
plus foncée ou décolorée.
CAUSE POSSIBLE
• Trop de levure ou d’eau.
• La palette de pétrissage pousse la pâte sur un côté
avant la levée et la cuisson.
• La forme varie selon le type de pain.
• Le pain est resté trop longtemps dans le moule en
mode Réchaud et il a absorbé de l’humidité.
• La pâte est trop mouillée, il y a trop de levure, pas
de sel.
• L’eau est trop chaude.
• Trop de liquide ; le cycle choisi n’est pas
approprié.
• Le pain est trop chaud.
• Trop de farine, la farine n’est pas assez fraîche.
• Il manque d’eau.
• Après un lavage au lave-vaisselle.
SOLUTION
• Mesurer les ingrédients avec précision.
• Diminuer légèrement la quantité de levure ou d’eau.
•
Certaines miches n’auront pas une forme symétrique,
en particulier avec la farine de grain entier.
• La farine de grain entier ou multigrain est plus
dense et peut produire une miche plus courte que
le pain blanc ordinaire.
• Éteindre le réglage Réchaud en appuyant sur le
bouton START/STOP (marche/arrêt) pendant
2 à 3 secondes.
• Retirer le pain du moule à l’aide de gants isolants.
• Mesurer les ingrédients avec précision.
• Diminuer légèrement la quantité de levure ou d’eau.
Vérifier la mesure de sel.
• Utiliser de l’eau à température ambiante.
• Diminuer la quantité de liquide et mesurer les
ingrédients avec précision.
• Vérifier que le cycle convient à la recette.
• Laisser refroidir sur une grille de 15 à 30 minutes
avant de trancher.
• Augmenter la quantité d’eau ou diminuer la quantité
de farine.
• Les pains à grain entier ont une texture plus dense.
• Ce phénomène est normal et il n’affectera pas le
moule à pain.
840194103 FRv03.indd 48 12/15/14 4:18 PM

49
Recettes – Basic
(De base) (Cycle )
Blanc
1,5 lb (680 g) Pain
1 tasse (
237
ml) d’eau
1 1/8 cuillers à café (5,5 ml) de sel
1 cuiller à soupe (15 ml) de sucre
3 cuillers à soupe (44 ml) de beurre
ou d’huile végétale
3 1/2 tasses (828 ml) de farine à pain
1 1/2 cuillers à café (7,4 ml) de
levure de machine à pain
2 lb (907 g) Pain
1 1/3 tasses (315 ml) d’eau
1 1/2 cuillers à café (7,4 ml) de sel
2 cuillers à soupe (30 ml) de sucre
1/4 tasse (59 ml) de beurre ou
d’huile végétale
4 1/2 tasses (1,1 L) de farine à pain
1 3/4 cuillers à café (8,6 ml) de
levure de machine à pain
Au blé blanc
1,5 lb (680 g) Pain
1 1/4 tasses (296 ml) d’eau
1 1/2 cuillers à café (7,4 ml) de sel
1 cuiller à soupe (15 ml) de sucre
2 cuillers à soupe (30 ml) de beurre
ou d’huile végétale
2 cuillers à soupe (30 ml) de lait
sec écrémé
2 tasses (473 ml) de farine à pain
1 tasse (237 ml) de farine de
blé entier
1 1/2 cuillers à café (7,4 ml) de
levure de machine à pain
2 lb (907 g) Pain
1 1/2 tasses (355 ml) d’eau
2 cuillers à café (10 ml) de sel
2 cuillers à soupe (30 ml) de sucre
3 cuillers à soupe (44 ml) de beurre
ou d’huile végétale
3 cuillers à soupe (44 ml) de lait
sec écrémé
2 1/2 tasses (591 ml) de farine à pain
1 1/2 tasses (355 ml) de farine de
blé entier
2 cuillers à café (10 ml) de
levure de machine à pain
Aux oignons
1,5 lb (680 g) Pain
1 tasse (237 ml) d’eau
1 1/8 cuillers à café (5,5 ml) de sel
1 cuiller à soupe (15 ml) de sucre
2 cuillers à soupe (30 ml) de beurre
ou d’huile végétale
2 cuillers à soupe (30 ml) d’oignons
émincés secs
3 1/2 tasses (828 ml) de farine à
pain
2 cuillers à café (10 ml) de levure
de machine à pain
2 lb (907 g) Pain
1 1/3 tasses (315 ml) d’eau
1 1/2 cuillers à café (7,4 ml) de sel
2 cuillers à soupe (30 ml) de sucre
1/4 tasse (59 ml) de beurre ou
d’huile végétale
3 cuillers à soupe (44 ml) d’oignons
émincés secs
4 1/2 tasses (1,1 L) de farine à pain
2 1/2 cuillers à café (12,3 ml) de
levure de machine à pain
1,5 lb (680 g) Pain
1 tasse (237 ml) d’eau
1 1/8 cuillers à café (5,5 ml) de sel
1 cuiller à soupe (15 ml) de sucre
3 cuillers à soupe (44 ml) de beurre
ou d’huile végétale
3 1/2 tasses (828 ml) de farine à pain
1 1/2 cuillers à café (7,4 ml) de
flocons d’oignons
2 cuillers à café (10 ml) de graines
de pavot
2 cuillers à café (10 ml) de levure
de machine à pain
2 lb (907 g) Pain
1 1/3 tasses (315 ml) d’eau
1 1/2 cuillers à café (7,4 ml) de sel
2 cuillers à soupe (30 ml) de sucre
1/4 tasse (59 ml) de beurre ou
d’huile végétale
4 1/2 tasses (1,1 L) de farine à pain
2 cuillers à café (10 ml) de flocons
d’oignons
1 cuiller à soupe (15 ml) de graines
de pavot
2 1/4 cuillers à café (11,1 ml) de
levure de machine à pain
Aux graines de pavot et aux oignons
REMARQUE : La farine canadienne contient beaucoup plus de
gluten que la farine américaine. La farine américaine peut être
substituée par des quantités égales de farine canadienne. Toutefois,
la farine canadienne absorbe plus l’humidité. Vérifier la pâte pendant
le cycle de levée. Si la pâte semble trop sèche, ajouter 1 c. à table
(15 ml) d’eau par tasse de farine demandée par la recette. Ajouter
1 c. à table (15 ml) à la fois pour obtenir une pâte douce et souple.
840194103 FRv03.indd 49 12/15/14 4:18 PM

50
Recettes – Basic
(De base) (Cycle )
1,5 lb (680 g) Pain
1 tasse (237 ml) de babeurre
1 cuiller à café (5 ml) de sel
2 cuillers à soupe (30 ml) de sucre
3 cuillers à soupe (44 ml) de beurre
ou d’huile végétale
3/4 tasse (177 ml) d’avoine ordinaire
(avoine à l’ancienne)
2 1/2 tasses (591 ml) de farine à pain
2 cuillers à café (10 ml) de levure
de machine à pain
2 lb (907 g) Pain
1 1/4 tasses (296 ml) de babeurre
1 1/4 cuillers à café (6,2 ml) de sel
2 cuillers à soupe (30 ml) de sucre
1/4 tasse (59 ml) de beurre ou
d’huile végétale
1 tasse (237 ml) d’avoine ordinaire
(avoine à l’ancienne)
2 3/4 tasses (651 ml) de farine à pain
2 1/2 cuillers à café (12,3 ml) de
levure de machine à pain
Au blé et à l’érable
1,5 lb (680 g) Pain
1 tasse (237 ml) de babeurre
1 cuiller à café (5 ml) de sel
2 cuillers à soupe (30 ml) de lait sec
écrémé
2 cuillers à soupe (30 ml) de sirop
d’érable
2 cuillers à soupe (30 ml) de beurre
ou d’huile végétale
1 tasse (237 ml) de farine de blé
entier
2 tasses (473 ml) de farine à pain
1 1/2 cuillers à café (7,4 ml)
de levure de machine à pain
2 lb (907 g) Pain
1 1/3 tasses (315 ml) de babeurre
1 cuiller à café (5 ml) de sel
2 cuillers à soupe (30 ml) de lait sec
écrémé
3 cuillers à soupe (44 ml) de sirop
d’érable
2 cuillers à soupe (30 ml) de beurre
ou d’huile végétale
1 1/2 tasses (355 ml) de farine de
blé entier
2 1/2 tasses (591 ml) de farine à pain
2 cuillers à café (10 ml) de
levure de machine à pain
Pain au parmesan italien
1,5 lb (680 g) Pain
1 tasse (237 ml) + 2 cuillers à
soupe (30 ml) d’eau
1 1/8 cuillers à café (5,5 ml) de sel
1 cuiller à soupe (15 ml) de sucre
3 cuillers à soupe (44 ml) d’huile
d’olive
3 1/2 tasses (828 ml) de farine à pain
1 cuiller à café (5 ml) de basilic sec
broyé
1 cuiller à café (5 ml) d’origan sec
broyé
3 cuillers à soupe (44 ml) de
parmesan râpé fin
1 1/2 cuillers à café (7,4 ml) de
levure de machine à pain
2 lb (907 g) Pain
1 1/3 tasses (315 ml) d’eau
1 1/2 cuillers à café (7,4 ml) de sel
2 cuillers à soupe (30 ml) de sucre
1/4 tasse (59 ml) d’huile d’olive
4 1/2 tasses (1,1 L) de farine à pain
1 1/2 cuillers à café (7,4 ml) de
basilic sec broyé
1 1/2 cuillers à café (7,4 ml) d’origan
sec broyé
1/4 tasse (59 ml) de parmesan râpé
fin
2 1/4 cuillers à café (11,1 ml) de
levure de machine à pain
Au seigle pâle
1,5 lb (680 g) Pain
1 tasse (237 ml) d’eau
1 1/2 cuillers à café (7,4 ml) de sel
2 cuillers à soupe (30 ml) de sucre
1 cuiller à soupe (15 ml) de beurre
ou d’huile végétale
2 cuillers à café (10 ml) de graines
de carvi
2 tasses (473 ml) de farine à pain
1 tasse (237 ml) de farine de seigle
1 1/2 cuillers à café (7,4 ml) de
levure de machine à pain
2 lb (907 g) Pain
1 1/2 tasses (355 ml) d’eau
1 1/2 cuillers à café (7,4 ml) de sel
2 cuillers à soupe (30 ml) de sucre
1 cuiller à soupe (15 ml) de beurre
ou d’huile végétale
2 cuillers à café (10 ml) de graines
de carvi
3 tasses (710 ml) de farine à pain
1 1/2 tasses (355 ml) de farine de
seigle
2 cuillers à café (10 ml) de levure
de machine à pain
À la farine d’avoine et au babeurre
840194103 FRv03.indd 50 12/15/14 4:18 PM

51
Recettes – French
(Français) (Cycle )
NOTE : Le réglage pour croûte foncée est recommandé.
Français
1,5 lb (680 g) Pain
1 tasse (237 ml) + 2 cuillers
à soupe (30 ml) d’eau
1 cuiller à café (5 ml) de sel
1 cuiller à café (5 ml) de sucre
3 1/2 tasses (828 ml) de farine à pain
1 1/2 cuillers à café (7,4 ml) de
levure de machine à pain
2 lb (907 g) Pain
1 1/2 tasses (355 ml) d’eau
1 1/2 cuillers à café (7,4 ml) de sel
1 1/2 cuillers à café (7,4 ml) de sucre
4 1/2 tasses (1,1 L) de farine à pain
2 cuillers à café (10 ml) de
levure de machine à pain
Recettes – Basic
(De base) (Cycle )
Au granola et au miel
1,5 lb (680 g) Pain
1 tasse (237 ml) + 2 cuillers à
soupe (30 ml) d’eau
1 1/8 cuillers à café (5,5 ml) de sel
1 cuiller à soupe (15 ml) de sucre
3 cuillers à soupe (44 ml) de beurre
ou d’huile végétale
1 1/2 tasses (355 ml) de farine à pain
1 tasse (237 ml) de farine de blé
entier
1 tasse (237 ml) de granola
1 1/4 cuillers (6,2 ml) à café de
levure de machine à pain
2 lb (907 g) Pain
1 1/2 tasses (355 ml) d’eau
1 1/2 cuillers à café (7,4 ml) à café
de sel
1/4 tasse (59 ml) de miel
2 cuillers à soupe (30 ml) de beurre
ou d’huile végétale
2 1/2 tasses (591 ml) de farine à pain
1 tasse (237 ml) de farine de blé
entier
1 tasse (237 ml) de granola
2 cuillers à café (10 ml) de
levure de machine à pain
840194103 FRv03.indd 51 12/15/14 4:18 PM

52
Recettes – Gluten-Free
(Sans gluten) (Cycle )
1,5 lb (680 g) Pain
1 1/2 tasses (355 ml) de lait chaud
(vache, riz, soja ou noix)
3/4 tasse (177 ml) d’œufs entiers
(il faut mesurer 3/4 tasse)
1/4 tasse (59 ml) d’huile végétale
1 cuiller à café (5 ml) de vinaigre
de cidre ou de jus de citron
3/4 cuiller à café (3,7 ml) de sel
marin
2 cuillers à soupe (30 ml) de sucre
1 cuiller à soupe (15 ml) de gomme
xanthane
1 cuiller à café (5 ml) de gomme
de guar
3/4 cuiller à café (3,7 ml) de granules
de lécithine (soja ordinaire)
1 cuiller à soupe (15 ml) de farine
de pomme de terre
3 tasses (710 ml) de farine
tout-usage sans gluten
2 cuillers à café (10 ml) de levure
sèche active
Garder tous les ingrédients à température ambiante. Fouetter les
ingrédients liquides ensemble jusqu’à obtenir un mélange très onctueux.
Verser le mélange dans le moule à pain. Dans un autre bol, fouetter
ensemble les ingrédients secs, sauf la levure, en les mélangeant bien.
Verser le mélange d’ingrédients secs sur celui d’ingrédients liquides.
Faites un petit puits au milieu du dessus des ingrédients secs et ajouter
la levure.
Recette offerte par Bob’s Red Mill Natural Foods, copyright 2010.
Rendez-vous sur le site de Bob’s Red Mill à www.bobsredmill.com pour
plus de recettes de machine à pain ou pour trouver où les produits Bob’s
Red Mill sont vendus.
Pain de sandwich sans gluten
1,5 lb (680 g) Pain
1 1/2 tasses (355 ml) d’eau chaude
66 °C (150 °F)
3 gros oeufs, légèrement battus
1 cuiller à café (5 ml) de vinaigre
de cidre
1/4 tasse (59 ml) d’huile de colza
2 tasses (473 ml) de farine de riz
complet
1/2 tasse (118 ml) de farine de
tapioca
1/2 tasse (118 ml) de fécule de
pomme de terre
1/2 tasse (118 ml) de farine de pois
chiche
1 1/2 cuillers à café (7,4 ml) de sel
marin
4 1/2 cuillers à café (22,2 ml) de
gomme xanthane
3 cuillers à soupe (44 ml) de sucre
3 cuillers à soupe (44 ml) de colorant
à café
2 1/4 cuillers à café (11,1 ml) de
levure sèche active
Dans un bol, fouetter ensemble l’eau chaude, les œufs, le vinaigre et
l’huile. Placer les ingrédients liquides dans le moule à pain. Dans un bol
distinct, mélanger ensemble la farine de riz, la farine de tapioca, la fécule
de pomme de terre, la farine de pois chiche, le sel marin, la gomme
xanthane, le colorant à café et le sucre. Verser le mélange d’ingrédients
secs sur celui d’ingrédients liquides. Faites un petit puits au milieu du
dessus des ingrédients secs et ajouter la levure.
Recette offerte par Bob’s Red Mill Natural Foods, copyright 2010.
Rendez-vous sur le site de Bob’s Red Mill à www.bobsredmill.com pour
plus de recettes de machine à pain ou pour trouver où les produits Bob’s
Red Mill sont vendus.
Pain aux céréales entières
Cette recette sans gluten comprend 50 % de plus de céréales entières en
utilisant la farine de riz complet.
840194103 FRv03.indd 52 12/15/14 4:18 PM

53
Recettes – Quick
(Rapide) (Cycle )
1,5 lb (680 g) Pain
1 tasse (237 ml) d’eau
1/4 tasse (59 ml) de beurre
ou d’huile végétale
2 œufs, légèrement battus
1 paquet de 14 oz (397 g) de
préparation de pain instantanée
à la banane
1/2 tasse (118 ml) de noix finement
hachées
Pain de maïs
NOTE: Le réglage pour croûte
pâle est recommandé.
1,5 lb (680 g) Pain
2 œufs, légèrement battus
1 tasse (237 ml) de lait
1/2 cuiller à café (2,4 ml) de levure
de machine à pain
2 paquets de 8,5 oz (241 g) de
préparation instantanée de muffin
Gâteau du diable crémeux
NOTE: Le réglage pour croûte
pâle est recommandé.
1,5 lb (680 g) Pain
Boîte de 12 oz (340 g) de lait
concentré
1/2 tasse (118 ml) de beurre
ou d’huile végétale
3 œufs, légèrement battus
1 paquet de 18 oz (510 g) de
préparation pour gâteau
du diable
Quatre-quarts jaune
1,5 lb (680 g) Pain
1 1/3 tasses (315 ml) d’eau
1/3 tasse (79 ml) de beurre ou
d’huile végétale
3 gros œufs, légèrement battus
3,9 oz (111 g) de préparation
instantanée de crème-dessert
à la vanille
Paquet de 18 oz (510 g) de
préparation de quatre-quarts
jaune
Préparation rapide pour pain aux noix et à la banane
840194103 FRv03.indd 53 12/15/14 4:18 PM

54
1,5 lb (680 g) Pain
1 tasse (237 ml) d’eau
1 1/2 cuillers à café (7,4 ml) de sel
1/4 tasse (59 ml) de sucre
2 cuillers à soupe (30 ml) de lait
sec écrémé
2 cuillers à soupe (30 ml) de
beurre ou d’huile végétale
2 3/4 tasses (651 ml) de farine à
pain
1 1/2 cuillers à café (7,4 ml) de
cannelle
2 cuillers à café (10 ml) de levure
de machine à pain
3/4 tasse (177 ml) de raisins secs
2 lb (907 g) Pain
1 1/4 tasses (296 ml) d’eau
2 cuillers à café (10 ml) de sel
1/3 tasse (79 ml) de sucre
2 1/2 cuillers à soupe (37 ml) de
lait sec écrémé
2 1/2 cuillers à soupe (37 ml) de
beurre ou d’huile végétale
4 tasses (946 ml) de farine à
pain
2 1/2 cuillers à café (12,3 ml) de
cannelle
2 1/2 cuillers à café (12,3 ml) de
levure de machine à pain
1 tasse (237 ml) de raisins secs
Ajouter des raisins secs au signal « Add Ingredient » (ajouter ingrédient).
La machine à pain émet 10 bips sonores au bout de 30 minutes après le
début du cycle.
Recettes – Sweet
(Sucré) (Cycle )
NOTE : Le réglage pour croûte pâle est recommandé.
Pain aux canneberges, orange
et pacanes
1,5 lb (680 g) Pain
3/4 tasse (177 ml) d’eau
1/4 tasse (59 ml) de jus d’orange
1 1/2 cuillers à café (7.4 ml) de sel
1/4 tasse (59 ml) de sucre
2 cuillers à soupe (30 ml) de lait
en poudre écrémé
2 cuillers à soupe (30 ml)
de beurre, coupé en petits
morceaux
3 1/2 tasses (828 ml) de farine à
pain
1 1/2 cuillers à café (7.4 ml) de
zeste d’orange
2 cuillers à café (10 ml) de levure
pour machine à pain
1/3 tasse (79 ml) de canneberges
sèches
1/3 tasse (79 ml) de pacanes
hachées
2 lb (907 g) Pain
1 tasse (237 ml) d’eau
1/4 tasse (59 ml) de jus d’orange
2 cuillers à café (10 ml) de sel
1/3 tasse (79 ml) de sucre
2 1/2 cuillers à soupe (37 ml) de
lait en poudre écrémé
2 1/2 cuillers à soupe (37 ml)
de beurre, coupé en petits
morceaux
4 tasses (946 ml) de farine à pain
2 1/2 cuillers à café (12,3 ml) de
zeste d’orange
2 1/2 cuillers à café (12,3 ml) de
levure pour machine à pain
1/2 tasse (118 ml) de
canneberges sèches
1/3 tasse (118 ml) de pacanes
hachéess
Ajouter les canneberges et les pacanes au signal « Add Ingredient ». Avant
d’en faire l’ajout, déposer les ingrédients dans un sac à glissière à pression
et les enrober avec 1
cuiller à café
(5 ml) de farine.
À la cannelle et aux raisins secs
840194103 FRv03.indd 54 12/15/14 4:18 PM

55
Recettes – 1.5 lb. Express
(Express 1,5 lb) (Cycle )
NOTE : Le cycle Express n’offre qu’une durée de levée. Le pain sera plus lourd et ne lèvera pas autant qu’avec les autres cycles. Le réglage pour
croûte foncée (Dark) est recommandé afin d’obtenir un pain bien doré.
Blanc
1,5 lb (680 g) Pain
1 tasse (237 ml) d’eau chaude
1/2 cuiller à café (2,4 ml) de sel
3 cuillers à soupe (44 ml) de sucre
2
cuillers à soupe
(30 ml
) de beurre
ou d’huile végétale
2
cuillers à soupe
(30 ml
) de lait sec
écrémé
3 1/4 tasses (769 ml) de farine à pain
1
cuiller à soupe
(15 ml) de levure
rapide
Au poivre et à l’aneth
1,5 lb (680 g) Pain
1 tasse (237 ml) d’eau chaude
1 cuiller à café (5 ml) de sel
1/2 cuiller à café (2,4 ml) de poivre
noir
1/2 cuiller à café (2,4 ml) d’aneth sec
3 cuillers à soupe (44 ml) de sucre
2
cuillers à soupe
(30 ml
) de beurre
ou d’huile végétale
2
cuillers à soupe
(30 ml
) de lait sec
écrémé
3 tasses (710 ml) de farine à pain
1 cuiller à soupe (15 ml) de levure
rapide
840194103 FRv03.indd 55 12/15/14 4:18 PM

56
Recettes – 2.0 lb. Express
(Express 2,0 lb) (Cycle )
NOTE : Le cycle Express n’offre qu’une durée de levée. Le pain sera plus lourd et ne lèvera pas autant qu’avec les autres cycles. Le réglage pour
croûte foncée (Dark) est recommandé afin d’obtenir un pain bien doré.
Blanc
2 lb (907 g) Pain
1 1/2 tasses (355 ml) d’eau chaude
2 cuillers à café (10 ml) de sel
1/4 tasse (59 ml) de sucre
2 1/2 cuillers à soupe (37 ml) de
beurre ou d’huile végétale
2 cuillers à soupe (30 ml) de lait sec
écrémé
4 1/4 tasses (1 L) de farine à pain
1 cuiller à soupe (15 ml) de levure
rapide
Au poivre et à l’aneth
2 lb (907 g) Pain
1 3/4 tasses (414 ml) d’eau chaude
1 cuiller à café (5 ml) de sel
1/2 cuiller à café (2,4 ml) de poivre
noir
1 cuiller à café (5 ml) d’aneth sec
1/4 tasse (59 ml) de sucre
3 cuillers à soupe (44 ml) de beurre
ou d’huile végétale
2 cuillers à soupe (30 ml) de lait sec
écrémé
4 1/2 tasses (1,1 L) de farine à pain
1 cuiller à soupe (15 ml) de levure
rapide
840194103 FRv03.indd 56 12/15/14 4:18 PM

57
Recettes – Dough
(Pâte) (Cycle )
Petits pains mollets
1 tasse (237 ml) de lait
1/4 tasse (59 ml) de beurre, à
température ambiante
1 œuf, légèrement battu
1/4 tasse (59 ml) de sucre
1 cuiller à café (5 ml) de sel
4 tasses (946 ml) de farine
tout-usage
2 cuillers à café (10 ml) de levure
de machine à pain
À la fin du cycle de Dough (pâte), retirer la pâte de la machine à pain.
Appuyer sur le bouton START/STOP (marche/arrêt) et maintener-le
appuyé plusieurs secondes pour terminer le cycle. Placer sur le comptoir
saupoudré de farine. Graisser un moule à pain 9 x 13 po (23 x 33 cm).
Couper la pâte en deux, puis diviser chaque moitié en 8 morceaux. Placer
dans un moule graissé. Laisser lever jusqu’à ce qu’elle double presque de
taille, environ 45 minutes. Faites cuire à 190 °C (375 °F) pendant 15 à 20
minutes ou jusqu’à ce que le pain soit cuit. Recette pour 16 petits pains.
Pâte à pizza
1 tasse (237 ml) d’eau
1 cuiller à café (5 ml) de sel
1
cuiller à soupe
(15 ml
) de beurre
ou d’huile végétale
3 tasses (710 ml) de farine à pain
2 cuillers à café (10 ml) de levure
de machine à pain
À la fin du cycle de Dough (pâte), retirer la pâte de la machine à pain.
Appuyer sur le bouton START/STOP (marche/arrêt) et maintener-le
appuyé plusieurs secondes pour terminer le cycle. Placer sur le comptoir
saupoudré et laisser la pâte reposer pendant 10 minutes. Mettre en forme
dans un moule à pizza rond de 38 ou 40 cm. Ajouter vos garnitures de
pizza préférées. Faites cuire à 246 °C (475 °F) pendant 20 à 25 minutes ou
jusqu’à ce que la pizza soit cuite. Recette pour une pizza de 16 po (40 cm).
Fouace
Pâte
1 tasse (237 ml) d’eau
1 cuiller à café (5 ml) de sel
2 cuillers à soupe (30 ml) d’huile
d’olive
3 1/4 tasses (769 ml) de farine
à pain
1
cuiller à soupe
(15 ml)
d’assaisonnement à l’italienne
2 cuillers à café (10 ml) de levure
sèche active
Garnitures
1 à 2 cuillers à soupe (15 à 30 ml)
de semoule de maïs
2 cuillers à soupe (30 ml) d’huile
d’olive
3 cuillers à soupe (44 ml) de basilic
frais, grossièrement haché
1/4 tasse (59 ml) de parmesan râpé
À la fin du cycle de Dough (pâte), retirer la pâte de la machine à pain.
Appuyer sur le bouton START/STOP (marche/arrêt) et maintener-le
appuyé plusieurs secondes pour terminer le cycle. Placer sur le comptoir
saupoudré et laisser la pâte reposer pendant 10 minutes. Saupoudrer de
semoule de maïs un moule de roulé à la gelée ou une plaque à biscuits.
Rouler la pâte en un grand rectangle. Placer le rectangle sur le moule.
Faites des indentations avec les doigts espacées d’environ 1 à 2 po
(2,5 à 5 cm). Badigeonner le dessus de la pâte avec de l’huile. Laisser
monter 30 à 45 minutes. Saupoudrer la pâte de basilic et de fromage.
Faites cuire à 204 °C (400 °F) pendant 20 à 25 minutes. Recette pour
1 fouace.
840194103 FRv03.indd 57 12/15/14 4:18 PM

58
Recettes – Dough
(Pâte) (Cycle )
Pâte
1/2 tasse (118 ml) plus 1 cuiller à
soupe (15 ml) de lait chaud
2 œufs, légèrement battus
1 cuiller à café (5 ml) de sel
1/2 tasse (118 ml) de sucre
1/4 tasse (59 ml) de beurre,
à température ambiante
4 tasses (946 ml) de farine
tout-usage
2 1/2 cuillers à café (12,3 ml) de
levure de machine à pain
Garniture
1/3 tasse (79 ml) de beurre ramolli
3/4 tasse (177 ml) de sucre roux
2 cuillers à soupe (30 ml) de cannelle
3/4 tasse (177 ml) de raisins secs
Glaçage
3 oz (85 g) de fromage à la crème,
à température ambiante
3 cuillers à soupe (44 ml) beurre,
à température ambiante
1 tasse (237 ml) de sucre glace
1 cuiller à café (5 ml) d’extrait de
vanille
Une pincée de sel
À la fin du cycle de pâte (dough), retirer la pâte de la machine à pain.
Appuyer sur le bouton START/STOP (marche/arrêt) et maintener-le
appuyé plusieurs secondes pour terminer le cycle. Placer sur le comptoir
saupoudré et laisser la pâte reposer pendant 10 minutes. Rouler la pâte
pour former un grand rectangle d’environ 14 x 16 po (36 x 41 cm). Étaler
du beurre ramolli dessus. Mélanger le sucre brun et la cannelle, puis
saupoudrer le mélange sur le beurre. Répartisser les raisins secs sur le
beurre et le sucre. Rouler la pâte depuis le côté le plus long. Couper en
rouleaux d’environ 1 po (2,5 cm) d’épaisseur. Placer dans un moule graissé
de 10 x 14 po (25 x 36 cm).* Couvrer et laisser monter presque au double,
environ 1 heure. Faites cuire à 190 °C (375 °F) pendant 20 à 25 minutes
ou jusqu’à ce que ce soit cuit. Laisser légèrement refroidir puis mettre le
glaçage.
Glaçage : Combiner le fromage à la crème, le beurre, le sucre glace,
la vanille et le sel.
Recette pour environ 16 grands pains mollets à la cannelle.
*Ou un moule 9 x 13 po (23 x 33 cm) et un moule à pain de 9 x 5 po
(23 x 13 cm).
Brioches aux raisins secs et à la cannelle
840194103 FRv03.indd 58 12/15/14 4:18 PM

59
Recettes – Jam
(Confiture) (Cycle )
Confiture de fraise
6 tasses (1,4 L) de fraises, à
équeutées, coupées en petit
morceaux (environ 2 lb [907 g] de
fraises fraîches)
1 1/2 tasses (355 ml) de sucre
1 boîte de pectine de fruits allégée
en sucre
1 cuiller à soupe (15 ml) de jus de
citron
Dans un grand bol à mélanger, combiner tous les ingrédients. Verser
dans le moule à pain. Mettre en marche la machine à pain. Une fois le
cycle terminé, laisser la confiture refroidir 1 heure avant de la transférer
dans des conteneurs. Garder au réfrigérateur pendant 3 semaines ou au
congélateur pendant 1 an. Recette pour 6 tasses (1,4 L).
Recettes – Cake
(Gâteau) (Cycle )
Utiliser une boîte entière de n’importe quelle marque et n’importe quelle
couleur de préparation de quatre-quarts de 18 oz. (510 g) ou 18 3/4 oz.
(532 g). Suiver les instructions de l’emballage pour cycle .
840194103 FRv03.indd 59 12/15/14 4:18 PM

60
Recettes – Whole-Grain
(Grain entier) (Cycle )
Au blé entier
1,5 lb (680 g) Pain
1 1/4 tasses (296 ml) d’eau
2 cuillers à soupe (30 ml) d’huile
végétale
1 1/2 cuillers à café (7,4 ml) de sel
2 cuillers à soupe (30 ml) de sucre
2 cuillers à soupe (30 ml) de lait
sec écrémé
4 cuillers à café (20 ml) de gluten
de froment vital
3 1/2 tasses (828 ml) de farine
de blé entier
1 1/2 cuillers à café (7,4 ml) de
levure de machine à pain
2 lb (907 g) Pain
1 3/4 tasses (414 ml) d’eau
3 cuillers à soupe (44 ml) d’huile
végétale
1 1/2 cuillers à café (7,4 ml) de sel
3 cuillers à soupe (44 ml) de sucre
2 cuillers à soupe (30 ml) de lait
sec écrémé
2 cuillers à soupe (30 ml) de gluten
de froment vital
4 1/2 tasses (1,1 L) de farine
de blé entier
2 cuillers à café (10 ml) de
levure de machine à pain
1,5 lb (680 g) Pain
1 1/4 tasses (296 ml) d’eau
1/2 cuiller à café (2,4 ml) de sel
2 cuillers à soupe (30 ml) de miel
2 cuillers à soupe (30 ml) de beurre
ou d’huile végétale
1 tasse (237 ml) de son complet
1 1/2 tasses (355 ml) de farine de
blé entier
1 1/2 tasses (355 ml) de farine à pain
2 cuillers à café (10 ml) de levure
de machine à pain
2 lb (907 g) Pain
1 1/2 tasses (355 ml) plus 1 cuiller
à soupe (15 ml) d’eau
1 cuiller à café (5 ml) de sel
3 cuillers à soupe (44 ml) de miel
2 cuillers à soupe (30 ml) de beurre
ou d’huile végétale
1 tasse (237 ml) de son complet
1 3/4 tasses (414 ml) de farine de
blé entier
1 3/4 tasses (414 ml) de farine
à pain
2 1/2 cuillers à café (12,3 ml) de
levure de machine à pain
Au son à haute teneur en fibres alimentaires
Le gluten de froment élastique se trouve dans l’allée des produits de cuisson du supermarché. Il aide à faire lever le pain lorsque l’on utilise des farines de céréales entières qui
rendent le pain plus lourd et plus dense.
840194103 FRv03.indd 60 12/15/14 4:18 PM

61
Garantie limitée
Cette garantie s’applique aux produits achetés et utilisées aux É.-U. et au Canada. C’est la seule garantie expresse pour ce
produit et est en lieu et place de tout autre garantie ou condition.
Ce produit est garanti contre tout défaut de matériaux et de main-d’oeuvre pour une période des cinq (5) ans à compter de
la date d’achat d’origine au Canada et un (1) an à compter de la date d’achat d’origine aux É.-U. Au cours de cette période,
votre seul recours est la réparation ou le remplacement de ce produit ou tout composant s’avérant défectueux, à notre gré,
mais vous êtes responsable de tous les coûts liés à l’expédition du produit et le retour d’un produit ou d’un composant dans
le cadre de cette garantie. Si le produit ou un composant n’est plus offert, nous le remplacerons par un produit similaire de
valeur égale ou supérieure.
Cette garantie ne couvre pas le verre, les filtres, l’usure d’un usage normal, l’utilisation non conforme aux directives imprimées,
ou des dommages au produit résultant d’un accident, modification, utilisation abusive ou incorrecte. Cette garantie s’applique
seulement à l’acheteur original ou à la personne l’ayant reçu en cadeau. La présentation du reçu de vente d’origine comme
preuve d’achat est nécessaire pour faire une réclamation au titre de cette garantie. Cette garantie s’annule si le produit est
utilisé autrement que par une famille ou si l’appareil est soumis à toute tension ou forme d’onde différente des caractéristiques
nominales précisées sur l’étiquette (par ex. : 120 V ~ 60 Hz).
Nous excluons toutes les réclamations au titre de cette garantie pour les dommages spéciaux, consécutifs et indirects causés
par la violation de garantie expresse ou implicite. Toute responsabilité est limitée au prix d’achat. Chaque garantie implicite,
y compris toute garantie ou condition de qualité marchande ou d’adéquation à un usage particulier, est exonérée, sauf
dans la mesure interdite par la loi, auquel cas la garantie ou condition est limitée à la durée de cette garantie écrite. Cette
garantie vous donne des droits légaux précis. Vous pouvez avoir d’autres droits qui varient selon l’endroit où vous habitez.
Certaines provinces ne permettent pas les limitations sur les garanties implicites ou les dommages spéciaux ou indirects de
telle sorte que les limitations ci-dessus ne s’appliquent peut-être pas à votre cas.
Ne pas retourner cet appareil au magasin lors d’une réclamation au titre de cette garantie. Téléphoner au 1.800.851.8900 aux
É.-U. ou au 1.800.267.2826 au Canada ou visiter le site internet www.hamiltonbeach.com aux É.-U. ou www.hamiltonbeach.ca
au Canada. Pour un service plus rapide, trouvez le numéro de modèle, le type d’appareil et les numéros de série sur votre
appareil.
840194103 FRv03.indd 61 12/15/14 4:18 PM

62
SALVAGUARDIAS IMPORTANTES
1. Lea todas las instrucciones.
2. Este aparato no se destina para utilizarse por personas
(incluyendo niños) cuyas capacidades físicas, sensoriales o
mentales sean diferentes o estén reducidas, o carezcan de
experiencia o conocimiento, a menos que dichas personas
reciban una supervisión o capacitación para el funcionamiento
del aparato por una persona responsable de su seguridad.
3. Se requiere de una estrecha supervisión cuando el aparato se
use cerca de niños. Los niños deben supervisarse para asegurar
que ellos no empleen los aparatos como juguete.
4. Verifique que el voltaje de su instalación corresponda con el del
producto.
5. No toque superficies calientes. Use manijas o perillas. Siempre
utilice guantes de cocina para manipular moldes para pan
calientes o pan caliente.
6. No coloque sus manos dentro de la cámara del horno después
de haber quitado el molde para pan. La unidad de calentamiento
seguirá caliente.
7. Para evitar el peligro de descargas eléctricas, no sumerja el cable,
el enchufe o la máquina panificadora en agua u otro líquido.
8. Desconecte de la toma cuando no esté en uso o antes de limpiar.
Deje que se enfríe antes de poner o quitar partes o antes de limpiar.
9. No opere ningún aparato eléctrico si el cable o el enchufe esta
averiado, después de un mal funcionamiento del aparato, o si
éste se ha caído o averiado de alguna forma. Llame a nuestro
número gratuito de servicio al cliente para información sobre
examinación, reparación o ajuste.
10. El uso de accesorios no recomendados por fabricante de
electrodomésticos puede causar lesiones.
11. No lo use al aire libre.
12. No deje que el cable cuelgue sobre el borde de una mesa o de
un mostrador, o que toque alguna superficie caliente.
13. No coloque el aparato sobre o cerca de un quemador a gas o
eléctrico caliente, ni dentro de un horno caliente.
14. Es importante tener extremo cuidado cuando se mueva un
aparato eléctrico que contenga aceite caliente u otros líquidos
calientes.
15. Para desconectar, apague todos los controles (O/STOP) y luego
saque el enchufe del tomacorriente.
16. Tenga mucho cuidado al quitar el molde para pan.
17. Para apagar (OFF) la máquina panificadora, presione y sostenga
el botón START/STOP (iniciar/detener) durante 2 segundos. Para
más información, ver la sección “Panel de Control”.
18. No acerque demasiado el rostro a la ventana de visualización de
vidrio templado, en caso de que el vidrio de seguridad se rompa.
19. No use el aparato electrodoméstico para ningún otro fin que no
sea el indicado.
20. Limpie la parte interior de horno con cuidado. No raye o dañe el
tubo del elemento calentador.
21. PRECAUCIÓN: Riesgo de descarga eléctrica. Cocine sólo en el
molde para pan desmontable.
Cuando utilice artefactos eléctricos, siempre deben seguirse precauciones de seguridad básicas a fin de reducir el riesgo de incendio,
descarga eléctrica, y/o lesiones a personas, incluyendo las siguientes:
¡GUARDE ESTAS INSTRUCCIONES!
840194103 SPv03.indd 62 12/15/14 4:20 PM

63
Otra Información de Seguridad para el Cliente
Este aparato ha sido diseñado solamente para uso doméstico.
w
ADVERTENCIA
Peligro de Descarga Eléctrica: Este producto es
provisto con un enchufe polarizado (una pata más ancha) para
reducir el riesgo de una descarga eléctrica. El enchufe embona
únicamente en una dirección dentro de un tomacorriente
polarizado. No trate de obviar el propósito de seguridad del enchufe
modificándolo de alguna manera o utilizando un adaptador. Si el
enchufe no entra completamente en la toma, invierta el enchufe. Si
aún no entra, haga que un electricista reemplace la toma.
El largo del cable que se usa en este aparato fue seleccionado para
reducir el peligro de que alguien se enganche o tropiece con un
cable más largo. Si es necesario usar un cable más largo, se podrá
usar un cable de extensión aprobado. La clasificación eléctrica
nominal del cable de extensión debe ser igual o mayor que la
clasificación nominal del aparato. Es importante tener cuidado
de colocar el cable de extensión para que no se pliegue sobre el
mostrador o la mesera en donde niños puedan tirar del mismo o
tropezarse accidentalmente.
Para evitar una sobrecarga del circuito eléctrico, no haga funcionar
ningún otro aparato de alto vataje en el mismo circuito con su
máquina panificadora.
840194103 SPv03.indd 63 12/15/14 4:20 PM
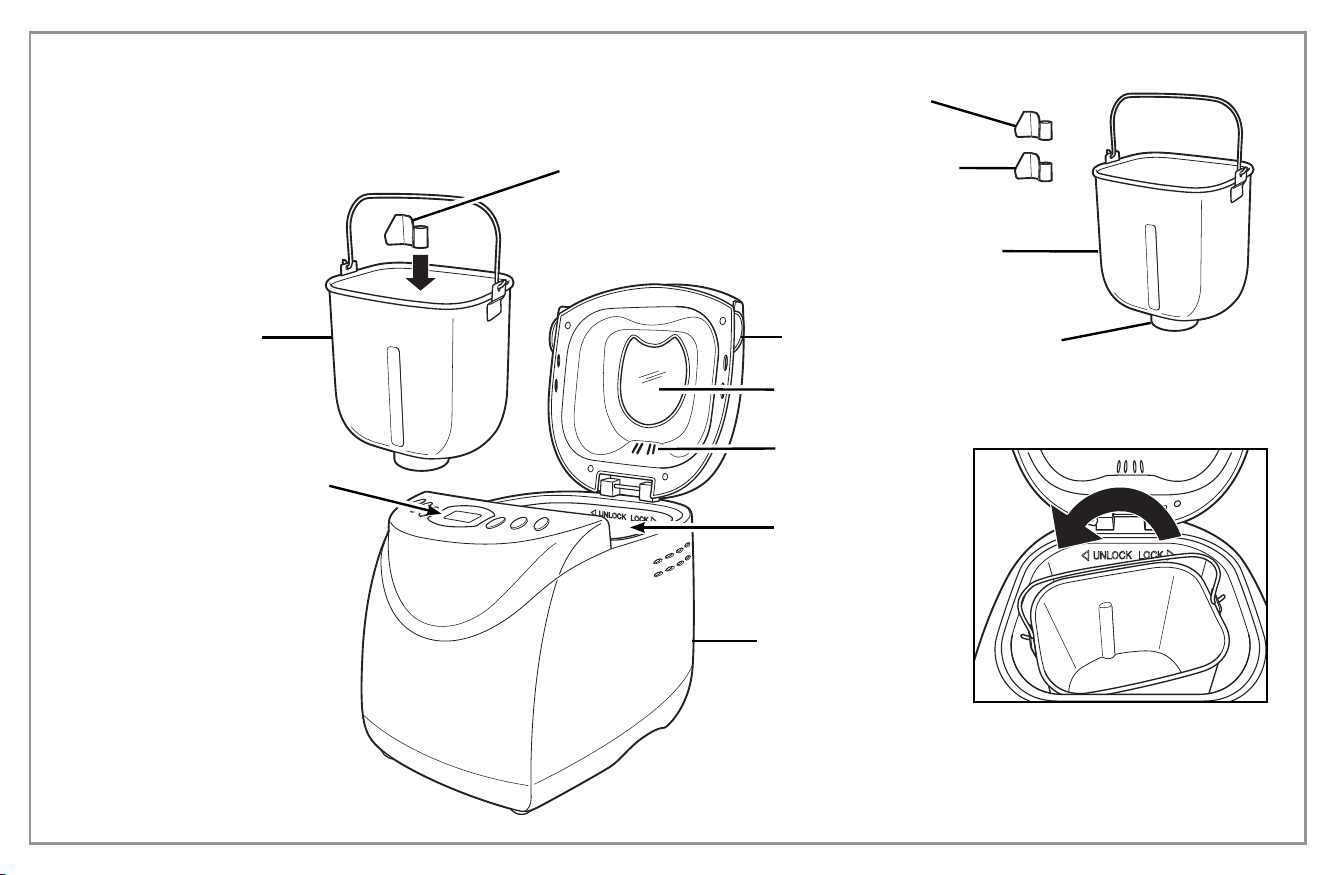
64
Partes y Características
Tapa Superior
PARA QUITAR EL MOLDE
PARA PAN:
Ventana de
Visualización
Paleta para
Amasar*
Orificios de
Ventilación
Carcasa
Molde para
Pan
Antiadherente*
Panel de Control
Utilizando la manija del molde para pan,
gire el molde en sentido contrario a las
agujas del reloj para destrabarlo. Levante
y quite el molde para pan de la cámara
de horneado.
Base
Cámara de
Horneado
Paleta para
Amasar de
Repuesto
Molde para
Pan Antiadherente*
Paleta para Amasar*
(la unidad incluye
2 paletas para
amasar)
*Para ordenar partes:
EE. UU.:
1.800.851.8900
www.hamiltonbeach.com
México:
01 800 71 16 100
840194103 SPv03.indd 64 12/15/14 4:20 PM
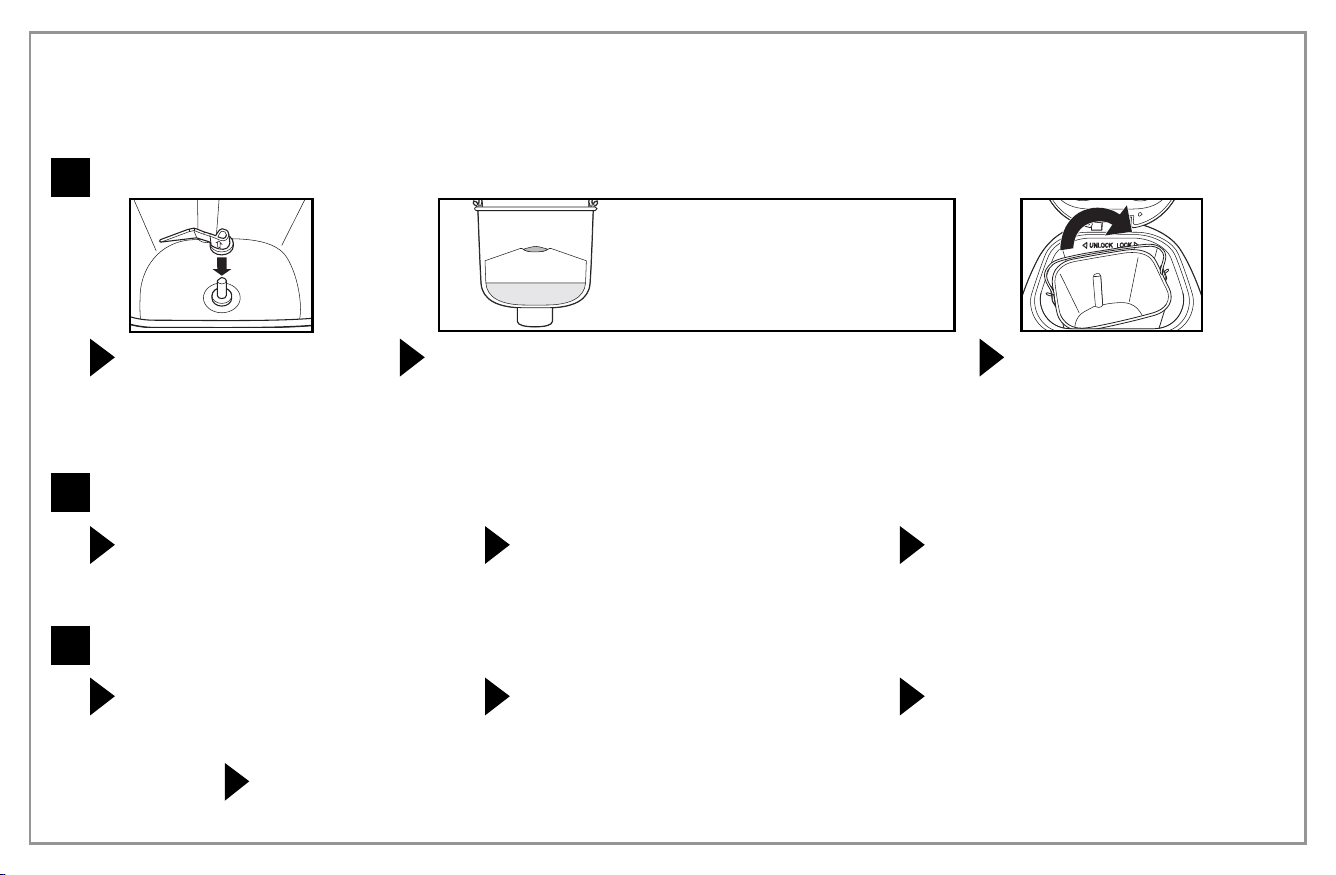
65
Coloque la paleta para amasar en
el eje, con la flecha apuntando
hacia arriba, presionando hacia
abajo hasta que haga tope y
verificando que las superficies
planas se encuentren alineadas.
Guía de Inicio Rápido
ANTES DE USAR POR PRIMERA VEZ: Lave y seque el molde para pan y la paleta
para amasar.
NOTA: No utilice utensilios de metal dentro del molde para pan porque pueden
dañar la superficie antiadherente.
¡PRECAUCIÓN! Peligro de Caída de Objeto. La máquina panificadora puede
moverse o desplazarse durante el ciclo de amasado. Siempre colóquela en el centro
del mostrador de encimera alejada del borde.
Con cuidado mida y agregue los ingredientes al molde para pan en el
orden EXACTO indicado en la receta.
CONSEJO: Mida previamente todos los ingredientes, incluyendo
agregados (nueces, pasas de uva), antes de comenzar.
ÚLTIMO: Levadura. DEBE estar separada de
los ingredientes húmedos.
SEGUNDO: Ingredientes secos (azúcar, sal,
mantequilla, harina)
PRIMERO: Ingredientes líquidos a temperatura
ambiente.
Coloque el molde para pan en la
máquina panificadora, girándolo en
sentido de las agujas del reloj hasta
que se trabe en su lugar. Cierre la
tapa.
NOTA: El molde para pan debe
trabarse en su lugar para lograr un
mezclado y amasado adecuados.
1
Para más información, ver la sección “Instrucciones Detalladas”.
Añada los Ingredientes
2
Seleccione el Ciclo
Presione el botón CYCLE (ciclo) hasta que
aparezca el número de programa deseado
en la pantalla digital.
Para programar un inicio con retardo, utilice los
botones + o – del temporizador con retardo
para agregar hasta 12 horas previas a que
comience el ciclo. Ver la página 70 para
información adicional.
Presione los botones CRUST (corteza) y LOAF SIZE
(hogaza) para AJUSTAR la configuración deseada
(no ajustable en algunos ciclos).
3
Comience a Preparar Pan
Presione START/STOP (iniciar/detener). La
pantalla digital mostrará el tiempo restante
del ciclo.
Una vez finalizada la preparación, la máquina
panificadora emitirá un pitido y comenzará el
ciclo “mantener caliente” durante 1 hora.
Presione el botón START/STOP (iniciar/
detener) durante 2 segundos para cancelar el
ciclo “mantener caliente” y apague la máquina
panificadora.
Agregados: Después del segundo ciclo de
amasado, 10 pitidos le indicarán que debe
agregar frutas, nueces, etc.
Utilizando guantes de cocina, gire en sentido contrario a las agujas del reloj para
destrabar el molde para pan, y tire del mismo hacia arriba. Sin sacarse los guantes
de cocina, sacuda hasta quitar el pan del molde y déjelo enfriar durante 10 minutos.
840194103 SPv03.indd 65 12/15/14 4:20 PM
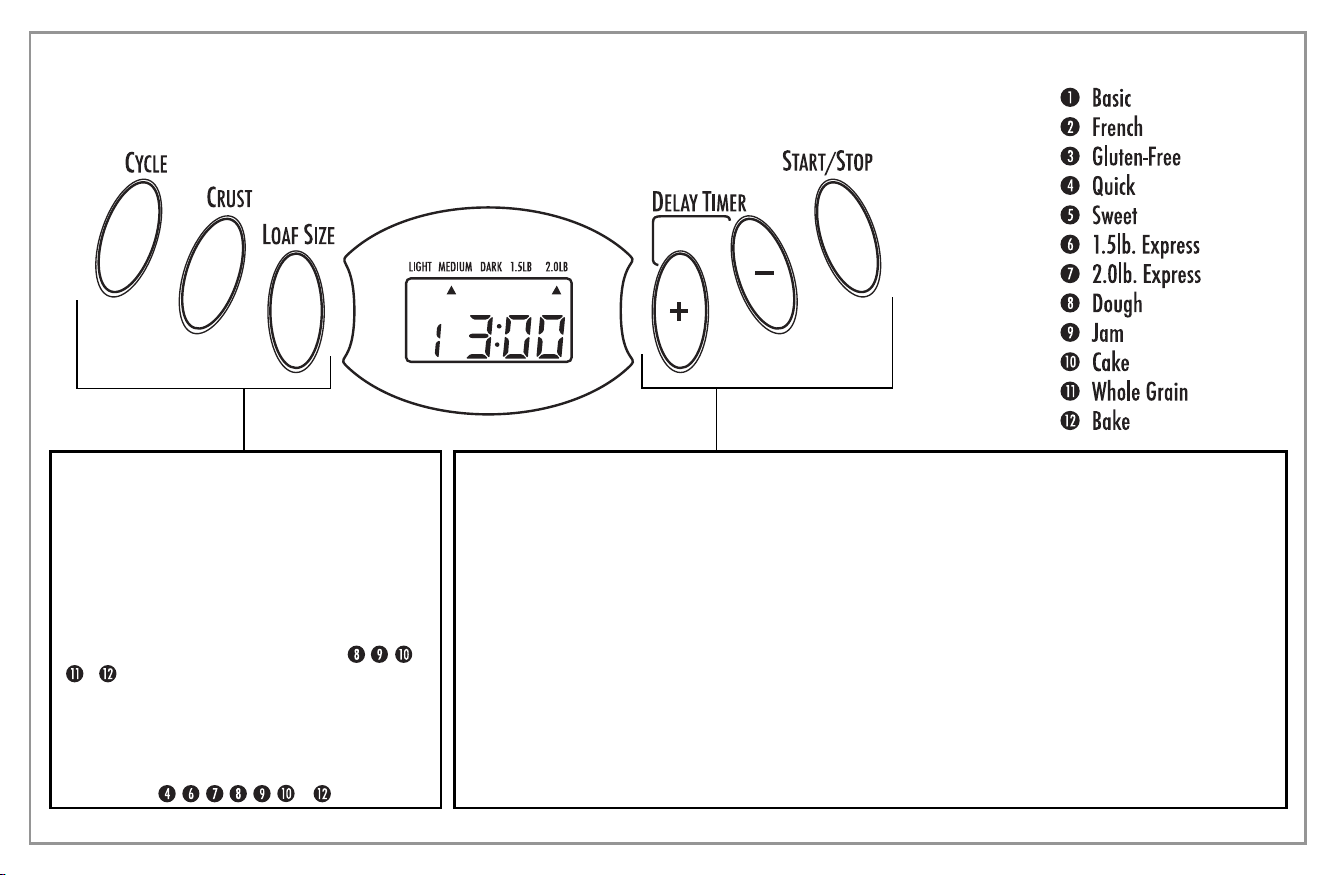
66
Panel de Control
CICLO
Presione el botón CYCLE (ciclo) para seleccionar su
ciclo deseado. El número de ciclo correspondiente
aparecerá en la pantalla.
COLOR DE LA CORTEZA
Presione el botón CRUST (corteza) para desplazar
la flecha a la configuración deseada: Corteza LIGHT
(clara), MEDIUM (media) u DARK (oscura).
(La corteza no es ajustable en los ciclos , , ,
y ).
TAMA—O DE LA HOGAZA
Presione el botón LOAF SIZE (tamaño de la hogaza)
para desplazar la flecha al tamaño de hogaza de
1.5 o 2.0 lb. (El tamaño de hogaza no es una opción
en los ciclos , , , , , y ).
TEMPORIZADOR CON RETARDO
Utilice la característica de temporizador con retardo para accionar la máquina panificadora más tarde. Presione
los botones + y – para aumentar el tiempo del ciclo indicado en la pantalla. Agregue hasta 13 horas incluyendo
el tiempo de retardo y el tiempo del ciclo de preparación de pan.
NOTAS:
• Configure el tiempo de retardo después de seleccionar el ciclo, el tamaño de la hogaza y el color de la corteza.
• Los ciclos 1.5 lb. Express (extra rápido de 1.5 lb), 2 lb. Express (extra rápido de 2 lb.) y JAM (mermelada) no
cuentan con la función con retardo.
• No utilice la función con temporizador con recetas que incluyen productos lácteos u otros ingredientes,
tales como huevos, leche, crema o queso.
BOTÓN START/STOP (iniciar/detener)
Presione el botón START/STOP (iniciar/detener) una vez para iniciar un ciclo. Se oirá un pitido corto, los dos
puntos de la pantalla de tiempo comenzarán a destellar y se iniciará el ciclo. Para quitar el pan, presione el botón
START/STOP (iniciar/detener) para finalizar el ciclo de horneado.
Para cancelar un ciclo, presione el botón START/STOP (iniciar/detener) durante por lo menos 2 segundos.
Ciclos preprogramados
840194103 SPv03.indd 66 12/15/14 4:20 PM
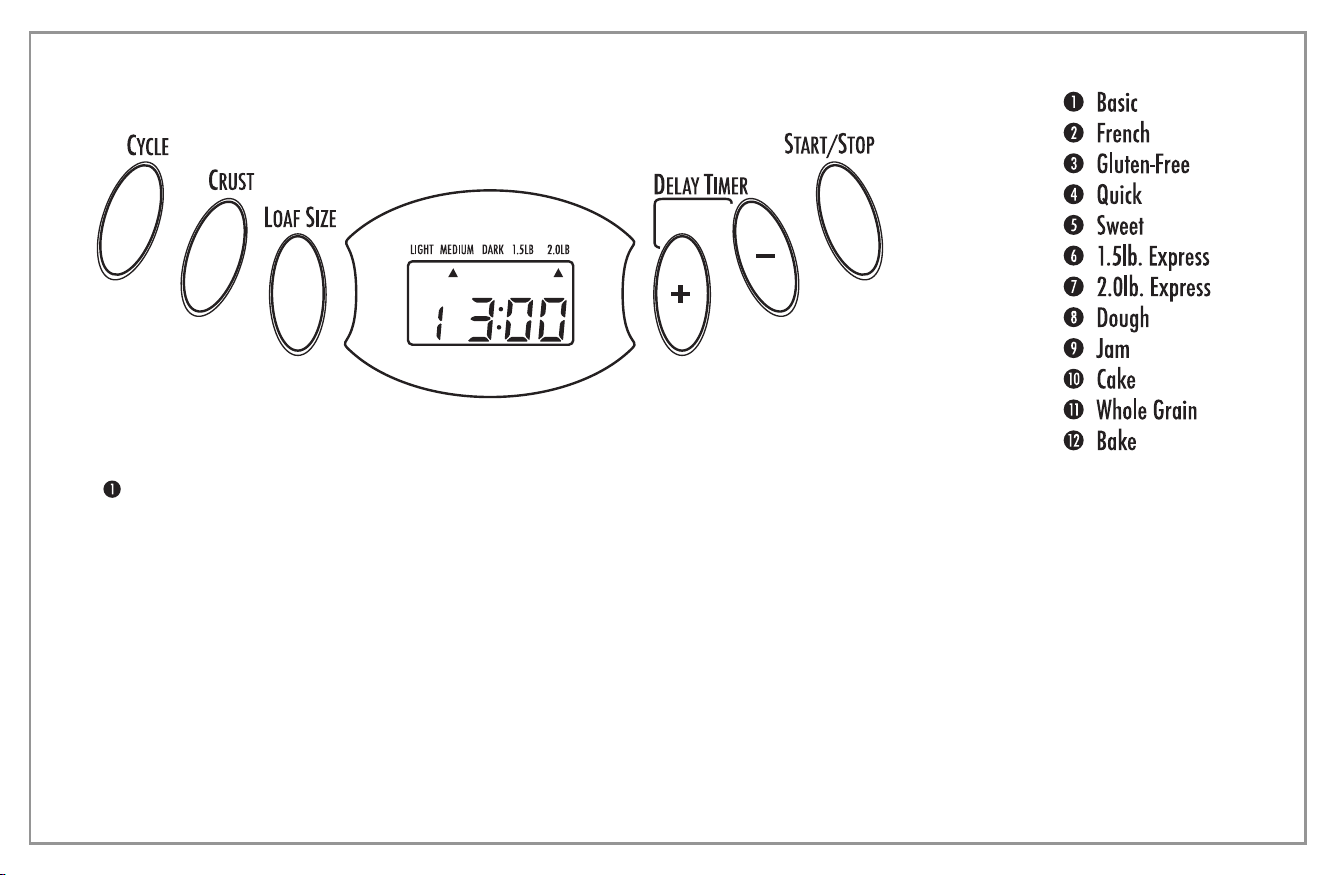
67
Panel de Control
(cont.)
INTERRUPCIÓN DE ENERGÍA
Si ocurriera un corte de energía, el proceso de preparación del pan continuará en forma automática dentro de los 5 minutos. Si el tiempo
de interrupción es mayor a los 5 minutos, la unidad no seguirá funcionando y la pantalla volverá a la configuración predeterminada
(ciclo , color medio y hogaza de 2 lb.). Si la masa ha comenzado a leudar, descarte los ingredientes del molde para pan y comience de
nuevo. Si la masa no ha comenzado la fase de leudado, usted puede presionar el botón START/STOP (iniciar/detener) para continuar el
ciclo desde el comienzo.
PANTALLA DE ADVERTENCIA
“HHH” – Esta advertencia significa que la temperatura dentro del molde para pan es demasiado elevada. Detenga el programa,
desenchufe el cable de energía, abra la tapa y deje que la máquina se enfríe por completo antes de reiniciarla.
“LLL” – Esta advertencia significa que la temperatura dentro del molde para pan es demasiado baja. La temperatura ambiente es
demasiado baja para que funcione la máquina panificadora.
MANTENER CALIENTE
Después de finalizado el ciclo de horneado, la máquina panificadora cambiará a la configuración “mantener caliente” durante 1 hora.
Para cancelar el proceso de “mantener caliente”, presione el botón START/STOP (iniciar/detener) durante 2 segundos.
CONSEJO: Quitar el pan inmediatamente después de finalizado el ciclo de horneado evitará que la corteza se oscurezca más.
Ciclos preprogramados
840194103 SPv03.indd 67 12/15/14 4:20 PM

68
Ciclos de Programa
Basic (Básico)
Para panes blancos y mixtos compuestos principalmente
por harina para pan básica.
French (Francés)
Para panes livianos hechos de harina fina. Normalmente,
el pan es esponjoso y tiene una corteza crocante. Esta no
es una configuración adecuada para recetas que requieren
manteca, margarina o leche.
Gluten-Free (Libre de Gluten)
Para panes y mezclas libres de gluten.
Quick (Rápido)
Para recetas de panes rápidos que no utilizan levadura
para leudar y en su lugar pueden usar polvo para hornear
o bicarbonato de sodio. El amasado, leudado y horneado
del pan lleva menos tiempo que en un pan básico.
Sweet (Dulce)
Para panes con agregados como jugos de fruta, coco
rallado, pasas de uva, frutas secas, chocolate o azúcar
agregada. Debido a una fase más prolongada de leudado,
el pan será liviano y aireado.
1.5 lb. Express (Extra Rápido de 1.5 lb [680 g])
El amasado, leudado y horneado de un pan de 1.5 lb.
(680 g) ocurre en 58 minutos utilizando levadura de
leudado rápido. El pan será más pequeño y áspero que el
hecho con el ciclo básico.
2.0 lb. Express (Extra Rápido de 2.0 lb [907 g])
Igual al extra rápido de 1.5 lb pero prepara un pan de 2.0 lb.
(907 g).
Dough (Masa)
Este ciclo prepara la masa con levadura para pancitos,
masa para pizza, etc., que se horneará en un horno
convencional. No existe horneado en este ciclo.
Jam (Mermelada)
Para preparar mermeladas con frutas frescas.
Cake (Pastel)
Se lleva a cabo el amasado, leudado y horneado pero con
la ayuda de bicarbonato de sodio o polvo para hornear.
Whole Grain (Integral)
Para panes con variedades fuertes de harina que requieren
una fase más prolongada de amasado y leudado (harina
de trigo entero, harina de centeno). El pan será más
compacto y pesado.
Bake (Hornear)
Cuando se necesita un horneado adicional porque un pan
quedó muy claro o no se horneó lo suficiente. No hay
amasado o reposo.
840194103 SPv03.indd 68 12/15/14 4:20 PM
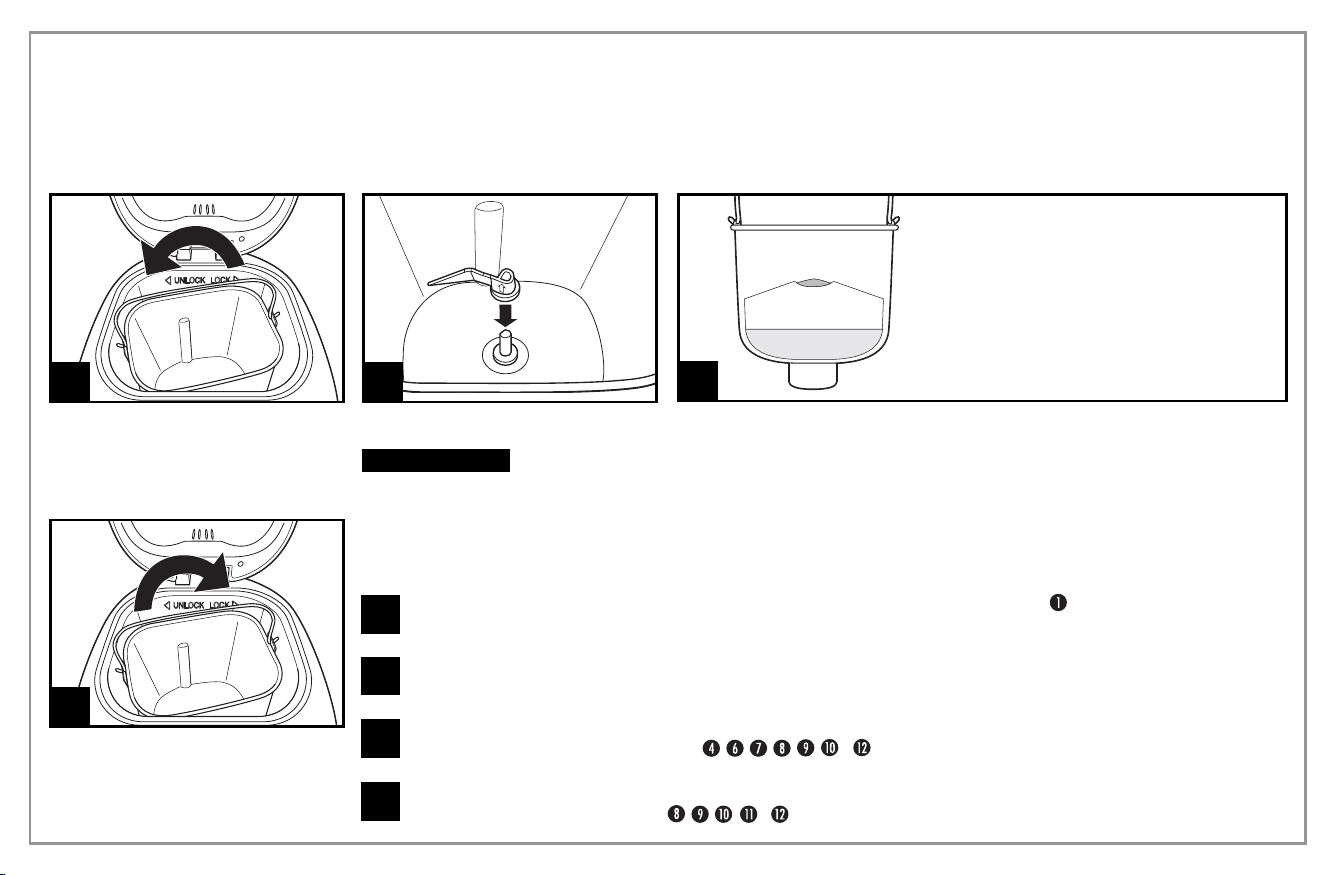
69
Presione el botón CRUST (corteza) para desplazar la flecha a la configuración deseada: Corteza clara, media u oscura. (La
corteza no es ajustable en los ciclos , , , y ).
8
1
Utilizando la manija del molde para pan,
gire el molde en sentido contrario a las
agujas del reloj y quítelo del aparato.
Instrucciones
Detalladas
ANTES DE USAR POR PRIMERA VEZ:
• Verifique que no haya piezas faltantes o dañadas.
• Limpie todas las piezas de acuerdo con la sección de
limpieza.
• Configure la máquina panificadora en el modo “hornear”
y hornee con el molde vacío por 10 minutos. Deje que
la unidad se enfríe y limpie de nuevo todas las piezas
desmontadas. El aparato puede emitir un poco de humo
y/o olor cuando se acciona por primera vez. Esto es
normal y desaparecerá después del primer o segundo
uso. Asegúrese de que el aparato tenga suficiente
ventilación.
• Seque bien todas las piezas. El aparato ya está listo para
usar.
2
Coloque la paleta para amasar en el eje
impulsor dentro del molde para pan.
w PRECAUCIÓN
Peligro de caída
de objeto. La máquina panificadora
puede moverse o desplazarse durante
el ciclo de amasado. Siempre colóquela
en el centro del mostrador de encimera
alejada del borde.
3
Añada los ingredientes dentro del molde para pan en el orden señalado en la receta.
Primero, agregue los líquidos, azúcar y sal; luego la harina, y por último la levadura.
NOTA: Verifique que la levadura no entre en contacto con sal o líquidos.
4
Coloque el molde para pan dentro del
aparato y verifique que esté bien trabado
en su lugar girándolo en sentido de las
agujas del reloj. Cierre la tapa.
Enchufe el aparato. Se oirá un pitido y la pantalla pasará en forma predeterminada al ciclo .
Presione el botón CYCLE (ciclo) hasta que aparezca el número de programa deseado en la pantalla digital.
5
6
Presione el botón LOAF SIZE (tamaño de la hogaza) para desplazar la flecha al tamaño de hogaza de 1.5 o 2.0 lb. (El tamaño
de hogaza no es una opción en los ciclos , , , , , y ).
7
ÚLTIMO: Levadura. DEBE estar separada de los
ingredientes húmedos.
SEGUNDO: Ingredientes secos (azúcar, sal,
mantequilla, harina)
PRIMERO: Ingredientes líquidos a temperatura
ambiente.
840194103 SPv03.indd 69 12/15/14 4:20 PM

70
Instrucciones Detalladas
(cont.)
Después de finalizado el ciclo, la máquina emitirá 10 pitidos y cambiará a la configuración “mantener caliente” durante 1 hora.
12
Para detener la máquina, presione el botón START/STOP (iniciar/detener) durante 2 segundos y finalizará la configuración “mantener caliente”. Desenchufe el cable de
energía y abra la tapa utilizando guantes para cocina.
13
14
Deje que el molde para pan se enfríe un poco antes de quitar el pan. Usando guantes de cocina, con cuidado gire el molde para pan en sentido contrario a las agujas
del reloj y levántelo de la manija para quitarlo de la máquina.
15
Usando guantes de cocina, dé vuelta el molde para pan (con la manija del molde para pan doblada) sobre una parrilla de enfriamiento o superficie de cocción limpia
y sacúdalo suavemente hasta que caiga el pan. Utilice una espátula antiadherente para separar delicadamente del molde los costados del pan.
16
Si la paleta para amasar se mantiene dentro del pan, con cuidado libérela utilizando una espátula o un utensilio pequeño. Cuando no use la máquina o cuando haya
finalizado el funcionamiento, desenchufe el cable de energía.
NOTA: Almacene el pan restante en una bolsa plástica hermética durante hasta tres días a temperatura ambiente. Para almacenarlo por más tiempo, colóquelo en una bolsa
plástica hermética dentro del refrigerador por hasta 10 días.
Si lo desea, configure el DELAY START (temporizador con retardo) con los botones + y –. (La función con retardo no se encuentra disponible en los ciclos , y ).
NOTA: No utilice esta característica cuando incluya productos lácteos, huevos, etc.
9
Presione el botón de START/STOP (iniciar/detener) para iniciar el ciclo. La máquina panificadora emitirá un pitido y los “:” de la pantalla digital comenzarán a destellar
indicando que el temporizador inició la cuenta regresiva. La paleta para amasar comenzará a mezclar los ingredientes. Si se activó el temporizador con retardo, la
paleta para amasar no mezclará los ingredientes hasta que se haya configurado el ciclo para comenzar.
10
Para agregados (nueces, pasas de uva), la máquina emitirá un pitido al inicio del segundo amasado. Abra la tapa y vierta los agregados. El tiempo varía en relación al
ciclo. (Consulte la tabla de los tiempos de los ciclos).
11
840194103 SPv03.indd 70 12/15/14 4:20 PM

71
Tiempos de los
Ciclos
Cada uno de los ciclos de la máquina panificadora tienen diferentes cantidades
de tiempo dedicadas a amasar, leudar y/o hornear. La tabla siguiente muestra
la cantidad de minutos incluida en cada fase para ciclos específicos.
NOTA: El tiempo total suma todas esas fases. No incluye el tiempo de inicio
demorado.
CICLO
Básico – 1.5 lb
2 lb
Francés – 1.5 lb
2 lb
Libre de Gluten – 1.5 lb
2 lb
Rápido
Dulce – 1.5 lb
2 lb
Extra Rápido de 1.5 lb
Extra Rápido de 2 lb
Masa
Mermelada
Pastel
Integral – 1.5 lb
2 lb
Hornear
PRIMER
AMASADO
9 min.
10 min.
16 min.
18 min.
9 min.
10 min.
7 min.
10 min.
10 min.
12 min.
9 min.
20 min.
–
10 min.
15 min.
15 min.
–
PRIMER
LEUDADO
DE LA
MASA
20 min.
20 min.
40 min.
40 min.
25 min.
25 min.
5 min.
5 min.
5 min.
11 min.
9 min.
30 min.
–
5 min.
40 min.
40 min.
–
INICIO DEL
PRIMER
LEUDADO
DE LA MASA
–
–
–
–
–
–
–
–
–
–
–
–
–
–
–
–
–
SEGUNDO
AMASADO
14 min.
15 min.
19 min.
22 min.
18 min.
20 min.
8 min.
20 min.
20 min.
–
–
–
–
20 min.
5 min.
5 min.
–
SEGUNDO
LEUDADO
DE LA
MASA
25 min.
25 min.
30 min.
30 min.
35 min.
35 min.
–
30 min.
30 min.
–
–
40 min.
–
30 min.
25 min.
25 min.
–
TERCER
LEUDADO
DE LA
MASA
45 min.
45 min.
50 min.
50 min.
1 hr. 10 min.
1 hr. 10 min.
–
55 min.
50 min.
–
–
–
–
35 min.
40 min.
40 min.
–
HORNEAR
1 hr.
1 hr. 5 min.
1 hr. 5 min.
1 hr. 10 min.
55 min.
1 hr.
1 hr. 20 min.
50 min.
1 hr.
35 min.
40 min.
–
1 hr. 20 min.
1 hr. 10 min.
50 min.
55 min.
1 hr.
MANTENER
CALIENTE
(1 HORA)
Sí
Sí
Sí
Sí
Sí
Sí
Sí
Sí
Sí
Sí
Sí
No
No
Sí
Sí
Sí
Sí
TIEMPO
TOTAL
2 hrs. 53 min.
3 hrs.
3 hrs. 40 min.
3 hrs. 50 min.
3 hrs. 32 min.
3 hrs. 40 min.
1 hr. 40 min.
2 hrs. 50 min.
2 hrs. 55 min.
58 min.
58 min.
1 hr. 30 min.
1 hr. 20 min.
2 hrs. 50 min.
2 hrs. 55 min.
3 hrs.
1 hr.
840194103 SPv03.indd 71 12/15/14 4:20 PM
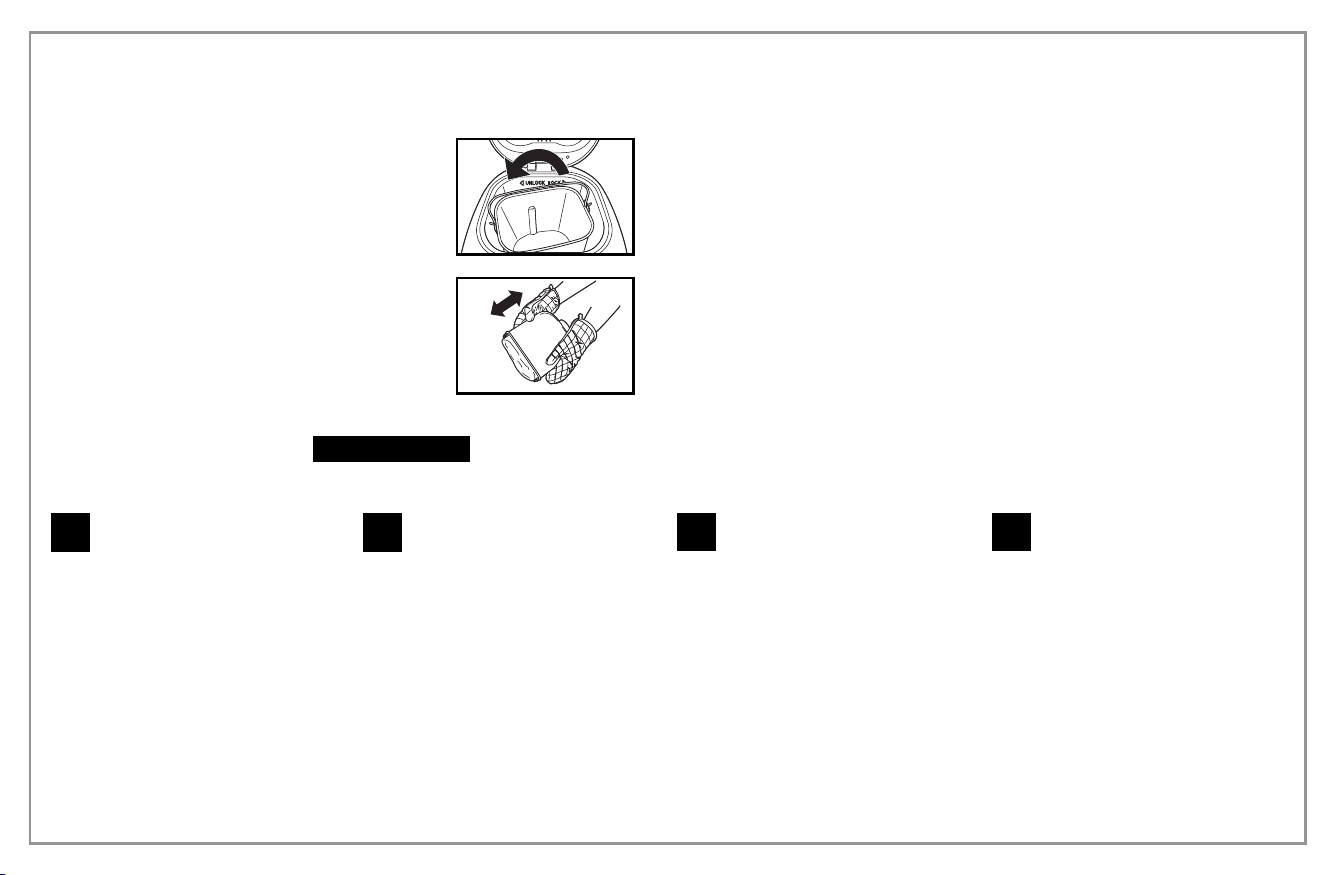
72
Limpieza
Para limpiar la paleta para amasar:
Si resulta difícil quitar la paleta para
amasar del pan, agregue agua a la
base del molde para pan y deje remojar
durante 1 hora.
Limpie la paleta detenidamente con un
paño húmedo. La paleta para amasar es
apta para lavavajillas.
1
Para limpiar el molde para pan:
Quite el molde para pan girándolo en
sentido contrario a las agujas del reloj.
Limpie la parte interior y exterior del
molde para pan con un paño húmedo.
No utilice agentes abrasivos para así
proteger el revestimiento antiadherente.
El molde para pan debe estar
completamente seco antes de su
instalación.
NOTA: El molde para pan y las paletas
para amasar son aptos para lavavajillas.
La parte exterior del molde para pan y la
base pueden decolorarse. Esto es normal.
2
Para limpiar la carcasa y la tapa superior:
Después de su uso, deje enfriar la
unidad. Utilice un paño húmedo para
limpiar la tapa, la carcasa, la cámara de
horneado y la parte interior de la ventana
de visualización. No utilice limpiadores
abrasivos para la limpieza, ya que puede
degradarse el brillo de la superficie.
Nunca sumerja la carcasa en agua para
la limpieza.
3
Antes de embalar la máquina panificadora
para su almacenamiento, verifique que se
haya enfriado por completo, se encuentre
limpia y seca y que la tapa superior esté
cerrada.
4
Cómo Quitar el Pan
El molde para pan y la cámara de horneado estarán
calientes y deben usarse guantes para cocina. Quite
el molde para pan levantando la manija y girándola en
sentido contrario a las agujas del reloj para destrabarlo
de la base de la cámara.
Con cuidado, sacuda el pan con el molde al revés
hasta que el pan caiga. Deje enfriar en una rejilla por
10 minutos antes de rebanarlo.
CONSEJO: Si la paleta para amasar queda dentro del
pan, quítela con una espátula o utensilio pequeño.
Rebanar
Deje enfriar el pan durante 10 minutos y rebánelo con un cuchillo para pan.
Almacenamiento de Pan Casero
Resulta mucho mejor consumir el pan recién hecho lo antes posible. Para
almacenarlo, envuelva el pan enfriado en papel de aluminio o en una bolsa plástica
para conservar la frescura. El pan puede congelarse por hasta 6 meses.
Cuando haya finalizado el horneado, la unidad pasará a la configuración “mantener
caliente” por hasta 1 hora. Presione y sostenga el botón START/STOP (iniciar/detener)
durante 2 segundos para finalizar este ciclo antes de quitar el molde para pan.
Peligro de Descarga Eléctrica:
Desconecte la energía antes de limpiar. No sumerja el cable, el enchufe o la carcasa en ningún líquido.
Permita que la máquina panificadora se enfríe por completo antes de limpiarla.
w
ADVERTENCIA
840194103 SPv03.indd 72 12/15/14 4:20 PM

73
Consejos: Lo Esencial Sobre el Pan
Dos cosas pueden garantizar una hogaza de pan perfecta: Utilizar ingredientes frescos de buena calidad y medirlos correctamente.
Harina
Harina Común
Harina que no contiene polvo para hornear, adecuada para panes “rápidos” o panes
hechos en configuraciones rápidas. La harina para pan es mejor para panes con
levadura.
Harina para Pan
La harina para pan es el ingrediente más importante para preparar pan y se recomienda
en la mayoría de las recetas para panes con levadura. Tiene un alto contenido de
gluten y puede conservar el tamaño del pan sin desplomarse después del leudado. Las
harinas varían por región. Por ejemplo, la harina estadounidense se obtiene de trigo de
primavera, mientras que la harina canadiense se obtiene de trigo de invierno.
Harina Leudante
Harina que contiene polvo para hornear, utilizada especialmente para preparar
pasteles. No utilice harina leudante en combinación con levadura.
Harina Integral
La harina integral se obtiene del grano de trigo entero. El pan hecho con toda o
parte de la harina integral tendrá mayor cantidad de fibra y de contenido nutricional.
La harina integral es más pesada y, como resultado, los panes pueden ser más
pequeños y tener una textura más compacta.
Otros Ingredientes
Huevo
Los huevos pueden mejorar la textura del pan y aumentar su tamaño. El huevo debe
batirse con los otros ingredientes líquidos.
Sal
La sal es necesaria para mejorar el sabor del pan y el color de la corteza. También se
utiliza para contener la actividad de la levadura.
Margarina, Mantequilla y Aceite Vegetal
La margarina y la mantequilla deben cortarse en trozos pequeños antes de agregarse
al líquido.
Azúcar
El azúcar es el “alimento” de la levadura y también aumenta el sabor dulce y el color
del pan. Es un elemento muy importante para que el pan leude. Normalmente se
utiliza azúcar blanco; sin embargo, en algunas recetas también puede requerirse
azúcar moreno, azúcar en polvo o algodón de azúcar.
Agua y Otros Líquidos (siempre se añaden primero)
El agua es un ingrediente esencial para preparar pan. En general, el agua debe hallarse
a temperatura ambiente. Algunas recetas pueden requerir leche u otros ingredientes.
Nunca utilice productos lácteos con la opción de temporizador con retardo.
Levadura
La levadura es un organismo vivo y debe conservarse en el refrigerador para
permanecer fresco. Necesita los carbohidratos del azúcar y de la harina como alimento.
La levadura utilizada en recetas con la máquina panificadora se vende con diferentes
nombres: Levadura para máquinas panificadoras (preferida), levadura seca activa y
levadura instantánea.
Antes de utilizarla, verifique la fecha de vencimiento de la levadura. Devuélvala al
refrigerador inmediatamente después de cada uso.
Consejo:
Para verificar si la levadura se encuentra fresca y activa:
• Vierta 1 taza (237 ml) de agua caliente del grifo dentro de la jarra medidora.
• Agregue 1 cucharadita (5 ml) de azúcar blanca y 1 cucharada (15 ml) de
levadura.
• Coloque la jarra medidora en un lugar tibio durante 5 minutos.
• La levadura fresca y activa comenzará a hacer burbujas o a “crecer”. Si no
lo hace, la levadura se encuentra muerta o inactiva.
Ingredientes
840194103 SPv03.indd 73 12/15/14 4:20 PM
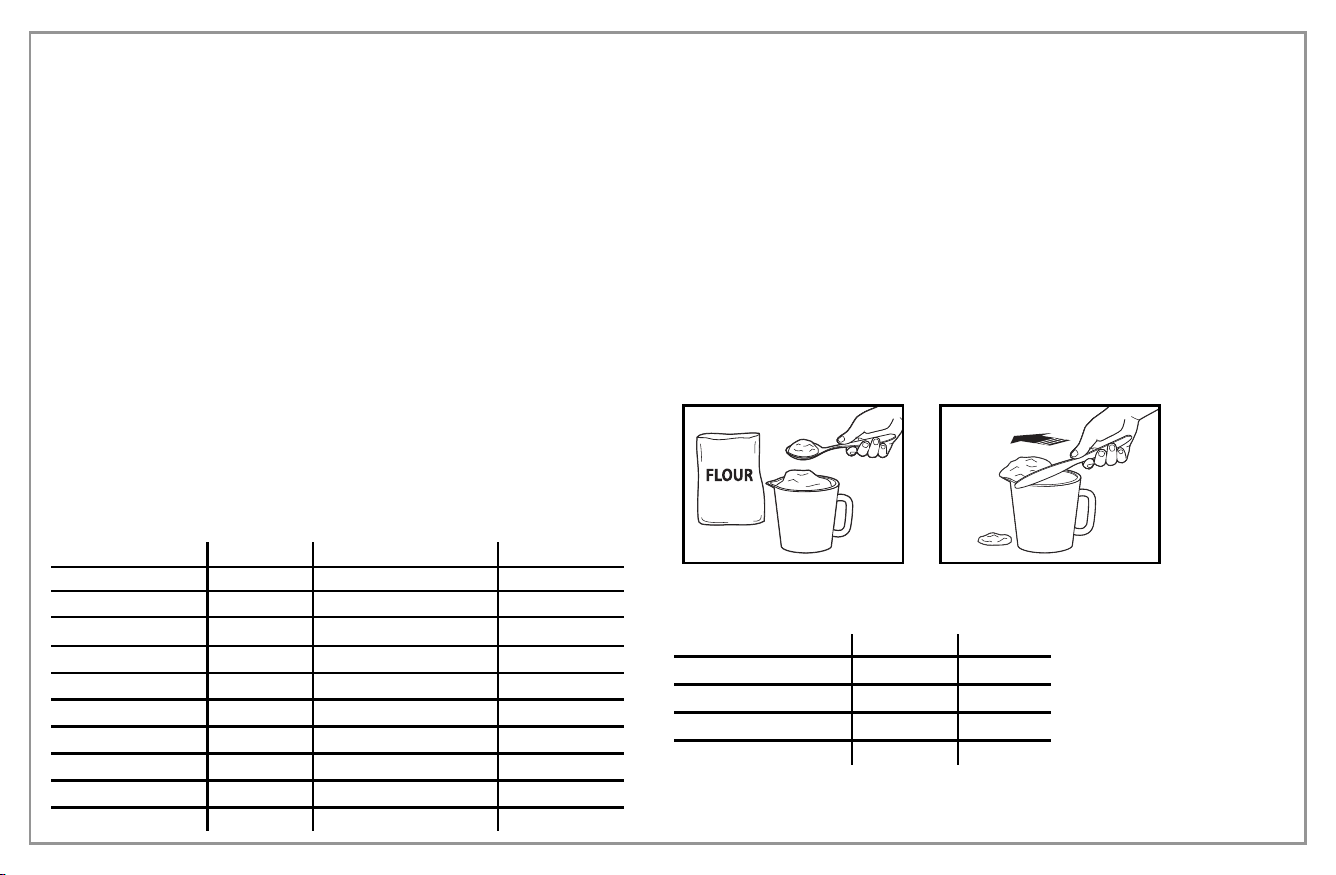
74
Consejos: Utilice Mediciones Exactas
Uno de los pasos más importantes para preparar un buen pan es la medición correcta de los ingredientes. Mida con detenimiento todos los ingredientes y agréguelos al
molde para pan en el orden indicado en la receta.
La Secuencia para Añadir Ingredientes
Siempre añada los ingredientes en el orden indicado en la receta.
PRIMERO: Ingredientes líquidos
SEGUNDO: Ingredientes secos
ÚLTIMO: Levadura
La levadura sólo debe colocarse sobre la harina seca y nunca debe entrar en
contacto con líquidos o sal.
Cuando utilice la función de temporizador con retardo durante un período prolongado,
nunca añada ingredientes perecederos tales como huevos o leche.
Ingredientes Líquidos
El agua, leche fresca u otros ingredientes deben medirse con una jarra medidora
de vidrio que contenga marcas claras y un pico. Coloque la jarra sobre el mostrador
de encimera y agáchese para verificar el nivel del líquido. Cuando mida aceite para
cocción u otros ingredientes, luego limpie muy bien la jarra medidora.
Mediciones de Elementos Secos
Mida los ingredientes secos colocándolos con una cuchara dentro de la jarra
medidora y luego nivelándolos con un cuchillo. Nunca utilice la jarra medidora para
tomar los ingredientes secos directamente de un recipiente porque esto podría sumar
una cucharada de ingredientes extra. No golpee la parte inferior de la jarra medidora
ni apisone el contenido.
CONSEJO: Antes de medirla, revuelva la harina para airearla.
Cuando mida pequeñas cantidades de ingredientes secos, tales como sal o azúcar,
utilice una cuchara medidora, verificando que esté nivelada.
Medir ingredientes secos con una balanza digital brinda mejores resultados de
horneado.
Tabla de Conversión de Medición de Líquidos
Onzas Líquidas
8
7
6
5
4
3
2
1
Jarra
1
7/8
3/4
5/8
1/2
3/8
1/4
1/8
Cucharadas
16
14
12
10
8
6
4
2
1
1/2
Cucharaditas
48
42
36
30
24
18
12
6
3
1 1/2
1 taza de:
Harina común
Harina para pan
Harina integral
Harina de centeno
Onzas
4.4
4.5
4.2
3.6
Gramos
125
128
119
102
Equivalentes de Peso para Medición de Elementos Secos
840194103 SPv03.indd 74 12/15/14 4:20 PM

75
Preguntas Frecuentes
¿Puedo utilizar un reemplazo de azúcar en lugar de azúcar común?
El azúcar es necesaria para que la levadura produzca un pan liviano con una buena
altura. Los resultados pueden variar en relación al tipo y cantidad de reemplazo de
azúcar utilizados. Si usted va a utilizar un endulzante artificial, elija uno basado en
aspartamo en lugar de sacarina.
¿Puedo suprimir la sal o el azúcar de una receta?
No, tanto el azúcar como la sal desempeñan un papel importante en el proceso de
preparación del pan. La sal evita que la levadura actúe de más y que el pan leude
demasiado. La combinación de azúcar, sal y levadura es una parte clave del proceso
de preparación del pan. Recuerde que las cantidades totales de azúcar y de sal se
encuentran divididas entre todas las rebanadas, y por lo tanto la cantidad de azúcar
y de sal por porción es reducida.
¿Cuándo añado pasas de uva, nueces, etc. al pan?
Esta máquina panificadora emitirá un pitido al inicio del segundo amasado para
indicarle cuándo debe añadir pasas de uva, nueces, semillas, etc. El tiempo varía
respecto del ciclo. (Consulte la tabla de los tiempos de los ciclos). Si usted está
utilizando el temporizador de inicio con retardo y le resulta más conveniente, puede
añadir ingredientes al comienzo.
¿Puedo abrir la tapa mientras la máquina panificadora se encuentra
en funcionamiento?
Esta máquina panificadora se encuentra diseñada con una ventana en la tapa para
que pueda verse el progreso del pan. Pueden realizarse verificaciones rápidas en
las primeras etapas del amasado y para añadir ingredientes cuando suena el pitido.
Sin embargo, la temperatura de la cámara de horneado se ajusta para las etapas de
leudado y horneado. Abrir la tapa durante estos pasos puede provocar que el pan se
desmorone o que no se hornee correctamente. A veces se forma condensación en
la ventana después del mezclado y amasado inicial. Generalmente desaparece una
vez que se inicia el ciclo de horneado y por lo tanto usted debería tener una buena
visualización del pan.
¿Puedo usar mis recetas de pan favoritas en la máquina panificadora?
Sí, pero tendrá que experimentar para lograr las proporciones correctas de los
ingredientes. Familiarícese con la unidad y prepare varias hogazas de pan con las
recetas provistas antes de comenzar a experimentar. Nunca supere una cantidad
total de 4 1/4 tazas (1 L) de ingredientes secos (incluye harinas, avena, harina gruesa
de maíz amarillo, etc.). Utilice las recetas de este libro para determinar la relación de
ingredientes secos respecto de los líquidos y las cantidades de levadura, azúcar,
sal y mantequilla/margarina a usar.
¿Qué puede pasar si dejo el pan en el molde después del horneado?
Esta unidad cuenta con un ciclo de 60 minutos de “mantener caliente” que le permite
dejar el pan en el molde hasta por una hora después de finalizado el horneado. Una
vez finalizado el ciclo de calentamiento, es mejor quitar el pan inmediatamente
porque si no la parte inferior del pan absorberá humedad y se pondrá gomoso.
¿Se pueden reducir las recetas a la mitad?
No se recomienda. Las proporciones de los ingredientes funcionan mejor con
cantidades completas.
¿Cómo pueden utilizarse las mezclas para pan en la máquina y en
qué configuración?
Las instrucciones del paquete le indicarán la cantidad de agua y de levadura que debe
usar. Asegúrese de añadir el líquido, luego los ingredientes secos y por último la levadura.
No permita que la levadura quede encima del líquido. La configuración del tipo de pan
depende del tipo de mezcla que se está utilizando (es decir, los panes blancos utilizan
la configuración de pan básico, la configuración de pan dulce se usa con frutas secas,
queso o nueces, la integral o multicereal debe utilizar la configuración de pan integral, y la
configuración de corteza, clara u oscura, es una preferencia personal). No utilice mezclas
para pan que superen un tamaño de pan de 2 lb (907 g).
¿Cuál es la diferencia entre la harina estadounidense y la harina canadiense?
La harina canadiense tiene un contenido mayor de proteína o gluten que la harina estadounidense.
Se puede reemplazar la harina estadounidense en cantidades iguales por la harina canadiense.
Sin embargo, la harina canadiense puede absorber más humedad. Controle la masa durante el
primer ciclo de amasado. Si parece seca, usted puede agregar hasta 1 cucharada (15 ml) de agua
adicional por taza de harina indicada en la receta. Agregue el agua de 1 cucharada (15 ml) por vez
hasta alcanzar la consistencia deseada de una masa suave y flexible.
840194103 SPv03.indd 75 12/15/14 4:20 PM

76
PROBLEMA
Olor penetrante o a
quemado.
Los ingredientes no se
mezclan; se oye el motor
girando.
Aparece “HHH” en la
pantalla cuando se
presiona el botón START/
STOP (iniciar/ detener).
La ventana está empañada
o cubierta de condensación.
La paleta para amasar
queda dentro del pan.
CAUSA PROBABLE
• Se ha derramado harina u otros ingredientes
dentro de la cámara de horneado.
• El molde para pan o la paleta para amasar están
mal instalados.
• Demasiados ingredientes.
• La temperatura interna de la máquina es muy
elevada.
• Puede ocurrir durante los ciclos de mezclado o
leudado.
• Configuración de corteza más gruesa con corteza
oscura.
SOLUCIÓN
• Detenga la máquina panificadora y déjela enfriar
por completo. Limpie el exceso de harina, etc., de
la cámara de horneado con una toalla de papel.
CONSEJO: Mida los ingredientes sobre el
mostrador, añadiéndolos al molde para pan antes
de colocarlos en la máquina.
• Verifique que la paleta para amasar esté bien
insertada en el eje.
• Mida los ingredientes con precisión.
• Permita que la unidad se enfríe entre ciclos.
Desenchufe la unidad, abra la tapa y quite el
molde para pan. Deje que se enfríe durante
15–30 minutos antes de iniciar un nuevo ciclo.
• La condensación generalmente desaparece
durante el ciclo de horneado. Limpie bien la
ventana entre ciclos.
• Es común que la paleta para amasar quede
dentro del pan. Una vez que el pan se enfríe, quite
la paleta con una espátula.
• Elija una corteza más clara (sólo ciclos – ).
Resolviendo Problemas
840194103 SPv03.indd 76 12/15/14 4:20 PM

77
Resolviendo Problemas
(cont.)
PROBLEMA
La masa no se
mezcla bien; hay una
acumulación de harina
y otros ingredientes en
los costados del molde;
el pan está cubierto de
harina.
El pan leuda demasiado
o empuja la tapa hacia
arriba.
El pan no leuda; la
hogaza queda baja.
El pan está hundido en la
parte superior al finalizar
el horneado.
El color de la corteza es
muy claro.
El color de la corteza es
muy oscuro.
CAUSA PROBABLE
• El molde para pan o la paleta para amasar están
mal instalados.
• Demasiados ingredientes secos.
• La masa libre de gluten es comúnmente muy
húmeda. Puede requerir ayuda adicional mediante
la inserción de una espátula en los costados.
• No se han medido bien los ingredientes
(demasiada levadura o harina).
• La paleta para amasar no se encuentra en el
molde para pan.
• Olvidó colocar sal.
• Medición inadecuada de ingredientes o levadura
inactiva.
• Se levantó la tapa durante los ciclos.
• La masa ha leudado demasiado rápido.
• Demasiada levadura o agua.
• Se eligió un ciclo incorrecto para la receta.
• Se abrió la tapa durante el horneado.
• Demasiada azúcar en la receta.
SOLUCIÓN
• Verifique que el molde para pan esté bien
colocado en la unidad y que la paleta para amasar
se encuentre firmemente insertada en el eje.
• Asegúrese de que los ingredientes se midan con
precisión y que se añadan en el orden correcto.
• El exceso de harina puede quitarse del pan una
vez que se haya horneado y enfriado. Agregue
agua, de a una cucharada por vez, hasta que la
masa se haya convertido en un bollo.
• Mida todos los ingredientes con precisión y
asegúrese de haber añadido azúcar y sal.
•
Reduzca la levadura de a 1/4 de cucharadita (1.2 ml).
• Controle la instalación de la paleta para amasar.
• Mida todos los ingredientes con precisión.
• Controle la fecha de vencimiento de la levadura y
de la harina.
•
Los líquidos deben hallarse a temperatura ambiente.
• Mida todos los ingredientes con precisión.
• Reduzca un poco la levadura o el agua.
• No abra la tapa durante el horneado.
• Elija una opción de corteza más oscura (sólo ciclos
– ).
• Reduzca un poco la cantidad de azúcar.
• Elija una opción de corteza más clara (sólo ciclos
– ).
840194103 SPv03.indd 77 12/15/14 4:20 PM

78
Resolviendo Problemas
(cont.)
PROBLEMA
El pan está torcido.
Los panes tienen
diferentes formas.
La parte inferior del pan
está gomosa.
El pan está hueco o lleno
de agujeros.
Pan poco horneado,
crudo o pegajoso.
El pan se desarma cuando
se lo rebana.
El pan tiene una textura
densa y gruesa.
La base del molde para
pan se ha oscurecido o
tiene manchas.
CAUSA PROBABLE
• Demasiada levadura o agua.
• La paleta para amasar empuja la masa hacia un
lado antes del leudado y horneado.
• Hay variaciones respecto del tipo de pan.
• El pan ha permanecido en el molde con la
configuración “mantener caliente” durante mucho
tiempo y ha absorbido humedad.
• La masa está muy húmeda, demasiada levadura,
no se añadió sal.
• Agua muy caliente.
• Demasiado líquido; se eligió un ciclo incorrecto.
• El pan está muy caliente.
• Demasiada harina; harina vieja.
• No se añadió suficiente agua.
• Después del lavado en lavavajillas.
SOLUCIÓN
• Mida todos los ingredientes con precisión.
• Reduzca un poco la levadura o el agua.
• Algunos panes pueden no quedar parejos,
especialmente si se usa harina integral.
• El pan integral o multicereal es más denso y puede
quedar más bajo que un pan blanco básico.
• Finalice la configuración “mantener caliente”
presionando el botón START/STOP (iniciar/
detener) por 2–3 segundos.
• Quite el pan del molde usando guantes de cocina.
• Mida todos los ingredientes con precisión.
• Reduzca un poco la levadura o el agua. Mida la sal
utilizada.
• Use agua a temperatura ambiente.
• Reduzca el líquido y mida los ingredientes con
precisión.
• Controle el ciclo elegido para la receta.
• Deje enfriar en una rejilla por 15–30 minutos antes
de rebanarlo.
• Trate de aumentar el agua o de reducir la harina.
• Los panes integrales tienen una textura más densa.
• Esto es normal y no daña el molde para pan.
840194103 SPv03.indd 78 12/15/14 4:20 PM

79
Recetas – Básico
(Ciclo )
Blanco
1.5 lb (680 g) Hogaza
1 taza (237 ml) de agua
1 1/8 cucharaditas (5.5 ml) de sal
1 cucharada (15 ml) de azúcar
3 cucharadas (44 ml) de mantequilla
o aceite vegetal
3 1/2 tazas (828 ml) de harina para
pan
1 1/2 cucharaditas (7.4 ml)
de levadura para máquina
panificadora
2 lb (907 g) Hogaza
1 1/3 tazas (315 ml) de agua
1 1/2 cucharaditas (7.4 ml) de sal
2 cucharadas (30 ml) de azúcar
1/4 tazas (59 ml) de mantequilla
o aceite vegetal
4 1/2 tazas (1.1 L) de harina para
pan
1 3/4 cucharaditas (8.6 ml)
de levadura para máquina
panificadora
Trigo Blanco
1.5 lb (680 g) Hogaza
1 1/4 tazas (296 ml) de agua
1 1/2 cucharaditas (7.4 ml) de sal
1 cucharada (15 ml) de azúcar
2 cucharadas (30 ml) de mantequilla
o aceite vegetal
2 cucharadas (30 ml) de leche
descremada deshidratada
2 tazas (473 ml) de harina para pan
1 taza (237 ml) de harina integral
1 1/2 cucharaditas (7.4 ml) de
levadura para máquina
panificadora
2 lb (907 g) Hogaza
1 1/2 tazas (355 ml) de agua
2 cucharaditas (10 ml) de sal
2 cucharadas (30 ml) de azúcar
3 cucharadas (44 ml) de
mantequilla o aceite vegetal
3 cucharadas (44 ml) de leche
descremada deshidratada
2 1/2 tazas (591 ml) de harina
para pan
1 1/2 tazas (355 ml) de harina
integral
2 cucharaditas (10 ml) de
levadura para máquina
panificadora
Cebolla
1.5 lb (680 g) Hogaza
1 taza (237 ml) de agua
1 1/8 cucharaditas (5.5 ml) de sal
1 cucharada (15 ml) de azúcar
2 cucharadas (30 ml) de
mantequilla o aceite vegetal
2 cucharadas (30 ml) de cebolla
picada deshidratada
3 1/2 tazas (828 ml) de harina
para pan
2 cucharaditas (10 ml) de levadura
para máquina panificadora
2 lb (907 g) Hogaza
1 1/3 tazas (315 ml) de agua
1 1/2 cucharaditas (7.4 ml) de sal
2 cucharadas (30 ml) de azúcar
1/4 taza (59 ml) de mantequilla o
aceite vegetal
3 cucharadas (44 ml) de cebolla
picada deshidratada
4 1/2 tazas (1.1 L) de harina
para pan
2 1/2 cucharaditas (12.3 ml) de
levadura para máquina
panificadora
1.5 lb (680 g) Hogaza
1 taza (237 ml) de agua
1
1/8 cucharaditas (5.5 ml) de sal
1 cucharada (15 ml) de azúcar
3 cucharadas (44 ml) de
mantequilla o aceite vegetal
3 1/2 tazas (828 ml) de harina
para pan
1 1/2 cucharaditas (7.4 ml) de
copos de cebolla
2 cucharaditas (10 ml) de semillas
de amapola
2 cucharaditas (10 ml) de levadura
para máquina panificadora
2 lb (907 g) Hogaza
1 1/3 tazas (315 ml) de agua
1
1/2 cucharaditas (7.4 ml) de sal
2 cucharadas (30 ml) de azúcar
1/4 taza (59 ml) de mantequilla o
aceite vegetal
4 1/2 tazas (1.1 L) de harina para
pan
2 cucharaditas (10 ml) de copos
de cebolla
1 cucharada (15 ml) de semillas
de amapola
2 1/4 cucharaditas (11.1 ml) de
levadura para máquina
panificadora
Cebolla y Semillas de Amapola
NOTA: La harina canadiense tiene un contenido mayor de proteína o gluten que la
harina estadounidense. Se puede reemplazar la harina estadounidense en cantidades
iguales por la harina canadiense. Sin embargo, la harina canadiense puede absorber
más humedad. Controle la masa durante el primer ciclo de amasado. Si parece seca,
usted puede agregar hasta 1 cucharada (15 ml) de agua adicional por taza de harina
indicada en la receta. Agregue el agua de 1 cucharada (15 ml) por vez hasta alcanzar
la consistencia deseada de una masa suave y flexible.
840194103 SPv03.indd 79 12/15/14 4:20 PM

80
Recetas – Básico
(Ciclo )
Avena-Suero de Leche
1.5 lb (680 g) Hogaza
1 taza (237 ml) de suero de leche
1 cucharadita (5 ml) de sal
2 cucharadas (30 ml) de azúcar
3 cucharadas (44 ml) de mantequilla
o aceite vegetal
3/4 taza (177 ml) de avena común
(avena tradicional)
2 1/2 tazas (591 ml) de harina
para pan
2 cucharaditas (10 ml) de levadura
para máquina panificadora
2 lb (907 g) Hogaza
1 1/4 tazas (296 ml) de suero de
leche
1 1/4 cucharaditas (6.2 ml) de sal
2 cucharadas (30 ml) de azúcar
1/4 taza (59 ml) de mantequilla o
aceite vegetal
1 taza (237 ml) de avena común
(avena tradicional)
2 3/4 tazas (651 ml) de harina
para pan
2 1/2 cucharaditas (12.3 ml) de
levadura para máquina
panificadora
Arce y Trigo
1.5 lb (680 g) Hogaza
1 taza (237 ml) de suero de leche
1 cucharadita (5 ml) de sal
2 cucharadas (30 ml) de leche
descremada deshidratada
2 cucharadas (30 ml) de jarabe
de arce
2 cucharadas (30 ml) de
mantequilla o aceite vegetal
1 taza (237 ml) de harina integral
2 tazas (473 ml) de harina
para pan
1 1/2 cucharaditas (7.4 ml) de
levadura para máquina
panificadora
2 lb (907 g) Hogaza
1 1/3 tazas (315 ml) de suero
de leche
1 cucharadita (5 ml) de sal
2 cucharadas (30 ml) de leche
descremada deshidratada
3 cucharadas (44 ml) de jarabe
de arce
2 cucharadas (30 ml) de
mantequilla o aceite vegetal
1 1/2 tazas (355 ml) de harina
integral
2 1/2 tazas (591 ml) de harina
para pan
2 cucharaditas (10 ml) de
levadura para máquina
panificadora
1.5 lb (680 g) Hogaza
1 taza (237 ml) + 2 cucharadas
(30 ml) de agua
1 1/8 cucharaditas (5.5 ml) de sal
1 cucharada (15 ml) de azúcar
3 cucharadas (44 ml) de aceite
de oliva
3 1/2 tazas (828 ml) de harina para pan
1 cucharadita (5 ml) de albahaca
machacada deshidratada
1 cucharadita (5 ml) de orégano
machacado deshidratado
3 cucharadas (44 ml) de queso
parmesano rallado
1 1/2 cucharaditas (7.4 ml) de
levadura para máquina
panificadora
2 lb (907 g) Hogaza
1 1/3 tazas (315 ml) de agua
1 1/2 cucharaditas (7.4 ml) de sal
2 cucharadas (30 ml) de azúcar
1/4 taza (59 ml) de aceite de oliva
4 1/2 tazas (1.1 L) de harina para pan
1 1/2 cucharaditas (7.4 ml) de
albahaca machacada deshidratada
1 1/2 cucharaditas (7.4 ml)
de orégano machacado
deshidratado
1/4 taza (59 ml) de queso
parmesano rallado
2 1/4 cucharaditas (11.1 ml) de
levadura para máquina
panificadora
Liviano de Centeno
1.5 lb (680 g) Hogaza
1 taza (237 ml) de agua
1
1/2 cucharaditas (7.4 ml) de sal
2 cucharadas (30 ml) de azúcar
1 cucharada (15 ml) de mantequilla
o aceite vegetal
2 cucharaditas (10 ml) de semillas
de alcaravea
2 tazas (473 ml) de harina para pan
1 taza (237 ml) de harina de centeno
1 1/2 cucharaditas (7.4 ml) de
levadura para máquina
panificadora
2 lb (907 g) Hogaza
1 1/2 tazas (355 ml) de agua
1
1/2 cucharaditas (7.4 ml) de sal
2 cucharadas (30 ml) de azúcar
1 cucharada (15 ml) de mantequilla
o aceite vegetal
2 cucharaditas (10 ml) de semillas
de alcaravea
3 tazas (710 ml) de harina para pan
1 1/2 tazas (355 ml) de harina
de centeno
2 cucharaditas (10 ml) de levadura
para máquina panificadora
Pan Italiano con Parmesano
840194103 SPv03.indd 80 12/15/14 4:20 PM

81
Recetas – Francés
(Ciclo )
NOTA: Se recomienda la configuración de corteza oscura.
Francés
1.5 lb (680 g) Hogaza
1 taza (237 ml) + 2 cucharadas
(30 ml) de agua
1 cucharadita (5 ml) de sal
1 cucharadita (5 ml) de azúcar
3 1/2 tazas (828 ml) de harina
para pan
1 1/2 cucharaditas (7.4 ml) de
levadura para máquina
panificadora
2 lb (907 g) Hogaza
1 1/2 tazas (355 ml) de agua
1 1/2 cucharaditas (7.4 ml) de sal
1 1/2 cucharaditas (7.4 ml) de azúcar
4 1/2 tazas (1.1 L) de harina para pan
2 cucharaditas (10 ml) de
levadura para máquina
panificadora
Miel y Granola
1.5 lb (680 g) Hogaza
1 taza (237 ml) + 2 cucharadas
(30 ml) de agua
1 1/8 cucharaditas (5.5 ml) de sal
1 cucharada (15 ml) de azúcar
3 cucharadas (44 ml) de
mantequilla o aceite vegetal
1 1/2 tazas (355 ml) de harina
para pan
1 taza (237 ml) de harina integral
1 taza (237 ml) de granola
1 1/4 cucharaditas (6.2 ml) de
levadura para máquina
panificadora
2 lb (907 g) Hogaza
1 1/2 tazas (355 ml) de agua
1 1/2 cucharaditas (7.4 ml) de sal
1/4 taza (59 ml) de miel
2 cucharadas (30 ml) de
mantequilla o aceite vegetal
2 1/2 tazas (591 ml) de harina
para pan
1 taza (237 ml) de harina integral
1 taza (237 ml) de granola
2 cucharaditas (10 ml) de
levadura para máquina
panificadora
Recetas – Básico
(Ciclo )
840194103 SPv03.indd 81 12/15/14 4:20 PM

82
Recetas – Libre de Gluten
(Ciclo )
1.5 lb (680 g) Hogaza
1 1/2 tazas (355 ml) de leche tibia
(de vaca, arroz, soya o nuez)
3/4 taza (177 ml) de huevo entero
(debe medir 3/4 tazas)
1/4 taza (59 ml) de aceite vegetal
1 cucharadita (5 ml) de vinagre de
sidra o jugo de limón
3/4 cucharadita (3.7 ml) de sal
marina
2 cucharadas (30 ml) de azúcar
1 cucharada (15 ml) de goma
xántica
1 cucharadita (5 ml) de goma guar
3/4 cucharadita (3.7 ml) de lecitina
granulada (soya común)
1 cucharada (15 ml) de harina de
papa
3 tazas (710 ml) de harina para
hornear común libre de gluten
2 cucharaditas (10 ml) de levadura
seca activa
Todos los ingredientes deben estar a temperatura ambiente. Bata todos
los ingredientes líquidos juntos hasta que queden homogéneos. Añada
los ingredientes líquidos al molde para pan. En otro tazón, mezcle los
ingredientes secos, con excepción de la levadura, hasta que queden
bien unidos. Vierta los ingredientes secos sobre los húmedos. Haga
un pequeño orificio sobre la parte superior de los ingredientes secos y
agregue la levadura.
La receta es gentileza de Red Mill Natural Foods, derechos de
reproducción 2010.
Si desea más recetas para la máquina panificadora o averiguar
dónde se venden los productos Bob’s Red Mill, visite Bob’s Red Mill
online en www.bobsredmill.com.
Pan para Sándwiches Libre de Gluten
1.5 lb (680 g) Hogaza
1 1/2 tazas (355 ml) de agua caliente
(150°F/66°C)
3 huevos grandes batidos
ligeramente
1 cucharadita (5 ml) de vinagre
de sidra
1/4 taza (59 ml) de aceite de canola
2 tazas (473 ml) de harina de arroz
integral
1/2 taza (118 ml) de harina de
tapioca
1/2 taza (118 ml) de almidón de
papa
1/2 taza (118 ml) de harina de
garbanzos
1 1/2 cucharaditas (7.4 ml) de sal
marina
4 1/2 cucharaditas (22.2 ml) de
goma xántica
3 cucharadas (44 ml) de azúcar
3 cucharadas (44 ml) de crema no
láctea
2 1/4 cucharaditas (11.1 ml) de
levadura seca activa
En un tazón, bata el agua caliente, los huevos, el vinagre y el aceite.
Coloque los ingredientes líquidos en el molde para pan. En otro tazón,
mezcle la harina de arroz, la harina de tapioca, el almidón de papa, la
harina de garbanzo, la sal marina, la goma xántica, la crema no láctea y
el azúcar. Vierta los ingredientes secos sobre los húmedos. Haga un
pequeño orificio sobre la parte superior de los ingredientes secos y
agregue la levadura.
La receta es gentileza de Red Mill Natural Foods, derechos de
reproducción 2010.
Si desea más recetas para la máquina panificadora o averiguar
dónde se venden los productos Bob’s Red Mill, visite Bob’s Red Mill
online en www.bobsredmill.com.
Pan Integral
Esta receta libre de gluten tiene más del 50% de granos enteros utilizando
harina de arroz integral.
840194103 SPv03.indd 82 12/15/14 4:20 PM

83
Recetas – Rápido
(Ciclo )
1.5 lb (680 g) Hogaza
1 taza (237 ml ) de agua
1/4 taza (59 ml) de mantequilla
o aceite vegetal
2 huevos, batidos ligeramente
Paquete de mezcla de pan rápido
de banana de 14 onzas (397 g)
1/2 taza (118 ml) de nueces bien
picadas
Pan de Maíz
NOTA:
Se recomienda la
configuración de corteza clara.
1.5 lb (680 g) Hogaza
2 huevos, batidos ligeramente
1 taza (237 ml) de leche
1/2 cucharadita (2.4 ml) de levadura
para máquina panificadora
2 paquetes de mezcla para muffins
de maíz de 8.5 onzas (241 g)
Pastel de Libra Amarillo
1.5 lb (680 g) Hogaza
1 1/3 tazas (315 ml) de agua
1/3 taza (79 ml) de mantequilla
o aceite vegetal
3 huevos grandes, batidos
ligeramente
Mezcla de pudín instantáneo
de vainilla de 3.9 onzas (111 g)
1 paquete de mezcla de pastel
amarillo de 18 onzas (510 g)
Pan Rápido de Bananas y Nueces
Pastel Húmedo Devil’s Food
NOTA:
Se recomienda la
configuración de corteza clara.
1.5 lb (680 g) Hogaza
1 lata de leche evaporada de
12 onzas (340 g)
1/2 taza (118 ml) de mantequilla
o aceite vegetal
3 huevos, batidos ligeramente
1 paquete de mezcla para pastel
Devil’s Food de 18 onzas (510 g)
840194103 SPv03.indd 83 12/15/14 4:20 PM

84
Canela-Pasas de Uva
1.5 lb (680 g) Hogaza
1 taza (237 ml) de agua
1 1/2 cucharaditas (7.4 ml) de sal
1/4 taza (59 ml) de azúcar
2 cucharadas (30 ml) de leche
descremada deshidratada
2 cucharadas (30 ml) de mantequilla
o aceite vegetal
2 3/4 tazas (651 ml) de harina para pan
1 1/2 cucharaditas (7.4 ml) de canela
2 cucharaditas (10 ml) de levadura
para máquina panificadora
3/4 taza (177 ml) de pasas de uva
2 lb (907 g) Hogaza
1 1/4 tazas (296 ml) de agua
2 cucharaditas (10 ml) de sal
1/3 taza (79 ml) de azúcar
2 1/2 cucharadas (37 ml) de leche
descremada deshidratada
2 1/2 cucharadas (37 ml) de
mantequilla o aceite vegetal
4 tazas (946 ml) de harina para
pan
2 1/2 cucharaditas (12.3 ml) de
canela
2 1/2 cucharaditas (12.3 ml)
de levadura para máquina
panificadora
1 taza (237 ml) de pasas de uva
Agregue las pasas de uva cuando se dé la señal de Añadir ingredientes.
La máquina panificadora emitirá 10 pitidos 30 minutos después de
iniciado el ciclo.
Recetas – Dulce
(Ciclo )
NOTA: Se recomienda la configuración de corteza clara.
Arándanos, naranja y pecanas
1.5-lb. (680-g) Hogaza
3/4 taza (177 ml) de agua
1/4 taza (59 ml) de jugo de naranja
1 1/2 cucharaditas (7.4 ml) de sal
1/4 taza (59 ml) de azúcar
2 cucharadas (30 ml) de leche
descremada deshidratada
2 cucharadas (30 ml) de mantequilla
cortada en trocitos
3 1/2 tazas (828 ml) de harina para
pan
1 1/2 cucharaditas (7.4 ml) de
ralladura de naranja
2 cucharaditas (10 ml) de levadura
para máquina panificadora
1/3 taza (79 ml) de arándanos secos
1/3 taza (79 ml) de pecanas picadas
2 lb (907 g) Hogaza
1 taza (237 ml) de agua
1/4 taza (59 ml) de jugo de naranja
2 cucharaditas (10 ml) de sal
1/3 taza (79 ml) de azúcar
2 1/2 cucharadas (37 ml) de leche
descremada deshidratada
2 1/2 cucharadas (37 ml) de
mantequilla cortada en trocitos
4 tazas (946 ml) de harina para
pan
2 1/2 cucharaditas (12.3 ml) de
ralladura de naranja
2 1/2 cucharaditas (12.3 ml) de
levadura para máquina
panificadora
1/2 taza (118 ml) de arándanos
secos
1/2 taza (118 ml) de pecanas
picadas
Agregue los arándanos y las pecanas cuando se de la señal de Añadir
ingredientes. Antes de agregarlas, colóquelas en una bolsa resellable con
1 cucharadita (5 ml) de harina para cubrir.
840194103 SPv03.indd 84 12/15/14 4:20 PM

85
Recetas – Extra Rápido de 1.5 lb.
(Ciclo )
NOTA: El ciclo Express (rápido) tiene sólo un tiempo de leudado. El pan será más pesado y no se elevará tanto como el pan de otros ciclos.
Se recomienda usar la configuración Oscura para lograr un mejor tostado.
Blanco
1.5 lb (680 g) Hogaza
1 taza (237 ml) de agua tibia
1/2 cucharadita (2.4 ml) de sal
3 cucharadas (44 ml) de azúcar
2 cucharadas (30 ml) de mantequilla
o aceite vegetal
2 cucharadas (
30 ml )
de leche
descremada deshidratada
3 1/4 tazas (769 ml) de harina
para pan
1 cucharada (15 ml) de levadura
instantànea
Pimienta-Eneldo
1.5 lb (680 g) Hogaza
1 taza (237 ml) de agua tibia
1 cucharadita (5 ml) de sal
1/2 cucharadita (2.4 ml) de pimienta
negra
1/2 cucharadita (2.4 ml) de eneldo
deshidratado
3 cucharadas (44 ml) de azúcar
2 cucharadas (30 ml) de mantequilla
o aceite vegetal
2 cucharadas (
30 ml)
de leche
descremada deshidratada
3 tazas (710 ml) de harina para pan
1 cucharada (15 ml) de levadura
instantànea
840194103 SPv03.indd 85 12/15/14 4:20 PM

86
Recetas – Extra Rápido de 2.0 lb.
(Ciclo )
NOTA: El ciclo Express (rápido) tiene sólo un tiempo de leudado. El pan será más pesado y no se elevará tanto como el pan de otros ciclos.
Se recomienda usar la configuración Oscura para lograr un mejor tostado.
Blanco
2 lb (907 g) Hogaza
1 1/2 tazas (355 ml) de agua tibia
2 cucharaditas (10 ml) de sal
1/4 taza (59 ml) de azúcar
2 1/2 cucharadas (37 ml) de
mantequilla o aceite vegetal
2 cucharadas (30 ml) de leche
descremada deshidratada
4 1/4 tazas (1 L) de harina para pan
1 cucharada (
15 ml)
de levadura
instantànea
Pimienta-Eneldo
2 lb (907 g) Hogaza
1 3/4 tazas (414 ml) de agua tibia
1 cucharadita (5 ml) de sal
1/2 cucharadita (2.4 ml) de pimienta
negra
1 cucharadita (5 ml) de eneldo
deshidratado
1/4 taza (59 ml) de azúcar
3 cucharadas (
44 ml)
de
mantequilla o aceite vegetal
2 cucharadas (30 ml) de leche
descremada deshidratada
4 1/2 tazas (1.1 L) de harina para
pan
1 cucharada (15 ml) de levadura
instantànea
840194103 SPv03.indd 86 12/15/14 4:20 PM

87
Recetas – Masa
(Ciclo )
Panecillos para Cena
1 taza (237 ml) de leche
1/4 taza (59 ml) de mantequilla,
a temperatura ambiente
1 huevo, batido ligeramente
1/4 taza (59 ml) de azúcar
1 cucharadita (5 ml) de sal
4 tazas (946 ml) de harina común
2 cucharaditas (10 ml) de levadura
para máquina panificadora
Al finalizar el ciclo de Dough (masa), quite la masa de la máquina pani-
ficadora. Presione y sostenga el botón START/STOP por varios segun-
dos para finalizar el ciclo. Coloque sobre un mostrador de encimera
espolvoreado con harina. Unte con mantequilla una bandeja para hornear
de 9 x 13 pulgadas (23 x 33 cm). Corte la masa en dos; luego divida cada
mitad en 8 piezas. Colóquelas en un recipiente enmantecado. Deje leudar
hasta que se dupliquen en tamaño, en alrededor de 45 minutos. Hornee a
375°F (190°C) durante 15 a 20 minutos o hasta que estén listos. Alcanza
para 16 pancitos.
Masa para Pizza
1 taza (237 ml) de agua
1 cucharadita (5 ml) de sal
1 cucharada (15 ml) de mantequilla
o aceite vegetal
3 tazas (710 ml) de harina para pan
2 cucharaditas (10 ml) de levadura
para máquina panificadora
Al finalizar el ciclo de Dough (masa), quite la masa de la máquina pani-
ficadora. Presione y sostenga el botón START/STOP por varios segun-
dos para finalizar el ciclo. Colóquela sobre un mostrador de encimera
espolvoreado con harina y deje reposar la masa durante 10 minutos. Dé
forma en un recipiente redondo para pizza de 15 a 16 pulgadas (38 x 40
cm). Añada sus ingredientes favoritos para pizza. Hornee a 475°F (246°C)
durante 20 a 25 minutos o hasta que esté lista. Alcanza para una pizza de
16 pulgadas (40 cm).
Focaccia
Masa
1 taza (237 ml) de agua
1 cucharadita (5 ml) de sal
2 cucharadas (30 ml) de aceite de
oliva
3 1/4 tazas (769 ml) de harina para
pan
1 cucharada (15 ml) de aderezo
italiano
2 cucharaditas (10 ml) de levadura
seca activa
Coberturas
1 a 2 cucharadas (15 à 30 ml) de
harina de maíz amarillo
2 cucharadas (30 ml) de aceite de
oliva
3 cucharadas (44 ml) de albahaca
fresca picada
1/4 taza (59 ml) de queso
parmesano rallado
Al finalizar el ciclo de Dough (masa), quite la masa de la máquina
panificadora. Presione y sostenga el botón START/STOP por varios
segundos para finalizar el ciclo. Colóquela sobre un mostrador de
encimera espolvoreado con harina y deje reposar la masa durante 10
minutos. Esparza la harina de maíz amarillo sobre un recipiente para
hornear o plancha para galletas. Enrolle la masa en un rectángulo grande.
Coloque el rectángulo en el recipiente. Utilizando sus dedos, presione
sobre la masa a una distancia de 1 a 2 pulgadas (2.5 a 5 cm). Pinte aceite
sobre la parte superior de la masa. Deje leudar durante 30 a 45 minutos.
Esparza albahaca y queso sobre la masa. Hornee a 400°F (204°C) durante
20 a 25 minutos. Alcanza para 1 focaccia.
840194103 SPv03.indd 87 12/15/14 4:20 PM

88
Recetas – Masa
(Ciclo )
Masa
1/2 taza (118 ml) más 1 cucharada
(15 ml) de leche tibia
2 huevos, batidos ligeramente
1 cucharadita (5 ml) de sal
1/2 taza (118 ml) de azúcar
1/4 taza (59 ml) de mantequilla,
a temperatura ambiente
4 tazas (946 ml) de harina común
2 1/2 cucharaditas (12.3 ml)
de levadura para máquina
panificadora
Relleno
1/3 taza (79 ml) de manteca
derretida
3/4 taza (177 ml) de azúcar moreno
Glaseado
3 onzas (85 g) de queso crema a
temperatura ambiente
3 cucharadas (44 ml) de mantequilla,
a temperatura ambiente
1 taza (237 ml) de azúcar
impalpable
1 cucharadita (5 ml) de extracto
de vainilla
1 pizca de sal
2 cucharadas (30 ml) de canela
3/4 taza (177 ml) de pasas de uva
Al finalizar el ciclo de Masa, quite la masa de la máquina panificadora.
Presione y sostenga el botón START/STOP por varios segundos para
finalizar el ciclo. Colóquela sobre un mostrador de encimera espolvoreado
con harina y deje reposar la masa durante 10 minutos. Enrolle la masa
en un rectángulo grande acerca de 14 x 16 pulgadas (36 x 41 cm). Unte
con mantequilla derretida. Mezcle el azúcar marrón y la canela; luego
espolvoree sobre la mantequilla. Coloque las pasas de uva sobre la
mantequilla y el azúcar. Enrolle la masa desde el lado más largo. Corte
en pancitos de un grosor de 1 pulgada (2.5 cm). Coloque en una plancha
para hornear enmantecada de 10 x 14 pulgadas (25 x 36 cm). *Cubra
y deje leudar hasta que se haya duplicado en tamaño, cerca de 1 hora.
Hornee a 375°F (190°C) durante 20 a 25 minutos o hasta que estén listos.
Deje enfriar ligeramente; luego coloque el glaseado.
Glaseado: Mezcle el queso crema, la mantequilla, el azúcar impalpable,
la vainilla y la sal.
Alcanza para 16 pancitos grandes de canela.
* También puede usar una plancha para hornear de 9 x 13 pulgadas (23 x
33 cm) más un recipiente para pan de 9 x 5 pulgadas (23 x 13 cm).
Pancitos de Canela y Pasas de Uva
840194103 SPv03.indd 88 12/15/14 4:20 PM

89
Recetas – Mermelada
(Ciclo )
Mermelada de Frutillas
6 tazas (1.4 L) de frutillas, sin
cabitos, cortadas en trozos
(aprox. 2 lbs. [907 g] frescas)
1 1/2 tazas (355 ml) de azúcar
1 caja de pectina de fruta baja en
azúcar
1 cucharada (15 ml) de jugo de
limón
En un tazón grande, mezcle todos los ingredientes. Coloque en una
bandeja para pan. Accione la máquina panificadora. Cuando termine el
ciclo, deje que la mermelada se enfríe durante 1 hora antes de trasladarla
a recipientes de almacenamiento. Guarde en el refrigerador por hasta
3 semanas o en el congelador por hasta 1 año. Alcanza para 6 tazas
(1.4 L).
Recetas – Pastel
(Ciclo )
Utilice una caja entera de cualquier marca o sabor de mezcla para pastel
de 18 onzas (510 g) o 18 3/4 onzas (532 g). Siga las instrucciones del
paquete utilizando el Ciclo .
840194103 SPv03.indd 89 12/15/14 4:20 PM

90
Recetas – Integral
(Ciclo )
Integral
1.5 lb (680 g) Hogaza
1 1/4 tazas (296 ml) de agua
2 cucharadas (30 ml) de aceite
vegetal
1 1/2 cucharaditas (7.4 ml) de sal
2 cucharadas (30 ml) de azúcar
2 cucharadas (30 ml) de leche
descremada deshidratada
4 cucharaditas (20 ml) de gluten
vital de trigo
3 1/2 tazas (828 ml) de harina
integral
1 1/2 cucharaditas (7.4 ml) de
levadura para máquina
panificadora
2 lb (907 g) Hogaza
1 3/4 tazas (414 ml) de agua
3 cucharadas (44 ml) de aceite
vegetal
1 1/2 cucharaditas (7.4 ml) de sal
3 cucharadas (44 ml) de azúcar
2 cucharadas (30 ml) de leche
descremada deshidratada
2 cucharadas (30 ml) de gluten
vital de trigo
4 1/2 tazas (1.1 L) de harina integral
2 cucharaditas (10 ml) de
levadura para máquina
panificadora
Salvado con Fibras
1.5 lb (680 g) Hogaza
1 1/4 tazas (296 ml) de agua
1/2 cucharadita (2.4 ml) de sal
2 cucharadas (30 ml) de miel
2 cucharadas (30 ml) de
mantequilla o aceite vegetal
1 taza (237 ml) de cereal de salvado
entero
1 1/2 tazas (355 ml) de harina
integral
1 1/2 tazas (355 ml) de harina para
pan
2 cucharaditas (10 ml) de levadura
para máquina panificadora
2 lb (907 g) Hogaza
1 1/2 tazas (355 ml) más
1 cucharada (15 ml) de agua
1 cucharadita (5 ml) de sal
3 cucharadas (44 ml) de miel
2 cucharadas (30 ml) de
mantequilla o aceite vegetal
1 taza (237 ml) de cereal de salvado
entero
1 3/4 tazas (414 ml) de harina
integral
1 3/4 tazas (414 ml) de harina para
pan
2 1/2 cucharaditas (12.3 ml) de
levadura para máquina
panificadora
El gluten de trigo vital puede encontrarse en la sección de horneado de su supermercado. Ayuda a que el pan leude cuando se utilizan ingredientes tales como harinas
integrales que normalmente producen panes muy pesados y densos.
840194103 SPv03.indd 90 12/15/14 4:20 PM

91
Grupo HB PS, S.A. de C.V.
Monte Elbruz 124-301
Colonia Palmitas, Delegación Miguel Hidalgo
C.P. 11560, México, Distrito Federal
01 800 71 16 100
PÓLIZA DE GARANTÍA
PRODUCTO: MARCA: MODELO:
Grupo HB PS, S.A. de C.V. cuenta con una Red de Centros de Servicio Autorizada, por favor consulte en la lista anexa el nombre y dirección de los establecimientos en la
República Mexicana en donde usted podrá hacer efectiva la garantía, obtener partes, componentes, consumibles y accesorios; así como también obtener servicio para
productos fuera de garantía. Para mayor información llame sin costo: Centro de Atención al consumidor: 01 800 71 16 100
Grupo HB PS, S.A. de C.V. le otorga a partir de la fecha de compra:
GARANTÍA DE 1 AÑO.
COBERTURA
• Esta garantía ampara, todas las piezas y componentes del producto que resulten con defecto de fabricación incluyendo la mano de obra.
• Grupo HB PS, S.A. de C.V. se obliga a reemplazar, reparar o reponer, cualquier pieza o componente defectuoso; proporcionar la mano de obra necesaria para su diagnóstico y reparación,
todo lo anterior sin costo adicional para el consumidor.
• Esta garantía incluye los gastos de transportación del producto que deriven de su cumplimiento dentro de su red de servicio.
LIMITACIONES
• Esta garantía no ampara el reemplazo de piezas deterioradas por uso o por desgaste normal, como son: cuchillas, vasos, jarras, filtros, etc.
• Grupo HB PS, S.A. de C.V. no se hace responsable por los accidentes producidos a consecuencia de una instalación eléctrica defectuosa, ausencia de toma de tierra, clavija de enchufe
en mal estado, etc.
EXCEPCIONES
Esta garantía no será efectiva en los siguientes casos:
a) Cuando el producto se hubiese utlizado en condiciones distintas a las normales. (Uso industrial, semi-industrial o comercial.)
b) Cuando el producto no hubiese sido operado de acuerdo con el instructivo de uso.
c) Cuando el producto hubiese sido alterado o reparado por personas no autorizadas por Grupo HB PS, S.A. de C.V. el fabricante nacional, importador o comercializador responsable
respectivo.
El consumidor puede solicitar que se haga efectiva la garantía ante la propia casa comercial donde adquirió su producto, siempre y cuando Grupo HB PS, S.A. de C.V. no cuente con talleres de
servicio.
840194103 SPv03.indd 91 12/15/14 4:20 PM

12/14840194103
Los modelos incluídos en el instructivo de Uso y Cuidado pueden ir seguidos o no por un sufijo correspondiente a una
o varias letras del alfabeto y sus combinaciones, separadas o no por un espacio, coma, diagonal, o guión. Como ejemplos
los sufijos pueden ser: “Y” y/o “MX” y/o “MXY” y/o “Z”.
Modelos:
29881, 29882, 29882C
Tipo:
BM07
Características Eléctricas:
120 V~ 60 Hz 600 W
• Para hacer efectiva la garantía no deben exigirse mayores requisitos que la presentación del producto y la póliza correspondiente, debidamente sellada por el establecimiento que lo vendió.
• Para hacer efectiva la garantía, lleve su aparato al Centro de Servicio Autorizado más cercano a su domicilio (consulte la lista anexa).
• Si no existe Centro de Servicio Autorizado en su localidad llame a nuestro Centro de Atención al Consumidor para recibir instrucciones de como hacer efectiva su garantía.
• El tiempo de reparación, en ningún caso será mayor de 30 días naturales contados a partir de la fecha de recepción del producto en nuestros Centros de Servicio Autorizados.
• En caso de que el producto haya sido reparado o sometido a mantenimiento y el mismo presente deficiencias imputables al autor de la reparación o del mantenimiento dentro de los treinta
días naturales posteriores a la entrega del producto al consumidor, éste tendrá derecho a que sea reparado o mantenido de nuevo sin costo alguno. Si el plazo de la garantía es superior a
los treinta días naturales, se estará a dicho plazo.
• El tiempo que duren las reparaciones efectuadas al amparo de la garantía no es computable dentro del plazo de la misma. Cuando el bien haya sido reparado se iniciará la garantía respecto
de las piezas repuestas y continuará con relación al resto. En el caso de reposición del bien deberá renovarse el plazo de la garantía.
DÍA___ MES___ AÑO___
Si desea hacer comentarios o sugerencias con respecto a nuestro servicio o tiene alguna queja derivada de la atención recibida en
alguno de nuestros Centros de Servicio Autorizados, por favor dirigirse a:
GERENCIA INTERNACIONAL DE SERVICIO
01 800 71 16 100
Email: mexico.service@hamiltonbeach.com.mx
PROCEDIMIENTO PARA HACER EFECTIVA LA GARANTÍA
RED DE CENTROS DE SERVICIO AUTORIZADA GRUPO HB PS, S.A. DE C.V.
Distrito Federal
ELECTRODOMÉSTICOS
Av. Plutarco Elias Cailes No. 1499
Zacahuitzco MEXICO 09490 D.F.
Tel: 01 55 5235 2323 • Fax: 01 55 5243 1397
CASA GARCIA
Av. Patriotismo No. 875-B
Mixcoac MEXICO 03910 D.F.
Tel: 01 55 5563 8723 • Fax: 01 55 5615 1856
Nuevo Leon
FERNANDO SEPULVEDA REFACCIONES
Ruperto Martínez No. 238 Ote.
Centro MONTERREY, 64000 N.L.
Tel: 01 81 8343 6700 • Fax: 01 81 8344 0486
Jalisco
SERVICIOS DE MANTENIMIENTO CASTILLO
Garibaldi No. 1450
Ladrón de Guevara
GUADALAJARA 44660 Jal.
Tel: 01 33 3825 3480 • Fax: 01 33 3826 1914
Chihuahua
DISTRIBUIDORA TURMIX
Av. Paseo Triunfo de la Rep. No. 5289 Local 2 A.
Int. Hipermart
Alamos de San Lorenzo
CD. JUAREZ 32340 Chih.
Tel: 01 656 617 8030 • Fax: 01 656 617 8030
SELLO DEL VENDEDOR QUEJAS Y SUGERENCIASFECHA DE ENTREGA
840194103 SPv03.indd 92 12/15/14 4:20 PM