Owner's Guide Bread Makers
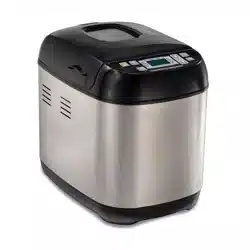
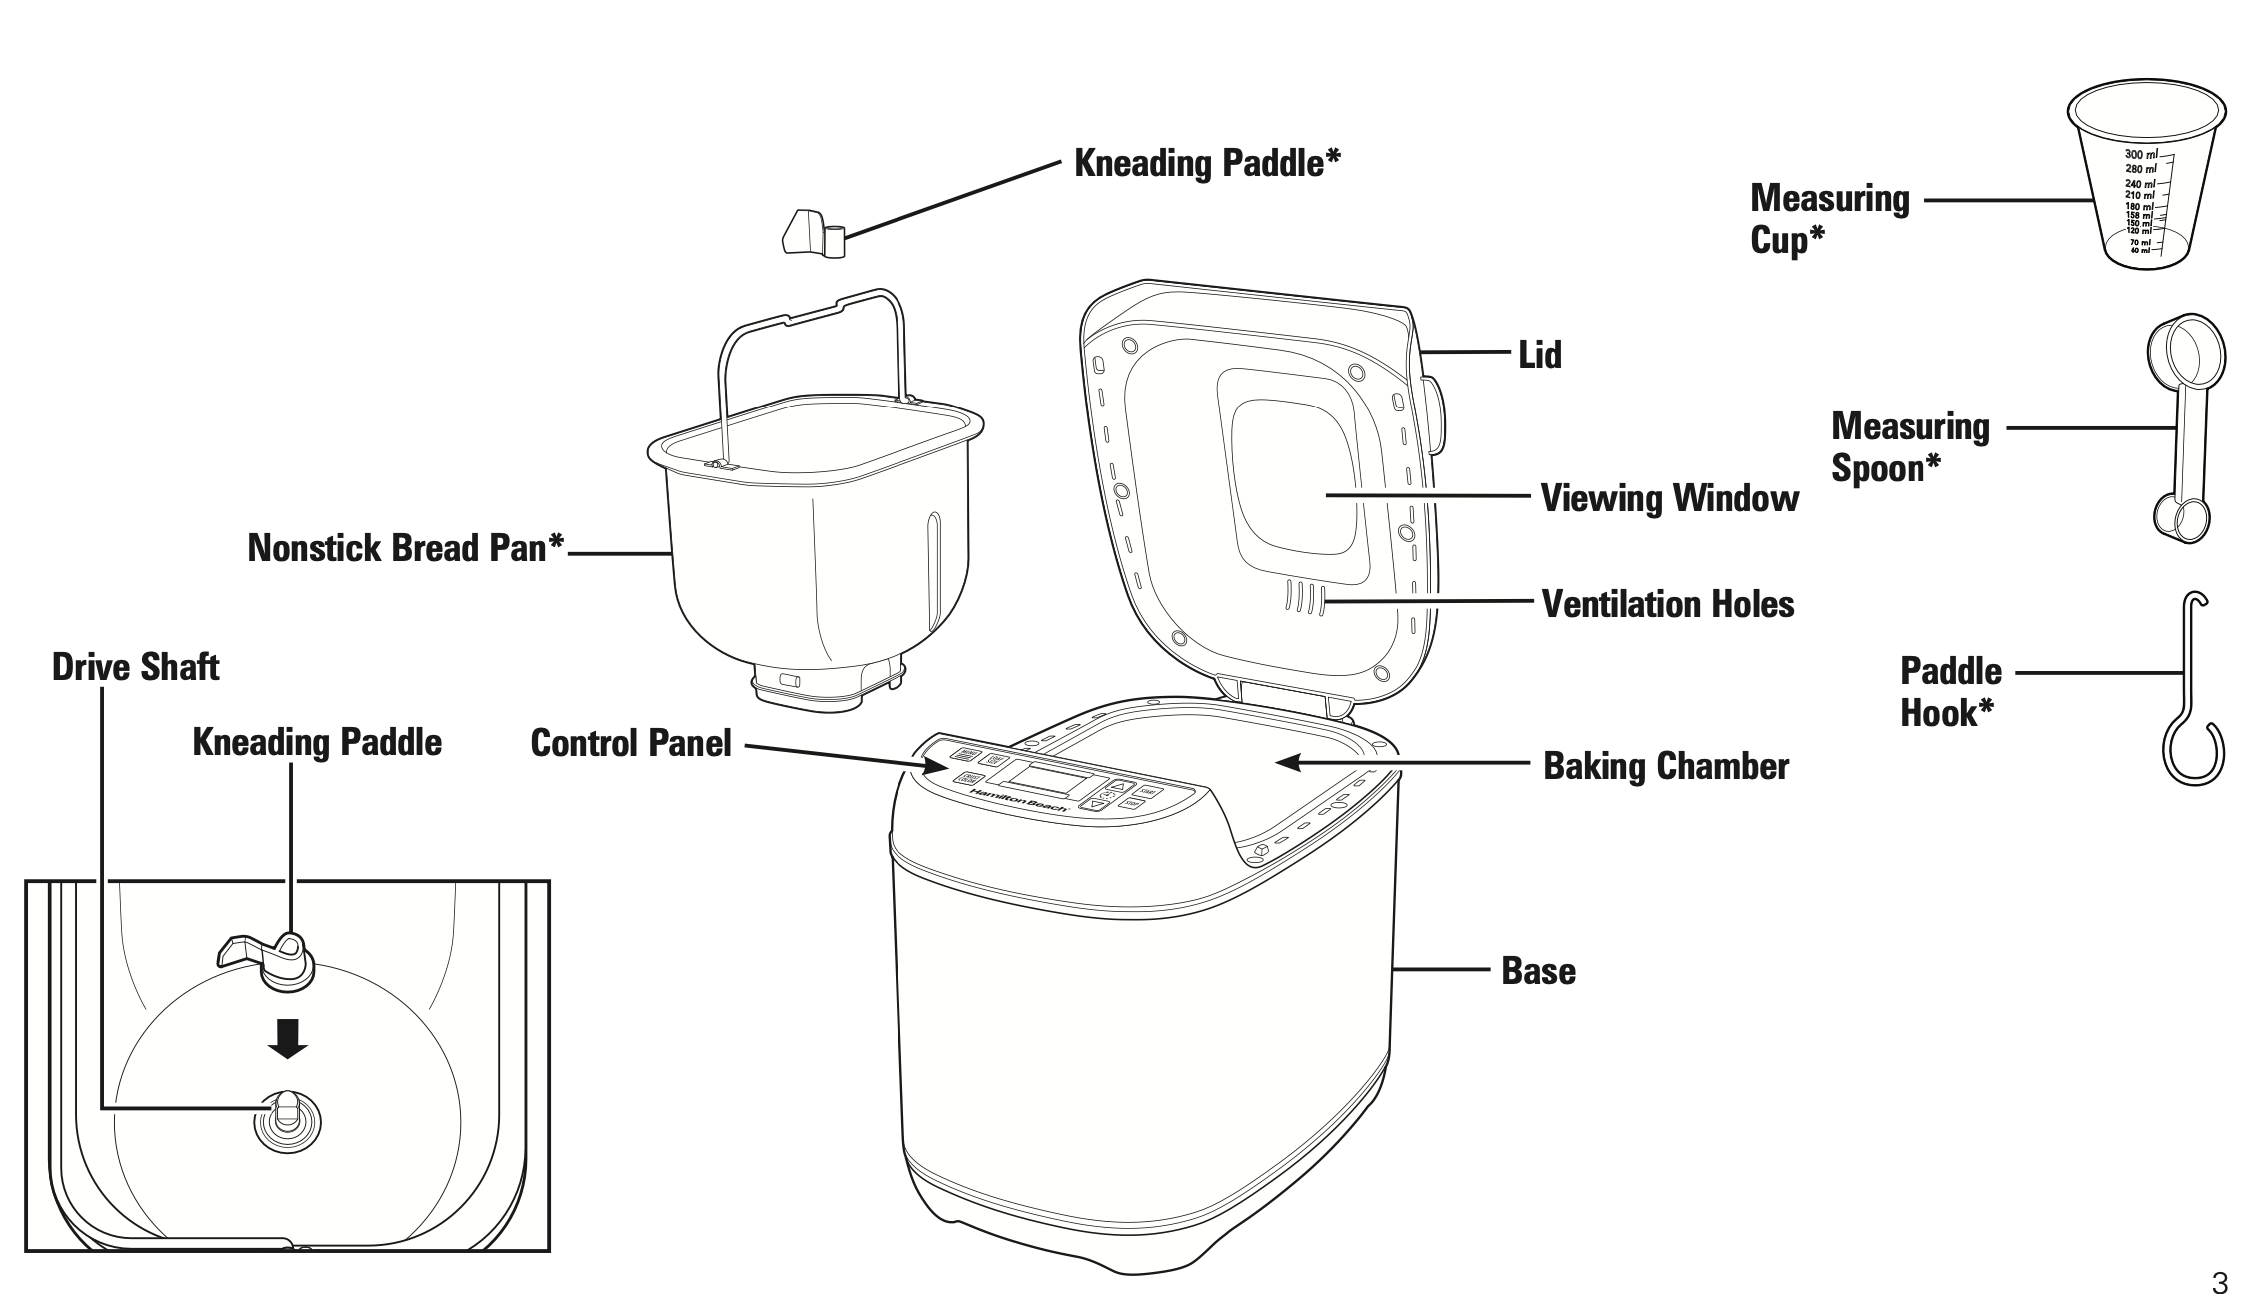
Parts and Features
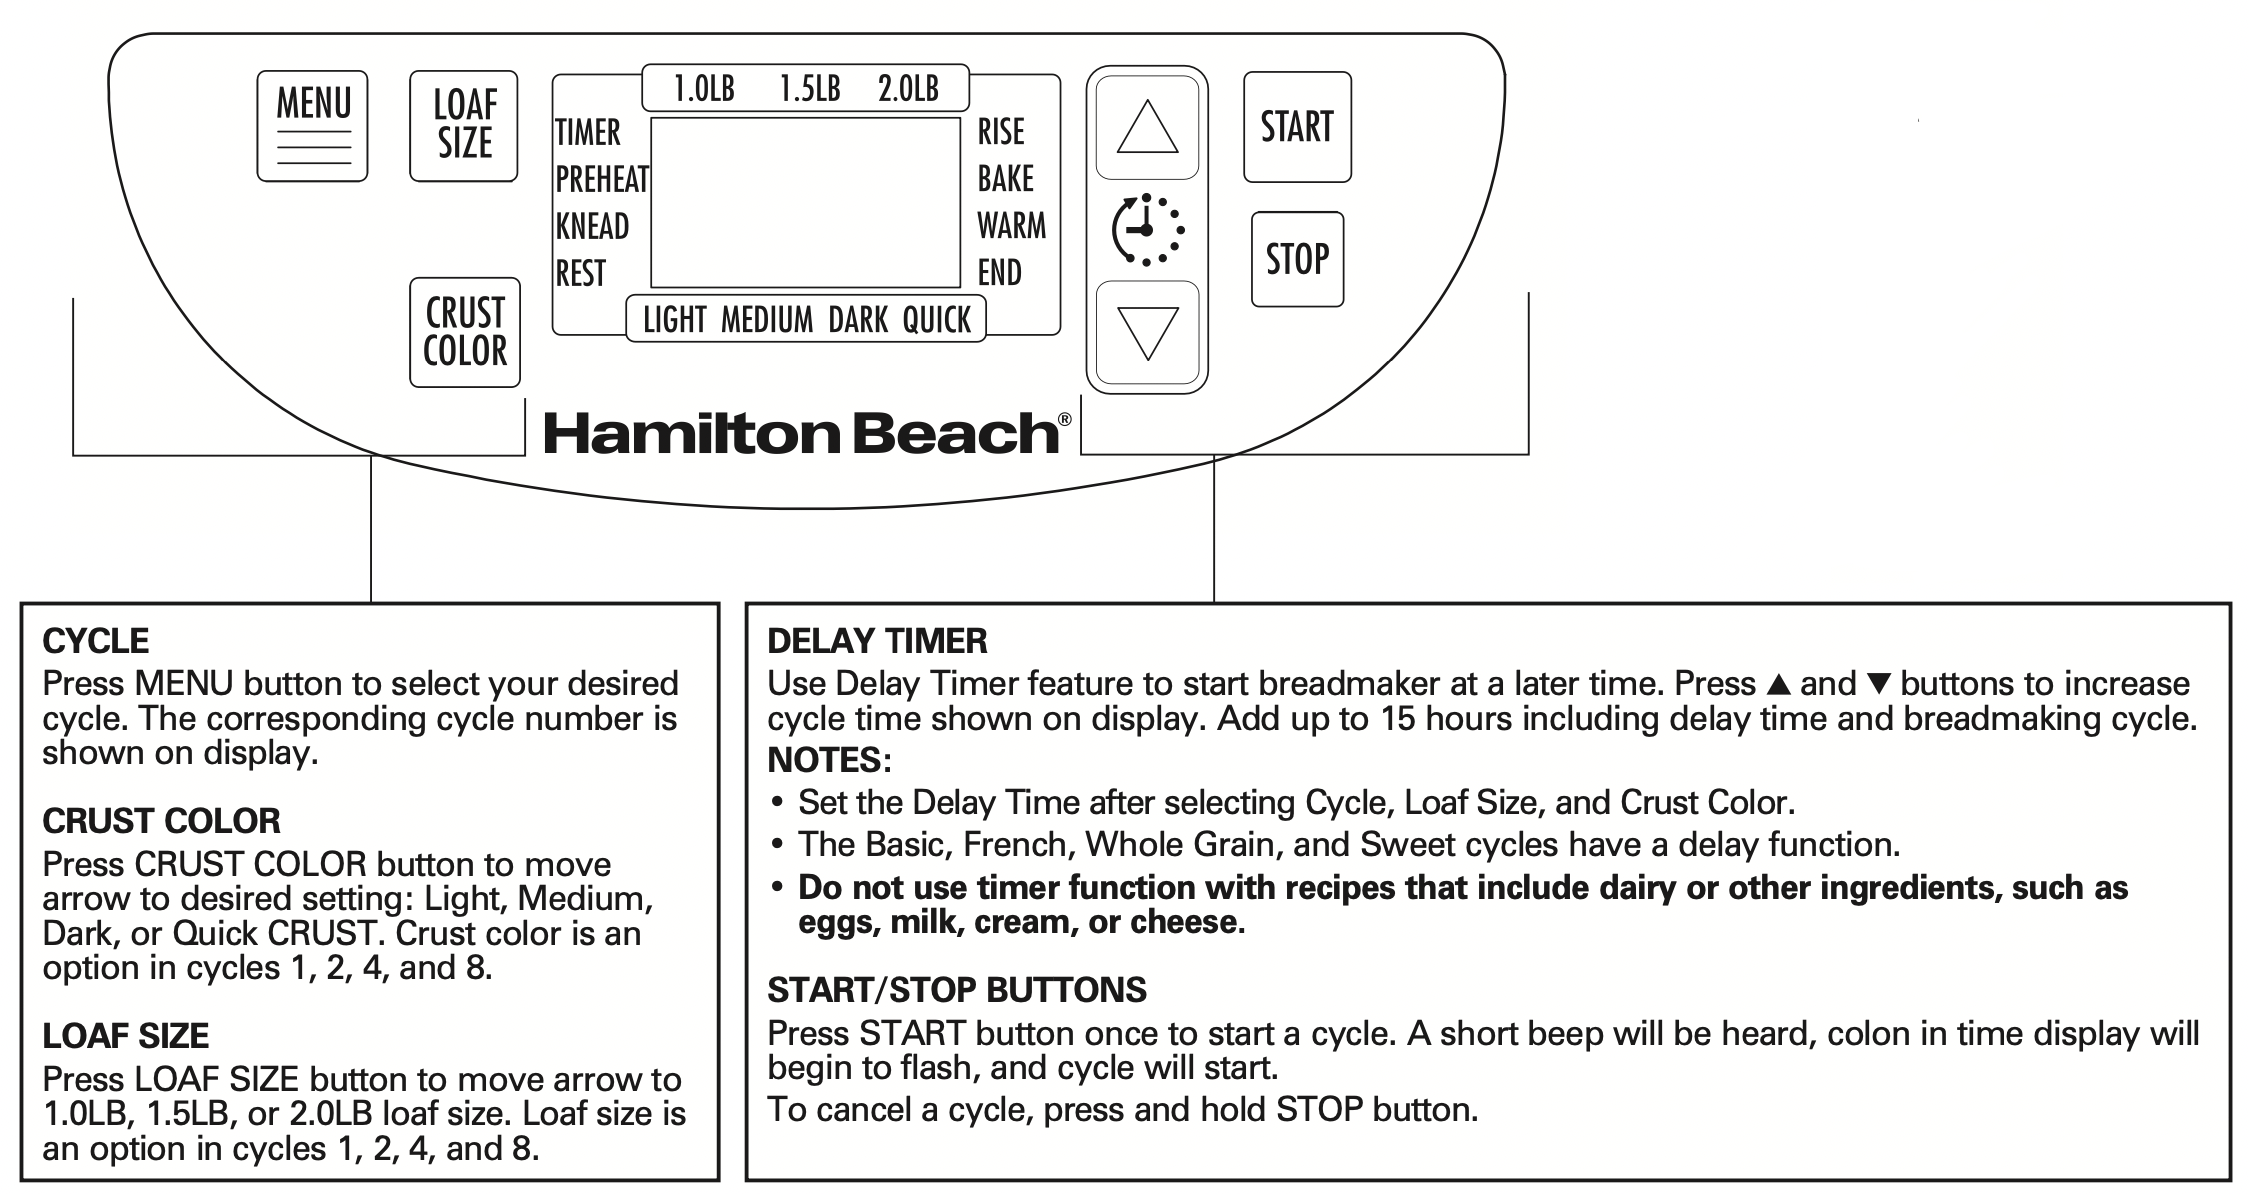
Control Panel
Preprogrammed Cycles
- Basic
- French
- Gluten Free
- Whole Grain
- 1.5 LB Express
- 2.0 LB Express
- Quick Bread
- Sweet
- Dough
- Cake
- Jam
- Rise
- Bake
- Artisan Dough
POWER INTERRUPTION
In event of a power outage, the process of making bread will continue automatically within 7 minutes. If dough has started rising, discard ingredients in bread pan and start over. If dough has not entered rising phase, you can press START button to continue cycle from beginning.
WARM
After baking cycle is complete, bread machine will shift to Warm setting for 1 hour.
To cancel Warm process, press and hold STOP button until it beeps.
TIP: Removing bread immediately after baking cycle is complete will prevent crust from becoming darker.
Program Cycles
- Basic
For white and mixed breads consisting mainly of basic bread flour.
- French
For light breads made from fine flour. Normally, bread is fluffy and has a crispy crust. This is not a suitable setting for recipes requiring butter, margarine, or milk.
- Gluten Free
For gluten-free breads and mixes.
- Whole Grain
For breads with heavy varieties of flour that require a longer phase of kneading and rising (whole wheat flour, rye flour).
Bread will be more compact and heavy.
- 1.5 LB Express
Kneading, rising, and baking a 1.5-lb. (680-g) loaf occurs in 1 hour and 20 minutes using a quick-rising yeast. Loaf will be smaller and rougher than that made with Basic cycle.
- 2.0 LB Express
Same as 1.5 LB Express, but takes 1 hour and 55 minutes and yields a 2.0-lb. (907-g) loaf.
- Dough
This cycle prepares yeast dough for buns, pizza crust, etc., to be baked in a conventional oven. There is no baking in this cycle.
- Quick
For quick-bread recipes that do not use yeast for rising and instead may use baking powder or soda. Kneading, rising, and baking loaf within a time less than for basic bread.
Tip: Use a rubber spatula to scrape sides of pan while bread baker is mixing to ensure all ingredients are blended.
- Sweet
For breads with additives such as fruit juices, grated coconut, raisins, dry fruits, chocolate, or added sugar. Due to a longer phase of rising, bread will be light and airy.
- Cake
Kneading, rising, and baking occurs, but with aid of soda or baking powder.
- Jam
For making jams with fresh fruit.
- Rise
Use for rising doughs following recipe directions or speed method directions on packages of frozen bread dough. Rising time can be set up to 6 hours.
- Bake
After using rise cycle, bread can be baked with this cycle or use when additional baking of breads is needed because a loaf is too light or not baked through. There is no kneading or resting.
- Artisan Dough
This cycle is for making artisan dough, which will then be shaped and baked in an oven. Ingredients should be cool since this cycle provides a long cool rise to develop flavors and textures of dough.
How to Use
BEFORE FIRST USE:
- Check for any missing or damaged parts.
- Clean all parts according to Care and Cleaning section.
- Set breadmaker on Bake mode and bake empty for about 10 minutes. Let unit cool down and clean all the detached parts again. The appliance may emit a little smoke and/or odor when you turn it on for first time. This is normal and will subside after first or second use. Make sure appliance has sufficient ventilation.
- Dry all parts thoroughly. The appliance is ready for use.
- Place bread pan into base and make sure it is firmly locked in place by turning it clockwise.
- Push kneading paddle onto drive shaft inside bread pan.
CAUTION - Falling Object Hazard. Breadmaker can wobble and walk during kneading cycle. Always position it in center of counter away from edge.
- Add ingredients to bread pan in order listed in recipe. First, add liquids, sugar, and salt; then flour; and the yeast last.
NOTE: Make sure yeast does not come into contact with salt or liquids.
- Plug into outlet. A beep will be heard and display will default to Cycle 1.
- Press MENU button until your desired cycle is displayed.
- Press LOAF SIZE button to move arrow to 1- or 2-lb. loaf size. (Loaf size is an option in Cycles 1, 2, 4, and 8.)
- Press the CRUST COLOR button to move the arrow to desired setting: Light, Medium, Dark, or Quick. (Crust color is an option in cycles 1, 2, 4, and 8.)
- If desired, set DELAY TIMER with
 or
or  arrows. (Delay function is available in Cycles 1, 2, 4, and 8 for up to 15 hours.)
NOTE: Do not use this feature when using dairy, eggs, etc.
- Press START button to begin cycle. Breadmaker will beep once and the “:” in digital display will begin to flash indicating timer is counting down. The kneading paddle will begin to mix your ingredients. If Delay Timer was activated, kneading paddle will not mix ingredients until cycle is set to begin.
- For add-ins (nuts, raisins), machine will beep 12 times. Open lid and pour in your add-ins.
- Once Baking cycle is complete, machine will beep 10 times and shift to Warm setting for 1 hour.
- To stop machine, press and hold STOP button until it beeps. The Warm setting will end. Unplug cord and then open the lid using oven mitts. At the end of Warm, breadmaker will beep 10 times.
- Let bread pan cool down slightly before removing bread.
Using oven mitts, carefully lift up on handle and turn bread pan counterclockwise; then pull pan out of breadmaker.
- Using oven mitts, turn bread pan upside down (with bread pan handle folded down) onto a wire cooling rack or clean cooking surface and gently shake until bread falls out. Use a nonstick spatula to gently loosen sides of bread from bread pan.
- If kneading paddle remains in bread, gently pry it out using paddle hook. Unplug when not in use.
NOTE: Store remaining bread in a sealed plastic bag for up to three days at room temperature. To store for a longer time, place sealed plastic bag in refrigerator for up to 10 days.
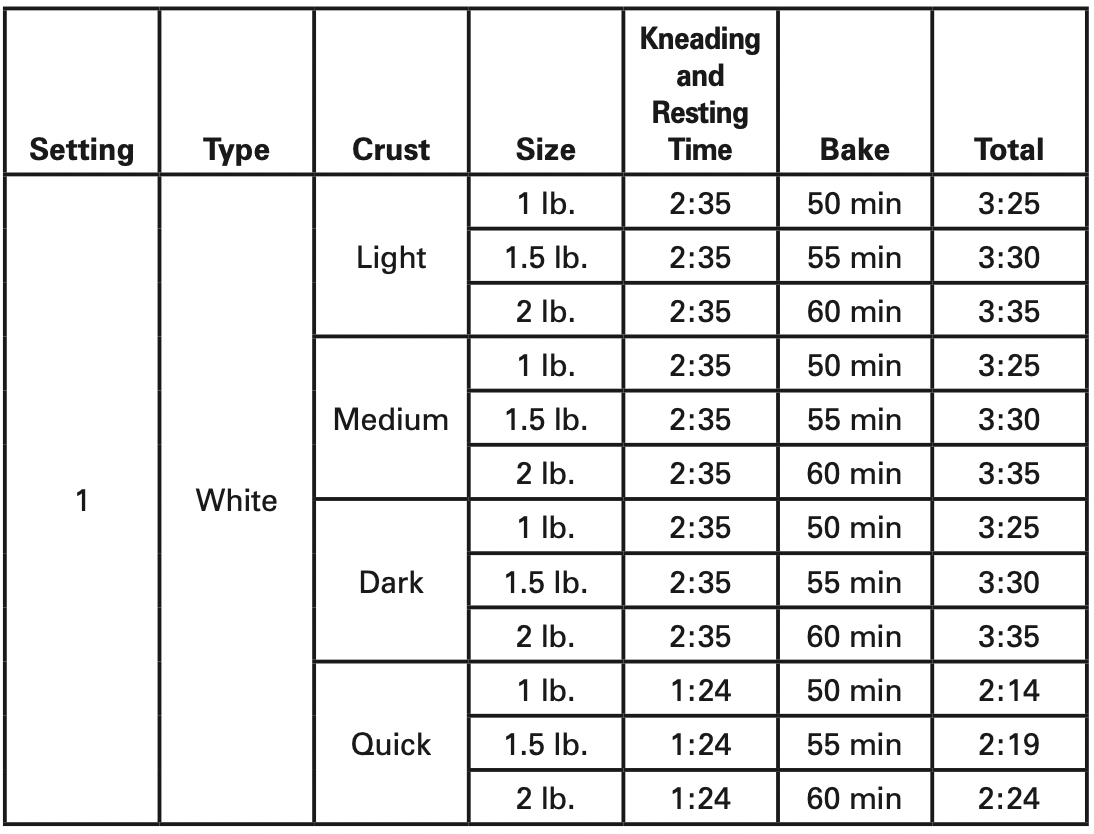
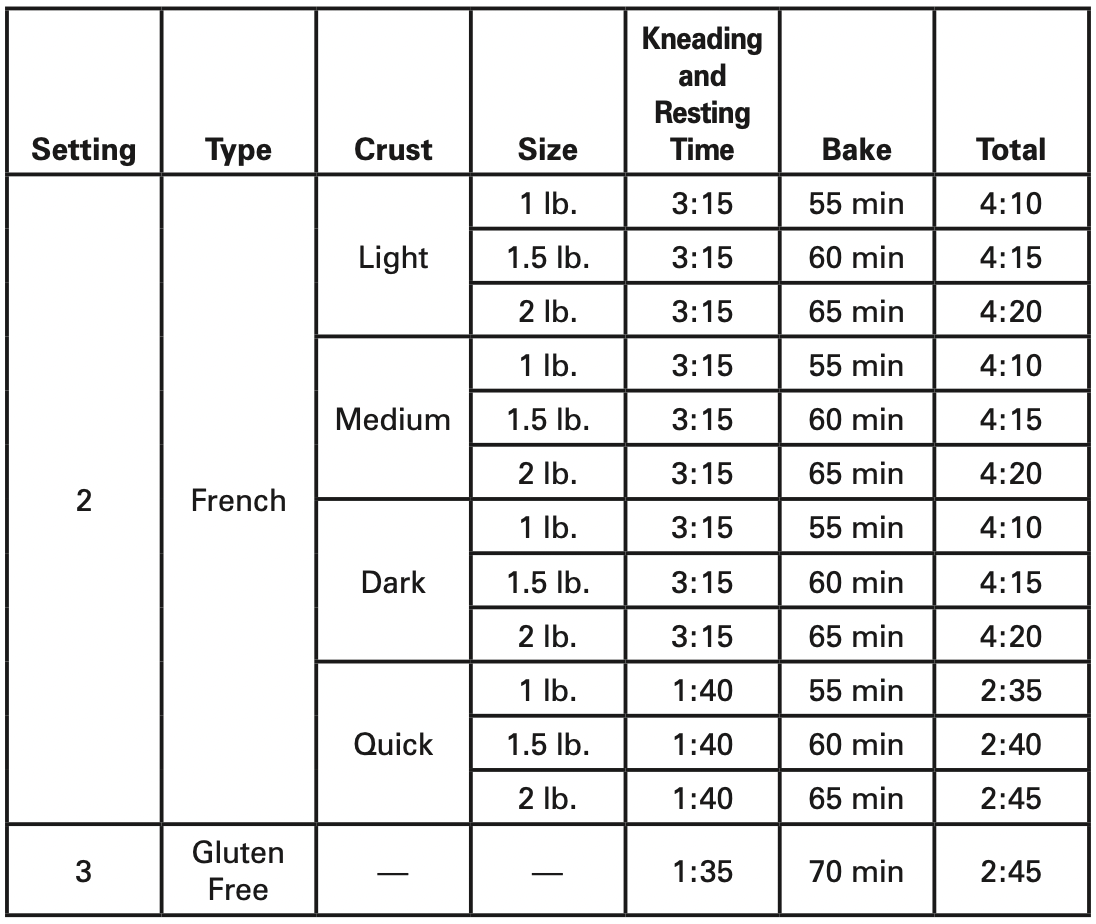
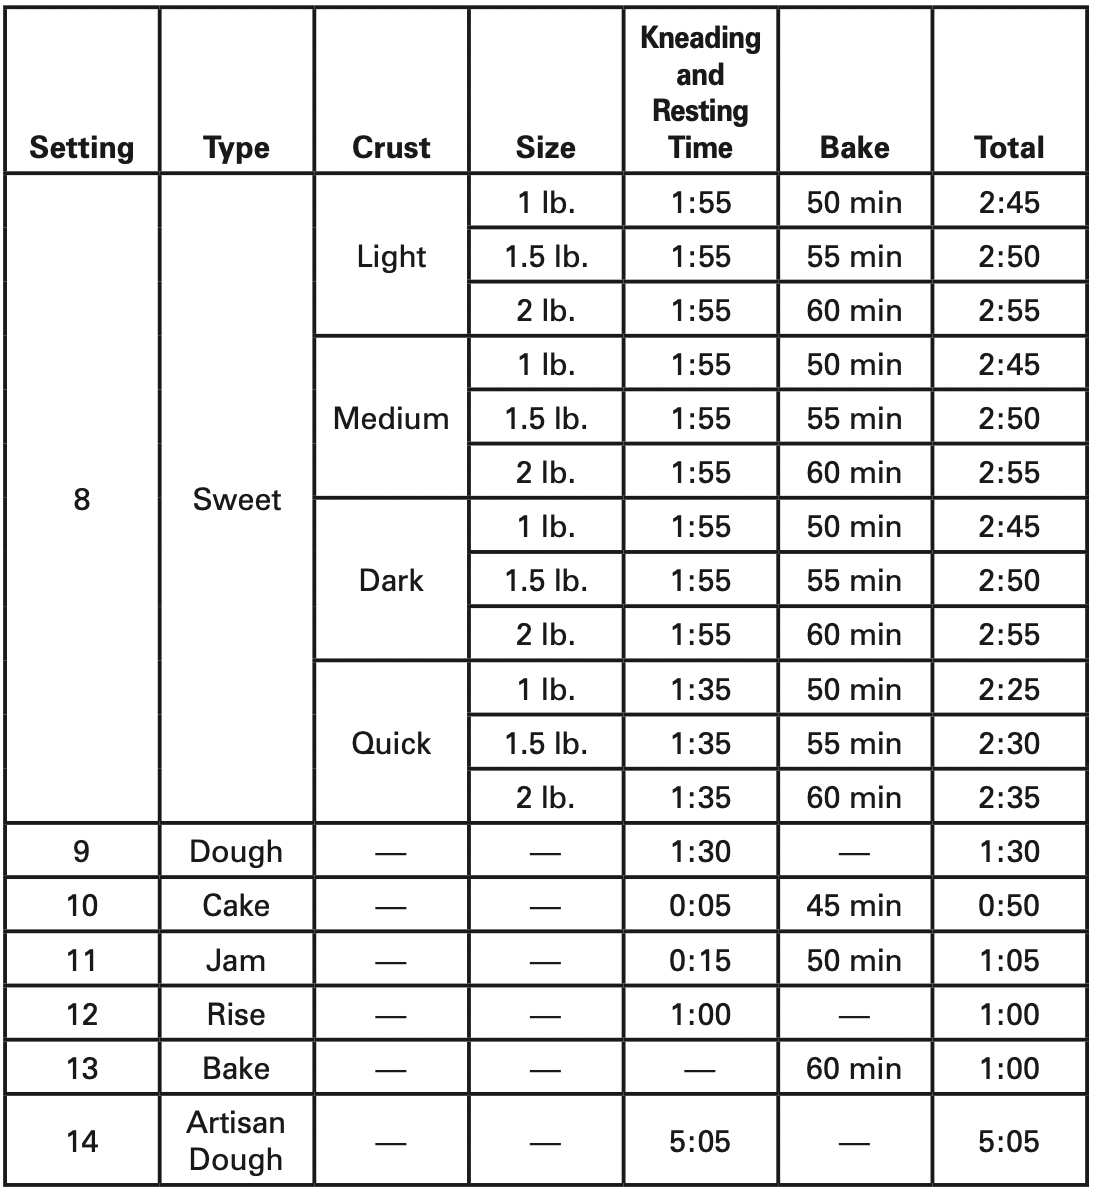
Each of the cycles of the breadmaker has different amounts of time devoted to kneading, rising, and/or baking. The chart below shows how many minutes are in each phase for specific cycles.
NOTE: Total time adds all of those phases together. It does not include any delayed start time.

Removing Bread
Bread pan and baking chamber will be hot and oven mitts should be used. Using handle, lift pan from baking chamber.
Carefully shake the bread upside down until the loaf falls out of the bread pan. Allow to cool on a wire rack for 10 minutes before slicing.
Use paddle hook to remove paddle from bread.
When baking is complete, unit will switch to Warm setting for up to 1 hour. Press and hold STOP button to end this cycle before removing bread pan.
Slicing
Allow to cool for 10 minutes and slice with a bread knife.
Storing Homemade Bread
Fresh-baked bread is best when consumed as soon as possible.
To store, wrap cooled loaf in foil or a plastic bag to preserve freshness. Bread can be frozen for up to 6 months.
Care and Cleaning
WARNING - Electrical Shock Hazard.
Disconnect power before cleaning. Do not immerse cord, plug, or housing in any liquid. Allow breadmaker to cool down completely before cleaning.
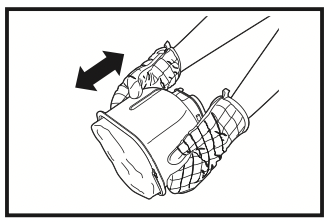
- To clean kneading paddle: If the kneading paddle is difficult to remove from bread pan, add water to bottom of bread pan and allow to soak for up to 1 hour. Wipe paddle carefully with a damp cloth. The kneading paddle is dishwasher-safe.
- To clean bread pan: Using handle, lift pan from baking chamber.
Wipe inside and outside of bread pan with a damp cloth. Do not use any abrasive agents, in order to protect nonstick coating.
Bread pan must be dried completely before installation.
NOTE: Bread pan, kneading paddle, measuring cup, spoon, and paddle hook are dishwasher-safe. The outside of bread pan and base may discolor. This is normal.
- To clean housing and top lid: After use, unplug and allow unit to cool. Use a damp cloth to wipe lid, housing, baking chamber, and interior of viewing window. Do not use any abrasive cleaners for cleaning, since this will degrade the high polish of the surface.
Never immerse the housing into water for cleaning.
- Before breadmaker is packed for storage, ensure that it has completely cooled down, is clean and dry, and top lid is closed.
Tips
Bread Basics
Ingredients
Two things can ensure a perfect loaf of bread: using fresh, quality ingredients and measuring them accurately.
Flour
All-Purpose Flour
Flour that contains no baking powder, suitable for “quick” breads or bread made with the Quick settings. Bread flour is better suited for yeast breads.
Bread Flour
Bread flour is the most important ingredient of making bread and is recommended in most yeast-bread recipes. It has a high gluten content and can keep size of bread from collapsing after rising. Flour varies by region. For example, American flour is milled from hard spring wheat; Canadian flour is milled from hard winter wheat.
Self-Rising Flour
Flour that contains baking powder, used especially for making cakes. Do not use self-rising flour in combination with yeast.
Whole-Wheat Flour
Whole-wheat flour is ground from the entire wheat kernel. Bread made with all or part whole-wheat flour will have higher fiber and nutritional content. Whole-wheat flour is heavier and, as a result, loaves may be smaller in size and have a heavier texture.
Tip:
To check whether yeast is fresh and active:
- Pour 1 cup (237 ml) hot tap water into a measuring cup.
- Add 1 teaspoon (5 ml) white sugar and 1 tablespoon (15 ml) yeast.
- Place measuring cup in a warm place for about 5 minutes.
- Fresh, active yeast will begin to bubble or “grow.” If it does not, the yeast is dead or inactive.
Other Ingredients
Egg
Eggs can improve bread texture and make bread larger in size. The egg must be whisked in with other liquid ingredients.
Salt
Salt is necessary to improve bread flavor and crust color. It is also used to restrain yeast activity.
Shortening, Butter, and Vegetable Oil
Shortening and butter should be cut into small pieces before adding to liquid.
Sugar
Sugar is “food” for yeast and also increases sweet taste and color of bread. It is a very important element of making bread rise. White sugar is normally used; however, brown sugar, powdered sugar, or cotton sugar may also be called for in some recipes.
Water and Other Liquids (always added first)
Water is an essential ingredient for making bread. See recipe recommendations for liquid temperatures. Some recipes may call for milk or other liquids. Never use dairy with the Delay Timer option.
Yeast
Yeast is a living organism and should be kept in the refrigerator to remain fresh. It needs carbohydrates found in sugar and flour as nourishment. Yeast used in breadmaker recipes will be sold under several different names: Bread machine yeast (preferred), active-dry yeast, and instant yeast.
Before using, check expiration date of the yeast. Return to refrigerator immediately after each use.
Use Exact Measurements
One of the most important steps of making good bread is proper measurement of ingredients. Measure each ingredient carefully and add to your bread pan in order given in the recipe.
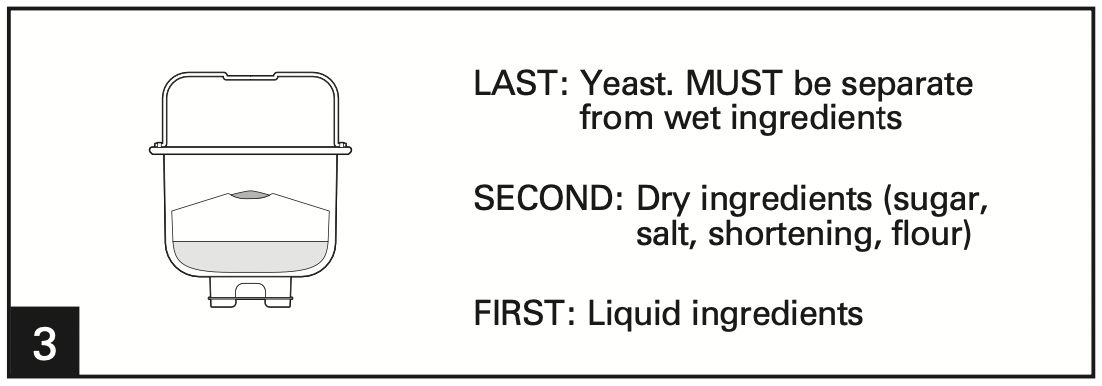
Adding Sequence
Always add ingredients in order given in recipe.
FIRST: Liquid ingredients
SECOND: Dry ingredients
LAST: Yeast
The yeast should only be placed on dry flour and never come in contact with liquid or salt.
When you use Delay Timer function for a long time, never add perishable ingredients such as eggs or milk.
Liquid Ingredients
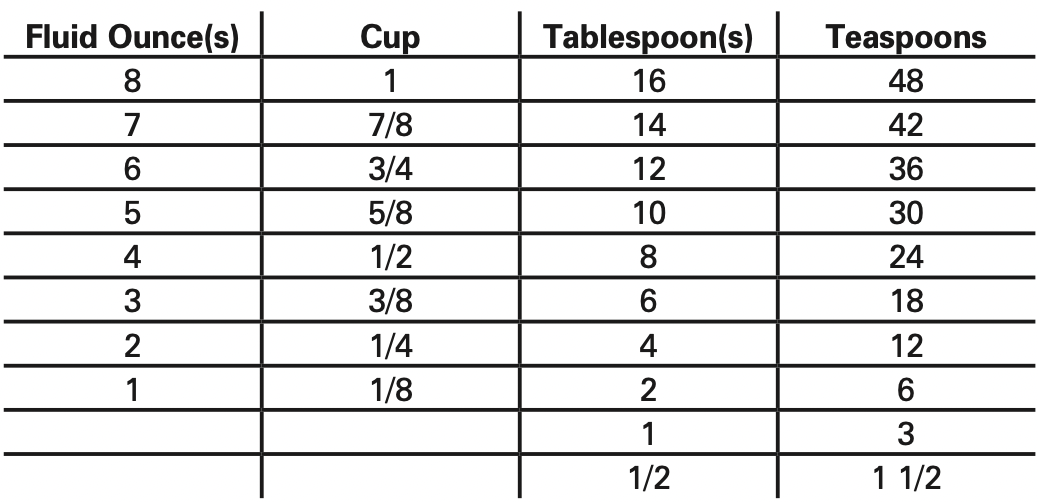
Water, fresh milk, or other liquids should be measured with a glass measuring cup with clear markings and a spout. Set cup on counter and lower yourself to check the liquid level. When measuring cooking oil or other ingredients, clean measuring cup thoroughly in between.
Liquid Measurement Conversion Chart
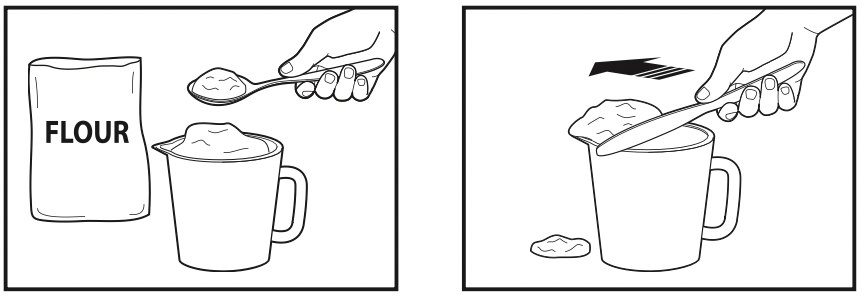
Dry Measurements
Measure dry ingredients by gently spooning flour, etc., into the measuring cup and then, once filled, leveling off with a knife. Never use the measuring cup to scoop your dry ingredients directly from a container since this could add up to one tablespoon of extra ingredients. Do not tap bottom of the measuring cup or pack down.
HINT: Before measuring, stir flour to aerate it.
When measuring small amounts of dry ingredients, such as salt or sugar, use a measuring spoon, making sure it is leveled off.
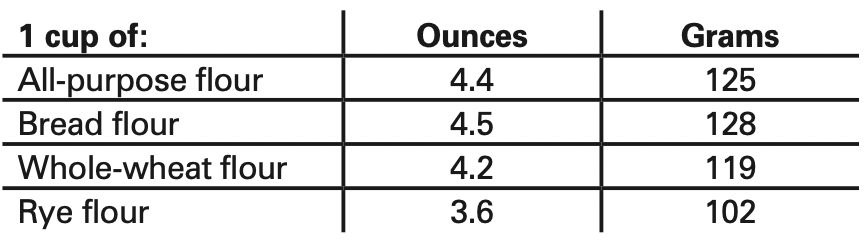
Weighing dry ingredients with a digital scale will provide better baking results.
Dry Measurement Weight Equivalents
Frequently Asked Questions
May I use a sugar substitute in place of sugar?
Sugar is necessary for yeast to produce a light loaf with a good height. Results may vary with the type and amount of sugar substitute used.
May I omit salt or sugar from the recipe?
No, both sugar and salt play an important role in the breadmaking process. Salt prevents yeast from overreacting and bread from overrising. The combination of sugar, salt, and yeast is a key part of the breadmaking process. Remember that total sugar and salt amounts are divided among all the slices, so the amount of sugar and salt per serving is small.
When do I add raisins, nuts, etc. to bread?
For add-ins (nuts, raisins), machine will beep 12 times. Open lid and pour in your add-ins.
Can I open lid while breadmaker is operating?
This breadmaker is designed with a window in lid to let you watch your bread’s progress. Quick checks are OK in early stages of kneading and to add ingredients when beeper sounds. Use a rubber spatula to scrape sides of pan while bread baker is mixing to ensure all ingredients are blended. However, temperature in baking chamber adjusts for Rising and Baking stages. Opening lid during these steps could cause loaf to fall or not bake properly. Sometimes condensation forms on window after initial mixing and kneading. It usually disappears once baking cycle starts so you should be able to get a clear view of your loaf.
Can I use my favorite bread recipes in my breadmaker?
Yes, but you will need to experiment to get the right proportion of ingredients. Become familiar with unit and make several loaves of bread with recipes provided before you begin experimenting. Never exceed a total amount of 4 1/4 cups (1 L) of dry ingredients (that includes flours, oats, cornmeal, etc.). Use the recipes in this book to help determine the ratio of dry ingredients to liquid and amounts of yeast, sugar, salt, and butter/margarine to use.
What will happen if I leave bread in bread pan after baking?
This unit has a 1 hour Warm cycle that lets you leave bread in pan for up to an hour after baking is complete. Once warming cycle is over, it is best to remove bread immediately or bottom of your loaf will absorb moisture and become soggy.
Can recipe be cut in half?
No, it is not recommended. The ingredient proportions work better in the full amounts.
How can bread mixes be used in machine and at what setting?
The package instructions will list amount of water and amount of yeast to use. Be sure to add liquid, then dry ingredients, followed by yeast. Do not allow yeast to sit in liquid. The bread type setting is dependent upon type of bread mix being used (i.e., White bread uses Basic bread setting; Sweet Bread setting is for use with dried fruit, cheese, or nuts; whole-wheat or multigrain should use Whole Grain setting; Crust setting, either Light, Medium, or Dark, is a personal preference). Do not use bread mixes that exceed 2-lb. (907-g) loaf size.
What is the difference between American flour and Canadian Flour?
Canadian flour has a higher protein or gluten content than American flour. You can substitute US flour in even amounts for Canadian flour. However, Canadian flour may absorb more moisture. Check your dough during first kneading cycle. If it appears dry, you may add up to 1 tablespoon (15 ml) of additional water per cup of flour in the recipe. Add the water 1 tablespoon (15 ml) at a time until desired consistency of a soft and supple dough is reached.
Troubleshooting
Odor or burning smell.
- Flour or other ingredients have spilled into baking chamber. Stop breadmaker and allow to cool completely. Wipe excess flour, etc., from baking chamber with a paper towel.
TIP: Measure ingredients over counter, adding them to bread pan prior to insertion into machine.
Ingredients not blending; can hear motor turning.
- Bread pan or kneading paddle may not be installed properly. Make sure kneading paddle is set all the way on shaft.
- Too many ingredients. Measure ingredients accurately.
Window is cloudy or covered with condensation.
- May occur during mixing or rising cycles. Condensation usually disappears during baking cycle. Clean window well in between uses.
Kneading paddle comes out with bread.
- Thicker crust with dark crust setting. Choose a lighter crust (Cycles 1, 2, 4, or 8 only).
- It is not uncommon for kneading paddle to come out with bread loaf. Once loaf cools, remove paddle with paddle hook.
Bread rises too high or pushes lid up.
- Ingredients not measured properly (too much yeast, flour). Measure all ingredients accurately and make sure sugar and salt have been added.
- Kneading paddle not in bread pan. Check installation of kneading paddle.
- Forgot to add salt.
- Try decreasing yeast by 1/4 teaspoon (1.3 ml).
Dough is not blending thoroughly; flour and other ingredients are built up on sides of pan; bread loaf is coated with flour.
- Bread pan or kneading paddle may not be installed properly. Make sure bread pan is securely set in unit and kneading paddle is firmly on shaft.
- Too many dry ingredients. Make sure ingredients are measured accurately and added in the proper order. Use a rubber spatula to scrape sides of pan while bread baker is mixing to ensure all ingredients are blended.
- Gluten-free dough is typically very wet. It may need additional help by scraping sides with a rubber spatula.
- Excess flour can be removed from loaf once baked and cooled. Add water, one tablespoon at a time, until dough has formed into a ball.
Bread does not rise; loaf is short.
- Inaccurate measurement of ingredients or inactive yeast. Measure all ingredients accurately. Check expiration date of yeast and flour.
- Lifting lid during cycles.
Beeping and E00 on control panel.
- Bread pan is too cold. Allow pan to come to room temperature.
Beeping and E01 on control panel.
- Bread pan is too warm. Allow pan to cool down before using.
Beeping and EEE on control panel .
- There is a problem with your breadmaker. Call Customer Service.
Beeping and HHH on control panel.
- There is a problem with your breadmaker. Call Customer Service.
Bread has a crater in top of loaf once baked.
- Dough has risen too fast.
- Too much yeast or water. Measure all ingredients accurately. Decrease yeast or water slightly.
- Incorrect cycle chosen for the recipe.
Crust color is too light.
- Opening the lid during baking. Do not open lid during baking.
- Select a darker crust option (Cycles 1, 2, 4, or 8 only).
Crust color is too dark.
- Too much sugar in the recipe. Decrease sugar amount slightly.
- Select a lighter crust option (Cycles 1, 2, 4, or 8 only).
Kneading paddle comes out with the bread.
- Thicker crust with dark crust setting. Choose a lighter crust (Cycles 1, 2, 4, or 8 only).
- It is not uncommon for the kneading paddle to come out with the bread loaf. Once the loaf cools, remove the paddle with paddle hook.
Bread loaf is lopsided.
- Too much yeast or water. Measure all ingredients accurately. Decrease yeast or water slightly.
- Kneading paddle pushes dough to one side before rising and baking. Some loaves may not be evenly shaped, particularly with whole-grain flour.
Loaves made are different shapes.
- Varies by the type of bread. Whole-grain or multigrain is denser and may be shorter than a basic white bread.
Bottom of loaf is soggy.
- Bread has remained in bread pan on Warm setting too long and absorbed moisture. End Warm setting by pressing and holding STOP. Remove bread from bread pan using oven mitts.
Bread is hollow or holey inside.
- Dough too wet, too much yeast, no salt. Measure all ingredients accurately. Decrease yeast or water slightly. Check salt measurement.
- Water too hot.
Underbaked or sticky, doughy bread.
- Too much liquid; incorrect cycle chosen. Decrease liquid and measure ingredients carefully. Check cycle chosen for recipe.
Bread mashes down when slicing.
- Bread is too hot. Allow to cool on a wire rack for 15–30 minutes before slicing.
Bread has a heavy, thick texture.
- Too much flour, old flour. Try increasing water or decreasing flour.
- Not enough water. Whole-grain breads will have a heavier texture.
Base of bread pan has darkened or is spotted.
- After washing in dishwasher. This is normal and will not affect the bread pan.