ShowMatch
TM
DeltaQ
TM
Array Loudspeaker
Sub-Module Transition Kit Accessory: SMSTK
ShowMatch
TM
DeltaQ
TM
Array Loudspeaker
Sub-Module Transition Kit Accessory: SMSTK
©2016 Bose Corporation. All rights reserved.
The Mountain, Framingham, MA 01701-9168 USA,
www.pro.Bose.com
All trademarks are the property of their respective owners
AM772967 Rev. 00
November 2016
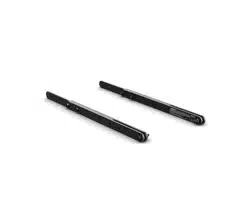
Sub-module transition kit
Product Dimensions
Limited Warranty
Your product is covered by a limited warranty, Visit pro.Bose.com for warranty details.
The warranty information provided with this product does not apply in Australian and New Zealand. See our website at www.bose.com/au/
warranty or www.bose.com/nz/warranty for details of the Australian and New Zealand warranty.
Importer Information
European Union
Bose GP, Castleblayney Road, Carrickmacross, County Monaghan, Ireland
China
Bose Electronics (Shanghai) Company Limited, Part C, Plan 9, No. 353 North Riying Road, China (Shanghai) Pilot Free Trade Zone
Taiwan
Bose Taiwan Branch, 9F-A1, No. 10, Section 3, Minsheng East Road, Taipei City 104, Taiwan
Tel: 886 2 2514 7977
Mexico
Bose de México, S. de R.L. de C.V., Paseo de las Palmas 405-204, Lomas de Chapultepec, 11000 México, D.F.
Tel: 001 800 900 2673
Safety Information
CAUTION: This product is intended for installation by professional installers only!
• Make no modification to system or accessories. Unauthorized alterations may compromise safety, regulatory compliance, and
system performance.
• This accessory is intended for use with Bose ShowMatch DeltaQ Array loudspeakers only.
Additional Information
For additional information on ShowMatch DeltaQ Array loudspeaker modules and accessories, refer to the installation guide available at pro.
Bose.com. To request a printed copy, use the phone numbers provided.
Contact Information
Bose Corporation
The Mountain
Framingham, MA 01701 USA
Corporate Center: 508-879-7330
Americas Professional Systems,
Technical Support: 800-994-2673
PRECAUCIÓN: Solo un instalador profesional deberá montar este producto!
• No realice alteraciones no autorizadas a este producto; esto podría comprometer la seguridad, el cumplimiento de las normas y el
rendimiento del sistema.
• Este accesorio está diseñado para usarse únicamente con altavoces Bose ShowMatch DeltaQ Array.
ATTENTION: L’installation de ce produit est réservée à un technicien professionnel!
• Ne pas faire des modifications non autorisées à ce produit; ce qui pourrait compromettre la sécurité, la conformité réglementaire et
la performance du système.
• Cet accessoire est destiné pour l’usage avec les haut-parleurs Bose ShowMatch Delta Q exclusivement.
ACHTUNG: Dieses Produkt darf nur von fachkundigen Monteuren installiert werden!
• Keine nicht autorisierten Veränderungen am Produkt vornehmen. Diese können die Sicherheit, die Einhaltung von Richtlinien und
die Systemleistung beeinträchtigen.
• Dieses Zubehör ist ausschließlich zur Verwendung mit Bose ShowMatch DeltaQ Array Lautsprechern vorgesehen.
Installation Information
Thank you for selecting Bose® ShowMatch DeltaQ array loudspeakers. This document is intended to
provide professional installers with basic installation and safety guidelines for using the Transition
Bracket Accessory with ShowMatch DeltaQ array loudspeakers. Please read this document before
attempting installation.
Use the ShowMatch DeltaQ Sub-Module Transition Kit Accessory (SMSTK) to build certain array configurations
containing ShowMatch DeltaQ SM10 and SM20 full-range loudspeaker modules, and subwoofer modules (SMS118).
The sub-module transition kit allows you to build certain array configurations without needing a second ShowMatch
Array Frame (SMAF) between the subwoofer module and the top-most full-range module.
CAUTION: The ShowMatch DeltaQ Sub-Module Transition Kit Accessory is for use only with the
array configurations specified in this installation guide. Do not use this accessory with any other
configurations.
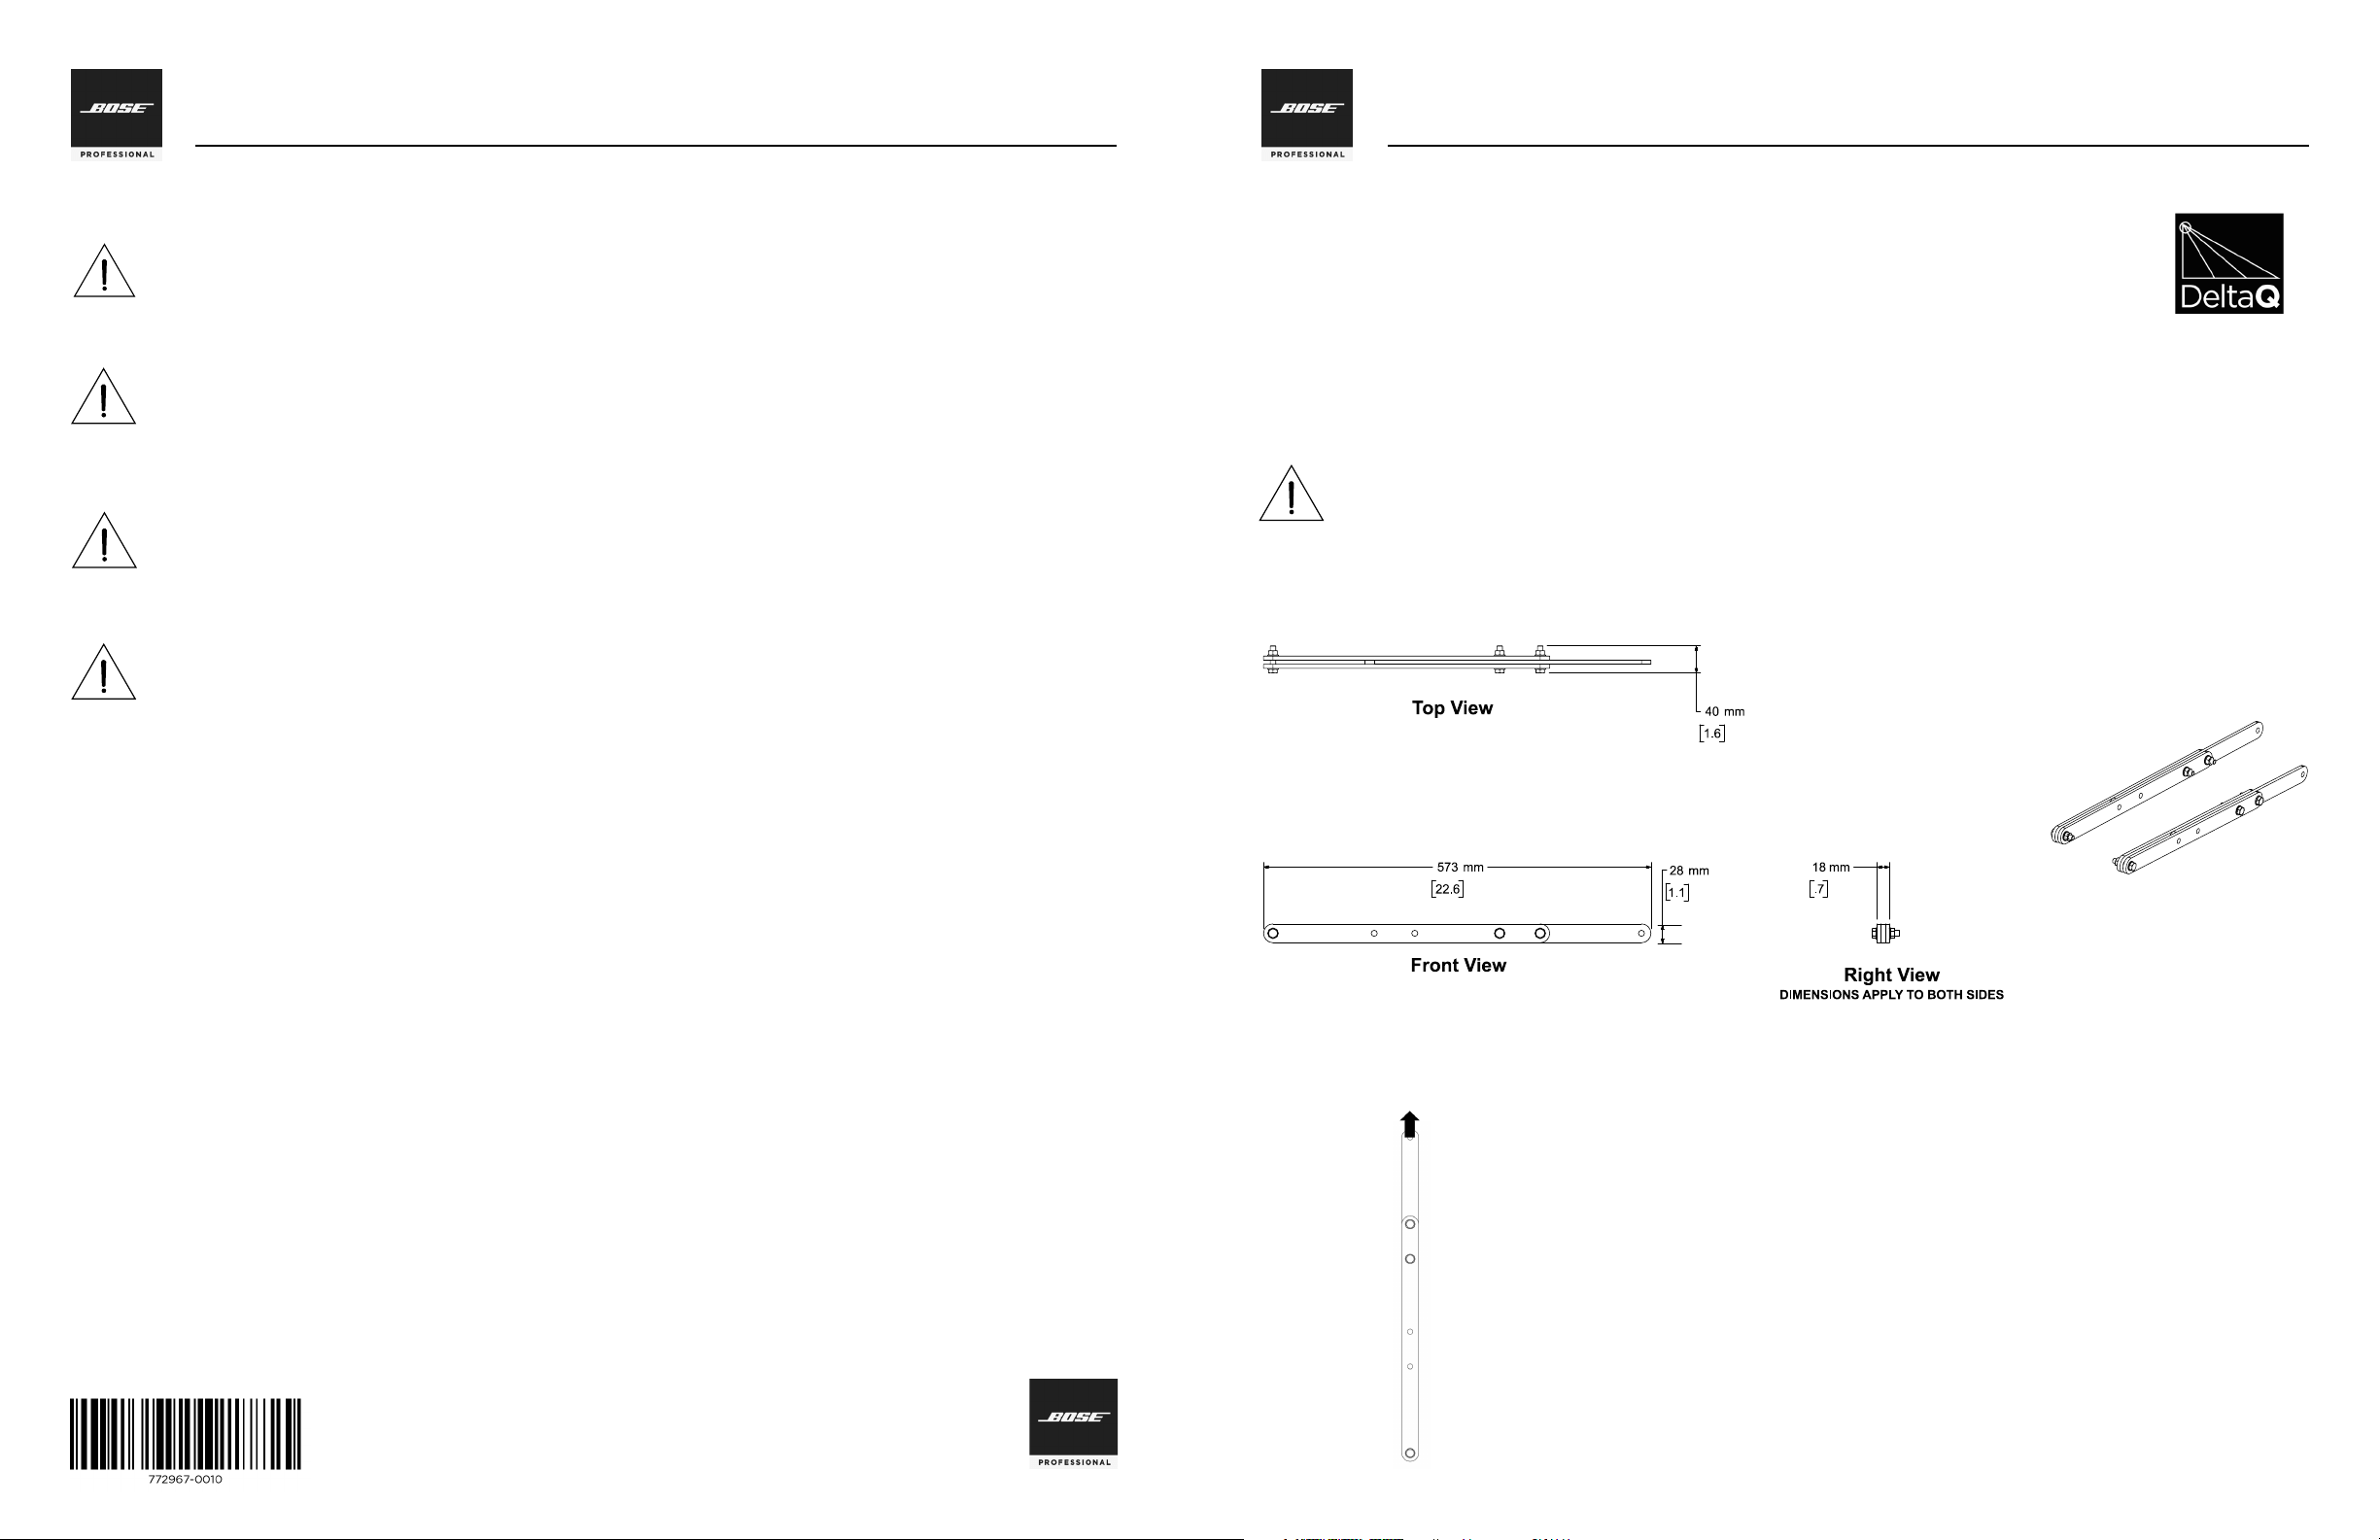
Single Point, 10:1 Working Load Limit
(in accordance with ANSI E1.8-2012)
ShowMatch Array Frame
Transition Bracket (SMSTK)
WLL = 110 kg (250 lbs)
Note: Must use TWO assemblies per
array configuration, one on each side
of the array
Configurations Using Long Bracket Position
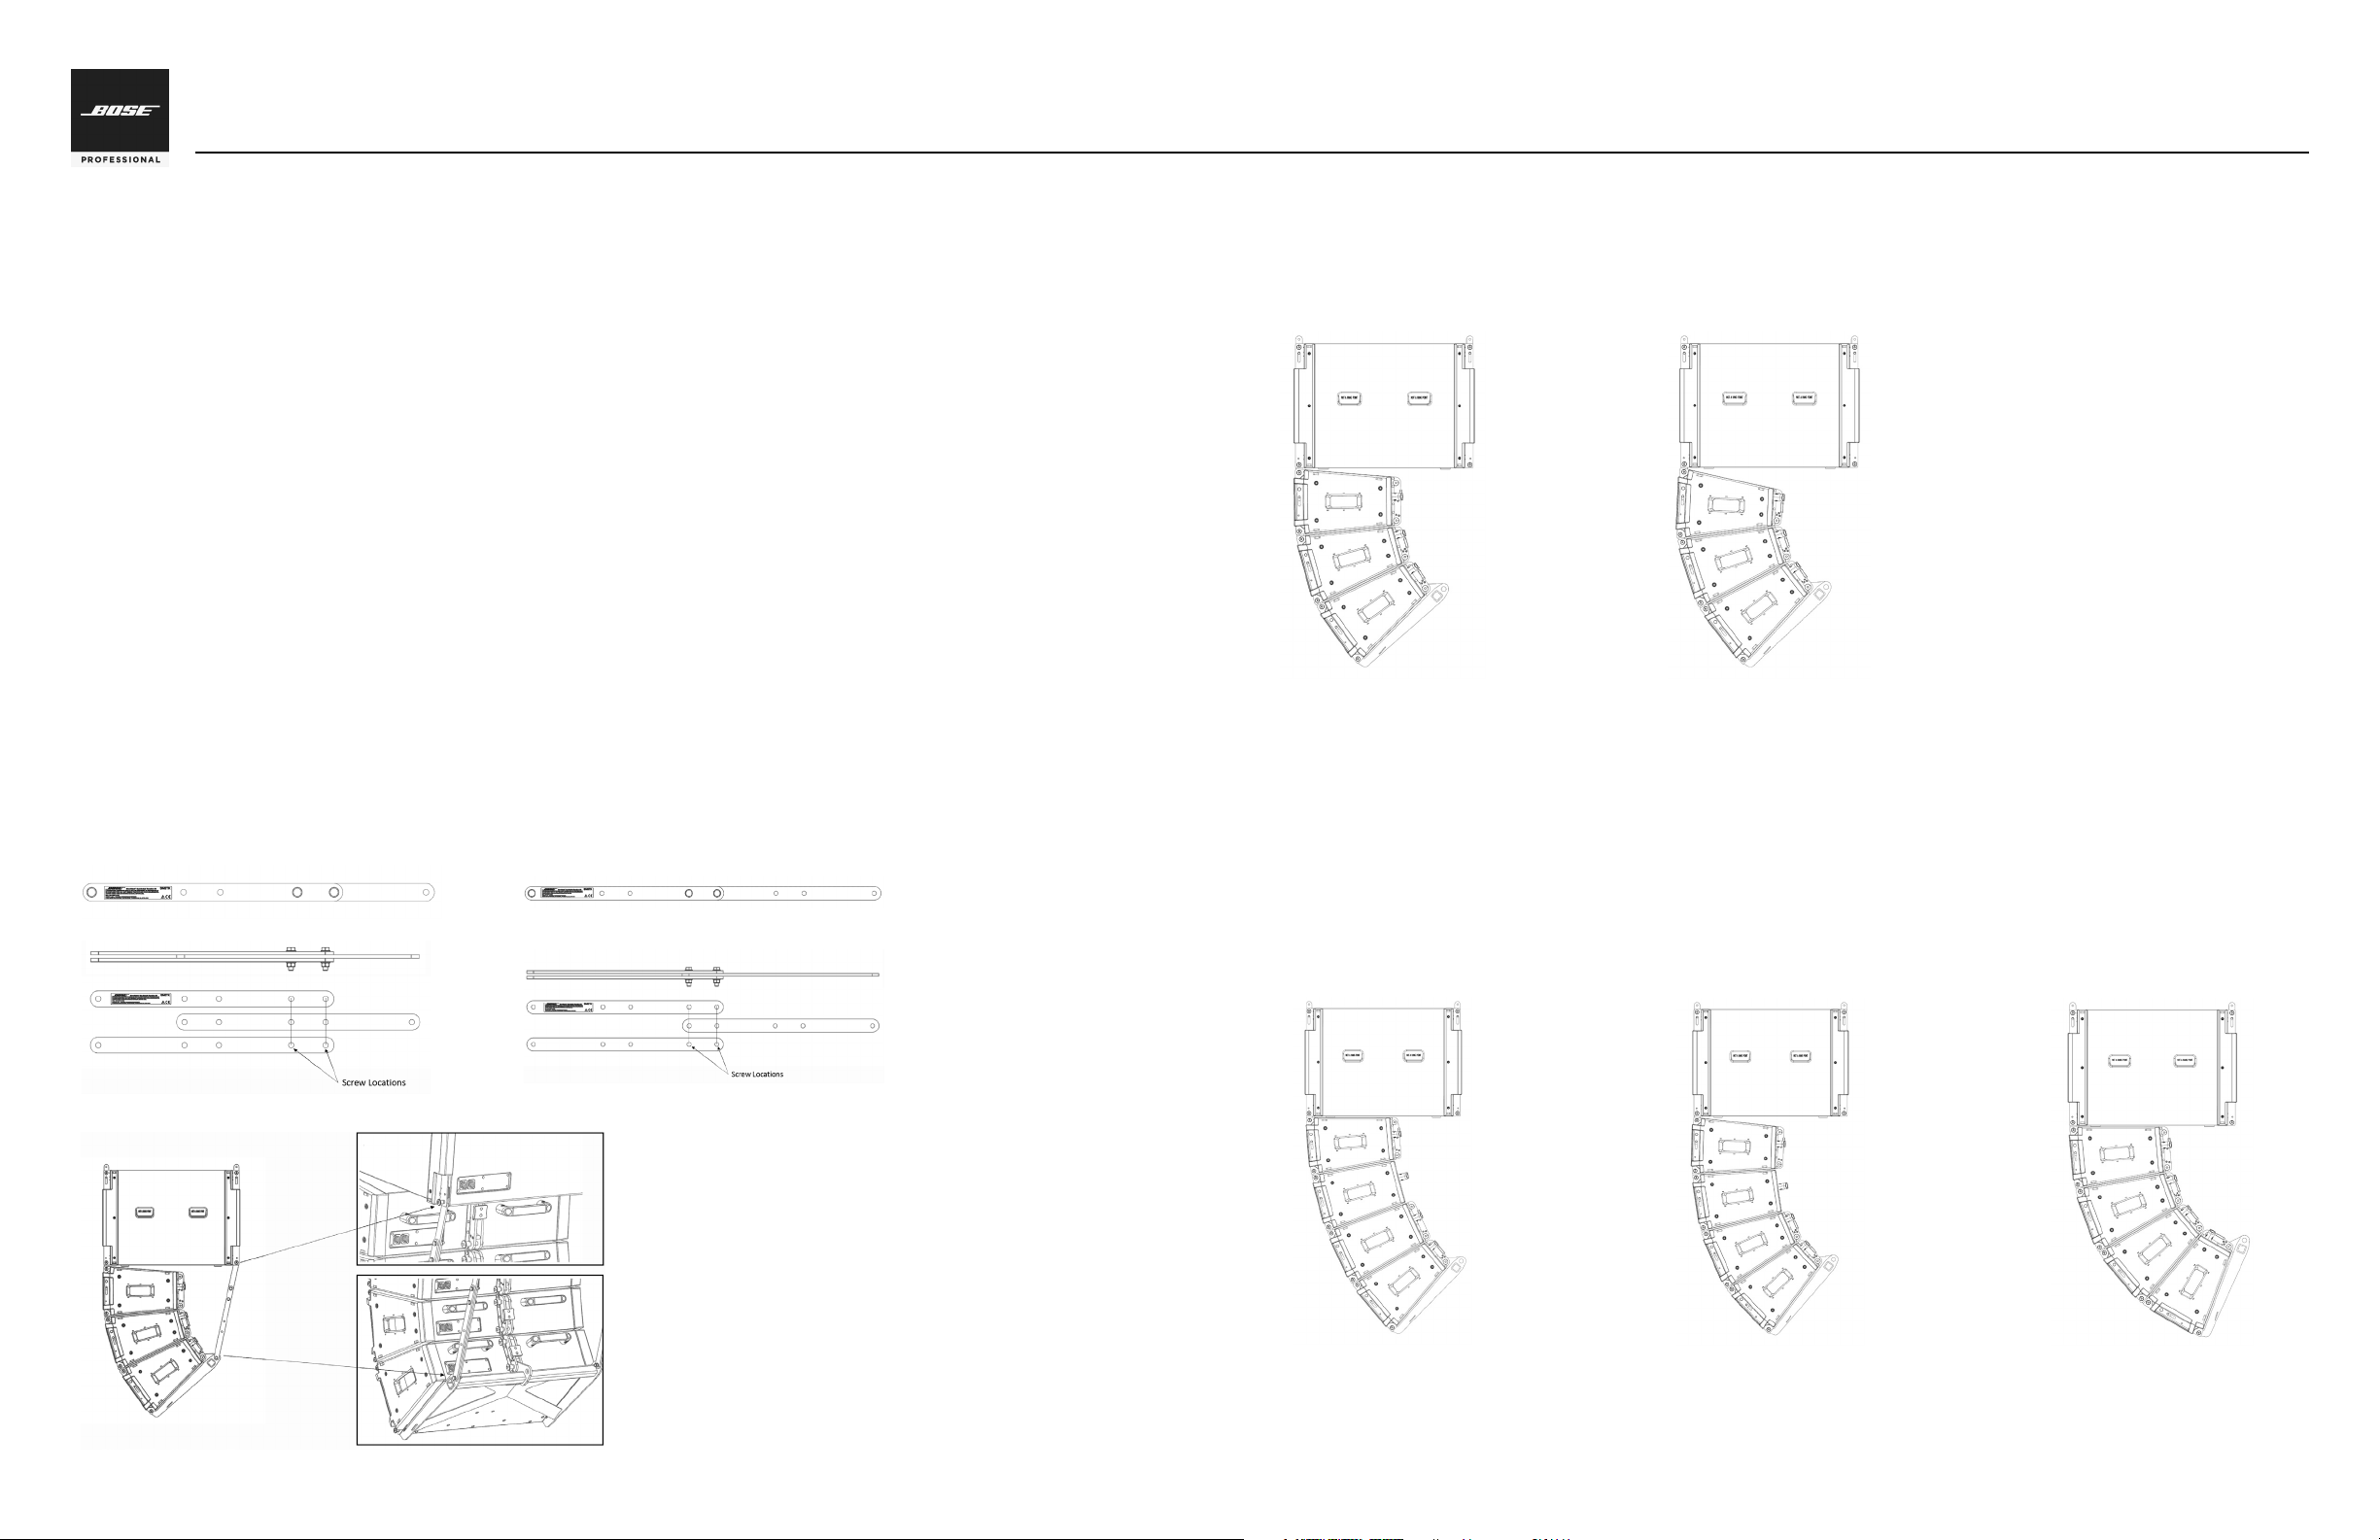
There are three array configurations that use the long bracket position:
• SM10, SM10, SM10, SM20 (see Figure 8)
• SM10, SM10, SM20, SM20 (see Figure 9)
• SM10, SM20, SM20, SM20 (see Figure 10)
Configurations Using Short Bracket Position
There are two allowable array configurations that use the short bracket position:
• SM10, SM20, SM20 (see Figure 6)
• SM20, SM20, SM20 (see Figure 7)
Installation Instructions
To install the sub-module transition kit, follow these instructions:
1. Determine correct position (short or long) for transition brackets, based on desired array configuration.
2. Assemble a stack of three bars as shown in Figure 3 (for short brackets) or Figure 4 (for long brackets). Each
assembly includes one bar with a label, and two bars without a label. Assemble bars with label visible (facing
outward). Repeat to create two assemblies.
3. Attach nuts and bolts on both brackets in locations shown in Figures 3 and 4. Tighten to 9 N-m (80 in-lbs).
4. Attach ShowMatch SM118 subwoofer module to hanging ShowMatch Array Frame (SMAF). For more
information and assemby instructions, see ShowMatch DeltaQ Array Rigging Frames installation guide,
available at pro.Bose.com.
5. Attach front two connection points of first full-range module to front two connection points of subwoofer
module, using included quick pins. Do not attach rear connection point of full-range module. For more
information and assembly instructions, see ShowMatch DeltaQ Array Loudspeakers installation guide,
available at pro.Bose.com.
6. Attach remaining full-range modules to complete the array, using front and back connection points.
7. Attach ShowMatch Array Pullback Bracket (SMPULL) to bottom module of array. For more information and
assembly instructions, see ShowMatch DeltaQ Array Rigging Frames installation guide, available at
pro.Bose.com.
8. Attach one transition bracket to each side of pullback bracket using provided nuts and bolts. Tighten to 9
N-m (80 in-lbs).
9. Using handles on rear of full-range modules, lift array into position until transition brackets reach the bottom,
rear connection points of subwoofer module.
10. Attach transition bracket to the bottom, rear connection point of the subwoofer, using included quick pins.
See Figure 5.
ShowMatch
TM
DeltaQ
TM
Array Loudspeaker
Sub-Module Transition Kit Accessory: SMSTK
Fig. 6. SM10-SM20-SM20
Fig. 7. SM20-SM20-SM20
Fig. 8. SM10-SM10-SM10-SM20
Fig. 9. SM10-SM10-SM20-SM20 Fig. 10. SM10-SM20-SM20-SM20
Fig. 1. Short bracket position
Fig. 2. Long bracket position
Fig. 3. Short bracket assembly
Fig. 4. Long bracket assembly
Fig. 5. Transition bracket connection points
