Owner’s Manual
English: Page 1
Mode d’emploi
Français : Page 6
Manual de Uso
Español: Página 11
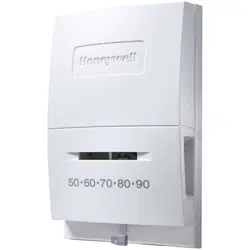
CT87N/CT87K
The Round
®
® U.S. Registered Trademark. U.S. Patents 7,159,789;
7,159,790; 7,476,988 and other patents pending.
Copyright © 2009, Honeywell International Inc.
All rights reserved.
69-1959EFS-02
The Round
®
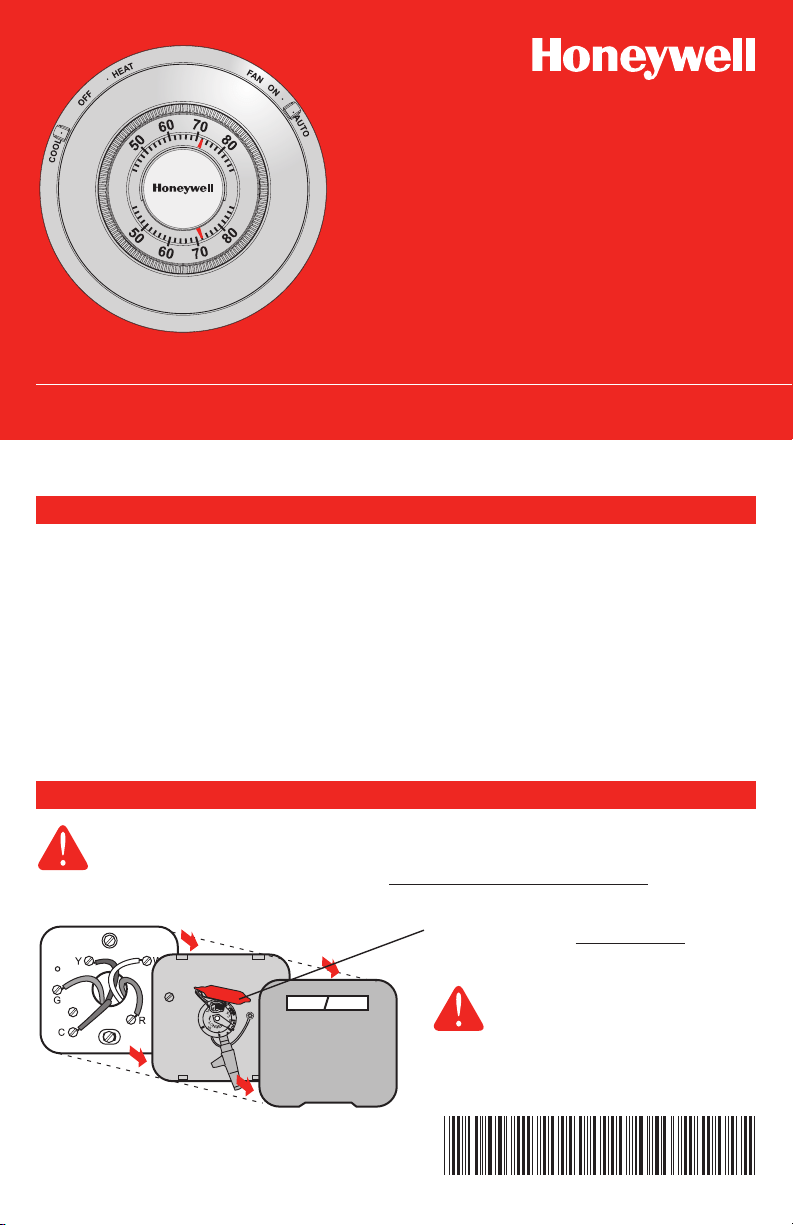
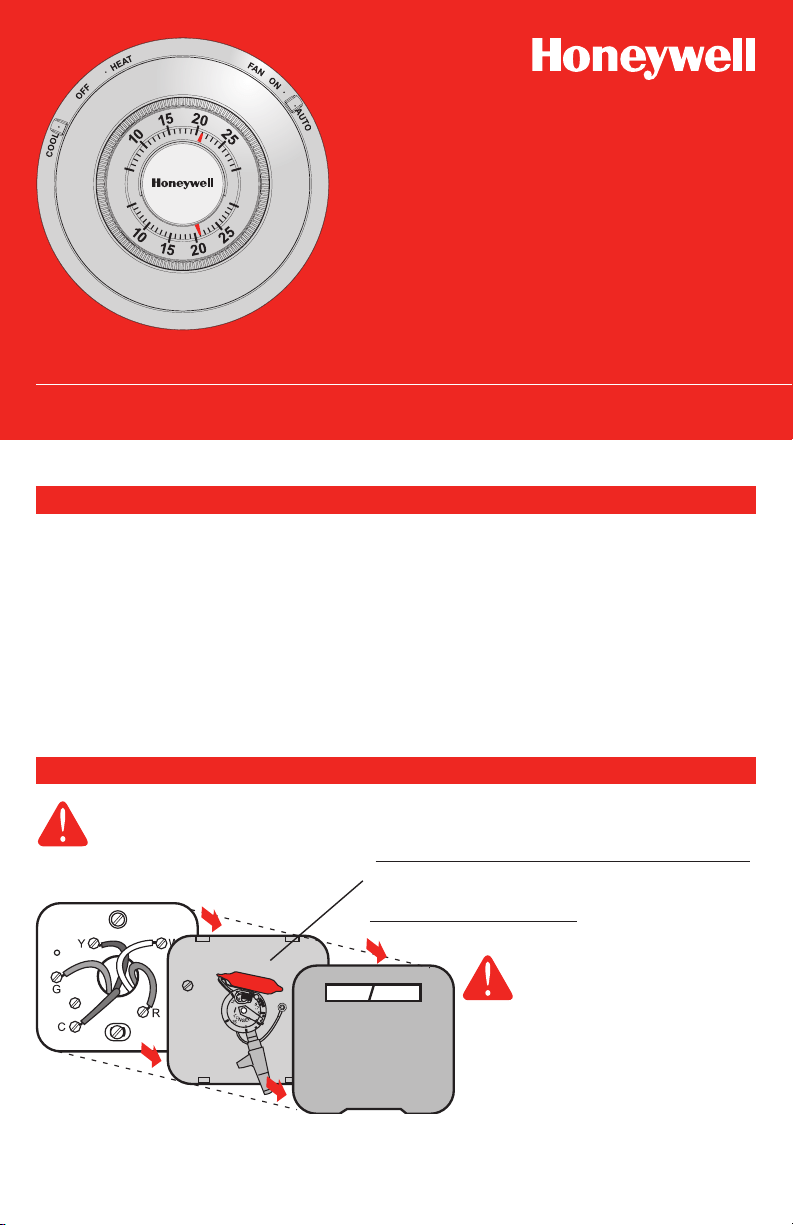
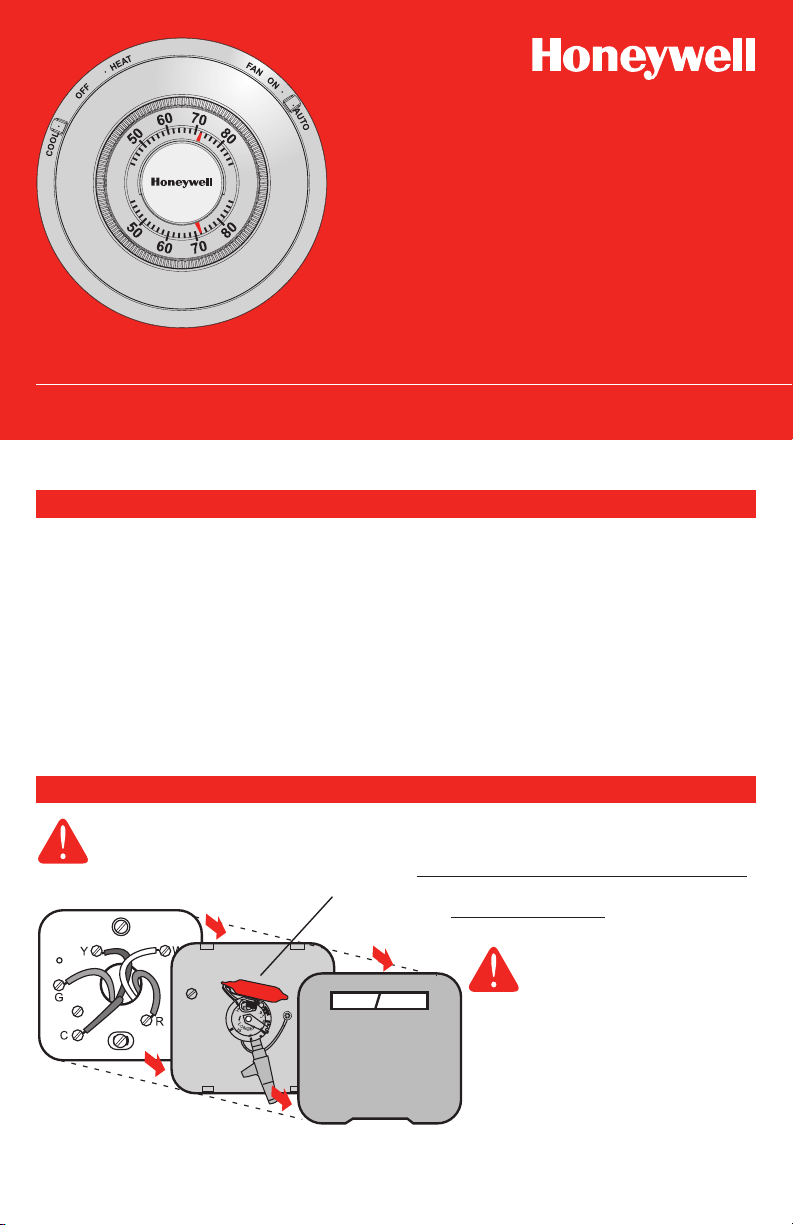
1. CAUTION TURN OFF POWER to system at the furnace, or at the fuse/circuit breaker
panel before you begin.
2. Remove cover and thermostat, but leave wallplate with wires attached.
MERCURY NOTICE
If your old thermostat contains
mercury, contact your local waste
management authority for proper
disposal instructions.
Is there a sealed tube containing
mercury? If so, see mercury notice
below.
Leave wallplate in place.
Old thermostat
Cover
Check package contents:
• Thermostat
• Coverplate
• Wallanchors&screws(2each)
• Wirelabels
Before you begin, make sure
you have:
• No.2Phillips&smallpocket
screwdrivers
• Hammer
• Level(optional)
• Pencil
• Drillandbit(3/16”fordrywall,7/32”
forplaster)
Getting started
Remove your old thermostat
CT87K(24Vacheatingsystems) • CT87N(24Vacheatingandcoolingsystems)
This thermostat contains a Lithium battery which
may contain Perchlorate material.
Perchlorate Material—special handling may apply,
See www.dtsc.ca.gov/hazardouswaste/perchlorate
CT87N/CT87K • Owner's Manual
69-1959EFS—02 2
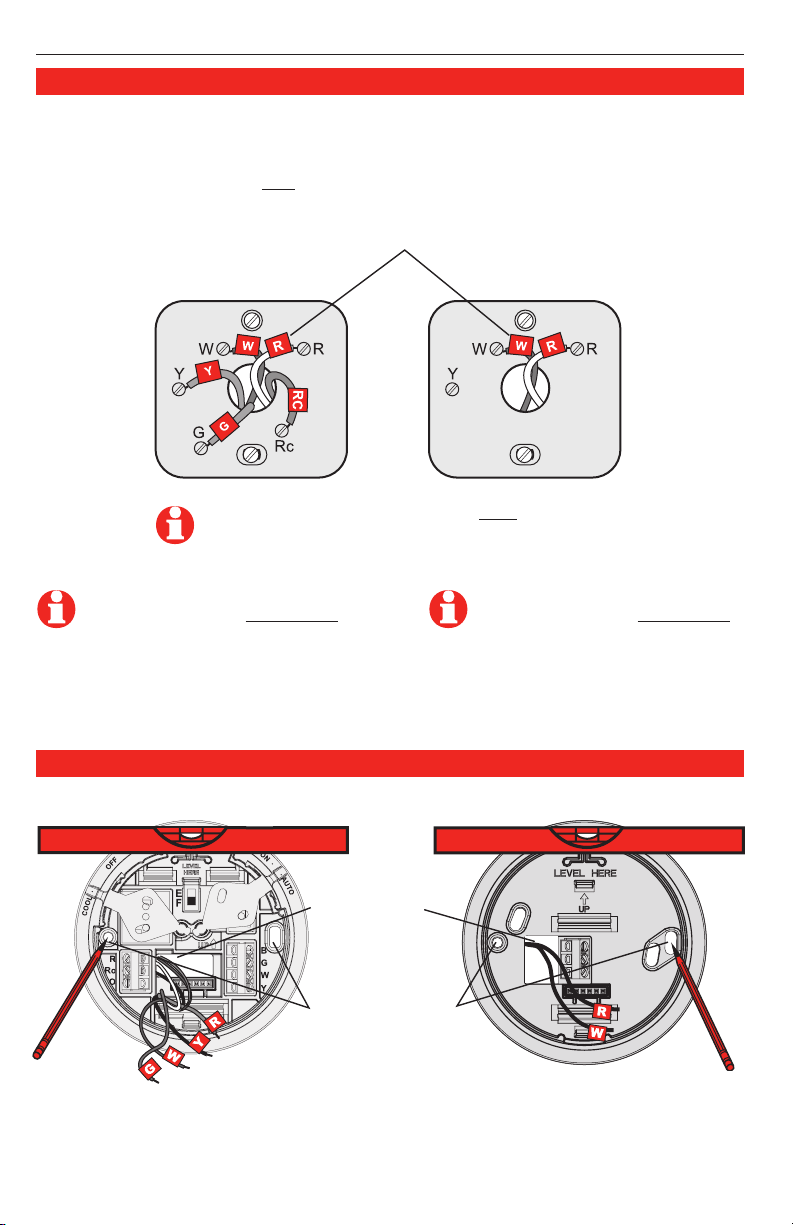
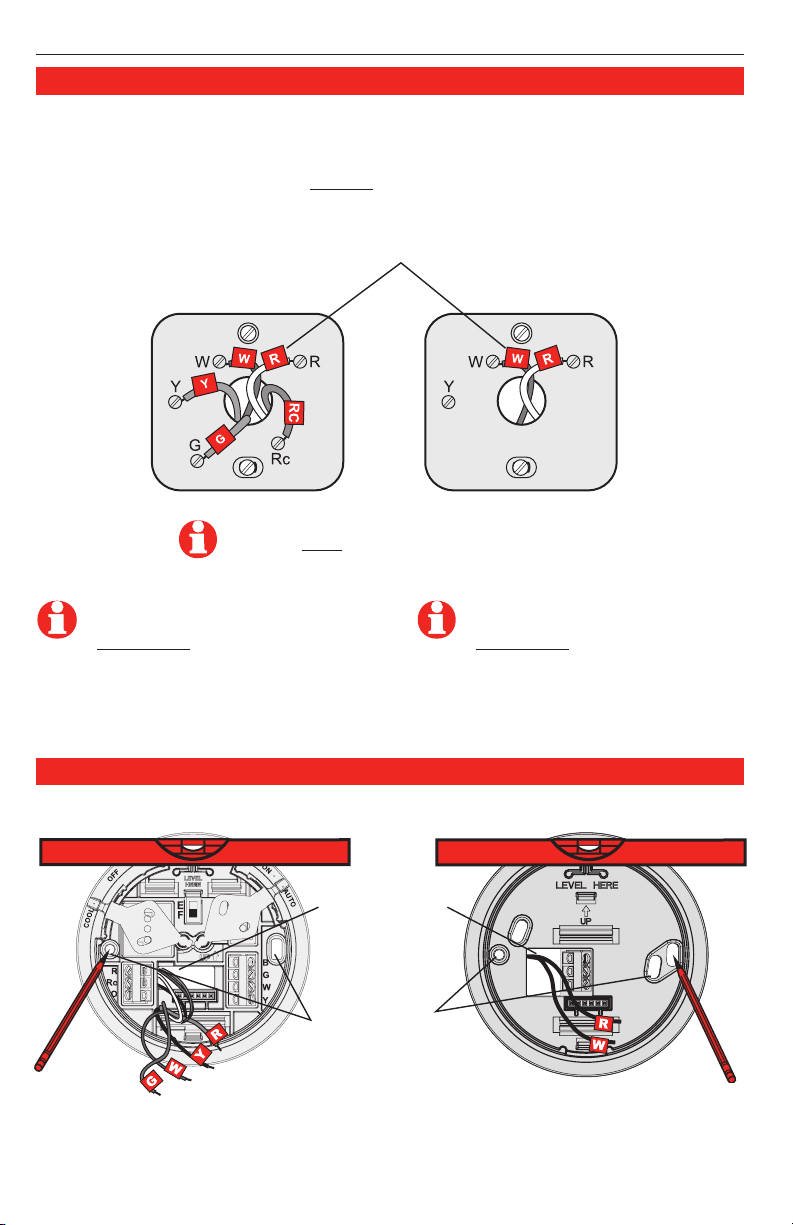
Wrap supplied labels securely around each wire. Do not let wires fall into wall opening!
IGNORE WIRE COLORS: Use only letter designations
to identify wire types.
For CT87N: If your old thermostat
has7ormorewires(not counting
terminals C or C1),youmayhave
purchased the wrong replacement
thermostat. Stop now and call
1-800-468-1502 for advice.
CT87N
1. Pull wires
through base.
2. Level base if
desired.
3. Markpositions
of both screw
holes.
R
W
Y
CT87K
For CT87K: If your old thermostat
has4ormorewires(not counting
terminals C or C1),youmayhave
purchased the wrong replacement
thermostat. Stop now and call
1-800-468-1502 for advice.
Use a screwdriver to disconnect wires one by one. As you disconnect each wire, wrap it with
thelabelmatchingtheletteronyouroldthermostat.(Adhesivelabelsaresuppliedinyour
thermostatpackage.)
Remove the old wallplate only after all wires are labeled. Be careful not to let loose wires fall
into the wall opening.
Label wires and remove old wallplate
Mark mounting position
CT87N CT87K
English: Page 1 • Français : Page 6 • Español: Página 11
3 69-1959EFS—02
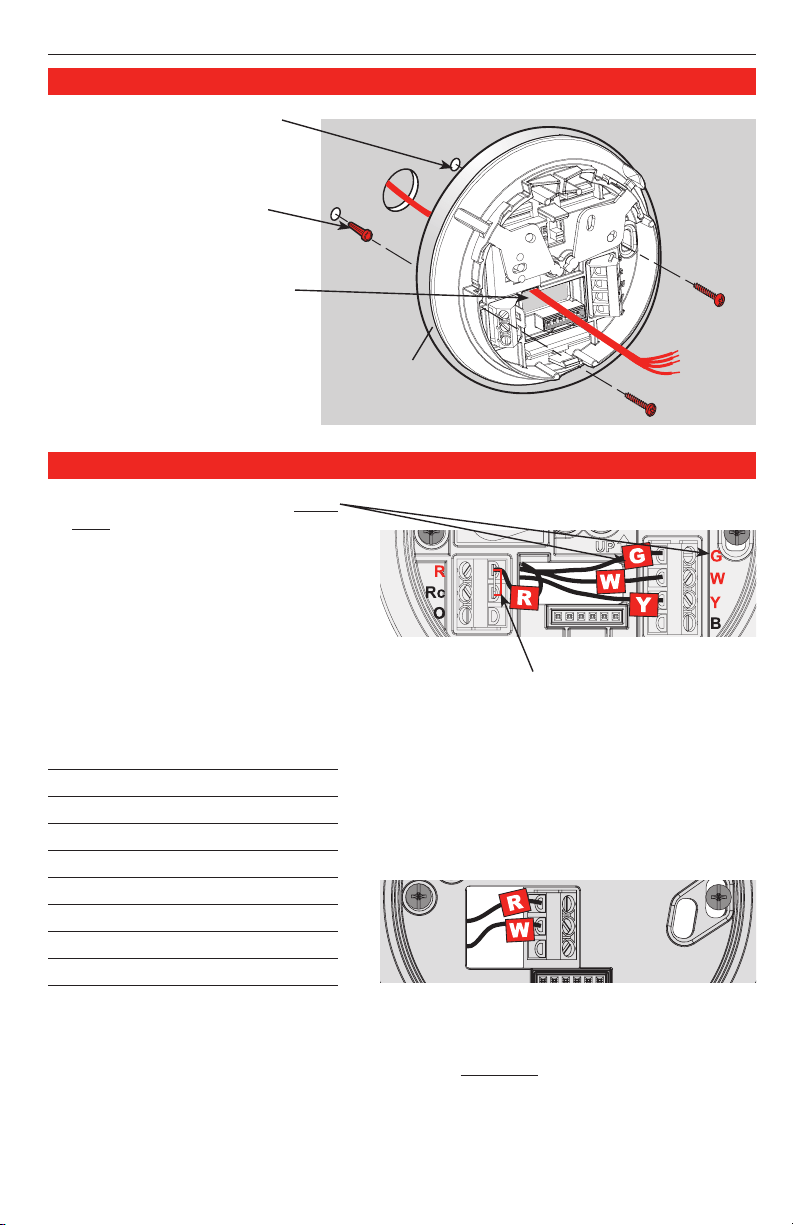
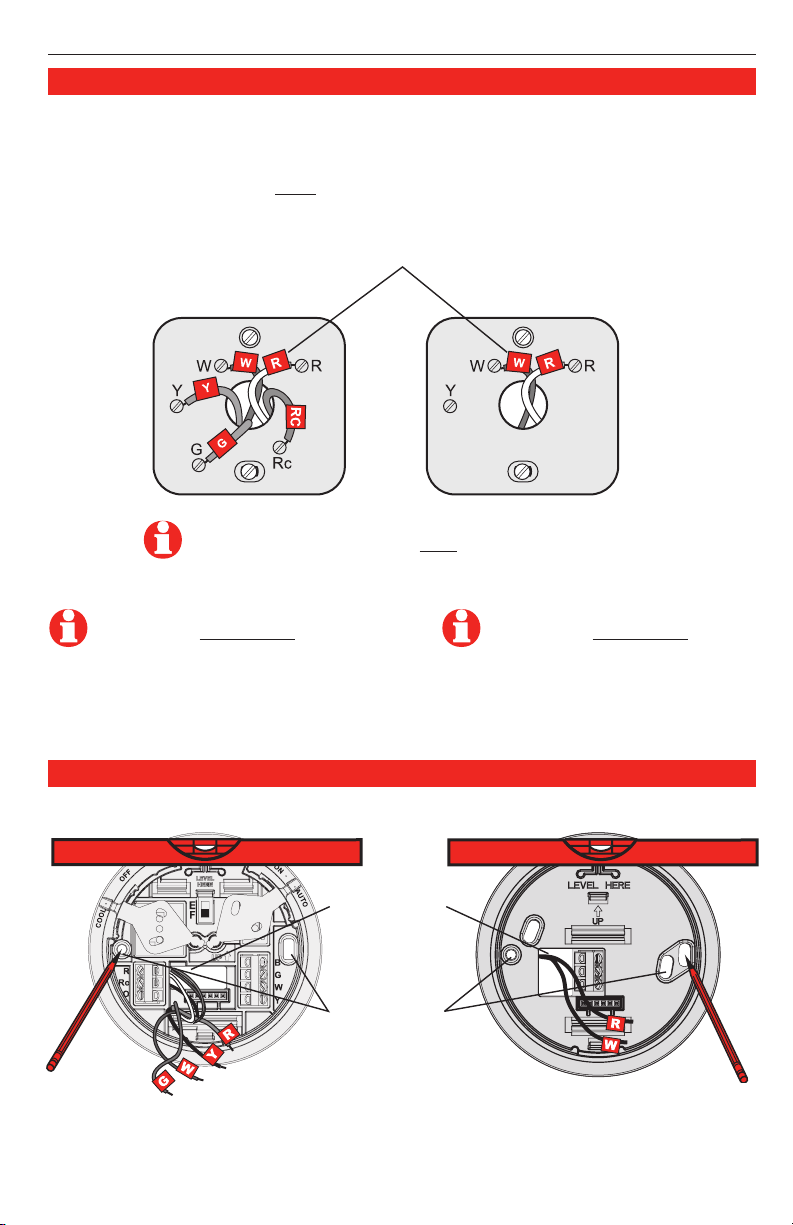
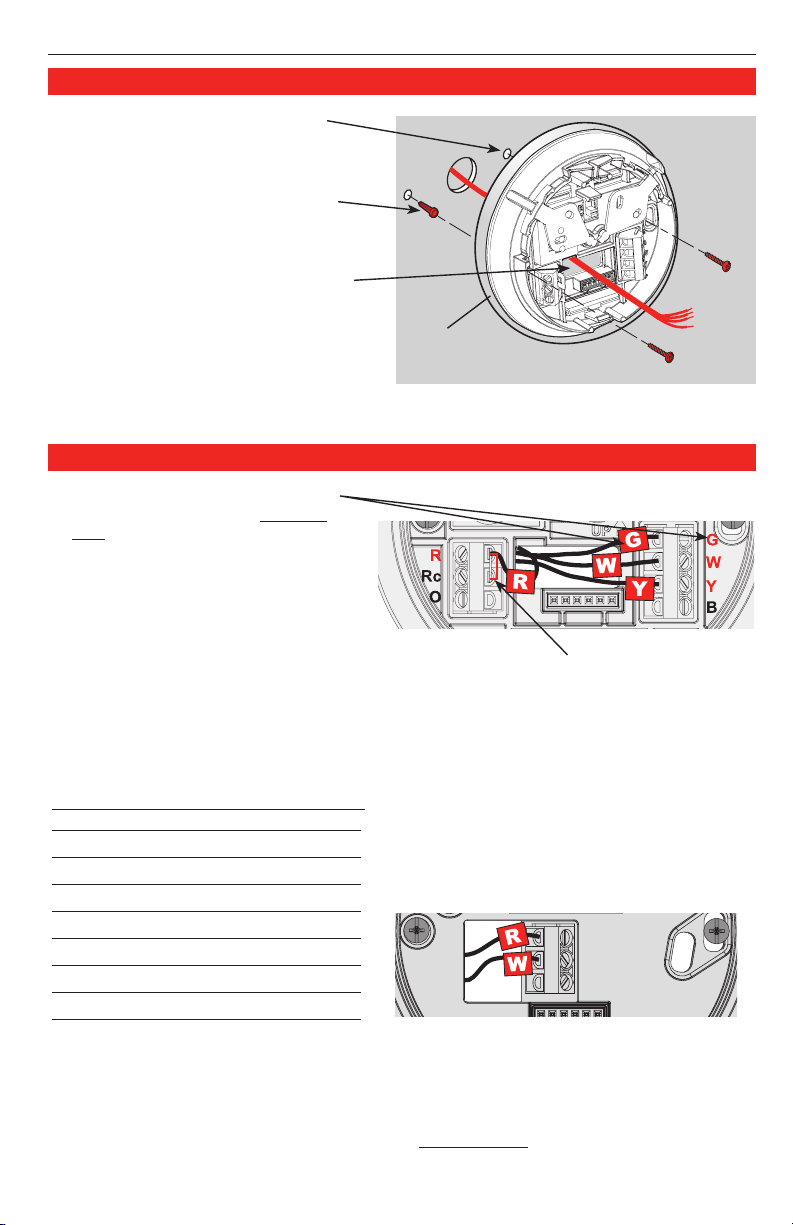
Wiring CT87N
[1] If wires will be connected to both R and Rc
terminals, remove the metal jumper.
[2]DonotconnectbothO and B if you have a
heat pump. Connect only the O wire. Wrap B
wire with electrical tape and do not use.
[3]DonotuseC, X or B. Wrap bare end of wire
with electrical tape.
Cover plate
(optional)
Thermostat
base
CT87N
Wiring CT87K
• 2-wire heat-only system: Connect one
wire to R terminal, one wire to W terminal.
• 3-wire hot water heat-only system: Connect
wires R to R, W to W, and Y to Y terminals.
R
W
Y
CT87K
1. Drillholesatpencil-marked
locations(3/16”fordrywall,
7/32”forplaster).
2. Use hammer to tap anchors
into holes until flush with
wall.
3. [Optional] Pull wires through
coverplate(ifneededtocover
marksleftbytheoldthermostat).
4. Pull wires through thermostat
base, position over anchors,
then insert mounting screws.
Check level if desired, then
tighten screws.
Mount thermostat base
1. Match each labeled wire with same
letterontheterminalblock(s).
2. Use a screwdriver to loosen screw
terminals, insert bare wire into
slots, then tighten screws.
3. Pushanyexcesswirebackintothe
wall opening.
Labels don't match?
If labels do not match letters on
thermostat, see table below.
Existing wires Connect to:
R• RH•4• V Terminal “R” [1]
Rc Terminal “Rc” [1]
O Terminal “O” [2]
B Terminal “B” [2]
G•F Terminal “G”
W•W1•H Terminal “W”
Y •Y1•M Terminal “Y”
C•X •B Do not use [3]
Connect wires
CT87N/CT87K • Owner's Manual
69-1959EFS—02 4
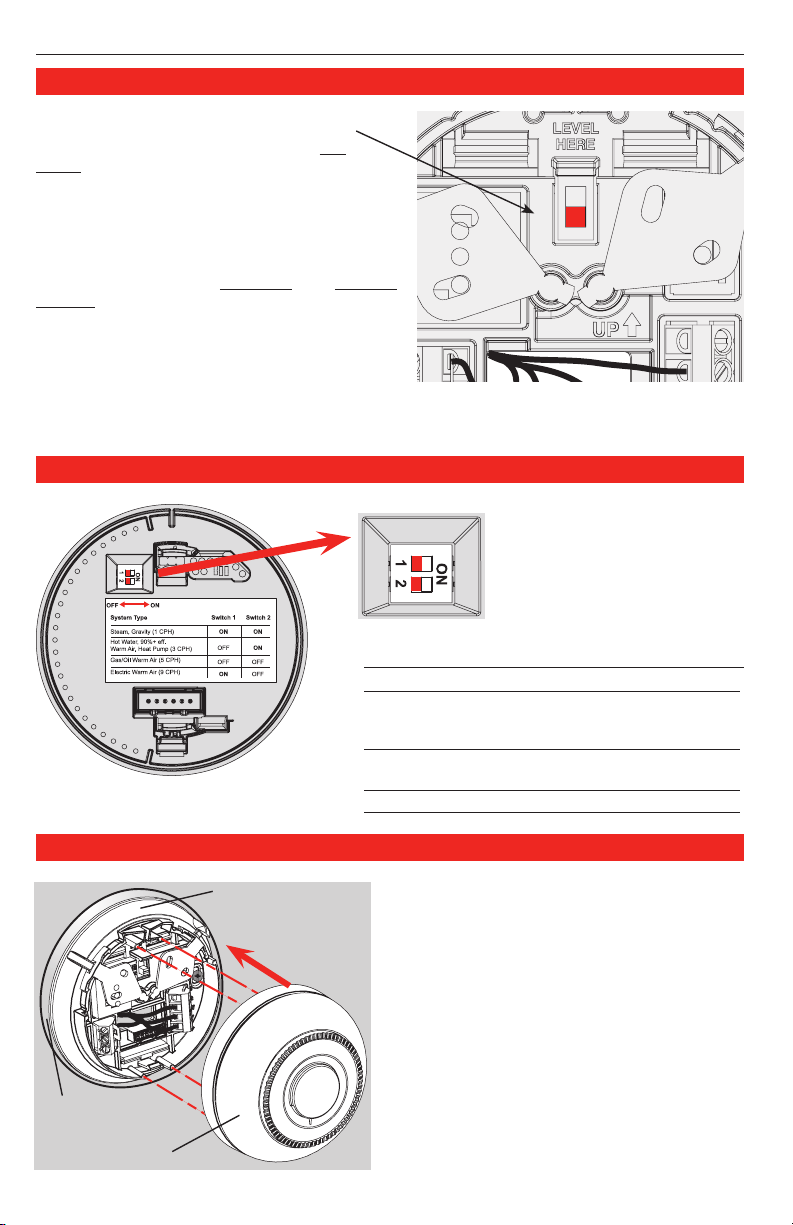
1. Align the slots on the base with tabs on
the thermostat, then push gently until the
thermostat snaps into place.
2. Restore electrical power at the heating/
cooling system, or at the fuse/circuit-
breaker panel.
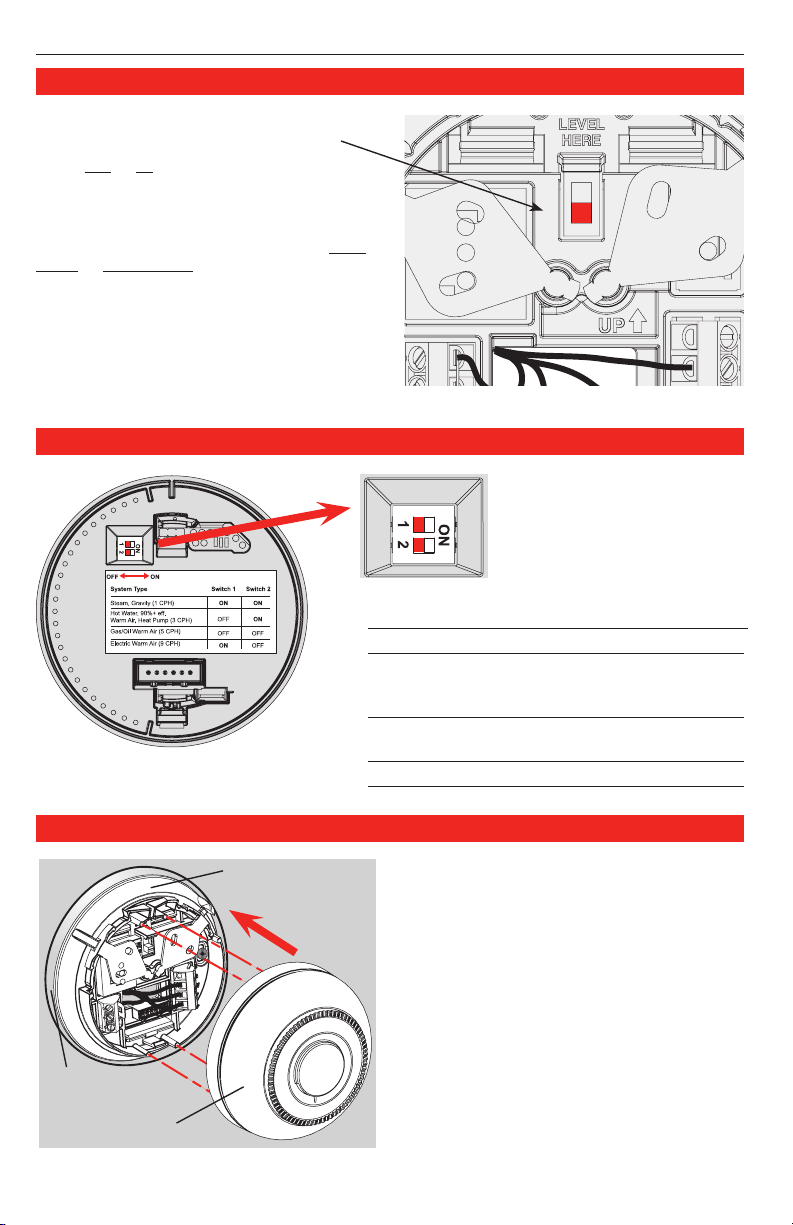
Move the switch to the proper setting for your
system:
F: For gas or oil heating systems, leave the
fan operation switch in this factory-set position
(forsystemsthatcontrolthefaninacallfor
heat).
E: Change the switch to this setting for heat
pump or electric heatsystems.(Thissetting
is for systems that allow the thermostat to
control the fan in a call for heat, if a fan wire is
connected to the Gterminal.)
E
F
Set fan operation switch (CT87N)
Finish installation
Base
Heating System Switch 1 Switch 2
Steam or gravity On On
High efficiency warm air Off On
(90%plusefficiency),
hot water, or heat pump
Gas or oil warm air Off Off
(factorysetting)
Electric warm air On Off
Thermostat
Coverplate
(optional)
Move the cycle rate switches
to the proper setting for your
system(seetablebelow).
Set cycle rate switches
English: Page 1 • Français : Page 6 • Español: Página 11
5 69-1959EFS—02
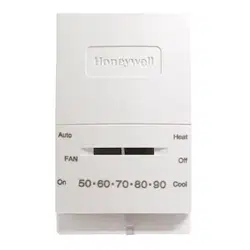
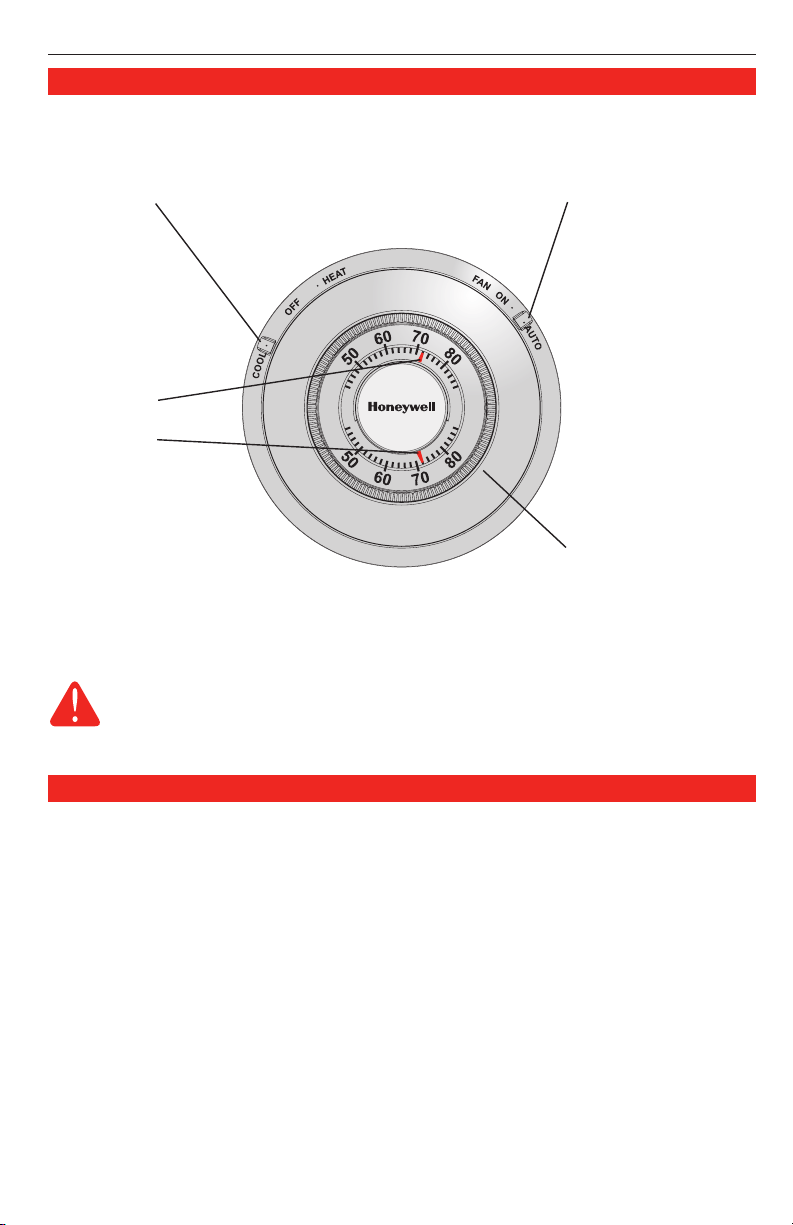
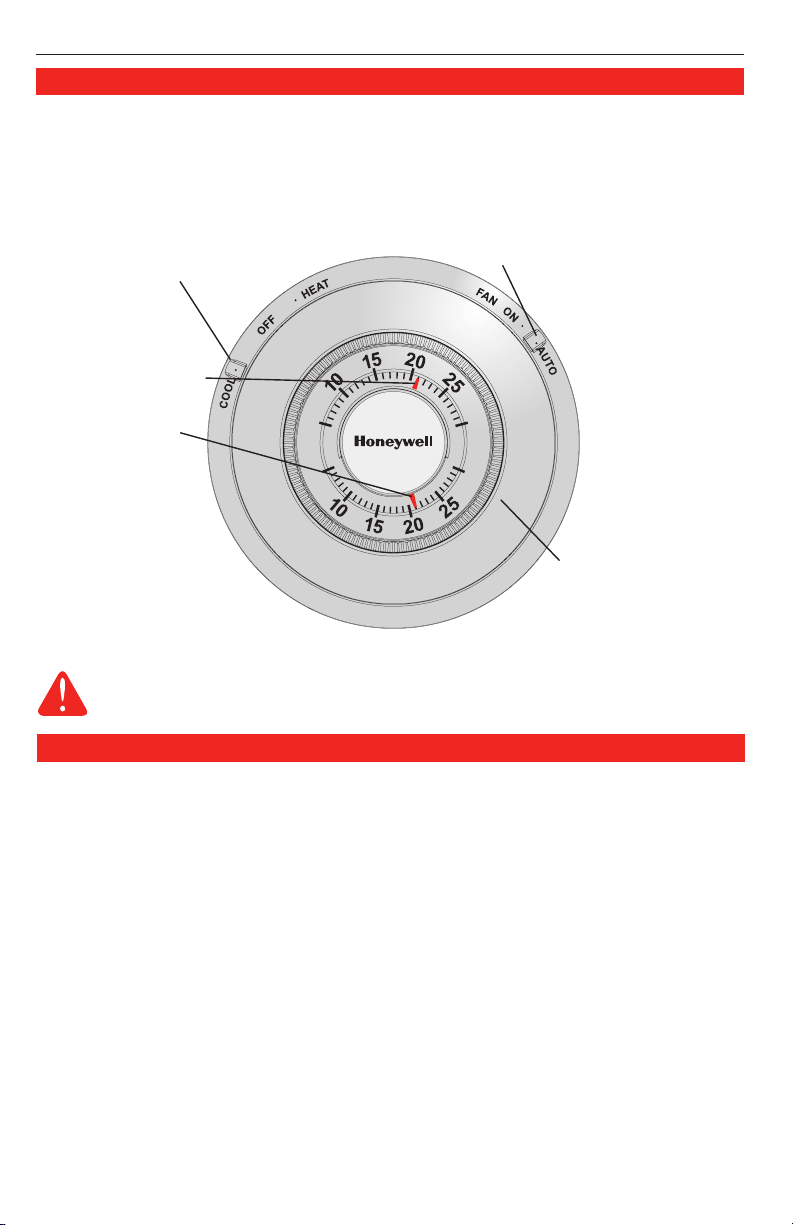
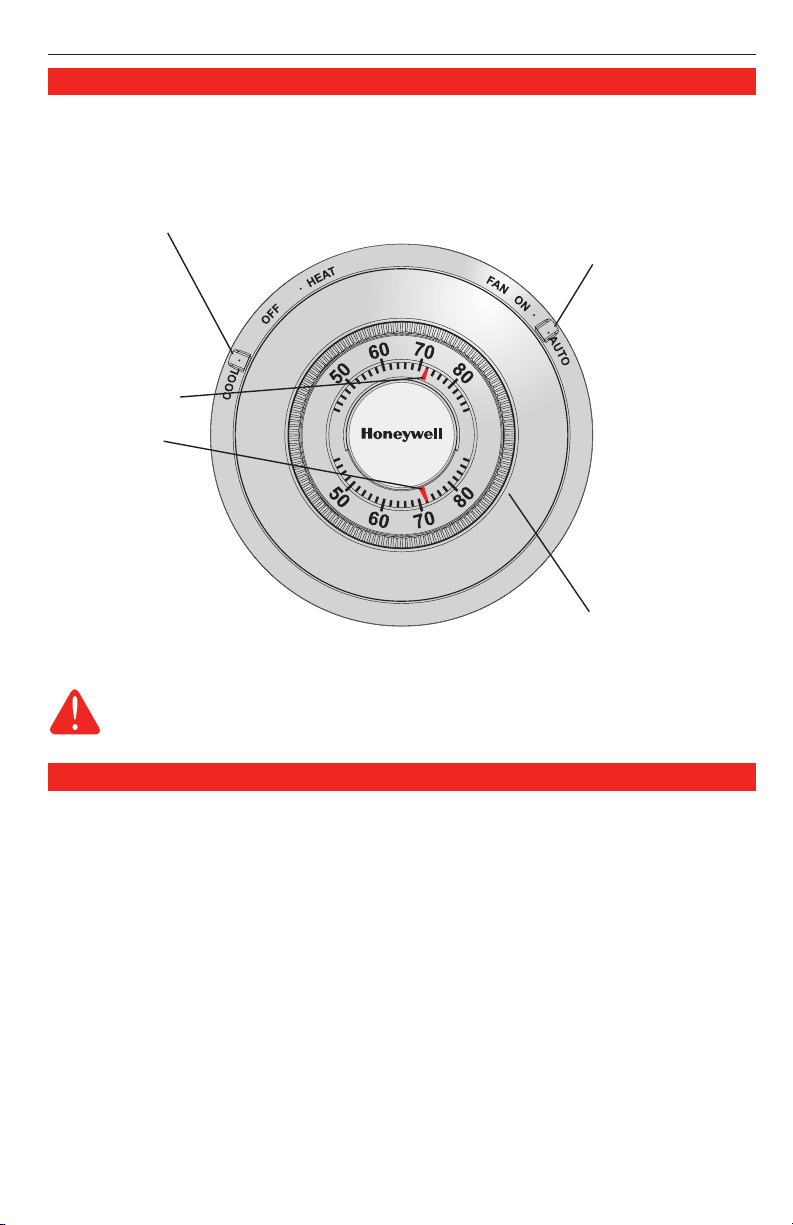
Fan switch (CT87N)
• On: Fan runs continuously.
• Auto: Fan runs only when heating
or cooling system is on.
System switch (CT87N)
• Cool: Controls the cooling system.
• Heat: Controls the heating system.
• Off: All systems are off.
Operation
CAUTION: EQUIPMENT DAMAGE HAZARD (CT87N)
Donotoperatecoolingsystemwhenoutdoortemperatureisbelow50°F(10°C).
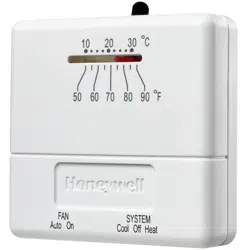
Temperature setting
Rotate to set desired indoor
temperature.
Honeywell warrants this product to be free from defects in
the workmanship or materials, under normal use and service,
for a period of one (1) year from the date of purchase by the
consumer. If at any time during the warranty period the product
is determined to be defective or malfunctions, Honeywell shall
repair or replace it (at Honeywell's option).
If the product is defective,
(i) return it, with a bill of sale or other dated proof of
purchase, to the place from which you purchased it; or
(ii) call Honeywell Customer Care at 1-800-468-1502.
Customer Care will make the determination whether the product
should be returned to the following address: Honeywell Return
Goods, Dock 4 MN10-3860, 1885 Douglas Dr. N., Golden
Valley, MN 55422, or whether a replacement product can be
sent to you.
This warranty does not cover removal or reinstallation
costs. This warranty shall not apply if it is shown by Honeywell
that the defect or malfunction was caused by damage which
occurred while the product was in the
possession of a consumer.
Honeywell's sole responsibility shall be to repair or replace
the product within the terms stated above. HONEYWELL
SHALL NOT BE LIABLE FOR ANY LOSS OR DAMAGE OF
ANY KIND, INCLUDING ANY INCIDENTAL OR
CONSEQUENTIAL DAMAGES RESULTING, DIRECTLY OR
INDIRECTLY, FROM ANY BREACH OF ANY WARRANTY,
EXPRESS OR IMPLIED, OR ANY OTHER FAILURE OF THIS
PRODUCT. Some states do not allow the exclusion or
limitation of incidental or consequential damages, so this limita-
tion may not apply to you.
THIS WARRANTY IS THE ONLY EXPRESS WARRANTY
HONEYWELL MAKES ON THIS PRODUCT. THE DURATION
OF ANY IMPLIED WARRANTIES, INCLUDING THE
WARRANTIES OF MERCHANTABILITY AND FITNESS FOR A
PARTICULAR PURPOSE, IS HEREBY LIMITED TO THE ONE-
YEAR DURATION OF THIS WARRANTY. Some states do not
allow limitations on how long an implied warranty lasts, so the
above limitation may not apply to you.
This warranty gives you specific legal rights, and you may
have other rights which vary from state to state.
If you have warranty questions, please write Honeywell
Customer Relations, 1985 Douglas Dr., Golden Valley, MN
55422 or call 1-800-468-1502. In Canada, write Retail Products
ON15-02H, Honeywell Limited/Honeywell Limitée, 35 Dynamic
Drive, Toronto, Ontario M1V 4Z9.
1-year limited warranty
Temperature
Desiredindoor
temperature.
Current indoor
temperature.
CT87N/CT87K
The Round
®
Owner’s Manual
English: Page 1
Mode d’emploi
Français : Page 6
Manual de Uso
Español: Página 11
Vérifier le contenu de
l'emballage :
• Thermostat
• Plaquederecouvrement
• Chevillesetvisdemontage
(2dechaque)
• Étiquettesdefils
Outils et matériel nécessaires :
• Tournevisàpointecruciformen°2
• Petittournevisdepoche
• Marteau
• Niveau(facultatif)
• Crayon
• Mèche(3/16popourcloisonssèches,
7/32popourcloisonsplâtre)
AVIS SUR LE MERCURE
Ne pas placer l'ancien
thermostat dans les ordures
s’il contient une ampoule de
mercure. Contacter l'agence
de gestion des déchets de
la localité pour connaître les
règlementsconcernantle
recyclage et la mise au rebut.
Ancien
thermostat
Laisserlaplaquedemontageenplace. Le thermostat comporte-t-il un tube scellé
contenantdumercure?Sic’estlecas,sereporterà
l’avis concernant le mercure ci-dessous.
Couvercle
1. MISE EN GARDE COUPER L'ALIMENTATIONdusystèmeàl'appareildechauffage
ou au panneau de disjoncteurs ou de fusibles avant de commencer.
2. Retirer le boîtier et le thermostat. Laisserlaplaquemuraleetlesfilsquiysontfixés.
Retrait de l'ancien thermostat
Avant l'installation
®MarquedéposéeauxÉ.-U.BrevetsÉ.-U.N
o
7,159,789;
7,159,790; 7,476,988 et autres brevets en instance.
© 2009 Honeywell International Inc. Tous droits réservés.
CT87K(systèmesdechauffage24Vc.a.) • CT87N(systèmesdechauffageetderefroidissement24Vc.a.)
Cethermostatcontientunepileaulithiumquipourraitcontenirduperchlorate.
Matériau contenant du perchlorate — des consignes de manipulation spéciales pourraient
s'appliquer,prièredeconsulterwww.dtsc.ca.gov/hazardouswaste/perchlorate
English: Page 1 • Français : Page 6 • Español: Página 11
7 69-1959EFS—02
Étiquetage des fils et retrait de l'ancienne plaque murale
Fixersoigneusementlesétiquettesfourniesàchaquefil.Ne pas laisser les fils tomber dans
l’ouverture du mur!
Installation de la plaque de raccordement
Débrancherlesfilsunparunàl’aided’untournevis.Àmesurequelesfilssontdébranchés,fixer
lesétiquettesci-jointesportantlalettrecorrespondantàl’ancienneborne.(Desétiquettesadhé-
sivessontfourniesdansl'emballageduthermostat.)
Neretirerl’ancienneplaquequ’aprèsavoirétiquetétouslesfils.Veillerànepaslaisserdesfils
détachés tomber dans l’ouverture du mur.
CT87N CT87K
NE PAS TENIR COMPTE DE LA COULEUR DES FILS :
Tenir compte seulement de la lettrequiidentifieletypedefil.
CT87N : Si l'ancien thermostat a
7filsouplus(sans compter C ou
C1),lethermostatderechangene
convientpeu-êtrepasàl'application.
Arrêter l'installation et demander
conseil au 1 800 468-1502.
CT87K : Si l'ancien thermostat a
4filsouplus(sans compter C ou
C1),lethermostatderechangene
convientpeu-êtrepasàl'application.
Arrêter l'installation et demander
conseil au 1 800 468-1502.
1. Tirer les fils
par la base.
2. Mettre la base
de niveau
(facultatif).
3. Marquerla
position des
deuxtrousdevis.
R
W
Y
CT87N CT87K

CT87N/CT87K • Mode d’emploi
69-1959EFS—02 8
Plaquede
recouvrement
en option
Base du
thermostat
1. Percerdestrousauxendroits
marquésaucrayon(3/16po
pourlescloisonssèches,
7/32popourleplâtre).
2. Enfoncer les chevilles avec
unmarteaujusqu'àce
qu'ellessoientdeniveau
avec le mur.
3. [Facultatif] Tirer les fils par
laplaquederecouvrement
(utiliséepourdissimuler
lesmarqueslaisséespar
l'ancienthermostat).
4. Tirer les fils par la base du
thermostat et insérer les vis.
Vérifiersilethermostatest
deniveau(facultatif)etserrer
les vis.
Installation de la plaque murale et de la plaque de raccordement
Câblage CT87N
[1]SidesfilsserontraccordésauxbornesR et
Rc, enlever le cavalier en métal.
[2]NepasraccorderàlafoislesbornesO et
Bàunepompeàchaleur.RaccorderlefilO
seulement. Enrouler le bout du fil B de ruban
isolant.
[3] Ne pas utiliser les fils C, X ou B. Enrouler les
bouts de fil de ruban isolant.
CT87N
Câblage CT87K
• Système de chauffage à 2 fils : Raccorder
unfilàlaborneR,unfilàlaborneW.
• Système de chauffage à eau chaude à 3 fils :
Raccorder les bornes RàR, WàW et YàY.
R
W
Y
CT87K
1. Fairecorrespondrelefilàlaborne
portant la même lettre.
2. Desserrerlesbornesàvisàl’aide
d’un tournevis, insérer les fils dans
des fentes et serrer les vis.
3. Repousserlefilentropdans
l'ouverture du mur.
Les étiquettes ne
correspondent pas?
Silesétiquettesnecorrespondentpas
auxlettresmarquéessurlethermostat,
voir le tableau ci-dessous.
Fils existants Raccorder à :
R• RH•4• V Borne R [1]
Rc Borne Rc [1]
O Borne O [2]
B Borne B [2]
G•F Borne G
W•W1•H Borne W
Y •Y1•M Borne Y
C•X •B Ne pas utiliser [3]
Raccordement

English: Page 1 • Français : Page 6 • Español: Página 11
9 69-1959EFS—02
Placerlesélecteuràlapositionqui
correspondausystème:
F :S’ils’agitd’unsystèmedechauffageau
gaz ou au mazout,laisserlesélecteuràla
positionrégléeenusine(pourlessystèmes
quicommandentlamiseenmarchedu
ventilateurlorsd’unedemandedechaleur).
E : Déplacerlecommutateuràcette
positionsilesystèmeestunethermopompe
ou un appareil de chauffageélectrique.(À
cette position, le thermostat commande la
mise en marche du ventilateur lors d’une
demande de chaleur si un fil du ventilateur
estraccordéàlaborneG.)
E
F
Réglages du ventilateur (CT87N)
Réglages du nombre de cycles
Déplacerlesinterrupteursde
réglage du nombre de cycles
enfonctiondedusystème
(consulterletableauci-
dessous).
Système de chauffage 1 2
Vapeur ou gravité On On
Système à air chaud à haut rendement Off On
(90%d’efficacitéetplus),
eau chaude ou thermopompe
Air chaud au gaz ou au mazout Off Off
(réglagesdel’usine)
Air chaud à l’électricité On Off
Interrupteurs
1. Aligner les fentes du couvercle avec les
languettes du thermostat, puis pousser
doucementjusqu’àcequelecouvercle
s’emboîte en place.
2. Rétablirlecourantélectriqueàpartirde
l’installation de chauffage/climatisation ou
du panneau de fusibles ou de disjoncteurs.
Thermostat
Base
Plaquede
recouvrement
en option
Montage du thermostat
CT87N/CT87K • Mode d’emploi
69-1959EFS—02 10
Honeywell garantit ce produit, contre tout vice de fabrication
ou de matière dans la mesure où il en est fait une utilisation
et un entretien convenables, et ce, pour un (1) an à partir de
la date d’achat par le consommateur. En cas de défectu-
osité ou de mauvais fonctionnement pendant la période de
garantie, Honeywell remplacera ou réparera le produit (au gré
de Honeywell) dans un délai raisonnable.
Si le produit est défectueux,
(i) le retourner, accompagné d’une preuve d’achat indiquant la
date d’achat, au détaillant auprès de qui il a été acheté, ou
(ii) s’adresser aux Services à la clientèle de Honeywell en
composant le 1 800 468-1502. Les Services à la clientèle
détermineront alors si le produit doit être retourné à l’adresse
suivante : Honeywell Return Goods, Dock 4 MN10-3860, 1885
Douglas Dr. N., Golden Valley, MN 55422, ou si un produit
de remplacement peut vous être expédié.
La présente garantie ne couvre pas les frais de retrait ou de
réinstallation. La présente garantie ne s’appliquera pas s’il est
démontré que la défectuosité ou le mauvais fonctionnement
est dû à un endommagement du produit alors que le con-
sommateur l’avait en sa possession.
La responsabilité de Honeywell se limite à réparer ou à
remplacer le produit conformément aux modalités susmen-
tionnées. HONEYWELL N’EST EN AUCUN CAS RESPONS-
ABLE DES PERTES OU DOMMAGES, Y COMPRIS LES
DOMMAGES INDIRECTS OU ACCESSOIRES DÉCOULANT
DIRECTEMENT OU INDIRECTEMENT D’UNE VIOLATION
QUELCONQUE D’UNE GARANTIE, EXPRESSE OU TACITE,
APPLICABLE AU PRÉSENT PRODUIT NI DE TOUTE AUTRE
DÉFECTUOSITÉ DU PRÉSENT PRODUIT. Certaines provinces
ne permettent pas l’exclusion ou la restriction des dommages
indirects et, par conséquent, la présente restriction peut ne
pas s’appliquer.
LA PRÉSENTE GARANTIE TIENT LIEU DE TOUTES LES
AUTRES GARANTIES EXPRESSES ACCORDÉES PAR
HONEYWELL POUR CE PRODUIT. LA DURÉE DE TOUTE
GARANTIE TACITE, Y COMPRIS LES GARANTIES DE
VALEUR MARCHANDE ET DE CONFORMITÉ À UNE FIN
PARTICULIÈRE SONT PAR LES PRÉSENTES LIMITÉES À LA
PÉRIODE D'UN AN DE LA PRÉSENTE GARANTIE. Certaines
provinces ne permettent pas de limiter la durée des garanties
tacites et, par conséquent, la présente limitation peut ne pas
s’appliquer.
La présente garantie donne au consommateur des droits
légaux spéciques et peut-être certains autres droits qui
peuvent varier d’une province à l’autre.
Pour toute question concernant la présente garantie, prière
d’écrire aux Services à la clientèle de Honeywell à l’adresse
suivante : Honeywell Customer Relations, 1985 Douglas Drive,
Golden Valley, MN 55422, ou encore composer le 1 800
468-1502. Au Canada, prière de s’adresser au service des
Produits de détail, Honeywell Limited/Honeywell Limitée, 35
Dynamic Drive, Toronto (Ontario) M1V 4Z9.
Garantie limitée de un an
MISE EN GARDE : RISQUE DE DOMMAGES MATÉRIELS (CT87N)
Nepasfairefonctionnerlesystèmederefroidissementlorsquelatempératureextérieure
estinférieureà10°C(50°F).
Sélecteur du ventilateur
(CT87N)
• On : Le ventilateur fonctionne en
permanence.
• Auto :Leventilateurnefonctionneque
lorsquelechauffageoulaclimatisation
est en marche.
Réglage de la
température
Tourner pour obtenir la
température ambiante désirée.
La température
Température ambiante
désirée.
Température
ambiante actuelle.
Sélecteur du système
(CT87N)
• Cool :Commandelesystèmede
refroidissement seulement.
• Heat :Commandelesystèmede
chauffage seulement.
• Off :Touslessystèmessont
hors tension.
Fonctionnement
Compruebe el contenido
del paquete:
• Termostato
• Placadecubierta
• Soportesdeparedytornillosdemontaje
(2cadauno)
• Rótulosparaloscables
Herramientas y materiales
necesarios:
• Destornillador Phillips N.º 2
• Destornilladorpequeñodebolsillo
• Martillo
• Nivel(optativo)
• Lápiz
• Mechadetaladro(3/16"para
mamposteríaenseco,7/32"parayeso)
Lista de comprobación previa a la instalación
AVISO DE MERCURIO
No arroje su viejo termostato
a la basura si contiene
mercurio en un tubo sellado.
Comuníqueseconla
autoridadlocaldedisposición
de desechos para recibir
instrucciones sobre reciclado
yeliminacióncorrecta.
CT87N/CT87K
The Round
®
Owner’s Manual
English: Page 1
Mode d’emploi
Français : Page 6
Manual de Uso
Español: Página 11
Termostato viejo
Dejelaplacademontajeensulugar. ¿Existealgúntuboselladoquecontengamercurio?Sies
así, consulte el aviso sobre mercurioquefiguraabajo.
Cubierta
Remueva su viejo termostato
1. PRECAUCIÓN APAGUE LA ENERGÍA del sistema en el calentador, o en el panel de
fusibles-interruptor térmico del circuito antes de iniciar.
2. Retire la cubierta y el termostato, pero deje los cables unidos a la placa de montaje.
® Marca registrada de los EE. UU. Patente en EE.UU: Nº 7,159,789;
7,159,790; 7,476,988 y otras patentes pendientes.
© 2009, Honeywell International Inc. Todos los derechos reservados.
CT87K(sistemasdecalefacción24VCA) • CT87N(sistemasdecalefacciónyderefrigeración24VCA)
Estetermostatotieneunabateríadelitioquepuedecontenerperclorato.
Perclorato: puede ser necesario manipularlo con métodos especiales.
Visitewww.dtsc.ca.gov/hazardouswaste/perchlorate
CT87N/CT87K • Manual de Uso
69-1959EFS—02 12
Rotule los cables y retire la vieja placa de montaje
Useundestornilladorparadesconectarloscablesunoauno.Amedidaquedesconectecada
cable,péguelealrededorelrótuloconlamismaletraquefiguraensuviejotermostato.(Enel
paquetedesutermostatoseincluyenrótulosautoadhesivos.)
Retirelaviejaplacademontajesólodespués de haber rotulado todos los cables. Tenga cui-
dadodenodejarqueloscablessueltoscaiganenelhuecodelapared.
Envuelvafirmementelosrótulosprovistosalrededordecadacable¡No permitaqueloscables
caigan en el hueco de la pared!
IGNORE LOS COLORES DE LOS CABLES:
Usesóloletras para identificar los tipos de cable.
Para el modelo CT87N: Si su viejo
termóstatotiene7omáscables
(no contando los terminales C o
C1),ustedpudohabercompradoel
termóstatoincorrectodelreemplazo.
Interrumpalainstalaciónyllameal
1-800-468-1502 para pedir consejo.
Repérez la position de montage
CT87N CT87K
Para el modelo CT87K: Si su viejo
termóstatotiene4omáscables
(no contando los terminales C o
C1),ustedpudohabercompradoel
termóstatoincorrectodelreemplazo.
Interrumpalainstalaciónyllameal
1-800-468-1502 para pedir consejo.
1. Tire de los
cables a través
de la base.
2. Nivele la base
si lo desea.
3. Marquelas
posiciones de
ambos orificios.
R
W
Y
CT87N CT87K
English: Page 1 • Français : Page 6 • Español: Página 11
13 69-1959EFS—02
1. Taladre orificios en las posiciones
marcadas.Orificiosde3/16"para
mampostería en seco. Orificios de
7/32"parayeso.
2. Con un martillo golpee suavemente
los soportes de pared e
introdúzcalosenlosorificioshasta
quequedenalrasdelapared.
3. [Opcional] Tire de los cables a través
delacubierta(sifuesenecesario
para cubrir las marcas dejadas por
suviejotermostato).
4. Tire de los cables a través de la
base del termostato e inserte los
tornillos. Nivélela si lo desea y luego
ajuste los tornillos.
Instalación de placa de montaje
Termostato
Cubierta
opcional
Cableado CT87N
[1] Si los cables son conectados con los
terminales de R y de Rc, retire el empalme
de metal.
[2] No conecte los cables de O y de B si
usted tiene una bomba de calor. Conecte
solamente el cable de O. Envuelva el cable
de B con la cinta eléctrica.
[3] No utilice los cables de C, de X o de B.
Envuelvaelextremodecablesconlacinta
eléctrica.
CT87N
Cableado CT87K
• Sistema de calefacción de dos cables:
Conecte un cable con el terminal de R, un
cable al terminal de W.
• Sistema de calefacción de tres cables de
agua caliente: Conecte los cables de R a
de R, de W a de W y de Y a de Y.
R
W
Y
CT87K
1. Haga coincidir cada cable rotulado
conelterminalquetienela misma
letra.
2. Utilice un destornillador para aflojar
los terminales atornillados, inserte
los cables en ranuras, luego ajuste
los tornillos.
3. Empujeelcablesobrantedentrodel
orificio de la pared.
¿Los rótulos no coinciden?
Silosrótulosnocoincidenconlasletras
de los terminales en el termostato,
consulte la tabla abajo.
Cables existentes Conecte a:
R • RH • 4 • V Terminal “R” [1]
Rc Terminal “Rc” [1]
O Terminal “O” [2]
B Terminal “B” [2]
G • F Terminal “G”
W • W1 • H Terminal “W”
Y • Y1 • M Terminal “Y”
C • X • B Para no utilizar [3]
Conecte los cables
CT87N/CT87K • Manual de Uso
69-1959EFS—02 14
E
F
Finalice la instalación
Termostato
Cubierta
opcional
1. Alinee las ranuras de la cubierta con las
lengüetas del termostato, luego empuje con
suavidadhastaquelacubiertacalceensu
lugar.
2. Vuelvaaconectarlacorrienteeléctricaenel
sistemadecalefacción/refrigeración,oenel
panel de fusibles/disyuntor.
Fije el interruptor para su sistema:
F: Paralossistemasdecalefacciónagas o
aceite, deje el interruptor de fun-cionamiento
delventiladorenlaposiciónoriginaldefábrica
(estaposiciónesparalossistemasquecon-
trolan el ventilador cuando hay demanda de
calefacción).
E: Cambieelinterruptoraestaposiciónparalos
sistemasdecalefaccióneléctricos o de bombeo
de calor.(Estaposiciónesparalossistemas
quepermitenqueeltermostatocontroleel
ventiladorcuandohaydemandadecalefacción,
si hay conectado un cable del ventilador al
terminal G).
Fije los interruptores de la tarifa del ciclo
Fije los interruptores de la
tarifa del ciclo para su sistema
(véaselatablaabajo).
Sistema de calefacción 1 2
Sistema de vapor/gravedad On On
Aire caliente de alta Apagado On
eficiencia(90%+),agua
caliente o pompa de calor
Aire caliente (gas/petróleo) Apagado Apagado
(ajustedelafábrica)
Aire caliente eléctrico On Apagado
Interruptores
Ajuste de funcionamiento del ventilador (CT87N)
Base
English: Page 1 • Français : Page 6 • Español: Página 11
15 69-1959EFS—02
Honeywell garantiza que, a excepción de la batería y en condi-
ciones de uso y servicio normales, este producto no tendrá
defectos de fabricación ni de materiales durante un (1) año
a partir de la fecha de compra por parte del consumidor. Si
durante ese período de garantía, el producto resulta defectuoso
o tiene problemas de funcionamiento, Honeywell lo reparará o
reemplazará (a criterio de Honeywell).
Si el producto es defectuoso:
(i) devuélvalo, acompañado de la factura u otra prueba de
compra con fecha, al lugar donde lo adquirió; o
(ii) llame al número de atención al cliente de Honeywell al
1-800-468-1502. Atención al cliente determinará si el
producto se debe devolver a la siguiente dirección: Honeywell
Return Goods, Dock 4 MN10-3860, 1885 Douglas Dr. N.,
Golden Valley, MN 55422 o bien, si se le puede enviar un pro-
ducto de reemplazo.
Esta garantía no cubre los costos de remoción o reinsta-
lación. Esta garantía no corresponde si Honeywell prueba que
el defecto o mal funcionamiento ha sido ocasionado por daño
producido mientras el producto estaba en manos de un con-
sumidor.
La única responsabilidad de Honeywell será repa-
rar o reemplazar el producto en el marco de los términos
precedentemente mencionados. HONEYWELL NO SERÁ
RESPONSABLE POR NINGUNA PÉRDIDA NI DAÑOS
DE NINGÚN TIPO, INCLUSO DAÑOS INCIDENTALES
O CONSECUENTES QUE RESULTEN, DIRECTA O
INDIRECTAMENTE DEL INCUMPLIMIENTO DE CUALQUIER
GARANTÍA, EXPRESA O IMPLÍCITA, O DE NINGUNA OTRA
FALLA DE ESTE PRODUCTO. Algunos estados no admiten la
exclusión o limitación de los daños incidentales o consecuen-
tes, de manera que tal vez esta limitación no se aplique en su
caso.
ÉSTA ES LA ÚNICA GARANTÍA EXPRESA DE
HONEYWELL RESPECTO DE ESTE PRODUCTO. LA
DURACIÓN DE LAS GARANTÍAS IMPLÍCITAS, INCLUSO
LA DE COMERCIABILIDAD Y DE APTITUD PARA UN USO
PARTICULAR, SE LIMITA POR ELLO A LA DURACIÓN DE
UN AÑO DE ESTA GARANTÍA. Algunos estados no admiten
limitaciones en cuanto a la duración de las garantías implícitas,
de manera que tal vez la limitación precedente no se aplique en
su caso.
Esta garantía le otorga derechos legales específicos y puede
gozar de otros derechos que varían de un estado al otro.
Si desea consultar acerca de esta garantía, escriba a
Honeywell Customer Relations, 1985 Douglas Dr., Golden
Valley, MN 55422 o llame a 1-800-468-1502. En Canadá,
escriba a Retail Products ON15-02H Honeywell Limited/
Honeywell Limitée, 35 Dynamic Drive, Toronto, Ontario M1V
4Z9.
Interruptor del ventilador
(CT87N)
• On: El ventilador funciona
continuamente.
• Auto:Funcionasólocuandoestá
encendidoelsistemaderefrigeración
ocalefacción.
Temperatura
Temperatura
interior deseada.
Temperatura de
interior actual.
Interruptor del sistema
(CT87N)
• Cool:Controlaelsistemaderefrigeración.
• Heat:Controlaelsistemadecalefacción.
• Off:Todoslossistemasestánapagados.
Instrucciones de funcionamiento
Ajuste de temperatura
Rote para ajustar la tempera tura deseada.
Garantía limitada de un año
PRECAUCIÓN: PELIGRO DE DAÑO AL EQUIPO (CT87N)
Nohagafuncionarelsistemaderefrigeracióncuandolatemperaturaexteriorsea
inferiora50°F(10°C).
CT87N/CT87K • Owner's Manual
Honeywell International Inc.
1985DouglasDriveNorth
GoldenValley,MN55422
http://yourhome.honeywell.com
Automation and Control Solutions
® U.S. Registered Trademark.
© 2009 Honeywell International Inc.
69-1959EFS—02 M.S. Rev. 10-09
Honeywell Limited-Honeywell Limitée
35DynamicDrive
Toronto,OntarioM1V4Z9
Printed in U.S.A. on recycled
papercontainingatleast10%
post-consumer paper fibers.
Need Help?
For assistance with this product please visit http://yourhome.honeywell.com
or call Honeywell Customer Care toll-free at 1-800-468-1502
Besoin d’aide?
Pourobtenirdel’aideetapprendreàfairefonctionnervotreproduit
Honeywell, veuillez consulter le site Web http://yourhome.honeywell.com
ouvousadresserauxServicesàlaclientèledeHoneywellencomposantle
1 800 468-1502
¿Necesita ayuda?
Consulte sobre este producto en http://yourhome.honeywell.com
ollamandosincargoaatenciónalclientedeHoneywell1-800-468-1502