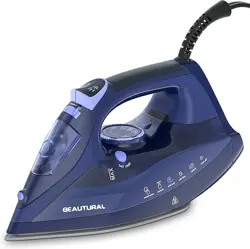
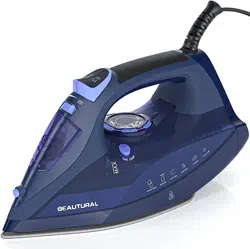
Product may vary slightly from what is illustrated.
HOW TO USE
This product is intended for household use only
IMPORTANT: This product was thoroughly tested by our QA team in our factories prior to shipping. Some residual water from the testing might remain in the unit or the water tank. This is normal and we guarantee this is a brand new product.
Remove all labels, stickers and tags attached to the body of the iron.
The ceramic-coated soleplate doesn't come with protective film, which is normal. Only stainless steel soleplates need the protective film.
Use ordinary tap water for ironing. If the water is very hard, it is possible to mix untreated tap water with distilled or demineralized water.
For optimum performance, turn the iron on and let it stand for 90 seconds before beginning to iron.
Always stand the iron on its heel rest when powered on but not in use.
The iron may give off some smoke and emit an odor when first used. This will cease after a short while. It is safe and will not harm the performance of the iron.
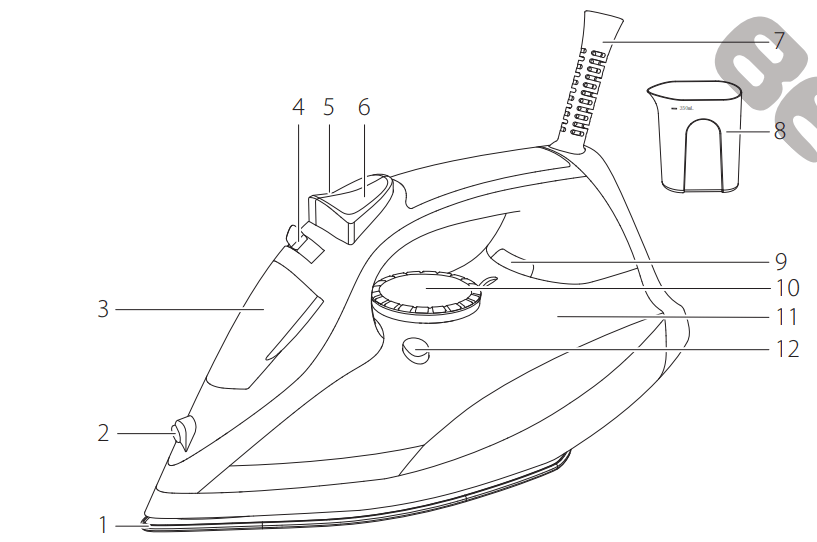
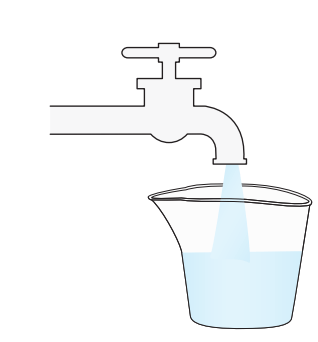
Filling with Water
Tilt the iron and pour water into the water tank opening using a clean filling cup until the water reaches the MAX level as indicated on the water tank. Refill as needed.
Note: If you need to add water while ironing, unplug the iron from the power supply and follow the above steps.
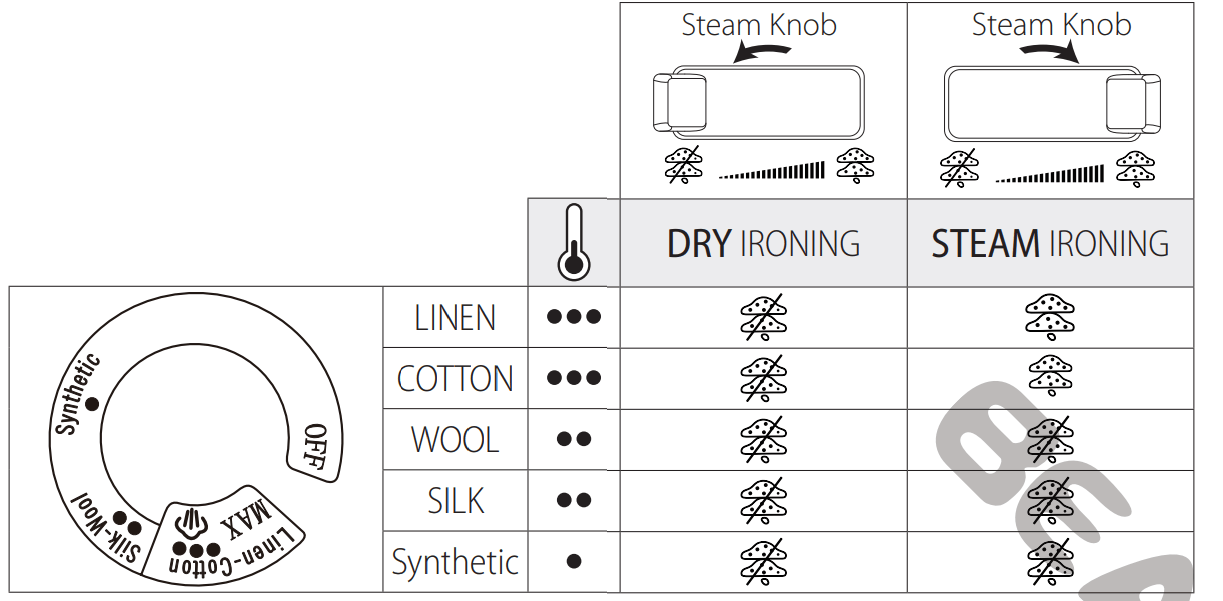
Temperature and Steam Adjustment
Note: Steam ironing is only possible within the to MAX temperature zone.
Setting the Temperature
Plug in the iron. The indicator light will turn green indicating the iron is in Standby mode.
Turn the Temperature Control Dial to choose the suitable temperature according to the fabric.
The indicator light will turn red, indicating the soleplate is heating up.
When your set temperature is reached, the indicator light will change to green.
From time to time, the indicator light will switch between green and red during ironing.
Dry Ironing
Note: If you’re going to be dry ironing for 20 minutes or more, empty the reservoir first to avoid spontaneous bursts of steam.
To iron without steam, ALWAYS make sure the Variable Steam Knob is closed in the position
Ironing with Steam
For steam ironing, make sure the water tank is filled to the Max level. Do not overfill.
Turn the Temperature Control Dial to choose the suitable temperature for your fabric. Note: Steam ironing is only possible within the to MAX temperature zone.
Once the selected temperature setting is reached, slide the Variable Steam Knob to the desired position and start ironing. Warning: Before the selected temperature is reached, make sure the Variable Steam Knob is in the position.
When finished ironing, ALWAYS slide the Variable Steam Knob to the position.
Burst of Steam
It is recommended to use the Burst of Steam feature for dry ironing. Please note to ONLY use the Burst of Steam button within the Temperature Control Dial ( to MAX), otherwise the iron may leak. For best performance, press the Steam Burst button at 5-second intervals.
Horizontal
Tip: Use to remove stubborn creases.
Fill the water tank up to the Max level. Do not overfill.
Turn the Temperature Control Dial to choose the suitable temperature for your fabric.
Once the selected temperature setting is reached, press the Steam Burst button to start ironing with bursts of steam.
When finished ironing, stand the iron on its heel and unplug the iron.
Vertical
Tip: Use for removing wrinkles from hanging clothes and drapes.
Fill the water tank up to the Max level. Do not overfill.
Turn the Temperature Control Dial to choose the suitable temperature for your fabric.
Once the selected temperature setting is reached, press the Steam Burst button to start ironing with bursts of steam.
Hang the garment to be steamed on a clothes hanger. Curtains or drapes can be steamed once they are hung.
Hold the iron close to, but not touching the fabric. It is suggested to hold the iron vertically between 15 to 30mm (0.59 to 1.18 in) away from the hanging fabric.
Pull the fabric tight in your free hand and press the Steam Burst button as you move the iron over the fabric.
When finished ironing, stand the iron on its heel and unplug the iron.
Using Spraying Mist
Tip: For fabrics other than silk, use spraying mist to dampen tough wrinkles at any setting.
Make sure the iron is filled with enough water.
On first use, press the Spray button several times.
Note: Do not spray silk.
3-Way Auto Shutoff
The automatic shutoff feature works as follows:
Once the iron reaches appropriate temperature, it will:
switch off after 8 minutes of inactivity when the iron is placed in a vertical position.
switch off after 30 seconds of inactivity when the iron is placed in a horizontal position.
switch off after 30 seconds of inactivity when the iron is tipped over on its side.
Once shut off, the iron will beep 6 times and the power indicator light will flash.
As soon as you pick up the iron, it will start heating again to the set temperature setting. Wait for the iron to reheat completely before resuming operation.
Note: If you find that the iron stops from time to time, please try to using with larger movements, as smaller movements may activate the auto shutoff feature.
Emptying the Water Tank
Note: It is recommended to empty the water tank after each use to keep steaming clean and to avoid scale deposits. This will also prolong the iron’s lifespan.
Unplug the iron and let it cool.
To empty the water, hold the iron over a sink with the tip pointing down. Water will empty out of the water tank opening.
Automatic Anti-Calc Function
Your iron contains an anti-calc cartridge to reduce scale deposits. This considerably prolongs the operational life of your iron.
The anti-calc cartridge is an integral part of the water tank and does not need to be replaced.
Auto-Cleaning System
It is recommended to use the Self Clean function once every two weeks to double the life of your iron and secure long-lasting, powerful steam.
Fill the water tank to the Max level and slide the Variable Steam Knob to the position.
Plug in the iron.
Turn the Temperature Control Dial to the Max level and stand the iron on its heel rest. Allow it to heat for about 3 minutes.
Unplug the iron and hold over a sink with the soleplate facing down.
Press and hold the Self Clean button and gently shake the iron from side to side and front to back. Be careful, as hot water and steam will come out from the steam vents.
Continue to press the Self Clean button until all water has emptied.
Repeat the self clean process if the water tank still contains a lot of impurities.
When finished, release the Self Clean button, stand the iron on its heel rest and plug it in. Heat for about 2 minutes to dry out any remaining water.
Cleaning the Exterior
Make sure the iron is unplugged and has cooled down completely.
Wipe the outer surfaces with a soft cloth dampened with water and mild household detergent. Never use abrasive, heavy-duty cleansers, vinegar or scouring pads that may scratch or discolor the iron.
Do not immerse the iron into water or other liquids.
After cleaning, steam the iron over an old cloth to remove any residue from the steam vents.
Soleplate Care
The Self Clean function cleans the steam holes, but will not remove residue from the flat surface of the soleplate. To clean an iron’s soleplate, preheat the iron to the Cotton-Linen ( to MAX) setting and iron over a damp, 100% cotton cloth. This creates heavy steam that transfers residue from the soleplate to the cloth.
NOTES:
Care should be taken while cleaning as steam can burn.
Never iron over zippers, pins, metal rivets, or snaps since these may scratch the soleplate.
Do not use abrasive cleansers or metal scouring pads.
Storing the Iron
Unplug the iron and let it cool completely.
Make sure the Variable Steam Knob is in the position.
Store the iron on its heel rest. Storing the iron on its soleplate may cause leaks or damage.
Tips for Best Ironing Results
FABRIC FACTS AND LABELS:
Every fabric is different and should be treated accordingly. The label inside clothing or linens should contain fabric care instructions that include ironing recommendations.
As a general rule, these instructions should be followed. If the fabric is a blend, use a low temperature setting. If you do not know what the content of the fabric is, use the lowest temperature first and test on an inside seam.
PREPARE TO IRON:
Cover your ironing board with a padded, heat-resistant cover. Brush or wipe off any dust, dirt, or debris so it doesn’t transfer to clothing.
To set the height of the ironing board, stand with your elbows bent at right angles; then drop your hands slightly so your arms are in a comfortable position. Set the height of your ironing board to this height.
Check the soleplate for mineral deposits or scorched material before you begin ironing. Follow the “Soleplate Care” instructions on page 8.
FAST FACTS:
Always iron with a lengthwise motion. Ironing in a circular motion may stretch fabric.
Natural fibers such as cotton and linen should be ironed slightly damp for faster, easier ironing. If they are completely dry, use maximum steam while ironing or mist them with water prior to ironing.
Any portion of a garment that has two layers of fabric such as pockets, seams, collars, and cuffs should first be ironed inside out.
To press a collar, iron from the points in using small strokes of the iron. After wrinkles are removed, crease the collar into place by hand. Treat French cuffs similarly, gently creasing by hand after ironing
What type of water to use?
Your steam iron has been designed to function with untreated tap water. If your water is very hard (check with your local water authority), it is possible to mix untreated tap water with store-bought distilled or demineralized water in the following proportions: 50% tap water, 50% distilled or demineralized water.
However, it is necessary to operate the Self Clean function regularly in order to eliminate hard water deposits from the steam chamber.
Use the Self Clean function approximately every 2 weeks. If the water is very hard, clean the iron weekly.
What type of water not to use?
Do not use rainwater or water containing additives (starch, perfume, aromatic substances, softeners, etc.) or water obtained through condensation (e.g. dryer, refrigerators, air conditioners or rainwater). These contain organic waste as well as minerals that condense under influence of heat and cause sputtering, brown stains or the premature wearing of your iron.
TROUBLESHOOTING
Issue
Possible Cause(s)
Solution
Water drips from the holes in the soleplate.
You are using steam while the iron is not hot enough.
Wait until the temperature indicator light turns off.
You are using the Steam Burst button too often.
Press the Steam Burst button at 5-second intervals.
You have stored the iron horizontally, without emptying it and without setting it to the position.
See the section "Storing the Iron”
Brown streaks come through the holes in the soleplate and stain the linen.
You are using ironing water additives (eg. scented water, starch).
Never use ironing water additives as these will permanently damage your steam iron.
You are not using the right type of water.
Perform a self cleaning operation and see the section "What type of water to use?”
Your linen has not been rinsed sufficiently or you have ironed a new garment before washing it.
Make sure that your laundry is rinsed sufficiently in order to remove any deposits of soap or chemical products on new clothes.
The soleplate is dirty or brown and can stain the linen.
You're ironing with an inappropriate temperature selection (temperature too high).
Clean the soleplate (see the section "Soleplate Care") and select the appropriate temperature.
You have ironed over a printed area of a garment.
Never iron printed areas or applications. Always iron the reverse side of such a garment.
The soleplate is dirty.
Check the soleplate before ironing and clean the soleplate if necessary (see the section "Soleplate Care").
Steam or water come out of the iron as you finish filling the tank.
The Variable Steam Knob is not in the position.
Make sure that the Variable Steam Knob is slid to the position.
The water tank is overfilled.
Never exceed the Max level.
There is little or no steam.
The water tank is empty.
Fill the water tank to the Max level.
Spray mist is not working.
The water tank is not filled enough.
Fill the water tank to the Max level.
The iron will stop from time to time.
The movement during ironing is too small that the auto shutoff feature has activated.
Please try to use the iron with larger movements.
Specifications
Rated Voltage: AC 120V~60Hz
Rated Power: 1500W
Dimensions: 28.5x12x14.4cm (11.2x4.7x5.7in)
Weight: 1.3kg (2.87lbs)
Temperature Range: 70~220°C (158~428°F) Water Tank Capacity: 350ml (11.8oz)
IMPORTANT SAFETY INSTRUCTIONS
When using this iron, basic safety precautions should always be followed. These include:
READ ALL INSTRUCTIONS BEFORE USE.
Use the iron only for its intended purpose.
To protect against a risk of electric shock, do not immerse the iron in water or other liquids.
The iron should always be turned to the minimum setting before plugging or unplugging from the outlet. Never yank the cord to disconnect from the outlet; instead grasp the plug and pull to disconnect.
Do not allow the cord to touch hot surfaces. Let the iron cool completely before putting away. Loop cord loosely around the iron when storing.
Always disconnect the iron from the electrical outlet when filling with water or emptying, and also when not in use.
Do not operate the iron if the power cord is damage or if the iron has been dropped or damaged. To avoid a risk of electric shock, do not disassemble the iron. Take it to a qualified service person for examination and repair, or contact our customer service. Incorrect reassembly can cause a risk of electric shock when the iron is used.
Close supervision is necessary for any appliance being used by or near children. Do not leave the iron unattended while connected to power or on an ironing board.
Burns can occur from touching hot metal parts, hot water or steam. Use caution when you turn a steam iron upside down or use a burst of steam as there may be hot water in the reservoir.
Avoid rapid movement of iron to minimize hot water spillage.
The iron must not be left unattended while it is connected to power.
The plug must be removed from the power outlet before the water tank is filled with water.
The iron must be used and rested on a stable surface.
When placing the iron on its stand, ensure that the surface on which the stand is placed is stable.
The iron is not to be used if it has been dropped, if there are visible signs of damage or if leaking.
SPECIAL INSTRUCTIONS
To avoid circuit overload, do not operate another high-wattage appliance on the same circuit.
If an extension cord is absolutely necessary, a cord with an ampere rating equal to or greater than the maximum rating of the iron shall be used. Cords rated for less amperage may overheat. Care should be taken to arrange the extension cord so that it cannot be pulled or tripped over.
SAVE THESE INSTRUCTIONS
SAFETY FEATURES POLARIZED PLUG (FOR US ONLY)
This appliance has a polarized plug (one pin is wider than the other). To reduce the risk of electric shock, this plug is intended to fit into a polarized outlet in only one orientation. If the plug does not fit fully into the outlet, reverse the plug. If it still does not fit, contact a qualified electrician. Do not attempt to modify the plug in any way.
TAMPER-RESISTANT SCREW
WARNING: This appliance is equipped with a tamper-resistant screw to prevent removal of the outer cover. To reduce the risk of fire or electrical shock, do not attempt to remove the outer cover. There are no userserviceable parts inside. Repairs should be done only by authorized service personnel.
Note: If the power cord is damaged, it should be replaced by qualified personnel
 to MAX temperature zone.
 position
 several times.
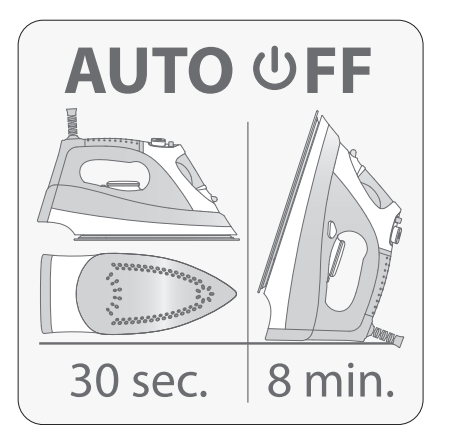
 to MAX) setting and iron over a damp, 100% cotton cloth. This creates heavy steam that transfers residue from the soleplate to the cloth.