OVERVIEW
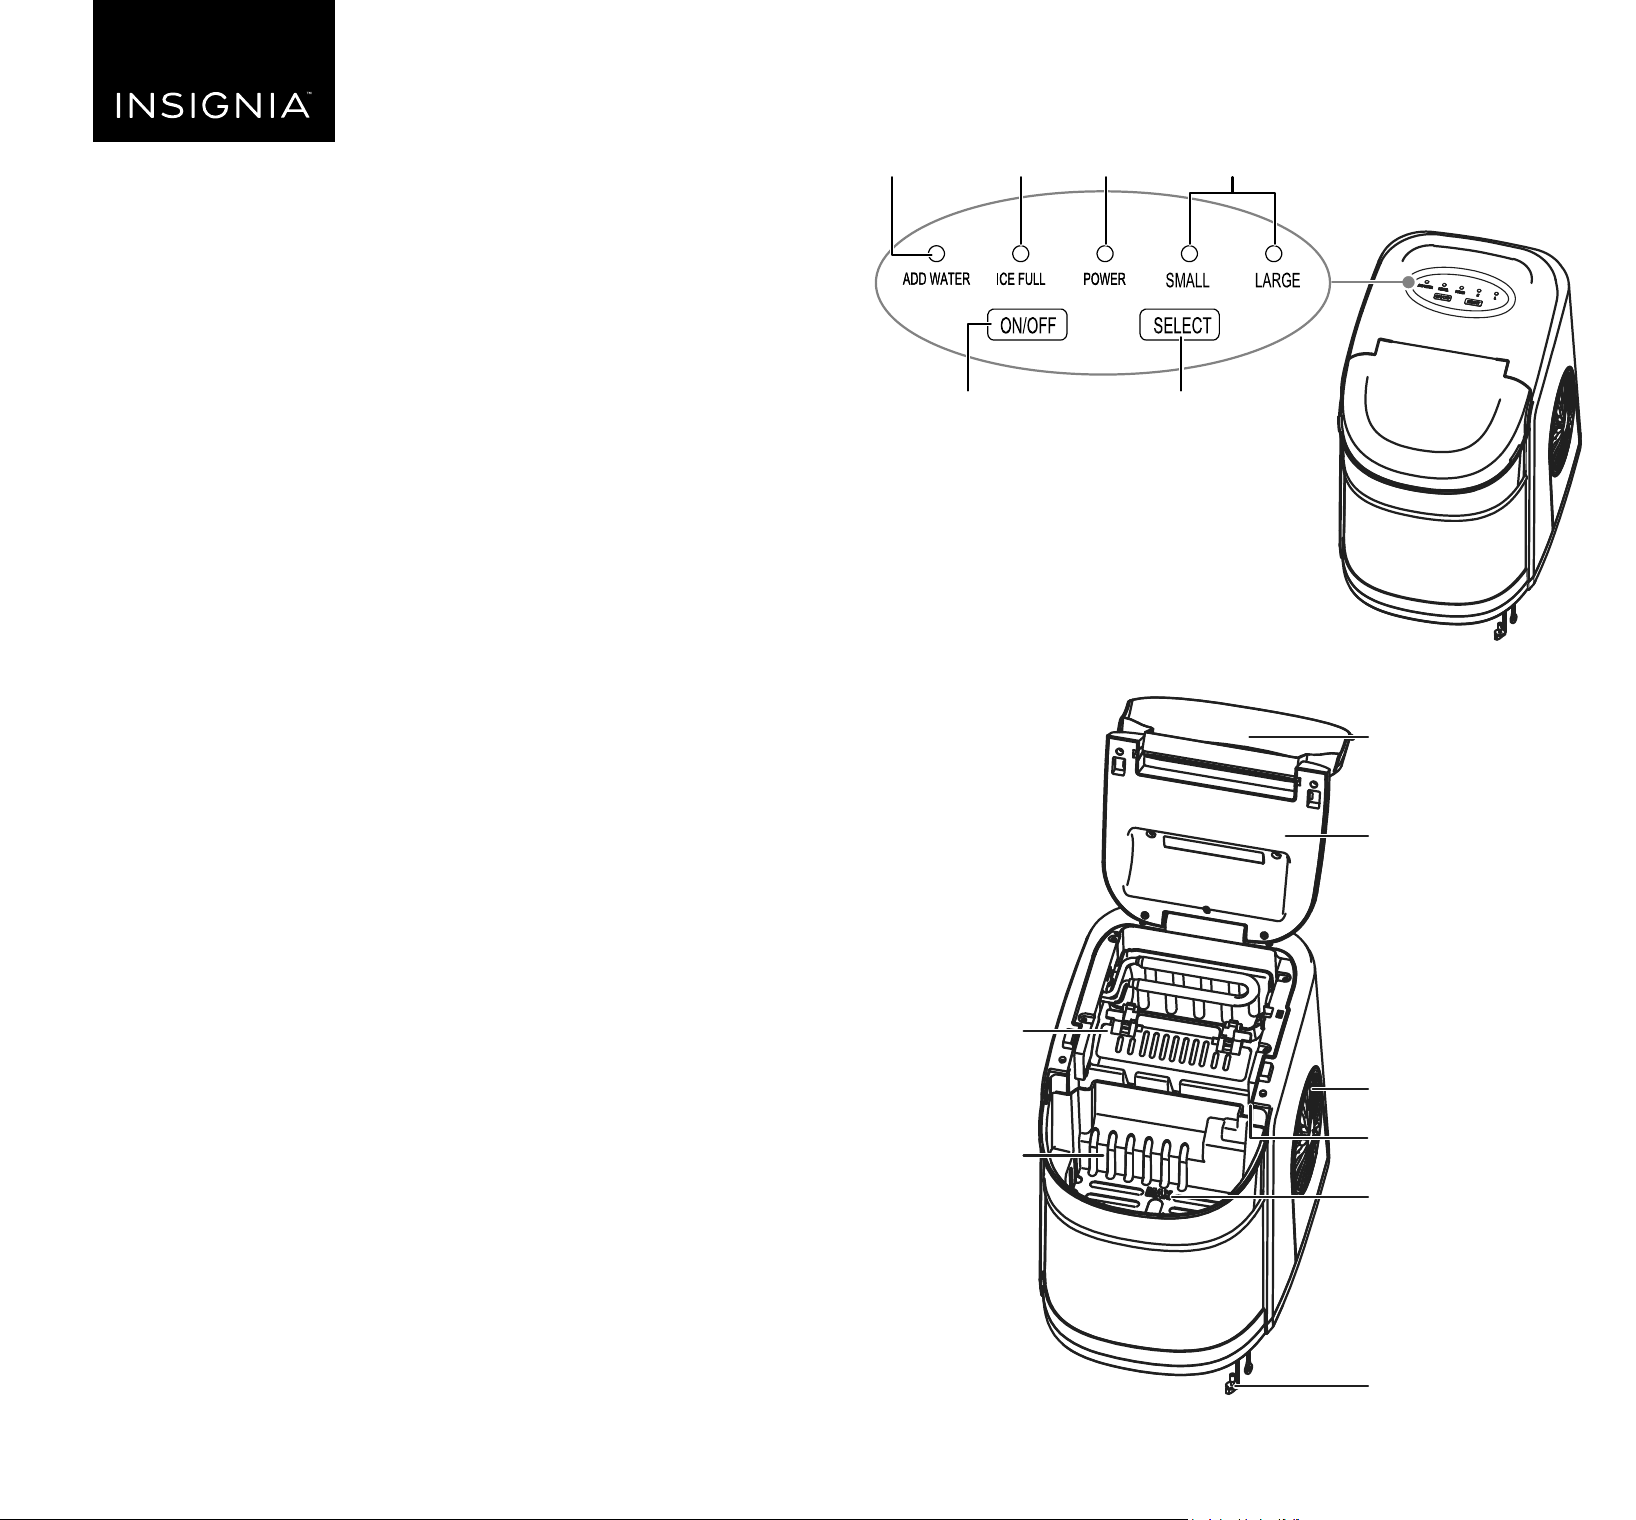
Control panel
Before using your new product, please read these instructions to prevent any damage.
UNPACKING AND SETTING UP YOUR ICE MAKER
1 Remove the exterior and interior packaging. Make sure that you
unpack and remove the tape that holds the ice shovel, ice basket,
and ice scoop in place.
2 Put the ice maker on a at, level surface away from direct sunlight
and other sources of heat (such as a stove, furnace, heating ducts,
or radiator).
3 Make sure that there is at least a four inch gap between the back
and sides and surrounding walls with adequate air circulation
behind it.
4 Position the ice maker so that the plug is accessible.
5 Wait four hours for the refrigerant uid to settle before plugging
the ice maker in.
6 Plug in your ice maker.
CLEANING YOUR ICE MAKER
• Before using your ice maker for the rst time, make sure to clean
the ice maker thoroughly.
• Clean the ice maker at least once a week or every three days if
your water quality is poor.
1 To run the self-cleaning cycle, ll the reservoir to the MAX water
line with clean water, then press the ON/OFF button for more
than ve seconds. The self-cleaning cycle starts.
2 When the self-cleaning cycle is done (about 30 minutes), unplug
the drain plug on the front bottom to drain the water.
3 Clean the exterior and interior with diluted detergent, warm
water, and a soft cloth. Rinse with clean water.
CAUTION: Do not use bleach or vinegar to clean the internal
components.
4 Insert the water drain plug back in place and secure before lling
with water.
5 Run two to three cycles of ice and dispose of them to help remove
any rst time plastic odor or residue.
QUICK SETUP GUIDE
33 lb Portable
Ice Maker
NS-PIM33SS
Flat size (W×H): 20 × 9.5 in. (508 × 241.3 mm.)
Final folded size: 5 × 9.5 in. (127 × 241.3 mm.)
USING YOUR ICE MAKER
WARNINGS:
• Your ice maker must be grounded and comes equipped with a
grounding-type power cord with a three-prong plug that plugs into
a standard, three-prong wall outlet.
• When using for the rst time, wait four hours for the refrigerant uid
to settle before plugging the ice maker in.
• Fill with drinking water only.
1 Make sure that the water drain plug is in place and secure.
2 Open the cover, then pour drinking water into the reservoir through
the ice basket. Add water up to MAX water line.
3 Close the cover.
4 Plug the power cord into a power outlet.
5 Press the ON/OFF button. The power indicator lights and the ice
maker begins making ice.
Note: If the water level is too low, your ice maker stops automatically and
the ADD WATER indicator light turns on. Turn o your ice maker, then ll the
reservoir up to the MAX water line. Wait at least three minutes, then turn on
your ice maker.
6 Press the SELECT button to select the ice cube size. If the room
temperature is lower than 60°F (16°C), it is best to select the small
cube size to keep ice from sticking together. When the ice basket is
full, your ice maker automatically stops making ice and the ICE FULL
indicator lights.
Note: The ice making cycle lasts ve to eight minutes, depending on the
selected ice cube size and the ambient temperature. If the room is
extremely hot, the cycle may take longer.
7 Remove the ice from the basket and use or freeze the ice.
Note: After the ice is made it slowly begins to melt into the reservoir. Your
ice maker recycles the water to make ice again.
PACKAGE CONTENTS
• Portable ice maker
• Ice basket (pre-installed)
• Ice shovel
• Quick Setup Guide
FEATURES
• Produces up to 33 lbs. (14.9 kg) of ice per day, letting you stock up
for your next get-together
• 2 lbs. (.9 kg) storage capacity gives you plenty of ice for any
occasion
• Fast-paced production cycle makes fresh ice every 5–8 minutes
• Two cube sizes, .25 oz. (7 g) and .32 oz. (9 g), to t various glass
sizes
• Analog controls make using this ice maker simple and
straight-forward
• Water recycling system with 1.8 qt. (1.7 l) reservoir automatically
uses water from melted ice to make new ice
• Modern stainless steel design looks great in your kitchen
• Ice shovel and basket give you easy access to your ice
Cover with
transparent window
Back top panel
Ventilation opening
Ice full sensor
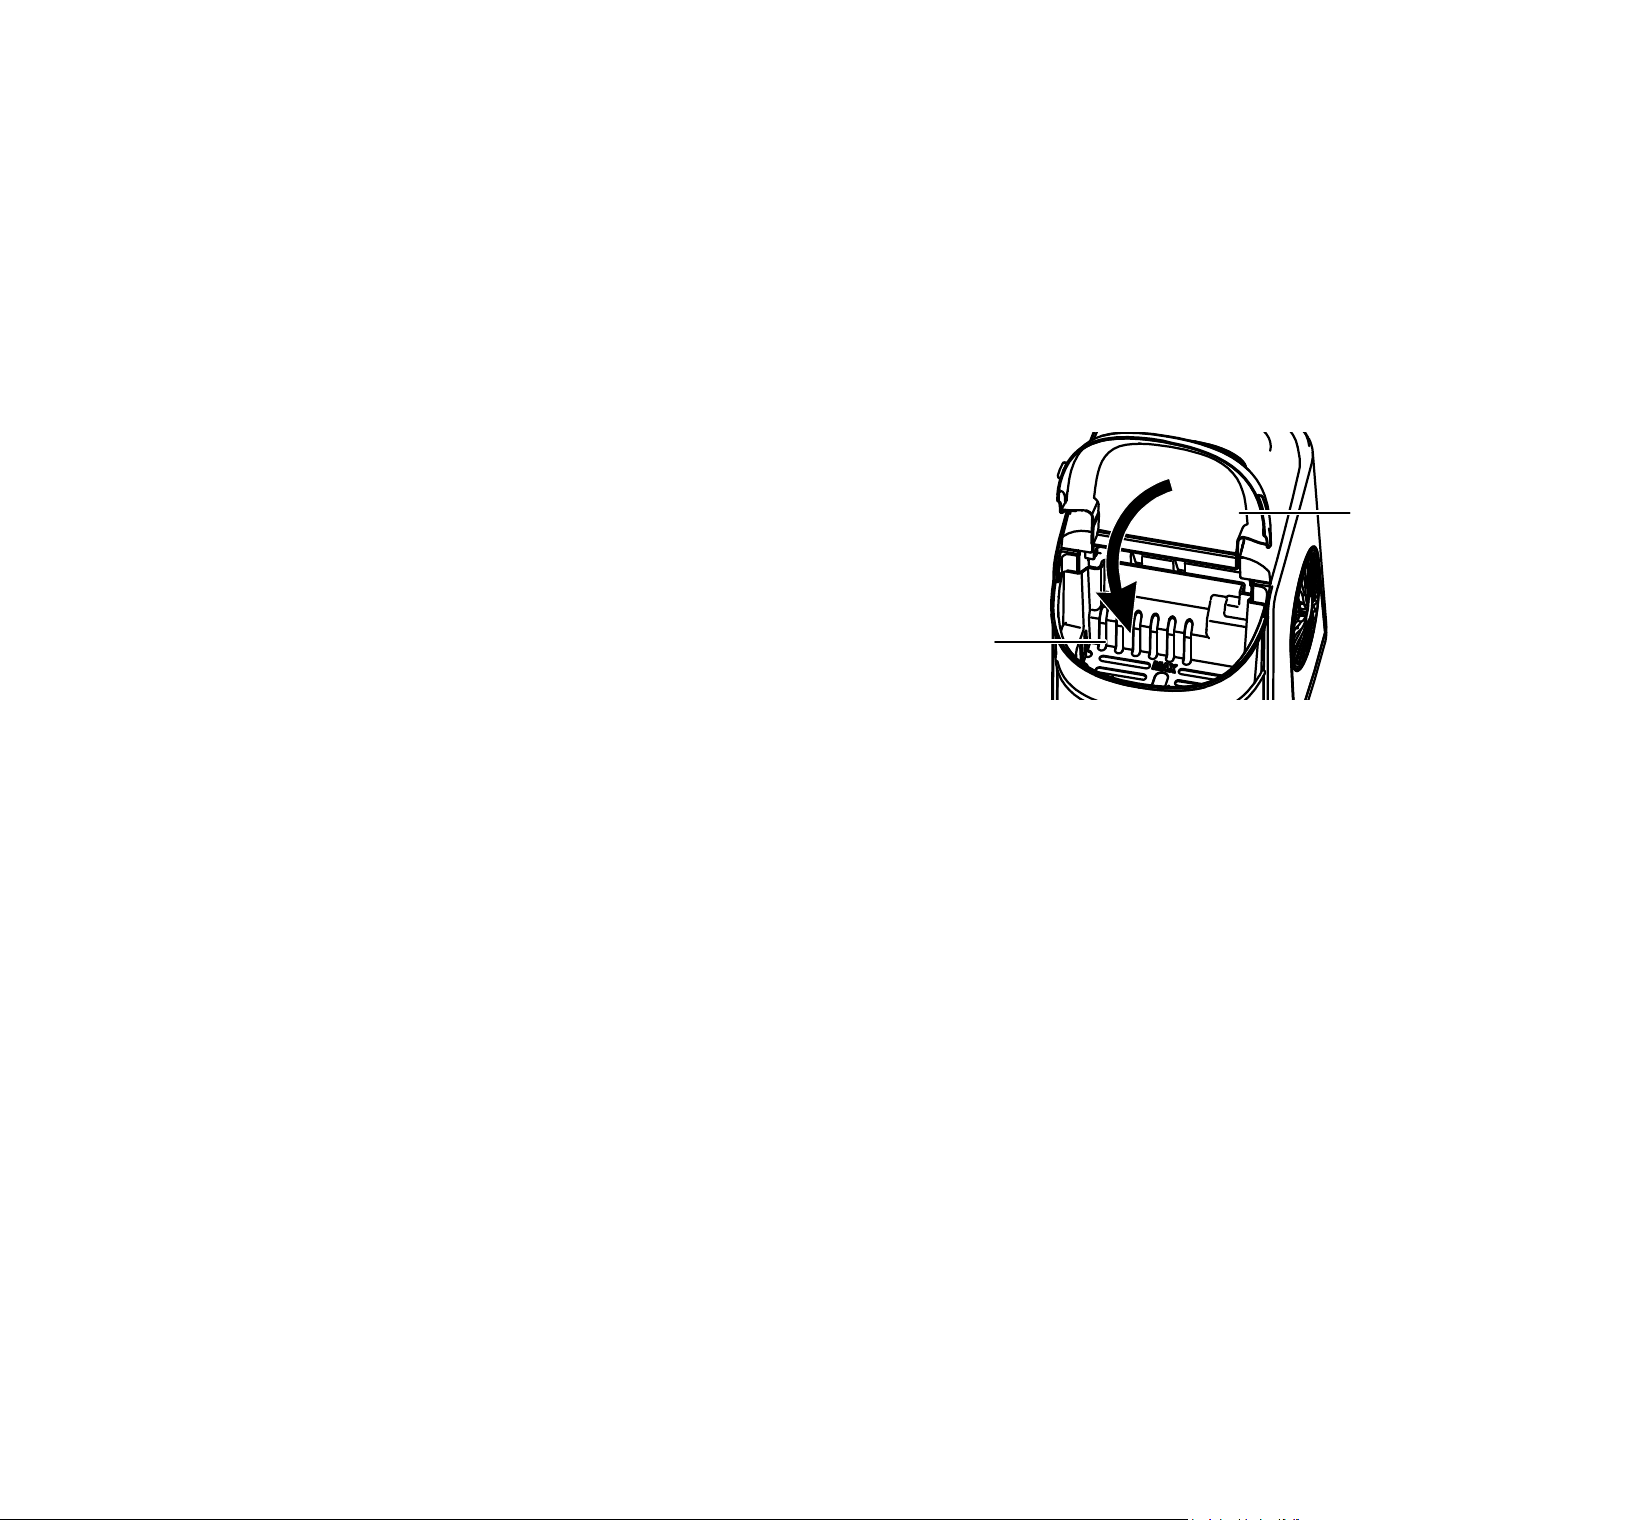
MAX water line
Water drain plug
Ice scoop
Ice basket
SELECT button
(push to select small or
large ice cube size)
Ice size
indicator
POWER
indicator
ICE-FULL
indicator
ADD WATER
indicator
ON/OFF
button
Cover
Reservoir
Ice maker
Hold 5S-Clean
NS-PIM33SS_21-0452_QSG_V1_EN.ai 1 6/22/2021 12:31:42 PMNS-PIM33SS_21-0452_QSG_V1_EN.ai 1 6/22/2021 12:31:42 PM
OVERVIEW
Control panel
Before using your new product, please read these instructions to prevent any damage.
UNPACKING AND SETTING UP YOUR ICE MAKER
1 Remove the exterior and interior packaging. Make sure that you
unpack and remove the tape that holds the ice shovel, ice basket,
and ice scoop in place.
2 Put the ice maker on a at, level surface away from direct sunlight
and other sources of heat (such as a stove, furnace, heating ducts,
or radiator).
3 Make sure that there is at least a four inch gap between the back
and sides and surrounding walls with adequate air circulation
behind it.
4 Position the ice maker so that the plug is accessible.
5 Wait four hours for the refrigerant uid to settle before plugging
the ice maker in.
6 Plug in your ice maker.
CLEANING YOUR ICE MAKER
• Before using your ice maker for the rst time, make sure to clean
the ice maker thoroughly.
• Clean the ice maker at least once a week or every three days if
your water quality is poor.
1 To run the self-cleaning cycle, ll the reservoir to the MAX water
line with clean water, then press the ON/OFF button for more
than ve seconds. The self-cleaning cycle starts.
2 When the self-cleaning cycle is done (about 30 minutes), unplug
the drain plug on the front bottom to drain the water.
3 Clean the exterior and interior with diluted detergent, warm
water, and a soft cloth. Rinse with clean water.
CAUTION: Do not use bleach or vinegar to clean the internal
components.
4 Insert the water drain plug back in place and secure before lling
with water.
5 Run two to three cycles of ice and dispose of them to help remove
any rst time plastic odor or residue.
QUICK SETUP GUIDE
33 lb Portable
Ice Maker
NS-PIM33SS
Flat size (W×H): 20 × 9.5 in. (508 × 241.3 mm.)
Final folded size: 5 × 9.5 in. (127 × 241.3 mm.)
USING YOUR ICE MAKER
WARNINGS:
• Your ice maker must be grounded and comes equipped with a
grounding-type power cord with a three-prong plug that plugs into
a standard, three-prong wall outlet.
• When using for the rst time, wait four hours for the refrigerant uid
to settle before plugging the ice maker in.
• Fill with drinking water only.
1 Make sure that the water drain plug is in place and secure.
2 Open the cover, then pour drinking water into the reservoir through
the ice basket. Add water up to MAX water line.
3 Close the cover.
4 Plug the power cord into a power outlet.
5 Press the ON/OFF button. The power indicator lights and the ice
maker begins making ice.
Note: If the water level is too low, your ice maker stops automatically and
the ADD WATER indicator light turns on. Turn o your ice maker, then ll the
reservoir up to the MAX water line. Wait at least three minutes, then turn on
your ice maker.
6 Press the SELECT button to select the ice cube size. If the room
temperature is lower than 60°F (16°C), it is best to select the small
cube size to keep ice from sticking together. When the ice basket is
full, your ice maker automatically stops making ice and the ICE FULL
indicator lights.
Note: The ice making cycle lasts ve to eight minutes, depending on the
selected ice cube size and the ambient temperature. If the room is
extremely hot, the cycle may take longer.
7 Remove the ice from the basket and use or freeze the ice.
Note: After the ice is made it slowly begins to melt into the reservoir. Your
ice maker recycles the water to make ice again.
PACKAGE CONTENTS
• Portable ice maker
• Ice basket (pre-installed)
• Ice shovel
• Quick Setup Guide
FEATURES
• Produces up to 33 lbs. (14.9 kg) of ice per day, letting you stock up
for your next get-together
• 2 lbs. (.9 kg) storage capacity gives you plenty of ice for any
occasion
• Fast-paced production cycle makes fresh ice every 5–8 minutes
• Two cube sizes, .25 oz. (7 g) and .32 oz. (9 g), to t various glass
sizes
• Analog controls make using this ice maker simple and
straight-forward
• Water recycling system with 1.8 qt. (1.7 l) reservoir automatically
uses water from melted ice to make new ice
• Modern stainless steel design looks great in your kitchen
• Ice shovel and basket give you easy access to your ice
Cover with
transparent window
Back top panel
Ventilation opening
Ice full sensor
MAX water line
Water drain plug
Ice scoop
Ice basket
SELECT button
(push to select small or
large ice cube size)
Ice size
indicator
POWER
indicator
ICE-FULL
indicator
ADD WATER
indicator
ON/OFF
button
Cover
Reservoir
Ice maker
Hold 5S-Clean
NS-PIM33SS_21-0452_QSG_V1_EN.ai 1 6/22/2021 12:31:42 PMNS-PIM33SS_21-0452_QSG_V1_EN.ai 1 6/22/2021 12:31:42 PM

V1 ENGLISH 21-0452
USAGE TIPS
• Change the water in the water reservoir every 24 hours to make sure
that the ice tastes good.
• If your ice maker is not in use, drain all water left in the tank.
TROUBLESHOOTING
The ADD WATER indicator is on.
• Turn o your ice maker, open the cover, then add water up to the MAX
water line. Close the cover. Turn on your ice maker.
The ICE FULL indicator is on.
• Remove ice from the ice basket.
Ice cubes stick together.
• The ice cycle is too long for the room temperature. Stop your ice maker,
then restart it when the ice melts. Select the small size ice cube and try
making ice again.
• The water temperature may be too cold. Change the water
in the reservoir. The best water temperature is between 40°F ~ 90°F
(4.4°C ~ 32°C).
The ice making cycle is normal, but no ice is made.
• The room temperature or water temperature may be too high. The
room temperature should be 50°F ~ 105°F (10°C ~ 40°C). The water
temperature should be 40°F ~ 90°F (4.4°C ~ 32°C).
• The refrigerant liquid may have leaked. Contact a qualied service
technician for repair.
• The pipe in the cooling system may be blocked. Contact a qualied
service technician for repair.
The ice maker continues to make ice even though the ice basket is full.
• Direct sunlight or reected sunlight may cause the infrared sensor to
malfunction. If that happens, your ice maker will continue to make ice
cubes even when full. Move the ice maker out of the sunlight to
resume normal operation.
My ice maker is noisy.
• Your ice maker makes noise during the freezing cycle and when it is
dumping ice. This is normal.
SPECIFICATIONS
Dimensions (H×W×D): 13 × 9.5 × 13.9 in. (33 × 24.2 × 35.3 cm)
Net weight: 17.2 lbs. (7.8 kg)
Reservoir capacity: 2 lbs (.9 kg)
Ice per day: 33 lbs. (14.9 kg)
Protection type: 1
Power: 115 V/60 Hz
Ice making current: 2.1 A
Ice harvest current: 2.3 A
Refrigerant: R290 22 g
Enclosure: Plastic with stainless steel
IMPORTANT SAFETY INFORMATION
When using electrical appliances, basic safety precautions should be followed to reduce the
risk of re, electric shock, and injury to persons or property. Read all instructions before
using any appliance.
• Do not operate this or any other appliance with a damaged cord.
If the supply cord is damaged, it must be replaced by the manufacturer or its service
agent or a similarly qualied person in order to avoid a hazard.
This ice-maker must be positioned so that the plug is accessible.
Connect to properly polarized outlets only. No other appliance should be plugged into
the same outlet. Be sure that the plug is fully inserted into the receptacle.
• Do not run the power cord over carpeting or other heat insulators. Do not cover the cord.
Keep cord away from trac areas, and do not submerge in water.
• We do not recommend the use of an extension cord, as it may overheat and become a
risk of re. If you must use an extension cord, use No.14AWG minimum size and rated no
less than 1875 watts.
• Unplug the ice maker before cleaning or making any repairs or servicing.
• Exercise caution and use reasonable supervision when appliance is used near children.
• Do not use your ice-maker outdoors. Place the ice-maker away from direct sunlight and
make sure that there is at least 4 inches of space between the back of your unit and wall.
Keep a minimum distance of 4 inches on each side of your unit free.
• Do not use other liquid to make the ice-cube other than water.
• Do not clean your ice maker with ammable uids. The fumes can create a re hazard or
explosion.
• Do not tip over.
• If the ice maker is brought in from outside in wintertime, give it a few hours to warm up
to room temperature before plugging it in.
WARNING: This appliance must be grounded.
DANGER – Risk Of Fire or Explosion. Flammable Refrigerant Used. Do Not Use
Mechanical Devices To Defrost Ice Maker. Do Not Puncture Refrigerant Tubing.
DANGER – Risk Of Fire Or Explosion. Flammable Refrigerant Used. To Be
Repaired Only By Trained Service Personnel. Do Not Puncture Refrigerant
Tubing.
• CAUTION – Risk Of Fire Or Explosion. Flammable Refrigerant Used. Consult Repair
Manual/Owner’s Guide Before Attempting To Install or Service This Product. All Safety
Precautions Must be Followed.
• CAUTION – Risk Of Fire Or Explosion. Dispose Of Property In Accordance With Federal Or Local
Regulations. Flammable Refrigerant Used .
• CAUTION-Risk Of Fire Or Explosion Due To Puncture Of Refrigerant Tubing. Follow Handling
Instructions Carefully. Flammable Refrigerant Used.
• The ice maker should be installed in accordance with the safety standard for Refrigeration
Systems, ASHRAE15. The ice maker shall not be installed in corridors or hallways of public
buildings.
• If the unit is with problem need to be maintained, that replacing with like components and
that servicing shall be done by factory authorized service personnel, so as to minimize the
risk of possible ignition due to incorrect parts or improper service.
IMPORTANT:
The wires in this cord are colored in accordance with the following code:
Green or Green with a strip yellow: Grounding
White: Neutral
Black: Live
To avoid a hazard due to instability of the appliance, it must be placed at an even or at
surface.
ONE-YEAR LIMITED WARRANTY
Visit www.insigniaproducts.com for details.
CONTACT INSIGNIA:
For customer service, call 1-877-467-4289 (U.S. and Canada) or
01-800-926-3000 (Mexico)
www.insigniaproducts.com
INSIGNIA is a trademark of Best Buy and its aliated companies
Distributed by Best Buy Purchasing, LLC
7601 Penn Ave South, Richeld, MN 55423 U.S.A.
©2021 Best Buy. All rights reserved.
NS-PIM33SS_21-0452_QSG_V1_EN.ai 2 6/22/2021 12:31:42 PMNS-PIM33SS_21-0452_QSG_V1_EN.ai 2 6/22/2021 12:31:42 PM