Quick Setup Guide for Smart TV
Getting started
Step 1. Attach stand or mount
Before you start using your TV, attach your TV stand or mount it on the wall.
CAUTION:
- Disconnect the A/C power cord before installing a stand or a wall mount bracket.
- The LED display on your TV is fragile. Make sure the TV screen is not scratched or damaged by hard objects or from pressure.
- After the installation is complete, make sure the TV is steady on a table or firmly attached to a wall mount, before removing all protective film, if any.
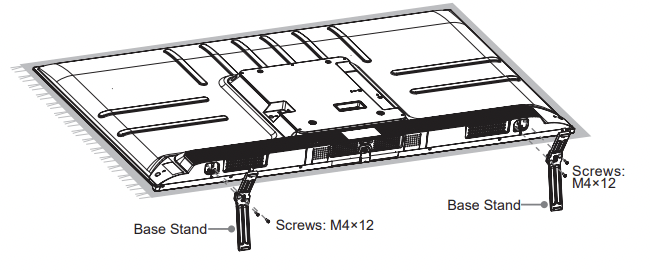
Attach the TV stand
To attach the TV stand legs to your TV:
- Carefully place your TV face down on a clean, soft, flat surface.
- Insert the TV Base Stand into the bottom slots on your TV.
- Use the screws provided to secure each leg tightly
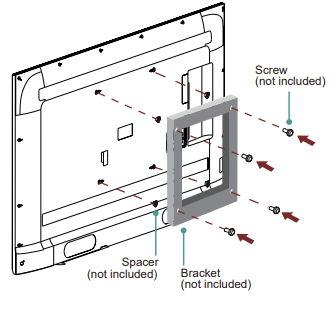
Attach the wall mount bracket (not included)
Before you begin the third-party manufacturer instructions, be sure to do the following things:
- Place the TV face down on a clean, safe and cushioned surface.
- Remove the TV stand if you have already attached it.
- Place spacers (not included) in the corresponding bracket holes
CAUTION:
- Follow instructions provided with the wall mount bracket. If it is not correctly mounted, the TV may fall and cause property damage or personal injury.
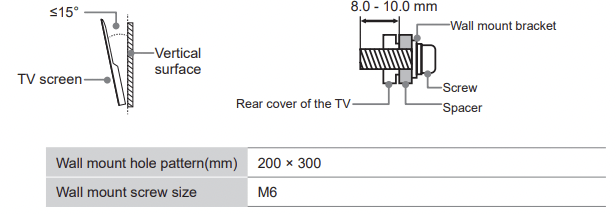
- When you attach the mount, be sure to use spacers (provided by the third-party manufacturer) between the TV and the bracket.
- To prevent internal damage to the TV and to ensure it is mounted securely, be sure to use fixing screws (not included) that are 8.0 - 10.0 mm in length when measured from the attaching surface of the rear cover.
- Make sure the tilt angle between the TV screen and the vertical surface is no more than 15 degrees.
NOTE:
- If you have additional questions, please contact the wall mount manufacturer or the retailer from which you purchased the TV.
- The diameter and length of the screws differ depending on the wall mount bracket model.
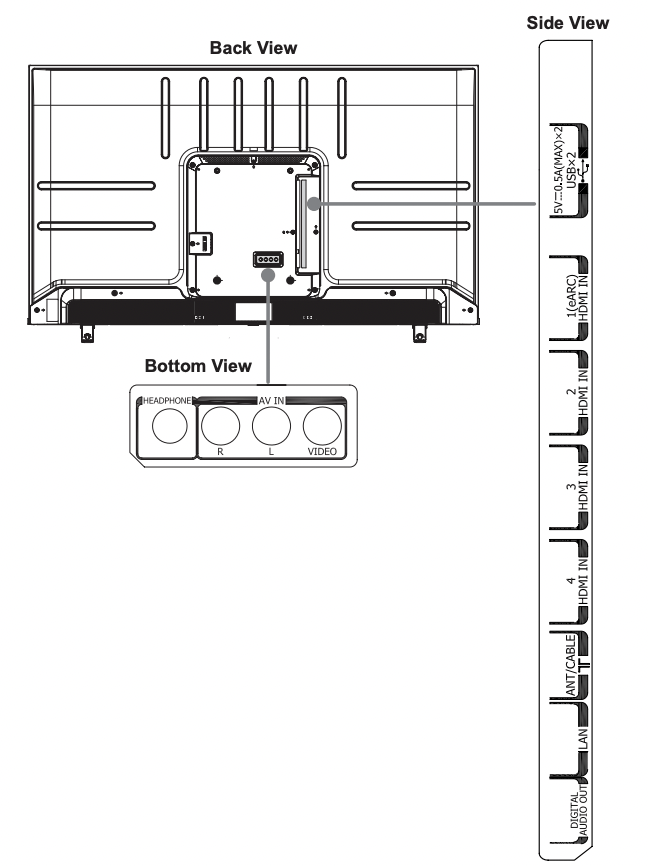
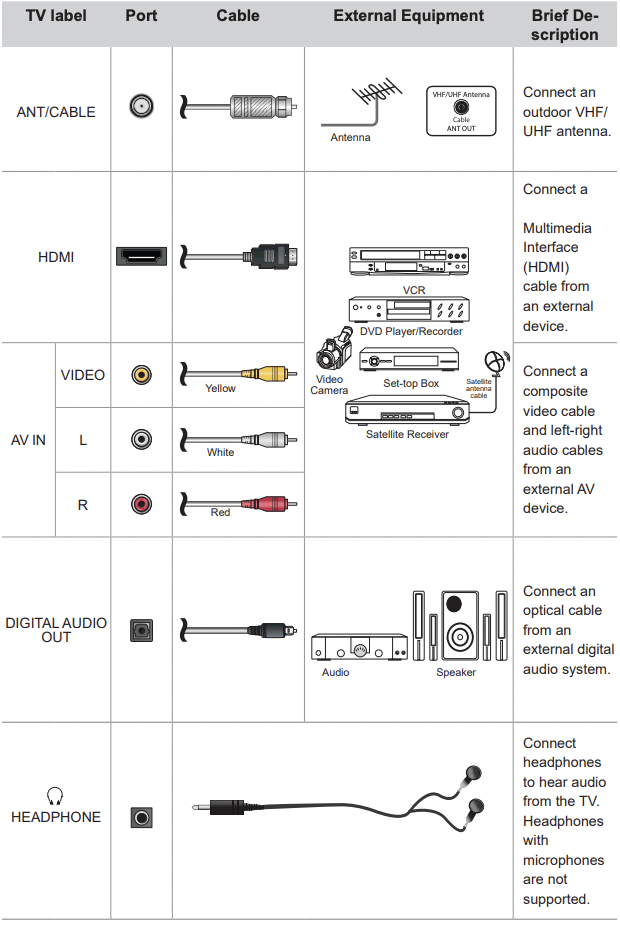
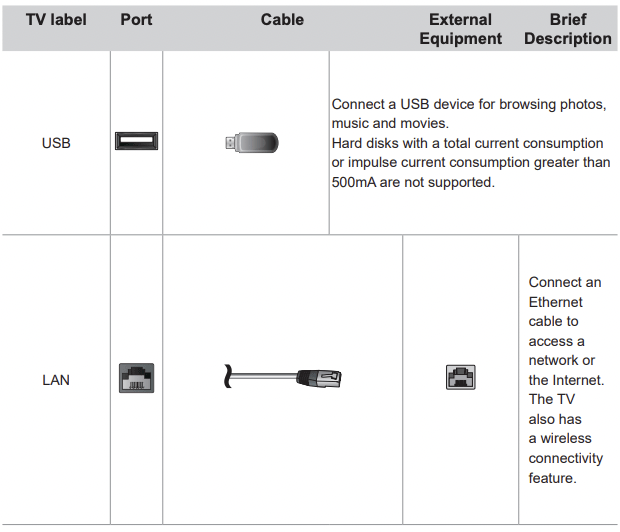
Step 2. Connect devices to your TV
Check to ensure that you have connected right cables for right ports securely. Loose connections can affect the quality of the picture image and color.
Step 3. Get your remote ready
The following table shows the buttons on your remote control and describes what they are for.
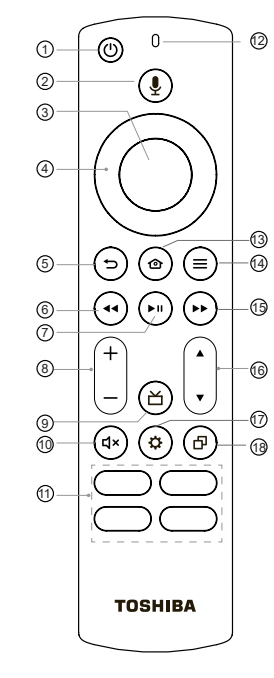
1 POWER: Turn your TV on or off
2 Voice button: Receive the voice
3 Select:
4 D-pad (up/down/left/right navigation buttons)
5 Back: Return to the previous place in the menu or app
6 REWIND: Rewind streaming video, jump to the previous audio track or selection, jump up one page in menus. This button is also used to rewind paused live TV using Live TV Pause
7 PLAY/PAUSE: Pause or resume playback. This button is also used to activate and use the Live TV Pause feature
8 VOLUME + / VOLUME -: Increase / decrease the volume or un-mute the sound
9 Guide: Open the live TV Channel Guide
10 MUTE: Mute or un-mute the sound
11 App buttons: Quick access buttons to apps
12 Microphone
13 HOME: Display your TV’s Home screen / Stop playback if you are watching TV or streaming content
14 MENU: The button for the Menu
15 FAST FORWARD: Fast forward streaming video, jump to the next audio track or selection, jump down one page in menus. This button is also used to fast forward paused live TV using Live TV Pause.
16 Channel (up/down)
17 Quick Settings: Activate quick settings overlay
18 Recents: Open a row of recently watched content so you can easily switch between content.
Insert the batteries
Remove the battery door and insert the two AAA batteries into your Alexa Voice Remote.
Important information about the remote and batteries
- Discard batteries in a designated disposal area. Do not throw them into a fire.
- Remove old batteries immediately to prevent them from leaking into the battery compartment.
- If you do not intend to use the remote control for a long time, then remove the batteries.
- Battery chemicals can cause a rash. If the batteries leak, clean the battery compartment with a cloth. If chemicals touch your skin then wash it immediately.
- Do not mix old and new batteries.
- Do not mix alkaline, standard (carbon-zinc) or rechargeable (NiCd, NiMH, etc.) batteries.
- Do not continue using the remote if it gets warm or hot.
- Call our Support Center immediately on the support website.
Program your universal cable or satellite remote control to operate your new television (only for USA)
If you would like to program your other household remote controls to your new television, please refer to the User Manual supplied by your Cable or Satellite provider.
It should include instructions on how to program their remote to your television.
A list of codes for the most common Cable and Satellite providers are listed below. Use the code that is associated with your Cable or Satellite provider (if applicable).
DIRECTV......0178, 10178, 10019, 10748, 11314, 11660, 11710, 11780, 12049, 10171, 11204, 11326, 11517, 11564, 11641, 11963, 12002, 12183
Time Warner Cable......386, 0178, 10178, 400, 450, 461, 456, 0748, 1463, 0463, 10463
Comcast......0178, 10178, 10463, 11463, 10748, 11314, 11660, 10171, 11204, 11326, 11517, 11641, 11780, 11785, 11892, 11963, 12002
Cox Communications......0178, 10178, 1326, 1463
Dish Network......505, 627, 538, 720, 659
If the code associated with your Cable or Satellite provider is not listed, does not work or you cannot locate the instructions to program your remote, call your local Cable or Satellite provider’s customer service center.
If your Cable or Satellite provider does not have a code available, please contact us at one of the phone numbers on Page 2.
Using your cable set-top box or satellite receiver remote as a ‘universal’ remote
If you prefer to use your Cable Set-top Box or Satellite Receiver Remote as a ‘universal’ remote, then visit the Support page to view a list of the codes.
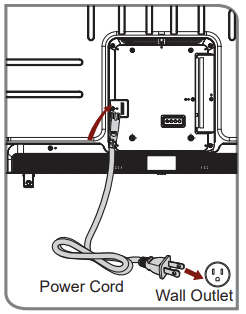
Step 4. Power on the TV
Connect your power cord to the TV and plug it into a power outlet. Your TV will display a launch screen showing the Toshiba logo.
Step 5. Complete the first-time setup
The first time you turn on your TV, there is a guided setup to make it easy to connect your TV to the Internet and complete the setup of your TV. Your TV will automatically pair with your new Voice Remote with Alexa
- If there are issues with the remote pairing, you will be prompted to pair your remote by pressing the Home button. If you continue to have issues, try reinserting or replacing your batteries.
- Select your Wi-Fi network from the list of Wi-Fi networks displayed on the screen.
NOTE:
- If your Wi-Fi network is password protected, please have your Wi-Fi network password handy to connect your TV to the internet. If your network is hidden, select the Join Other Network. If required, enter your network password using the onscreen keyboard.
Step 6. Enjoy your TV!
Now that you’ve completed the first-time setup, your Home screen is your starting point for using your TV. Your Toshiba TV provides a variety of entertainment options, so you’ll always find something new. Use your TV to watch live channels, access video on demand to watch movies, and much more.
Press the Home button on your remote to get started.
Troubleshooting
If you are having trouble with your TV, first try turning it off and on again. If this does not fix the problem, check the tips in the following table. If your problem is not listed in the following table, then contact us at one of the phone numbers on Page 2.
| Issues |
Possible solutions |
| No sound or picture |
- Check if the power cord is plugged into a powered AC outlet.
- Press the Power button on the remote control to activate the unit from 'Standby' mode.
- Check to see if the LED light is on or not. If it is, then the TV is receiving power.
|
| I have connected an external source to my TV and I get no picture and/or sound. |
- Check for the correct output connection on the external source and for the correct input connection on the TV.
- Make sure you have made the correct selection for the input mode for the incoming signal.
|
| When I turn on my TV, there is a delay for a few seconds before the picture appears. Is this normal? |
- Yes, this is normal. The TV is initializing and searching for previous setting information.
|
| The picture is normal but there is no sound |
- Check the volume settings.
- Check if 'Mute' mode is set to On.
|
| Sound but no picture or black and white picture |
- If the picture is black and white, unplug the TV from the AC outlet and replug it after 60 seconds.
- Check that the Color is set to 50 or higher.
- Try different TV channels.
|
| The sound and/or picture is distorted or appears wavy |
- An electric appliance may be affecting the TV. Turn off any appliances that are nearby and move it farther away from the TV.
- Insert the power plug of the TV set into another power outlet.
|
| The sound and picture is blurry or cuts out |
- If using an external antenna, check the direction, position and connection of the antenna.
- Adjust the direction of your antenna the channel.
|
| A horizontal or vertical stripe appears on the picture and/or the picture is shaking |
- Check if there is an appliance or electric tool nearby that is causing interference.
|
| The plastic cabinet makes a "clicking" type of sound |
- The 'click' sound can occur when the temperature of the television changes. This change causes the television cabinet to expand or contract, which makes the sound. This is normal and the TV is OK.
|
| The remote control does not work |
- TV still has power and is operational.
- Change the batteries in the remote control.
- Check if the batteries are correctly installed.
|