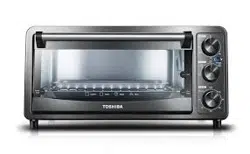
User Manual
BEFORE FIRST USE
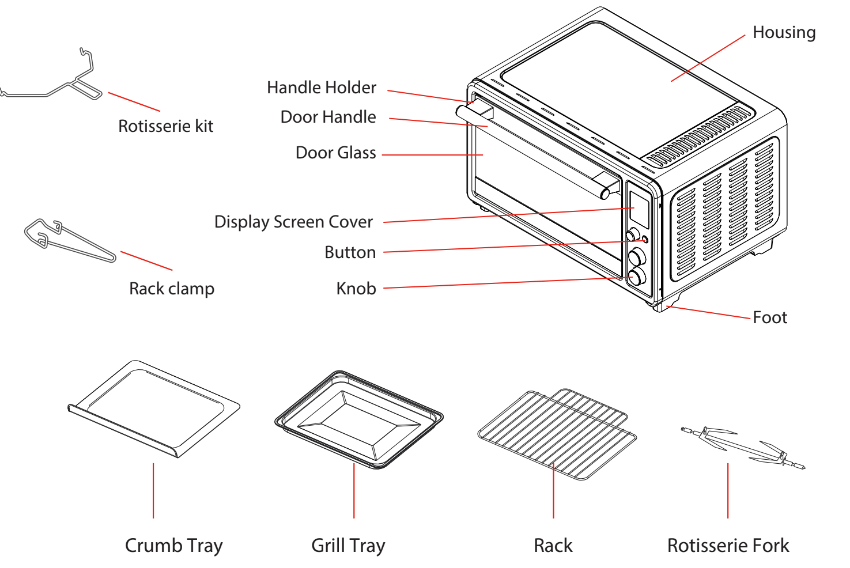
- Remove all accessories and shipping materials packed inside the Oven.
- Wash the Rack and Grill tray in warm soapy water. Wipe the inside of the Oven with a damp cloth or sponge. Blot dry with paper towels to be sure the unit is dry before using.
- Place Oven on a at counter or other stable surface DO NOT OPERATE ON THE SAME CIRCUIT WITH ANOTHER APPLIANCE.
- Make sure the Crumb Tray is properly installed before using. For the rst time only, Set the Temperature Knob to MAX, the function setting on toast and the timer to 15 minutes. This will burn o any oils still on the Oven.
NOTE: The oven may smoke during this process. This is normal for a new Oven and will last more than 10-15 minutes
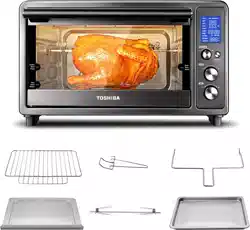
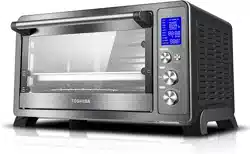
NAME OF PARTS
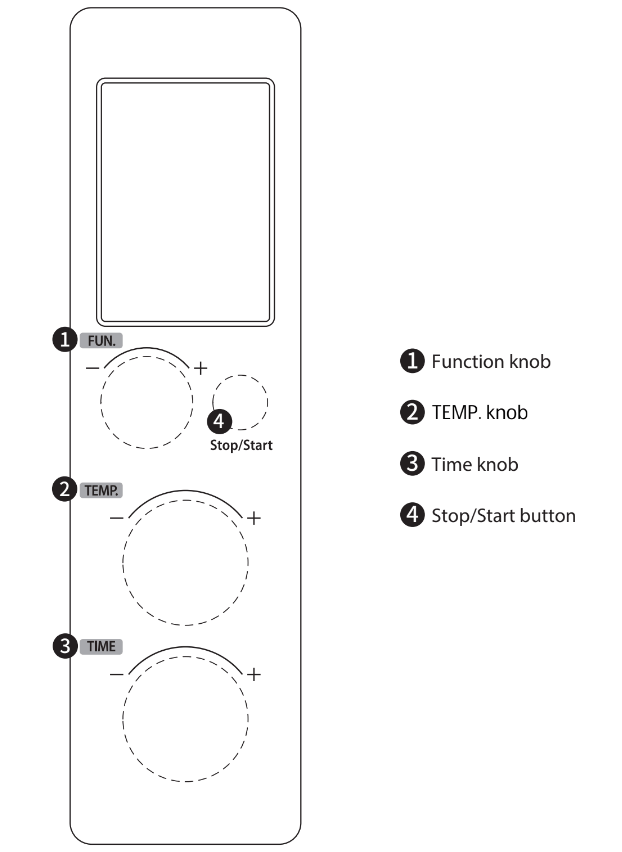
CONTROL PANEL
HOW TO USE
CAUTION: THE OVEN SURFACES ARE HOT DURING AND AFTER USE GENERAL INSTRUCTIONS
a. Place the Rack in position that will accommodate the height of the food to be cooked.
b. The food must be put into the Grill Tray to avoid the re danger that caused by the accumulation of food chipping on the heating pipes.
c. Make sure that you always use an ovenproof container in the oven, never use plastic or cardboard containers in the Oven.
d. Clean the heating pipe periodically.
e. Never use glass or ceramic pans or lids.
f. DO NOT let juices run to the bottom of the oven. Use the Crumb Tray when cooking.
g. Set the temperature as suggested by the recipe or as desired. h. Securely shut the door and set the cooking time to begin operating the oven.
FUNCTION SETTING
This oven offer 10 different functions for versatile cooking all in one appliance.
Toast:  The upper and lower heating elements are working during this function.
Bake:  The upper and lower heating elements are working during this function.
Broil:  The upper heating elements are working during this cycle.
Pizza:  The upper and lower heating elements, along with the motor fan are working.
Cookies:  The upper and lower heating elements, along with the motor fan are working.
Defrost:  It is suitable for defrost food and so on.
Reheat:  The upper and lower heating elements, along with the motor fan are working.
Rotisserie:  The upper straight electric heating elements, along with the Rotisserie Motor is working. Follow Rotisserie instruction for proper use.
Keep warm:  The upper and lower heating elements are working during this function.
Convection:  The upper and lower heating elements, along with the motor fan are working.
OPERATION
When the oven is electrified, the buzzer will ring once. The default function is TOAST. In the process of cooking , press " Stop/Start " can stop cooking.
TOAST FUNCTION:
a. Power on to enter initial state, the default mode is TOAST, the screen display TOAST” and "
".
b. Rotate the “TEMP.” knob to set the power level from 1-6, the default level is 4.
c. Rotate the “TIME” knob to set the quantity of bread from 1-6. The default quantity is 4 slices.
d. Press “Stop/Start” button to start cooking. The default temperature is 450。F and it cannot be changed.
e. The buzzer will sound 3 times to remind you when cooking is nished. Always pay attention when taking out food, the food and oven are very hot.
BAKE FUNCTION:
a. Rotate the “FUNCTION” knob, until the screen display "BAKE" and "
", the oven will enter the BAKE function.
b. Rotate the “TEMP.” knob to set temperature. The default temperature is 450 OF.
c. Rotate the “TIME” knob to set the cooking time. The default time is 30min.
d. Press “Stop/Start” button to start cooking.
e. The buzzer will sound 3 times to remind you when cooking is nished. Always pay attention when taking out food, the food and oven are very hot.
BROIL FUNCTION:
a. Rotate the “FUNCTION” knob, until the screen display "BROIL" and "
", the oven will enter the BROIL function.
b. Rotate the “TEMP.” knob to set temperature. The default temperature is 350 OF.
c. Rotate the “TIME” knob to set the cooking time. The default time is 30min.
d. Press “Stop/Start” button to start cooking.
e. The buzzer will sound 3 times to remind you when cooking is nished. Always pay attention when taking out food, the food and oven are very hot.
PIZZA FUNCTION:
a. Rotate the “FUNCTION” knob, until the screen display "PIZZA" and " ", the oven will enter the PIZZA function.
b. Rotate the “TIME” knob to set the size of pizza (6 inches, 9 inches, and 12 inches). The default size is 9 inches.
c. Rotate the “TEMP.” knob to set temperature. The default temperature is 450 OF for inches.
d. Press “Stop/Start” button to start cooking.
e. The buzzer will sound 3 times to remind you when cooking is nished. Always pay attention when taking out food, the food and oven are very hot.
COOKIES FUNCTION:
a. Rotate the “FUNCTION” knob, until the screen display "COOKIES" and "
", the oven will enter the COOKIES function.
b. Rotate the “TEMP.” knob to set temperature. The default temperature is 350 OF.
c. Rotate the “TIME” knob to set the cooking time. The default time is 30min.
d. Press “Stop/Start” button to start cooking.
e. The buzzer will sound 3 times to remind you when cooking is nished. Always pay attention when taking out food, the food and oven are very hot.
DEFROST FUNCTION:
a. Rotate the "FUNCTION" knob, until the screen display "DEFROST" and "
", the oven will enter the DEFROST function.
b. Rotate the "TEMP." knob to set temperature. The default temperature is 180 OF.
c. Rotate the "TIME" knob to set the cooking time. The default time is 1hour 30min.
d. Press "Stop/Start" button to start cooking.
e. The buzzer will sound 3 times to remind you when cooking is nished. Always pay attention when taking out food, the food and oven are very hot.
REHEAT FUNCTION:
a. Rotate the “FUNCTION” knob, until the screen display "REHEAT" and "
", the oven will enter the REHEAT function.
b. Rotate the “TEMP.” knob to set temperature. The default temperature is 350 OF.
c. Rotate the “TIME” knob to set the cooking time. The default time is 30min.
d. Press “Stop/Start” button to start cooking.
e. The buzzer will sound 3 times to remind you when cooking is nished. Always pay attention when taking out food, the food and oven are very hot.
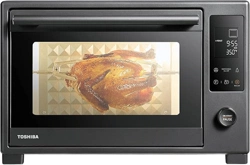
ROTISSERIE FUNCTION:
a. Rotate the “FUNCTION” knob, until the screen display "ROTISSERIE" and "
", the oven will enter the ROTISSERIE function.
b. Rotate the “TEMP.” knob to set temperature. The default temperature is 350 OF.
(The maximum temperature shall not exceed 350 OF).
c. Rotate the “TIME” knob to set the cooking time. The default time is 1 hour.
d. Press “Stop/Start” button to start cooking.
e. The buzzer will sound 3 times to remind you when cooking is nished. Always pay attention when taking out food, the food and oven are very hot.
KEEP WARM FUNCTION:
a. Rotate the “FUNCTION” knob, until the screen display “KEEP WARM" and "
", the oven will enter the KEEP WARM function.
b. Rotate the “TEMP.” knob to set temperature. The default temperature is 180 OF.
c. Rotate the “TIME” knob to set the cooking time. The default time is 1hour30min.
d. Press “Stop/Start” button to start cooking.
e. The buzzer will sound 3 times to remind you when cooking is nished. Always pay attention when taking out food, the food and oven are very hot.
CONVECTION FUNCTION:
a. Rotate the “FUNCTION” knob, until the screen display “CONVECTION" and "
", the oven will enter the CONVECTION function.
b. Rotate the “TEMP.” knob to set temperature. The default temperature is 450 OF.
c. Rotate the “TIME” knob to set the cooking time. The default time is 30min.
d. Press “Stop/Start” button to start cooking.
e. The buzzer will sound 3 times to remind you when cooking is nished. Always pay attention when taking out food, the food and oven are very hot.
ROTISSERIE FUNCTION USING THE ROTISSERIE FORKS:
- Secure the food with weight centered on the forks.
- Slide the Holding Forks onto each of the forks and press rmly into the food, piercing the food to hold in place on the forks. Insert the Holding Forks at dierent angles to hold the food more rmly. Tighten the screws, turning clockwise so that the holding forks will stay in place during the Rotisserie cooking session.
- Insert the pointed end of the Rotisserie forks into the Rotisserie Socket on the inside right side of the oven.
- Lift the Rotisserie Forks on the left side just a bit to allow the notch to fit into the Rotisserie Bracket on the left side of the oven.
- Set the Temperature knob and the Time knob to begin operating the oven.
- Once the cooking time has been complete and you have checked the internal temperature of the food to ensure that it has cooked properly, you can remove the Rotisserie Forks with the Rotisserie Helper Handle.
- Hold the handle in your right hand and support handle in your left hand.
- Place the hooks on the Helper Hander underneath the Rotisserie Forks.
- Lift the left side of the Rotisserie Forks out of the Bracket rst and pull slightly toward you.
- Gently remove the right pointed side of the Rotisserie Forks from the Rotisserie Socket and remove the food on the forks out of the oven.
- Place the food on a heat safe plate or dish when you have removed from the oven. Let it cool slightly before attempting to remove the holding forks and Rotisserie Forks from the food
- To remove the Holding Forks, turn the screws counterclockwise and pull the Holding.
CARE AND CLEANING
- Before cleaning unplug the toaster oven and allow it to cool completely.
- Wash all the attachments with mild, soaped water including the rack and the grill
- Tray.
- Do not use abrasive cleansers, scrubbing brushes and chemical cleaner as this will cause damage to the non-stick coating of baking Tray.
- Using a wet cloth to wipe the inner of the oven.
- To clean the door by using a wet cloth saturated with detergent or soap.
- Never immerse the unit in water or other liquid.
- Any other servicing should be performed by an authorized service representative.