
AC25CEW-SS
TOSHIBA
Toaster Oven
Instruction

Welcome to the world of
TOSHIBA
BEFORE OPERATING THIS PRODUCT,
READ, UNDERSTAND, AND FOLLOW THESE INSTRUCTIONS.
BE SURE TO SAVE THIS BOOKLIST FOR FUTURE REFERENCE
CONTENTS
IMPORTANT SAFEGUARDS
BASIC SAFETY PRECAUTIONS
BEFORE FIRST USE
PRODUCT INSTRUCTION
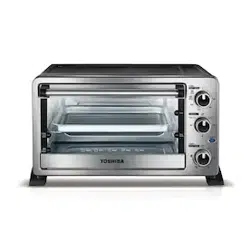
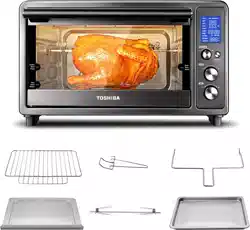
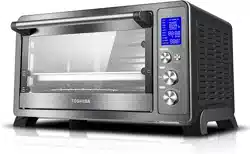
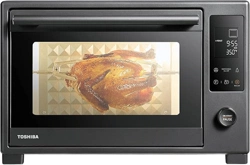
NAMES OF PARTS
CONTROL PANEL
OPERATION
HOW TO USE
FUNCTION INSTRUCTION
CARE AND CLEANING
EN-1

When using electrical appliance, basic safety precatutions should
always be followed, including the following:
Read all instructions before using.
To protect against any electrical hazards, DO NOT place unit or cord in water or
any other liquids.
Do not touch any hot surfaces. Use oven mitts for removing or touching any
hot parts. Always place Toast Oven on heat protected surface.
Leave about 100-150mm open space all around the exterior of this appliance.
Place the appliance on a dry, horizontal surface.
Unplug the unit from outlet when not in use and before cleaning. Always allow
to cool before attaching or removing any parts.
The use of accessory attachments not recommended by the appliance manu-
facturer may cause injuries.
Then plug cord into the wall outlet. To disconnect, turn any control to " off ",
then remove plug from wall outlet.
Do not let cord hang over edge of table or counter, or touch hot surface.
Do not place the Toaster Oven inside an heated oven or near a hot gas or
electric burner.
Do not use outdoors.
If the electric circuit is overloaded with other appliances, this appliance may
not operate properly. The Toaster Oven should be operated on a separate
electrical circuit from other operating appliances.
The temperature of accessible surfaces may be high when the appliance is
operating.
IMPORTANT SAFEGUARDS
BASIC SAFETY PRECAUTIONS
1.
2.
3.
4.
5.
6.
7.
8.
9.
10.
11.
12.
EN-2

Do not operate any appliance with a damaged cord or plug or after the
appliance malfunctions or has been damaged in any manner. Return appliance
to the nearest authorized service facility for examination, repair, or
adjustment.
Store only the accessories provided with this unit inside the oven when not in
use.
Do not store any other materials.
A fire may occur if the appliance is covered or touching flammable material,
including curtains, draperies, walls, and the like, when in operation. Do not put
any items on top of the appliance when in operation.
Do not place any cardboard, paper or plastic inside the oven.
All containers placed inside the oven must not be airtight. Also, they need to
have enough room to allow for expansion of fluids.
Clean this appliance regularly as build ‒ up of grease may cause a fire. Make
sure that this appliance is not placed near curtains, any drapery, or other
flammable material.
Do not clean with metal scouring pads. Pieces can break off the pad and touch
electrical parts involving a risk of electric shock.
In order to prevent accidental burns, always use the handle and knobs to
operate this appliance.
The temperature of the door or outer surface may be high when the appliance
operating.
Oversize foods or metal utensils must not be inserted in a toast oven as they
may create a fire or risk of electric shock.
Do not cover crumb tray or any part of the oven with metal foil.
13.
14.
15.
16.
17.
18.
19.
20.
21.
22.
23.
IMPORTANT SAFEGUARDS
BASIC SAFETY PRECAUTIONS
EN-3

Extreme caution must be used when moving an appliance containing hot oil or
other hot liquids. Use extreme caution when removing tray or disposing of hot
grease.
This appliance is not intended for use by persons (including children ) with
reduced physical, sensory or mental capabilities. Or lack of experience and
knowledge unless they have been given supervision or instruction concerning
use of the appliance by a person responsible for their safety.
Children should be supervised to ensure that they do not play with the
appliance.
The appliance is not intended to be operated by means of an external timer or
separate remote-control system.
The rear surface of appliance shall be placed against a wall.
●
A short power-supply cord (or detachable power-supply cord) should be used
to reduce the risk resulting from becoming entangled in or tripping over a
longer cord.
●
Longer detachable power-supply cords or extension cords are available and
may be used if care is exercised in their use.
●
If a longer detachable power-supply cord or extension cord is used:
●
The marked electrical rating of the cord set extension cord should be at least
as great as the electrical rating of the appliance;
●
The cord should be arranged so that it will not drape over the countertop or
tabletop where it can be pulled on by children or tripped over unintentionally;
and
●
If the appliance is of the grounded type, the cord set or extension cord should
be a grounding-type-3-wire cord.
24.
25.
26.
27.
28.
.
IMPORTANT SAFEGUARDS
BASIC SAFETY PRECAUTIONS
EN-4

Remove all accessories and shipping materials packed inside the Oven.
Wash the Rack and Pan in warm soapy water. Wipe the inside of the Oven with
a damp cloth or sponge. Blot dry with paper towels to be sure the unit is dry
before using.
Place Oven on a flat counter or other stable surface DO NOT OPERATE ON THE
SAME CIRCUIT WITH ANOTHER APPLIANCE.
Make sure the Crumb Tray is properly installed before using.
1.
2.
3.
4.
For the first time only, Set the Temperature Knob to MAX, the function setting on
toast and the timer to 15 minutes. This will burn off any oils still on the Oven.
NOTE The oven may smoke during this process. This is normal for a new
IMPORTANT SAFEGUARDS
BASIC SAFETY PRECAUTIONS
BEFORE FIRST USE
Do not use appliance for other than intended use.
Do not clean with metal scouring pads. Pieces can break off the pad and touch
electrical parts, creating a risk of electric shock.
Extreme caution should be exercised when using containers contructed of
other than metal or glass.
29.
30.
31.
SAVE THESE INSTURCTIONS
HOUSEHOLD INDOOR USE ONLY
CAUTION: Do not insert ngers into any gaps or holes; it may cause injuries.your fi
EN-5
When using electrical appliance, basic safety precatutions should
always be followed, including the following:
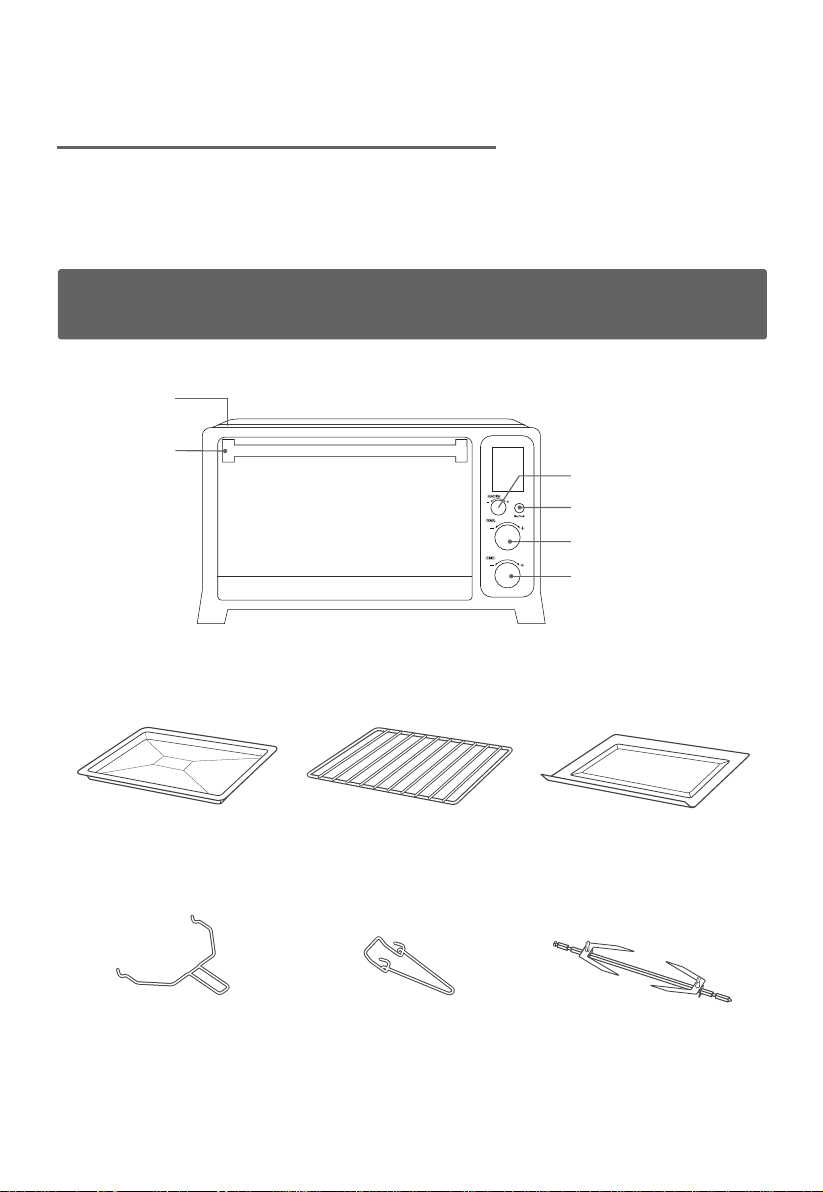
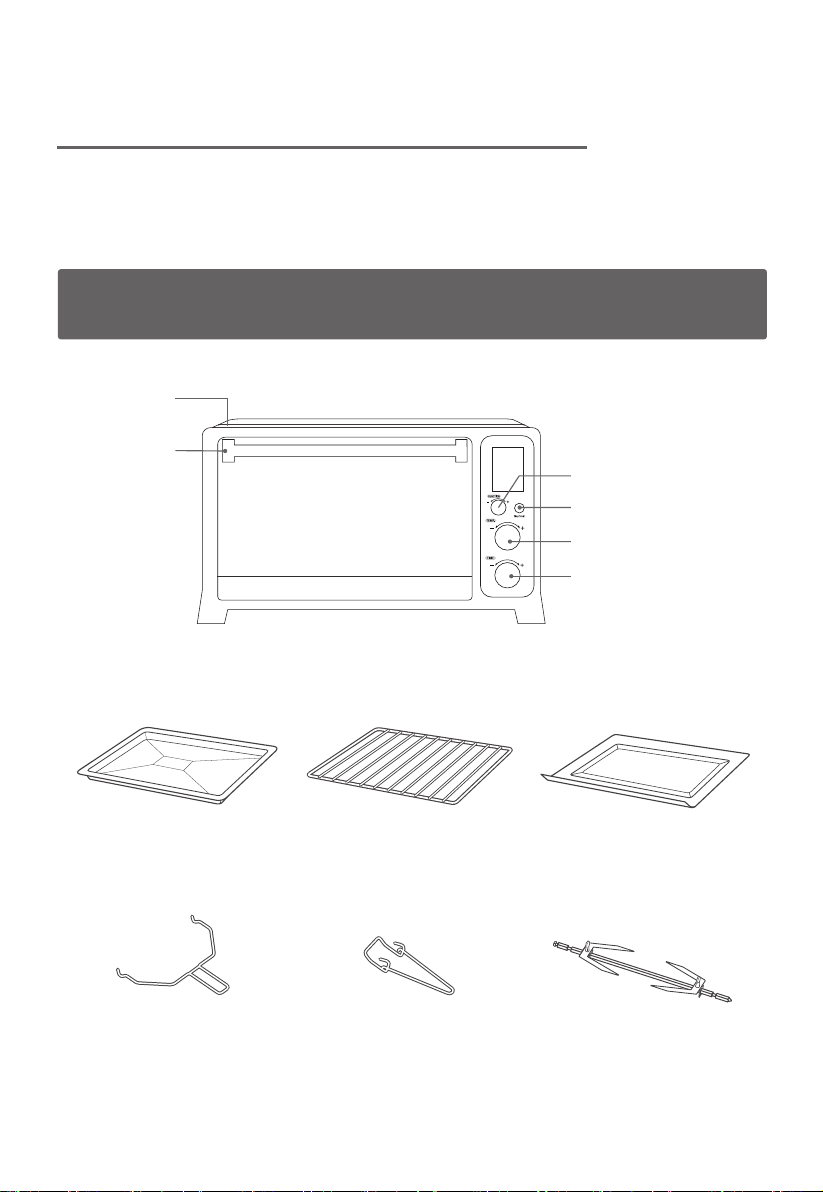
NAMES OF PARTS
PRODUCT INSTRUCTION
Door handle
Baking Pan Baking Rack Crump Tray
Rotissirie Kit Rotissirie Kit Rotissirie Kit
Housing
Function knob
Stop/Start button
Temperature knob
Timer knob
EN-6
HOW TO USE
When the oven is electrified, the buzzer will ring once. The default function is
TOAST. In the process of cooking , pressing " Stop/Start " can stop cooking.
CAUTION:
the oven surfaces are hot during and after use general instructions
Place the Baking Rack in position that will accommodate the height of the food to be
cooked.
Set the food on the Rack. Make sure that you always use an ovenproof container in
the oven, never use plastic or cardboard containers in the Oven
.
Never use glass or ceramic pans or lids.
DO NOT let juices run to the bottom of the oven. Use the Drip Tray and Crumb Tray
when cooking.
Set the temperature as suggested by the recipe or as desired.
Securely shut the door and set the cooking time to begin operating the oven.
1.
2.
3.
4.
5.
6.
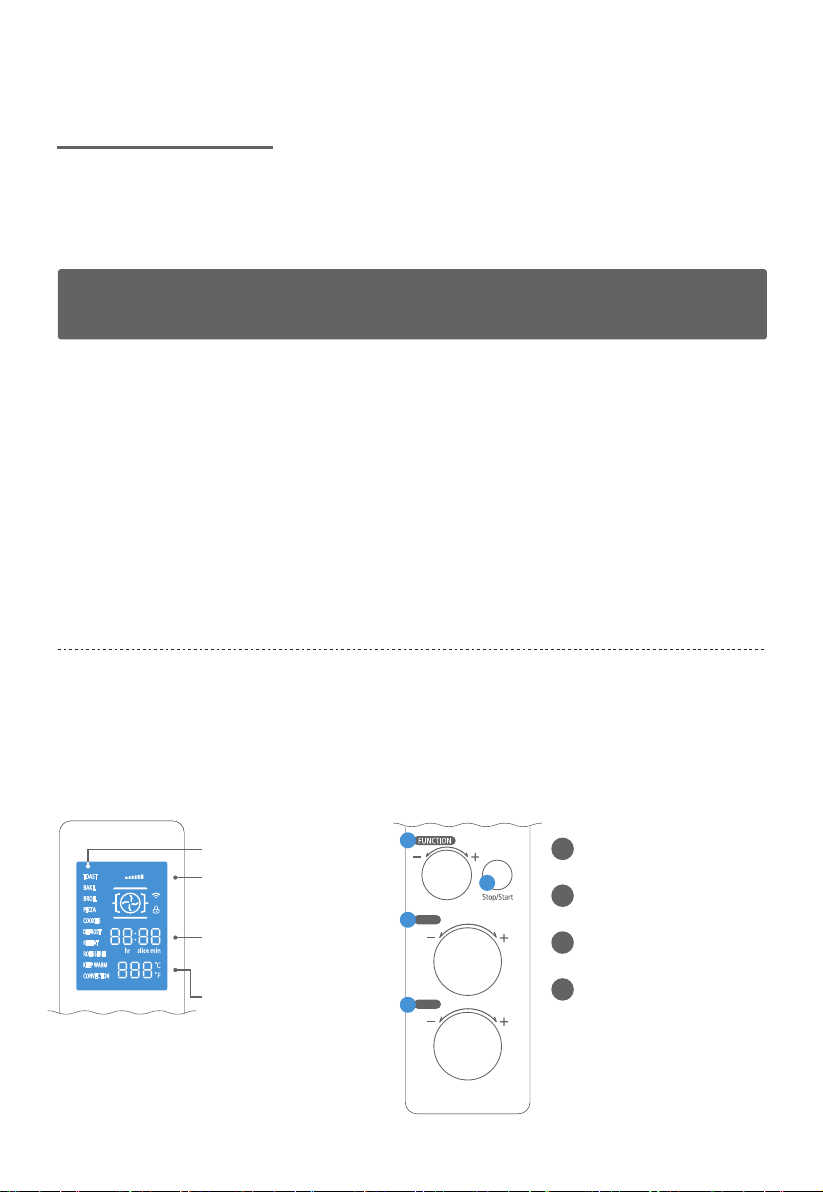
OPERATION
CONTROL PANEL
Stop/Start button
Temperature knob
Timer knob
2
3
4
Function knob
TIME
TEMP.
1
2
3
4
1
Bake level
(only Toast function)
Time / Slice
(only Toast function)
Temperature
Cooking Function
TOAST
BAKE
BROIL
PIZZA
COOKIES
DEFROST
REHEAT
ROTISSERIE
KEEP WARM
CONVECTION
LIGHT DARK
COOKING STEP
EN-7
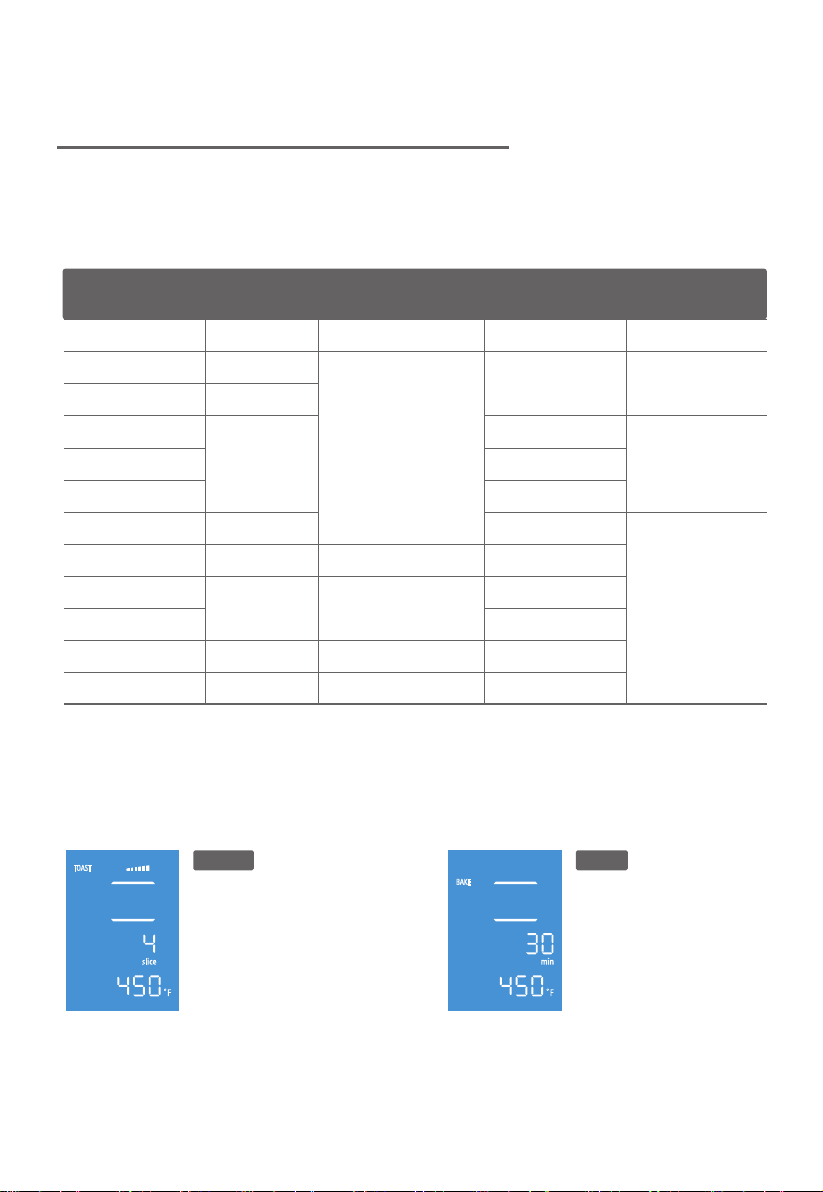
FUNCTION INSTRUCTION
OVEN FUNCTION
TOAST BAKE
COOKING
FUNCTION
Toast
Bake
Broil
Pizza 6 inch
Pizza 9 inch
Pizza 12 inch
Cookie
Defrost
Reheat
Rotisserie
Keep warm
Convection
30min
7min
8.5min
9min
30min
1hour30min
30min
1hour
1hour30min
30min
Firxed Temp Firxed Time
0.01~2Hour
1min~30min
0.01~2Hour
PRESET
TEMP
TEMP RANGE PRESET TIME TIME RANGE
TOAST
LIGHT DARK
BAKE
Fixed temperature & time
Preset power level : 4
Power level range : 1-6 level
Preset toast quantity : 4
Toast quantity range : 1-6 slice
Preset temperature : 450℉
Temp range : 150℉- 450℉
Preset time : 30min
Time range : 0.01~2 Hour
450℉
350℉
450℉
350℉
180℉
350℉
180℉
450℉
150℉~450℉
100℉~180℉
150℉~450℉
100℉~180℉
150℉~450℉
EN-8
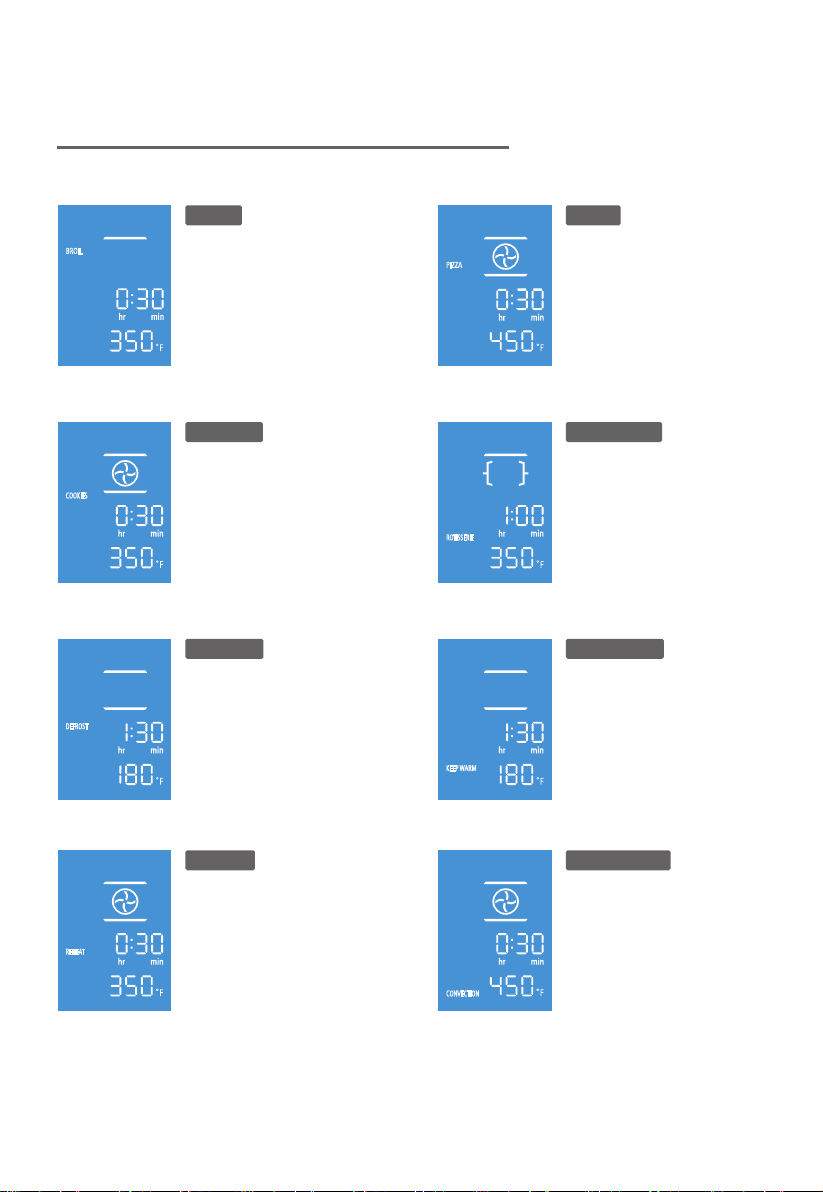
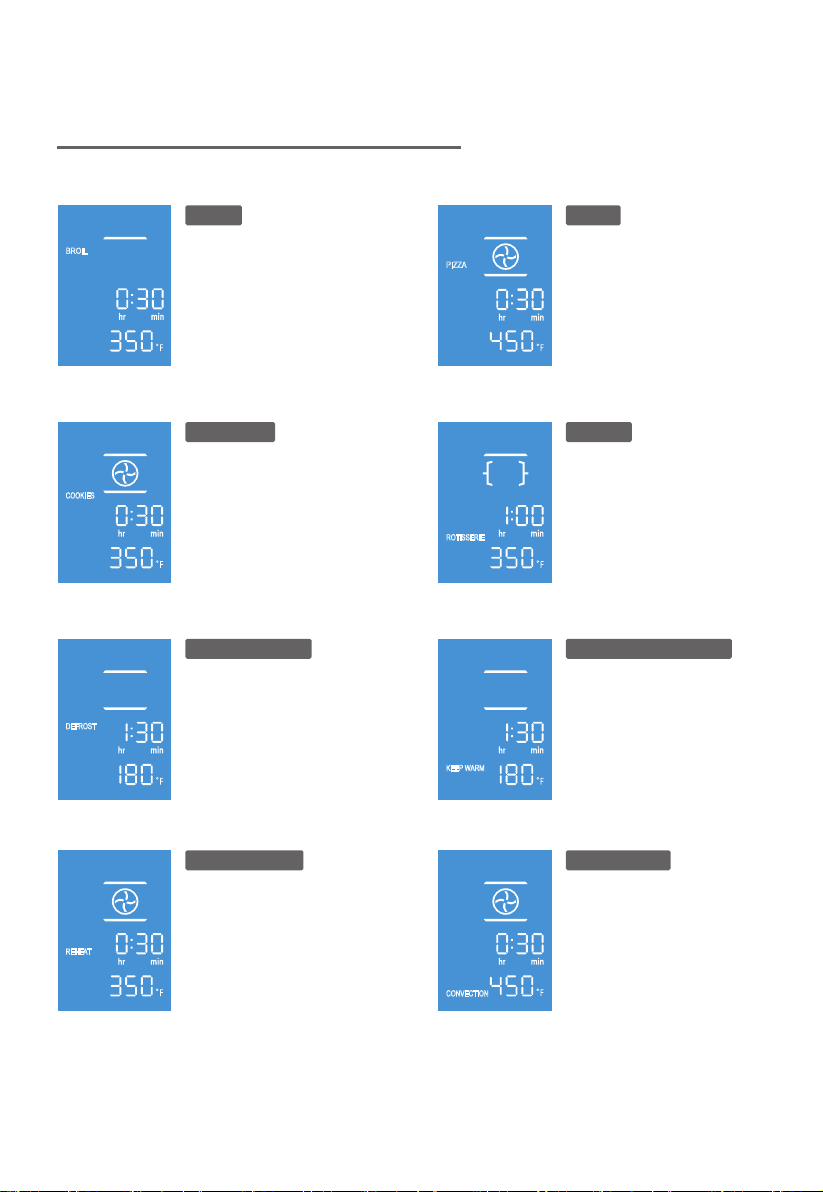
FUNCTION INSTRUCTION
BROIL PIZZA
COOKIES ROTISSERIE
DEFROST KEEP WARM
REHEAT CONVECTION
BROIL
COOKIES
KEEP WARM
CONVECTION
PIZZA
DEFROST
REHEAT
ROTISSERIE
Preset temperature : 350℉
Temp range : 150℉- 450℉
Preset time : 30min
Time range : 0.01~2 Hour
NOTE Do not preheat whenusing this fuction
NOTE Do not preheat whenusing this fuction
NOTE Do not preheat whenusing this fuction
Preset temperature : 450℉
Temp range : 150℉- 450℉
Preset time : 30min
Time range : 0.01~2 Hour
Preset temperature : 350℉
Temp range : 150℉- 450℉
Preset time : 30min
Time range : 0.01~2 Hour
Preset temperature : 180℉
Temp range : 100℉- 180℉
Preset time : 1hour 30min
Time range : 0.01~2 Hour
Preset temperature : 350℉
Temp range : 150℉- 450℉
Preset time : 30min
Time range : 0.01~2 Hour
Preset temperature : 350℉
Temp range : 150℉- 450℉
Preset time : 1hour
Time range : 0.01~2 Hour
Preset temperature : 180℉
Temp range : 100℉- 180℉
Preset time : 1hour 30min
Time range : 0.01~2 Hour
Preset temperature : 450℉
Temp range : 150℉- 450℉
Preset time : 30min
Time range : 0.01~2 Hour
EN-9

Remove the Baking Rack from the oven and set aside.
Place the Baking Pan in the lowest level of the oven. This will catch all the
drippings from the food that is on the Rotisserie Forks as it cooks. Do Not
attempt to use the Rotisserie Function without placing the Baking Pan in the
correct position of the oven.
Set the Function knob to " ROTIS"
Select the length of time you want to Rotisserie the food.
Rotate the Temperature knob clockwise to desired temperature.
ROTISSERIE FUNCTION
ROTISSERIE FUNCTIO USING THE ROTISSERIE FORKS
1.
2.
3.
4.
5.
Secure the food with weight centered on the forks.
Slide the Holding Forks onto each of the forks and press firmly into the food,
piercing the food to hold in place on the forks. Insert the Holding Forks at
different angles to hold the food more firmly. Tighten the screws, turning
clockwise so that the holding forks will stay in place during the Rotisserie
cooking session.
Insert the pointed end of the Rotisserie forks into the Rotisserie Socket on the
inside right side of the oven.
1.
2.
3.
FUNCTION INSTRUCTION
EN-10

Lift the Rotisserie Forks on the left side just a bit to allow the notch to fit into
the Rotisserie Bracket on the left side of the oven.
Set the Temperature knob and the Time knob to begin operating the oven.
Once the cooking time has been complete and you have checked the internal
temperature of the food to ensure that it has cooked properly, you can
remove the Rotisserie Forks with the Rotisserie Helper Handle.
Hold the handle in your right hand and support handle in your left hand.
Place the hooks on the Helper Hander underneath the Rotisserie Forks.
Lift the left side of the Rotisserie Forks out of the Bracket first and pull slightly
toward.
Gently remove the right pointed side of the Rotisserie Forks from the
Rotisserie Socket and remove the food on the forks out of the oven.
Place the food on a heat safe plate or dish when you have removed from the
oven. Let it cool slightly before attempting to remove the holding forks and
Rotisserie Forks from the food
To remove the Holding Forks, turn the screws counterclockwise and pull the
Holding.
4.
5.
6.
7.
8.
9.
10.
11.
12.
CAUTION
hot surface
Warning: Hot Surface!
Avertissement: Surface Chaude!
FUNCTION INSTRUCTION
EN-11

Before cleaning unplug the toaster oven and allow it to cool completely.
Wash all the attachments with mild, soaped water including the rack and the baking
tray.
Do not use abrasive cleansers, scrubbing brushes and chemical cleaner as this will
cause damage to the non-stick coating of baking tray.
Using a wet cloth to wipe the inner of the oven.
To clean the door by using a wet cloth saturated with detergent or soap.
Never immerse the unit in water or other liquid.
Any other servicing should be performed by an authorized service representative.
1.
2.
3.
4.
5.
6.
7.
CARE AND CLEANING
SPECIFICATION
MODEL
CUBAGE
VOLTAGE
AC FREQUENCY
POWER
L*W*H
Rated Energy Consumption
AC25CEW-SS
25L
120V,1Ph
60Hz
1500W
1.5KW/H
EN-12
18.9x15.6x10.8 inch

EN-13
ONE YEAR LIMITED WARRANTY
This product carries a warranty stating that it will be free from defects in material and
workmanship for a period of one year from the date of purchase. This warranty is valid
for the original retail purchaser from the date of initial retail purchase and is not
transferable. Keep your original sales receipt.
IMPORTANT:
If service is required during the warranty period, properly pack your unit. We
If additional assistance is needed, please contact
recommend using the original carton and packing materials.
customer assistance at:
Some states do not allow this exclusion
quential losses so the foregoing disclaimer may not
rights which may vary from state to state.
SAVE THIS FOR YOUR RECORDS
Made in China
apply to you. This warranty gives you specific legal rights, and you may also have other
expressly disclaims all responsibility for consequential damages or Midea America Corp
incidental losses caused by use of the appliance.
or limitation of incidental or conse
The serial number can be found on the back cabinet. We suggest that you record the
serial number of your unit in the space below for future reference
Model Number:_______________________
Serial Number:________________________
800-842-1289
Midea Am erica Corp
.
5 Sylvan Way,
Parsippany, NJ 07054
1. This warranty does not cover damages resulting from accident, misuse or abuse,
lack of reasonable care, the affixing of any attachments not provided with the
product, loss of parts, or subjecting the appliance to any but the specified
voltage. ( Read directions carefully. )
2. This warranty is void if this product is ever used for other than private household
purposes.
3. This warranty is void if this product is ever used outside of United State .
s
AC25CEW-SS
TOSHIBA
Horno tostador
Instrucciones

Bienvenido al mundo de
TOSHIBA
ANTES DE UTILIZAR ESTE PRODUCTO, LEA, ENTENDA Y SIGA ESTAS
INSTRUCCIONES.
ASEGÚRESE DE GUARDAR ESTA LISTA DE LIBROS PARA SU CONSUL-
TA EN EL FUTURO
CONTENIDO
SALVAGUARDIAS IMPORTANTES
MEDIDAS DE SEGURIDAD BÁSICAS
ANTES DEL PRIMER USO
INSTRUCCIONES DEL PRODUCTO
NOMBRES DE PIEZAS
PANEL DE CONTROL
FUNCIONAMIENTO
CÓMO UTILIZAR
INSTRUCCIÓN DE LA FUNCIÓN
CUIDADO Y LIMPIEZA
SP-1

Cuando utilice aparatos eléctricos, siempre debe seguir las precauciones
básicas de seguridad, incluyendo las siguientes:
1. Leer instrucciones antes de usar.
2. Para protegerse de cualquier peligro eléctrico, NO coloque la unidad o el cable en
agua o en ningún otro líquido.
3. No toque ninguna superficie caliente. Utilice guantes de cocina para quitar o tocar
cualquier parte caliente. Coloque siempre el horno tostador en la superficie protegi-
da por calor.
4. Deje alrededor de 100-150mm de espacio abierto en todo el exterior de este
aparato. Coloque el aparato sobre una superficie seca y horizontal.
5. Desenchufe la unidad de la toma de corriente cuando no esté en uso y antes de
limpiarla. Deje enfriar siempre antes de fijar o retirar cualquier pieza.
6. El uso de accesorios no recomendados por el fabricante del aparato puede causar
lesiones.
7. A continuación, enchufe el cable a la toma de corriente. Para desconectar, gire
cualquier control a "off", luego retire el enchufe de la toma de corriente.
8. No deje que el cable cuelgue del borde de la mesa o mostrador, ni toque la superfi-
cie caliente.
9. No coloque el horno tostador dentro de un horno caliente o cerca de un quemador
de gas caliente o eléctrico.
10. No utilice al aire libre
11. Si el circuito eléctrico está sobrecargado con otros aparatos, es posible que este
aparato no funcione correctamente. El horno tostador debe funcionar en un circuito
eléctrico separado de otros aparatos en funcionamiento.
12. La temperatura de las superficies accesibles puede ser alta cuando el aparato esté
funcionando.
SALVAGUARDIAS IMPORTANTES
MEDIDAS DE SEGURIDAD BÁSICAS
SP-2

SALVAGUARDIAS IMPORTANTES
MEDIDAS DE SEGURIDAD BÁSICAS
13. No opere ningún aparato con un cable o enchufe dañado o después de que el
aparato funcione mal o se haya dañado de alguna manera. Devuelva el electro-
doméstico al centro de servicio autorizado más cercano para su examen,
reparación o ajuste. Guarde únicamente los accesorios suministrados con esta
unidad dentro del horno cuando no esté en uso.
14. No guarde ningún otro material.
15. Se puede producir un incendio si el aparato está cubierto o toca material inflam-
able, incluyendo cortinas, telones, paredes y similares, cuando está en funciona-
miento. No coloque ningún objeto encima del aparato cuando esté en funciona-
miento.
16. No coloque ningún cartón, papel o plástico dentro del horno.
17. Ningún recipiente colocado dentro del horno debe ser hermético. Además,
necesitan tener espacio suficiente para permitir la expansión de los fluidos.
18. Limpie este aparato regularmente ya que la acumulación de grasa puede causar
un incendio. Asegúrese de que este electrodoméstico no esté cerca de cortinas,
cortinas u otro material inflamable.
19. No limpie con almohadillas para fregar metales. Las piezas pueden romper la
almohadilla y tocar las partes eléctricas que implican un riesgo de descarga
eléctrica.
20. Para evitar quemaduras accidentales, utilice siempre el mango y las perillas para
hacer funcionar este aparato.
21. La temperatura de la puerta o superficie exterior puede ser alta cuando el aparato
funcione.
22. Los alimentos de gran tamaño o los utensilios de metal no se deben insertar en un
horno tostado, ya que pueden crear un incendio o riesgo de descarga eléctrica.
23. No cubra la bandeja para migas ni ninguna parte del horno con papel metálico.
SP-3

SALVAGUARDIAS IMPORTANTES
MEDIDAS DE SEGURIDAD BÁSICAS
24. Se debe tener extrema precaución al mover un aparato que contenga aceite
caliente u otros líquidos calientes. Tenga mucho cuidado al retirar la bandeja o
eliminar la grasa caliente.
25. Este aparato no está diseñado para ser utilizado por personas (incluyendo niños)
con capacidades físicas, sensoriales o mentales reducidas, o con falta de experi-
encia y conocimiento a menos que se les haya dado instrucciones sobre el uso del
aparato o estén supervisados por una persona responsable de su seguridad.
26. Los niños deben ser supervisados para asegurarse de que no jueguen con el
aparato.
27. El aparato no está diseñado para ser operado por medio de un temporizador
externo o un sistema de control remoto separado.
28. La superficie posterior del aparato se colocará contra una pared.
● Se debe utilizar un cable de alimentación corto (o un cable de suministro de
energía desmontable) para reducir el riesgo de enredo o tropiezo con un cable
más largo.
● Se dispone de cables de alimentación o alargadores más largos y se pueden
utilizar si se tiene cuidado en su uso.
● Si se utiliza un cable de alimentación o un cable de extensión más largo:
● La clasificación eléctrica marcada del cable de extensión del cable debe ser al
menos tan grande como la capacidad eléctrica del aparato;
● El cordón debe estar dispuesto de manera que no quede cubierto por encima de
la encimera o de la mesa donde pueda ser tirado por los niños o con el que se
pueda tropezar involuntariamente; y
● Si el aparato es del tipo con conexión a tierra, el cable o extensión debe ser un
cable de 3 hilos con conexión a tierra.
SP-4

Retire todos los accesorios y materiales de envío embalados dentro del horno.
Lave la rejilla y la bandeja en agua jabonosa tibia. Limpie el interior del horno con
un paño húmedo o una esponja. Seque con toallas de papel para asegurarse de
que la unidad esté seca antes de usarla.
Coloque el Horno en un mostrador plano u otra superficie estable. NO HAGA
FUNCIONAR EN EL MISMO CIRCUITO CON OTRO APARATO.
Asegúrese de que la bandeja de migas esté instalada correctamente antes de
usarla.
1.
2.
3.
4.
Sólo por primera vez, ajuste el mando de temperatura en MAX, la configuración de la
función en tostar y el temporizador a 15 minutos. Esto quemará cualquier aceite que
quede en el horno.
NOTA El horno puede echar humo durante este proceso. Esto es normal en un horno
nuevo.
SALVAGUARDIAS IMPORTANTES
MEDIDAS DE SEGURIDAD BÁSICAS
ANTES DEL PRIMER USO
No utilice el aparato para otro uso que no sea el previsto.
No limpie con almohadillas para fregar metales. Las piezas pueden romper la
almohadilla y tocar las partes eléctricas, creando un riesgo de descarga eléctrica.
Se debe tener extrema precaución cuando se utilicen recipientes con otros
materiales que no sean de metal o vidrio.
29.
30.
31.
GUARDE ESTAS INSTRUCCIONES
SOLO PARA USO DOMÉSTICO
PRECAUCIÓN: No introduzca el dedo en las aberturas o agujeros, podría causar
el riesgo de lesiones.
SP-5
Cuando utilice aparatos eléctricos, siempre debe seguir las precauciones
básicas de seguridad, incluyendo las siguientes:
NOMBRES DE PIEZAS
INSTRUCCIONES DEL PRODUCTO
Mango de
la puerta
Bandeja para hornear Rejilla para hornear Bandeja de para migas
Kit para asar Kit para asar Kit para asar
Alojamiento
Perilla de función
Botón Parar/Iniciar
Botón de Temperatura
Perilla de Temporizador
SP-6

CÓMO UTILIZAR
Cuando el horno está conectado, el timbre suena una vez. La función predeterminada
es TOSTAR. En el proceso de cocción, presionar "Parar/Iniciar" puede detener la
cocción.
PRECAUCIÓN:
las superficies del horno están calientes durante y después del uso.
Coloque la rejilla para hornear en la posición que se adapte a la altura de los
alimentos a cocinar.
Coloque los alimentos en el estante. Asegúrese de que siempre usa un recipiente
para horno en el horno, nunca use recipientes de plástico o cartón en el horno.
Nunca utilice recipientes o tapas de vidrio o de cerámica.
NO deje que los jugos corran hasta el fondo del horno. Utilice la bandeja de goteo
y la bandeja de migas al cocinar.
Ajuste la temperatura según lo sugerido por la receta o como se desee.
Cierre firmemente la puerta y ajuste el tiempo de cocción para comenzar a utilizar
el horno.
1.
2.
3.
4.
5.
6.
FUNCIONAMIENTO
PANEL DE CONTROL
Botón parar/iniciar
Botón de temperatura
Perilla de temporizador
2
3
4
Botón de función
TIME
TEMP.
1
2
3
4
1
Nivel de horneado
(sólo función Tostar)
Tiempo/Rebanada
(sólo función Tostar)
Temperatura
Función de cocción
TOAST
BAKE
BROIL
PIZZA
COOKIES
DEFROST
REHEAT
ROTISSERIE
KEEP WARM
CONVECTION
LIGHT DARK
PASO PARA COCINAR
SP-7

INSTRUCCIÓN DE LA FUNCIÓN
FUNCIÓN DEL HORNO
TOSTAR HORNEAR
FUNCION DE
COCCIÓN
Tostar
Hornear
Asar
Pizza 6 pulgadas
Pizza 9 pulgadas
Pizza 12 pulgadas
Galletas
Descongelar
Recalentar
Asado
Mantener caliente
Convección
450℉
350℉
450℉
350℉
180℉
350℉
180℉
450℉
30min
7min
8.5min
9min
30min
1hora 30min
30min
1hora
1hora 30min
30min
Temp. fija
150℉~450℉
100℉~180℉
150℉~450℉
100℉~180℉
150℉~450℉
Temp. fija
0,01~2Horas
1min~30min
0,01~2Horas
TEMP
PREESTAB.
RANGO TEMP
TIEMPO
PREESTAB.
INTERVALO DE
TIEMPO
TOAST
LIGHT DARK
BAKE
Temperatura y tiempo fijos
Nivel de potencia preestablecido: 4
Rango de nivel de potencia: Nivel 1-6
Cantidad de tostadas preestablecida: 4
Cantidad de tostadas: 1-6 rebanadas
Temp. preestablecida: 450℉
Rango temp.: 150℉ - 450℉
Tiempo preestablecido: 30min
Intervalo de tiempo : 0.01~2h
SP-8
FUNCTION INSTRUCTION
ASAR PIZZA
GALLETAS ASADO
DESCONGELAR MANTENER CALIENTE
RECALENTARA CONVECCIÓN
BROIL
COOKIES
KEEP WARM
CONVECTION
PIZZA
DEFROST
REHEAT
ROTISSERIE
Temp. preestablecida: 350℉
Rango temp.: 150℉ - 450℉
Tiempo preestablecido: 30min
Intervalo de tiempo : 0.01~2h
NOTA No precaliente cuando use esta función
NOTA No precaliente cuando use esta función
NOTA No precaliente cuando use esta función
Temp. preestablecida: 450℉
Rango temp.: 150℉ - 450℉
Tiempo preestablecido: 30min
Intervalo de tiempo : 0.01~2h
Temp. preestablecida: 350℉
Rango temp.: 150℉ - 450℉
Tiempo preestablecido: 30min
Intervalo de tiempo : 0.01~2h
Temp. preestablecida: 180℉
Rango temp.: 100℉ - 180℉
Tiempo preestablecido: 1h30min
Intervalo de tiempo : 0.01~2H
Temp. preestablecida: 350℉
Rango temp.: 150℉ - 450℉
Tiempo preestablecido: 30min
Intervalo de tiempo : 0.01~2h
Temp. preestablecida: 350℉
Rango temp.: 150℉ - 450℉
Tiempo preestablecido: 1h
Intervalo de tiempo : 0.01~2h
Temp. preestablecida: 180℉
Rango temp.: 100℉ - 180℉
Tiempo preestablecido: 1h30min
Intervalo de tiempo : 0.01~2H
Temp. preestablecida: 450℉
Rango temp.: 150℉ - 450℉
Tiempo preestablecido: 30min
Intervalo de tiempo : 0.01~2h
SP-9

Retire la rejilla del horno y déjela a un lado.
Coloque la bandeja de hornear en el nivel más bajo del horno. Esto
atrapará todos los goteos de la comida que está en las horquillas para
asar cuando cocine. No intente utilizar la función del asador sin colocar la
bandeja de hornear en la posición correcta del horno.
Ajuste el mando de Función a "ROTIS".
Seleccione la duración de tiempo que desea asar el alimento.
Gire la perilla de temperatura hacia la derecha hasta la temperatura
deseada.
FUNCIÓN DE ASADO
FUNCIÓN DE ASADO UTILIZANDO LAS HORQUILLAS DE ASADO
1.
2.
3.
4.
5.
Asegure el alimento con el peso centrado en las horquillas.
Deslice las horquillas de sujeción en cada uno de los tenedores y presione
firmemente en los alimentos, perforando los alimentos para colocarlos en
las horquillas. Inserte las horquillas de sujeción en ángulos diferentes para
sostener los alimentos más firmemente. Apriete los tornillos, girando en el
sentido de las agujas del reloj para que las horquillas de sujeción se
mantengan en su lugar durante la sesión de asado.
Inserte el extremo puntiagudo de las horquillas para asar en el casquillo
del asador en el lado derecho interior del horno.
1.
2.
3.
INSTRUCCIÓN DE LA FUNCIÓN
SP-10

4. Levante las horquillas para asar en el lado izquierdo un poco para permitir
que la muesca encaje en el soporte de las horquillas en el lado izquierdo
del horno.
5. Ajuste la perilla de temperatura y la perilla de tiempo para comenzar a
utilizar el horno.
6. Una vez que haya terminado el tiempo de cocción y haya comprobado la
temperatura interna de los alimentos para asegurarse de que se ha cocina-
do adecuadamente, puede quitar las horquillas del asador con el mango
auxiliar del asador.
7. Sostenga el mango en la mano derecha y apoye la manija en la mano
izquierda.
8. Coloque los ganchos en el soporte debajo de las horquillas para asar.
9. Levante el lado izquierdo de las horquillas fuera del soporte y tire ligera-
mente.
10. Retire suavemente el lado apuntado a la derecha de las horquillas para
asar de la toma del asador y retire los alimentos de las horquillas del
horno.
11. Coloque los alimentos en una placa o plato de calor seguro cuando se
haya retirado del horno. Deje enfriar un poco antes de intentar sacar las
horquillas de sujeción y las horquillas para asar de la comida
12. Para quitar las horquillas de sujeción, gire los tornillos en sentido contrario
a las agujas del reloj y tire de la sujeción.
CAUTION
hot surface
Warning: Hot Surface!
Advertencia: ¡Superficie Caliente!
Avertissement: Surface Chaude!
INSTRUCCIÓN DE LA FUNCIÓN
SP-11

1. Antes de limpiar, desenchufe el horno tostador y déjelo enfriar completa-
mente.
2. Lave todos los accesorios con agua, incluyendo la rejilla y la bandeja para
hornear.
3. No utilice limpiadores abrasivos, cepillos de limpieza y limpiadores quími-
cos, ya que esto puede dañar el revestimiento antiadherente de la bandeja
para hornear.
4. Utilice un paño húmedo para limpiar el interior del horno.
5. Limpie la puerta con un paño húmedo saturado con detergente o jabón.
6. Nunca sumerja la unidad en agua u otro líquido.
7. Cualquier otro servicio debe ser realizado por un representante de servicio
autorizado.
CUIDADO Y LIMPIEZA
ESPECIFICACIONES
MODELO
CAPACIDAD
TENSIÓN
RECUENCIA CA
POTENCIA
L*An*Al
Consumo de energía nominal
AC25CEW-SS
25L
120V, 1Ph
60Hz
1500W
pulg.
1.5KW/H
18.9×15.6×10.8
SP-12

GARANT A LIMITADA POR UN AÑO
Este producto cuenta con una garantía por defectos de materiales y fabricación por el
período de un año a partir de la fecha de compra. Esta garantía es válida para el
comprador minorista original desde la fecha de compra inicial y no es transferible.
Guarde su comprobante de venta original.
IMPORTANTE:
Si requiere servicio durante el período de garantía, empaque la unidad apropiadamente.
Para asistencia adicional por
Recomendamos el uso de la caja y los materiales de embalaje originales.
favor contacte nuestro servicio de asistencia al cliente bajo
el número:
expresamente rechaza cualquier responsabilidad por daños
resultantes
o
pérdid as accidental es causad as p or el apara. to Algun os estad os no
permiten esta
exclusión o limitación de pérdidas resultantes o accidentales, por lo que la
limitación de
responsabilidad antes mencionada puede no aplicarse a usted. Esta garantía
le otorga
derechos legales, y usted también puede tener otros derechos que pueden
variar de
estado en estado.
GUARDE ESTO PARA SUS REGISTROS
Hecho en China
Midea America Corp.
El número de serie se encuentra en el fondo del gabinete. Le aconsejamos que recorda
sto en el espacio abajo para la referencia en el futuro.
Número de modelo:_______________________
Número de serie:________________________
800-842-1289
Midea Am erica Corp
5 Sylvan Way,
Parsippany, NJ 07054
1. Esta garantía no cubre daños resultantes de accidentes, mal uso o abuso, falta
de cuidado responsable, fijar cualquier accesorio no provisto con el producto,
pérdida de partes o someter al aparato a cualquier voltaje diferente al
especificado. (Lea las instrucciones con atención).
2. Esta guarantía es invalido si este producto se utiliza para con excepción de los
propósitos privados de casa.
3. Esta guarantía es invalido si este producto se utiliza fuera de Estados Unidos.
SP-13