This appliance complies with all standards regarding Electro-Magnetic fields (EMF) and is safe under normal operation.
Before First Use
Remove all packaging materials, stickers, and labels.
Clean the basket and cooking shelf with hot water, detergent, and a non-abrasive sponge. These parts are safely to be cleaned in the dishwasher.
Wipe the inside and outside of the appliance with a clear cloth.
Keep in mind there is no need to fill the cooking shelf with oil or frying fat as this appliance cooks using circulating hot air.
Using The Appliance
1. Place the appliance on a flat, stable, horizontal surface. Do not place the appliance on a non-heat-resistant surface.
2. Put the basket cooking shelf. Do not fill the shelf with oil or any other liquid.(Fig. 3)
3. Preheat the appliance for 5 minutes when first turning on. Press the Warm-up button first, followed by the Start button to gradually warm up the appliance. After 5 minutes, carefully pull the cooking shelf out of the air fryer.(Fig. 4)
Caution: The appliance will stop heating and the LCD display will turn off when the cooking shelf is pulled out.
4. Place the ingredients in the basket, and then slide the basket and cooking shelf back into the appliance.(Fig. 5)
5. Select the proper time and temperature for the ingredients. See Table 1 under the 'Settings' section to determine the correct time and temperature.(Fig.6)
You may set cooking time and temperature manually or select one of the 7 preset programs (Fries, Chicken, Steak, Shrimp, Meat, Cake, and Fish). When more flexible time setting and temperature are needed. Adjustments can be made using the control panel buttons. There are two sets of buttons on the control manual, one for the timer and one for the temperature. The timer buttons ('+' & '-') are used to adjust the time settings. The ‘-‘ button decreases the time by 1 minute each press and the ‘+’ button increases the time by 1 minute each press. Press and hold either the ‘+’ or ‘-‘, '-' button to change the timer more quickly. The temperature buttons ('+' & '-') are used to adjust the temperature settings. The ‘-‘ button decreases the temperature by 10°F each press and the ‘+’ button increases the temperature by 10°F each press. Press and hold either the ‘+’ or ‘-‘, '-' button to change the temperature more quickly.
6. Press the START button after preferred cooking mode or time and temperature have been selected and the heat and circulation icons will blink.
Caution: During the frying process, the heat icon will blink, indicating the internal heating element is switched on. This icon will stop blinking when the heat element is switched off. The heating element will switch on and off to maintain an average temperature.
8. Oil and juices from the ingredients gather in the bottom of the cooking shelf.
9. Some ingredients require the cooking shelf be shaken halfway through the cooking time (see the 'Settings' section in this manual). Pull the shelf out of the appliance using the handle and shake it. After, slide the shelf back into the air fryer.(Fig. 8)
Caution: Do not press the basket release button on the handle while shaking.(Fig. 9)
Tip: You can remove the basket from the shelf to reduce weight when shaking the ingredients. Pull the shelf out of the appliance, place it on a heat-resistant holder, and press the button on the handle.(Fig.10)
10. When you hear the timer ring 5 times, the set preparation time has elapsed. Wait 20 seconds then pull the cooking shelf out of the appliance and place it on a heat-resistant holder.
Note: The appliance's air blower will stop 20 seconds after the timer goes off.
11. Check if the ingredients are ready
Note: If the ingredients are not ready yet, simply slide the cooking shelf back into the appliance. Adjust the timer and temperature settings and then press the Start button to run the appliance again.
12. To remove ingredients, press the basket release button and lift the basket out of the cooking shelf.(Fig. 11)
Note: Take the basket out of the shelf when emtying the basket so the oil collected at the bottom of the shelf does not get on the ingredients.
13. Empty the basket into a bowl or onto a plate.(Fig. 12)
Tip: To remove large or fragile ingredients, lift the ingredients out of the basket using a pair of tongs.
14. When a batch of ingredients is finished cooking, another batch can be cooked without warming up the appliance.
Cleaning
Clean the appliance after use every time.
Do not clean the cooking shelf, basket, and the inside of the appliance by metal kitchen utensils or abrasive cleaning materials, as doing so may damage the non-stick coating.
1. Remove the power plug from the wall socket and wait for the appliance to cool down.
Note: Remove the shelf to cool down the fryer more quickly.
2. Wipe the outside of the appliance with a moist cloth.
3. Clean the shelf and basket with hot water, some washing-up liquid, and a non-abrasive sponge.
You can remove any remaining dirt using degreasing liquid.
Note: The shelf and basket are dishwasher-proof.
Tip: If dirt is stuck to the basket or the bottom of the cooking shelf, fill the shelf with hot water with some washing-up liquid. Put the basket in the shelf and soak for about 10 minutes.
4. Clean the inside of the appliance with hot water and non-abrasive sponge.
5. Clean the heating element with a cleaning brush to remove any food residues.
Troubleshooting
Problem
Possible cause
Solution
The AIR FRYER does not work
The appliance is not plugged in
Put the power plug into a grounded wall socket
You have not set the Timer
Press the timer buttons to select the preferred cooking time
The ingredients fried with the AIR FRYER are not fully cooked
The amount of ingredients in the basket is too big
Put smaller batches of ingredients in the basket. Smaller batches are fried move evenly
The set temperature is too low
Press the temperature buttons to select the preferred cooking temperature
The ingredients are fried unevenly in the AIR FRYER
Certain types of ingredients need to be shaken halfway through the preparation time
Ingredients that are stacked on each other (e.g. fries) need to be shaken halfway through the preparation time.
Fried snacks are not crispy when they come out of the AIR FRYER
You used ingredients meant to be prepared in a traditional deep fryer
Use oven or lightly brush some oil onto the ingredients for a crisper result
I cannot properly slide the shelf into the appliance properly
There are too many ingredients in the basket
Do not fill the basket beyond the MAX indication
The basket is not correctly placed in the shelf
Push the basket down into the shelf until you hear a "Click"
White smoke comes out from the appliance
You are preparing greasy ingredients
When you fry greasy ingredients in the AIR fryer., a large amount of oil will leak into the shelf. The oil produces while smoke and the shelf may heat up more than usual. This does not affect the appliance or the end result
The pan still contains grease residues from previous use
White smoke is caused by grease heating up in the shelf. Make sure you clean the shelf properly after each use
Fresh fries are fried unevenly in the AIR FRYER
You did not use the right potato type
Use fresh potatoes and make sure that they stay firm during frying
You did not rinse the potato sticks properly before you fried them
Rinse the potato sticks properly to remove starch from the outside of the sticks
Fresh fries are not crispy when they come out of the AIR FRYER
The crispiness of the fries depends on the amount of oil and water in the fries
Make sure you dry the potato sticks properly before you add the oil
Cut the potato sticks smaller for a crispier result
Add slightly more oil for a crisper result
Automatic Switch-off
This appliance will automatically switch off using its integrated timer. It may also be switched off manually using the CANCEL button. Pressing the CANCEL button will switch off the appliance in 20 seconds.
I don't believe so..the lowest temperature appears to be 180. I believe you dehydratecat around 135 or 140.
#2 Can I cook a whole chicken with vegetables together?
The basket is only about 4” high so a whole chicken wouldn’t fit. We have used it a lot for smaller items (chicken breasts, thighs, chops, steaks etc.) and we love it.
#3 How long does it take to cook a normal batch of fries?
I normally cook mine for 20 minutes total at 400. Shake/ flip midway. Soak the cut up potatoes in water at least an hour prior to frying. I drizzle a little olive oil over it for more crunch.
You can't put plastic in the fryer. Just put your frozen fries or frozen onion rings in the basket and set the fry button. Everything is wonderful especially if you spray a small amount PAM or Coconut oil.
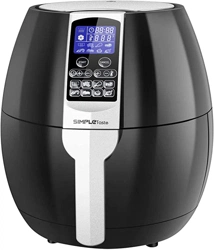

 buttons (0-30min)
 buttons (170-400ºF)