Owner's Manual
Manual Del Propietado
Vacuum Cleaner
Aspiradora
Model, Modelo
116.32189
116,32289
CAUTION: Read and follow all safety
and operating instructions before first
use of this product.
CUIDADO: Lea y sigue todas las
instrucciones de operaci6ny seguridad
antes del uso de este producto.
Directions For Use
It is a violation of Federal law to use
this product in a manner inconsistent
with its labeling_
Direcciones de uso
Es una violacion a la ley Federal el utilizar
este producto de una manera contraria
con su etiquetado,
Sears, Roebuck and Co., Hoffman Estates, IL 60179 U.S.A.
www.sears.com
Part No. C01ZBUM10UO(_-8192395
Impresoen Mexico
Printed in Mexico

Before Using Your New Vacuum ..... 2
Kenmore Vacuum Cleaner Warranty _, 2
Important Safety Instructions ........ 3
Parts and Features ................. 4
Assembly Instructions ............ 5-6
Operating instructions ................ 6
Pile Height Selection and Setting .......... 7
Carpet/Bare Floor Selector ............. 7
Releasing the Handle ................. 8
On/Off Switch ....................... 8
Attachments ........................ 8-10
Attachment Use Chart ............... 10
Vacuuming Tips .................... 11
Performance Features ............... 11
Vacuum Cleaner Care ............... I2
Vacuum S!orage .................... 12
Cleaning Exterior and Attachments ...... I2
Dust Bag Changing ................. I3
Motor Safety Filter Cleaning ......... 14-15
Exhaust Filter Cleaning .............. i5
Belt Changing and Agitator Cleaning . ,t6-18
Clog Removal ...................... 19
Light Bulb Changing .................... 20
Agitator Servicing ................... 21
Agitator Assembly .................. 2I
Troubleshooting ....................... 22
Please read this guide. It will help you assemble and operate your new Kenmore vacuum in
the safest and most effective way.,
For more information about vacuum cleaner care and operation, call your nearest Sears store.
You will need the complete model and serial numbers when requesting informatiom Your vacu-
um's model and serial numbers are located on the Model and Serial Number Plate.
Use the space below to record the model number and serial number of your new Kenmore
vacuum.
Model No.
Serial No.
Date of Purchase
Keep this book and your sales check (receipt) in a safe place for future reference,
LIMITED ONEYEAR WARRANTY ON KENMORE VACUUM CLEANER
This warranty is for one year from the date of purchase, and includes only private household
vacuum cleaner use, During the warranty year, when this vacuum cleaner is operated and
maintained according to the owner's manual instructions, Sears will repair any defects in
material or workmanship free of charge.
This warranty' excludes vacuum bags, belts, light bulbs, and filters, which are expendable parts
and become worn during normal use.
For warranty service, return this vacuum cleaner to the nearest Sears Service Center in
the United States.
This warranty applies only while this product is in use in the United States° This warranty gives
you specific legal rights, and you may also have other rights which vary from state to state.
Sears, Roebuck and Co., D1817 WA, Hoffman Estates, IL 60179
Your safety is important to us.To reduce the risk of fire, electrical shock, injury
to persons or damage when using your vacuum cleaner, follow basic safety
precautions including the following:
Read this manual before assembling or
using your vacuum cleaner.
Use your cleaner only as described in
this manual. Use only with Sears recom-
mended attachments.
To reduce the risk of electrical shock-
Do not use outdoors or on wet sur-
faces_
Disconnect electrical supply before any
servicing or cleaning. Failure to do so
could result in electrical shock or per-
sonal injury°
Always turn cleaner off before unplug-
ging.
Do not unplug by pulling on cord. To
unplug, grasp the plug, not the cord.
Do not use with damaged cord or plug.
tf cleaner is not working as it should,
has been dropped, damaged, left out-
doors, or dropped into water, return it to
a Sears Service Center.
Do not pull or carry by cord, use cord
as a handle, close door on cord, or pull
cord around sharp edges or corners.
Do not run cleaner over cord. Keep cord
away from heated surfaces.
Do not leave cleaner when plugged in.
Unplug from outlet when not in use and
before servicing.
Do not allow to be used as a toy° Close
attention is necessary when used by or
near children.
Do not handle plug or cleaner with wet
hands.
Do not put any objects into openings_
Do not use with any opening blocked;
keep free of dust, lint, hair and anything
that may reduce air flow.
Keep hair, loose clothing, fingers, and
all parts of body away from openings
and moving parts.
Do not use cleaner without dust bag
and/or filters in place.
Always change the dust bag after vacu-
uming carpet cleaners or freshener,
powders and fine dust. These products
clog the bag, reduce airflow and can
cause the bag to burst. Failure to
change bag could cause permanent
damage to the cleaner.
Do not use the cleaner to pick up sharp
hard objects, small toys, pins, paper,
etc. They may damage the cleaner or
dust bag.
Do not pick up anything that is burning
or smoking, such as cigarettes, match-
es, or hot ashes.
Do not use cleaner to pick up flamma-
ble or combustible liquids (gasoline,
cleaning fluids, perfumes, etco), or use
in areas where they may be present.
The fumes from these substances can
create a fire hazard or explosion.
Use extra care when cleaning on stairs.
Do not put on chairs, tables, etc. Keep
on floor°
You are responsible for making sure
that your vacuum cleaner is not used by
anyone unable to operate it properly.
SAV THESE INSTRUCTIONS
Proper assembly and safe use of your vacuum cleaner are your responsibilities. Your
cleaner is intended only for household use. Read this Owner's Manual carefully for
important use and safety information. This guide contains safety statements under
warning and caution symbols. Please pay special attention to these boxes and follow
any instructions given. WARNING statements alert you to such dangers as fire, elec-
trica! shock, burns and personal injury. CAUTION statements alert you to such dan-
gers as personal injury and/or property damage_
i .............
i
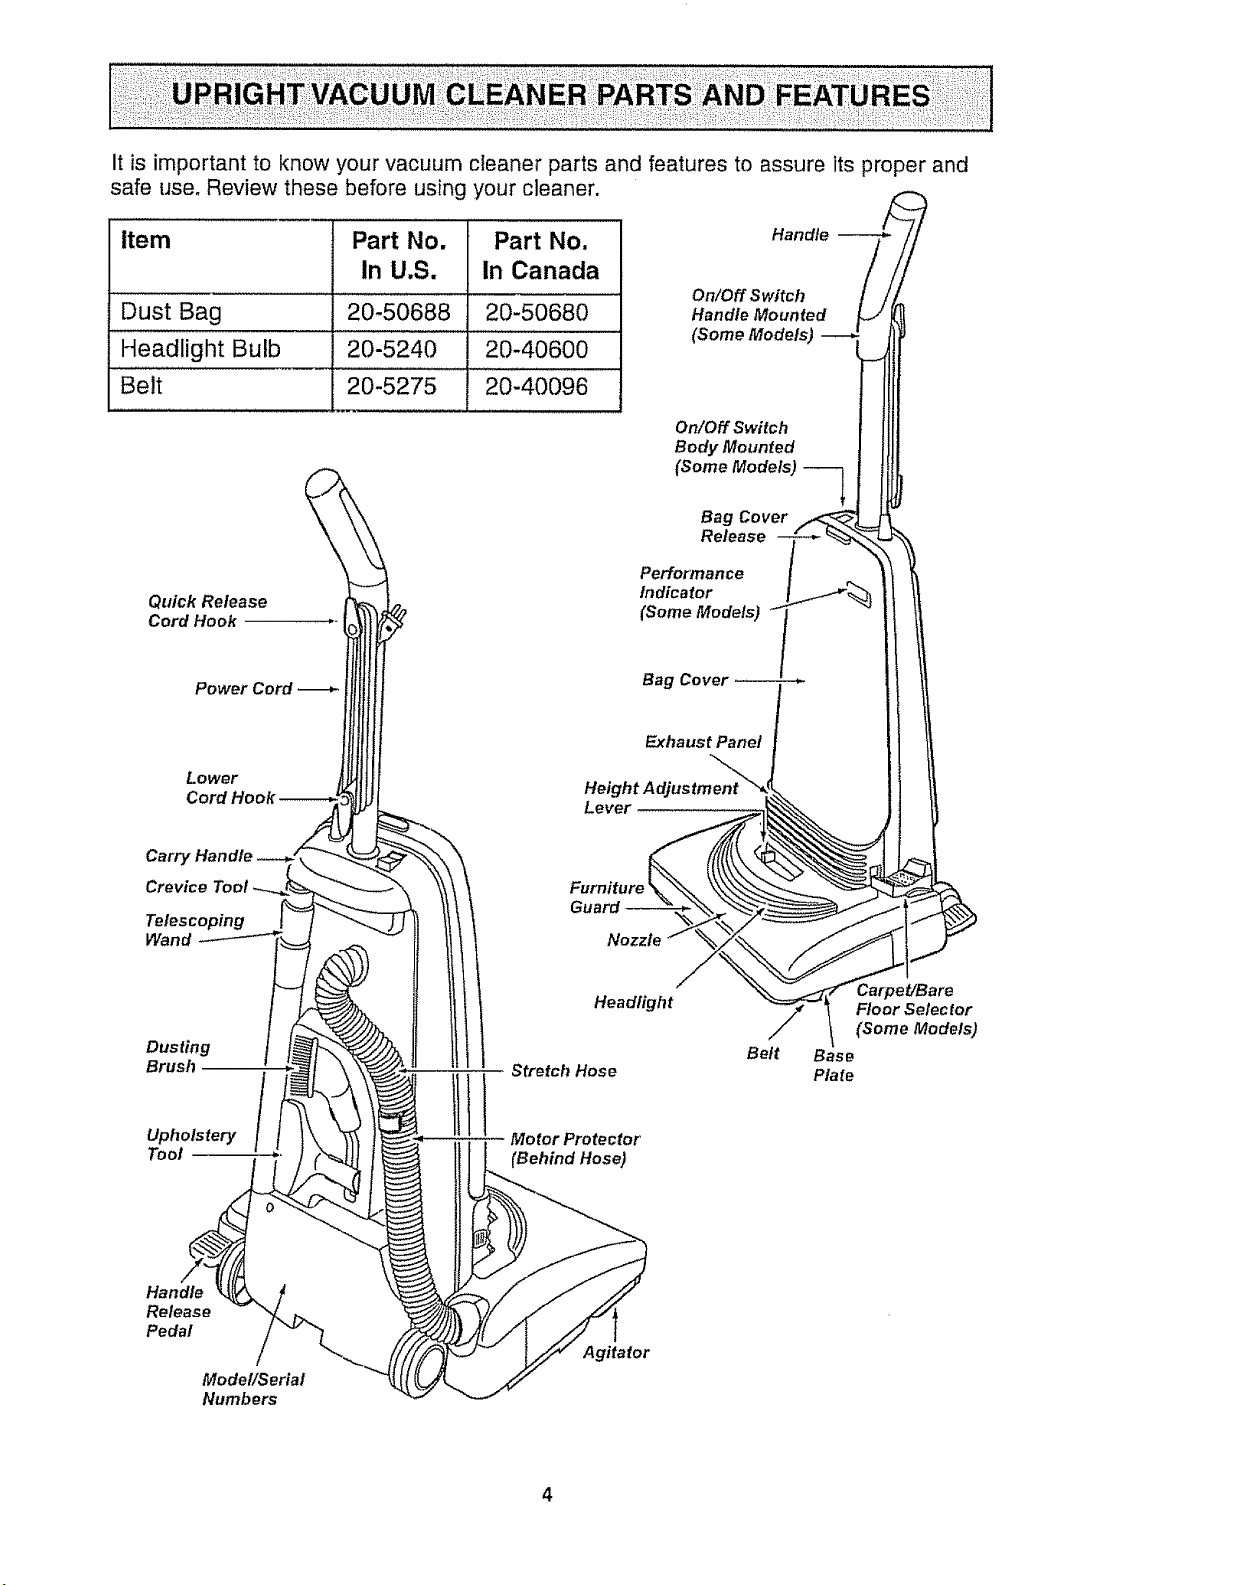
It is important to know your vacuum cleaner parts and features to assure its proper and
safe use_ Review these before using your cleaner.
Item Part No. Part No,
In U.S. in Canada
Dust Bag ' 20-50688 20-50680
Headlight Bulb 20'5240 20-40600
Belt 20-5275 20-40096
Handle
On!Off Switcl7
Handle Mounted
(Some Models)
On/Off Switch
Body Mounted
(Some Models) -_
Bag Cover
Release
Quick Release
Cord Hook
Power Cord
Lower
Performance
Indicator
(Some Models)
Bag Cover--
ExhaustPane/
Level
Carry
Crev_e
Te/escopmg
Wand
Furniture
Nozzle
Dustmg
Brush
Upholstery
Tool
Headlight
Stretch Hose
Motor Protector
(Behind Hose)
Belt
_arpet/Bare
Floor Selec for
(Some Models)
Base
Plate
Handle
Release
Pedal
Modet/Serial
Numbers
Agitator
Before assembling vacuum, check the
PACKING LIST on the cover of the separate
Repair Parts List. Use this list to verify that
you have received all the components of
your new Kenmore vacuum,
Electrical Shock Hazard
Do not plug into the electrical sup-
ply until the assembly is complete,
Failure to do so could result in
electrical shock or injury.
,,, ,, ,, , ,,,
HANDLE ASSEMBLY
Before assem- C'_,
bling your vacu- \,_
um cleaner be \.
sure you have all '_
the parts shown,
H_nd/p.
Screw
Itt
Opening
for Handle
Handle
Screw
Hole
Bacif ot
Va c u u I_:|
Cleaner
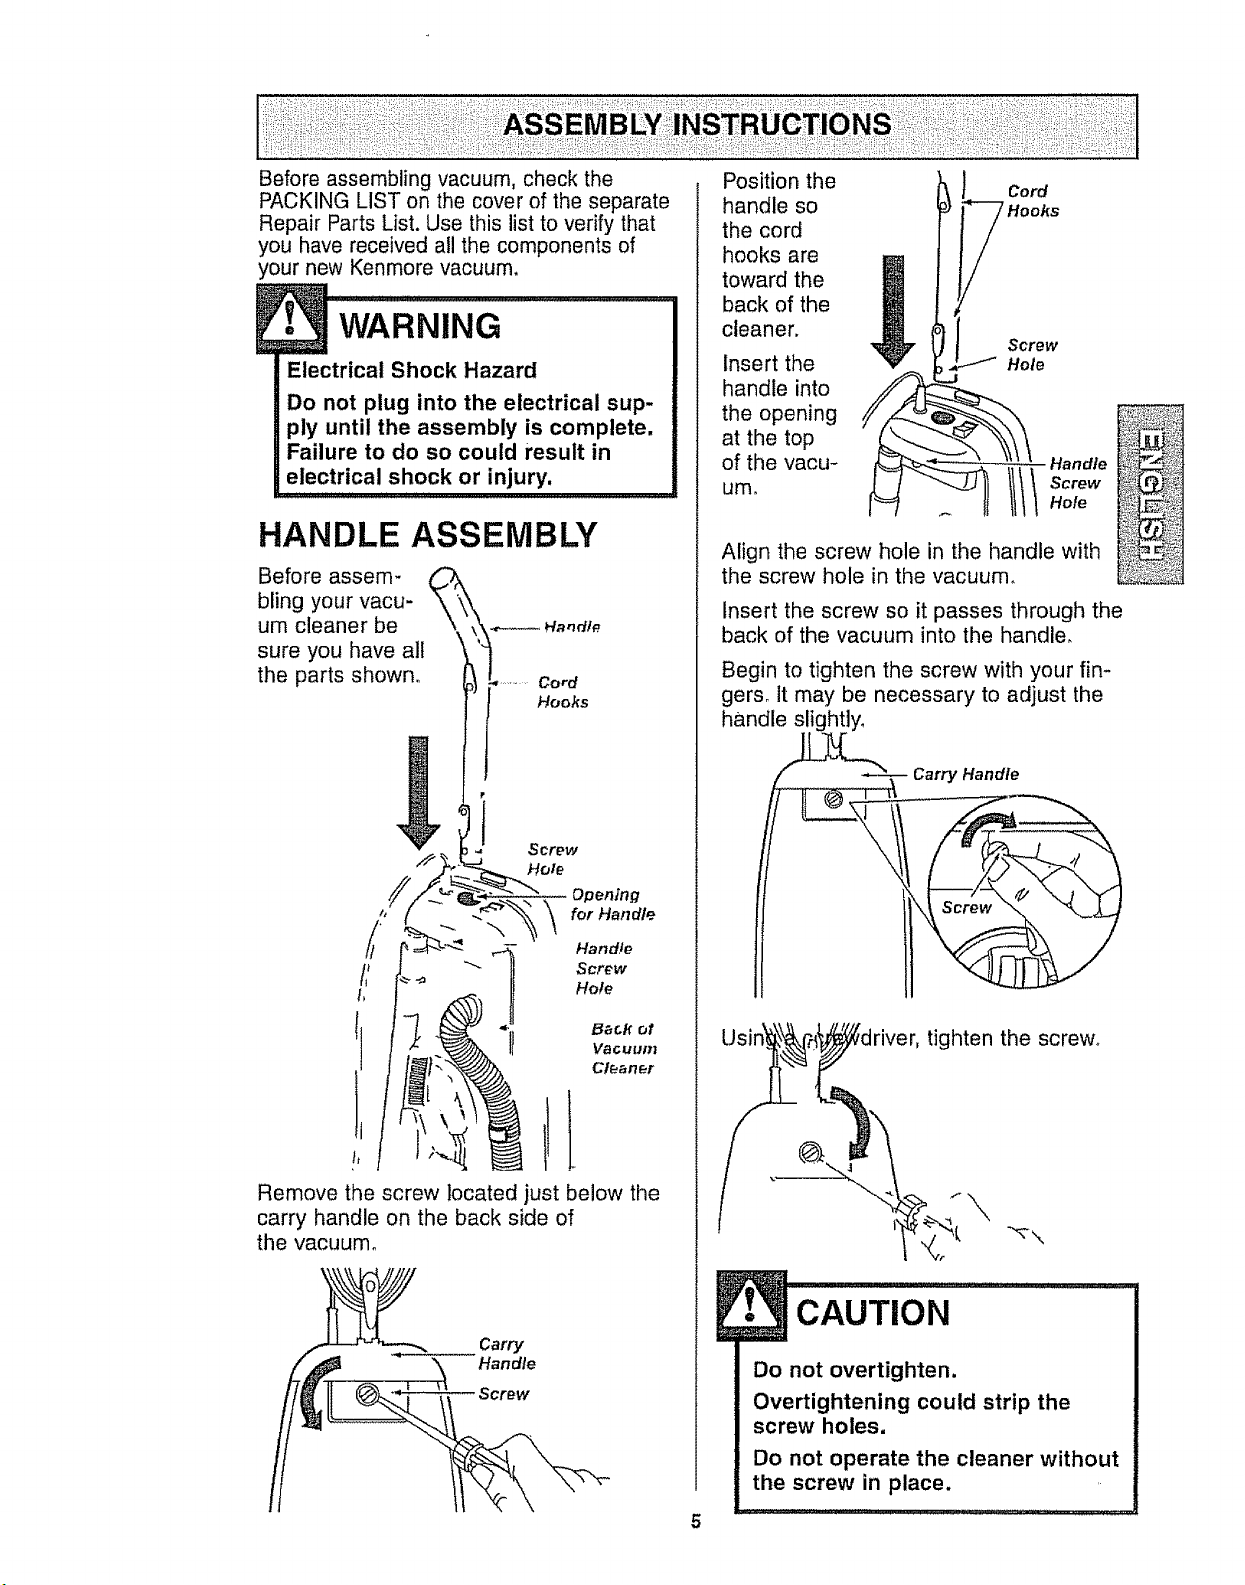
Remove the screw located just below the
carry handle on the back side of
the vacuum_
Carry
Handle
Position the
handle so
the cord
hooks are
toward the
back of the
cleaner.
Insert the
handle into
the opening
at the top
of the vacu-
um.
Cord
_ Hooks
Screw
/ Hole
li_ andfe
Screw
Hole
Align the screw hole in the handle with
the screw hole in the vacuum,
Insert the screw so it passes through the
back of the vacuum into the handle,
Begin to tighten the screw with your fin-
gerso It may be necessary to adjust the
handle slightly,
Carry Handle
Usin
tighten the screw°
E
Do not overtighten.
Overtightening could strip the
screw holes.
Do not operate the cleaner without
the screw in place,
5
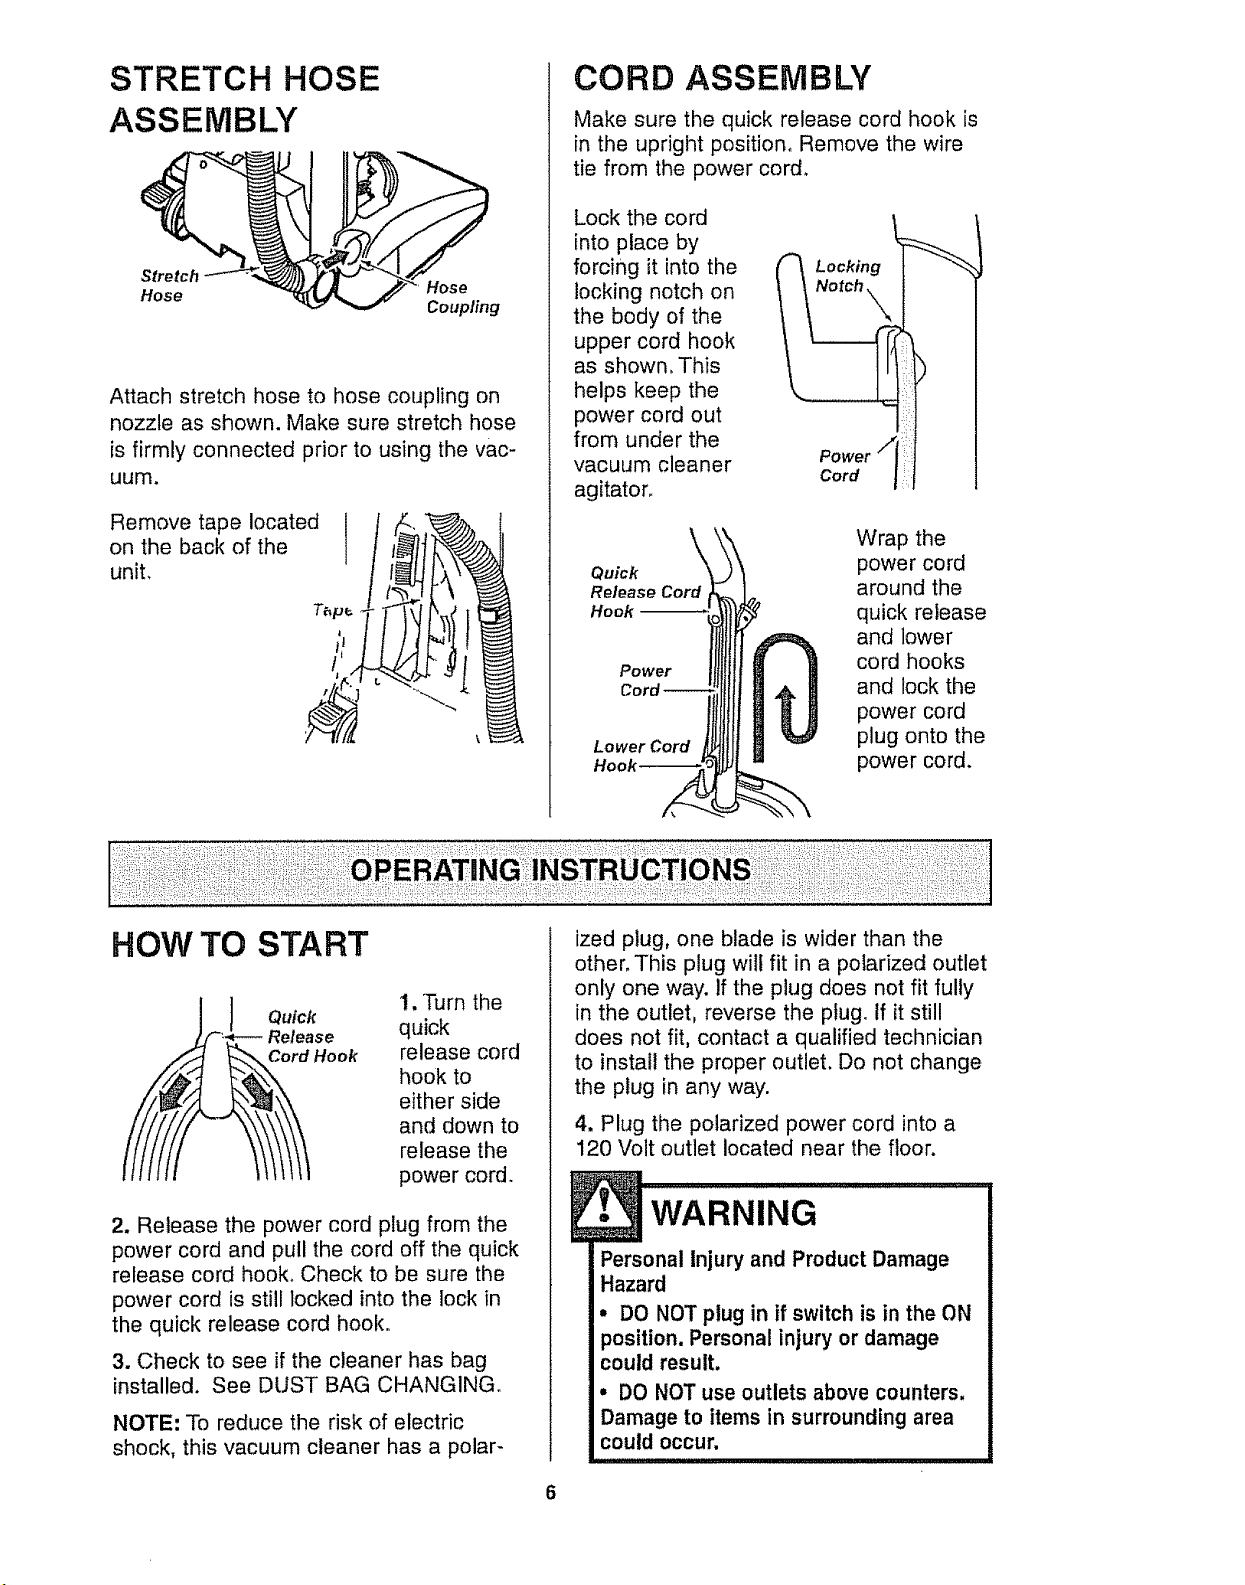
STRETCH HOSE
ASSEMBLY
Attach stretch hose to hose coupling on
nozzle as shown. Make sure stretch hose
is firmly connected prior to using the vac-
uum.
Remove tape located l
on the back of the
unit,
CORD ASSEMBLY
Make sure the quick release cord hook is
in the upright position, Remove the wire
tie from the power cord.
Lock the cord
into place by
forcing it into the
locking notch on
the body of the
upper cord hook
as shown, This
helps keep the
power cord out
from under the
vacuum cleaner
agitatoro
Quick
Release Cord
Hook -_-*.
Power
Lower Cord
Wrap the
power cord
around the
quick release
and lower
cord hooks
and lock the
power cord
plug onto the
power cord.
HOW TO START
_iil Quick
"_--- Release
Hook
1. Turn the
quick
release cord
hook to
either side
and down to
release the
power cord.
2. Release the power cord plug from the
power cord and pull the cord off the quick
release cord hook, Check to be sure the
power cord is still locked into the lock in
the quick release cord hook.
3. Check to see if the cleaner has bag
installed. See DUST BAG CHANGING°
NOTE: To reduce the risk of electric
shock, this vacuum cleaner has a polar-
ized plug, one blade is wider than the
other. This plug will fit in a polarized outlet
only one way. If the plug does not fit fully
in the outlet, reverse the plug. If it still
does not fit, contact a qualified technician
to install the proper outlet. Do not change
the plug in any way.
4. Plug the polarized power cord into a
120 Volt outlet located near the floor.
WARNING
Personal Injury and Product Damage
Hazard
• DO NOT plug in if switch is in the ON
position. Personal injury or damage
could result,
• DO NOT use outlets above counters.
Damage to items in surrounding area
could occur,
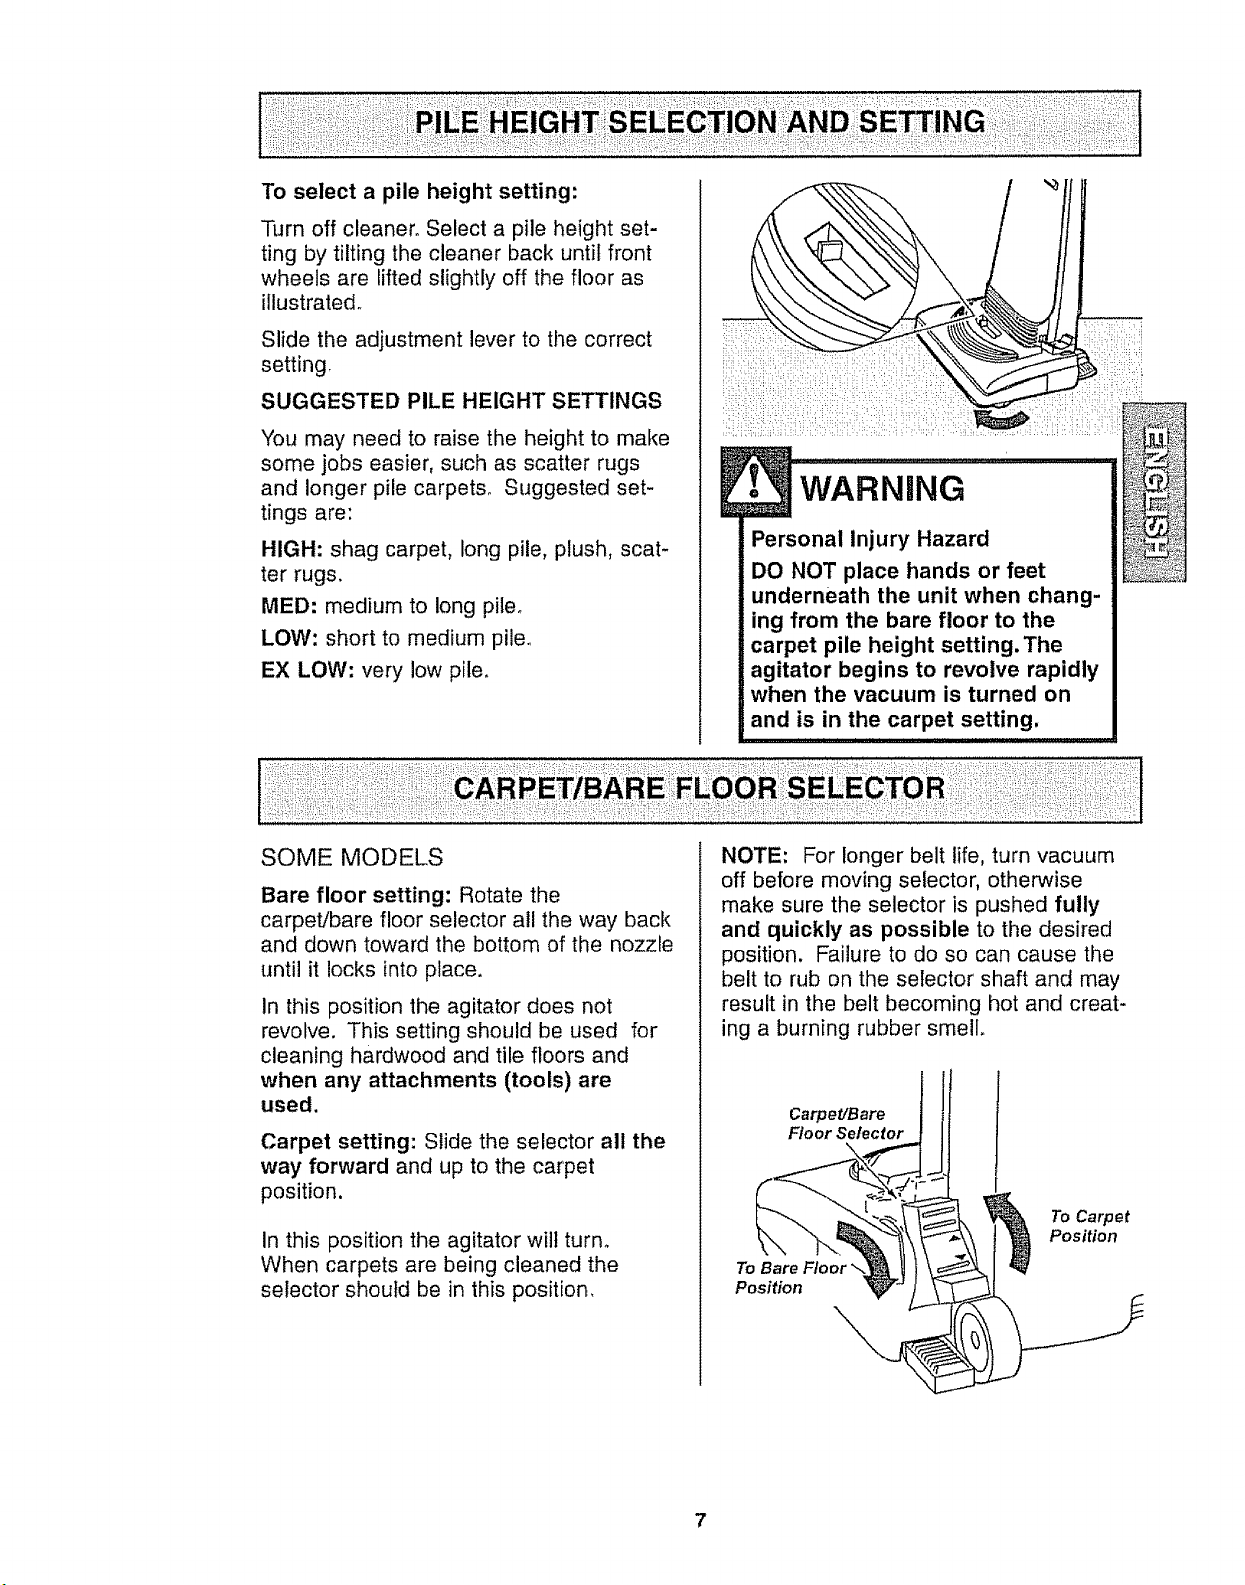
Turn off cleaner. Select a pile height set-
ting by tilting the cleaner back until front
wheels are lifted slightly off the floor as
illustrated.
Slide the adjustment lever to the correct
setting
SUGGESTED PILE HEIGHT SETTINGS
You may need to raise the height to make
some jobs easier, such as scatter rugs
and longer pile carpets° Suggested set-
tings are:
HIGH: shag carpet, long pile, plush, scat-
ter rugs.
rilED: medium to long pileo
LOW: short to medium pile..
EX LOW: very low pile.
I:1
SOME MODELS
Bare floor setting: Rotate the
carpet/bare floor selector all the way back
and down toward the bottom of the nozzle
until it locks into place.
In this position the agitator does not
revolve. This setting should be used for
cleaning hardwood and tile floors and
when any attachments (tools) are
used.
Carpet setting: Slide the selector all the
way forward and up to the carpet
position.
In this position the agitator wilt turn°
When carpets are being cleaned the
selector should be in this position,
NOTE: For longer belt life, turn vacuum
off before moving selector, otherwise
make sure the selector is pushed fully
and quickly as possible to the desired
position. Failure to do so can cause the
belt to rub on the selector shaft and may
result in the belt becoming hot and creat-
ing a burning rubber smell.
Carpet/Bare
Fioor Selector
To Bare Floor \
Position
To Carpet
Position
7

Release the handle by pressing down on
the handle release pedal with your foot
and pulling back and down on the handle
with your hand.
\
Handle
Release Pedal
HANDLE MOUNTED
SOME MODELS
To start the vacuum
cleaner, slide the
ON!OFF switch
from the OFF posi-
tion to the ON posi-
tiono To stop the
vacuum cleaner,
slide the ON/OFF
switch to the OFF
position.
On/Off
Switch
BODY MOUNTED
SOME MODELS
To start the vacuum cleaner, put the
ON/OFF switch on the top of the body in
the ON position. To stop the cleaner, put
the ON/OFF
switch in
the OFF
position_
Crevice
Tool .._
Telescoping
War
Dusting
Brush
Upholstery
Tool
Hose
Hose
Collar
Identify each of the attachments shown
above.
TO USE ATTACHMENTS
Place the bare floor selector in the bare
floor setting by rotating the selector back
and down to the bare floor setting. See
CARPET/BARE FLOOR SELECTOR
section.
When returning the bare floor selector to
the carpet setting, use caution as the
selector can move quickly to that setting
due to tension created by the belto
Remove the lower end of the stretch hose
from the cleaner by grasping the hose
collar, twisting and pulling straight out.
NOTE: The motor protector may open
when using attachments or when cleaning
new carpet, due to reduced airflow by the
attachments themselves or by new carpet
fuzz filling the bag quickly. See the
TROUBLESHOOTING section.
8
WARNING
Electrical Shock And Personal
Injury Hazard
Disconnect electrical supply before
servicing or cleaning the unit.
Failure to do so could result in
electrical shock or personal injury
from cleaner suddenly starti..ng..
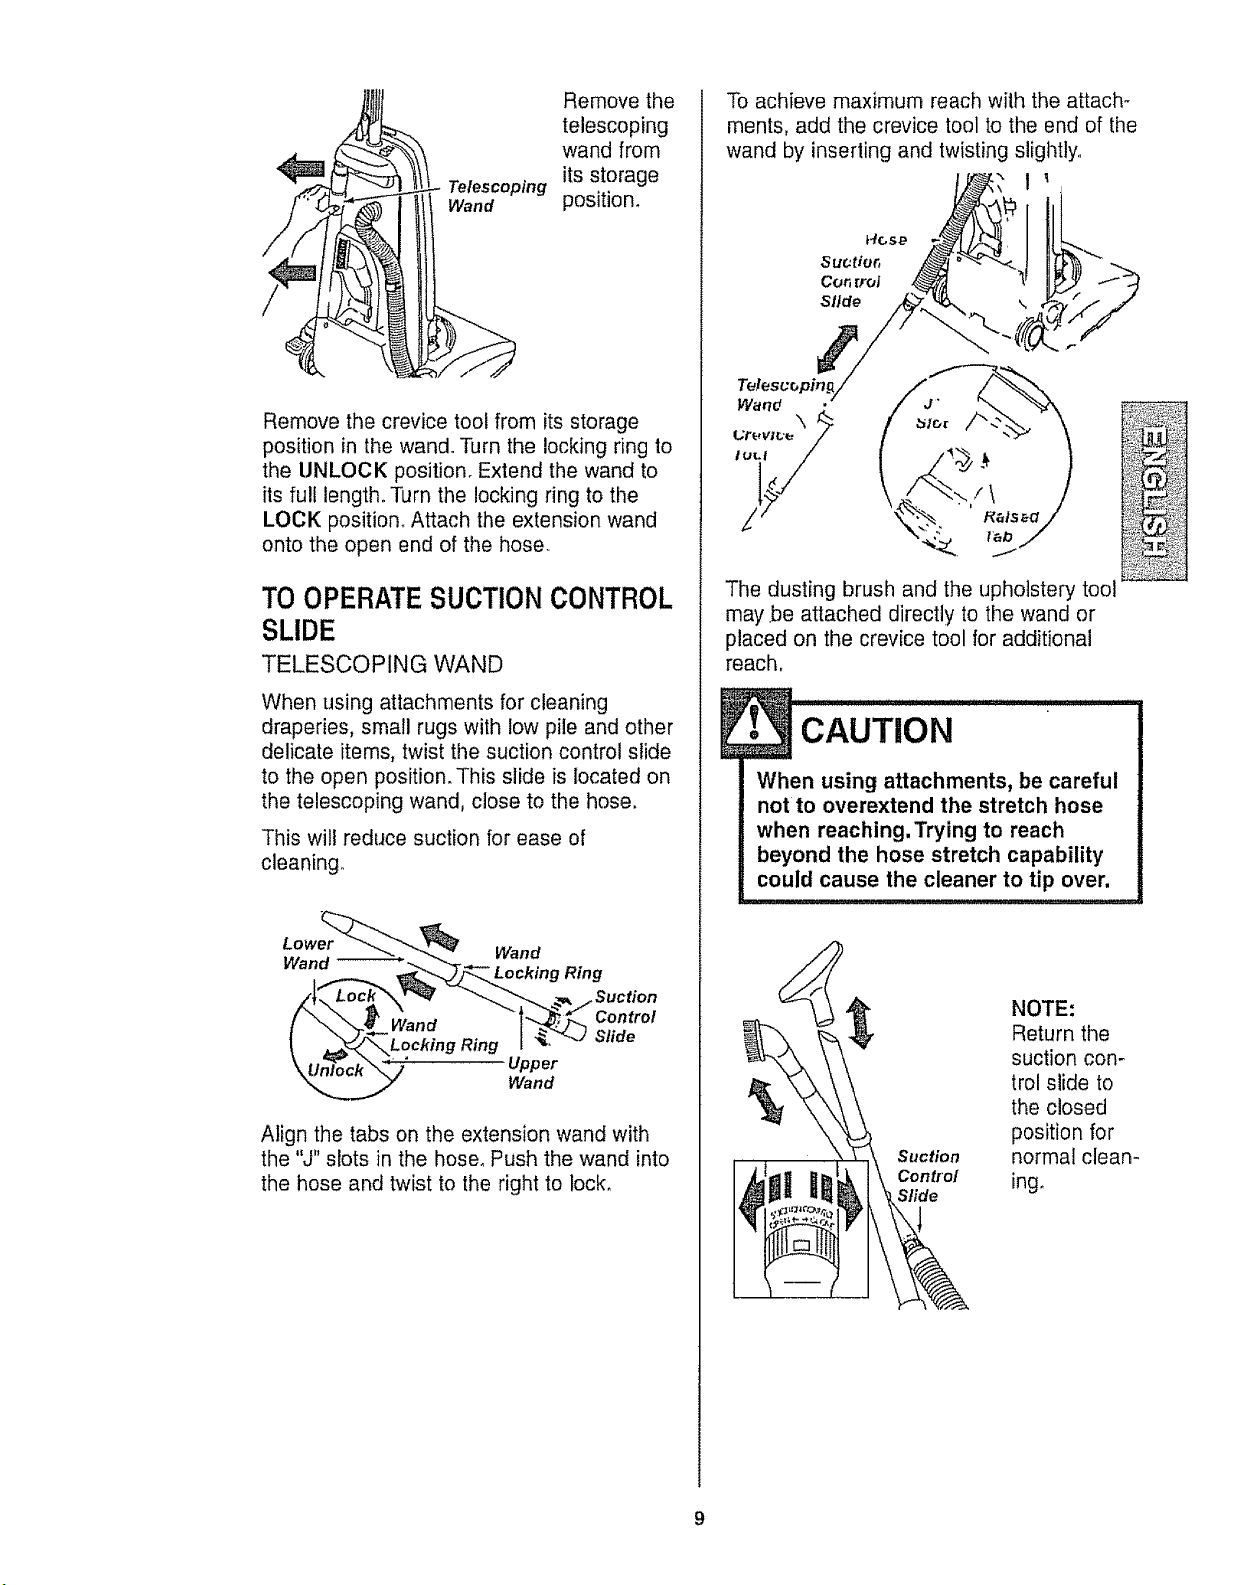
Telescoping
Wand
Remove the
telescoping
wand from
its storage
position.
Remove the crevice tool from its storage
position in the wand. Turn the locking ring to
the UNLOCK position. Extend the wand to
its full length. Turn the locking ring to the
LOCK position° Attach the extension wand
onto the open end of the hose
TOOPERATESUCTIONCONTROL
SLIDE
TELESCOPING WAND
When using attachments for cleaning
draperies, small rugs with low pile and other
delicate items, twist the suction control slide
to the open position. This slide is located on
the telescoping wand, close to the hose.
This will reduce suction for ease of
cleaning
Lowe_-,._ Wand
\, Un_ock"',_ Z" Upper
"_ Wand
Align the tabs on the extension wand with
the "J" slots in the hose. Push the wand into
the hose and twist to the right to lock_
To achieve maximum reach wilh the attach-
ments, add the crevice tool to the end of the
wand by inserting and twisting slightly.
.o. I!!..
Cot,fro/ _ !1F_..Yf .4
St/de ,I_" _ ,, ,_"_/ / /
Tefescopin£/
@
The dusting brush and the upholstery tool
may .be attached directly to the wand or
placed on the crevice tool for additional
reach,
CAUTION
When using attachments, be careful
not to overextend the stretch hose
when reaching. Trying to reach
beyond the hose stretch capability
could cause the cleaner to tip over,
Suction
Control
Slide
NOTE:
Return the
suction con-
trol slide to
the closed
position for
normal clean-
ing_
9
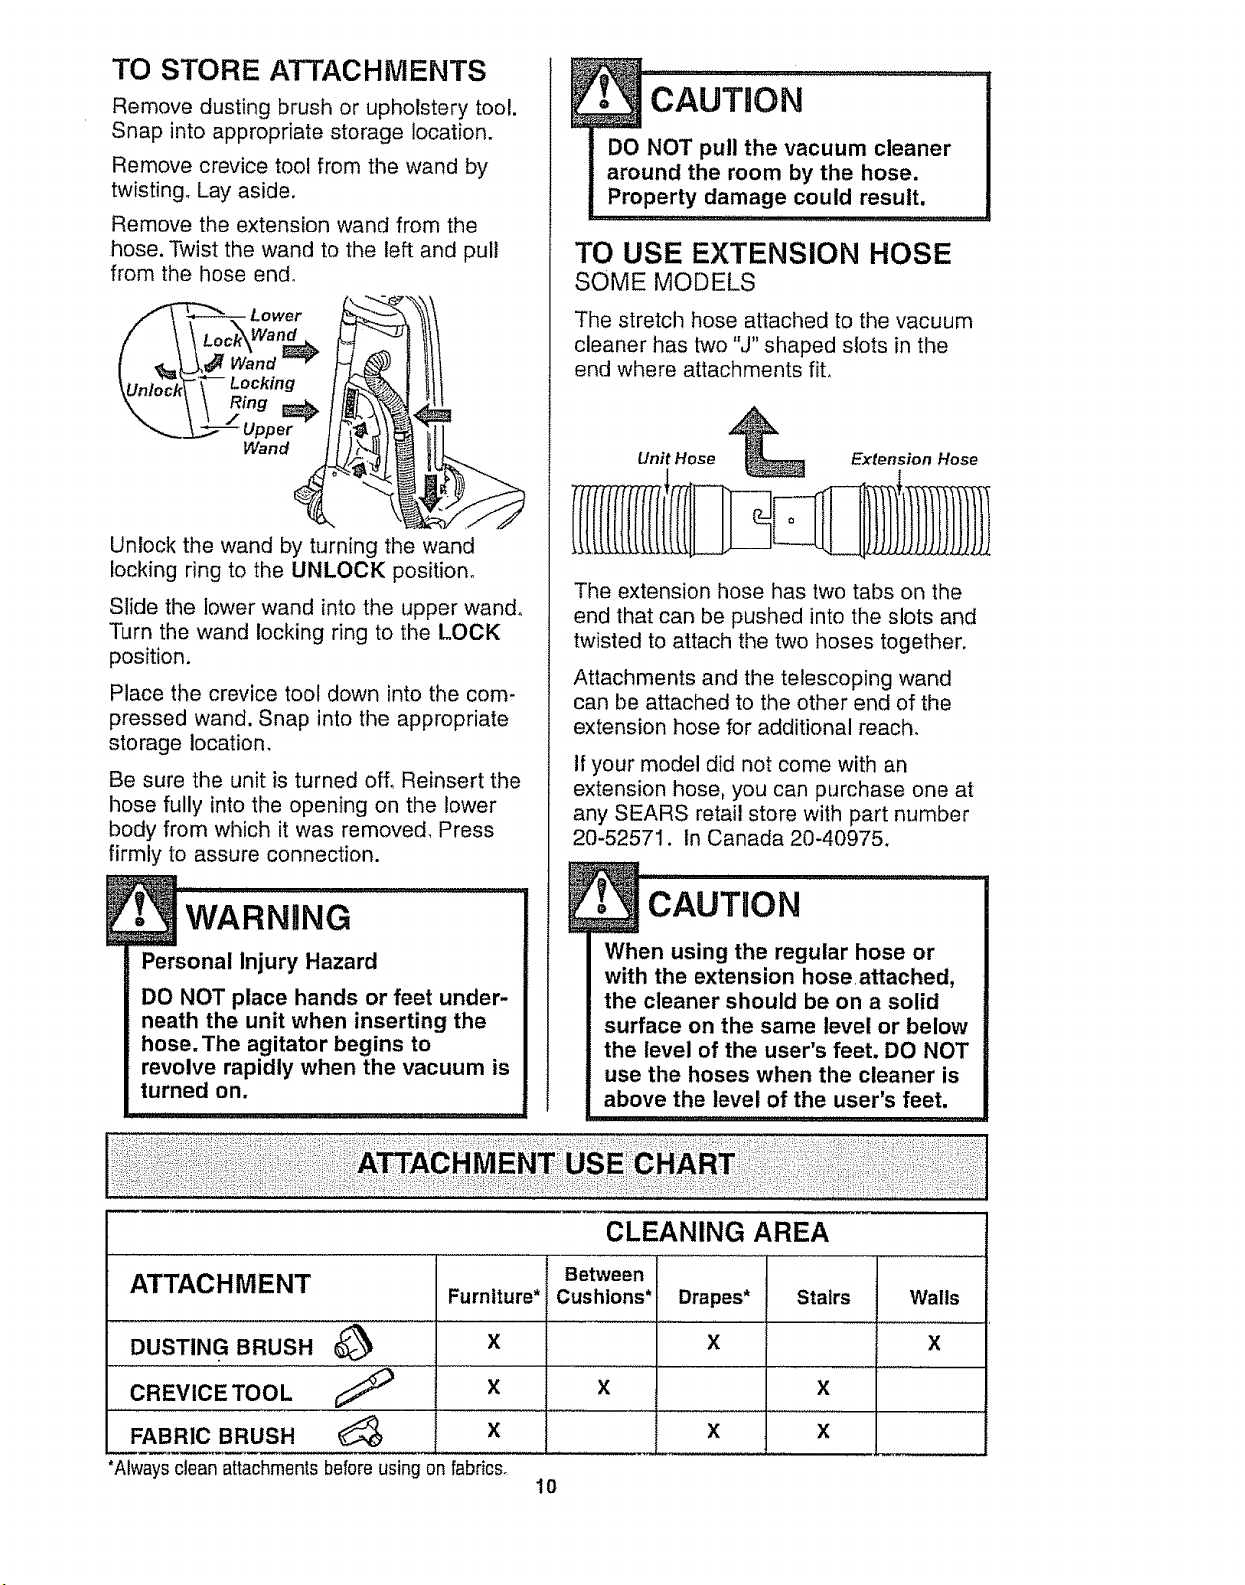
TO STORE ATTACHMENTS
Remove dusting brush or upholstery tool.
Snap into appropriate storage location,
Remove crevice tool from the wand by
twisting, Lay aside.
Remove the extension wand from the
hose, Twist the wand to the left and pull
from the hose end,
Unlock the wand by turning the wand
locking ring to the UNLOCK position,
Slide the lower wand into the upper wand.
Turn the wand locking ring to the LOCK
position.
Place the crevice tool down into the com-
pressed wand, Snap into the appropriate
storage location,
Be sure the unit is turned off, Reinsert the
Ilose fully into the opening on the lower
body from which it was removed, Press
firmly to assure connection.
WARNING
Personal Injury Hazard
DO NOT place hands or feet under-
neath the unit when inserting the
hose,The agitator begins to
revolve rapidly when the vacuum is
turned on,
TO USE EXTENSION HOSE
SOME MODELS
The stretch hose attached to the vacuum
cleaner has two "J" shaped slots in the
end where attachments fit,
Unit Hose
Extension Hose
The extension hose has two tabs on the
end that can be pushed into the slots and
twisted to attach the two hoses together.
Attachments and the telescoping wand
can be attached to the other end of the
extension hose for additional reach.
If your model did not come with an
extension hose, you can purchase one at
any SEARS retail store with part number
20-52571, In Canada 20-40975,
. CAuT oN
When using the regular hose or
with the extension hose,attached,
the cleaner should be on a solid
surface on the same level or below
the level of the user's feet, DO NOT
use the hoses when the cleaner is
above the level of the user's feet,
I1" ','", ..................... IIII, I_11
ATTACHMENT
......CREVICE TOOL
FABRIC BRUSH
Furniture*
X
X
X
*Alwaysclean attachments beforeusing on fabrics_
10
CLEANING AREA
Between
Cushions* Drapes*
X
X
Stairs Walls
X
X
X X

Carpetedges
Guideeithersideorthefrontof thenoz-
zle along a baseboard. The full length
brushes help remove dirt at carpet edges°
Stairs
Put handle in full upright position. Use the
crevice tool or fabric brush°
. RNIN ¸¸&
Personal Injury Hazard
Use care if vacuum cleaner is
placed on stairs. If it falls, person-
al injury or property damage could
result.
i , i I ,111,1,
For best clean-
ing results,
keep the air-
flow passage
clear.
Occasionally,
check each of .4
the areas indi-
cated for clogs.
Unplug the
cleaner from
the outlet
before check-
ing.
PERFORMANCE INDICATOR
SOME MODELS
When the unit is running with normal air
flow, the lines on the performance indica-
tor are white. Red lines appear in the per-
formance indicator whenever the airflow
becomes blocked° if that occurs, check
the disposable dust bag, motor safety fil-
ter and other possible clog locations
shown in CLOG REMOVAL.
NOTE: Red lines may appear when using
attachments, due to reduced air flow
through the attachment.
To correct problem: See the TROU-
BLESHOOTING chart.
:!i_:_:!:/_!:_!_:;i!"::ii:!:i!:_iiii i::!!
• wA..,.G I
Electrical Shock And Personal Injury
Hazard
Disconnect electrical supply before
servicing or cleaning the unit.
Failure to do so could result in elec-
trical shock or personal injury from
cleaner suddenly starting.
MOTOR PROTECTION
SYSTEM
This vacuum has a motor protector by-
pass valve which automatically opens to
provide cooling air to the motor when a
clog prevents the normal flow of air to the
motor_ If the by-pass valve opens to
prevent motor overheating and possible
damage to the vacuum, you will notice a
change of sound as air I1!
rushes through the valve __ 1%
opening°
To correct problem:/._"__
See the TROUBLE- /_ _\/ _"'-"
SHOOTING P-J,t_
_(J / _] Protector
chart. _ _Behind
HOS_')
NOTE: Do not block motor protector.
11
Always follow all safety precautions when
cleaning and servicing the vacuum
cleaner.
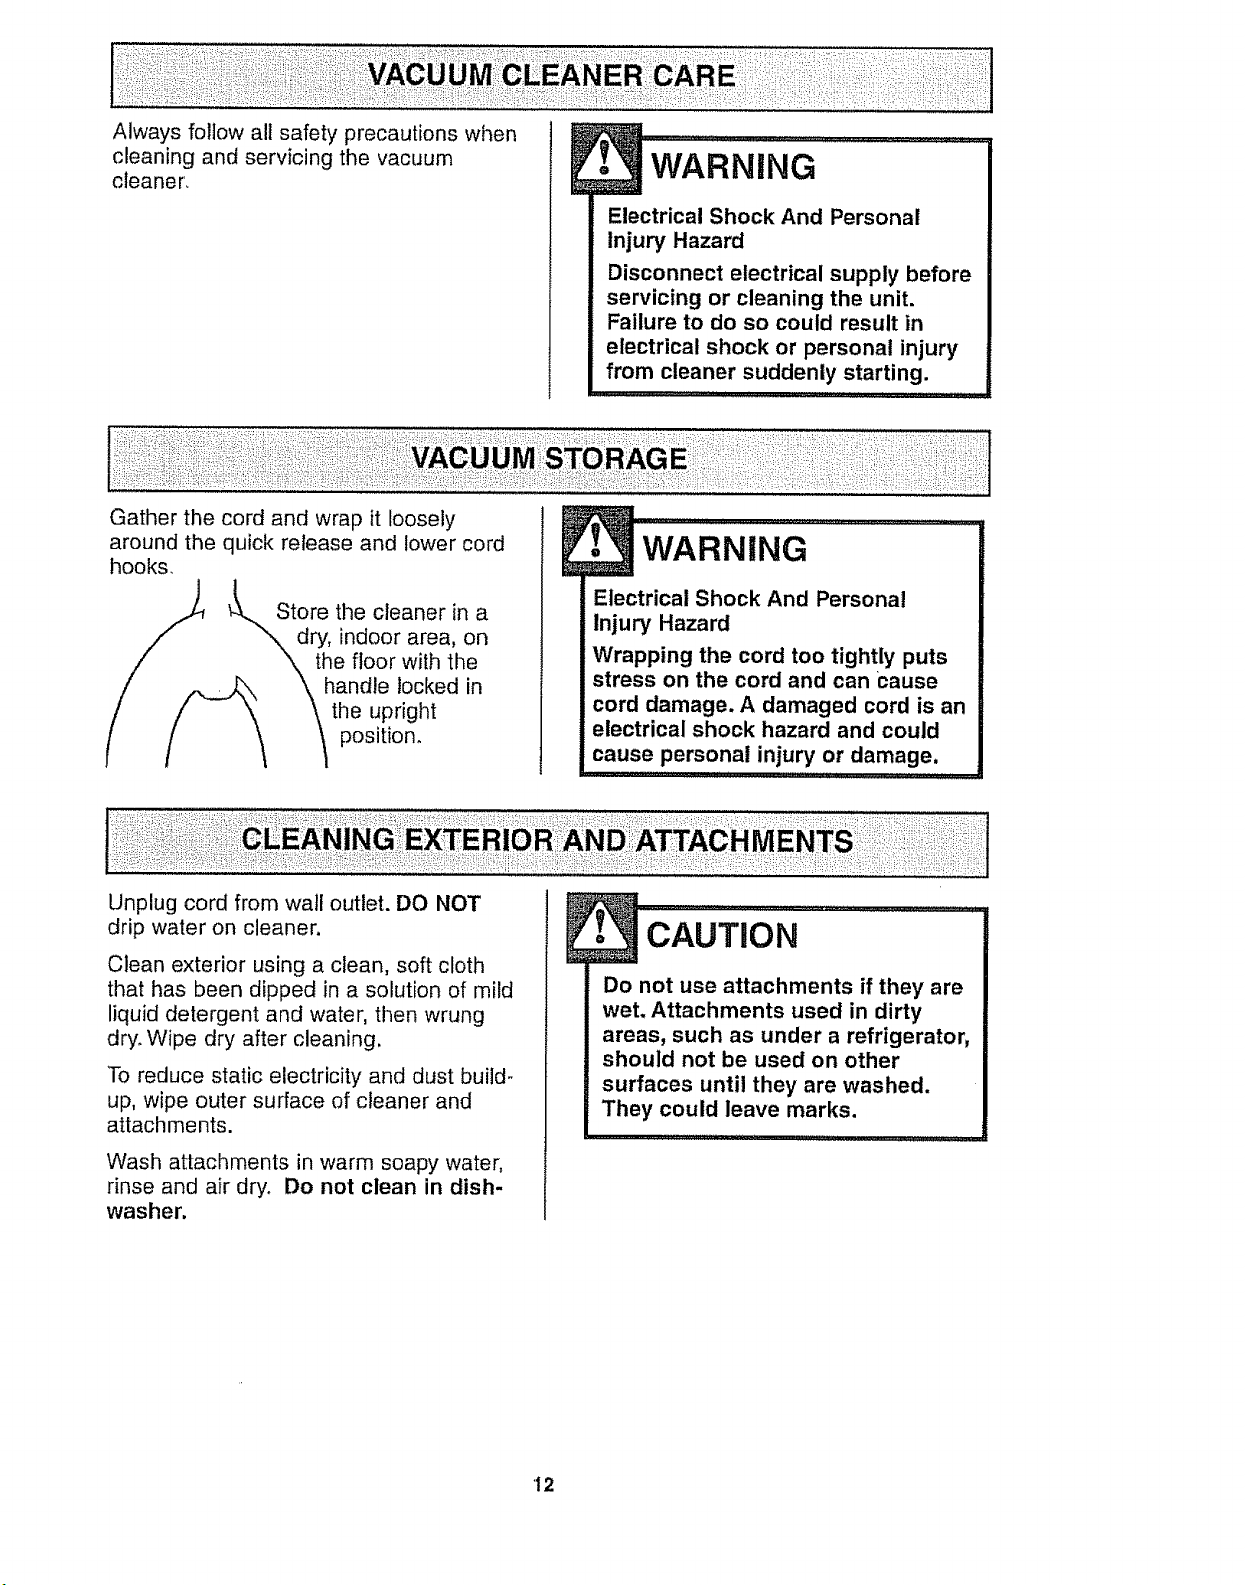
Gather the cord and wrap it loosely
- WARNING.............................
Electrical Shock And Personal
Injury Hazard
Disconnect electrical supply before
servicing or cleaning the unit.
Failure to do so could result in
electrical shock or personal injury
from cleaner suddenly starting.
ir iir r i;i,ii;r ...... .......... ;111;11;i ............
around the quick release and lower cord
hooks.
....,..S\ltore the cleaner in a
ry, indoor area, on
the floor with the
handle locked in
the upright
position.
WARNING
Electrical Shock And Personal
Injury Hazard
Wrapping the cord too tightly puts
stress on the cord and can Cause
cord damage. A damaged cord is an
electrical shock hazard and could
cause personal injury or damage.
Unplug cord from wall outlet. DO NOT
drip water on cleaner.
Clean exterior using a clean, soft cloth
that has been dipped in a solution of mild
liquid detergent and water, then wrung
dry. Wipe dry after cleaning,
To reduce static electricity and dust build-
up, wipe outer surface of cleaner and
attachments.
Wash attachments in warm soapy water,
rinse and air dry. Do not clean in dish-
washer.
Do not use attachments if they are
wet. Attachments used in dirty
areas, such as under a refrigerator,
should not be used on other
surfaces until they are washed.
They could leave marks.
12
TO REMOVE BAG
Always unplug power cord from
electrical outlet before performing
any service on vacuum.
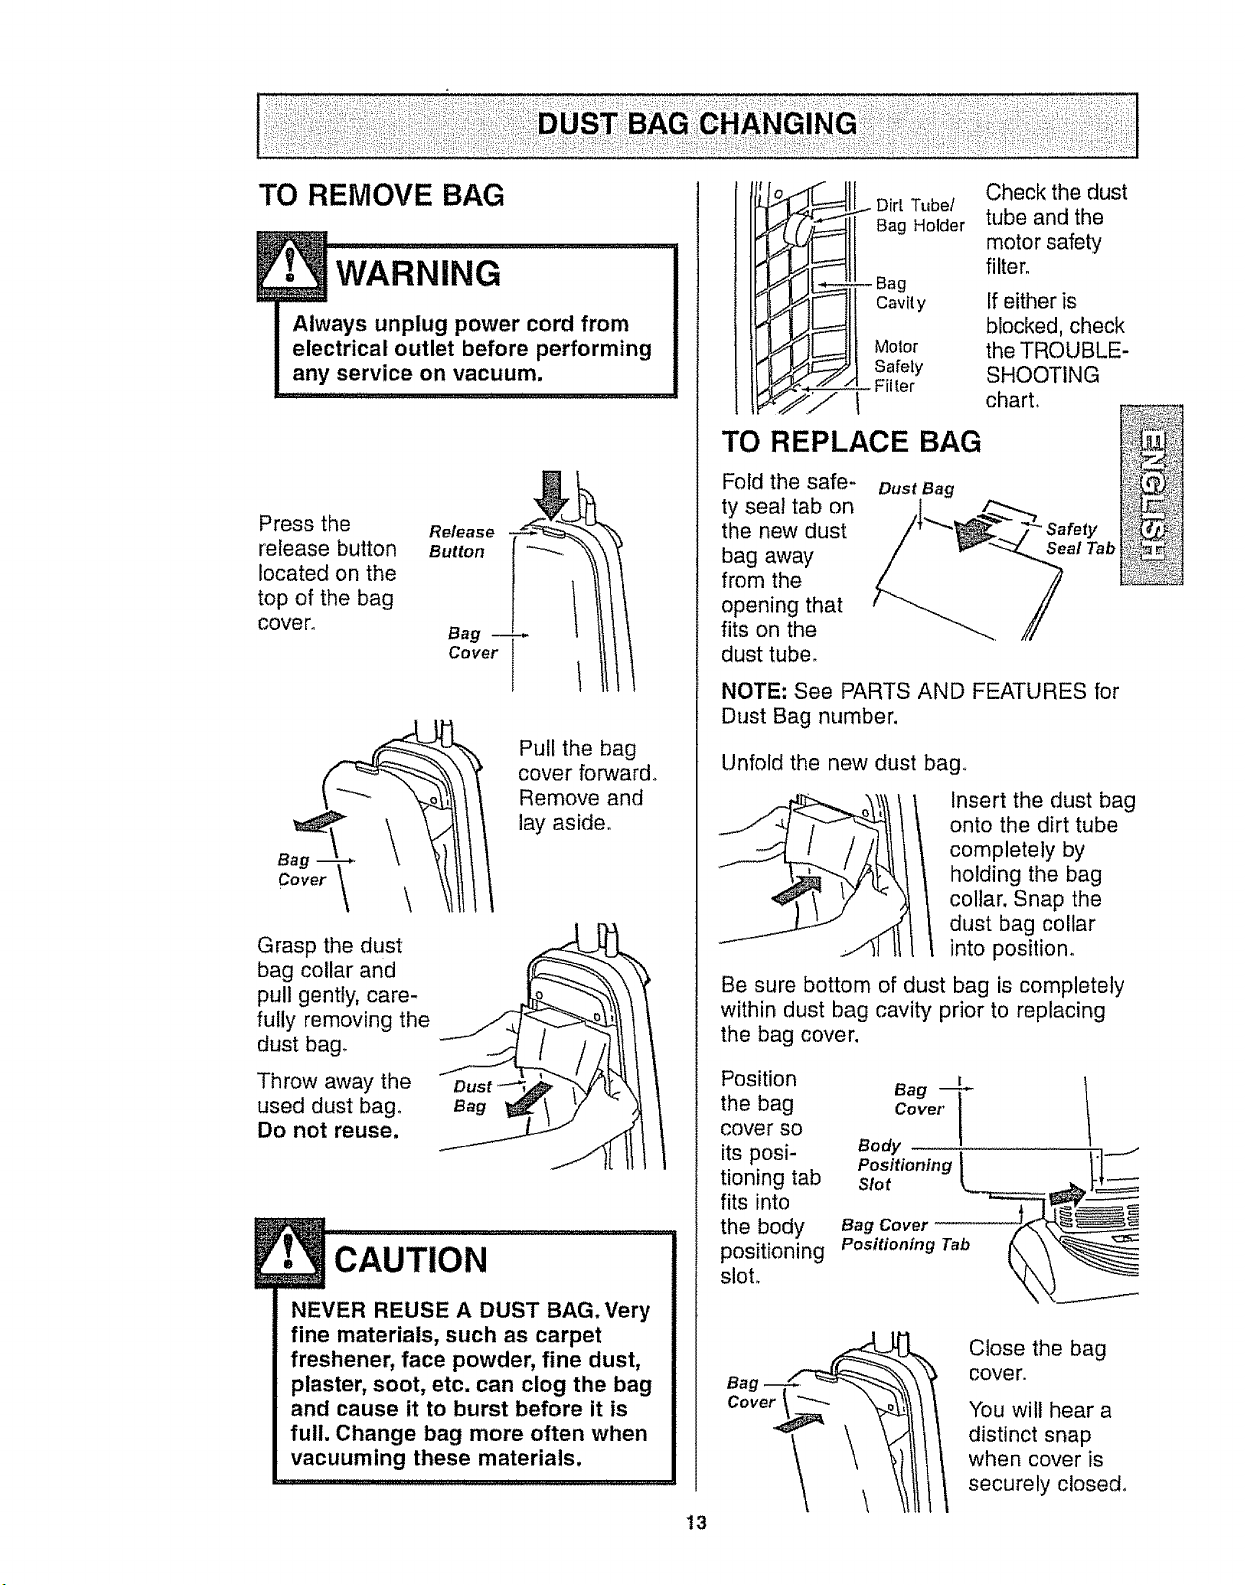
Press the
release button
located on the
top of the bag
cover.
Bag
Cover
Grasp the dust
bag collar and
pull gently, care-
fully removing the
dust bag.
Throw away the
used dust bag.
Do not reuse.
Pull the bag
cover forward°
Remove and
lay aside°
E• CAUTiON ......... !
NEVER REUSE A DUST BAG.Very
fine materials, such as carpet
freshener, face powder, fine dust,
plaster, soot, etc. can clog the bag
and cause it to burst before it is
full. Change bag more often when
vacuuming these materials.
o I Dir[ Tubel
"q Bag Holder
--Bag
Cavil y
Molor
Safety
- Filter
TO REPLACE BAG
Fold the safe-
ty seal tab on
the new dust
bag away
from the
opening that
fits on the
dust tube.
Dust Bag
Check the dust
tube and the
motor safety
filter.
If either is
blocked, check
the TROUBLE-
SHOOTING
chart.
Seal Tab
NOTE: See PARTS AND FEATURES for
Dust Bag number.
Unfold the new dust bag,,
Insert the dust bag
onto the dirt tube
completely by
holding the bag
collar. Snap the
dust bag collar
into position.
Be sure bottom of dust bag is completely
within dust bag cavity prior to replacing
the bag cover.
Position
the bag
cover so
its posi-
tioning tab
fits into
the body
positioning
slot,
!
Bag ---['-
Cover I
Body
13
Close the bag
cove r.
You will hear a
distinct snap
when cover is
securely closed.
Checkmotorsafetyfilterfrequentlyand
cleanwhendirty.
• WARNING
Electrical Shock Hazard
Do not operate the cleaner without
the motor safety filter. Be sure the
filter is dry and properly installed
to prevent motor failure andtor
electrical shock.
Always unplug power cord from
electrical outlet before performing
any service on vacuum.
TO REMOVE BAG
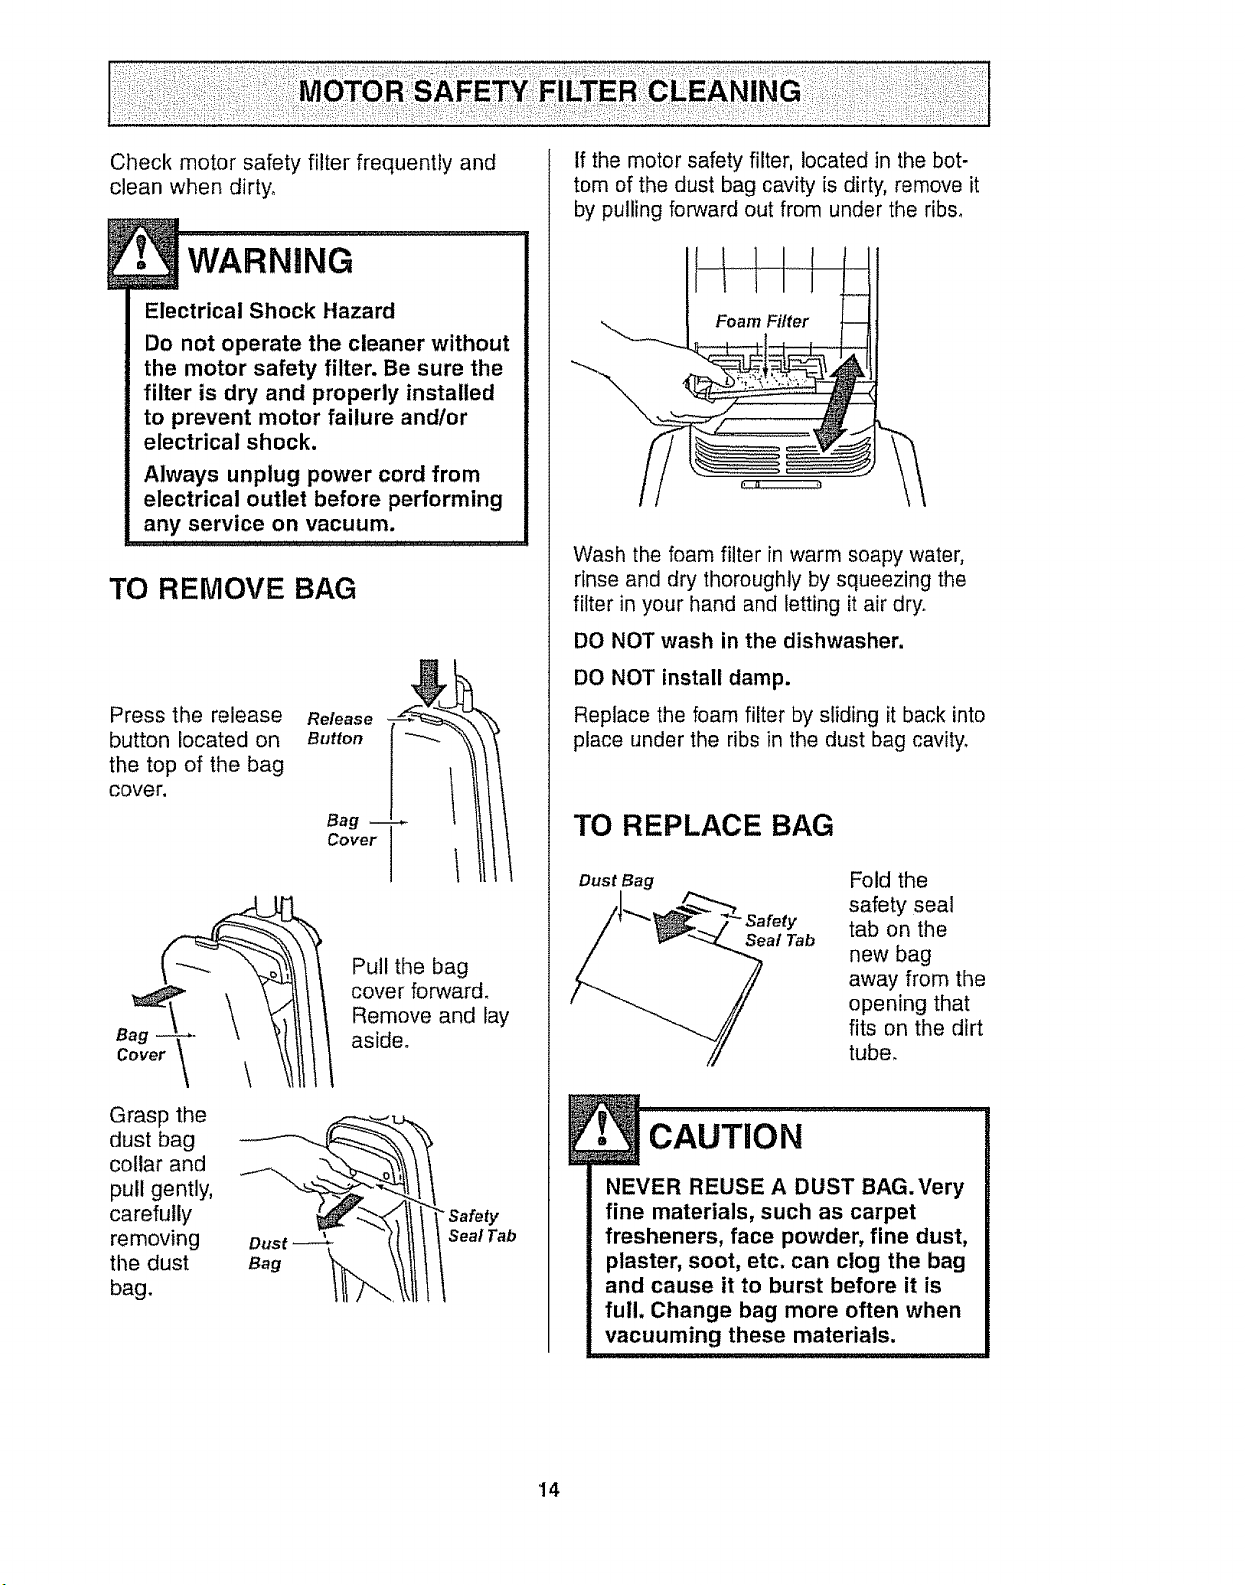
Press the release
button located on
the top of the bag
cover.
Release
Button
Bag
Cover
Dust
Bag
Grasp the
dust bag
collar and
pull gently,
carefully
removing
the dust
bag,
Pull the bag
cover forward.
Remove and lay
aside.
Seal Tab
If the motor safety filter, located in the bot-
tom of the dust bag cavity is dirty, remove it
by pulling forward out from under the ribs,
Wash the foam filter in warm soapy water,
rinse and dry thoroughly by squeezing the
filter in your hand and letting it air dry.
DO NOT wash in the dishwasher.
DO NOT install damp.
Replace the foam filter by sliding it back into
place under the ribs in the dust bag cavity.
TO REPLACE BAG
Dust Bag
Safety
Seal Tab
Fold the
safety seal
tab on the
new bag
away from the
opening that
fits on the dirt
tube,
NEVER REUSE A DUST BAG. Very
fine materials, such as carpet
fresheners, face powder, fine dust,
plaster, soot, etc. can clog the bag
and cause it to burst before it is
full. Change bag more often when
vacuuming these materials.
14
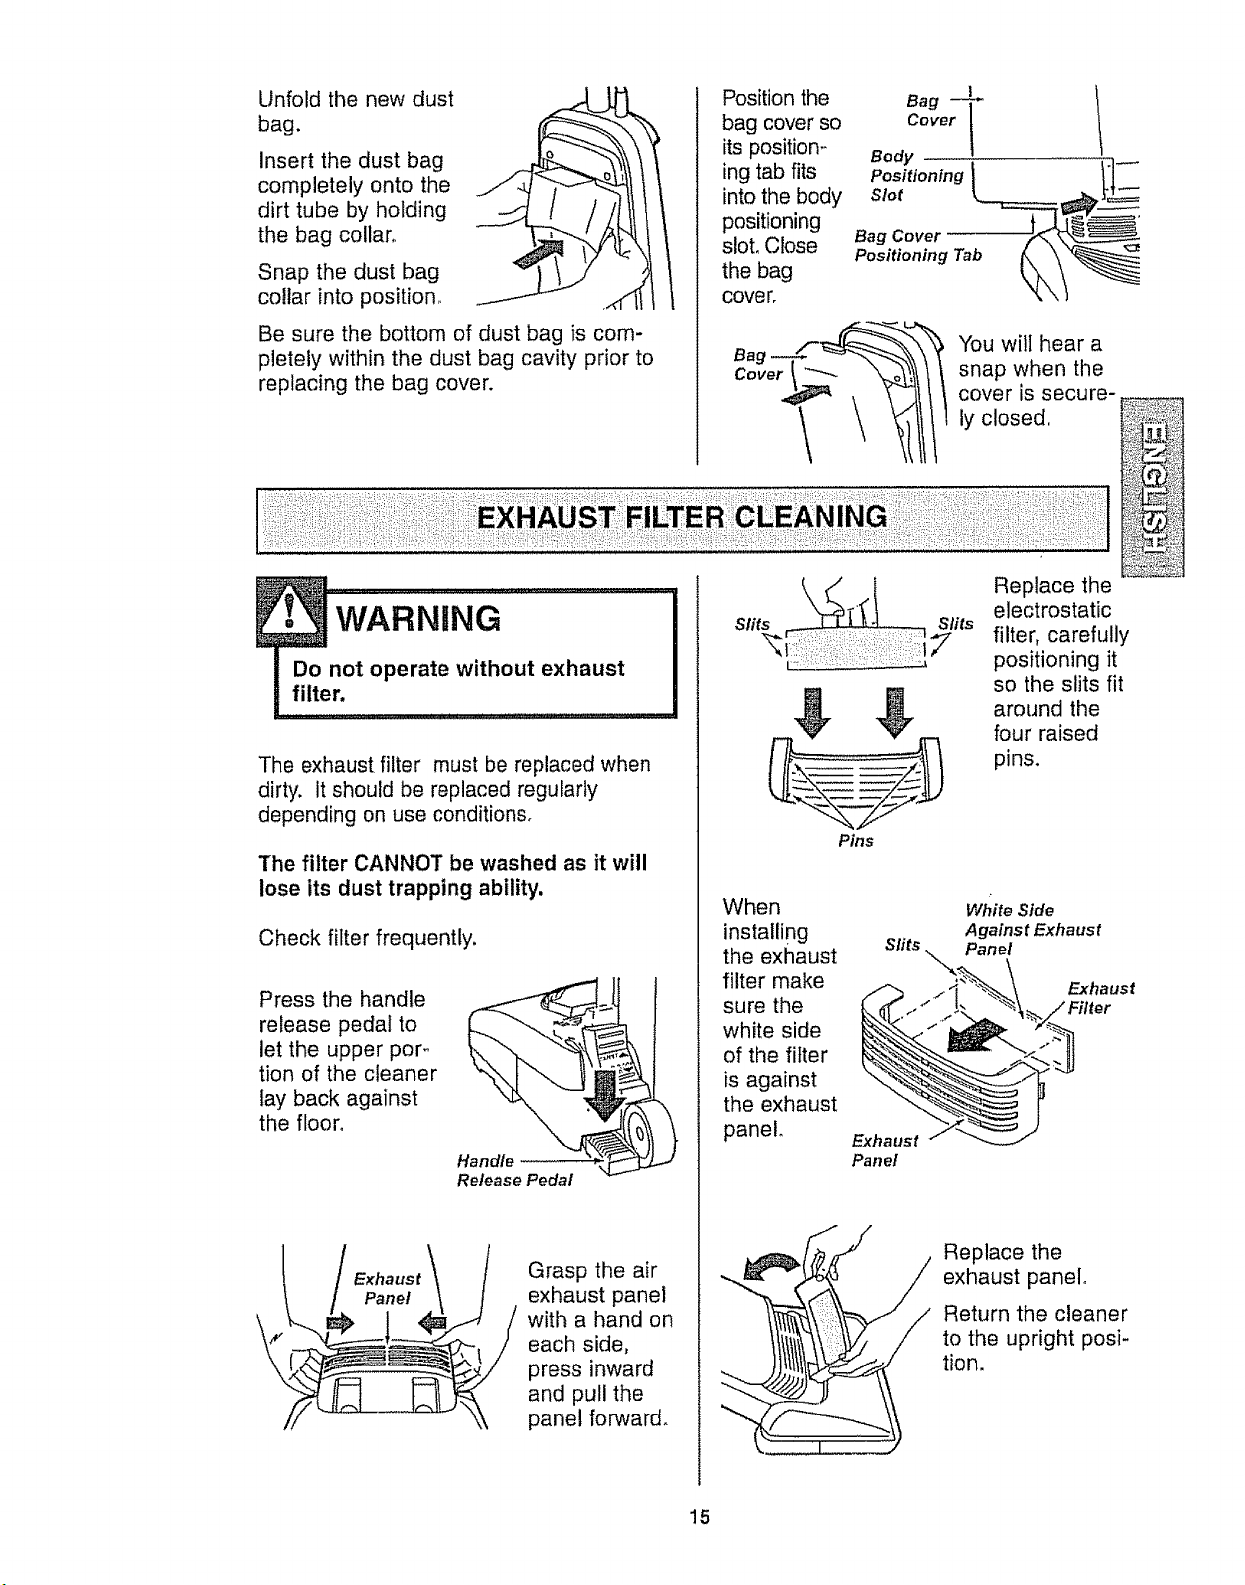
Unfold the new dust
bag.
Insert the dust bag
completely onto the
dirt tube by holding
the bag collar.
Snap the dust bag
collar into position° ...__.I-
Be sure the bottom of dust bag is com-
pletely within the dust bag cavity prior to
replacing the bag cover.
The exhaust filter must be replaced when
dirty. It should be replaced regularly
depending on use conditions,
The filter CANNOT be washed as it will
lose its dust trapping ability,
Check filter frequently.
Press the handle
release pedal to
let the upper poro
tion of the cleaner
lay back against
the floor°
Handle
Release Pedal
\
Exhaus t
Panel
Grasp the air
exhaust panel
with a hand on
each side,
press inward
and pull the
panel forward.
Position the
bag cover so
its position-
ing tab fits
into the body
positioning
slot. Close
the bag
cove r,
!
Bag --_
Cover 1
Body
/- You will hear a
Bag
....whenthe
cover is secure- _
ly closed. _._:_:_!
Replace the :'_::'_!_
electrostatic
Slits filter, carefully
_ positioning it
so the slits fit
around the
four raised
pins.
Pins
When
installing
the exhaust
filter make
sure the
white side
of the filter
is against
the exhaust
panel
Slits
Exhaust
Panel
White Side
Against Exhaust
Panel
Exhaust
..._._ _.___"_/ Replace the
exhaust panel.
Return the cleaner
!_/_j / to the upright posi-
lit! tion.
15
WAR:Ni:NG.......................................
Electrical Shock Or Personal Injury
Hazard
Disconnect electrical supply before
servicing or cleaning the unit.
Failure to do so could result in
electrical shock or personal injury
from cleaner suddenly starting.
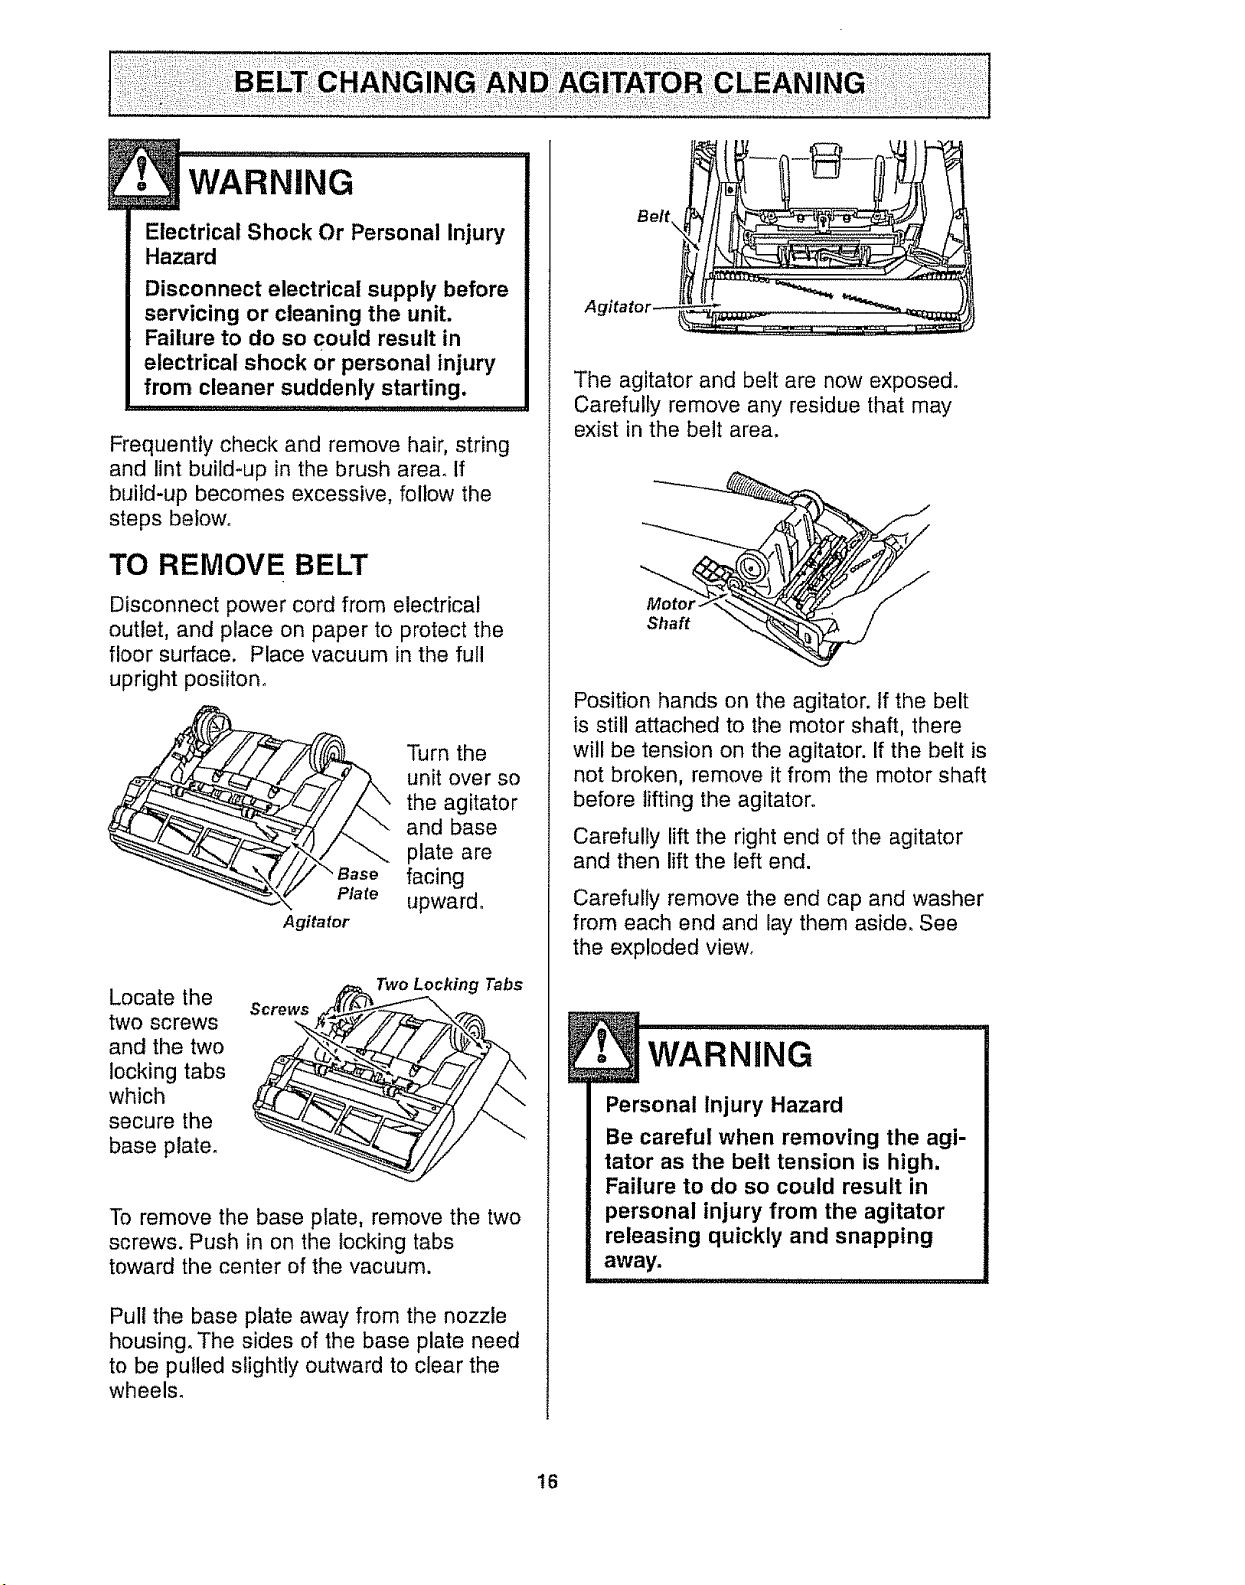
Frequently check and remove hair, string
and lint build-up in the brush area. If
build-up becomes excessive, follow the
steps below.
TO REMOVE BELT
Disconnect power cord from electrical
outlet, and place on paper to protect the
floor surface. Place vacuum in the full
upright posiiton°
Plate
Agitator
Turn the
unit over so
the agitator
and base
plate are
facing
upward°
Locate the
two screws
and the two
locking tabs
which
secure the
base plate.
Screws
Two Locking Tabs
To remove the base plate, remove the two
screws. Push in on the locking tabs
toward the center of the vacuum.
Pull the base plate away from the nozzle
housing. The sides of the base plate need
to be pulled slightly outward to clear the
wheels.
Belt _=
Agitator
The agitator and belt are now exposed.
Carefully remove any residue that may
exist in the belt area.
Motor
Shaft
Position hands on the agitator. If the belt
is still attached to the motor shaft, there
will be tension on the agitator. If the belt is
not broken, remove it from the motor shaft
before lifting the agitator.
Carefully lift the right end of the agitator
and then lift the left end.
Carefully remove the end cap and washer
from each end and lay them aside. See
the exploded view.
WARNING
Personal Injury Hazard
Be careful when removing the agi-
tator as the belt tension is high.
Failure to do so could result in
personal injury from the agitator
releasing quickly and snapping
away.
16

• CAUTnON !
When you remove the end caps, a
small metal washer on each end
may come off. DO NOT lose these
two metal washers,
,J_t
TO CLEAN AGITATOR
NOTE: tn order to keep cleaning efficiency
high and to prevent damage to your vacu-
um, the__itator must be cleaned every time
the belt is changed.
The agitator must also be cleaned accord-
ing to the following schedule:
Vacuum Use Clean Agitator
HEAVY -
(used daily)
MODERATE -
(used 2-3 times/week)
LIGHT -
(used 1 time/week)
every week
every month
every 2 months
Remove any dirt or debris in the belt path
area or in the brush roller area°
Exploded View - Agitator
Assembly
Felt Washer
Agitator Unit
Felt Washer
End
Cap
End
Cap
Carefully remove
any string or
debris located on
the agitator, end
caps or agitator
bearing°
TO REPLACE BELT
Make sure that the carpet/bare floor
selector is in the carpet position_
Loop the new belt on the motor shaft.
Motor
Shaft
New
Belt
Belt
. Carpet/Bare
Floor Selector Shaft
Belt
Groove
NOTE: See PARTS AND FEATURES for
belt number.
Loop the end of the new belt on the brush
assembly.
Align the square extension on each end
cap with the slots in the frame of the
nozzle.
Nozzle -
Nozzle slot
Slot
NOTE: Care must be taken due to the
belt tension during reassembly.
17
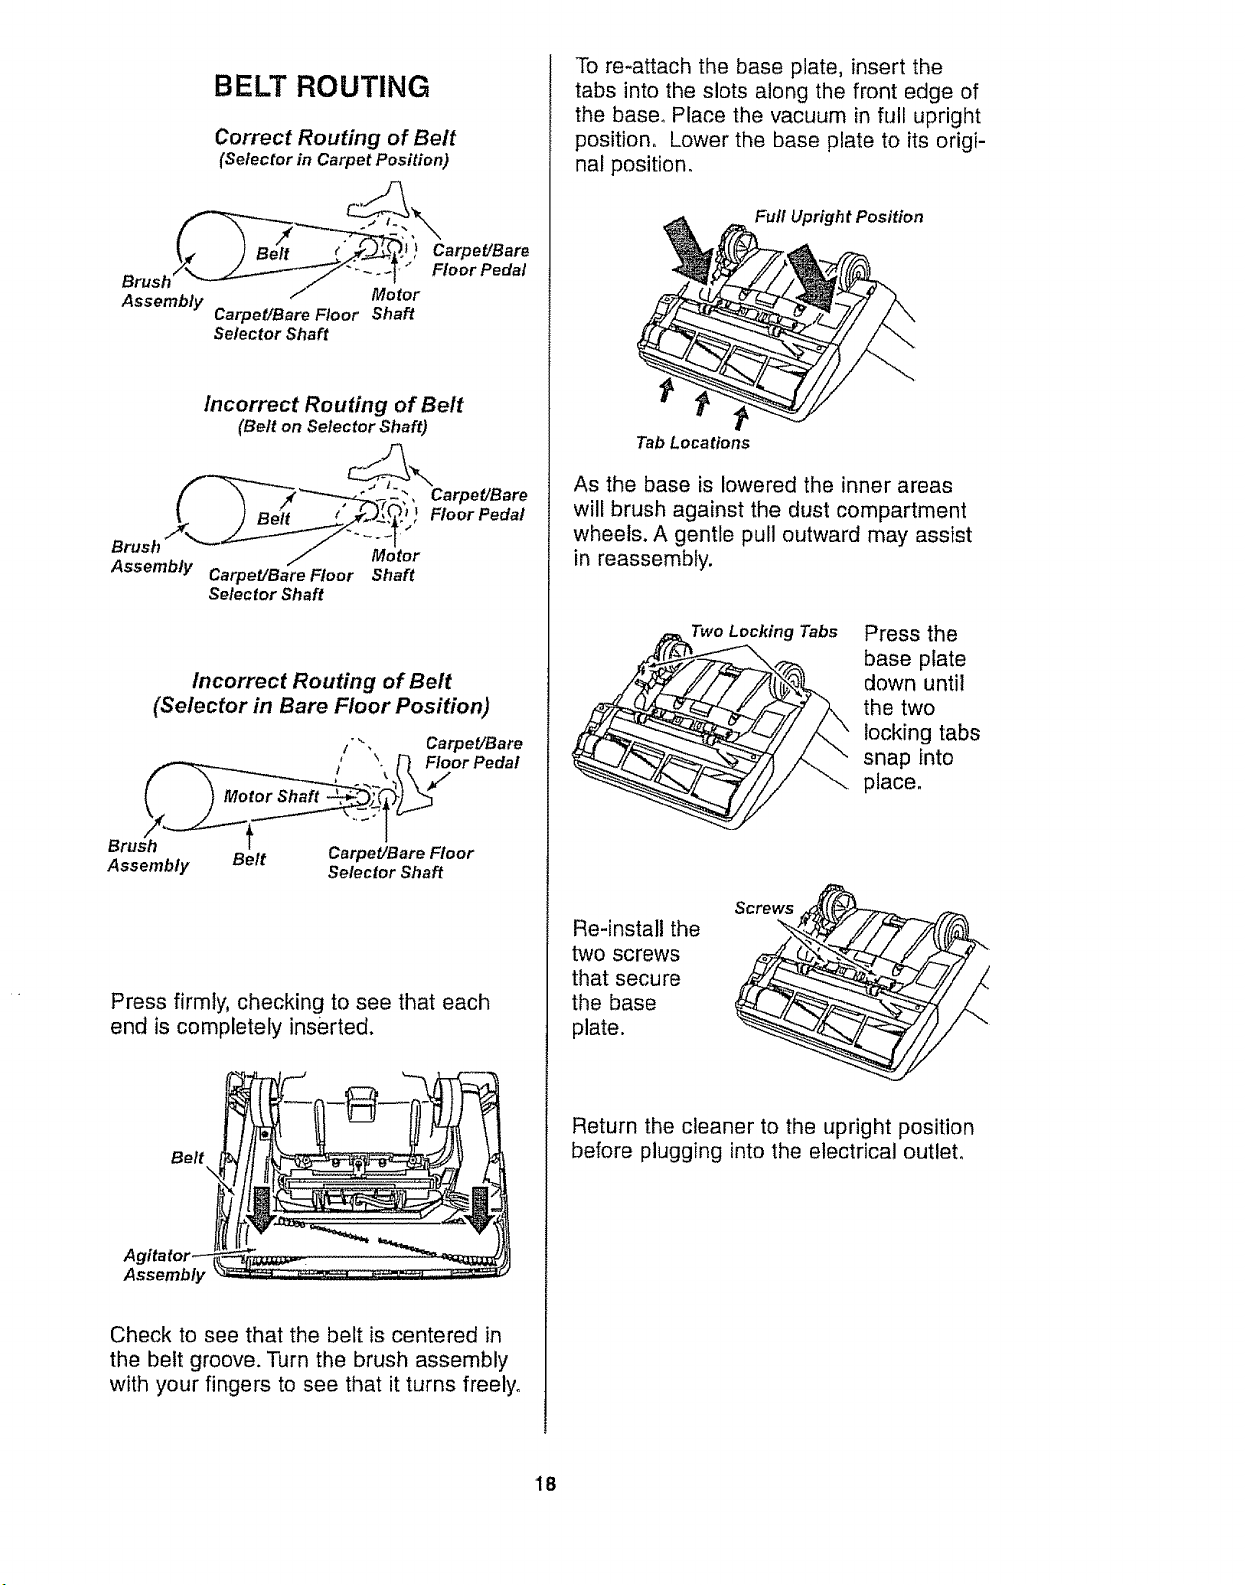
BELT ROUTING
Correct Routing of Belt
(Selector in Carpet Position)
Assembly
Carpet/Bare Floor Shaft
Selector Shaft
Incorrect Routing of Belt
(Belt on Selector Shaft)
Assembly CarpeYBare FIoor Shaft
Selector Shaft
Incorrect Routing of Belt
(Selector in Bare Floor Position)
Brush Carpet/Bare Floor
Assembly Belt Selector Shaft
Press firmly, checking to see that each
end is completely inserted.
Belt
\
Agitator_
Assembly
Check to see that the belt is centered in
the belt groove. Turn the brush assembly
with your fingers to see that it turns freely°
To re-attach the base plate, insert the
tabs into the slots along the front edge of
the base, Place the vacuum in full upright
position, Lower the base plate to its origi-
nal position,
Full Upright Position
Tab Locations
As the base is lowered the inner areas
will brush against the dust compartment
wheels. A gentle pull outward may assist
in reassembty.
Two Locking Tabs Press the
base plate
clown until
the two
locking tabs
snap into
place.
Re-install the
two screws
that secure
the base
plate.
Screws
Return the cleaner to the upright position
before plugging into the electrical outlet,
18
Always follow all safety precautions when
cleaning and servicing the vacuum
cleaner.
1• WARNING...............................
Electrical Shock Or Personal Injury
Hazard
Disconnect electrical supply before
servicing or cleaning the unit.
Failure to do so could result in
electrical shock or personal injury
from cleaner suddenly starting.
: :......................,,.
If the cleaner does not seem to have ade-
quate suction, first check for a full bag or
filter which is clogged° See instructions in
DUST BAG CHANGING and MOTOR
SAFETY FILTER CLEANING.
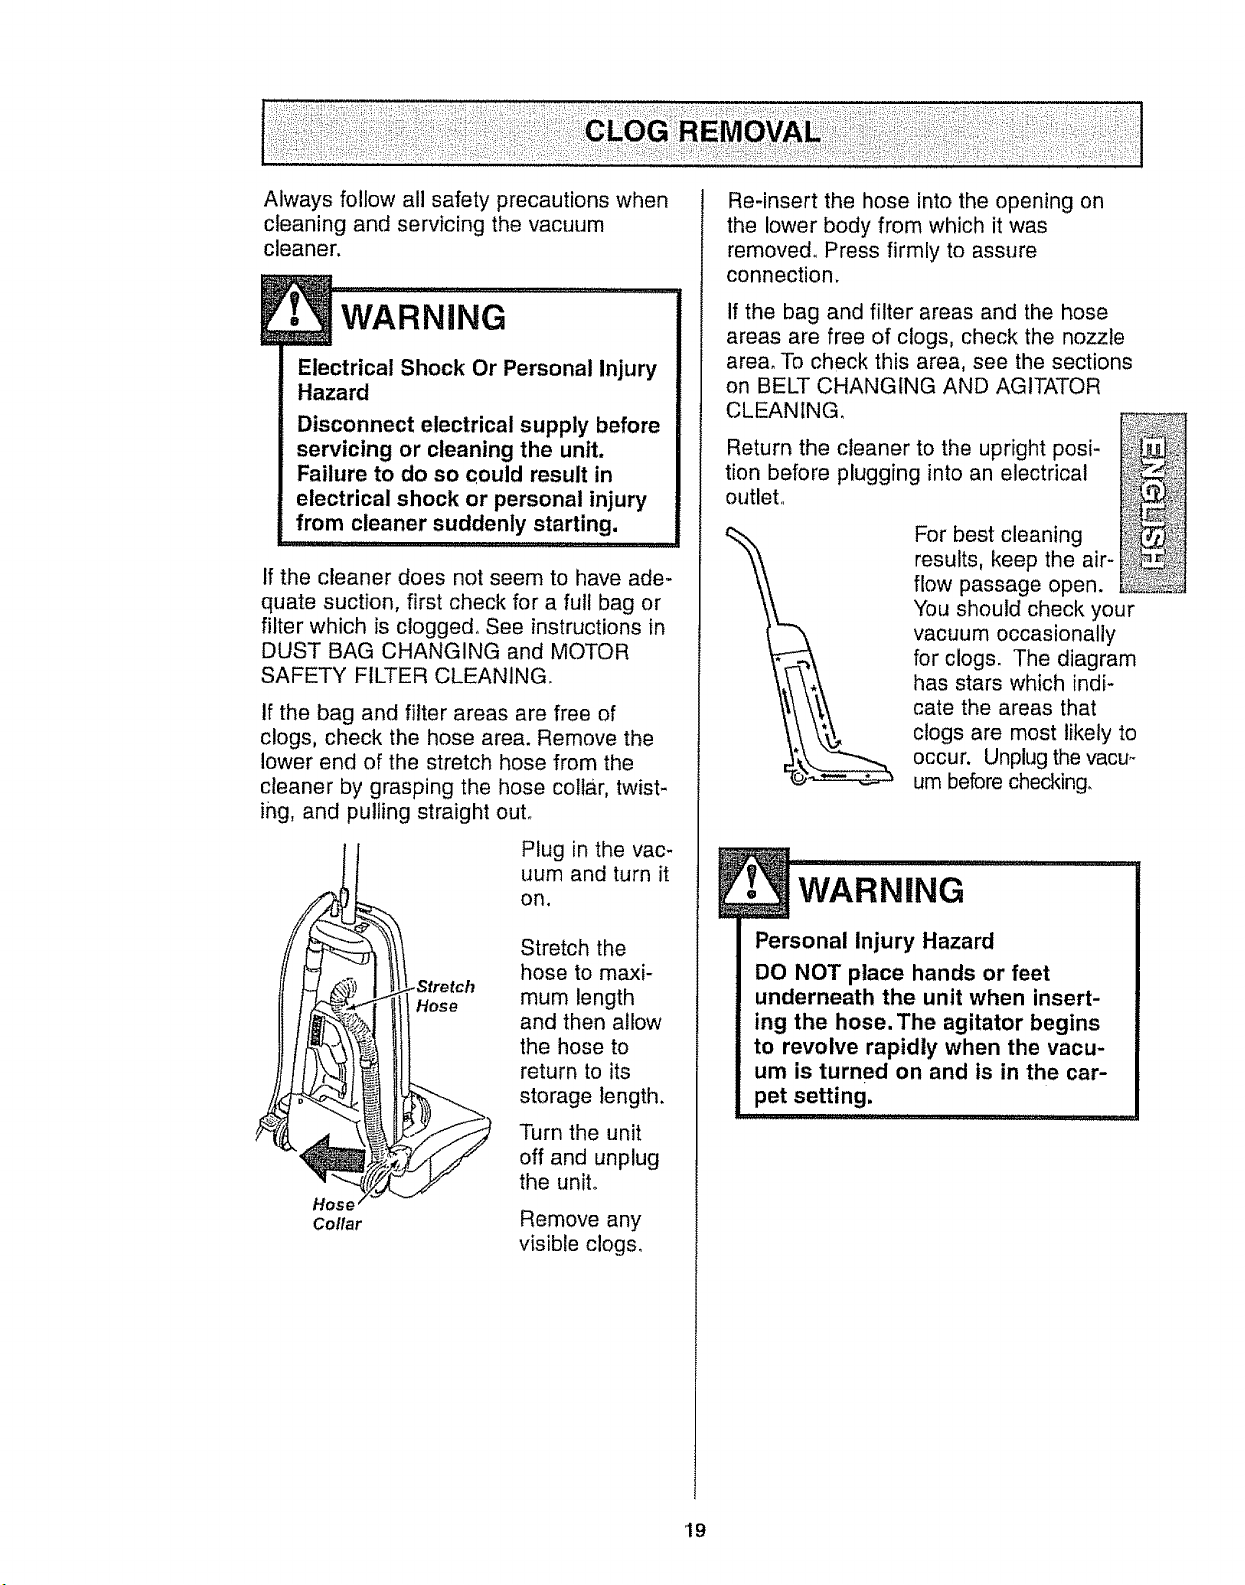
If the bag and filter areas are free of
clogs, check the hose area. Remove the
lower end of the stretch hose from the
cleaner by grasping the hose collar, twist-
ing, and pulling straight ouL
J
Plug in the vac-
uum and turn it
on.
Hose
Co!lar
Hose
Stretch the
hose to maxi-
mum length
and then allow
the hose to
return to its
storage length.
Turn the unit
off and unplug
the unit°
Remove any
visible clogs.
Re-insert the hose into the opening on
the lower body from which it was
removed. Press firmly to assure
connection.
if the bag and filter areas and the hose
areas are free of clogs, check the nozzle
area. To check this area, see the sections
on BELT CHANGING AND AGITATOR
CLEANING.
Return the cleaner to the upright posi-
tion before plugging into an electrical
outlet,,
For best cleaning
results, keep the air-
flow passage open.
You should check your
vacuum occasionally
for clogs. The diagram
has stars which indi-
cate the areas that
clogs are most likely to
occur. Unplug the vacu_
um before checking.
!
Personal Injury Hazard
DO NOT place hands or feet
underneath the unit when insert-
ing the hose. The agitator begins
to revolve rapidly when the vacu-
um is turned on and is in the car-
pet setting.
19
i
WARNING
Electrical Shock Or Personal Injury
Hazard
Disconnect electrical supply before
servicing or cleaning the unit.
Failure to do so could result in
electrical shock or personal injury
from cleaner suddenly starting.
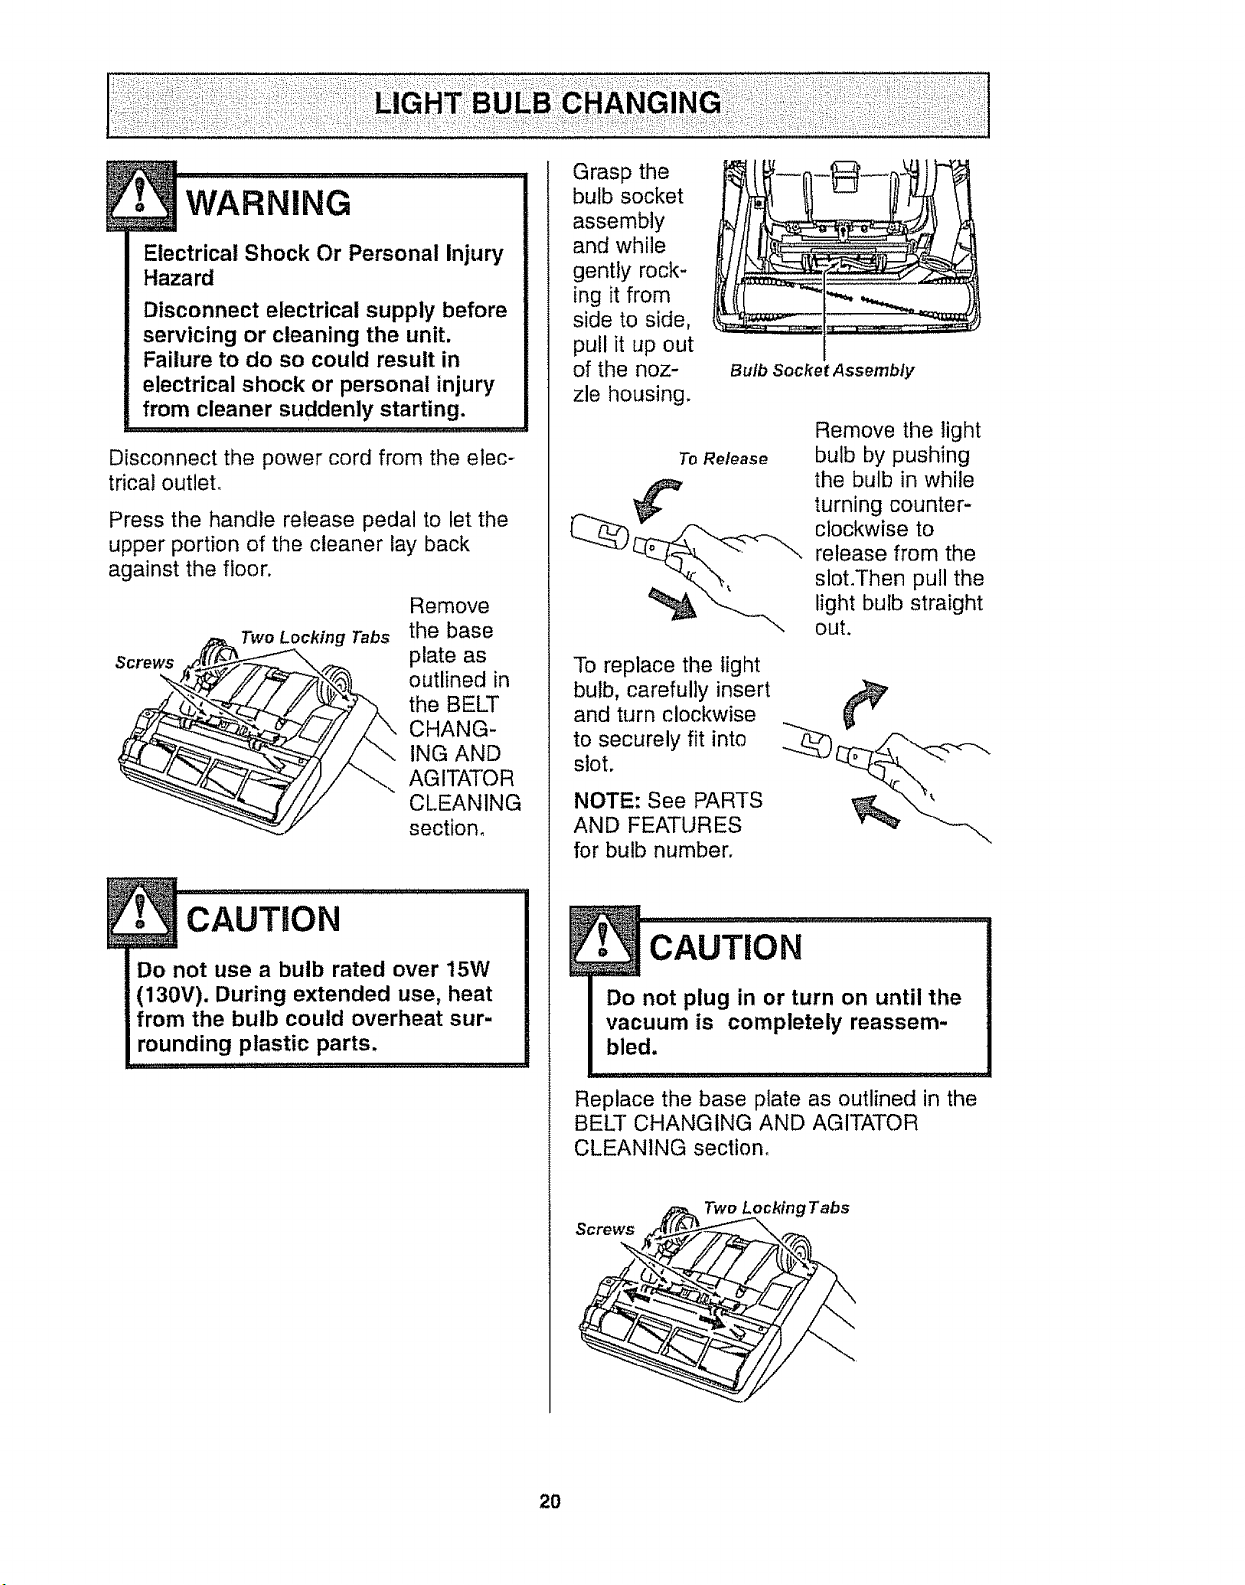
Disconnect the power cord from the elec-
trical outlet,
Press the handle release pedal to let the
upper portion of the cleaner lay back
against the floor.
Remove
Two Locking Tabs the base
Screws plate as
outlined in
the BELT
CHANG-
ING AND
AG ITATO R
CLEANING
section,
Do not use a bulb rated over 15W
(130V). During extended use, heat
from the bulb could overheat sur-
rounding plastic parts.
t
bulb socket
assembly i
and while
gently rock-
ing it from
side to side,
pull it up out I
of the noz- Bulb Socket Assembly
zle housing.
Remove the light
ToRelease bulb by pushing
[__ the bulb in while
turning counter-
___ clockwise to
release from the
, sloLThen pull the
light bulb straight
out.
To replace the light
bulb, carefully insert
and turn clockwise
to securely fit into
slot.
NOTE: See PARTS
AND FEATURES
for bulb number.
cAuTIoN I
Do not plug in or turn on until the
vacuum is completely reassem-
bled.
Replace the base plate as outlined in the
BELT CHANGING AND AGITATOR
CLEANING section,
Screws
Two Locking Tabs
20
•_ WARNING ..........
Electrical Shock Or Personal Injury
Hazard
Disconnect electrical supply before
servicing or cleaning the unit.
Failure to do so could result in
electrical shock or personal injury
from cleaner suddenly starting.
Ill' I"l",r.,,.,'"'ll 111" III I II I I'' I II II I
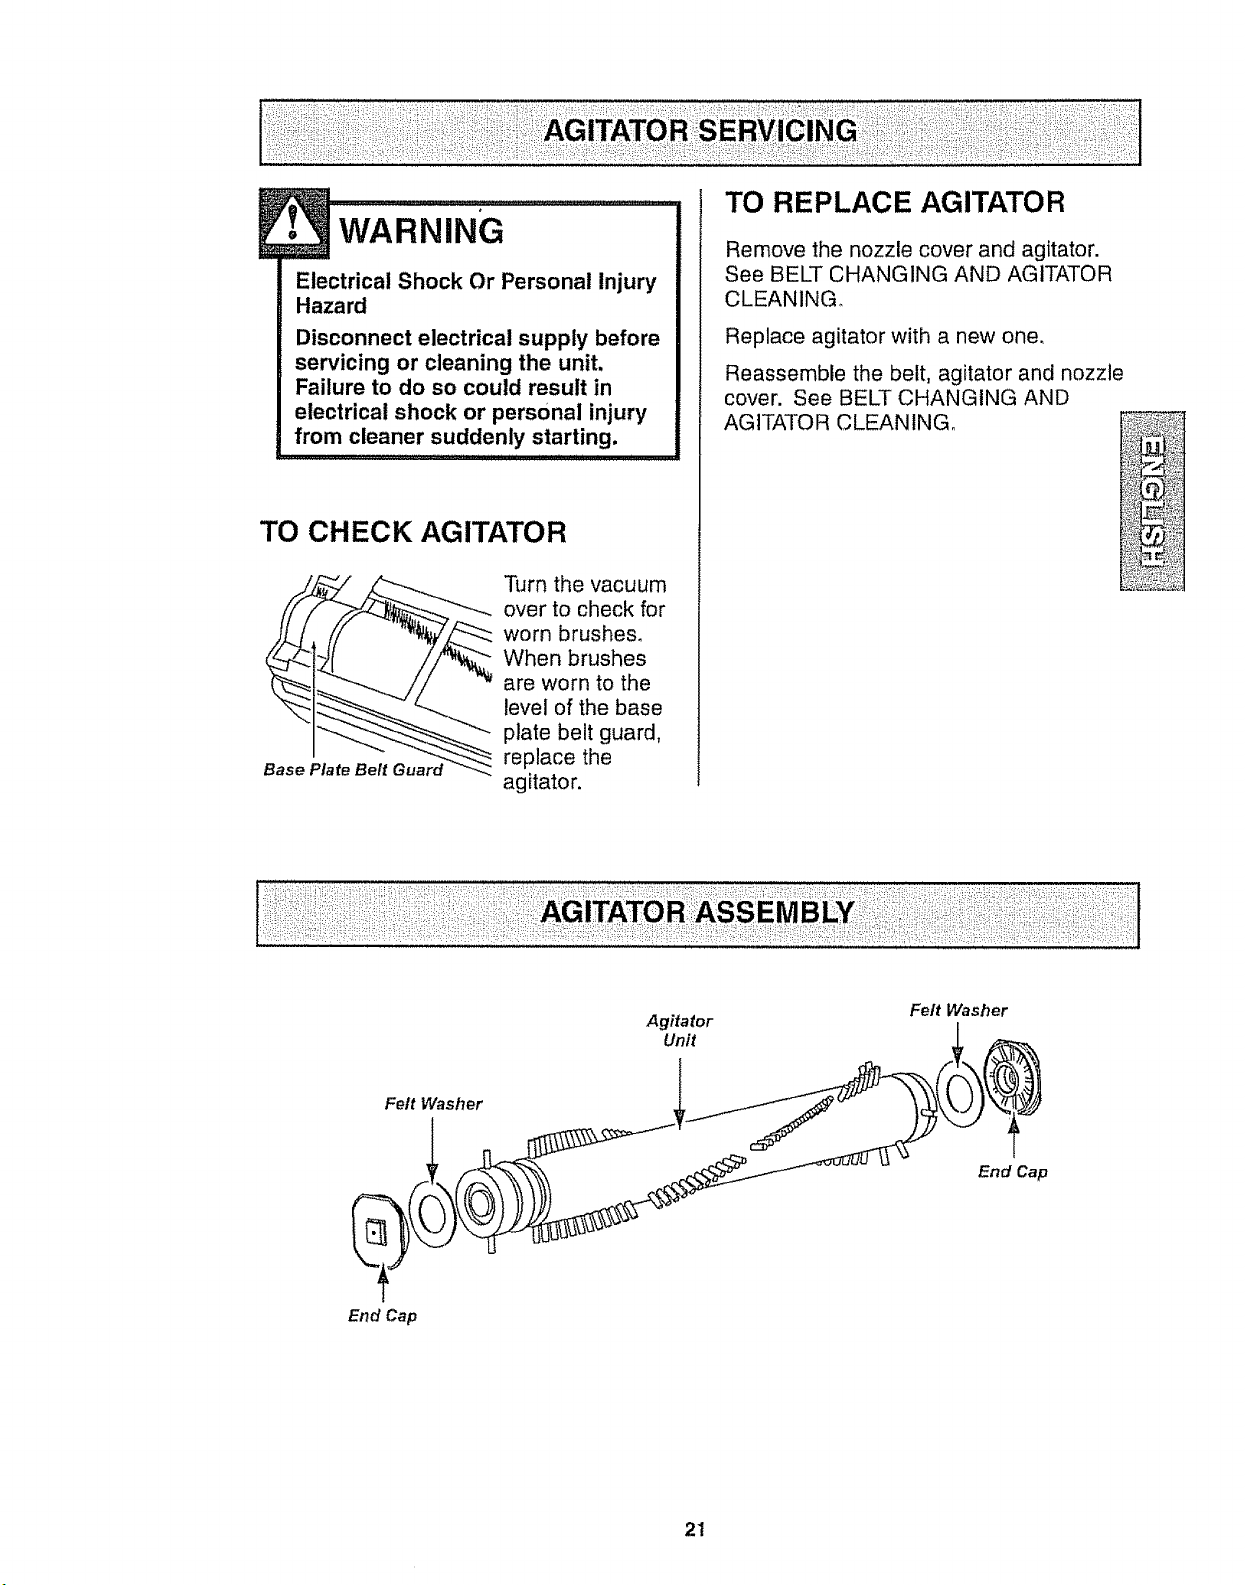
TO CHECK AGITATOR
Base Plate Belt Guard
Turn the vacuum
over to check for
worn brushes.
When brushes
are worn to the
level of the base
plate belt guard,
replace the
agitator.
TO REPLACE AGITATOR
Remove the nozzle cover and agitator.
See BELT CHANGING AND AGITATOR
CLEAN1NG.
Replace agitator with a new one,
Reassemble the belt, agitator and nozzle
cover. See BELT CHANGING AND
AGITATOR CLEANING,
Agitator
Unit
Felt Washer
Felt Washer
End Cap
End Cap
21
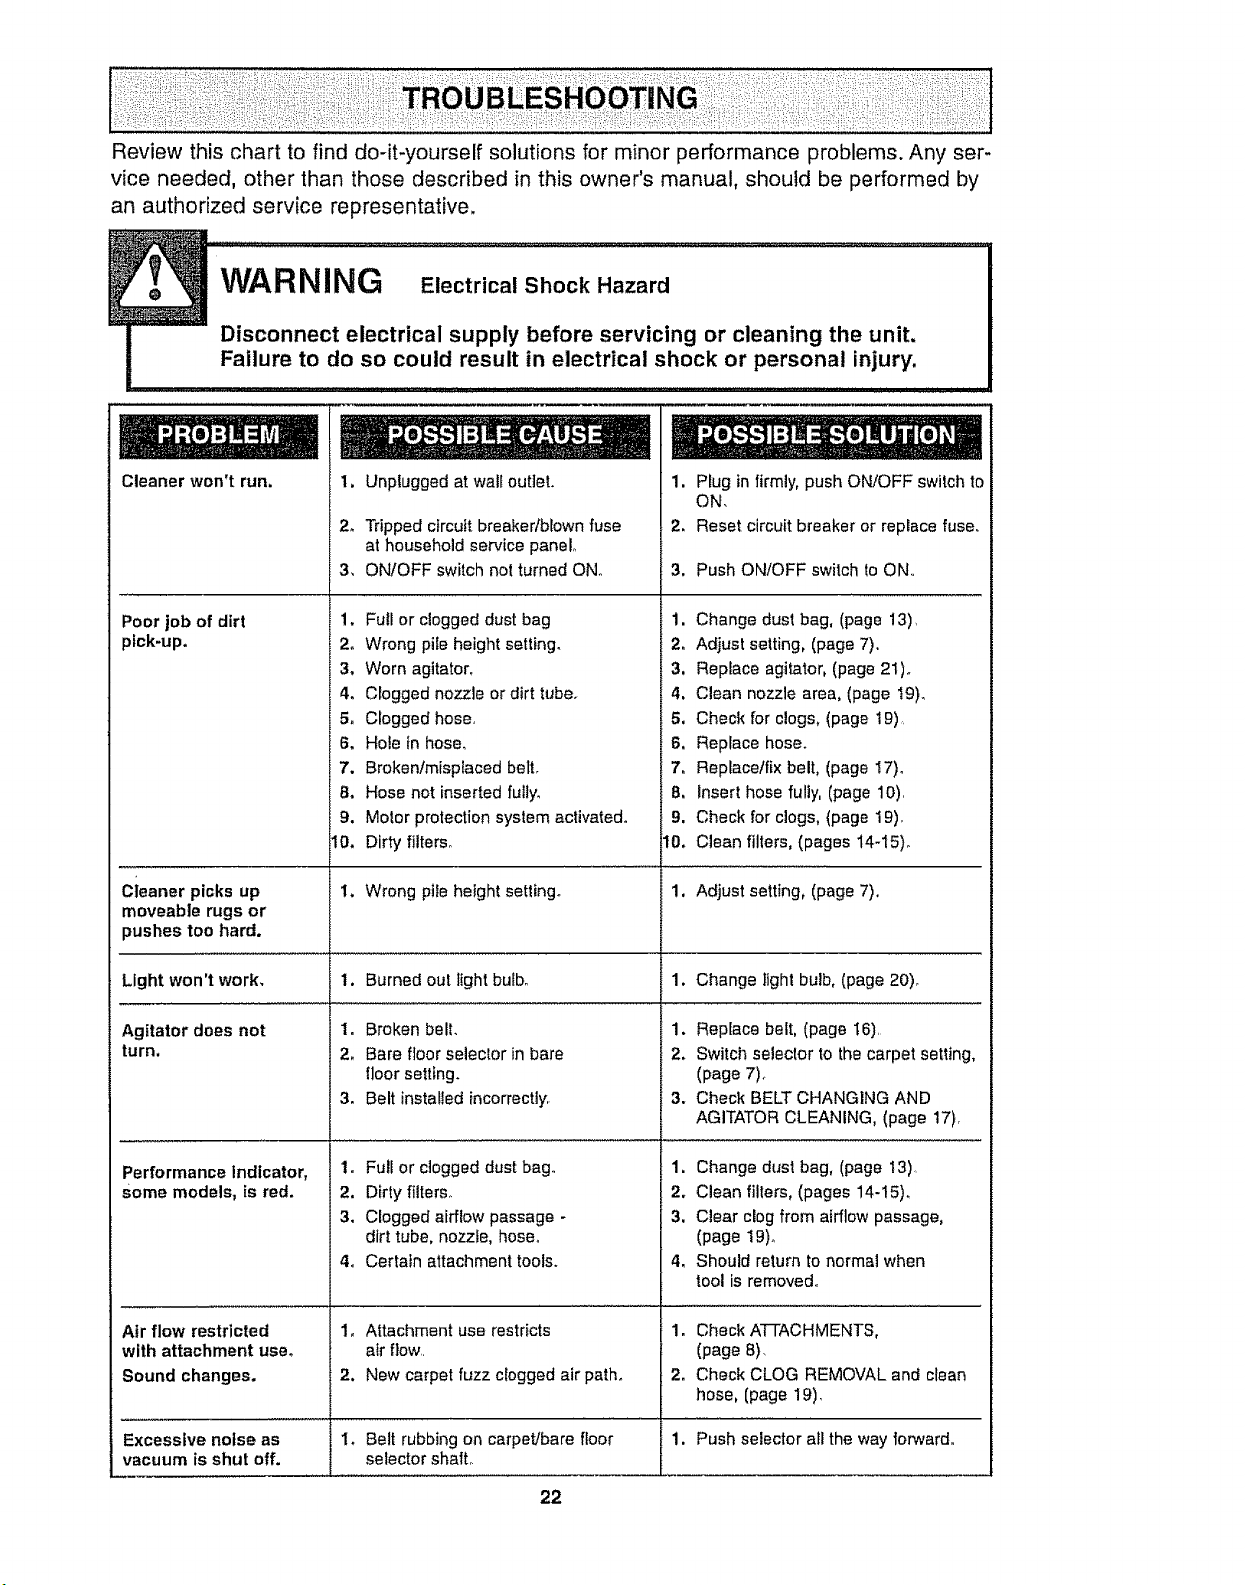
Review this chart to find do-it-yourself solutions for minor performance problems. Any ser-
vice needed, other than those described in this owner's manual, should be performed by
an authorized service representative+
Cleaner won't run.
Poor job of dirt
pick-up.
1, Unplugged at walt outlet.
2+ Tripped cfrcutt breakertblown fuse
at household service panel.
3. ON!OFF switch not turned ON+,
1. Fu!l or clogged dust bag
2. Wrong pile height setting.
3. Worn agitator+
4+ Clogged nozzle or dirt tube.
5. Clogged hose,
6. Hole inhose,
7. Broken/misplaced belt.
1, Plug in firmly, push ON/OFF switch to
ON.
2. Reset circuit breaker or replace fuse.
3. Push ONtOFF switch toON,,
B. Hose not inserted fully+ B.
9. Motor protection system activated+ 9.
10. Dirty filters. 10.
.............. i
Cleaner picks up 1. Wrong ptie height setting. 1. Adjust setting, (page 7),,
moveable rugs or
pushes too hard.
Light won't work. 1. Burned out light bulbo 1. Change light bulb, (page 20),
1. Change dust bag, (page 13),
2o Adjust setting, (page 7),,
3, Replace agitator, (page 21)+
4. Clean nozzle area, (page I9)_
5. Check for clogs, (page 19)
6. Replace hose+
7o Replace/fix belt, (page 17)o
Insert hose fully. (page 10),
Check for clogs, (page 19).
Clean filters, (pages 14-15).
Agitator does not
turn.
Performance Indicator,
Some models, is red.
Air flow restricted
with attachment use+
Sound changes.
1+ Broken belt.
2. Bare floor selector in bare
floor setting.
3. Belt installedincorrectly,.
1o Full or clogged dust bag.,
2. Dirty filters+
3. Clogged airflow passage -
dirt tube, nozzle, hose+
4. Certain attachment tools.
1. Attachment use restricts
air ftow.
2. New carpet fuzz clogged air path.
Excessive noise as 1+ Belt rubbing on carpet/bare floor
vacuum is shut off. selector shaft,,
22
1. Replace belt, (page I6),
2. Switch selector to the carpet setting,
(page 7),
3. Check BELT CHANGING AND
AGITATOR CLEANING, (page 17),
1. Change dust bag, (page 13)+
2. Clean filters, (pages 14-15).
3. Clear clog from airflow passage,
(page 19)o
4. Should return to normal when
tool is removed°
1. Check ATTACHMENTS,
(page 8).
2. Check CLOG REMOVAL and clean
hose, (page 19).
1. Push selector all the way 1orward.
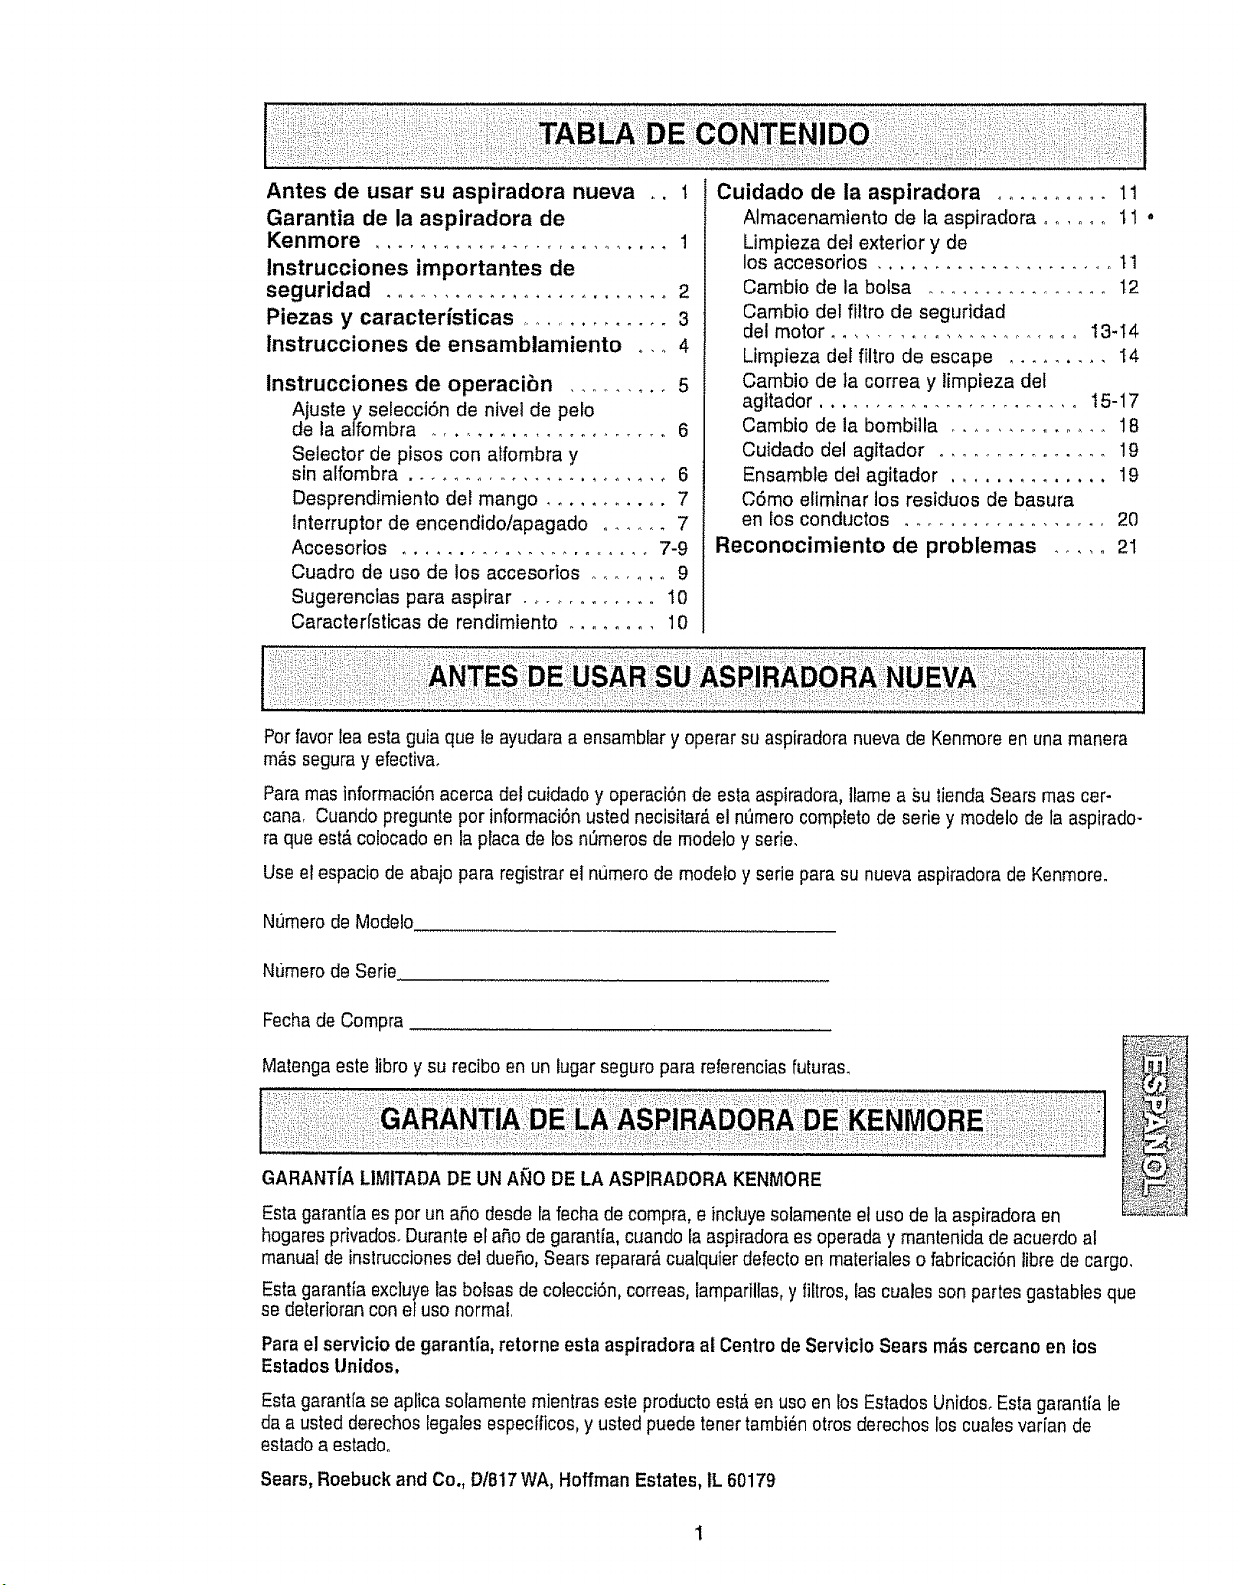
Antes de usar su aspiradora nueva ,. 1
Garantia de la aspiradora de
Kenmore ........................... 1
Instrucciones importantes de
seguridad .......................... 2
Piezas y caracterfsticas ............... 3
lnstrucciones de ensamblamiento o,_ 4
Instrucciones de operacibn ......... 5
Ajuste y selecci6n de nivel de pelo
de la alfombra ........................ 6
Selector de pisos con alfombra y
sin alfombra ....................... 6
Desprendimiento del mango ........... 7
interruptor de encendidolapagado ...... 7
Accesorios ...................... 7-9
Cuadro de uso de los accesorios ....... 9
Sugerencias para aspirar ............ 10
Caracterfsticas de rendimiento ........ 10
Cuidado de la aspiradora .......... 11
Almacenamtento de la aspiradora ...... t 1 •
Limpieza del exterior y de
los accesorios ...................... t 1
Cambio de la bolsa ................ 12
Cambio del filtro de seguddad
det motor ...................... 13-14
Ltmpieza del flltro de escape ......... I4
Cambio de la correa y limpieza del
agttador ....................... I5-17
Cambio de la bombilla .............. 18
Cuidado del agitador ............... 19
Ensamble dei agitador .............. 19
COmo eliminar los residuos de basura
en los conductos .................... 20
Reconocimiento de problemas ..... 2I
Potfavor leaesta guia que le ayudaraa ensamblar y operarsu aspiradoranuevade Kenmore en unamanera
m_s seguray efectiva.
Paramas informaci6nacerca del cuidadoy operaci6nde esta aspiradom, llame a su tiendaSears rnas cer-
can& Cuando pregunte por informaci6n ustednecisitar_,el nernerocompleto de serie y modelo de la aspirado-
ra que est_colocado en ta placade los n_rnerosde rnodeloy serie.
Use el espaciode abajo para registrarel nt)rnerode modetoy seriepara su nuevaaspiradora de Kenmore.
NQmerode Modelo
Nt]mero de Serie
Fechade Compra
Matenga este libro y su reciboen un lugar seguro para referenciasfuturas.
GARANTiALIMITADADE UN ANO DE LA ASP1RADORAKENMORE
Estagarantia es por un aSo desde lafecha de compra, e incluye solamenteeluso de la aspiradora en
hogaresprivados.Duranteel a5o de garantia, cuando la aspiradoraes operada y mantenida de acuerdoal
manualde instruccionesdel dueRo,Sears reparar#,cualquier defectoen materialeso fabricaci6nfibrede cargo,
Estagarantta exc]uyelas bolsas de colecciOn,correas,lamparillas,y fiftros,lascuales son partes gastables que
se deteriorancon el uso normal.
Parael servicio de garantia,retorne esta aspiradora al Centro deServiclo Sears m_s cercanoen los
Estados Unidos,
Estagarantia seaplica solamentemientraseste productoest_ en usoen los EstadosUnidos.Estagarantia le
da a usted derechos legalesespecificos,y usted puede tenet tambi_notros derechos loscuales varian de
estado a estado.
Sears, Roebuck and Co., D/817WA,HoffmanEstates,IL 60179
ADVERTENCIA
Su seguridad es muy tmportantepara nosotros. Pararedueir el riesgo de incendio, choque
el_ctrico, iesi6n corporal o dafos al utilizar su aspiradora,actue de acuerdocon precauciones
bdsicas de seguridad, entre eltas:
Leaeste manualantes de armar o utilizar su
aspiradora.
Use su aspiradora [_nicamenteenla forma
descritaen este manual..Use 5nicamentecon
accesorios recomendadosper Sears.
Para reducirel riesgo dechequeel_ctrico,no use
su aspiradoraal aire libre nisobresuperficies
mojadaso
Desconecte tafuente de electricdadantes de
darservicio o limpiar. DeIo contrario podrla
causar uncheque e!_ctrico o lesi6ncorporal..
Siempre debe apagarsu aspiradoraantes de
desconectarla.
No desconectela aspiraderatirando delcord6n
el_ctrico. Paradescenectarla, hale el enchufe,no
elcord6no
Nouse la aspiradora si el cord6n o elenchufe
est#,dahadooSi la aspiradora no est_
funcionando adecuadamenteo sise hadejado
caer, est,'_daSada,seha dejado expuestaa la
intemperie o se ha dejado caer en agua, devu_l-
valaa un Centre/Departamento de servicio de
Sears.
No hale ni transporte la aspiradoraper el cord6n;
no useelcord6n come mango; no cierre puertas
sobre el cord6n; no hale el cord6nsobre rebor-
des agudosni esquinas. Nopase laaspiradora
sobre el cordSn,Mantengael cord6nalejado de
superficies cafientes.
No abandone la aspiradora cuandoest_ conec-
tada, Descon_ctelacuando nola est_ usandey
antes de darle servicioo
No permita que sea utilizada come juguete. Se
requiere tenor mayorcuidado cuandosea
utilizada en taproximidad de niSoso perniSos_
No toque la aspiradorani elenchufecon las
manes mojadas.
GUARDE ESTAS
No cotoqueebjetos en lasaberturaso
No utilice laaspiradorasi alguna abertura est_
bloqueada;mant_ngalalibre de polvo,pelusa,
cabellosy cualquieracosa que podda disminuir
el flujo de aire.
Mantengael cabello,ropa suelta, dedosy todas
laspartes del cuerpo alejadosde lasaberturas y
piezas mec,_nicaso
No use la aspiradorasin tonerinstalada la bolsa
para polvoy/o los fittros.
Cambie siempre la bolsaparapolvodespu_s de
aspirarlimpiadores de atfombraso desodorantes,
talcosy polvos fines.Estosproductosatascan la
bolsa, reducenel flujo de aire y pueden causar
que _sta se rompa.Si no cambia la bolsapodrfa
ocasionardare permanente a la aspiradora.
No use la aspiradorapara levantarobjetos agu-
dos,juguetes pequeRes,alfileres,papel, etc_
Podr[andaRartaaspiradorao la bolsa para polvo.
No levanteninguna cosa que se est_ quemando
o emitiendo humo,come cigarrillos,cerillos o
cenizascalientes.
No usela aspiradera paraaspirar liquidos
inflamabieso combustibles(gasolina,liquidos
para limpieza,perfumes,etc.) ni la use en
lugaresderide _stospodrtan estarpresentes_Los
vapores de estas sustanciaspuedencrear un
peligro de incendioo explosi6n.
Tonga cuidadoespecial al utilizar la aspiradora
en escalones, Nola coloque sobresillas, mesas,
etc.Mant#ngala en el piSOr
Usted es responsabiede asegurarque su aspira-
dora no sea utilizada per ninguna personaque no
pueda manejarlacorrectamente,
INSTRUCCIONES
El armadoy useseguro de su aspiradorason su responsabilidad.Esta aspiradoraha side diseSada
exclusivamentepara use dom_stico.La aspiradoradeber_almacenarseenunlugar seco yen el inte-
rior.Leaeste Manual del propietariodetenidamente,puescontiene informaci6nimportante sobre segu-
ridad y use..Esta guia contiene informaci6nsobre seguridaddebajo de simbolos de advertienciay/o
cuidado. Perfavor pongaatenci6n especial a estas instruccionesdadas. Advertencia: Esta
informaci6nle alertar_ con el peligro de fuego, cheques electricos,quemadasy lesionesoCuidado:
Estainformaci6nle alertara a petigroscome lesionesy daSosde propiedado
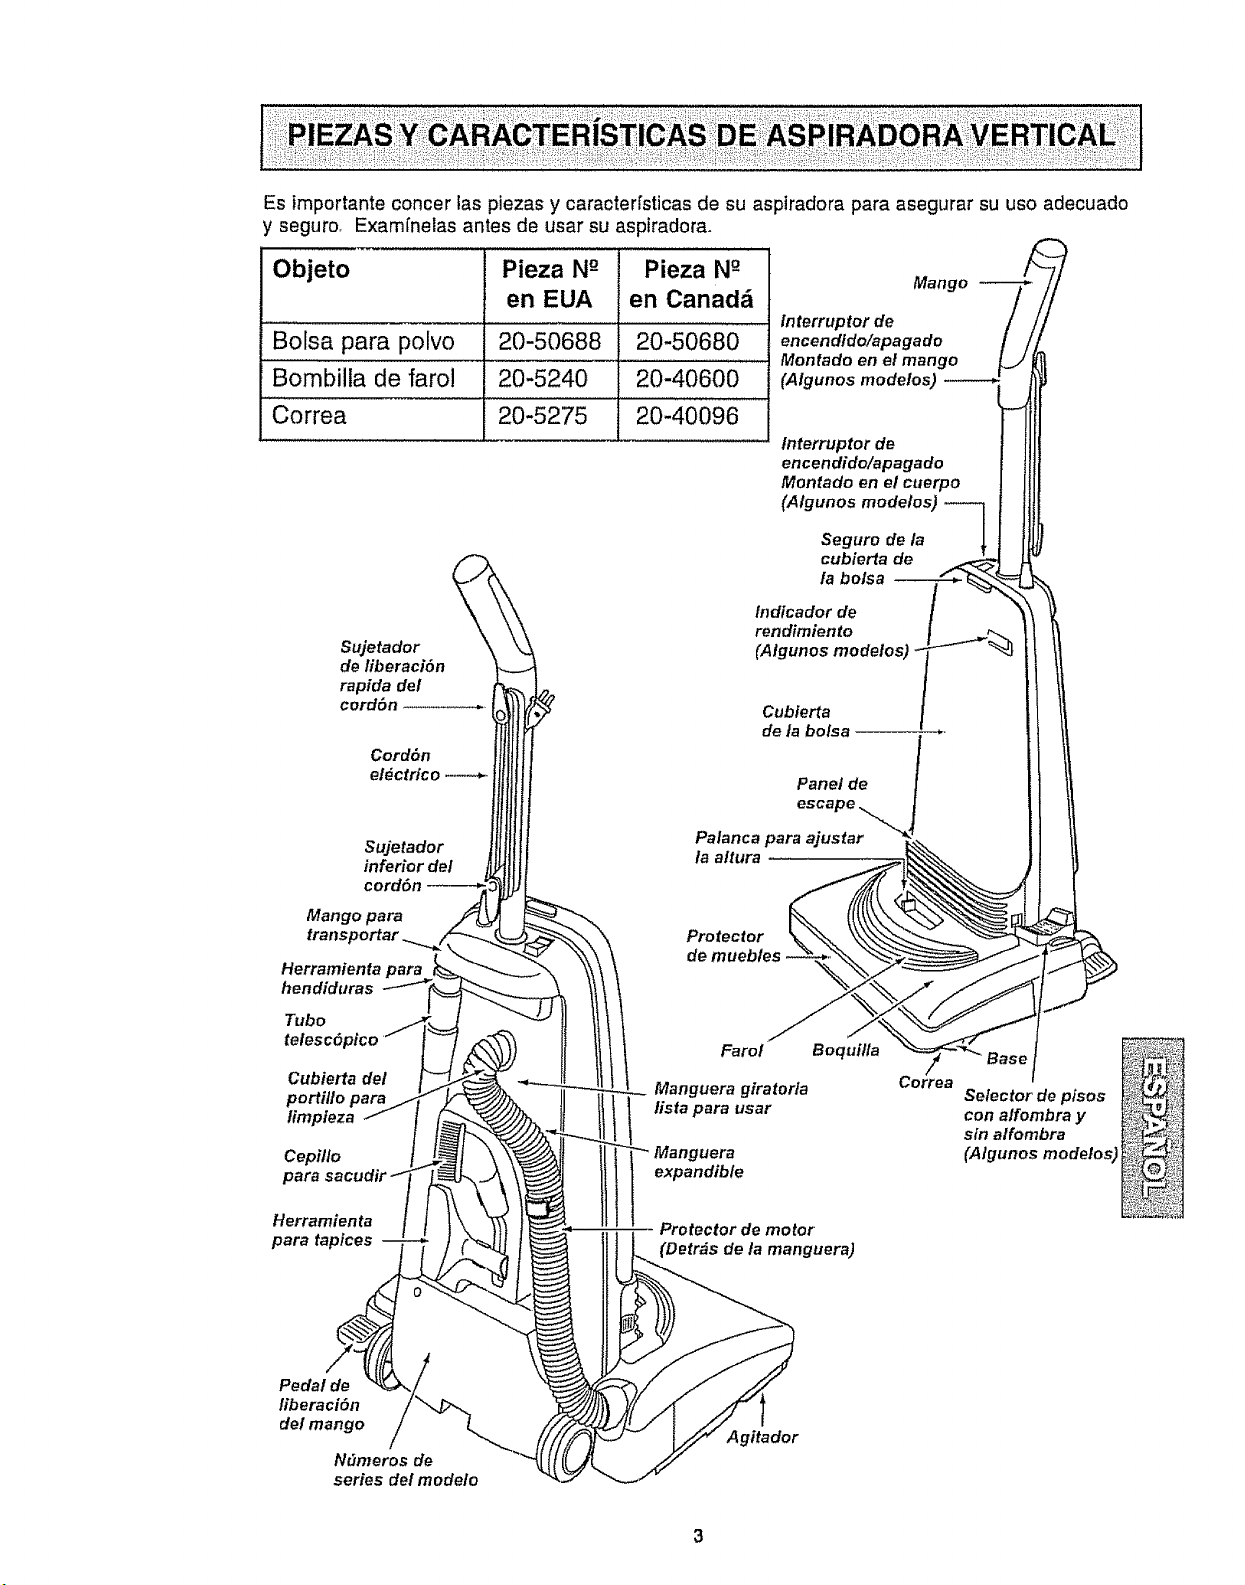
Esimportanteconcerlaspiezasycaracterfsticasdesuasptradoraparaasegurarsuusoadecuado
yseguro,Examfnelasantesdeusarsuaspiradora.
Objeto Pieza N°- Pieza N°-
en EUA en Canad&
Bolsa para polvo 20-50688 20-50680
Bombilla de farol 20-5240 20-40600
Correa 20-5275 20-40096
Mango
In terruptor de
encendtdo/apagado
Montado en el mango
(Atgunos modetos)
Interruptor de
encendido/apagado
Montado en el cuerpo
(Algunos modelos) --_
Seguro de la
cubierta de
la bolsa
Sujetador
de liberaci6n
rapida del
cord6n ................
Cord6n
el_ctrico ....
Sujetador
inferior det
cord6n
Mango para
Herramienta para
hendiduras
Indicador de
rendimiento
(Atgunos modetos) _-
Cubierta j
de la botsa
Panel de /
.,oo,o o:o;22;, J
la altura
Protector
de muebles
Tubo
Cubierta del
portillo para
limpteza
Cepillo
Herramienta
para tapices
Farol Boquilla
Manguera giratorta
fista para usar
Manguera
expandib/e
Protector de motor
(Detr_s de la manguera)
Correa
Selector de pisos
con alfombra y
sin alfombra
(A/gunos modelos)
Pedal de
liberaci6n
del mango
Ndmeros de
series del modelo
Agitador
Antes dearmar la aspiradora,verfique la LISTA
DE EMBALAJE en la cubierta separadade la Lista
de Partespara ReparaciSn. Use estalista paraveri-
ficar que harecibido todos los componentes de su
nuevaaspiradoraKenmoreo
........
Pellgro de choque el_ctrico
No conecte la aspiradora hasta que
termine de armada° De !o contrado
podrfa causar un choque elSctrico o
lesl6n corporal.
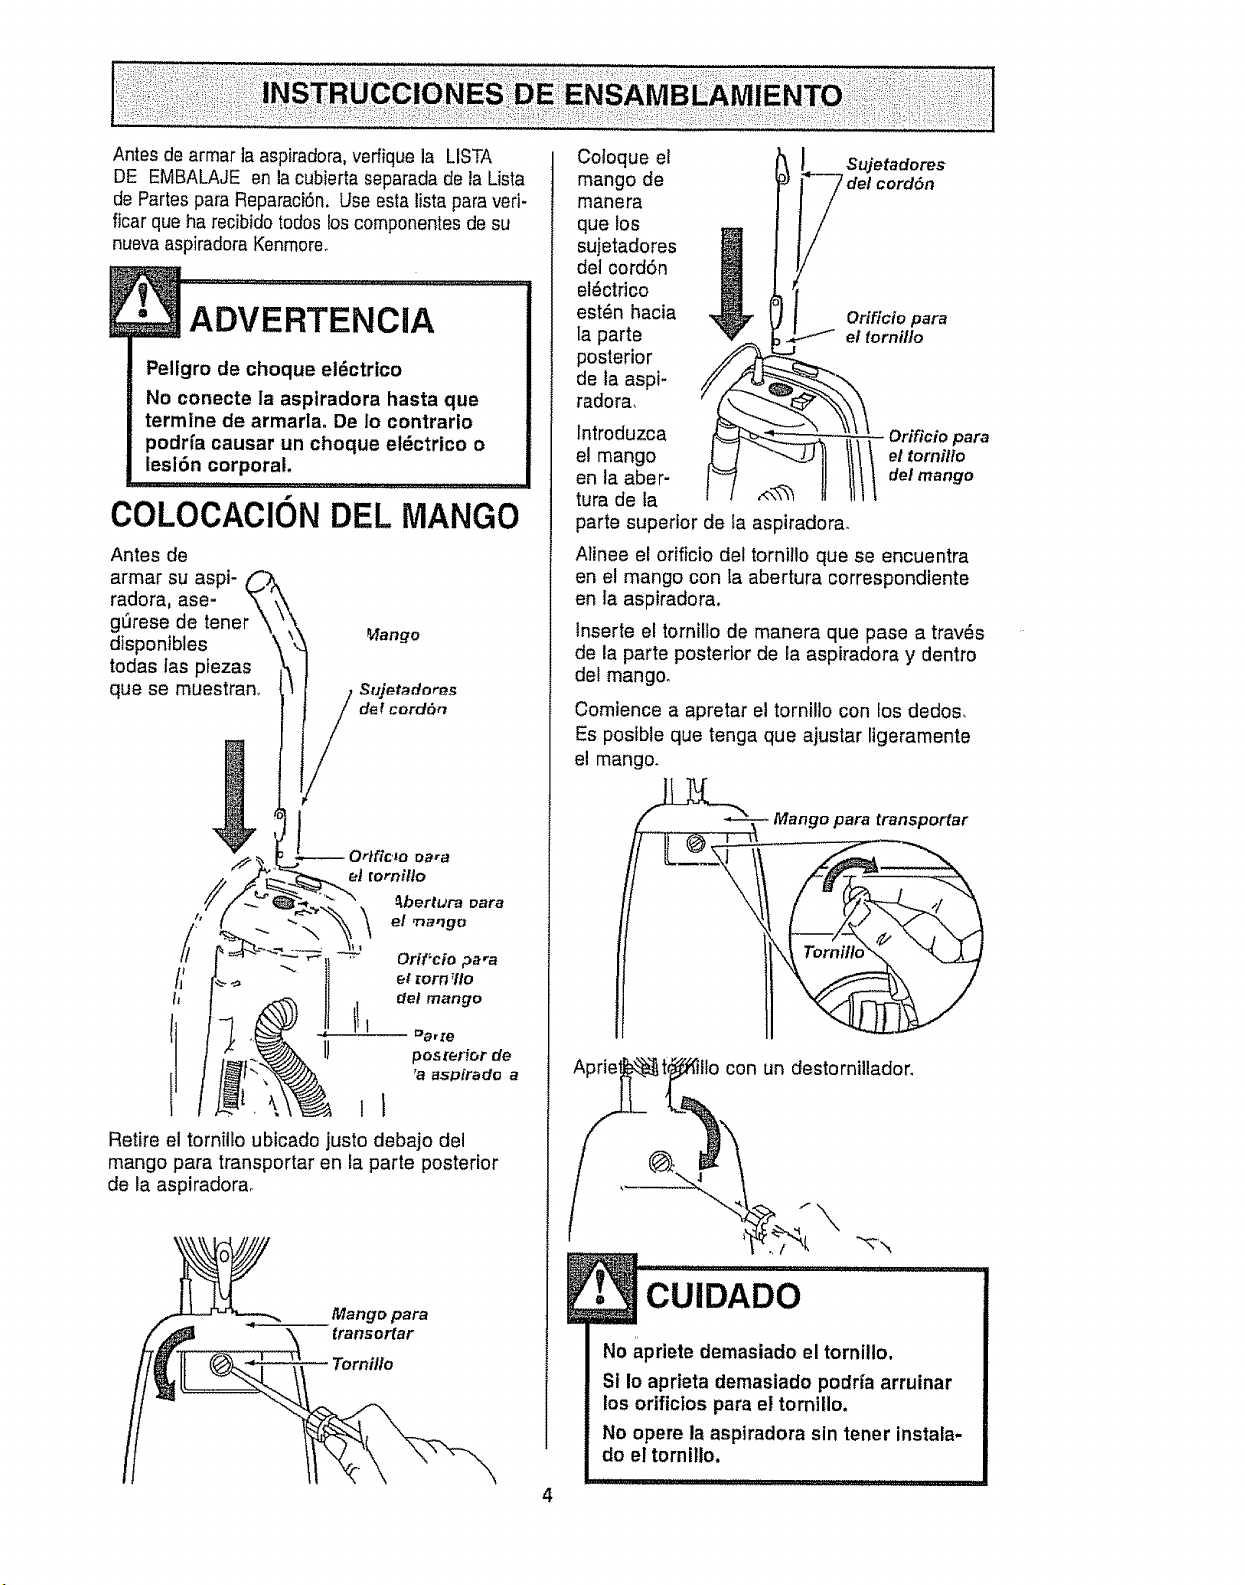
COLOCACION DEL MANGO
Antes de
armar su aspi- C_)_,
radora, ase- "\ ,,_\
gt3rese de tener "\ '_
disponibles \ \
todas tas pfezas _,
que se muestran.
_ango
Retire el tornillo ubicado justo debajo del
mango para transportar en la parte posterior
de la aspiradorao
Mango para
transortar
Tornillo
\
Coloque el
mango de
manera
que los
sujetadores
del cord6n
el_ctrico
est_n hacia
Ia parte
posterior
de ia aspi-
radora,
cord6n
Orificio para
/ el tornillo
lntroduzca Orificio para
el mango el tomilto
en la aber- delmango
tura de la "_"_
parte superior de la aspirador&
Atinee el orificio del tornillo que se encuentra
en el mango con la abertura correspondiente
en ]a aspiradora.
lnserte el tornillo de manera que pase a trav_s
de la parte posterior de la aspiradora y dentro
del mango.
Comience a apretar el tornillo con los dedos.
Es posfble que tenga que ajustar ltgeramente
el mango.
Mango para transportar
con un destornillador_
\
CUIDADO
No apriete demasiado el tornillo.
Si Io aprieta demasiado podfla arruinar
los orifictos para et tornillo.
No opere la asptradora sin tener instala-
do el tornillo.
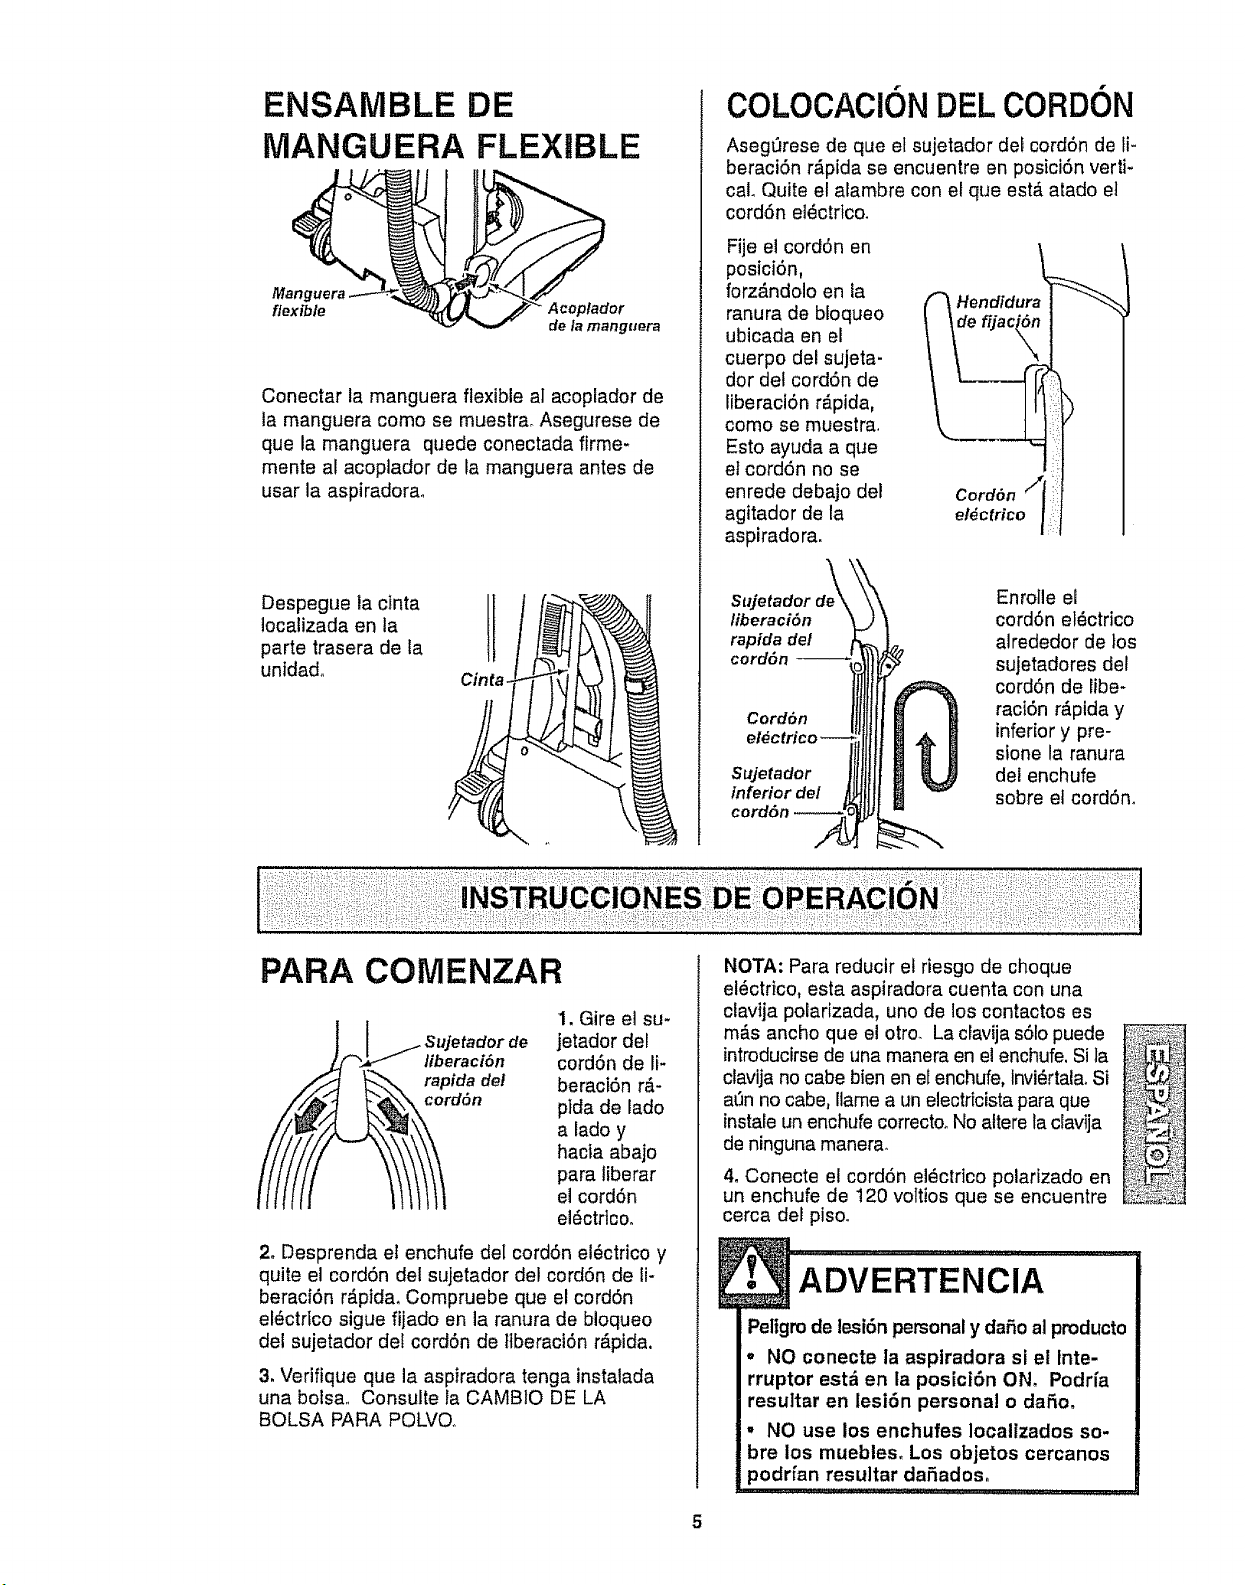
ENSAMBLE DE
MANGUERA FLEXIBLE
Manguera
Conectar la manguera flexible al acoplador de
la manguera como se muestrao Asegurese de
que la manguera quede conectada firme-
mente al acoplador de la manguera antes de
usar la aspiradora.
Despegue la ctnta
localizada en la
parte trasera de ta
unidado
COLOCACION DEL CORDON
Aseg,brese de que el sujetador del cord6n de li-
beraciSn r_pida se encuentre en posici6n verti-
cal. Quite el alambre con el que est,. atado el
cord6n el_ctrico.
Fije el cord6n en
posici6n,
forz_.ndolo en ta
ranura de bloqueo
ubicada en el
cuerpo dei sujeta-
dot del cord6n de
Iiberaci6n r_pida,
como se muestra.
Esto ayuda a que
el cord6n no se
enrede debajo del
agitador de la
aspiradora.
Sujetador d_e\_
liberaci6n
rapida de/
cord6n
Cord6n
Sujetador
inferior del
Cord6n
e/_ctrico
Enrolle el
cord6n el_ctrico
alrededor de los
sujetadores del
cord6n de libe-
raci6n r_ptda y
inferior y pre-
sfone la ranura
del enchufe
sobre et cord6no
PARA COMENZAR
liberaci6n
rapida de!
cord6n
'1.Gire el su-
jetador del
cord6n de li-
beraciSn r,5-
pida de lado
a lado y
hacia abajo
para liberar
el cord6n
el_ctricoo
2. Desprenda el enchufe det cord6n el_ctrico y
quite el cord6n del sujetador del cord6n de li-
beraci6n r_.pida. Compruebe que el cord6n
el_ctrtco sigue fijado en la ranura de bloqueo
del sujetador det cordSn de ltberaci6n r&pida.
3. Verifique que la aspiradora tenga instalada
una bolsa.. Consulte la CAMBIO DE LA
BOLSA PARA POLVOo
NOTA: Para reductr el riesgo de choque
el_ctrico, esta aspiradora cuenta con una
clavija polarizada, uno de los contactos es
m&s ancho que el otro. La clavija sSIopuede
introducirsede una manera en el enchufe. Si la
ctavija no cabe bien en el enchufe, lnvi_rtala. Si
a0n no cabe, llame a un electricista para que
instaleun enchufe correctooNo altere la clavija
de ninguna manera_
4. Conecte el cord6n el_ctrico polarizado en
un enchufe de 120 voltios que se encuentre
cerca def piso.
!• ADVERTENCiA
Peligm de tesi6n personal y dahoal producto
• NO conecte la asptradora si el Inte-
rruptor est_ en la posici6n ON, Podrfa
resultar en lesi6n personal o da_o,
, NO use los enchufes localizados so-
bre los muebles, Los objetos cercanos
podrfan resultar da5ados,
i1,1............. L ! ....... _;......
@
I
Para seleccionar un ajuste de nivel de pelo
de la atfombra:
Apague la aspirador& Seleccione un nivel de
ajuste lnclinando la aspiradora hacla atr_.s
hasta que las ruedas delanteras est6n un poco
despegadas del piso.
Deslice la patanca de ajuste de nivel de pelo
de la alfombra a ta posici6n deseadao
SUGERENCIAS DE AJUSTE DE NtVEL DE
PELO ALFOMBRA
Para que sete faciliten algunas tareas de
limpieza, como pot ejemplo tapetes aueltos y
alfombras de pelo largo, puede que sea nece-
sario elevar ajuste de nivel de pelo de la alfom-
bra. Los ajustes sugeridos son los suguientes.
HIGH; pe]o &spero y lanudo, pelo largo, felpa,
alfombras o tapetes irregulares.
MED: pelo mediano o poco largo.
LOW: pe!o corto o meianoo
EX LOW: pelo muy corto.
• ADVERTENCIA
Pellgro de lesi6n personal
NO PONGA las manos o los pies deba-
jo de la aspiradora cuando cambie de
ta seleccl6n de pisos sin alfombra
hasta ia selecci6n de nivel de peio de
la atfombra. El agitador gira raptda-
mente cuando la aspiradora est_
encendida y est_ en la seleccf6n de
pisos con alfombra.
''1"",, _,,,,_,'_llllII I
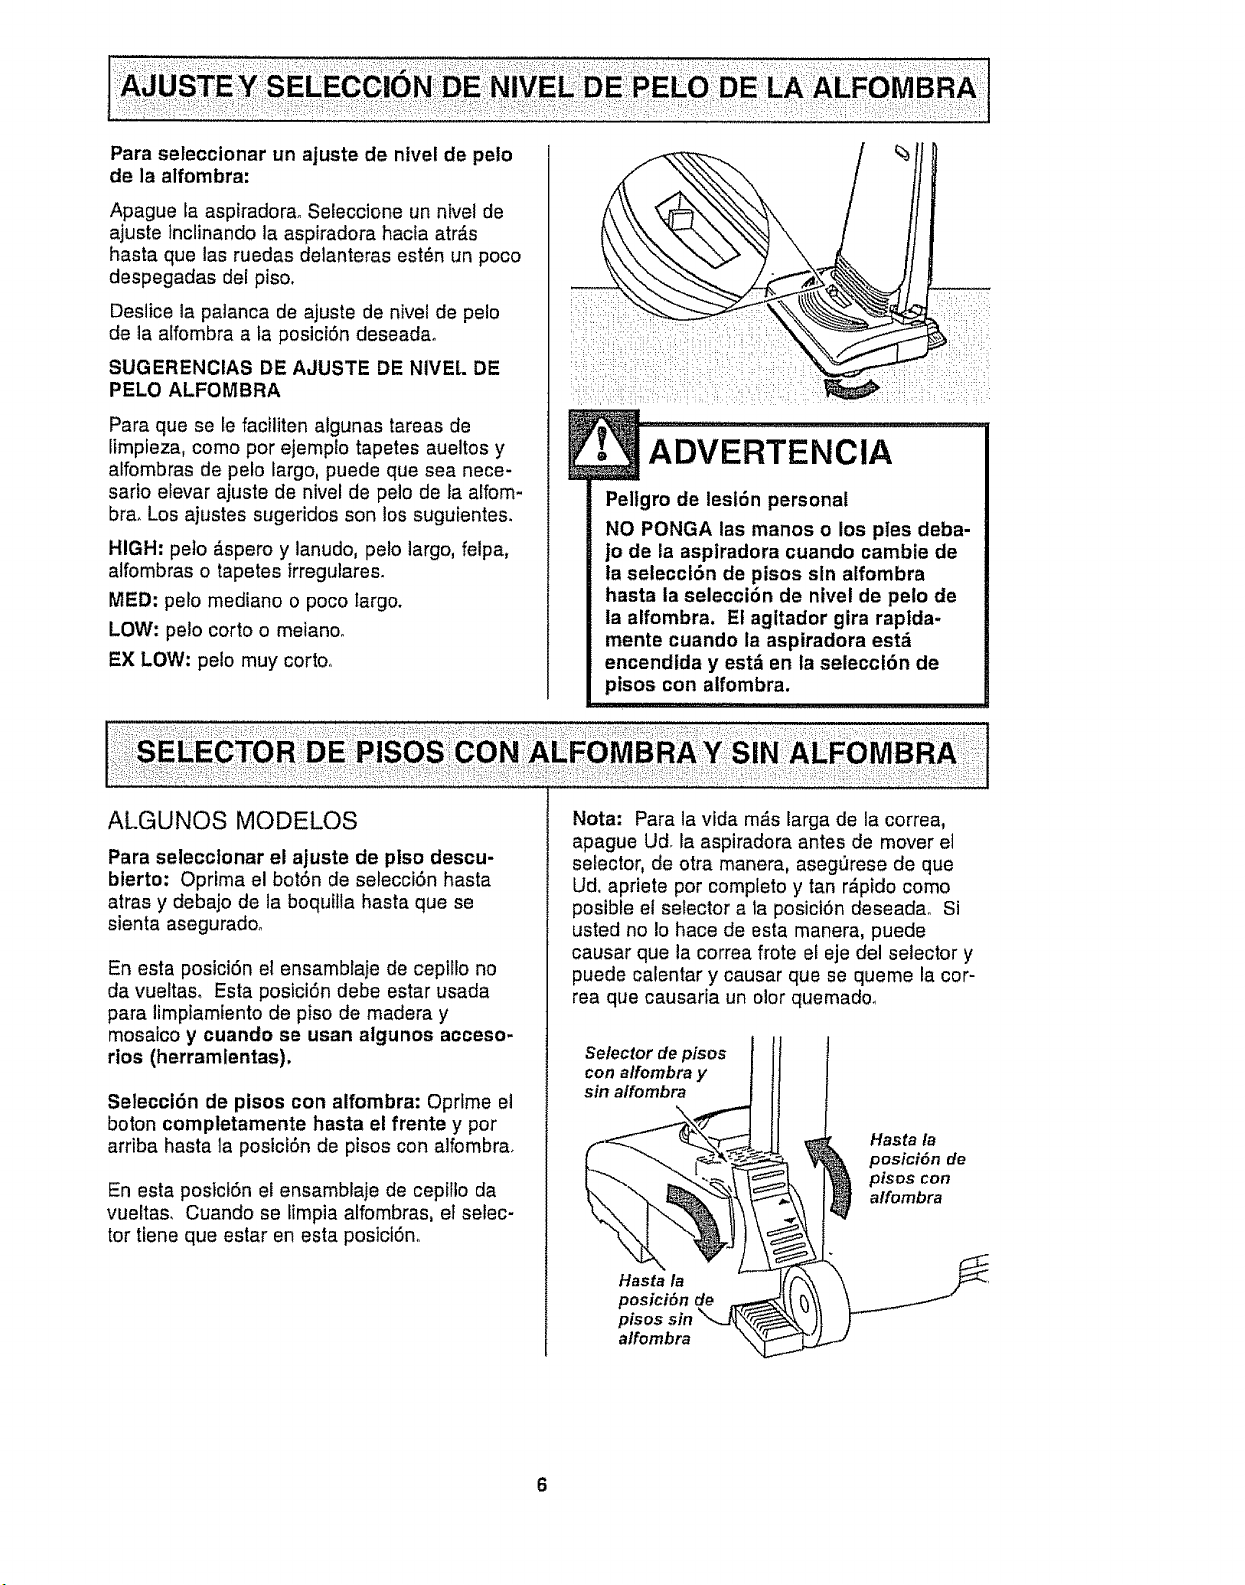
Para seleccionar el ajuste de plso descu-
bierto: Oprima el botSn de selecci6n hasta
atras y debajo de la boquilla hasta que se
sienta aseguradoo
En esta posici6n el ensamblaje de cepillo no
da vueltaso Esta posiciSn debe estar usada
para limpiamiento de piso de madera y
mosaico y cuande se usan atgunos acceso-
dos (herramlentas).
Selecci6n de pisos con alfombra: Oprfme el
boton completamente hasta el frente y per
arriba hasta la posiciSn de pisos con alfombra,
En esta posJct6n el ensamblaje de cepitto da
vueltas. Cuando se limpia alfombras, el selec-
tor tfene que estar en esta posiciSno
Nota: Para la vida m4s larga de la correa,
apague Ud. la aspiradora antes de mover el
selector, de otra manera, aseg_rese de que
Ud. apriete por completo y tan r_pido como
posible el selector a la posici6n deseada° Si
usted no Io hace de esta manera, puede
causar que la correa frote el eje del selector y
puede calentar y causar que se queme la ccr-
tea que causaria un olor quemado.
Selector de pisos
con alfombra y
sin alfombra
\
Hasta la
posici6n de
t
alfombra
Hasta la
posici6n de
pisos con
a/fombra
6
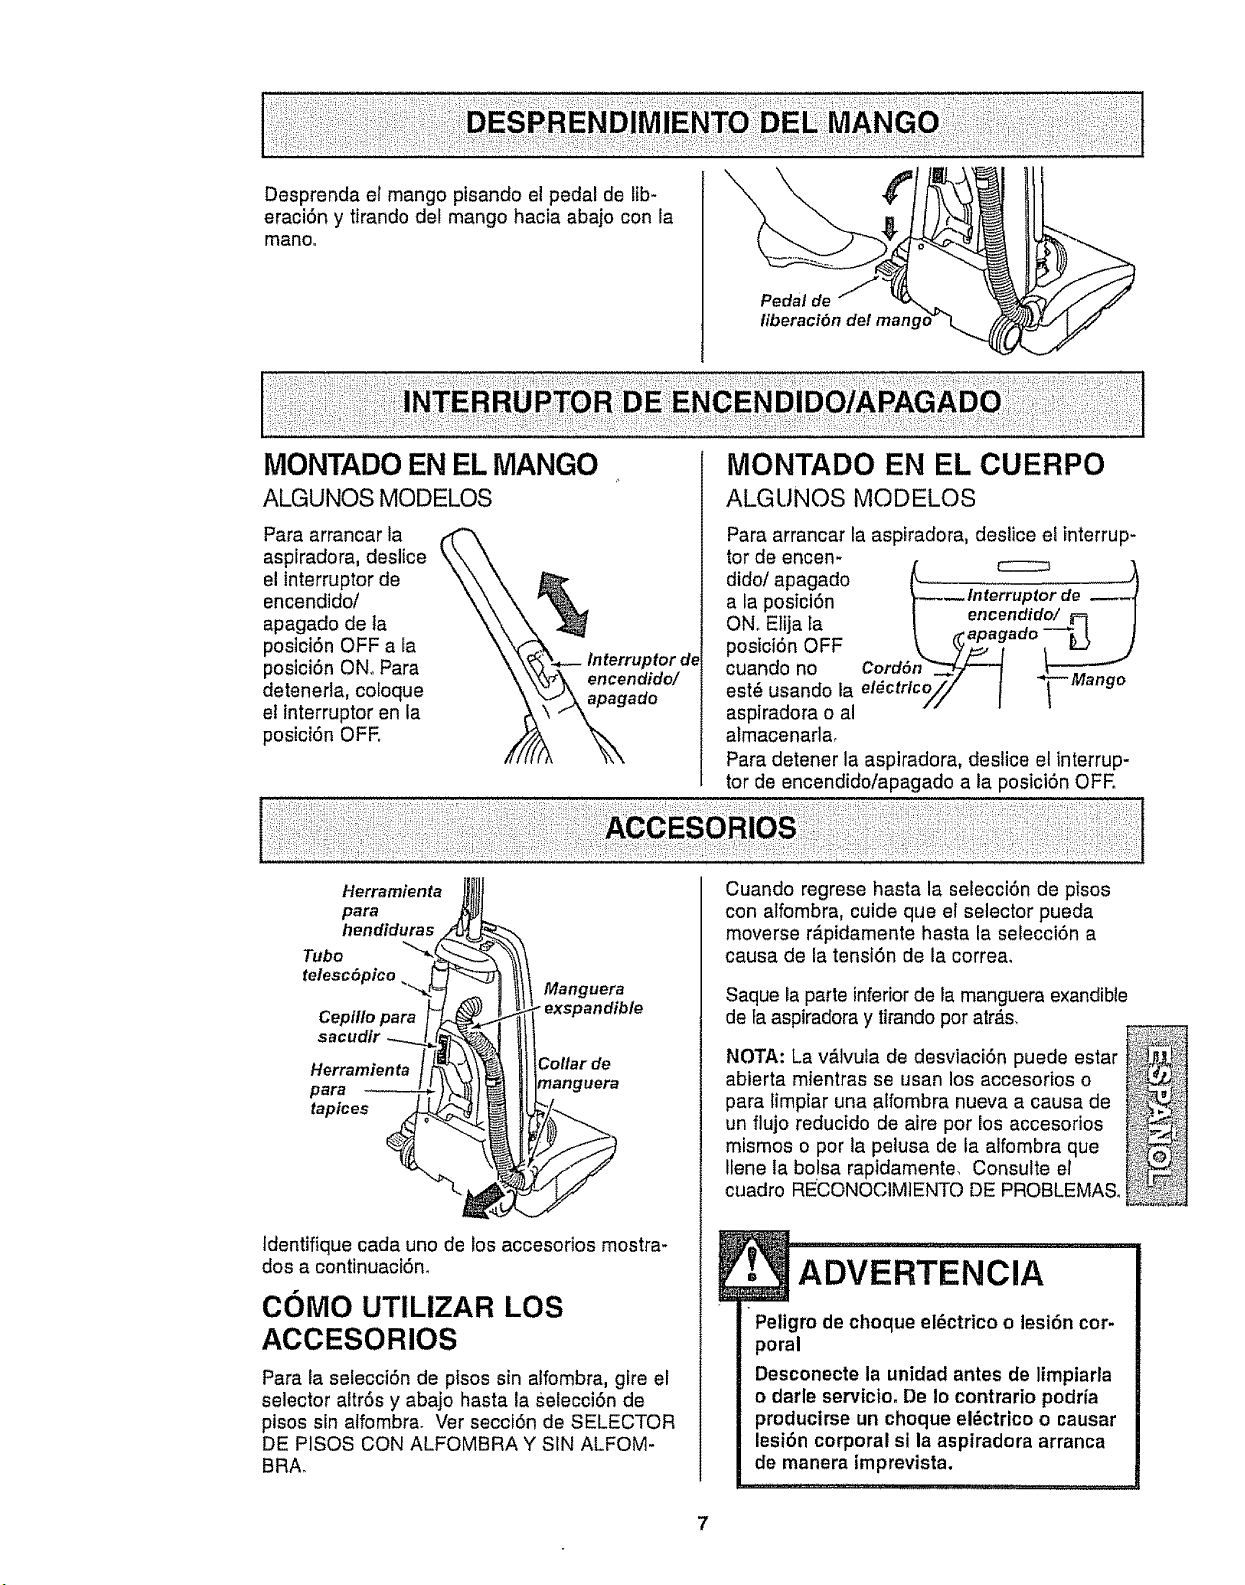
Desprendaelmangopisandoelpedaldelib-
eraci6nytirandodelmangohaciaabajoconla
mano_
Pedal de "/_"
Itberacibn de! man
MONTADO EN EL MANGO
ALGUNOS MODELOS
Para arrancar la
aspiradora, deslice
el interruptor de
encendido/
apagado de la
postciSn OFF a ta
postciSn ON. Para ,_
detenerla, coioque
el interruptor en la
posiciSn OFE
Interrupforde
encendido/
ado
MONTADO EN EL CUERPO
ALGUNOS MODELOS
Para arrancar ta aspiradora, deslice el interrup-
tor de encen-
dido/apagado _ Inte_ de
a la posiciSn
| encendido/ FtJ
ON. Elija _a _ (_apagado _ _ ]
posiciSn OFF Cord6n_ _
est_Cuand°nOusandola el_ctr';€o// I I Mango
aspiradora o al
almacenarla_
Para detener la aspiradora, deslice el interrup-
tor de encendido/apagado a la posiciSn OFE
Herramienta
para
hendiduras
Tubo _"
telesc6pico
Ceplllo para
sacudlr
Manguera
- exspandible
Herramienta Collar de
para manguera
tapices
tdentifique cada uno de los accesorios mostra-
dos a continuaci6m
COMO UTILIZAR LOS
ACCESORIOS
Para la selecci6n de ptsos sin alfombra, gfre el
selector altr6s y abajo hasta la Selecci6n de
pisos sin atfombra. Ver secci6n de SELECTOR
DE PISOS CON ALFOMBRA Y SIN ALFOM-
BRA.
Cuando regrese hasta la selecci6n de pfsos
con alfombra, cuide que el selector pueda
moverse r_.pidamente hasta la seEecciSna
causa de la tensiSn de la correa,
Saque la parte inferiorde la manguera exandible
de la aspiradora y tirandopor atr,_s,
NOTA: La v#.lvula de desviaci6n puede estar !_!_
abierta mientras se usan los accesorios o _;""_.._:_
para limptar una affombra nueva a causa de _:f_'_'_'_../_
un flujo reducido de aire pot los accesorios :_"__",:ii
mtsmos o por la pelusa de la alfombra que iiii;i,_e_"_i_;
Ilene ia bolsa rapidamente, Consulte ef _,,_:._--%_
cuadro RECONOCIMIENTO DE PROBLEMA& "";"__'_"_"
E
AoVERTENC,A.......................I
Peligm de choque el_ctrico o lesi6n cor-
poral
Desconecte la unidad antes de limpiarla
o darle servicio. De Io contrario podria
producirse un choque el_ctrico o causar
lesi6n corporal si la aspiradora arranca
de manera imprevista.
7
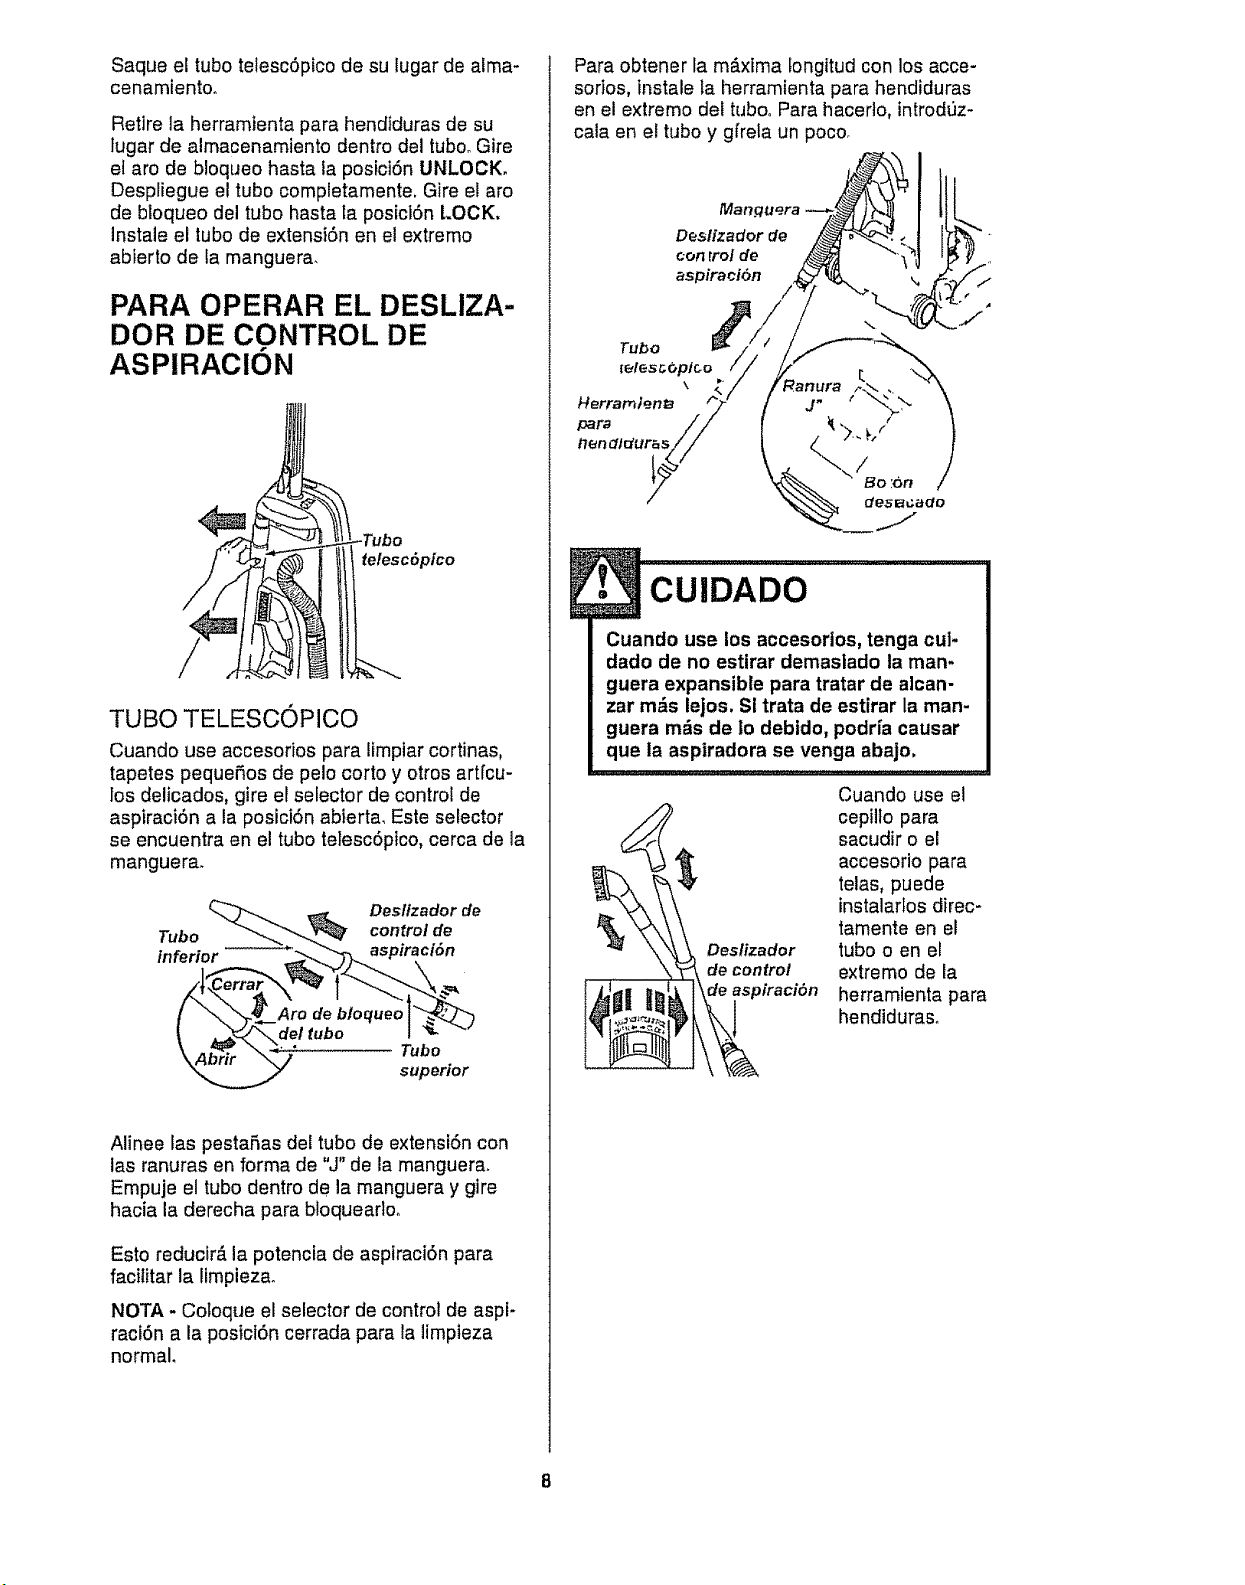
Saque el tubo telescSpico de su lugar de alma-
cenamientoo
Retire la herramtenta para hendtduras de su
tugar de almacenamiento dentro del tubooGire
et arc de bloqueo hasta la posiciSn UNLOCK.
Despliegue el tubo completamente. Gire el arc
de bloqueo del tubo hasta ta posict6n LOCK,
Instale el tubo de extensiSn en el extremo
abierto de la manguera.
PARA OPERAR EL DESLIZA-
DOR DE CONTROL DE
ASPIRACION
telesc6pico
TUBO TELESCOPICO
Cuando use accesorios para Iimplar cortinas,
tapetes pequefios de pelo corto y otros art[cu-
los delicados, gire el selector de control de
aspiraciSn a la posiciSn abierta, Este selector
se encuentra en el tubo telesc6pico, cerca de la
manguera.
Alinee las pesta5as del tubo de extensiSn con
las ranuras en forma de "J" de la manguera.
Empuje el tubo dentro de la manguera y gire
hacia la derecha para bloquearlo.
Esto reducir_ la potencla de aspiraci6n para
facilitar la llmpieza.
NOTA - Coloque el selector de controlde aspi-
raci6n a la posicf6n cerrada para la limpieza
normal.
Para obtener la m_.xima tongitud con los acce-
sorios, instale fa herramienta para hendiduras
en el extremo del tubooPara hacerlo, introdSz-
cala en el tubo y gfrela un poco.
!
Deslizador de
con rrol de
aspiraci6n
Cuando use los accesorlos, tenga cut-
dado de no estirar demaslado la man-
guera expansible para tratar de alcan-
zar mrs lejos. Si trata de estirar la man-
guera mrs de Io debido, podrfa causar
que la aspiradora se venga abajo.
n
Cuando use el
cepilto para
sacudir o el
accesorio para
telas, puede
instalarlos direc-
tamente en el
tubo o en el
extremo de la
herramienta para
hendiduraso
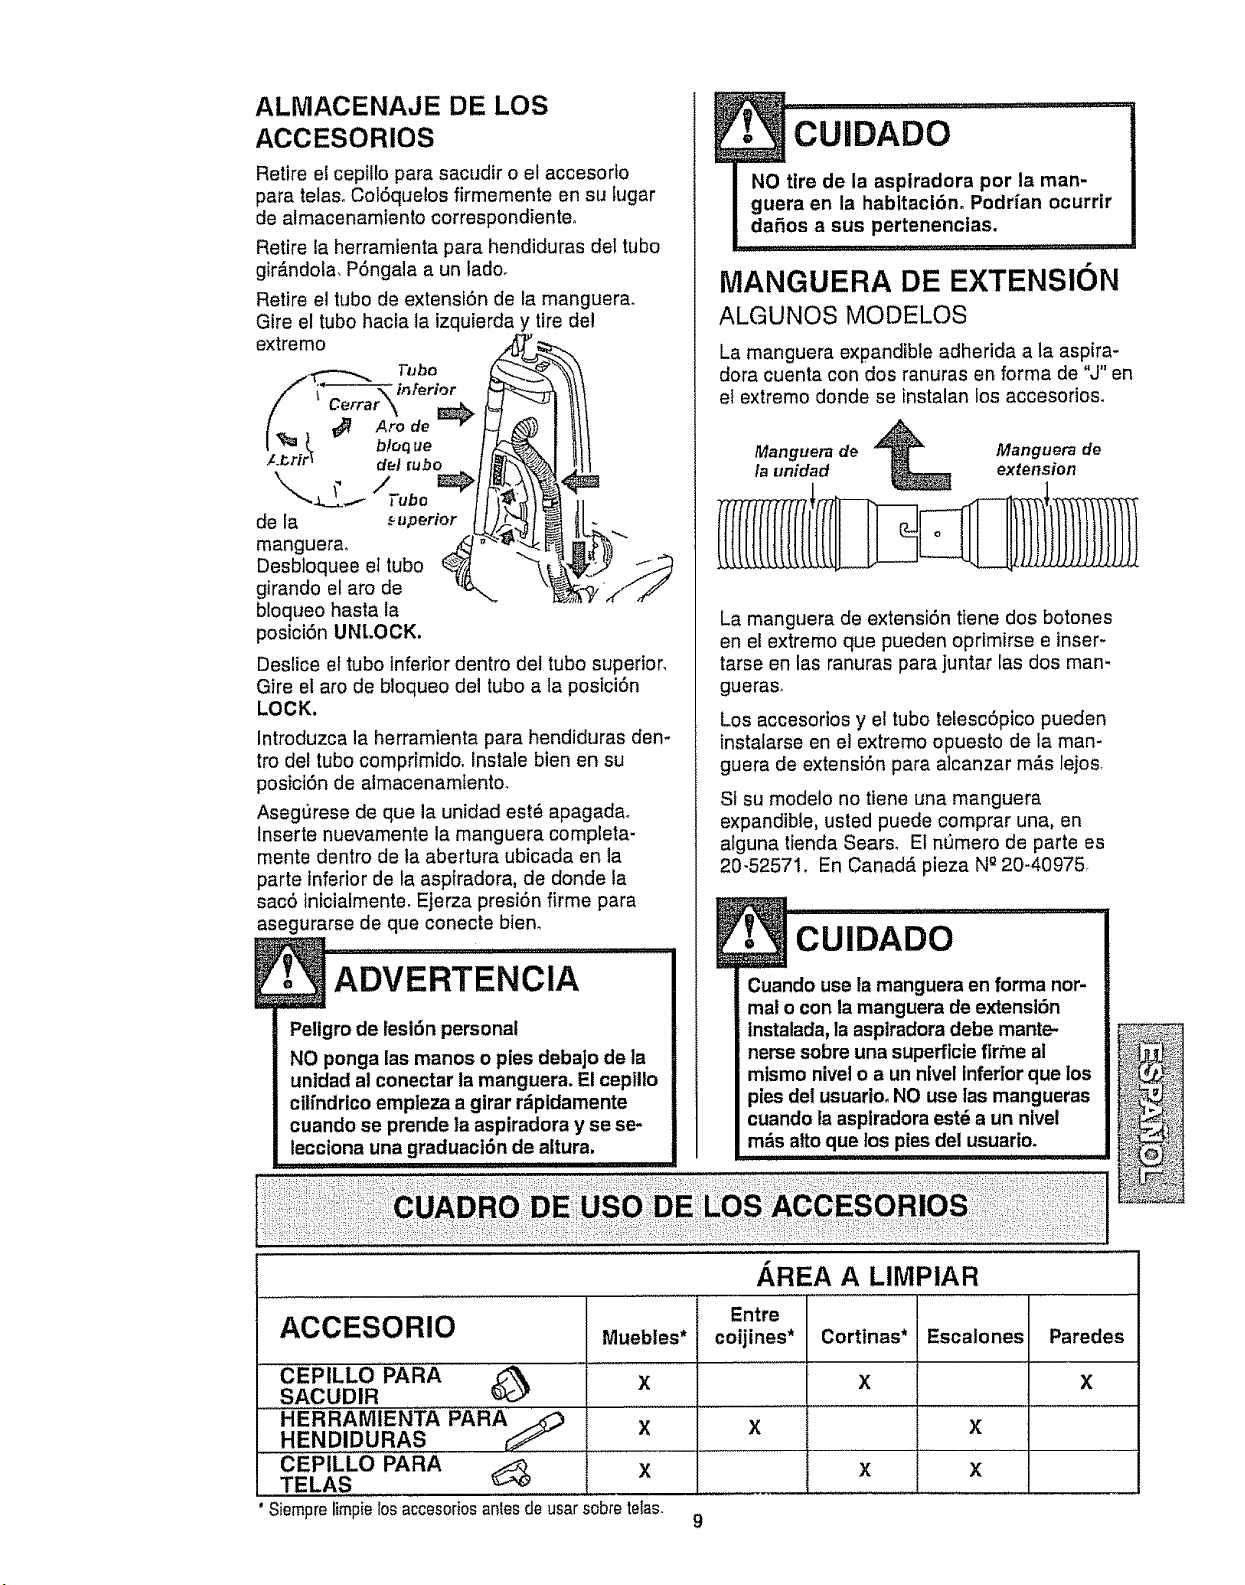
ALMACENAJE DE LOS
ACCESORIOS
Retire el cepillo para sacudir o el accesorto
para telasoCol6quelos firmemente en su fugar
de almacenamiento correspondienteo
Retire la herramienta para hendiduras deI tubo
gk#.ndola, P6ngala a un lado°
Retire el tubo de extensi6n de la manguera.
Gire el tubo hacia la izquierda y tire del
MANGUERA DE EXTENSION
ALGUNOS MODELOS
extremo
del rubo
\--.2.--
de ta superior
manguera,
Desbloquee et tubo
girando el aro de
bloqueo hasta ia
posici6n UNLOCK.
La manguera expandible adherida a la aspira-
dora cuenta con dos ranuras en forma de "J" en
et extremo donde se instalan los accesorios,
Manguerade _ Manguerade
launidad _ extension
La manguera de extensi6n tiene dos botones
en el extremo que pueden oprimirse e tnser-
Deslice el tubo inferiordentro del tubo superior,
Gire el aro de bloqueo del tubo a la postci6n
LOCK.
Introduzca la herramienta para hendiduras den-
tro del tubo comprimtdoo lnstale bien en su
posici6n de almacenamtento.
Asegurese de que la unidad est_ apagadao
Inserte nuevamente la manguera compieta-
mente dentro de la abertura ubicada en la
parte inferior de la aspfradora, de donde la
sac5 inicialmente, Ejerza presi6n firme para
asegurarse de que conecte bien,
ADVERTENCIA
Peligro de lesi6n personae
tarse en las ranuras para juntar las dos man-
gueras_
Los accesortos y et tubo teiesc6pico pueden
instalarse en et extremo opuesto de la man-
guera de extensi6n para alcanzar m_s lejos
Sf su modelo no ttene una manguera
expandibie, usted puede comprar una, en
alguna tienda Sear& E1m)mero de parte es
20-52571. En Canad#. pieza N_20-40975,
p. i1,1i,Ul i ,llU,, ,i,u,,
CU|DADO
Cuando use hamanguera en forma nor-
mal o con la manguera de extenst6n
ACCESORIO
AREA A LIMPIAR
Corttnas*
X
Escalones
Muebles*
Entre
coijines*
CEPILLO PARA _ ........
X
SACUDIR
HERRArvIIENT,a, PARA_ X
HENDIDURAS
CEPILLO PARA _ X
TELAS
SiemprelimpielosaccesoriosantesdeusarsobreteIas,
X
X
×
X
Paredes
X
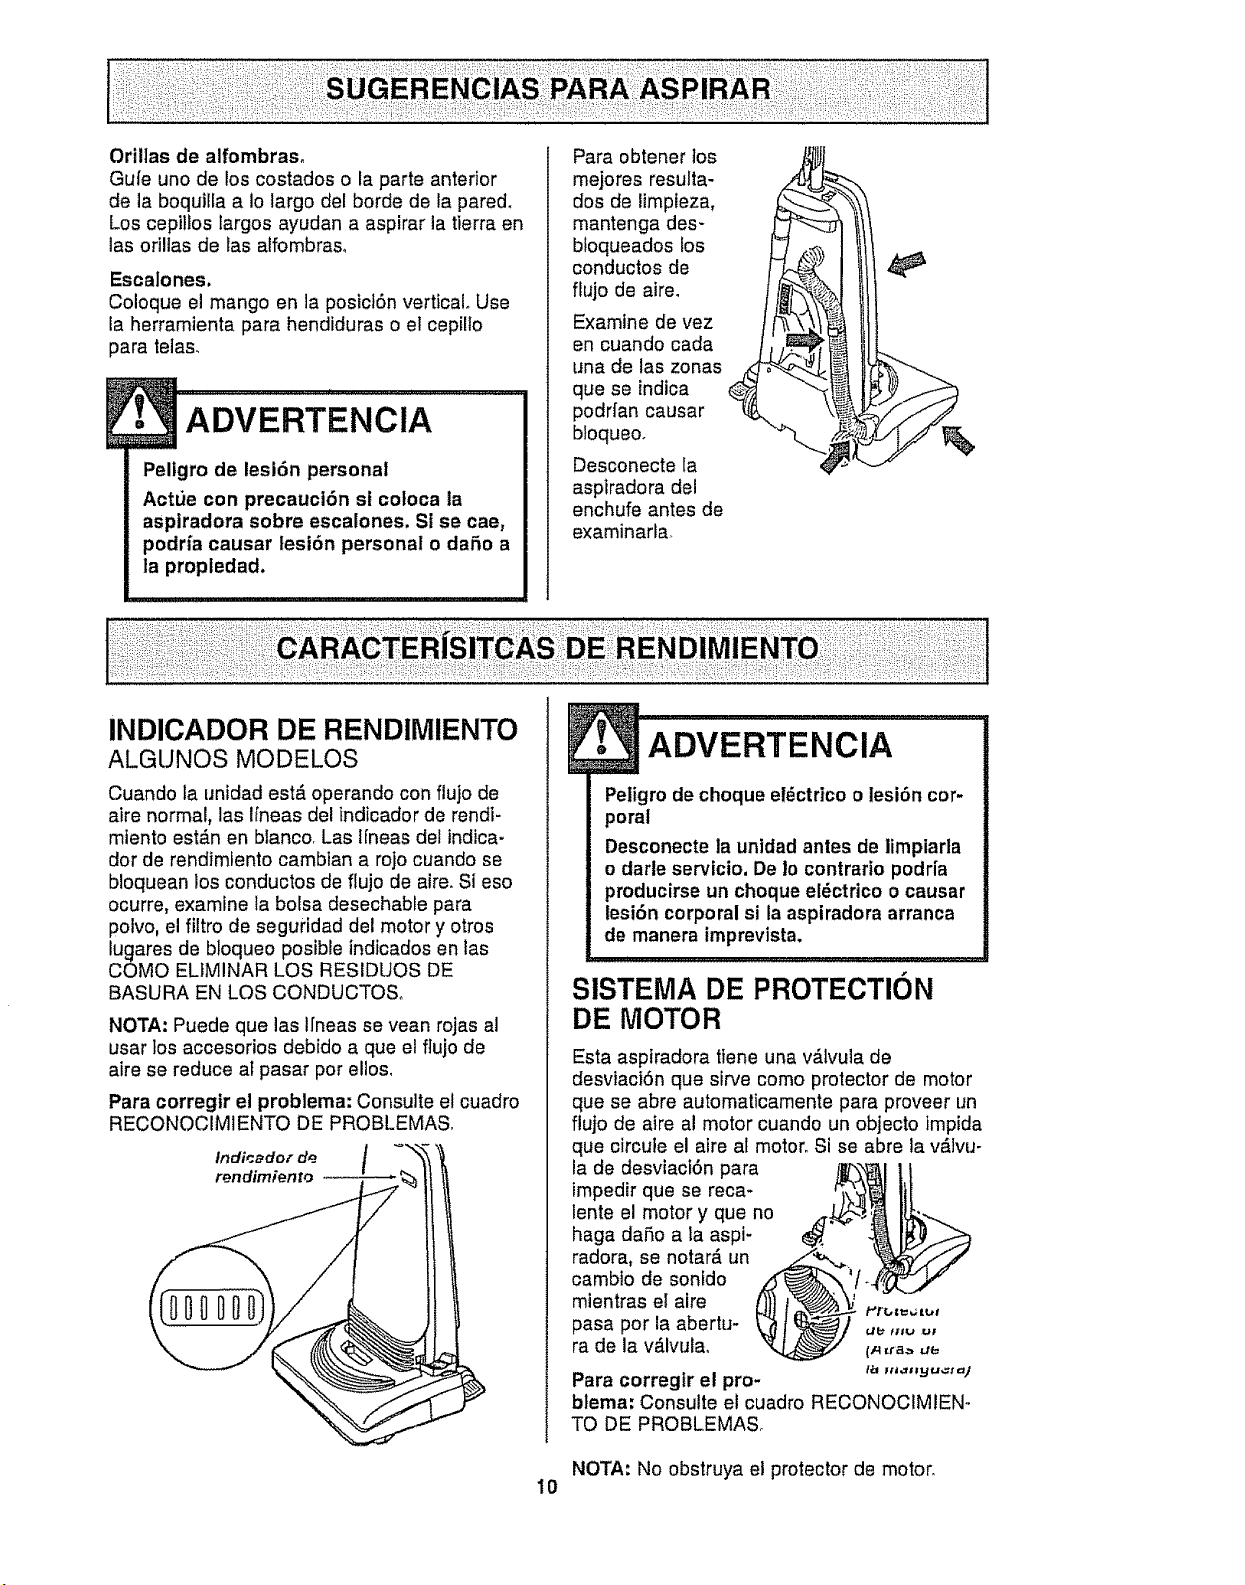
Orillas de alfombraso
Gu{e uno de los costados o la parte anterior
de la boqutlla a io largo del borde de la pared.
Los cepillos largos ayudan a aspirar la tierra en
las orillas de las alfombraso
Escalones.
Coloque el mango en la posict6n vertical Use
la herramienta para hendiduras o et cepilto
para telas.
ADVERTENCIA
Pellgro de lesi6n personal
ActL_econ precauci6n si coloca ta
aspiradora sobre escalones. Si se cae,
podrfa causar lesi6n personal o daSo a
la proptedad,
Para obtener los
mejores resulta-
dos de limpieza,
mantenga des-
bloqueados los
conductos de
flujo de aire.
Examine de vez
en cuando cada
una de las zonas
que se indica
podrfan causar
bloqueo.
Desconecte la
asptradora del
enchufe antes de
examinarla.
INDICADOR DE RENDIMIENTO
ALGUNOS MODELOS
Cuando la unidad est,. operando con flujo de
aire normal, las lfneas del indicador de rendi-
mlento est,_n en blanco, Las l[neas del lndica-
dor de rendimlento cambian a rojo cuando se
bloquean los conductos de fiujo de aire. Si eso
ocurre, examine la bolsa desechable para
poivo, el fiitro de seguridad del motor y otros
lugares de bloqueo posible indicados en las
COMO ELtMINAR LOS RESIDUOS DE
BASURA EN LOS CONDUCTOSo
NOTA: Puede que las Ifneas se vean rojas al
usar los accesorios debido a que el flujo de
aire se reduce al pasar por ellos,
Para corregir el problema: Consulte el cuadro
RECONOCIMIENTO DE PROBLEMAS,
Indicador de
rendimiemo
• ADVERTENCIA
Peligro de choque elSctrico o lesi6n cor-
poral
Desconecte la unidad antes de limpiarla
o darle servicio, De !o contrarto podr[a
producirse un choque el_ctrico o causar
lesi6n corporal si la aspiradora arranca
de manera imprevista.
I
SiSTEMA DE PROTECTION
DE MOTOR
i
Esta asptradora tiene una vd.lvula de
desviaciSn que sirve como protector de motor
que se abre automaticamente para proveer un
flujo de atre al motor cuando un objecto impida
que circute el aire al motor. Si se abre la vdivu-
la de desviact6n para
impedir que se reca-
lente el motor y que no
haga da5o a la aspi-
radora, se notard un
cambio de sonfdo
mientras el aire
pasa por la abertu-
ra de la vdlvula.
Para corregtr el pro-
blema: Consulte el cuadro RECONOCIMIEN-
TO DE PROBLEMASo
NOTA: No obstruya el protector de motor.
10
Siga siempre todas las instrucciones de
seguridad al limpiar y darle servicio a su
asptradora,
ADVERTENCIA
Peligm de choque el_ctrico o lesi6n cor-
poral
Desconecte la unidad antes de limpiarla
o darle servtcio. De Io contrario podda
productrse un choque el6ctrico o causar
lesi6n corporal si la aspiradora arranca
de manera imprevtsta.
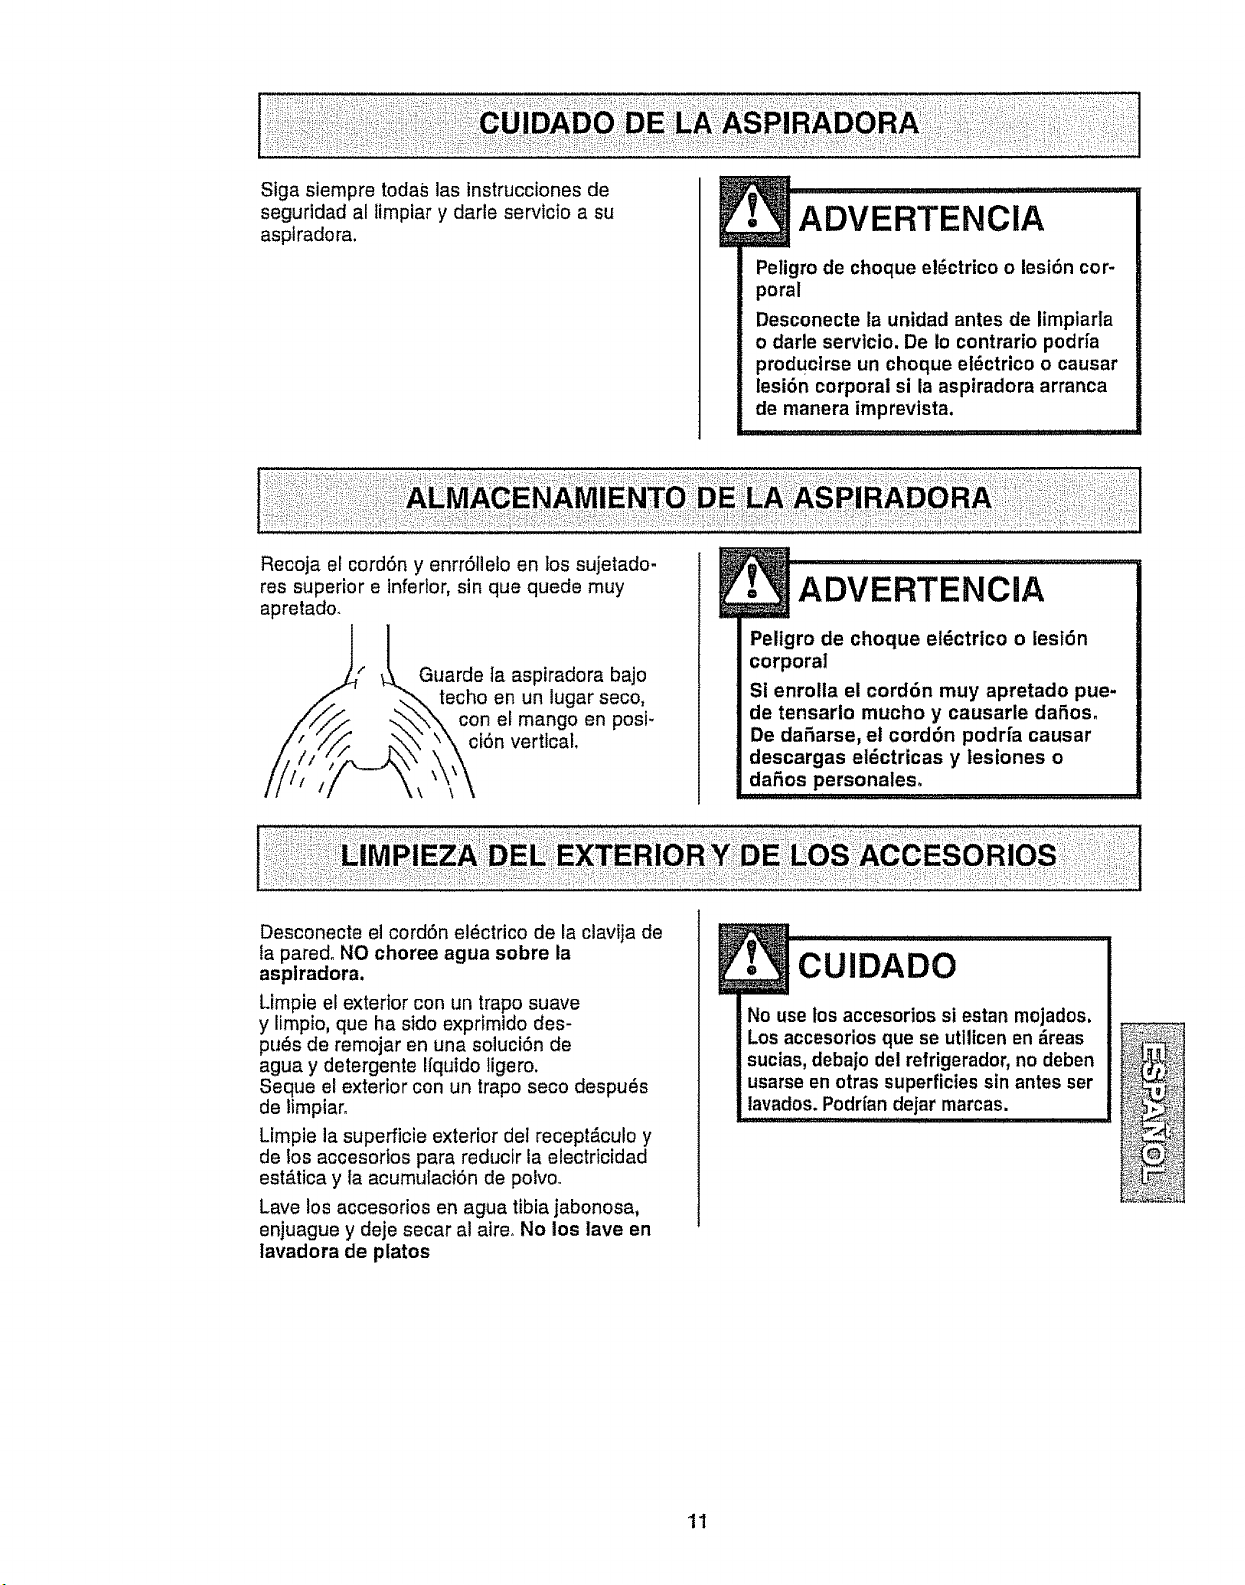
Recoja el cord6n y enrr6tlelo en los sujetado-
res superior e inferior, sin que quede muy
apretado.
Guarde la aspiradora bajo
techo en un lugar seco,
con el mango en posi-
cf6n vertical,
[• ADVERTENC[A I
Peltgro de choque el6ctrico o lest6n
corporal
Si enrolla el cord6n muy apretado pue-
de tensarlo mucho y causarle daSos°
De daffarse, et cord6n podrfa causar
descargas el_ctricas y lesiones o
dafos personales.
IJ I J J ........
Desconecte el cord6n el6ctrico de la clavija de
la pared° NO choree agua sobre la
asplradora.
Limpie el exterior con un trapo suave
y limpio, que ha sido exprimido des-
pu6s de remojar en una soluci6n de
agua y detergente I[quido ligero.
Seque el exterior con un trapo seco despu6s
de limpiar.
Limpie la superficie exterior dei recept#.culo y
de los accesortos para reducir la electricidad
est_,tica y la acumulaci6n de polvoo
Lave los accesorios en agua tibia jabonosa,
enjuague y deje secar al aire. No los lave en
lavadora de platos
[ CUIDADO
No use los accesorios si estan mojados.
Los accesorios que se utllicen en _reas
sucias,debajo del refrigerador,no deben
usarse en otras superficiessin antes ser
lavados. Podffan dejar marcas.
11
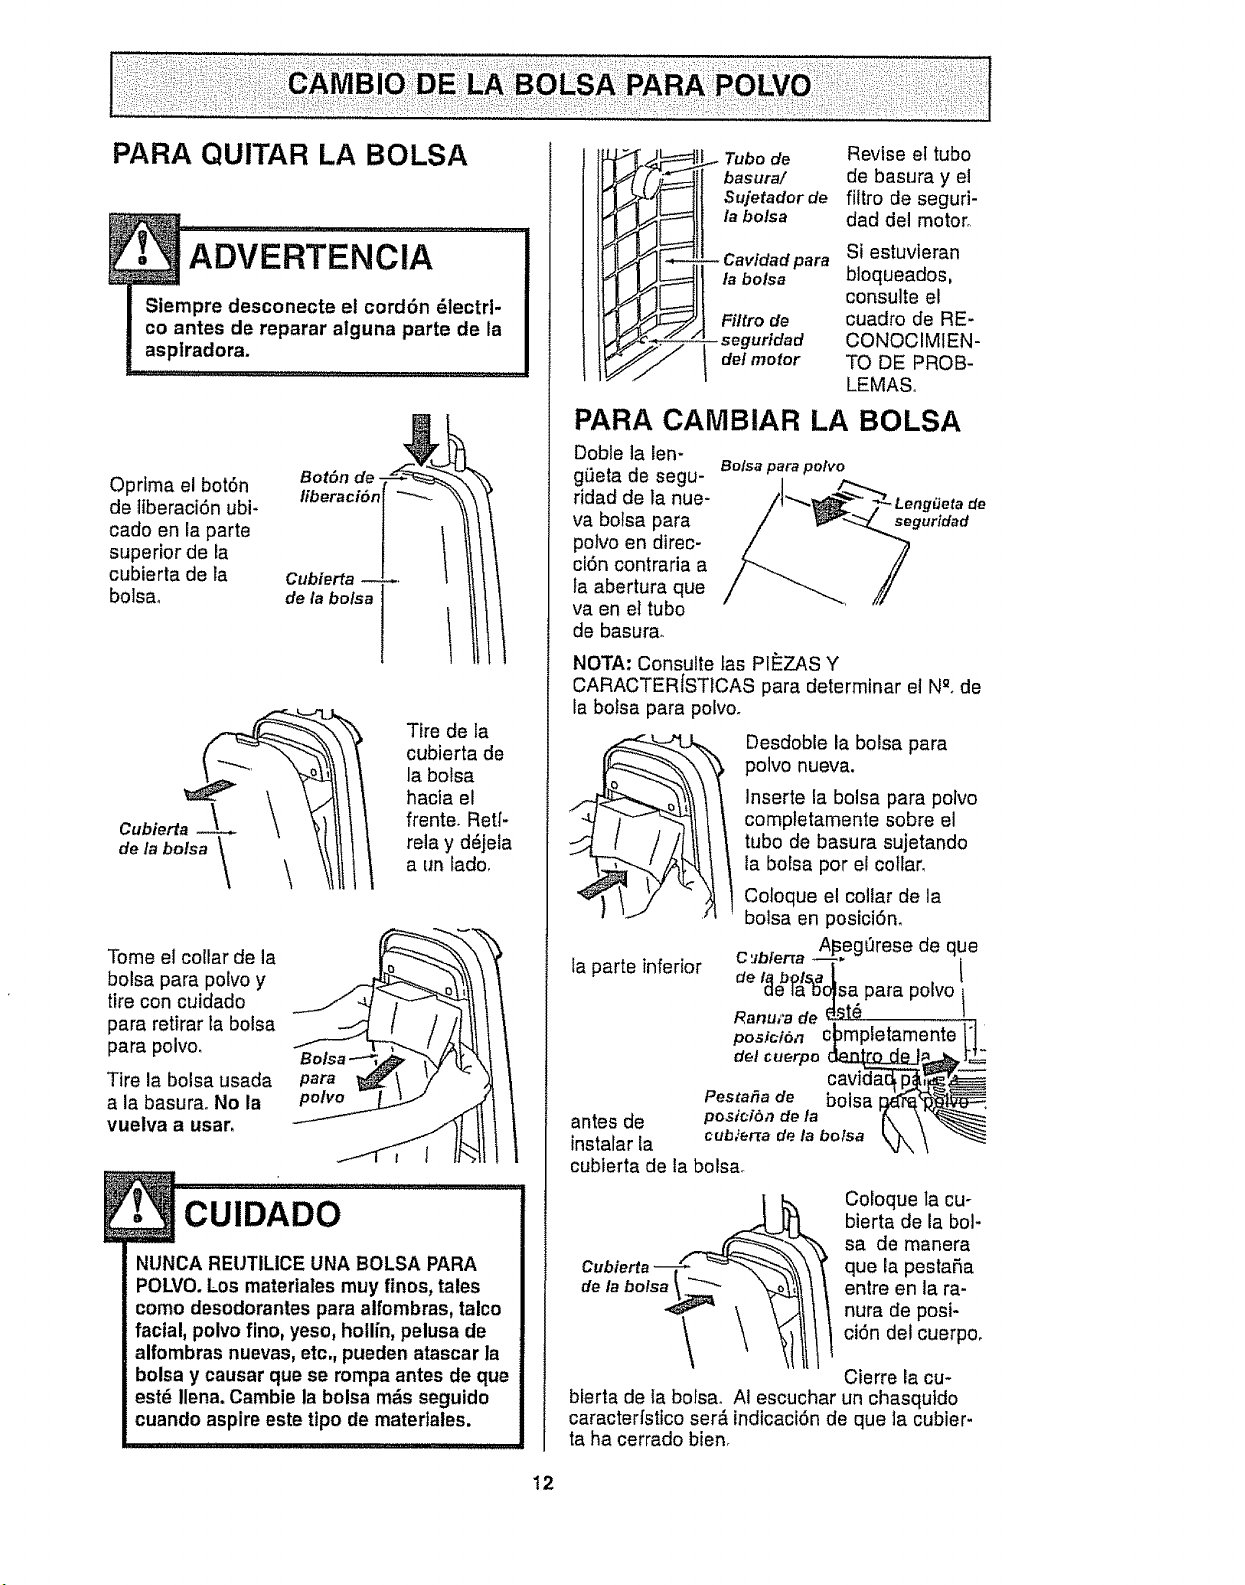
Oprfmaelbot6n
deiiberaciSnubi-
cadoenlaparte
superiordela
cubiertadela
bolsa,
Bot6n de,
Cubierta
de la bo/sa
Tire de ia
cubierta de
la bolsa
hacia el
frente. Retf-
relay d6jela
a un lado,
Tome el collar de la
bolsa para poivo y
tire con cuidado
para retirar la bolsa
para polvo.
Tire la bolsa usada
a la basurao No la
vuelva a usar.
CUIDADO......
NUNCA REUTILiCE UNA BOLSA PARA
POLVO.Los materiales muy finos, tales
como desodorantes para alfombras, talco
facial, polvo ftno, yeso, hoiUn, pelusa de
alfombras nuevas, etc., pueden atascar la
bolsa y causar que se rompa antes de que
est6 ilena. Cambie la bolsa mds seguido
cuando aspire este tipo de matertales.
Tubo de Revise el tubo
basura! de basura y el
Sujetadorde filtro de seguri-
la bolsa dad del motor°
Si estuvieran
para
la bolsa bloqueados,
consulte el
Filtrode cuadro de RE-
CONOCIMIEN-
det motor TO DE PROB-
LEMASo
PARA CAMBIAR LA BOLSA
Doble la len-
g0eta de segu-
ridad de la nue-
va botsa para
polvo en direc-
cf6n contraria a
la abertura que
va en el tubo
de basura.
Bolsa para potvo
de
seguridad
NOTA: Consulte tas PIEZAS Y
CARACTERISTICAS para determinar el N_°de
la bolsa para polvo.
Desdoble la bolsa para
polvo nueva.
Inserte la bolsa para polvo
completamente sobre el
tubo de basura sujetando
la bolsa pot el collar,
ta parte inferior
Coloque el collar de la
bolsa en posiciSn.
C'_bferraA_peg0rese de que
antes de
instalar la
cubierta de la bolsao
def_bol_a[ , l
oe laoopa parapo=vot
Ranu,"ade est6 !.
postci6n c_mpletamente 11
Pestafia de boisa I:__
cub,'erra de la bolsa _k \
Cubierta ---_a_
de la bols
Coloque la cu-
bierta de la bol-
sa de manera
que la pestaSa
entre en la ra-
nura de post-
ciSn del cuerpo.
Cierre la cu-
bferta de ia bolsa. AI escuchar un chasqutdo
caracterfstfco ser_,indicaciSnde que la cubier-
ta ha cerrado bien_
12
Reviseconfrecuenciaelfiltrodemotory
limpiecuandoest6sucioo
• ADVERTENCiA ..................
Peligro de choque el_ctrlco
No opere la asplradora sin el filtro de
seguridad del motor. Asegdurese de
que el filtro estd seco e Instalado
adecuadamente para impedtr que el
motor falle ylo que se produzca un
choque el_ctrico°
Stempre desconecte el cord6n dlectri-
co antes de reparar alguna parte de la
asplradora.
PARA QUITAR LA BOLSA
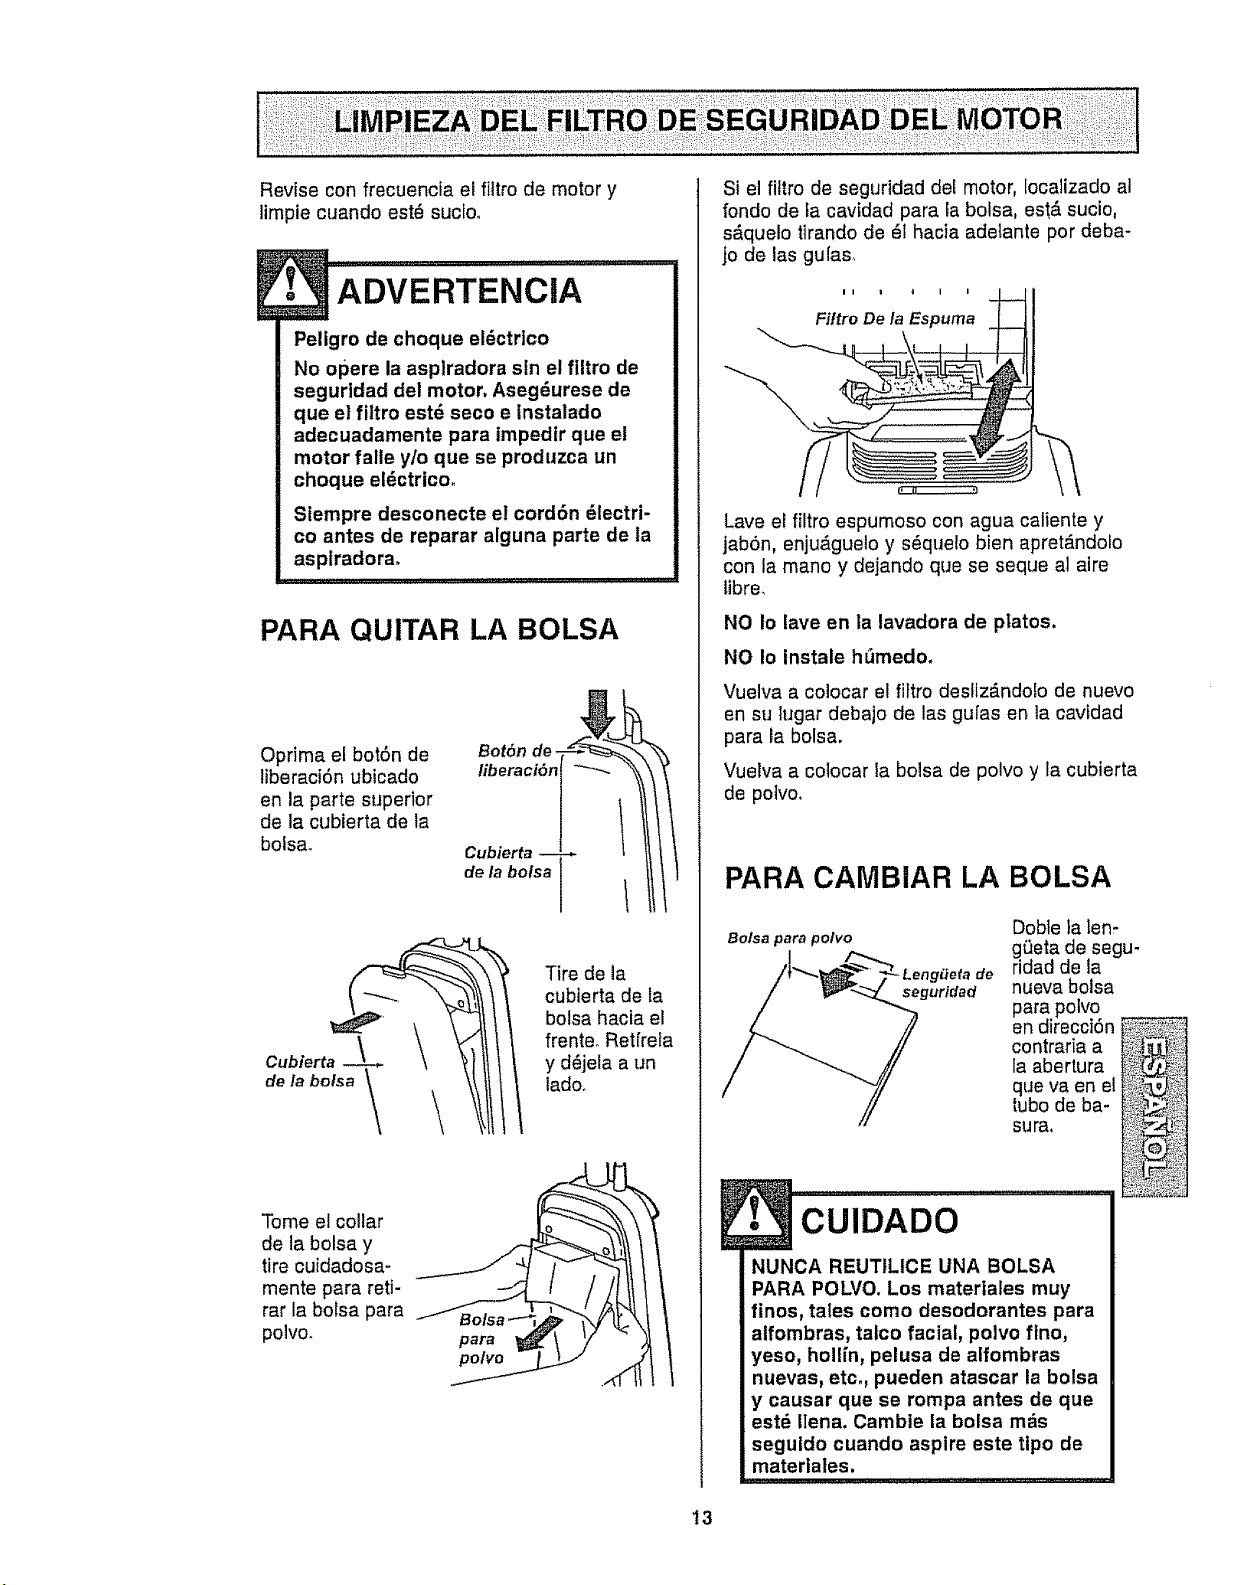
Oprima el botSn de
liberaci6n ubicado
en la parte superior
de la cubierta de la
bolsa.
Bot6n de,
tiberaci6n
Cubierta
de la bolsa
Cubier__! !
de la bolsa _!l t
Tire de la
cubierta de la
bolsa hacia el
frente. Ret[reta
y d_jela a un
ladoo
Tome el collar
de la bolsa y
tire cuidadosa-
mente para reti-
rar la bolsa para
polvo.
Si el filtro de seguridad del motor, Iocalizado al
rondo de fa cavidad para la bolsa, est& sucio,
s_quelo tirando de 61hacia adelante pot deba-
jo de las gufas_
Filtro De la Espuma
Lave el filtro espumoso con agua caliente y
jabSn, enju&guelo y s_quelo bien apret_.ndofo
con la mano y dejando que se seque al aire
libre_
NO Io lave en la lavadora de platos.
NO Io instale hSmedo,
Vuelva a colocar el fiftro desltz_.ndoio de nuevo
en su lugar debajo de las gulas en la cavidad
para la bolsa.
Vueiva a colocar la bolsa de polvo y la cubierta
de polvo,
E
PARA CAMBIAR LA BOLSA
Bo/sa para potvo
Doble la lem
g_ieta de segu-
,_erade ridad de la
seguridad nueva bolsa
para polvo
endirecciSn _
_" 1_"_....
contraria a :.!j] _i;
la abertura _.,:_..... ,_
que va en el .
sura.
• CU OAOO ....
NUNCA REUTtLiCE UNA BOLSA
PARA POLVO. Los matertales muy
finos_ tales como desodorantes para
alfombras, talco facial, polvo flno,
yeso, holl[n, pelusa de aifombras
nuevas, etc., pueden atascar la bolsa
y causar que se rompa antes de que
est_ Ilena. Gamble la botsa m_s
seguldo cuando aspire este tipo de
matertales.
t3
Desdoble la bolsa para
polvo nueva.
Inserte la bolsa para
polvo completamente
sobre el tubo de basura
sujetando la bolsa por
e! collar. ,_
Coloque e! collar de la
bolsa en posici6no
Aseg_rese de que fa parte inferior de la botsa
para polvo est6 completamente dentro de ta
cavidad para la bolsa para pofvo antes de
tnstalar la cubierta de la bolsa.
ADVERTENcIA
pere la aspiradora sin el fiitro de
pe. _..................
Estecartucho delfillro escape se tieneque cambiar
est_ sucio.Debecambiarse periRdicamenlesegL_n
las condiciones de uso.
El filtro no se puede lavar pues perderia su
capacidad para atrapar polvo.
Examine el filtro fre-
cuentemente.
Optima el pedal de
liberaciRn del mango
con el fin de que la
parte superior de la
aspIradora se incline
completamente hacia
atr,_s hasta que
quede sobre el piso.
Pedal de
liberaci6n
del mango
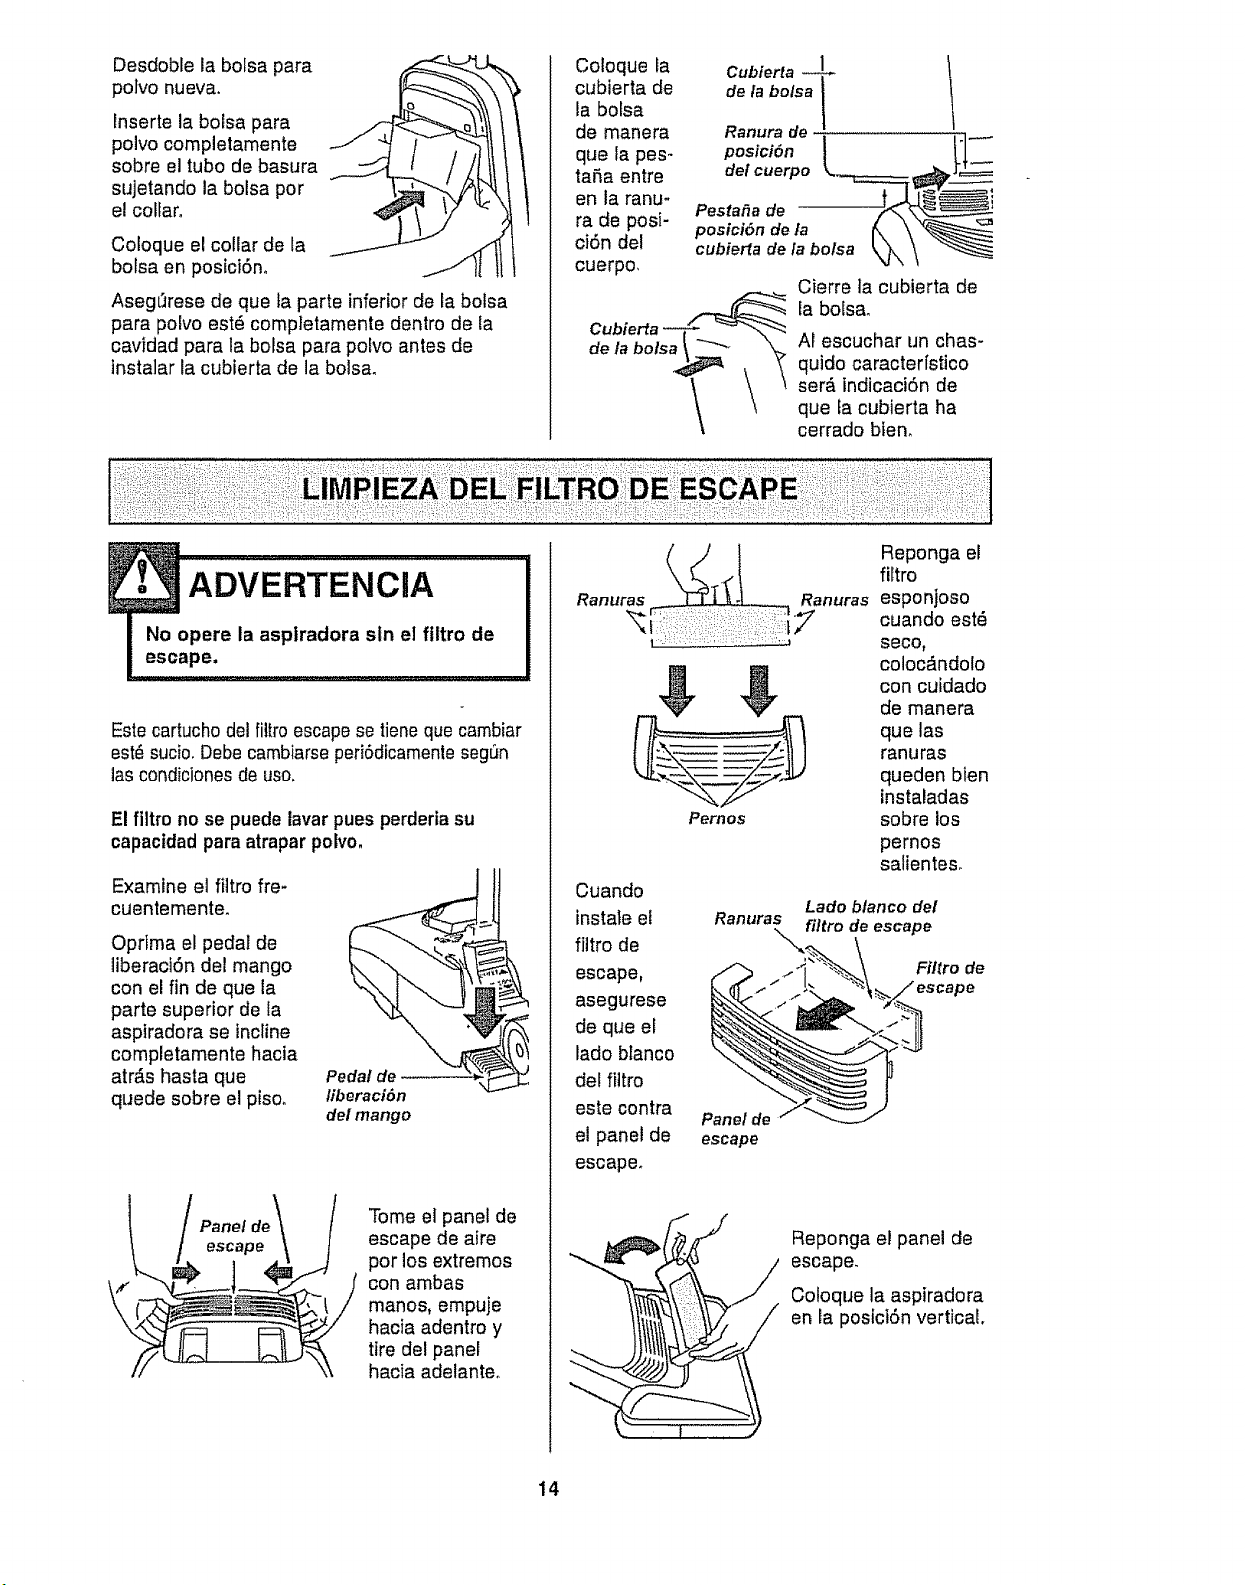
Panel
Tome e] panel de
escape de aire
por los extremos
con ambas
manos, empuje
hacia adentro y
tire del panel
hacia adelanteo
Coloque la Cubferla l
cubierta de de la bolsa
la bolsa
|
de manera Ranurade
que fa pes-
tara entre
en la ranu-
ra de posi-
ci6n del
cuerpo,
__ Cierre la cubierta de
--'r_. - _,-">. la bolsa.
Cubierta
de la botsa_ "_'_ _ AI escuchar un chas-
t
quido caracter[stico
_ ser_, indicaciRnde
que fa cubierta ha
cerrado bien.
Ranuras
Pernos
Cuando
instaleel Ranuras
filtro de
escape,
asegurese
de que el
lado blanco
del filtro
este contra
Panel de
el panel de escape
escape°
Reponga el
filtro
Ranuras esponjoso
cuando est_
seco,
colocdndolo
con cuidado
de manera
que las
ranuras
queden bien
instaladas
sobre los
pernos
salienteso
Lado blanco del
filtro de escape
Ftltro de
Reponga el panel de
" escape.
//ij Coloque la aspiradora
en la posictRn vertical.
14
ADVERTENcIA
Peligro de choque etdctrtco o lest6n
corporal
Desconecte la unidad antes de ltm-
plarla o darle servlcioo De !o contrario
podrfa producirse un choque eldctrlco
o causar lesi6n corporal sl la asptra-
dora arranca de manera ImprevIsta,
Frecuentemente revise ei _rea deI cepillo y qui-
te todo pe[o, cord6n o pelusa que se haya acu-
mulado_ Si la acumulaci6n es excestva, siga las
instruccionesa contlnuaci6no
PARA QUITAR LA CORREA
Desconecte el cord6n el_ctrico y ponga un
papel debajo de la aspiradora para proteger el
pisoo Coloque la aspfradora en la posiei6n
vertical.
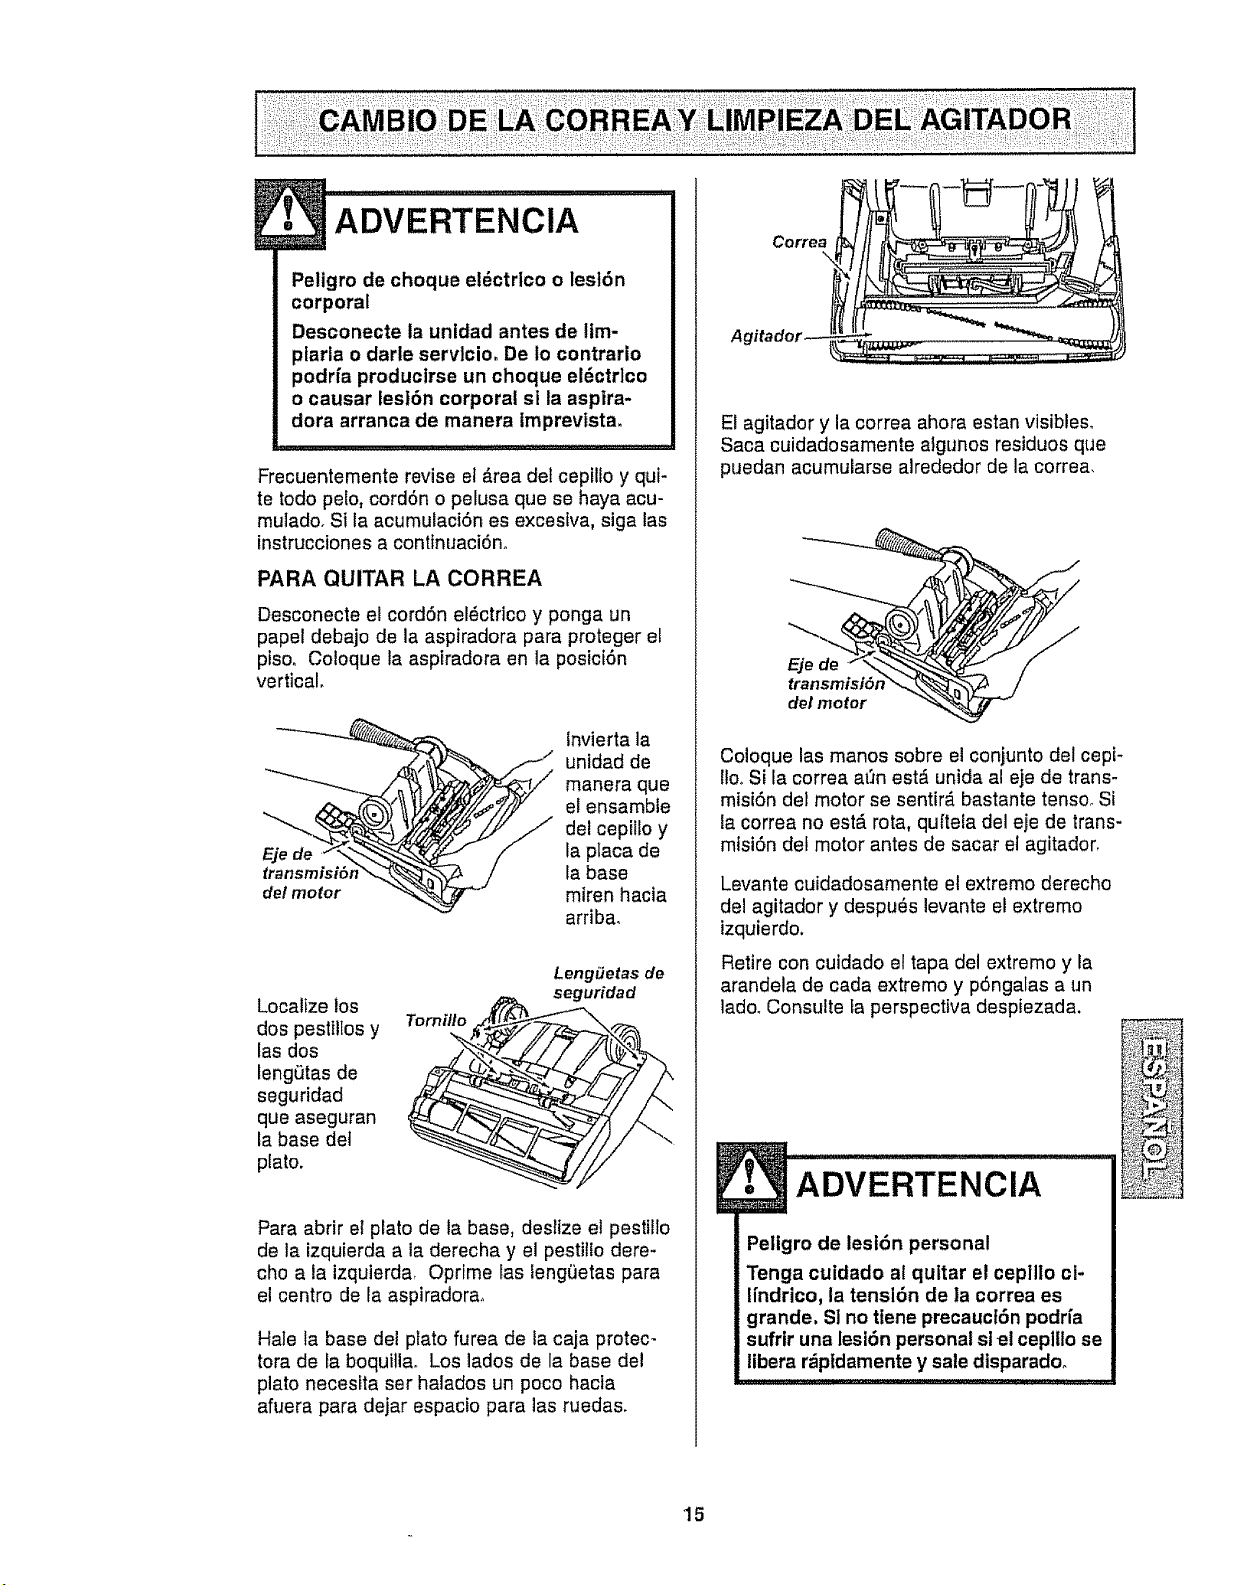
invierta la
_ nidad de
manera que
e! ensamble
del cepiilo y
la placa de
la base
miren hacia
arriba,
LengiJetas de
Localize los seguridad
dos pestillos y Tornillo
las dos
lengetas de
seguridad
que aseguran
la base det
plato.
Para abrir el plato de la base, desltze et pestitlo
de la izquierda a la derecha y el pestillo dere-
cho a la izqulerda_ Oprime las iengL_etaspara
el centro de la aspiradora,
Hale la base del plato furea de la caja protec-
tora de la boqui]la° Los lados de la base del
plato necesfta ser halados un poco hacia
afuera para dejar espacio para las ruedas,
Correa
\
El agitador y la correa ahora estan visibles.
Saca cuidadosamente algunos residuos que
puedan acumularse alrededor de la correa,
transmisi6n_
de/motor "%
Coloque las manos sobre el conjunto del cept-
IlooSi la correa a_n est,. unida al eje de trans-
misi6n del motor se sentir_, bastante tensoo Si
la correa no est,. rota, quftela del eje de trans-
mtsi6n del motor antes de sacar el agitador,
Levante cuidadosamente el extremo derecho
del agitador y despu_s levante el extremo
izquierdo.
Retire con cuidado el tapa del extremo y la
arandela de cada extremo y p6ngalas a un
lado, Consulte fa perspectiva despiezada.
ADVERTENClA
Peligro de lesf6n personal
Tenga cuidado al quitar el cepillo cl-
ffndrico, la tensi6n de la correa es
grande, SI no tlene precauct6n podrfa
sufrir una lesi6n personal slel ceplllo se
libera r_pldamente y sale disparado,
15
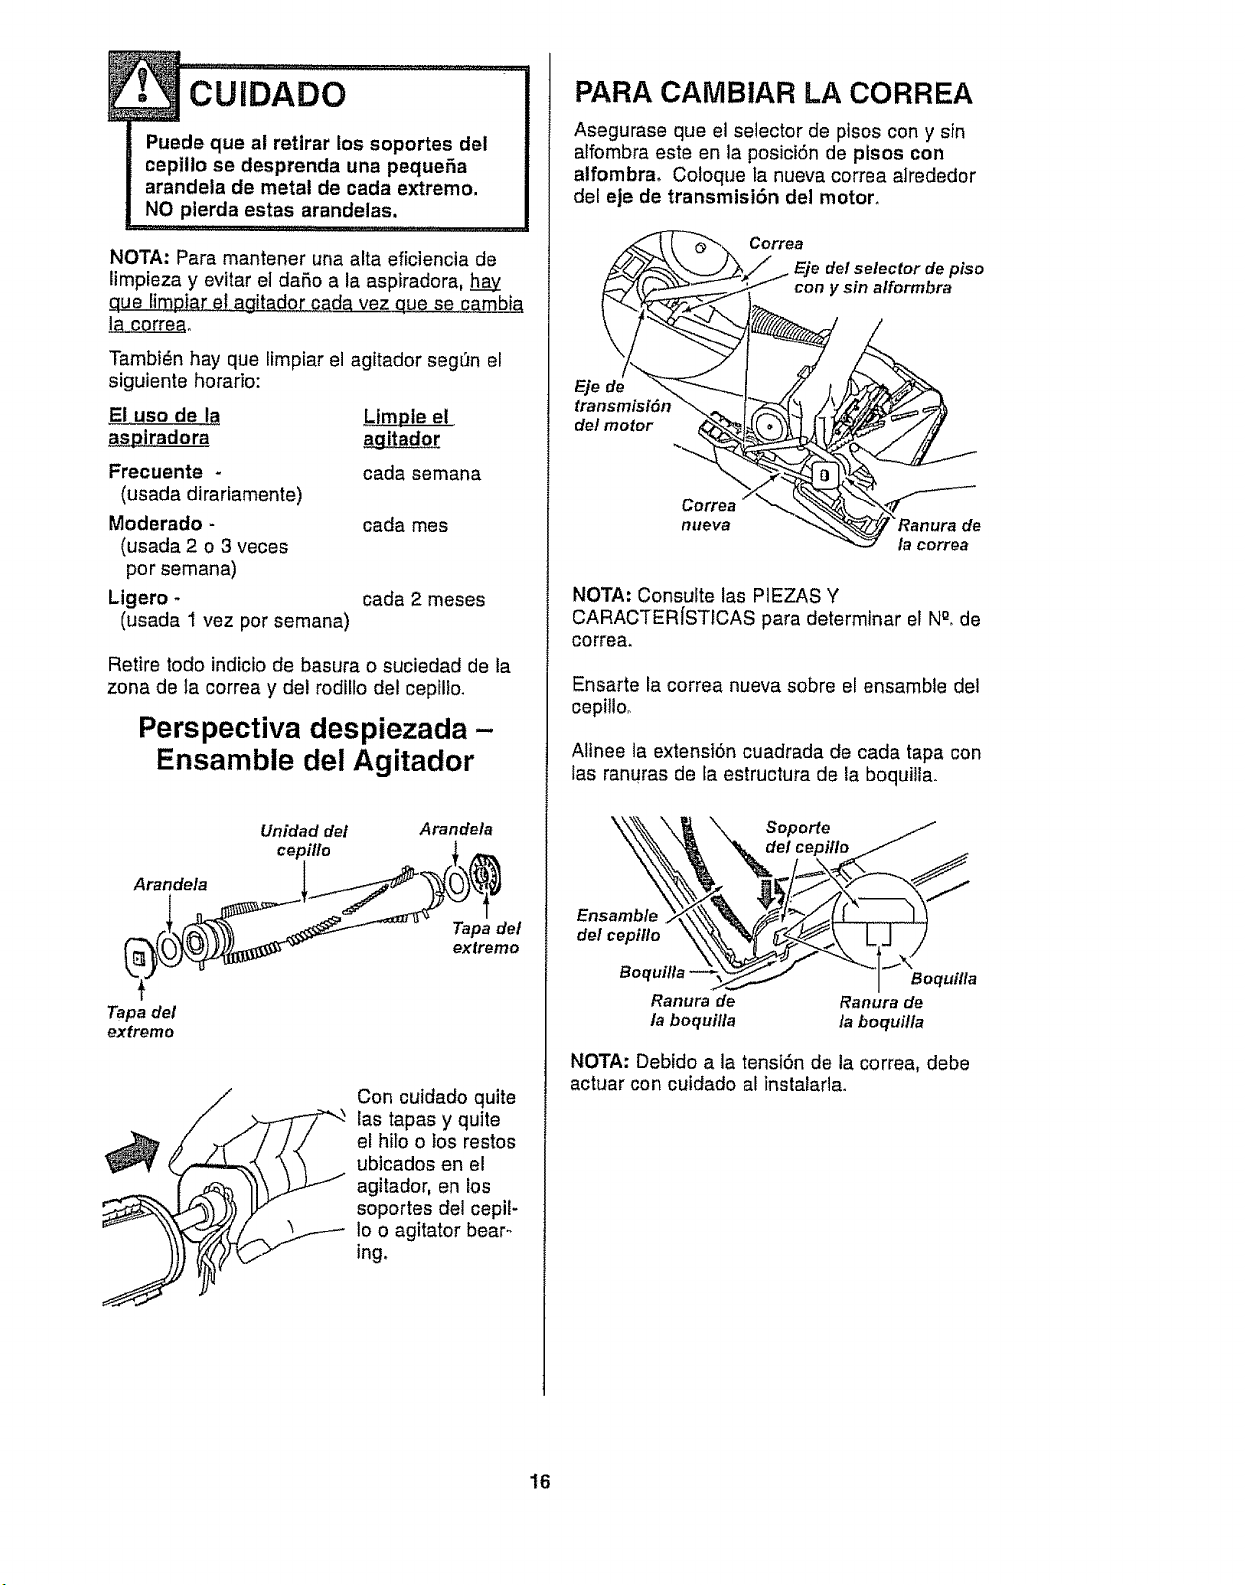
Puede que al retirar los soportes del
cepillo se desprenda una pequefia
arandela de metal de cada extremo.
NO pierda estas arandelas.
NOTA: Pare mantener una alta eficiencia de
limpieza y evitar el daRo ala aspiradora, h__
gue limpia[ ef agitador ca,de vez que se cambia
!a correao
Tambi_n hay que timpiar el agitador seg[_n el
siguiente horario:
El USOde la ,Limple el
aspiradora agitador
Frecuente -
(usada dirariamente)
Moderado -
(usada 2 o 3 veces
por semana)
Ligero -
(usada 1 vez por semana)
cada semana
cada rues
cada 2 meses
Retire todo indicio de basura o suciedad de la
zone de fa correa y del rodillo del cepflto.
Perspectiva despiezada-
Ensamble del Agitador
Unidad del Arandela
cepillo l
Tapadel
exfremo
Con cuidado quite
las tapes y quite
el hito o los restos
ublcados en el
agitador, en los
soportes del cepii-
Io o agitator bear-
ing.
PARA CANIBIAR LA CORREA
Asegurase que et selector de pisos con y sin
atfombra este en la posictSn de plsos con
alfombra. Coloque la nueva correa a]rededor
del eje de transmisi6n del motor_
Coffee
selector de piso
con y sin alformbra
de
del motor
Ranura de
la correa
NOTA: Consulte las PIEZAS Y
CARACTERISTICAS para determiner el N°, de
correa.
Ensarte la correa nueva sobre el ensemble del
cepilloo
Alinee la extensi6n cuadrada de cada tapa con
las tenures de fa estructura de la boquiila.
,o,oo ,,,o L
Ranura de Ranura de
la boquilla /a boquitla
NOTA: Debido ala tenst6n de la correa, debe
actuar con cuidado al instalarla.
16
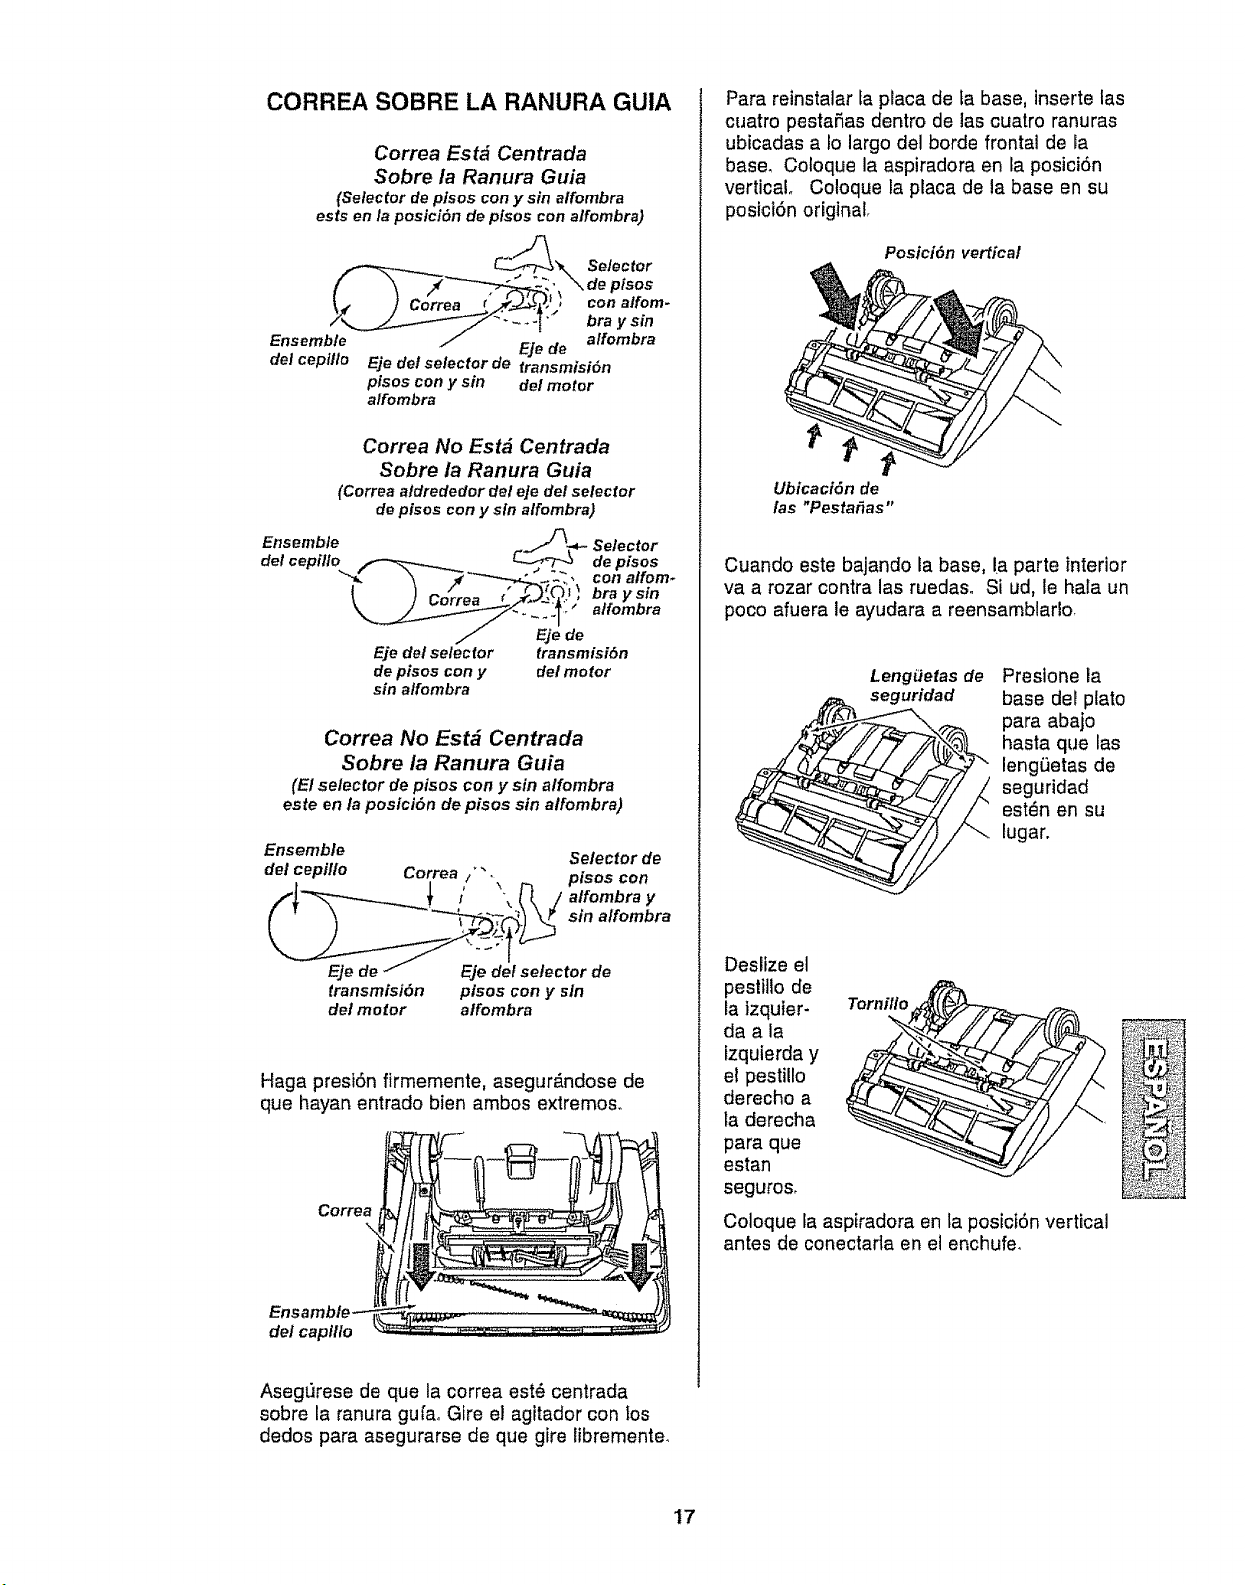
CORREA SOBRE LA RANURA GUIA
Correa Est_ Centrada
Sobre la Ranura Guia
(Selector de plsos con y sin alfombra
ests en la posicidn de plsos con alfombra)
del ceptllo
affombra
Eje de
Eje del selector de transmisi6n
pisos con y sin del motor
alfombra
Correa No Est_ Centrada
Sobre la Ranura Guia
(Correa aldrededor del eje del selector
de ptsos con y sin alfombra)
Selector
de pisos
con alfom-
bray sin
alfombra
Eje del selector transmisiSn
de pisos con y del motor
sin alfombra
Correa No Est_ Centrada
Sobre la Ranura Guia
(El selector de pisos con y sin alfombra
este en ta posicl6n de pisos sin alfombra)
Ensemble
Selector de
transmisiOn ptsos con y sin
del motor alfombra
Haga presi6n firmemente, asegurdndose de
que hayan entrado bien ambos extremos,,
Correa
del caplllo
Para reinstalar fa placa de fa base, inserte las
cuatro pestaSas dentro de las cuatro ranuras
ubicadas a 1olargo del borde frontal de la
base. Coloque la aspiradora en la posicidn
vertical. Coloque la placa de la base en su
posict6n original,
Posici6n vertical
Ubicaci6n de
las "Pesta_as"
Cuando este bajando la base, la parte interior
va a rozar contra las ruedaso Si ud, le hala un
poco afuera le ayudara a reensamblarlo,
Leng_etas de Presione la
seguridad base del plato
para abajo
hasta que las
leng0etas de
seguridad
estdn en su
lugar.
Deslize el
pestillo de
la izquier-
da a la
fzquierda y
e! pestiUo
derecho a
la derecha
para que
estan
seguros.
Tornillo
Coloque la aspiradora en la posici6n vertical
antes de conectarla en et enchufe.
Asegt_rese de que la correa est_ centrada
sobre la ranura gufa. Gfre el agitador con los
dedos para asegurarse de que gire libremente.
17
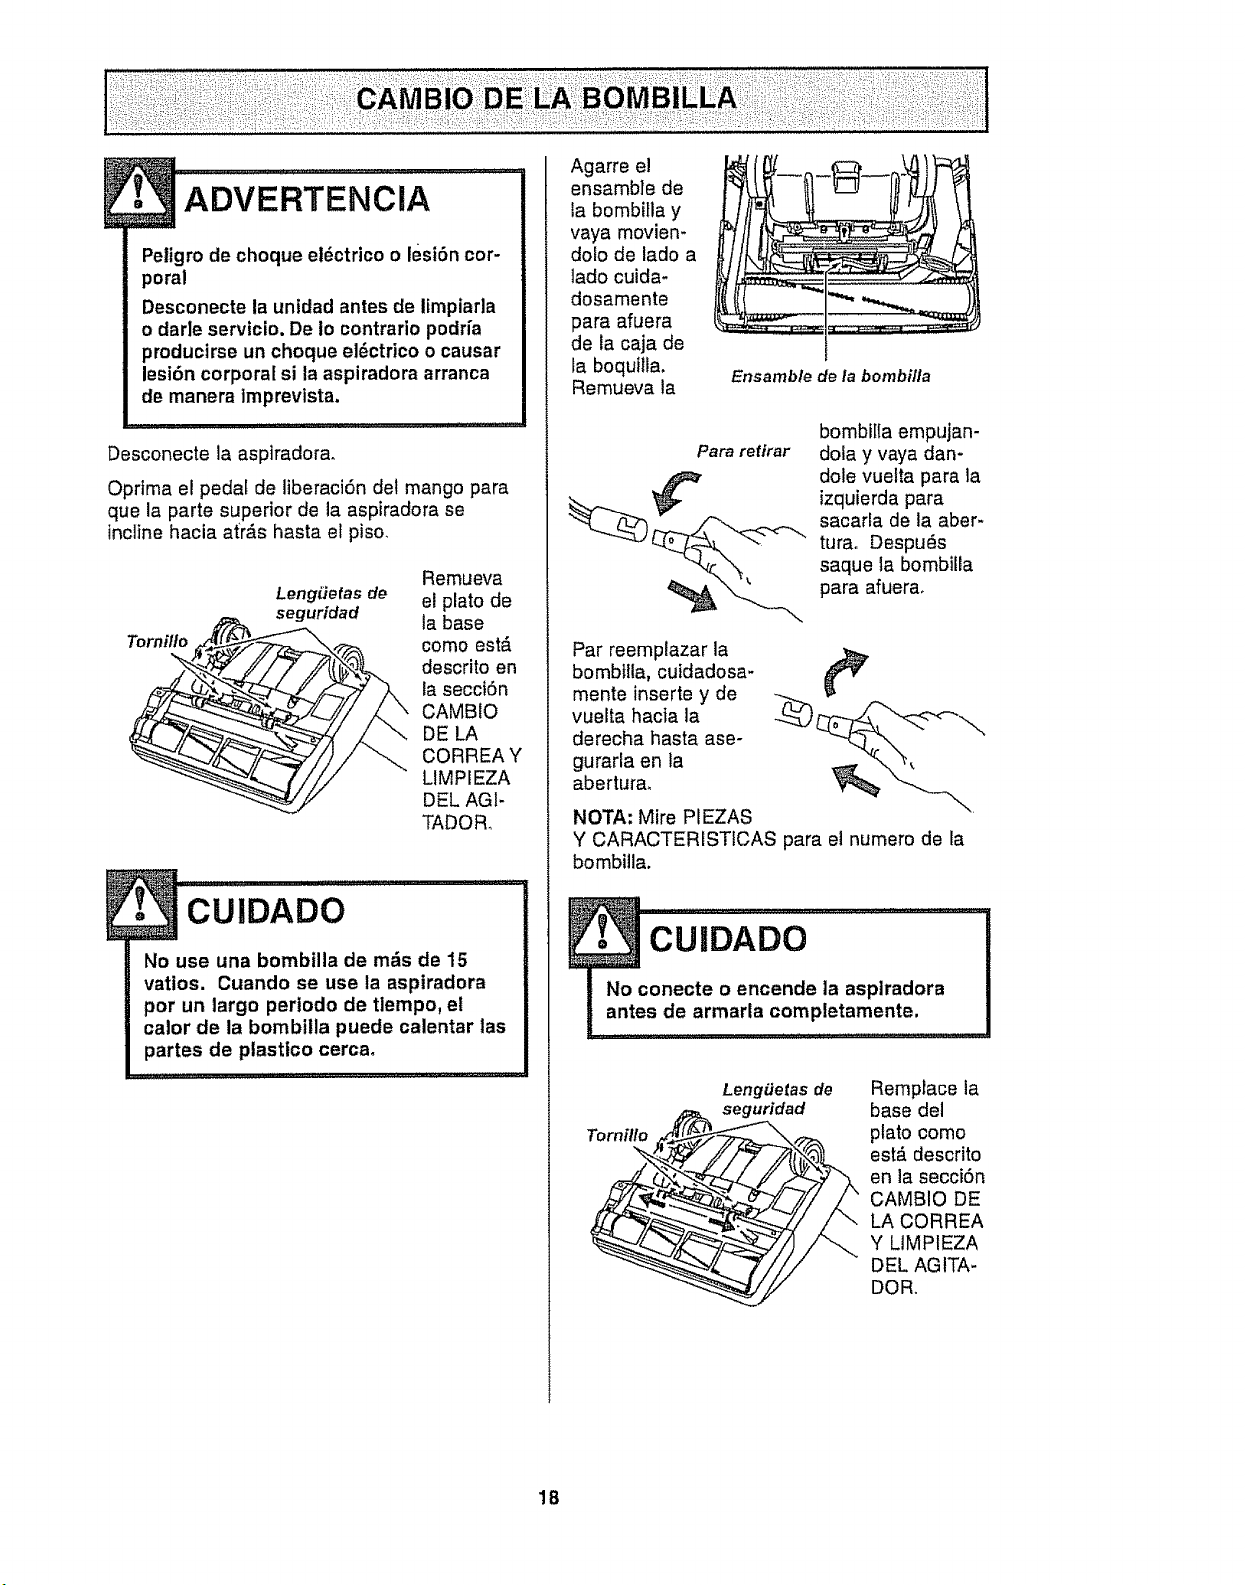
ADVERTENCIA
Peligro de choque el_ctrico o lest6n cor-
poral
Desconecte la untdad antes de limpiarla
o darle servicio. De io contrario podr{a
pmducirse un choque el6ctrico o causar
lesi6n corporal si la aspiradora arranca
de manera tmprevista.
Desconecte la aspiradora.
Optima el pedal de liberaci6n del mango para
que la parte superior de la aspiradora se
inclinehacia at_r_.shasta el piso.
Tornillo
Remueva
LengLiefasde el plato de
seguridad la base
come est,.
descrito en
la secci6n
CAMBIO
DE LA
CORREA Y
LIMPIEZA
_ DEL AGI-
TADOR_
:C:UIDADO ........
No use una bombilla de mrs de 15
vatios. Cuando se use la aspiradora
por un largo perlodo de tlempo, et
calor de la bombilla puede calentar las
partes de plastico cerca.
Agarre el
ensamble de
ta bombilla y
vaya movien-
dolo de lado a
lado cuida-
dosamente
para afuera
de la caja de
la boquflla.
Remueva la
Ensamb/e de la bombilla
bombilla empujan-
Para retirar dola y vaya dan-
__ dole vuelta para ,a
izquierda para
_ acarla de la aber-
turao Despu_s
saque la bombiila
para afuera.
Par reemplazar la
bombilla, cuidadosa-
mente inserte y de
vuelta hacia la
derecha hasta ase-
gurarla en la
abertura.
NOTA: Mire PIEZAS
Y CARACTERISTICAS para el numero de la
bombilla.
TorniUo
LengiJetas de
seguridad
Remplace ia
base del
plato como
estd descrito
en la secci6n
CAMBIO DE
LA CORREA
Y LIMPIEZA
DEL AG tTA-
DOR.
1B

E
Peltgro de choque el_ctrlco o lest6n
corporal
Desconecte la unidad antes de lim-
plarla o darle servicto. De Io contrarlo
podrfa producirse un choque el_ctrico
o causar lesi6n corporal sl la asptra-
dora arranca de manera imprevistm
PARA EXAMINAR
Protector de la correa
de/a placa de la base
EL AGITADOR
Coloque la aspt-
radora con la base
hacia arriba para
revisar si los ceptflos
est_n en rnalas
condiciones°
Cuando los cepfllos
esten gastados al
nivel del protector
de base, reempIace
el agitador.
PARA QUITAR EL AGITADOR
Quite la cubierta de la boquitla y el agitador.
V_ase CAMBIO DE LA CORREA Y LIMPIEZA
DEL AGITADOR_
Reemplace el agitador con un nuevo.
Rearme la correa, el agitador y la cubierta de
la boquilla. VSase CAMBIO DE LA CORREA Y
LIMPtEZA DEL AGiTADOR.
Unldad del
cepillo
Arandela
Arandela
Tapadel
extremo
Tapa de/
extremo
'19
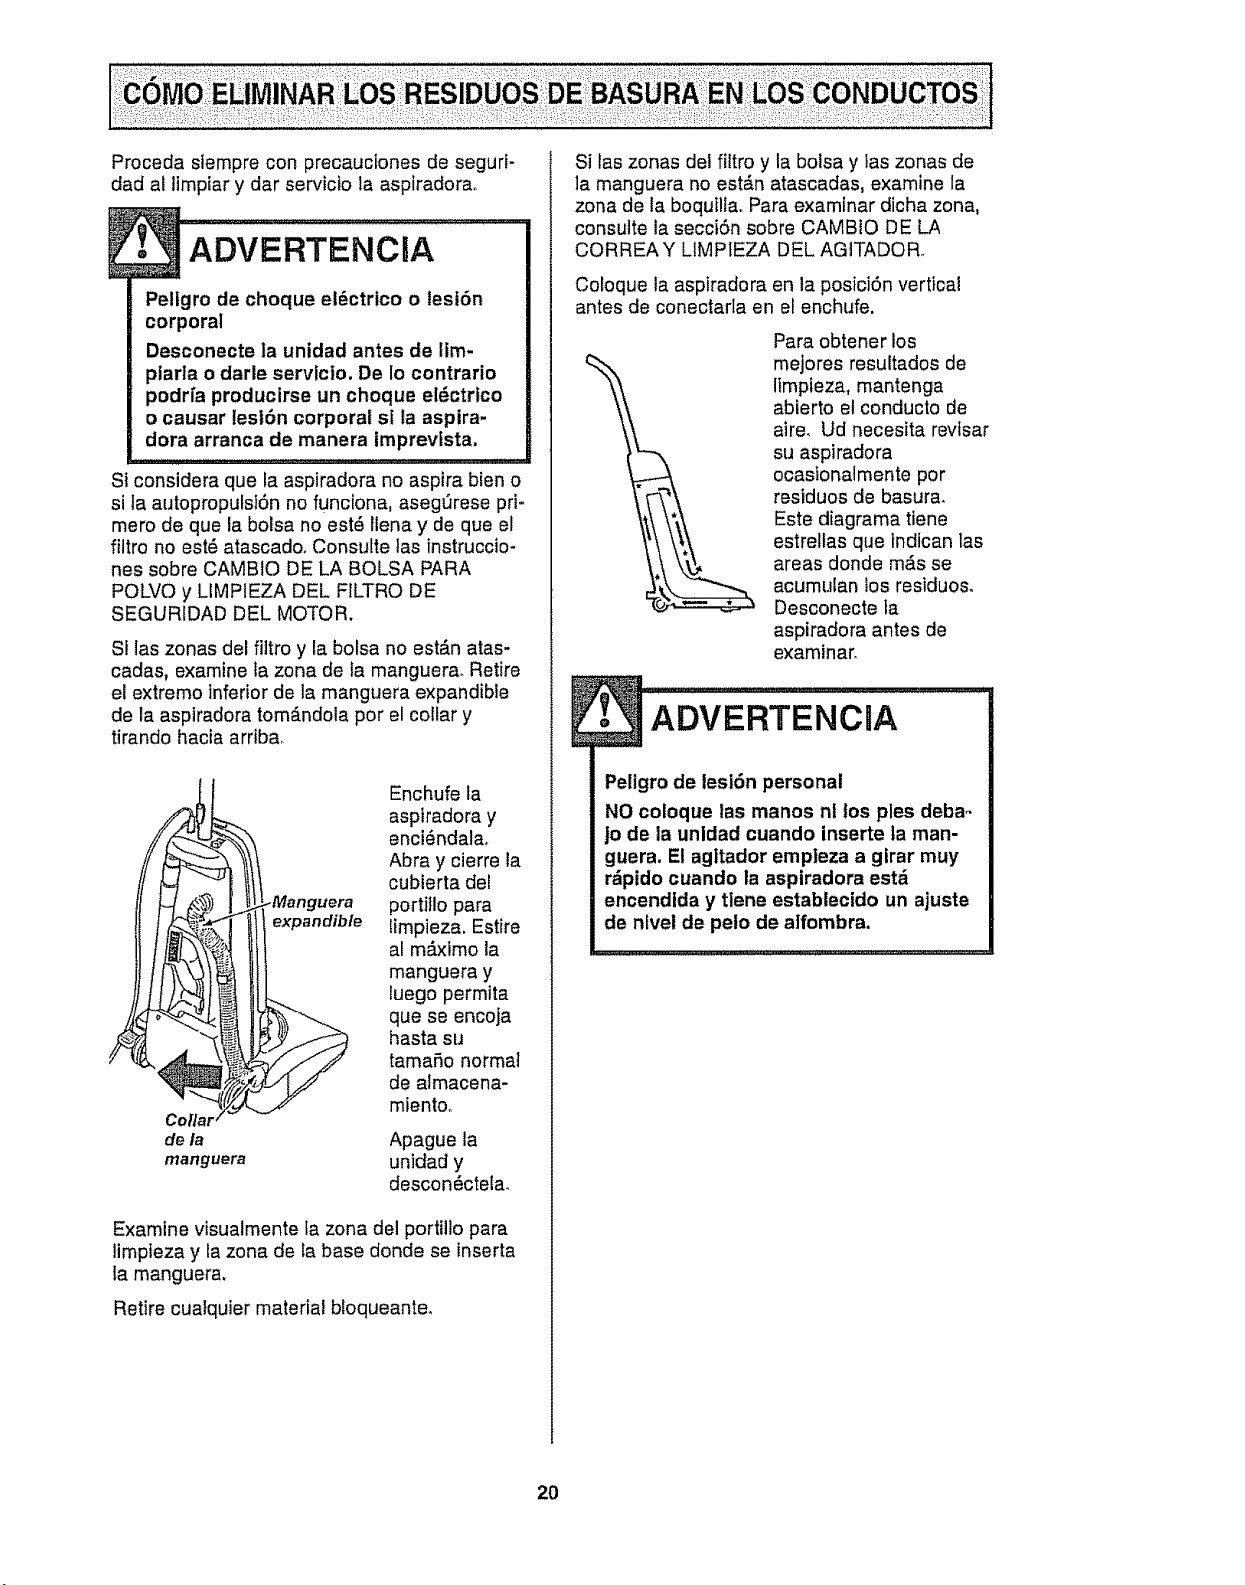
Proceda slempre con precauciones de seguri-
dad al Ilmpiar y dar servicIo la aspiradorao
ADVERTENO'A
Pellgro de choque el_ctrico o lesI6n
corporal
Desconecte la unidad antes de lim-
piarla o darle servicto. De !o contrarto
podrfa producirse un choque el6ctrico
o causar lest6n corporal st la aspira-
dora arranca de manera imprevlsta.
Si considera que la aspiradora no aspira bien o
si la autopropulsI6n no funciona asegt3rese pri-
mero de que la bolsa no est4 Ilena y de que el
filtro no est4 atascadoo Consutte tas instruccio-
nes sobre CAMBIO DE LA BOLSA PARA
POLVO y LIMPIEZA DEL FtLTRO DE
SEGURIDAD DEL MOTOR.
SI las zonas del filtro y la bolsa no est_n atas-
cadas, examine la zona de fa manguera. Retire
el extremo inferior de ta manguera expandible
de la asplradora tom_ndola por el collar y
tirando hacia arriba,
.Manguera
expandible
Enchufe la
aspiradora y
enci6ndala.
Abra y cierre la
cubierta del
portillo para
limpieza. Estire
al m_.xtmo la
manguera y
luego permita
que se encoja
hasta su
tamaSo normal
de almacena-
mientoo
de la Apague la
manguera unidad y
descon_ctela.
Examine visualmente la zona del portillo para
limpieza y la zona de Ia base donde se inserta
la manguera.
Retire cuatquier material bloqueante.
Si las zonas del _tro y la bolsa y ias zonas de
]a manguera no est#,n atascadas, examine la
zona de la boqut!la. Para examinar dicha zona,
consulte la secci6n sobre CAMBIO DE LA
CORREA Y LtMPIEZA DEL AGITADOR°
Coloque la aspiradora en la posici6n vertical
antes de conectarla en el enchufe.
Para obtener los
mejores resultados de
limpleza, mantencja
abierto el conducto de
aire. Ud necesita revlsar
su aspiradora
ocastonalmente por
residuos de basura.
Este diagrama tiene
estrellas que indican las
areas donde m,is se
acumulan los residuos.
Desconecte la
aspiradora antes de
examinar,
, ADVERTENCIA
Peligro de lesi6n personal
NO coloque las manos nt los pies deba-
jo de la unidad cuando inserte la man-
guera. El agltador empleza a gfrar muy
rdpido cuando la aspiradora est_
encendida y tiene establecido un ajuste
de nlvel de peio de alfombra.
2O
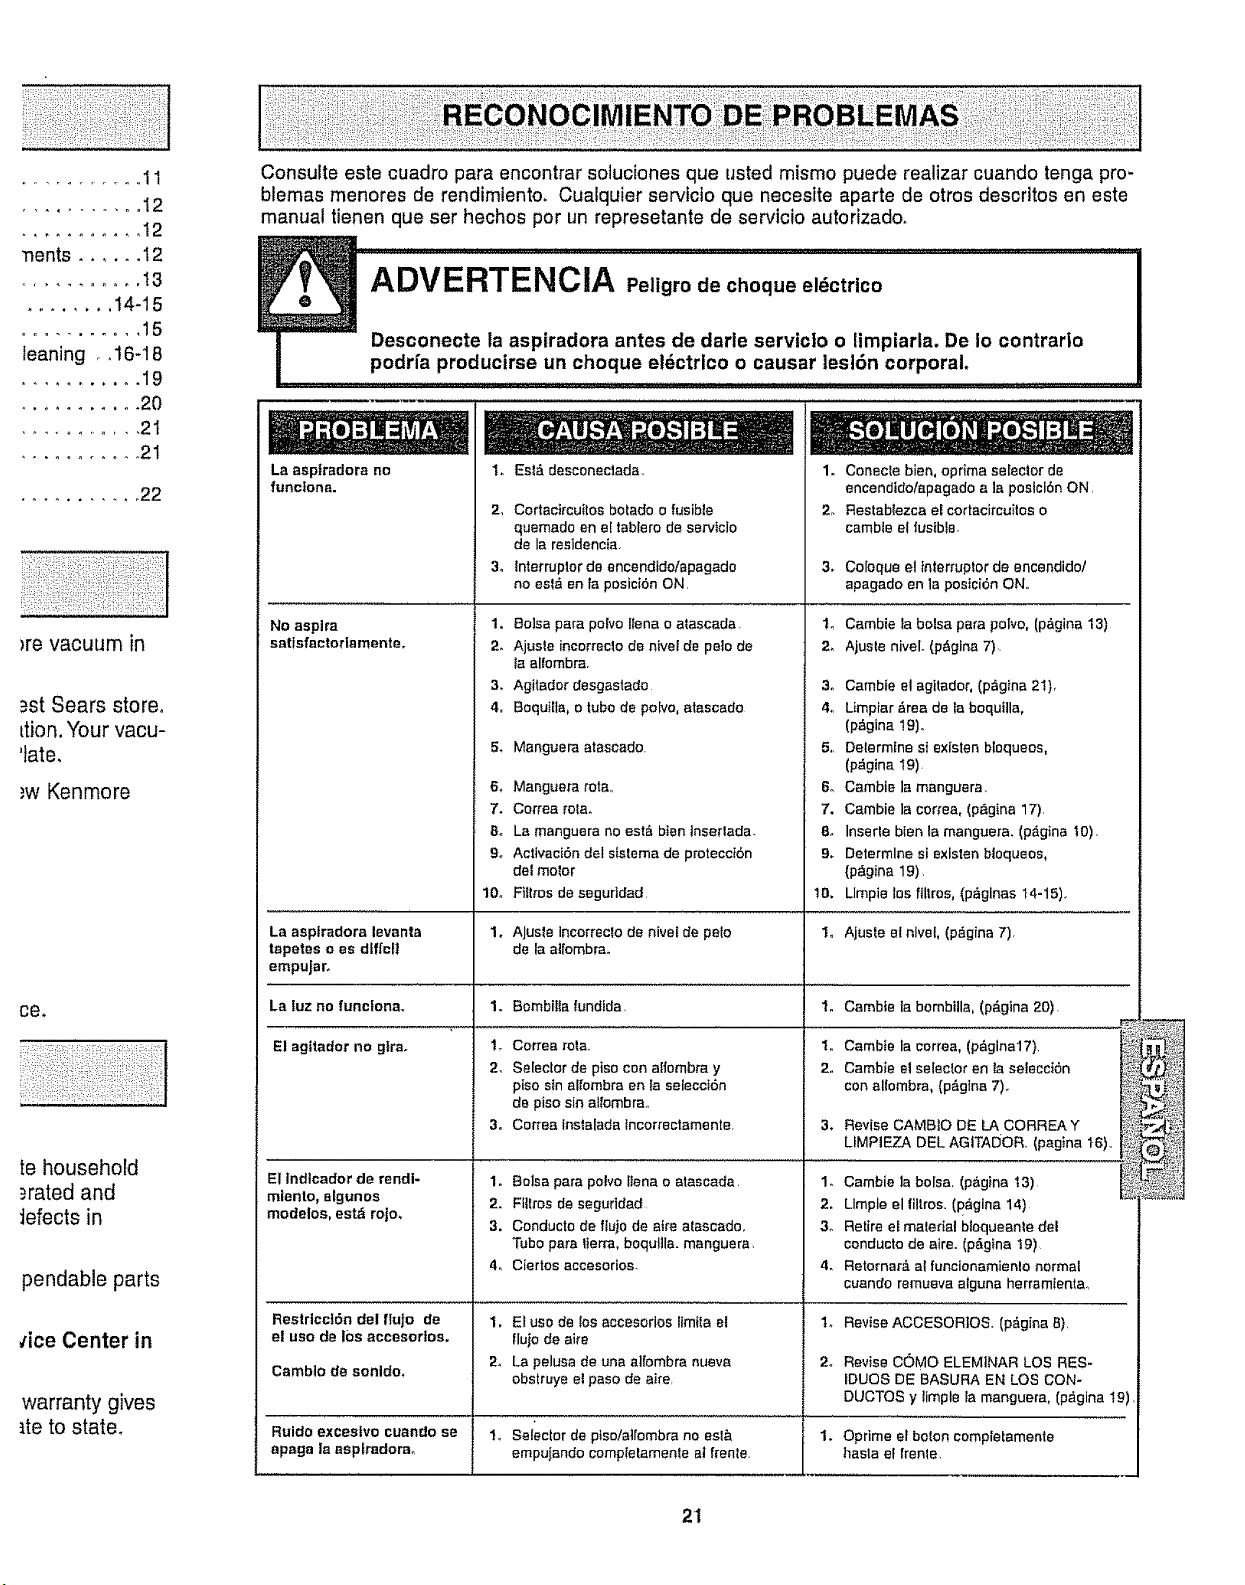
!iiiiiiiiiiii!!!iili!i!iiiil
........... 22
)re vacuum in
_=stSears store.
ttion.Your vacu-
'late.
,_wKenmore
ce_
te household
)rated and
iefects in
pendable parts
,'ice Center in
warranty gives
tte to state_
Consulte este cuadro pare encontrar soluciones qua usted mismo puede realizer cuando tenga pro-
blemas menores de rendimiento, Cualquier servicto que necesite aparte de otros descritos en este
manual tienen queser hechos per un represetante de servtcio autorizado.
Desconecte la aspiradora antes de darle serviclo o limp|aria. De Io contrarto
podrfa producirse un cheque el_ctrlco o causar lesl6n corporal,
La asptradora no
funclona.
No aspire
satisfactorlamenteo
1. Esl& desconectada_
2, Cortacircuitos botado o fusible
quemado en el tablerode servicio
de la residencia,
3. lnterruplor de encendide/apagado
no esl_ en faposici6n ON,
2_
3.
4.
S°
6_
7.
8°
9.
10_
1,
Bolsa pare polvo liana o atascada,
Ajuste incorreclode niveI de pelo de
ts alfombra.
Agitador desgastado
Boqutlla, e tube de pofvo,atascado
Manguera atascado.
Mangueta rote,,
Correa re|a,
La manguera no est_ bten lnserlada,
ActtvaciSn del sistema de proteccibn
del motor
Fiftros de segurldad.
2,
1. Conecr.e bien, oprima seleclor de
encendtdo/apagadoala posici6n ON,
2_ Restabiezca eEcortacircuitos o
camble el lusibte.
3. Coloque el tnterruplor de encendido/
apagado en la posici_n ON.
1. Cambie la boise para polvo, (p_gina 13)
2. Ajuste niveL (p&gina 7),
3o Cambte el agitador, (pdgina 21),
4° Umpiar _,reade la boqutlla,
(p_gina 19).
5,, Delermtne st existenbloqueos_
(p,_gina 19).
6o Camble la manguera_
7. Cambie la cor_'ea,(p_gina 17),
8. Inserte bienla manguera. (p>na I0).
9. Determine si existen bloqueos,
{p&gina 19),
!0. Llmpte los flllres, (p_glnas 14-15)_
La asptradora levanta AJus_eincorreclo de nivet de polo I. Ajuste el nivel, (p_gtna 7),
tapetes o es dlflcft de la atfombra°
empuJar.
La |uz no funclona. Bomb|lie |undida, 1. Cambie la bombtlla, (p&gina 20)
El agttador no glra.
Correa re|a,
Selector de piso con atfombra y
piso sin alfombra en fa selecct6n
de piso sin alfombra,,
Correa inslatadafncorrectamente,3.
1. Be|so pare polvo liana o atascada.
2. Ftilres de seguddad,
3, Conducto de flujo de atre atascado,,
Tube pare lIerra, bequftla, manguera,
4, Ciertos acceserios
El |ndlcador de rendi-
mlento, elgunos
modelos, estd rojo,
Restrlect6n del fluJo de
el use de 10s accesorfos.
Camb]o de sonldo,
1. El use de los accesorios limtfa el
Ilujo de aire
2. La pelusa de una a][ombra nueva
obstruye el paso de aide,
t. Cambtela correa, (p&gina17),
2. Cambie el selecto_ en la selecci6n
con allombra, (p&glna 7)°
3, Revise CAMBtO DiELA CORREA Y
UMPIEZA DEL AGITADOR, (pagina t6)_,
1_ Cambie la boise, (pagina I3),
2. Llmple el tiltros. (pagina 14)
3_ Retire el ma',eria! bloqueante del
conducto de afro. (p&gina t9)
4_ Retornar_. al funcienamiento normal
cuando remueva alguna herramtenta.1
2_
Revise ACCESOR]OS. (p_gina 6),
Revise COMe ELEMINAR LOS RES-
IDUES DE BASURA Etq LOS CON-
DUCTOS y limple la manguera, (p_gina 19),
Ruido exceetvo cuando se 1. Selector de ptso!atrombra no est,, 1. Oprime el boron compietamente
apaga la aspfradorm empuiando cempietamen_e atf_ente, basle e_lrente,
21

Getitfixedl home Or ours!
Your Home
For repair -- in your home - of all major brand appliances,
lawn and garden equipment, or heating and cooling systems,
no matter who made it, no matter who sold it!
For the replacement parts, accessories and
owner's manuals that you need to do-it-yourself.
For Sears professional installation of home appliances
and items like garage door openers and water heaters.
1-800-4-MY-HOME _ Anytime, day ornight
(1-800-469-4663) (U.S.A. and Canada)
www.sears.com www.sears.ca
Our Home
For repair of carry-in products like vacuums, lawn equipment,
and electronics, call or go on-line for the nearest
Sears Parts and Repair Center.
1-800-488-1222 Anytime, day or night (U.S.A. only)
www, seal*S.com
To purchase a protection agreement (U.S.A.)
or maintenance agreement (Canada) on a product serviced by Sears:
1-800-827-6655 (uosJ_) 1-800-361-6665 (Canada)
Para pedir serviciode reparaci6n
a domicilio,y pare ordenar piezas:
1-888-SU-HOGAR _
(1-888-_7)
Au Canada pour service en franc,.ais:
1-800-LE-FOYERMc
(1_7)
www, sears.ca
©S_ Ro_ucksndCo,
T'M 8M
® Regtster_dTrademark t Trademark ! Service Mark of Sears, Roebuck and Co_
®
Marca Regislrada / Marca de Fdbrica tsM Marca de Servicio de Sears, Roebuck and Co,
I_C MD
Marque de commerce / Marque ddposee de Sears, Roebuck and Co,