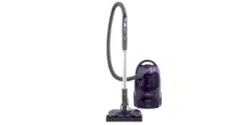
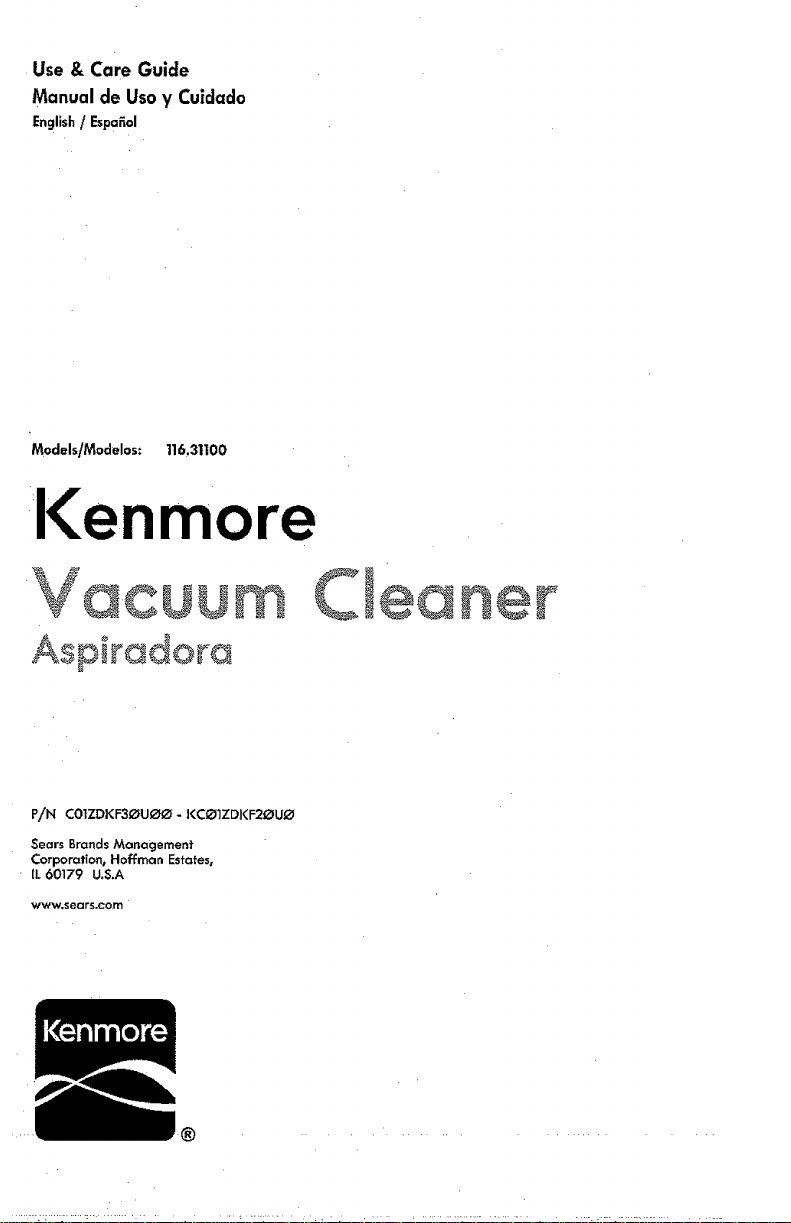
Use & Care Guide
Manual de Usay Cuidaclo
English / EspaEol
ModelsiModelos: I16.3n00
P/N COlIDKF30U00- KC_TIZDKF20UO
Sears Brands Management
Corporation, Hoffman Estates,
[L 60179 U.S.A
_5ears,com
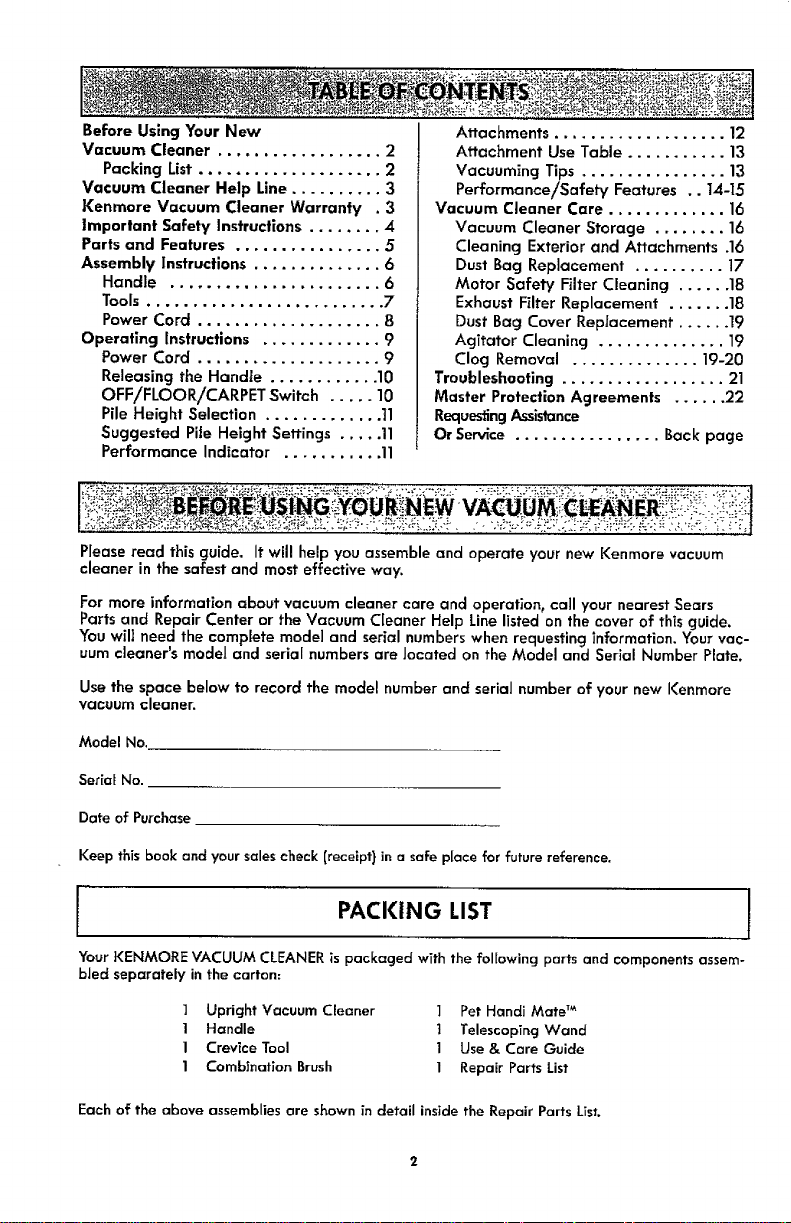
Before Using Your New
Vacuum Cleaner .................. 2
Packing List .................... 2
Vacuum Cleaner Help Line .......... 3
Kenmore Vacuum Cleaner Warranty . 3
Important Safety Instructions ........ 4
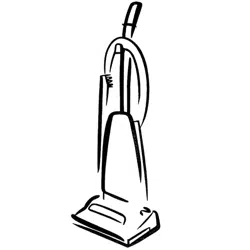
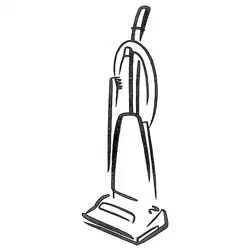
Parts and Features ................ 5
Assembly Instructions .............. 6
Handle ....................... 6
Tools .......................... 7
Power Cord .................... 8
Operating Instructions ............. 9
Power Cord .................... 9
Releasing the Handte ............ 10
OFF/FLOOR/CARPET Switch ..... 10
Pile Height Selection ............. 11
Suggested Pile Height Settings ..... 11
Performance Indicator ........... 11
Attachments ................... 12
Attachment Use Table ........... 13
Vacuuming Tips ................ 13
Performance/Safety Features .. 14-15
Vacuum Cleaner Care ............. 16
Vacuum Cleaner Storage ........ 16
Cleaning Exterior and Attachments .16
Dust Bag Replacement .......... 17
Motor Safety Filter Cleaning ...... 18
Exhaust Filter Replacement ....... 18
Dust Bag Cover Replacement ...... 19
Agitator Cleaning .............. 19
Clog Removal .............. 19-20
Troubleshooting .................. 21
Master Protection Agreements ...... 22
RequestingAssistance
Or Service ................ Back page
I_!!i!_i_i_.__._jG:_y_(_.UR._._E.W._:.`:`::_:_i_._._i_`_:_?._:_`#_%_`i_?_.:_::`:_.:_`_```_`_:._:`::_;_``:?:_`_::_::.:`"VA_.._f_i,!_N_:_i!!{:ii_iii:iiii_i_i:!il--,-,_-_.::.L:.:-::-i,-:_:i:_?_:.--..:-,.._._,-.._:._-;=,._:._:_:,.:--.o,_,-,,-,1
Please read this guide, It wUl help you assemble and operate your new Kenmore vacuum
cleaner in the safest and most effective way.
For more information about vacuum cleaner care and operation, call your nearest Sears
Parts and Repair Center or the Vacuum Cleaner Help Line listed on the cover of this guide.
You will need the complete model and serial numbers when requesting information. Your vac-
uum cleaner's model and serlal numbers are Jocated on the Model and Serial Number Plate.
Use the space below to record the model number and serial number of your new I(enmore
vacuum cleaner.
Model No.
Ser[af No.
Date of Purchase
Keep this book and your sales check [receipt} in a safe place for future reference.
I PACKING LIST I
YourKENMOP,EVACUUM CLEANERis packaged with the following parts and components assem-
bJed separately in the carton:
1 Upright Vacuum Cleaner l Pet Handi MateTM
1 Handle t TelescopingWand
1 Crevice Tool 1 Use & Care Guide
1 Combination Brush 1 Repair Parts List
Each of the above assemblies ore shown in detail inside the Repair Parts Ust.
Vacuum Cleaner Help Line:
1-877-531-7321
8_00am-5_00pm EST, M-F
(U.S.A. and Canada)
One Year Limited Warranty
When assembled, operated and maintained according to all instructions supplied with
the product, if this vacuum cleaner fails due to a defect in material or workmanship
within one year from the date of purchase, return it to any Sears store, Sears Parts &
Repair Center or other Kenmore outlet for free repair.
If this vacuum cleaner is used for other than private family purposes, this warranty
applies for only 90 days from the date of purchase.
This warranty covers only defects in material and workmanship. Sears will NOT pay
for:
1. Expendable items that can wear out from normal use, including but not limited to
filters, belts, light bulbs, and bags.
2. A service technician to instruct the user in correct product assembly, operation or
maintenance.
3. A service technician to clean or maintain this product.
,4. Damage to or failure of this product if it is not assembled, operated or maintained
according to all instructions supplied with the product.
5. Damage to or failure of this product resulting from accident, abuse, misuse or use for
other than its intended purpose.
6. Damage to or failure of this product caused by the use of detergents, cleaners,
chemicals or utensils other than those recommended in all instructions supplied with
the product.
Z Damage to or failure of parts or systems resulting from unauthorized modifications
made to this product.
Disclaimer of implied warranties; limitation of remedies
Customer's sole and exclusive remedy under this limited warranty shall be product
repair as provided herein. Implied warranties, including warranties of merchantability or
fitness for a particular purpose, are limited to one year or the shortest period allowed
by law. Sears shaft not be liable for incidental or consequential damages. Some states
and provinces do not allow the exclusion or limitation of incidental or consequential
damages, or limitations on the duration of implied warranties of merchantability or
fitness, so these exclusions or limitations may not apply to you.
Thiswarranty appliesonly while thisvacuumcleaner isusedin the United States and
Canada.
This warranty gives you specific legal rights, and you may also have other rights which
vary from state to state.
Sears, Roebuck and Co., Hoffman Estates, IL 60179
Sears Canada Inc., Toronto, Ontario, Canada M5B 2B8
i illlLIIlllilllllillll
Read all ins|rue,ions in this guide before assembling or using your vacuum cleaner.
LWARNING:
Your safely is important to us. To reduce the risk of fire, electrical shock, injury to
persons or damage when using your vacuum cleaner, follow basic safety precau-
tions including the following:
Use your vacuum cleaner only as
described in this guide. Use only with
Sears recommended attachments.
Disconnect electrical supply before
servicing or cleaning out the brush area.
Failure to do so could result in the brush
unexpectedly starting, causing persona!
injury from moving parts.
Do not leave vacuum cleaner when
plugged in. Unplugfrom outletwhen
notin useand before performing
maintenance.
To reduce the risk of electrical shock -
Do not use outdoors or on wet surfaces.
Do not allow to be used as a toy. Close
attention is necessary when used by or
near children.
Do not use with a damaged cord or
plug. If vacuum cleaner is not working
as it should, has been dropped,
damaged, left outdoors, or dropped in
water, return it to a Sears Service
Center.
Do not pull or carry by cord, use cord
as a handle, close a door on cord, or
pull cord around sharp edges or corners.
Do not run vacuum cleaner over cord.
Keep cord away from heated surfaces.
Do not unplug by pulling on cord. To
unplug, grasp the plug, not the cord.
Do not handle plug or vacuum cleaner
with wet hands.
Do not put any ob)ects into openings.
Do not use with any opening blocked;
keep free of dust, lint, hair, and anything
that may reduce air flow.
Keep hair, loose clothing, fingers, and
all parts of body away from openings
and moving parts.
Turn off all controls before unplugging.
Use extra care when cleaning on stairs.
Do not put on chairs, tables, etc. Keep
on floor,
Do not usevacuum cleanerto pick up
flammable or combustibleliquids
(gasoline, cleaning fluid, perfumes,etc.),
or usein areas where they may be
present, The fumes from these
substances can create a fire hazard or
explosion.
Do not pick up anything that is burning
or smoking, such as cigarettes, matches,
or hot ashes.
Do not use vacuum cleaner without dust
bag and/or filters in place.
Always replace the dust bag after
vacuuming carpet cleaners or freshener0
powders, and fine dust. These products
clog the filters, reduce airflow and can
cause damage to the vacuum cleaner.
Failure to replace the dust bag could
cause permanent damage to the
vacuum cleaner.
Do not use the vacuum cleaner to pick
up sharp hard ob3ects, small toys, pins,
paper clips, etc. They may damage the
vacuum cleaner or dust bag.
Unplug before connectingPet Handi
Mate TM.
"Youare responsible for making sure that
your vacuum cleaner is not used by
anyone unable to operate it properly.
SAVE THESEINSTRUCTIONS
Proper assembly and safe useof your vacuum cleaner are your responsibilities. Your
vacuum cleaner isintended for Household use. Read this Use & Care Guide carefully for
important use and safety information. This guide contains safety statements under
warning and caution symbols.
I IIIIIIIIIUJ I I IIlllll
4
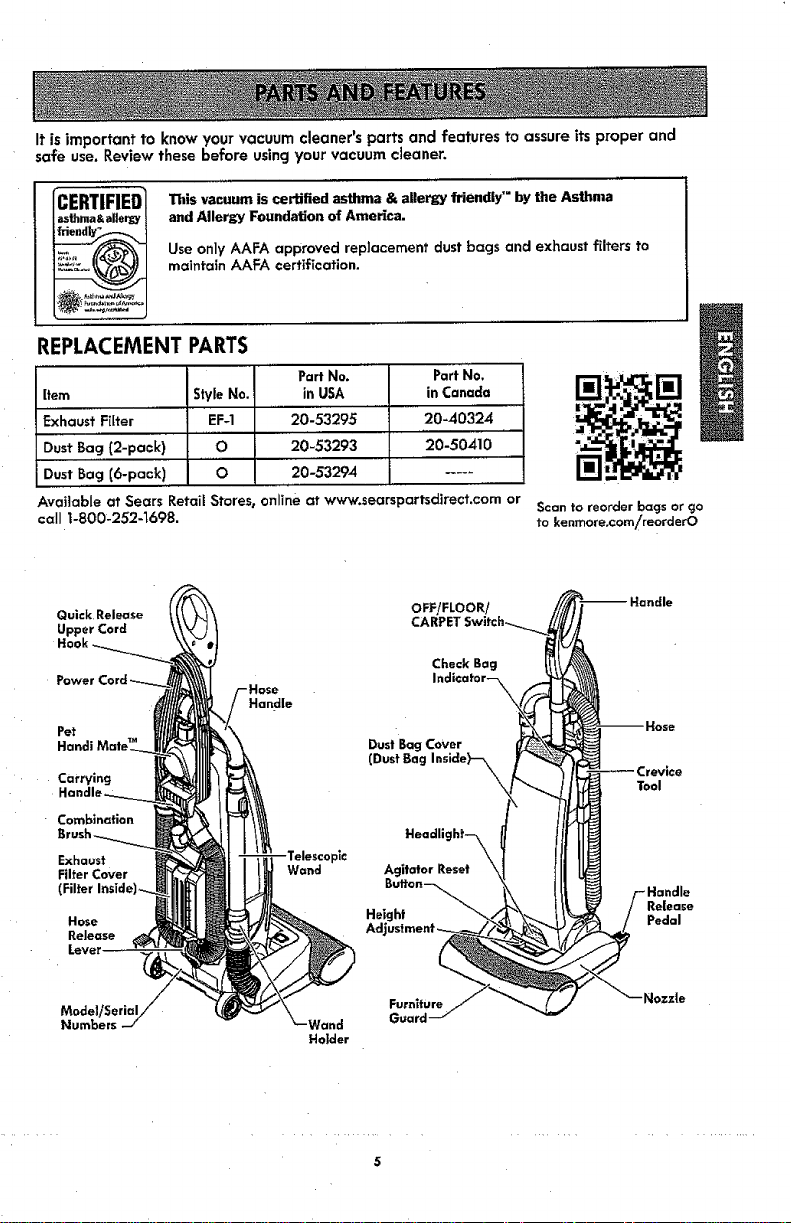
Itisimportantto know your vacuum cleaner's parts and features to assure its proper and
safe use. Review these before using your vacuum cleaner.
CERTIFIED
asthma&alle_
This vacuum is certified asthma & atlergy friendly TM by the Asthma
and Allergy Foundation of America.
Useonly _.FA approved replacement dust bags and exhaust filters to
maintain AAFA certification.
REPLACEMENT PARTS
Part No. Part No.
Item Style No.' in USA in Canada
,,, ,,
Exhaust Filter EF-1 20-5329,5 20-40324
Dust Bag (2-pack) O 20-53293 20-50A10
Dust Bag (6-pack) O 20-5329_1 .....
Avaiiable at Sears Retail Stores, online at www.searspartsdirect.com or
call t-800-252-t698.
Scan to reorder bags or go
to kenmore.com/reordee_O
Quick Release
Upper Cord
Hook
Pet
Handi
Exhaust
Filter Cover
(Fil_er
Hose
Release
Handle
Holder
OFF!FLOOR/
Check Bag
Indicater--_
Dust Bag Cover
(Dust Bag Inside)_,\\
Headlight-_\\
Agitator Reset
Button--._
Height _ _
Adjustment _
-- Hose
Crevice
Tool
Handle
Release
Pedal
5

Please pay special attention to these hazard alert boxes, and follow any
A instructions given. WARNING statements alert you to such hazards as fire,
electric shock, burns and personal injury. CAUTION statements alert you to
such hazards as personal injury and/or property damage.
,11ii i i i
_[_kWARNING
Electrical Shock Hazard
Do not ptug into the electrical supply
until the assembly is complete. Failure
to do so could result in eletrical shock or
injury.
Before assembling the vacuum cleaner°
check the PACKING LIST. Use this list to
verify that you have received all the
components of your new Kenmore
vacuum cleaner.
HANDLE
ACAUTION
Do not overtighten.
Overtlghtening could strip the screw
holes.
Do not operate the vacuum cleaner
without the screw in place.
1. Remove the handle screw from the
body of the vacuum cleaner.
2. Position the handle assembly as shown
in the illustration.
3. Using a screwdriver, tighten handle
screw.
NOTE: It may be necessary to adjust the
handle slightly.
Handl, --
Screw
Hole
Handle
6
ATTACHMENT ASSEMBLY
HOSE AND WAND
1. Insert the tab on
the telescopic wand
into the "J" slot on
the hose handle.
Twist the telescopic
wand to lock in
place,
2. Place the telescop_
ic wand in the wand
holder and route the
hose as shown.
0
Hose
Raised
Edge
Hose
Handle J
HoseX_\_
Handle_ _
"J" Slot_ _
e
Telescopic
the
, into the hose
holder located
on the handle
of the vacuum
cleaner.
NOTE: fie sure
the raised
edge of the
hose handle
rests against
edge of the
hose holder.
4. Rotate the
hose release
lever down
and route the
hose as Hose
shown.
5. Snap the
hose into the Telescopfc
hose cuff on
the side of Wand
the vacuum
cleaner Hose
ReleaseI
I
6. Rotate the hose
_ elease lever
upwards to lock
the hose in place.
A ,u,,o, . j
Do not operate the agitator without theJ
wand properly inserted into the wand| _
holder and the hose handle properly|
secured in the h°se h°lder J
7
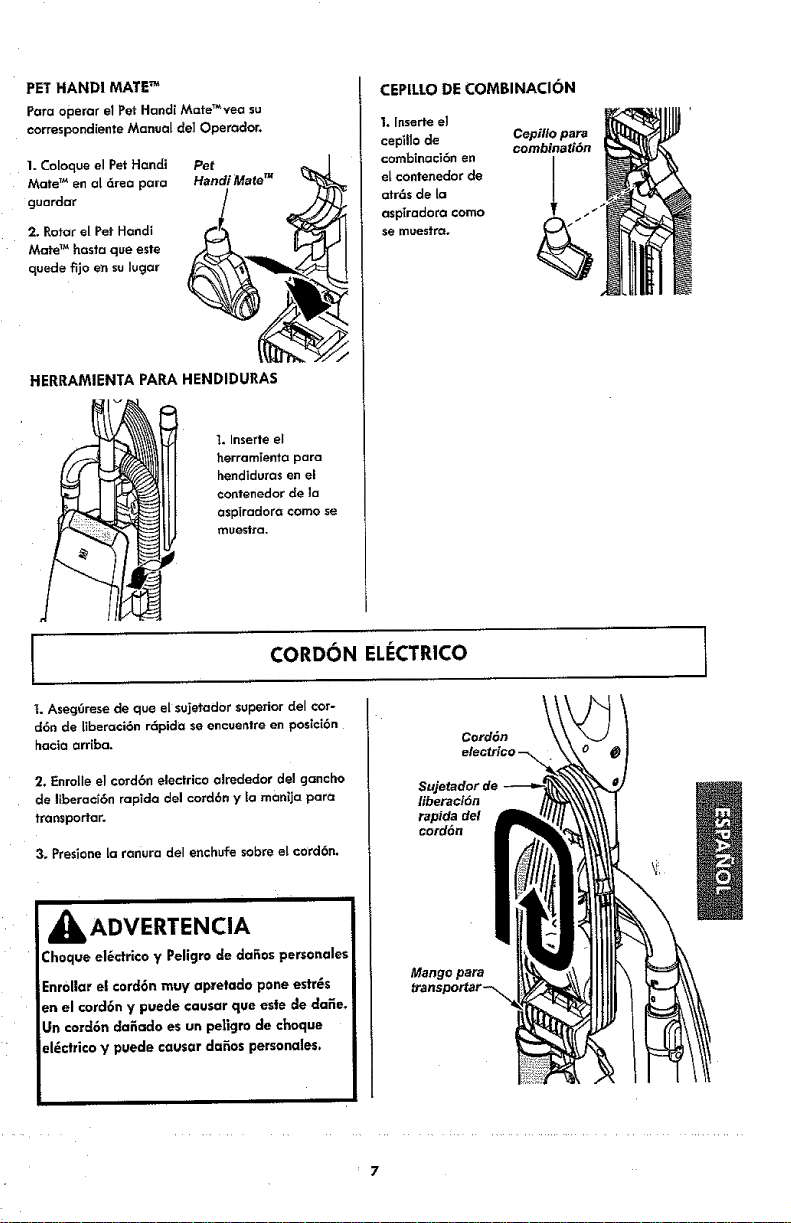
PET HANDI MATETM
For operation of Pet Handi Mate TM see
separate Use & Care Guide.
1. Place Pet
Handi Mate TM
into the storage
area.
2, Rotate the Pet
Handi Mate TM
back until it
snaps into place,
Pet
Handi Mate TM
CREVICE TOOL
1. Insert the crevice
tool into the holder
on the side of the
vacuum cleaner as
shown.
COMBINATION BRUSH
1. Insert the
combination Combination
brush into
the holder
on the back
of the
vacuum
cleaner as
shown.
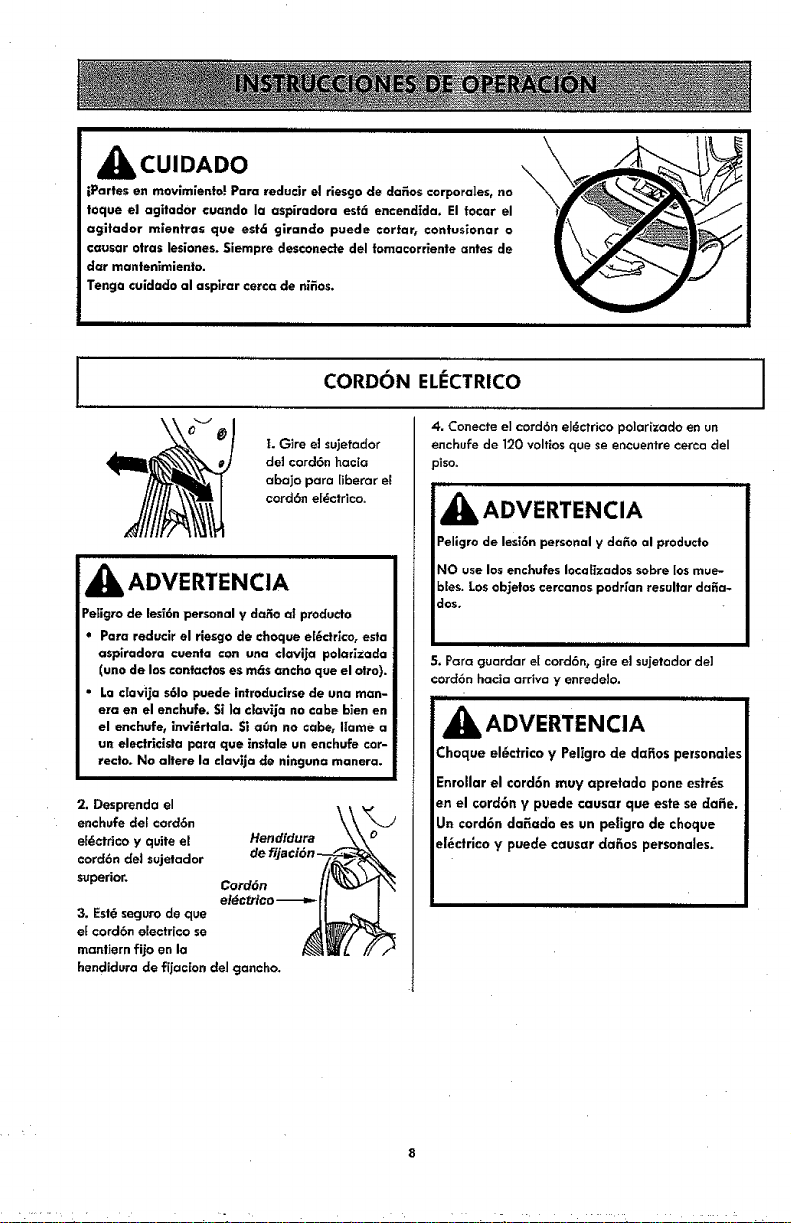
POWER CORD
1. Make sure that cord hook is in upright
position as shown.
2. Wrap power cord loosely around cord
hook and carry handle,
3. Lockpower cord plug ontothe power
cord.
_WARNING
Electrical Shock and Personal Injury
Hazard
Wrapping the cord too lightly puts stress
on the cord and can cause cord damage.
A damaged cord is an electrical shock
hazard and could cause personal injury or
damage.
Carry
8
_CAUTION
Moving parts! To reduce the risk of personal injury, \,
DO NOT touch the agitator when vacuum cleaner is
on. Contacting the agitator while it is rotating can
cut, bruise or cause other injuries. Always turn off
and unplug from electrical outlet before servicing.
Use caution when operating near children.
POWER CORD
1. Turn the quick
release upper
cord hook to
either side and
down to release
the power cord.
To reduce the risk of electric shock,
this vacuum cleaner has a polarized
plug (one blade is wider than the
other).
The plug will fit in a polarized outlet
only one way. If the plug does not fit
fully in the outlet, reverse the plug. If
it still does not fit, contact a qualified
technician to install the proper outlet.
Do not change the plug in any way.
2. Detach the Lock •
power cord plug Notch__. j
from the power
cord and pull the Power
quick release
upper cord hook.
3. Be sure the power cord islocked into
the locking notch of the upper cord hook.
4. Plug the polarized power cord into a
120 Volt outlet located near the floor.
i ill illll,IHII
_WARNING
Personal Injury and Product Damage
Hazard
DO NOT use outlets above counters.
Damage from cord to items in
surrounding area could occur.
I III IIII IIIII
5. To store cord, turn upper cord hook to
the up position, then wrap cord loosely
around quick release cord hook and
carrying handte.
_WARNING
Electrical 5hock And Personal injury
Hazard
Wrapping the cord too lightly puts stress
on the cord and can cause cord damage.
A damaged cord is an electrical shock
hazard and could cause personal injury
or damage.
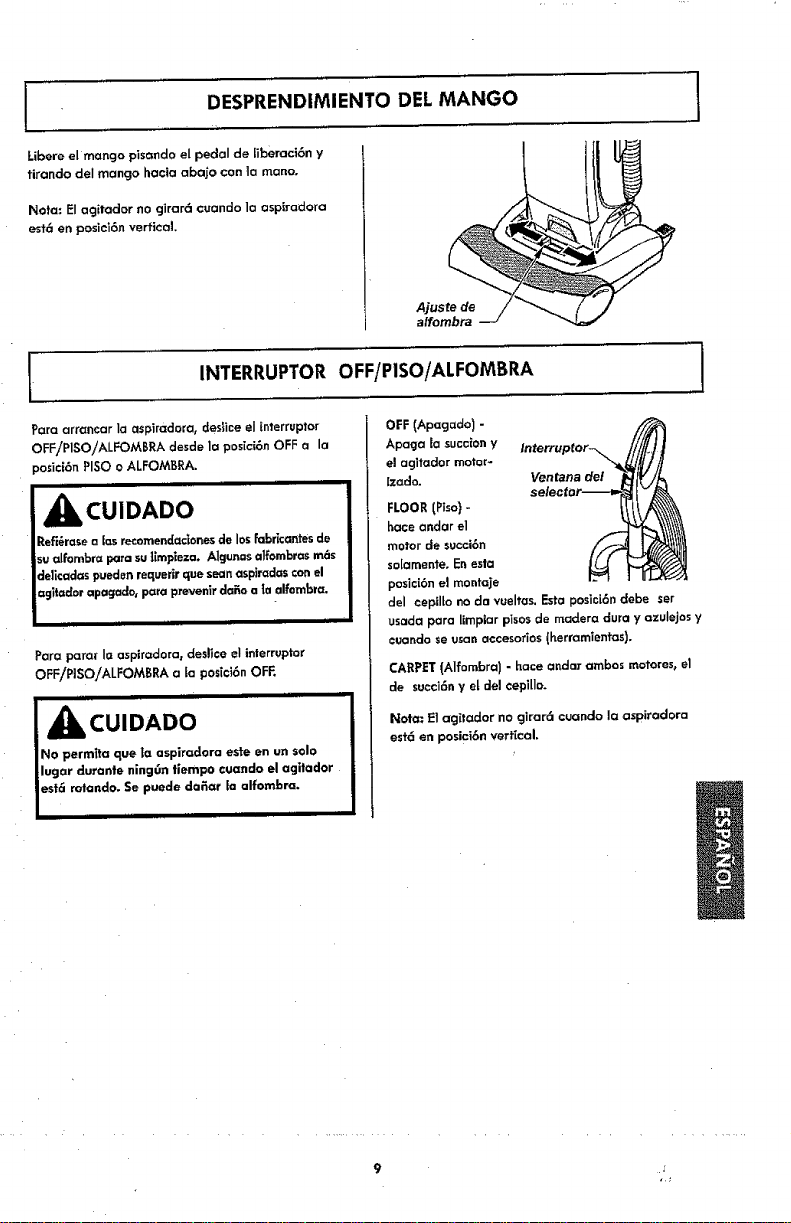
RELEASING THE HANDLE J
Release the handle by pressing down on
the handle release pedal with your foot
and putling back and down on the handle
with your hand.
Note: The agitator does not rotate when
the vacuum cleaner is in the upright posi-
tion.
\
I OFF/FLOOR!CARPET SWITCH
To start the vacuum cleaner, slide the
OFF/FLOOR/CARPET switch from the OFF
position to the FLOOR or CARPET position.
i,i ii
J bCAUTION
JRefer to your carpel manufacturers
Jcleaning recommendations. Some more
Idelicate carpets may require that they
Jbe vacuumed with the agitator turned
Joff, to prevent carpet damage.
To stop the vacuum cleaner, slide the
ON/FLOOR/CARPET switchto the OFF
)osit]on.
_kCAUTION J
Do not allow vacuum cleaner to remain
in one spot for any length of time when
the agitator is turning, Damage to car-
pet may occur. .....
OFF - turnsboth
suctionand
brushmotorsoff,
FLOOR - turns
on the suction
motor only, in
this position the
brush assembly
OFF/FLOOR/
CARPET
Selector
does not
revolve. Use
this setting for cleaning hardwood and tile
floors and when any attachments (tools)
are used.
CARPET - turns on both the suctionand the
brush motors.
Nole: The agitator does not rotate when
the vacuum cleaner is in the upright posi-
tion.
IO

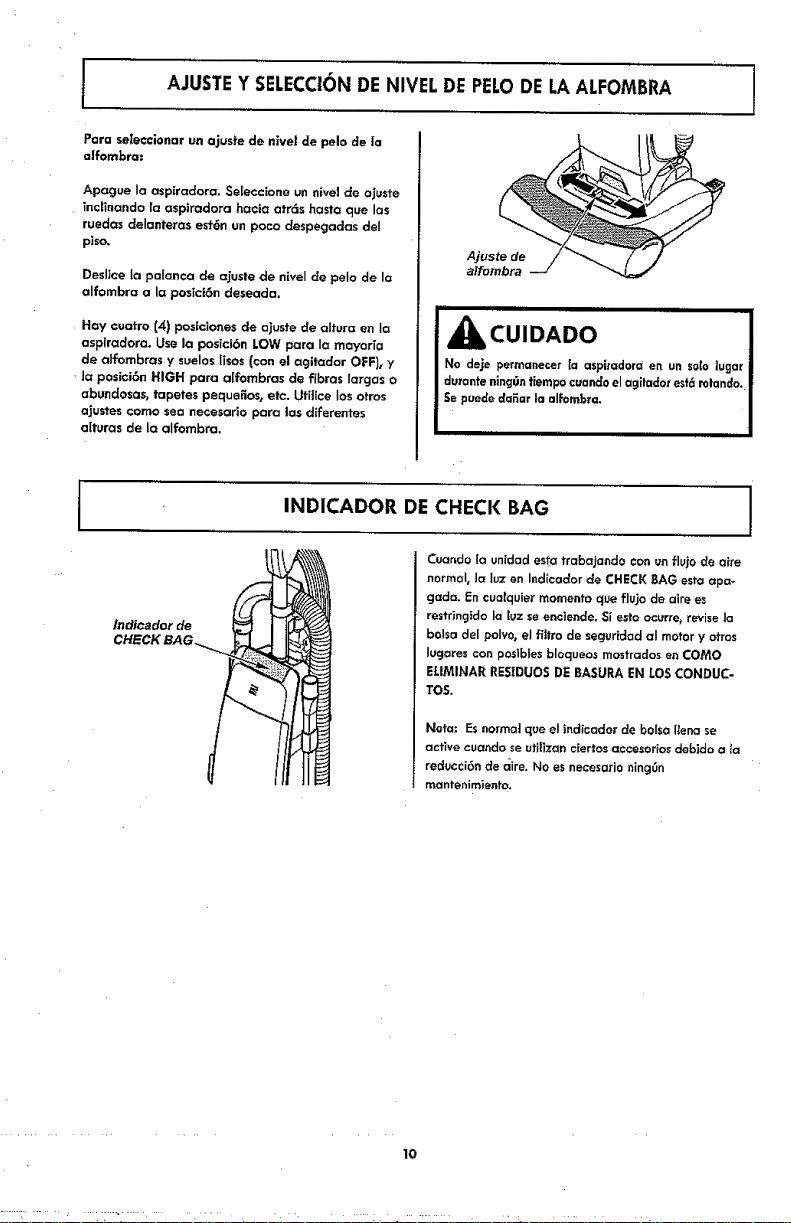
PILE HEIGHT SELECTION AND SETTING
To select a plfe heighf sefffng:
Turn off vacuum cleaner. Select a pile
height setting by tilting the cleaner back
until the front wheels are tiffed slightly
Off the floor.
Slide the adjustment lever to the correct
. setting.
i There are four (4) pile height settings on
the vacuum cleaner. Use the LOW setting
for most low-pile carpets and bare floor
cleaning (with agitator OFF), and the
HIGH setting for high-pile carpets like
shag carpet, scatter rugssetc. Use the
other settings as needed for carpet
heights in between.
Pile Height
Adjustment
CHECK BAG INDICATOR
When the vacuum cleaner is running with
norrnal air flownthe light on the CHECK
BAG indicator isoff. The light comes on
whenever the airflow becomes blocked. If
that occurs, check the disposable dust bag,
motor safety filter and other possible clog
locations shown in CLOG REMOVAL.
NOTE: It is normal for the CHECK BAG
indicator to come on when using certain
attachments, due to reduced airflow
through attachment. No maintenance is
required.
CHECKBAG
11
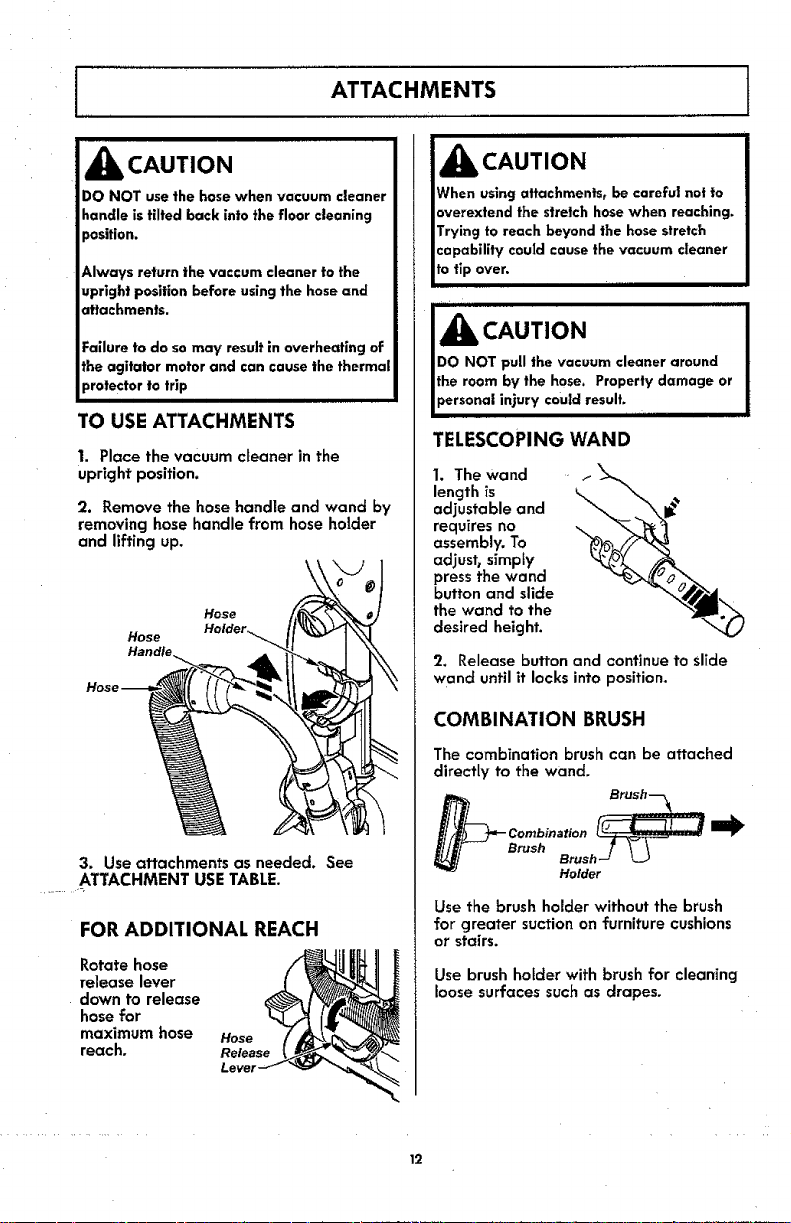
I ATTACHMENTS
_1_ CAUTION
DO NOT use the hose when vacuum cleaner
handle is tilted back into the floor cleaning
_osition.
_,lways return the vaccum cleaner to the
upright position before using the hose and
attachments.
Failure to do so may resultin overheating of
the agitator motor and can causethe thermal
protectorto trip
TO USE ATTACHMENTS
1. Place the vacuum cleaner in the
upright position.
2. Remove the hose handle and wand by
removing hose handle from hose holder
and lifting up.
Hose
Hose
Handle
3. Use attachments as needed. See
ATTACHMENT USE TABLE.
FOR ADDITIONAL REACH
Rotate hose
release lever
down to release
hose for
maximum hose
reach.
Hose
Release
Level
CAUTION
When using attachments, be careful notto
overextend the stretch hosewhen reaching.
Trying to reach beyond the hosestretch
capability could causethe vacuum cleaner
to tip over.
_lb CAUTION
DO NOT pull the vacuum cleaner around
the room by the hose. Property damage or
personal injury couldresult. ......
TELESCOPING WAND
1, The wand
length is
adjustable and
requires no
assembly. To
adjust_ simpJy
press the wand
button and slide
the wand to the
desired height.
2. Release button and continue to slide
wand until it locks into position.
COMBINATION BRUSH
The combination brush can be attached
directly to the wand.
Combination_
Use the brush holder without the brush
for greater suction on furniture cushions
or stairs.
Use brush holder with brush for cleaning
loose surfaces such as drapes,
12
1
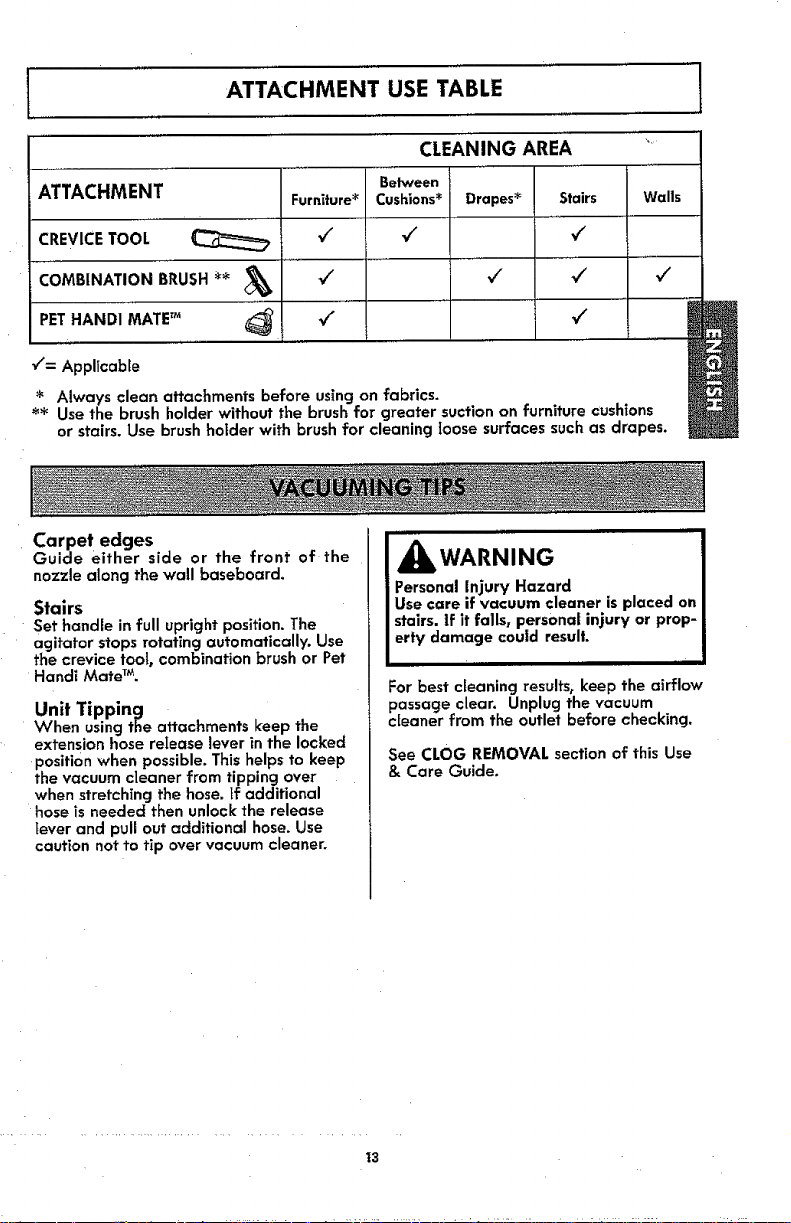
ATTACHMENT USE TABLE
Furniture=
€"
¢"
¢"
Between
Cushions*
v"
ATTACHMENT
CREVICE TOOL
COMBiNATiON BRUSH e_ _,_
PETHANDI MATETM
CLEANING AREA
Drapes_ Stairs
"It
¢" V'
¢"
I
¢"
•,/= Applicable
Always clean attachments before using on fabrics.
** Use the brush holder without the brush for greater suction on furniture cushions
or stairs. Use brush hotder with brush for cleaning loose surfaces such as drapes.
Carpet edges
Guide either side or the front of the
nozzle along the wall baseboard.
Stairs
Set handle in full upright position. The
agitator stops rotating automatically. Use
the crevice tool0 combination brush or Pet
Handi Mate TM.
Unit Tipping
V4hen using the attachments keep the
extension hose reIease lever in the locked
position when possible. This helps to keep
the vacuum cleaner from tipping over
when stretching the hose. If additional
hose is needed then unlock the release
lever and pull out additional hose. Use
caution not to tip over vacuum cleaner.
!
rsonal Injury Hazard I
e care if vacuum cleaner is placed on I
irs. If it falls, personal injury or prep- |
ty damage could result. J
For best cleaning results, keep the airflow
passage clear. Unplug the vacuum
cleaner from the outlet before checking.
See CLOG REMOVAL section of this Use
& Care Guide.
13
MOTOR PROTECTION SYSTEM
Thermal Protector - Suction Motor
This vacuum cleaner has a thermal
protector which automatically trips to
protect the vacuum cleaner suction motor.
If a clog prevents the normal flow of air
to the motor, the thermal protector turns
the motor off automatically. This allows
the motor to cool in order to prevent
possible damage to the vacuum cleaner.
Thermal Protector- Agitator Motor
Thisvacuum cleaner hasa thermal
protector whichautomatically trips to
protect the agitator motor.The thermal
protector turns the motoroff
automatically. Thisallows the motor to
cool in order to preventpossibledamage
to the vacuum cleaner.
To reset thermal protector: Turn the
vacuum cleaner off and unplug the power
cord from the outlet to allow the vacuum
cleaner to cool and the thermal protector
to reset.
_CAUTION
Always return the vaccum cleaner to the
upright position before usingthe hose and
attachments. Failure to do so may result in
overheating of the agitator motor and can
causethe thermal protectorsto trip.
Check for and remove clogs,and replace
bag if necessary.See CLOG REMOVAL
section.Also checkand replace any
clogged filters. Wait approximately 40-
50 minutesbefore restartingvacuum
cleaner.
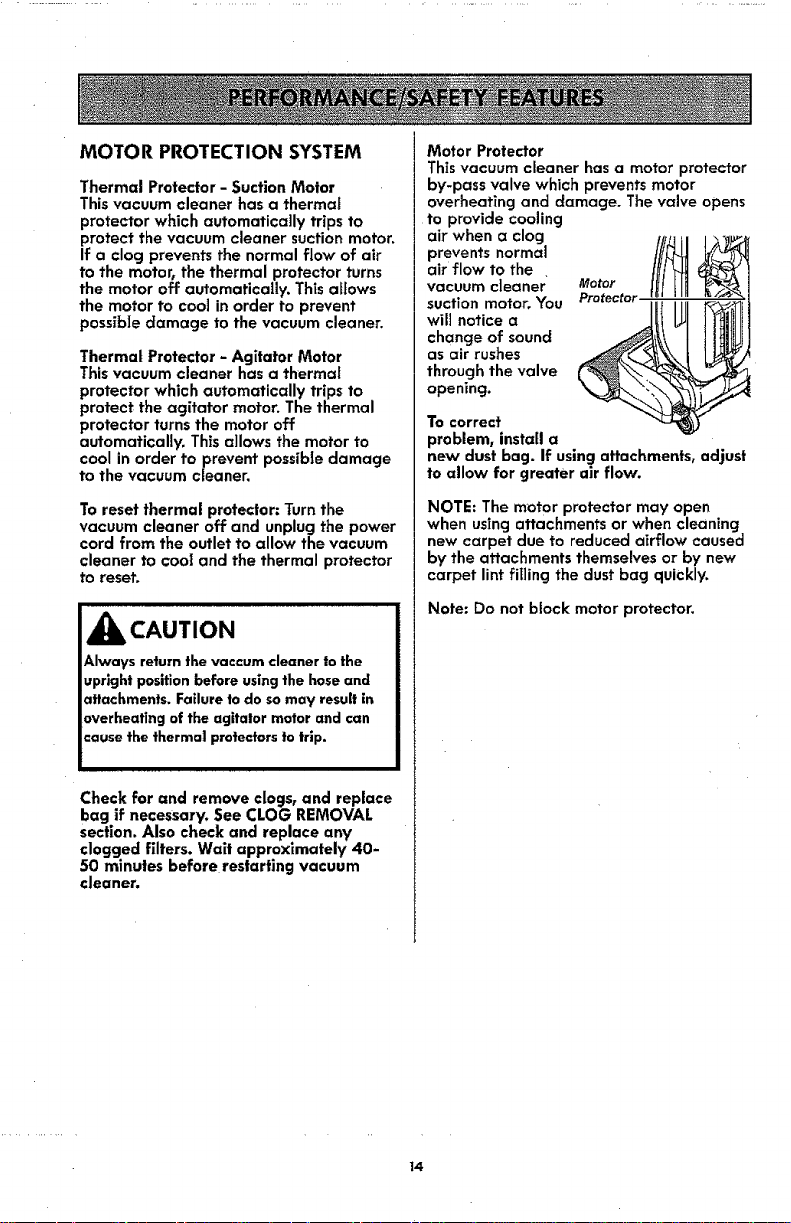
Motor Protector
This vacuum cleaner has a motor protector
by-pass valve which prevents motor
overheating and damage. The valve opens
to provide cooling
air when a clog
prevents normal
air flow to the .
vacuum cleaner Motor
suction motor. You ProtectoJ
wifl notice a
change of sound
as air rushes
through the valve
opening.
To correct
problem, install a
new dust bag. If using attachments, adjust
to allow for greater air flow.
NOTE: The motor protector may open
when using attachments or when cleaning
new carpet due to reduced airflow caused
by the attachments themselves or by new
carpet lint filling the dust bag quickly.
Note: Do not block motor protector.
14

AGITATOR OVERLOAD
PROTECTOR
The agitator has built-in protection
against motor damage should the
agitator jam. If the agitator slows down
or stops, the agitator overload protector
shuts off the agitator motor. The vacuum
cleaner suction motor will continue to run.
i
_IbWARNING
Electrical Shock And Personal Injury
Hazard
Disconnect electrical supply before per-
forming maintenance to the vacuum
cleaner. Failure to do so could result in
electrical shock or personal injury from
vacuum cleaner suddenly starting.
i ii i
To correct problem: Turn off and unplug
vacuum cleaner, remove obstruction,
then press AGITATOR RESET BUTTON.
If the problem persisls, have the
vacuum cleaner serviced by a Sears or
other qualified technician.
t5

Alwaysfollowallsafetyprecautions
when performing maintenance to the
vacuum
cleaner.
A_ WARNING
Electrical Shock And Personal Injury
Hazard
Disconnect electrical supply before
servicing or cleaning the vacuum
cleaner. Failure to do so could result in
electrical shock or personal injury from
vacuum cleaner suddenly starting.
I
Gather the cord
and wrap it
loosely around
the upper and
lower cord
hooks. Lock
power cord
plug onto the
power cord.
Store the vacu-
um cleaner in a
dry, indoor
area, on the
floor with the
handle locked
in the upright
position.
VACUUM CLEANER STORAGE
iii iiiiiiiiiiii
,_k WARNING
Electrical Shock And
Hazard
Personal injury
Wrapping the cord too tightly puts stress
on the cord and can cause cord damage.
A damaged cord is an electrical shock
hazard and could cause personal injury
or damage.
,,,,,,,,,,,,
CLEANING EXTERIOR AND ATTACHMENTS II
I
Unplug cord from wall outlet.
Clean exterior using a clean, soft cloth
that has been dipped in a solution of mild
liquid detergent and watert then wrung
dry. DO NOT drip water on vacuum
cleaner. Wipe dry after cleaning.
To reduce static electricity and dust build-
up, wipe outer surface of vacuum cleaner
and attachments.
Wash attachments in warm soapy water,
rinse and air dry. Do not clean in
dishwasher.
CAUT,O. !
Do not use attachments if they are wet. J
Attachments used in dirty areas, such !
as under a refrigerator, should not be !
used on other surfaces until they are J
washed. They could leave marks. J
16
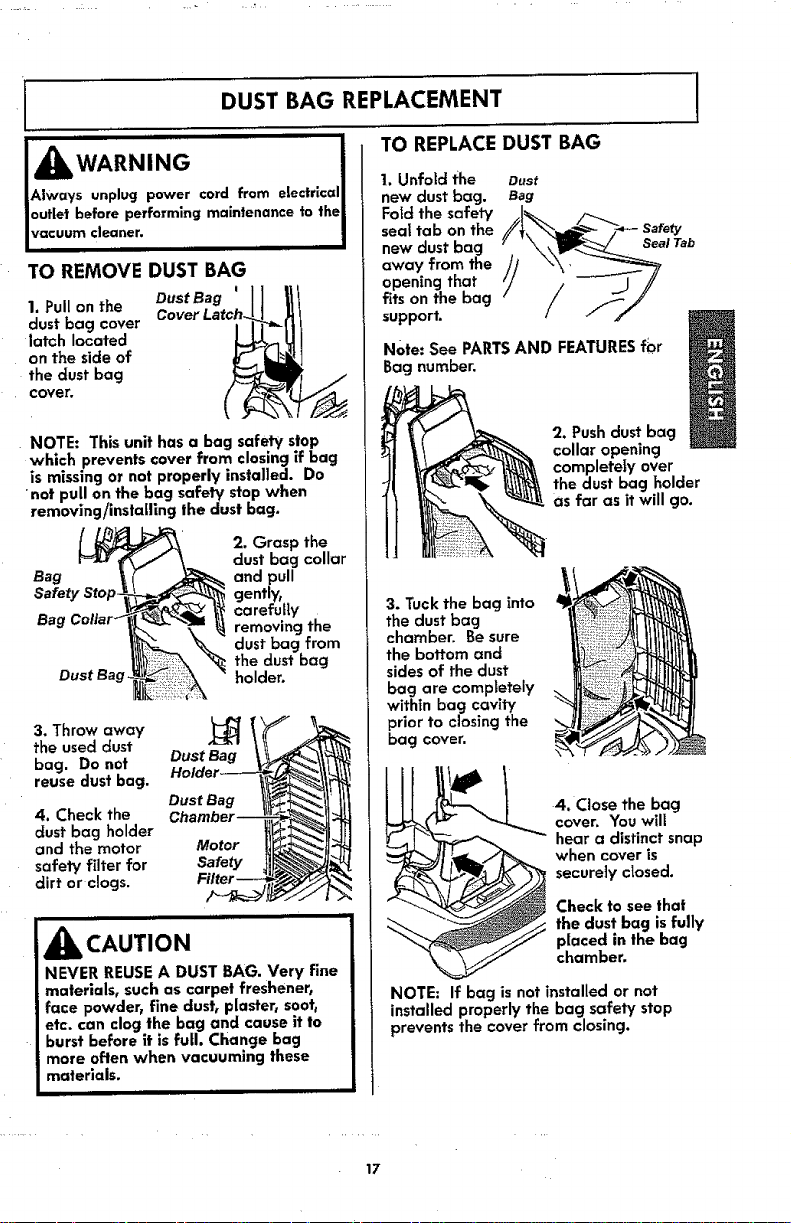
DUST BAG REPLACEMENT
,i i Ill"""W '""""
&w.R.,.G i
Always unplug power cord from electrlcalI
outlet before performing maintenance to theJ
vacuum cleaner. I
iii III IIII I I
TO REMOVE DUST BAG
1. Pull on the DustBag
dust bag cover
latch located
on the side of
the dust bag
cover.
NOTE: This unit has a bag safety stop
which prevents cover from closing if bag
is missing or not properly installed. Do
not pull on the bag safety stop when
removing/installing the dust bag.
2. Grasp the
dust bag collar
Bag and pull
Safety Stop- gently,
carefully
Bag removing the
dust bag from
the dust bag
Dust Bag holder,
3. Throw away
the used dust
bag. Do not
reuse dust bag.
4. Check the
dust bag holder
and the motor
safety filter for
dirt orclogs.
Dust Bag
Dust Bag
Motor
Safety
ii iill i ,,,
CAUTIO N
NEVER REUSE A DUST BAG. Very fine
materials, such as carpet freshener,
face powder, fine dust, plaster, soot,
etc. can clog the bag and cause it to
burst before it is full. Change bag
more often when vacuuming these
materials.
III I I I I
TO REPLACEDUST BAG
I. Unfold the Dust
new dust bag, Bag
oldthe
seaf tab on the afety
new dust bag \\_\1111_-_sea__lr.b
awayfromthe//
opening that
fits on the bag
support.
Note: See PARTS AND FEATURES fbr
Bag number.
f
2. Push dust bag
collar opening
completeIy over
the dust bag holder
as far as it will go.
3. Tuck the bag into
the dust bag
chamber. Be sure
the bottom and
sides of the dust
bag are completely
within bag cavity
prior to closing the
bag cover.
4, Close the bag
cover. You will
hear a distinct snap
when cover is
securely closed.
Check to see that
the dust bag is fully
placed in the bag
chamber.
NOTE: If bag is not installed or not
installed properly the bag safety stop
prevents the cover from closing.
17
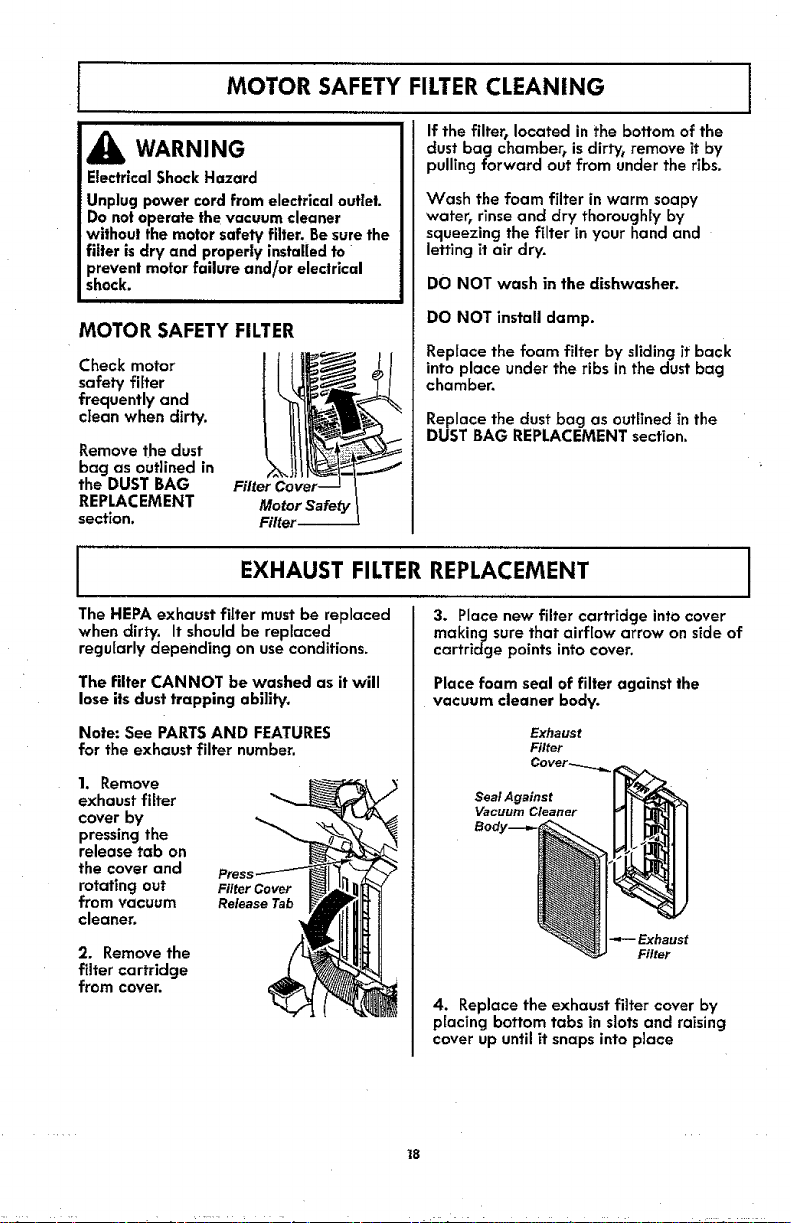
MOTOR SAFETY FILTER CLEANING
WARNING
Electrical Shock Hazard
!Unplug power cord from electrical outlet.
iDo not operate the vacuum cleaner
wlthou! the motor safety filter. Be sure the
filler isdry and properly installed to
prevent motor failure and/or eledrical
shock.
ill ill
MOTOR SAFETY FILTER
Check motor
safety filter
frequentlyand
clean whendirty.
Remove the dust
bag as outlined in
the DUST BAG Filter q
REPLACEMENT Motor Safety
section.
If the filter, located in the bottom of the
dust bag chamber_ isdirty_ remove it by
pulling forward out from under the ribs.
Wash the foam filter in warm soapy
water, rinse and dry thoroughly by
squeezing the filter in your hand and
letting it air dry.
DO NOT wash in the dishwasher.
DO NOT install damp.
Replace the foam filter by sliding it back
into place under the ribs in the dust bag
chamber.
RepJacethe dustbag as outlined in the
DUSTBAG REPLACEMENTsection.
I
,,
The HEPA exhaust filter must be replaced
when dirty. It should be replaced
regularly depending on use conditions.
I
EXHAUST FILTER REPLACEMENT I
I
3. Place new filter cartridge into cover
making sure that airflow arrow on side of
cartridge points into cover.
The filter CANNOT be washed as it will
lose its dust trapping ability.
Note: See PARTS AND FEATURES
for the exhaust filter number.
1, Remove
exhaust fiffer
cover by
pressing the
release tab on
the cover and
rotating out
from vacuum
cleaner,
Release_ _
2. Remove the
filter cartridge
from cover.
Place foam seal of filter against the
vacuum cleaner body.
Exhaust
Filter
Seal Against
Vacuum Cleaner
_Exhaust
Filter
4. Replace the exhaust filter cover by
placing bottom tabs in slots and raising
cover up until it snaps into place
18
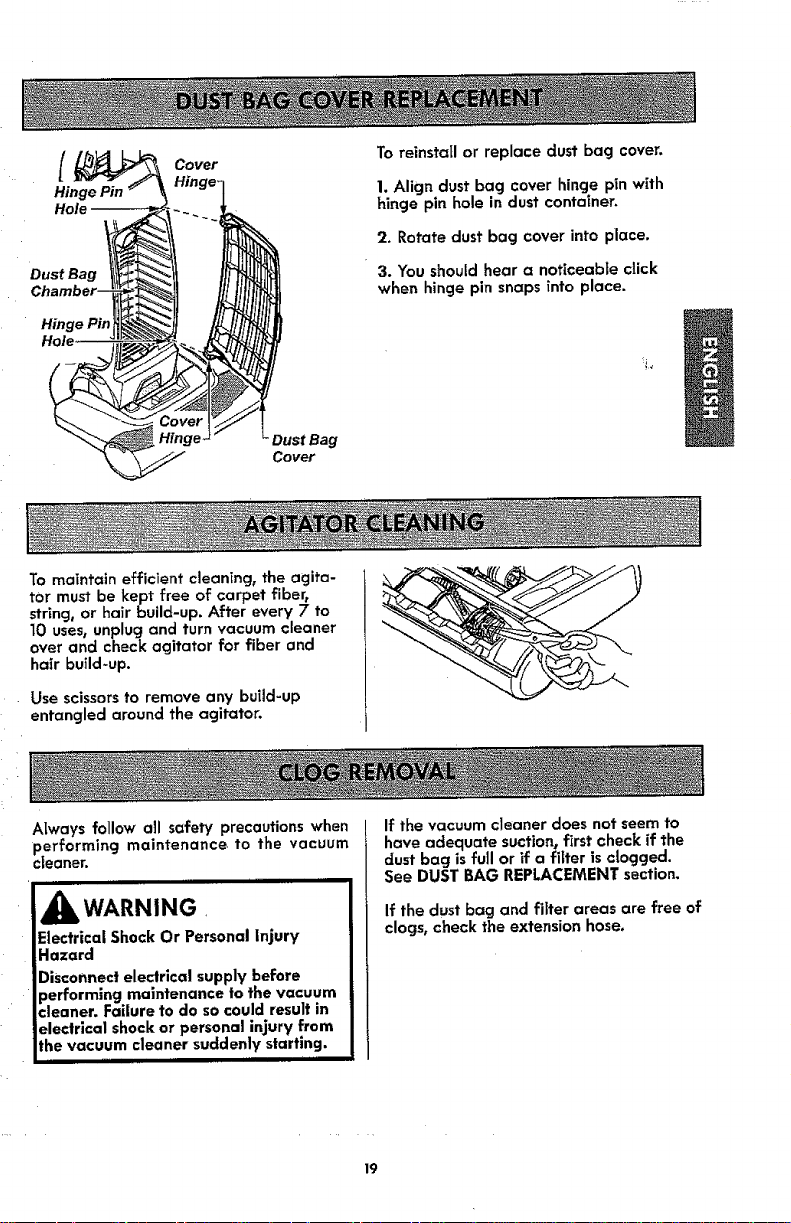
[
Hinge Pin
Dust Bag
Hinge Pin
Cover
Toreinstallor replace dust bag cover.
1.Align dust bag cover hinge pin with
hinge pin hole in dust container.
2. Rotate dustbag cover into place.
3. You should hear a noticeable click
when hinge pin snapsinto place.
Dust Bag
Cover
To maintain efficient cleaning, the agita-
tor must be kept free of carpet fiber,
string, or hair build-up. After every 7 to
I0 uses, unplug and turn vacuum cleaner
over and check agitator for fiber and
hair build-up.
. Use scissorsto removeany build-up
entangled around the agitator.
Always follow all safety precautions when
performing maintenance, to the vacuum
cleaner.
,i i ill ,,,,,, iHl_
I_WARNING
Electrical Shuck Or Personal Injury
Hazard
Disconnect electrical supply before
performing maintenance to the vacuum
cleaner. Failure to do so could result in
electrical shock or personal injury from
the vacuum cleaner suddenly starting.
,i
If the vacuum cleaner does not seem to
have adequate suction, first check if the
dust bag is full or if a filter is clogged.
See DUST BAG REPLACEMENT section.
If the dust bag and filter areas are free of
clogs, check the extension hose.
19
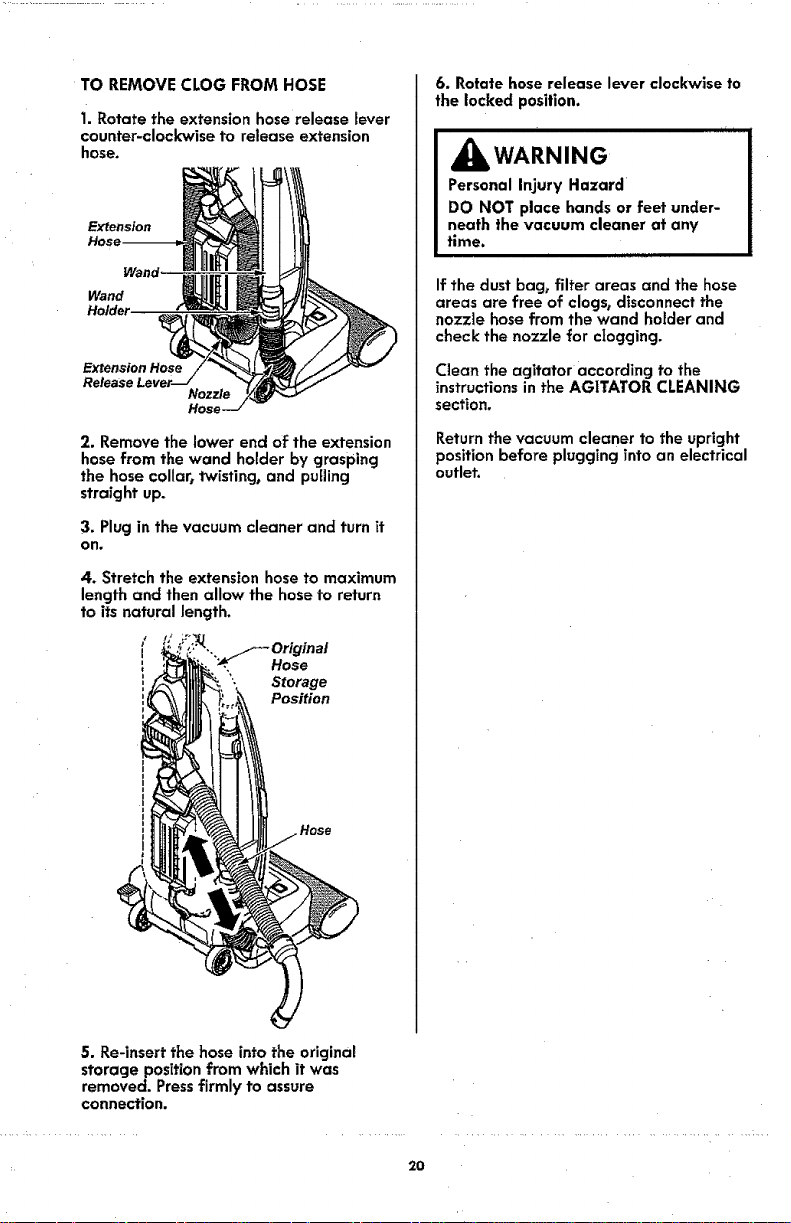
TO REMOVE CLOG FROM HOSE
1. Rotate the extension hose release lever
counter-clockwise to release extension
hose.
Extension
Wand _
Wand
Extension Hose
Nozzle
Hose,
2. Remove the lower end of the extension
hose from the wand holder by grasping
the hose collar, twisting, and puffing
straight up.
3. Plug in the vacuum cleaner and turn it
on.
4. Stretch the extension hose to maximum
length and then allow the hose to return
to its natural length.
Hose
Storage
Position
,Hose
6. Rotate hose release lever clockwise to
the locked posilion.
AW*RN'NG
Personal Injury Hazard
DO NOT place hands or feet under-
neath the vacuum cleaner at any
time.
If the dust bag, filter areas and the hose
areas are free of clogs, disconnect the
nozzle hose from the wand holder and
check the nozzle for clogging.
Clean the agitator according to the
instructions in the AGITATOR CLEANING
section.
Return the vacuum cleaner to the upright
position before plugging into an electrical
outlet.
5. Re-insert the hose into the original
storage posltion from which it was
removed. Pressfirmly to assure
connection.
2O
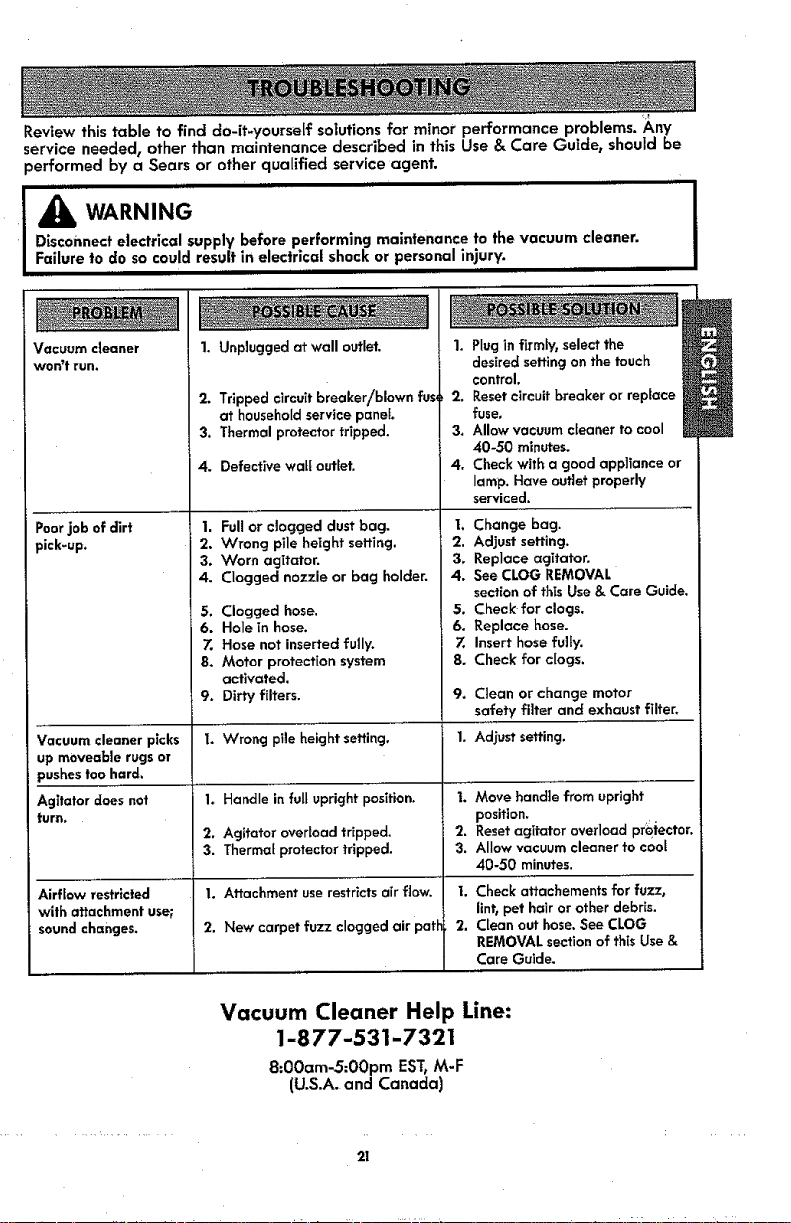
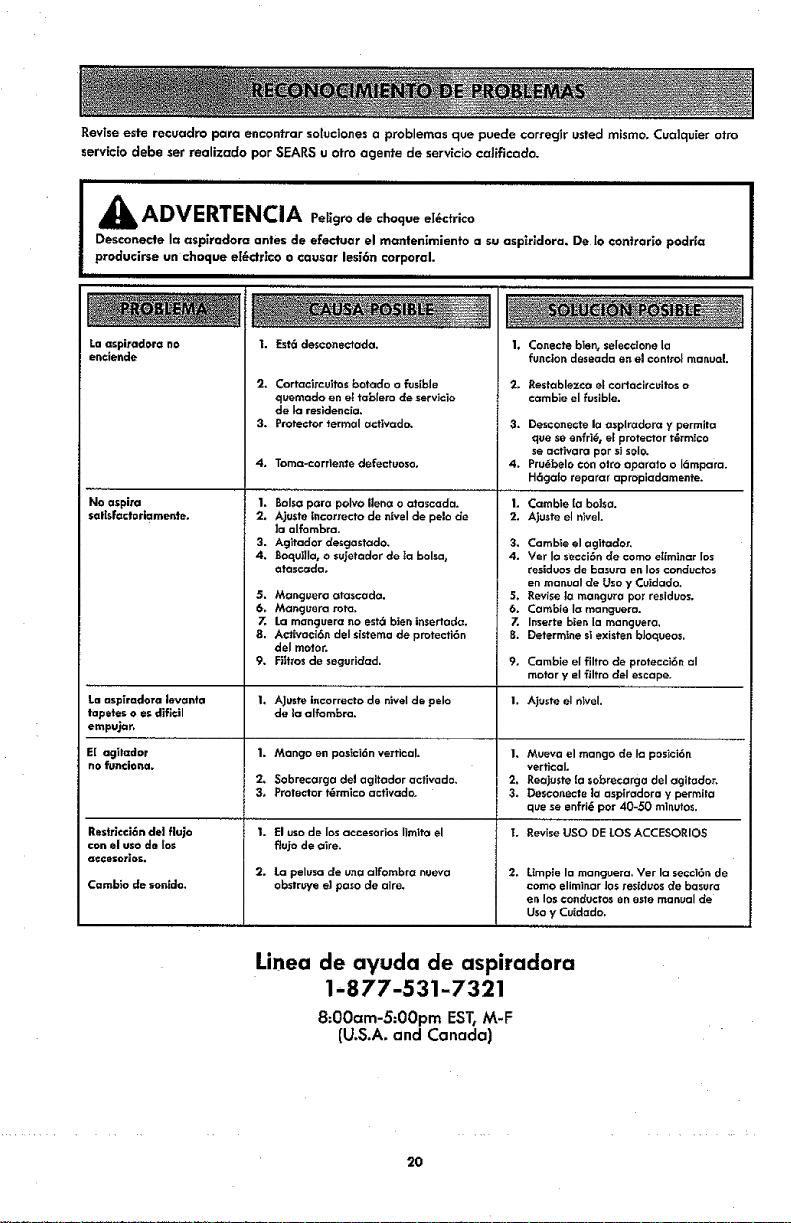
Review this table to find do-it-yourself solutions for minor performance problems. 'A,ny
service needed, other than maintenance described in this Use & Care Guide, should be
performed by a Sears or other qualified service agent.
J A WARNING
i Disconnect electrical supply before performing maintenance to the vacuum cleaner.
Failure to do so could result in electrical shock or personal injury.
Vacuum cleaner
won't run.
Poor job of dirt
pick-up.
Vacuum cleaner picks
up moveable rugs or
pushes too h,,rd.
Agitator does not
turn.
Airflow restricted
with attachment useF
sound changes.
1. Unplugged at wall outlet.
2. Tripped circuit breaker!blown fus_
at household service panel
3. Thermal protector tripped.
4. Defective waft outlet.
I. Full or clogged dust bag.
2. Wrong pile height setting.
3. Worn agitator.
4. Clogged nozzle or bag holder.
5. Clogged hose.
6. Hole in hose.
7. Hose not inserted fully.
8. Motor protection system
activated,
9. Dirty filters,
I. Wrong pile height setting.
1. Handle in full upright position.
2. Agitatoroverload tripped.
3. Thermal protector tripped.
1. Attachment use restricts air flow.
2. New carpet fuzz clogged air path
J
1. Plug in firmly, select the
desired setting on the touch W
control.
2. Reset circuit breaker or replace
fuse. R
3. Allow vacuum cleaner to cool
40-50 minutes.
4. Check with a good appliance or
lamp. Have outlet properly
serviced.
I. Change bag.
2. Adjust setting.
3. Replace agitator.
4. See CLOG REMOVAL
section of this Use & Care Guide.
5. Check for clogs.
6+ Replace hose.
Z Insert hose fully.
8. Check for clogs.
9. Clean or change motor
safety filter and exhaust filter_
1. Adjust setting.
1. Move handle" from upright
position,
2. Reset agitator overload protector.
3. Allow vacuum cleaner to cool
40-50 minutes.
I. Check attachements for fuzz,
lint_pet hair or other debris.
2. Clean out hose. See CLOG
REMOVAL section of this Use &
Care Guide.
Vacuum Cleaner Help Line:
1-877-531-7321
8:00am-5:OOpm EST, M-F
(U.S.A. and Canada)
Master Protection Agreements
Congratulations on making a smart purchase. Your new Kenmore® product is designed
and manufactured for years of dependable operation. But like all products, it may
require preventive maintenance or repair from time to time. That's when having a
Master Protection Agreement can save you money and aggravation.
The Master ProtectionAgreement also helpsextend the life of your new product. Here's
what the Agreement* includes:
[] Parts and labor needed to help keep products operating properly under normal
use, not just defects. Our coverage goes well beyond the product warranh/. No
deductibles, no functional failure excluded from coverage-- real protection.
[] Expert service by a force of more than 10,000 authorized Sears service techni-
cians, which means someone you can trust will be working on your product.
[] Unlimited service calls and nationwide service, as often as you want us, whenever
you want us.
[] "No-lemon" guarantee - replacement of your covered product if four or more
product failures occur within twelve months.
[] Product replacement if your covered product can't be fixed.
[] Annual Preventive Maintenance Check at your request - no extra charge.
[] Fast help by phone - we call it Rapid Resolution - phone support from a Sears rep_
resentative on all products. Think of us as a "talking Use & Care Guide."
[] Power surge protection against electrical damage due to power fluctuations.
[] $250 Food Loss Protection annually for any food spoilage that is the result of
mechanical failure of any covered refrigerator or freezer.
[] Rental reimbursement if repair of your covered product takes longer than
promised.
[] 10% discount off the regular price of any non-covered repair service and related
installed parts.
Once you purchase the Agreement, a simple phone call is all that it takes for you to
schedule service. You can call anytime day or nTght, or schedule a service appointment
online.
The Master Protection Agreement is a risk free purchase, if you cancel for any reason
during the product warranty period, we will provide a full refund. Or, a prorated refund
anytime after the product warranty period expires. Purchase your Master Protection
Agreement today!
Some limitations and exclusions apply. For prices and additional information in the
U.S.A. call 1-800-827-6655.
* Coverage in Canada varies on some items. For full details call Sears Canada at 1-
800-361-6665.
Sears Installation Service
For Sears professional installation of home appliances, garage door openers, water
heaters, and other major home items, in the U.S.A. or Canada call 1-800-4-MY-HOME®.
22
Antesdeusarsuaspiradoranueva.......... 1
Usta de embaJa,ie.......................... 1
Linea de ayuda de =spiradoras ............. 2
Gatantia de la csspiradora de I(enrnere ...... 2
Insfrucciones importantes de
segur|dad ................................. 3
Piezas y caraCter[stlcas de aspiradora
vertical ................................... 4
Instrucciones de ensamble ................ 5-6
Montoje del mango ....................... 5
Montajedetaccesarbs ....................6
Cord6n e1_ctrico..........................7
Instrucciones de operaci6n .................. 8
Cord6n el6ctrico ..........................8
Desprendimiento deI mango ................ 9
Interrupter OFF/PISO!ALFROMBrA ........... 9
Ajuste y selecci6n de nivel de pelo de ta
alfrombra ............................... 10
Sugerenciassabre el ajustede nivel de pelo
de [a alf'mmbra ......................... _10
lndicador de CHECK BAG ..................10
Accesorios ..............................11
Cuadro de usa de los accesorios ............12
Sugerencias para asp|rat ..... .............. 12
Caracterlstlcasde rendimiento ............ 13-14
Cu[dado de la aspiradoro .................. 15
Almacenamiento de la aspiradora ........... 15
Limpieza del exter_r y de Ios aceesorios ..... 1.5
Cambio de ta balsa para polvo .............16
Cambio filtro de protecct6naI motor .... ._.,. ,17
Cambio ffltro de escape ....... _" ,17
Coma reinstalar [a cublerta de la balsa ....... 18
iimpieza del agitodor ..................... 18
C6mo effminar los residues de basura
en los conductos .........................19
Reconoelmiento de problemas ............. 20
Acuerdos maestros de protecci6n ........... 21
Informaci6n de =ssistancla
o servic|o ..................... pagfna posterior
Par favor lea esta guia que le ayudara a assemblar y operor su asplradora nueYa de Kenmore en una manero m6s segu*
ray efectiva.
Para mas ieformoct6n acerca cleI cuidado y operaci6n de esta asp[racier, Ilame a su centre de partes y servicio m6s cer-
cane o lklme a kz Iinea de ayuda a| dtente que se encuentra en _a primera paglna, C_ando pregunte par |nformacl6rl
usted necisitar6 ei n0mem de serie complete y model0 de la aspiradora que estae en la placa de bs n0meros de modelo
y serio.
Use el espaciade abaJopara registrar el n6merode rnodeb y serie de sunuevo_aspiradora de Kenmere.
"N0mero de Modelo.
N_mero de Serie
Fechade Compra
Matenga estelibra y surecibo en un lugar seguropara referenciasfuturas.
LISTADEEMBALAJE
Su ASPIRADOR KENMORE se empaca con tas sigutentes plezas y componentes par separa-
do..
1 Aspiradora ] Pet Handi Mote TM
1 Cepillo para sacudlr 7 Tuba telescop}ca
I Herramienta para I Manuai de use y cu]dado
hendiduras 1 Lista de partes
] CepiIIo para combinac|6n
..... Coda uno de estos ensamb!es es m0strgdo detaf adamente en la ]!stct de pTezas par a.....
reparaci6n.
1

Linea de ayuda de aspiradora
1-877-531-7321
8:00am-5_00pm EST,M-F
(U.S.A, and Canada)
Garantla limitada de un afio
Siesta aspiradora falla par un defecto en susmateriales o fabricaci6n en el periodo de unaF,o
desde la fecha de campra, evando se instala, maneja y mantiene siguiendotodas las
instruccionesincluidas con el producto, devu6Ivala a cualquier fienda Sears, Sears Parts& Repair
Center (Centro de Reparaciones y PiezasSears) u a otro distribuidor Kenmore para que reparen
el aparato de farina gratuita.
Siesta aspiradora se utlltza para arras fines que no sea usafamiliar privado, esta garanfia es
v61idasolamente durante 90 dfas desde la fecha de compra.
Esta garanfia cubre exclusivamente los defectos de materiales y fabricaci6n. Sears NO pagar6:
1. Los elementos desechables que puedan desgastarse con un usa normal, [ncluyendo sin
car6cter excluyente, filtros, correas0 I6mparas y botsas.
2. A un t6cnico del servicio t($cnico para que enseF,e al usuario a instalar, mane)ar o mantener
eorrectamente el producto.
3. A un t6cnico del servicio t6cnico para limpiar o mantener este producto.
,4. Dafios o aver[a de este producto si no se ha lnstalado, mane iado o mantenido siguiendo
todas las instrueciones incluidas con el producto.
5. Dafios o averra de este product(} originados par accidente, abuso, usa incorrecto u usa del
producto para arras fines distintos de los indicados.
6. Dafios o averia de este producto causados par el usa de detergentes, limpiadores, productos
qu_micos o utensilios diferentes a los recomendados en todas las instrucclones que se incluyen
con el producto.
Z Dafios o aver[a de tas piezas o sistemas causados par modificaciones no autorizadas que se
hayan hecho a este producto.
Limitaci6n de responsabiffdad de las garantias impffcitas; llmltaci6n de remedlos
E.I6ntco y exclusivo remedio del cliente bajo esta garanffa limltada ser6 la reparaci6n del
product(} seg6n Io indicado en este documento. Las garanffas implicitas, incluyendo las garant_as
de comereiabiIidad a ldoneidad para un prop6sito especi'fico, se limitan a un aria o el periodo
mrs eorto permitido par la ley. Sears no ser6 responsable par dafios incldentales ni
consecuenciales. Algunos estados o provincias no permiten la exclusi6n o Iimitaci6n de dafios
incidentales o consecuenciaIes, ni Iimitaciones en la duraci6n de las garanffas _mpl[citas de
comerclablffdad o idoneidad_ par Io que estas exclusJones o limitaciones podr_an no aplicar en su
caso.
Estagaranffa aplica solamente cuando esta aspiradora seutiliza en Estados Unidos o Canad6.
Esta garant[a le otorga derechoslegales espec[ficos, y usted podria tener otros derechos que
varian en funci6n de cada estado.
Sears, Roebuck and Co., Hoffman Estates,IL 60179
Sears Canada Inc., Toronto,Ontario, Canada M5B 2B8
,,,,,,,,,,i i iiilu i iiiiiiiiiiiiiiiiii M
Lea todas los instrucciones en este manual antes de armar o usar su aspiradora.
ADVERTENCIA
SusegurldadesmuyimpoTtanteparenosolros.Parareduclreltiesgodeincendlo,chequeel6ctrico,iesi6n€or-
poraloda_osalutilizarsuaspimdora,ac_e deacuecdoconlosprecaucionesbciskasdeseguridad,entreel/a__.
Use su aspiradora solamente corno se
describe en este manual. Use so[amente
con los accesorios recomendados pot
Sears.
Desconecte la fuente de electricidad antes
de hacer el servicio o limpiar el drea de1
cepillo. La falta de hacer esto puede
resultar en el s0bito arranqve del cepillo.
Causando lesiones personales per partes
en movimiento.
No deje Ia aspiradora cuando est6
enchufada. Desenchufe del tomacorriente
cuando no est6 en use y antes de hacer el
servicio.
Para reducir el riescjo de cheque el6ctrico
- No la use afuera o sobre superficies
mojadas.
No permlta que se la use come unjucjuete.
Ponga especial atenci6n cuando es usada
per o cerca de nifios.
No la use con un cord6n o clavija
dafiados. Sila aspiradora no est6
trabajando come debe, se la ha dejado
caer, da_ado_ dejada afuera_ o volteada
en el acjua, ret6rnela a un Centre de
Servicio Sears.
No la ]ale o arrastre del cord6n, use el
cord6n come una manija, cierre una
puerta sobre el cord6n, o tire del cord6n
alrededor de bordes afilados o esquinas.
No pose la aspiradora sobre el cord6n.
Mantenga el cord6n le}os de superficies
calientes.
No desenchufe tirando del cord6n. Para
desenchufar0 tome ta clavija, no el cord6n.
No tome la clavija o la aspiradora con ]as
manes mojadas.
No ponga ning0n objeto en las aberturas.
No la use con nincjuna abertura
bloqueada; mant6ngala libre de polvo_
hllachas, pelo, y cualquier cosa que pueda
reducir la circulaci6n del aire.
Mantenga el pel0, ropes sueltas, dedos, y
todas las partes deL cuerpo lejos de
aberturas y partes en movimiento.
Apague todosloscontrolesantesde
desenchufar.
Use cuidado extra cuando limple
escaleras. No la ponga sobre sillas,mesas,
etc. Ment6ngala sobre el piso.
No use la aspiradora pare levantar
ffquidos inftamables o combustibles
(gasolina, fluido de limpiar, perfumes, etc.),
o la use en 6teas donde puedan ester
presentes. Losvapores de estas
substanclas pueden crear un peligro de
incendio o explosi6n.
No levante nada que est6 ardiendo o
echando hume, tal come cigarrillos,
f6sforos, o cenizas calientes.
No use la aspiradom sin la bo[sa de polvo
y/o filtros en su lugar.
Siempre cambie la bolsa de polvo despu6s
de Limpiar la alfombra, limpiadores o
refrescantes, pelves, y polvo fine. Estos
productos obstruyen los filtros, reducen la
circulaci6n del aire y pueden causer dale
ala aspiradora. La fatla en cambiar la
bolsa de polvo puede causar dafio
permanente a la aspiradora.
No use la aspiradora para Levantar
objetos duros afilados, pequeifos jucjuetes,
alfileres, sujetapapeles, etc. Ellos pueden
dafiar La aspiradora o la boise de polvo.
Desencl_ufe antes de conectar e!
Mate _M
Usted es responsable de estar seguro de
que su aspiradora no esusada pot
a]cjuien incapaz de operarla
correctamente,
GUARDEESTASINSTRUCCIONES
Elarmado y useseguro de su aspiredera sonsu responsabilidad. Esta aspiradora ha side dise-
fiada exclusivamente pare use dom6stico.Lea este Manual del propietario detenidamente_ pues
c0ntiene informaci6n importante sobre seguridad ¥ use.Esta guia confiene informaci6n sobre
seguridad deba)o de simbelosde advertiencia o Cuidadc_
I I II I I _1 IIII I I I III IIIII

Es importante cancer las piezas y caracterfsticas de su aspiradora para asegurar su use
adecuado y seguro. Examinelas antes de usar su aspiradora.
CERTIFIED
asthma&a|le_
Esta Aspiradora es.certificada asthma & alle_y friendly"por la
Asthma and Alle_y Foundation of America.
Usaiizando solamente balsas de polvo y filtros de escape con
certificaci6n AAFA para mantener cerfificaci6n AAFA.
PARTESDEREEMPLAZO
Objecto
:Filtro de escape
Balsa para poIvo
{Paquete de 2)
Balsa para po)va
(Paquete de 6)
Pieza No.
Esfilo No. en USA
.....EF-1 20-53295
0 20-53293
0 20 -53294
Disponibie en las fiendas Sears, en Ia p_gina
www.searspartsdirect.com o llamando al 1-800-252-1698.
Pieza No.
en Canada
20-40324
20-50410
Escanear para reordenar
ias balsas or visitar
to kenmore.com/reorderO
Sujetador superior
de l|beraci6n r6
del cordon
Cord6n
Pet
Mango para
Cepillo de
Cublerto de filtro
(Fiitro de escape
denim)
Palanca de
liberation de
la man
N_mero de
modeIo/serie
monguera
Teleso6pTco
interruplor
Indicator de
CHECK
Cubierta de la balsa
Luz
Bot6n de _'_\
reajuste de
Protector de
muebfes
_Manguera
-- Herramlenta
de hend_duras
Pedai de
liberaci6n
delmango
_'_"_--Boquilia
,iUl,,ll,,i iii ,1111,,,,,,,i i i ii,i,,,,,,,,1111 ii
Porfavor ponga atenci6n especiat a tos cuadros que le atertaran de posibles peligr0s
Advertencia: Este _formaci6n le alertar6 de peligro de fuego, choques electricos_ quemadas y
les[ones, Cuidado: Este informaci6n le alertara de peligros coma [esionesy dafios de
propiedad.
iiiiiiiiiiiiiiiii iiiii I II I IIII II I
l/ i ii
_IIbADVERTENCIA
Pellgro de lesJ6n personal y da_o al producto
No conecte la aspiradora hasta que termine
de armarla. De la contrarlo podr_a causar un
choque el6¢trico a lesi6n corporal.
Antes de armar ia asplradora, revise la LISTA
DE EMBALAJE. Use esta lista para ver[f[car
que ha reo|bido todos los componentes de su
nueva aspiradora Kenmore.
ij
MONTAJE DEL MANGO I
_kCUIDADO
No apriele demaslado el tornillo.
Silo aprieta demasiado podr|a arruinar los
or|tic|as para el tornillo.
No opere la aspiradora sin tenet instalado el
torniUo.
i ii i i
1. Remover el tormlJlo del mango que se
encuentra en la parte superior de la aspl-
radora.
2. Coloque el mango coma se ve en el dia-
grama.
3. Apriete el ?ornillo con un destornillador.
NOTA: Quiz6sea necesarioajustar unpocoel
mango.
Tornillo del
mango

MONTAJE DELACCESORIOS i
MANGUERA Y TUBO
1. lnsertar el perno del
tubo en las ranuras "J"del
mango de la manguera.
Devuelta a el tubo par°
hasta que atore.
2. CoJocar el tubo
teJesc6pico en el porto
tubo y coloque ]a
manguera como se roues-
ira.
MangOdela _'X
mangeura----_
Ranuras
i
Tubo
telescopico_
3, lnsertar el mango de la manguera en [a soporte
par° manguera IocaiTzado en e] mango de la
manguera.
Soporte par°
Levante
NOTA:
AsecjOresede
levantar la orffla
del mango de la
manguera.
Desc6nselo sobre
el soporte par°
la manguera.
Soporte par°
4. Rotare] manguera_
Mango para I_]
liberador de la manguera_
mangvera hacia
abajo y coloque la Boquilla de la
marlgueFa como m_guer_
Tubo li_
5. Insertar la telesc6pico_=_
mongoeroe.'o Po.o
boquilla de la tubo _II |
manguera en e] /'L_
asplradora, manguera ---_
ii.u! iili!:i
6. Rote el Iiberador de
?amanguer° hacia
arriba par° asegurar ta
manguera el su lugar.
ACUIDADO
No use el agitador sin el tubo
telesc6pico insertado apropiadamente
dentro del porta tubo y la manguera
asegurada apropiadamente en el
sujetador de la manguera.
Ul,,,,,u,,,,,,,,
PET HAND! MATE TM
Para operar el Pet Handi MateT_vea su
correspond[ente Manual de1 Operador.
1. Coloque el Pet Handi
Mate TM enal 6rea pora
guardar
2. Rotor el Pet Handi
Mate TM basra que este
quede fijo en suIugor
Pat
Handi Mate TM
HErtRAMIENTA PARA HENDIDURAS
t. Inserte el
herramienta para
hendiduras en el
contenedor de |a
aspiradora coma se
muestra.
CEPILLODE COMBINACI6N
I. |nserte el
cepillo de
combinaci6n en
el contenedor de
atr6s de la
asp[radora coma
se muestra.
Cepiflo para
combinati6n
CORDON ELI:CTRICO
I. AsegOrese de qua el sujetador superior del ¢or-
d6n de liberaci6n r_pida se encuenlre en pos_c|6n
hacia arriba.
2. EnrolIe el cord6n elecfrico alrededor de| gancho
de liberad6n rapicio del cord6n y fa man_ja para
transportar.
3. Presione [a ranura del enchufe sabre el cordon.
iii i iiiiiADVERTENCIA
Choque el_=trico y Peligro de dafios personales
Enr011ar el cord6n muy apretado pone estr_s
en el cord6n y puede causar que este de dafie.
Un cord6n dafiado es un peJigro de €floque
el_ctrico ¥ puede causar da_os persona|es.
liberaci6n
r_pida del
cord6n
Mango para
transportar __\
_CUIDADO
iPartes en movimiento! Pare reduc|r el riesgo de da_os corpora|es, no
toque el agltaSor cuando la asplradora est6 encen,'iida. El tocar el
agitador mientras que est6 girando puede cotter, contus_onar o
causar otras leslones. Siempre desconede del tomacorriente antes de
dot mantenlmiento.
Tengo culdacio al asplrar cerca de niEos.
I'1
L Gire el sujetaclor"
deJ cord6n hac[a
abajo para liberar el
cord6n e[_ctrico.
CORD(3N ELI:CTRICO
4, Conecte el cord6n eI_ctrico polarizado en un
enchufe de 120 voltios que se encuentre ¢erca deI
3ISO.
,111,lllllii
ADVERTENCIA
PeEgrode lesf6npersonal y daEo c=|producto
* Pare reducer el riesgo de choque e[_ctr_€o,esta
aspiradora cuenta con una clovi_a poler_zada
(uno de los ¢ontactos es m6s ancho que el otto}.
• La €_avija s61opuede introduc|rse de una man-
era en el enchufe. S| la ¢lavija no cabe beenen
el enchufe, |nvi_rtala. S| abn no ¢abe, Ilame a
un electdc;sta pare que instale un enchufe car-
recto_No altere la clavlja de ningun,, manera.
2. Desprenda el
enchufe c[el cord6n
eE_ct_co y quite e[ Hendidura
cord6n del sujetador
superior. Cord6n
eidctrico-_
3. Est_ seguro de que
el cordbn electrico se
mantiern fijo en la
hendidura de f[jacion del cjancho.
Pellgro de lesi6n personae y daEo al producto
NO use los enchufes Iocai|zados sobre los mue-
bees. Losobjetos cercanos podr_an resultar dafia-
dos.
5. Para guardar e[ cord6nt gire el sujetador deJ
¢ord6n hacia arrive y enredeEo.
IIIIIIIIII i iiiii
_llb ADVERTENCIA
_'hoque el_ctrico y Peligro de defies persona]es
Enrollar el cord6n muy apretado pone estr_s
en el cord6n y puede caus=r que este se c[afie.
Un cord6n daft=d0 es un petigro de choque
el_ctrlco y puede causclr dafios personales.
Libereelmangopisandoelpedaldefiberaci6n y
tirando de_mango haoia abajo con la mane,
DESPRENDIMIENTO DEL MANGO
Note: El agitador no girar_ cuando la aspiradora
est6 en pasici6n vertical,
Ajuste de
alfombra
I
I
INTERRUPTER OFFiPISO!ALFOMBRA
I
Para arrancar Ia aspiradora, des_iceel interrupter
OFF/P1SO/ALFOMBRA desde la pos[ci6nOFF a la
3osi¢i6n PISO o ALFOMBRA.
i i
_CUIDADO
Refi6raseo [asrecomenc[a_onesdo los|ebr[cantesde
sualhambra par= su |imp'raze,AJgunasaJfombrosm6s
delicadaspuedenrequer|rciueseenasplradascon el
agitador apagado_pare preveni_defoeata alfombra.
Pare para_ la aspiradora, dedice el interrupter
OFF/PISO/ALFOMERA a la pos[ci6nOFF.
! _1= CUIDADO
No permffo qua |a aspiradoro este en un solo
|ugar durante nlngOn ffempo euando el ag|tador
est6 rotando. Se puede dafter Eaalfombra.
II III i II i I IIIIIII
OFF (Apagado) -
Apaga la suction y
el agitador motQr-
lzado.
Ventana del
FLOOR[Piso)-
hace andar el
motor de $ucci6n
soiamente. En esta
poslc[bnel montaje
del cepiffo noda vueltas. Estoposici6ndebe set
usada para limpiar pisos de mac{eradura y azulejes y
cuando se usanaccesorios(herramientas),
CARPET (Alfombra) -hace andar ambos motores,el
de succl6ny e[ del cepille.
Nora: El agffador no girar6 cuando la aspiradora
estd en posici6n vertical.
9
•r
AJUSTEY SELECCI6NDE NIVELDE PELODELAALFOMBRA
I
Para seleccionar un ajusfe de nlve| de pelo de la
alfombra:
Apague la aspiradora. Se[eccione un nivel de ajuste
Tnclinondo [a aspiradora hacia atrds basra que los
rueclas delanteras est6n un pace despegadas deJ
piso.
Deslice lo po|anca de ajusle de nivel de pelo de la
alfombra a la posTci6ndeseada.
Hay auatro (4) pos[ciones de a_ustede affura en Ia
aspiradora. Use la pos_ci6nLOW para Ia mayor[a
de alfombras y suelos lisos (con el agttador OFF), y
Ja posici6n HIGH para a[fombras de fibras Iargas o
abundosas, tapetes pequefios, el=. Utitice los arras
a]ustes coma sea necesario para ias d[ferentes
a[turas de [a aIfombm.
Ajuste de
alfombra
i uilllllllmlllli i
I No deje permanecer [a aspJradoraen un sololugar
durantening_ntiempocuancJoelagiladerest6rolando.
Sepuec_edafiar la alFombra.
IIIIIIIIII II I I
/ndicador de
CHECK BA_
Cuando la unidad esta trabajanda con un fluie de affe
normal, ]a luz on Indicador de CHECK BAG esta apa-
gada. En cua[quiermomenta que flu)o de aire es
restringido la [uz seenciende. Siesto ocor_e_revisela
balsa del polvo, el filtro de segurfdadal motory afros
lugares con poslblesbloqueos mostrados enCOMO
ELINIINAR RE$1DUOSDE BASURAEN LOSCONDUC-
TOS.
Neta: Esnormal que el indicador de balsa llena se
active cuando se ufilizan ciertosaccesoriosdeb]do a la
reducci6n de aire, No es necesarionin90o
mantenimiento.
10
.........._....... ; : ..... .....
ACCESORIOS
&CUIDADO
NO USE Ja manguera cuando el mango de la
aspiradora este en posici6n horizontal de
limp_eza en pizos,
Siempre tegrese ta aspiraclora a la posic|6n
vertical antes de usar la manguera ¥ |as
accesorlos.
Esto puede causar que el protector termal se
active.
,,,,,,,,
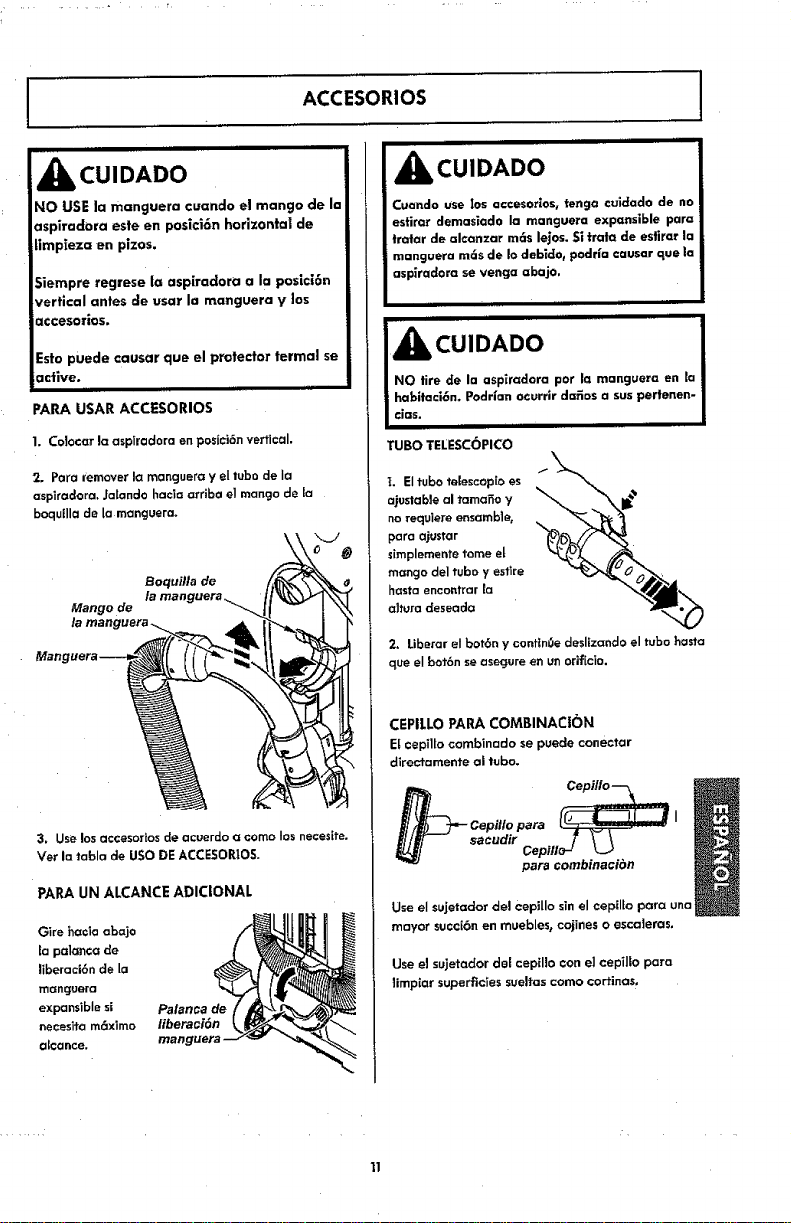
PARA USAR ACCESORIOS
1. Colocar la asp_radora en po_ici6nvertical.
2. Pora remover la mangueroy eI tuba de Ia
aspiradora, Jalando hada arrlba eI mango de la
boqullla de la rnanguera.
3. Use los accesorios de acuerdo a coma los necesite.
Ver la tabla de USO DE ACCESOR|OS.
PARAUN ALCANCEADICIONAL
Gire hac)a abajo
la palanca de
liberaci6n de la
rnanguera
expansible si Palanca de
necesita m6xirno #beraci6n
alcance.
_kcUIDADO ..............................
Cuando use Ios accesor|os, tenga cuidado de no
estirar demasiodo la monguera expansible para
tratar de olca_zar m6s lejos. 51trata de estirar la
manguera m6s de Io debt.4o_podda causar Rue la I
aspiradora se venga abujo.
,,, i iii
iiHIIIIIII III I
I&cu,o,oo !
! NO tire de la asplradora par la manguera en la I
i habitaci6n. Podr{an ocurrlr duties a suspertenen- I
I _ia_. , I
TUBO TEI:ESCOPICO
L El tuba telescopio es
a|ustable al tarnafio y
no requIere ensamble,
para ajustar
simplemente tome et
mango de1 tuba y esflre
hasta encontrar {a
ahura deseada
2. Liberar el _oot6ny conttn0edeslizando el tuba basra
que eI bot6n se asecjureen unorifida.
CEPILLO PARA COMBINACIC)N
E[cepillo combinado se puede conectar
dlrectamente ol tube.
_ Cepilto para
Use el sujetador del CepilIo sin el cepillo pore= una
mayor su¢ci6n en muebleru cojines o escaleras.
Use el sujetador deecepillo con el cepillo para
ffmplar superficies sue|tas coma cortinas,
11
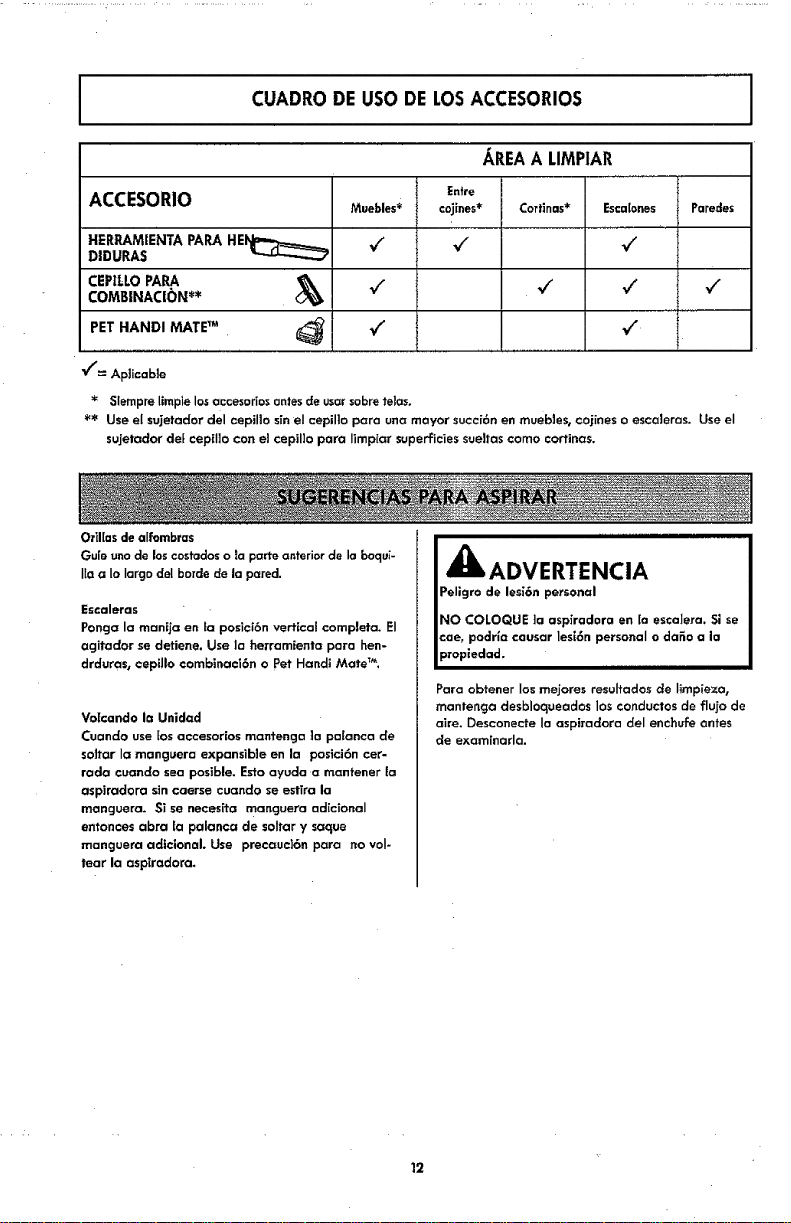
CUADRODEuse DELOSACCESORIOS
AREA A LIMPIAR
Entre
ACCESORIO Muebles* cojines* Corfinas* Esca[enes Paredes
HERRAMIENTA PAPA HE_ _/' v/ _/"
D|DURAS
CEPtLLO PARA _1_COMBINAC|C)N** "/ _ _ "/
PET HANDI MATETM _ _
V/'= Aplicable
* Slempre limplelosaccesoriosantesde usersobre tetas.
*_ Use el sujetador del cepil!o sinel cepillo para una mayor succi6n en muebJes, ¢ojines o escoleras. Use el
sujetador de! cepiI]o con el cepillo pare Iimpiar superficies sueltas come aortinas.
Or[l[asde aifi_mbras
Gu[e unode loscostadoso Ia porte anteriorde la boqui-
ffa a Io largo del borde de la pared.
Esoaleras
Ponga la mani.[a en ta posici6n vertical completa. El
agitador se detiene. Use ia herramienta para hen-
drduras, cepillo combinacl6n o Pet Handl Mate_
Votcando la Unidad
Cuando use los accesoHos mantenga ]a palanca de
soJtar la manguera expansible en la posici6n cer-
rada cuanda sea posible. Esta ayuda a mantener ia
aspiradora sin caerse cuando se esfira Ja
manguera. Si se neces[ta manguera adicionaI
entonaes abra [a palanca de soltar y saque
manguera adlclonal. Use precauc]6n para no vol-
tear la aspiradora.
iii ii iii i HI
I
Peligro de lesi6n personal
INO COLOQUE ta asplradore en [a escalera. Si se
Jcae, podrla causar lesE6npersonaI o dafio ala
Jpropiedad. ,,,,,,,,,,,,,,,,
Para obtener losmejores resuJtados de limpieze,
mantenga desbloqueados los conductos de flujo de
aire. Desconecte laaspiradora del enchufe antes
de examinarla.
12
SISTEMA DE PROTECTION
DE MOTOR
Protector Termal - Succi6n del Motor
Esta aspiradora t[ene un protector termal que se
ojusta autom6ficamente para proteger a la
aspiradora ciet sobrecalentamiento. Si una
obstrucc(6n impTde el flujo normal de aire al motor,
el protector terma( apaga e( motor
automc_ficamente para permitJr clue el motor se
enfffe a fin de evffar posibles dafios a [a aspirodora.
ProtectorTermal- Motor ((el agitodor
Esta aspiracIora esta equipocIa con protector de
sabre calentamiento en el motor del agitador que se
activan autom6ticamente paro )a protecci6n de)
motor. Este protector desconectan de toda corriente
ei_ctrica a! motor aulom6ticamente cuando existe
un sobrecalentamiento. Esto permite que el motor se
enfr(en y que no se rayon a fundir o suffir un
desperfecto.
iii iii II
_k CUIDADO
Siernpre regrese la aspiradora a la poslci6n
vertical antes de usar la manguera y los
accesorios. La falIa de este es el resultaaIo
del sabre calentamiento del motor del
agitador. Esto puede causar que el protector
|ermal se active,
Paro corregir el problema: Si esto ocurre_ apague )a
aspiradora y desenchufe el cord6n del
toma¢orr[ente para pemliflr que la aspiradora se
enfr(e y que el protector termaI se reajuste, Busque
y saque los obstrucciones o eatable la balsa, sÀes
necesario. Examine tomb(_n ¥ reemplace cualqu(er
filtro obstruido. Espere aproximadamente 40-50
minutos y enchufe to asp(radora y pr6ndola para
ver s( el protector de! motor se ha reajustado.
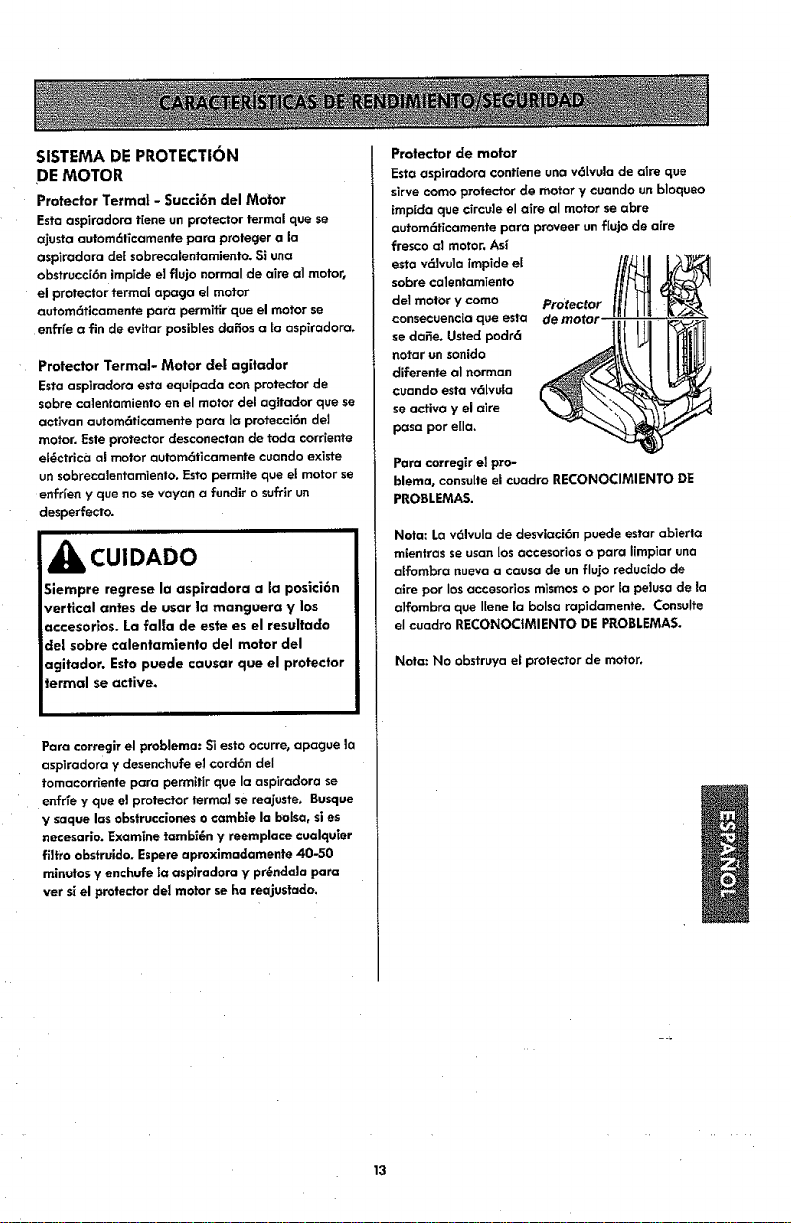
Protector de motor
Esto aspiradora cant(one una v_s[vula de a)re que
sirve coma protector de motor y cuando un bJoqueo
impic[a que c(rcule el a(re al motor se abre
outomc_ficamente para proveer un fiu|ode a(re
fresco aI motor. As(
esta vF_]vulo (mpide eL
sabre calentamiento
de) motor y coma
conseouencia que esta
se dafie. Ustec[ podr6
notar un sonido
diferente al norman
cuando esta v6ivuia
so activo y el aire
paso par ella.
Para correglr e| pro-
blema, consu(ie el cuadro RECONOCIMIENTO DE
PROBLEMAS.
Nora: Lov61vuIa de desvlaci6n puede estar abierta
mientros se usan Ios accesorios o para limpiar una
aIfombro nueva a cousa de un fiujo recIucido de
aire par Ios accesorios mismoso par la pelusa de la
olfornbra que IIene la balsa rapic[amente. Consuffe
e( cuodro RECONOCtMIENTO DE PROBLEMAS.
Nolo: No obstruya el protector de motor,
13
i i
_i, ADVERTENCIA
Pellgro de choque el6clr_coo [es|6n corporal
Des¢onecte |a un|€lad antes de ||mplarla o darle
servicio. De To ¢ontror_o podrfa producirse un
cheque e|6ctr|co o causer lesi6n corporal sT la
asplradora arranca de manera imprevlsta.
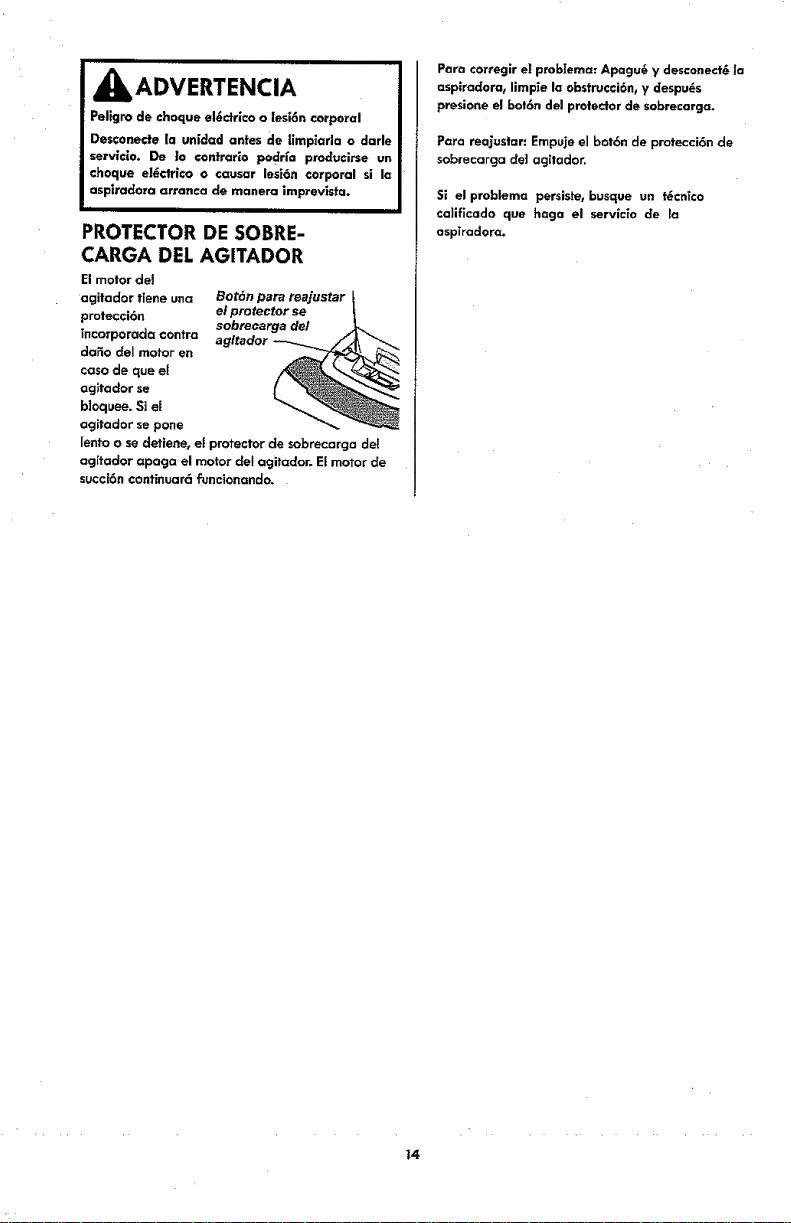
PROTECTOR DE SOBRE-
CARGA DEL AGITADOR
El motor del
agitador tiene una
protecci6n
Tncorporacia contra
daffo deI motor en
caso de que el
ocjitador se
bloquee. Si el
agitador se pone
Bot6n pare reajuster
el pro rector se |
sobrecarga del _-._
agltador _
lento o so detfene, el protector de sobrecarga del
ag[tador apaga el motor deI agitador_ El motor de
succl6n continuar6 funcionondo.
Pare corregir el probtema: Apagu6 y desconect6 |a
asplrodora_ limp|e la obstrucci6n_ y despu_s
presione el bot6n del protector de sobrecarga.
Pare reajustar: Empujeel bot6n de protecci6n de
sobrecarga de] agltadon
Si el problema persiste, busque un t6cn_co
calificado que h¢zga el servi=|o de la
aspiradoro.
14
Sigasiempretodas los instruccienes de seguridad
antes de efectuar e] mantenimiento a suaspiradera, ADVERTENCIA
Pe|ig_ode cheque eI_:trico o lesi6n corporal
Desconecte la unldad antes de efectuar el
manfenimiento a su asp_radora. De Io contrarlo
pedr[a producirse un choque el_ctrlco o causar
les[6n cerporal slla asplradera arranca de manera
imprevista.
r
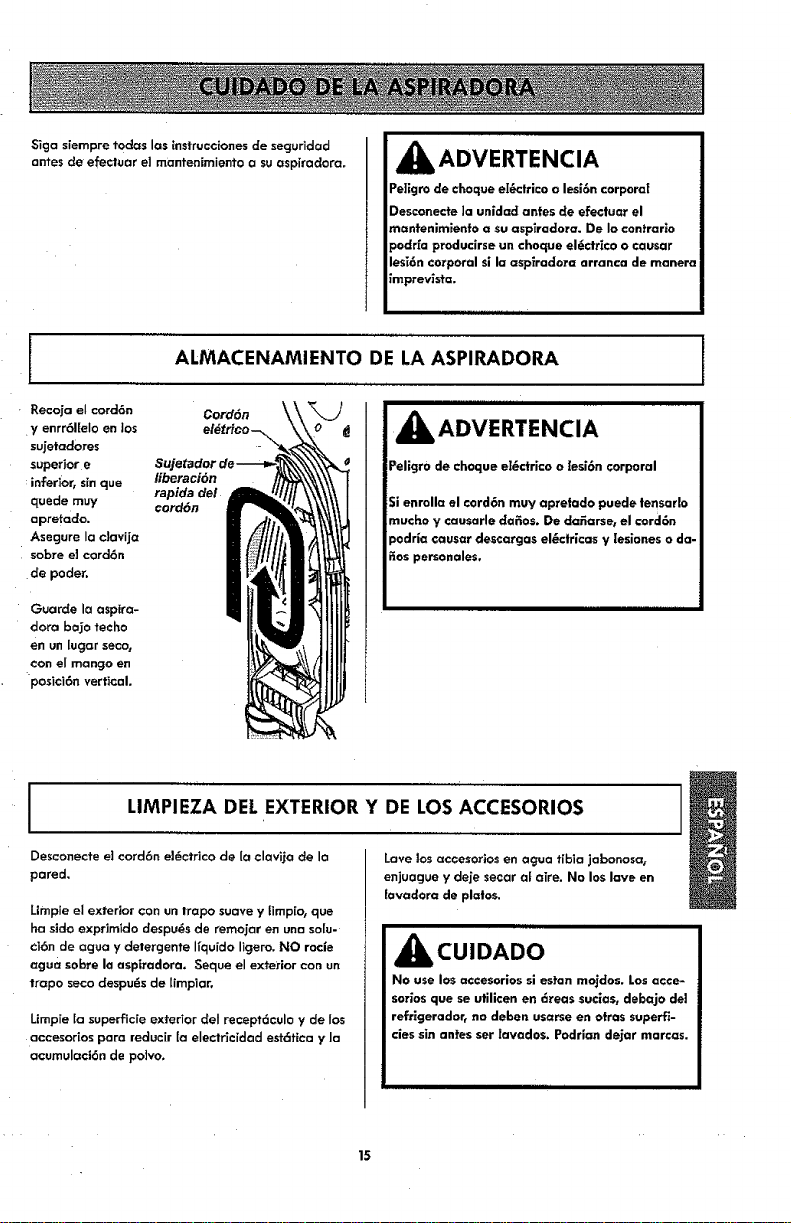
Recoja el cord6n
y enrr61[ela en los
su_etad0res
superior e
:inferi0r, sinque
quede muy
apretado.
Asegure la c]avija
sabre e] cord6n
de peder.
Guarde la asptra-
dora 1oeje teche
en un lucjar seco,
con el mango en
posici6n vertical,
ALMACENAMIENTO DE LA ASPIRADORA
I
Cord6n
liberaci6n
rapidadel
cord6n
_IL ADVERTENCIA
Peligr0 de choque el_ctrlco o lesi6n corporal
Si enrolla el cerd6n mu¥ apretedo puede tensarle
mucho y causarle ctaEos.De da5arse_ el €ord6n
pedria eausar descargas el_:trlcas y [esianes o da-
ties personales.
LIMPIEZA DEI. EXTERIOR Y DE LOS ACCESORIOS
Descenecte e] cord6n el6ctr]co de la clavija de la
pared,
Limpie e] exterior con un trapo suave y limp[o, que
ha sido exprimido despu_s de remojar en una solu-
Ci6n de agua y detergente ffquido ligero, NO rocie
agua sabre la aspiradora. Seque el extex'ior con un
trapo seco despu_s de limpiar,
Limpie [a superfide exterior deI receptciculo y de los
accesorios para reducir {a electricidad est6tica y la
aeumuloel6n de polvo,
Lave los acceserios en agua tibia jabonasa_
enjuague y deje secar at aire. No los lave en
iovadera de plates.
_CUIDADO
Ne use les occeserios si estan mojdes. Les acce-
series que se utilicen en 6teas suc;as, debaje del
refrlgeradar, no deben usarse en arras superfi-
cies sin antes set tavades. Pedr|an dejar marcas.
illlHi i
15
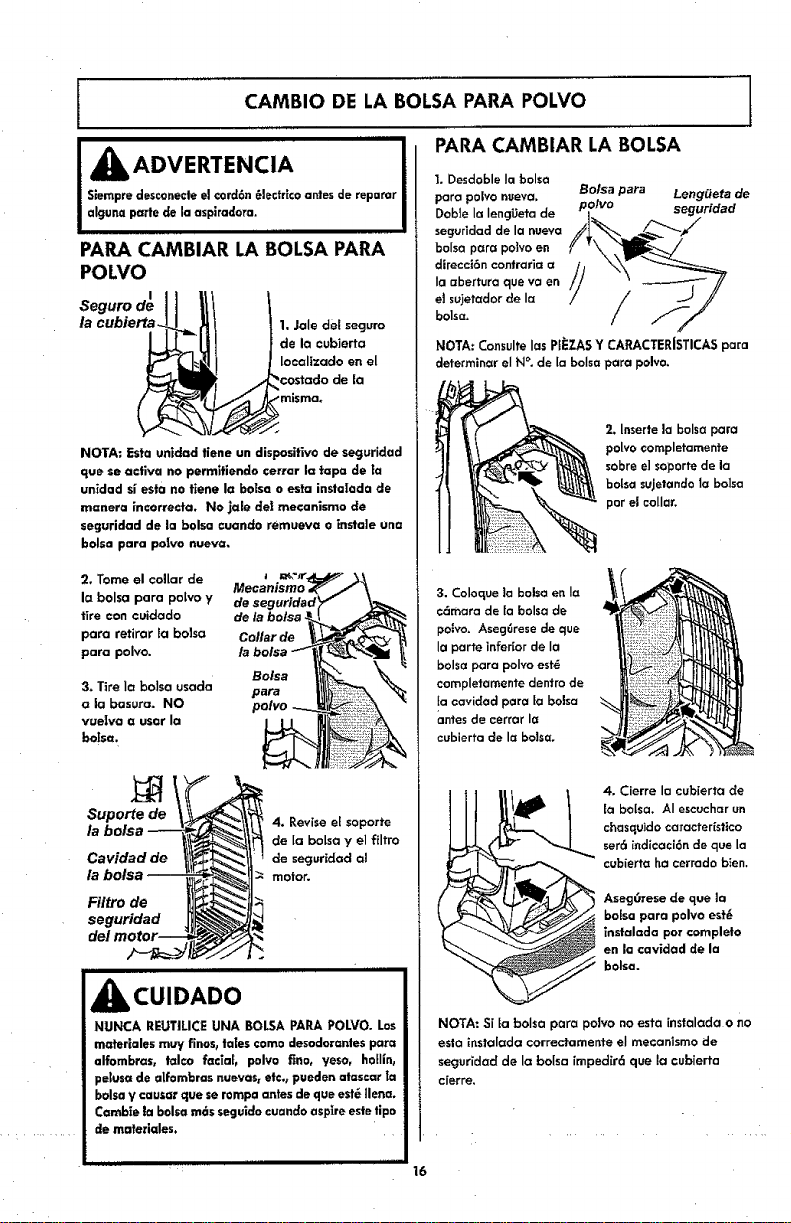
CAMBIO DE LA BOLSA PARA POLVO
PARA CAMBIAR LA BOLSA
IA OVE" "CIA ..............................I
Slempre desconecte el cord6n 6Jectrlco antes de reparar i
alguna parte de la asplradora. I
I
PARA CAMBIAR LA BOLSA PARA
POLVO
I
Seguro de
la cubierta. 1. Jole del seguro
de la cubierta
locoltzado en el
NOTA; Esta un|dad tiene un disposifivo de seguridad
que se active no permifiendo terror la tape de la
unidad sf esta no fiene la balsa o esta instaIada de
manera incorrect(=. No |ale dei mecanismo de
seguridad de |a balsa cuan_o remueva o ins|ale una
balsa para poivo nueva.
2. Tame el collar de
Io balsa para polvo y
fire con cuidado
para retlrar la balsa
para polvo.
3. Tire Ia balsa usada
ala basura. NO
vuelvo o user Io
bolsa_
de seguridad_ r
de la botsa __
Collar de __
eolsa |1__ \
4. Revise e[ soporte
de la balsa y el ill|re
de seguridad a]
motor.
[_is CUIDADO
NUNCA REUTILICE UNA BOLSA PARA POLVO. Los
materiales mw fines, tales come desodorentes pore
alfombrus, talco fat|a6 polvo fine, yeso, hollin_
pe|usa de alfombras nuevas_ etc., pueden atuscar [o
belsa y causar que se rompa antes de que est,-_ llena.
Cambie ta balsa m6s seguido cuando aspire este tlpo
de mater|ales.
I. Desdoble Ia balsa
pare polvo nueva, Balsa para Leng_eta de
Doble la IengUeta de j__/p°lva seguridad
seguridad de la nuevo /_,_= /__"_-,/
boise pora polvo en
direcci6n contraria a
Ia abertura que va en
el sujetedar de Ia
bolscz,
NOTA: Consulteias Plt:ZASY CARACTERiSTICASpara
determiner el N°. de [a boisepara polv0.
2. lesertela balsa pare
polvoeompletamente
sabre e| soportede la
boise sujetando to balsa
per el collar.
3. Coloque]a boise en Ie
c6mara de la bolsa de
peeve, Aseg6resede que
la parte inferior de Ia
boise para polvo est_
completomente den|re de
!a coy|dad pare [a balsa
antes de cerror Jet
cubierta de la boise.
4. Cierre la cubierta de
[a boise. AI escuchar un
chasquldo catacter[sfico
set6 indicaci6n de que la
cubierto ha cerrado bien.
Aseg0rese de que la
balsa pare polvo est'.
_nstalada par complete
en la cavidad de la
balsa.
NOTA: S[ia boise pare polvo no esta [nstalada a na
eslo instaJada correcfamente el mecanismo de
segur[dad de la boise impedir6 que la cubierta
cierre.
i IJLLII iiiiilll,,i
16
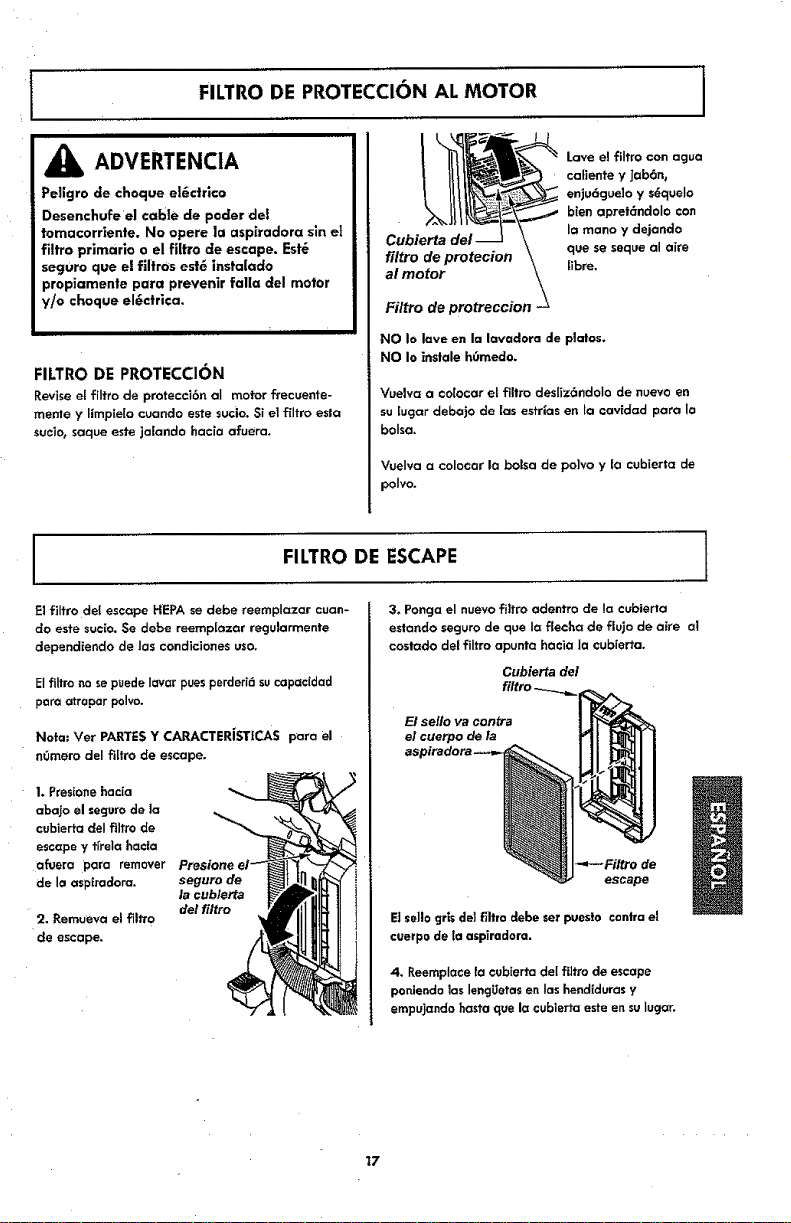
FILTRO DE PROTECCION AL MOTOR it
II
ADVERTENCIA Lave el fiItro con agua
ca_ientey Jab6n_
Pellgro de cheque e|6drlco enju6cjuelo y s6quelo
Desenchufe el cab|e tie peeler de! b[en apret6ndolo con
fomacorriente. No opere la aspffadora sin el la mane y dejando
filtro primario o el filtro de escape. Est_ Cubierta que se seque al aire
filtro de protecion
seguro que e! filtros est6 instalado tibre.
fal|a clel motor al motor \
propiamenle pare prevenir
y/o cheque el6ctrica. Filtro de protreccion -_\
'"''..... NO Io lave en la lavadora de plates.
NO Io instale h0medo.
FILTRO DE PROTECCION
Revise el filtro de protecci6n aI motor frecuente- Vuelva a co[ocar et filtro desliz6ndolo de nuevo en
monte y limpie[o cuando este sucio. Si el filtro esla su[ugar debajo de [as estr_asen ta cav[dad pare la
suciot saque este jalando hac[a afuera, balsa.
Vuelva a colocar la balsa de po]vo y la cubierta de
polvo.
FILTRO DE ESCAPE
E1fiItro deI escape HEPA se debe reempiazer cuan-
do este sucre, $e debe reemp[azar regularmente
dependienclo de los condiciones usa.
Elfiltro nose puede Iavar puesperderi6 sucap=cidad
para atrapar polvo.
Note: Vet PARTESY CARACTERJSTICAS para el
n,3merodel fi[lro de escape.
1.Pres[onehacia
abajo el seguro de la
cubierta cleIfiltro de
escape y tfrele hacla
afuera pera remover
de la aspiradora.
2. Remueva el filtro
de escape.
seguro de
la cublerta
del filtro
3. Ponga el nuevo filtro adentro de lacubierta
eslondo seguro de que laffecha de flujo de aire al
costado del filtro apunta hacia Ia cubierta.
Cubierta del
El sello va centre
el cuerpo de/a
Filtro de
escape
Etse]logris de1filffo debe set puesto centre el
cuerpode la asplradora.
4. Reemplace la cub[erta del filtro do escape
poniende las lengUetasen Ias hend[durasy
empujando haste que la cubierta este en su Iuger.
t7
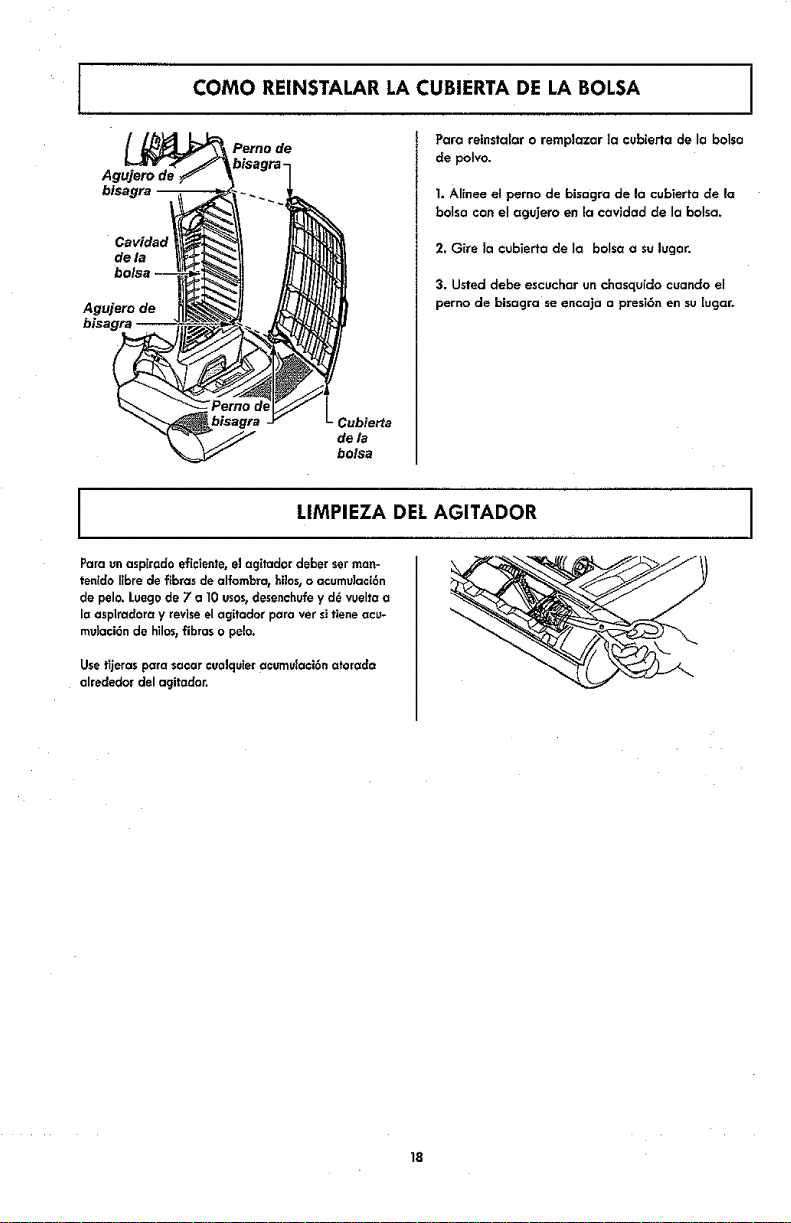
COMa REINSTALAR LA CUBIERTA DE LA BALSA
Agujero de
Cavidad
dela
bolsa
Agujero de
bisagra
Perno de
Cubierta
dela
bolsa
Paro reinstalar o remplazar la cubierta de Ia boIsa
de polvo.
1. Alinee el perno de bisagra de la cubierta de la
balsa con el agujero en la coy[dad de la bolsa.
2. Gire la cubierta de ia bolsa a su lugor,
3. Usted debe escuchar un chasquido cuando el
perno de bisagra se encaja a presi6n en su[ugar.
LIMPIEZA DEL AGITADOR
Para unasp[ratio eficien_e_el ag[tador debar set man-
ten[do Iibre de flbras de alfombrasbilos_o acumulac[6n
de pelo.Luegode 7 a 10 usos_desenehufey d6 vuelta a
la asplradora y reviseelagitador para vet sifleneacu-
mulaci6nde hilos_fibras o pelo.
Usetl/eras para sacar ceoJquieracumu[aci6natorada
alrededor del agitador.
18
Procedasiempreconprecaucionesdesegurldad
antesdeefectuarelrnantenimiento a su aspirado-
re.
_ILADVERTENCIA
Pel[grode choqueel_€lricoo lesi6ncorporal
Desconect,_le unldadanlesde efectuarel manten_mien-
Io a suasplradora.De Ioconlrarlo podr_aproducirseun
choqueel,_ciricoo causerlesi6n€orporalslia asplradora
arranca de manem imprevista.
$i Ja aspiradora no parece tenet suficiente succi6n,
revise s[ la balsa del polvo estc_Ilena o si eJfiltro
est6 tapado, Ver CAMBIO DE LA BOLSA PARA
POLVO y FILTRO DE PROTECCI6N AL MOTOR.
Sita balsa deI polvo y 6teas del filtro est6n libres
de trabas, revice la mancjuera expansible.
PARA REMOVER LA OBSTRUCCION DE LA
MANGUERA
1, Gire la palanca de soltar la manguera expansi-
bJe en direccion de Ins agujas deI re]oj pare sottar
la manguera expansible.
Manguera
Tubo
Porta-tubo
Palanca escape
manguera extensi6n
Manguera
2, Remueva el extreme inferior de Ia mancjuera
expansible cleI porta-tubo tomando de[ cue[In de la
man_Juera, cjirando, y tirando derecho bae[a arriba.
3. Enchufe la asp]fedora y enci6ndala.
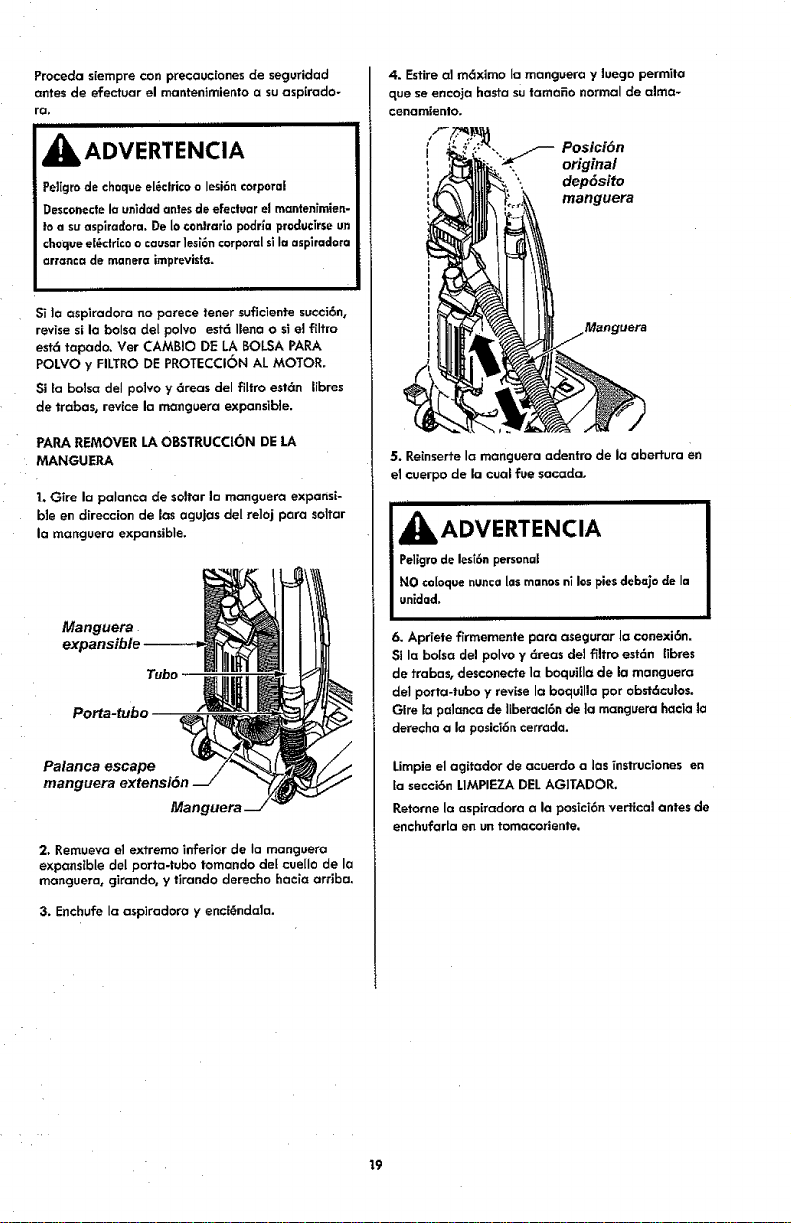
4. Estire al m_ximo Ia manguera y luego permita
que se encaja haste su tamafio normal de alma-
cenamiento.
Posici6n
original
*\ dep6sito
manguera
Manguera
5. Reinserte la manguera adentro de ia abertura en
el cuerpo de la cua_ rue sacada.
'_i, ADVERTENCIA
Peligrodelest6npersonae
NO co[oquenuncalas mnnosni Inspiesdebajo €[ela
unldad.
6. Apt[ere firmemente pare asegurar la conexi6n.
Si la balsa del polvo y 6reas del filtPo estdn Iibres
de trabas, desconecte la boqui[ia de la manguera
del porta-tubo y revise la Iooquilla pot obst6culos.
GJrela palanca de ltberacl6n de la mancJuerahacla la
derecha ala posici6ncerrada.
Limpie el agitador de acuerc[o a Ins instruciones en
la secci6n LIMPIEZA DEL AGITADOR,
Retome la aspiradora ala pos[ci6n vertical antes de
enchufar[a en un tomacoriente,
19
Revise este recuadro para encontrar sotuciones a problemas que puede corregir usted mlsmo, Cualquier otto
servicio debe ser realizado par SEARS u otto agente de serv_cio calificado,
iiiiiiiiiiiiiiiiiii iiiiiiiiiiiiiiiiiiiiiiiiii
J _,ADVERTENCIA PetlgrodeohaquoeI_ctrioa
! Desconecte la aspiradora antes de efectuer el menten[miento a su asplr|dora. Dele cenfraHe pedrfa
I producirse an cheque el_ctrico e causer I_si6n corporal.
IIIII IIII I
La aspiradora no
enciende
No asplra
sal[sfactortomente,
La aspTradora levanta
tapetes o es d]ficil
empujan
EI agilador
no fonciona.
Restricci6n del flute
con el usa de los
acce$oT|o&.
Camblo de sonlde.
I. Est(i des¢onectada, 1, Coneo_ bien, seleccJone la
fun€ion deseada en el control manual.
2. Cortacircuitos botado a fusible
quemado en e_tablero de servicio
de Ia residencia.
3. Protector termal acflvado,
4, Toma-cardente defectuoso,
1. fialsa pare polvo ilenC_o atascada,
2, Aju_te |ncorrecto de nlvel de pelo de
la aIfombra.
3. AgltadoT a[esgastado,
4. BoquilIa, o sujetodor de ta balsa0
atasc_ado,
5. Manguera c_tascada.
6. Manguera rata.
7, La manguera no est_ bien lnsertad_.
8, Activact6n deI sistema de protecti6n
del motor.
9, Fiffros de segurldad.
I, AJuste iecorrecto de niveI de pelo
de ta al_mbra.
1. Mango en pos_ci6n vertical
2. $cbreca_'ga deJ acjItader actlvado,
3. Pmlector t_rmlco acfivado.
I. El usa de los accesorios I|mit_ el
flute de aire.
La pelusa de una a|fombra neeva
obstruye el paso de aire.
2. Restablezca el cortacircuitos o
eatable el fuslbIe.
3,
4,
1,
2,
Desconecte la asplradora y permffa
que se enfr|_, el protector t_rm_co
se activara par si solo.
Ptu_bela con otfo operate o kJmpara.
H6galo reparar apropiadamente.
eatable la be|so.
Ajuste el n_vel,
3, Cambie el agltador.
4, Ver Ia secci6n de como e[|minar los
_esiduos de basura en los conductos
en manual de Usa y Cuidado,
5, P,evise ]a manguro par residues,
6, Camble la manguera.
7, Inserte b_en[a manguera,
8. Determine si existen b|oqueos.
Cambie el filtro de protecci6n c_I
motor y el filtro deI escape.
Ajuste el nlveL
1, Mueva el mango de Ia posici6n
vertical.
2, ReaJust_ la sobrecorcja deI agilador.
3. Desconecte la asplradora y permi_a
que se enfri6 par 40-50 mlnutos.
I. Revise USO DE LOS ACCESORIOS
Ltmple la manguera, Vet la secc16n de
coma eliminar los residues de basura
en los €onductos en este manual de
Usa y Cu|dado.
Linea de ayuda de aspiradora
1-877-531-7321
8:00am-5:00pm EST, M-F
(U.S.A. and Canada)
2O
AcuerdosMaestrosdeProtecci6n
Enhorc_buenapar hacer una cornpra in_efigeate. Su nuevo producta Kenmore_) est6 disefiado y fabricado para
ofreceHe arias de funcionamiento confiable. Pete at igual que todos tos productos pueden precisar un manten-
imiento preventive o alguno reparaci6n de vez en cuando. Par este mativa, tener un Acuerdo Maestro de
Protecci6n puede ahorrarle dinero e inconvenientes.
El Acuerda Maestro de Protec=i6n tambi6n Ie ayuda a prolongar la v[da 0til de su nuevo producto. A contln-
uac[6n indicamos Io que el Acuerdo* incluye:
D Partes y mane c_eobra necesarios para ayudar a que estos procluc)osfuncione correctamenle bajo concli-
clonales normales de use, no s[mpIemente defectos. Nuestra cober_ura va touche m6s aff_ de la garantla
del prodacto. NingOn deducible, ninguna aver[a funcianal quada excluicta de Io cobertura- protecci6n real.
[] Serv[cio experto ofrec[do pot una lista de m6s de 10,000 t6cnices autorlzados del servlclo t_cnico de
Sears, Io que signif[ca clue alguien en quien usted puede conflar estarc_trabajanda en su producto.
[] N_mero illmffacto de Ilamadas al servicio t6cnico y serv_cio en toda la naci6n, tan continua coma usted
nos ]o soficite, sinimportar donde est,.
[_ Garanfia ser|a de sustltuci6n del producto. La sustituci6n de su producto cubierto s1se praducen cuatro o
m6s averras en dace meses.
[] Sustituci6n del producto par otto nuevo si suproducto cubierto no puede repararse.
[] Revisi6n y mantenimlento anual prevez_tiva slempre que Io desee ¥ sin cargo algunoo
[] Ayuclo r6pida per tel6fono - Nosotros I0 Ilamamas Resolucl6n r6pida. Soporte telef6nico de un represen-
tonte de Sears en todos los productos. Pienseen nosotros coma un "manual de
usa y cuidado".
[] Preiecci6n cantra subidas de tens(6n que provoquen dories eI_Ctricas causados par las fluctuaciones de (a
corriente.
[] $250 de protecc(6n contra la p6rcffda de allmentos anualmente en case de que se estropee alg0n alimen-
to coma resuffado de una averra mec_nica de cualqu(er congelador o refrigerador cubierlo.
[] Reembolso del alquiter sl [a reparaci6n de su producto cubierto toma m6s tiempo clel prometiclo.
[] t0% de descuento en el precio regular de cua_quier servicio de reparaci6n no cubierta y de )as piezas
instaladas relacionadas.
Una vez que compre el Acuerdo_ s61obastarc_una simple Ilomada te]ef6nica para que pueda programor unser-
vicio. Puede tlamar a cualqu[er hera del dfa o tie la noche, o concertar una ¢ffa de servicio en ffnea.
El Acuerdo maestro de protecci6n es una compra [ibre de riesgos, $i par cuolquler roz6n se
cancela durante el perfodo de garanffa de1 producto, le devolveremos rode et dinero. O, un
reembolso prorrateado despu6s del per[ado de vencimiento de la garantia, iCompre su
Acuerdo maestro hay!
Aplican algunas limiiaclones y excluslones. Para precios y m6s informaci6n en EE.UU., Ilame ai 1-800-827.
6655.
* La cobertura en Canad6 varla en algunos arffculos. Para obtener redes los cIetalles, Ilame a Sears Canada
al 1-800-361-6665.
Servicio de instalaci6n de Sears
Para la instalac[6n profesional par parle de Sears de electrodom6sticos_ abridores de puertas de gorajes, caEen-
tadores de ague y arras arffcuIos princlpales para eI hogar, en EE.UUoo Canadc_ tlarne al
1-800-4-MY-HOME@.
21
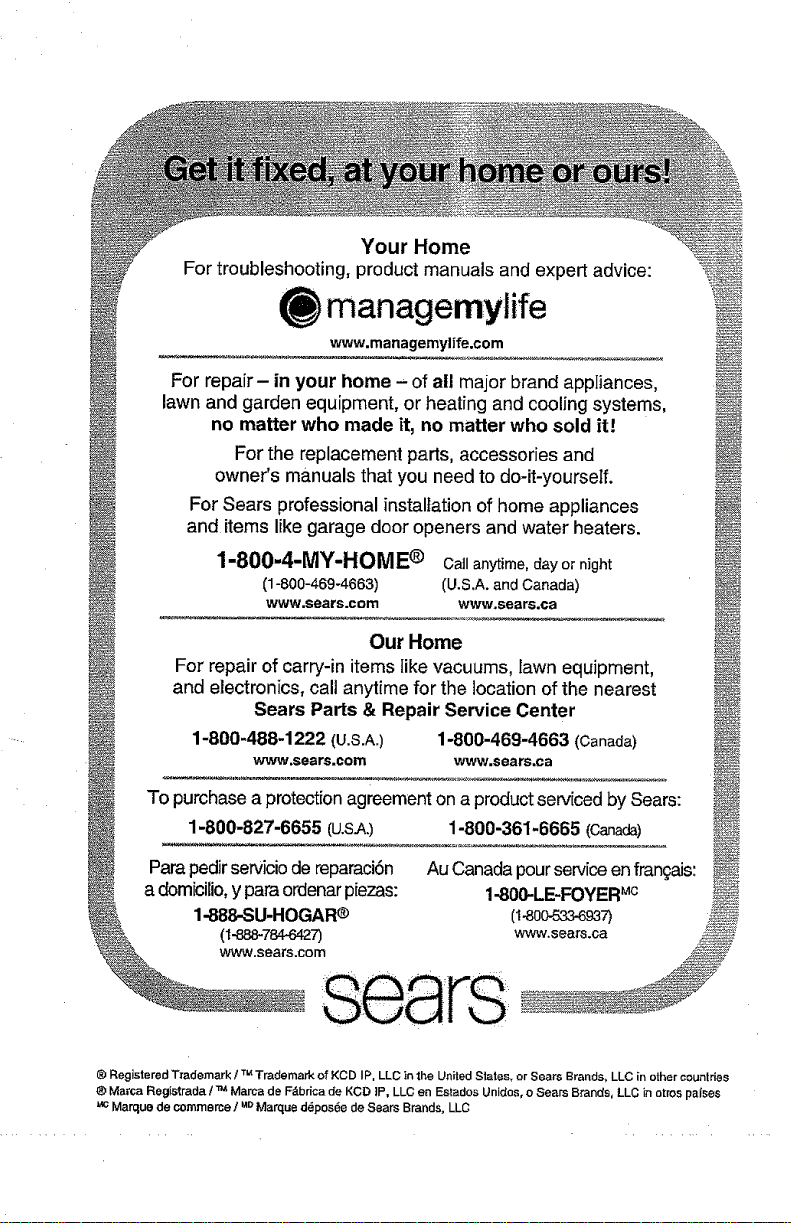
Your Home
For troubleshooting, product manuals and expert advice:
managemylife
www.managemylife.corn
For repair- in your home - of all major brand appliances,
lawn and garden equipment, or heating and cooling systems,
no matter who made it, no matter who sold it!
Forthe replacement parts,accessories and
owner'smanuals that you need to do-it-yourself.
ForSears professionalinstallation ofhome appliances
and itemslikegarage door openersand water heaters.
1-800-4-MY-HOME ® Call anytime, day or night
(1-800-469-4663) (U.S,A. and Canada)
www.sears.com www.sears.ca
Our Home
For repair ofcarry-initemslikevacuums,lawn equipment,
and electronics,call anytimefor the locationofthe nearest
Sears Parts & Repair Service Center
1-800-488-1222 (U.S.A.) 1-800-469-4663 (Canada)
www.sears.com www.sears.ca
To purchase a protectionagreementon a productservicedby Sears:
1-800-827-6655 (U.SA.) 1-800-361-6665 (Canada)
Parapedirserviciode reparaci6n Au Canadapourserviceenfrangais:
a domicilio,y paraordenarpiezas: 1-800-LE-FOYERMc
1-888-SU-HOGAR® 0-80_7) _
(1-888784-6427) www.sears.ca _'
www.sears.com _
se arsl
® Registered Trademark / "r=Trademark of KCD IP, LLC in the United States, or Sears Brands, LLC in other countries
® Marca Registrada t TM Mama de F_brica de KCD IP, LLC en Estados Unities, o Sears Brands, LLC in otms patses
_c Marque de commerce / uo Marque d_po,_6e de Sears Brands, LLC