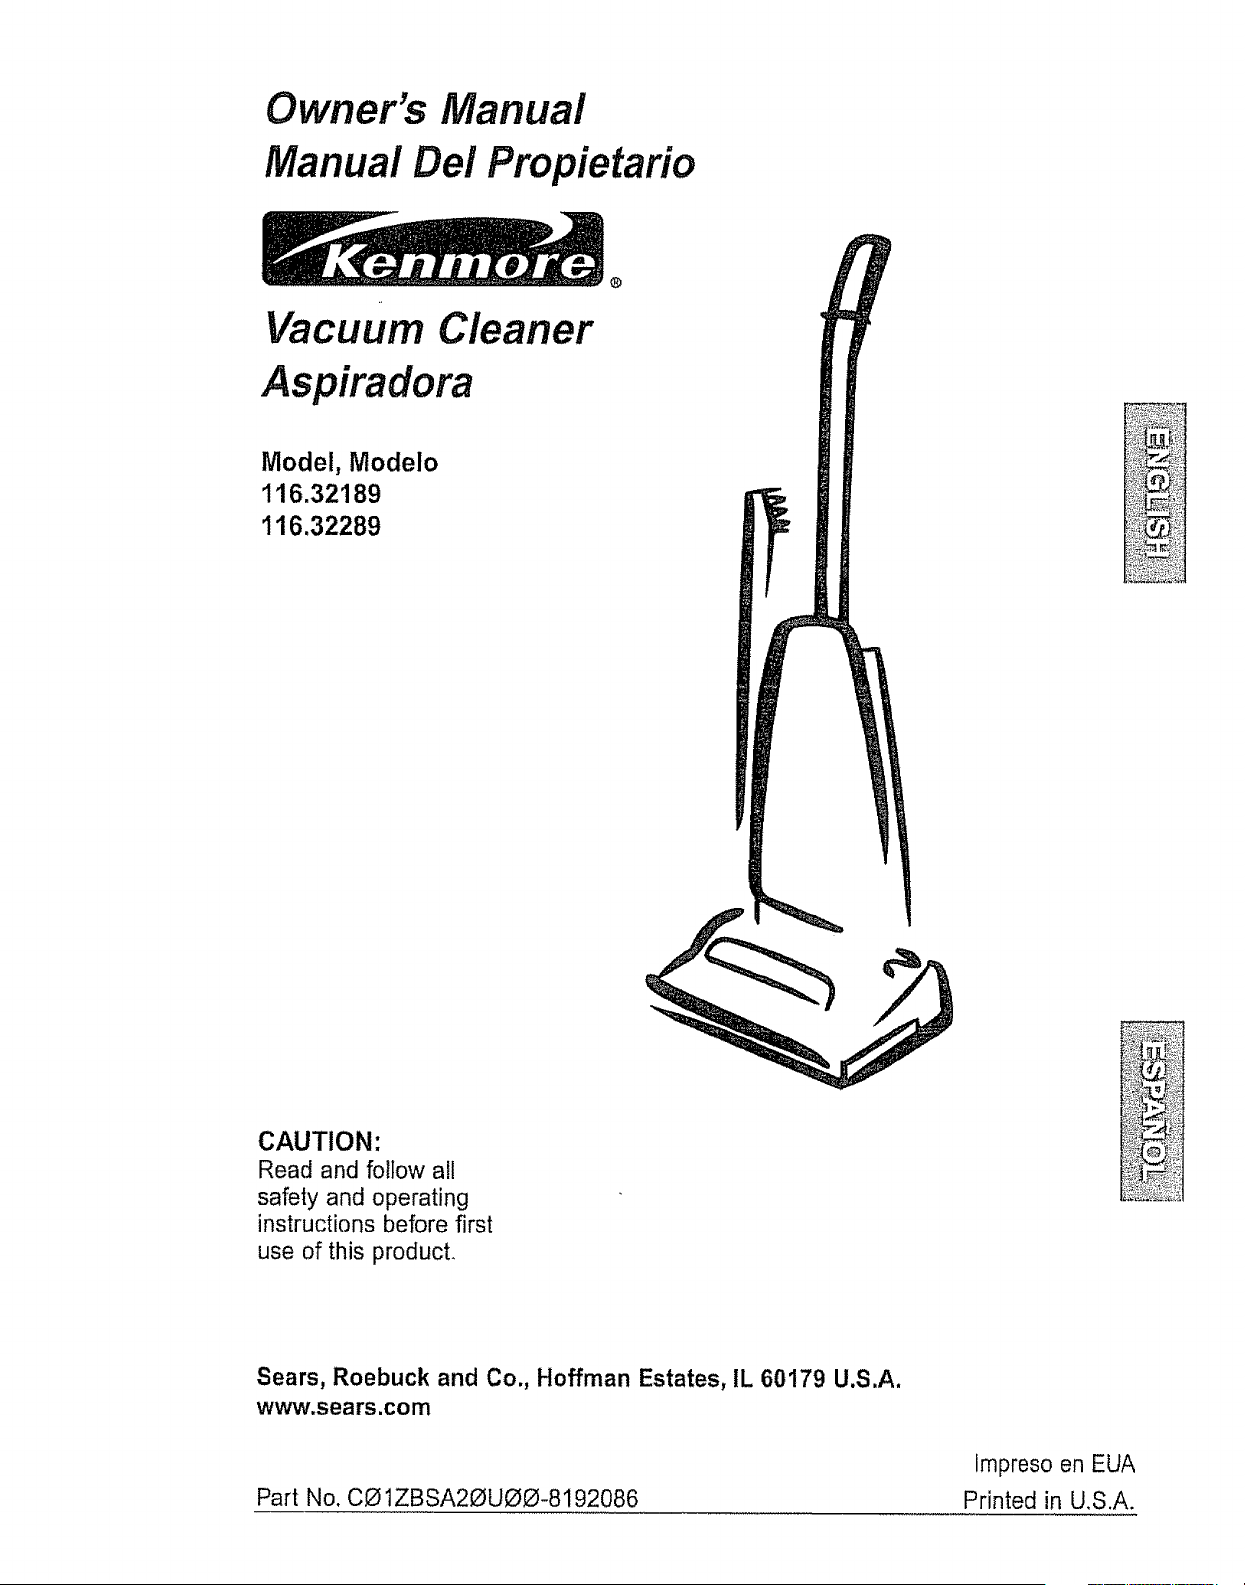
Owner's Manual
Manual Del Propietario
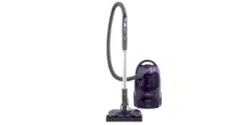
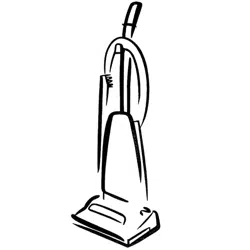
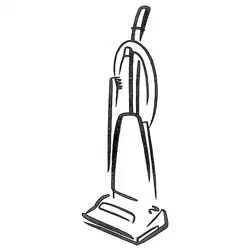
Vacuum Cleaner
Aspiradora
Model, Modelo
116.32189
116.32289
CAUTION:
Read and follow all
safety and operating
instructions before first
use of this product.
Sears, Roebuck and Co., Hoffman Estates, IL 60179 U.S.A.
www.sears.com
Part No. CO 1ZBSA20UOO-8192086
Impreso en EUA
Printed in U,S.A.
Before Using Your New Vacuum ..... 2
Kenmore Vacuum Cleaner Warranty ,, 2
important Safety Instructions ........ 3
Parts and Features ................. 4
Assembly Instructions ............. 5-6
Operating Instructions ................ 6
Pile Height Selection and Setting .......... 7
Carpet/Bare Floor Selector ............. 7
Releasing the Handle ................... 8
On/Off Switch .................... 8
Attachments .................... 8-10
Attachment Use Chart ................. 10
Vacuuming Tips ...................... 1t
Performance Features ................ 11
Vacuum Cleaner Care ............... 12
Vacuum Storage ..................... 12
Cleaning Exterior and Attachments ...... 12
Dust Bag Changfng ................. I3
Motor Safety Filter Cleaning .......... 14-15
Exhaust Filter Cleaning ............ I5
Belt Changing and Agitator Cleaning ,, 16-t8
Clog Removal ....................... 19
Light Bulb Changing ................. 20
Agitator Servicing ................. 21
Agitator Assembly ................... 21
Troubleshooting ...................... 22
Please read this guide. It will help you assemble and operate your new Kenmore vacuum in
the safest and most effective way.
For more information about vacuum cleaner care and operation, call your nearest Sears store.
You will need the complete model and serial numbers when requesting information. Your vacu-
um's model and serial numbers are located on the Model and Serial Number Plate,
Use the space below to record the model number and seriaI number of your new Kenmore
vacuum
Model No.
Serial No,
Date of Purchase
Keep this book and your sales check (receipt) in a safe place for future reference.
LIMITED ONEYEAR WARRANTY ON KENMORE VACUUM CLEANER
This warranty is for one year from the date of purchase, and includes only private household
vacuum cleaner use. During the warranty year, when this vacuum cleaner is operated and
maintained according to the owner's manual instructions, Sears will repair any defects in
material or workmanship free of charge..
This warranty excludes vacuum bags, belts, light bulbs, and filters, which are expendable parts
and become worn during normal use.
For warranty service, return this vacuum cleaner to the nearest Sears Service Center in
the United States.
This warranty applies only while this product is in use in the United States. This warranty gives
you specific legal rights, and you may also have other rights which vary from state to state.
Sears, Roebuck and Con, D/8t7 WA, Hoffman Estates, IL 60179
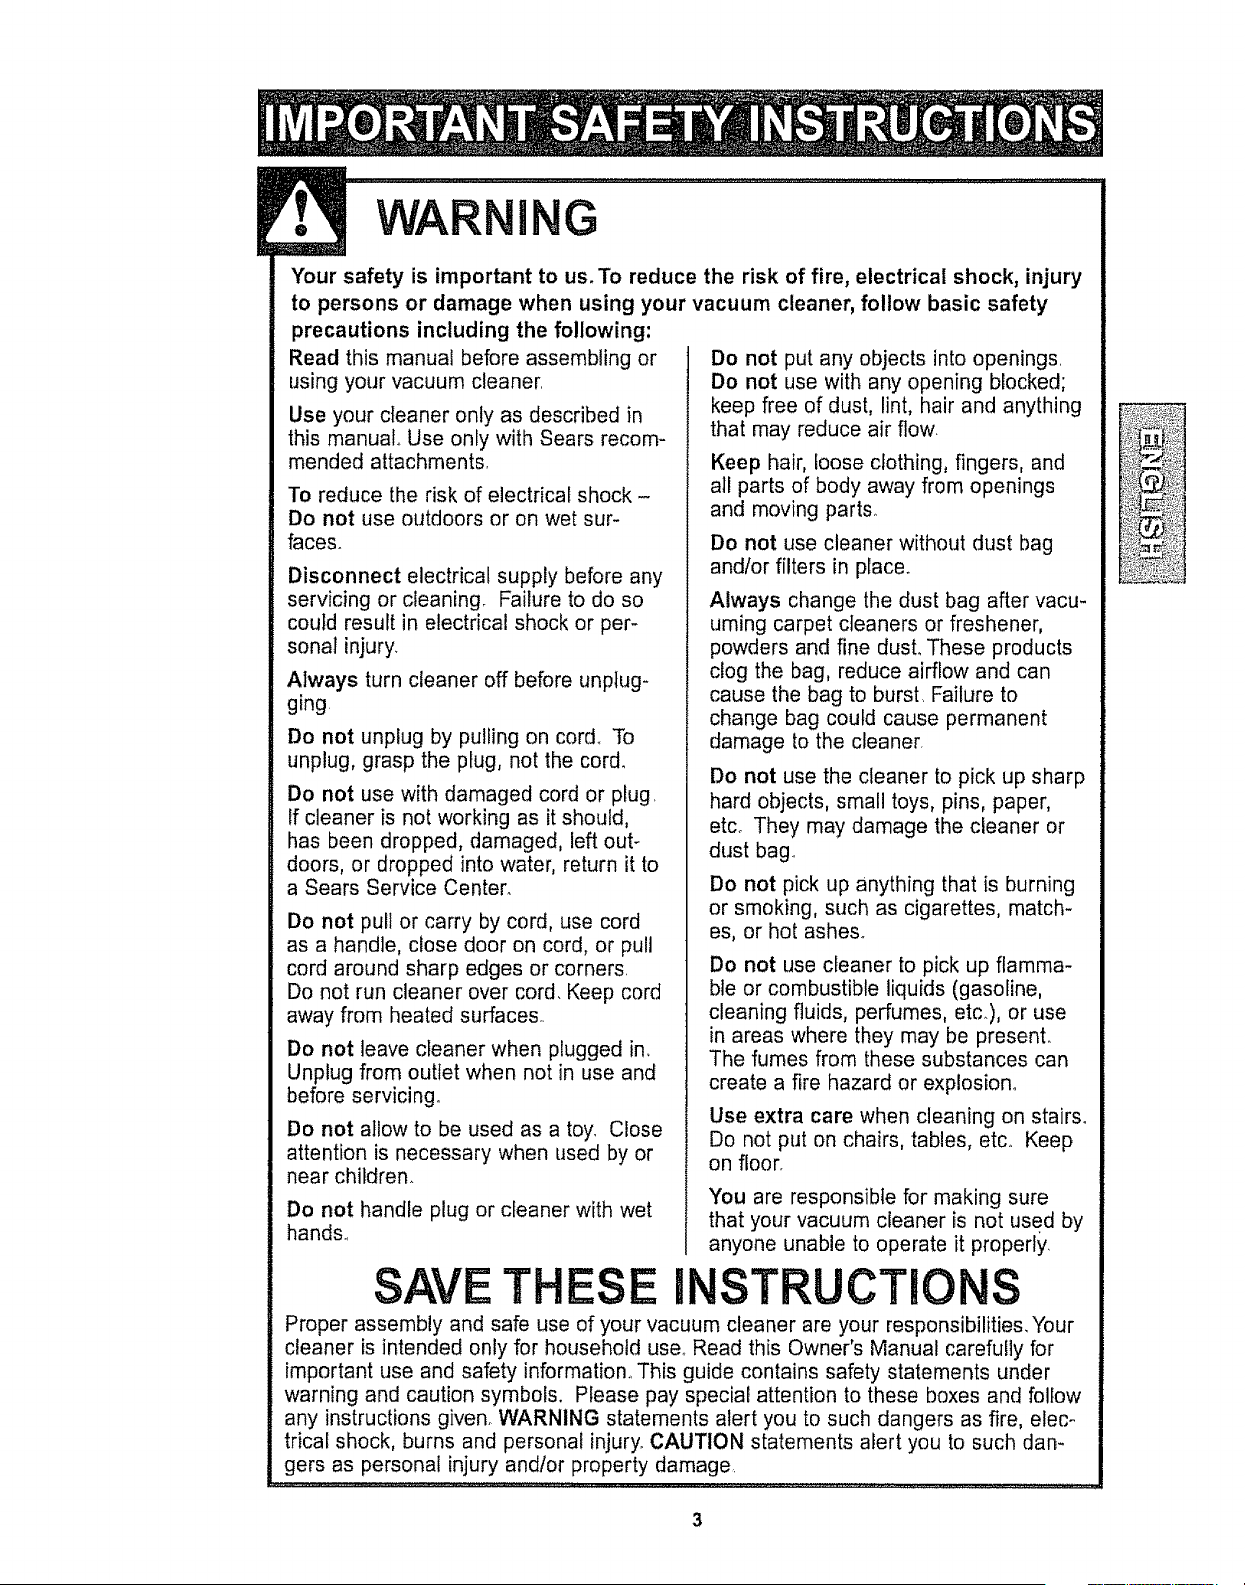
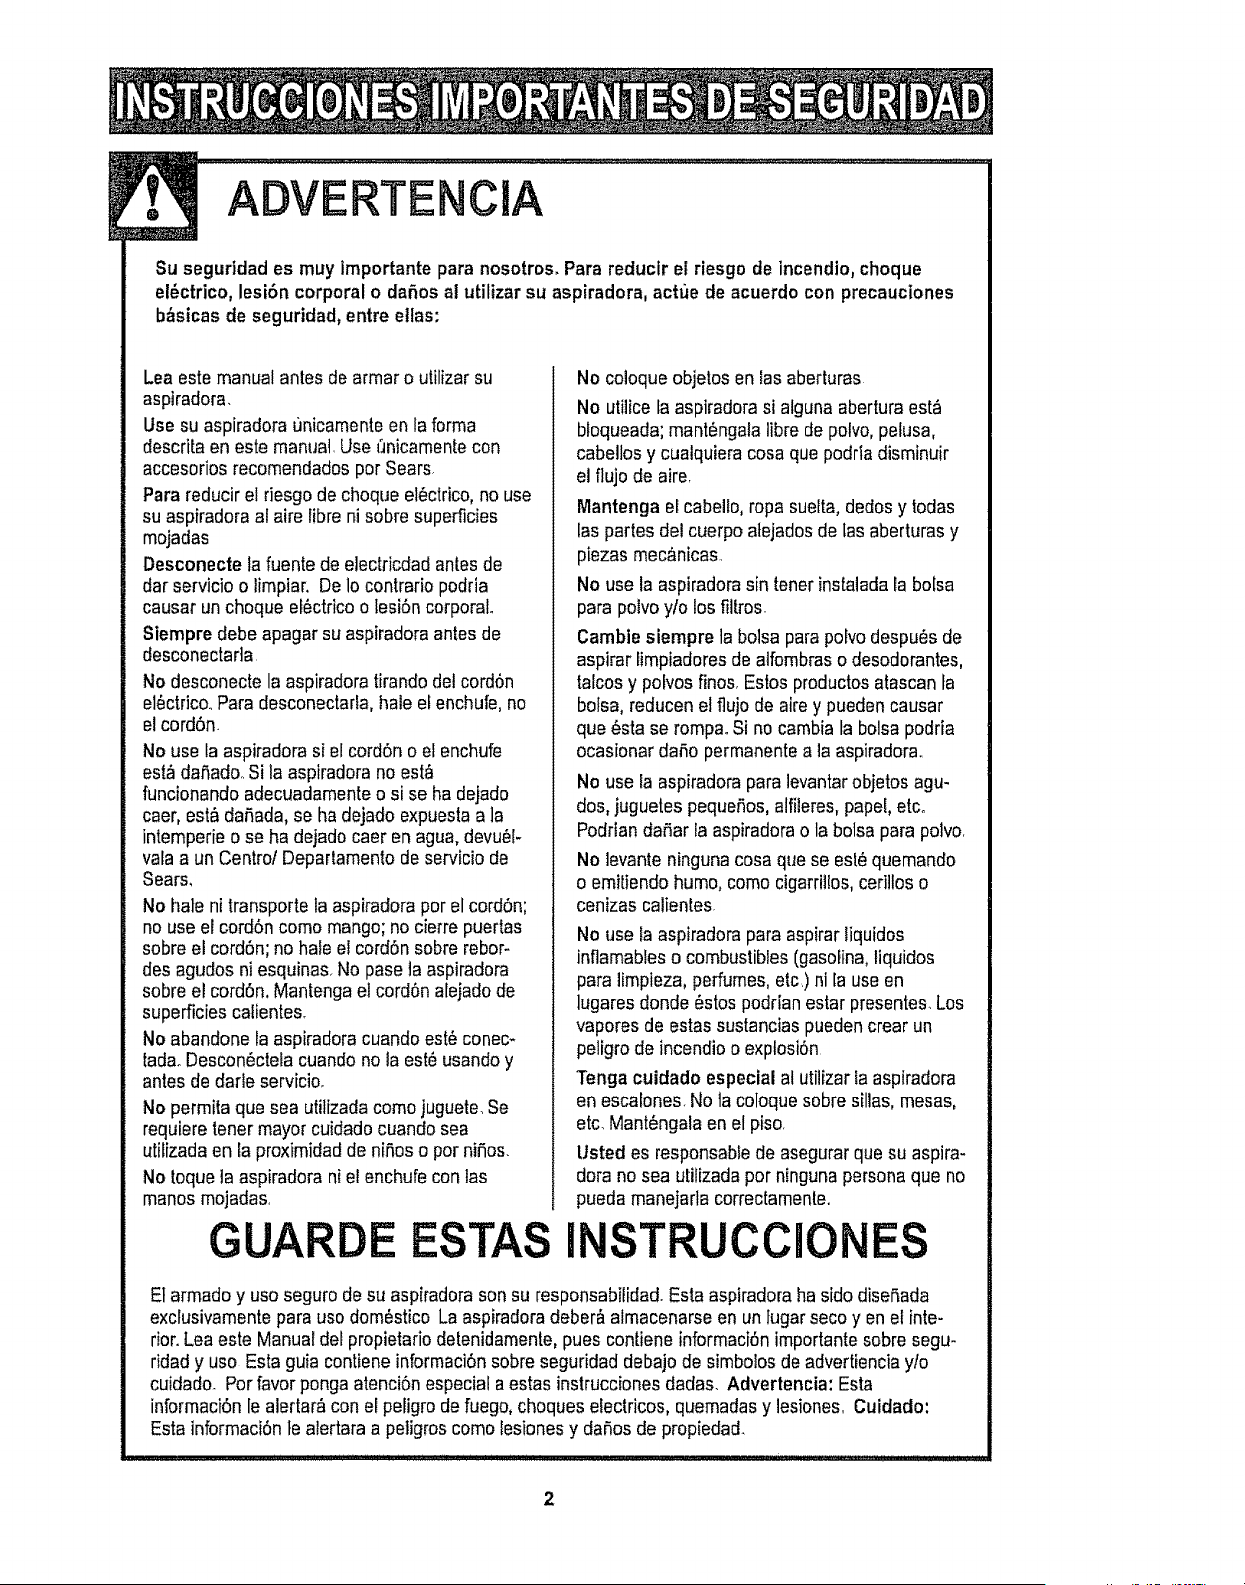
WARNING
Your safety is important to us. To reduce the risk of fire, electrical shock, injury
to persons or damage when using your vacuum cleaner, follow basic safety
precautions including the following:
Read this manual before assembling or
using your vacuum cleaner.
Use your cleaner only as described in
this manual° Use only with Sears recom-
mended attachments,
To reduce the risk of electrical shock -
Do not use outdoors or on wet sur-
faces.
Disconnect electrical supply before any
servicing or cleaning. Failure to do so
could result in electrical shock or per-
sonal injury.
Always turn cleaner off before unplug-
ging
Do not unplug by pulling on cord. To
unplug, grasp the plug, not the cord.
Do not use with damaged cord or plug.
If cleaner is not working as it should,
has been dropped, damaged, left out-
doors, or dropped into water, return it to
a Sears Service Center.
Do not pull or carry by cord, use cord
as a handle, close door on cord, or pull
cord around sharp edges or corners.
Do not run cleaner over cord. Keep cord
away from heated surfaces
Do not leave cleaner when plugged in.
Unplug from outlet when not in use and
before servicing°
Do not allow to be used as a toy. Close
attention is necessary when used by or
near children.
Do not handle plug or cleaner with wet
hands.
Do not put any objects into openings.
Do not use with any opening blocked;
keep free of dust, lint, hair and anything
that may reduce air flow
Keep hair, loose clothing, fingers, and
all parts of body away from openings
and moving part&
Do not use cleaner without dust bag
andfor filters in place°
Always change the dust bag after vacu-
uming carpet cleaners or freshener,
powders and fine dust. These products
clog the bag, reduce airflow and can
cause the bag to burst, Failure to
change bag could cause permanent
damage to the cleaner_
Do not use the cleaner to pick up sharp
hard objects, small toys, pins, paper,
etco They may damage the cleaner or
dust bag,,
Do not pick up anything that is burning
or smoking, such as cigarettes, match-
es, or hot ashes°
Do not use cleaner to pick up flamma-
ble or combustible liquids (gasoline,
cleaning fluids, perfumes, etc.), or use
in areas where they may be present.
The fumes from these substances can
create a fire hazard or explosion°
Use extra care when cleaning on stairs.
Do not put on chairs, tables, etco Keep
on floor.
You are responsible for making sure
that your vacuum cleaner is not used by
anyone unable to operate it properly.
SAVE THESE iNSTRUCTiONS
Proper assembly and safe use of your vacuum cleaner are your responsibilities. Your
cleaner is intended only for household user Read this Owner's Manual carefully for
important use and safety information.. This guide contains safety statements under
warning and caution symbols. Please pay special attention to these boxes and follow
any instructions given. WARNING statements alert you to such dangers as fire, elec-
trical shock, burns and personal injury. CAUTION statements alert you to such dan-
gers as personal injury and/or property damage
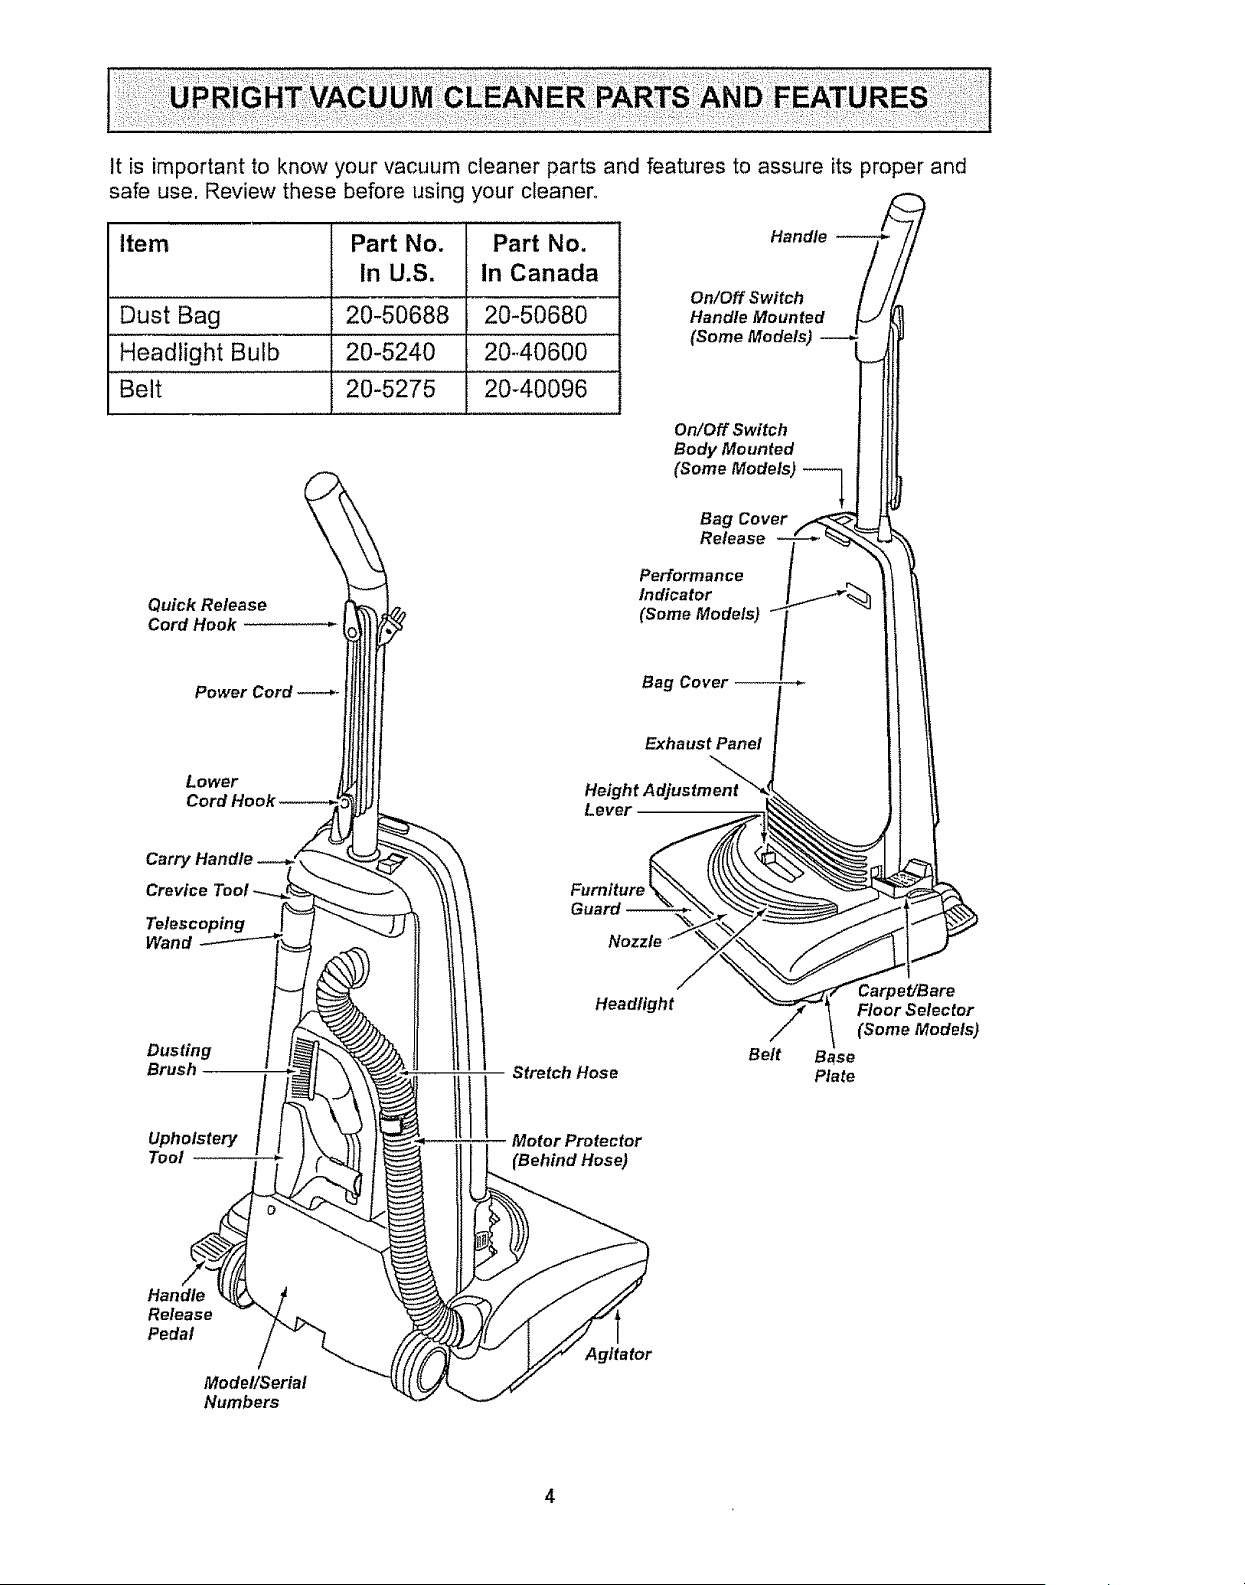
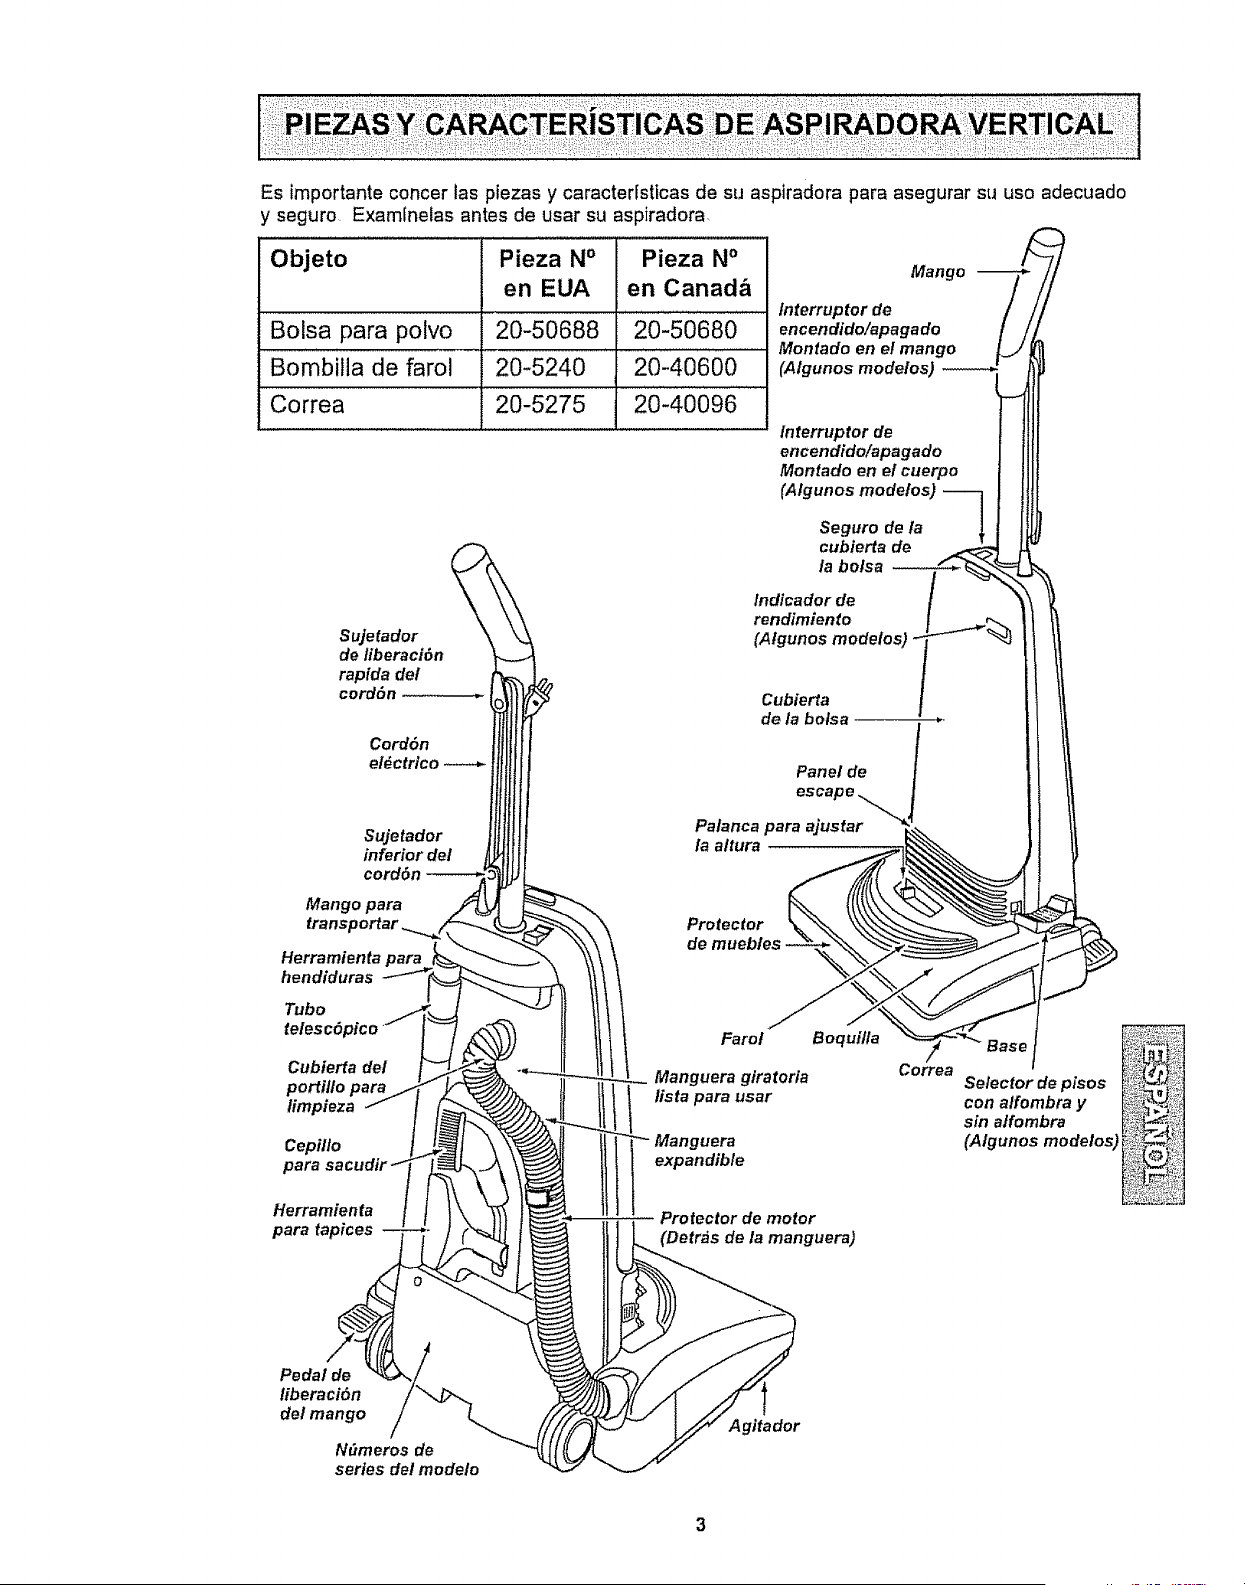
It is importantto knowyourvacuumcleanerpartsand featuresto assureits properand
safe use.Reviewthese beforeusingyour cleaner°
Item
Dust Bag
Headlight Bulb
Part No.
In U.S.
20-50688
2O-5240
Part No.
in Canada
20-50680
20,,40600
Belt 20-5275 20-40096
Handle
On/Off Switch
Handle Mounted
(Some Models)
On/Off Switch
Body Mounted
(Some Models) --_
Bag Cover
Release
Quick Release
Cord Hook
Lower
Performance
Indicator
(Some Models)
Bag Cover
Exhaust Panel
Lever
Carry
Crevice
Telescoping
Wand
Furniture
Dusting
Brush
Upholstery /
Toot
Headlight
Stretch Hose
Motor Protector
(Behind Hose)
Belt
Carpet/Bare
Floor Selector
(Some Models)
Base
Plate
Handle
Release
Pedal
!
Model/Serial
Numbers
Agitator
4
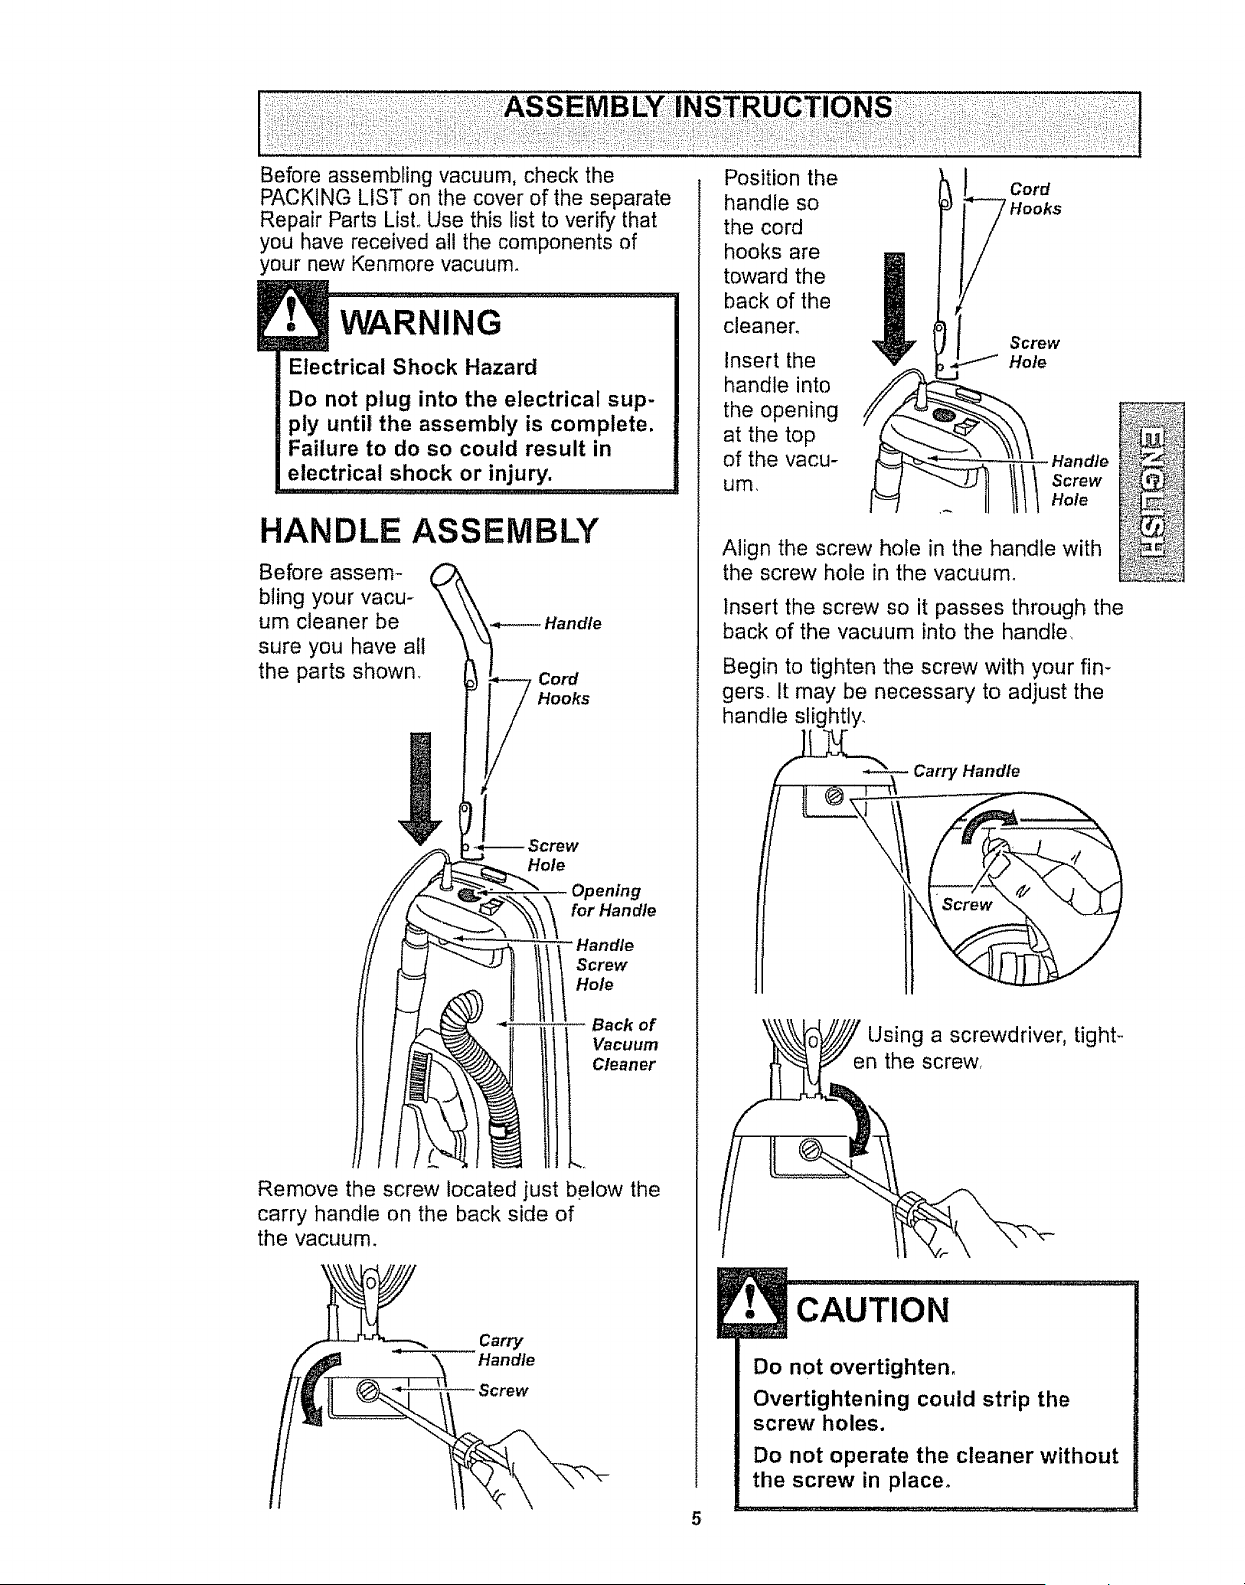
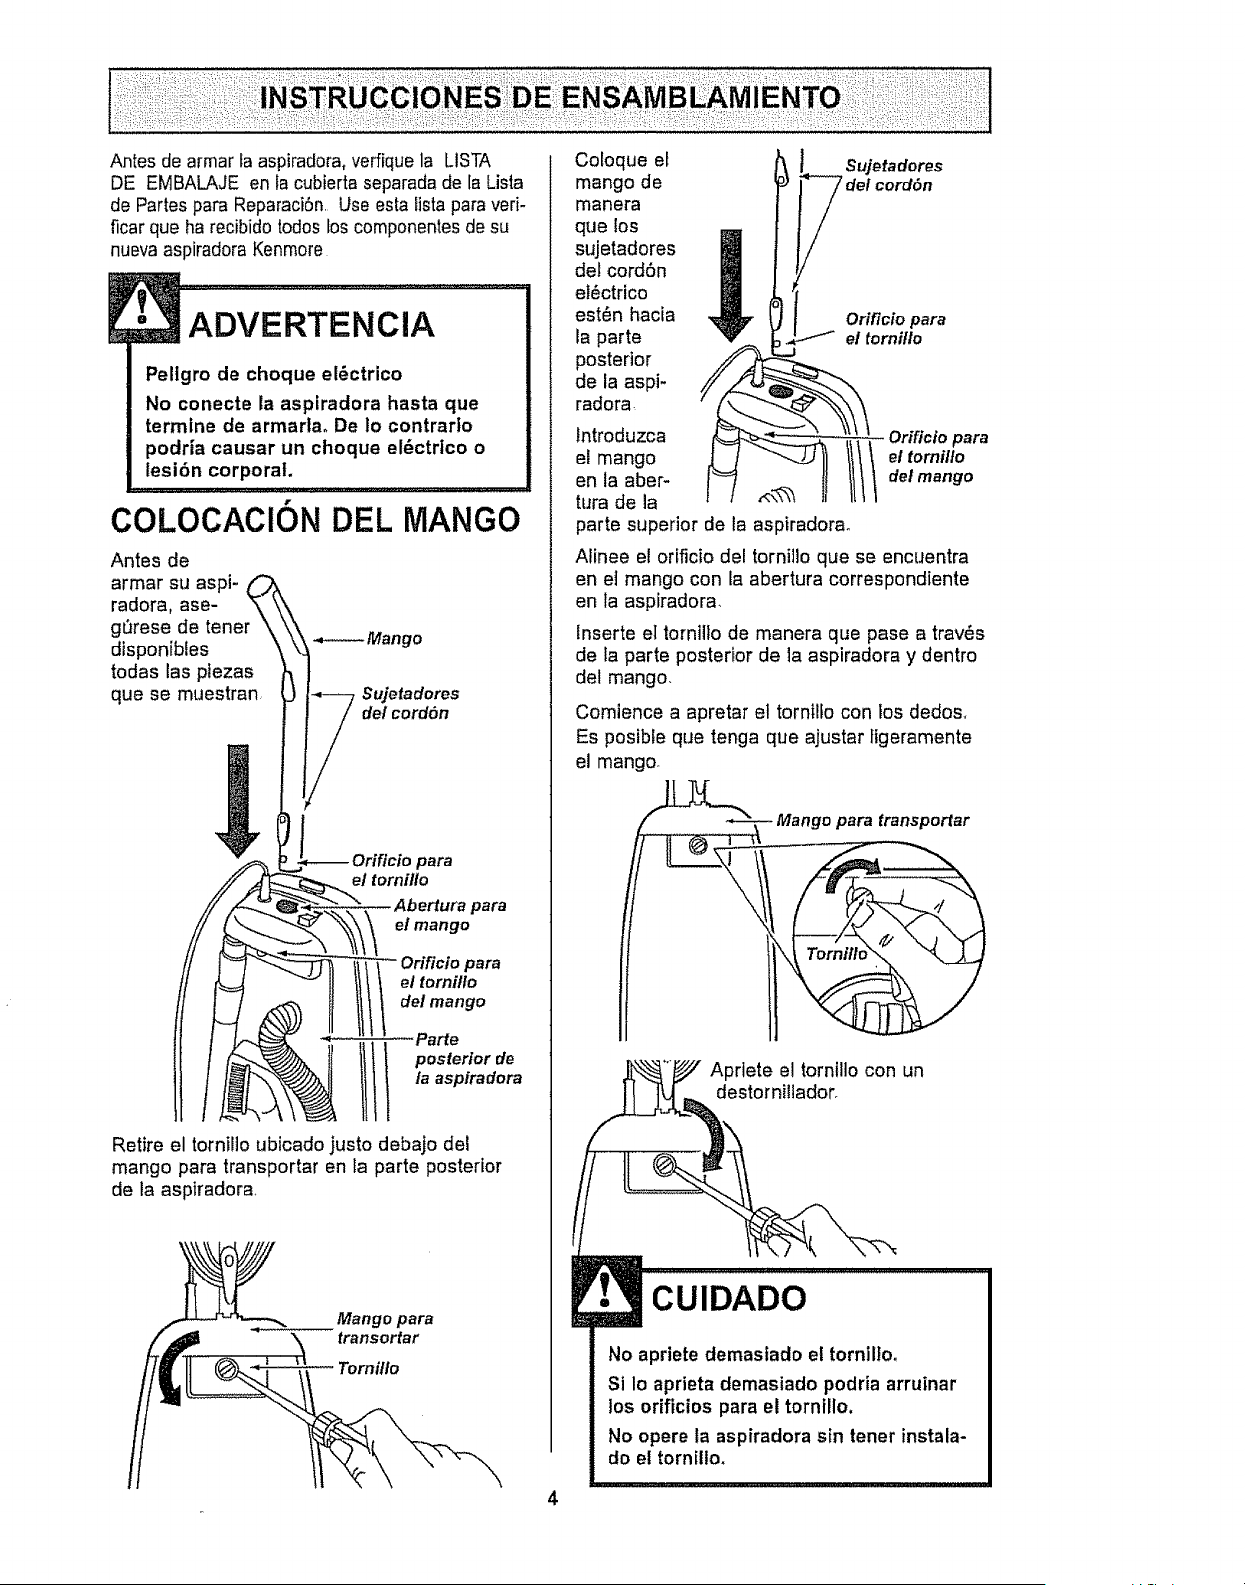
Before assembling vacuum, check the
PACKING LIST on the cover of the separate
Repair Parts LisL Use this list to verify that
you have received all the components of
your new Kenmore vacuum,
WARNING
Electrical Shock Hazard
Do not plug into the electrical sup-
ply until the assembly is complete.
Failure to do so could result in
electrical shock or injury.
,,,,,,,,,,,,,,, ,
HANDLE ASSEMBLY
Before assem- (_
biing your vacu-
um cleaner be
sure you have all
the parts shown,
Remove the screw located just below the
carry handle on the back side of
the vacuum.
Carry
Handle
Position the
handle so
the cord
hooks are
toward the
back of the
cleaner.
Insert the
handle into
the opening
at the top
of the vacu-
um,
Cord
y Hooks
Screw
Hole
_ Handte
I Screw
Hole
Align the screw hole in the handle with
the screw hole in the vacuum.
insert the screw so it passes through the
back of the vacuum into the handte
Begin to tighten the screw with your fin-
gers It may be necessary to adjust the
handle slightly,
Carny Handle
Using a screwdriver, tight-
en the screw,
CAUTION
Do not overtighten,
Overtightening could strip the
screw holes.
Do not operate the cleaner without
the screw in place°
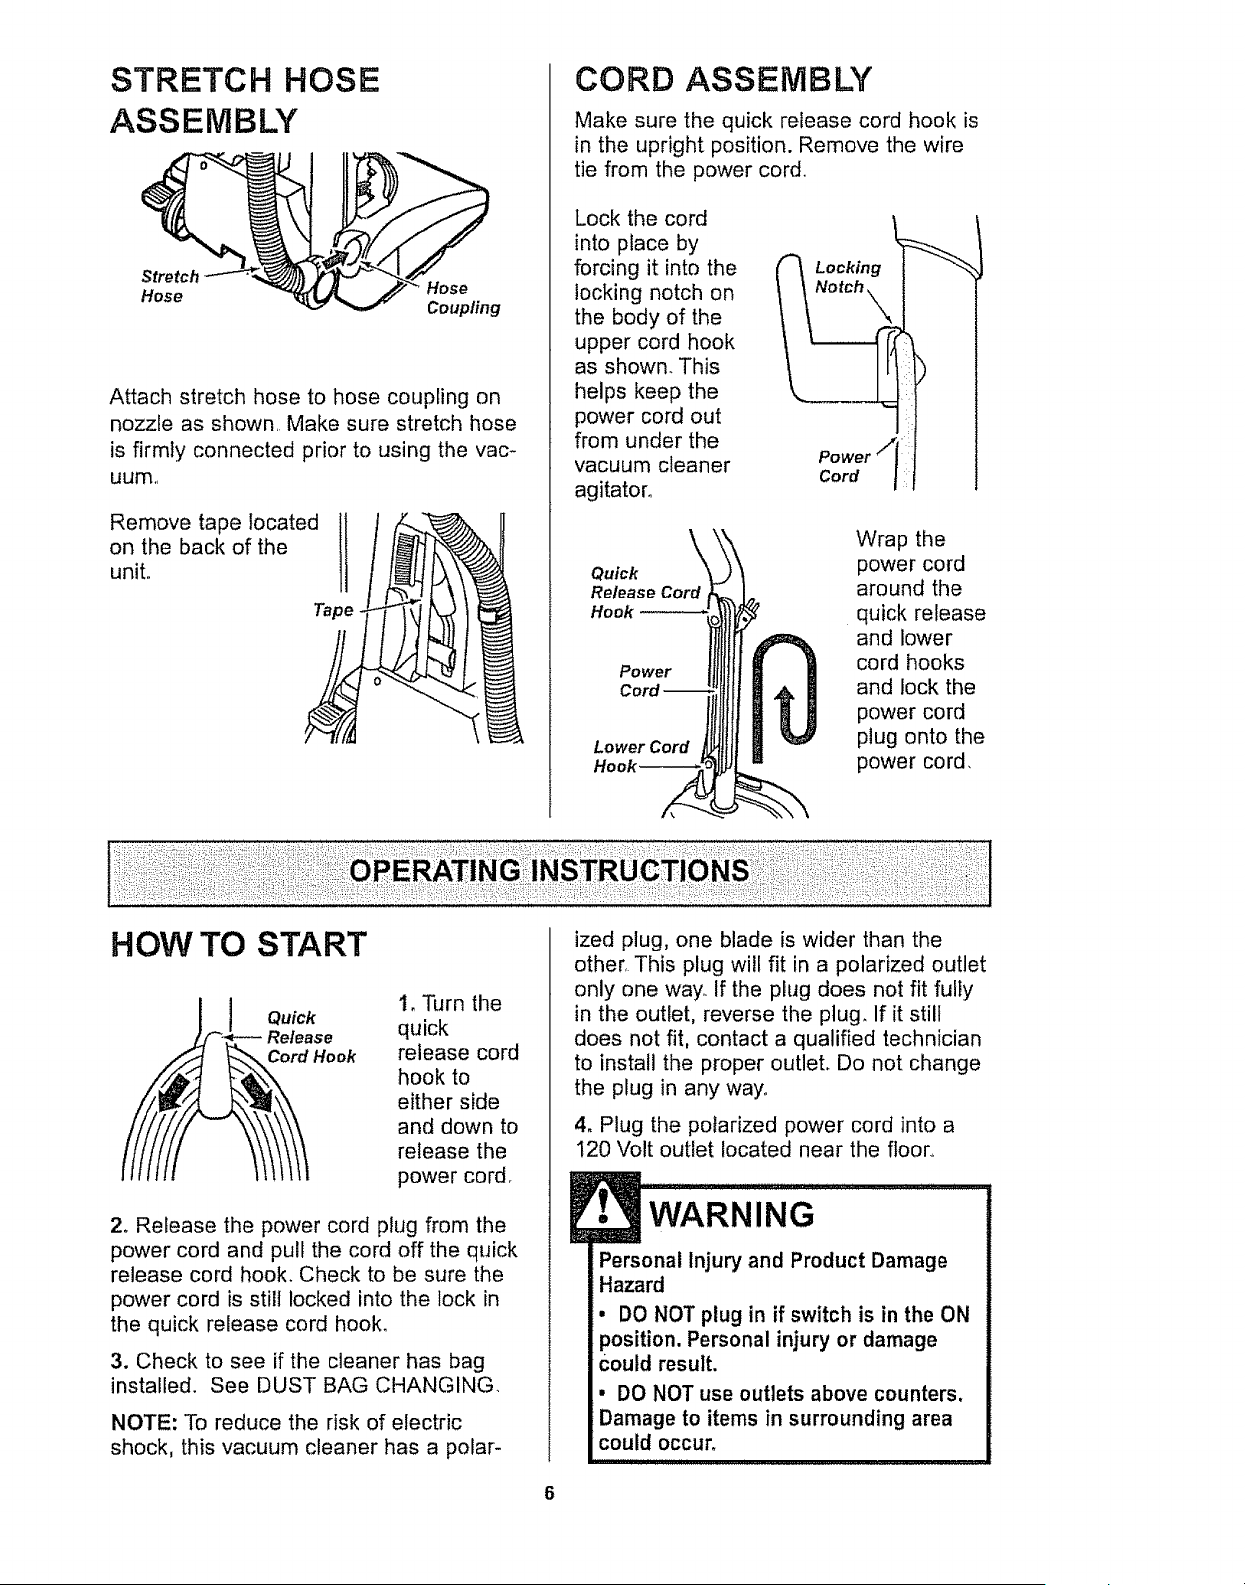
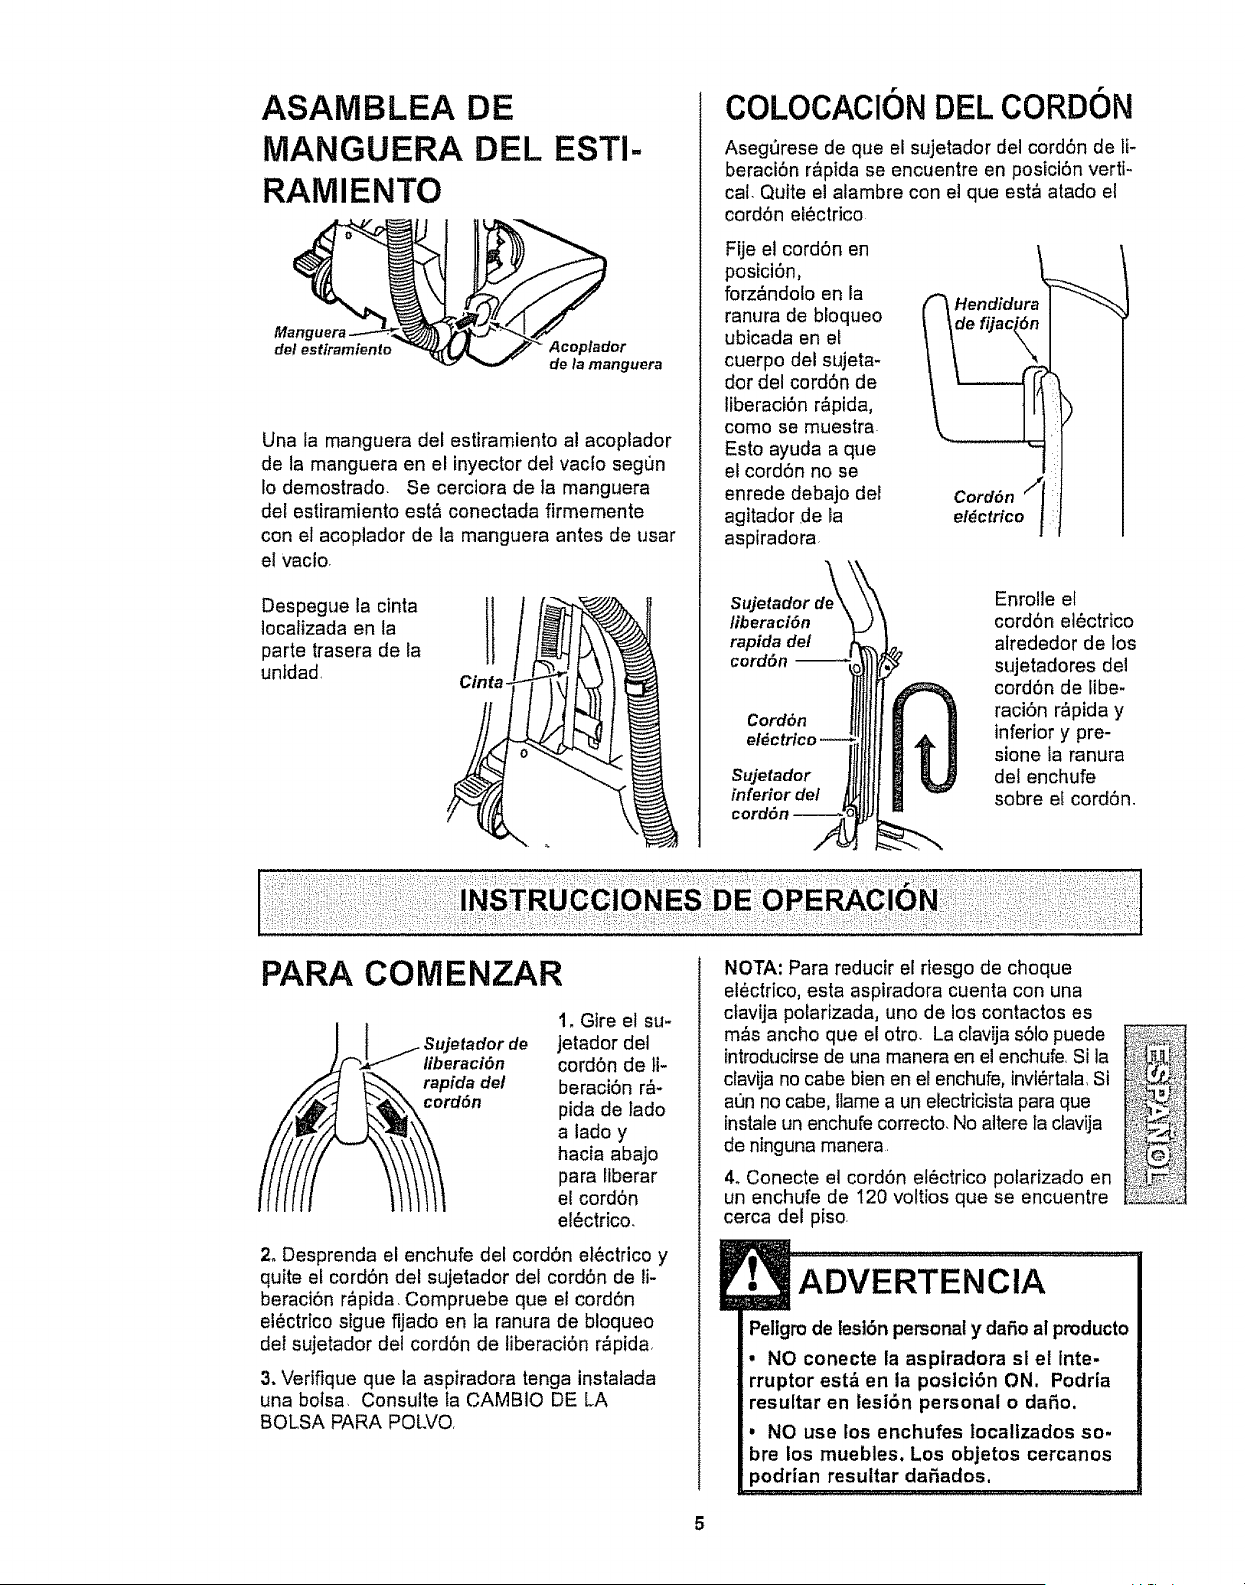
STRETCH HOSE
ASSEMBLY
Stretch
Hose
Hose
Coupling
Attach stretch hose to hose coupling on
nozzle as shown Make sure stretch hose
is firmly connected prior to using the vac-
uum,
Removeta eocatodII
on the back of the
unit.
Tape
CORD ASSEMBLY
Make sure the quick release cord hook is
in the upright position. Remove the wire
tie from the power cord
Lock the cord
into place by
forcing it into the
locking notch on
the body of the
upper cord hook
as shown. This
helps keep the
power cord out
from under the
vacuum cleaner
agitator°
Locking
Power ! I
Cord
\
Quick
Release Cord
Hook
Power
Lower Cord
Wrap the
power cord
around the
quick release
and lower
cord hooks
and lock the
power cord
plug onto the
power cord,
HOW TO START
Quick
Cord Hook
I, Turn the
quick
release cord
hook to
either side
and down to
release the
power cord
2. Release the power cord plug from the
power cord and pull the cord off the quick
release cord hook. Check to be sure the
power cord is still locked into the lock in
the quick release cord hook.
3. Check to see if the cleaner has bag
installed. See DUST BAG CHANGING.
NOTE: To reduce the risk of electric
shock, this vacuum cleaner has a polar-
ized plug, one blade is wider than the
other, This plug will fit in a polarized outlet
only one way. If the plug does not fit fully
in the outlet, reverse the plug. If it still
does not fit, contact a qualified technician
to install the proper outlet. Do not change
the plug in any way.
4. Plug the polarized power cord into a
120 Volt outlet located near the floor,,
Personal Injury and Product Damage
Hazard
, DO NOT plug in if switch is in the ON
position. Personal injury or damage
Could result.
, DO NOT use outlets above counters,
Damage to items in surrounding area
could occur,
6
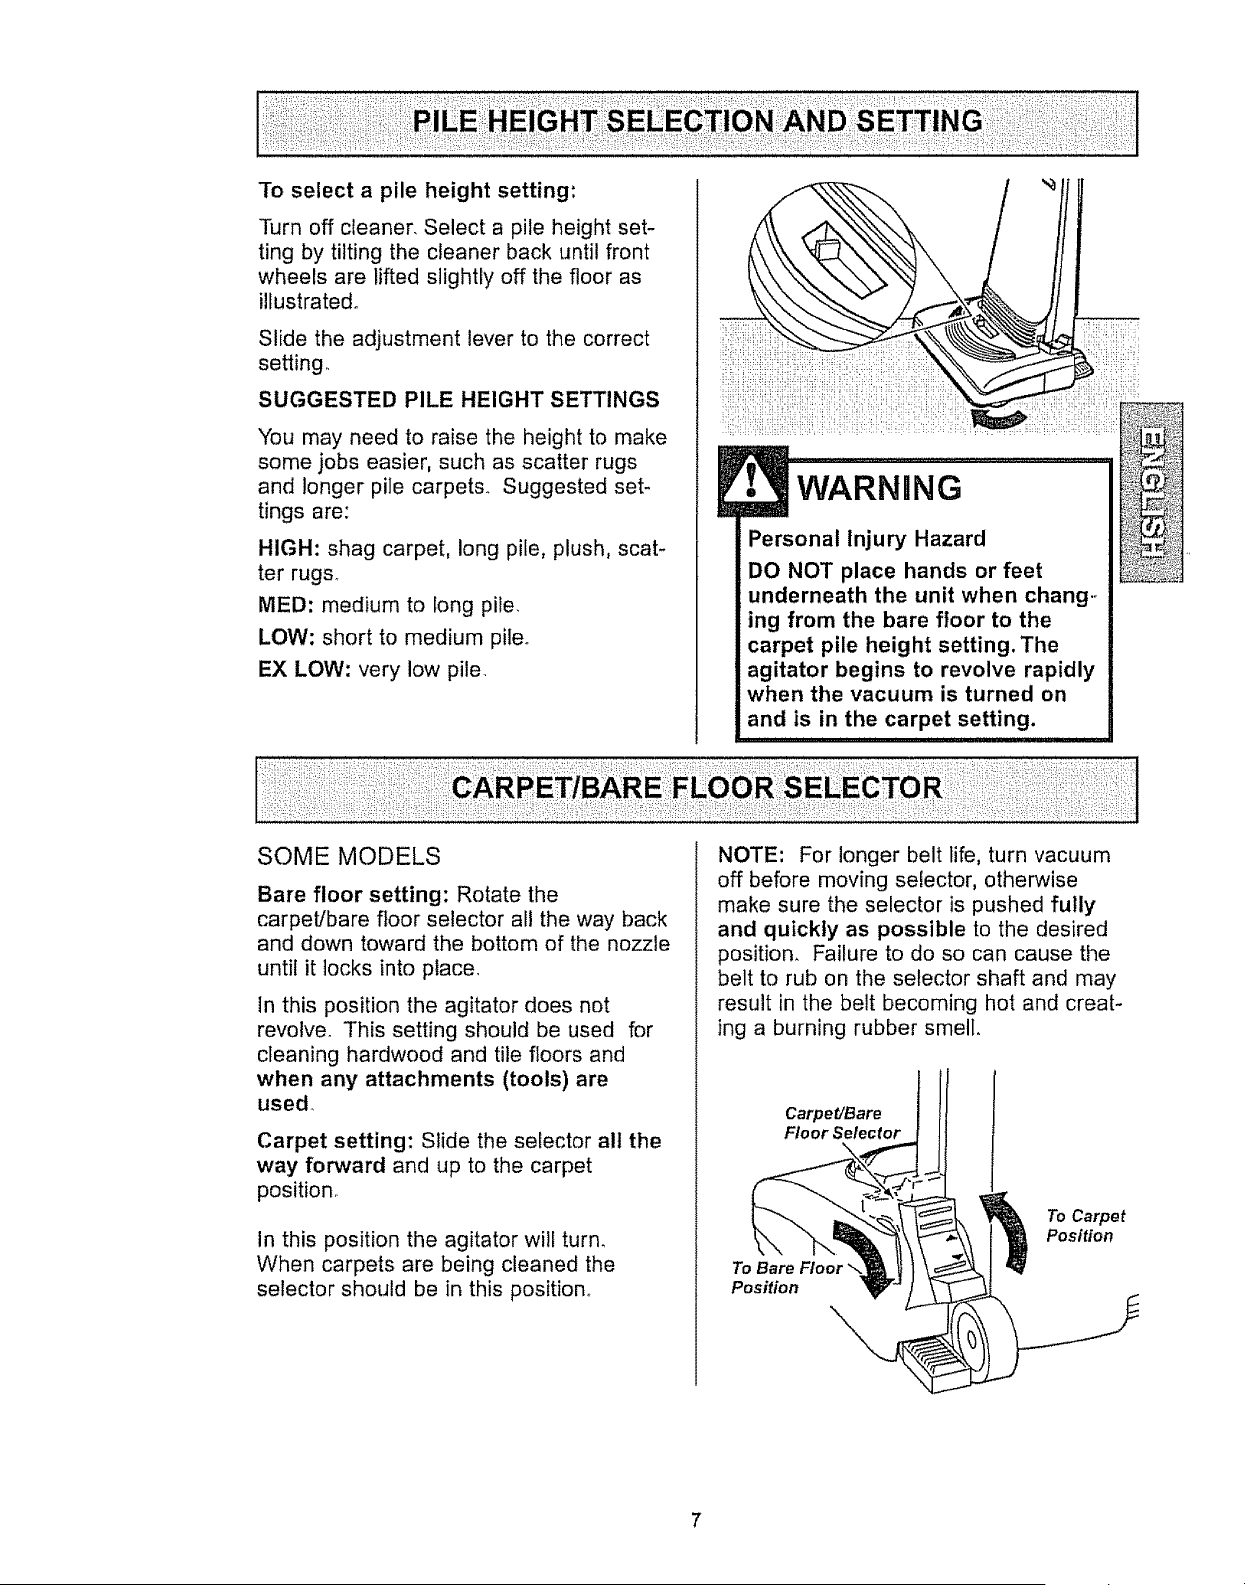
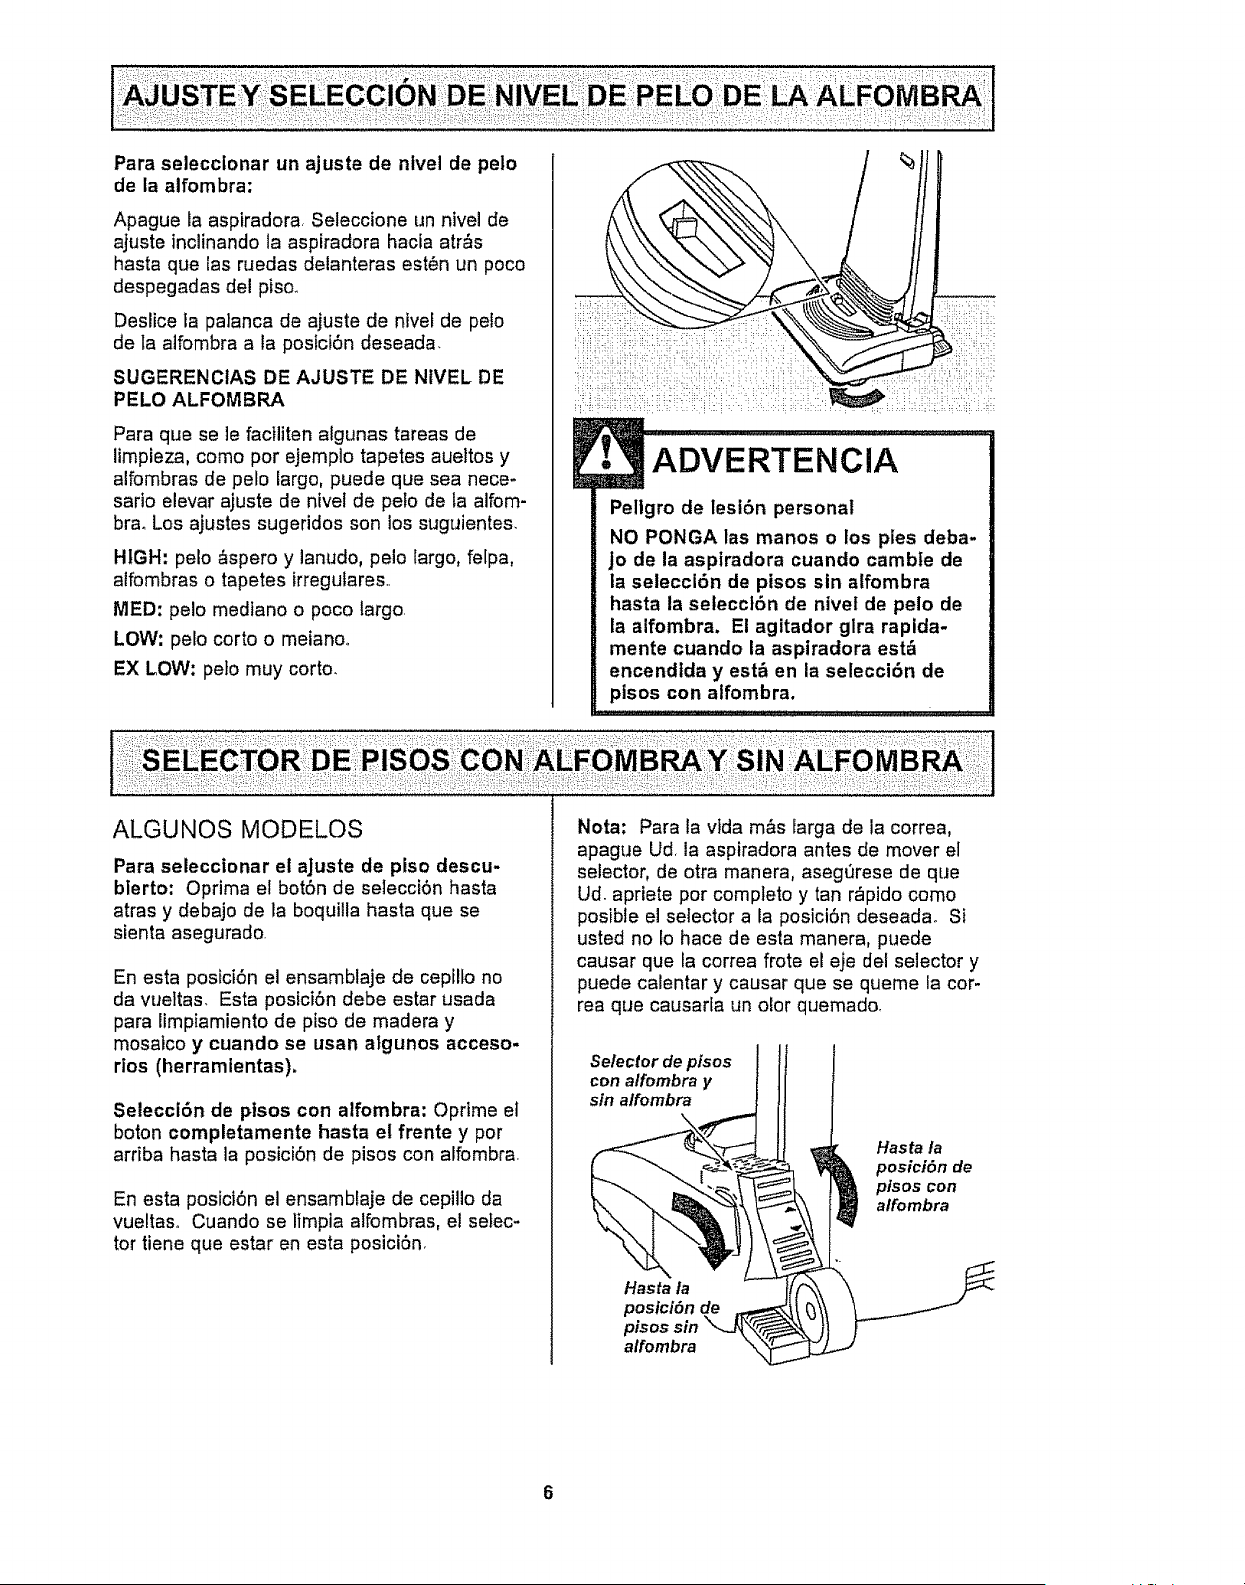
To select a pile height setting:
Turn off cleaner. Select a pile height set-
ting by tilting the cleaner back until front
wheels are lifted slightly off the floor as
illustrated.
Slide the adjustment lever to the correct
setting.
SUGGESTED PILE HEIGHT SETTINGS
You may need to raise the height to make
some jobs easier, such as scatter rugs
and longer pile carpets° Suggested set-
tings are:
HIGH: shag carpet, long pile, plush, scat*
ter rugs_
MED: medium to long pile.
LOW: short to medium pile.
EX LOW: very low pile.
E
Personal Injury Hazard
DO NOT place hands or feet
underneath the unit when chang,.
ing from the bare floor to the
carpet pile height setting. The
agitator begins to revolve rapidly
when the vacuum is turned on
and is in the carpet setting.
i i i ,, i i i i i ul ................................ i i
SOME MODELS
Bare floor setting: Rotate the
carpet/bare floor selector all the way back
and down toward the bottom of the nozzle
until it locks into place
In this position the agitator does not
revolve_ This setting should be used for
cleaning hardwood and tile floors and
when any attachments (tools) are
used
Carpet setting: Slide the selector all the
way forward and up to the carpet
position°
In this position the agitator will turn_
When carpets are being cleaned the
selector should be in this position..
NOTE: For longer belt life, turn vacuum
off before moving selector, otherwise
make sure the selector is pushed fully
and quickly as possible to the desired
position. Failure to do so can cause the
belt to rub on the selector shaft and may
result in the belt becoming hot and creat-
ing a burning rubber smell.
Carpet/Bare
Floor Selector
To Bare
Position
To Carpet
Position
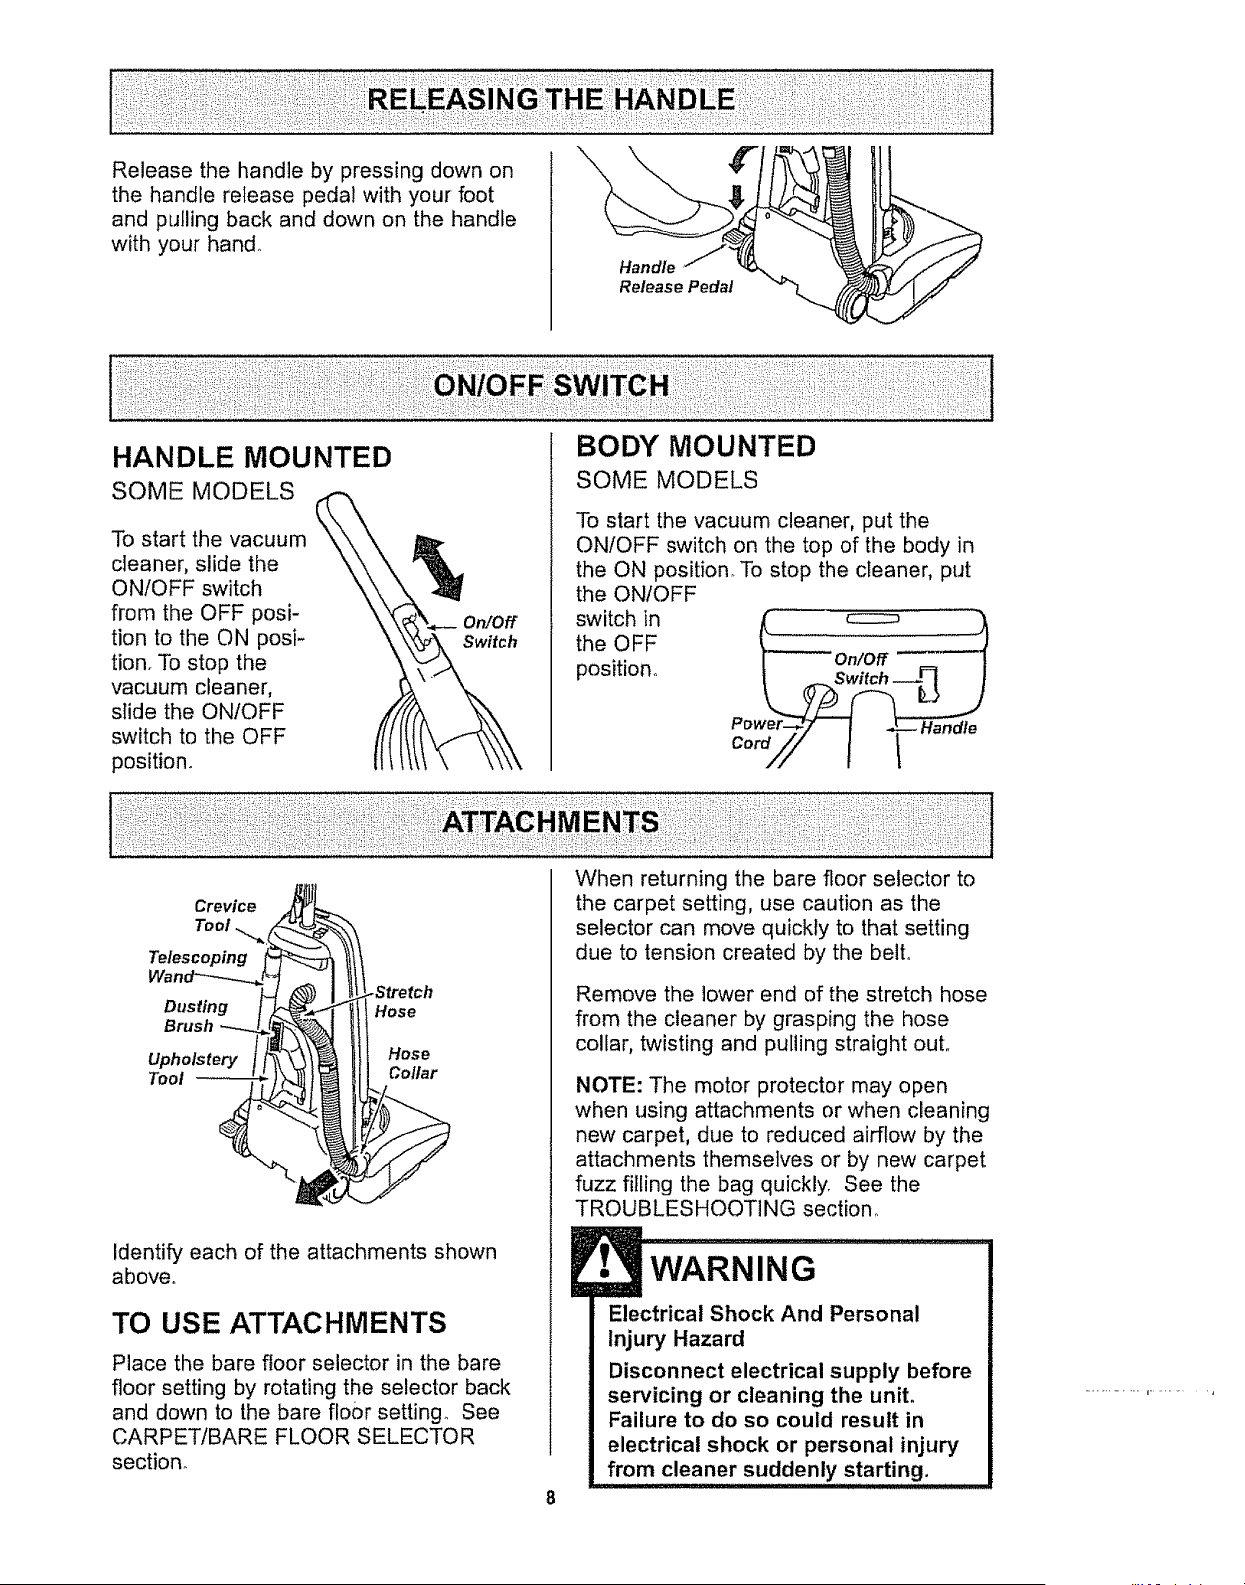
Release the handle by pressing down on
the handle release pedal with your foot
and pulling back and down on the handle
with your hand,,
Handle ,/'
Release Pedal
HANDLE MOUNTED
SOME MODELS
To start the vacuum
cleaner, slide the
ON/OFF switch
from the OFF posi-
tion to the ON posi-
tion. To stop the
vacuum cleaner,
slide the ON/OFF
switch to the OFF
position.
BODY MOUNTED
SOME MODELS
To start the vacuum cleaner, put the
ON/OFF switch on the top of the body in
the ON position. To stop the cleaner, put
the ON/OFF
switch in
the OFF
position°
Crevice
Tool
Telescoping
Dusting
Brush
Upholstery
Tool
.Stretch
Hose
Hose
Collar
identify each of the attachments shown
above°
TO USE ATTACHMENTS
Place the bare floor selector in the bare
floor setting by rotating the selector back
and down to the bare floor setting See
CARPET/BARE FLOOR SELECTOR
section
When returning the bare floor selector to
the carpet setting, use caution as the
selector can move quickly to that setting
due to tension created by the bell
Remove the lower end of the stretch hose
from the cleaner by grasping the hose
collar, twisting and pulling straight out.
NOTE: The motor protector may open
when using attachments or when cleaning
new carpet, due to reduced airflow by the
attachments themselves or by new carpet
fuzz filling the bag quickly. See the
TROUBLESHOOTING section°
Electrical Shock And Personal
Injury Hazard
Disconnect electrical supply before
servicing or cleaning the unit.
Failure to do so could result in
electrical shock or personal injury
from cleaner suddenly starting.
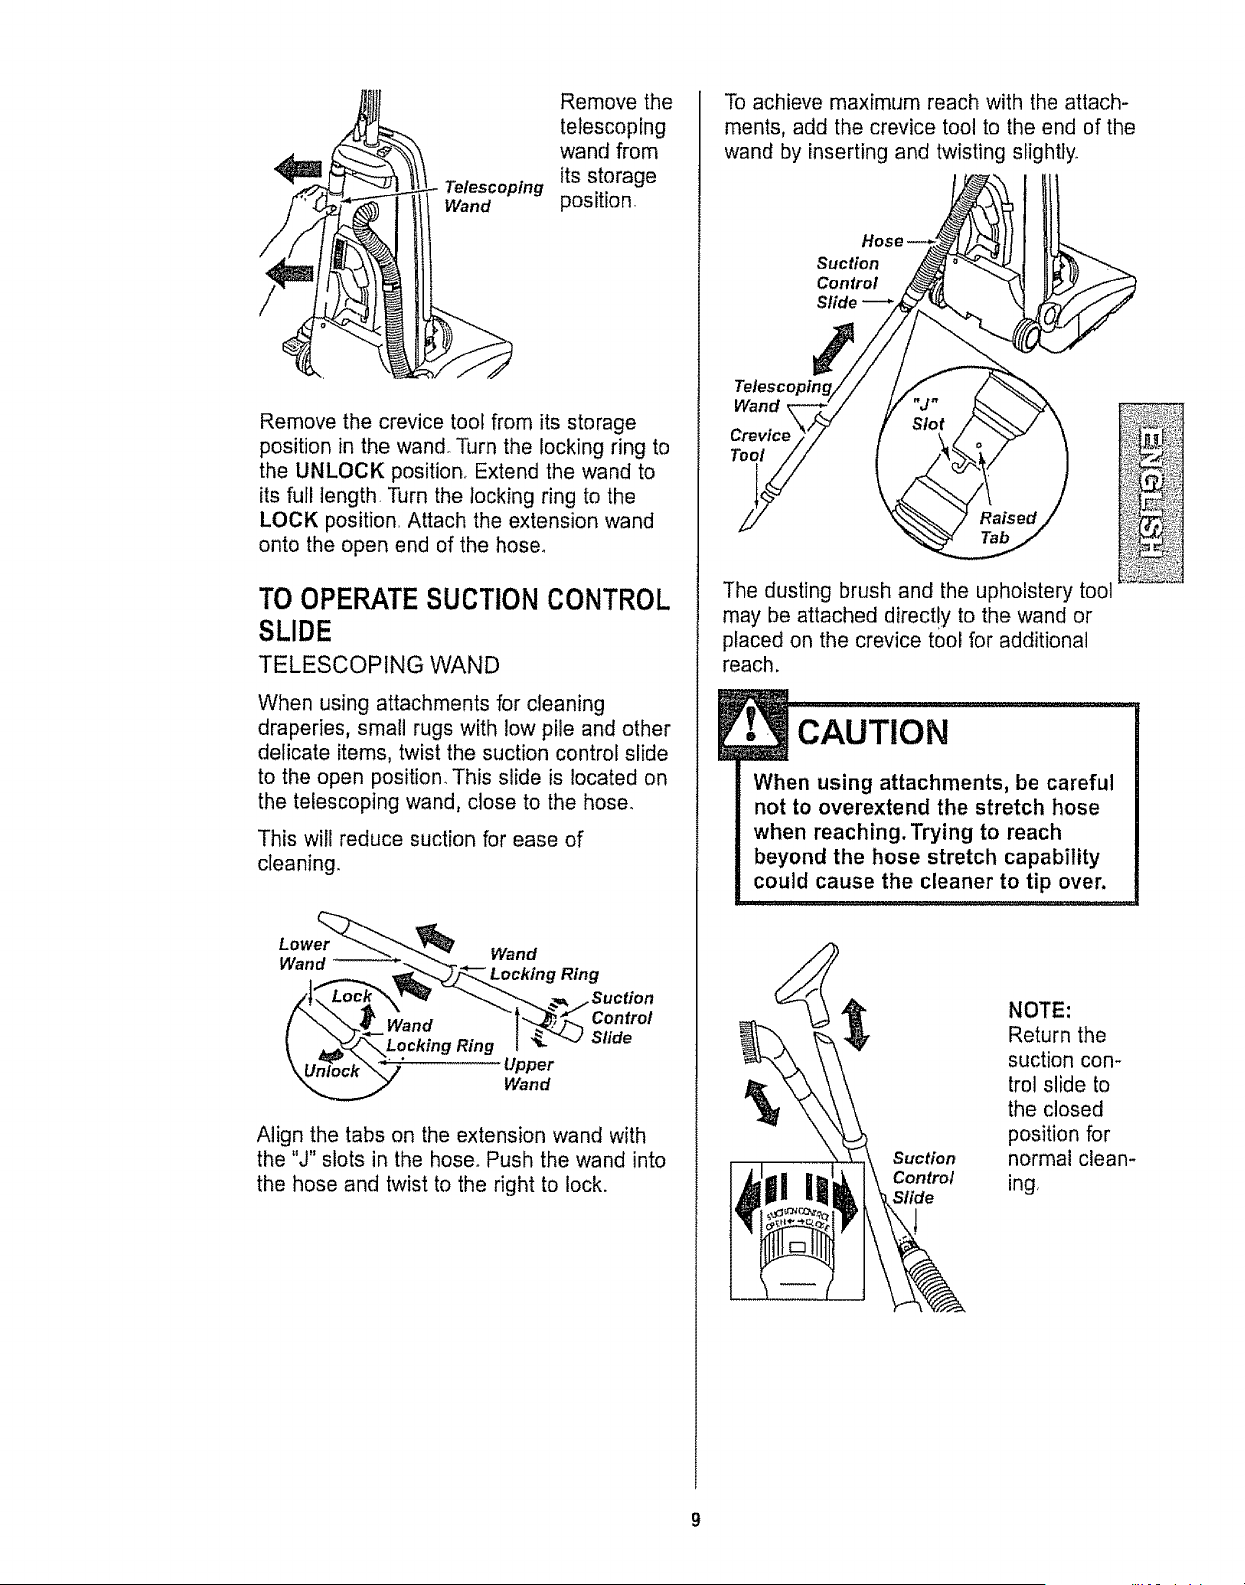
Telescoping
Wand
Remove the
telescoping
wand from
its storage
position
Remove the crevice tool from its storage
position in the wand_ Turn the locking ring to
the UNLOCK position. Extend the wand to
its full length. Turn the locking ring to the
LOCK position. Attach the extension wand
onto the open end of the hose°
TO OPERATESUCTION CONTROL
SLIDE
TELESCOPING WAND
When using attachments for cleaning
draperies, small rugs with low pile and other
delicate items, twist the suction control slide
to the open position This slide is located on
the telescoping wand, close to the hose.
This will reduce suction for ease of
cleaning.
Lower
Wand
Wand
Locking Ring
.Suction
Control
Slide
Upper
Wand
Align the tabs on the extension wand with
the "J" slots in the hose. Push the wand into
the hose and twist to the right to lock.
To achieve maximum reach with the attach-
ments, add the crevice tool to the end of the
wand by inserting and twisting slightly°
Hose
Suction
Control
Slide
Wand
Crevice
Tool
The dusting brush and the upholstery tool
may be attached direct!y to the wand or
placed on the crevice tool for additional
reach.
When using attachments, be careful
not to overextend the stretch hose
when reaching. Trying to reach
beyond the hose stretch capability
could cause the cleaner to tip over.
Suction
Control
Slide
NOTE:
Return the
suction con-
trol slide to
the closed
position for
normal clean-
ing.

TO STORE ATTACHMENTS
Remove dusting brush or upholstery tool,,
Snap into appropriate storage location.,
Remove crevice tool from the wand by
twisting, Lay aside,
Remove the extension wand from the
hose. Twist the wand to the left and pull
from the hose end,,
Wand
T- Lo kJng
......1'\ Ri.g
Unlock the wand by turning the wand
locking ring to the UNLOCK position°
Slide the lower wand into the upper wand.
Turn the wand locking ring to the LOCK
position°
Place the crevice tool down into the com-
pressed wand. Snap into the appropriate
storage location.
Be sure the unit is turned off,, Reinsert the
hose fully into the opening on the lower
body from which it was removed, Press
firmly to assure connection.
Personal Injury Hazard
DO NOT place hands or feet under-
neath the unit when inserting the
hose, The agitator begins to
revolve rapidly when the vacuum is
turned on,
DO NOT pull the vacuum cleaner
around the room by the hose.
Property damage could result,
TO USE EXTENSION HOSE
SOME MODELS
The stretch hose attached to the vacuum
cleaner has two "J" shaped slots in the
end where attachments fit,,
Unit Hose t
Extension Hose
The extension hose has two tabs on the
end that can be pushed into the slots and
twisted to attach the two hoses together.
Attachments and the telescoping wand
can be attached to the other end of the
extension hose for additional reach.
If your model did not come with an
extension hose, you can purchase one at
any SEARS retail store with part number
20-52571,_ In Canada 20-40975.
• CAUTiON ................
When using the regular hose or
with the extension hose attached,
the cleaner should be on a solid
surface on the same level or below
the level of the user's feet, DO NOT
use the hoses when the cleaner is
above the level of the user's feet.
CLEANING AREA
Between
ATTACHMENT Furniture* Cushions* Drapes* Stairs Walls
DUSTING BRUSH _ X X X
CREVICE TOOL _ X X X
FABRIC BRUSH _ X X X
*Always Cleanattachments before using on fabrics,
10
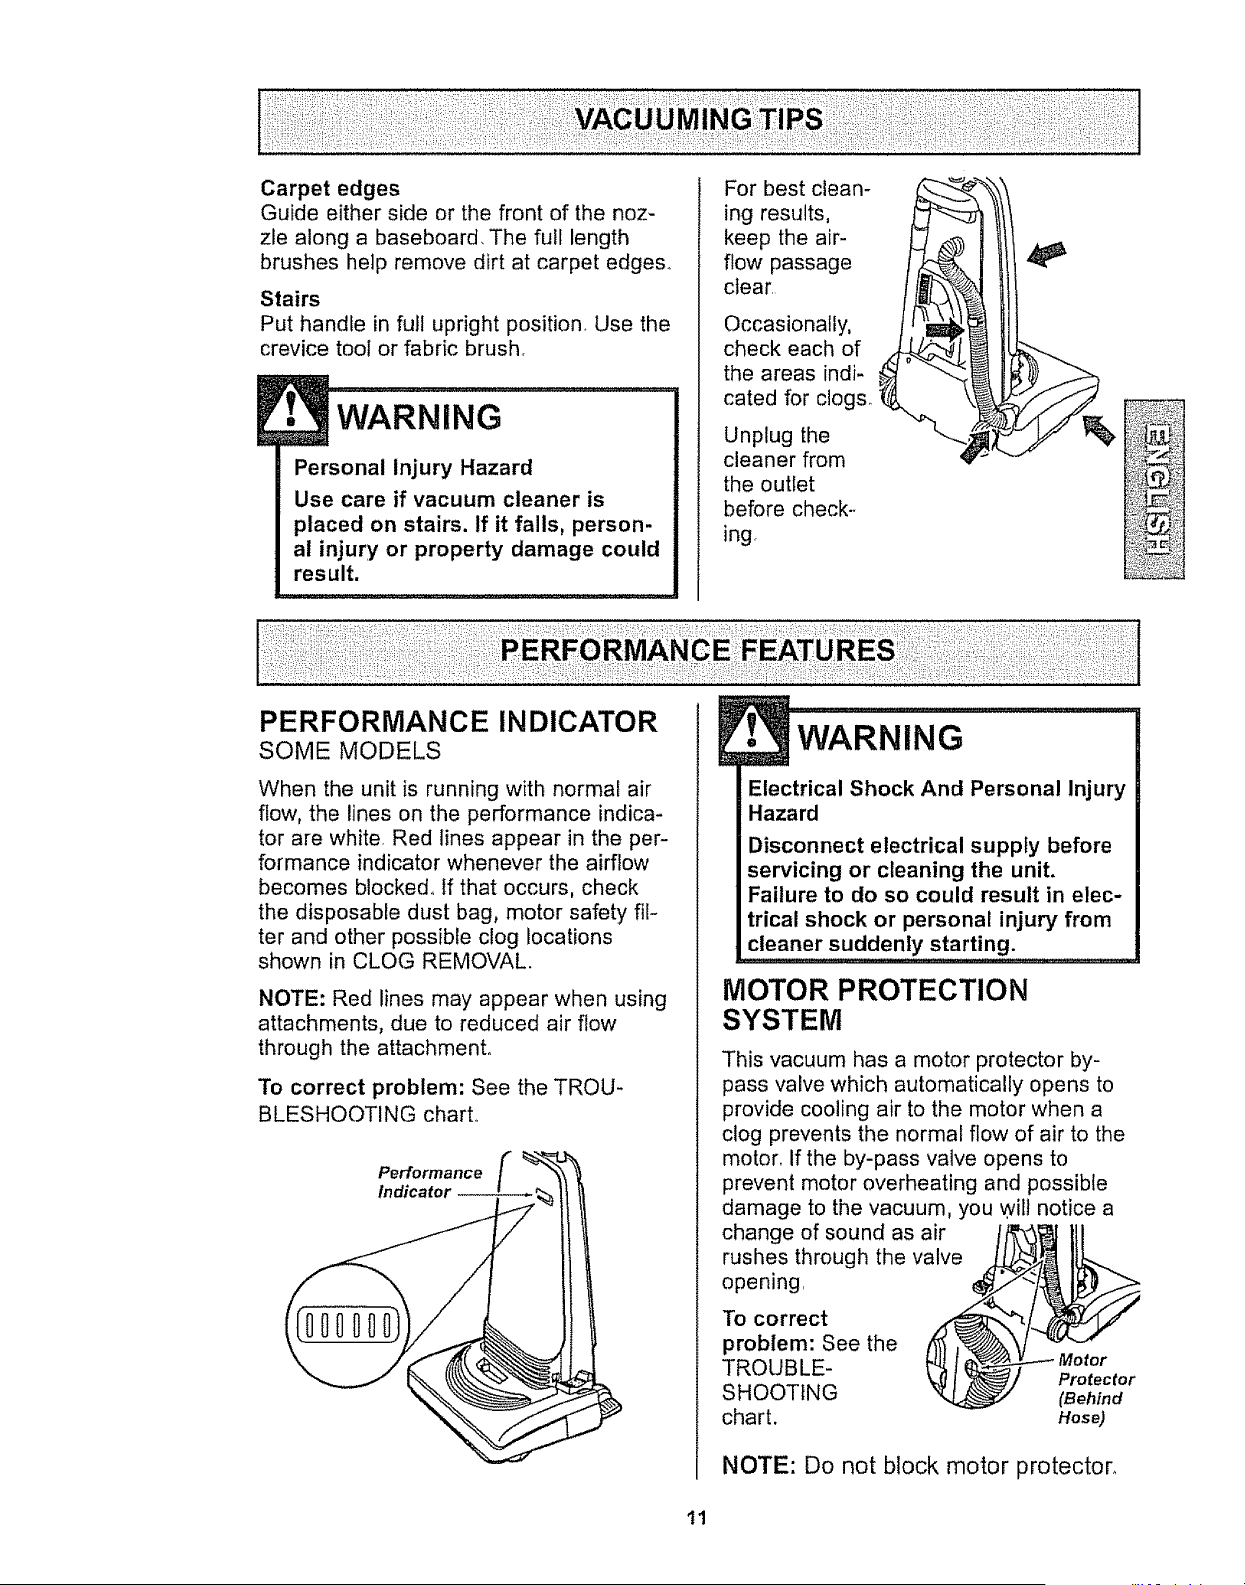
Carpet edges
Guideeitherside or the front of the noz-
zle along a baseboard. The full length
brushes help remove dirt at carpet edge&
Stairs
Put handle in full upright position. Use the
crevice tool or fabric brush.
Personal Injury Hazard
Use care if vacuum cleaner is
placed on stairs. If it falls, person-
al injury or property damage could
result.
For best clean-
ing results,
keep the air-
flow passage
clear
Occasionally,
check each of .4
the areas indi-
cated for clogs.
Unplug the
cleaner from
the outlet
before check--
ingo
PERFORMANCE INDICATOR
SOME MODELS
When the unit is running with normal air
flow, the lines on the performance indica-
tor are white Red lines appear in the per-
formance indicator whenever the airflow
becomes blocke& If that occurs, check
the disposable dust bag, motor safety fil-
ter and other possible clog locations
shown in CLOG REMOVAL.
NOTE: Red lines may appear when using
attachments, due to reduced air flow
through the attachment.
To correct problem: See the TROU-
BLESHOOTING chart..
Performance
Indicator
Electrical Shock And Personal Injury
Hazard
Disconnect electrical supply before
servicing or cleaning the unit.
Failure to do so could result in elec-
trical shock or personal injury from
cleaner suddenly starting.
MOTOR PROTECTION
SYSTEM
This vacuum has a motor protector by-
pass valve which automatically opens to
provide cooling air to the motor when a
clog prevents the normal flow of air to the
moron If the by-pass valve opens to
prevent motor overheating and possible
damage to the vacuum, you wiIl notice a
change of sound as air
rushes through the valve
opening
To correct
problem: See the
TROUBLE-
Protector
SHOOTING (Behind
chart. Hose)
NOTE: Do not block motor protector,
11
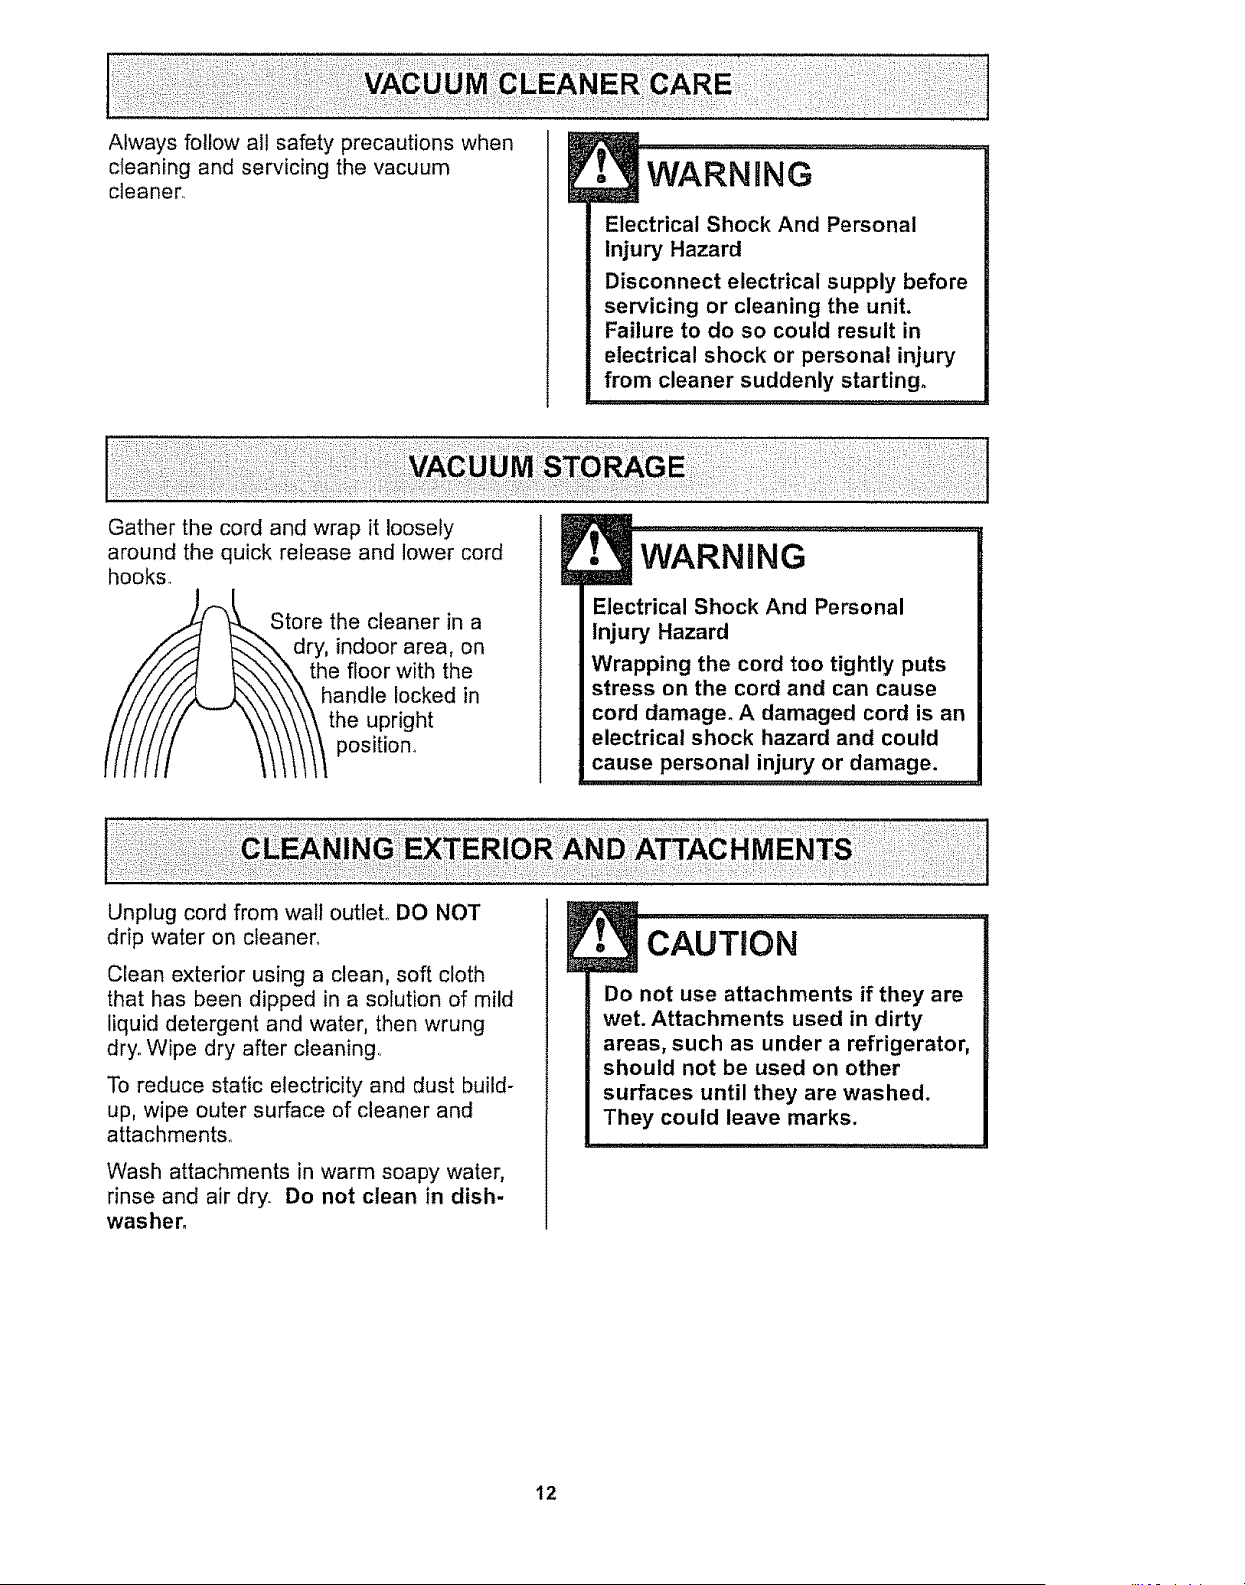
Always follow alt safety precautions when
cleaning and servicing the vacuum
cleaner,
, WARNING
Electrical Shock And Personal
Injury Hazard
Disconnect electrical supply before
servicing or cleaning the unit.
Failure to do so could result in
electrical shock or personal injury
from cleaner suddenly starting.
Gather the cord and wrap it loosely
around the quick release and lower cord
hooks_
_,.. Store the cleaner in a
/_ _-_-,_...dry, indoor area, on
_ J/,_ _.._--\"._,\the floor with the
_4/,.._._\\\ handle locked in
/ \_\\\\\\ the upright
!• wARNiNG.......
Electrical Shock And Personal
Injury Hazard
Wrapping the cord too tightly puts
stress on the cord and can cause
cord damage. A damaged cord is an
electrical shock hazard and could
cause personal injury or damage.
Unplug cord from wall outleL DO NOT
drip water on cleaner.
Clean exterior using a clean, soft cloth
that has been dipped in a solution of mild
liquid detergent and water, then wrung
dry° Wipe dry after cleaning,
To reduce static electricity and dust build-
up, wipe outer surface of cleaner and
attachments°
Wash attachments in warm soapy water,
rinse and air dry. Do not clean in dish-
washer,
• CAUTION
Do not use attachments if they are
wet. Attachments used in dirty
areas, such as under a refrigerator,
should not be used on other
surfaces until they are washed.
They could leave marks.
12
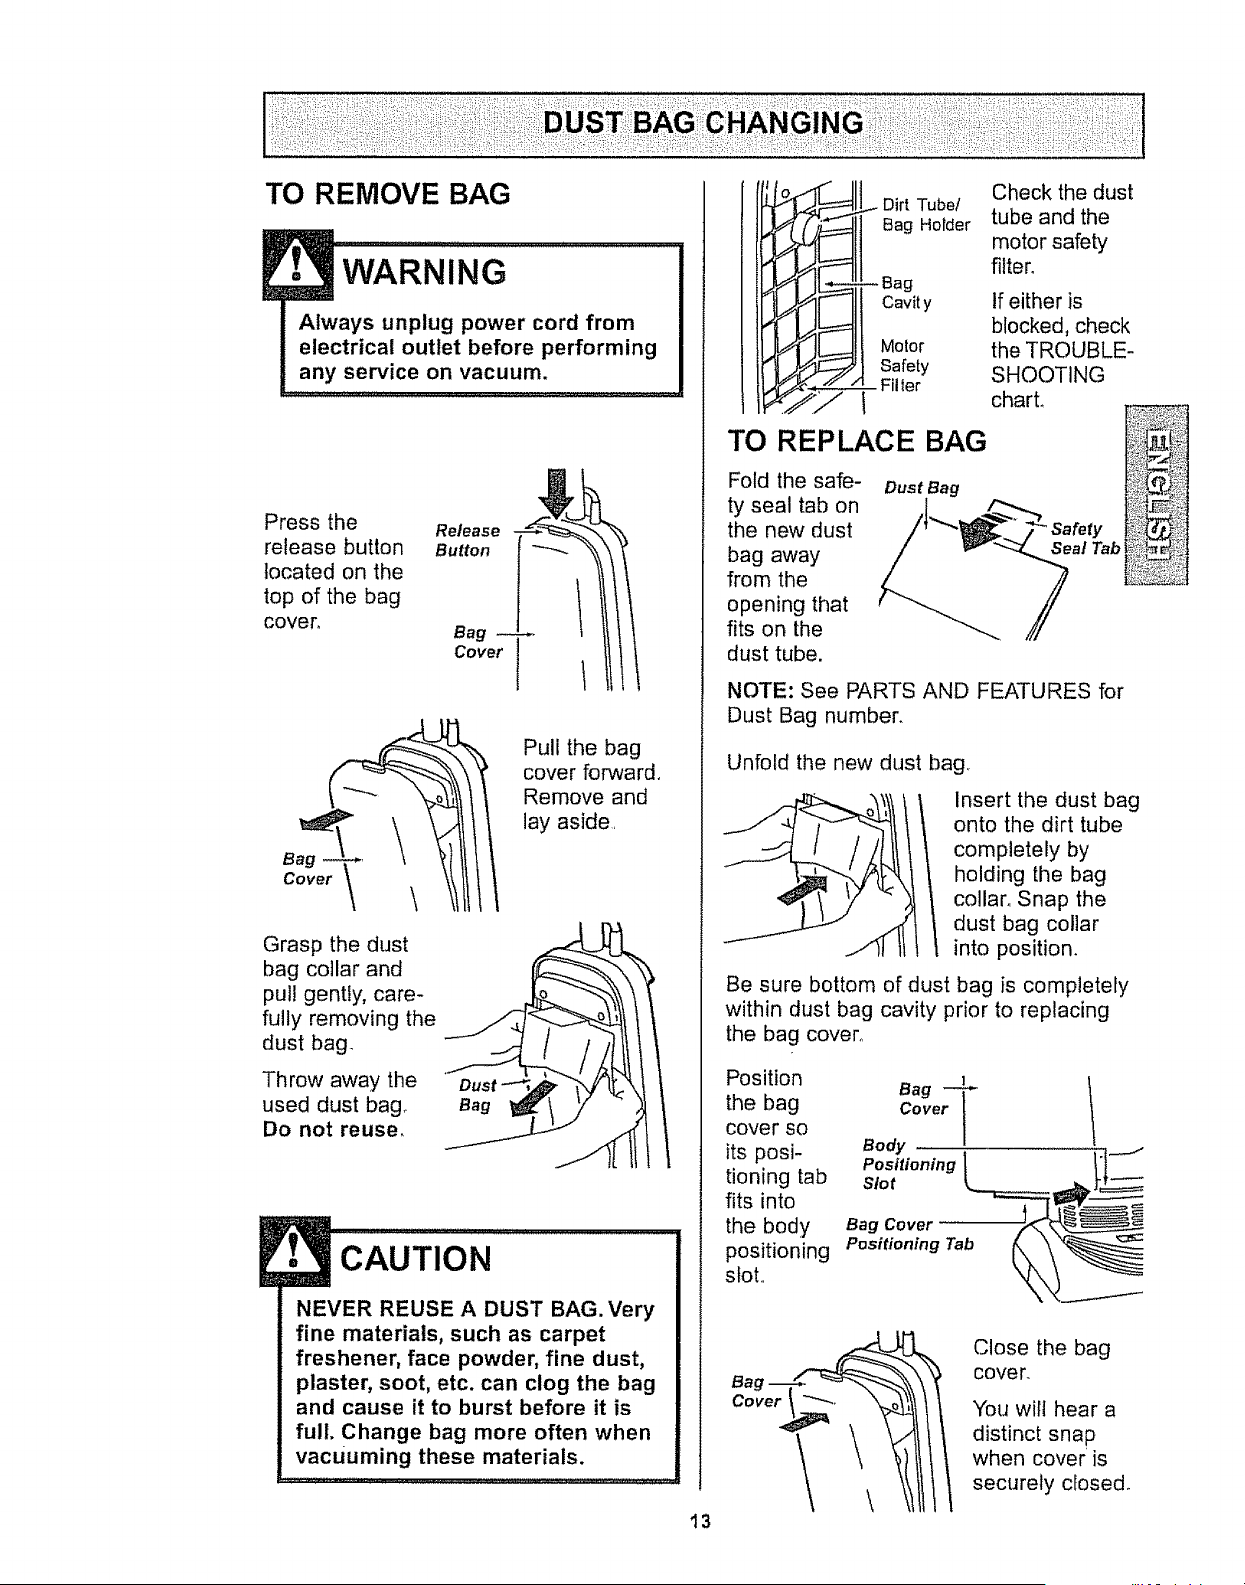
WARNING
Always unplug power cord from
electrical outlet before performing
any service on vacuum.
Press the
release button
located on the
top of the bag
COVER
Release
Button
Bag
Cover
Cover\ \ _ tl
bag collar and
pull gently, care-
fully removing the
Throw away the '/
oust-_,.,_ _ _.\
used dust bag_ __t
Do not reuse,
Pull the bag
cover forward.
Remove and
lay aside
CAUTION
NEVER REUSE A DUST BAG. Very
fine materials, such as carpet
freshener, face powder, fine dust,
plaster, soot, etc. can clog the bag
and cause it to burst before it is
full. Change bag more often when
vacuuming these materials.
13
Dirt Tube/
Bag Holder
-- Bag
Cavity
Motor
Safety
- Filter
TO REPLACE BAG
Fold the safe-
ty seal tab on
the new dust
bag away
from the
opening that
fits on the
dust tube.
Dust Bag
Check the dust
tube and the
motor safety
filter.
If either is
blocked, check
the TROUBLE-
SHOOTING
charL •
NOTE: See PARTS AND FEATURES for
Dust Bag number.
Unfold the new dust bag,
Insert the dust bag
onto the dirt tube
completely by
holding the bag
collar° Snap the
dust bag collar
into position.
Be sure bottom of dust bag is completely
within dust bag cavity prior to replacing
the bag cover_
Position
the bag
cover so
its posi-
tioning tab
fits into
the body
positioning
slot,
Cover I
Body
Close the bag
cover.
You wilt hear a
distinct snap
when cover is
securely closed°
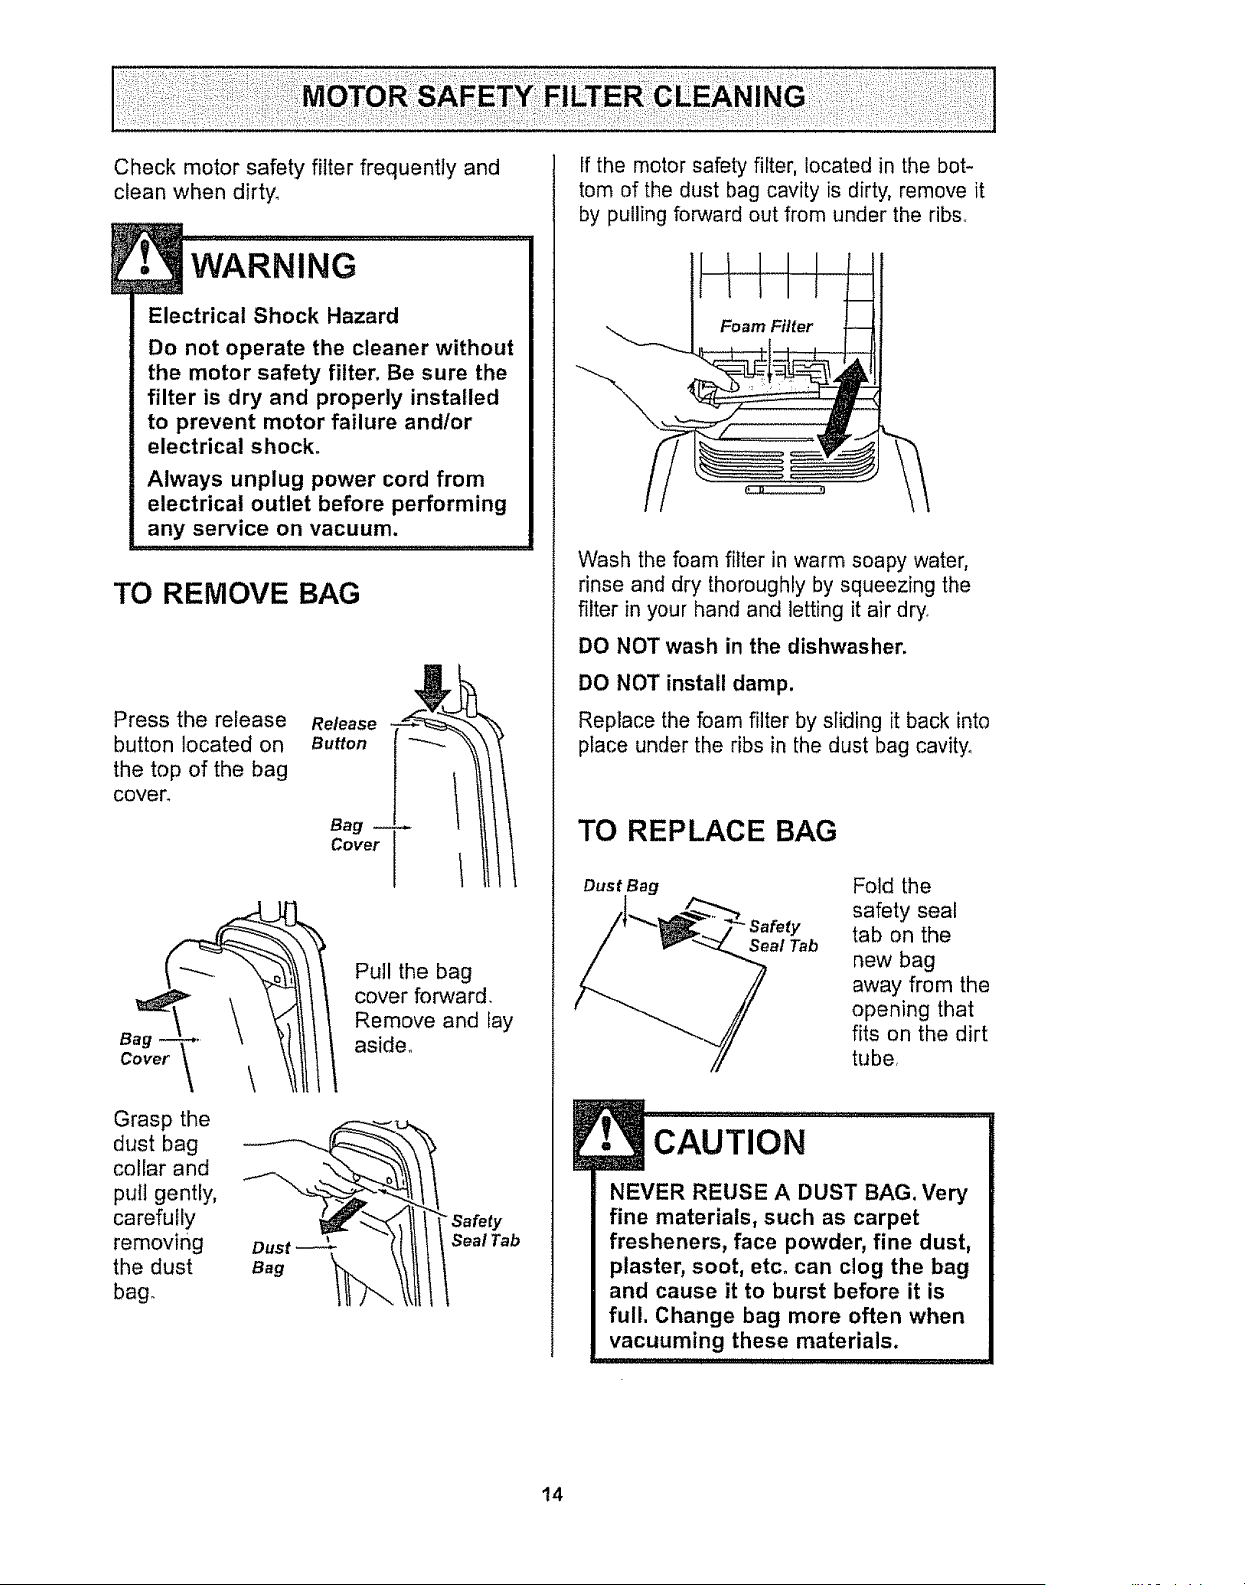
Checkmotorsafetyfilter frequentlyand
cleanwhendirty.
, 'WARNI'NG
Electrical Shock Hazard
Do not operate the cleaner without
the motor safety filter. Be sure the
filter is dry and properly installed
to prevent motor failure and/or
electrical shock.
Always unplug power cord from
electrical outlet before performing
any sewice on vacuum.
TO REMOVE BAG
Press the release
button located on
the top of the bag
cover.
Release
Button
Bag
Cover
Dust
\
Bag
Grasp the
dust bag
collar and
pull gently,
carefully
removing
the dust
bag.
Pull the bag
cover forward.
Remove and fay
aside.
Safety
Seal Tab
If the motor safety filter, located in the bot-
tom of the dust bag cavity is dirty, remove it
by pulling forward out from under the ribs°
Wash the foam filter in warm soapy water,
rinse and dry thoroughly by squeezing the
filter in your hand and letting it air dry_
DO NOT wash in the dishwasher.
DO NOT install damp.
Replace the foam filter by sliding it back into
place under the ribs in the dust bag cavity,
TO REP LAC E BAG
Dust Bag
Safety
Seal Tab
Fold the
safety seal
tab on the
new bag
away from the
opening that
fits on the dirt
tube,
CAUTION
NEVER REUSE A DUST BAG. Very
fine materials, such as carpet
fresheners, face powder, fine dust,
plaster, soot, etc. can clog the bag
and cause it to burst before it is
full. Change bag more often when
vacuuming these materials.
14
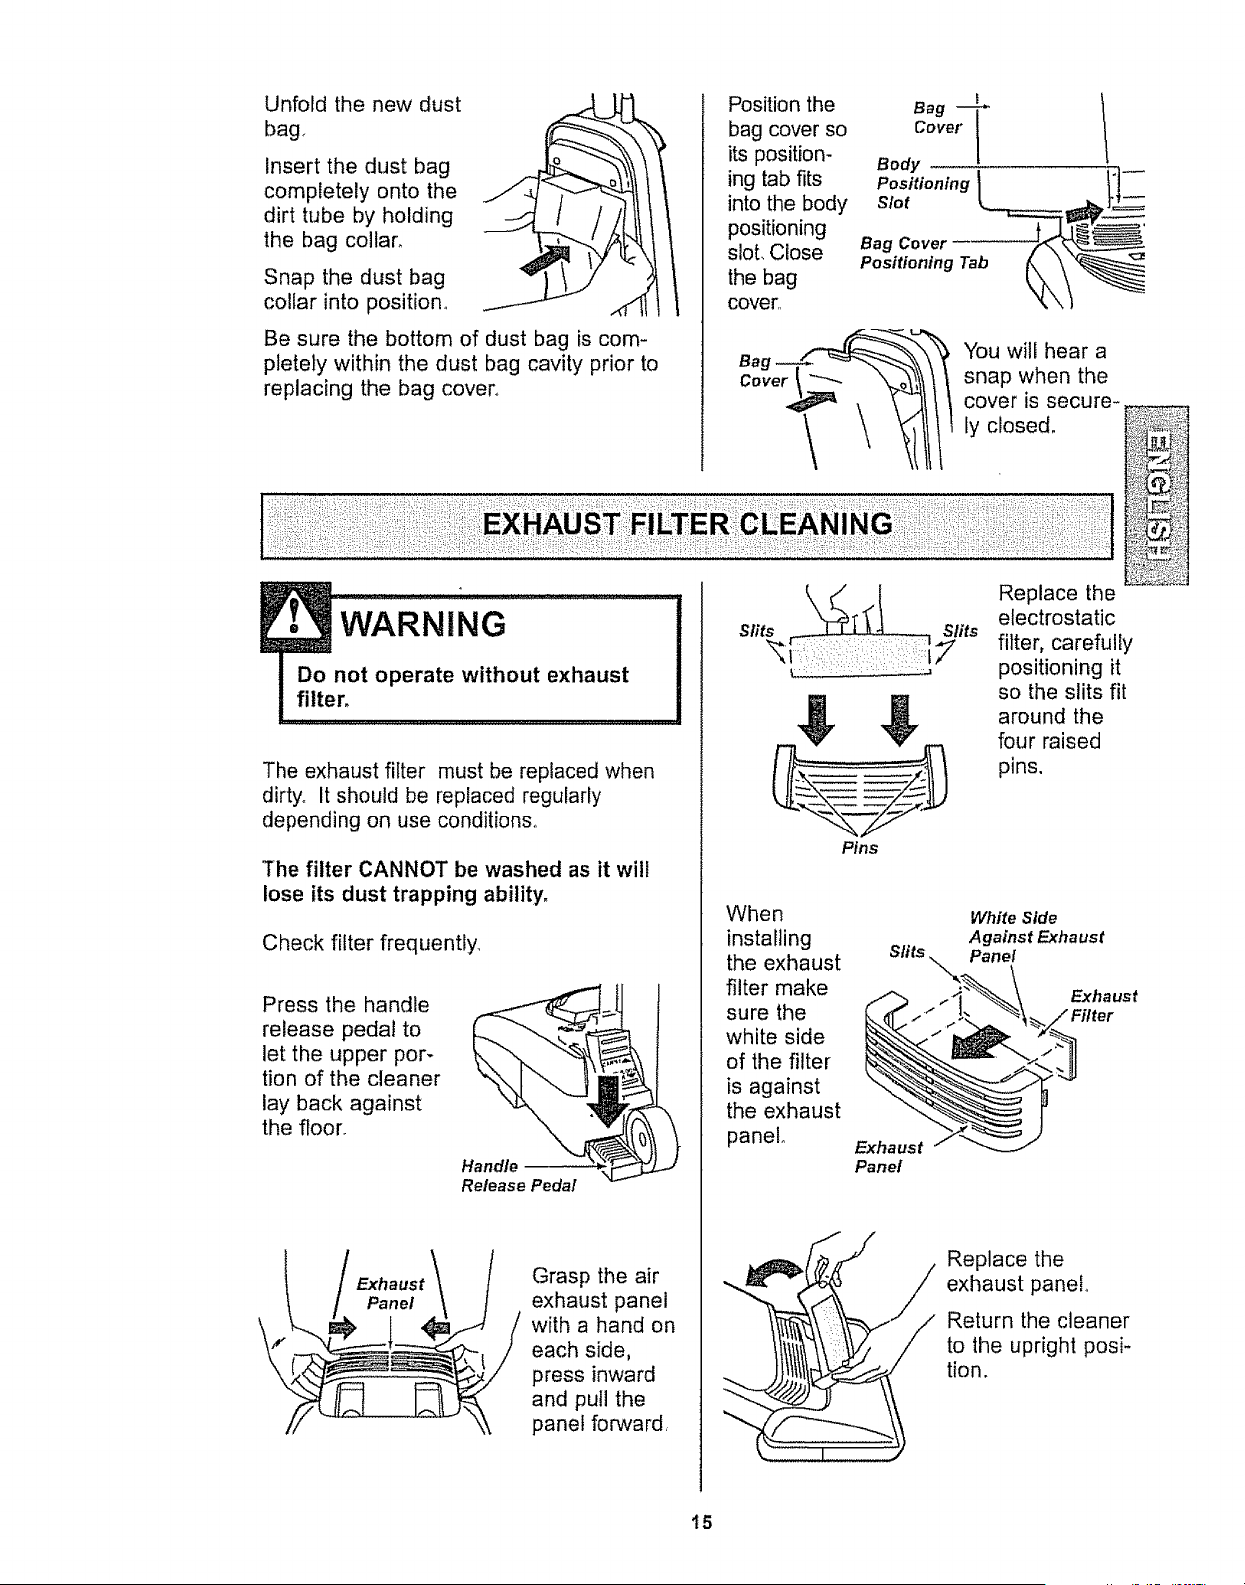
Unfold the new dust
bag,
Insert the dust bag
completely onto the
dirt tube by holding
the bag collar,
Snap the dust bag 4
collar into position° _..i---
0
0 t
Be sure the bottom of dust bag is com-
pletely within the dust bag cavity prior to
replacing the bag cover,,
!• WARNING .....
Do not operate without exhaust
filter,
,,,,, ,
The exhaust filter must be replaced when
dirty° It should be replaced regularly
depending on use conditions°
The filter CANNOT be washed as it wil!
lose its dust trapping ability,
Check filter frequently,
Press the handle
release pedal to
let the upper por-
tion of the cleaner
lay back against
the floor,
Panel
Handle --
Release Pedal
Grasp the air
exhaust panel
with a hand on
each side,
press inward
and pull the
panel forward,
Position the Bag _L
bag cover so cover I
its position- Body
1
ing tab fits Positioning |
into the body slot
L_
positioning
SlOt, Close Bag Cover
Positioning Tab
the bag
cover,,
Bag__\,'_ You will hear a
Cover _ ""__ _i!i snap when the
cover is secure-_.
Replace the _;_
stit_..., slits electrostatic
filter, carefully
positioning it
so the slits fit
around the
four raised
pins.
Pins
When
installing
the exhaust
filter make
sure the
white side
of the filter
is against
the exhaust
panel
Slits
Exhaust
Panel
White Side
Against Exhaust
Panel
Exhaust
...,,_ ___k._ ///_ Replace the
exhaust panel°
__ Return the cleaner
to the upright posi-
tion.
15
Electrical Shock Or Personal Injury
Hazard
Disconnect electrical supply before
servicing or cleaning the unit.
Failure to do so could result in
electrical shock or personal injury
from cleaner suddenly starting,
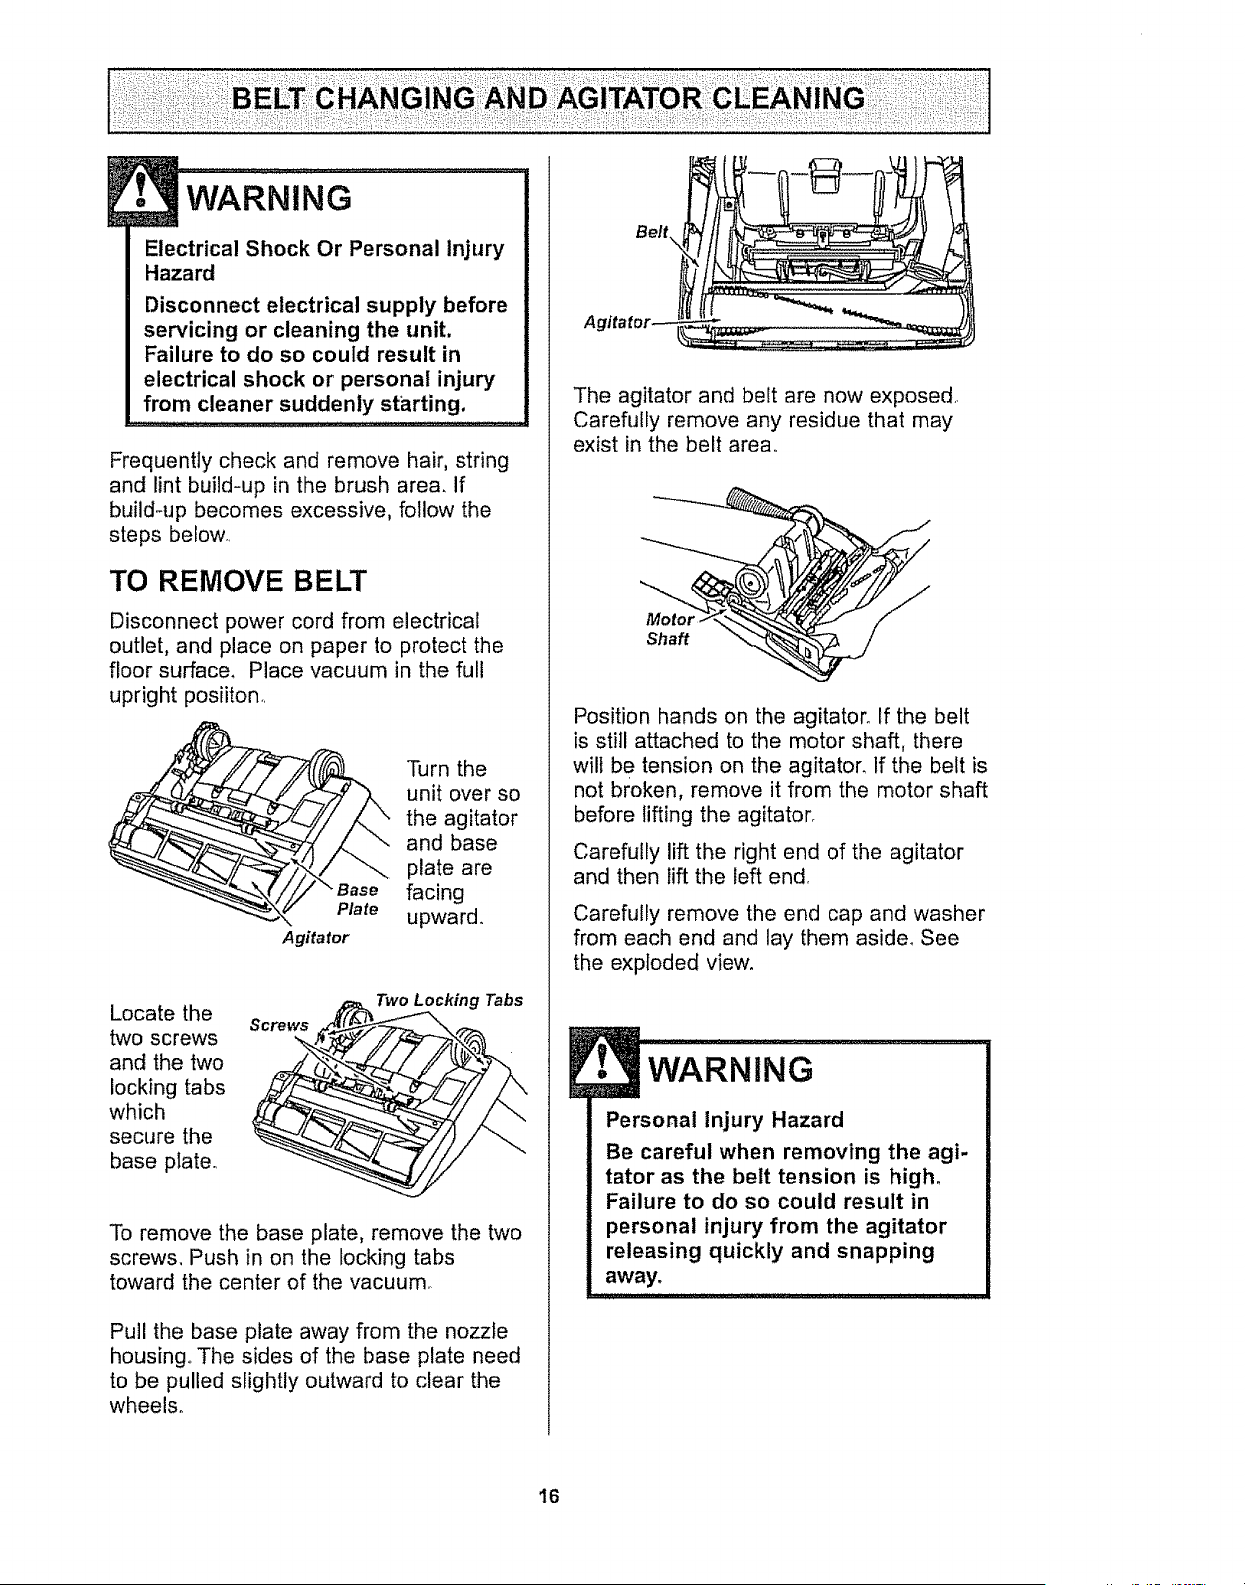
Frequently check and remove hair, string
and lint build-up in the brush area. If
build-up becomes excessive, follow the
steps below
TO REMOVE BELT
Disconnect power cord from electrical
outlet, and place on paper to protect the
floor surface_ Place vacuum in the full
upright posiiton
Plate
Agitator
Turn the
unit over so
the agitator
and base
plate are
facing
upward.
Locate the
two screws
and the two
locking tabs
which
secure the
base plate.
g Tabs
To remove the base plate, remove the two
screws. Push in on the locking tabs
toward the center of the vacuum
Pull the base plate away from the nozzle
housing., The sides of the base plate need
to be pulled slightly outward to clear the
wheels.
Agitator
The agitator and belt are now exposed,
Carefully remove any residue that may
exist in the belt area,
Motor
Shaft
Position hands on the agitaton If the belt
is still attached to the motor shaft, there
wilt be tension on the agitaton If the belt is
not broken, remove it from the motor shaft
before lifting the agitator°
Carefully lift the right end of the agitator
and then lift the left end,
Carefully remove the end cap and washer
from each end and lay them aside_ See
the exploded view.
WARNING
Personal Injury Hazard
Be careful when removing the agi-
tator as the belt tension is high.
Failure to do so could result in
personal injury from the agitator
releasing quickly and snapping
away.
16
When you remove the end caps, a
small metal washer on each end
may come off. DO NOT lose these
two metal washers.
TO CLEAN AGITATOR
NOTE: In order to keep cleaning efficiency
high and to prevent damage to your vacu-
um, the agitator must be cleaned every time
the belt is changed.,
The agitator must also be cleaned accord-
ing to the following schedule:
Vacuum Use
HEAVY -
(used daily)
MODERATE -
(used 2-3 times/week)
LIGHT -
(used 1 time/week)
Clean Agitator
every week
every month
every 2 months
Remove any dirt or debris in the belt path
area or in the brush roller area.
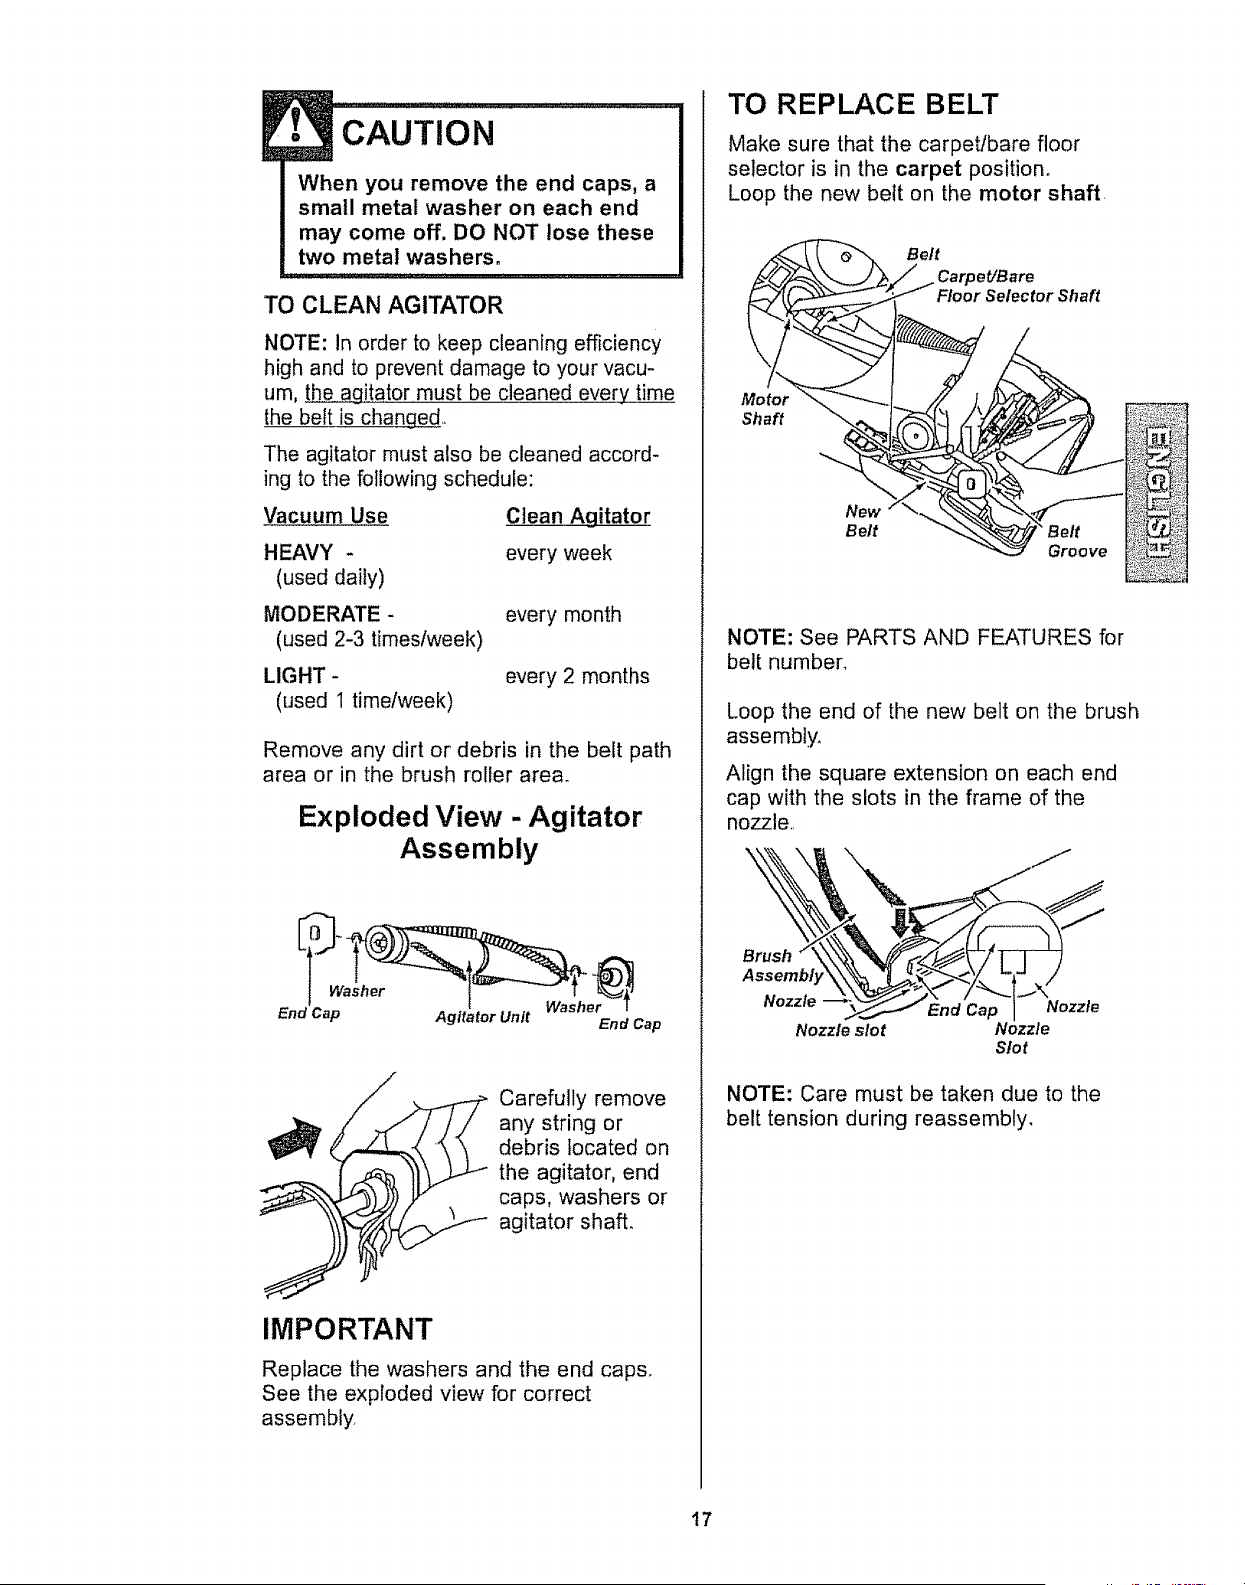
Exploded View - Agitator
Assembly
_Washer Washer_
End Cap Agitator Unit End Cap
_ arefully remove
any string or
debris located on
the agitator, end
caps, washers or
agitator shall
IMPORTANT
Replace the washers and the end caps.
See the exploded view for correct
assembly.
TO REPLACE BELT
Make sure that the carpet/bare floor
selector is in the carpet position°
Loop the new bett on the motor shaff_
Belt
Motor
Shaft
New
Belt
Groove
NOTE: See PARTS AND FEATURES for
belt number,
Loop the end of the new belt on the brush
assembiy_
Align the square extension on each end
cap with the slots in the frame of the
nozzle_
Nozzle -
Nozzle slot
Nozzle
Slot
NOTE: Care must be taken due to the
belt tension during reassembly.
17
BELT ROUTING
Correct Routing of Belt
(Selector in Carpet Position)
Assembly
Carpet/Bare Floor Shaft
Selector Shaft
Incorrect Routing of Belt
(Belt on Selector Shaft)
--t)2( , ,, Carpet/Bare
Brush .,.7 Motor
Assembly Carpet/Bare Floor Shaft
Selector Shaft
Incorrect Routing of Belt
(Selector in Bare Floor Position)
"_ Carpet/Bare
/ •
/ \" {Q FloorPedal
Assembly Belt Carpet/Bare Floor
Selector Shaft
Press firmly, checking to see that each
end is completely inserted.
Belt
\
Agitator_
Assembly
Check to see that the belt is centered in
the belt groove. "PJrn the brush assembly
with your fingers to see that it turns freely,.
To re-attach .the base plate, insert the
tabs into the slots along the front edge of
the base. Place the vacuum in full upright
position° Lower the base plate to its origi-
nal position°
Full Upright Position
Tab Locations
As the base is lowered the inner areas
will brush against the dust compartment
wheels. A gentle pull outward may assist
in reassembly.
Two Locking Tabs Press the
base plate
down until
the two
locking tabs
snap into
place,
Re-install the
two screws
that secure
the base
plate,
Screws
Return the cleaner to the upright position
before plugging into the electrical outlet.
18
Always follow all safety precautions when
cleaning and servicing the vacuum
cleaner_
E• WARNING ...............
Electrical Shock Or Personal Injury
Hazard
Disconnect electrical supply before
servicing or cleaning the unit.
Failure to do so could result in
electrical shock or personal injury
from cleaner suddenly starting°
If the cleaner does not seem to have ade-
quate suction, first check for a full bag or
filter which is clogged_ See instructions in
DUST BAG CHANGING and MOTOR
SAFETY FILTER CLEANING
If the bag and filter areas are free of
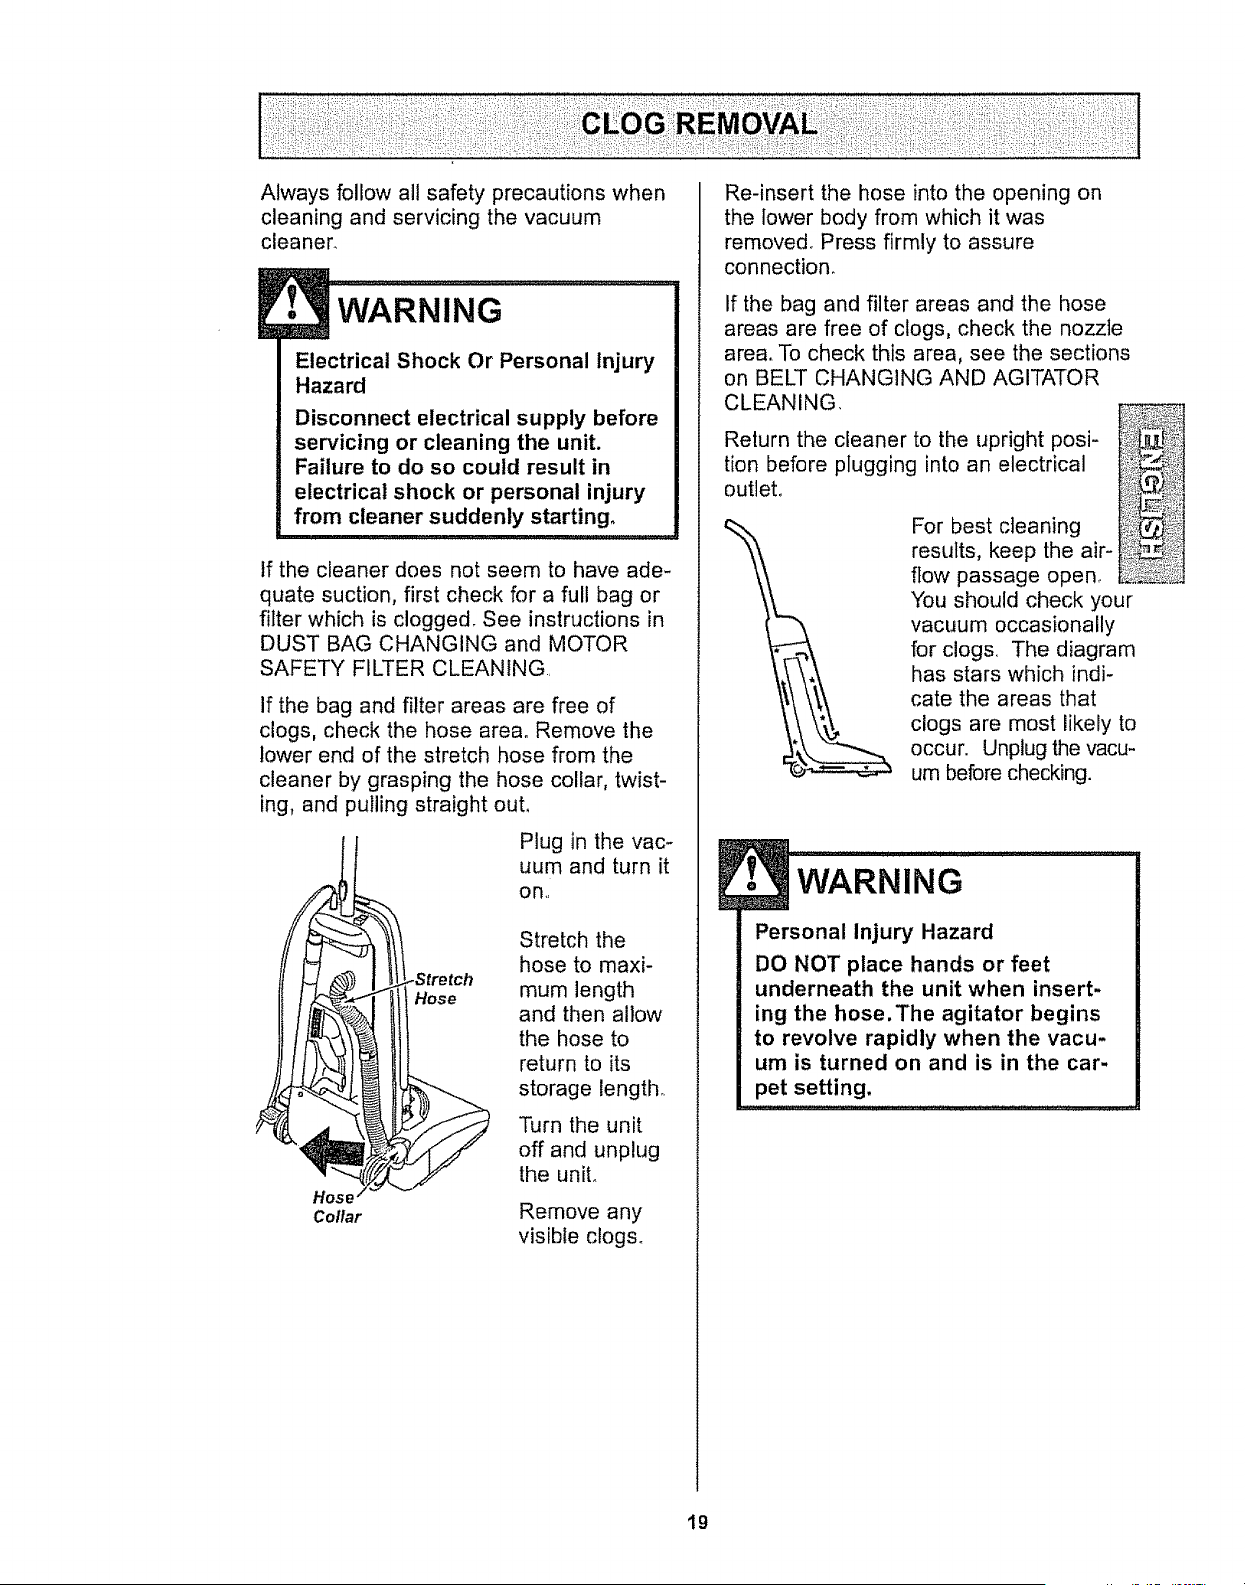
clogs, check the hose area. Remove the
lower end of the stretch hose from the
cleaner by grasping the hose collar, twist-
ing, and pulling straight out,
Plug in the vac-
uum and turn it
on,,
Hose
Collar
_Stretch
Hose
Stretch the
hose to maxi-
mum length
and then allow
the hose to
return to its
storage length.
Turn the unit
off and unplug
the unit.
Remove any
visible clogs°
Re-insert the hose into the opening on
the lower body from which it was
removed_ Press firmly to assure
connection.
If the bag and filter areas and the hose
areas are free of clogs, check the nozzle
area. To check this area, see the sections
on BELT CHANGING AND AGITATOR
CLEANING.
Return the cleaner to the upright posi-
tion before plugging into an electrical
outlet.
For best cleaning
results, keep the air-
flow passage open.
You should check your
vacuum occasionally
for clogs The diagram
has stars which indi-
cate the areas that
clogs are most likely to
occur. Unplug the vacu-
um before checking.
WARNING
Personal Injury Hazard
DO NOT place hands or feet
underneath the unit when insert-
ing the hose.The agitator begins
to revolve rapidly when the vacu-
um is turned on and is in the car-
pet setting,
t9
WARNING
Electrical Shock Or Personal Injury
Hazard
Disconnect electrical supply before
servicing or cleaning the unit,
Failure to do so could result in
electrical shock or personal injury
from cleaner suddenly starting,
, , I I II I =
Disconnect the power cord from the elec-
trical outlet.
Press the handle release pedal to let the
upper portion of the cleaner lay back
against the floor°
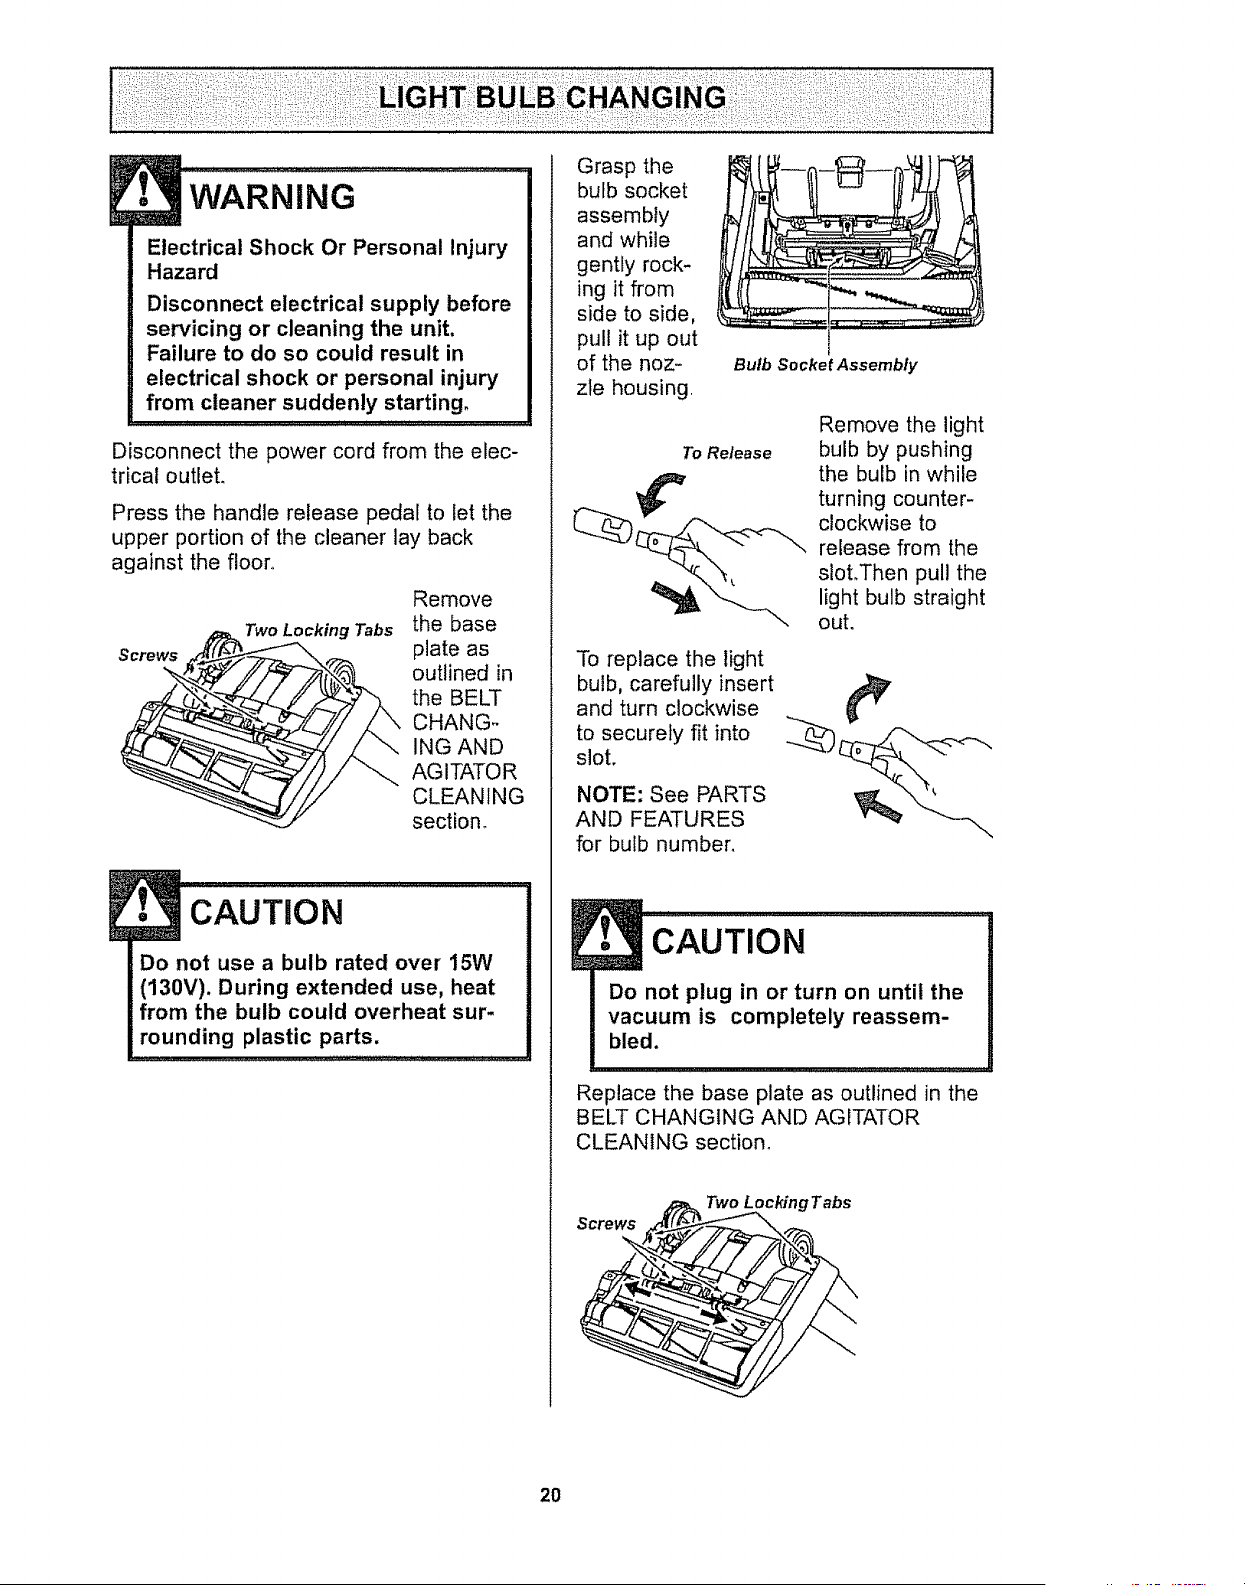
Remove
Two Locking Tabs the base
Screws plate as
outlined in
the BELT
CHANG-
ING AND
AGITATOR
CLEANING
section.
E• CAUTION
Do not use a bulb rated over 15W
(130V). During extended use, heat
from the bulb could overheat sur-
rounding plastic parts.
Grasp the
bulb socket
assembly
and while
gently rock-
ing it from
side to side,
pull it up out
of the noz-
zle housing
_J
/
Bulb Socket Assembfy
Remove the light
To Release bulb by pushing
__ the bulb in while
turning counter-
_ clockwise to
release from the
slot,Then pull the
light bulb straight
out,
To replace the light
bulb, carefully insert
and turn clockwise
to securely fit into
slot.
NOTE: See PARTS
AND FEATURES
for bulb number.
, 'CAuTION ....
Do not plug in or turn on until the
vacuum is completely reassem-
bled,
Replace the base plate as outlined in the
BELT CHANGING AND AGITATOR
CLEANING section.
Screws
Two Locking Tabs
2O
WARNING
Electrical Shock Or Personal Injury
Hazard
Disconnect electrical supply before
servicing or cleaning the unit.
Failure to do so could result in
electrical shock or personal injury
from cleaner suddenly starting.
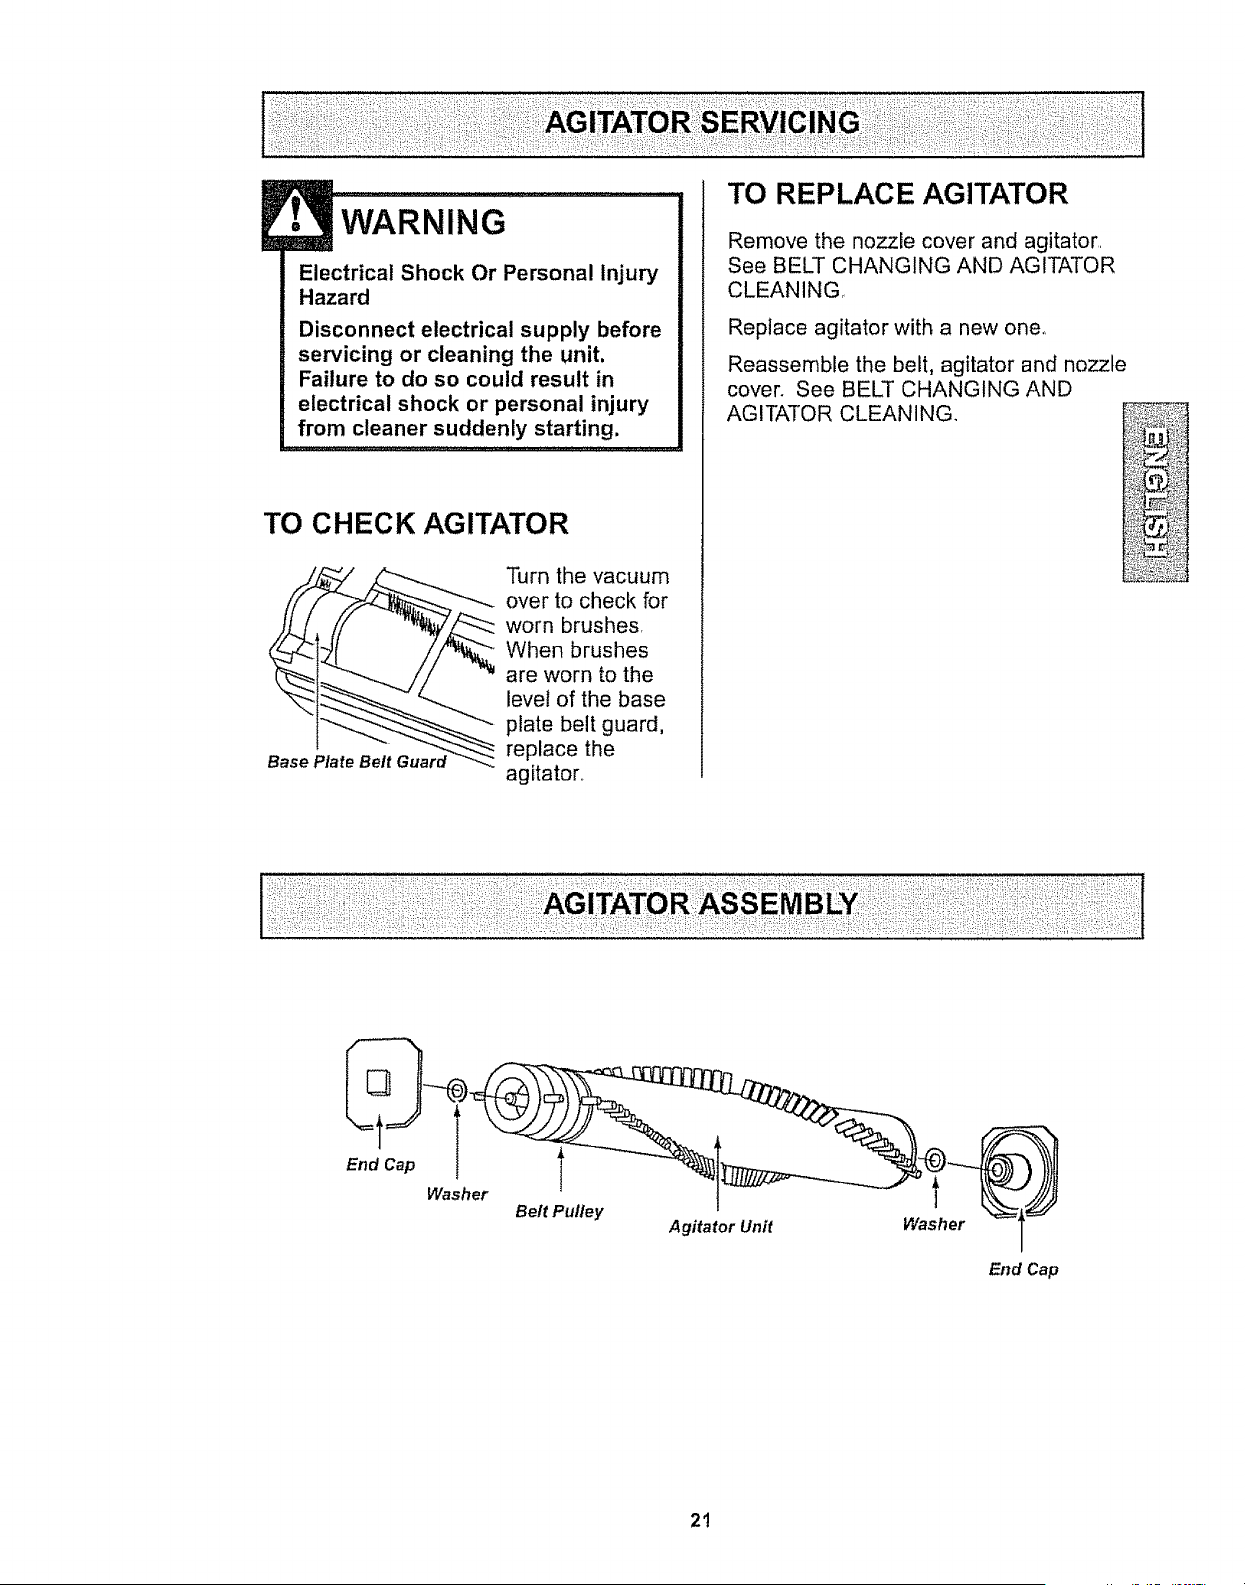
TO CHECK AGITATOR
Base Plate Belt Guard_
Turn the vacuum
over to check for
worn brushes,
When brushes
are worn to the
level of the base
plate belt guard,
replace the
agitator,,
TO REPLACE AGITATOR
Remove the nozzle cover and agitator,,
See BELT CHANGING AND AGITATOR
CLEANING,,
Replace agitator with a new one,
Reassemble the belt, agitator and nozzle
cover. See BELT CHANGING AND
AGITATOR CLEANING.
End Cap
Washer
Belt Pulley
Agitator Unit
Washer
End Cap
2t
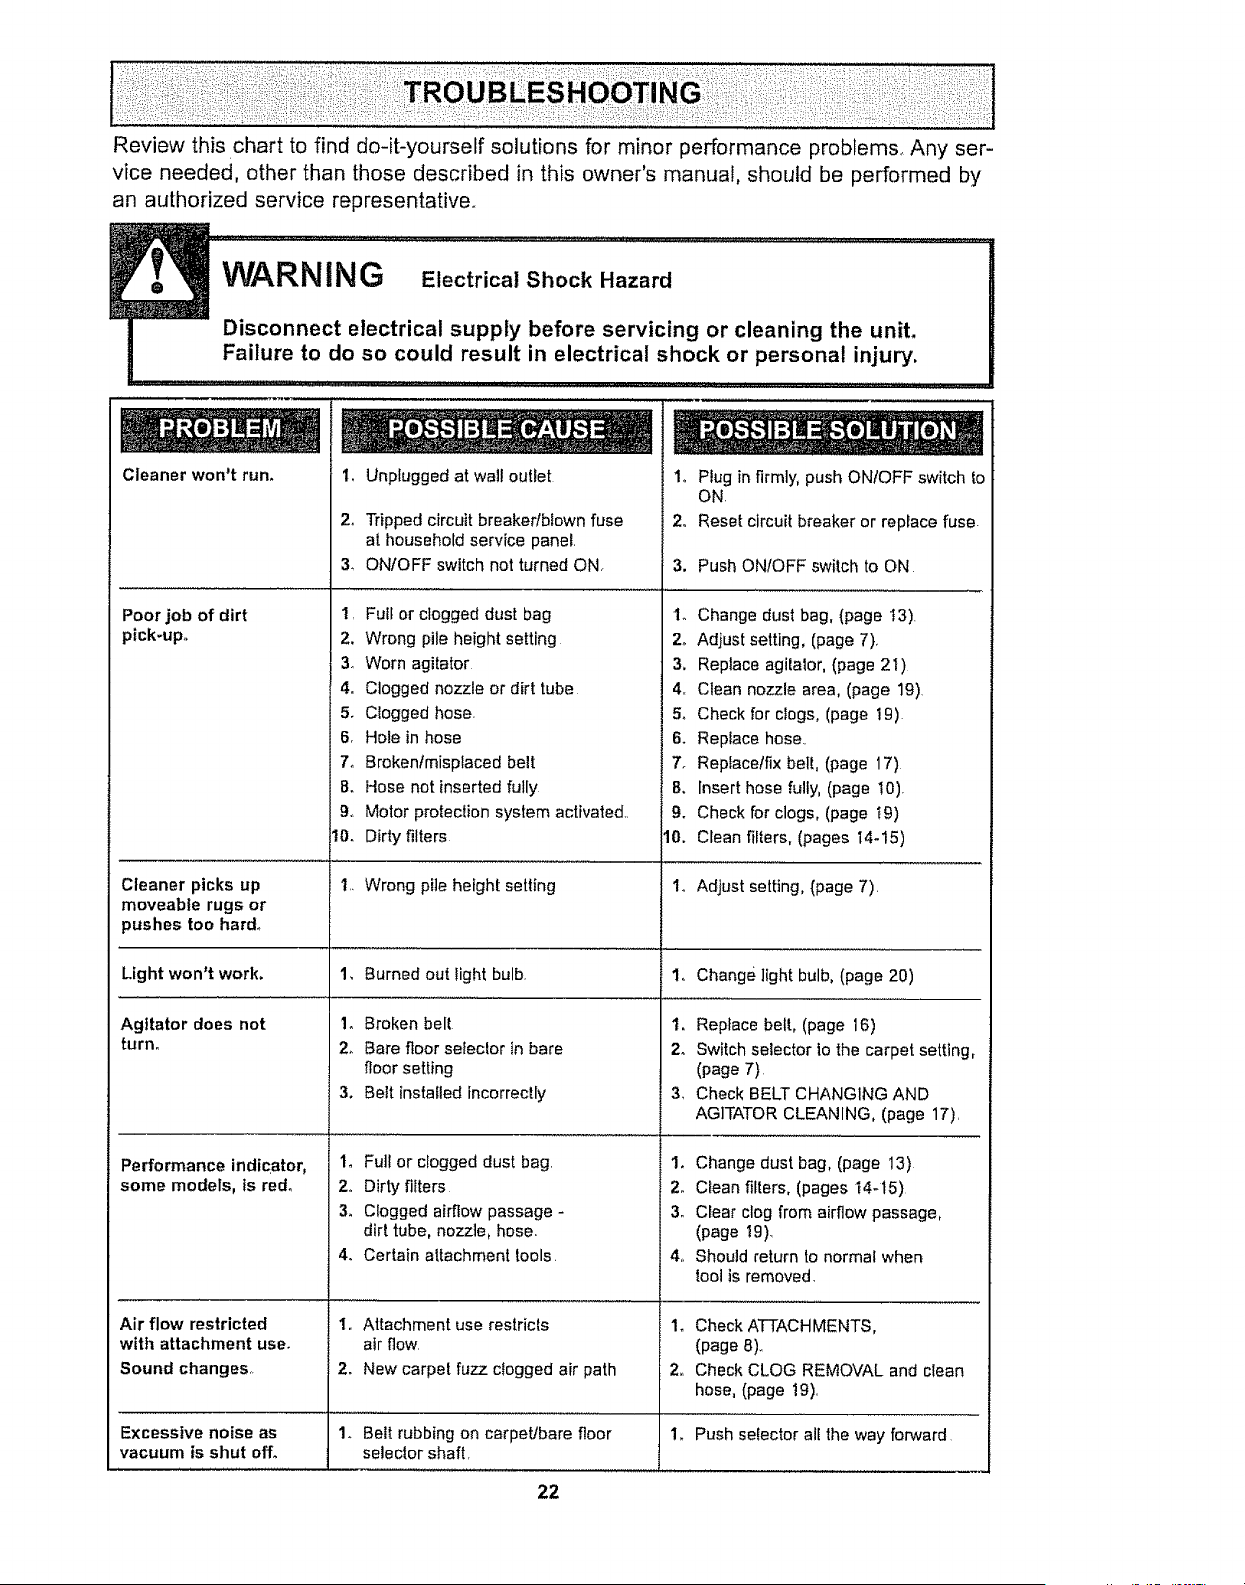
Review this chart to find do-it-yourself solutions for minor performance problems. Any ser-
vice needed, other than those described in this owner's manual, should be performed by
an authorized service representative.
Cleaner won't run.
Poor job of dirt
pick-upo
Cleaner picks up
moveable rugs or
pushes too hard°
Light won't work.
Agltator does not
turn°
Performance indicator,
some models, is red°
Air flow restricted
with attachment use,
Sound changes,.
1. Unplugged at wall outlet
2. Tripped circuit breaker/blown fuse
at household service panel,
3. ON/OFF switch not turned ON
1, Full or clogged dust bag
2. Wrong pile height setting
3. Worn agitator
4. Clogged nozzle or dirt tube
5. Clogged hose.
6, Hole in hose
7. Brokenfmisplaced belt
8. Hose not inserted fully
9,, Motor protection system activated,
10. Dirty filters
'I,, Wrong pile height setting
1, Burned out light bulb,
1. Broken bell
2. Bare floor seleclor in bare
floor setting
3, Belt installed incorrectly
1. Full or clogged dust bag.
2o Dirty filters
3. Clogged airflow passage -
dirt tube, nozzle, hose,
4. Certain attachment tools.
1. Attachment use restricts
air flow,
2. New carpet fuzz clogged air path
1o Plug in firmly, push ON/OFF switch tc
ON,
2o Reset circuit breaker or replace fuse.
3,
2.
3,
4o
5,
6.
7.
B_
9.
10.
Push ONtOFF switch to ON
Change dust bag, (page I3).
Adjust setting, (page 7).
Replace agitalor, (page 21)
Clean nozzle area, (page 19).
Check for clogs, (page 19)
Replace hose..
Replaceffix belt, (page 17)
Insert hose fully, (page !0).
Check for clogs, (page t9)
Clean filters, (pages 14-15)
Adjust setting, (page 7).
1. Change light bulb, (page 20)
I. Replace belt, (page 16)
2. Switch selector to the carpet setting,
(page 7)
3, Check BELT CHANGING AND
AG]TATOR CLEANING, (page 17).
1. Change dust bag, (page 13)
2. Clean filters, (pages t4-15)
3. Clear clog from airflow passage,
(page !9)_
4,, Should return to normal when
tool is removed,
1.
2_
Excessive noise as 1. Belt rubbing on carpeL/bare floor 1,
vacuum is shut off. selector shaft,
22
Check ATTACHMENTS,
(page 8),,
Check CLOG REMOVAL and clean
hose, (page 19),
Push selector all the way forward
Antes de usar su aspiradora nueva ,, t
Garantia de la aspiradora de
Kenmore .......................... 1
Instrucciones importantes de
seguridad .......................... 2
Piezas y caracteristicas ............. 3
Instrucciones de ensamblamiento _ ,. 4
lnstrucciones de operacibn ............. 5
Ajuste y selecci6n de nivel de pelo
de la atfombra ..................... 6
Selector de pisos con alfombra y
sin alfombra ..................... 6
Desprendimiento del mango ........... 7
Interrupter de encendido/apagado ....... 7
Accesorios ..................... 7-9
Cuadro de use de los accesorios ....... 9
Sugerencias para aspirar ............ 10
Caracterfsticas de rendimiento ......... I0
Cuidado de la aspiradora .......... tl
Almacenamtento de la aspiradora ...... 1t
Limpieza del exterior y de
los accesorios ....................... 1'1
Cambio de la bolsa ............... 12
Cambio del filtro de seguridad
de! motor ...................... 13-14
Limpieza del filtro de escape ......... 14
Cambio de la correa y limpieza del
agitador ......................... 15-17
Cambio de la bombilla ............ 18
Cuidado del agitador ............... 19
Ensamble del agitador .............. I9
C6mo eliminar los residues de basura
en los conductos ................... 20
Reconocimiento de problemas ..... 21
Per favorlea esta guia que le ayudara a ensamblary operar su aspiradora nuevade Kenmore en una manera
m&s segura y efectiva,
Para mas informaci6n acerca del cuidado y operaci6n de esla aspiradora, flame a su tienda Sears mas ceF
cana Cuando pregunte per informaci6n usted necisilar_ el n0mero complete de serie y modelo de la aspirado-
ra que est& colocado en la placa de fos numeros de modeto y serie,
Use el espacio de abajo para registrarel n_mero de mode!oy serie para su nueva aspiradora de Kenmore
Nflmero de Modelo
Nt_merode Serie
Fecha de Compra
Matenga este tibro y su recibo en un lugar seguro para referencias futuras
GARANTiA LIMITADA DE UN A_IO DE LA ASPIRADORA KENMORE
Esta garantia es per un afio desde la fecha de compra, a incluye solamente e! use de la aspiradora en
hogares privados Durante el aSo de garantla, cuando ta aspiradora es operada y mantenida de acuerdo al
manual de inslrucciones de1dueSe,Sears reparar&cualquier defecto en materiales o fabricaci6n libre de cargo
Esta garantia excluye las bolsas de colecci6n,correas, lamparitlas, y filtros, las cuales son partes gastables qua
se deterioran con el use normal.
Para el servicio de garantia, retorne esta aspiradora al Centro de Ser¢icio Sears m_s cercano en los
Estados Untdos.
Esta garantia se aplica solamente mientras este producto est_ en uso en los Estados Unidos, Estagarantia le
da a usted derechos legatesespecificos,y usted puedetener tambi6n otros derechos los cua]esvarian de
estado a estado
Sears, Roebuck and Co,, Dt817 WA, Hoffman Estates, IL 61)179
ADVERTE CIA
Su seguridad es muy lmportante para nosotros, Para reducir el riesgo de incendio,cheque
el_ctrico, lesi6n corporal o dafios at utilizar su aspiradora, actfie de acuerdo con precauciones
b_sicas de seguridad, entre elias:
Lea este manual antes de armar o utilizar su
aspiradora.
Use su aspiradora unicamente en la forma
descrita en este manual. Use _nicamentecon
accesorios recomendados par Sears.
Para reducir el riesgo de cheque el6ctrico, no use
su aspiradora af aire libre ni sabre superficies
mojadas
Desconecte ta fuente de electricdad antes de
dar servicio o iimpiar. De lo contrario podria
causar un cheque ef6ctricoo lesi6n corporal°
Siempre debe apagar su aspiradora antes de
desconectar]a.
No desconecte la aspiradora tirando del cord6n
el6ctrico..Para desconectarta,hale el enchufe, no
el cord6n
No use ta aspiradora si el cord6n o el enchufe
est_daSado..Si la aspiradora no est6
funcionando adecuadamenteo si se ha dejado
caer, est&daSada,se hadejado expuestaa ]a
intemperie o se ha dejado caer en agua, devu61-
vataa un Centrof Departamento de servicio de
Sears,
No hate ni transporte la aspiradora par el cord6n;
no use el cord6n coma mango; no cierre puertas
sabre el cord6n; no hale el cord6n sabre rebor-
des agudos ni esquinas. No pase la aspiradora
sabre el cord6n, Mantengael cord6n alejado de
superficies calientes.
No abandone la aspiradora cuando est_ conec*
tad& Descon6ctela cuando no la est6 usando y
antes de darle servicio.
No permita que sea utilizadacoma juguete_Se
requiere tener mayorcuidada cuando sea
utitizada en la proximidadde nifios o par niSos.
No toqueia aspiradora ni el enchufe con las
manes mojadas.
GUA
No coloque objetos en las aberturas
No utilice fa aspiradora si atguna abertura est_
bloqueada; mant6ngala libre de potvo,pelusa,
cabellos y cualquiera cosa que podrla disminuir
el flujo de aire.
Mantenga el cabello, ropa suelta, dedos y todas
las partes del cuerpo atejadosde tasaberturas y
piezas mec&nicas..
No use la aspiradorasin tener instalada la balsa
para polvo ylo los filtros
Cambie siempre la balsa para pofvo despues de
aspirar limpiadoresde alfombraso desodorantes,
talcos y pelves fines. Estos productos atascan la
bofsa, reducen el flujo de aire y puedencausar
que _sta se romp& Si no cambia la balsa podria
ocasionar daSo permanentea la aspiradora..
No use la aspiradora para levantarobjetos agu-
dos,juguetes pequeSos,alfileres, papel, etco
Podrtan dafiar la aspiradorao la balsa para polvo.
No levante ninguna cosa que se est_ quemando
o emitiendo humo, carrie cigarrillos, ceriltos o
cenizas calientes
No use la aspiradora para aspirar liquides
inftamabteso combustibles (gasofina,liquidos
para limpieza, perfumes, etc) ni la use en
lugares donde 6stos poddan estar presentes.Los
vapores de estas sustancias puedencrear un
peligro de incendia a exptosi6n
Tenga cuidado especial al utilizar la aspiradora
en escalones No la coloque sabre sillas, mesas,
etc. Mant6ngala en el piso.
Usted es responsablede asegurarque su aspira-
dora no sea utilizada par ninguna persona que no
pueda manejarla correctarnenteo
STRUCClO ES
El armada y usa seguro de su aspiradora son su responsabilidad. Esta aspiradora ha side dise5ada
exclusivamentepara usa dom6stico La aspiradora deber&almacenarse en un tugarseco yen el inte-
rior. Leaeste Manual del propielario detenidamente,pues contiene informaci6n importante sabre segu-
ridad y usa Estaguia contiene informaci6nsabre seguridad debajo de simbolos de advertiencia yto
cuidado. Par favor ponga atenci6n especial a estas instrucciones dadas. Advertencia: Esta
informaci6n le alertar& con el peligro de fuego, cheques electricos, quernadasy lesiones,,Cuidado:
Esta informaci6n le alertara a petigros coma lesiones y dafios de propiedad.
2
Esimportante concer ias piezas y caracteflsttcas de su aspiradora para asegurar su use adecuado
y seguro Examlnelas antes de usar su aspiradora
Objeto Pieza N° Pieza N°
Mango
en EUA en Canada
, , interrupter de
B01sa para polvo ' 20-50688 "20-50680 encendido/apagado
...................................... Montado en el mango
Bombilla de farol 20-5240 20-40600 (Algunos modelos)
Correa 20-5275 20-40096
Interrupter de
encendido/apagado
Montado en el cuerpo
(Algunos mode/os) q
Seguro de fa
cubierta de
la bolsa
Sujetador
de liberaci6n
rapida de/
cord6n .....
Cord6n
el_ctrico
Sujetador
inferior del
indicador de
rendimiento
(Algunos modelos)
Cubierta
de la bolsa
Panel de
esca
Palanca para ajustar
la altura
Mango para
Herramienta para
hendiduras
Tube
Cubierta de/
portiflo para
fimpieza
Cepillo
Herramienta
para tapices
Protector
de muebles
Faro/ Boquilla
Manguera giratoria
/ista para usar
Manguera
expandible
Protector de motor
(Detr_s de la manguera)
Correa
Pedal de
fiberaci_n
del mango
N_meros de
series det modelo
Agitador
Antes de armar ta aspiradora, verfique la LISTA
DE EMBALAJE en la cubierta separada de la Lista
de Partes para ReparaciSn Use esta lista para veri-
ficar que ha recibido todos los componentesde su
nueva aspiradora Kenmore
Peltgro de choque elOctrico
No conecte la aspiradora hasta que
termtne de armarta, De 1o contrarlo
podria causar un choque el_ctrtco o
lesion corporal,
"H : :
COLOCAClON DEL MANGO
Antes de
armar su aspi- C'_
radora, ase- '_\\
g_rese de tenet \\
disponibles
todas las plezas
que se muestran,
\
\\ -.----Mango
Sujefadores
del cordon
para
el tornitlo
Abertura para
el mango
para
el tornilto
del mango
Parte
la aspiradora
Retire el tornillo ubicado justo debajo del
mango para transportar en la parte posterior
de la aspiradora
Mango para
transortar
Tornilto
Coloque et
mango de
manera
que los
sujetadores
del cord6n
eI_ctrico
est6n hacia
la parte
posterior
de la aspi-
radora
Orificio para
el tornillo
tntroduzca _ Orificiopara
el mango lll! _l el tornilto
en la aber- det mango
tura de la ,_--,'x_
parte superior de la aspiradorao
Alinee el orificio del tornillo que se encuentra
en el mango con la abertura correspondiente
en ta aspiradora,
Inserte el torniltode manera que pase a trav_s
de la parte posterior de la aspiradora y dentro
del mango,
Comience a apretar el torntlfo con los dedos_
Es posibte que tenga que ajustar figeramente
el mango.
Mango para fransportar
Aprlete el tornillo con un
destornilladoro
CUIDADO
4
No apriete demasfado et tornillo,
Si Io aprieta demasiado podria arruinar
los orificios para el tornillo.
No opere ta aspiradora sin tener instala-
do el tornillo.
i,
ASAMBLEA DE
MANGUERA DEL ESTI-
RAMIENTO
Una la manguera del estiramiento al acoplador
de la manguera en el inyector del vacfo segun
Io demostrado. Se cerciora de ta manguera
del estiramiento est& conectada firmemente
con el acoplador de la manguera antes de usar
el vacio
Despegue la cinta I]
Iocalizada en la
parte trasera de la
untdad. Cinta-
COLOCACION DEL CORDON
AsegQrese de que el sujetador del cord6n de li-
beraci6n rgtpida se encuentre en posici6n verti-
cal. Quite el alambre con el que est_ atado el
cord6n electrico
Fije el cord6n en
posici6n,
forz&ndolo en la
ranura de bloqueo
ubicada en el
cuerpo del sujeta-
dor del cord6n de
liberaci6n r&pida,
como se muestra
Esto ayuda a que
el cord6n no se
enrede debajo del
agitador de la
aspiradora
Sujetador d_e\
liberaci6n
rapida del
cord6n
Cord6n
Sujetador
inferior de/
Cord6n d
el_ctrico I
Enrolle el
cord6n el_ctrtco
alrededor de los
sujetadores del
cord6n de libe-
raciSn r_pida y
inferior y pre-
sione la ranura
del enchufe
sobre e! cord6n,
PARA COMENZAR
/t
Sujetador de
,/-_ '/'_ liberaci6n
r.pid,del
cord6n
1, Glre el su-
jetador del
cord6n de ti-
beraci6n r&-
pida de lado
a lado y
hacia abajo
para liberar
el cord6n
el6ctrico.
2oDesprenda el enchufe del cord6n el_ctrico y
quite el cord6n del sujetador del cord6n de li-
beraci6n r&pida, Compruebe que el cord6n
el6ctrico sigue fijado en ta ranura de bloqueo
del sujetador del cord6n de liberacibn r&pida,
3, Verifique que la aspiradora tenga instalada
una botsa, Consulte ta CAMBIO DE LA
BOLSA PARA POLVQ
NOTA: Para reducir el riesgo de choque
el_ctrico, esta aspiradora cuenta con una
ctavija polarizada, uno de los contactos es
m_s ancho que el otro, La clavija s61opuede
introducirse de una manera en el enchufe, Si la
clavija no cabe bien en el enchufe, invi_rtala, Si
aun no cabe, ltame a un electricista para que
instale un enchufecorrecto. No altere la clavija
de ninguna manera.
4oConecte el cord6n el_ctrico polarizado en
un enchufe de 120 voltios que se encuentre
cerca del piso
ADVERTENClA
Peligrode lesi6n personal y dafio al producto
. NO conecte la asptradora sl el lnte-
rruptor est& en la postci6n ON. Podria
resultar en lesi6n personal o dafio.
. NO use los enchufes locallzados so-
bre los muebles, Los objetos cercanos
podrian resultar dafiados.
5
Para seleccionar un ajuste de ntvel de pelo
de ia alfombra:
Apague la aspiradora. Seleccione un nivel de
ajuste inclinando la aspiradora hacia atr_s
hasta que las ruedas delanteras est6n un poco
despegadas del piso.
Deslice ta palanca de ajuste de nivel de pelo
de la alfombra a la posici6n deseada.
SUGERENClAS DE AJUSTE DE NIVEL DE
PELO ALFOMBRA
Para que se le faciliten algunas tareas de
limpieza, como por ejemplo tapetes aueltos y
alfombras de pelo largo, puede que sea nece-
sario elevar ajuste de nivel de pelo de la alfom-
brao Los ajustes sugeridos son los suguientes.
HIGH: pelo _spero y lanudo, pelo largo, felpa,
alfombras o tapetes irregutares..
MED: pelo medtano o poco largo.
LOW: pelo corto o meiano,.
EX LOW: pefo muy corto.
ALGUNOS MODELOS
%
ADVERTENCIA
Peltgro de lesi6n personal
NO PONGA las manos o los pies deba-
jo de la asptradora cuando cambte de
ia selecci6n de pisos sin alfombra
hasta la selecct6n de nivel de pelo de
la alfombra. E! agitador gira raplda-
mente cuando la aspiradora est&
encendtda y est& en la selecci6n de
plsos con alfombra.
Para selecctonar el aJuste de piso descu-
blerto: Oprima el bot6n de selecci6n hasta
arras y debajo de la boquitla hasta que se
sienta asegurado.
En esta posici6n el ensamblaje de cepfllo no
da vueltas. Esta posfci6n debe estar usada
para limpiamiento de piso de madera y
mosalco y cuando se usan algunos acceso-
rios (herramtentas),
Seleccl6n de pisos con alfombra: Oprime et
boton completamente hasta el frente y por
arriba hasta la posici6n de pisos con alfombra
En esta posicl6n el ensambtaje de cepillo da
vueltas,. Cuando se limpia alfombras, el selec-
tor tiene que estar en esta posiciSn.
Nota: Para la vtda m&s larga de ia correa,
apague Ud, la aspiradora antes de mover el
selector, de otra manera, asegQrese de que
Ud. apriete por compteto y tan r_pido como
posible el selector a la posici6n deseadao Si
usted no Io hace de esta manera, puede
causar que la correa frote el eje del selector y
puede calentar y causar que se queme la cor-
rea que causarla un olor quemado,
Selector de ptsos
con alfombra y
sin a/fombra
Hasta /a
posiciSn de
pisos con
alfombra
Hasta ta
posiciSn de
pisos sin
alfombra
Desprenda el mango pisando el pedal de lib-
eraci6n y tirando del mango hacia abajo con ta
mano,
Pedal de /'
liberaci6n del
MONTADO EN EL IVIANGO
ALGUNOS MODELOS
Para arrancar la
asptradora, destice
el interruptor de
encendidol
apagado de ta
posici6n OFF a la
posici6n ON. Para
detenerla, coloque
el interruptor en la
posici6n OFE
lnterruptor de
encendido/
apagado
MONTADO EN EL CUERPO
ALGUNOS MODELOS
Para arrancar ta aspiradora, deslice el interrup-
tor de encen-
dido/apagado
a la posici6n
ON Elija la
posici6n OFF
cuando no
est6 usando la el_ctrico
aspiradora o al
almacenarla,
Para detener la aspiradora, deslice el interrup-
tor de encendido/apagado a la postci6n OFE
Herramienta
para
hendiduras
Tubo
Ceplllo para
sacudir
Herramienta
para
tapices
Manguera
Collar de
manguera
ldentifique cada uno de los accesorios mostra-
dos a continuaci6n,
COMO UTILIZAR LOS
ACCESORIOS
Para la se]ecci6n de pisos sin alfombra, gire el
selector attr6s y abajo hasta la selecci6n de
pisos sin atfombra Ver secci6n de SELECTOR
DE PISOS CON ALFOMBRAY SIN ALFOM-
BRA.
Cuando regrese hasta la selecci6n de pisos
con alfombra, cuide que el selector pueda
moverse r&pidamente hasta la selecci6n a
causa de la tensi6n de la correa.
Saque la parte inferior de la manguera exandible
de la aspiradora y tirando por at&s.
NOTA: La v&lvula de desviaci6n puede estar
abierta mientras se usan los accesorios o
para limpiar una alfombra nueva a causa de
un flujo reducido de aire por los accesorios
mismos o por la pelusa de la alfombra que
Ilene la bolsa rapidamente, Consutte el
cuadro RECONOCIMIENTO DE PROBLEMAS,
ADVERTENCIA
Peligro de choque el_ctrico o lesl6n cor-
poral
Desconecte la unidad antes de limpiarla
o darle servicfo. De Io contrario podria
producirse un choque el_ctrico o causar
lesi6n corporal sl ta aspiradora arranca
de manera imprevistao
Saquee]tubetelescOpicodesulugardealma-
cenamiento,
Retirelaherramientaparahendidurasde su
lugardealmacenamlentodentrodeltube.Gire
el aredeblequeohastala posici6nUNLOCK.
Despliegueeltubecompletamente.Gireel are
debloqueode!tubehastalaposici6nLOOK.
Instaleeltubedeextensi6nenelextreme
abiertodelamanguera.
PAPA OPERAR EL DESLIZA-
DOR DE CONTROL DE
ASPIRAClON
TUBO TELESCOPICO
Cuando use accesorios para limpiar cortinas,
tapetes pequeSos de pete corto y otros artfcu-
los delicados, gire el selector de control de
aspiract6n a la posict6n abiert& Este selector
se encuentra en el tube telesc6pico, cerca de la
manguera.
Alinee las pestaSas del tube de extensi6n con
las ranuras en forma de "J" de la manguerao
Empuje el tube dentro de la manguera y gire
hacia Faderecha para bloquearlo.
Esto reducir& la potencta de aspiractOn para
faci{ttar la limpieza
NOTA - Coloque el selector de control de aspF
raci6n a la posici6n cerrada para la limpieza
normal.
Para obtener la m&xima Iongitud con lot acce-
series, instale la herramienta para hendiduras
en el extreme del tube. Para hacerlo, introdt_z-
cala en el tube y gfrela un poco.
Manguera
Oesllzador de
control de
aspiract6n
Tubo
telesc@ico
Herramient_
para
hendiduras
des_cado
CUIDADO
Cuando use los accesorios, tenga cui.
dado de no estirar demasiado la man-
guera expansible para tratar de alcan-
zar m&s tejos. Si trata de estirar la man-
guera mrs de Io debido, podria causar
que la asplradora se venga abajo.
Cuando use el
cepillo para
sacudir o el
accesorio para
telas, puede
instalarlos direc-
tamente ell el
Deslizador tube o en el
de control extreme de la
de aspiraci6n herramienta para
hendiduras,
ALMACENAJE DE LOS
ACCESORIOS
Retire et cepitto para sacudir o et accesorio
para telas, Coi6quelos firmemente en su lugar
de almacenamiento correspondiente,
Retire la herramienta para hendiduras del tubo
gir_ndola, POngala a un lado,
Retire el tubo de extensi6n de la manguera,
Gire el tubo hacia la izquierda y tire del
extremo
__C Tubo
-.. inferior
errar
(.
! w= _----bloque
Abrir_ \ del tubo
"-_T ubo
de la superior
manguera
Desbloquee el tubo
girando el aro de
bloqueo hasta la
posicibn UNLOCK,
Desltce el tube inferior dentro del tubo superior,
Gire el aro de bloqueo del tubo a la posici6n
LOCK.
Introduzca la herramtenta para hendiduras den-
tro del tubo comprimido, lnstale bien en su
posici6n de almacenamiento
AsegBrese de que la unidad est6 apagada,
Inserte nuevamente la manguera completa-
mente dentro de la abertura ubicada en ia
parte inferior de la aspiradora, de donde ta
sac6 inicialmente, Ejerza presi6n firme para
asegurarse de que conecte bien,
ADVERTENCIA ......
Peligro de lesi6n personal
NO ponga las manos o pies debajo de la
untdad al conectar la manguera. E! ceplllo
cllindrico empieza a glrar r&pidamente
cuando se prende la aspiradora y se se-
f_
lecclona una graduacion de altura.
MANGUERA DE EXTENSION
ALGUNOS MODELOS
La manguera expandible adherida a la aspira-
dora cuenta con dos ranuras en forma de "J" en
el extremo donde se instalan los accesorios,
A
Manguerade "=_== Manguerade
la unidad _ extension
La manguera de extensi6n tiene dos botones
en el extreme que pueden oprimirse e inser-
tarse en las ranuras para juntar las dos man-
gueras
Los accesorios y el tubo telesc6pico pueden
instalarse en el extremo opuesto de la man-
guera de extensi6n para alcanzar m_s tejos.
S] su modelo no ttene una manguera
expandible, usted puede comprar una. en
alguna tienda Sears, El nL_merode parte es
20-52571, En Canad,€ pieza N° 20_40975
• cui6AS0...................................
Cuando use la manguera en forma nor-
mal o con la manguera de extensi6n
instalada, la aspiradora debe mante-
nerse sobre una superficte flrme al
mismo nivel o a un nivel inferior que los
pies dei usuario.NO use las mangueras
cuando la aspiradora est_ a un nivel
AREA A LIMPIAR
Entre
ACCESORIO Muebles* coijines* Cortinas* Escalones Paredes
CEPILLO PAPA _ X X X
SACUDIR
HERRAMIENTA PARA_ .....HENDIDURAS X X X
CEPILLO PARA
X X X
TELAS
Siemprelimpielos accesoriosantesdeusarsobretelas
9
Orillas de alfombras,
Gule uno de los costados o la parte anterior
de la boquilla a io largo del borde de la pared_
Los cepillos largos ayudan a aspirar la tierra en
tas oritlas de las alfombras
Escalones,
Coloque el mango en la posici6n vertica!, Use
Ia herramienta para hendiduras o el cepillo
para telas.
ADVERTENCIA
Peligro de lesi6n personal
ActLie con precauci6n si coloca la
aspiradora sobre escalones. Si se cae,
podria causar lesi6n personal o da5o a
la propiedad.
Para obtener los
mejores resulta-
dos de limpieza,
mantenga des-
bloqueados los
conductos de
flujo de airer
Examine de vez
en cuando cada
una de las zonas
que se indica
podrlan causar
bloqueo_
Oesconecte la
aspiradora del
enchufe antes de
examinarla
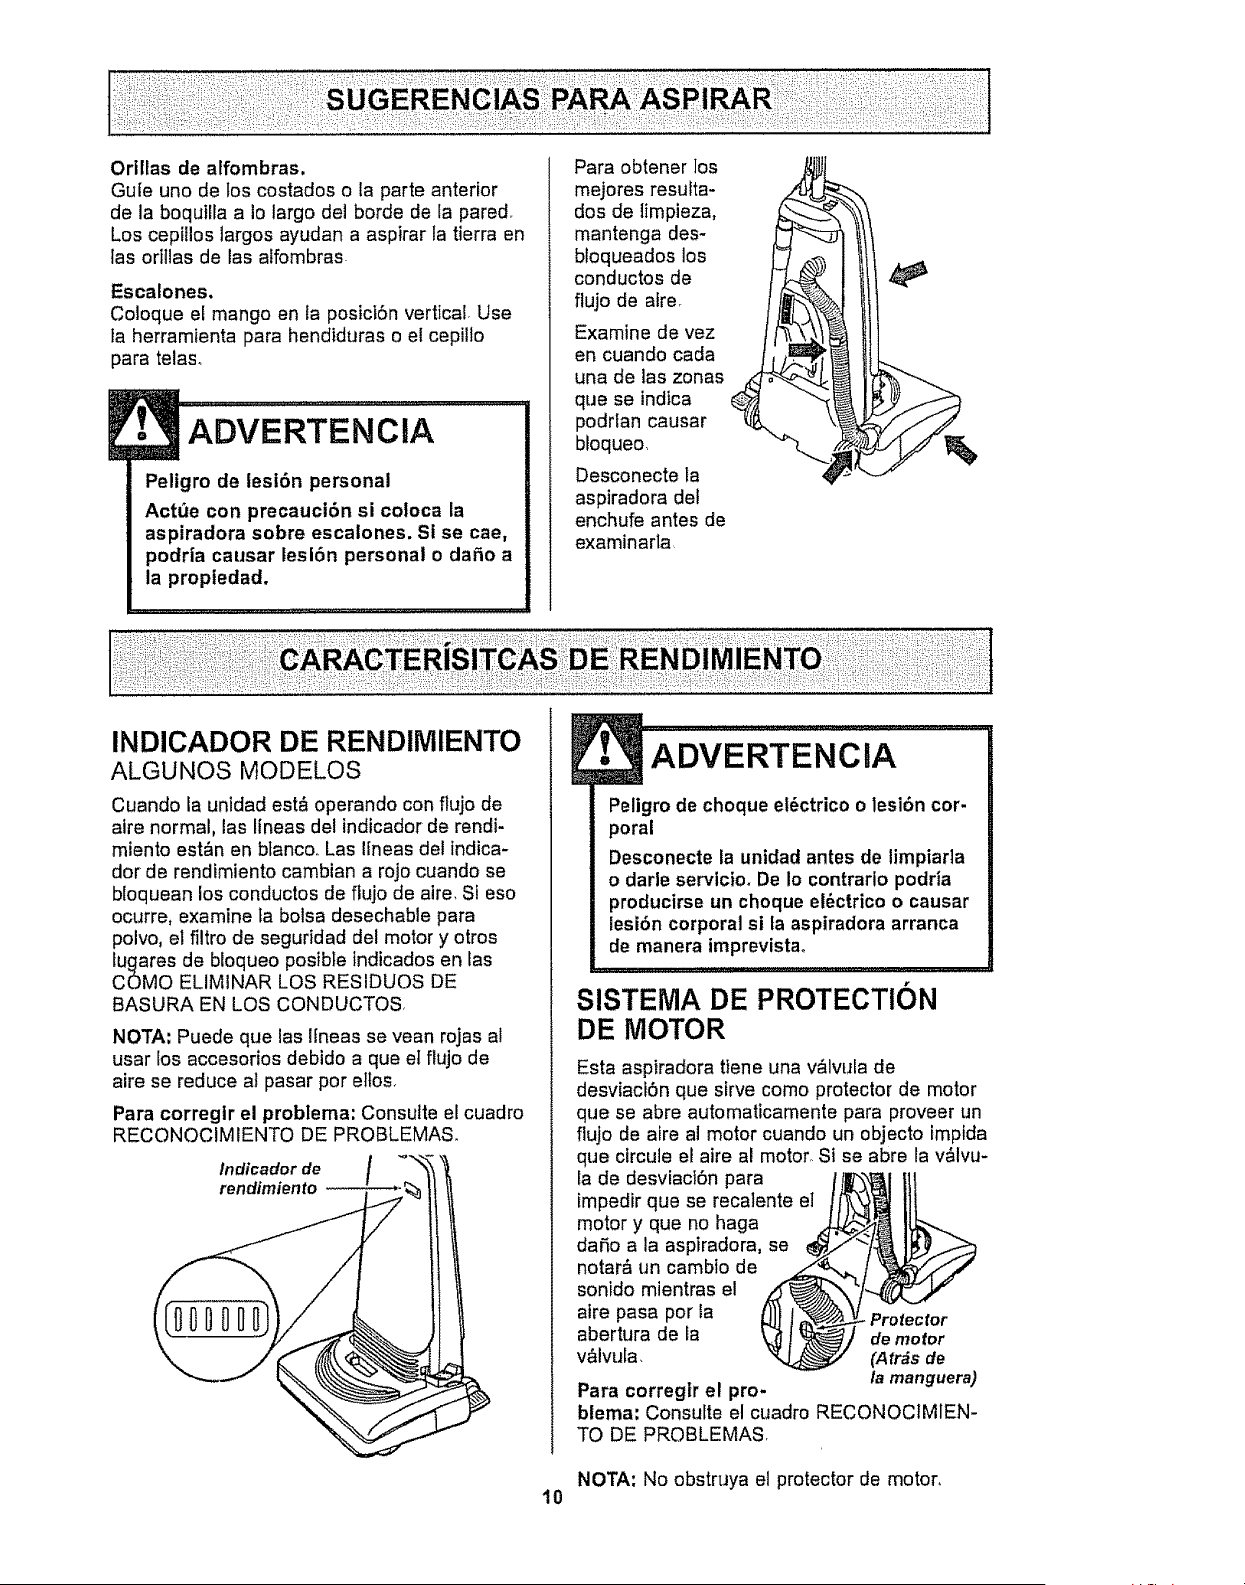
INDICADOR DE RENDllVlIENTO
ALGUNOS MODELOS
Cuando la unidad est& operando con ftujo de
alre normal, las lineas del indicador de rendi-
miento est&n en btanco. Las !fneas del indica-
dor de rendimiento cambian a rojo cuando se
bloquean los conductos de ftujo de aire, SI eso
ocurre, examine ta bolsa desechable para
polvo, el filtro de seguridad del motor y otros
tu£1aresde bloqueo posible indicados en tas
COMO ELIMINAR LOS RESIDUOS DE
BASURA EN LOS CONDUCTOS,
NOTA: Puede que las lineas se vean rojas al
usar los accesorios debido a que et flujo de
aire se reduce al pasar por ettos,
Para corregir el problema: Consulte el cuadro
RECONOCIMIENTO DE PROBLEMAS.
Indicador de
rendimiento
ADVERTENCIA
Peligro de choque el_ctrico o lesi6n cor-
poral
Desconecte ia unidad antes de limpiarla
o darle servicio. De Io contrarlo podria
producirse un choque el_ctrico o causar
lesi6n corporal si fa aspiradora arranca
de manera imprevistao
SISTEMA DE PROTECTION
DE MIOTOR
Esta aspiradora tiene una v&lvula de
desviaci6n que sfrve como protector de motor
que se abre automaticamente para proveer un
flujo de aire al motor cuando un objecto impida
que circule el aire al motor, St se abre la v&lvu-
la de desviaci6n para
impedir que se recalente el
motor y que no haga
daSo a la aspiradora, se
notar& un cambto de
sonido mientras el
aire pasa por ta
abertura de la
v&lvula,
- Protector
de motor
(Arras de
la manguera)
Para correglr el pro-
blema: Consulte el cuadro RECONOCtMIEN-
TO DE PROBLEMAS
NOTA: No obstruya el protector de motor°
10
Siga siempre todas las instrucciones de
seguridad al limpiar y darle servicio a su
aspiradora.
ADVERTENCIA
Peligro de choque elbctrico o lesi6n cor-
poral
Desconecte ta unidad antes de limpiarla
o darle servicioo De Io contrario podria
productrse un choque el6ctrico o causar
lesi6n corporal si la aspiradora arranca
de manera imprevista,
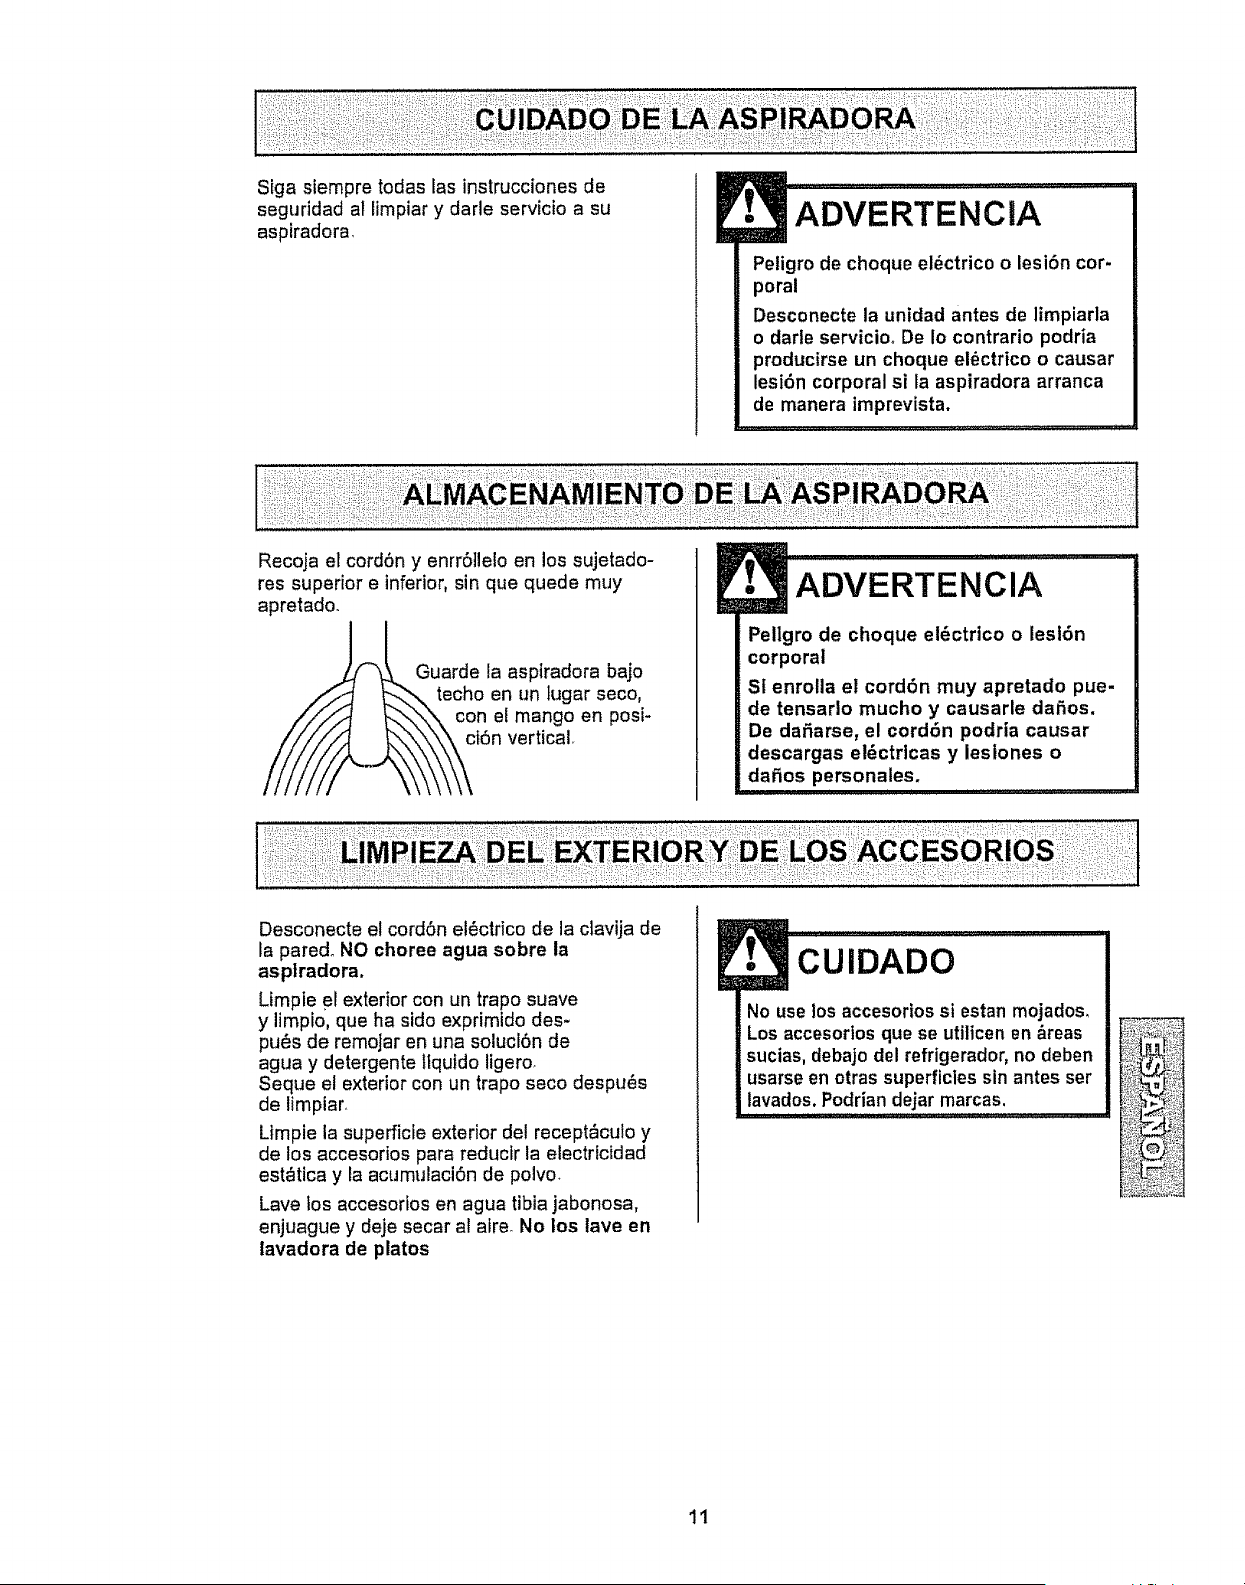
Recoja el cord6n y enrr6]lelo en los sujetado-
res superior e inferior, sin que quede muy
apretado.
uarde la asptradora bajo
echo en un tugar seco,
con el mango en posi-
i6n vertical_
ADVERTENClA
Pellgro de choque el_ctrtco o lesl6n
corporal
SI enrolla el cordbn muy apretado pue-
de tensarlo mucho y causarle daSos.
De dafiarse, el cord6n podria causar
descargas el_ctrtcas y lesiones o
dafios personates.
Desconecte el cord6n el_ctrico de la clavija de
la pared° NO choree agua sobre la
asptradora,
Limpie el exterior con un trapo suave
y limpio, que ha sido exprimido des-
pu6s de remoJar en una solucl6n de
agua y detergente llquido ligero
Seque el exterior con un trapo seco despu_s
de limpiar,
Limpie la superficfe exterior de! recept_culo y
de los accesorios para reducir la electricidad
est_tica y la acumulaci6n de polvo_
Lave fos accesorios en agua tibia jabonosa,
enjuague y deje secar al aire_No los lave en
lavadora de platos
CUIDADO
No use los accesorios si estan mojados,
Los accesorios que se utilicen en _reas
sucias, debajo del refrigerador, no deben
usarse en otras superficies sin antes ser
lavados.Podrian dejar rnarcas,
11
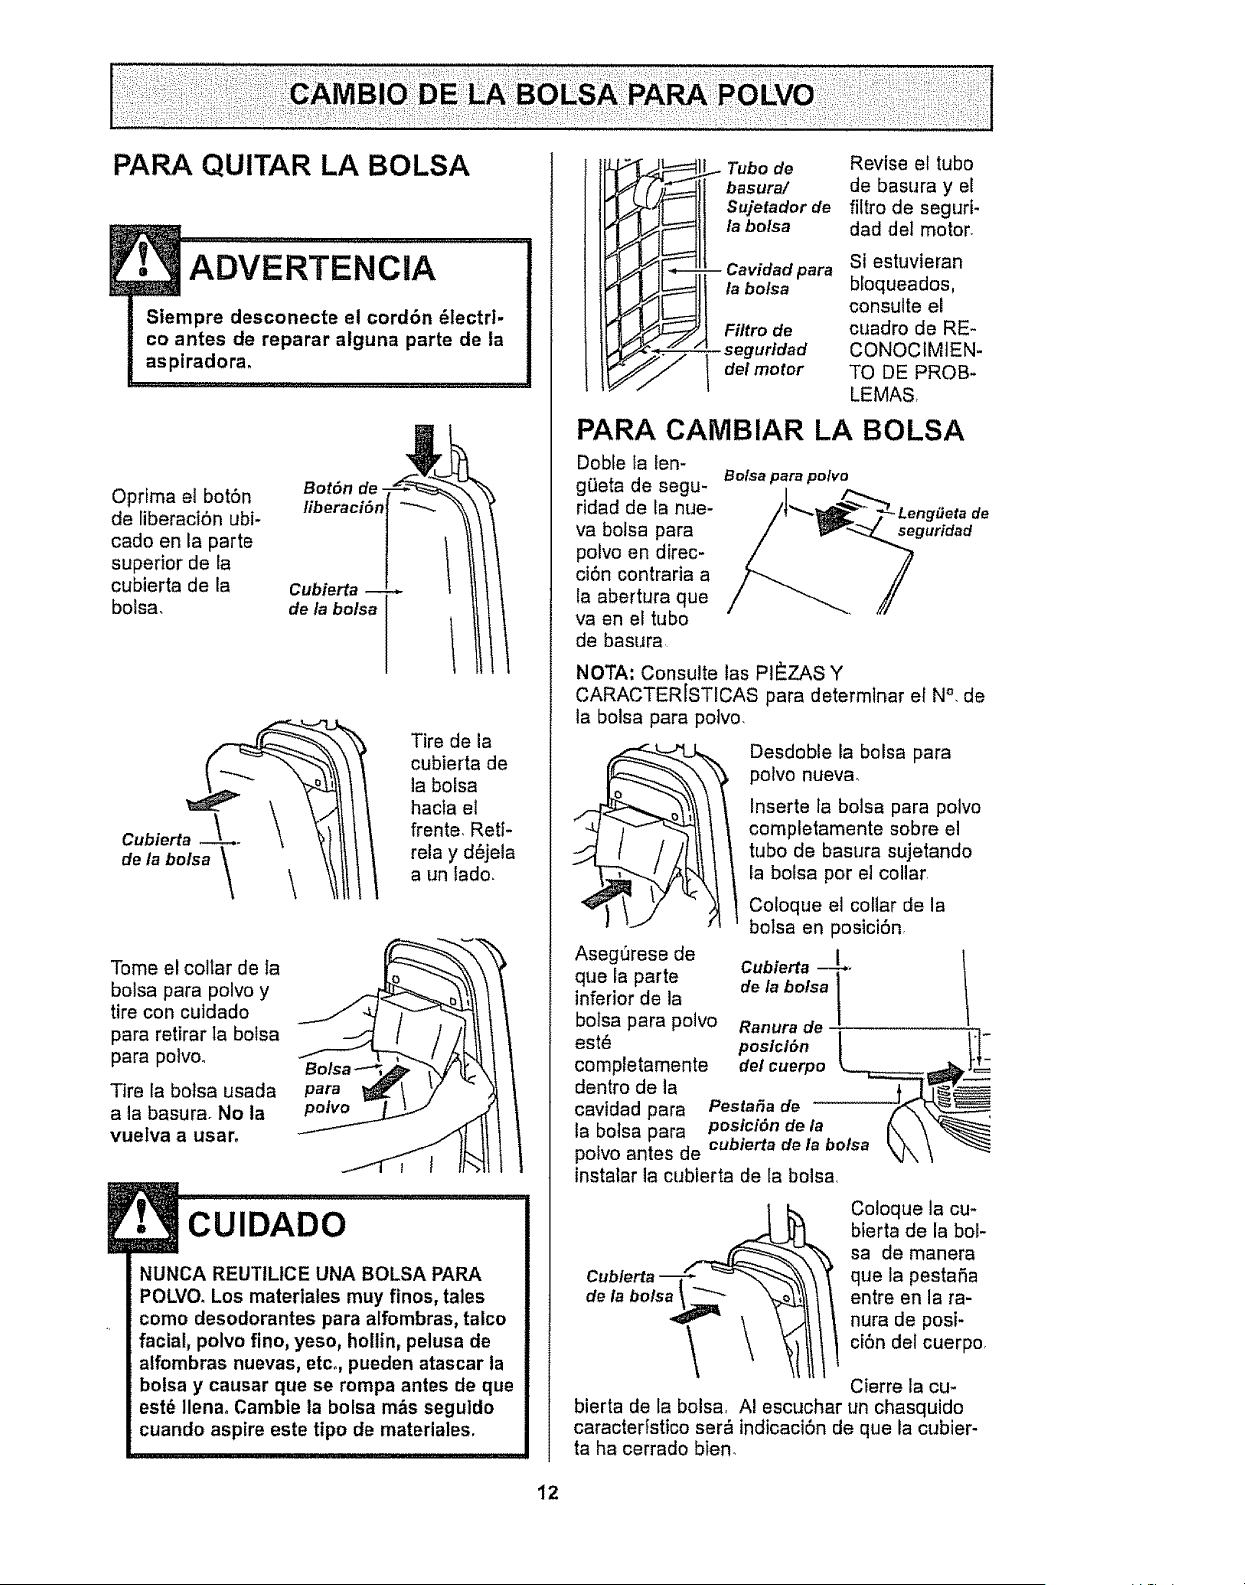
PARA QUITAR LA BOLSA
• ADVERTENClA
Siempre desconecte el cord6n _lectrl-
co antes de reparar alguna parte de la
as piradora.
Optima el bot6n Bot6n de-
liberaci6n
de liberact6n ubi-
cado en la parte
superior de la
cubierta de la Cubierta
bolsa, de la bolsa
Tire de la
cubierta de
la boisa
hacta el
frente. Reti-
relay d_jela
a un iado.
Tome el collar de la
bolsa para polvo y
tire con cuidado
para retirar la bolsa
para polvoo
Tire la bolsa usada
a la basurao No la
vuelva a usar,
para
polvo
CUIDADO
NUNCA REUTILtCE UNA BOLSA PARA
POL_VO.Los materiales muy finos, tales
como desodorantes para alfombras, talco
facial, polvo fino, yeso, hollin, pelusa de
alfombras nuevas, etco,pueden atascar la
bolsa y causar que se rompa antes de que
est_ IlenaoCambie la bolsa m&sseguldo
cuando aspire este tipo de materiales0
as_ePara
- s_guridad
"_//_ delmotor
Revise el tubo
de basura yet
filtro de seguri-
dad del motor.
Si estuvieran
bloqueados,
consulte el
cuadro de RE-
CONOCIMIEN-
TO DE PROB-
LEMAS
PARA CAMBIAR LA BOLSA
Doble ia ten-
g0eta de segu-
ridad de ta nue-
va bolsa para
polvo en direc-
ci6n contraria a
la abertura que
va en et tubo
de basura
Bolsa para polvo
seguridad
NOTA; Consulte las PI#ZAS Y
CARACTER[STICAS para determlnar el N°, de
la bolsa para poivo,
O =
O
Asegt_rese de
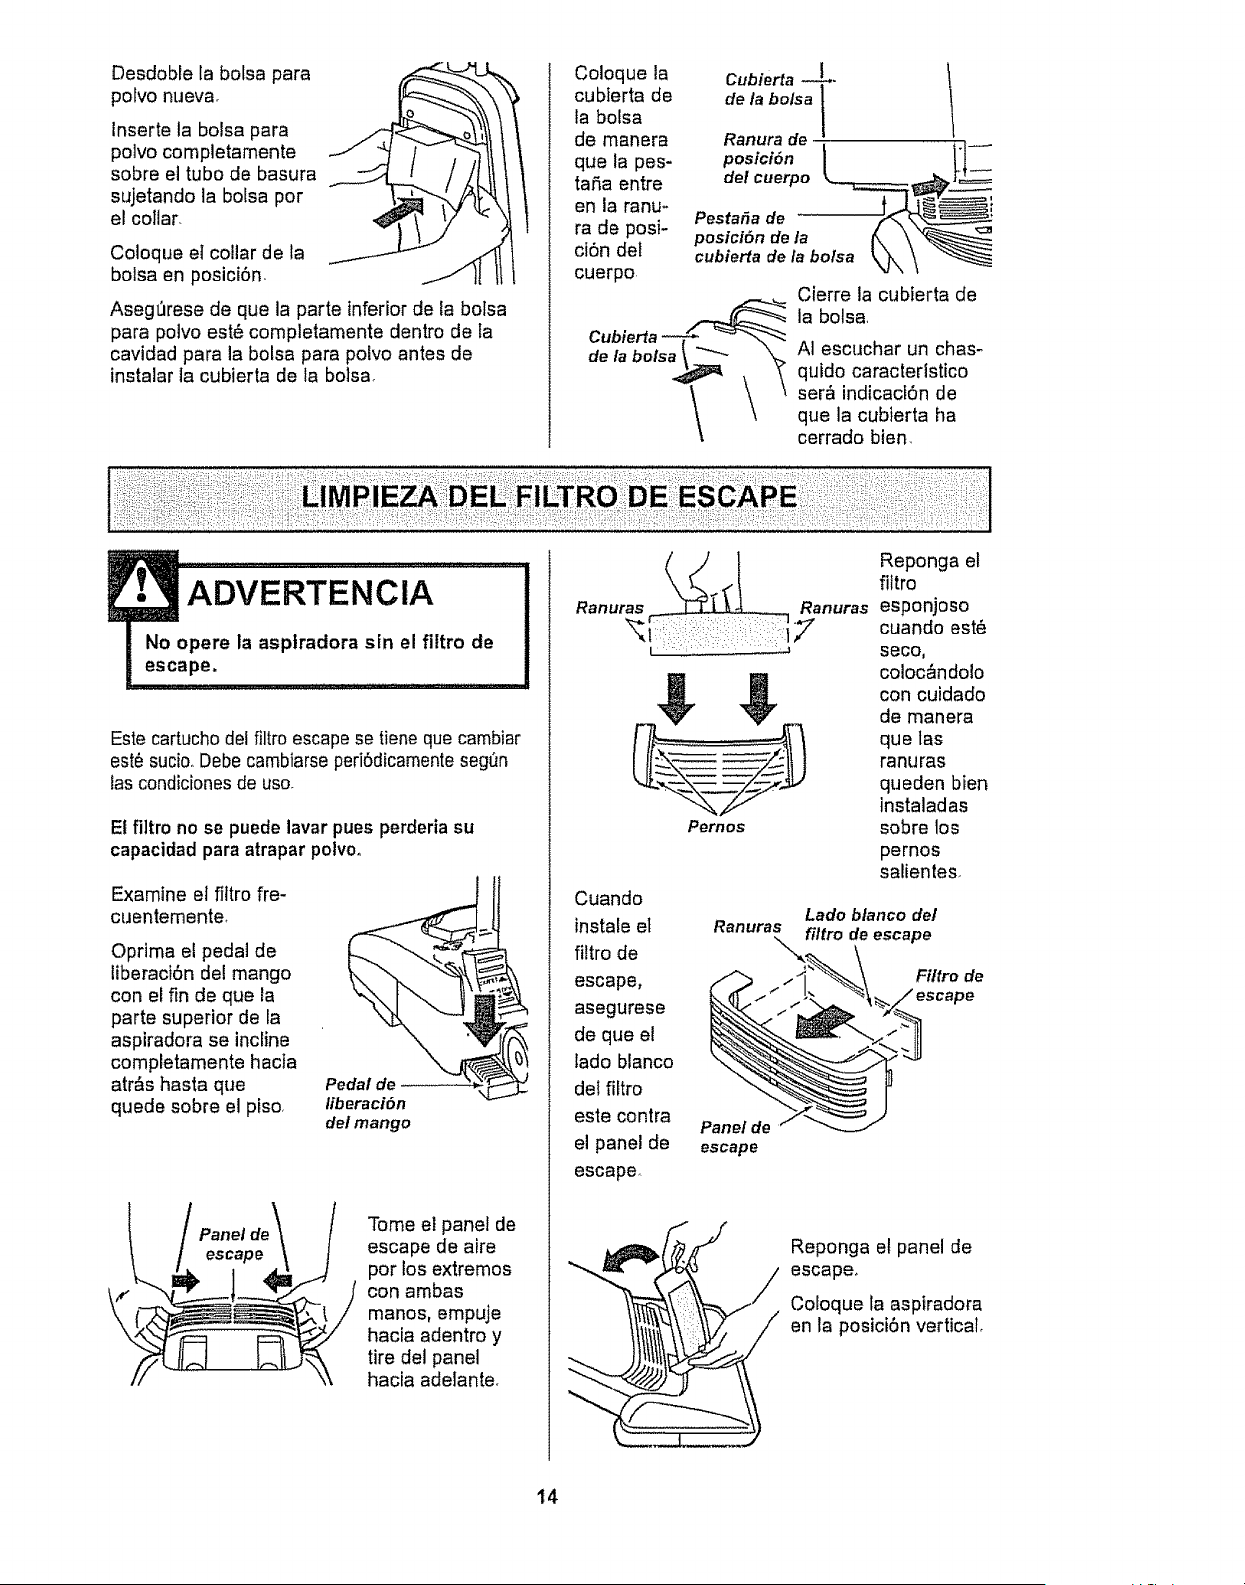
Desdoble la bolsa para
polvo nueva,
Inserte fa bolsa para polvo
comptetamente sobre el
tubo de basura sujetando
la bolsa por el collar_
Coloque el collar de la
bolsa en posici6n,
Cubierta __L.
que la parte 1
inferiorde la de la bolsa
I
bolsa para polvo Ranura de =
est6 I tl-
completamente del cuerpo ___jb t T-
dentro de la -_---_"7_r'_._
cavidad para Pesta_a de .....
la bolsa _oara posici6n, de la _\ \\
polvo antes de cubterta de la bolsa _._\ \
instalar la cubierta de la bolsa.
_! Coloque la cu-
blerta de la bol-
sa de manera
que la pestafia
,\X entre en la ra-
nura de posi-
ci6n del cuerpo,
Cierre la cu-
bierta de la bolsa, A! escuchar un chasquido
caracterfstico ser_ indicaci6n de que la cubier-
ta ha cerrado bien_
12
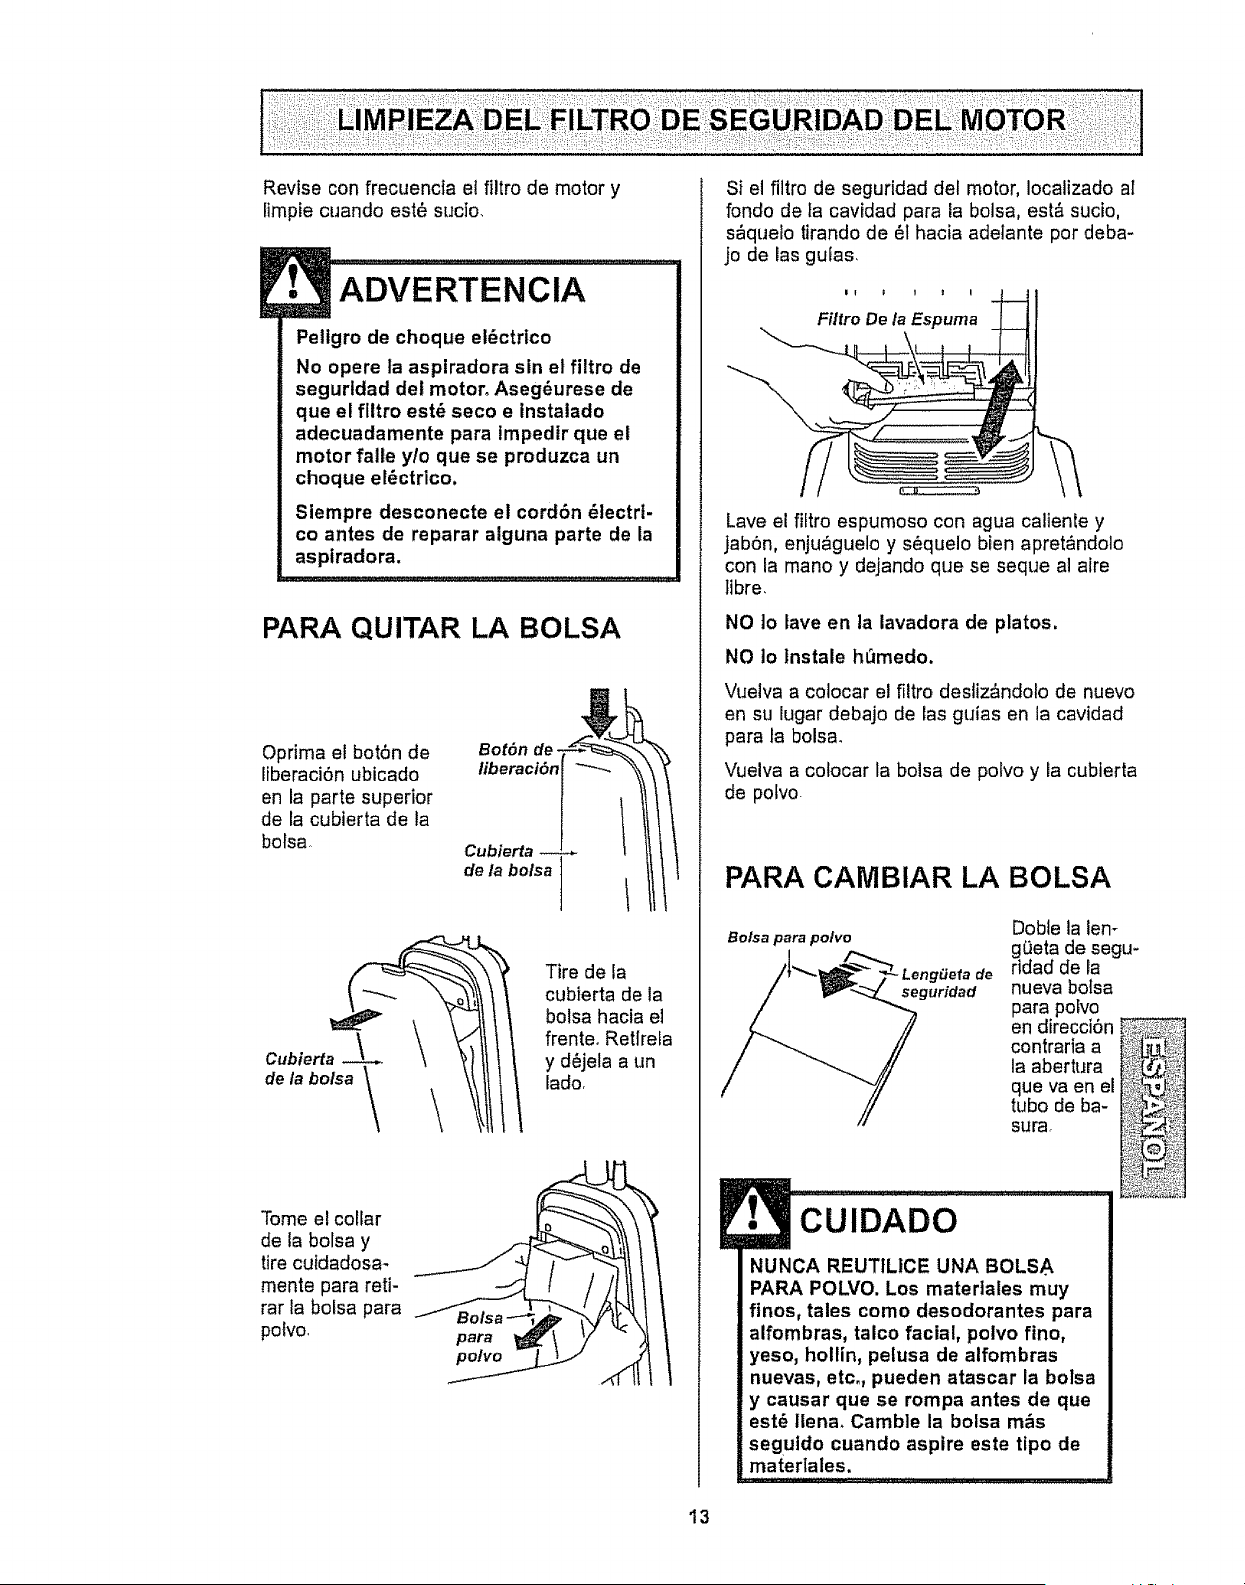
Revise con ffecuencta el filtro de motor y
limpie cuando est6 sucto.
ADVERTENClA
Peligro de cheque el6ctrtco
No opere ta aspiradora sin el filtro de
segurtdad del motor° Aseg_urese de
que el flltro est_ seco e tnstalado
adecuadamente para lmpedir que el
motor faile ylo que se produzca un
cheque el_ctrico.
Siempre desconecte el cord6n _lectrt-
co antes de reparar alguna parte de la
asptradora.
PARA QUITAR LA BOLSA
Oprima el bot6n de
riberaci6n ubicado
en la parte superior
de la cubierta de la
bolsa
Bot6n de-
tiberaci6n
Cubierta
de la belsa ]
t
Tire de la
cubierta de la
bolsa hacia el
frente. Retlrefa
y d6jela a un
lade.
Tome e! collar
de la bolsa y
tire cuidadosa-
mente para reti-
rar ia bolsa para
polvo,
para
potvo
Si el fittro de seguridad del motor, Iocalizado al
fondo de ta cavidad para la bolsa, est,. sucto,
s_quelo tirando de 61hacia adeiante per deba-
jo de las gufas,
Filtro De la Espuma
Lave el filtro espumoso con agua caliente y
jab6n, enju&guelo y s_quelo bien apret&ndolo
con la mano y dejando que se seque al aire
tibre,
NO 1o lave en ]a lavadora de plates.
NO to Instale hL_medo.
Vuelva a colocar el filtro desliz_ndolo de nuevo
en su lugar debajo de las guias en la cavidad
para la bolsa.
Vuelva a colocar la bolsa de polvo y la cubierta
de potvo
PARA CAMBIAR LA
Bolsa para polvo
seguridad
BOLSA
Doble la len-
gOeta de segu-
ridad de la
nueva bolsa
para potvo
en direcci6n
contraria a
la abertura
que va en el
tubo de ba-
surao
CUIDADO
NUNCA REUTILICE UNA BOLSA
PARA POLVO. Los matertales muy
fines, tales come desodorantes para
alfombras, talco facial, polvo fine,
yeso, hollin, pelusa de alfombras
nuevas, etc., pueden atascar la bolsa
y causar que se rompa antes de que
est_ llena. Camble la bolsa m_s
segutdo cuando aspire este tipo de
materlales.
I3
Desdoble la botsa para
pofvo nuevao
lnserte la bolsa para
polvo completamente
sobre el tubo de basura S
sujetando la bolsa por
el collar ,_
Coloque el collar de la /
bolsa en posici6n.
Aseg_rese de que la parte Inferior de la bolsa
para polvo est_ completamente dentro de la
cavidad para la bolsa para polvo antes de
instalar la cubierta de la bolsa.
Coloque la Cubierta __1
cublerta de de la bolsa i
la bolsa
I
de manera Ranura de
que la pes-
tara entre
en la ranu*
ra de posi-
ci6n det
cuerpo
_. Cierre la cubterta de
.__. - _-"_ la bolsa
Cubierta
de la bolsa_"- N.. AI escuchar un chas-
quido caracterlstico
\ ser& indicact6n de
que la cubterta ha
cerrado bien
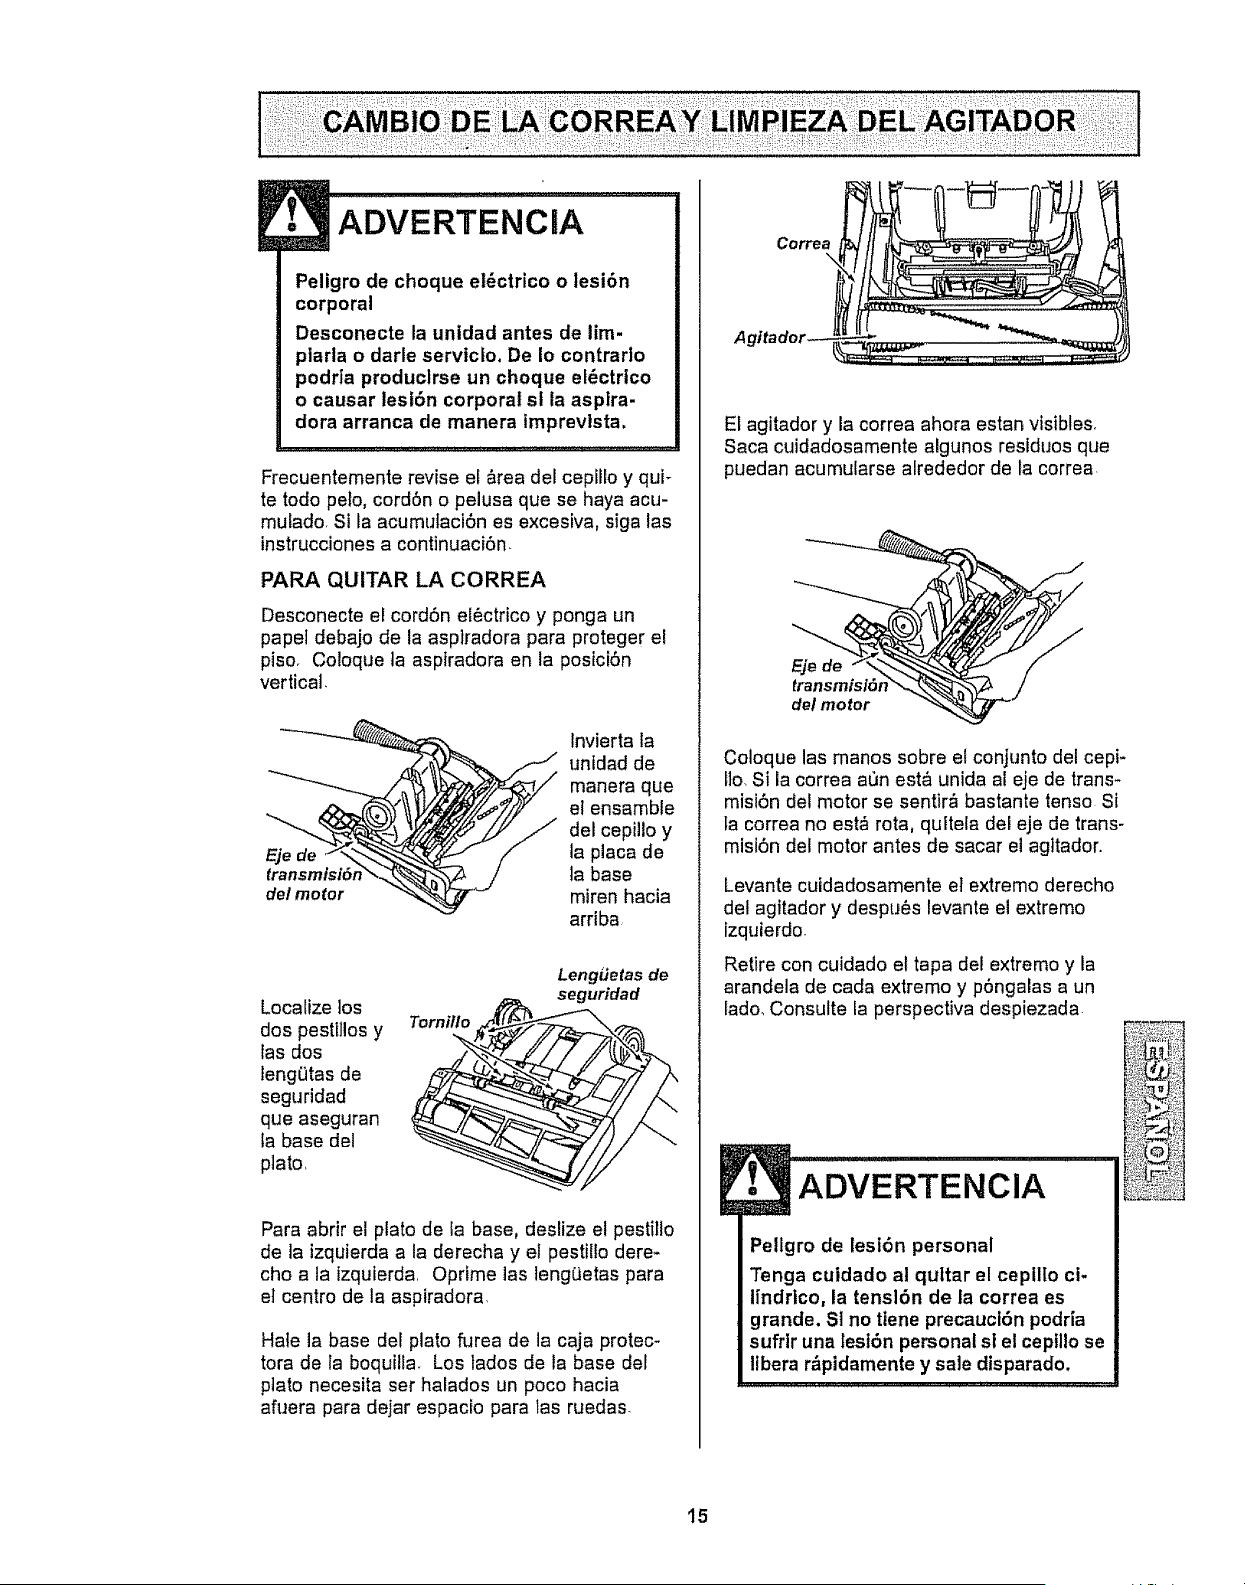
ADVERTENClA : ....
pere la asptradora sin el filtro de
pe,
Este cartucho del filtro escape se lene que cambiar
est6 sucio° Debe cambiarse peri6dicamenteseg0n
tas condiciones de uso.
El filtro no se puede lavar pues perderia su
capacidad para atrapar polvoo
Examine el fittro fie-
cuentemente,
Oprlma el pedal de
fberact6n del mango
con el fin de que la
parte superior de la
aspiradora se incline
completamente hacia
atr&s hasta que
quede sobre el piso,
Pedal de
/iberaci6n
del mango
tL Panel de
escape
Tome el panel de
escape de aire
pot los extremos
con ambas
manos, empuje
hacia adentro y
tire del panel
hacia adelante.
Pernos
Reponga el
filtro .
esponloso
cuando est&
seco,
coloc_ndolo
con cuidado
de manera
que las
ranuras
queden bien
instaladas
sobre los
pernos
sallenles.
Cuando
instale el
filtro de
escape,
Ranuras
Lado blanco del
filtro de escape
F#tro de
asegurese
de que el
lado blanco
det fittro
este contra
Panel de
el panel de escape
escape.
Reponga el panel de
escape,
Coloque la aspiradora
en la posici6n vertical,
14
ADVERTENCIA
Peligro de choque el_ctrico o lesi6n
corporal
Desconecte la unidad antes de lim-
plarla o darle serviclo. De Io contrado
podrla produclrse un choque el_ctrlco
o causar lesi6n corporal sl la asplra-
dora arranca de manera tmprevlsta,
Frecuentemente revise el Area del cepillo y qui-
te todo pelo, cordon o pelusa que se haya acu-
mulado, Si la acumutaciOn es excesiva, siga las
instrucciones a continuaci6n_
PARA QUITAR LA CORREA
Desconecte el cordon el_ctrico y ponga un
papel debajo de la aspiradora pare proteger el
piso_ Coloque ta aspiradora en la posiciOn
vertical,
lnvierta la
_ nidad de
manera que
el ensemble
del cepillo y
la place de
la base
miren hacia
arriba
Locafize los
dos pestillos y
las dos
leng0tas de
seguridad
que aseguran
ta base del
plato,
Tornillo
LengLJetas de
seguridad
Pare abrir el plato de la base, deslize el pestillo
de la izquierda ala derecha y el pestilto dere*
cho ala izquierda. Oprime las lengCietas para
el centro de la aspiradora.
Hate la base del plato furea de la caja protec-
tore de la boquilla_ Los tados de la base det
plato necesita ser halados un poco hacia
afuera para dejar espacio para las ruedas
El agitador y la correa ahora estan visibtes,
Saca cuidadosamente algunos restduos que
puedan acumularse alrededor de la correa.
del motor
Coloque las manos sobre el conjunto del cepi-
tlo.Si la correa a0n est& unida a[ eje de trans-
misi6n del motor se sentir& bastante tenso Si
la correa no est_ rota, quitela del eje de trans-
misi6n del motor antes de sacar e! agttador.
Levante cuidadosamente el extremo derecho
del agitador y despues levante el extremo
izquierdo.
Retire con cuidado el tapa del extremo y la
arandela de cada extremo y p6ngalas a un
lado, Consulte la perspectiva despiezada
ADVERTENClA
Pellgro de lesi6n personal
Tenga cuidado al qultar el ceplllo ci-
lindrico, la tensl6n de la correa es
grande. S] no ttene precauci6n podria
sufrtr una lesion personal st et cepfllo se
itbera r&ptdamente y sale disparado,
15
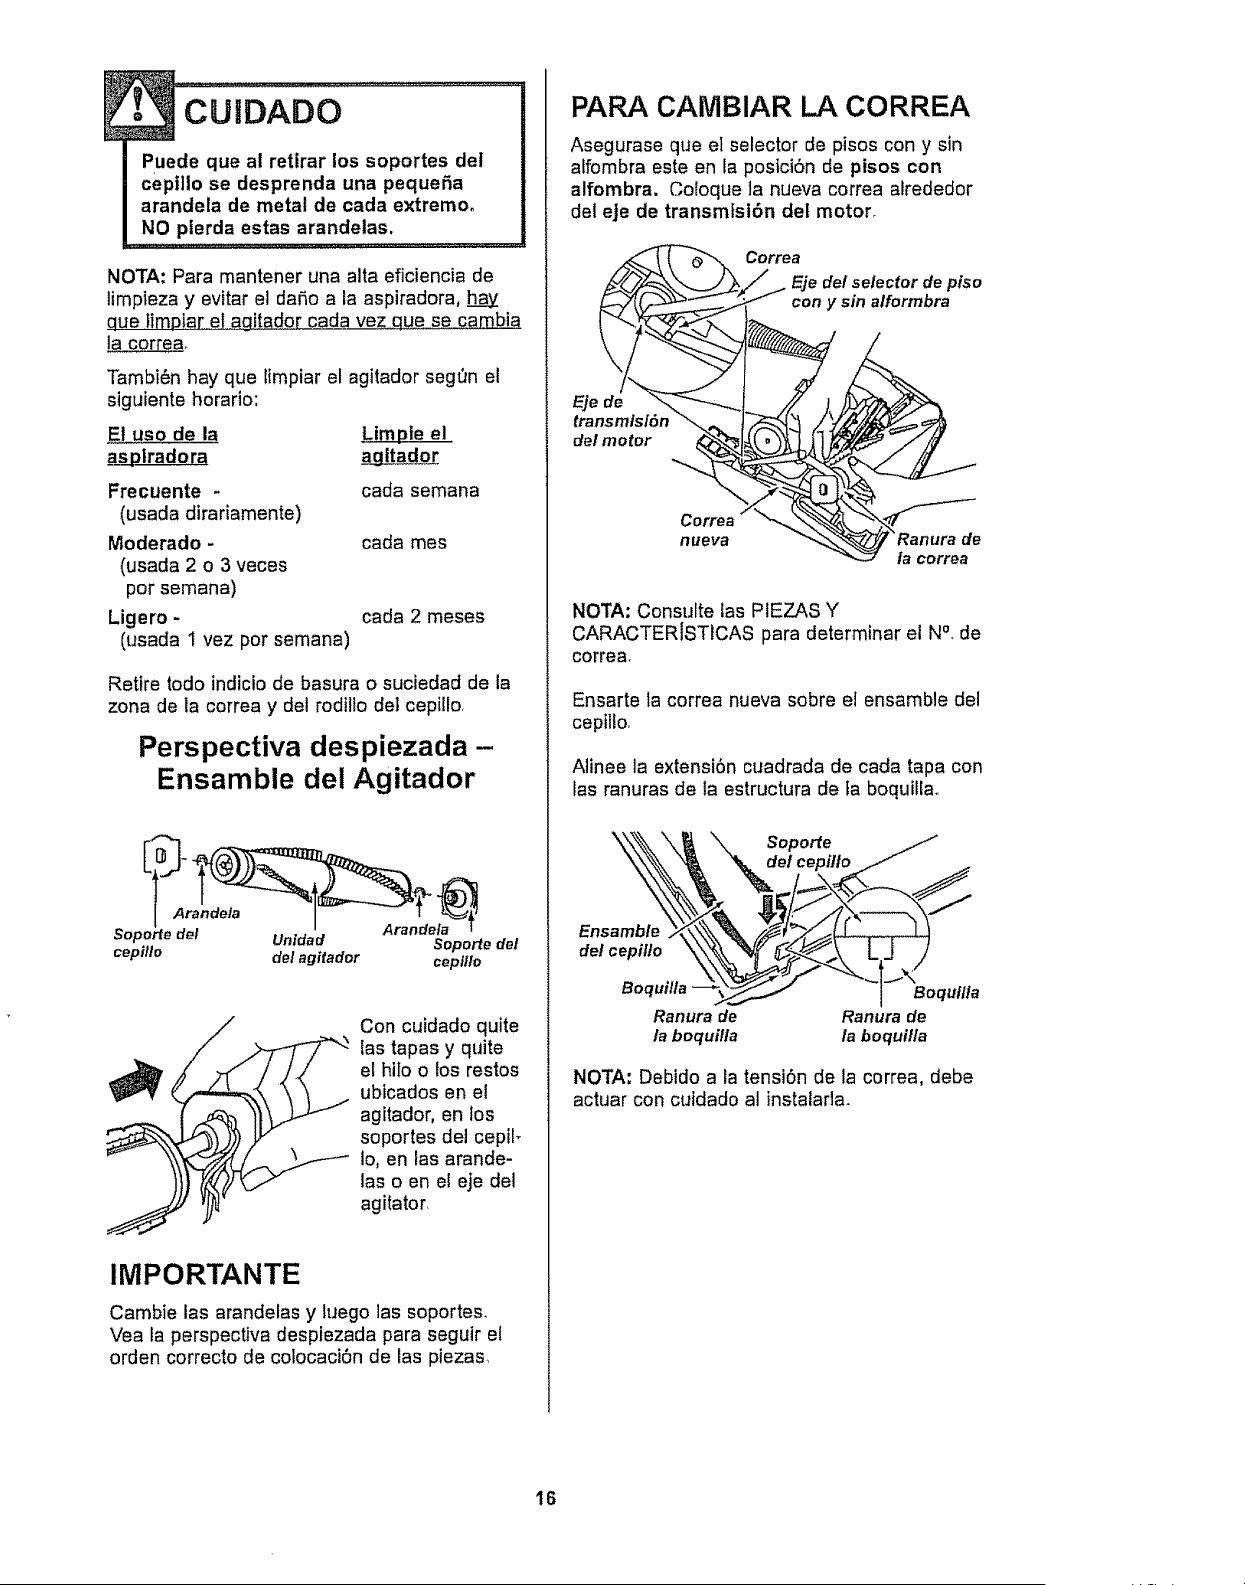
Puedequeal retirarlossoportesdel
ceptllosedesprendaunapequeSa
arandelademetalde cadaextremm
NOplerdaestasarandelas.
NOTA: Para mantener una aita eficiencia de
limpieza y evitar el daSo a la aspiradora,
c!ue limDiar el agitador cada vez que se car_bia
la cor_rea.
Tambi6n hay que Etmpiarel agitador seg_n el
siguiente horatio:
El uso de la
as__s_piradora
Frecuente -
(usada dirariamente)
Moderado -
(usada 2 o 3 veces
por semana)
Ligero -
(usada t vez pot semana)
LimDie el
cada semana
cada mes
cada 2 meses
Retire todo indicio de basura o suciedad de la
zona de la correa y del rodilio del cepitlo,
Perspectiva despiezada-
Ensamble del Agitador
cepillo
Arandela
Unldad Soporte del
del agitador cepil/o
Con cuidado quite
las tapas y quite
el hiIo o los restos
ubicados en el
agitador, en los
soportes del cep[I-
Io, en las arande-
las o en el eje del
agitator.
IMPORTANTE
Cambie las arandelas y luego ias soportes.
Vea la perspectiva despiezada para seguir el
orden correcto de colocaci0n de las piezas_
PARA CAIVIBIAR LA CORREA
Asegurase que el selector de pisos con y sin
alfombra este en la posici6n de pisos con
alfombra, Coloque ]a nueva correa alrededor
del eje de transmtst6n del motor,
Correa'
Eje de/selector de piso
con y sin alformbra
d8
delmotor
nueva
de
fa correa
NOTA: Consulte las PIEZAS Y
CARACTERISTICAS para determinar el N°, de
correa,
Ensarte la correa nueva sobre et ensamble del
cepillo,
Alinee la extensi6n cuadrada de cada tapa con
tas ranuras de la estructura de _a boquillao
Boquil/a --
Ranurade
/a boquilla
\_d S°p°rte /
el cepillo /
Ranura de
la boquilla
NOTA: Debido a la tensiOn de la correa, debe
actuar con cuidado al instalafla.
16
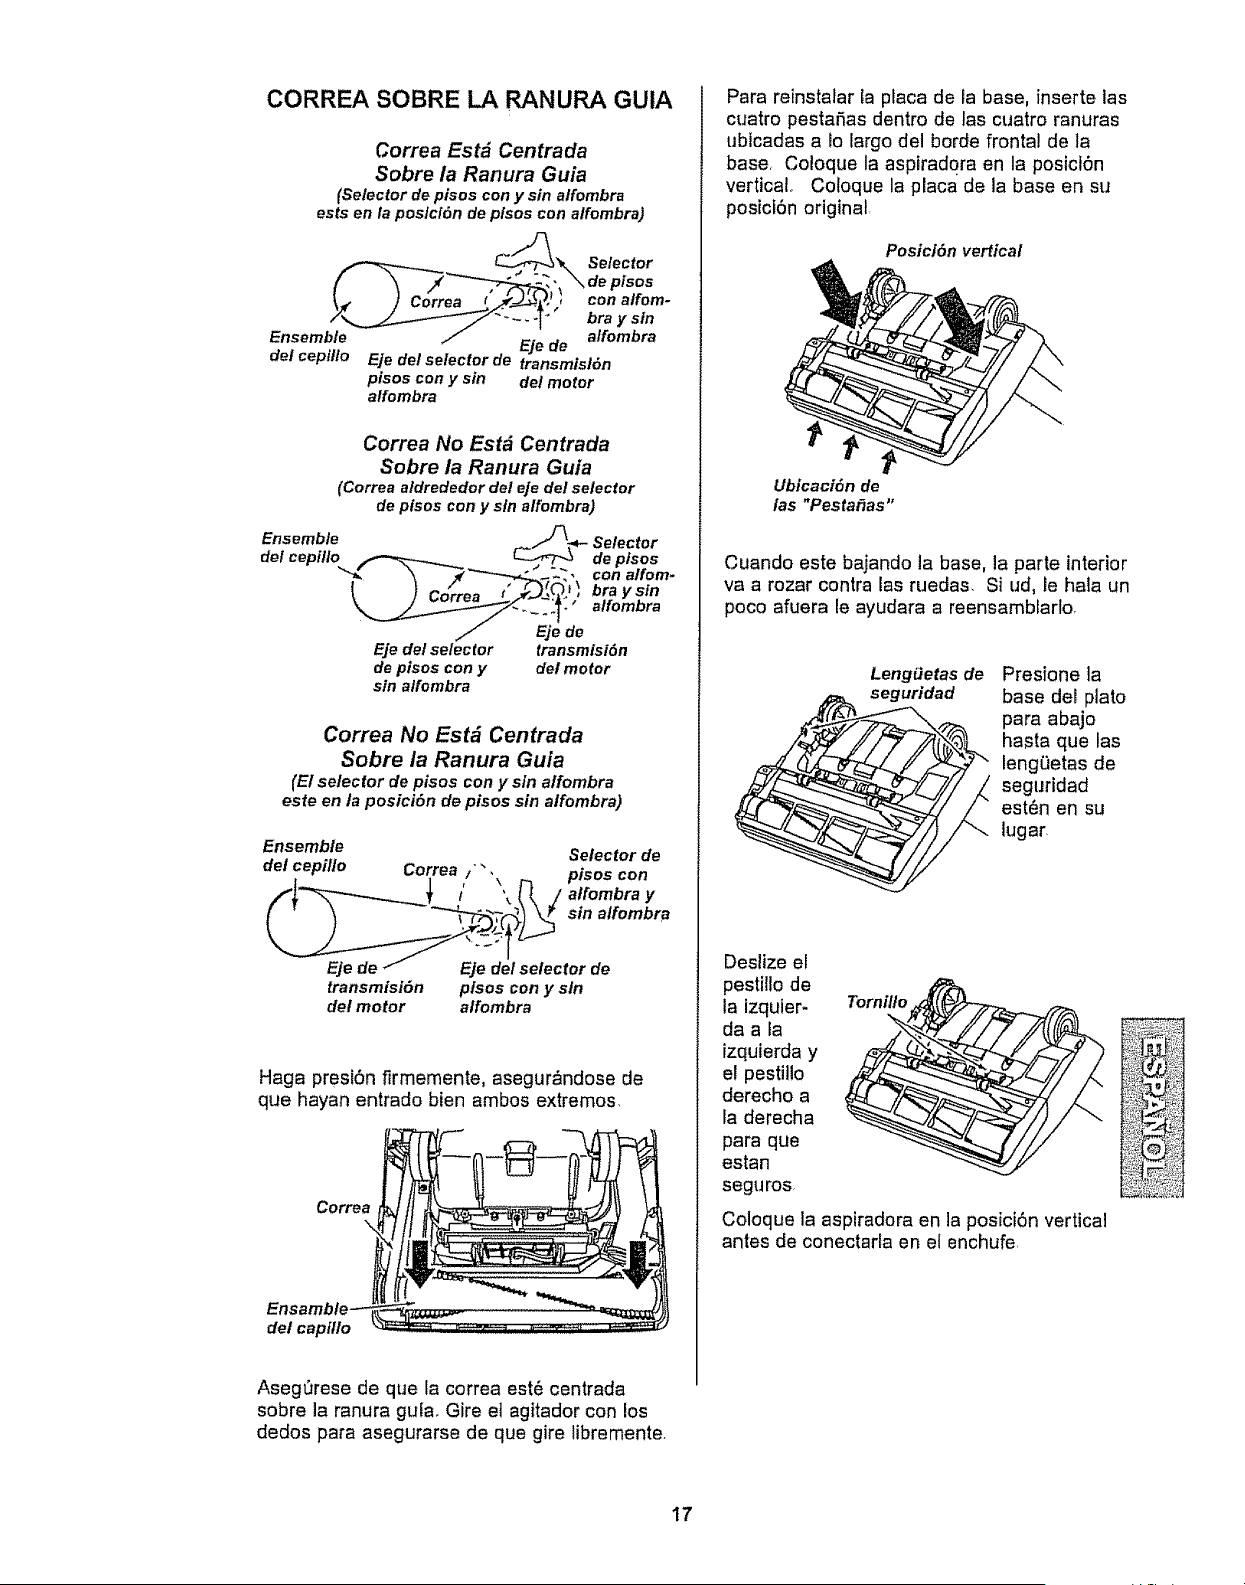
CORREA SOBRE LA RANURA GUIA
Correa Estd Centrada
Sobre la Ranura Guia
(Selector de pisos con y sin alfombra
ests en la poslcl6n de plsos con alfombra)
Eje de alfombra
del cepfllo Eje del selector de transmlsl6n
pisos con y sin de/motor
alfombra
Correa No Estd Centrada
Sobre la Ranura Guia
(Correa aldrededor del eje del selector
de plsos con y sin alfombra)
Selector
de pisos
con alfom.
bra y sin
alfombra
Eje del selector transmisi6n
de pisos con y del motor
sin alfombra
Correa No Estd Centrada
Sobre la Ranura Guia
(El selector de pisos cony sin alfombra
esteen la posici6n de pisos sin alfombra)
Ensemble Selector de
del cepil/o Correa /'_ ,, pisos con
Eje de .i- Eje delselector de
transmisi6n ptsoscon y sin
delmotor alfombra
Haga presi6n firmemente, asegur&ndose de
que hayan entrado bien ambos extremos,
Correa I
Para reinstalar la placa de la base, inserte las
cuatro pestafias dentro de las cuatro ranuras
ubtcadas a 1olargo del borde frontal de la
base, Coloque la aspiradora en la posicl6n
vertical. Coloque la placa de la base en su
posicf6n original
Posict6n vertical
f
Ublcaci6n de
las "Pesta&as"
Cuando este bajando la base, la parte interior
va a rozar contra las ruedas. Si ud, le hala un
poco afuera le ayudara a reensamblarlo,
Lengiietas de Presione la
seguridad base del plato
para abajo
k asta que las
leng0etas de
seguridad
est6n en su
/_ lugar
Deslize el
pestillo de
la izquier-
da a la
izquierda y
el pesti]lo
derecho a
la derecha
para que
estan
seguros
Tornillo
Coloque la aspiradora en la posiO6n vertical
antes de conectarla en et enchufe.
Aseg0rese de que la correa est_ centrada
sobre la ranura gufa. Gire et agitador con !os
dedos para asegurarse de que gire libremente.
17

!
Peltgro de choque el_ctrico o lesi6n cor-
poral
Desconecte la unidad antes de limpiarla
o darle servictoo De Io contrario podria
producirse un choque el6ctrico o causar
!esi6n corporal si la aspiradora arranca
de manera imprevista.
Desconecte ta aspiradora
Oprima el pedal de liberaci6n del mango para
que la parte superior de la aspiradora se
incline hacia atr&s hasta el piso.
Tornillo
Remueva
Lengi_etas de el plato de
seguridad la base
como est&
descrito en
la seccl6n
CAMBIO
DE LA
CORREA Y
LIMPIEZA
DEL AGI-
TADOR,
cUIDADO
No use una bombilla de m_s de I5
vatlos. Cuando se use ta aspiradora
por un largo periodo de tlempo, el
calor de la bombilla puede calentar las
partes de plastico cerca.
Agarre el
ensamble de
]a bombilla y
vaya movien-
dolo de lado a
lado cuida-
dosamente
para afuera
de la caja de
la boquilla,
Remueva la
Ensamble de la bombilla
bombilla empujan-
Para retirar dola y vaya dan-
_ _, dole vuelta para la
izquierda para
sacaria de la aber-
tura. Despues
saque la bombiiia
para afuera,
Par reemplazar la
bombilla, cuidadosa-
mente inserte y de
vuelta hacia la
derecha hasta ase-
gurada en la
abertura.
NOTA: Mire PIEZAS
Y CARACTERISTICAS para el numero de la
bombilla.
Tornillo
Leng_Jetas de
seguridad
Remplace la
base del
plato como
est,. descrito
en la secci6n
CAMBIO DE
LA CORREA
Y LIMPIEZA
DEL AGITA-
DOR
18
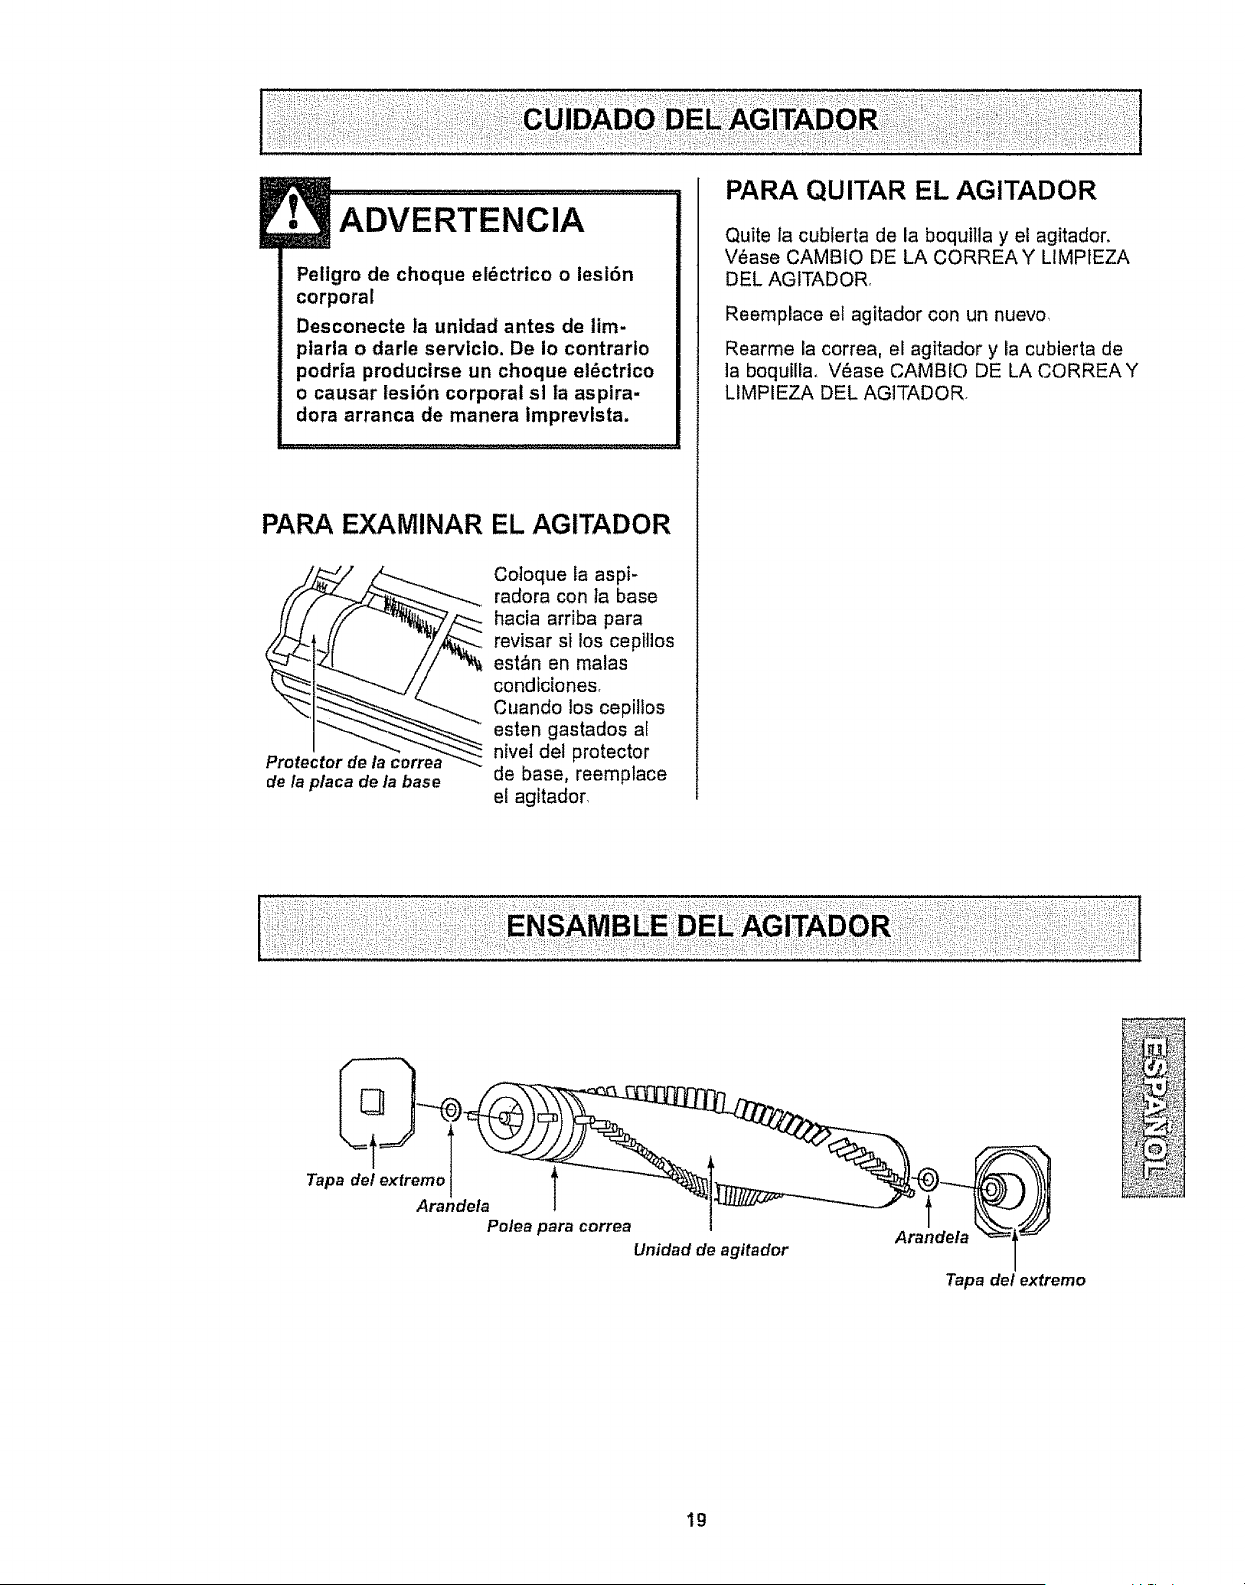
ADVERTENCIA
Peltgro de cheque el6ctrico o lesi6n
corporal
Desconecte la unidad antes de lim.
ptarla o darle servlclo. De Io contrarto
podria producirse un cheque el_ctrtco
o causar lesi6n corporal sl la asplra-
dora arranca de manera imprevlsta.
PAPA EXAMINAR
Protector de la cerrea
de/a p/aca de/a base
EL AGITADOR
Cotoque la aspi-
radora con la base
hacia arriba para
revisar si los cepltlos
est_n en rnalas
condiciones,
Cuando los cepillos
esten gastados al
niveI det protector
de base, reemplace
el agitador
PARA QUITAR EL AGITADOR
Quite la cubterta de la boquilla y el agitador.
V8ase CAMBIO DE LA CORREA Y LIMPtEZA
DEL AGITADOR,
Reemplace el agitador con un nuevo,
Rearme la correa, el agitador y la cubierta de
ia boquilfa,, V_ase CAMBIO DE LA CORREA Y
LIMPIEZA DEL AGITADOR
:::;::!::i::::;i: ::: ::::::;:_:;::::::: ::;::: _:::=:::::=:::::::::::::::::::::::::::::::::::
.o,o,o.°%"a°!.o.o
Polea para correa
Unidad de agitader
Tapa del extremo
t_:$_l¢_ g!df
19
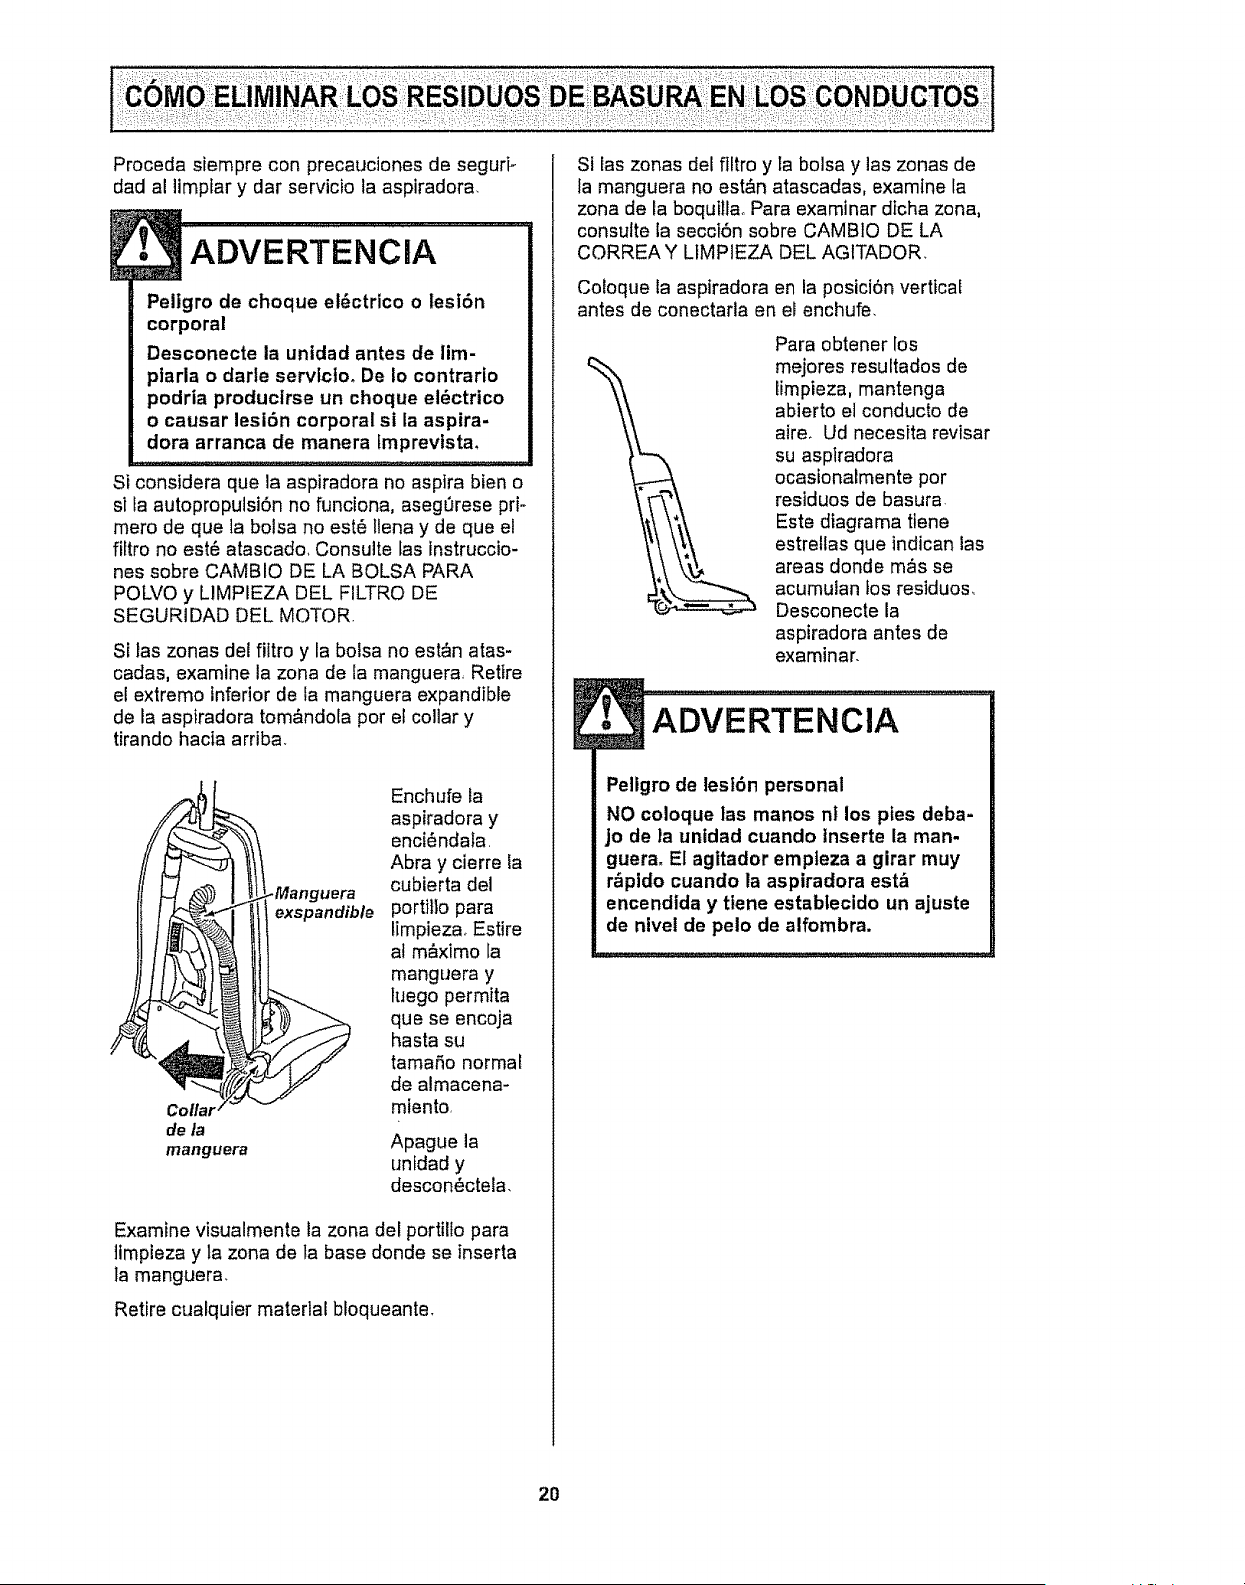
Procedasiempreconprecaucionesdeseguri-
dadal limpfary darserviciola aspiradora.
ADVERTENCIA
Peligro de choque ei_ctrico o lesi6n
corporal
Desconecte la unidad antes de lirn-
piarla o darte servlctoo De Io contrario
podria productrse un choque el6ctrico
o causar lesi6n corporal sl la aspira-
dora arranca de manera tmprevistm
Si cons]dera que la aspiradora no aspira bier o
si la autopropulsiSn no funciona, aseg0rese pri-
mero de que la bolsa no est_ ltena y de que el
filtro no est6 atascado, Consulte las lnstruccio-
nes sobre CAMBIO DE LA BOLSA PARA
POLVO y LIMPIEZA DEL FILTRO DE
SEGURIDAD DEL MOTOR.
Si las zonas del filtro y la botsa no est_n atas-
cadas, examine la zona de la manguera, Retire
el extremo inferior de la manguera expandible
de la asptradora tom&ndola por el collar y
tirando hacia arriba.
exspandible
Enchufe la
aspiradora y
enc{_ndata.
Abra y cierre la
cubierta del
portillo para
limpieza_ Estire
al m&ximo la
manguera y
luego permita
que se encoja
hasta su
tamaSo normal
de almacena-
miento,
de/a
manguera Apague la
unfdad y
descon_ctela.
Examine visualmente la zona del portilio para
timpieza y la zona de la base donde se inserta
ta manguera.
Retire cualquier material bloqueante.
Si las zonas del flltro y Eabolsa y las zonas de
la manguera no est&n atascadas, examine la
zona de la boquillao Para examinar dicha zona,
consutte la secciSn sobre CAMBIO DE LA
CORREA Y LIMPIEZA DEL AGITADOR.
Coioque la aspiradora en la posici6n vertical
antes de conectarla en el enchufe,
Para obtener los
mejores resultados de
Limpieza, mantenga
abierto el conducto de
aire_ Ud necesita revisar
su aspiradora
ocastonalmente por
residuos de basura.
Este diagrama tiene
estrellas que indican las
areas donde m_s se
acumulan fos residuos.,
Desconecte la
aspiradora antes de
examinar.
Peltgro de leslbn personal
NO coloque las manos nt los ptes deba-
jo de la untdad cuando Inserte la man-
guera, El agltador empteza a girar muy
r_pldo cuando la aspiradora est_
encendida y tlene establecido un ajuste
de nivel de pelo de alfombra.
2O
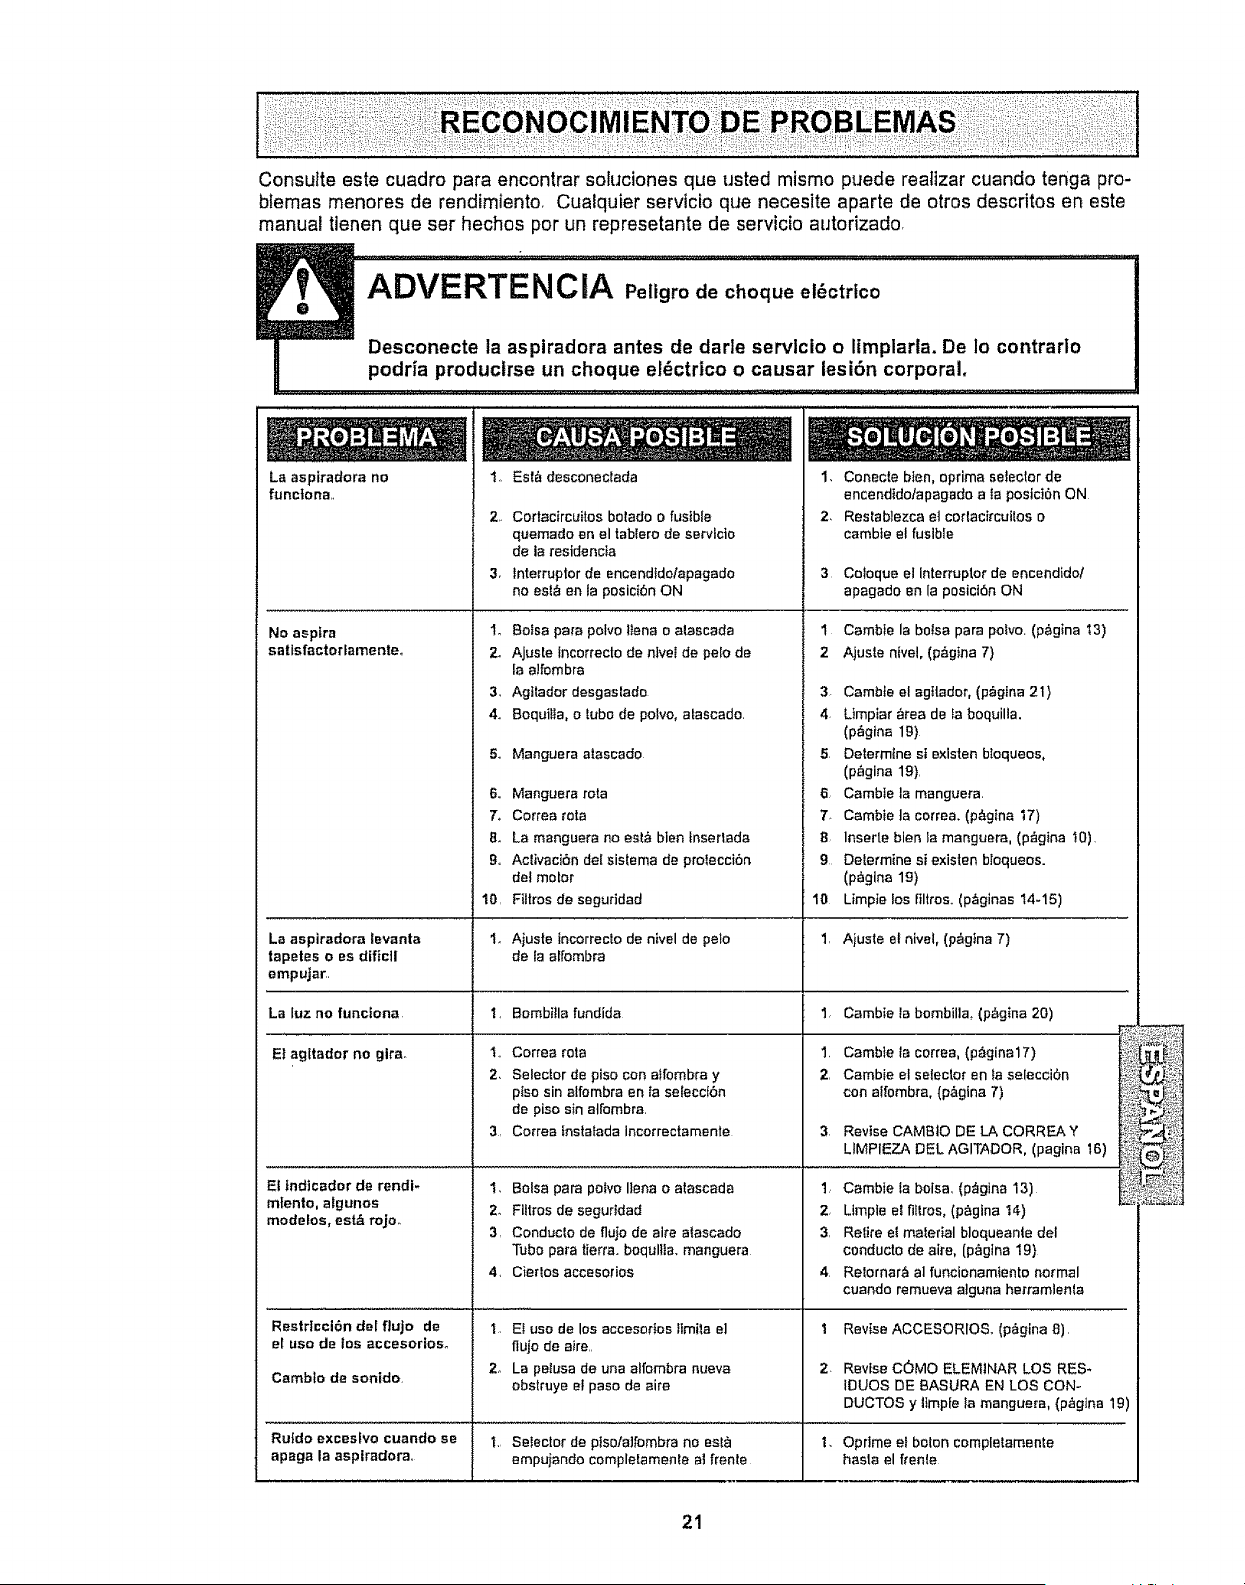
Consulte este cuadro para encontrar soluciones que usted mismo puede reatizar cuando tonga pro-
blemas menores de rendimiento, Cualquier servicfo que necesite aparte de otros descdtos en este
manual tienen que ser hechos per un represetante de servicio autorizado
ADVERTENClA Pe,grodechequeel ctrtco
....I!.....................Desconecte la aspiradora antes de darle ser¢lcio o iimplarla. De io contrarlo
podria productrse un cheque el_ctrlco o causar iesi6n corporal.
La aspiradora no
functona.
No aspfra
satlsfactorlamente,,
I.,EsI_desconeclada
2. Cortacircultos bolado o fusible
quemado en el tabferode servlcto
de laresidencia
3_ interrupter de encendtde/apagado
no esl_ en la posiciSn ON
14
2o
3_
4,,
7o
8_
10,
Bolsa pare polvo liana o alascada
Ajusle tncorrecto de nlvei de pelo de
la a]fombra
Agttador desgaslade
Bequi_la, o lube de pone, atascado.
Manguera alescado
Manguera rota
Cortes _ota
La manguera no est& blen tnserlada
Aclivacibn del sislema de prolecci6n
de! reeler
Filtros de seguddad
2.
1, Conecte blen, optima setecler de
encendtdolapagado ata posict6n ON
2, Restablezca et cortaci_cuitos o
cambte el fusible
3 Cotoque el interrupter de encendido!
apagado an la posici6n ON
1 Cambte la balsa para polvo. (p#,gina I3)
2 Ajuste ntvel, (p_gtna 7)
La aspiradora levanta Aiuste tncorrecto de nlvel de polo Aiuste el nivel, (p_gtna 7)
tapetes o es dific]! de la atfombra
empujar.
La luz no funciona. Bombi!la fundida Camble la bombill& (p_gina 20)
El agltador no gira.
3,
Correa rata
Selector de pise con a_fombra y
pIso sin alfombrs en fa seleccibn
de piso sin atfombra.
Correa fnsta}ada Incorrectsmente
1, Bolsa para potvo liens o alascada
2, Flltros de seguddad
3, Conducto de flujo de sire atascado
Tuba para tierra, boqullta, manguera
4. Cierlos accesorios
1. El use de los accesorIos fimila e]
ftujo de aire
2o La petusa de una alfombra nueva
obstruye el paso de sire
3 Cambte el agttader, (p_gtna 21)
4 Ltmplar area de fa boquilla.
(p_gina 19)
5. Determine st existen bloqueos,
(p_gina 19)
6, Cambte la msnguera.
7. Cembie la correa. (p_gina t7)
8, Inserte blen la manguera, (pflgIna I0),
9 Delermine siexisten bloquees.
(pagina 19)
10 Limpie los filtros. (p_ginas 14-15)
1,
1,
1.
2.
El fndtcador de rendi-
mtento, algunos
modelos, est,. rojo.
Restrtcci_n del fluje de
el use de los accesortoso
Cambfo de sonido,
Cambte ia cortes, (p&gina17)
Cambie el selector an fa selecci_,n
con aifombra, {p>na 7)
Revise CAMBtO DE LA CORREA Y
LIMP1EZA DEL AGITADOR, (pagina 16)
1, Cambie ta boise, (p_gina 13)
2, Llmpte el filtres, (pSgtna 14)
3, Retire el material bloqueante del
conducto de sire, (p_glna 19}
4. Relornar_ at funcionamtento normal
cuando remueva alguna herramlenla
I
2,
Rev{se ACCESORIOS. (p&gina 8).
Revfse COMe ELEMINAR LOS RES-
IDUES DE BASURA EN LOS CON-
DUCTOS y ltmple Ia mangueta, (p_glna 19)
Ruldo excestvo cuando se 1. Selector de ptsola]fombra no est_ 1. Opdme el bolon complelamente
apega la asplradora, empujando comple[amente al frenle heels el ffente
_J U B_X;
21
........_ For
repair of major brand appliances in your own home ...
no matter who made it, no matter who sold it!
1-800-4-MY-HOME ® Anytime, day or night
(1-800-469-4663) (US.A. and Canada)
www.sears,com www.sears.ca
w,
For repair of carry-in products like vacuums, lawn equipment, and
electronics, call for the nearest Sears Parts and Repair Center.
1-800-488-1222 Anytime, day or night (US.A. only)
www, sears.com
'!. i
_ i •,
i!_i!,!_i!,!ii_ii!,
i ! ! iiiiii!,!i!i
: _:_:i:i_L:_•:I¸_
For the replacement parts, accessories and owner's manuals
that you need to do-it-yourself, call Sears PartsDirectSM[
1-800-366-PART
(I-800-366-7278)
6 a.mo- 11 p.m, 7 days a week
(U.SA. only)
www.sears.com/partsdirect
To purchase or inquire about a Sears Service Agreement
or Sears Maintenance Agreement:
i! !:•:i_i•!i¸
_!iii_iiiii?
:•!,i_i_:¸¸1:!:!
1-800-827-6655 (USA)
7 amo - 5 pro, CST, Mort- Sat,
1-800-361-6665 (Canada) .........
9 a.m.- 8 p.m. EST, M - F, 4 p.m_Sat,
................................... ::=:1!
.... ;===
iLi:i:::i:i!:il
_i:i;:i:!:ii:}
_!ilili,i:i_i:i_i
ii!_iii!!i:i_ii:i
Para pedir servicio de reparaci6n a
domicilio, y para ordenar piezas:
1-888.SU.HOGAR sM
(1-888-784-6427)
_i:; !!iiii
Au Canada pour service en frangais:
1-800-LE-FOYER ic
(I-B00-533-6937) _:!!:
wwwsearsoa !
HomeCentral I ':.......
@ Sears, Roebuck and Co,.
® Registered Trademark 1TM Trademark I sMService Mark of Sears, Roebuck and Co,
"rM
® Marca Regtstrada / Marca de F_brica / s_4Marca de Servicio de Sears, Roebuck and Co
McMarque de commerce / _o Marque dSpos_e de Sears, Roebuck and Co,