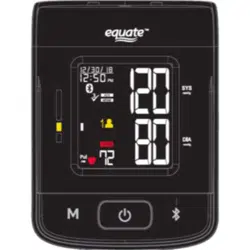
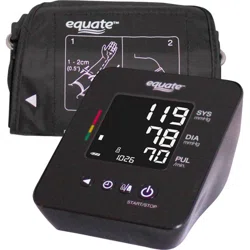
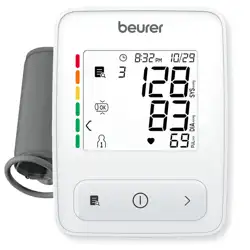
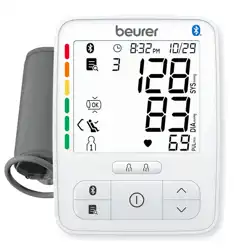
Instruction Manual Equate Digital Arm Blood Pressure Monitor 4000 Series
1. Introduction
- The Equate upper arm blood pressure monitor is one of the most advanced monitors available and is designed for ease of use and accuracy. This device will facilitate your daily blood pressure regimen.
- We recommend that you read through this manual carefully before using the device for the first time. This device is designed for use on adults, and is not intended for infants and children.
- This device is designed for use in the home healthcare environment to measure blood pressure and pulse rate of people for diagnosis.
2. Precautions
- Precision components are used in the construction of this device. Extremes in temperature, humidity, direct sunlight, shock or dust should be avoided.
- Clean the device and cuff with a dry, soft cloth or a cloth dampened with water and a neutral detergent. Never use alcohol, benzene, thinner or other harsh chemicals to clean the device or cuff.
- Avoid tighty folding the cuff or storing the hose tightly twisted for long periods, as such treatment may shorten the life of the components.
- Take care to avoid accidental strangulation of babies or infants with the hose.
- Do not twist the air hose during measurement. This may cause injury due to continuous cuff pressure.
- The device and cuff are not water resistant. Prevent rain, sweat and water from spilling the device and cuff.
- Measurements may be distorted if the device is used close to televisions, microwave ovens, cellular telephones, X-ray or other devices with strong electrical damage to the device.
- Wireless communication devices, such as home networking devices, mobile phones, cordless phones and their base stations, and walkie-talkers can affect this blood pressure monitor. Therefore, a minimum distance of 12 in/30 cm should be kept from such devices.
- When reusing the device, confirm that the device is clean.
- Used equipment, parts and batteries are not treated as ordinary household waste, and must be disposed of according to the applicable local regulations.
- Do not modify the device. It may cause accidents or damage to the device.
- To measure blood pressure, the arm must be squeezed by the cuff hand enough to temporarily stop blood flow through the artery. This may cause pain, numbness or a temporary red mark to the arm. This condition will appear especially when measurement is repeated successively. Any pain, numbness, or red marks will disappear with time.
- Measuring blood pressure too frequently may cause harm due to blood flow interference.
- Check that the operation of the device does not result in prolonged impairment of blood circulation, when using the device repeatedly.
- Clinical testing has not been conducted on newborn infants and pregnant woman. Do not use on newborn infants or pregnant woman.
- If you have had a mastectomy, please consult a doctor before using the device.
- Do not let children use the device by themselves and do not leave the device within the reach of children, it may cause accidents or injury.
- There are small parts that may cause a choking hazard if swallowed by mistake by infants.
- Do not touch the batteries and the patient at the same time. That may result in electrical shock.
- Use of accessories not detailed in this manual may comprise safety. Should the battery short-circuit, it may become hot and potentially cause burns.
- Allow the device to adapt to the surrounding environment before use (about one hour).
- Do not inflate without wrapping the cuff around the upper arm.
- Do not apply the cuff on an arm in which another medical device is attached. The equipment may not function properly.
- People who have a severe circulatory deficit in the arm must consult a doctor before using the device, to avoid medical problems.
- Do not self-diagnose the measurement results and start treatment by yourself. Consult a doctor before the evaluation of the results and treatment.
- Do not apply the cuff on an arm with an unhealed wound.
- Do not apply the cuff on an arm receiving an intravenous drip or blood transfusion. It may cause injury.
- Do not use the device where flammable gases such as anesthetic gases are present. It may cause an explosion.
- Do not use the device in highly concentrated oxygen environments, such as a high-pressure oxygen chamber or an oxygen tent. It may cause a fire or explosion.
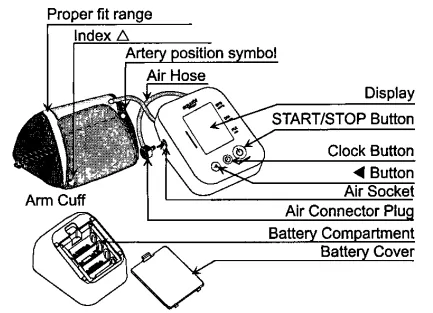
3. Parts Identification
Display
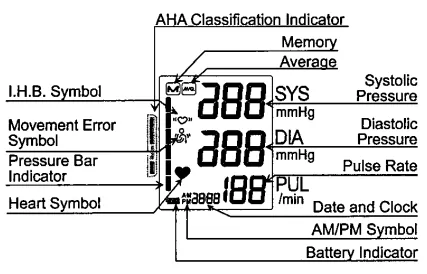
4. Symbols
Symbols that appear on the display
| Symbol |
Function/Meaning |
Recommended Action |
 |
Appears while measurement is in progress. It blinks when the pulse is detected. |
Measurement is in progress. Remain as still as possible. |
 |
I.H.B symbol appears when an irregular heartbeat is detected. It may appear when a very slight vibration is visible. |
|
 |
Appears when a body or arm movement is detected. |
|
 |
Previous measurement is stored in memory. |
|
 |
Average data |
|
 |
FULL BATTERY
The battery power indicator during measurement. |
|
 |
LOW BATTERY
The battery power is low when it blinks. |
Replace all batteries with new ones when the symbol blinks. |
| AM |
Time in the morning |
|
| PM |
Time in the afternoon |
|
| EE |
Device internal error |
Remove the Batteries and press the START/STOP button, and then install the batteries again. If the error still appears, contact the customer service. |
| E9 |
Unstable blood pressure due to movement during measurement. |
Take another measurement. Remain still during measurement. |
| E1 or E2 |
The systolic and diastolic values are within 10 mmHg of each other. |
Apply the cuff correctly, and take another measurement. |
| The pressure value did not increase during the inflation. |
| E3 |
The cuff is not applied correctly. |
| E |
PUL DISPLAY ERROR
The pulse is not detected correctly |
Symbols printed on the device case
| Symbols |
Function/Meaning |
 |
Standby and Turn the device on |
| SYS |
Systolic blood pressure in mmHg |
| DIA |
Diastolic blood pressure in mmHg |
| PUL/min |
Pulse per minute |
 |
Battery installation guide |
 |
Direct current |
 |
Type BF: Device, cuff and tubing are designed to provide special protection against electrical shocks |
| SN |
Serial number |
 |
Refer to instruction manual/booklet |
| IP |
International protection symbol |
 |
Keep dry |
 |
Clock Setting |
 |
Clock adjustment and memory recall |
5. Using the Monitor
5.1. Installing / Changing The Batteries
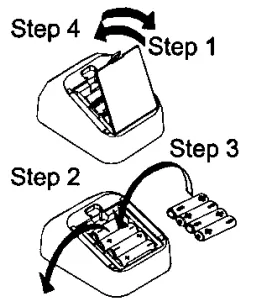
- Remove the battery cover.
- Remove the used batteries from the battery compartment in case of changing them.
- Insert new batteries into the battery compartment as shown, taking care that the polarities (+) and (-) are correct. Use only R6P, LR6 or AA batteries.
- Replace the battery cover.
CAUTION
- Insert the batteries as shown in the battery compartment. If installed incorrectly, the device will not work.
- When
 blinks on the display, replace all batteries with new ones. Do not mix old and new batteries. It may shorten the battery life, or cause the device to malfunction. Replace the batteries two seconds or more after the device turns off.
- does not appear when the batteries are drained.
- The battery life varies with the ambient temperature and may be shorter at low temperatures.
- Generally, four new R6P batteries will last approximately three months when used twice for measurement each day.
- Use the specified batteries only. The batteries provided with the device are for testing the device performance and may have a limited life.
- Remove the batteries if the device is not to be used for a long time. The batteries may leak and cause a malfunction.
5.2. Connecting The Air Hose
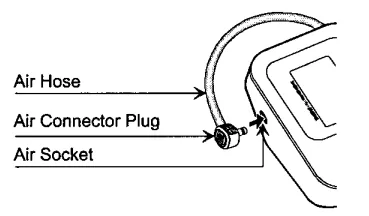
Insert the air connector plug into the air socket firmly.
5.3. Selecting The Correct Cuff
- Using the correct cuff size is important for an accurate reading. If the cuff is not the proper size, the reading may yield an incorrect blood pressure value.
- The arm size is printed on each cuff.
- The index △ and proper fit range, on the cuff, tell you if you are applying the correct cuff. Refer to "5.4 Applying The Arm Cuff".
- If the index △ points outside of the range, contact customer service.
- The arm cuff is a consumable. If it becomes worn, purchase a new one.
Symbols printed on the cuff
| Symbol |
Function/Meaning |
Recommended Action |
 |
Artery Position Symbol |
Set the O symbol on the artery of the upper arm or in line with the ring finger on the inside of the arm. |
 |
Index |
|
 |
Catalog number |
|
 |
Lot number |
|
5.4. Applying The Arm Cuff
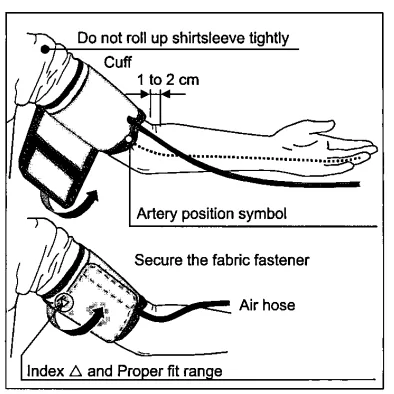
- Wrap the cuff around the upper arm, about 1 to 2 cm above the inside of the elbow, as shown. Place the cuff directly against the skin, as clothing may cause a faint pulse and result in a measurement error.
- Constriction of the upper arm, caused by rolling up a shirtsleeve, may prevent accurate readings.
- Confirm that the index A points within the proper fit range.
Note: During measurement, it is normal for the cuff to feel very tight. (Do not be alarmed).
6. Measurement
6.1. Normal Measurement
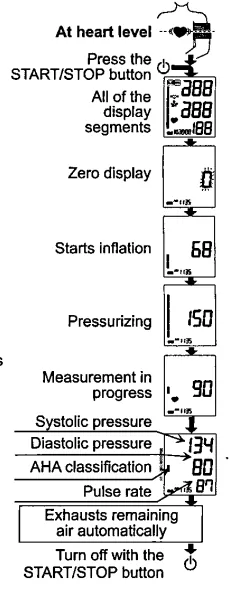
- Place the cuff on the arm at heart level (preferably the left arm). Sit quietly during measurement.
- Press the START/STOP button. All of the display segments are displayed. Zero is displayed blinking briefly. Then the display changes, as indicated in the figure at the right, as the measurement begins. The cuff starts to inflate. It is normal for the cuff to feel very tight. A pressure bar indicator is displayed, as in the figure at the right, during inflation.
Note: If you wish to stop inflation at any time, press the START/STOP button.
- When inflation is complete, deflation starts automatically and the
 blinks, indicating that the measurement is in progress. Once the pulse is detected, the symbol blinks with each pulse.
Note: If an appropriate pressure is not obtained, the device starts to inflate again automatically.
- When the measurement is complete, the systolic and diastolic pressure readings and pulse rate are displayed. The cuff exhausts the remaining air and deflates completely.
- Press the START/STOP button again to turn off the device.
Note: This device has an automatic power shut-off function. Allow at least 3 minutes between measurements on the same person.
6.2. Measurement with the Desired Systolic Pressure
If re-inflation occurs repeatedly, use the following methods. If your systolic pressure is expected to exceed 230 mmHg, use this procedure.
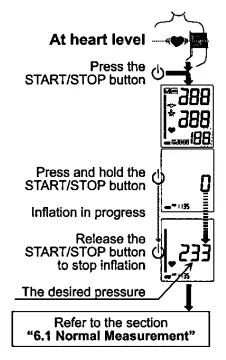
- Place the cuff on the arm at heart level (preferably the left arm).
- Press and hold the START/STOP button until a number about 30 to 40 mmHg higher than your expected systolic pressure appears.
- When the desired number is reached, release the START/STOP button to start measurement. Then continue to measure your blood pressure as described on the section "6.1 Normal Measurement".
6.3. Notes for Accurate Measurement
- Sit comfortably on a chair with your feet on the floor and your back straight. Do not cross your legs.
- Place your arm on a table with your palm facing upward and the cuff at the same level as your heart.
- Relax for about five to ten minutes before measurement.
- Remain still and keep quiet during measurement.
- Do not smoke, exercise, or consume anything for at least 30 minutes beforehand.
- This device bases its measurements on the heartbeat. If you have a very weak or irregular heartbeat, the device may have difficulty determining your blood pressure.
- Should the device detect a condition that is abnormal, it will stop the measurement and display an error symbol. Refer to the section "4 Symbols" for the description of the symbols.
- Try to measure your blood pressure at the same time every day.
- The automatic blood pressure monitor's performance may be affected by excessive temperature or humidity, or altitude.
7. Recalling the Memory Data
The device automatically stores up to sixty blood pressure and pulse measurements in memory. Data stored in memory are assigned a data number in the order of the newest to the oldest. The oldest data displays as "No. 1". The symbol in the upper left corner of the display indicates that you are viewing previous data stored in memory.
7.1. Recalling Data
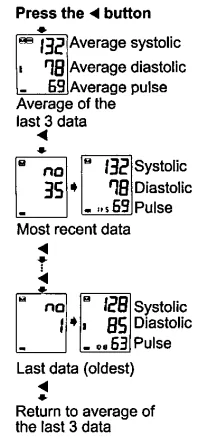
- Press the ◀button. The average of the last three measurements is displayed. (If no data, "0" is displayed. Press the ◀ or START/STOP button to turn device off.)
- Each time the ◀ button is pressed, the memory data is displayed. Three seconds after the data number display, the measurement data is displayed.
Last data (No. 1). Three seconds after the data is displayed as follows: systolic, diastolic, pulse.
- After the last data is displayed, press the ◀button to return the average display of the last three data.
- Press the START/STOP button to turn the device off. After one minute of nonoperation, the device will turn off automatically.
Note: If this device stores the two measurements, the average of the two measurements is displayed. If this device stores only one measurement, this is displayed as the average.
7.2. Clearing Data
- When the device is off, press and hold the ◀ button.
- Data is cleared when the symbol blinks.
- The device turns off automatically.
8. Setting Date and Time
Set the date and time prior to use.
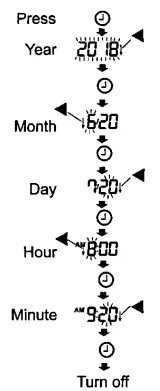
- Press the button, the year starts blinking.
- Select the year using the button. Press the ◀ button to set the current year and move to month/day selection. The date can be set anywhere between the years 2018 and 2036.
- Select the month using the ◀ button. Press the button to set the current month and move to day selection.
- Select the day using the ◀ button. Press the button to set the current day and move to hour/minute selection.
- Select the hour using the ◀ button. Press the button to set the current hour and move to minute selection.
- Select the minute using the ◀ button. Press the button to turn the device off.
Pressing the START/STOP button will turn the device off anytime.
Note: After three minutes of non-operation, the device will turn off automatically.
When the clock has not been set, the clock display indicates dashes.
When using the device for the first time, the clock is not adjusted. When the device is disconnected from the power supply, the set date and time will be erased. When the set date and time is erased, please adjust again.
9. What is an Irregular Heartbeat
The blood pressure monitor provides a blood pressure and pulse rate measurement even when an irregular heartbeat occurs. An irregular heartbeat is defined as a heartbeat that varies by 15% from the average of all heartbeats during the blood pressure measurement. It is important that you are relaxed, remain still and do not talk during measurements.
Note: We recommend contacting your physician if you see this indicator frequently.
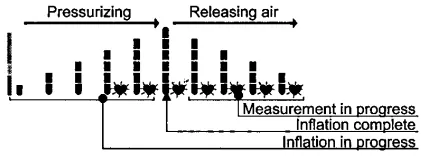
10. Pressure Bar Indicator
The indicator monitors the progress of pressure during measurement.
11. About Blood Pressure
What is Blood Pressure?
Blood pressure is the force exerted by blood against the walls of the arteries. Systolic pressure occurs when the heart contracts. Diastolic pressure occurs when the heart expands. Blood pressure is measured in millimeters of mercury (mmHg). One's natural blood pressure is represented by the fundamental pressure, which is measured first thing in the morning while one is still at rest and before eating.
12. AHA Classification Indicator
Each segment of the bar indicator corresponds to the AHA blood pressure classification.
AHA Classification Indicator
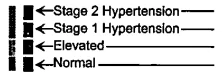
 : The indicator displays a segment, based on the current data, corresponding to the AHA classification.
Troubleshooting
| Problem |
Possible Reason |
Recommendation Action |
| Nothing appears on the display, even when the power is turned on. |
Batteries are drained. |
Replace all batteries with new ones. |
| Battery terminals are not in the correct position. |
Reinstall the batteries with negative and positive terminals matching those indicated on the battery compartment. |
| The cuff does not inflate. |
Battery voltage is too low.
blinks. If the batteries are drained and completely, the symbol does not appear. |
Replace all batteries with new ones. |
The device does not measure.
Readings are too high or too low. |
The cuff is not applied properly. |
Apply the cuff correctly. |
| You moved your arm or body during measurement. |
Make sure you remain still and quiet during measurement. |
| The cuff position is not correct. |
Sit comfortably and still. Place your arm on a table with your palm facing upward and the cuff at the same level as your heart. |
| |
If you have a very weak or irregular heartbeat, the device may have difficulty in determining your blood pressure. |
| Other |
The valve is different from that measured at a clinic or doctor's office. |
At a clinic or doctor's office, apprehension may cause an elevated reading. Home measurement reduces the effects of outside influences on blood pressure readings & supplements the doctor's readings. |
| |
Remove the batteries.
Place them back properly and take another measurement. |
Note: If the actions described above do not solve the problem, contact customer service. Do not attempt to open or repair this product, as any attempt to do so will make your warranty invalid.
14. Maintenance
Do not open the device. It uses delicate electrical components and an intricate air unit that could be damaged. If you cannot fix the problem using the troubleshooting instructions, contact customer service.
15. Technical Data
| Type |
UA-4000WM |
| Measurement method |
Oscillometric measurement |
| Measurement range |
Pressure: 0 - 299 mmHg
Systolic pressure: 60 - 279 mmHg
Diastolic pressure: 40 - 200 mmHg
Pulse: 40 - 180 beats/minute |
| Measurement accuracy |
Pressure: ±3 mmHg
Pulse: ±5 % |
| Power Supply |
4 x 1.5V batteries (R6P, LR6 or AA) |
| Number of measurements |
Approx. 700 LR6 or AA (alkaline batteries)
Approx. 200 R6P (manganese batteries)
With pressure value 180 mmHg, room temperature 23 °C. |
| Classification |
Internally powered ME equipment (by batteries)
Continuous operation mode |
| Clinical test |
According to ISO81060-2-2013 |
| EMC |
IEC 60601-1-2: 2014 |
| Memory |
Last 60 measurements |
| Operating conditions |
+10 to +40 °C/15 to 85 %RH/800 to 1060 hPa |
| Transport/Storage conditions |
-20 to +60 °C/10 to 95 %RH/700 to 1000 hPa |
| Cuff Circumference |
UA-420W/M: 8.6-16.5" (22 to 42 cm) |
| Dimensions |
Approx. 3.94"W"×2.68"H"×5.47"D" (110"W"×68"H"×138"D") |
| Weight |
Approx. 9.7 oz/275 g, excluding the batteries |
| Ingress protection |
Device: IP20 |
| Applied part |
Cuff: Type BF |
| Useful life |
Device: 5 years (when used six times a day)
Cuff: 2 years (when used six times a day) |
Note: Specifications are subject to change without prior notice. IP classification is the degree of protection provided by enclosures in accordance with IEC 60529. This device is protected against solid foreign objects of 12 mm diameter and greater such as a finger. This device is not protected against water.
16. Warranty
| Product |
Warranty Term |
| Monitor |
5 year |
| Cuff |
2 year |
Limited Warranty:
This warranty warrants to the first purchaser ("You") that the product You purchased (the "Product") will be free from defects in material, workmanship and design for the applicable Warranty Term stated above from the date You purchased the Product under normal use. This Limited Warranty is personal to You and is not transferable. If the Product is defective, then You return the Product in accordance with the procedure set forth below. This warranty obligation is limited to the repair or replacement, at our option, of the defective Product that has been returned by You within the warranty period. Such repair or replacement will be at no charge to You. The repaired or replacement Product is warranted here-under for the longer of the remainder of the original warranty period or 90 days from the date of shipment of the repaired or replacement Product.
To obtain a warranty service, please contact us at 1-888-726-9966 for return address, shipping and handling fee, and other instructions for processing warranty. Please ensure you have satisfactory proof of the date of Your purchase and a description of the defect. Returns will not be accepted unless a Return Material Authorization (RMA) Number has been issued from our Customer Service Representative.
This Limited Warranty does not cover, and we will not be liable for (i) any shipment damage, (ii) any damage or defect due to misuse, abuse, failure to use reasonable care, failure to follow written instructions enclosed with the Product, accident, subjecting the Product to any voltage other than the specified voltage, improper environmental conditions, or modification, alteration or repair by anyone other than persons authorized, or (iii) expendable or consumable components.
THIS LIMITED WARRANTY IS THE ONLY WARRANTY PROVIDED; THERE ARE NO OTHER EXPRESS WARRANTIES.
The above remedy of repair or replacement is your only and exclusive remedy. IN NO EVENT SHALL WE BE LIABLE FOR ANY DAMAGES, INCLUDING, WITHOUT LIMITATION, LOST PROFITS, LOST INFORMATION OR REPLACEMENT COSTS, ARISING OUT OF YOUR USE OF OR INABILITY TO USE THE PRODUCT, INCLUDING, WITHOUT LIMITATION, ANY SPECIAL, INCIDENTAL OR CONSEQUENTIAL DAMAGES, EVEN IF WE HAVE BEEN ADVISED OF THE POSSIBILITY OF SUCH DAMAGES.
Some states do not allow the exclusion of incidental or consequential damages, so that the above exclusions may not apply to you. This warranty gives you specific legal rights, and you may also have other rights that may vary from state to state.
No distributor, dealer or other party is authorized to make any warranty or to modify this warranty, or to assume any liability with respect to its products.
17. Satisfaction Guaranteed
Satisfaction guaranteed — Or we'll replace it or give you your money back. For questions or comments or to report an undesired reaction or side effect, please call 1-888-287-1915.
Walmart Inc.
702 S.W. 8th St.
Bentonville, AR 72716
www.walmart.com
1-888-287-1915