JUMP STARTER
WITH AIR COMPRESSOR
A30
USER MANUAL

CATALOG
INTRODUCTION
WARNINGS
PACKAGE INCLUDES
DIAGRAM
PREPARATION
INSTRUCTIONS
MAINTENANCE
TROUBLESHOOTING/FAQ
ERROR CODEANALYSIS
SPECIFICATIONS
RECYCLING
WARRANTY PERIOD
03
04
05
06
08
09
14
14
16
17
17
18

INTRODUCTION
Thank you for purchasing the AstroAI Jump Starter with Air Compressor.
This product uses the ultra-powerful discharge technology of a lithium
battery to help users jumpstart car batteries that are fully depleted or
in a low-temperature environment. It also functions as an air compressor,
power bank and emergency flashlight; it is a must-have tool for the
outdoors.
We hope this product protects you on your journeys. AstroAI strives to
build tools that help you enjoy all of life’s adventures.
Questions or concerns? You are welcome to contact us via
Please fully read and follow this manual before using this
product and keep it for future reference.
!
- 03 -

WARNINGS
Fully charge the product before use.
This product contains small accessories which are a choking hazard
for young children. Keep out of reach of children.
Extended use is not recommended. Please cool down the product for
at least 10 minutes after 10 minutes of continuous use.
Please check the preset value and unit before use. Do not overinflate
the tire, high pressure may cause injuries.
Do not use the product as a car battery and do not use it to start the
car while the jump starter is charging.
Do not connect the red clamp to the black clamp.
The product is intended only to start 12V vehicles and is prohibited for
use on non-12V equipment such as aircraft and 24V vehicles/boats.
Only use this product with the included battery clamps. Do not use the
jumper clamps or cables if they appear damaged.
Take o any metal accessories, such as rings, bracelets, or necklaces
before operating the jump starter.
Before starting your car, clean the battery terminals and inspect the
jumper clamps for any damage. Dirty terminals and damaged clamps
can aect performance.
Repeatedly jumpstarting your vehicle in a short time frame will increase
the likelihood of damage. To prevent this, ensure the jump starter has
adequate breaks in between each use.
If you are using the jump starter several times in a row, allow a 60-second
break in between each use.
- 04 -

PACKAGE INCLUDES
Promptly remove the jump starter from the vehicle’s battery after
successfully jumpstarting your car. Failure to do so may cause damage.
Do not place the product in a high temperature, humid environment, or
near flammable materials or strong magnetic fields.
Be aware of the product’s charging, working, and storage temperature
range. Do not expose it to direct sunlight or leave it in a high-tempera-
ture environment for a long time.
Non-professionals should not disassemble, remodel, or repair the product.
Handle the product with care to avoid dropping and other severe impacts.
If any abnormalities occur (e.g. overheating, smoking, or burning)
while using the jump starter, please turn it o, remove the clamps, and
immediately contact AstroAI customer support.
Do not press the Boost Button before connecting to the car battery.
Jump Starter with Air Compressor
Smart Battery Clamps
USB-A to USB-C Charging Cable
Needle Valve Adapter
Presta-Schrader Adapter
× 1
× 1
× 1
× 1
× 1
Air Hose
Air Nozzle
Storage Bag
User Manual
× 1
× 2
× 1
× 1
- 05 -
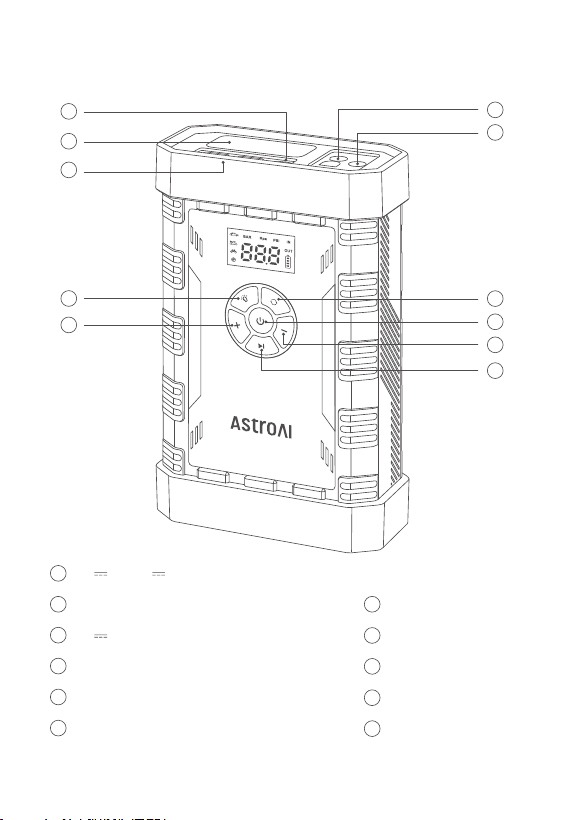
DIAGRAM
11
4
3
2
1
8
6
7
9
10
5
5V 2A 9V 2A USB-C Input Port
LED Flashlight
5V 2.4A USB-A Output Port
Light Button
“+” Button
12V Jump Start Port
1
2
3
4
5
Tire Inflation Port
Mode Button
Power Button
“-” Button
Start/Pause Button
6
7
8
9
11
10
- 06 -
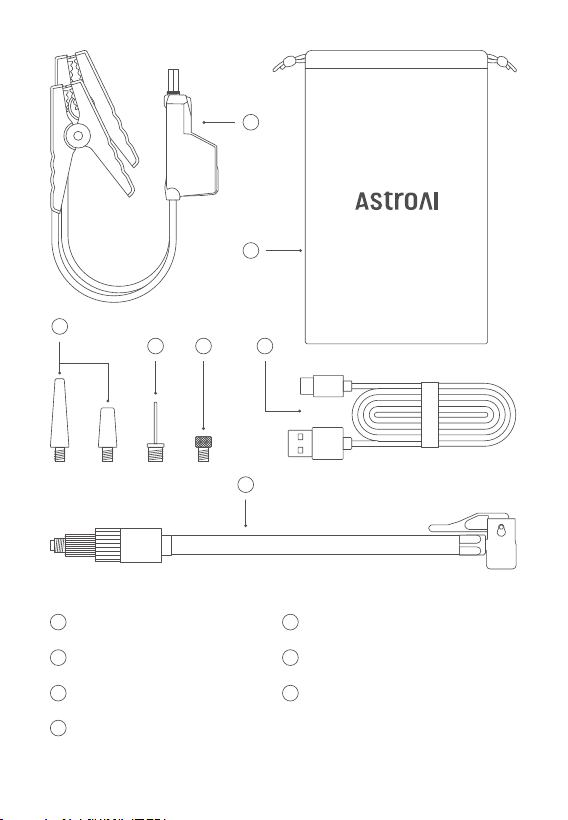
Smart Battery Clamps
Storage Bag
Air Nozzle × 2
Needle Valve Adapter
12
13
14
15
Presta to Schrader Adapter
USB-A to USB-C Charging Cable
Inflation Hose
16
17
18
12
13
17
14
15
16
18
- 07 -
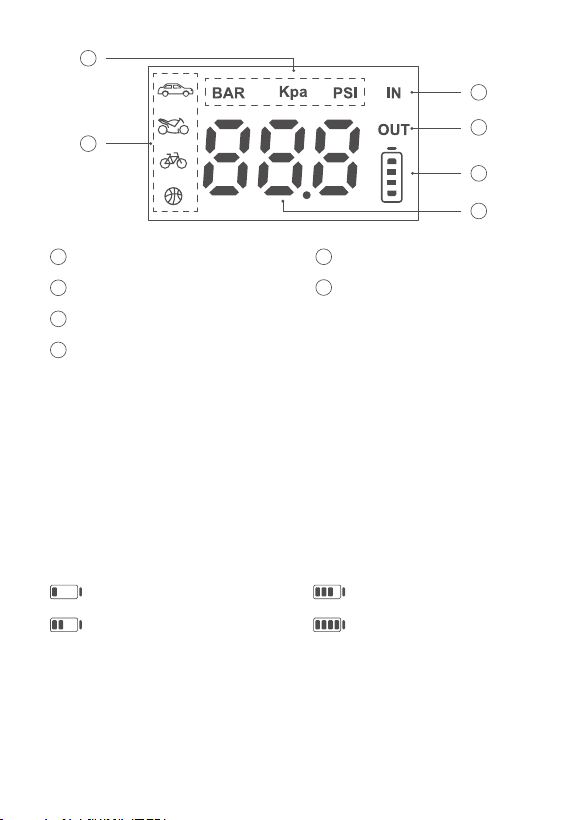
PREPARATION
Units
Inflation Mode Display
Input Charging Icon Display
Output Charging Icon Display
19
20
21
Battery Level
Real-Time Pressure Value/
Preset Pressure Value
22
23
24
22
21
23
24
20
19
How to Charge
Please charge the jump starter to 100% before using it. Connect its charging
cable to the USB-C port. (Charging block not included)
Charging Temperature: 32°F ~ 113°F; 0°C ~ 45°C
Under 25%
Between 25% and 50%
Between 50% and 75%
Between 75% and 100%
Note: The battery icon flashes while the jump starter is charging; once it’s
fully charged, the battery icon will illuminate. The screen automatically
turns o once the jump starter has finished charging.
- 08 -
INSTRUCTIONS
How to Jumpstart
Note: For best jumping performance, ensure the jump starter’s battery
level exceeds 75% and turn o any electrical devices inside your vehicle
before starting your car.
How to Turn the Machine On/O
Press the Power Button to turn it on and press and hold for 2 seconds
to power it o. It also turns o automatically when there is no external
load or output over 30 seconds.
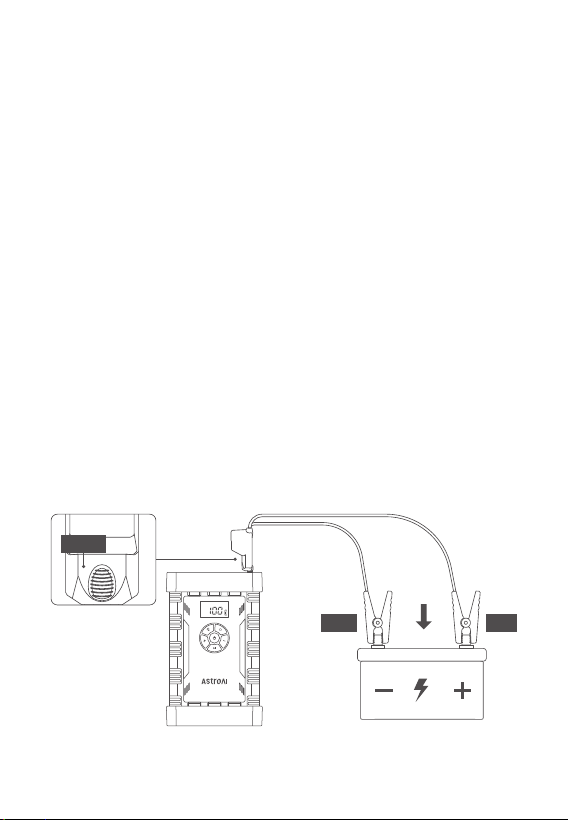
1. Fully insert the smart battery clamps into the jump starter’s 12V port.
2.
Connect the red clamp to the battery’s positive terminal (+) and the
black clamp to the battery’s negative terminal (-). Proceed to the next
step when the clamps’ indicator remains green. For other indicator
statuses, see the indicator light description table below.
Black
Red
Green
- 09 -

3. Start your engine.
4. Remove the clamps from the battery.
Indicator Light of the Battery Clamps
No Light
IndicationStatus Operation
Start your engine directlyClamps connected
correctly
Illuminated green
Illuminated red,
buzzer long beeping
Check the circuit or try step 1Short circuit
Try step 2
Intact status
Flashing in red
and green
Reverse the clampsReversed polarities
reconnect itProtection activated
Retry steps 2 and 3 when the
battery clamps are correctly
attached, or contact AstroAI
for further assistance.
The vehicle battery
may be damaged
Illuminated red
- 10 -
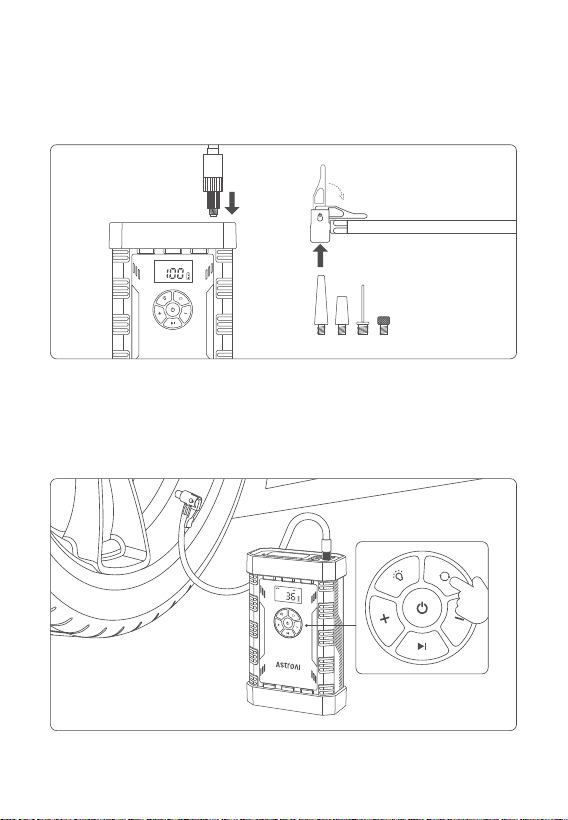
How to Inflate Tires
1. Connection: Choose an appropriate nozzle based on the inflatable
and tightly connect to it.
2. Setting: Press the Power Button to turn on the unit. Then, choose the
appropriate inflation mode and adjust the preset pressure value
according to the required air pressure of the inflatable.
- 11 -
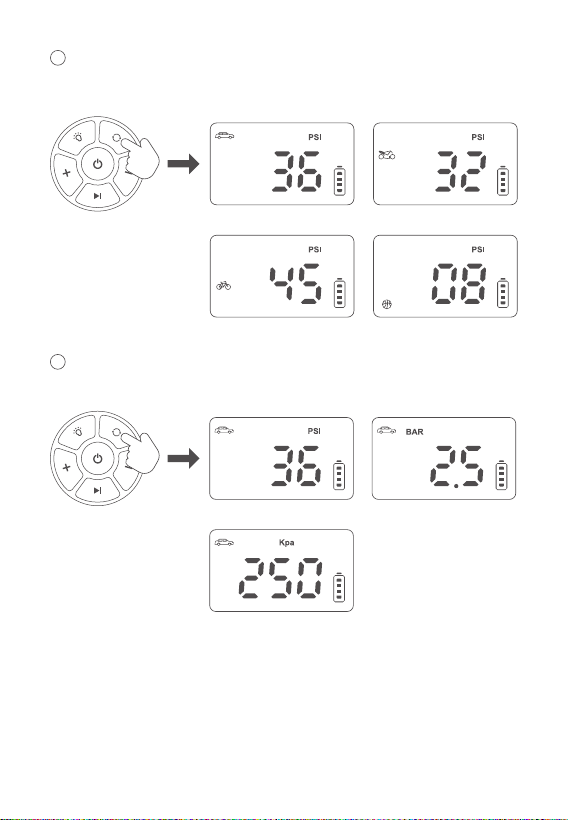
1
Press the Mode Button to switch between car, motorcycle, bicycle and
ball inflation modes.
2
Press and hold the Mode Button to switch units between Bar, PSI
and Kpa.
Car Motorcycle
Bicycle Ball
BarPSI
Kpa
- 12 -
3. Press and hold the Start/Pause Button to start inflating. The machine
will automatically stop when the inflation is complete.
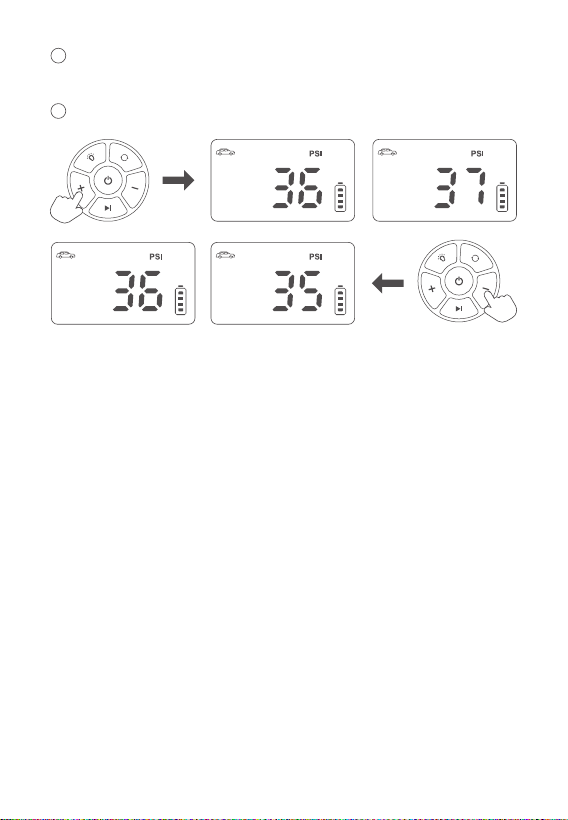
3
4
Press the “+” and “-” Buttons to adjust the preset value by 1PSI
(0.1Bar/1kPa) increments.
Press and hold the “+” and “-” Buttons to rapidly adjust the preset value.
Tip: To avoid overinflation, please confirm the maximum inflation
pressure of the objects being inflated. Overinflating may cause explo-
sions and personal injuries.
Power Bank Function
When the jump starter is on, connect the USB cable to the USB output
port to charge cell phones, tablets, and other devices.
Illumination Function
When the machine is on, press the Light Button for 3 seconds to turn on
the LED flashlight, press it again to switch between flashing, SOS, and
o modes.
- 13 -

MAINTENANCE
To maximize the battery’s performance and service life, please charge
the jump starter when its battery level is lower than 75%.
Please fully charge the jump starter if it will not be in use for an extended
amount of time. Charge it every three months to extend its service life.
Slow Inflation
Insucient battery level.
Check if the air hose leaks.
Check if there is a good seal on the air hose’s ends.
Check if the inflating object is leaking.
Failure to Charge
Check if the charging cable is connected correctly.
Ensure the outlet is powered.
If the jump starter overheats, it will turn on its overheating protection
feature and shut down for a few minutes. Once the unit cools down,
try again.
Contact AstroAI customer support.
TROUBLESHOOTING/FAQ
- 14 -

Failure to Jumpstart
Insucient power level; you may need to charge the jump starter. Please
charge your device to 75% or higher to successfully jumpstart your car.
Inspect the battery terminals for any rust or dirt, as it could aect the
connection quality. Clean up any residue and try again.
If the jump starter overheats, it will turn on its overheating protection feature
and shut down for a few minutes. Once the unit cools down, try again.
Check if the battery clamps are connected to the wrong terminals (reversed).
Poor connection between the clamps and battery; ensure a tight connection.
The vehicle cannot start because of issues unrelated to battery power levels.
Please use the appropriate equipment to check the battery or error code
of the vehicle. This will help identify and address potential issues beyond
the jump starter itself.
Contact AstroAI for after-sales support.
Failure to Power On
Insucient power level or the jump starter is still charging.
Contact AstroAI customer support.
Normal Inflation, but the Pressure Value is Zero
The object’s pressure value is too low to detect.
- 15 -

Error: Battery cell temperature too low; charger inserted but the device
is not charging.
Solution: Resume charging once the cell temperature returns to normal.
ERROR CODEANALYSIS
H0
Error: Overheated battery cell during charging or use has triggered
protection.
Solution: When the cell temperature returns to normal,itwillresume
normalfunctionality.
H1
Error: The air compressor temperature is too high; immediately stop
using it.
Solution: When the temperature returns to normal, it will resume its
normal functionality.
H2
Error: Overused air compressor has triggered protection.
Solution: Wait for 5 minutes then restart the air compressor.
H3
Error: Device has stopped charging because the input voltage is higher
than 11V.
Solution: It will charge normally once connected to a power source that
is lower than 10V.
188
- 16 -

This jump starter features four built-in 3.7V lithium batteries in a series
connection.
The battery pack capacity is 2000mAh (14.8V), equivalent to 8000mAh
(3.7V).
You may dispose of the jump starter when its service life has ended,
please recycle the recyclable parts according to local guidelines.
SPECIFICATIONS
RECYCLING
Model
Capacity
USB-C Input
USB-A Output
Inflating Pressure Range
Air Compressor Accuracy
Inflation Modes
Display Units
Operation Temperature
Charging Temperature
A30
29.6Wh
5V 2A 9V 2A
5V 2.4A
3-150PSI/0.2-10.3Bar/20-995Kpa
±1PSI
Cars, Motorcycles,
Bicycles and Basketballs Mode
PSI, Bar, Kpa
-4°F ~ 122°F; -20°C ~ 50°C
32°F ~ 113°F; 0°C ~ 45°C
- 17 -

2-Year Limited Warranty from AstroAI
Each AstroAI Jump Starter with Air Compressor will be free from defects
in material and workmanship.
This warranty does not cover damage from neglect, misuse, contamina-
tion, alteration, accident, or abnormal conditions of operation or handling.
This warranty covers the original purchaser only and is not transferable.
WARRANTY PERIOD
- 18 -

Web: www.astroai.com
E-Mail: support@astroai.com
