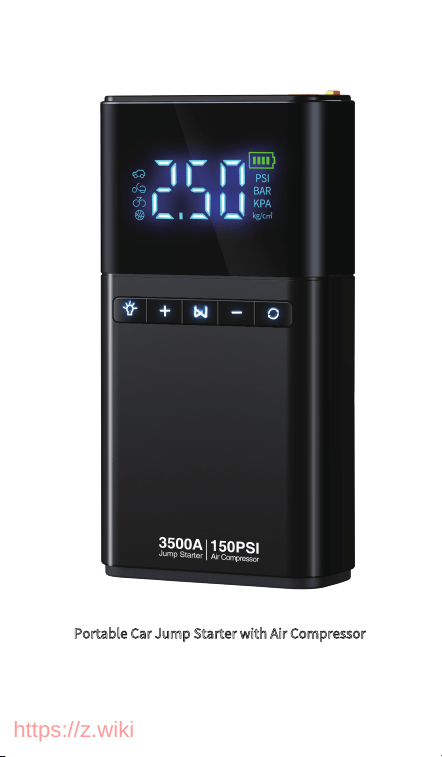
Portable Car Jump Starter with Air Compressor
User Manual
https://z.wiki

1. PRODUCT OVERVIEW
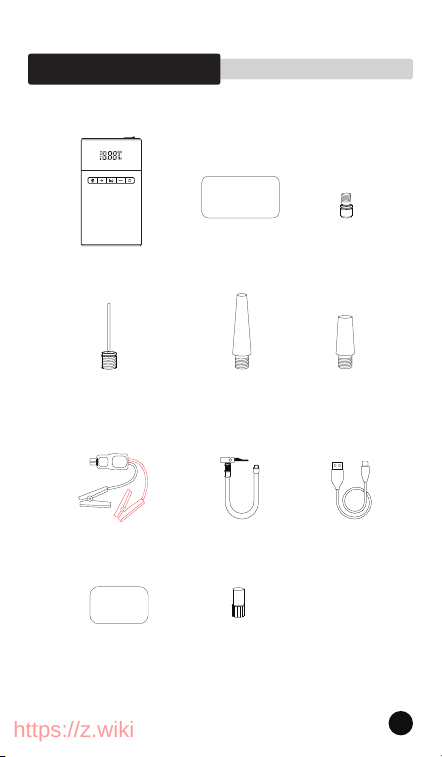
2. PACKAGE LIST
1.1 Product Description
1.2. Functional Area Display
1.3 Display and Button
4. INSTRUCTIONS FOR USE
4.1 How to Use Air Compressor
4.2 How to Use Jump Starter
4.3 Product Charging Guide
4.4 Lighting Operation
3.TECHNICAL SPECIFICATIONS
6. SAFETY STATEMENT
6.1 Matters Needing Attention
6.2 Product Care Tips
5. TROUBLESHOOTING GUIDE
01
03
01
01
02
05
05
07
09
09
04
11
11
13
09
CATALOGUE
https://z.wiki
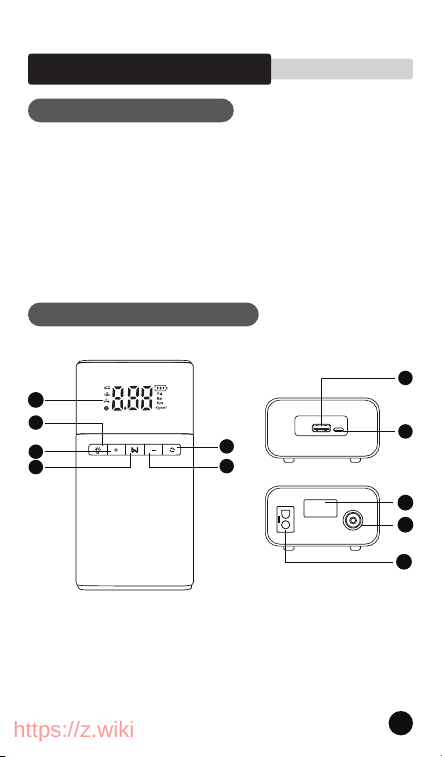
1. LCD screen
2. Lighting button
3. Air pressure +
4. Switch
5. Air pressure -
6. Unit adjustment
7.USB output
8.Type-C input port
1.1 Product Description
1.2 Functional Area Display
01
9
10
11
2
3
4
5
6
7
8
1
1. PRODUCT OVERVIEW
This product is an automobile emergency jump starter and air
compressor multi-functional all-in-one machine, that can give
the car that can not start due to battery loss for emergency
ignition,and pump for car tires, and with USB output, can
charge mobile phones, tablet computers and other devices,
while having emergency lighting function
https://z.wiki
9.LED lights
10. Inflation hose jack
11.Ec5 interface
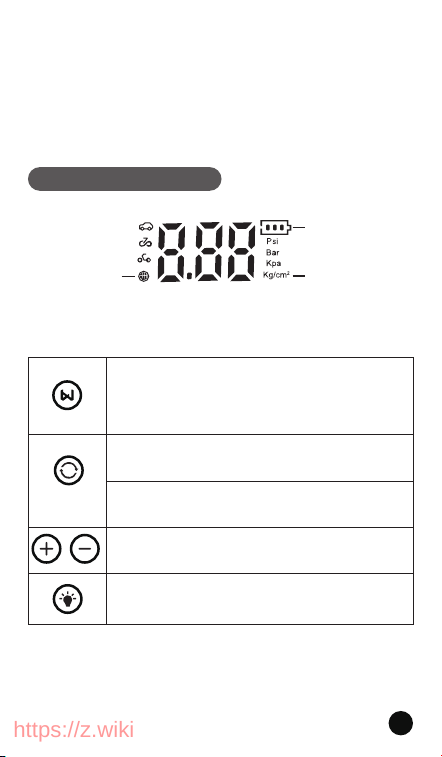
Function of button
1.3 Display and Button
4 Preset Modes
4 Pressure Value Unit
Electric quantity
02
Press and hold the "Switch button" for 2 seconds
Short press the "Switch button" to start inflating.
Press and hold the "Switch button" for 2S to shut down
the machine. In a non-working state, the machine will
shut down automatically for the 40s.
In the startup state, short press the "Unit adjustment" key
to switch between the four units of "PSI, BAR, KPA,
KG/CM "
In the startup state, long press the "Unit Adjustment"
button to switch between the four modes: Bicycle,
motorcycle, Car, and basketball
Long press the light button, LED lights. Next press the
Light Button to switch between illumination (white), SOS
(red), and strobe. Click again to turn off the light.
In the startup state, press + or - to set the target
pressure value, or hold down to set the pressure
value in quick succession
2
https://z.wiki
03
2.1 Standard configuration
2. PACKAGE LIST
Rubber Dinghy
Valve Adaptor x 1
Presta Valve
Adapter x 1
Swim Ring Valve
Adaptor x 1
Inflating Protective
Cover x 1
Needle Valve
Adaptor x 1
Air Pump
Hose x 1
USB Charging
Cable x 1
Storage Bag x 1
User Manual x 1YL03 Jump Starter
with Air Compressor
User Manual
https://z.wiki
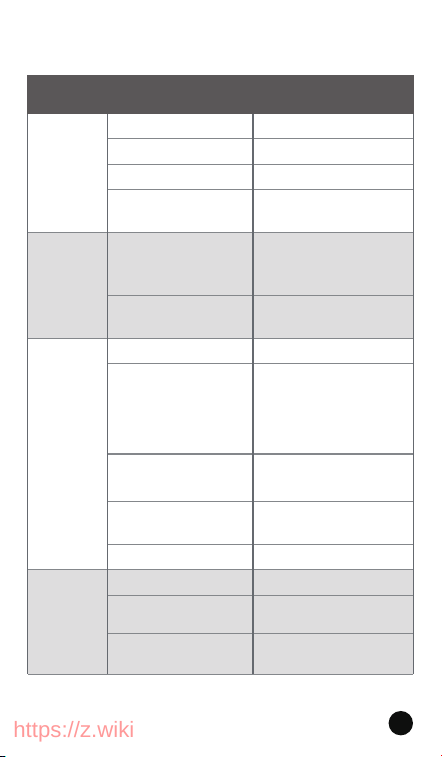
Product model
USB-C input
USB-A output
Charging time
Product size
Operating temperature
Battery type
Shell material
Air volume
YL03
5V 2A
4-5h
24*14*11cm
-20°C~60℃
Polymer battery
PC\ABS
Approx 45L/min
5V 2.1A
The above data comes from laboratory measurements, but the
data may be different or inaccurate due to changes in the objective
environment
3. TECHNICAL SPECIFICATIONS
04
https://z.wiki
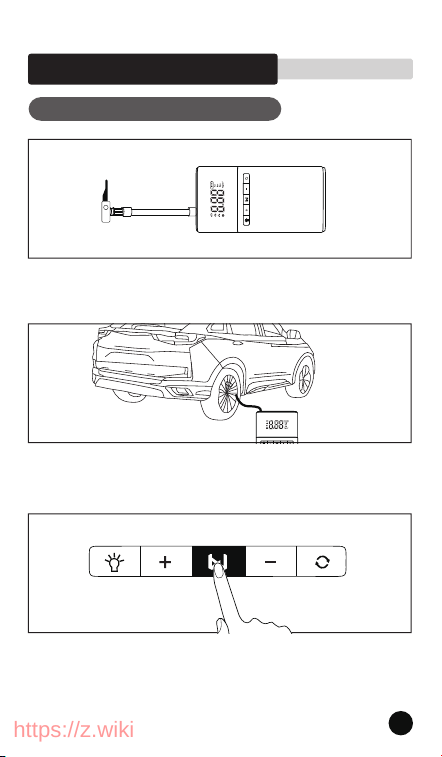
4.1 How to Use Air Compressor
Step 1: Screw on the inflation hose
Step 2: Clamp the tire nozzle
Step 3: Long press the key to start, at this time, the product
screen will automatically display the current tire pressure value
05
4. INSTRUCTIONS FOR USE
https://z.wiki
Warm tips: During the inflation process, the tire
pressure value will be displayed in real time, without
care, full of automatic stop
Step 5: Automatically stop when the air pressure reaches the
preset value, or press the switch key again to stop the inflation,
and remove the air pipe from the car tire and fuselage after the
air pipe has cooled
06
Step 4: Short press the " " key to switch pressure:
PSl, BAR, KPA, KG/CM ; Long press the " " key to
switch inflation modes: Car, Motorcycle, Bicycle, Ball.
" + " and " - " are pressure preset keys, short press for
the slow setting, long press for the fast setting, detect
the current pressure, and set the target pressure
value.
https://z.wiki
07
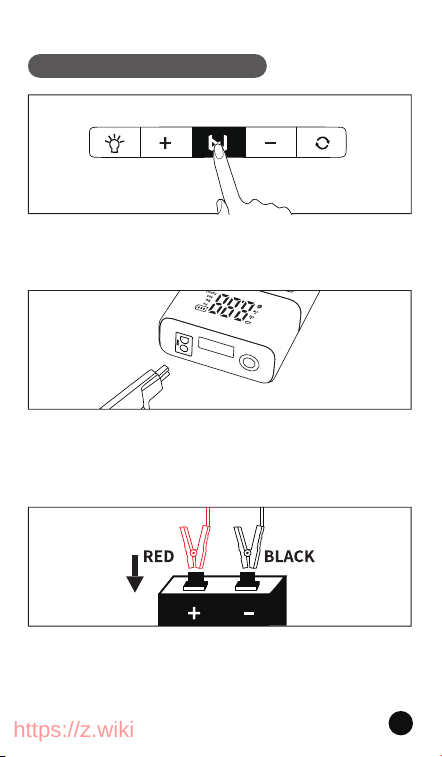
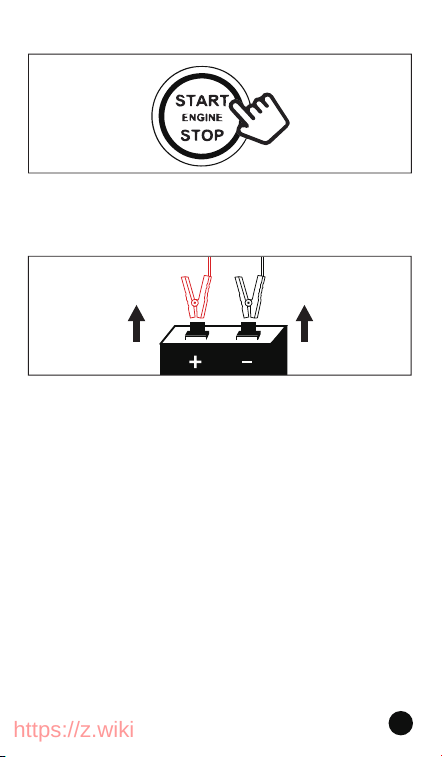
4.2 How to Use Jump Starter
Step 2: Insert the smart anti-reverse connection battery clip
into the EC5 interface of the product. At this time, the traffic
light of the battery clip flashes, indicating the normal
operation of the product
Step 3: The red clip fully clamp the positive electrode of the
battery, the black clip fully clamp the negative electrode of the
battery, (or the black clip clip on the vehicle metal sheet). At this
point, the red and green flashing of the battery holder becomes
green and steady
Step 1: Press the power button to power on, check the power,
and ensure that the power is sufficient (more than 75% is
recommended)
https://z.wiki
Step 4: Start the car and close the door and all electronic
devices. Tip: Automatic, step on the brake and start. Manual
transmission, need to step on the clutch and brake at the same
time, and then start)
Step 5: After the vehicle starts, please remove the product
within 30 seconds. (Tip: First unplug, then remove the positive
and negative terminals of the battery clip)
Tip1: If the power is not successful, follow the fifth step, remove
the battery clip, one minute later, re-operation. Do not start
continuously, the start time should not exceed five seconds, the
above
is the description of the steps of the smart battery clip
● The above is the description of the steps of the smart
battery clip. The ordinary battery clip is recommended to
replace the second and third steps, that is, first clip the
positive and negative electrodes of the battery, and then
insert the product EC5 interface
08
Tips2: If the car is started by key, you can turn the key to the
bottom and keep it for a while; for the car with a one-button
start, long press the start button and keep it for a while. After
hearing the engine sound, you can step on the accelerator
appropriately, which can increase the success rate of starting
https://z.wiki
09
We have summarized the suspected faults and common
problems that may be encountered when the equipment is
used, as follows
5. TROUBLESHOOTING GUIDE
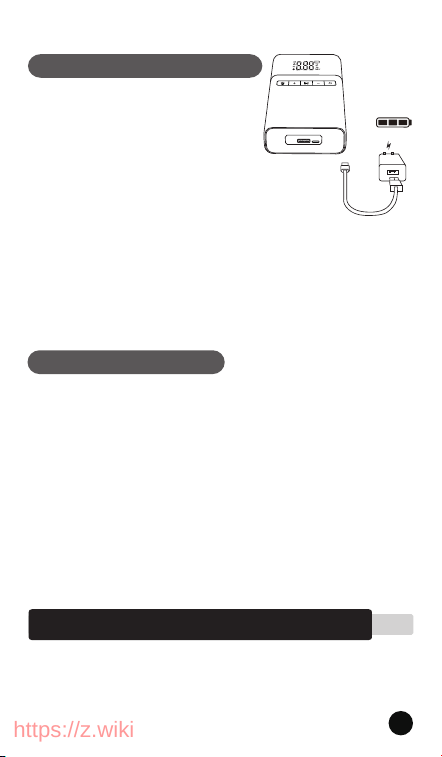
How to charge
4.4 Lighting Operation
Charge mobile phones, iPads, tablets,
and other digital products
4.3 Product Charging Guide
1. Plug the wall charger into the
universal socket.
2. Plug the end of the wall charger
into the Type-c input port of the
product.
Press the power button to power on, and then
connect the USB charging cable to the USB
output, you can charge mobile phones, iPads,
tablets, and other digital products
Long press the light button, LED lights. Next
press the Light Button to switch between
illumination (white), SOS (red), and strobe. Click
again to turn off the light.
https://z.wiki
Unable
to boot
Low battery
Please charge it
Product collision power off
protection
Charge activation
Hold down the power button
for about 3 seconds
Plug the power adapter fully
into the home outlet
Please charge for 3-5 hours
Clamp the battery clamp as
much as possible with the
battery large area, the contact
surface of the battery positive
and negative poles is clean,
and the indicator light is
normal
Turn off the electrical
appliances in the car and close
the doors when the power is
on
No battery lap or negative
electrode lap
Contact customer service
Please charge it
Set the corresponding device
mode correctly
Press the power button
The charging state fails to turn
on. Remove the charging cable
Charging
The charging cable is not
fully inserted into the
charging port
The adapter is not fully
plugged into the home
socket
Low battery
The battery clip is not
connected properly, and
the battery clip does not
recognize the battery
The electric appliances and
doors in the car are not
closed
Battery problem
Operational problem
Low battery
Wrong tire pressure pattern
P
roperly connect the gas pipe
and buckle
The buckle of the air pipe
is loose
Unable
to charge
Failure
to connect
Unable
to inflate
on startup
Insert the charging cable fully i
nto the charging port, and
make sure that the charging
port is not loose
Condition Possible cause The way to troubleshoot
10
https://z.wiki

Please check the power of the machine before use, in order
to achieve better use, please ensure that the power is above
75%, charging is recommended to use the special charging
cable attached to the product
Do not store this product in high temperature, high
humidity, strong light and strong magnetic field
environment, do not place in the fire source and other
harsh environment
Before use, please read the product instructions carefully to
avoid improper use of the product, which may easily cause
the product itself or may endanger the safety of life and
property
Make sure the EC5 plug (smart ignition clip) is fully plugged
into the boot power port. Otherwise, the startup
performance will be affected, and the plastic part of the
interface will have a n
egative impact, and may even melt
Do not use the emergency starting power to continuously
start the car at high frequency, and the time interval
between two ignitions must be greater than 1 minute.
After connecting the intelligent ignition clip and the
emergency starting power, please start the car immediately
If the car does not start, check whether the smart ignition
clip is not securely connected, or check the surface of the
battery connector for rust or dirt, and then start the car after
the surface is clean. If it doesn't start after three consecutive
attempts, stop forcing your car to start, or it will damage the
product
Do not store this product in high temperature and humidity,
①
②
③
④
⑤
⑥
⑦
6. SAFETY STATEMENT
6.1 Matters Needing Attention
11
Please check the power of the machine before use, in order
to achieve better use, please ensure that the power is above
75%, charging is recommended to use the special charging
cable attached to the product
Do not store this product in high temperature, high
humidity, strong light and strong magnetic field
environment, do not place in the fire source and other
harsh environment
Before use, please read the product instructions carefully to
avoid improper use of the product, which may easily cause
the product itself or may endanger the safety of life and
property
Make sure the EC5 plug (smart ignition clip) is fully plugged
into the boot power port. Otherwise, the startup
performance will be affected, and the plastic part of the
interface will have a n
egative impact, and may even melt
Do not use the emergency starting power to continuously
start the car at high frequency, and the time interval
between two ignitions must be greater than 30 seconds.
After connecting the intelligent ignition clip and the
emergency starting power, please start the car immediately
If the car does not start, check whether the smart ignition
clip is not securely connected, or check the surface of the
battery connector for rust or dirt, and then start the car after
the surface is clean. If it doesn't start after three consecutive
attempts, stop forcing your car to start, or it will damage the
product
Do not store this product in high temperature and humidity,
https://z.wiki

strong light and strong magnetic field environment, do not
place in the fire source and other harsh environment, such
as due to the improper use of consumers in violation of
product instructions, resulting in personal and property
damage will bear all consequences, the company will not
assume any legal responsibility, non-professional
personnel are strictly prohibited to disassemble this
product
Avoid using electrical appliances or loads that exceed the
output current of this product (if forced use will trigger
circuit protection, the product has no output)
Avoid strong physical effects, including knocking, throwing,
trampling, squeezing, etc
This product is not a toy, it is prohibited for children to use,
the user is recommended to be over 16 years old, please
keep children and the product at
a safe distance during the
inflating process
In order to extend the service life of the product, if the
product is not used for a long time, it is recommended to
charge it at least once every three months
Please use in a dry and clean environment, sand and dust
intrusion may cause damage to the product, the product is
not waterproof, do not wash with water
High pressure gas will generate heat during aeration, never
insert the trachea into the mouth, ear or eye of a person or
animal to prevent injury.
In order to ensure the good work of this product, after each
10 minutes of inflation, the machine must stop running for
5 minutes, cool down before use, in order to extend the life.
If there is abnormal noise in
the inflation or the tempera-
ture is too high, please shut down immediately and allow it
to cool for at least 15 minutes, and be careful when
disassembling the gas pipe
⑨
strong light and strong magnetic field environment, do not
place in the fire source and other harsh environment, such
as due to the improper use of consumers in violation of
product instructions, resulting in personal and property
damage will bear all consequences, the company will not
assume any legal responsibility, non-professional
personnel are strictly prohibited to disassemble this
product
Avoid using electrical appliances or loads that exceed the
output current of this product (if forced use will trigger
circuit protection, the product has no output)
Avoid strong physical effects, including knocking, throwing,
trampling, squeezing, etc
This product is not a toy, it is prohibited for children to use,
the user is recommended to be over 16 years old, please
keep children and the product at
a safe distance during the
inflating process
In order to extend the service life of the product, if the
product is not used for a long time, it is recommended to
charge it at least once every three months
Please use in a dry and clean environment, sand and dust
intrusion may cause damage to the product, the product is
not waterproof, do not wash with water
High pressure gas will generate heat during aeration, never
insert the trachea into the mouth, ear or eye of a person or
animal to prevent injury.
In order to ensure the good work of this product, after each
10 minutes of inflation, the machine must stop running for
5 minutes, cool down before use, in order to extend the life.
If there is abnormal noise
in the inflation or the tempera-
ture is too high, please shut down immediately and allow it
to cool for at least 15 minutes, and be careful when
disassembling the gas pipe
⑩
⑪
⑫
⑬
⑭
12
⑧
https://z.wiki

13
①
②
③
④
6.2 Product Care Tips
Keep the instrument dry and do not place it in high
temperature or humid environment
Product built-in lithium battery, the battery is prohibited to
use after immersion
If you do not use the product for a long time, please charge
and discharge it every 3 months
Do not disassemble, impact, squeeze or put into the fire
-
https://z.wiki
