
Technical Support and E-Warranty Certificate www.vevor.com/support
PIZZA DOUGH PRESSER
MODEL:APD24
We continue to be committed to provide you tools with competitive price.
"Save Half", "Half Price" or any other similar expressions used by us only represents an
estimate of savings you might benefit from buying certain tools with us compared to the major
top brands and does not necessarily mean to cover all categories of tools offered by us. You
are kindly reminded to verify carefully when you are placing an order with us if you are
actually saving half in comparison with the top major brands.

- 1 -
MODEL:APD24
Have product questions? Need technical support? Please feel free to
contact us:
Technical Support and E-Warranty Certificate
www.vevor.com/support
NEED HELP? CONTACT US!
This is the original instruction, please read all manual instructions
carefully before operating. VEVOR reserves a clear interpretation of our
user manual. The appearance of the product shall be subject to the
product you received. Please forgive us that we won't inform you again if
there are any technology or software updates on our product.
PIZZA DOUGH PRESSER

- 2 -
Warning-To reduce the risk of injury, user must read
instructions manual carefully.
IMPORTANT SAFEGUARDS
Always follow basic safety precautions when using these devices. These
include:
1.The device should not be used with children. Children may encounter
injury accidents. Therefore, this product should be placed in a position not
touched by children.
2.For optimal operation and service life of the device, please follow the
instructions.
3.Food acids will corrode the metal. Always clean this food preparation
equipment immediately after every use.To maintain the appearance and
increase the service life, clean it daily.
4.Do not put these devices in a dishwasher or other automatic cleaning
device for cleaning.
5.The use of accessories or modifications not provided by the
manufacturer may cause hazards.
7.Before using this equipment for the first time, please remove all
packaging and fixing materials according to the illustration and use them
after installation.
6.These devices require regular lubrication. Wipe the guide rod with
mineral oil,food-grade lubricant, or a towel when lubrication is needed. Do
not lubricate with cooking oil or another grease. Otherwise, it will become
viscous and affect the use.
SAVE THESE INSTRUCTIONS
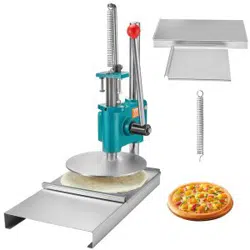
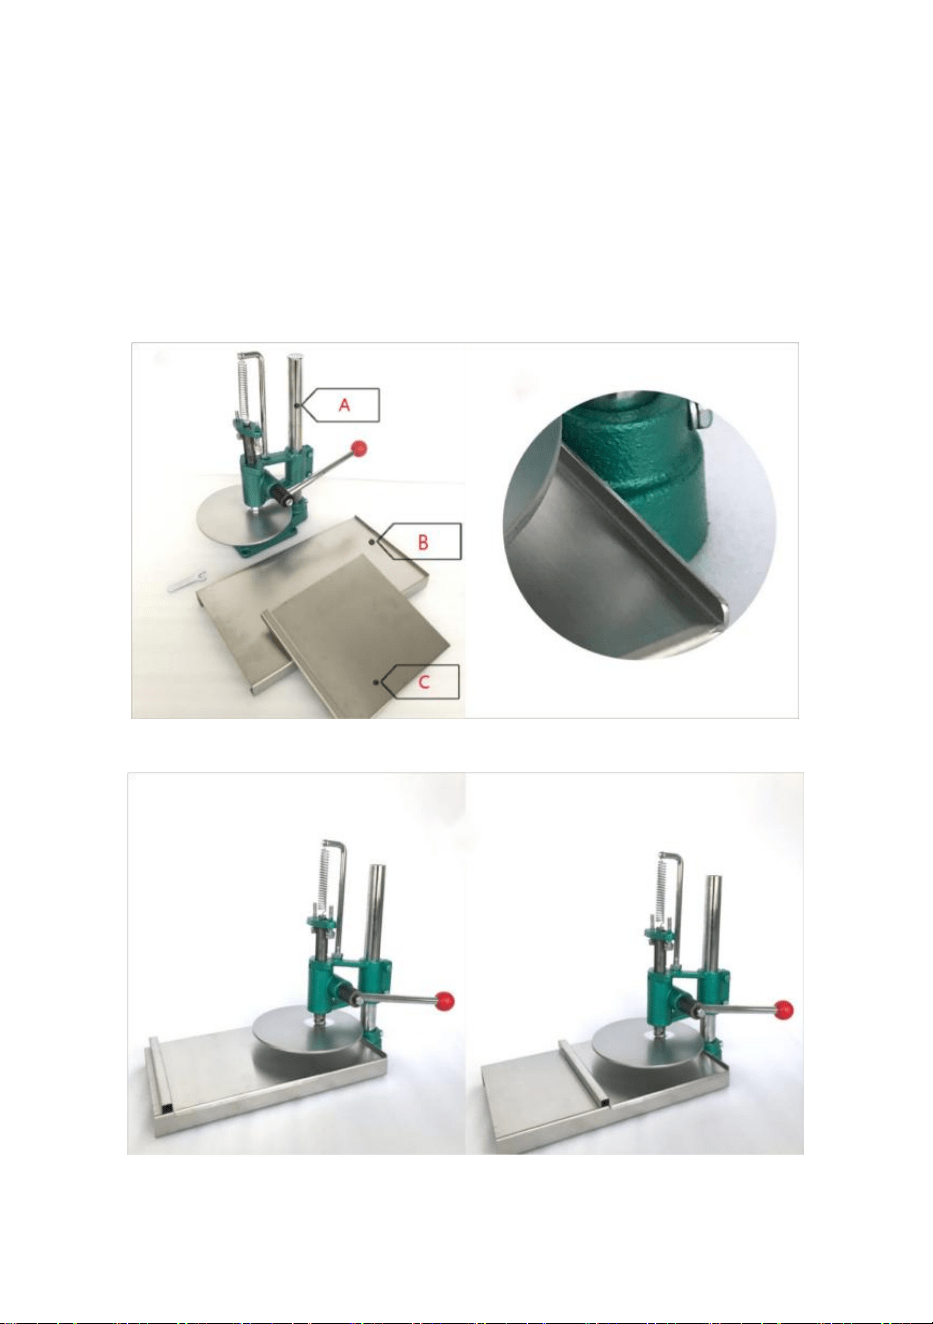
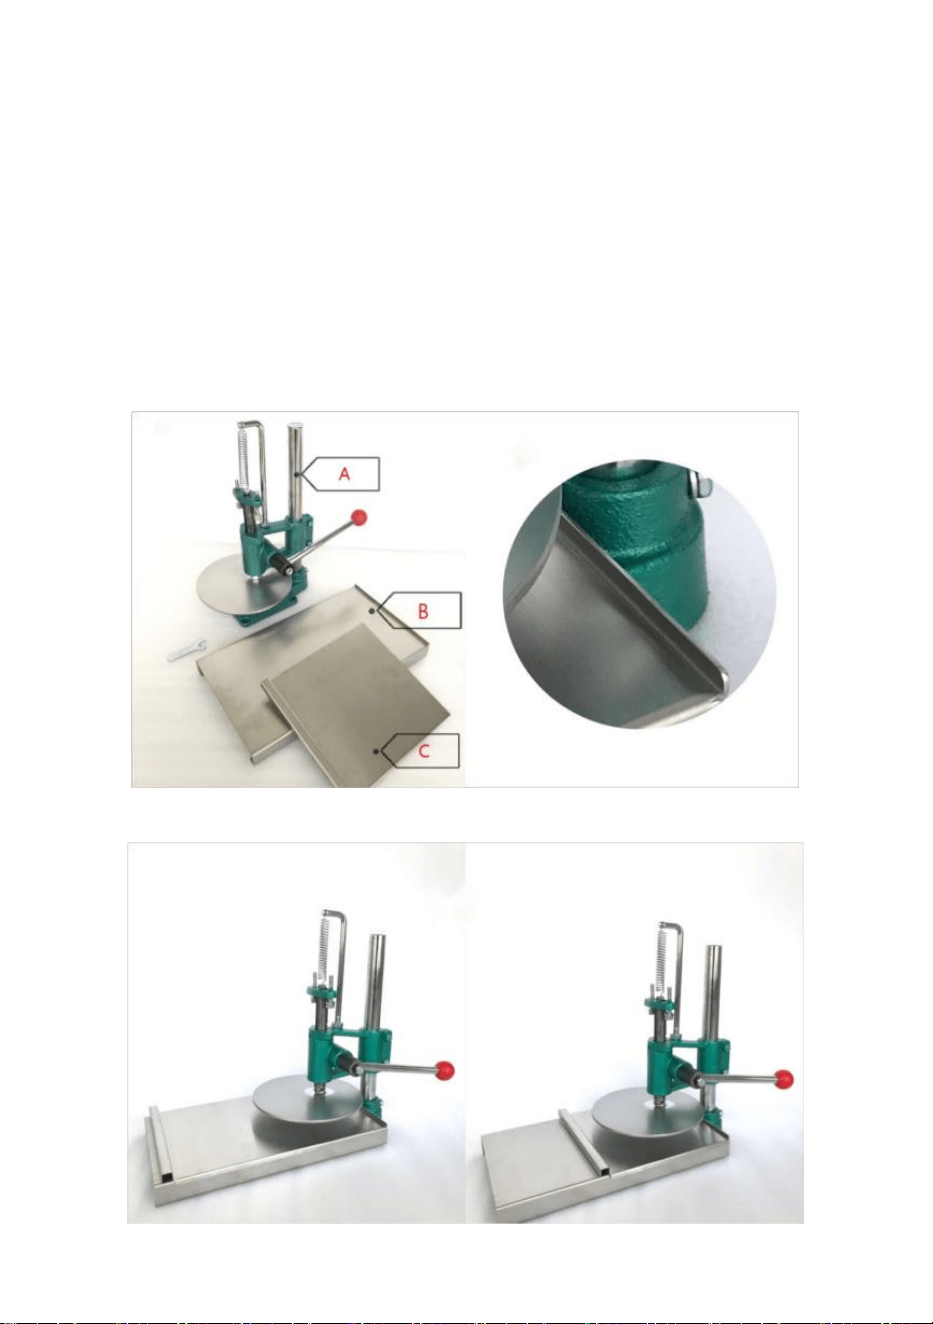
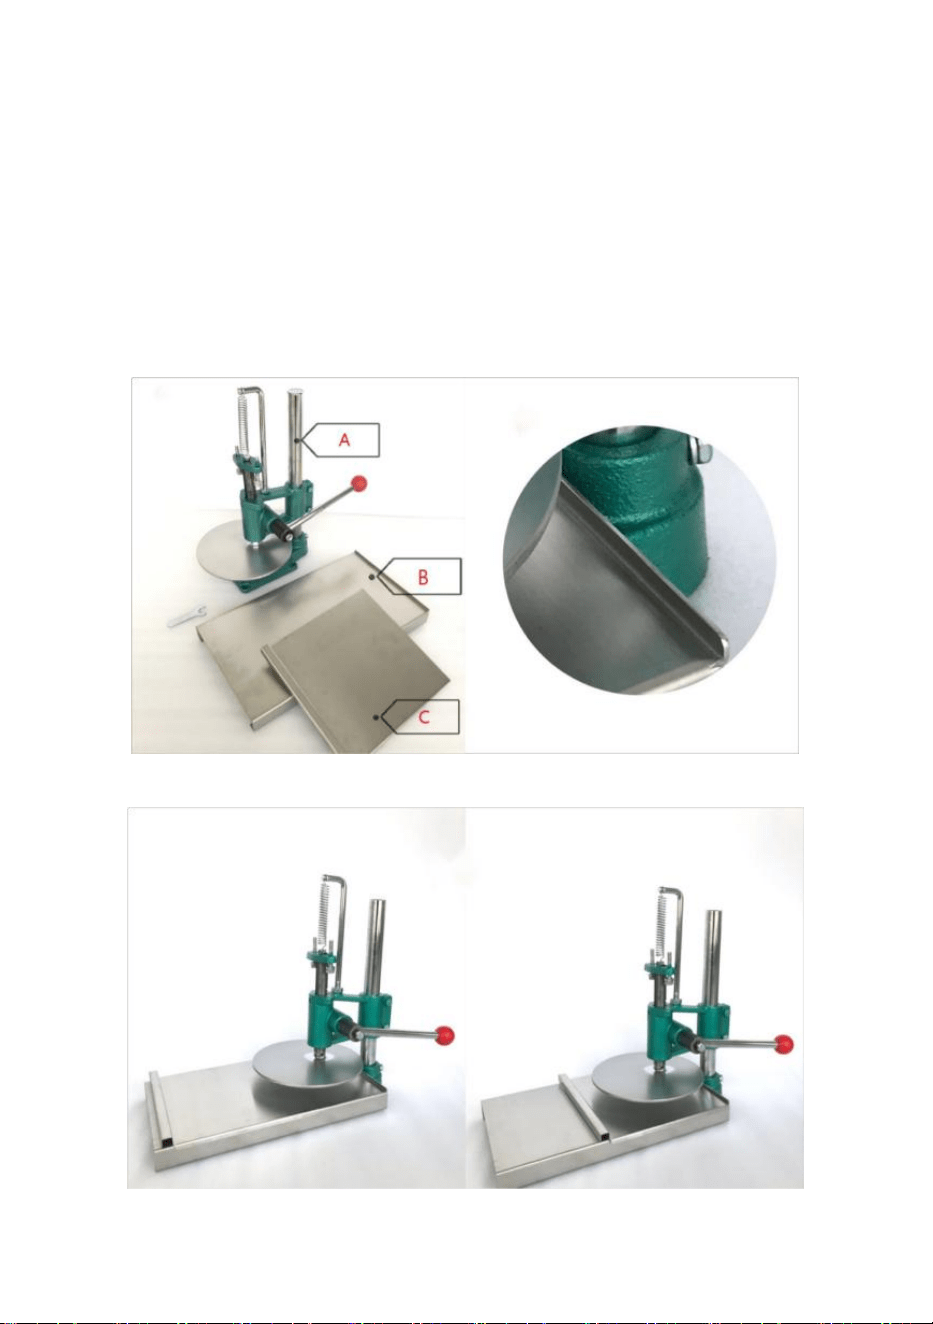
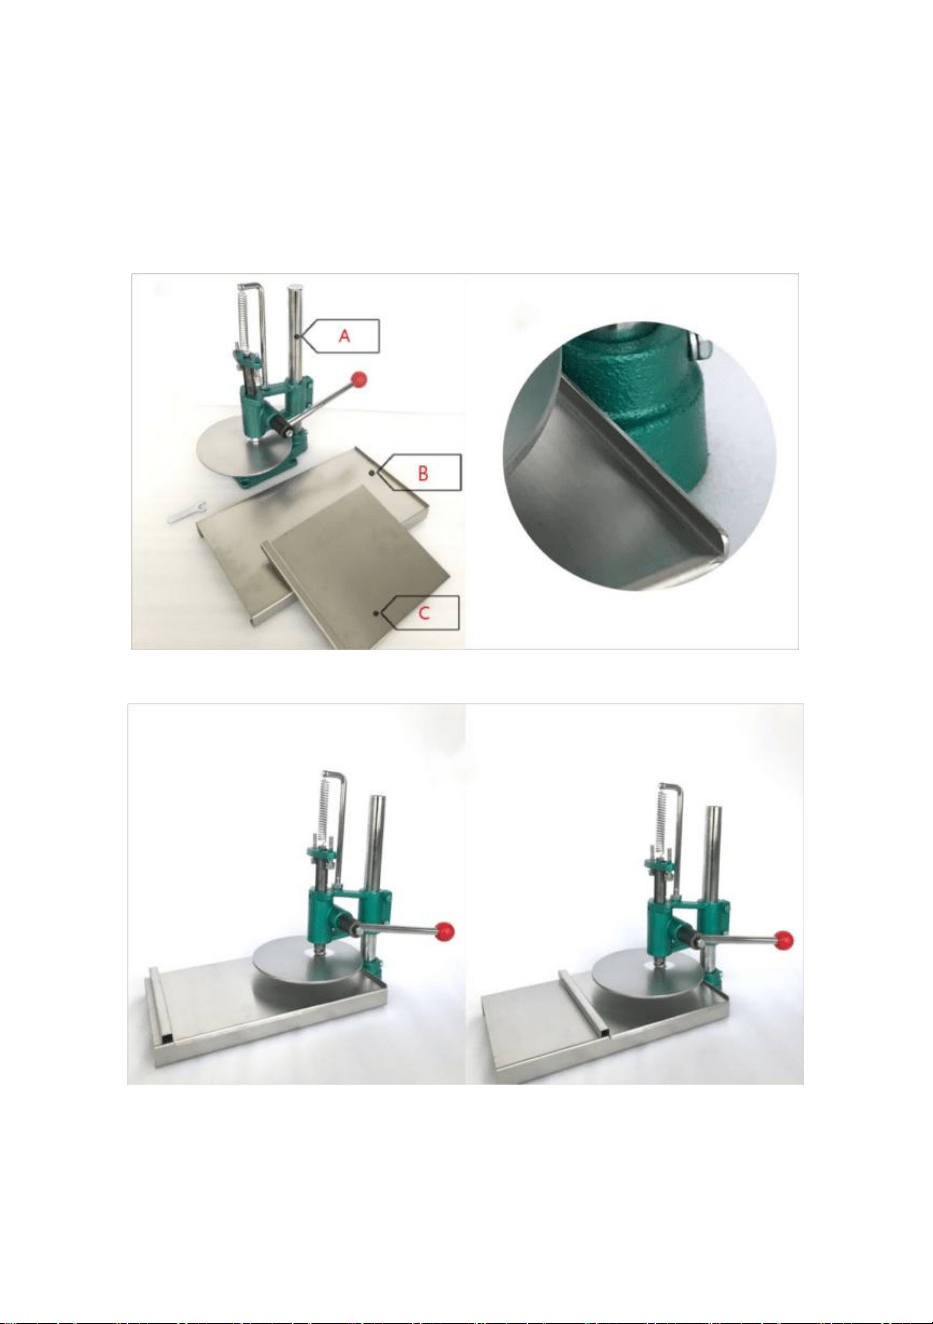
Ⅰ. Accessories and Installation
1.1. This product is a manual tool, which flattens the product by pulling the
- 3 -
handle.
1.2. The whole equipment is divided into three parts: fuselage body (A),
long supporting plate (B) and short pulling plate (C). As shown in the figure
(I).
1.3. Place the fuselage (A) inside the long support plate (B). Make the
higher end of fitting (B) close to the fuselage, as shown in figure (II). The
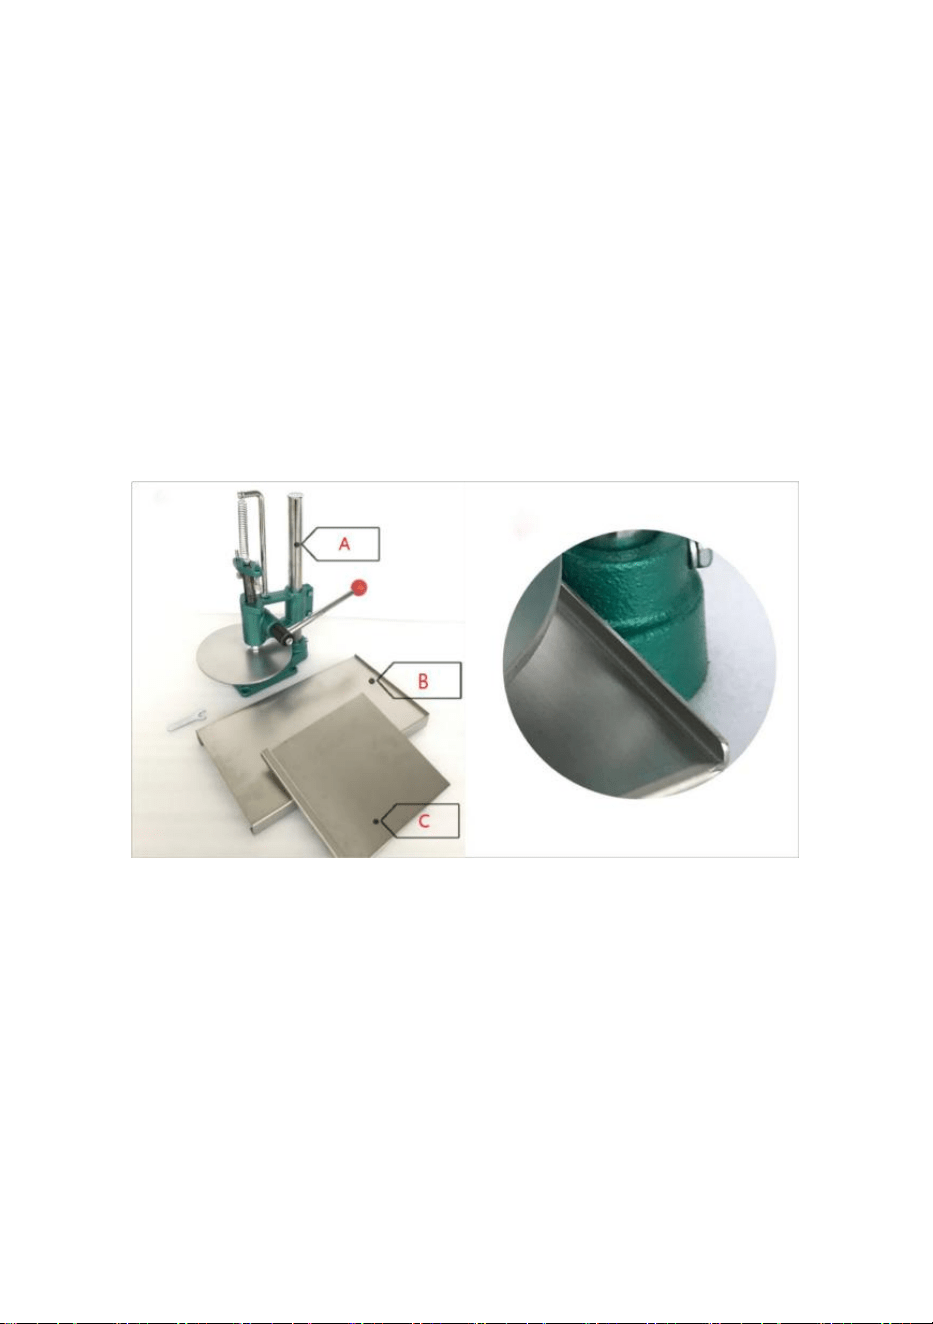
short pull-out plate (C) is placed on the long support plate (B) and can be
moved back and forth. The overall effect is shown in the figure (III).
figure (II)
figure (III)

- 4 -
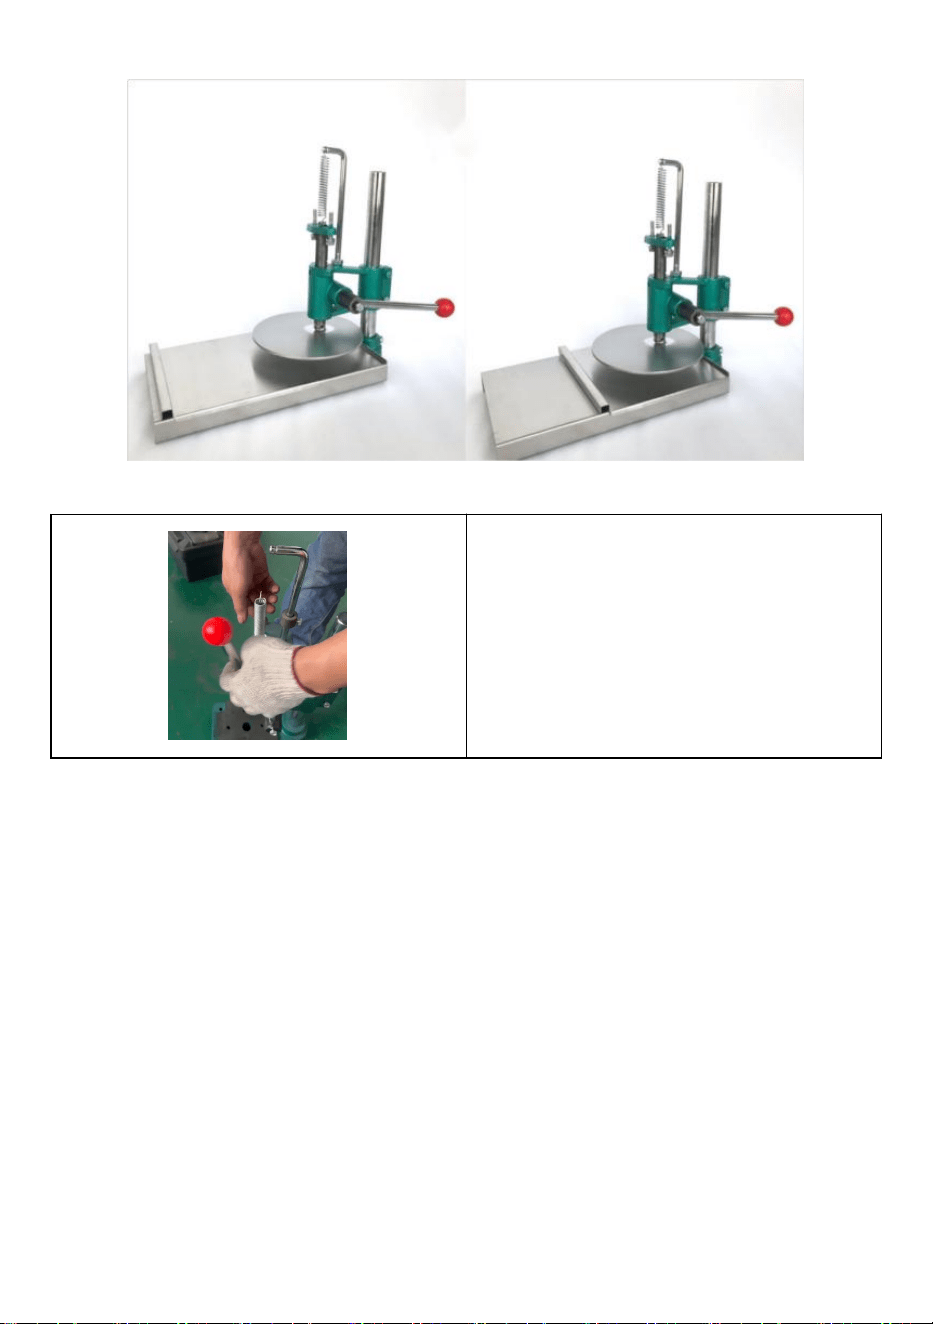
Lock one end of the spring with a
screw, and then pull the spring
firmly to hook it
Ⅱ. Use
2. 1. The initial stroke of the pressure plate is 35mm. If the dough is too
thick, please pre press the dough with your palm to less than 35mm before
pressing the dough.
2. 2. Put the dough on the pulling plate (C), push it directly below the
indenter and press down the handle.
2. 3. The prepared dough should be soft enough for pressing. Proof it for a
long time and apply some edible oil to its surface, then it would be much
easier to press. It is also recommonded that wrap the pressure plate with a
plastic bag or brush the back of the pressure head with oil.
Ⅲ. Adjust the Thickness of the Product
At the top of the fuselage, there are two set screws on both sides of the
spring, which can be adjusted up and down to limit the thickness of the
product.
Ⅳ. Precautions
It is not recommonded to use in humid environment.
Ⅴ. Other
Frequently Asked Questions and Solutions
5.1. Dough cakes being uneven in thickness: You can change the thicker

- 5 -
side to another position and press it again.
5.2. Dough cakes being not large enough: Enough time should be given to
ferment the dough in place, and then you can press it effortlessly. Or you
can brush the dough surface with edible oil, the lubrication of which will
make it easier to press.


Technique Assistance et certificat de garantie électronique
www.vevor.com/support
PRESSE-PÂTE À PIZZA
MODÈLE:APD24
We continue to be committed to provide you tools with competitive price.
"Save Half", "Half Price" or any other similar expressions used by us only represents an
estimate of savings you might benefit from buying certain tools with us compared to the major
top brands and does not necessarily mean to cover all categories of tools offered by us. You
are kindly reminded to verify carefully when you are placing an order with us if you are
actually saving half in comparison with the top major brands.

- 1 -
MODÈLE:APD24
Have product questions? Need technical support? Please feel free to
contact us:
Technical Support and E-Warranty Certificate
www.vevor.com/support
NEED HELP? CONTACT US!
This is the original instruction, please read all manual instructions
carefully before operating. VEVOR reserves a clear interpretation of our
user manual. The appearance of the product shall be subject to the
product you received. Please forgive us that we won't inform you again if
there are any technology or software updates on our product.
PIZZA DOUGH PRESSER

- 2 -
Avertissement : Pour réduire le risque de blessure, l'utilisateur
doit lire attentivement le manuel d'instructions.
GARANTIES IMPORTANTES
Suivez toujours les précautions de sécurité de base lorsque vous utilisez
ces appareils. Ceux-ci inclus:
1. L'appareil ne doit pas être utilisé avec des enfants. Les enfants peuvent
subir des accidents corporels. Par conséquent, ce produit doit être placé
dans une position non touchée par les enfants.
2.Pour un fonctionnement et une durée de vie optimaux de l'appareil,
veuillez suivre les instructions.
3. Les acides alimentaires corroderont le métal. Nettoyez toujours cet
équipement de préparation des aliments immédiatement après chaque
utilisation. Pour conserver son apparence et augmenter sa durée de vie,
nettoyez-le quotidiennement.
4. Ne mettez pas ces appareils dans un lave-vaisselle ou tout autre
appareil de nettoyage automatique pour le nettoyage.
5. L'utilisation d'accessoires ou de modifications non fournis par le
fabricant peut entraîner des dangers.
7. Avant d'utiliser cet équipement pour la première fois, veuillez retirer tous
les matériaux d'emballage et de fixation conformément à l'illustration et les
utiliser après l'installation.
6.Ces appareils nécessitent une lubrification régulière. Essuyez la tige de
guidage avec de l'huile minérale, un lubrifiant de qualité alimentaire ou une
serviette lorsqu'une lubrification est nécessaire. Ne pas lubrifier avec de
l'huile de cuisson ou une autre graisse. Sinon, il deviendra visqueux et
affectera l'utilisation.
CONSERVEZ CES INSTRUCTIONS
- 3 -
Ⅰ. Accessoires et installation
1.1. Ce produit est un outil manuel qui aplatit le produit en tirant sur la
poignée.
1.2. L'ensemble de l'équipement est divisé en trois parties : le corps du
fuselage (A), la plaque de support longue (B) et la plaque de traction
courte (C). Comme le montre la figure (I).
1.3. Placez le fuselage (A) à l'intérieur de la longue plaque de support (B).
Rapprochez l'extrémité supérieure du raccord (B) du fuselage, comme
indiqué sur la figure (II). La plaque coulissante courte (C) est placée sur la
plaque de support longue (B) et peut être déplacée d'avant en arrière.
L'effet global est illustré dans la figure (III).
figure (II)

- 4 -
figure (III)
Verrouillez une extrémité du ressort
avec une vis, puis tirez fermement
sur le ressort pour l'accrocher.
Ⅱ. Utiliser
2. 1. La course initiale de la plaque de pression est de 35 mm. Si la pâte
est trop épaisse, veuillez pré-appuyer sur la pâte avec votre paume à
moins de 35 mm avant de presser la pâte.
2. 2. Placez la pâte sur la plaque de tirage (C), poussez-la directement
sous le pénétrateur et appuyez sur la poignée.
2. 3. La pâte préparée doit être suffisamment molle pour être pressée.
Faites-le tremper pendant longtemps et appliquez un peu d'huile
comestible sur sa surface, il sera alors beaucoup plus facile de le presser.
Il est également recommandé d'envelopper la plaque de pression dans un
sac en plastique ou de brosser l'arrière de la tête de pression avec de
l'huile.

- 5 -
Ⅲ. Ajuster l'épaisseur du produit
Au sommet du fuselage, il y a deux vis de réglage des deux côtés du
ressort, qui peuvent être ajustées de haut en bas pour limiter l'épaisseur
du produit.
Ⅳ. Précautions
Il n'est pas recommandé de l'utiliser dans un environnement humide.
Ⅴ. Autre
Foire aux questions et solutions
5.1. Les gâteaux de pâte sont d'épaisseur inégale : vous pouvez changer
le côté le plus épais dans une autre position et le presser à nouveau.
5.2. Les gâteaux de pâte ne sont pas assez gros : il faut laisser
suffisamment de temps pour fermenter la pâte sur place, puis vous pourrez
la presser sans effort. Ou vous pouvez badigeonner la surface de la pâte
avec de l'huile alimentaire, dont la lubrification facilitera le pressage.


Technisch Support- und E-Garantie-Zertifikat www.vevor.com/support
PIZZATEIGPRESSE
MODELL: APD24
We continue to be committed to provide you tools with competitive price.
"Save Half", "Half Price" or any other similar expressions used by us only represents an
estimate of savings you might benefit from buying certain tools with us compared to the major
top brands and does not necessarily mean to cover all categories of tools offered by us. You
are kindly reminded to verify carefully when you are placing an order with us if you are
actually saving half in comparison with the top major brands.

- 1 -
MODELL: APD24
Have product questions? Need technical support? Please feel free to
contact us:
Technical Support and E-Warranty Certificate
www.vevor.com/support
NEED HELP? CONTACT US!
This is the original instruction, please read all manual instructions
carefully before operating. VEVOR reserves a clear interpretation of our
user manual. The appearance of the product shall be subject to the
product you received. Please forgive us that we won't inform you again if
there are any technology or software updates on our product.
PIZZA DOUGH PRESSER

- 2 -
Warnung: Um das Verletzungsrisiko zu verringern, muss der
Benutzer die Bedienungsanleitung sorgfältig lesen.
WICHTIGE SICHERHEITSMASSNAHMEN
Befolgen Sie bei der Verwendung dieser Geräte stets die grundlegenden
Sicherheitsvorkehrungen. Diese beinhalten:
1. Das Gerät sollte nicht mit Kindern verwendet werden. Bei Kindern kann
es zu Verletzungen kommen. Daher sollte dieses Produkt an einem Ort
aufgestellt werden, an dem Kinder es nicht berühren können.
2.Für einen optimalen Betrieb und eine optimale Lebensdauer des Gerätes
befolgen Sie bitte die Anweisungen.
3. Lebensmittelsäuren korrodieren das Metall. Reinigen Sie dieses
Lebensmittelzubereitungsgerät immer sofort nach jedem Gebrauch. Um
das Aussehen zu erhalten und die Lebensdauer zu erhöhen, reinigen Sie
es täglich.
4. Stellen Sie diese Geräte zur Reinigung nicht in die Spülmaschine oder
ein anderes automatisches Reinigungsgerät.
5. Die Verwendung von Zubehör oder Modifikationen, die nicht vom
Hersteller bereitgestellt wurden, kann zu Gefahren führen.
7. Bevor Sie dieses Gerät zum ersten Mal verwenden, entfernen Sie bitte
alle Verpackungs- und Befestigungsmaterialien gemäß der Abbildung und
verwenden Sie diese nach der Installation.
6.Diese Geräte erfordern eine regelmäßige Schmierung. Wischen Sie die
Führungsstange bei Bedarf mit Mineralöl, lebensmittelechtem
Schmiermittel oder einem Handtuch ab. Nicht mit Speiseöl oder einem
anderen Fett schmieren. Andernfalls wird es zähflüssig und beeinträchtigt
die Verwendung.
ANLEITUNG AUFBEWAHREN

- 3 -
Ⅰ. Zubehör und Installation
1.1. Bei diesem Produkt handelt es sich um ein manuelles Werkzeug, das
das Produkt durch Ziehen am Griff flach macht.
1.2. Die gesamte Ausrüstung ist in drei Teile unterteilt: Rumpfkörper (A),
lange Stützplatte (B) und kurze Zugplatte (C). Wie in der Abbildung (I)
gezeigt.
1.3. Legen Sie den Rumpf (A) in die lange Stützplatte (B). Bringen Sie das
höhere Ende des Beschlags (B) nahe am Rumpf an, wie in Abbildung (II)
gezeigt. Die kurze Auszugsplatte (C) wird auf die lange Trägerplatte (B)
aufgesetzt und kann hin und her bewegt werden. Der Gesamteffekt ist in
Abbildung (III) dargestellt.
Abbildung (II)
- 4 -
Abbildung (III)
Befestigen Sie ein Ende der Feder
mit einer Schraube und ziehen Sie
dann fest an der Feder, um sie
einzuhaken
Ⅱ. Verwenden
2. 1. Der Anfangshub der Druckplatte beträgt 35 mm. Wenn der Teig zu
dick ist, drücken Sie ihn bitte mit Ihrer Handfläche auf weniger als 35 mm
vor, bevor Sie den Teig pressen.
2. 2. Legen Sie den Teig auf die Ziehplatte (C), schieben Sie diese direkt
unter den Stempel und drücken Sie den Griff nach unten.
2. 3. Der vorbereitete Teig sollte weich genug zum Pressen sein. Lassen
Sie es lange stehen und tragen Sie etwas Speiseöl auf die Oberfläche auf,
dann lässt es sich viel leichter pressen. Es wird außerdem empfohlen, die
Druckplatte mit einer Plastiktüte zu umwickeln oder die Rückseite des
Druckkopfs mit Öl zu bestreichen.

- 5 -
Ⅲ. Passen Sie die Dicke des Produkts an
Oben am Rumpf befinden sich auf beiden Seiten der Feder zwei
Stellschrauben, die nach oben und unten verstellt werden können, um die
Dicke des Produkts zu begrenzen.
Ⅳ. Vorsichtsmaßnahmen
Die Verwendung in feuchter Umgebung wird nicht empfohlen.
Ⅴ. Andere
Häufig gestellte Fragen und Lösungen
5.1. Der Teig ist ungleichmäßig dick: Sie können die dickere Seite in eine
andere Position bringen und erneut drücken.
5.2. Wenn der Teig nicht groß genug ist: Es sollte genügend Zeit gegeben
werden, um den Teig an Ort und Stelle zu gären, und dann kann er
mühelos gepresst werden. Oder Sie bestreichen die Teigoberfläche mit
Speiseöl, das durch die Schmierung das Pressen erleichtert.


Tecnico Supporto e certificato di garanzia elettronica www.vevor.com/support
PRESSA PER PASTA PER PIZZA
MODELLO:APD24
We continue to be committed to provide you tools with competitive price.
"Save Half", "Half Price" or any other similar expressions used by us only represents an
estimate of savings you might benefit from buying certain tools with us compared to the major
top brands and does not necessarily mean to cover all categories of tools offered by us. You
are kindly reminded to verify carefully when you are placing an order with us if you are
actually saving half in comparison with the top major brands.

- 1 -
MODELLO:APD24
Have product questions? Need technical support? Please feel free to
contact us:
Technical Support and E-Warranty Certificate
www.vevor.com/support
NEED HELP? CONTACT US!
This is the original instruction, please read all manual instructions
carefully before operating. VEVOR reserves a clear interpretation of our
user manual. The appearance of the product shall be subject to the
product you received. Please forgive us that we won't inform you again if
there are any technology or software updates on our product.
PIZZA DOUGH PRESSER

- 2 -
Avvertenza: per ridurre il rischio di lesioni, l'utente deve
leggere attentamente il manuale di istruzioni.
TUTELA IMPORTANTE
Seguire sempre le precauzioni di sicurezza di base quando si utilizzano
questi dispositivi. Questi includono:
1.Il dispositivo non deve essere utilizzato con i bambini. I bambini
potrebbero subire incidenti con lesioni. Pertanto, questo prodotto deve
essere collocato in una posizione non toccata dai bambini.
2.Per un funzionamento e una durata ottimali del dispositivo, seguire le
istruzioni.
3. Gli acidi alimentari corrodono il metallo. Pulisci sempre questa
attrezzatura per la preparazione del cibo immediatamente dopo ogni
utilizzo. Per preservarne l'aspetto e aumentarne la durata, puliscila
quotidianamente.
4.Non mettere questi dispositivi in lavastoviglie o in altri dispositivi di pulizia
automatica per la pulizia.
5.L'uso di accessori o modifiche non forniti dal produttore può causare
pericoli.
7.Prima di utilizzare questa apparecchiatura per la prima volta, rimuovere
tutto l'imballaggio e i materiali di fissaggio come illustrato nell'illustrazione e
utilizzarli dopo l'installazione.
6.Questi dispositivi richiedono una lubrificazione regolare. Pulire l'asta di
guida con olio minerale, lubrificante per alimenti o con un panno quando è
necessaria la lubrificazione. Non lubrificare con olio da cucina o altro
grasso. Altrimenti diventerà viscoso e ne influenzerà l'uso.
CONSERVA QUESTE ISTRUZIONI
Ⅰ. Accessori e installazione

- 3 -
1.1. Questo prodotto è uno strumento manuale che appiattisce il prodotto
tirando la maniglia.
1.2. L'intera attrezzatura è divisa in tre parti: corpo della fusoliera (A),
piastra di supporto lunga (B) e piastra di trazione corta (C). Come mostrato
nella figura (I).
1.3. Posizionare la fusoliera (A) all'interno della piastra di supporto lunga
(B). Avvicinare l'estremità superiore del raccordo (B) alla fusoliera, come
mostrato in figura (II). La piastra estraibile corta (C) è posizionata sulla
piastra di supporto lunga (B) e può essere spostata avanti e indietro.
L'effetto complessivo è mostrato nella figura (III).
figura (II)

- 4 -
figura (III)
Bloccare un'estremità della molla
con una vite, quindi tirare con
decisione la molla per agganciarla
Ⅱ. Utilizzo
2. 1. La corsa iniziale dello spingidisco è 35 mm. Se l'impasto è troppo
denso, premerlo con il palmo della mano fino a meno di 35 mm prima di
pressarlo.
2. 2. Mettere l'impasto sulla piastra di estrazione (C), spingerlo
direttamente sotto il penetratore e premere verso il basso la maniglia.
2. 3. L'impasto preparato deve essere sufficientemente morbido per essere
pressato. Fai lievitare a lungo e applica un po' di olio commestibile sulla
sua superficie, quindi sarà molto più facile pressarlo. Si consiglia inoltre di
avvolgere la piastra di pressione con un sacchetto di plastica o di ungere
con olio la parte posteriore della testa di pressione.
Ⅲ. Regola lo spessore del prodotto
Nella parte superiore della fusoliera, su entrambi i lati della molla sono
presenti due viti di fissaggio, che possono essere regolate su e giù per
limitare lo spessore del prodotto.
Ⅳ. Precauzioni
Non è consigliato l'uso in ambienti umidi.
Ⅴ. Altro

- 5 -
Domande e soluzioni frequenti
5.1. Torte con impasto di spessore irregolare: è possibile spostare il lato
più spesso in un'altra posizione e premerlo nuovamente.
5.2. Le torte di pasta non sono abbastanza grandi: è necessario dare
abbastanza tempo per far fermentare l'impasto sul posto, quindi è possibile
pressarlo senza sforzo. Oppure puoi spennellare la superficie dell'impasto
con olio commestibile, la cui lubrificazione faciliterà la pressatura.


Técnico Soporte y certificado de garantía electrónica www.vevor.com/support
PRENSADOR DE MASA PARA PIZZA
MODELO:APD24
We continue to be committed to provide you tools with competitive price.
"Save Half", "Half Price" or any other similar expressions used by us only represents an
estimate of savings you might benefit from buying certain tools with us compared to the major
top brands and does not necessarily mean to cover all categories of tools offered by us. You
are kindly reminded to verify carefully when you are placing an order with us if you are
actually saving half in comparison with the top major brands.

- 1 -
MODELO:APD24
Have product questions? Need technical support? Please feel free to
contact us:
Technical Support and E-Warranty Certificate
www.vevor.com/support
NEED HELP? CONTACT US!
This is the original instruction, please read all manual instructions
carefully before operating. VEVOR reserves a clear interpretation of our
user manual. The appearance of the product shall be subject to the
product you received. Please forgive us that we won't inform you again if
there are any technology or software updates on our product.
PIZZA DOUGH PRESSER

- 2 -
Advertencia: para reducir el riesgo de lesiones, el usuario
debe leer atentamente el manual de instrucciones.
CONSIDERACIONES IMPORTANTES
Siga siempre las precauciones básicas de seguridad al utilizar estos
dispositivos. Éstas incluyen:
1. El dispositivo no debe utilizarse con niños. Los niños pueden sufrir
accidentes con lesiones. Por lo tanto, este producto debe colocarse en
una posición que los niños no toquen.
2. Para un funcionamiento y vida útil óptimos del dispositivo, siga las
instrucciones.
3. Los ácidos alimentarios corroerán el metal. Limpie siempre este equipo
de preparación de alimentos inmediatamente después de cada uso. Para
mantener la apariencia y aumentar la vida útil, límpielo diariamente.
4. No coloque estos dispositivos en un lavavajillas u otro dispositivo de
limpieza automático para su limpieza.
5.El uso de accesorios o modificaciones no proporcionadas por el
fabricante puede causar peligros.
7.Antes de utilizar este equipo por primera vez, retire todo el embalaje y
los materiales de fijación según la ilustración y utilícelos después de la
instalación.
6.Estos dispositivos requieren una lubricación regular. Limpie la varilla
guía con aceite mineral, lubricante de calidad alimentaria o una toalla
cuando sea necesaria la lubricación. No lubrique con aceite de cocina u
otra grasa. De lo contrario, se volverá viscoso y afectará el uso.
GUARDA ESTAS INSTRUCCIONES
Ⅰ. Accesorios e instalación
1.1. Este producto es una herramienta manual que aplana el producto

- 3 -
tirando del mango.
1.2. Todo el equipo se divide en tres partes: cuerpo del fuselaje (A), placa
de soporte larga (B) y placa de tracción corta (C). Como se muestra en la
figura (I).
1.3. Coloque el fuselaje (A) dentro de la placa de soporte larga (B).
Acerque el extremo superior del accesorio (B) al fuselaje, como se
muestra en la figura (II). La placa extraíble corta (C) se coloca sobre la
placa de soporte larga (B) y se puede mover hacia adelante y hacia atrás.
El efecto general se muestra en la figura (III).
figura (II)

- 4 -
figura (iii)
Bloquee un extremo del resorte con
un tornillo y luego tire del resorte
firmemente para engancharlo.
Ⅱ. Usar
2. 1. La carrera inicial de la placa de presión es de 35 mm. Si la masa es
demasiado espesa, presione previamente la masa con la palma de la
mano a menos de 35 mm antes de presionar la masa.
2. 2. Coloque la masa en la placa de extracción (C), empújela
directamente debajo del penetrador y presione hacia abajo el mango.
2. 3. La masa preparada debe quedar lo suficientemente suave como para
poder presionarla. Pruébelo durante mucho tiempo y aplique un poco de
aceite comestible en su superficie, entonces será mucho más fácil
presionar. También se recomienda envolver la placa de presión con una
bolsa de plástico o cepillar la parte posterior del cabezal de presión con
aceite.
Ⅲ. Ajustar el grosor del producto
En la parte superior del fuselaje, hay dos tornillos de fijación a ambos
lados del resorte, que se pueden ajustar hacia arriba y hacia abajo para
limitar el grosor del producto.
Ⅳ. Precauciones
No se recomienda su uso en ambientes húmedos.
Ⅴ. Otro

- 5 -
Preguntas frecuentes y soluciones
5.1. Los pasteles de masa tienen un grosor desigual: puedes cambiar el
lado más grueso a otra posición y presionarlo nuevamente.
5.2. Los pasteles de masa no son lo suficientemente grandes: se debe dar
tiempo suficiente para que la masa fermente en su lugar y luego se puede
presionar sin esfuerzo. O puede untar la superficie de la masa con aceite
comestible, cuya lubricación facilitará el prensado.


Techniczny Certyfikat wsparcia i e-gwarancji www.vevor.com/support
DOCISKARKA DO CIASTA NA PIZZĘ
MODEL:APD24
We continue to be committed to provide you tools with competitive price.
"Save Half", "Half Price" or any other similar expressions used by us only represents an
estimate of savings you might benefit from buying certain tools with us compared to the major
top brands and does not necessarily mean to cover all categories of tools offered by us. You
are kindly reminded to verify carefully when you are placing an order with us if you are
actually saving half in comparison with the top major brands.

- 1 -
MODEL:APD24
Have product questions? Need technical support? Please feel free to
contact us:
Technical Support and E-Warranty Certificate
www.vevor.com/support
NEED HELP? CONTACT US!
This is the original instruction, please read all manual instructions
carefully before operating. VEVOR reserves a clear interpretation of our
user manual. The appearance of the product shall be subject to the
product you received. Please forgive us that we won't inform you again if
there are any technology or software updates on our product.
PIZZA DOUGH PRESSER

- 2 -
Ostrzeżenie — aby zmniejszyć ryzyko obrażeń, użytkownik
musi uważnie przeczytać instrukcję obsługi.
WAŻNI OCHRONIARZE
Podczas korzystania z tych urządzeń należy zawsze przestrzegać
podstawowych zasad bezpieczeństwa. Obejmują one:
1. Urządzenia nie należy używać w obecności dzieci. Dzieci mogą ulec
wypadkom z obrażeniami. Dlatego produkt ten należy umieścić w miejscu
niedostępnym dla dzieci.
2. Dla optymalnego działania i żywotności urządzenia należy postępować
zgodnie z instrukcją.
3. Kwasy spożywcze powodują korozję metalu. Zawsze czyść ten sprzęt
do przygotowywania żywności natychmiast po każdym użyciu. Aby
zachować wygląd i wydłużyć żywotność, czyść go codziennie.
4. Nie wkładaj tych urządzeń do zmywarki lub innego automatycznego
urządzenia czyszczącego w celu czyszczenia.
5. Używanie akcesoriów lub modyfikacji niedostarczonych przez
producenta może spowodować zagrożenie.
7.Przed pierwszym użyciem tego urządzenia należy usunąć całe
opakowanie i elementy mocujące zgodnie z ilustracją i wykorzystać je po
instalacji.
6. Urządzenia te wymagają regularnego smarowania. Jeśli konieczne jest
smarowanie, wytrzyj pręt prowadzący olejem mineralnym, smarem
dopuszczonym do kontaktu z żywnością lub ręcznikiem. Nie smarować
olejem spożywczym ani innym smarem. W przeciwnym razie stanie się
lepki i wpłynie na użytkowanie.
ZACHOWAJ TE INSTRUKCJE
Ⅰ. Akcesoria i instalacja
- 3 -
1.1. Produkt ten jest narzędziem ręcznym, które spłaszcza produkt
poprzez pociągnięcie za uchwyt.
1.2. Całość wyposażenia podzielona jest na trzy części: korpus kadłuba
(A), długą płytę nośną (B) i krótką płytę ciągnącą (C). Jak pokazano na
rysunku (I).
1.3. Umieść kadłub (A) wewnątrz długiej płyty nośnej (B). Umieść wyższy
koniec łącznika (B) blisko kadłuba, jak pokazano na rysunku (II). Krótka
płyta wysuwana (C) jest umieszczona na długiej płycie nośnej (B) i można
ją przesuwać tam i z powrotem. Ogólny efekt przedstawiono na rysunku
(III).
rysunek (II)

- 4 -
rysunek (III)
Zablokuj jeden koniec sprężyny
śrubą, a następnie mocno pociągnij
sprężynę, aby ją zaczepić
Ⅱ. Używać
2. 1. Początkowy skok płytki dociskowej wynosi 35 mm. Jeśli ciasto jest
zbyt gęste, przed zaciśnięciem należy je wstępnie docisnąć dłonią do
grubości mniejszej niż 35 mm.
2. 2. Połóż ciasto na płycie ciągnącej (C), wsuń je bezpośrednio pod
wgłębnik i dociśnij uchwyt.
2. 3. Przygotowane ciasto powinno być wystarczająco miękkie, aby dało
się je sprasować. Należy go długo dojrzewać i na jego powierzchnię
nałożyć odrobinę oleju jadalnego, wtedy będzie dużo łatwiej go wycisnąć.
Zaleca się także owinięcie płytki dociskowej plastikowym workiem lub
nasmarowanie tylnej części głowicy dociskowej olejem.
Ⅲ. Dostosuj grubość produktu
W górnej części kadłuba po obu stronach sprężyny znajdują się dwie śruby
ustalające, które można regulować w górę i w dół, aby ograniczyć grubość
produktu.
Ⅳ. Środki ostrożności
Nie zaleca się używania w wilgotnym środowisku.
Ⅴ. Inny

- 5 -
Często zadawane pytania i rozwiązania
5.1. Ciasta z ciasta o nierównej grubości: Można przełożyć grubszą stronę
na inną pozycję i ponownie ją docisnąć.
5.2. Ciasta nie są wystarczająco duże: Należy poświęcić wystarczająco
dużo czasu, aby ciasto wyrosło na miejscu, a następnie można je bez
wysiłku ugniatać. Można też posmarować powierzchnię ciasta olejem
jadalnym, którego natłuszczenie ułatwi dociśnięcie.


Technisch Ondersteuning en e-garantiecertificaat www.vevor.com/support
PIZZADEEGPERS
MODEL:APD24
We continue to be committed to provide you tools with competitive price.
"Save Half", "Half Price" or any other similar expressions used by us only represents an
estimate of savings you might benefit from buying certain tools with us compared to the major
top brands and does not necessarily mean to cover all categories of tools offered by us. You
are kindly reminded to verify carefully when you are placing an order with us if you are
actually saving half in comparison with the top major brands.

- 1 -
MODEL:APD24
Have product questions? Need technical support? Please feel free to
contact us:
Technical Support and E-Warranty Certificate
www.vevor.com/support
NEED HELP? CONTACT US!
This is the original instruction, please read all manual instructions
carefully before operating. VEVOR reserves a clear interpretation of our
user manual. The appearance of the product shall be subject to the
product you received. Please forgive us that we won't inform you again if
there are any technology or software updates on our product.
PIZZA DOUGH PRESSER

- 2 -
Waarschuwing-Om het risico op letsel te verminderen, moet
de gebruiker de handleiding zorgvuldig lezen.
BELANGRIJKE VEILIGHEIDSMAATREGELEN
Volg altijd de basisveiligheidsmaatregelen bij het gebruik van deze
apparaten. Deze omvatten:
1. Het apparaat mag niet bij kinderen worden gebruikt. Kinderen kunnen te
maken krijgen met letselongevallen. Daarom moet dit product op een
plaats worden geplaatst die niet door kinderen kan worden aangeraakt.
2. Volg de instructies voor een optimale werking en levensduur van het
apparaat.
3. Voedingszuren zullen het metaal aantasten. Maak dit
voedselbereidingsapparaat altijd onmiddellijk na elk gebruik schoon. Maak
het dagelijks schoon om het uiterlijk te behouden en de levensduur te
verlengen.
4. Plaats deze apparaten niet in een vaatwasser of ander automatisch
reinigingsapparaat om ze schoon te maken.
5.Het gebruik van accessoires of wijzigingen die niet door de fabrikant zijn
geleverd, kan gevaren veroorzaken.
7. Voordat u dit apparaat voor de eerste keer gebruikt, dient u alle
verpakkings- en bevestigingsmaterialen te verwijderen volgens de
afbeelding en deze na installatie te gebruiken.
6. Deze apparaten vereisen regelmatige smering. Veeg de geleidestang af
met minerale olie, een geschikt smeermiddel voor levensmiddelen of een
handdoek als smering nodig is. Niet smeren met bakolie of een ander vet.
Anders wordt het stroperig en beïnvloedt het het gebruik.
BEWAAR DEZE INSTRUCTIES
Ⅰ. Accessoires en installatie
- 3 -
1.1. Dit product is een handmatig gereedschap dat het product plat maakt
door aan de hendel te trekken.
1.2. De hele uitrusting is verdeeld in drie delen: romplichaam (A), lange
steunplaat (B) en korte trekplaat (C). Zoals weergegeven in figuur (I).
1.3. Plaats de romp (A) in de lange steunplaat (B). Maak het hogere
uiteinde van fitting (B) dicht bij de romp, zoals weergegeven in afbeelding
(II). De korte uittrekplaat (C) wordt op de lange steunplaat (B) geplaatst en
kan heen en weer worden bewogen. Het totale effect wordt weergegeven
in figuur (III).
figuur (II)

- 4 -
figuur (III)
Vergrendel het ene uiteinde van de
veer met een schroef en trek
vervolgens stevig aan de veer om
deze vast te haken
Ⅱ. Gebruik
2. 1. De initiële slag van de drukplaat is 35 mm. Als het deeg te dik is, druk
het deeg dan met uw handpalm voor tot minder dan 35 mm voordat u het
deeg aandrukt.
2. 2. Leg het deeg op de trekplaat (C), druk het direct onder de indenter en
druk de hendel naar beneden.
2. 3. Het bereide deeg moet zacht genoeg zijn om te persen. Laat het lang
rijzen en breng wat eetbare olie aan op het oppervlak, dan is het veel
gemakkelijker om erop te drukken. Het wordt ook aanbevolen om de
drukplaat in een plastic zak te wikkelen of de achterkant van de drukkop
met olie te borstelen.
Ⅲ. Pas de dikte van het product aan
Aan de bovenkant van de romp bevinden zich aan beide zijden van de
veer twee stelschroeven, die op en neer kunnen worden aangepast om de
dikte van het product te beperken.
Ⅳ. Voorzorgsmaatregelen
Het wordt niet aanbevolen om te gebruiken in een vochtige omgeving.
Ⅴ. Ander

- 5 -
Veelgestelde vragen en oplossingen
5.1. Deegkoekjes zijn ongelijkmatig van dikte: U kunt de dikkere kant naar
een andere positie verplaatsen en opnieuw aandrukken.
5.2. Deegkoekjes zijn niet groot genoeg: Er moet voldoende tijd worden
gegeven om het deeg op zijn plaats te laten gisten, waarna je het
moeiteloos kunt aandrukken. Of u kunt het deegoppervlak bestrijken met
eetbare olie, waarvan de smering het aandrukken vergemakkelijkt.


Teknisk Support och e-garanticertifikat www.vevor.com/support
PIZZADEGPRESSARE
MODELL: APD24
We continue to be committed to provide you tools with competitive price.
"Save Half", "Half Price" or any other similar expressions used by us only represents an
estimate of savings you might benefit from buying certain tools with us compared to the major
top brands and does not necessarily mean to cover all categories of tools offered by us. You
are kindly reminded to verify carefully when you are placing an order with us if you are
actually saving half in comparison with the top major brands.
- 1 -
MODELL: APD24
Have product questions? Need technical support? Please feel free to
contact us:
Technical Support and E-Warranty Certificate
www.vevor.com/support
NEED HELP? CONTACT US!
This is the original instruction, please read all manual instructions
carefully before operating. VEVOR reserves a clear interpretation of our
user manual. The appearance of the product shall be subject to the
product you received. Please forgive us that we won't inform you again if
there are any technology or software updates on our product.
PIZZA DOUGH PRESSER

- 2 -
Varning - För att minska risken för skada måste användaren
läsa instruktionerna noggrant.
VIKTIGA SÄKERHETSÅTGÄRDER
Följ alltid grundläggande säkerhetsföreskrifter när du använder dessa
enheter. Dessa inkluderar:
1. Enheten ska inte användas med barn. Barn kan råka ut för skadeolyckor.
Därför bör denna produkt placeras i en position som inte kan vidröras av
barn.
2.Följ instruktionerna för optimal drift och livslängd för enheten.
3. Matsyror kommer att fräta på metallen. Rengör alltid denna
matberedningsutrustning omedelbart efter varje användning. För att
bibehålla utseendet och öka livslängden, rengör den dagligen.
4. Placera inte dessa enheter i en diskmaskin eller annan automatisk
rengöringsanordning för rengöring.
5. Användning av tillbehör eller modifieringar som inte tillhandahålls av
tillverkaren kan orsaka faror.
7. Innan du använder denna utrustning för första gången, ta bort allt
förpacknings- och fixeringsmaterial enligt illustrationen och använd dem
efter installationen.
6. Dessa enheter kräver regelbunden smörjning. Torka av styrstången med
mineralolja, livsmedelsgodkänt smörjmedel eller en handduk när smörjning
behövs. Smörj inte med matolja eller annat fett. Annars blir det trögflytande
och påverkar användningen.
SPARA DESSA INSTRUKTIONER
Ⅰ. Tillbehör och installation
1.1. Denna produkt är ett manuellt verktyg som plattar till produkten genom
att dra i handtaget.
- 3 -
1.2. Hela utrustningen är uppdelad i tre delar: flygkroppskropp (A), lång
stödplatta (B) och kort dragplatta (C). Som visas i figuren (I).
1.3. Placera flygkroppen (A) inuti den långa stödplattan (B). Placera den
övre änden av beslaget (B) nära flygkroppen, som visas i figur (II). Den
korta utdragsplattan (C) placeras på den långa stödplattan (B) och kan
flyttas fram och tillbaka. Den totala effekten visas i figuren (III).
figur (II)
figur (III)

- 4 -
Lås ena änden av fjädern med en
skruv och dra sedan i fjädern
ordentligt för att haka fast den
Ⅱ. Använda sig av
2. 1. Tryckplattans initiala slag är 35 mm. Om degen är för tjock, vänligen
förpressa degen med handflatan till mindre än 35 mm innan du pressar
degen.
2. 2. Lägg degen på dragplattan (C), tryck in den direkt under intryckaren
och tryck ner handtaget.
2. 3. Den förberedda degen ska vara tillräckligt mjuk för att kunna pressas.
Prova det länge och applicera lite matolja på dess yta, då skulle det vara
mycket lättare att pressa. Det rekommenderas också att linda in
tryckplattan med en plastpåse eller borsta baksidan av tryckhuvudet med
olja.
Ⅲ. Justera produktens tjocklek
Längst upp på flygkroppen sitter två ställskruvar på båda sidor av fjädern
som kan justeras upp och ner för att begränsa produktens tjocklek.
Ⅳ. Försiktighetsåtgärder
Det rekommenderas inte att använda i fuktig miljö.
Ⅴ. Övrig
Vanliga frågor och lösningar
5.1. Degkakor som är ojämna i tjocklek: Du kan byta den tjockare sidan till

- 5 -
ett annat läge och trycka på den igen.
5.2. Degkakor som inte är tillräckligt stora: Det bör ges tillräckligt med tid
för att jäsa degen på plats, och sedan kan du pressa den utan
ansträngning. Eller så kan du pensla degytan med matolja, vars smörjning
gör den lättare att pressa.