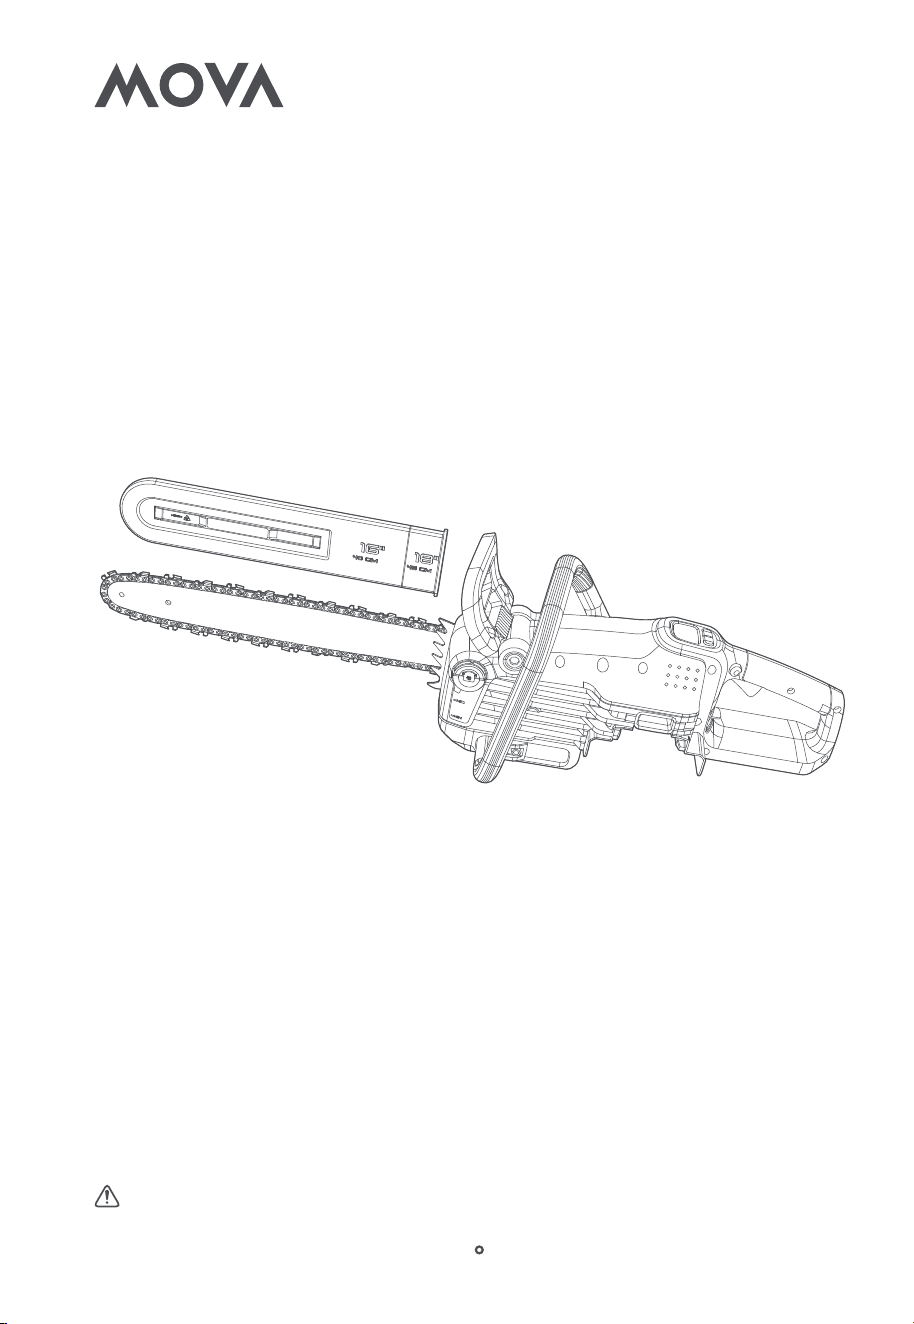
Model Number: GC618 / GC618X
60V 45cm Brushless Chainsaw
User Manual
WARNING:
Thoroughly read and understand the manual before using
this product. Save this user manual for future reference.
Images are for reference only. Actual appearance may vary.


Table of Contents
1 Safety Instructions........................................................................................ 4
2 Product Introduction ..................................................................................10
3 Assembly .....................................................................................................13
4 Operation ....................................................................................................16
5 MOVAhome App ........................................................................................ 24
6 Maintenance .............................................................................................. 25
7 Troubleshooting ......................................................................................... 28
8 Specifications.............................................................................................30

4
EN
1 Safety Instructions
1.1 General Power Tool Safety Warnings
WARNING:
Read all safety warnings, instructions, illustrations and
specifications provided with this power tool.
Failure to follow all
instructions listed below may result in electric shock, fire and/or serious
injury.
Save all warnings and instructions for future reference.
The term "power tool" in the warnings refers to your mains-operated
(corded) power tool or battery-operated (cordless) power tool.
1.1.1 Work Area Safety
•
Keep work area clean and well lit.
Cluttered or dark areas invite
accidents.
•
Do not operate power tools in explosive atmospheres, such as in the
presence of flammable liquids, gases or dust.
Power tools create sparks
which may ignite the dust or fumes.
•
Keep children and bystanders away while operating a power tool.
Distractions can cause you to lose control.
1.1.2 Electrical Safety
•
Power tool plugs must match the outlet. Never modify the plug in
any way. Do not use any adapter plugs with earthed (grounded) power
tools.
Unmodified plugs and matching outlets will reduce risk of electric
shock.
•
Avoid body contact with earthed or grounded surfaces, such as
pipes, radiators, ranges and refrigerators.
There is an increased risk of
electric shock if your body is earthed or grounded.
•
Do not expose power tools to rain or wet conditions.
Water entering
a power tool will increase the risk of electric shock.
•
Do not abuse the cord. Never use the cord for carrying, pulling or
unplugging the power tool. Keep cord away from heat, oil, sharp edges
or moving parts.
Damaged or entangled cords increase the risk of
electric shock.
•
When operating a power tool outdoors, use an extension cord
suitable for outdoor use.
Use of a cord suitable for outdoor use reduces
the risk of electric shock.
•
If operating a power tool in a damp location is unavoidable, use a
residual current device (RCD) protected supply.
Use of an RCD reduces
the risk of electric shock.
1.1.3 Personal Safety
•
Stay alert, watch what you are doing and use common sense when
operating a power tool. Do not use a power tool while you are tired or
under the influence of drugs, alcohol or medication.
A moment of
inattention while operating power tools may result in serious personal

5
EN
injury.
•
Use personal protective equipment. Always wear eye protection.
Protective equipment such as a dust mask, non-skid safety shoes, hard
hat or hearing protection used for appropriate conditions will reduce
personal injuries.
•
Prevent unintentional starting. Ensure the switch is in the off-
position before connecting to power source and/or battery pack,
picking up or carrying the tool.
Carrying power tools with your finger on
the switch or energising power tools that have the switch on invites
accidents.
•
Remove any adjusting key or wrench before turning the power tool
on.
A wrench or a key left attached to a rotating part of the power tool
may result in personal injury.
•
Do not overreach. Keep proper footing and balance at all times.
This
enables better control of the power tool in unexpected situations.
•
Dress properly. Do not wear loose clothing or jewellery. Keep your
hair and clothing away from moving parts.
Loose clothes, jewellery or
long hair can be caught in moving parts.
•
If devices are provided for the connection of dust extraction and
collection facilities, ensure these are connected and properly used.
Use
of dust collection can reduce dust-related hazards.
•
Do not let familiarity gained from frequent use of tools allow you to
become complacent and ignore tool safety principles.
A careless action
can cause severe injury within a fraction of a second.
1.1.4 Power Tool Use and Care
•
Do not force the power tool. Use the correct power tool for your
application.
The correct power tool will do the job better and safer at the
rate for which it was designed.
•
Do not use the power tool if the switch does not turn it on and off.
Any power tool that cannot be controlled with the switch is dangerous
and must be repaired.
•
Disconnect the plug from the power source and/or remove the
battery pack, if detachable, from the power tool before making any
adjustments, changing accessories, or storing power tools.
Such
preventive safety measures reduce the risk of starting the power tool
accidentally.
•
Store idle power tools out of the reach of children and do not allow
persons unfamiliar with the power tool or these instructions to operate
the power tool.
Power tools are dangerous in the hands of untrained
users.
•
Maintain power tools and accessories. Check for misalignment or
binding of moving parts, breakage of parts and any other condition
that may affect the power tool’s operation. If damaged, have the power
tool repaired before use.
Many accidents are caused by poorly
maintained power tools.

6
EN
•
Keep cutting tools sharp and clean.
Properly maintained cutting tools
with sharp cutting edges are less likely to bind and are easier to control.
•
Use the power tool, accessories and tool bits etc. in accordance with
these instructions, taking into account the working conditions and the
work to be performed.
Use of the power tool for operations different
from those intended could result in a hazardous situation.
•
Keep handles and grasping surfaces dry, clean and free from oil and
grease.
Slippery handles and grasping surfaces do not allow for safe
handling and control of the tool in unexpected situations.
1.1.5 Battery Tool Use and Care
•
Recharge only with the charger specified by the manufacturer.
A
charger that is suitable for one type of battery pack may create a risk of
fire when used with another battery pack.
•
Use power tools only with specifically designated battery packs.
Use
of any other battery packs may create a risk of injury and fire.
•
When battery pack is not in use, keep it away from other metal
objects,
like paper clips, coins, keys, nails, screws or other small metal
objects, that can make a connection from one terminal to another.
Shorting the battery terminals together may cause burns or a fire.
•
Under abusive conditions, liquid may be ejected from the battery;
avoid contact. If contact accidentally occurs, flush with water. If liquid
contacts eyes, additionally seek medical help.
Liquid ejected from the
battery may cause irritation or burns.
•
Do not use a battery pack or tool that is damaged or modified.
Damaged or modified batteries may exhibit unpredictable behaviour
resulting in fire, explosion or risk of injury.
•
Do not expose a battery pack or tool to fire or excessive
temperature.
Exposure to fire or temperature above 130°C (265°F) may
cause explosion.
•
Follow all charging instructions and do not charge the battery pack
or tool outside the temperature range specified in the instructions.
Charging improperly or at temperatures outside the specified range may
damage the battery and increase the risk of fire.
1.1.6 Service
•
Have your power tool serviced by a qualified repair person using
only identical replacement parts.
This will ensure that the safety of the
power tool is maintained.
•
Never service damaged battery packs.
Service of battery packs
should only be performed by the manufacturer or authorized service
providers.
1.2 General Chainsaw Safety Warnings
•
Keep all parts of the body away from the saw chain when the
chainsaw is operating. Before you start the chainsaw, make sure the

7
EN
saw chain is not contacting anything.
A moment of inattention while
operating chainsaws may cause entanglement of your clothing or body
with the saw chain.
•
Always hold the chainsaw with your right hand on the rear handle
and your left hand on the front handle.
Holding the chainsaw with a
reversed hand configuration increases the risk of personal injury and
should never be done.
•
Hold the chainsaw by insulated gripping surfaces only, because the
saw chain may contact hidden wiring.
Saw chains contacting a “live”
wire may make exposed metal parts of the chainsaw “live” and could give
the operator an electric shock.
•
Wear eye protection. Further protective equipment for hearing,
head, hands, legs and feet is recommended.
Adequate protective
equipment will reduce personal injury from flying debris or accidental
contact with the saw chain.
•
Do not operate a chainsaw in a tree, on a ladder, from a rooftop, or
any unstable support.
Operation of a chainsaw in this manner could
result in serious personal injury.
•
Always keep proper footing and operate the chainsaw only when
standing on fixed, secure and level surface.
Slippery or unstable
surfaces may cause a loss of balance, or control of the chainsaw.
•
When cutting a limb that is under tension, be alert for spring back.
When the tension in the wood fibres is released, the spring loaded limb
may strike the operator and/or throw the chainsaw out of control.
•
Use extreme caution when cutting brush and saplings.
The slender
material may catch the saw chain and be whipped toward you or pull you
off balance.
•
Carry the chainsaw by the front handle with the chainsaw switched
off and away from your body. When transporting or storing the
chainsaw, always fit the guide bar cover.
Proper handling of the
chainsaw will reduce the likelihood of accidental contact with the moving
saw chain.
•
Follow instructions for lubricating, chain tensioning and changing
the bar and chain.
Improperly tensioned or lubricated chain may either
break or increase the chance for kickback.
•
Cut wood only. Do not use chainsaw for purposes not intended. For
example: do not use chainsaw for cutting metal, plastic, masonry or
non-wood building materials.
Use of the chainsaw for operations
different than intended could result in a hazardous situation.
•
Do not attempt to fell a tree until you have an understanding of the
risks and how to avoid them.
Serious injury could occur to the operator
or bystanders while felling a tree.
•
Follow all instructions when clearing jammed material, storing or
servicing the chainsaw. Make sure the switch is off and the battery
pack is removed.
Unexpected actuation of the chainsaw while clearing

8
EN
jammed material or servicing may result in serious personal injury.
1.3 Causes and Operator Prevention of Kickback
•
Kickback may occur when the nose or tip of the guide bar touches an
object, or when the wood closes in and pinches the saw chain in the cut.
•
Tip contact in some cases may cause a sudden reverse reaction,
kicking the guide bar up and back towards the operator.
•
Pinching the saw chain along the top of the guide bar may push the
guide bar rapidly back towards the operator.
•
Either of these reactions may cause you to lose control of the saw
which could result in serious personal injury. Do not rely exclusively upon
the safety devices built into your saw. As a chainsaw user, you should take
several steps to keep your cutting jobs free from accident or injury.
•
Kickback is the result of chainsaw misuse and/or incorrect operating
procedures or conditions and can be avoided by taking proper
precautions as given below:
•
Maintain a firm grip, with thumbs and fingers encircling the chainsaw
handles, with both hands on the saw and position your body and arm to
allow you to resist kickback forces. Kickback forces can be controlled by
the operator, if proper precautions are taken. Do not let go of the
chainsaw.
•
Do not overreach and do not cut above shoulder height. This helps
prevent unintended tip contact and enables better control of the
chainsaw in unexpected situations.
•
Only use replacement guide bars and saw chains specified by the
manufacturer. Incorrect replacement guide bars and saw chains may
cause chain breakage and/or kickback.
•
Follow the manufacturer’s sharpening and maintenance instructions
for the saw chain. Decreasing the depth gauge height can lead to
increased kickback.
NOTE:
Although all reasonable and necessary safety measures have been
adopted in the design, production, and testing of this power tool to
minimize potential risks, due to the inherent characteristics of mechanical
products and the diversity of usage scenarios, there may still be residual
risks that cannot be completely eliminated.
1.4 Symbols and Decals
This section explains the safety symbols and decals that appear in this
manual and on the product. Understanding these markings is essential for
safe and proper operation.
Indicates potential damage or personal injury hazard.
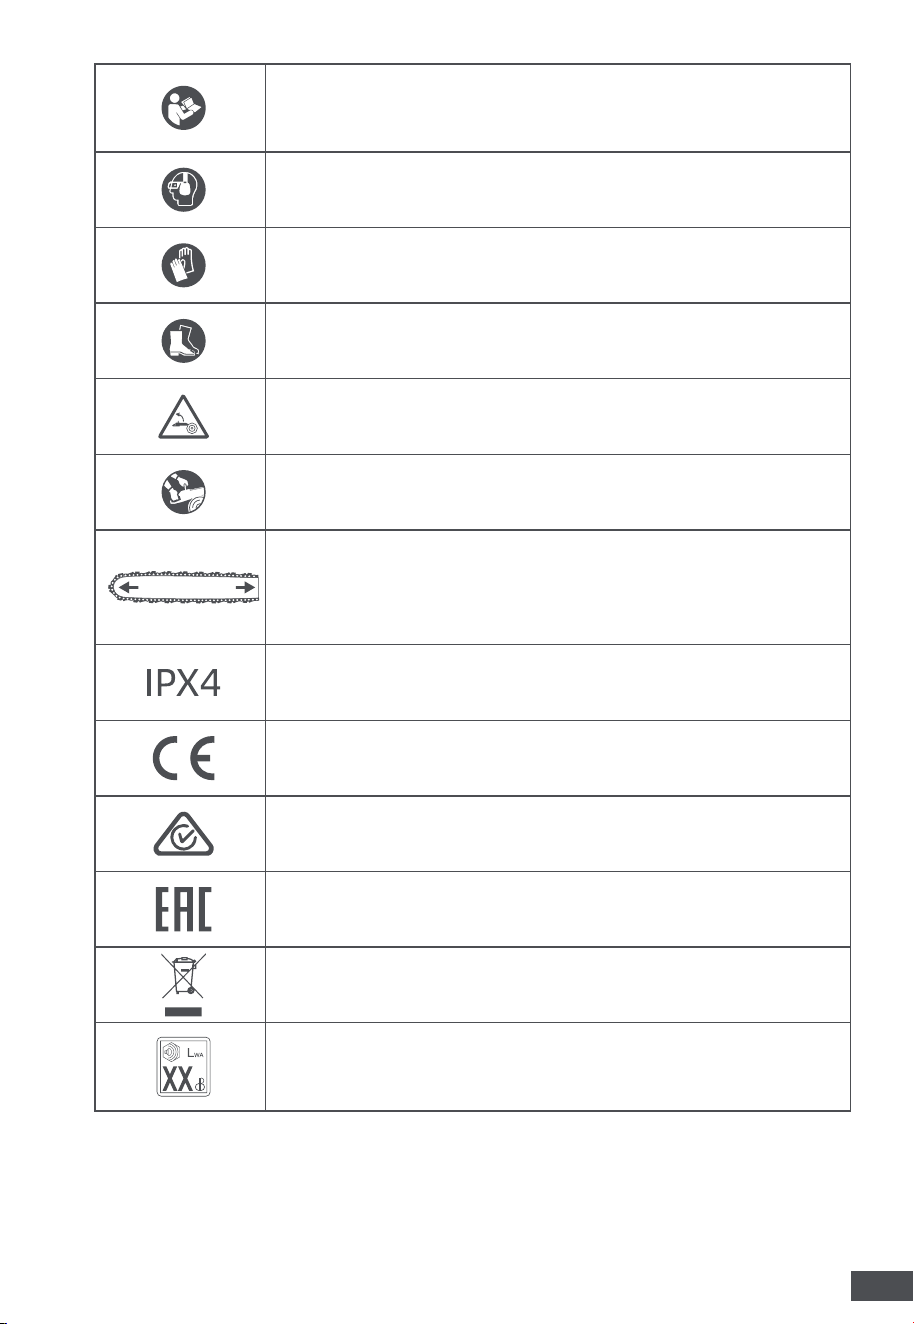
9
EN
To reduce the risk of injury, read and understand the
User Manual before operating. Failure to do so may
result in serious injury to the user and/or bystander.
Wear goggles, and ear protection.
Wear protective gloves.
Wear sturdy boots with nonslip soles.
Be aware of kickback. Contact of the guide bar tip with
any object should be avoided.
Always use both hands when operating the chainsaw.
Do not use a guide bar longer than the maximum
length indicated (450/406 mm). Using a longer bar
may increase kickback risk, overload the motor, and
compromise chain brake effectiveness.
IP symbol
European Conformity
Regulatory compliance mark
Eurasian conformity
Do not dispose of electrical products with household
waste. Recycle through authorized facilities.
Guaranteed sound power level. Noise emission to the
environment according to the European community’s
Directive.
10
EN
2 Product Introduction
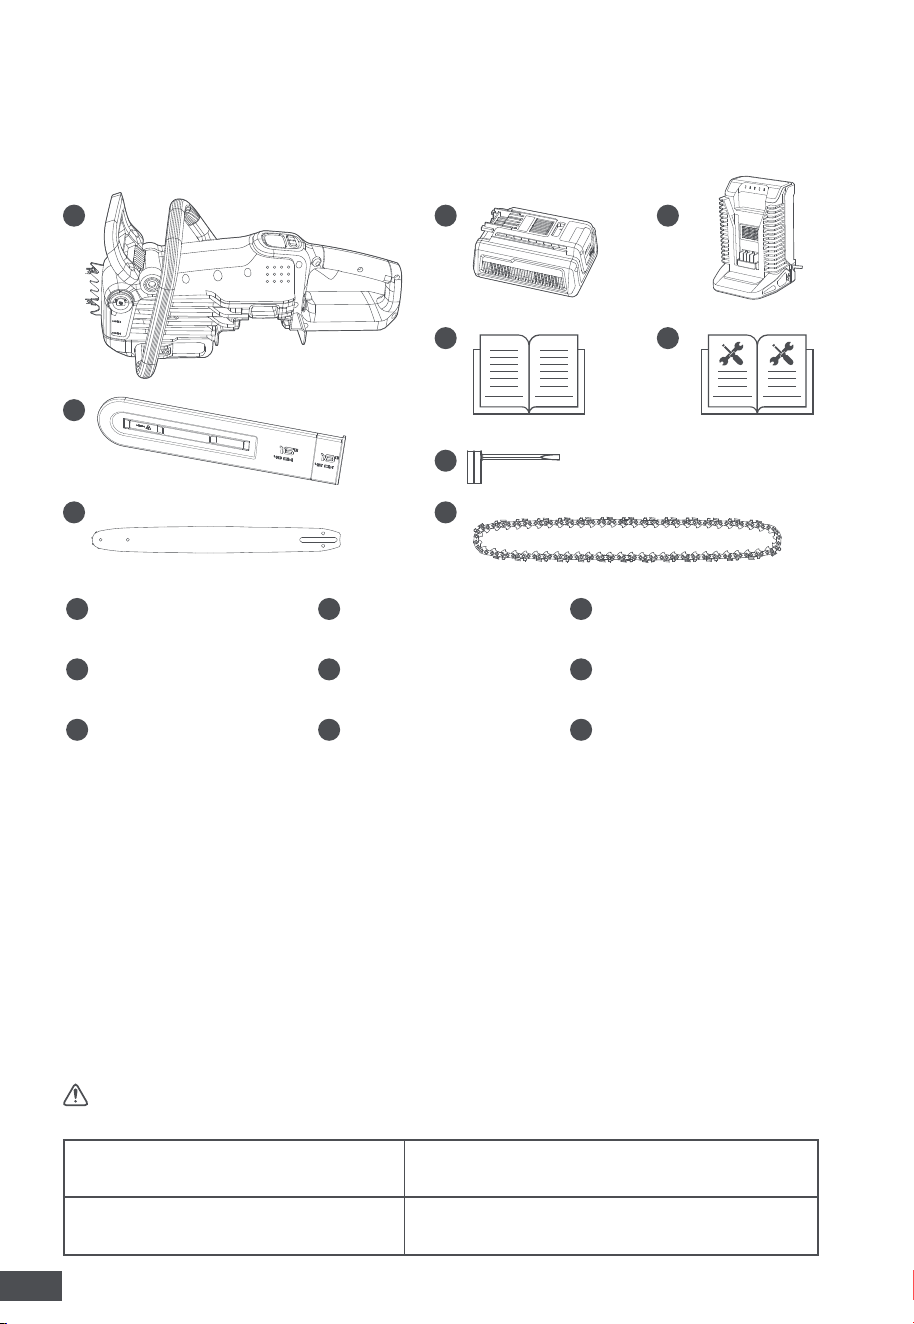
2.1 What's in the Box
1
2
9
4 6
3
5 7
8
1
Chainsaw
2
Chain Sheath
3
Guide Bar*
4
Battery Pack*
5
User Manual
6
Charger*
7
Warranty Card
8
Double-end
Socket Wrench
9
Saw Chain*
*The actual accessories supplied may vary depending on the product
model, sales region, production batch, or package configuration.
NOTE:
•
Examine the tool and accessories listed above for any signs of shipping
damage.
•
If any part is missing or damaged, contact the retailer or MOVA
Customer Service.
•
Retain the packaging materials until you have fully inspected and
tested the product.
2.2 Recommended Accessories
WARNING:
Use only the accessories listed below. Using non-approved
accessories may result in poor performance or safety hazards.
Battery Pack GBA625, GBA650
Charger GCH606, GCH612
11
EN
NOTE:
For usage instructions of the battery pack and charger, please
refer to the respective user manuals.
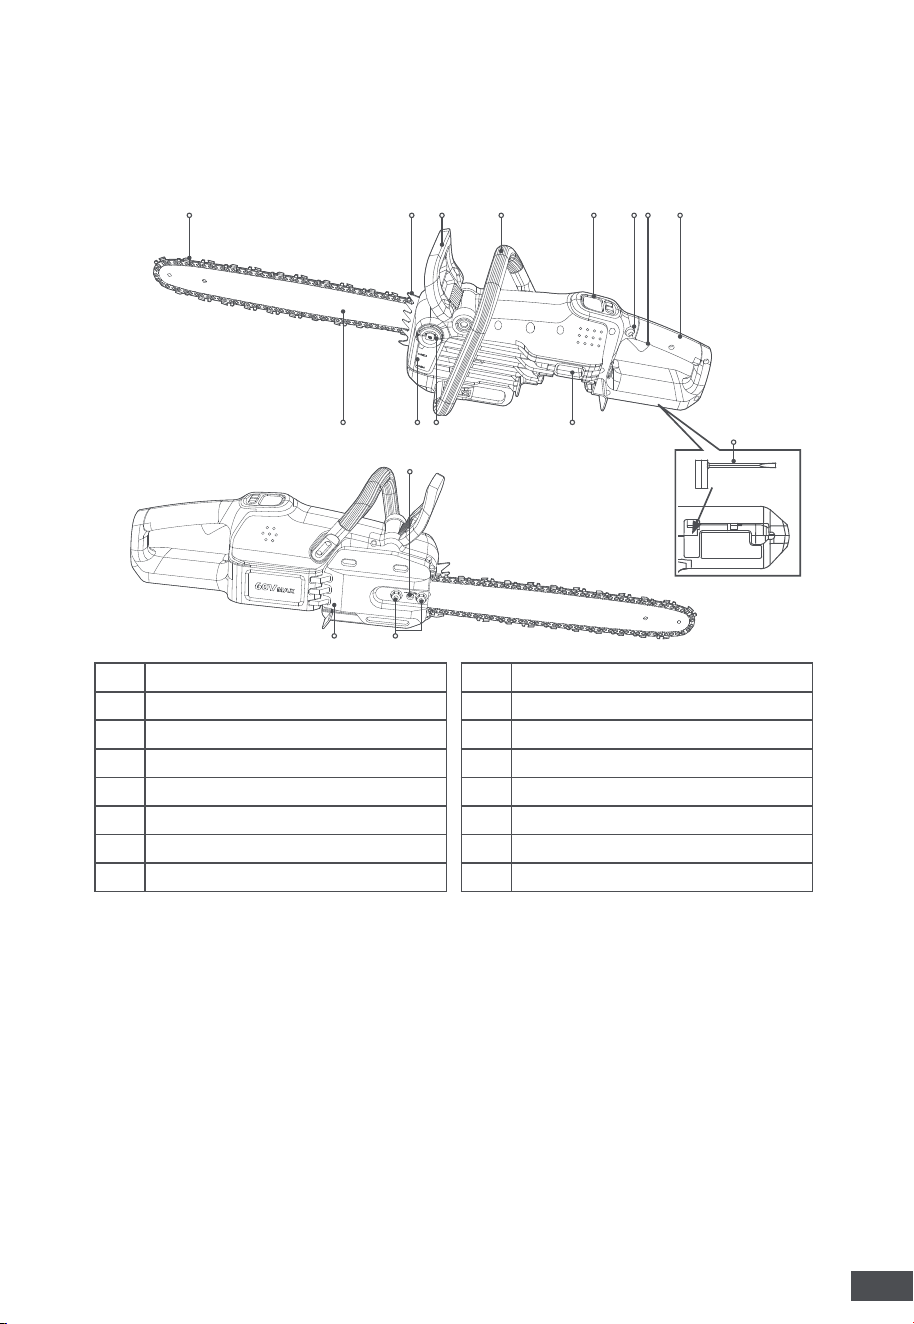
2.3 Product Overview
1 2
15
9
4 5 6 7 8
101213
14 16
11
3
1 Saw Chain
2 Bucking Spikes
3 Chain Brake Lever
4 Front Handle
5 Control Panel
6 Lock-off Button
7 Trigger Switch
8 Rear Handle
9 Double-end Socket Wrench
10 Battery-release Button
11 Oil Tank Cap
12 Oil Level Window
13 Guide Bar
14 Side Cover
15 Chain-tensioning Bolt
16 Side Cover Nuts
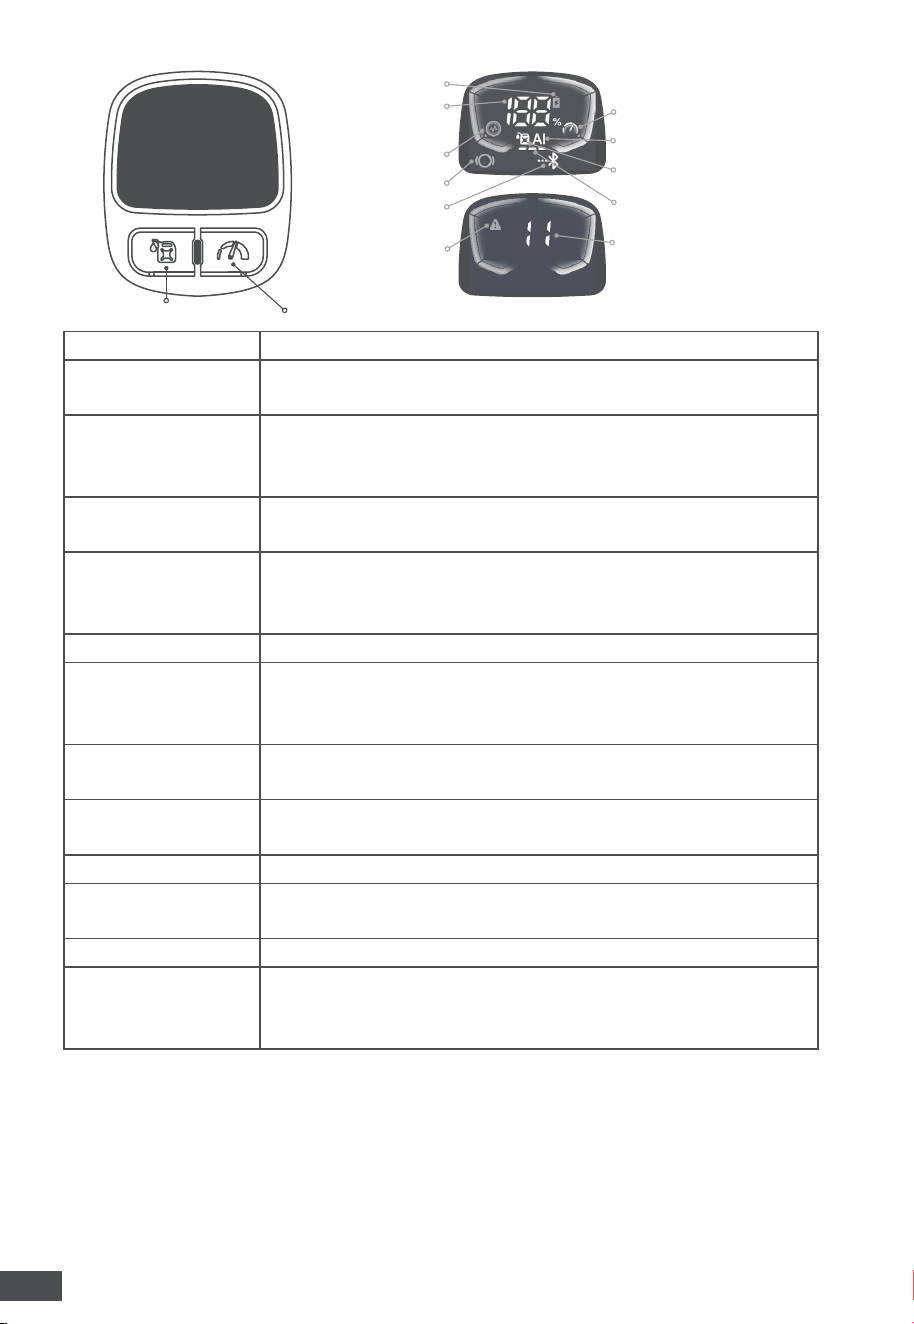
2.4 Control Panel
This section introduces the tool’s function buttons and the screen display
that indicates the product status. Press any button to wake up the display
screen.
NOTE:
The screen turns off automatically if no operation is detected for
10 minutes.
12
EN
Oil Pulse Button
Chain Speed Button
Power Indicator
Battery Pack Icon
Battery Level
Indicator
AI OilPulse™ Icon
Speed Mode Indicator
Oil Pulse Bar
Oil Level Icon
Chain Brake Icon
Bluetooth Icon
Error Icon
Error Code
Oil Pulse Button Press to cycle through oil pulse mode.
Chain Speed
Button
Press to cycle through chain speed levels.
Chain Brake Icon
Lights up when the chain brake lever is in the brake
position; turns off when the chain brake lever is in
the operation position.
Bluetooth Icon
Lights up when the tool is successfully connected via
Bluetooth.
Oil Level Icon
Indicates the oil level. It remains steady when the
oil level is sufficient, but turns red and flashes when
refueling is required.
Oil Pulse Bar Shows the current oil pulse mode.
AI OilPulse™ Icon
Lights up when AI Oilpulse mode is selected. In this
mode, the oil output is automatically adjusted to
match the cutting speed.
Battery Level
Indicator
Displays the current battery level (%) when the
screen is activated.
Battery Pack Icon
Lights up when the battery pack is properly installed
and the display is on.
Power Indicator Displays the current power output level of the tool.
Speed Mode
Indicator
Indicates the current speed mode selected.
1=Low Speed; 2=Medium Speed; 3=High Speed
Error Icon Lights up when a system malfunction is detected.
Error Code
Lights up when a system malfunction is detected.
Refer to the displayed error code to troubleshoot the
issue or contact Customer Service for help.
13
EN
3 Assembly
This product is delivered partially assembled and requires additional
assembly before use.
WARNING:
To avoid accidental starting that may cause serious
personal injury, always remove the battery pack before assembling or
adjusting the tool.
WARNING:
Do not assemble the tool if any parts are damaged or
missing. Operating with damaged or missing parts may result in serious
injury.
WARNING:
Use only MOVA-approved accessories and parts.
Unauthorized modifications or misuse may cause serious injury.
WARNING:
Wear protective gloves to avoid injury from sharp chain
teeth.
WARNING:
Do not attempt to start the tool unless all components are
securely installed.
WARNING:
Remove all adjustment tools after installing or replacing
parts.
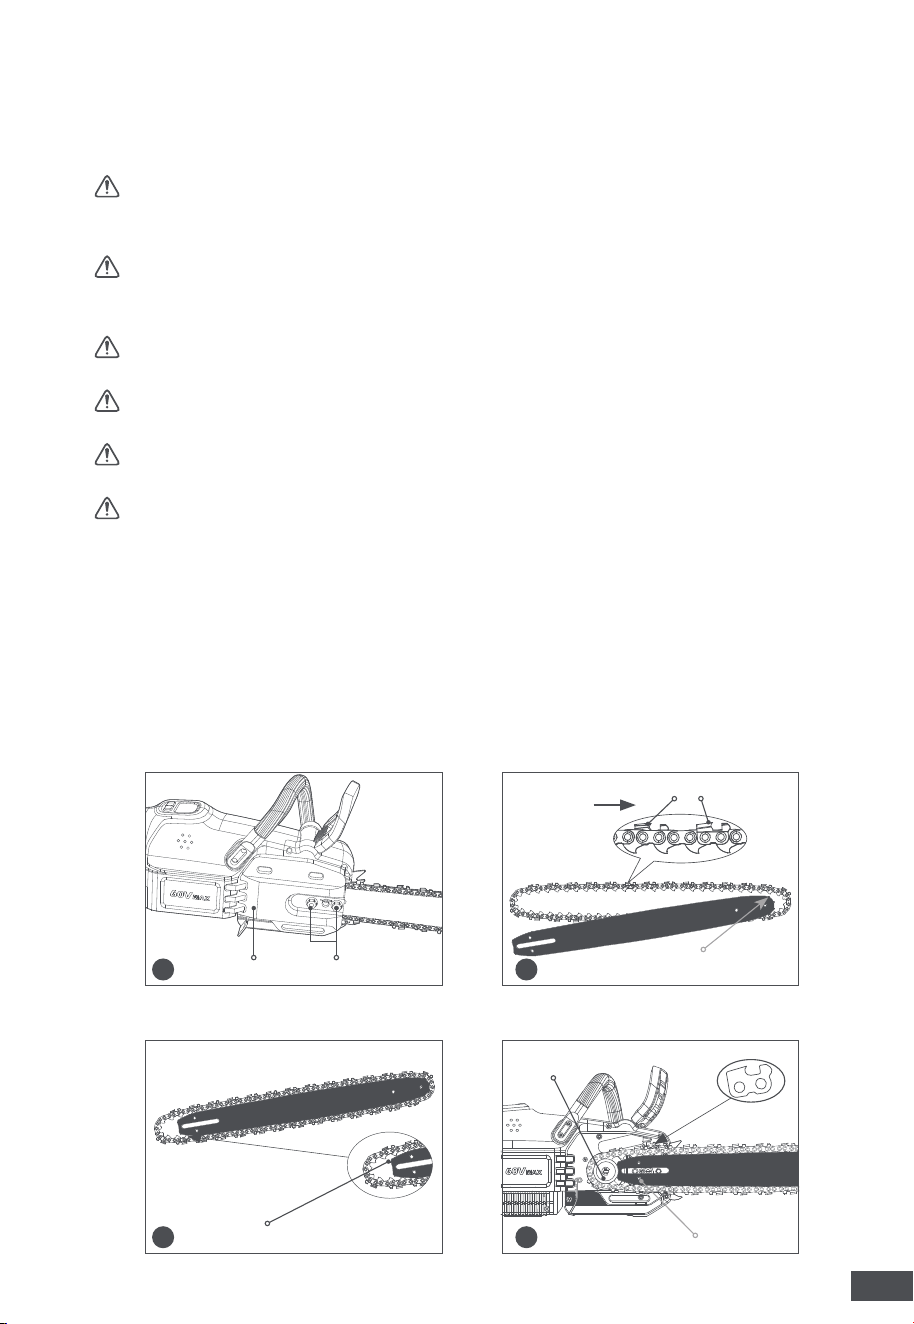
3.1 Install the Guide Bar and Saw Chain
1. Loosen the side cover nuts using the socket wrench (supplied), then
remove the side cover.
2. Lay the saw chain flat in a loop and straighten any twists or kinks.
3. Insert the chain drive links onto the sprocket nose first, then fit the
chain into the guide bar groove, keeping a loop of chain at the rear of the
guide bar.
1 2
3 4
Side Cover
Drive Sprocket
Pin
Chain Cutters
Sprocket Nose
Rotation
Direction
Side Cover Nuts
Guide Bar Groove
14
EN
WARNING:
Ensure the chain cutters face the rotation direction. A
reversed chain can cause malfunction and pose safety risks.
4. Hold the chain in place on the guide bar. Align the chain tensioner pin
with the hole in the guide bar, then install the guide bar and loop the saw
chain around the drive sprocket.
WARNING:
Make sure the cutters point in the same direction as the
directional symbol on the tool.
5. Use the flat end of the wrench to turn the chain-tensioning bolt
clockwise to tension the chain until it does not slip out.
6. Reinstall the side cover and tighten the nuts by hand. Follow the steps
below to properly adjust the chain tension, then tighten the side cover
nuts securely using the socket wrench.
3.2 Adjust the Chain Tension
CAUTION
: Always check that the chain is properly tensioned before
use.
WARNING:
Place the chainsaw on a stable, flat surface when adjusting
the chain tension.
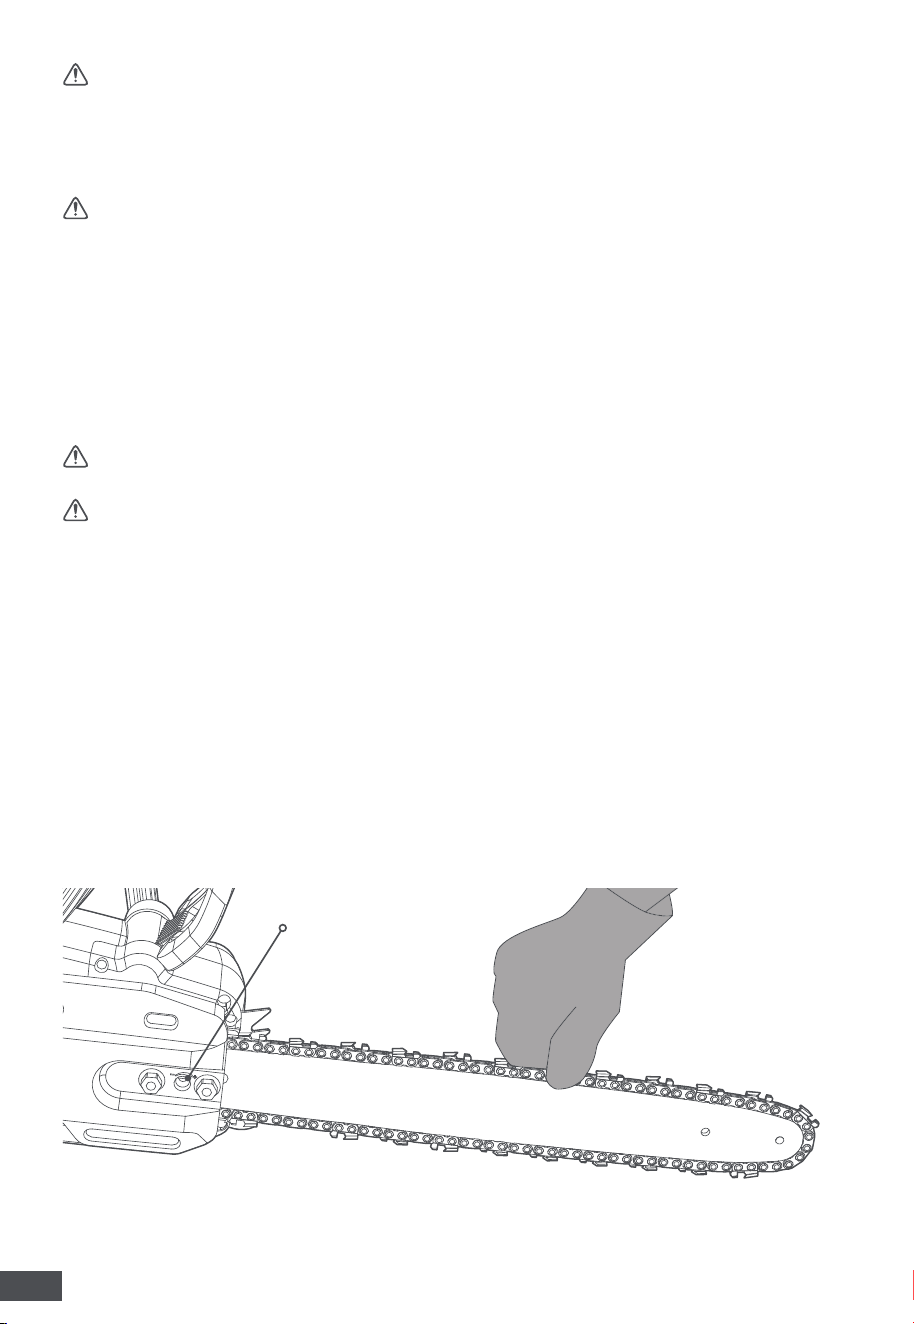
•
Use the flat end of the wrench to turn the chain-tensioning bolt
clockwise. The properly tensioned chain has no visible slack on the
underside of the guide bar, fits snugly against the bar, and can still be
turned freely by hand.
NOTE:
•
New saw chains will stretch. Check the chain tension frequently when
first used and tighten it when the chain becomes loose.
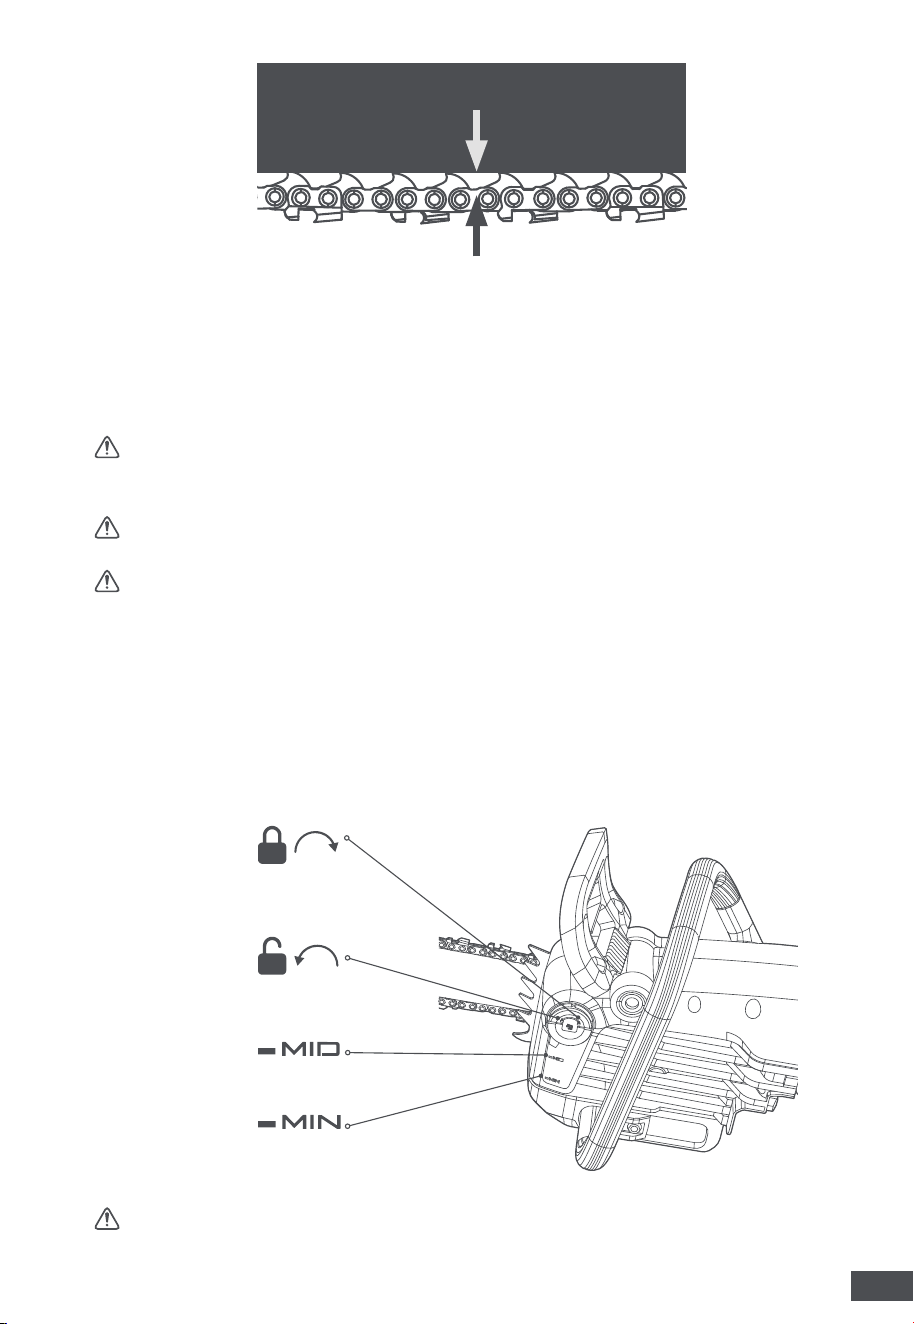
•
During normal operation, the chain will heat up. A properly tensioned
warm chain will have its drive links extending about 1.3 mm below the bar
groove.
•
A chain tightened while warm may become overly tight as it cools.
Always check chain tension when the chain is cold, before the next use.
Chain-tensioning
Bolt
15
EN
Approximately 1.3 mm (0.050'')
3.3 Fill the Oil Tank
This chainsaw is
not
pre-filled with chain oil. You must fill the oil tank
before first use. Refill the tank promptly when the oil level drops below
the minimum mark or when the Oil Level icon on the display flashes red.
WARNING:
Do not operate the chainsaw without chain oil or when the
oil level is below the minimum mark. Doing so may damage the guide bar
and chain.
WARNING:
Always remove the battery pack before filling the oil tank
to prevent accidental starting and serious injury.
WARNING:
Keep oil and the chainsaw away from open flames or
sparks. Do not smoke. Spilled oil may catch fire.
1. Place the chainsaw on a flat, stable surface with the oil level window
facing upward.
2. Clean the oil cap and the surrounding area to prevent dirt from
entering the oil tank. Then turn the cap counterclockwise to open it.
3. Slowly pour clean, chain-specific lubricant into the oil tank, taking care
not to overfill or spill. Wipe off any excess oil.
Minimum Oil Mark
CAUTION:
Using improper, dirty, used, or contaminated oil may clog or
damage the lubrication system, cause premature wear, and significantly
16
EN
reduce the service life of cutting components.
4. Tighten the oil cap clockwise.
5. Start the chainsaw (see
Section 4.2
). Hold the running chainsaw
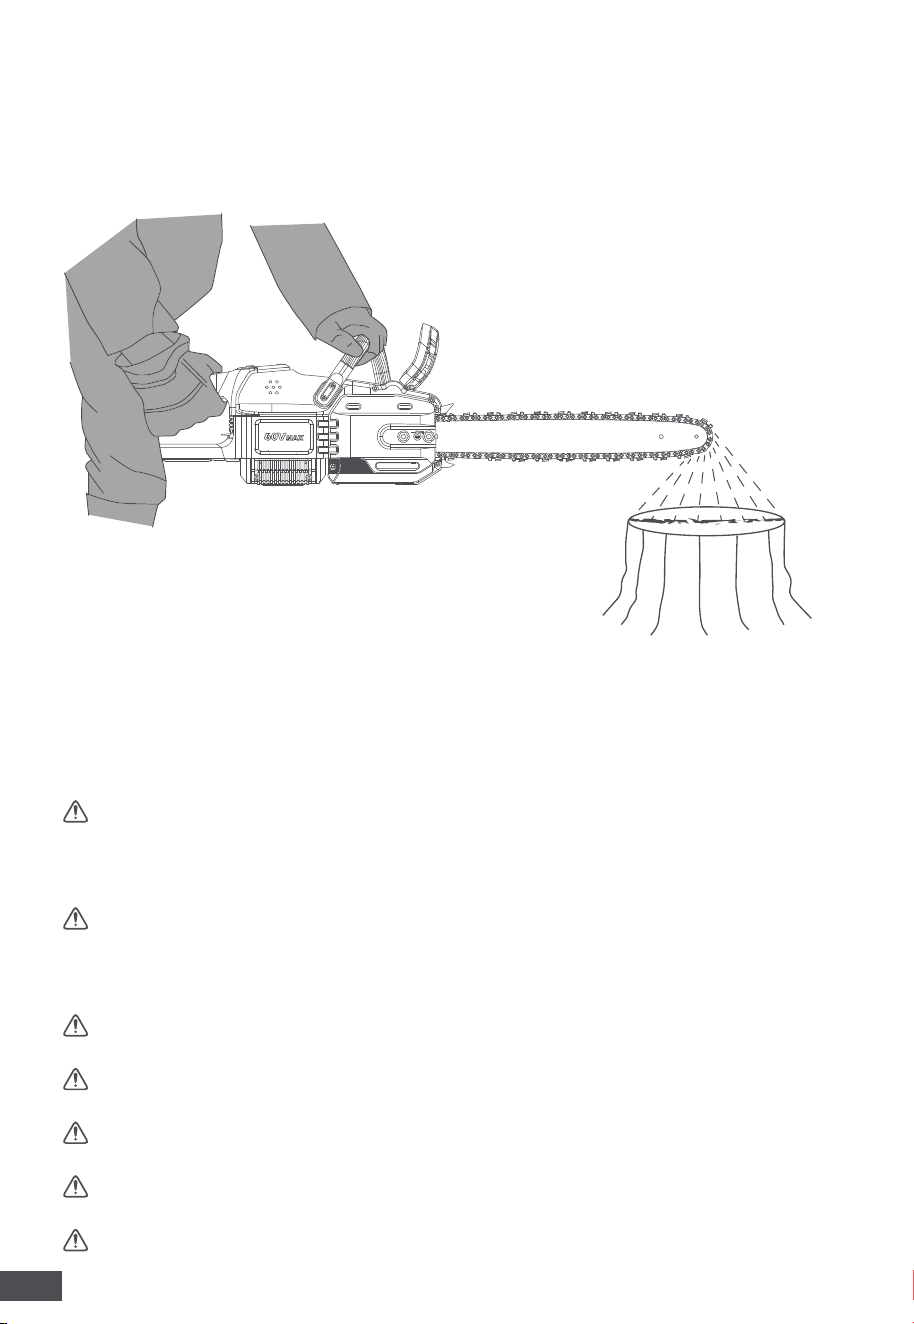
approximately 15 cm above the trunk or the ground. If the lubrication is
sufficient, you will see a light oil trace.
4 Operation
Before each use, inspect the chainsaw carefully. Ensure all parts are
properly assembled and securely attached. Replace any damaged or
missing components before operation.
WARNING:
Do not use the chainsaw with a malfunctioning chain brake
lever. A properly functioning brake lever will stop the movement of the
chain immediately. If the chain brake is not working properly, stop using it
and have it repaired by a qualified service technician.
WARNING:
Always use eye protection, dust masks, non-slip safety
footwear, and hearing protection as required. Appropriate personal
protective equipment reduces the risk of injury from flying debris, noise,
or slipping.
WARNING:
Hold the chainsaw firmly with both hands, maintaining a
stable stance while the chain is moving.
WARNING:
Never allow any part of your body to be in the chain line,
and keep clear of all moving parts.
WARNING:
Avoid touching the ground with the chainsaw while it is still
running.
WARNING:
When performing several cuts, the trigger must be released
in between.
WARNING:
Do not let familiarity from frequent use lead to carelessness.
17
EN
Always follow all safety guidelines and operating instructions.
4.1 Install/Remove the Battery Pack
WARNING:
Use only the battery packs specified in
Section 2.2.
Use of
any other battery packs may create a risk of injury and fire. Fully charge
the battery pack before first use.
WARNING:
Keep the chain brake lever in the brake position.
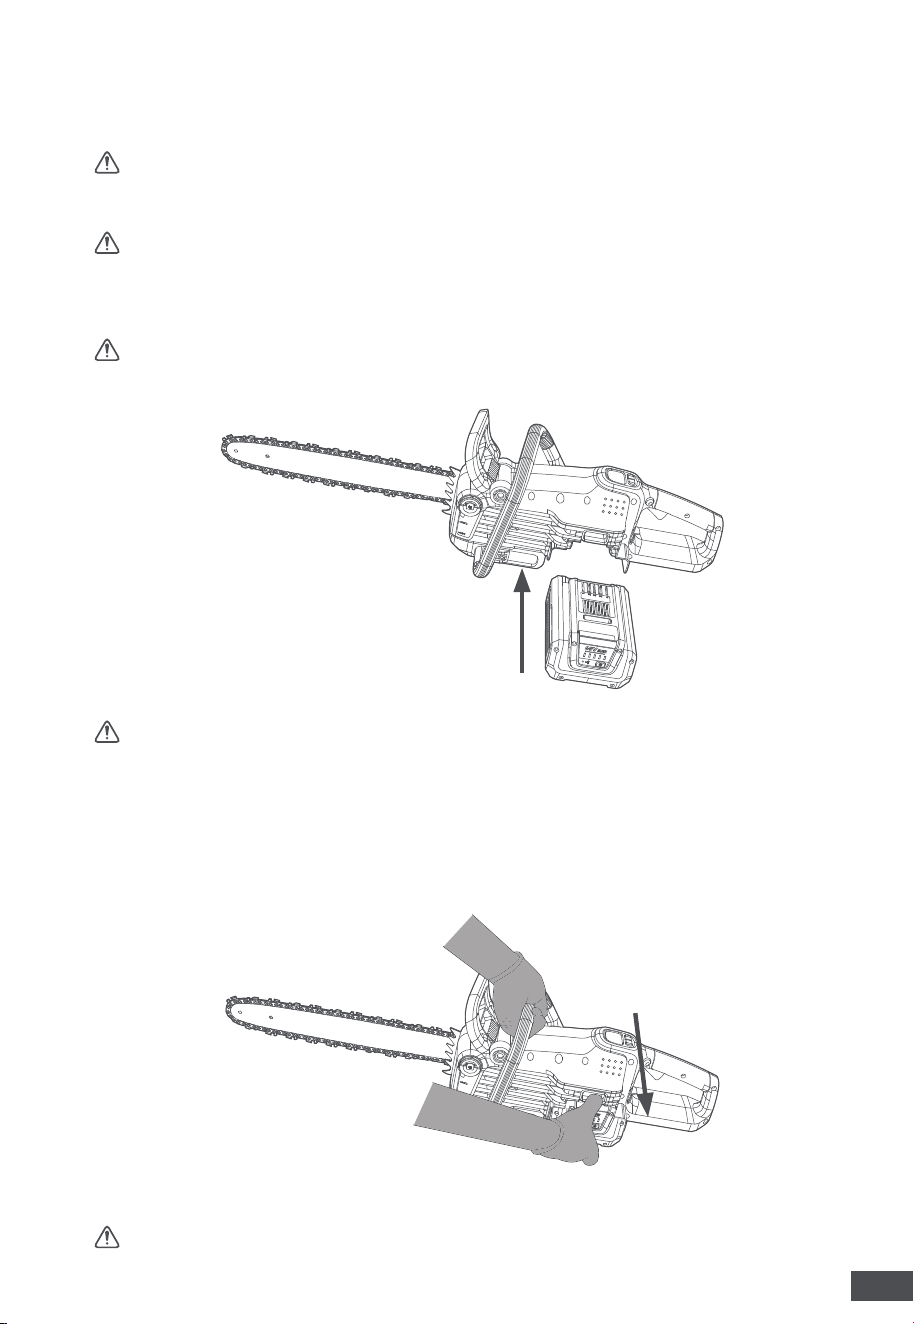
To install
1. Align the ribs on the battery pack with the mounting slots in the tool.
2. Slide the battery pack in until it clicks into place.
WARNING:
Make sure the battery pack is fully seated before use. An
unsecured battery may fall out during operation and cause injury.
To remove
WARNING:
To avoid injury from a dropped battery pack, keep your
feet clear of the battery's drop path and keep children or pets at a safe
distance. Never remove the battery pack at a high position.
1. Hold the battery pack firmly in your palm.
2. Press the battery-release button with your thumb to release the battery
pack from the latch.
3. Pull the battery pack straight out.
4.2 Start/Stop the Chainsaw
WARNING:
Before starting, make sure the area around you is clear of
18
EN
obstacles and that the guide bar and saw chain are not in contact with the
ground or any object.
WARNING:
Do not start or stop the chainsaw with the chain engaged in a cut.
To Start
WARNING:
This tool is equipped with a lock-off button to prevent
accidental startup. Do not use the tool if it starts by the trigger alone
without engaging the lock-off button. If this occurs, stop using and
contact an authorized service center.
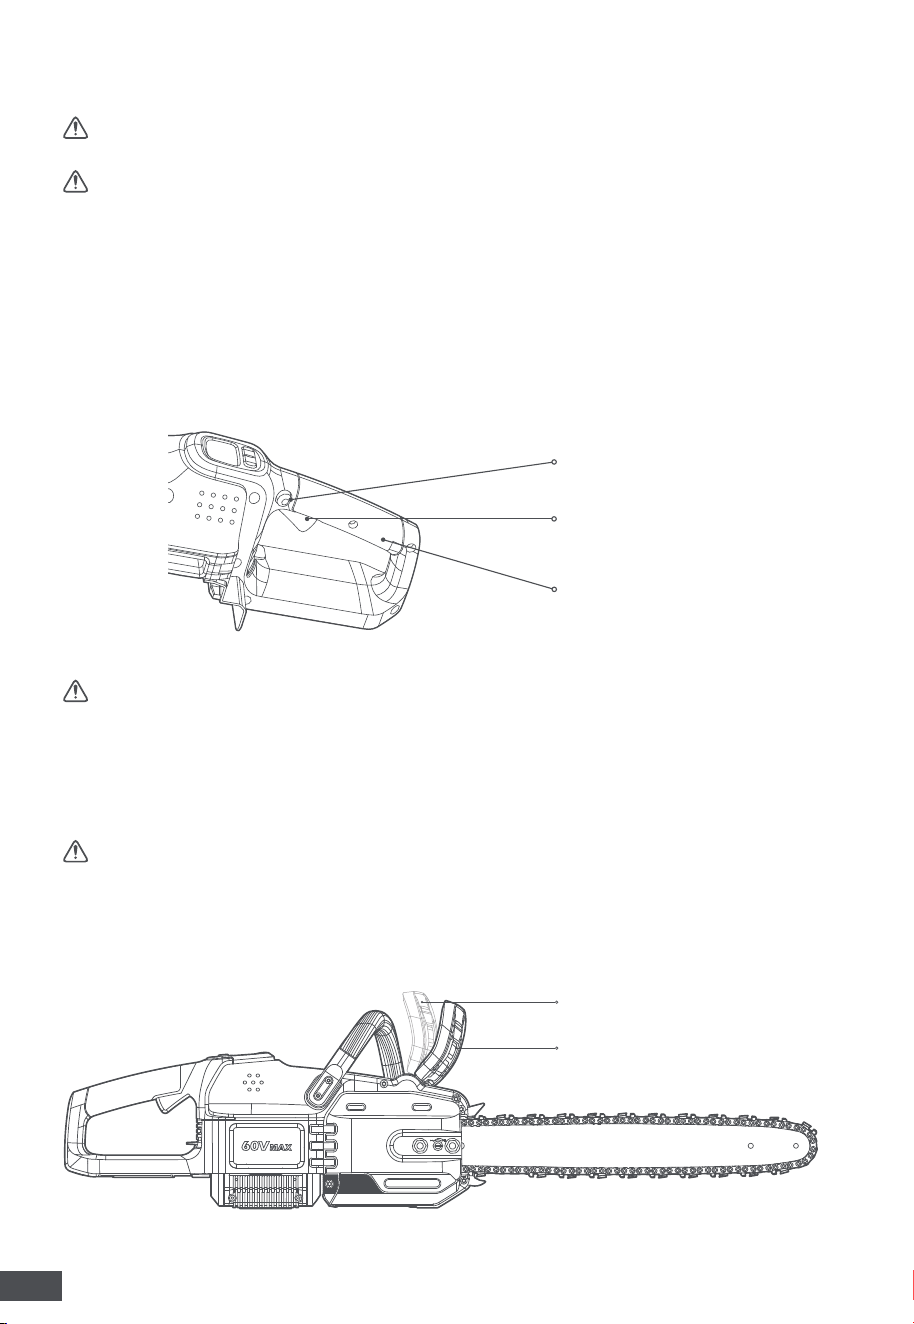
1. Grasp the gripping area of the rear handle with your right hand. Press
and hold the lock-off button with your thumb, then squeeze the trigger to
start the chainsaw.
2. Release the lock-off button and fully squeeze the trigger to reach the
full speed of the current mode before starting the cut.
Lock-off Button
Trigger Switch
Gripping Area
To Stop
WARNING:
Always remove the battery pack from the chainsaw during
breaks or after use.
1. Move the chainsaw away from the cutting area, then release the trigger
to stop the chainsaw.
2. Push the chain brake lever forward to the brake position to engage the
brake.
WARNING:
When kickback occurs, the chain brake lever will be pushed
forward into the brake position by the operator’s left hand to provide
protection against injury. If this happens, stabilize the tool and release the
trigger to stop the engine. Identify the cause of the kickback and make
sure the tool is free of abnormalities before operating again.
Operating Position
Brake Position
19
EN
4.3 Adjust the Oil Pulse and Speed Modes
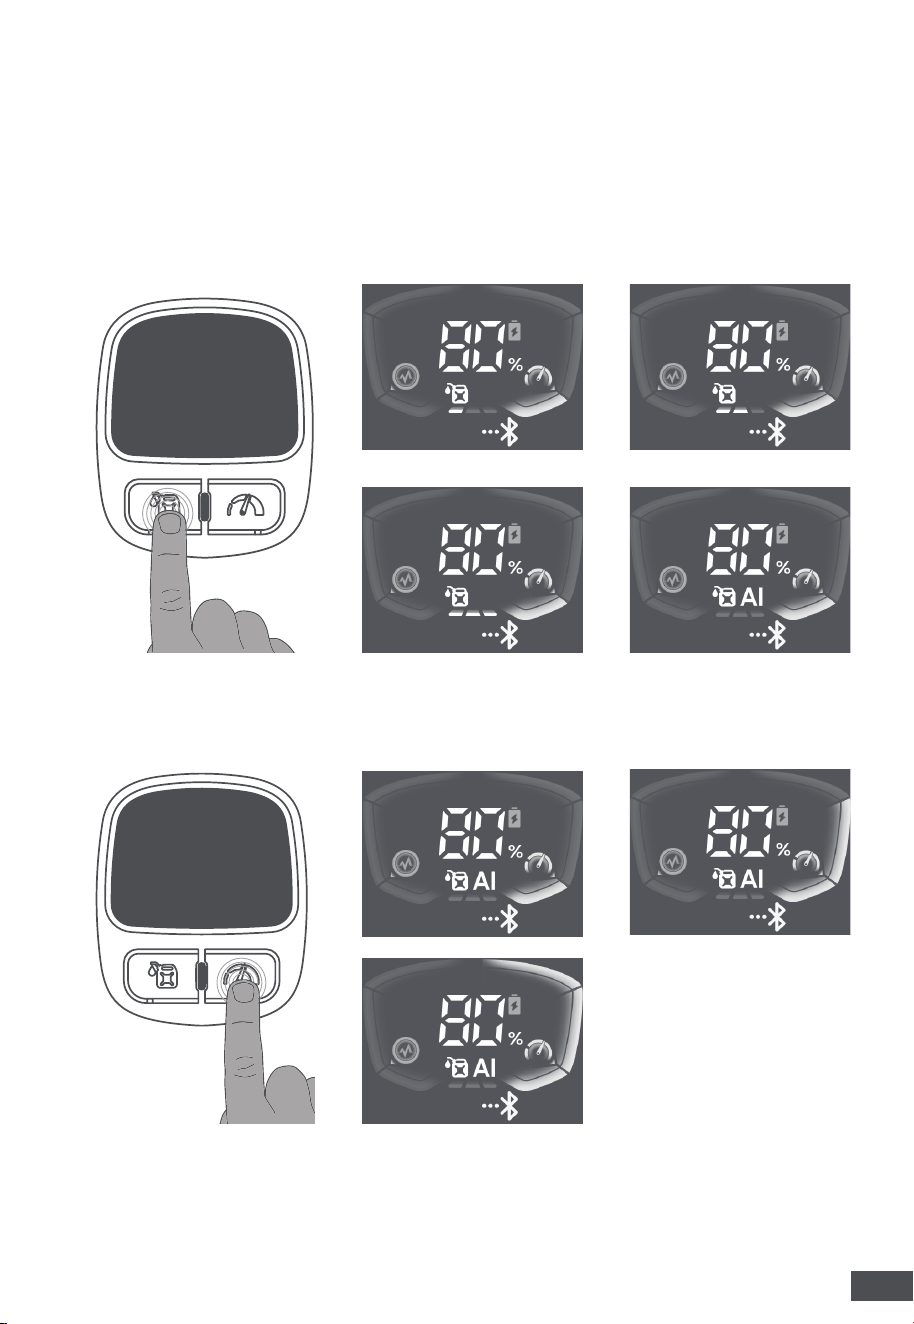
To adjust Oil Pulse Mode
This tool features four oil pulse modes. It starts in AI OilPulse by default.
• Press the oil pulse button to cycle through: 1 → 2 → 3 → AI → 1.
NOTE:
This tool features a memory function: When powered on, it
automatically resumes the oil pulse mode selected during the last
operation.
To adjust Speed Mode
This tool offers three speed modes.
• Press the chain speed button to cycle through: 1 → 2 → 3 → 1.
4.4 First-Time User Guide
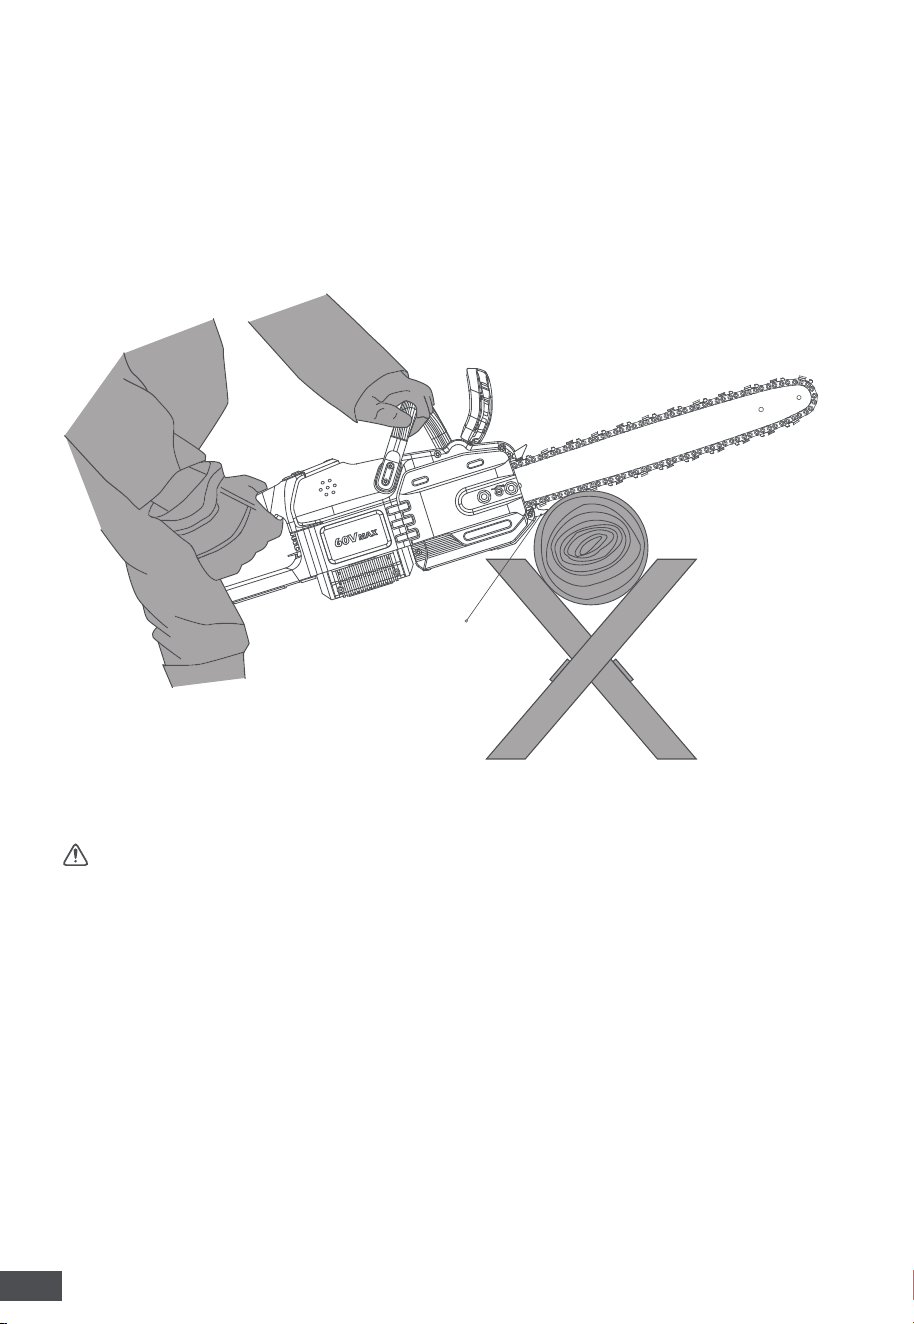
If you are new to using a chainsaw, practice on a few small logs to get a
"feel" for the tool's handling before starting any real cutting tasks.
20
EN
1. Place the log on a saw horse and ensure it is securely held.
2. Firmly position the bottom spike so that it grips the wood just behind
the initial cut to stabilize the log.
3. Start the chainsaw in low-speed mode with AI oil pulse mode enabled
and pull the trigger to reach full speed before beginning the cut.
4. Lower the saw chain and bar into the log, using the spike as a pivot
point.
5. Test different chain speeds and oil pulse modes on several logs.
Bucking Spike
4.5 Felling
WARNING:
• Avoid felling trees during high winds, storms, heavy rain, or poor
visibility.
• Do not fell trees that lean at extreme angles or large trees with rotten
limbs, loose bark, or hollow trunks. Instead, have these trees pushed or
dragged down with heavy equipment and then cut them up.
• When felling a tree, keep everyone – helpers, bystanders, children,
and animals – a safe distance away from the cutting area. During felling
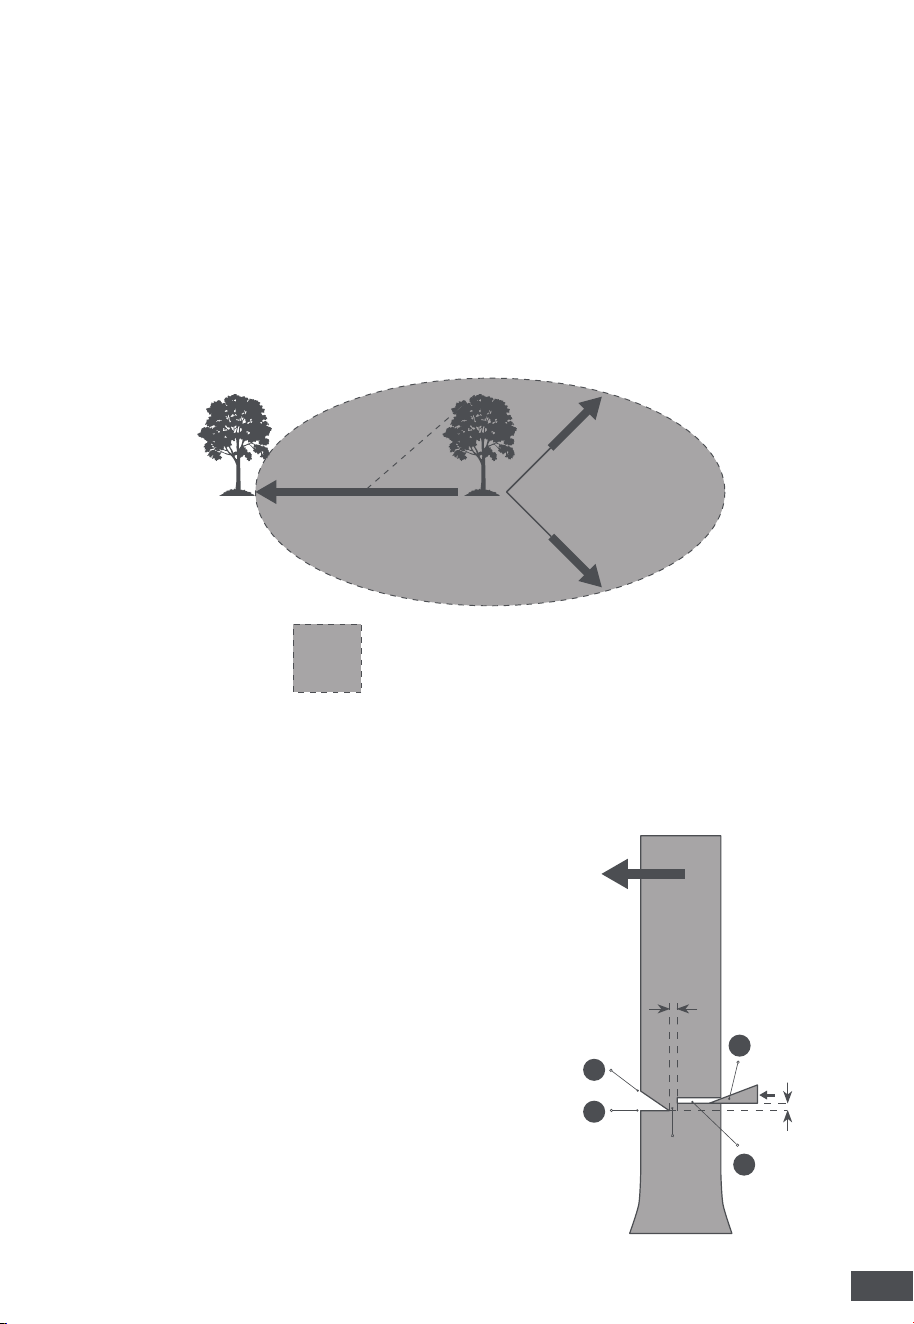
operations, the safe distance should be at least twice the height of the
tree being felled.
• Never fell a tree in a way that could endanger people, buildings, or
utility lines. If a tree contacts a utility line, stay away and immediately
notify the utility provider.
• Keep on the uphill side, as the tree may roll or slide downhill after
felling.
21
EN
• If the tree begins to fall in the wrong direction or the saw becomes
stuck, leave the area immediately and abandon the tool if necessary.
4.5.1 Before You Fell
• Check the tree for decay, hollow areas, or dead limbs, and clear all dirt,
stones, loose bark, nails, staples, and wire from the area where felling cuts
are to be made.
• Evaluate the natural lean of the tree, wind direction, and branch
distribution to determine its fall path.
• Prepare two safety retreat paths. Your retreat path should lead
diagonally back from the expected line of fall and be free from
obstructions.
45°
45°
= cutting down area
4.5.2 Felling Procedure
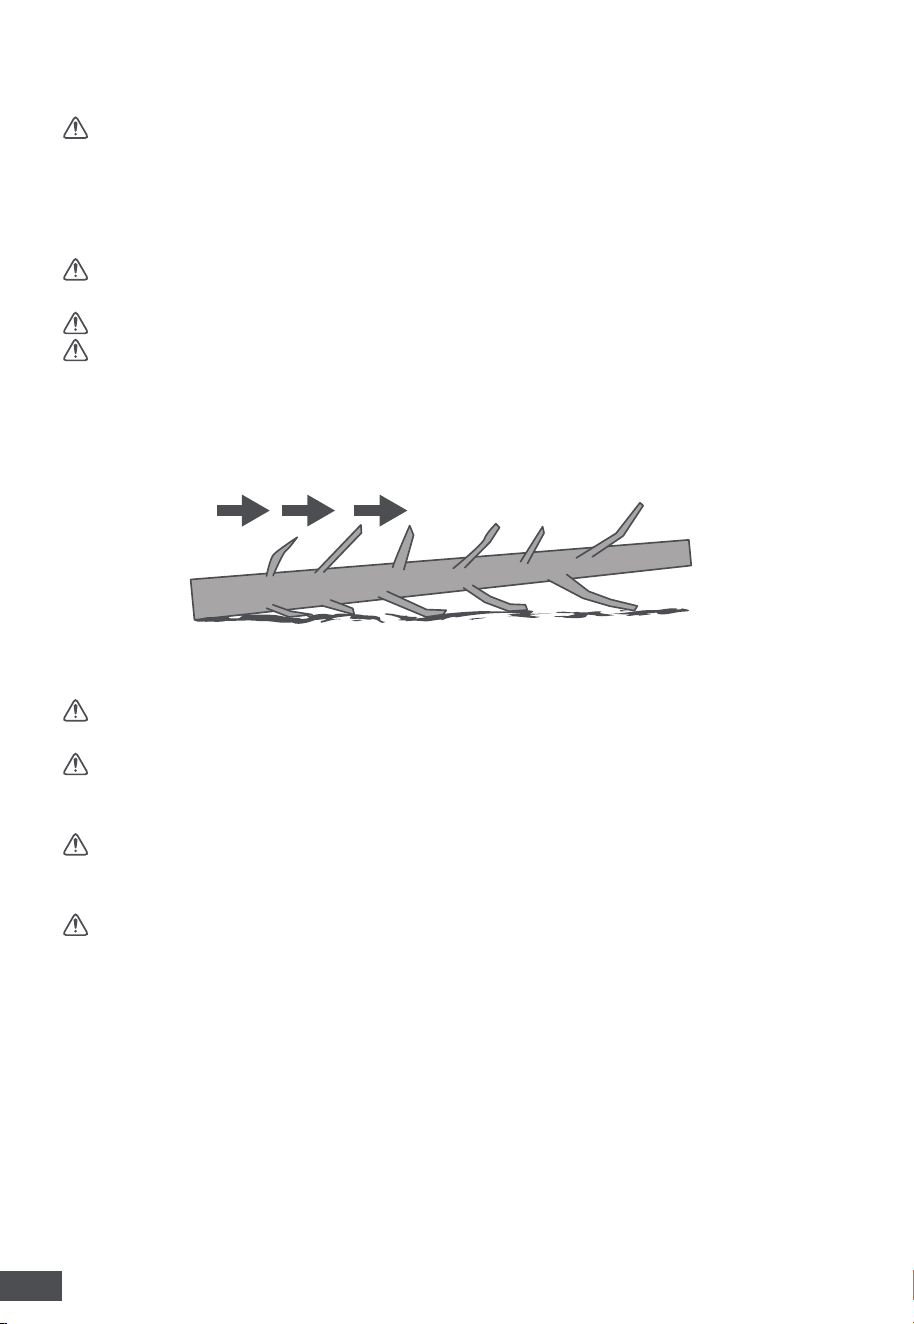
Notch Cut
1. On the side facing the intended felling direction, make a horizontal cut
into the trunk to a depth of about 1/3 of its diameter.
2. Make a second cut downward at
approximately a 60° angle to meet the
horizontal cut, forming a notch.
Back Cut
3. On the opposite side of the notch, make
a horizontal cut at least 50 mm above the
base of the notch. Do not cut through; leave a
hinge.
4. As the back cut approaches the hinge, the
tree should begin to fall. If the tree shows any
sign of falling in the wrong direction, or if it
begins to settle back and pinch the saw chain,
stop cutting immediately. Insert wedges into
the back cut to open the cut and guide the
tree to fall in the desired direction.
5. Once the tree starts to fall, withdraw the
50mm
Hinge
50mm
1
2
4
3
3
4
22
EN
chainsaw, release the trigger, set the saw on the ground, and retreat along
a pre-planned escape route.
WARNING:
After felling, wait until the tree has come to a complete
rest. Inspect for tensioned or suspended branches and any entanglement
with neighboring trees from a safe position before approaching.
4.6 Limbing
WARNING:
Stand to the side of the trunk and trim limbs from the
opposite side, keeping the tree stem between you and the chainsaw.
WARNING:
Never straddle or stand on top of the trunk.
WARNING:
Never place the chainsaw between your legs when cutting.
1. Leave larger lower limbs in place to support the trunk above the ground.
2. Remove small branches in one cut.
3. Branches under tension should be cut from the bottom up to avoid
binding the chainsaw.
4.7 Bucking
WARNING:
Always stand on the uphill side of the log when bucking on
a slope.
WARNING:
Bucking may cause the saw to pull forward or push back,
depending on the cutting direction. Always maintain a firm two-handed
grip, stable footing, and do not force the saw.
WARNING:
Near the end of a cut, reduce cutting pressure to prevent
kickback or saw damage. Avoid contact between the chain and the
ground.
WARNING:
Let the chain come to a complete stop before repositioning
or moving the saw.
4.7.1 Select a Cutting Method
To avoid saw binding and maintain better control, select a cutting method
according to how the log is supported, and use the spike as a pivot to
guide the chainsaw:
•
Log supported along entire length: Overbuck
• Place the bottom of the guide bar on top of the log.
• Apply light, steady downward pressure to begin the cut. Let the saw
feed naturally into the wood—do not force it.
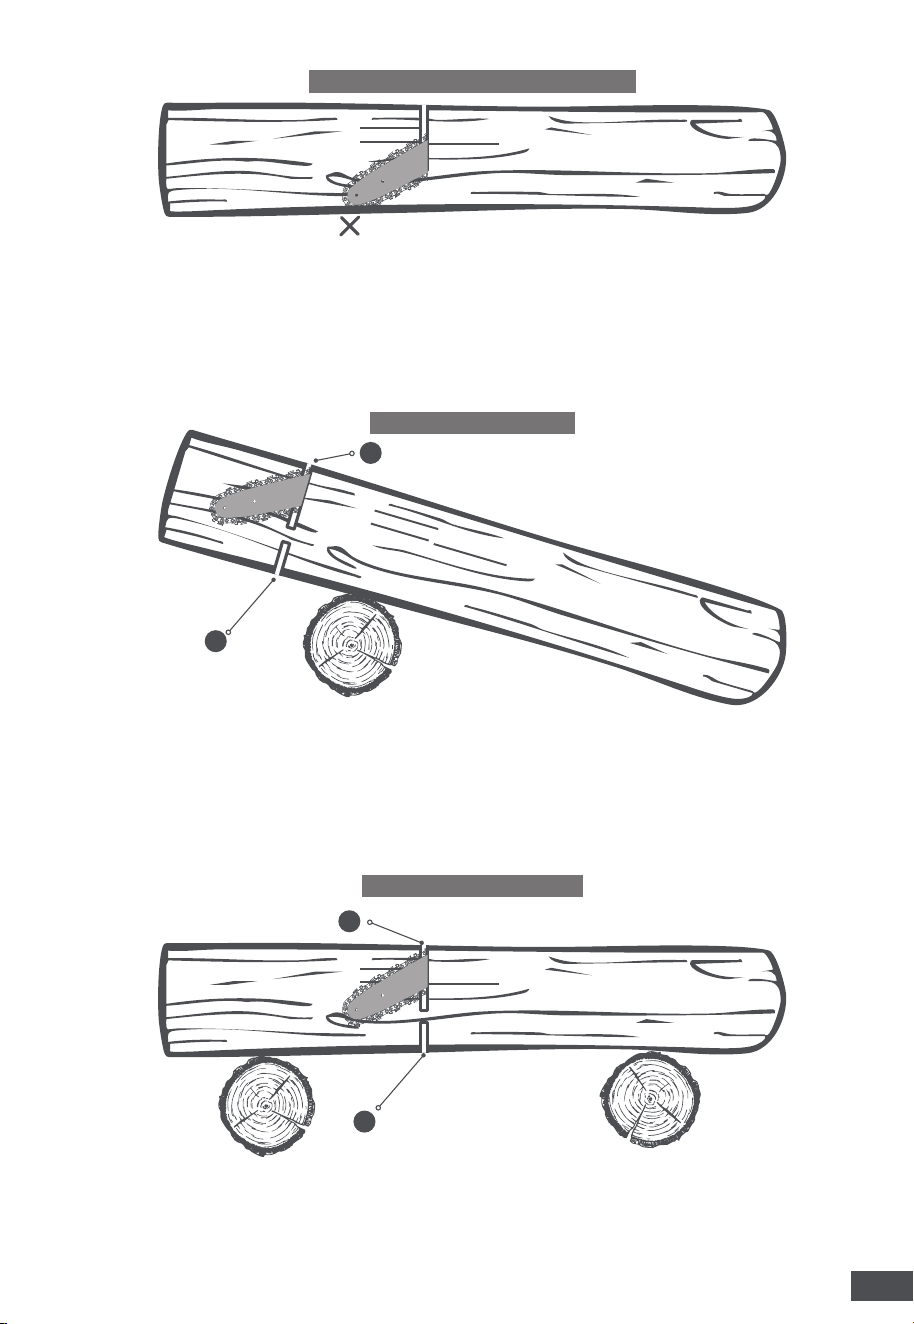
23
EN
Log Supported Along the Entire Length
Avoid Contacting Ground
•
Log supported at one end: Underbuck + Overbuck
• Place the top of the guide bar under the log.
• Cut about 1/3 of the log’s diameter from the underside (1), then
complete the cut from the top to meet the first cut (2).
Log Supported One End
1
2
•
Log supported at both ends: Overbuck + Underbuck
• Place the bottom of the guide bar on top of the log.
• Cut 1/3 of the log's diameter from the top (1), then complete the cut
from the underside (2) to meet the first cut.
2
1
Log Supported Both Ends
24
EN
5 MOVAhome App
The MOVAhome app allows you to monitor your tool's status, view total
operation time, access user guides, and diagnose potential issues.
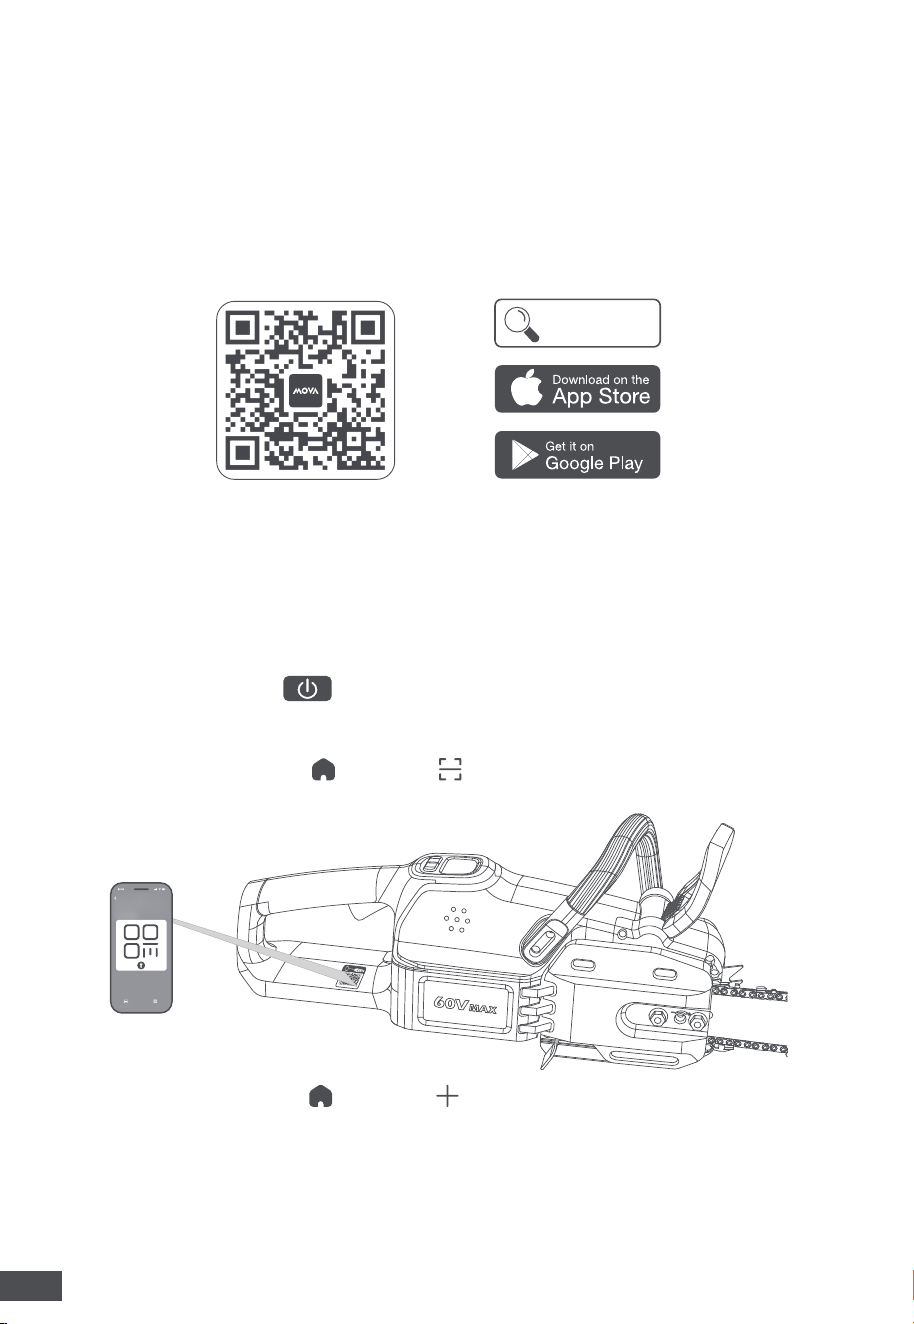
5.1 Connect to the MOVAhome App
1. Scan the QR code below or search for "MOVAhome" in the App Store or
Google Play. Install the app, create an account, and log in.
MOVAhome
2. Open the MOVAhome app and enable Bluetooth function on your
mobile device.
NOTE:
Please make sure that both the tool and your mobile device are
within range of the same Wi-Fi network, and your mobile device is within
10 m (33 ft) of the tool.
3. Follow the instructions in
Section 4.1
to properly and securely install the
battery pack into the tool, activating the tool's display screen.
4. Press and hold the button on battery pack for 4 seconds to enter
Bluetooth pairing mode. Then, pair the tool with your mobile device using
one of the following two methods:
•
Scan QR code:
Go to
Device
>
Scan to Connect
, then scan the
code on the tool as shown below.
MOVA 60V 45cm Chainsaw
•
Add Manually:
Go to
Device
>
Add
, then select your tool model.
5. Follow the in-app instructions to complete the connection. The
Bluetooth Icon on the screen lights up when successfully paired.
5.2 Unbind
The tool is automatically bound to the MOVAhome account once pairing is
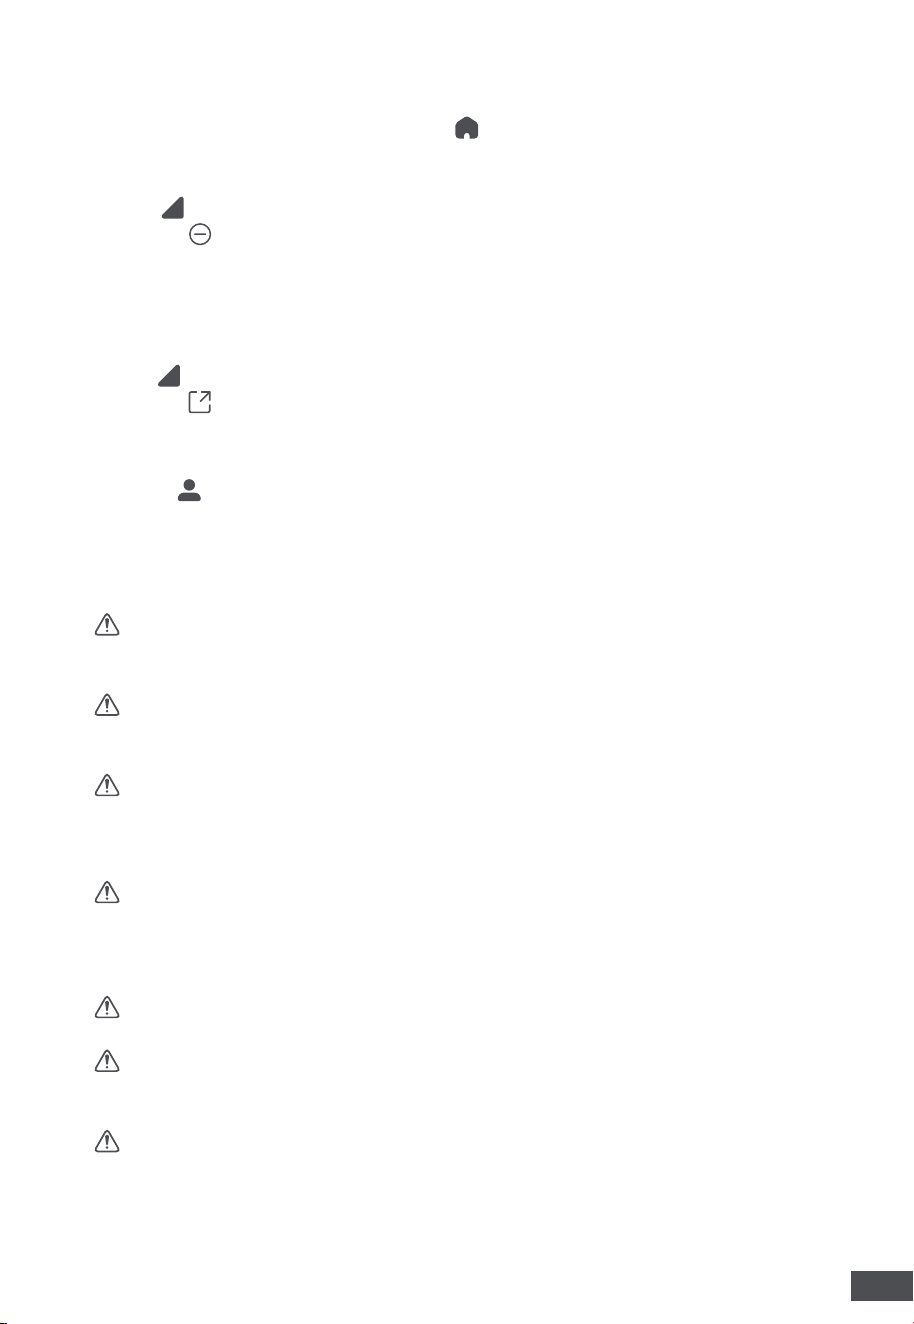
25
EN
6 Maintenance
WARNING:
Make sure the tool is turned off and the battery pack is
removed before servicing, cleaning, or changing attachments. Failure to
do so may result in serious personal injury.
WARNING:
Have your power tool serviced by qualified personnel using
only identical replacement parts. Improper repairs may result in serious
hazards.
WARNING:
Do not at any time let brake fluids, gasoline, petroleum-
based products, penetrating oils, etc., come in contact with plastic parts.
Chemicals can damage, weaken, or destroy plastic, which may result in
serious personal injury.
WARNING:
Any servicing not covered in this manual must be
performed by authorized service personnel only.
6.1 Cleaning
WARNING:
Never immerse the tool in water or any liquid when
cleaning.
CAUTION:
Avoid using commercial solvents when cleaning plastic
parts. These may cause discoloration, softening, or cracking of plastic
surfaces.
CAUTION:
Ensure all components are completely dry before
reassembling or storing.
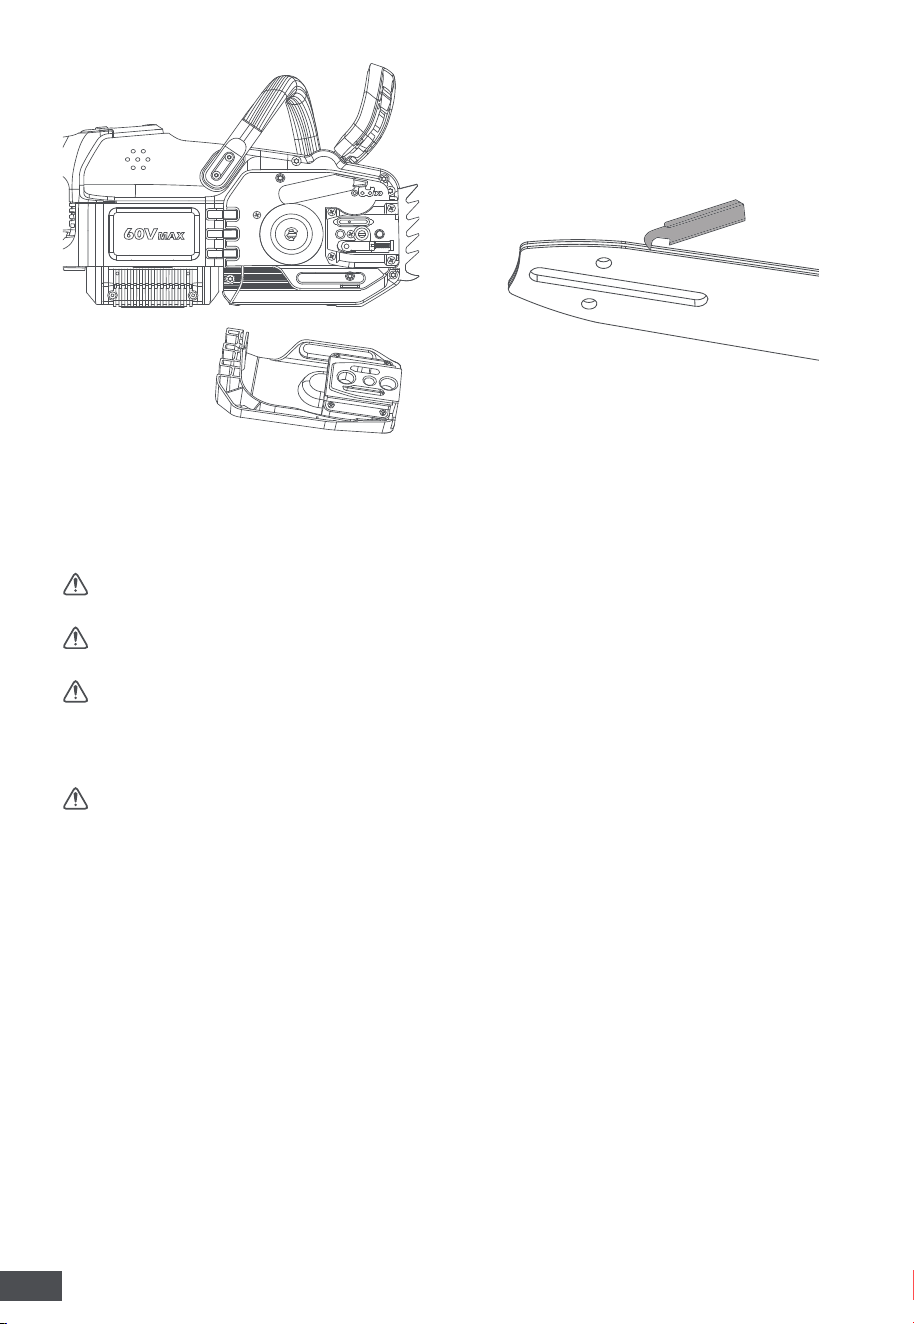
•
Remove the side cover and clean the interior using a soft brush.
•
Regularly clean the guide bar groove using a suitable tool.
successful. Each tool can only be bound to one account at a time.
To pair the tool with a new account, you need to unbind it first:
1. Open the MOVAhome app. Go to
Device
.
2. If you have multiple tools bound to your MOVAhome account, swipe left
or right to access the page of the tool you want to edit.
3. Tap
next to the tool's name.
4. Select
Delete
.
NOTE:
Unbinding will permanently erase all user data associated with the
tool from the cloud.
5.3 Share Your Tool
1. Tap
next to the tool's name.
2. Select
Device
Sharing
.
5.4 Log out / Delete Account
1. Go to
Me > Settings > General > Account
2. Select
Log Out
or
Delete Account
.
26
EN
6.2 Sharpen the Saw Chain
The chain may require sharpening if it produces only fine, powder-
like chips, cuts to one side, or feels noticeably harder than usual to cut
through the wood.
WARNING:
Never use a dull, damaged or improperly sharpened saw
chain. It increases the potential of kickback.
WARNING:
Always wear cut-resistant gloves and safety glasses when
handling or filing the chain.
WARNING:
If the cutter teeth are damaged by contact with hard
objects (e.g., nails, stones) or worn down by dirt, mud, or sand on the
wood, have the chain sharpened by a qualified service technician.
Proper sharpening
WARNING:
Always remove the battery pack before performing any
work on the guide bar or chain.
•
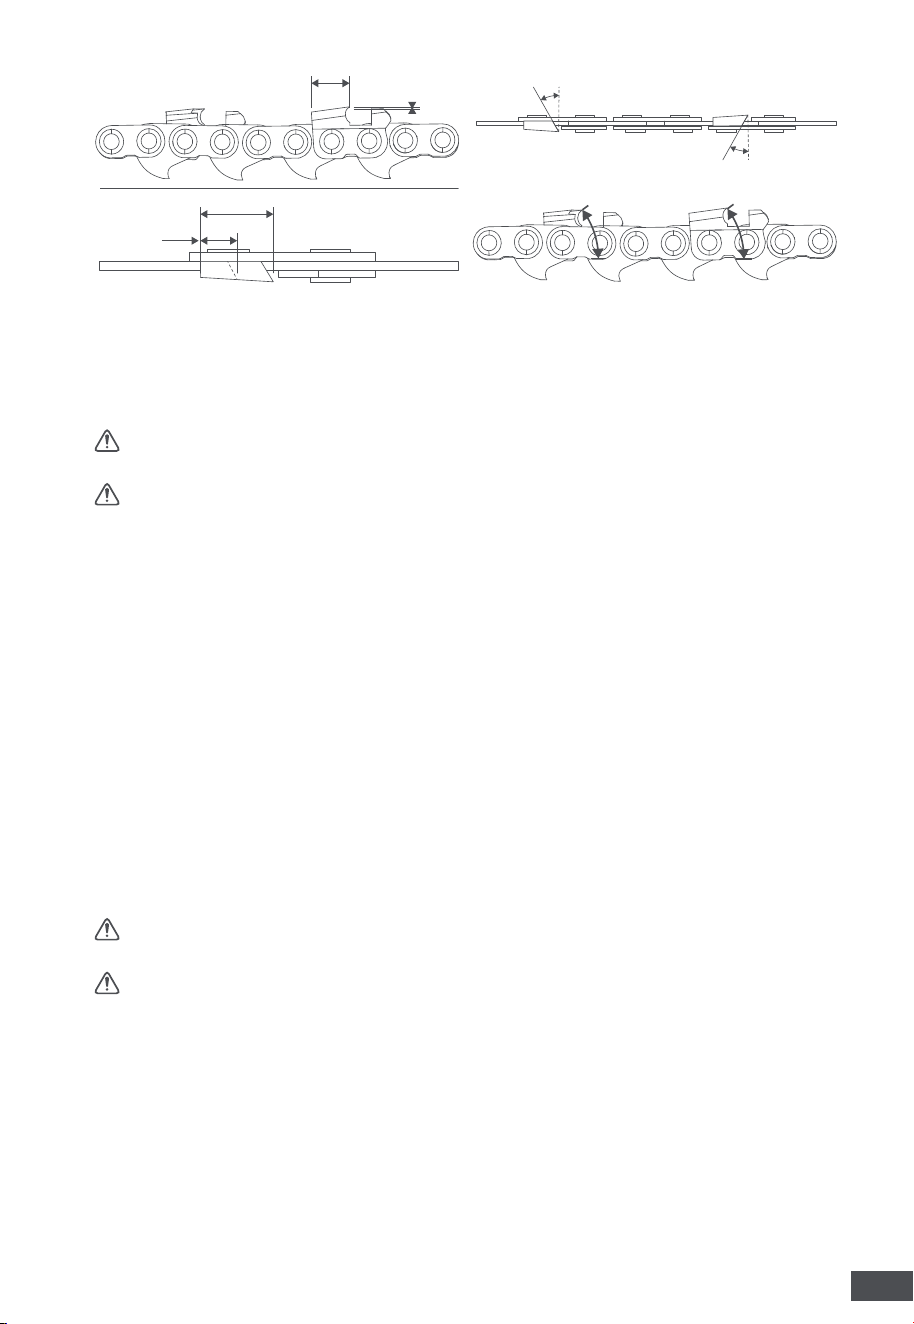
Use a dedicated round file for saw chains. Use a file holder if
necessary. Lift the file away from the cutter on each return stroke.
•
Sharpen all cutters to the same length (a).
Cutters of different
lengths cause rough chain operation and may lead to chain cracking.
•
Minimum cutter length: 3 mm.
Do not continue sharpening once this
limit is reached. The chain must be replaced at this point (see
Section 6.3
).
•
Recommended Depth-Gauge: 0.64 mm.
Excessive depth increases
the risk of kickback.
•
Sharpening angle: 25°; 70°.
The sharpening angle must be identical
for all cutters. Different angles cause rough and irregular chain operation,
increase wear, and may lead to chain breakage.
27
EN
0.64 mm
(0.025″)
a
3 mm
(0.11″)
a
α-25°
α-25°
β-70°
β-70°
6.3 Replace the Bar and Chain
Before each use, inspect the chain, guide bar, and bar rails for abnormal
wear, damage, or improper tracking. Replace the saw chain or guide bar
immediately if any such conditions are observed.
WARNING:
Do not continue using a damaged bar or chain. It may
result in poor cutting performance or serious injury.
WARNING:
Always wear cut-resistant gloves when handling the bar
and chain, these components are sharp and may contain burrs.
1. Remove the battery pack and allow the saw to cool.
2. Position the chainsaw on a firm, flat surface with the side cover facing up.
3. Loosen the side cover nuts and remove the cover. Clean the side cover
with a dry cloth.
4. Turn the chain-tensioning bolt with the flat end of the wrench to loosen
the chain.
5. Remove the worn bar and chain.
NOTE:
Inspect the drive sprocket for excessive wear or damage.
6. Follow the steps outlined in
Section 3.1
to install the new bar and
chain.
7. Follow the steps outlined in
Section 3.2
to correctly adjust the chain
tension.
6.4 Transporting and Storing
WARNING:
Always remove the battery pack before storage or
transportation.
CAUTION:
Store the chainsaw away from corrosive substances such
as garden chemicals or de-icing salts, as these may damage the tool.
•
Before changing your location during work, switch off the chainsaw
and engage the chain brake to prevent accidental starting.
•
Carry the chainsaw by the front handle, with the guide bar pointing
backward.
•
When transporting the chainsaw over long distances, always install the
chain sheath.
•
Allow the chainsaw to cool down completely before storage or
transportation.
28
EN
•
Clean the chainsaw thoroughly after use. Store it indoors in a dry,
locked location, out of the reach of children.
7 Troubleshooting
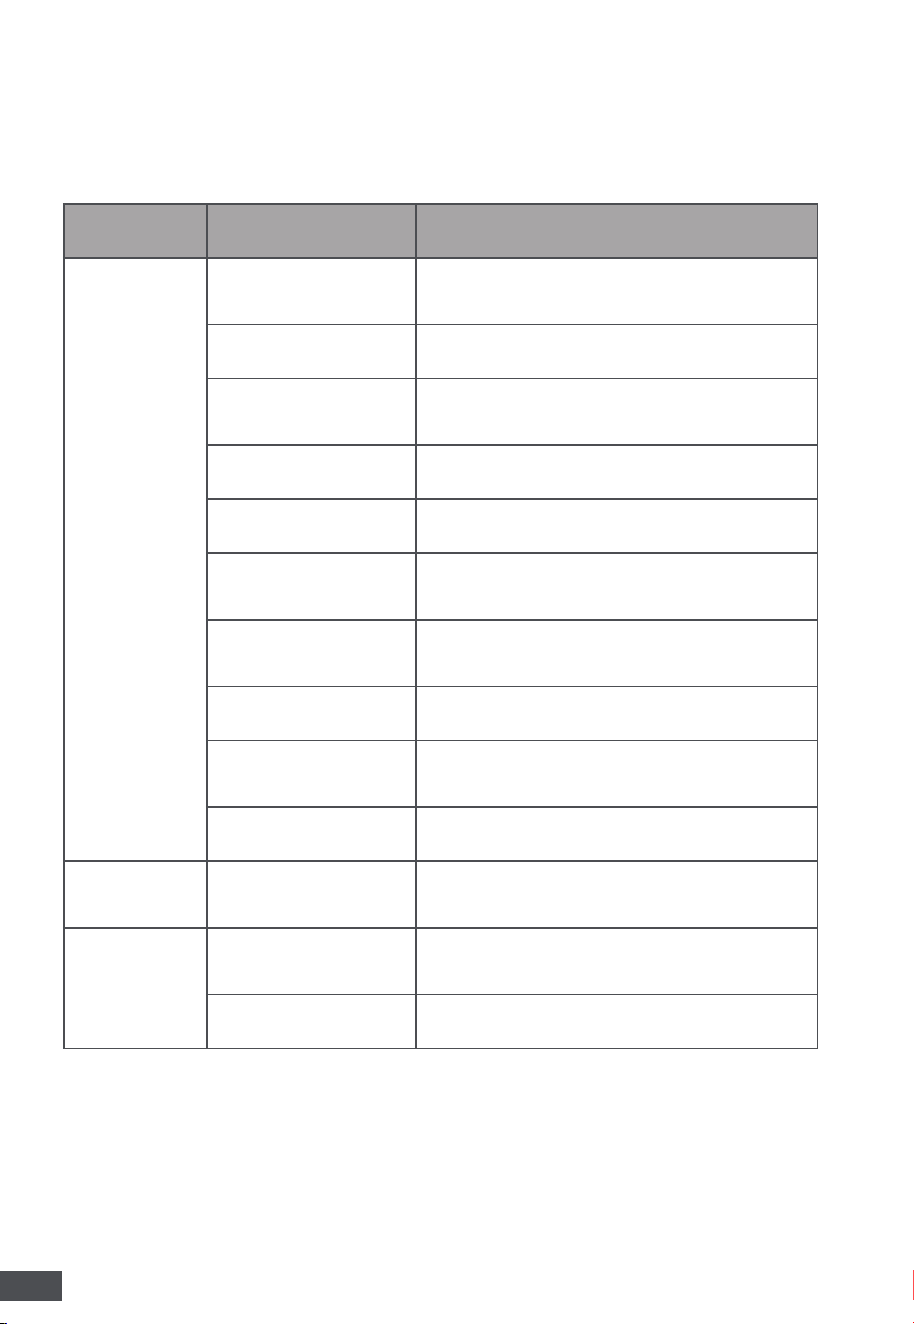
ISSUE CAUSE / ERROR CODE SOLUTION
Chainsaw does
not work.
The battery pack is not
attached or is attached
incorrectly to the tool.
Attach the battery pack securely to the tool.
The battery pack is
depleted.
Charge the battery pack.
The battery pack is
overheated. (Error code
E01)
Allow the battery pack to cool below 65°C
(149°F).
The tool is overheated.
(Error code E07)
Allow the tool to cool below 65°C (149°F).
Chain brake is engaged.
Pull the chain brake lever backward toward the
front handle.
Saw chain is bound in
the wood. (Error code
E06)
Release the trigger, wait for the chain to stop,
carefully remove the saw from the wood, and
then restart.
Debris in chain bar
groove (Error code E06)
Press the saw chain against the wood and
move the chainsaw back and forth to discharge
debris.
Debris in side cover
(Error code E06)
Remove the battery pack, remove the side
cover and clean out debris.
Battery pack
malfunction (Error code
E11)
Please contact MOVA Customer Service for
help.
Tool malfunction. (Error
code E13/E16/E18)
Please contact MOVA Customer Service for
help.
Motor runs but
chain does not
rotate.
Chain does not engage
drive sprocket.
Reinstall the chain, ensuring that the drive links
on the chain are fully seated on the sprocket.
Chain brake
can not be
engaged.
Debris blocks the full
movement of the chain
brake lever.
Clean debris from the external chain brake
mechanism.
Possible chain brake
malfunction.
Please contact MOVA Customer Service for
help.
29
EN
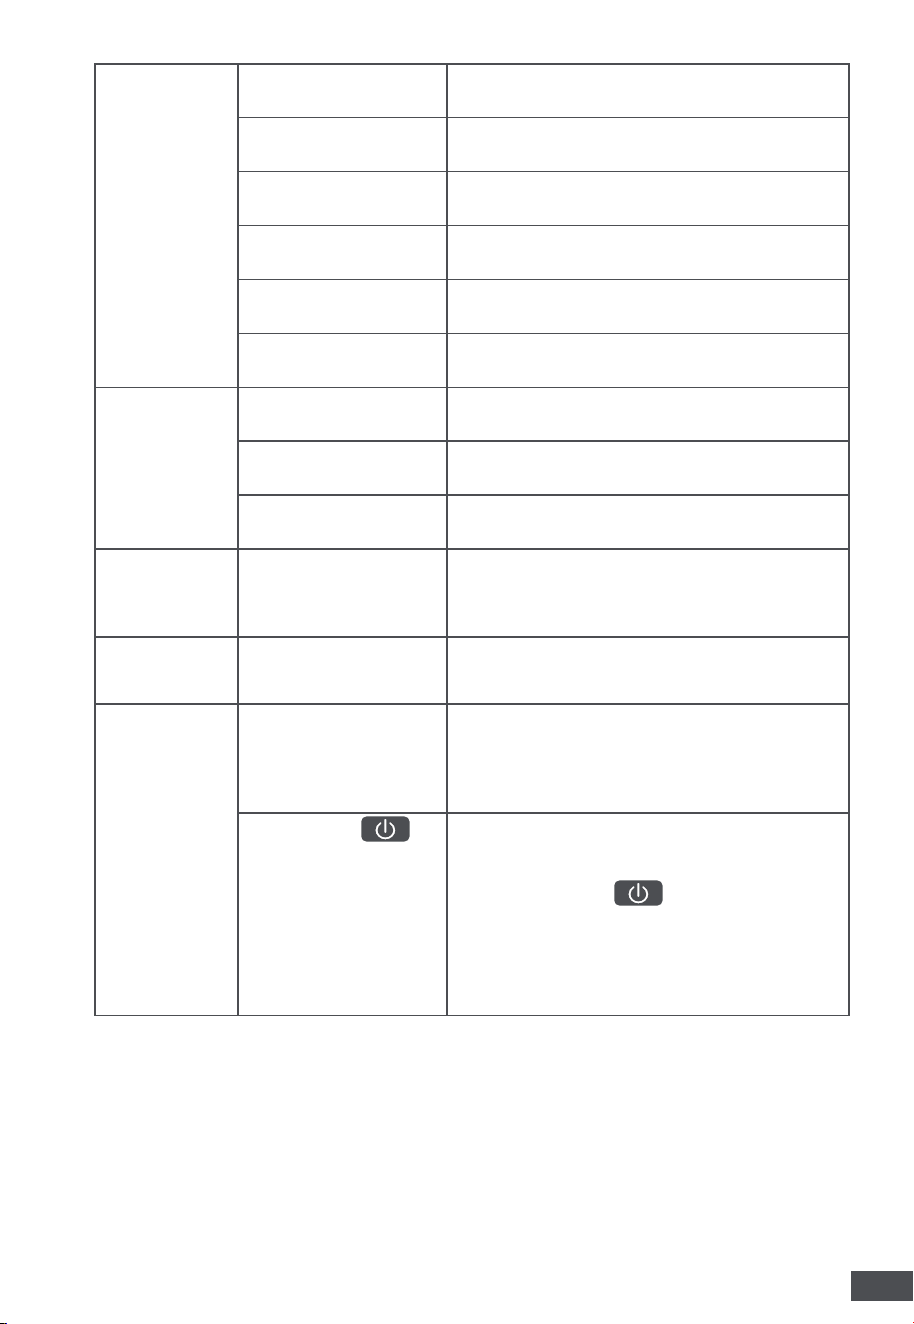
Chainsaw
does not cut
properly.
Insufficient chain
tension
Adjust the chain tension (see
Section 3.2
).
Dull chain Sharpen the chain cutters (see
Section 6.2
).
Chain installed
backwards
Reinstall the saw chain.
Worn chain Replace the chain (see
Section 6.3
)
Dry or excessively
stretched chain
Check the oil level. Refill the oil tank if
necessary.
Chain not in bar groove Reinstall the saw chain.
Bar and chain
run hot and
smoke.
Chain tension is too
tight.
Adjust the chain tension (see
Section 3.2
).
Chain oil tank is empty. Fill with bar and chain lubricant.
Debris in guide bar
groove (Error code E06)
Clear debris from the groove.
Oil pulse does
not work /
Inaccurate AI
oilpulse
Tool malfunction (Error
code E18)
Please contact MOVA Customer Service for
help.
Screen not
functioning
properly
Screen or wire
connection is damaged.
Contact MOVA Customer Service for repair.
Failure to
connect to the
APP
Battery pack is out of
Bluetooth range.
Keep the battery pack within 10 m from the
mobile device. Insert the Bluetooth-paired
battery pack into the tool, or insert the battery
pack first and then connect via Bluetooth.
If holding the on
the battery pack for
2 seconds (until the
Bluetooth indicator light
flashes blue) does not
work, the battery pack
or the tool may already
be paired with another
account.
Press and hold the for 4 seconds (until
the Bluetooth indicator light flashes rapidly in
blue) to re-enter pairing mode.

30
EN
8 Specifications
Model GC618/GC618X*
Rated Voltage 60V
Guide Bar Length 45 cm
Chain Pitch 8.25 mm
Chain Gauge 1.1 mm
Number of Drive Links 70
Chain Speed 26 m/s (Max)
Oil Tank Capacity 330 ml
Recommended Operating
Temperature
-15°C–40°C (5°F–104°F)
Recommended Storage
Temperature
-20°C–70°C (-4°F–158°F)
Weight (without battery pack) 5.0 kg
Ingress Protection Rating IPX4
Measured Sound Power Level LwA
107.4 dB(A)
K=3.0 dB(A)
Sound Pressure Level at Operator's
Position LpA
99 dB(A)
K=3.0 dB(A)
Guaranteed Sound Power Level LwA
(measured according to 2000/14/EC)
112 dB(A)
K=3.0 dB(A)
Vibration Value
Front Handle: 2.355 m/s²
Rear Handle: 3.843 m/s²
K=1.5 m/s²
*X=0-999, A-Z may vary depending on the sales region or package
configuration, with no safety-related changes between these models.
NOTE:
• IPX4 rating is based on the machine and battery being used together as
a system.
• The declared noise emission value(s) and vibration total value(s) are
measured in accordance with a standard test method, and may be used both
for comparing tools and for making a preliminary assessment of exposure.
WARNING:
The noise and vibration emissions during actual use of the
power tool may differ from the declared value(s), depending on how the
tool is used. To protect the operator, hearing protection and gloves should
be worn under actual working conditions.

Manufacturer: Lawnix Technology (Nanjing) Co., Ltd.
Address: Room 501-510, 5/F, Block E (Building 2), No.10 Mozhou East Road,
Jiangning Development Zone, Jiangning District, Nanjing, Jiangsu Province, P.R.China
Join our official Facebook group
where you can discuss your questions with
other fellow users.
Made in China

