1 | Remote Programming Manual
1, 5 & 15 Channel Remote
Programming Manual
Savant_Remote_ProgrammingManual_GL_v1.0_APR-2026
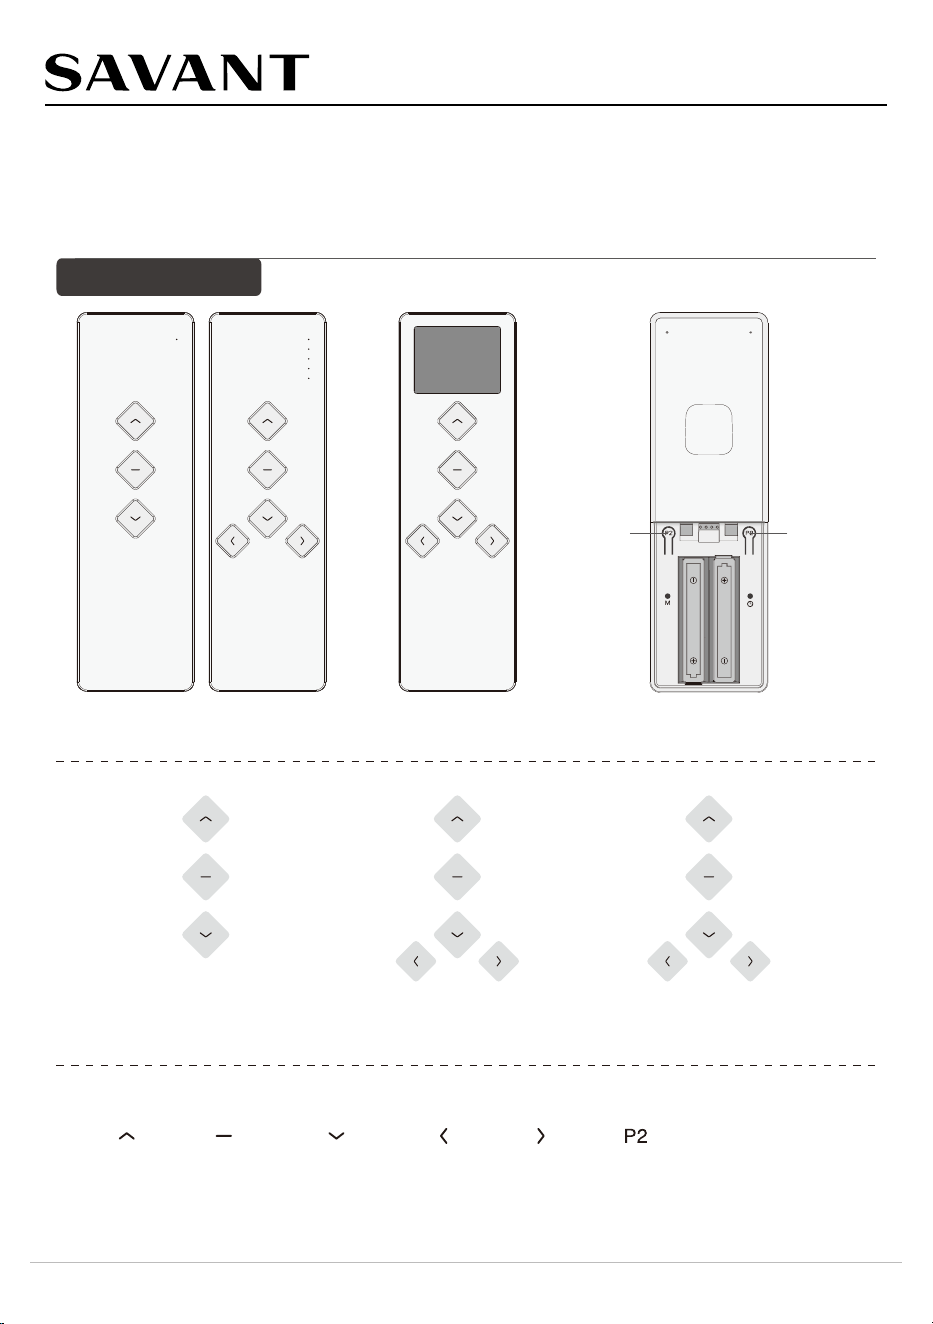
Remote Overview
Key Symbol
CH- P2CH+UP DOWNSTOP
BackFront
(Remote with LED)
Front
(Remote with LCD)
Setting
button
(P2)
Setting
button
(P2)
5 Channel Remote 15 Channel Remote1 Channel Remote
2 | Remote Programming Manual
WARNING: Important safety instructions to be read before installation.
Incorrect installation can lead to serious injury and will void manufacturer’s liability and warranty.
It is important for the safety of people to follow the enclosed instructions. Save these instructions for future reference.
• Do not expose to water, moisture, humid and damp
environments or extreme temperatures.
• Persons (including children) with reduced physical,
sensory or mental capabilities, or lack of experience and
knowledge, should not be allowed to use this product.
• Use or modication outside the scope of this instruction
manual will void warranty.
• Installation and programming to be performed by a
suitably qualied installer.
• Follow installation instructions.
• For use with motorized shading devices.
• Frequently inspect for improper operation.
• Do not use if repair or adjustment is necessary.
• Keep clear of the blind when in operation.
• Replace battery with correctly specied type.
• Non-rechargeable batteries are not to be recharged.
• Do not force discharge, recharge, disassemble, heat
above (manufacturer’s specied temperature rating) or
incinerate.
Doing so may result in injury due to venting, leakage or
explosion resulting in chemical burns.
• Ensure the batteries are installed correctly according to
polarity (+ and -).
• Remove and immediately recycle or dispose of batteries
from equipment not used for an extended period of time
according to local regulations.
Safety Instructions
Compliance Statement
Do not dispose of in general waste.
Please recycle batteries and damaged
electrical products appropriately.
For US Market
Add if mention radio
frequency on eng drw
Obsolete
This device complies with Part 15 of the FCC Rules /
Industry Canada licence-exempt RSS standard(s).
Operation is subject to the following two conditions:
(1) This device may not cause harmful interference, and
(2) This device must accept any interference received,
including interference that may cause undesired operation.
Le présent appareil est conforme aux CNR d’Industrie
Canada applicables aux appareils radio exempts de
licence. L’exploitation est autorisée aux deux conditions
suivantes:
(1) l’appareil ne doit pas produire de brouillage, et
(2) l’utilisateur de l’appareil doit accepter tout brouillage
radioélectrique subi, même si le brouillage est susceptible
d’en compromettre le fonctionnement.
Changes or modications not expressly approved by the
party responsible for compliance could void the user’s
authority to operate the equipment.
This equipment has been tested and found to comply with
the limits for a Class B digital device, pursuant to part 15
of the FCC Rules. These limits are designed to provide
reasonable protection against harmful interference in a
residential installation.
This equipment generates uses and can radiate radio
frequency energy and, if not installed and used in
accordance with the instructions, may cause harmful
interference to radio communications. However, there is
no guarantee that interference will not occur in a particular
installation.
If this equipment does cause harmful interference to radio
or television reception, which can be determined by turning
the equipment off and on, the user is encouraged to try to
correct the interference by one or more of the following
measures:
- Reorient or relocate the receiving antenna.
- Increase the separation between the equipment and
receiver.
- Connect the equipment into an outlet on a circuit different
from that to which the receiver is connected.
- Consult the dealer or an experienced radio/TV technician
for help.
3 | Remote Programming Manual
Press CH+ and
CH- and hold on
Press and hold CH+
and CH- at the same
time for about 3S
+
+
“ ” in
screen
“ ” in
screen
Battery: 3VDC (AAA battery×2) Battery life: >2 years
Radio frequency: 433.92MHz Working temperature: -10°C~50°C
Transmitting power: 10 mW Radio range: Outdoor > 150 meters, Indoor > 40 meters
Note:
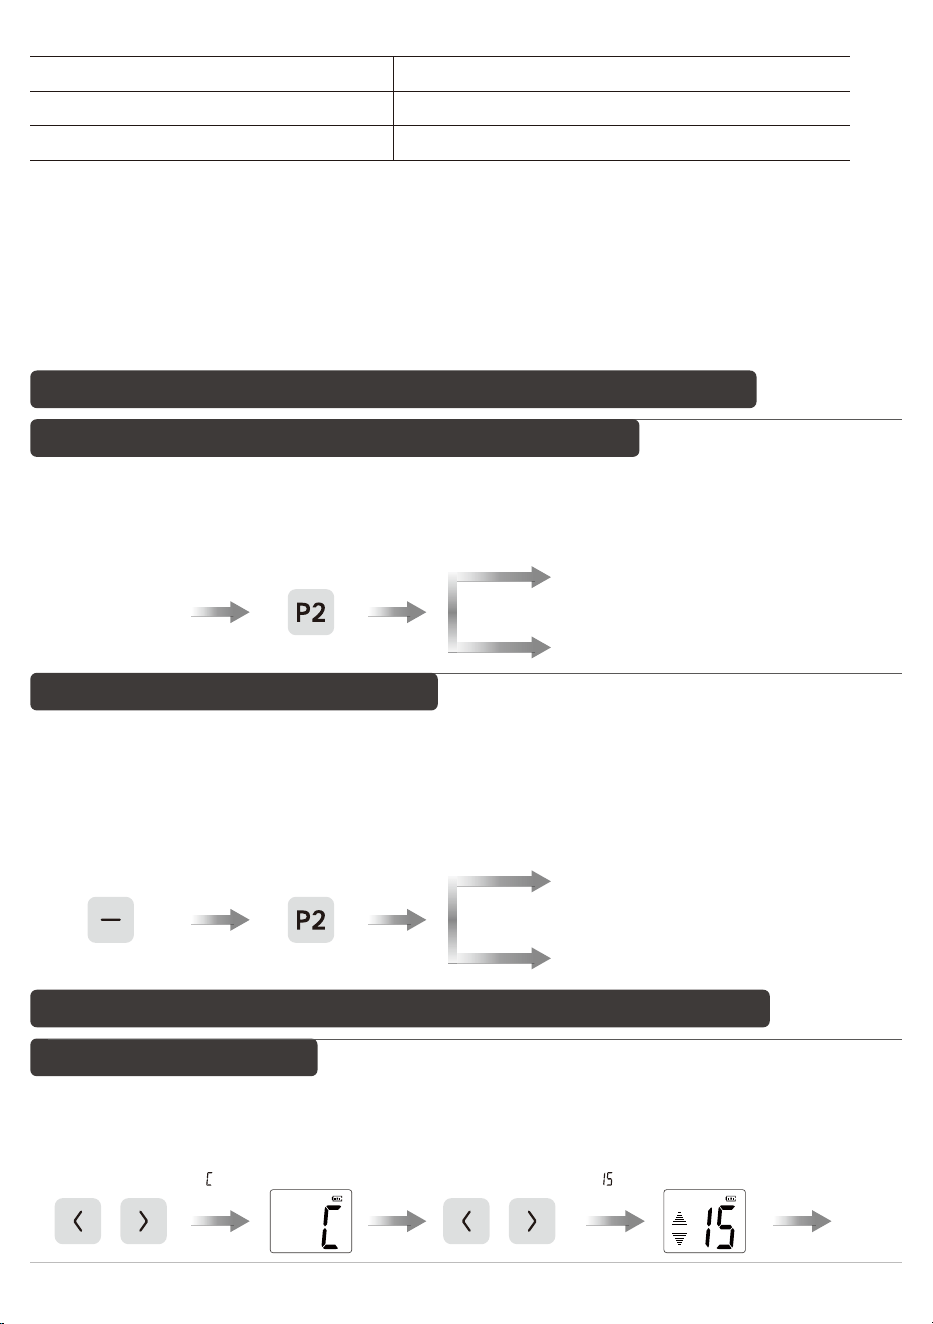
1. Either P2 button on back of Remote can be used.
2. The system will exit the settings and return to normal operation after 10 seconds of no activity.
3. Combo-Key is in unlocking status by factory default. Repeat same operations to switch unlock/lock status.
4. In locked status, the combo-keys don't work; In unlocked status,the combo-key will work normally.
5. If combo-key is locked, the only inuence is that the Remote cannot send signals.
Note:
1. Either P2 button on back of Remote can be used.
2. The factory default mode is Bi-directional mode, repeat the same operation to switch the mode circulary.
Note:
1. In the setting status, press UP or DOWN button to exit quickly.
2. Repeat the same process if you want to adjust the number of channels.
Remote
without
battery
Hold P2 button and
install the battery
LED ashes
once
LED ashes
twice
Uni-directional mode
Bi-directional mode
Press STOP
button more
than 15S
LED
stay
on
P2×1
Slow ashing
for 3S
Quick ashing
for 3S
Locked status, combo-key is invalid
Unlocked status, combo-key is available
Technical specication
Warning
1. Remote couldn't expose to moisture or be striked heavily, or else the Remote life will be affected.
2. During use, if you notice a signicant decrease in the remote control distance, reduced sensitivity, or the low
battery icon illuminating on the screen, please check whether the battery needs to be replaced.
3. When the voltage of DD3002H(HF) are lower than 2.65V, the battery icon will display, indicating low voltage.
4. In uni-directional mode, if you press any button more than 20S, or in bi-directional mode, you press any button for
5S, the Remote will stop sending radio signals.
5. It's forbidden to use different type battery to avoid any dangerous risk.
6. Please dispose of used batteries properly according to the instructions.
The Following Operations 1 and 2 are Applicable to Remotes with LED
1. Switch Between Uni-directional and Bi-directional Mode
2. Lock / Unlock Combo-key Operation
The Following Operations 3, 4, and 5 are Applicable to Remote with LCD
3. Set Number of Channels
4 | Remote Programming Manual
Bi-directional mode
Uni-directional mode
Press STOP
button more
than 15S
Press STOP
button more
than 15S
Combo-key
is unlocked
Combo-key
is locked
Locked
status
Unlocked
status
P2×1
Release
button
Release
button
T<10S
P2×1
T<10S
Hold P2 button and
install the battery
Remote
without
battery
Press CH+ or CH- button
to select the channels
(from 1 to 15)
STOP×1
Valid channel setup
successful
or
“ ” in
screen
“ ” in
screen
“ ” in
screen
“ ” in
screen
“ ” in
screen
“ ” in
screen
“ ” in
screen
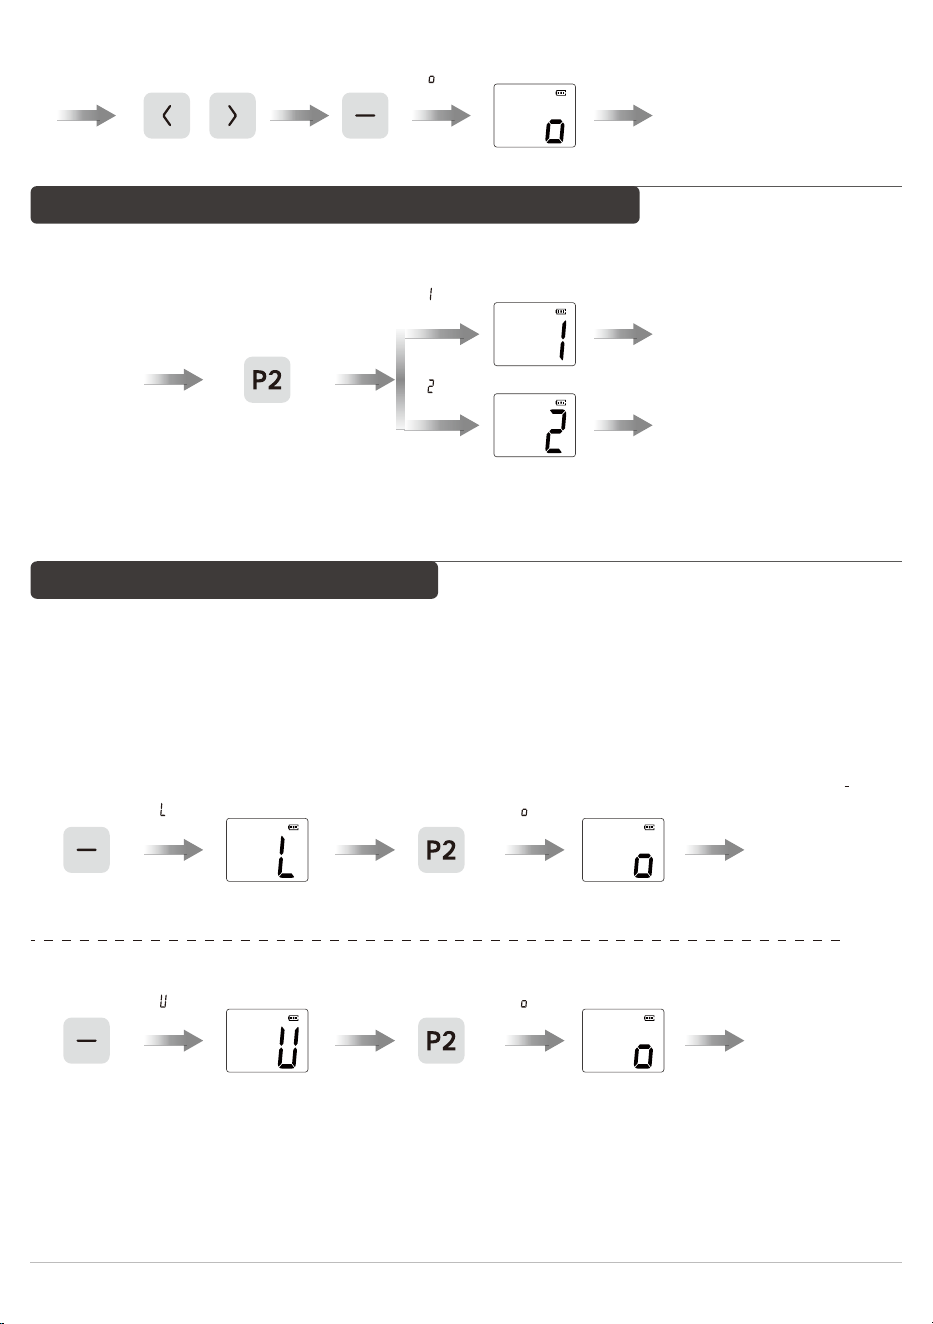
Note:
1. Either P2 button on back of Remote can be used.
2. The factory default mode is Bi-directional mode, repeat the same operation to switch the mode circulary.
Note:
1. Either P2 button on back of Remote can be used.
2. The system will exit the settings and return to normal operation after 10 seconds of no activity.
3. Combo-Key is in unlocking status by factory default. Repeat same operations to switch unlock/lock status.
4. In locked status, the combo-keys don’t work;In unlocked status,the combo-key will work normally.
5. If combo-key is locked, the only inuence is that the Remote cannot send signals.
4. Switch Between Uni-directional and Bi-directional Mode
5. Lock / Unlock Combo-key Operation