

CV
FormNo.3439-829RevA
PowerClear
®
721Snowthrower
ModelNo.38752—SerialNo.406765202andUp
ModelNo.38753—SerialNo.406836564andUp
ModelNo.38756—SerialNo.406728558andUp
Operator'sManual
Introduction
Thismachineisintendedtobeusedbyresidential
homeowners.Itisdesignedprimarilyforremoving
snowfrompavedsurfaces,suchasdrivewaysand
sidewalks,andothersurfacesfortrafconresidential
orcommercialproperties.Itisnotdesignedfor
removingmaterialsotherthansnow,norisitdesigned
forclearinggravelsurfaces.Usingthisproductfor
purposesotherthanitsintendedusecouldprove
dangeroustoyouandbystanders.
Readthisinformationcarefullytolearnhowtooperate
andmaintainyourproductproperlyandtoavoid
injuryandproductdamage.Youareresponsiblefor
operatingtheproductproperlyandsafely.
Visitwww.Toro.comforproductsafetyandoperation
trainingmaterials,accessoryinformation,helpnding
adealer,ortoregisteryourproduct.
Wheneveryouneedservice,genuineT oroparts,or
additionalinformation,contactanAuthorizedService
DealerorToroCustomerServiceandhavethemodel
andserialnumbersofyourproductready.Figure1
identiesthelocationofthemodelandserialnumbers
ontheproduct.Writethenumbersinthespace
provided.
Important:Withyourmobiledevice,youcan
scantheQRcodeontheserialnumberdecal(if
equipped)toaccesswarranty,parts,andother
productinformation.
g291503
Figure1
1.Modelandserialnumberlocation
ModelNo.
SerialNo.
Thismanualidentiespotentialhazardsandhas
safetymessagesidentiedbythesafety-alertsymbol
(Figure2),whichsignalsahazardthatmaycause
seriousinjuryordeathifyoudonotfollowthe
recommendedprecautions.
g000502
Figure2
Safety-alertsymbol
Thismanualuses2wordstohighlightinformation.
Importantcallsattentiontospecialmechanical
informationandNoteemphasizesgeneralinformation
worthyofspecialattention.
Important:Ifyouareusingthismachineabove
1500m(5,000ft)foracontinuousperiod,ensure
thattheHighAltitudeKithasbeeninstalled
sothattheenginemeetsCARB/EPAemission
regulations.TheHighAltitudeKitincreases
engineperformancewhilepreventingspark-plug
fouling,hardstarting,andincreasedemissions.
Onceyouhaveinstalledthekit,attachthe
©2020—TheToro®Company
8111LyndaleAvenueSouth
Bloomington,MN55420
Registeratwww.Toro.com.
OriginalInstructions(EN)
PrintedinMexico
AllRightsReserved
*3439-829*A
high-altitudelabelnexttotheserialdecalonthe
machine.ContactanyAuthorizedToroService
DealertoobtaintheproperHighAltitudeKitand
high-altitudelabelforyourmachine.Tolocate
adealerconvenienttoyou,accessourwebsite
atwww.Toro.comorcontactourToroCustomer
CareDepartmentatthenumber(s)listedinyour
EmissionControlWarrantyStatement.Remove
thekitfromtheengineandrestoretheengineto
itsoriginalfactorycongurationwhenrunningthe
engineunder1500m(5,000ft).Donotoperatean
enginethathasbeenconvertedforhigh-altitude
useatloweraltitudes;otherwise,youcould
overheatanddamagetheengine.
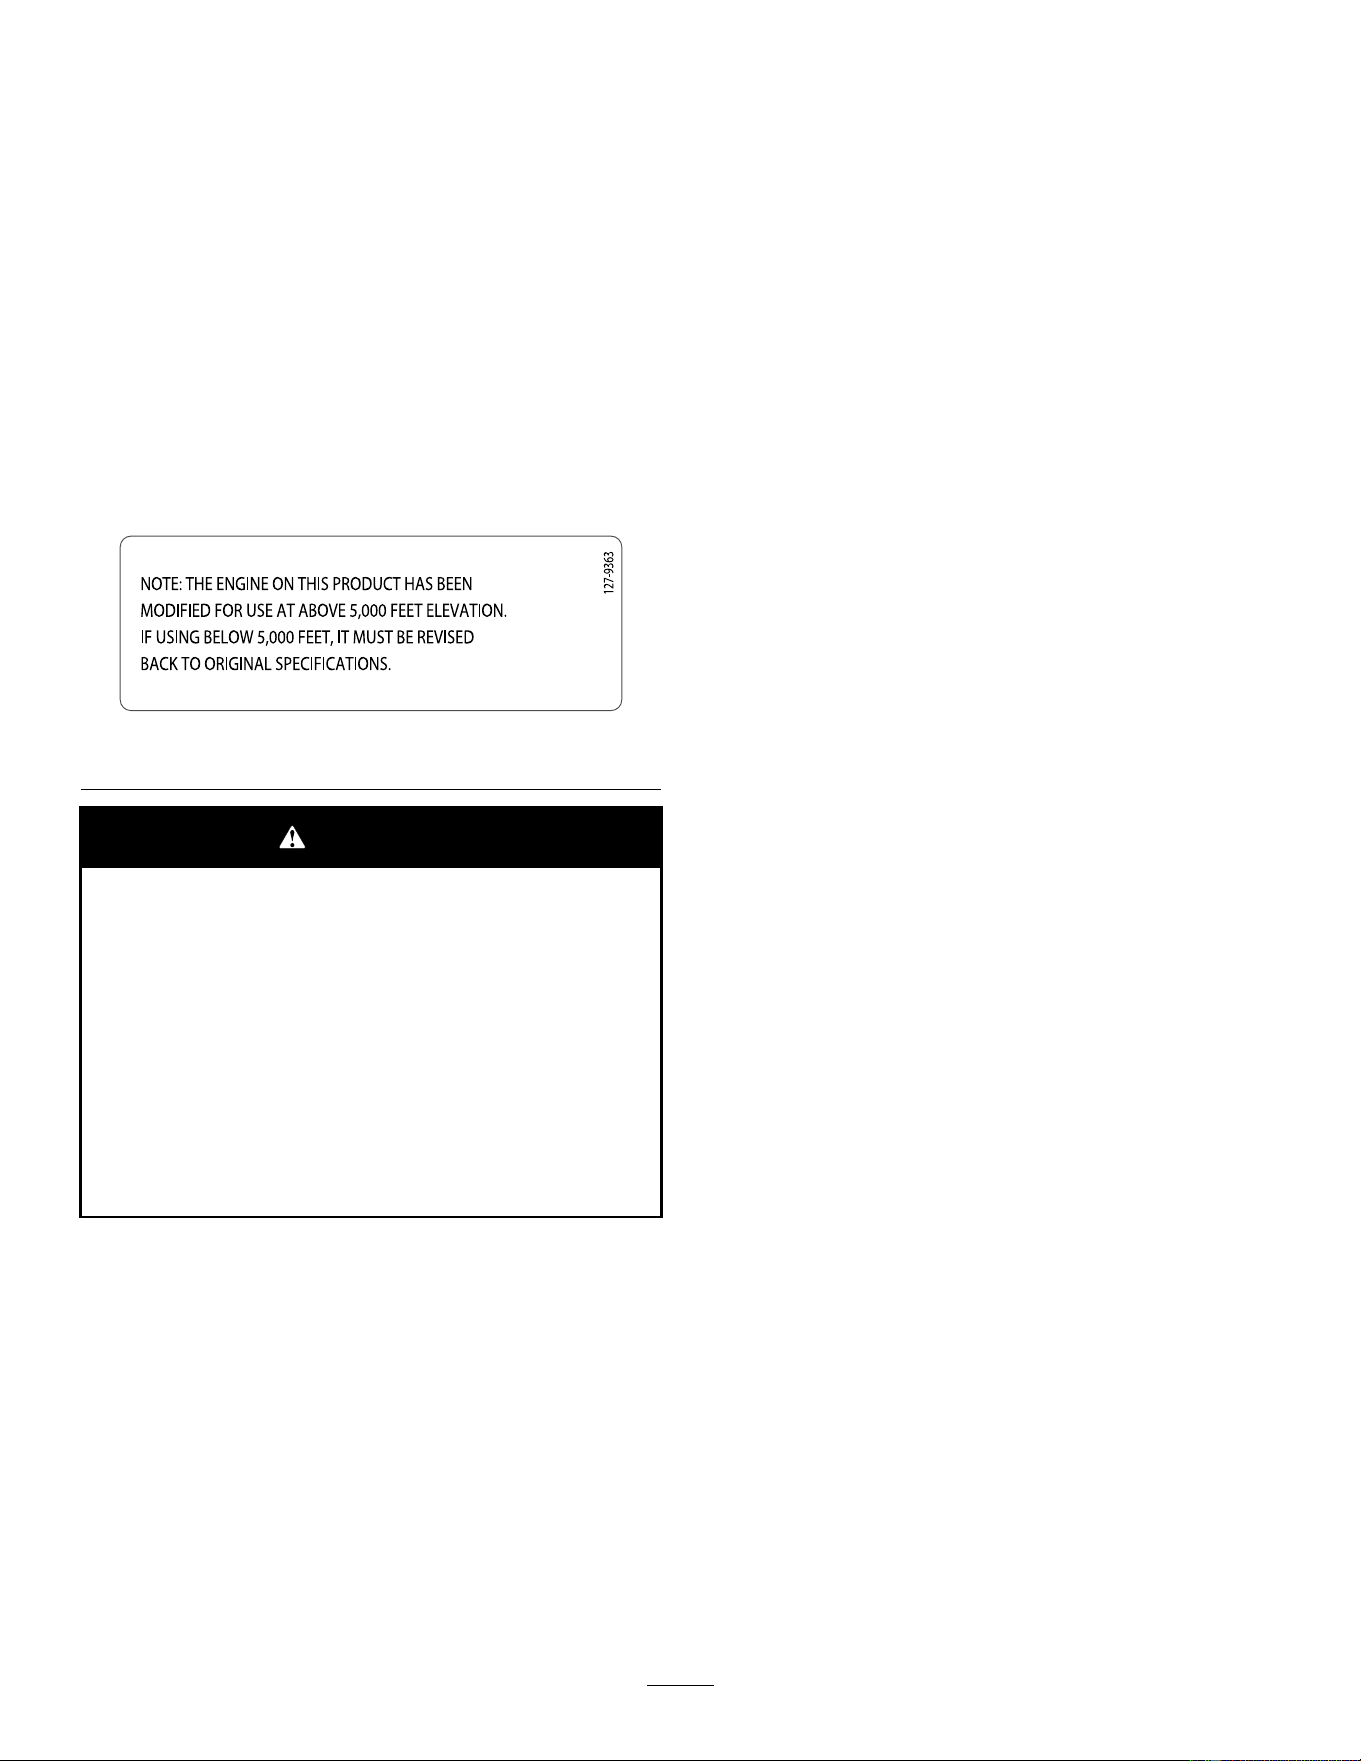
Ifyouareunsurewhetherornotyourmachinehas
beenconvertedforhigh-altitudeuse,lookforthe
followinglabel(Figure3).
decal127-9363
Figure3
WARNING
CALIFORNIA
Proposition65Warning
Theengineexhaustfromthisproduct
containschemicalsknowntotheStateof
Californiatocausecancer,birthdefects,
orotherreproductiveharm.
Useofthisproductmaycauseexposure
tochemicalsknowntotheStateof
Californiatocausecancer,birthdefects,
orotherreproductiveharm.
Contents
Introduction...............................................................1
Safety.......................................................................3
GeneralSafety...................................................3
SafetyandInstructionalDecals..........................4
Setup........................................................................5
1UnfoldingtheHandle.......................................5
2InstallingtheRecoil-StartGuideand
Rope...............................................................5
3InstallingtheDischargeChute.........................5
4FillingtheEnginewithOil.................................6
5AdjustingtheControlCable..............................7
ProductOverview.....................................................8
Specications....................................................8
Attachments/Accessories...................................8
Operation..................................................................9
BeforeOperation...................................................9
BeforeOperationSafety.....................................9
FillingtheFuelT ank............................................9
CheckingtheEngine-OilLevel..........................10
DuringOperation..................................................11
DuringOperationSafety....................................11
StartingtheEngine............................................11
EngagingtheRotorBlades...............................13
DisengagingtheRotorBlades..........................13
ShuttingOfftheEngine.....................................13
AdjustingtheDischargeChuteandChute
Deector.......................................................13
AdjustingtheDischargeChuteandChute
Deector.......................................................13
ClearingaCloggedDischargeChute................14
OperatingTips.................................................14
AfterOperation....................................................14
AfterOperationSafety......................................14
PreventingFreeze-upafterUse........................14
Maintenance...........................................................16
RecommendedMaintenanceSchedule(s)...........16
MaintenanceSafety..........................................16
CheckingandAdjustingtheControl
Cable............................................................16
InspectingtheRotorBlades..............................17
ChangingtheEngineOil...................................18
ReplacingtheSparkPlug.................................19
ReplacingtheDriveBelt...................................19
AdjustingtheQuickShootControl....................20
Storage...................................................................22
StorageSafety..................................................22
StoringtheMachine..........................................22
2

Safety
Thismachinehasbeendesignedinaccordancewith
ANSI/OPEIB71.3specications.
GeneralSafety
Thisproductiscapableofamputatinghandsand
feetandofthrowingobjects.Alwaysfollowallsafety
instructionstoavoidseriouspersonalinjury.
•Readandunderstandthecontentsofthis
Operator’sManualbeforeyoustarttheengine.
Ensurethateveryoneusingthisproductknows
howtouseit,knowshowtoshutofftheengine
quickly,andunderstandsthewarnings.
•Shutofftheenginewheneveryouleavethe
operatingpositionforanyreason.
•Donotputyourhandsorfeetnearmovingparts
onthemachine.
•Donotoperatethemachinewithoutallguards
andothersafetyprotectivedevicesinplaceand
working.
•Keepclearofanydischargeopening.Keep
bystanders,especiallysmallchildren,outofthe
operatingarea.
•Neverallowchildrentooperatethemachine.
3
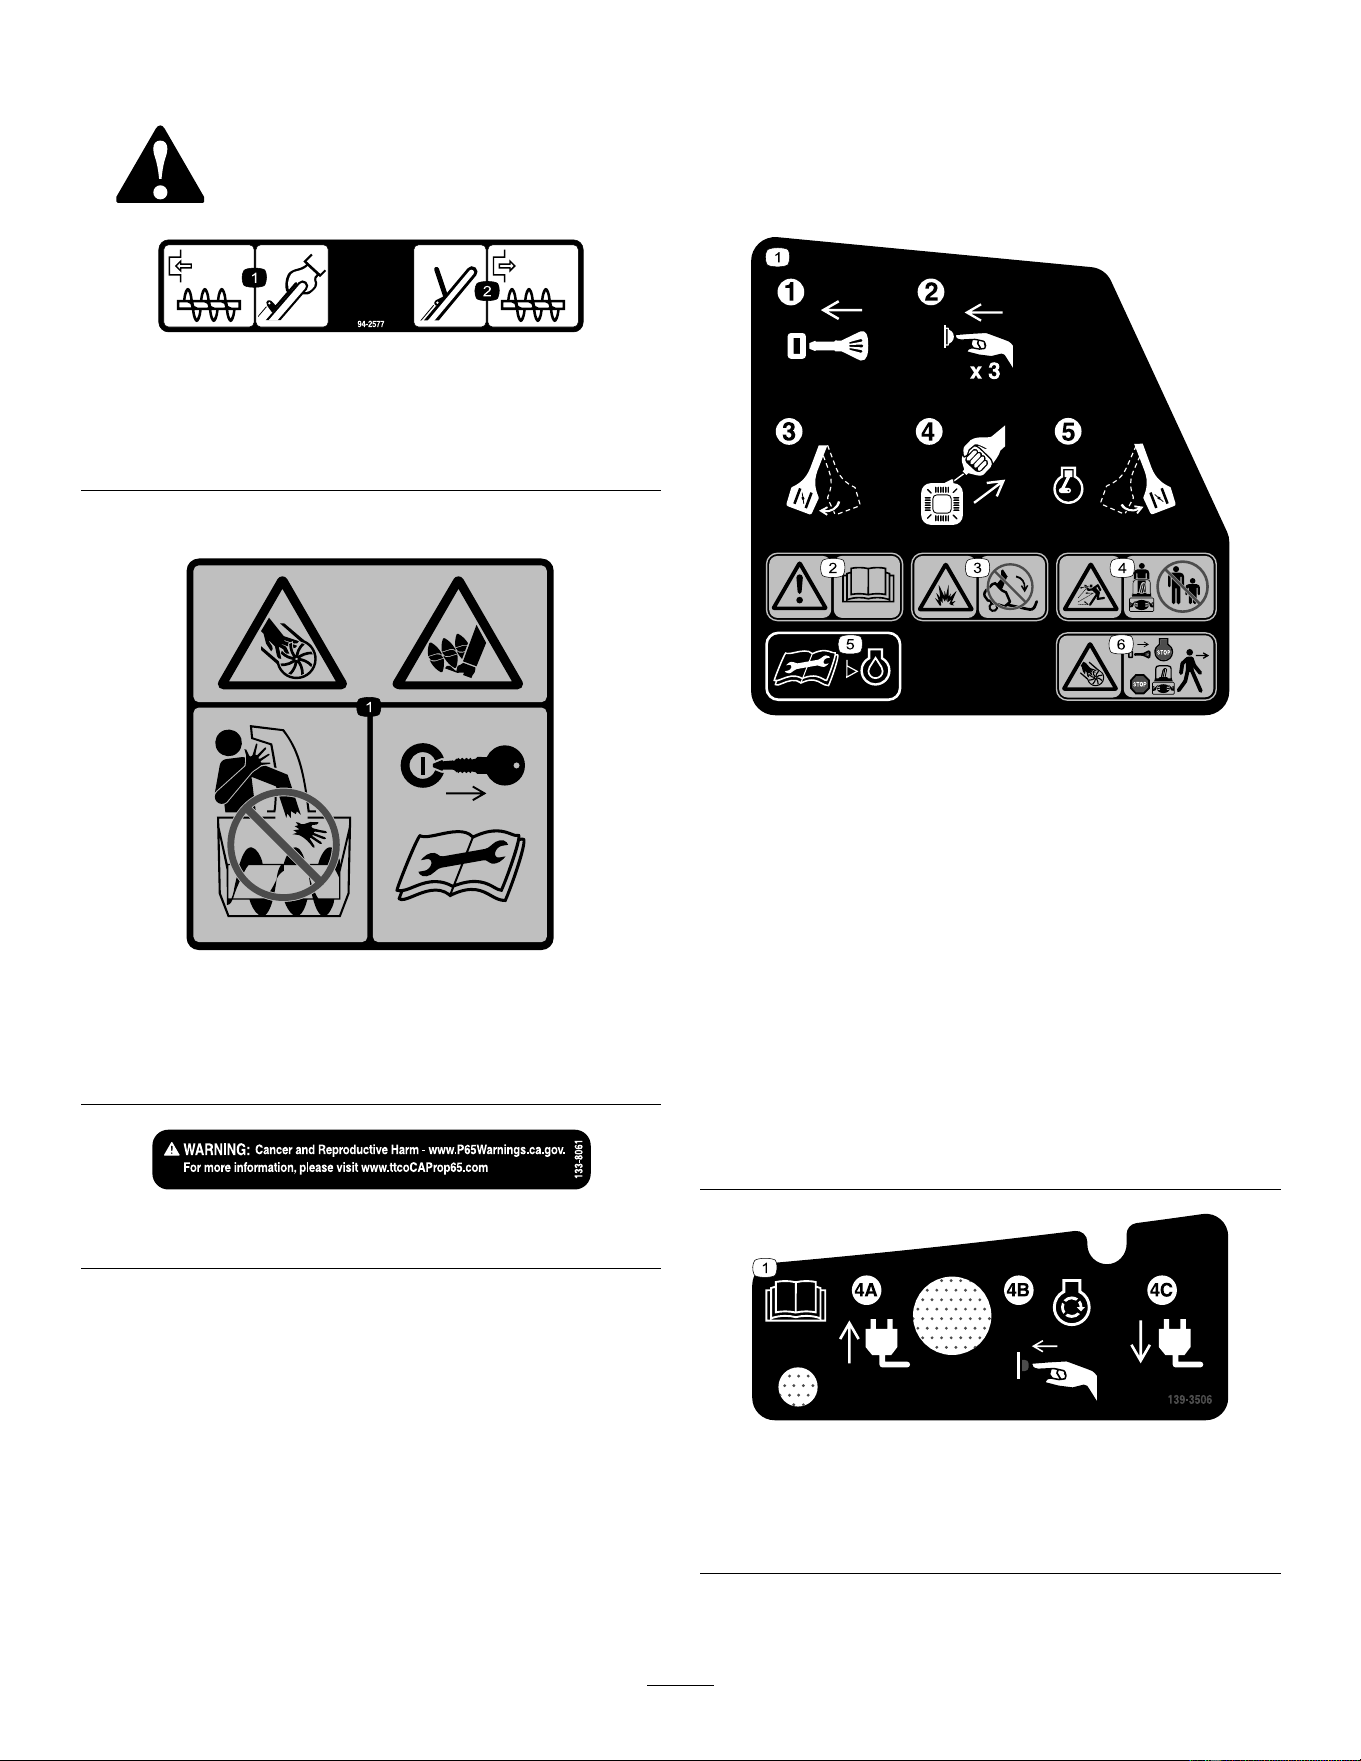
SafetyandInstructionalDecals
Safetydecalsandinstructionsareeasilyvisibletotheoperatorandarelocatednearanyarea
ofpotentialdanger.Replaceanydecalthatisdamagedormissing.
decal94-2577
94-2577
1.Toengagetherotorblades,holdthecontrolbaragainst
thehandle.
2.Todisengagetherotorblades,releasethecontrolbar.
OrderPartNo.117-9121
decal115-5698
115-5698
1.Cutting/dismembermenthazard,impellerandauger—do
notplaceyourhandinthechute;removethekeyandread
theOperator’sManualbeforeperformingmaintenance.
decal133-8061
133-8061
decal139-3505
139-3505
1.Insertthekey,pressthe
primer3times,movethe
chokelevertotheleft,pull
therecoil-starthandle,and
oncetheengineisrunning
movethechokeleverto
theright.
4.Thrownobject
hazard—keepbystanders
away.
2.Warning—readthe
Operator’sManual.
5.ReadtheOperator’s
Manualbeforeservicing
theengineoillevel.
3.Explosionhazard—donot
tipthemachine.
6.Cutting/dismemberment
hazardofthehand,
rotor—shutofftheengine,
removethekey,andwait
forallmovingpartsto
stopbeforeleavingthe
machine.
decal139-3506
139-3506
1.ReadtheOperator’sManual—plugthemachineintopower
theelectricstarter,presstheelectric-startbuttontostartthe
engine,andthenremovetheplugfromthemachine.
4
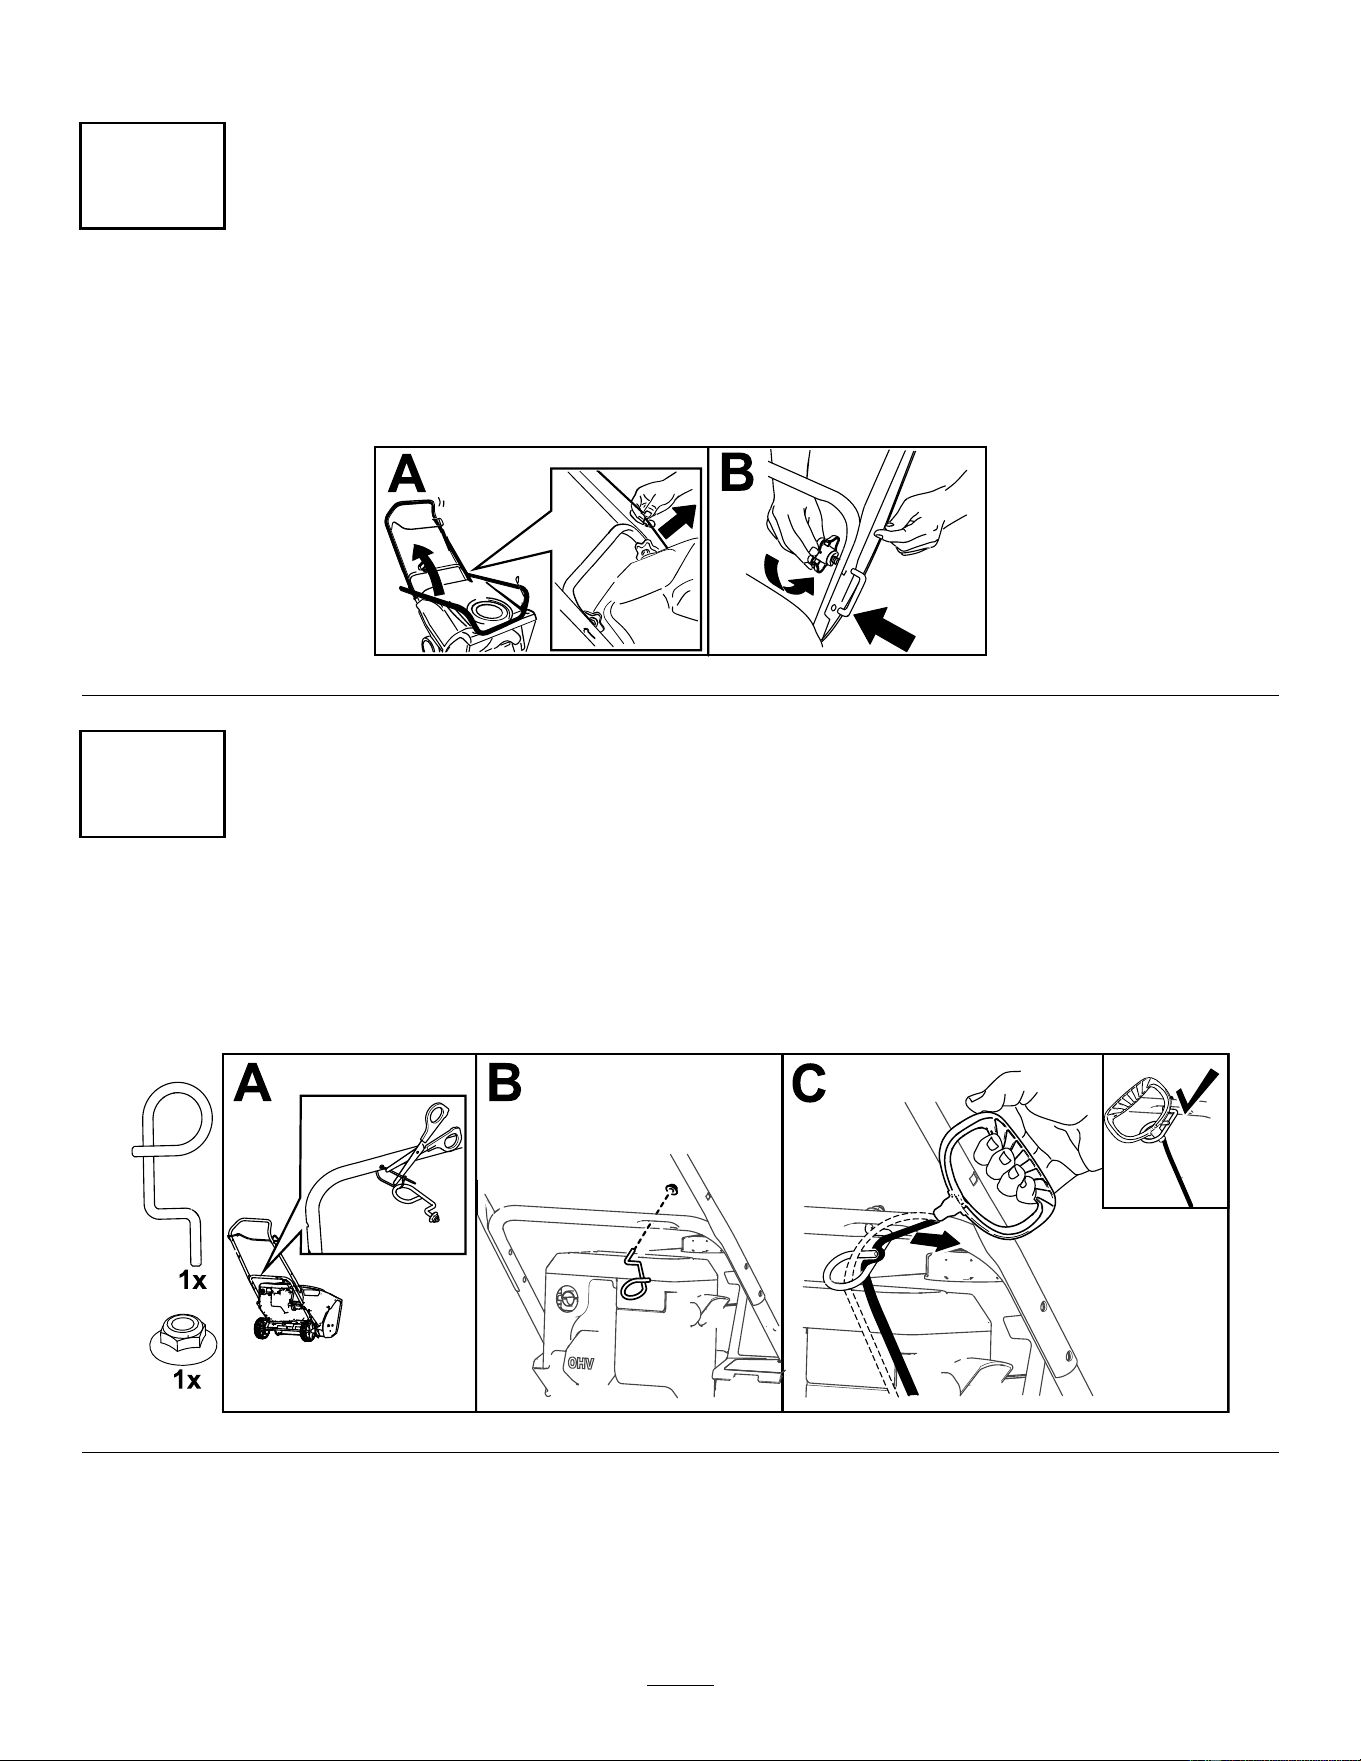
Setup
1
UnfoldingtheHandle
NoPartsRequired
Procedure
g287663
2
InstallingtheRecoil-StartGuideandRope
NoPartsRequired
Procedure
g286483
5
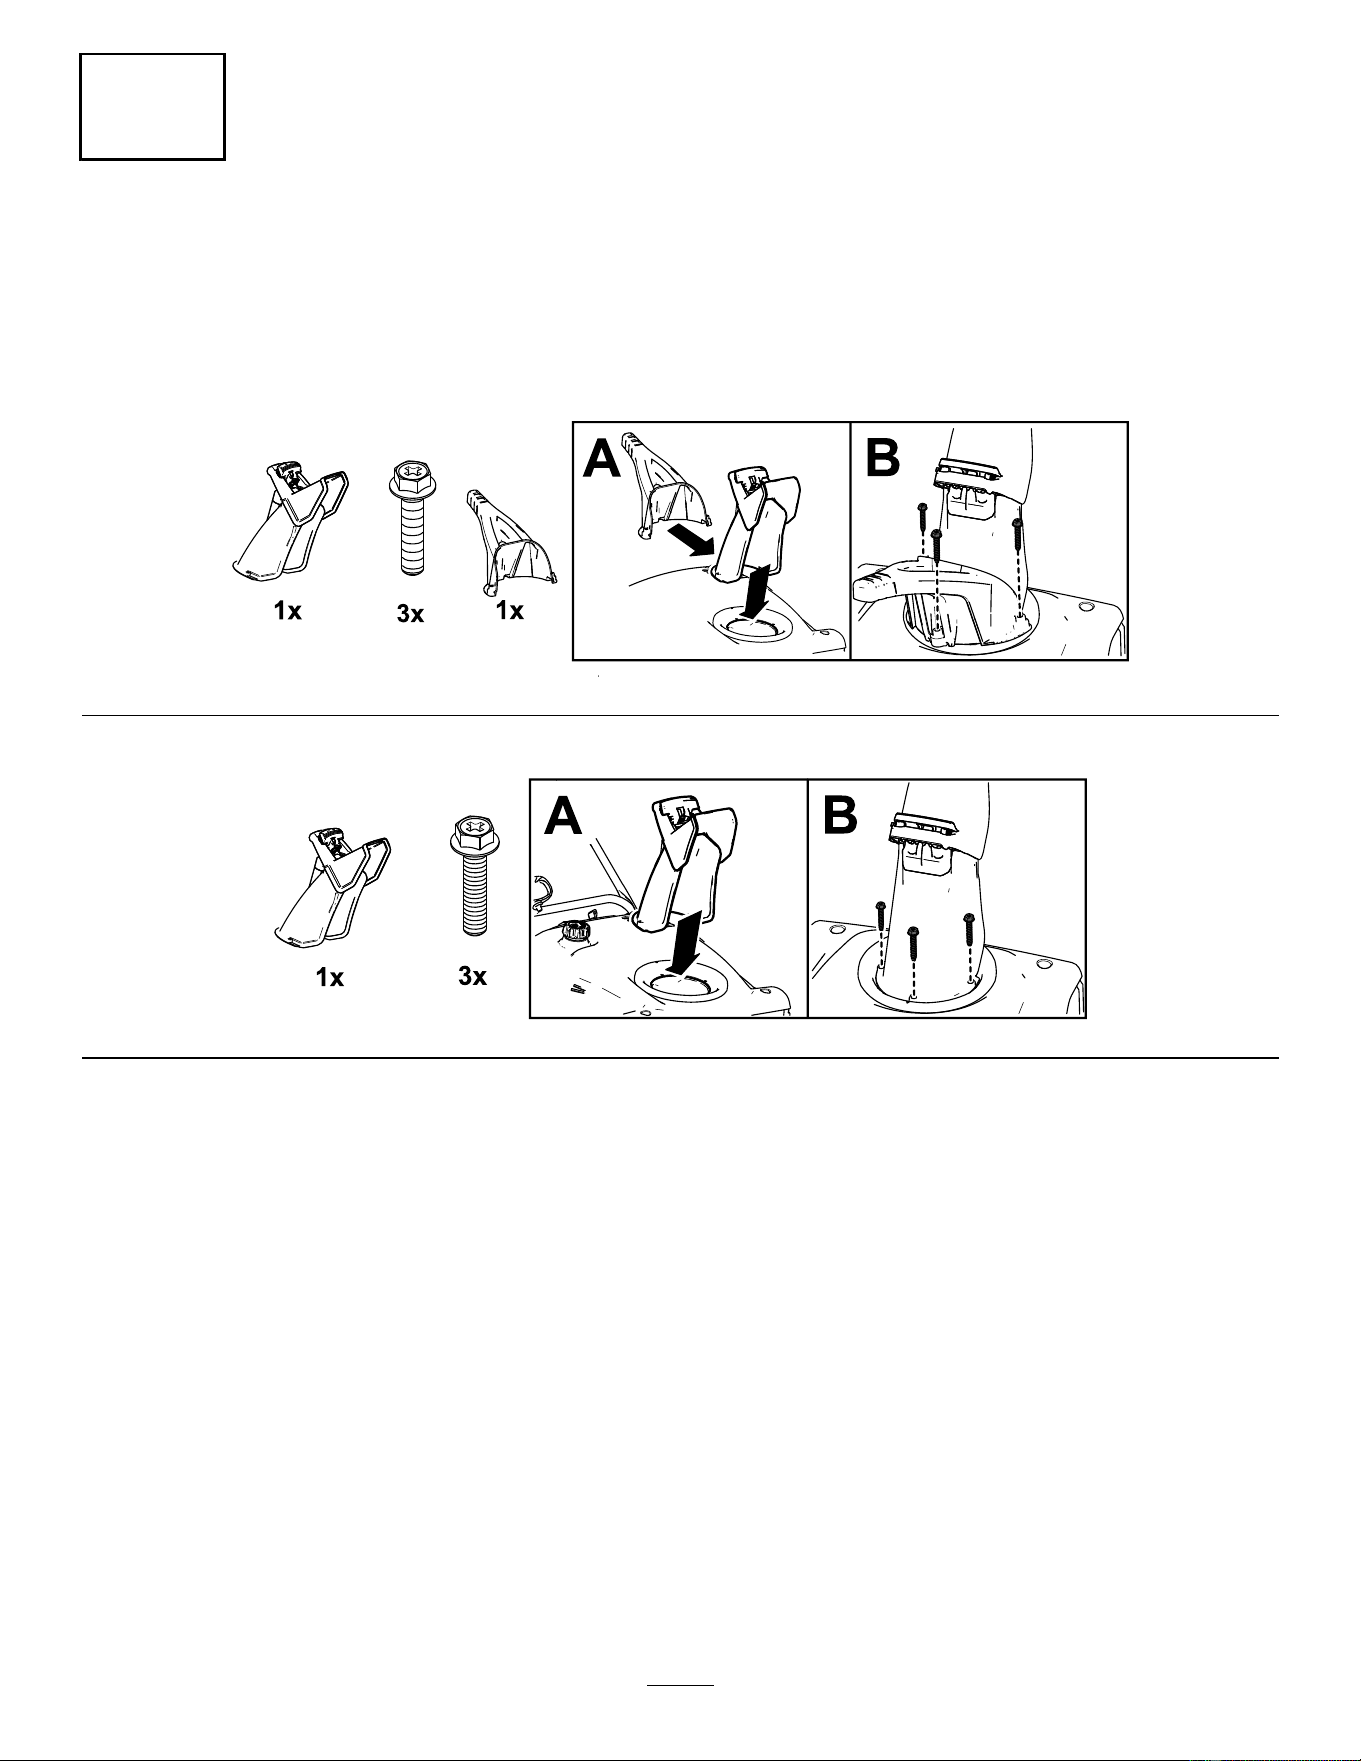
3
InstallingtheDischargeChute
NoPartsRequired
Procedure
Models38752and38753
g291515
Model38756
g262492
6

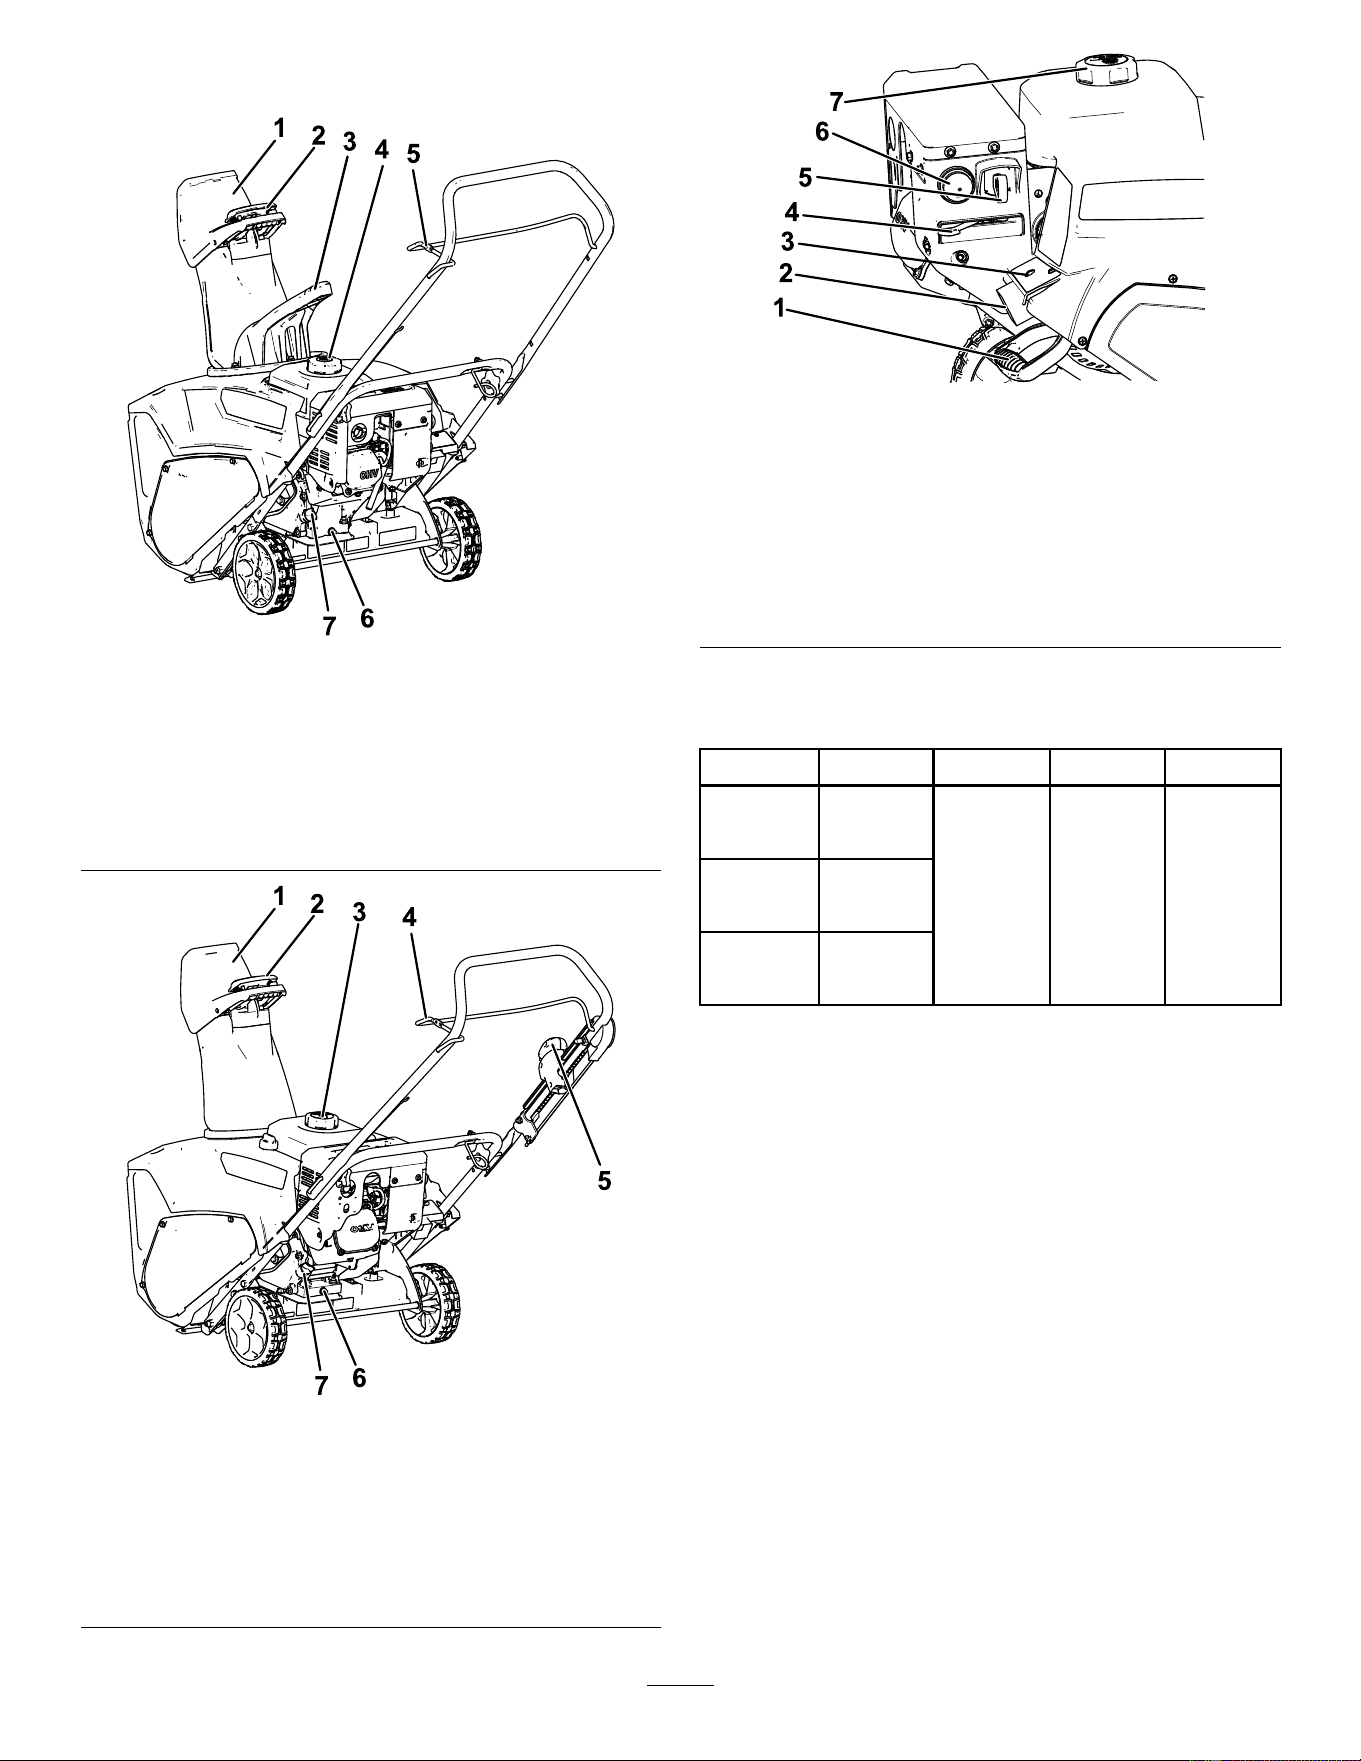
ProductOverview
g291536
Figure9
Models38752and38753
1.Chutedeector5.Controlbar
2.Chute-deectortrigger6.Oil-drainplug
3.Chutehandle7.Oilll/dipstick
4.Fuel-tankcap
g280271
Figure10
Model38756
1.Chutedeector5.QuickShoot™control
2.Chute-deectortrigger6.Oil-drainplug
3.Fuel-tankcap
7.Oilll/dipstick
4.Controlbar
g280282
Figure11
1.Recoil-starthandle5.Key
2.Electric-startplug-in
(electric-startmodelsonly)
6.Primer
3.Electric-startbutton
(electric-startmodels
only)
7.Fuel-tankcap
4.Choke
Specications
ModelWeightLengthWidthHeight
38kg
38752
(84lb)
38kg122cm54cm107cm
38753
(84lb)
39kg
38756
(86lb)
(48
inches)
(21
inches)
(42
inches)
Attachments/Accessories
AselectionofT oroapprovedattachmentsand
accessoriesisavailableforusewiththemachine
toenhanceandexpanditscapabilities.Contact
yourAuthorizedServiceDealerorauthorizedT oro
distributororgotowww.Toro.comforalistofall
approvedattachmentsandaccessories.
Toensureoptimumperformanceandcontinuedsafety
certicationofthemachine,useonlygenuineToro
replacementpartsandaccessories.Replacement
partsandaccessoriesmadebyothermanufacturers
couldbedangerous,andsuchusecouldvoidthe
productwarranty.
8
Operation
Note:Determinetheleftandrightsidesofthe
machinefromthenormaloperatingposition.
BeforeOperation
BeforeOperationSafety
GeneralSafety
•Forelectric-startmodelsonly:Useextension
cordsandreceptaclesasspeciedinthemanual.
Inspecttheelectricalcordbeforepluggingitinto
apowersource.Ifthecordisdamaged,replace
it.Unplugthepowercordwheneveryouarenot
startingthemachine.
•Wearappropriateclothing,includingeye
protection;longpants;substantial,slip-resistant
footwear;andhearingprotection.Tiebacklong
hair,securelooseclothing,anddonotwearloose
jewelry.
•Thoroughlyinspecttheareawhereyouwillusethe
machine,andremovealldoormats,sleds,boards,
wires,andotherforeignobjects.
•Ifashield,safetydevice,ordecalisdamaged,
illegible,ormissing,repairorreplaceitbefore
beginningoperation.Also,tightenanyloose
fasteners.
FuelSafety
Fuelisextremelyammableandexplosive.Areor
explosionfromfuelcanburnyouandothers.
•Topreventastaticchargefromignitingthefuel,
placethecontainerand/ormachineontheground
beforelling,notinavehicleoronanobject.
•Fillthefueltankoutdoorswhentheengineiscold.
Replacethefuelcapsecurelyandwipeupspills.
•Donothandlefuelwhensmokingoraroundan
openameorsparks.
•Storefuelinanapprovedfuelcontainer,outofthe
reachofchildren.
•Whenfuelisinthetank,tipthemachineonlyas
directedintheinstructions.
•Ifyouspillfuelonyourclothing,changeyour
clothingimmediately.
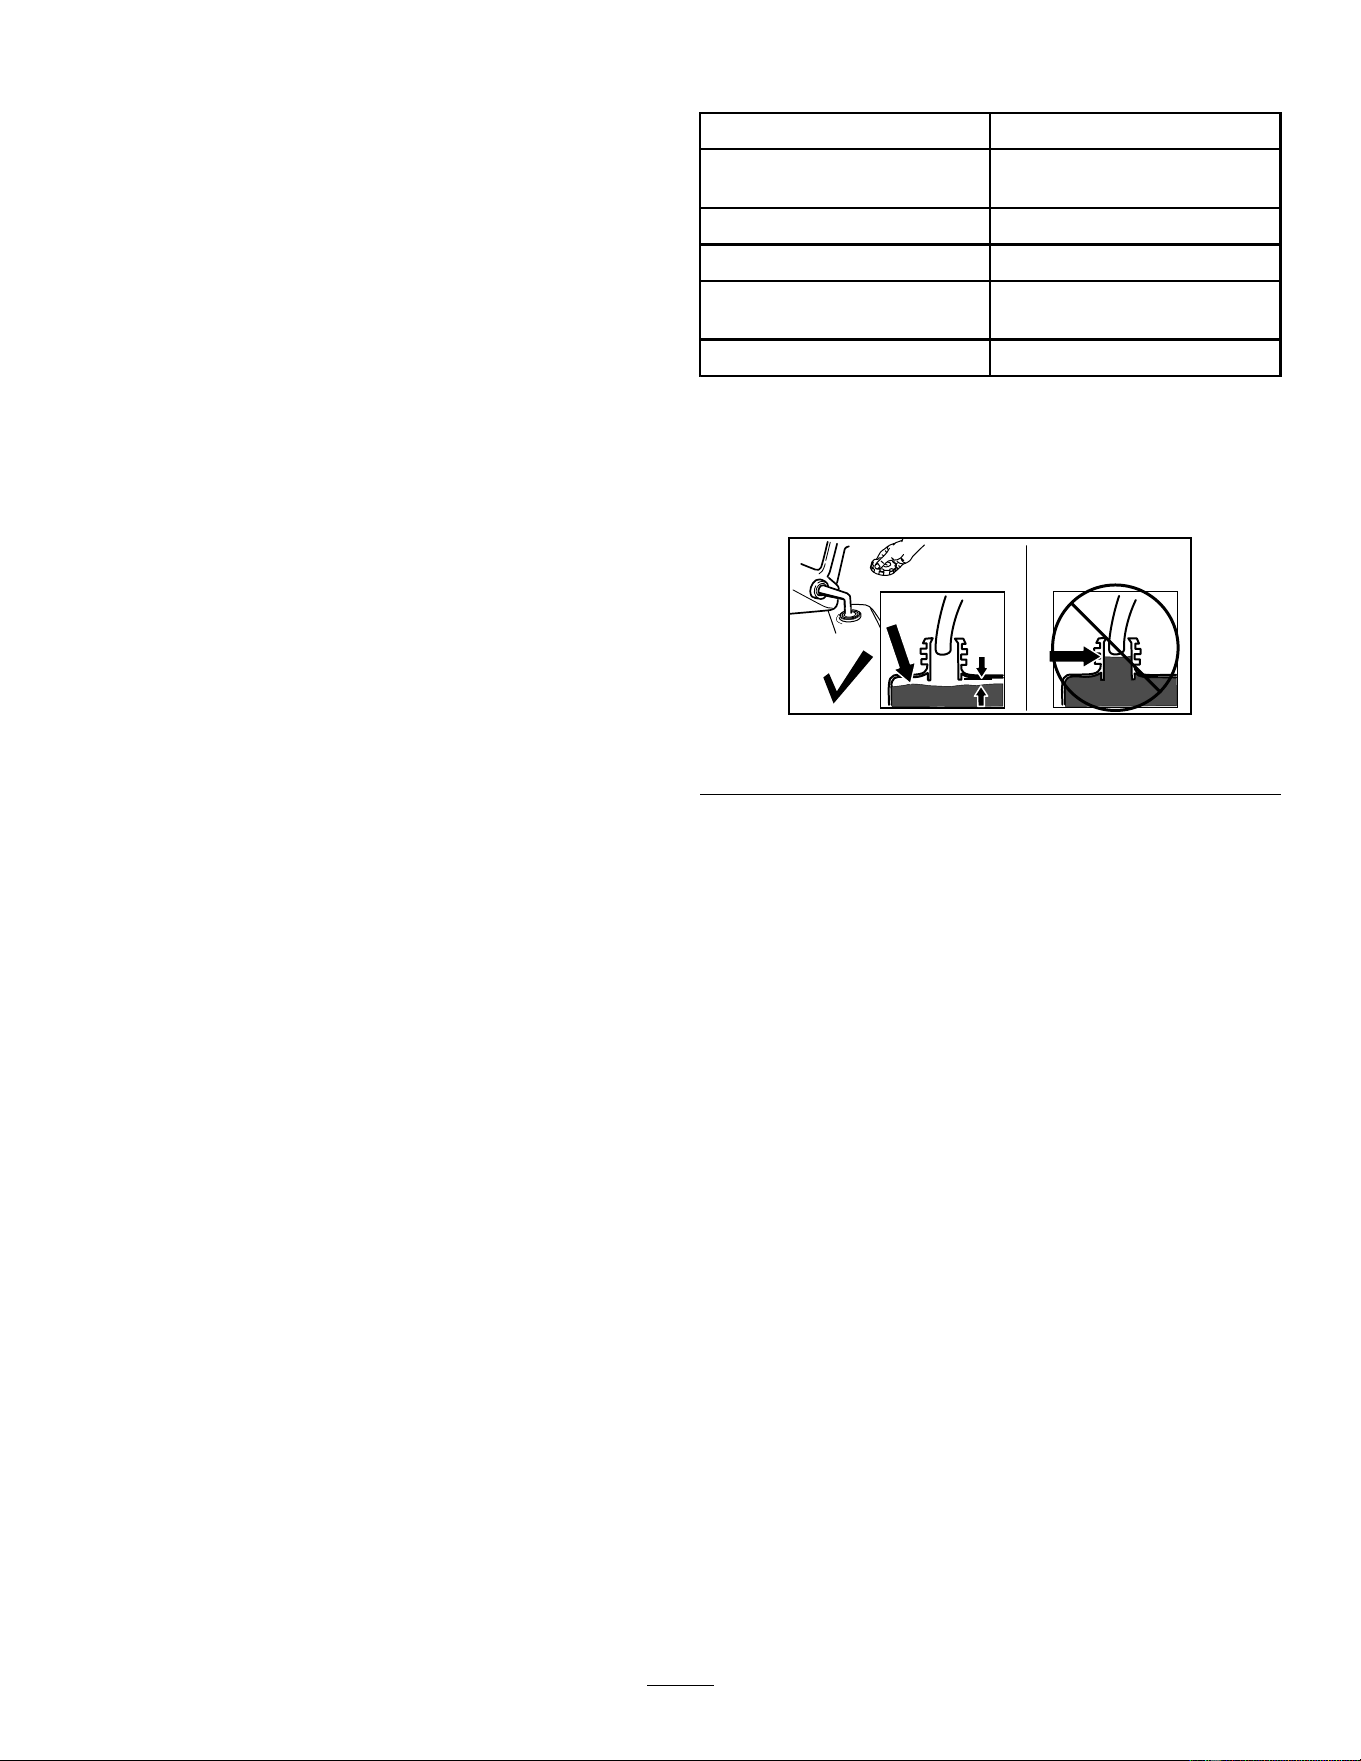
FillingtheFuelTank
TypeUnleadedgasoline
Minimumoctanerating
87(US)or91(research
octane;outsidetheUS)
Ethanol
Nomorethan10%byvolume
MethanolNone
MTBE(methyltertiarybutyl
ether)
Lessthan15%byvolume
OilDonotaddtothefuel
Useonlyclean,fresh(nomorethan30daysold),fuel
fromareputablesource.
FillthefueltankasshowninFigure12;donotll
abovethebottomofthefueltankneck.
g216203
Figure12
Important:Forbestresults,purchaseonlythe
quantityoffuelthatyouexpecttousein30days.
Otherwise,addfuelstabilizer/conditionertofresh
fuelasdirectedbythefuel-stabilizer/conditioner
manufacturer.
9
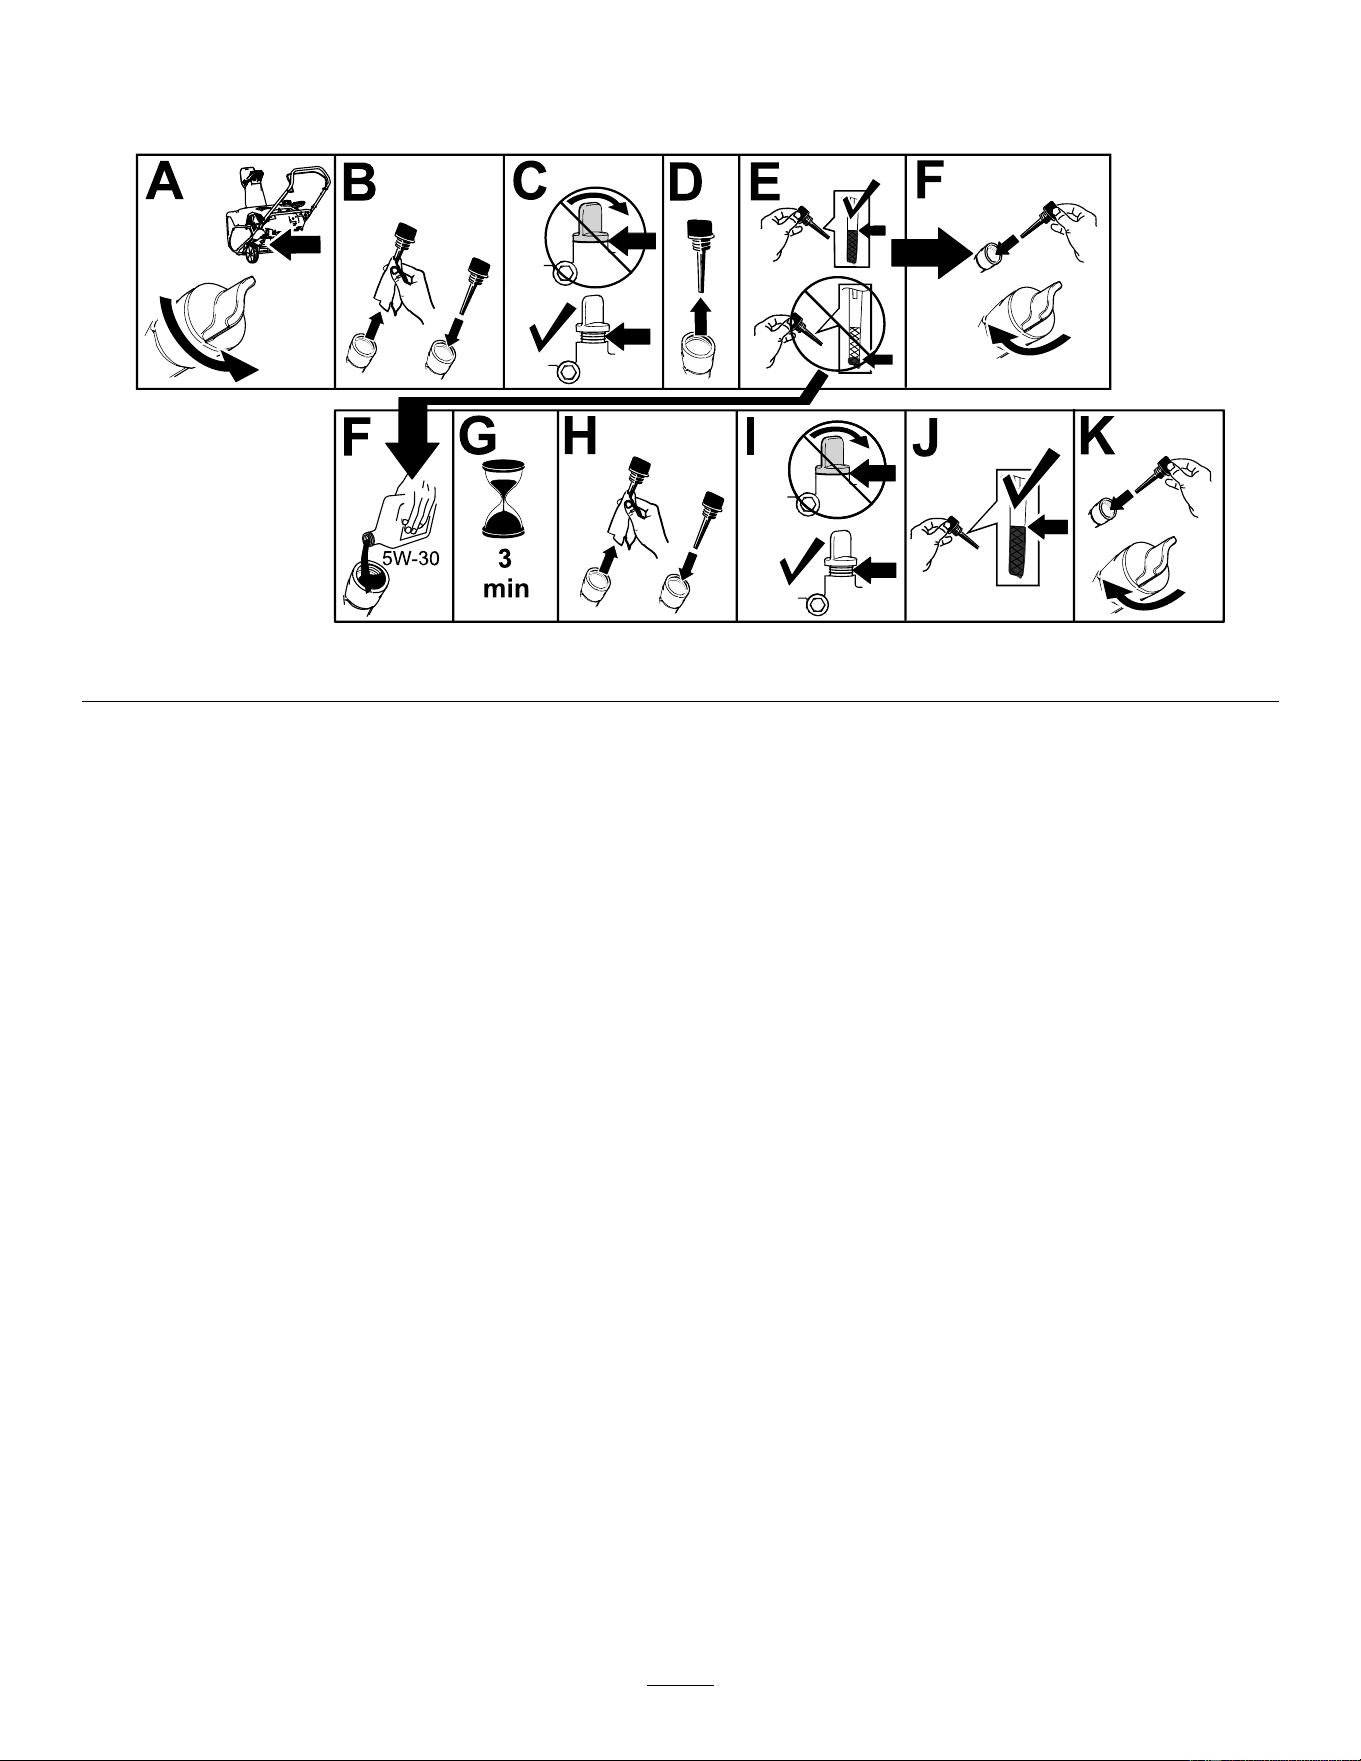
CheckingtheEngine-OilLevel
ServiceInterval:Beforeeachuseordaily—Checktheengine-oillevelandaddoilifnecessary.
g293393
Figure13
10

DuringOperation
DuringOperationSafety
GeneralSafety
•Shutofftheenginebeforeuncloggingthe
machineandalwaysuseastickorthe
snow-cleanouttool(ifprovided).
•Staybehindthehandlesandawayfromthe
dischargeopeningwhileoperatingthemachine.
Keepyourface,hands,feet,andanyotherpart
ofyourbodyorclothingawayfrommovingor
rotatingparts.
•Neverdirectthedischargetowardpeopleorareas
wherepropertydamagecanoccur.
•Useyourfullattentionwhileoperatingthe
machine.Donotengageinanyactivitythat
causesdistractions;otherwise,injuryorproperty
damagemayoccur.
•Exercisecautiontoavoidslippingorfalling,
especiallywhenoperatingthemachineinreverse.
•Alwaysbesureofyourfooting,andkeeparm
holdonthehandles.Walk;neverrun.
•Exerciseextremecautionwhenoperatingthe
machineonaslope.
•Donotoperatethemachinewithoutgoodvisibility
orlight.
•Lookbehindandusecarewhenbackingupthe
machine.
•Whennotactivelyclearingsnow,disengagepower
totheauger.
•Exerciseextremecautionwhenoperatingthe
machineonwalksorroads.Stayalertforhidden
hazardsortrafc.
•Neverattempttomakeanyadjustmentswhile
theengineisrunning,exceptasdirectedinthe
instructions.
•Afterstrikingaforeignobject,shutofftheengine,
removethekey,andinspectthemachinefor
damage.Repairanydamagebeforestartingthe
machine.
•Ifthemachinestartstovibrateabnormally,shutoff
theengineandcheckimmediatelyforthecause.
•Donotruntheengineindoors;exhaustfumesare
dangerous.
•Donotoverloadthemachinecapacityby
attemptingtoclearsnowattoofastarate.
•Shutofftheenginewheneveryouleavethe
operatingposition,beforeclearingorunclogging
thecollector,rotor,ordischargechute,andwhen
makinganyrepairs,adjustments,orinspections.
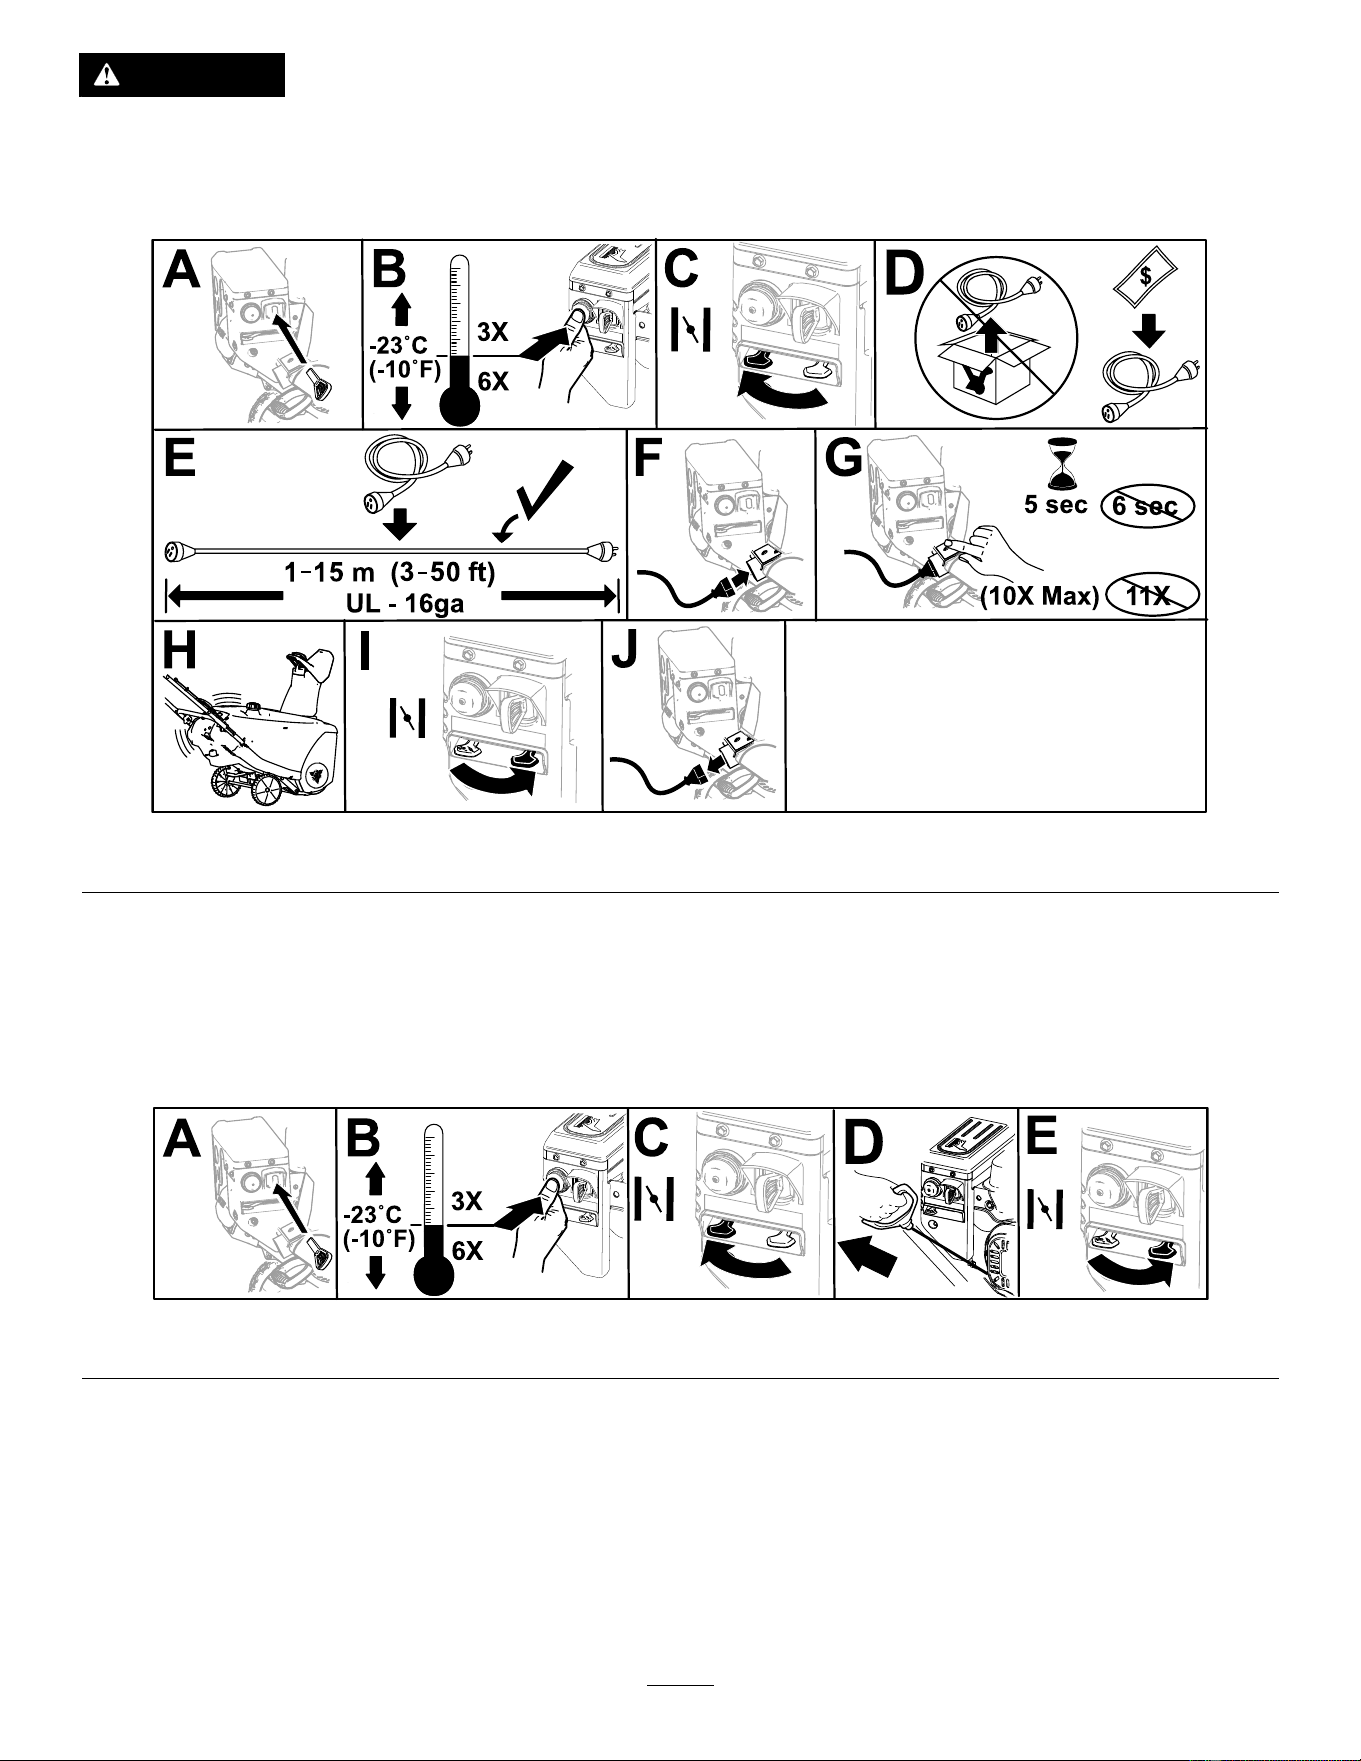
StartingtheEngine
UsingElectricStart
Electric-startmodelsonly
Note:Removeyourglovewhenyoupushintheprimersothataircannotescapefromtheprimerhole.
Important:Donotusetheprimerorthechokeiftheenginehasbeenrunningandishot.Excessive
primingmayoodtheengineandpreventitfromstarting.
Tousetheelectricstarter(electric-startmodelsonly),connectapowercordtotheelectric-startplug-inrst
andthentoagroundfaultcircuitinterrupter(GFCI)poweroutlet.UseonlyaUL-listed,16-gaugepowercord
recommendedforoutdoorusethatisnotlongerthan15m(50ft).
WARNING
Theelectricalcordcanbecomedamaged,causingashockorre.
Thoroughlyinspecttheelectricalcordbeforepluggingitintoapowersource.Ifthecord
isdamaged,donotuseit.Replaceorrepairthedamagedcordimmediately.Contactan
AuthorizedServiceDealerforassistance.
Important:Runtheelectricstarternomorethan10timesatintervalsof5secondson,then5seconds
off.Runningtheelectricstarterextensivelycanoverheatanddamageit.Iftheenginedoesnotstart
afterthisseriesofattempts,waitatleast40minutestoallowthestartertocoolbeforeattemptingto
startitagain.Iftheenginedoesnotstartafterthesecondseriesofattempts,takethemachinetoan
AuthorizedServiceDealerforservice.
11
CAUTION
Ifyouleavethemachinepluggedintoapowersource,someonecaninadvertentlystartthe
machineandinjurepeopleordamageproperty(electric-startmodelsonly).
Unplugthepowercordwheneveryouarenotstartingthemachine.
g327424
Figure14
UsingRecoilStart
Note:Removeyourglovewhenyoupushintheprimersothataircannotescapefromtheprimerhole.
Important:Donotusetheprimerorthechokeiftheenginehasbeenrunningandishot.Excessive
primingmayoodtheengineandpreventitfromstarting.
g280295
Figure15
12
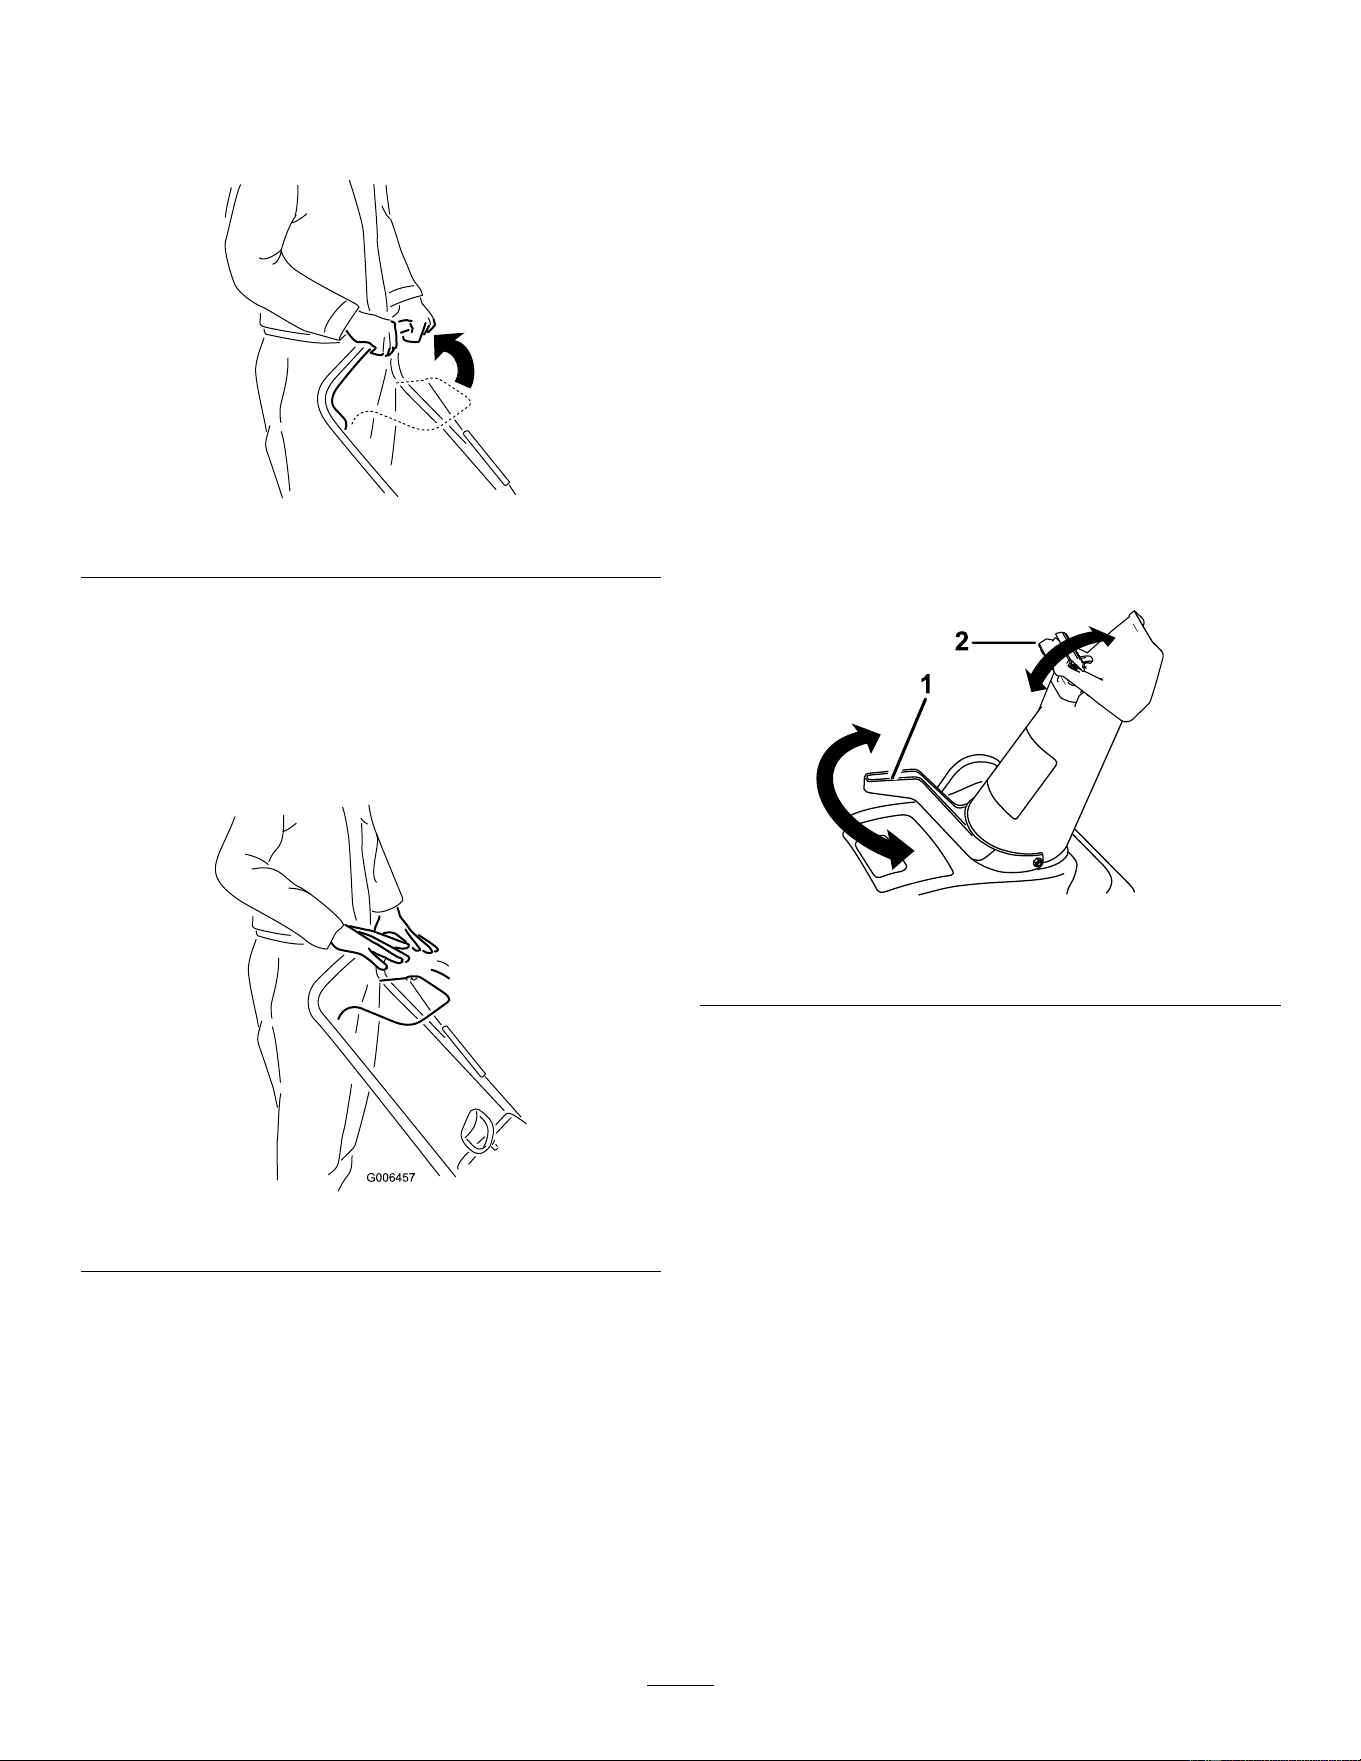
EngagingtheRotorBlades
Toengagetherotorblades,holdthecontrolbar
againstthehandle(Figure16).
g216251
Figure16
DisengagingtheRotor
Blades
Todisengagetherotorblades,releasethecontrolbar
(Figure17).
g006457
Figure17
ShuttingOfftheEngine
Toshutofftheengine,removethekeyfromthe
ignition.
AdjustingtheDischarge
ChuteandChuteDeector
Models38752and38753
Toraiseorlowertheangleofthechutedeector,
pressthetriggeronthechutedeectorandmovethe
chutedeectorupordown.
Toadjustthedischargechute,movethechutehandle.
g278630
Figure18
1.Chutehandle
2.Trigger
AdjustingtheDischarge
ChuteandChuteDeector
Model38756
Toadjustthedischargechute,pressthetriggerofthe
QuickShoot™controlontherightsideofthehandle
andmoveitupordownalongthehandle.Movingthe
controldownthehandlerotatesthedischargechute
totheleft;movingthecontrolupthehandlerotates
thedischargechutetotheright(Figure19).
13
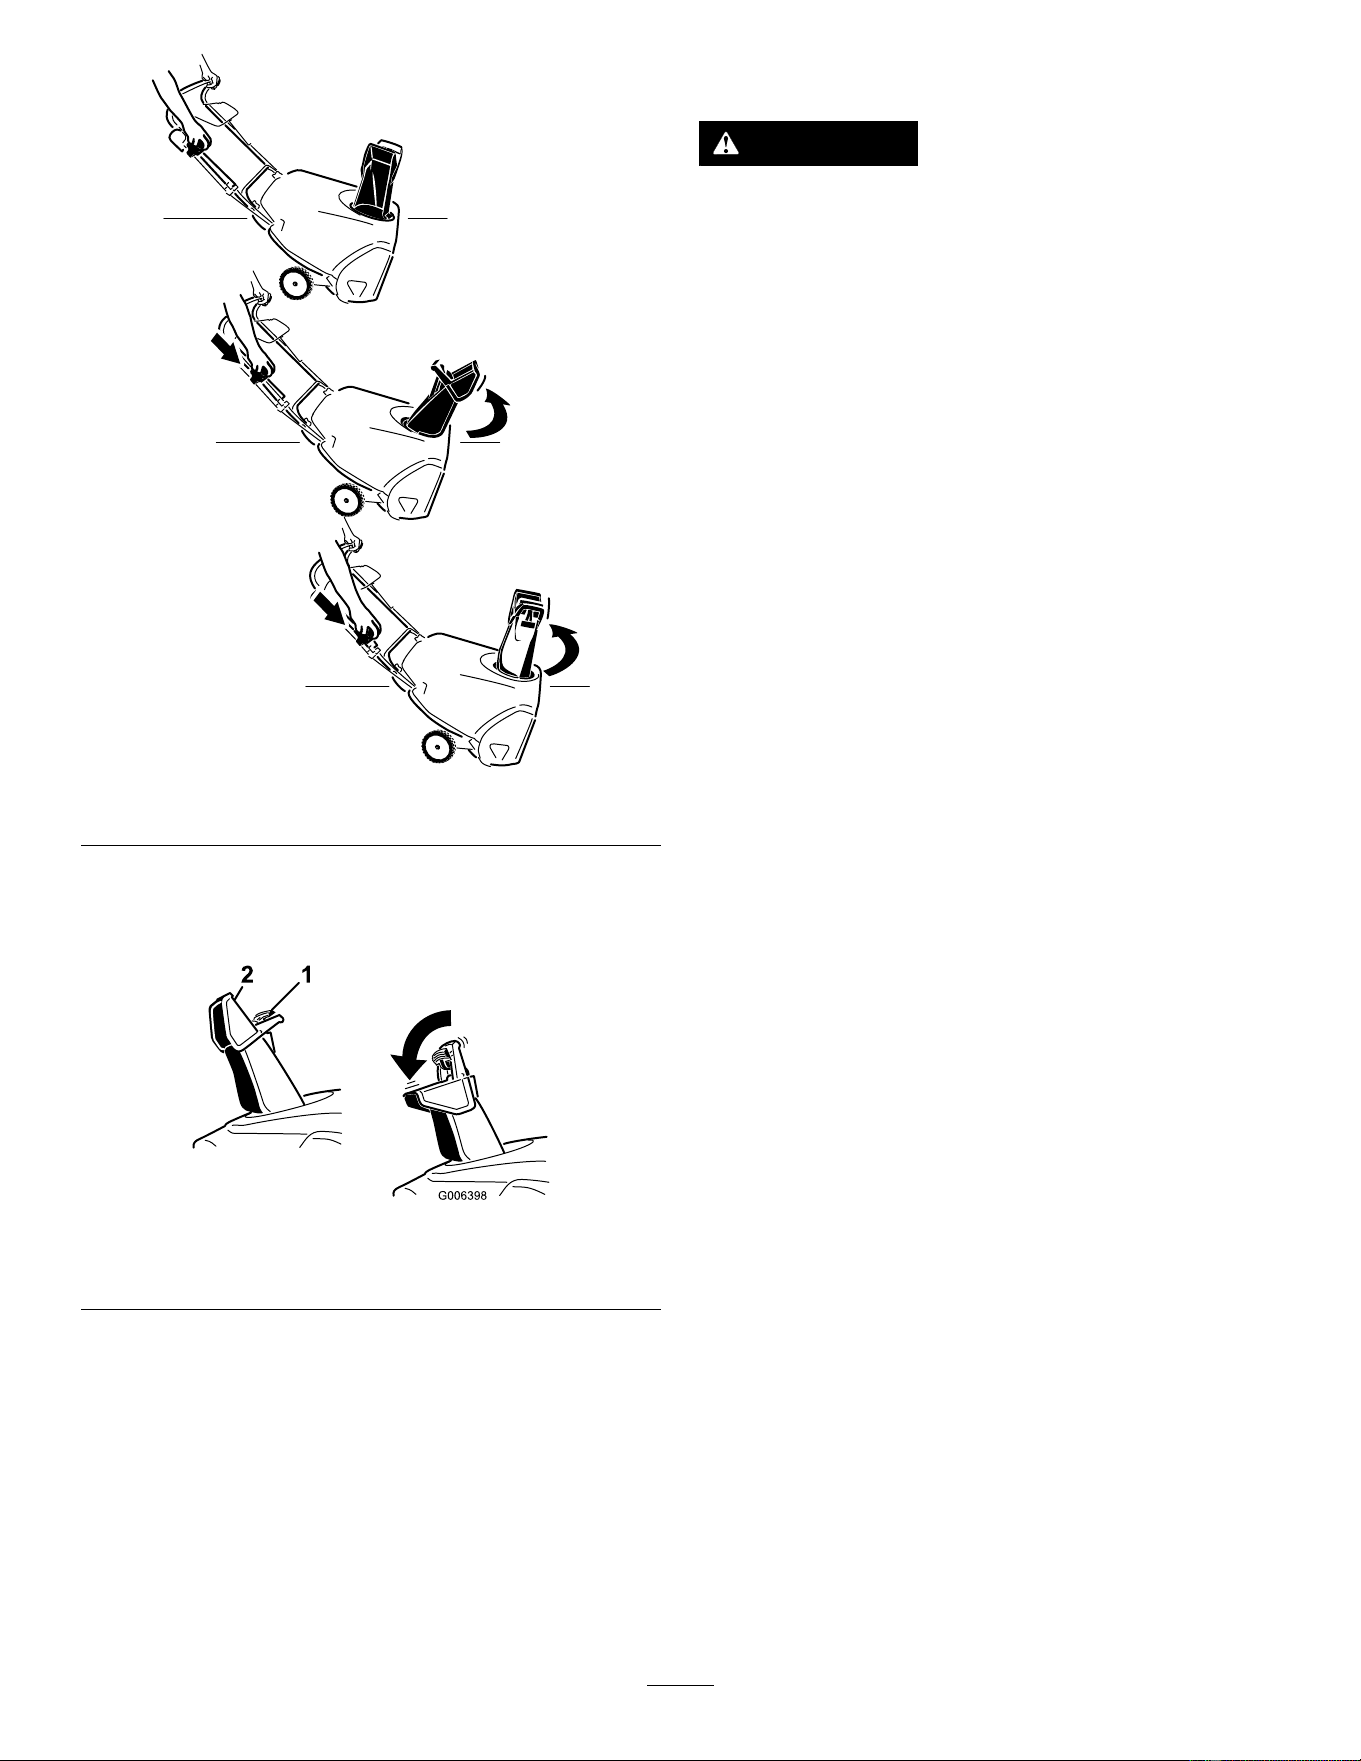
g280416
Figure19
Toraiseorlowertheangleofthechutedeector,
pressthetriggeronthechutedeectorandmovethe
chutedeectorupordown(Figure20).
g006398
Figure20
1.Chute-deectortrigger2.Chutedeector
ClearingaClogged
DischargeChute
Toclearthechute:
•Shuttheengineoff!
•Wait10secondstoensurethattherotorblades
havestoppedrotating.
•Alwaysuseaclean-outtool;neveruseyourhands.
OperatingTips
WARNING
Therotorbladescanthrowstones,toys,
andotherforeignobjectsandcauseserious
personalinjurytoyouorbystanders.
•Keeptheareatobeclearedfreeofall
objectsthattherotorbladescouldpickup
andthrow.
•Keepallchildrenandpetsawayfromthe
areaofoperation.
•Removethesnowassoonaspossibleafteritfalls.
•Overlapeachswathtoensurecompletesnow
removal.
•Dischargethesnowdownwindwheneverpossible.
•Ifthemachinedoesnotpropelitselfforwardon
slipperysurfacesorinheavysnow,pushforward
onthehandle,butallowthemachinetoworkat
itsownpace.
•Themachinemayleaverubbermarksonnew
brushedorlight-coloredconcrete.T estonan
inconspicuouslocationbeforeuse.Thesemarks
arenotpermanent.
AfterOperation
AfterOperationSafety
GeneralSafety
•Neverstorethemachinewithfuelinthefuel
tankinsideabuildingwhereignitionsourcesare
present,suchashotwaterheaters,spaceheaters,
orclothesdryers.Allowtheenginetocoolbefore
storingthemachineinanyenclosure.
•Whenstoringthemachineformorethan30
days,refertoStorage(page22)forimportant
information.
•Runthemachineafewminutesafterthrowing
snowtopreventfreeze-upofthecollectorand
rotor.
PreventingFreeze-upafter
Use
•Lettheenginerunforafewminutestoprevent
movingpartsfromfreezing.Shutofftheengine,
waitforallmovingpartstostop,andremoveice
andsnowfromthemachine.
•Cleanoffanysnowandicefromthebaseofthe
chute.
14

•Rotatethedischargechuteleftandrighttofree
itfromanyicebuildup.
•Withthekeyremoved,pulltherecoil-starthandle
severaltimesorconnecttheelectricalcordto
apowersourceandthemachineandpushthe
electric-startbuttononcetopreventtherecoil
starterand/ortheelectricstarterfromfreezingup
(electric-startmodelsonly).
•Insnowyandcoldconditions,somecontrolsand
movingpartsmayfreeze.Donotuseexcessive
forcewhentryingtooperatefrozencontrols.Ifyou
havedifcultyoperatinganycontrolorpart,start
theengineandletitrunforafewminutes.
15
Maintenance
RecommendedMaintenanceSchedule(s)
MaintenanceService
Interval
MaintenanceProcedure
Afterthersthour
•Checkthecontrolcableandadjustitifnecessary.
Aftertherst2hours
•Changetheengineoil.
Beforeeachuseordaily
•Checktheengine-oillevelandaddoilifnecessary.
Every100hours
•Replacethesparkplug.
Yearly
•Checkthecontrolcableandadjustitifnecessary.
•InspecttherotorbladesandhaveanAuthorizedServiceDealerreplacetherotor
bladesandscraperifnecessary.
•Changetheengineoil.
MaintenanceSafety
Readthefollowingsafetyprecautionsbefore
performinganymaintenanceonthemachine:
•Shutofftheengine,removethekey,andwait
forallmovementtostopbeforeyouleavethe
operator’sposition.Allowthemachinetocool
beforeadjusting,servicing,cleaning,orstoringit.
•Alwaysweareyeprotectionwhileperformingan
adjustmentorrepairtoprotectyoureyesfrom
foreignobjectsthatthemachinemaythrow.
•Checkallfastenersatfrequentintervalsforproper
tightnesstoensurethatthemachineisinsafe
workingcondition.
•Donotchangethegovernorsettingsontheengine.
PurchaseonlygenuineT ororeplacementparts
andaccessories.
CheckingandAdjustingthe
ControlCable
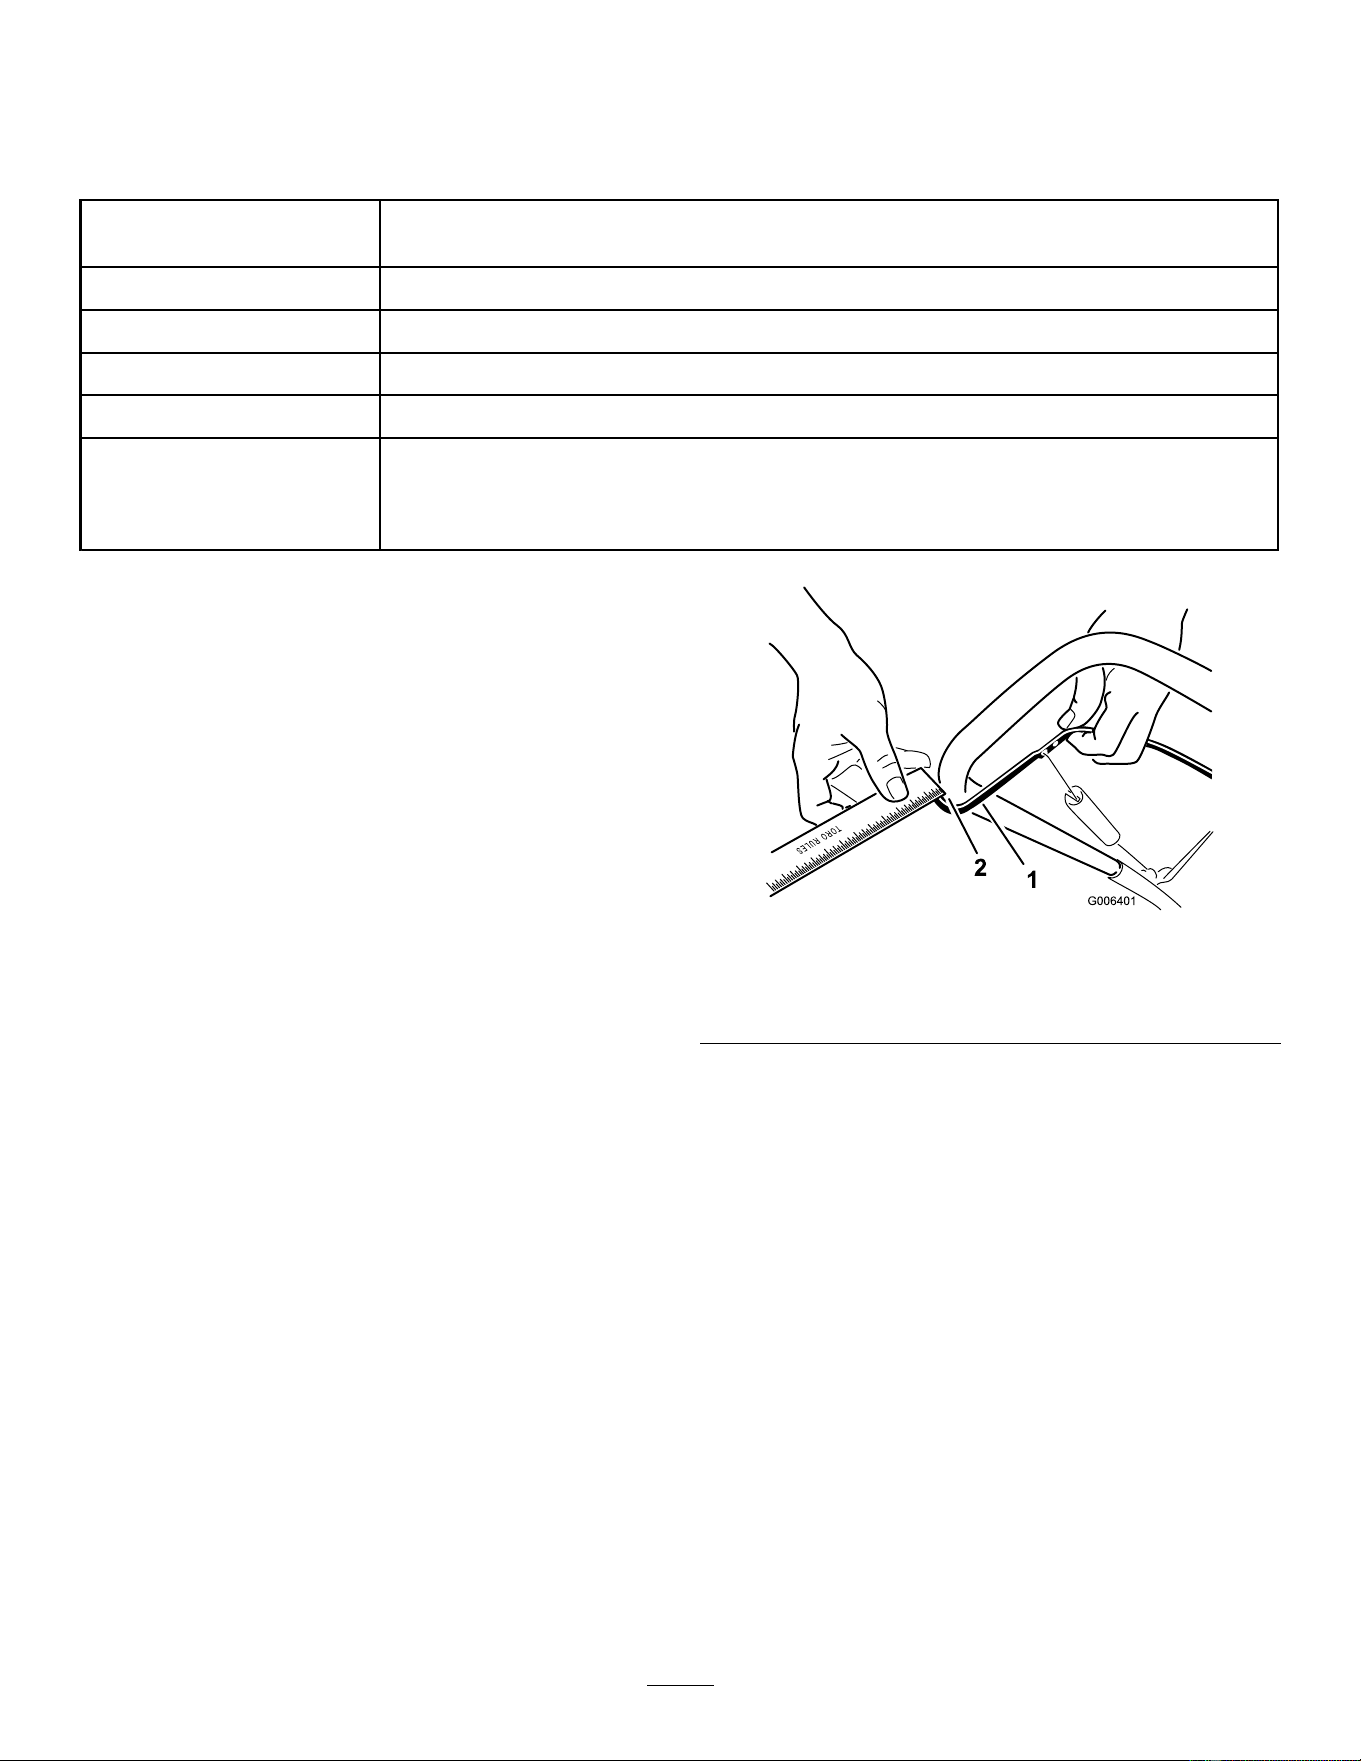
CheckingtheControlCable
ServiceInterval:Afterthersthour—Checkthe
controlcableandadjustitif
necessary.
Yearly—Checkthecontrolcableandadjustit
ifnecessary.
Movethecontrolbarbacktowardthehandleto
removetheslackinthecontrolcable(Figure21).
g006401
Figure21
1.Controlbar2.2mmto3mm(1/16inch
to1/8inch)gap
Note:Ensurethata2to3mm(1/16to1/8inch)
gapexistsbetweenthecontrolbarandthehandle
(Figure21).
Important:Thecontrolcablemustcontainsome
slackwhenyoudisengagethecontrolbarforthe
rotorbladestostopproperly.
16
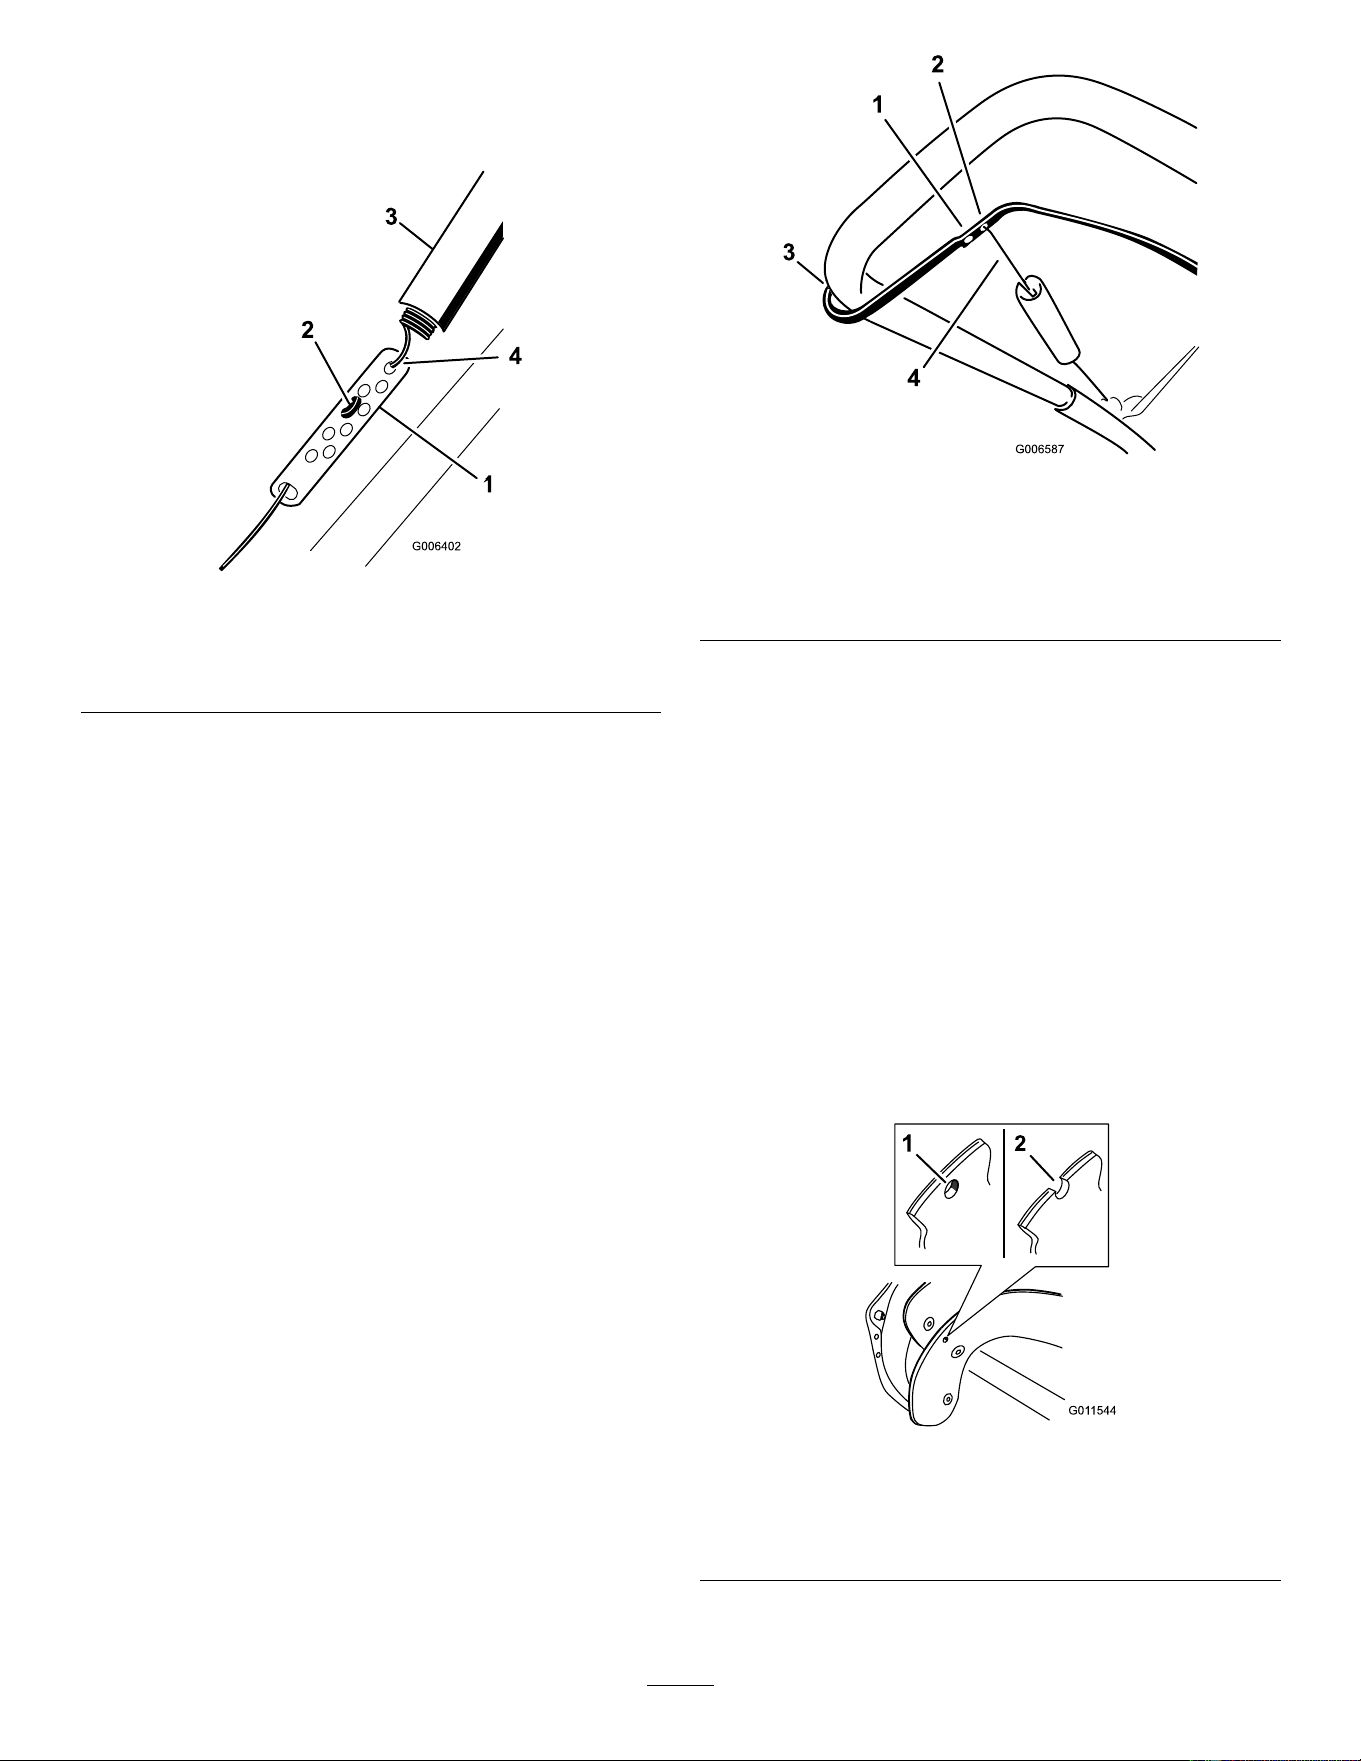
AdjustingtheControlCable
1.Slideupthespringcoverandunhookthespring
fromtheadjusterlink(Figure22).
g006402
Figure22
1.Adjusterlink
3.Springcover
2.Z-tting
4.Unhookthespringhere.
Note:Youcanpulluptheadjusterlinkand
cabletomakeunhookingthespringeasier.
2.MovetheZ-ttingtoahigherorlowerholeon
theadjusterlinkasneededtoobtainthe2to3
mm(1/16to1/8inch)gapbetweenthecontrol
barandthehandle(Figure21).
Note:MovingtheZ-ttinghigherdecreasesthe
gapbetweenthecontrolbarandthehandle;
movingitlowerincreasesthegap.
3.Hookthespringtotheadjusterlinkandslidethe
springcoverovertheadjusterlink.
4.Checktheadjustment;refertoCheckingthe
ControlCable(page16).
Note:Afterextendeduse,thedrivebeltmay
wearandloseitsproperbelttension.Ifthedrive
beltslips(continuouslysqueals)underaheavy
load,disconnectthespringfromtheadjustorlink
andmovetheupperendofthespringtothehole
thatisfurtherfromthepivotpointinthecontrol
bar(Figure23).Thenconnectthespringtothe
adjustorlinkandadjustthecontrolcable.
g006587
Figure23
1.Removetheupperendof
springfromthishole.
3.Pivotpoint
2.Inserttheupperendof
springintothishole.
4.Upperendofspring
Note:Thebeltmayslip(squeal)inwet
conditions;todryoutthedrivesystem,startthe
rotorandrunitwithoutaloadfor30seconds.
InspectingtheRotorBlades
ServiceInterval:Yearly—Inspecttherotorblades
andhaveanAuthorizedService
Dealerreplacetherotorbladesand
scraperifnecessary.
Beforeeachsession,inspecttherotorbladesfor
wear.Whenarotor-bladeedgehasworndownto
thewear-indicatorhole,haveanAuthorizedService
Dealerreplacetherotorbladesandthescraper
(Figure24).
g011544
Figure24
1.Thewear-indicatorholeis
intact;youdonotneedto
replacetherotorblades.
2.Thewear-indicatorholeis
exposed;replacetherotor
bladesandscraper.
17
ChangingtheEngineOil
ServiceInterval:Aftertherst2hours
Yearly
Ifpossible,runtheengineforafewminutesbefore
changingtheoiltowarmit.Warmoilowsbetterand
carriesmorecontaminants.
EngineOilSpecications
Engineoilcapacity
0.6L(20oz)*
OilviscosityRefertoFigure27.
APIserviceclassicationSJorhigher
*Thereisresidualoilinthecrankcaseafteryoudrain
theoil.Donotpourtheentirecapacityofoilintothe
crankcase.Fillthecrankcasewithoilasdirectedin
thefollowingsteps.
1.Siphonthefuelfromthefueltankintoan
approvedfuelcontainer,orruntheengineuntil
itshutsoff.
2.Movethemachinetoalevelsurface.
3.Placeanoil-drainpanundertheoil-drainplug,
removetheplug,andtipthemachinebackward
anddraintheusedoilinthepan(Figure25).
g286519
Figure25
1.Oil-drainplug
4.Afterdrainingtheusedoil,returnthemachineto
theoperatingposition.
5.Installtheoil-drainplugandtightenitsecurely.
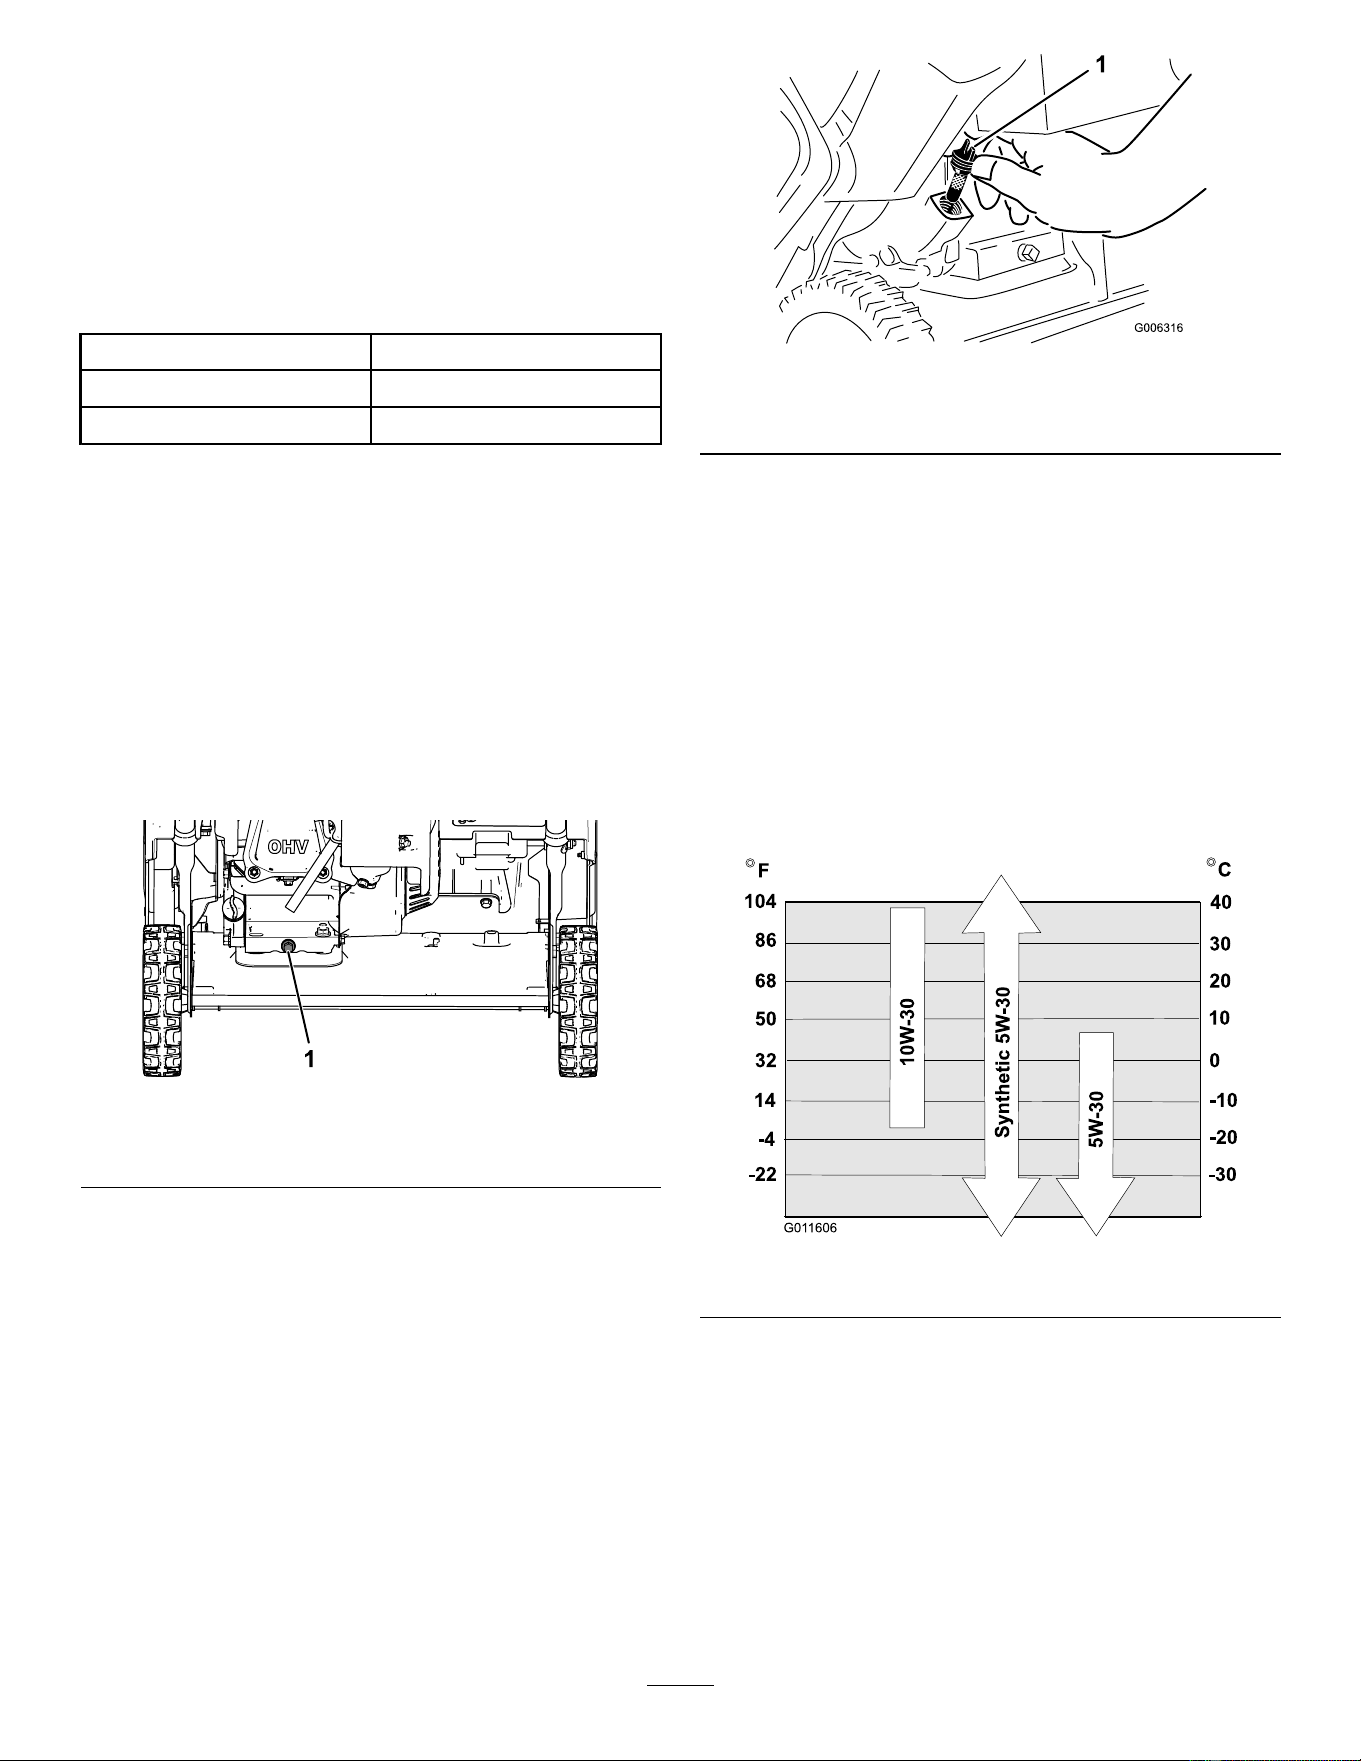
6.Cleanaroundtheoilll/dipstick.
7.Unscrewthedipstickandremoveit(Figure26).
g006316
Figure26
1.Dipstick
8.Carefullypourabout3/4oftheenginecapacity
ofoilintotheoil-lltube.
Note:Youmaytipthemachineforward(handle
up)tomakeaddingoileasier.Rememberto
returnthemachinetotheoperatingposition
beforecheckingtheoillevel.
Important:Donottipthemachineallthe
wayforwardontoitsnose,orfuelmayleak
outofthemachine.
UseFigure27belowtoselectthebestoil
viscosityfortheoutdoortemperaturerange
expected.
g011606
Figure27
18
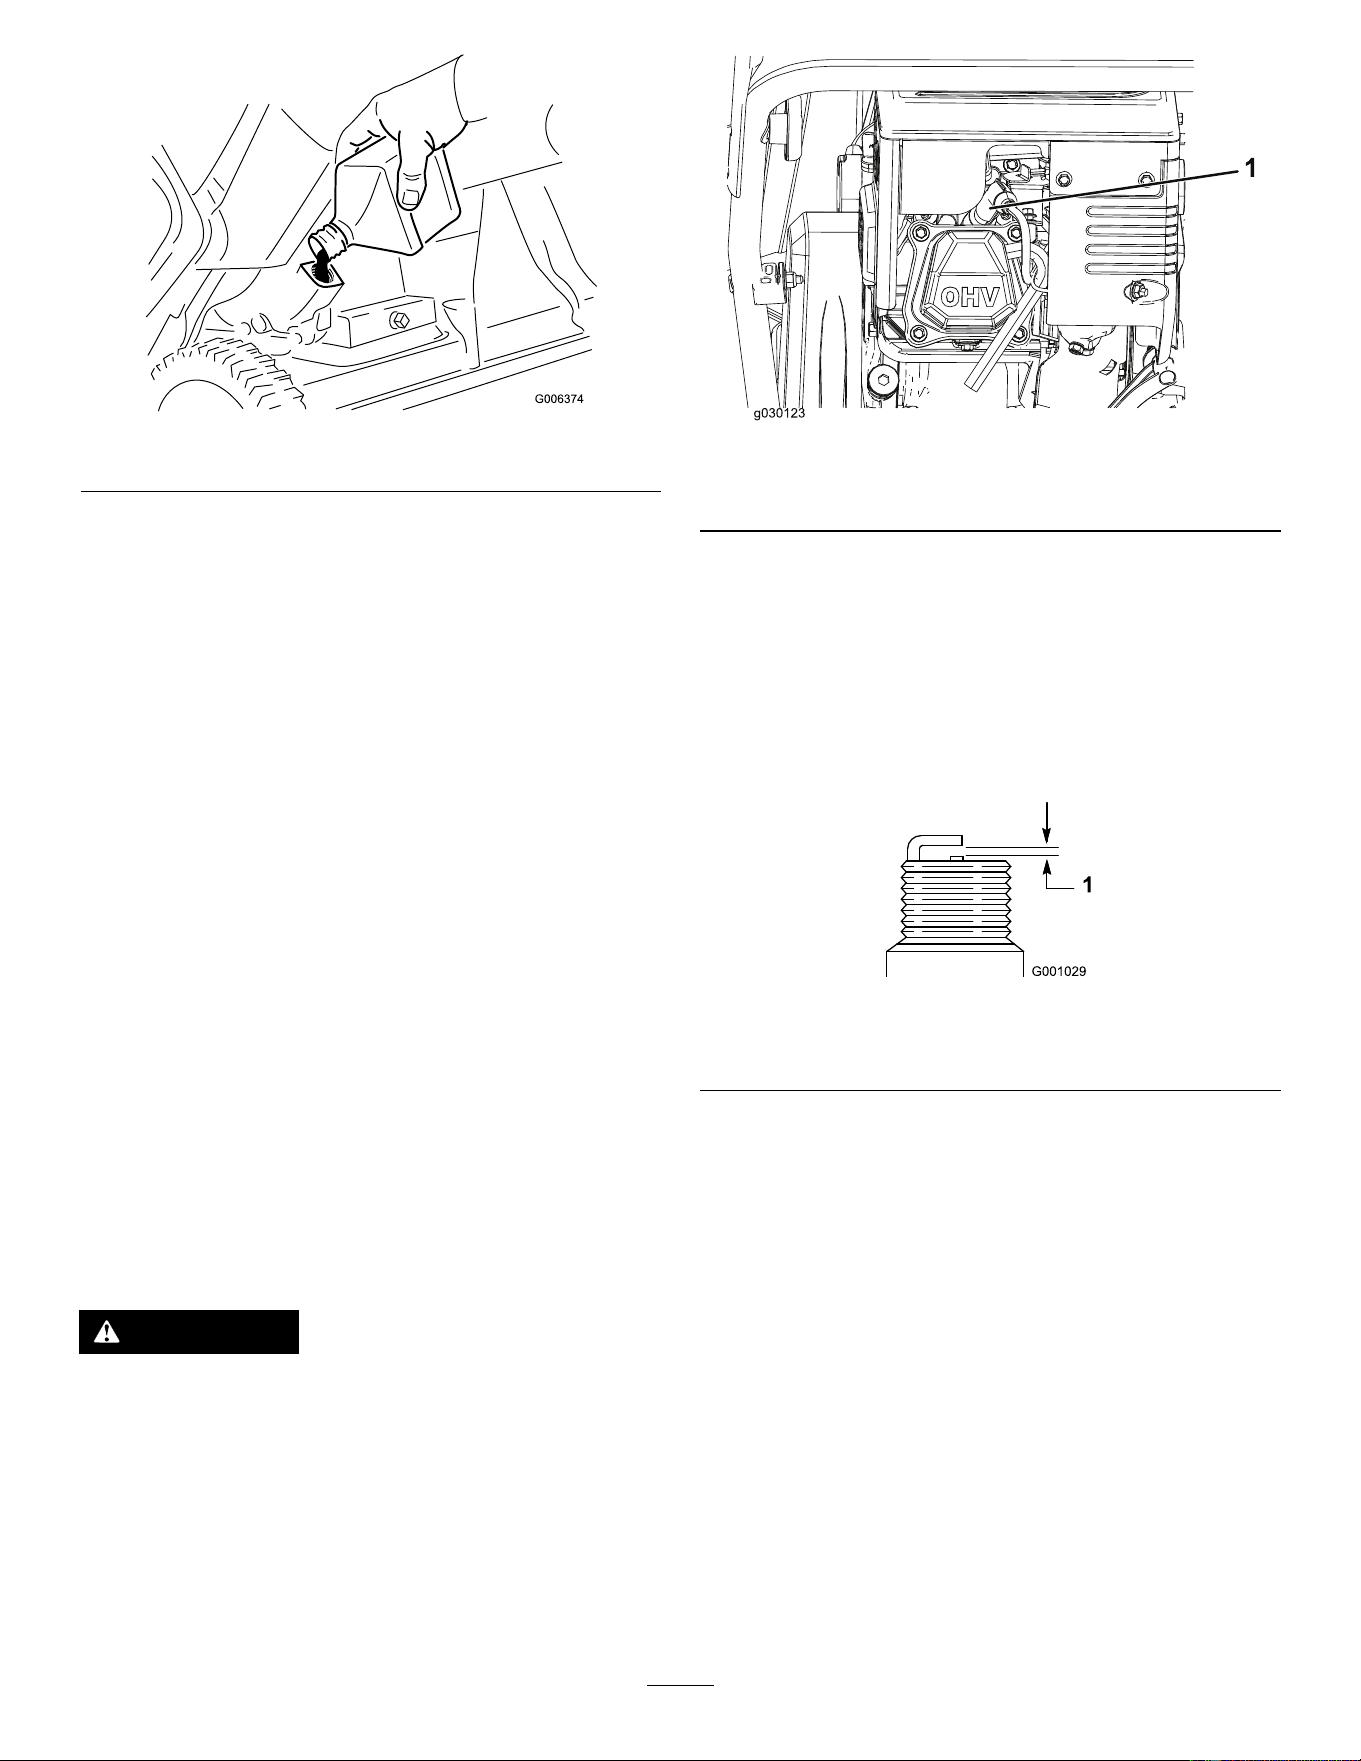
g006374
Figure28
9.Wait3minutesfortheoiltosettleintheengine.
10.Wipethedipstickcleanwithacleancloth.
11.Withthemachineintheoperatingposition,
insertthedipstickintotheoil-lltube,butdonot
screwitin,thenremovethedipstick.
12.Readtheoillevelonthedipstick.
•Iftheoillevelonthedipstickistoolow,
carefullypourasmallamountofoilinto
theoil-lltube,wait3minutes,andrepeat
steps10through12untiltheoillevelonthe
dipstickiscorrect.
•Iftheoillevelonthedipstickistoohigh,
draintheexcessoiluntiltheoillevelonthe
dipstickiscorrect.
Important:Iftheoillevelintheengineistoo
lowortoohighandyouruntheengine,you
maydamagetheengine.
13.Installthedipstickintotheoil-lltubesecurely.
14.Recycletheusedoilproperly.
ReplacingtheSparkPlug
ServiceInterval:Every100hours—Replacethe
sparkplug.
WARNING
Replacingthesparkplugwhiletheengineis
hotcanresultinburns.
Waituntiltheengineiscooltoreplacethe
sparkplug.
UseaTorosparkplugorequivalent(Champion®
RN9YCorNGKBPR6ES).
1.Removetheboot(Figure29).
g030123
Figure29
1.Spark-plugboot
2.Cleanaroundthebaseofthesparkplug.
3.Removeanddiscardtheoldsparkplug.
Note:Youwillneedaratchetwrenchextension
toremovethesparkplug.
4.Setthegapbetweentheelectrodesonanew
sparkplugat0.76mm(0.030inch)asshown
inFigure30.
g001029
Figure30
1.0.76mm(0.030inch)
ReplacingtheDriveBelt
Ifthedrivebeltbecomesworn,oil-soaked,excessively
cracked,frayed,orotherwisedamaged,replacethe
belt.
1.Removethedrive-beltcoverbyremovingthe3
boltsasshowninFigure31.
19
g008238
Figure31
1.Drive-beltcover6.Drivebelt
2.Bolt(3)7.Rotorshaft
3.Rotor-pulleybolt
8.Brakespring(unhookfrom
idlerarmhere)
4.Curvedwasher
9.Idlerpulley
5.Rotorpulley10.Enginepulley
2.Unhookthebrakespringfromtheidlerarmto
releasethebelttension(Figure31).
3.Removethescrewandcurvedwasherthat
holdstherotorpulley(Figure31).
4.Removetherotorpulleyandthedrivebelt
(Figure31).
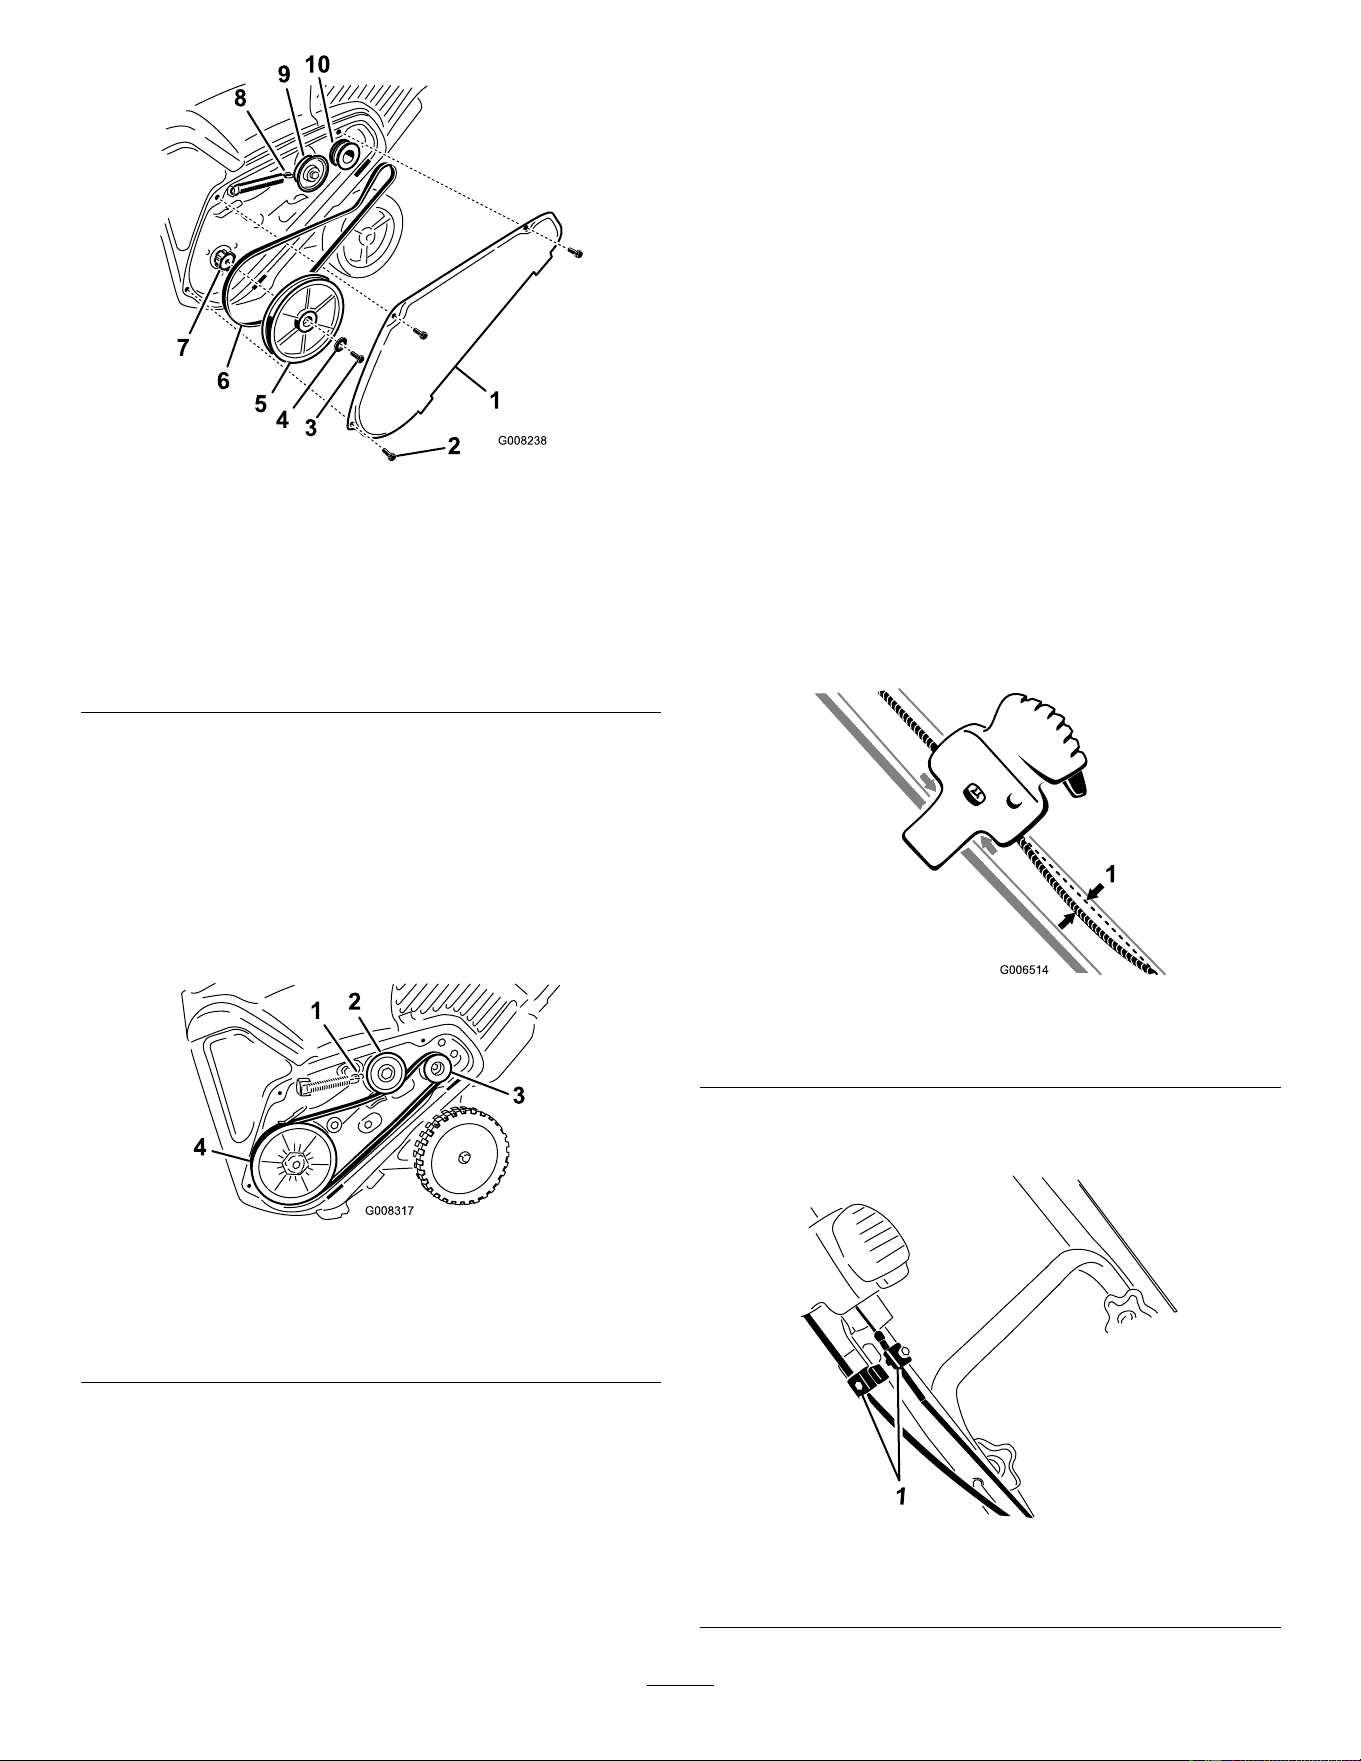
5.Installthenewdrivebelt,routingitasshownin
Figure32.
g008317
Figure32
1.Brakespring(installon
idlerarmhere)
3.Enginepulley
2.Idlerpulley4.Rotorpulley
Note:Routethenewdrivebeltrstaroundthe
enginepulley,thentheidlerpulley,andnally
aroundthelooserotorpulleypositionedjust
abovetherotorshaft(Figure31).
6.Installtherotorpulleyontotherotorshaft(Figure
31).
7.Installthecurvedwasherandtherotor-pulley
boltandtightenthemsecurely(Figure31).
Note:Theconcavesideofthecurvedwasher
goesagainsttheoutsideofthepulley.
8.Installthebrakespringontotheidlerarm(Figure
32).
9.Installthedrive-beltcoverwiththeboltsthatyou
removedinstep1.
Note:Ensurethatthedrivebeltisproperly
adjustedandoperating;refertoCheckingthe
ControlCable(page16)andAdjustingthe
ControlCable(page17).
AdjustingtheQuickShoot
Control
Model38756
Ifthereismorethan13mm(1/2inch)ofslackinthe
QuickShootcable(Figure33)orthedischargechute
doesnotrotateleftandrightinequalangles,adjust
theQuickShootcontrolcables.
g006514
Figure33
1.13mm(1/2inch)maximumslack
1.Loosenthe2QuickShootcontrol-cableclamps
(Figure34).
g286559
Figure34
1.Cableclamps
20
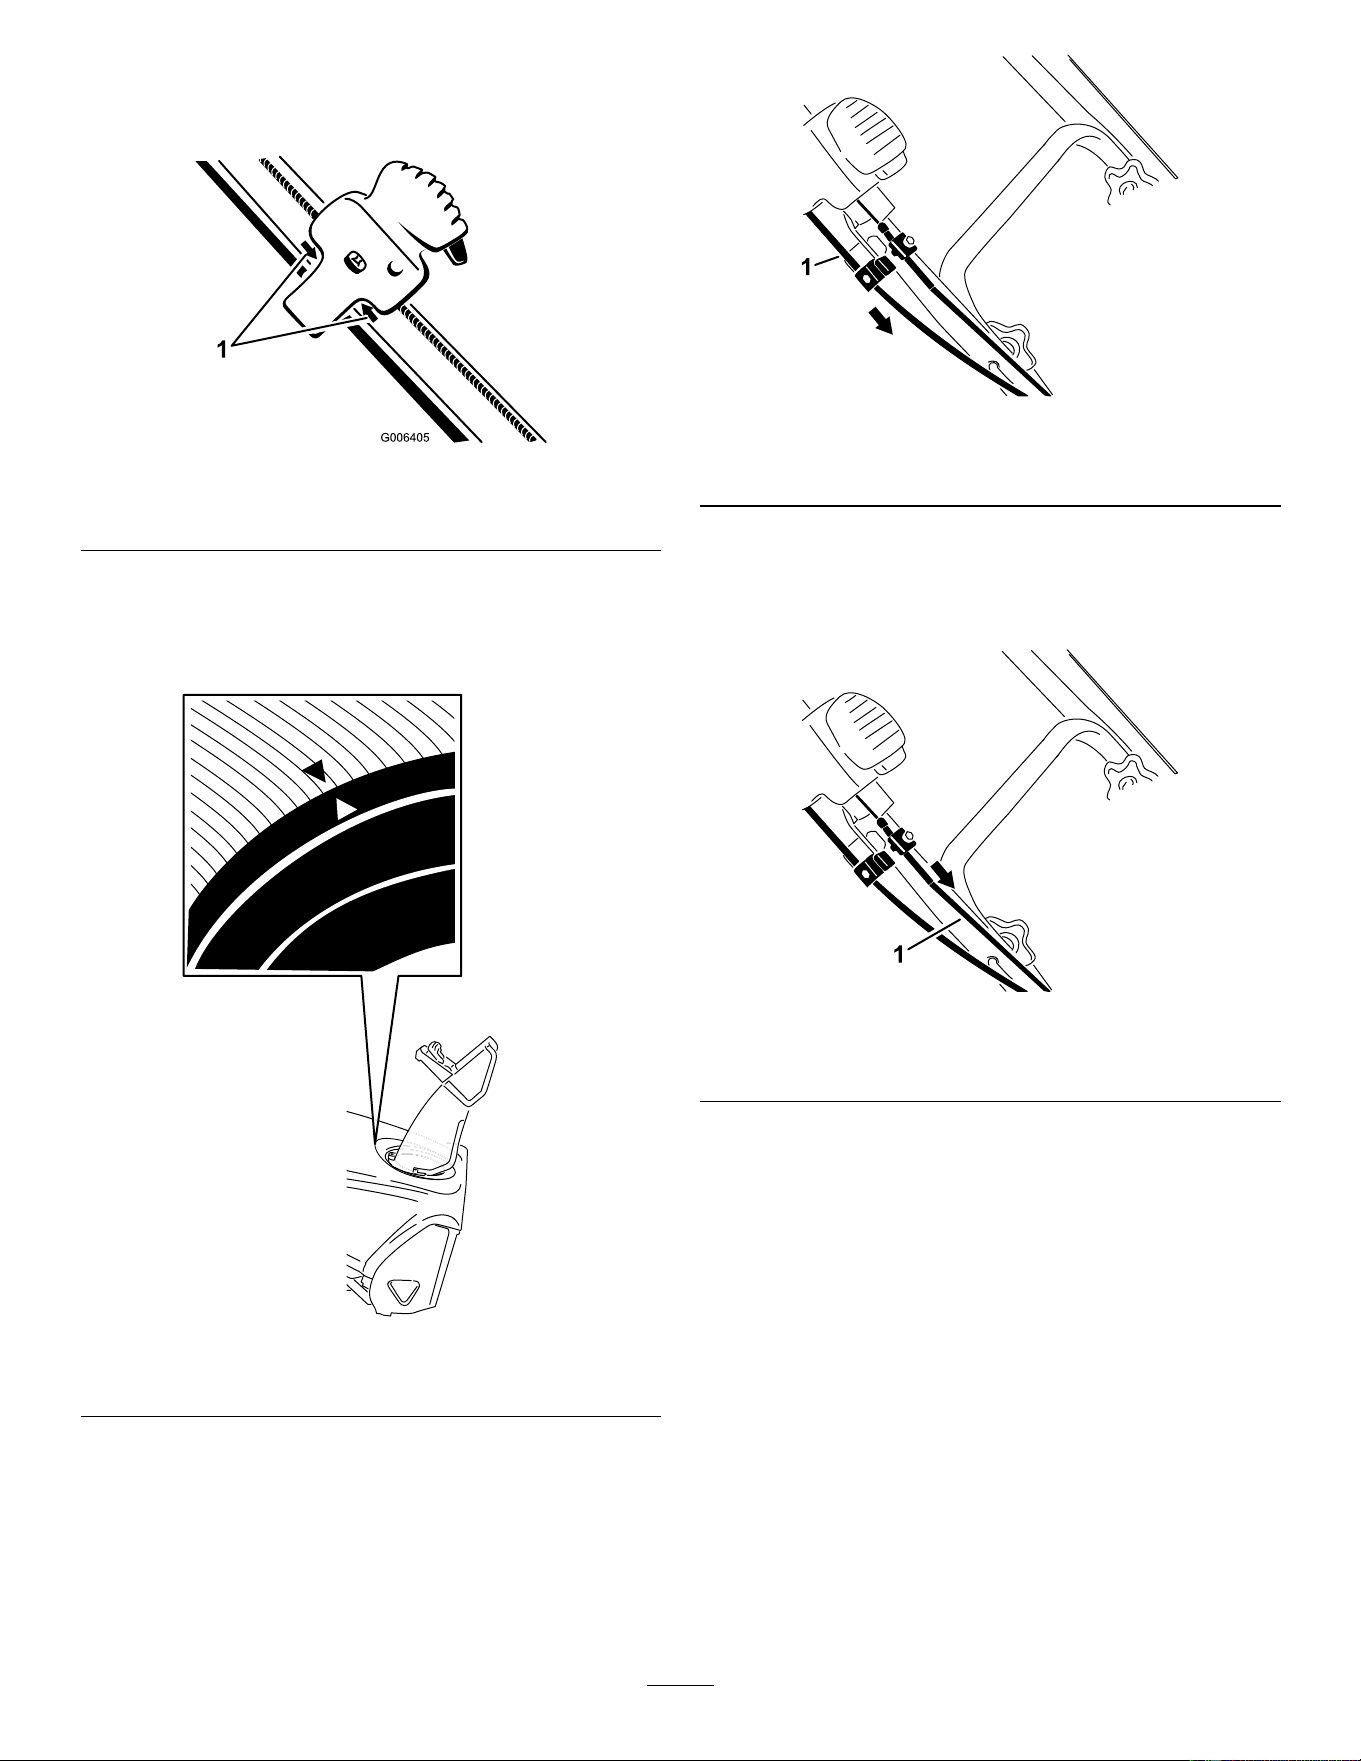
2.PositiontheQuickShootcontrolbetweenthe
2arrowslocatedontherightsideoftheupper
handle(Figure35).
g006405
Figure35
1.Arrows
3.Rotatethedischargechutesothatitfaces
straightaheadandthearrowonthebackofthe
dischargechutealignswiththearrowonthe
shroud(Figure36).
g286564
Figure36
4.Holdthedischargechuteinthestraight-ahead
position,pullthelowercablecasingdownward
untilyouremovetheslackinthecable,and
tightenthescrewonthelowercableclamp
securely(Figure37).
g286565
Figure37
1.Lowercablecasing
5.Pulltheuppercablecasingforwarduntilyou
removetheslackinthecable,andtightenthe
screwontheuppercableclampsecurely(Figure
38).
g286566
Figure38
1.Uppercablecasing
Note:Donotover-tensionthecables.Ifthe
cablesareover-tensioned,theQuickShootwill
behardtooperate.
21

Storage
StorageSafety
•Shutofftheengine,removethekey,andwait
forallmovementtostopbeforeyouleavethe
operator’sposition.Allowthemachinetocool
beforeadjusting,servicing,cleaning,orstoringit.
•Fuelfumesarehighlyammable,explosive,and
dangerousifinhaled.Ifyoustoretheproductinan
areawithanopename,thefuelfumesmayignite
andcauseanexplosion.
•Donotstorethemachineinahouse(living
area),basement,oranyotherareawhereignition
sourcesmaybepresent,suchashotwaterand
spaceheaters,clothesdryers,furnaces,andother
appliances.
•Donottipthemachineeitherforwardorbackward
withfuelinthefueltank;otherwise,fuelmayleak
outofthemachine.
•Donotstorethemachinewithitshandletipped
downontotheground;otherwise,oilmayleakinto
theenginecylinderandontotheground,andthe
enginemaynotstart.
StoringtheMachine
1.Onthelastrefuelingoftheseason,addfuel
stabilizertofreshfuelasdirectedbythe
fuel-stabilizermanufacturer.
Important:Donotstorefuellonger
thanthatsuggestedbythefuel-stabilizer
manufacturer.
2.Runtheenginefor10minutestodistributethe
conditionedfuelthroughthefuelsystem.
3.Shutofftheengine,allowittocool,andsiphon
thefueltankorruntheengineuntilitshutsoff.
4.Starttheengineandrunituntilitshutsoff.
5.Chokeorprimetheengine,startitathirdtime,
andruntheengineuntilitdoesnotstart.
6.Drainthefuelinthecarburetorthroughthe
carburetor-drainboltintoanapprovedgasoline
container.
7.Disposeofunusedfuelproperly.Recycleit
accordingtolocalcodes.
8.Whiletheengineisstillwarm,changetheengine
oil.RefertoChangingtheEngineOil(page18).
9.Removethesparkplug.
10.Squirt10ml(2tsp)ofoilintothespark-plughole.
11.Installthesparkplugbyhandandthentorqueit
to27to30N∙m(20to22ft-lb).
12.Withthekeyremoved,pulltherecoil-start
handleslowlytodistributetheoilontheinside
ofthecylinder.
13.Cleanthemachine.
14.Touchupchippedsurfaceswithpaintavailable
fromanAuthorizedServiceDealer.Sand
affectedareasbeforepainting,andusearust
preventativetopreventthemetalpartsfrom
rusting.
15.Tightenanyloosefasteners.Repairorreplace
anydamagedparts.
16.Coverthemachineandstoreitinaclean,dry
placeoutofthereachofchildren.Allowthe
enginetocoolbeforestoringthemachineinany
enclosure.
22

CaliforniaProposition65WarningInformation
Whatisthiswarning?
Youmayseeaproductforsalethathasawarninglabellikethefollowing:
WARNING:CancerandReproductiveHarm—www.p65Warnings.ca.gov.
WhatisProp65?
Prop65appliestoanycompanyoperatinginCalifornia,sellingproductsinCalifornia,ormanufacturingproductsthatmaybesoldinorbroughtinto
California.ItmandatesthattheGovernorofCaliforniamaintainandpublishalistofchemicalsknowntocausecancer,birthdefects,and/orother
reproductiveharm.Thelist,whichisupdatedannually,includeshundredsofchemicalsfoundinmanyeverydayitems.ThepurposeofProp65isto
informthepublicaboutexposuretothesechemicals.
Prop65doesnotbanthesaleofproductscontainingthesechemicalsbutinsteadrequireswarningsonanyproduct,productpackaging,orliteraturewith
theproduct.Moreover,aProp65warningdoesnotmeanthataproductisinviolationofanyproductsafetystandardsorrequirements.Infact,the
CaliforniagovernmenthasclariedthataProp65warning“isnotthesameasaregulatorydecisionthataproductis‘safe’or‘unsafe.’”Manyofthese
chemicalshavebeenusedineverydayproductsforyearswithoutdocumentedharm.Formoreinformation,gotohttps://oag.ca.gov/prop65/faqs-view-all
.
AProp65warningmeansthatacompanyhaseither(1)evaluatedtheexposureandhasconcludedthatitexceedsthe“nosignicantrisklevel”;or(2)
haschosentoprovideawarningbasedonitsunderstandingaboutthepresenceofalistedchemicalwithoutattemptingtoevaluatetheexposure.
Doesthislawapplyeverywhere?
Prop65warningsarerequiredunderCalifornialawonly.ThesewarningsareseenthroughoutCaliforniainawiderangeofsettings,includingbutnot
limitedtorestaurants,grocerystores,hotels,schools,andhospitals,andonawidevarietyofproducts.Additionally,someonlineandmailorder
retailersprovideProp65warningsontheirwebsitesorincatalogs.
HowdotheCaliforniawarningscomparetofederallimits?
Prop65standardsareoftenmorestringentthanfederalandinternationalstandards.TherearevarioussubstancesthatrequireaProp65warning
atlevelsthatarefarlowerthanfederalactionlimits.Forexample,theProp65standardforwarningsforleadis0.5μg/day,whichiswellbelow
thefederalandinternationalstandards.
Whydon’tallsimilarproductscarrythewarning?
•ProductssoldinCaliforniarequireProp65labellingwhilesimilarproductssoldelsewheredonot.
•AcompanyinvolvedinaProp65lawsuitreachingasettlementmayberequiredtouseProp65warningsforitsproducts,butothercompanies
makingsimilarproductsmayhavenosuchrequirement.
•TheenforcementofProp65isinconsistent.
•CompaniesmayelectnottoprovidewarningsbecausetheyconcludethattheyarenotrequiredtodosounderProp65;alackofwarningsfora
productdoesnotmeanthattheproductisfreeoflistedchemicalsatsimilarlevels.
WhydoesToroincludethiswarning?
Torohaschosentoprovideconsumerswithasmuchinformationaspossiblesothattheycanmakeinformeddecisionsabouttheproductstheybuyand
use.Toroprovideswarningsincertaincasesbasedonitsknowledgeofthepresenceofoneormorelistedchemicalswithoutevaluatingthelevelof
exposure,asnotallthelistedchemicalsprovideexposurelimitrequirements.WhiletheexposurefromT oroproductsmaybenegligibleorwellwithinthe
“nosignicantrisk”range,outofanabundanceofcaution,TorohaselectedtoprovidetheProp65warnings.Moreover,ifTorodoesnotprovidethese
warnings,itcouldbesuedbytheStateofCaliforniaorbyprivatepartiesseekingtoenforceProp65andsubjecttosubstantialpenalties.
RevA