FormNo.3451-565RevA
PowerClear
®
518Snowthrower
ModelNo.38474—SerialNo.400000000andUp
ModelNo.38475—SerialNo.400000000andUp
Operator'sManual
Introduction
Thismachineisintendedtobeusedbyresidential
homeowners.Itisdesignedprimarilyforremoving
snowfrompavedsurfaces,suchasdrivewaysand
sidewalks,andothersurfacesfortrafconresidential
orcommercialproperties.Itisnotdesignedfor
removingmaterialsotherthansnow,norisitdesigned
forclearinggravelsurfaces.Usingthisproductfor
purposesotherthanitsintendedusecouldprove
dangeroustoyouandbystanders.
Readthisinformationcarefullytolearnhowtooperate
andmaintainyourproductproperlyandtoavoid
injuryandproductdamage.Youareresponsiblefor
operatingtheproductproperlyandsafely.
Visitwww.Toro.comforproductsafetyandoperation
trainingmaterials,accessoryinformation,helpnding
adealer,ortoregisteryourproduct.
Wheneveryouneedservice,genuineT oroparts,or
additionalinformation,contactanAuthorizedService
DealerorToroCustomerServiceandhavethemodel
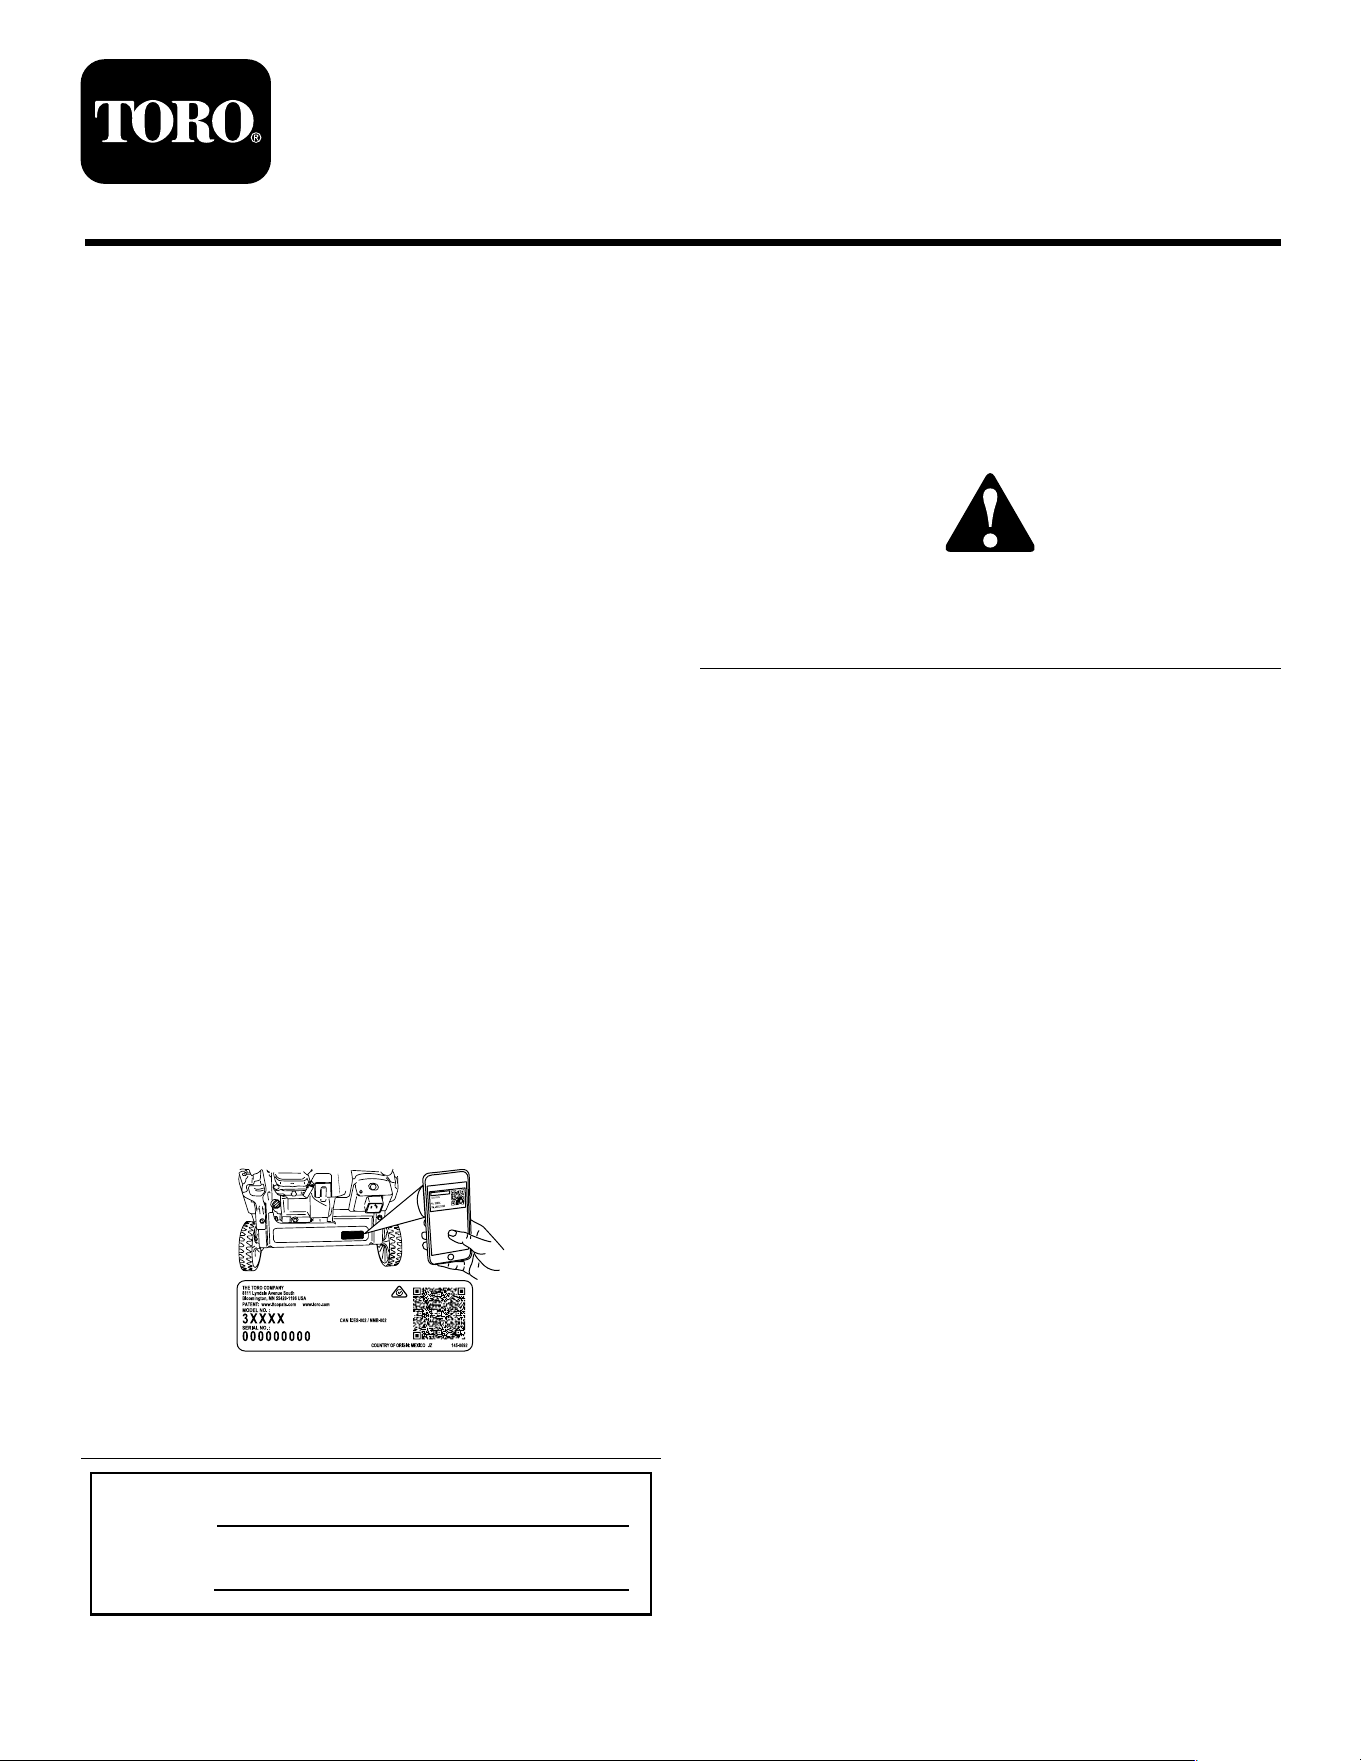
andserialnumbersofyourproductready.Figure1
identiesthelocationofthemodelandserialnumbers
ontheproduct.Writethenumbersinthespace
provided.
Important:Withyourmobiledevice,youcan
scantheQRcodeontheserialnumberdecal(if
equipped)toaccesswarranty,parts,andother
productinformation.
g389200
Figure1
1.Modelandserialnumberlocation
ModelNo.
SerialNo.
Thismanualidentiespotentialhazardsandhas
safetymessagesidentiedbythesafety-alertsymbol
(Figure2),whichsignalsahazardthatmaycause
seriousinjuryordeathifyoudonotfollowthe
recommendedprecautions.
g000502
Figure2
Safety-alertsymbol
Thismanualuses2wordstohighlightinformation.
Importantcallsattentiontospecialmechanical
informationandNoteemphasizesgeneralinformation
worthyofspecialattention.
©2022—TheToro®Company
8111LyndaleAvenueSouth
Bloomington,MN55420
Registeratwww.Toro.com.
OriginalInstructions(EN)
PrintedinMexico
AllRightsReserved
*3451-565*
Important:Ifyouareusingthismachineabove
1500m(5,000ft)foracontinuousperiod,ensure
thattheHighAltitudeKithasbeeninstalled
sothattheenginemeetsCARB/EPAemission
regulations.TheHighAltitudeKitincreases
engineperformancewhilepreventingspark-plug
fouling,hardstarting,andincreasedemissions.
Onceyouhaveinstalledthekit,attachthe
high-altitudelabelnexttotheserialdecalonthe
machine.ContactanyAuthorizedToroService
DealertoobtaintheproperHighAltitudeKitand
high-altitudelabelforyourmachine.Tolocate
adealerconvenienttoyou,accessourwebsite
atwww.Toro.comorcontactourToroCustomer
CareDepartmentatthenumber(s)listedinyour
EmissionControlWarrantyStatement.Remove
thekitfromtheengineandrestoretheengineto
itsoriginalfactorycongurationwhenrunningthe
engineunder1500m(5,000ft).Donotoperatean
enginethathasbeenconvertedforhigh-altitude
useatloweraltitudes;otherwise,youcould
overheatanddamagetheengine.
Ifyouareunsurewhetherornotyourmachinehas
beenconvertedforhigh-altitudeuse,lookforthe
followinglabel(Figure3).
decal127-9363
Figure3
WARNING
CALIFORNIA
Proposition65Warning
Theengineexhaustfromthisproduct
containschemicalsknowntotheStateof
Californiatocausecancer,birthdefects,
orotherreproductiveharm.
Useofthisproductmaycauseexposure
tochemicalsknowntotheStateof
Californiatocausecancer,birthdefects,
orotherreproductiveharm.
Contents
Introduction...............................................................1
Safety.......................................................................3
GeneralSafety...................................................3
SafetyandInstructionalDecals..........................4
Setup........................................................................5
1InstallingtheHandle........................................5
2InstallingtheDischargeChute.........................5
3InstallingtheRecoil-StartHandle.....................6
4FillingtheEnginewithOil.................................6
5AdjustingtheControlCable..............................6
ProductOverview.....................................................7
Specications....................................................7
Attachments/Accessories...................................7
Operation..................................................................8
BeforeOperation...................................................8
BeforeOperationSafety.....................................8
FillingtheFuelT ank............................................9
CheckingtheEngine-OilLevel..........................10
DuringOperation.................................................10
DuringOperationSafety...................................10
StartingtheEngine............................................11
EngagingtheRotorBlades...............................12
DisengagingtheRotorBlades..........................12
ShuttingOfftheEngine.....................................13
AdjustingtheDischargeChuteandChute
Deector.......................................................13
ClearingaCloggedDischargeChute................13
Self-PropellingtheSnowthrower......................13
OperatingTips.................................................14
AfterOperation....................................................14
AfterOperationSafety......................................14
PreventingFreeze-upafterUse........................14
Maintenance...........................................................15
RecommendedMaintenanceSchedule(s)...........15
MaintenanceSafety..........................................15
MaintenanceSafety..........................................15
CheckingandAdjustingtheControl
Cable............................................................15
InspectingtheRotorBlades..............................16
ChangingtheEngineOil...................................16
ServicingtheSparkPlug...................................18
ReplacingtheDriveBelt...................................18
Storage...................................................................20
StorageSafety..................................................20
StoringtheMachine..........................................20
2

Safety
GeneralSafety
Thisproductiscapableofamputatinghandsand
feetandofthrowingobjects.Alwaysfollowallsafety
instructionstoavoidseriouspersonalinjury.
•Readandunderstandthecontentsofthis
Operator’sManualbeforeyoustarttheengine.
Ensurethateveryoneusingthisproductknows
howtouseit,knowshowtoshutofftheengine
quickly,andunderstandsthewarnings.
•Shutofftheenginewheneveryouleavethe
operatingpositionforanyreason.
•Shutofftheenginebeforeuncloggingthemachine
andalwaysuseastickorthesnow-cleanouttool
(ifprovided).
•Donotoperatethemachinewithoutallguards
andothersafetyprotectivedevicesinplaceand
working.
•Keepclearofanydischargeopening.Keep
bystanders,especiallysmallchildren,outofthe
operatingarea.
•Neverallowchildrentooperatethemachine.
3
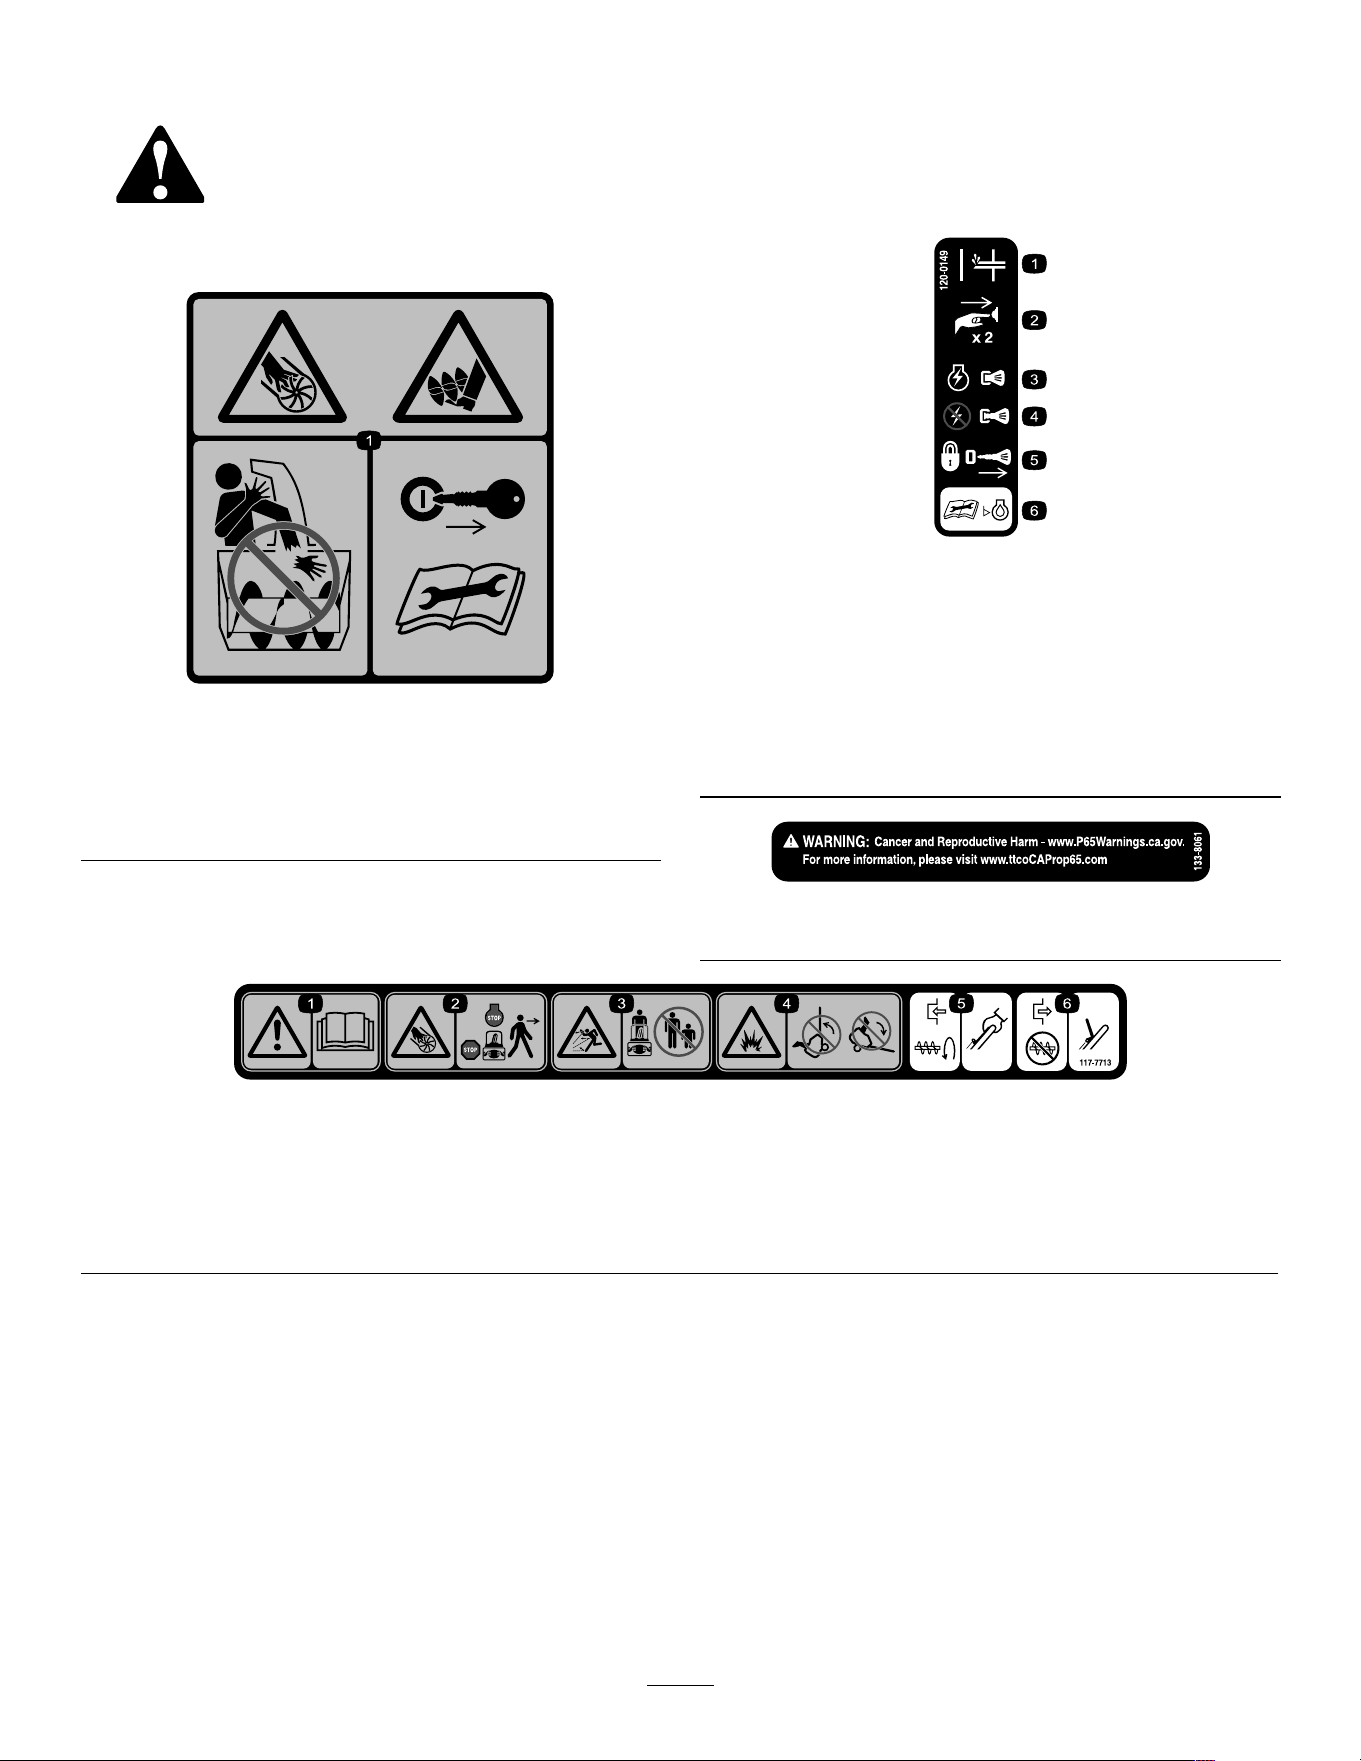
SafetyandInstructionalDecals
Safetydecalsandinstructionsareeasilyvisibletotheoperatorandarelocatednearanyarea
ofpotentialdanger.Replaceanydecalthatisdamagedormissing.
Orderpartnumber117–9121.
decal115-5698
115–5698
1.Cutting/dismembermenthazard,impeller;
cutting/dismembermenthazard,auger—donot
placeyourhandinthechute;removethekeyandreadthe
Operator’sManualbeforeperformingmaintenance.
decal120-0149
120-0149
1.Primer4.Pullthekeytoswitchthe
engineswitchoff.
2.Pushtheprimer2timesto
primetheengine.
5.Removethekeytolock
themachine.
3.Pushinthekeytoswitch
theengineon.
6.ReadtheOperator’s
Manualbeforechecking
theengine-oillevel.
decal133-8061
133-8061
decal117-7713
117-7713
1.Warning—readtheOperator'sManual.4.Explosionhazard—donottipmachineforwardorbackward.
2.Cutting/dismembermenthazard,impeller—shutofftheengine
andwaitfortheaugertostopbeforeleavingthemachine.
5.Toengagetheauger,squeezethecontrolbar.
3.Thrownobjecthazard—keepbystandersaway.6.Todisengagetheauger,releasethecontrolbar.
4
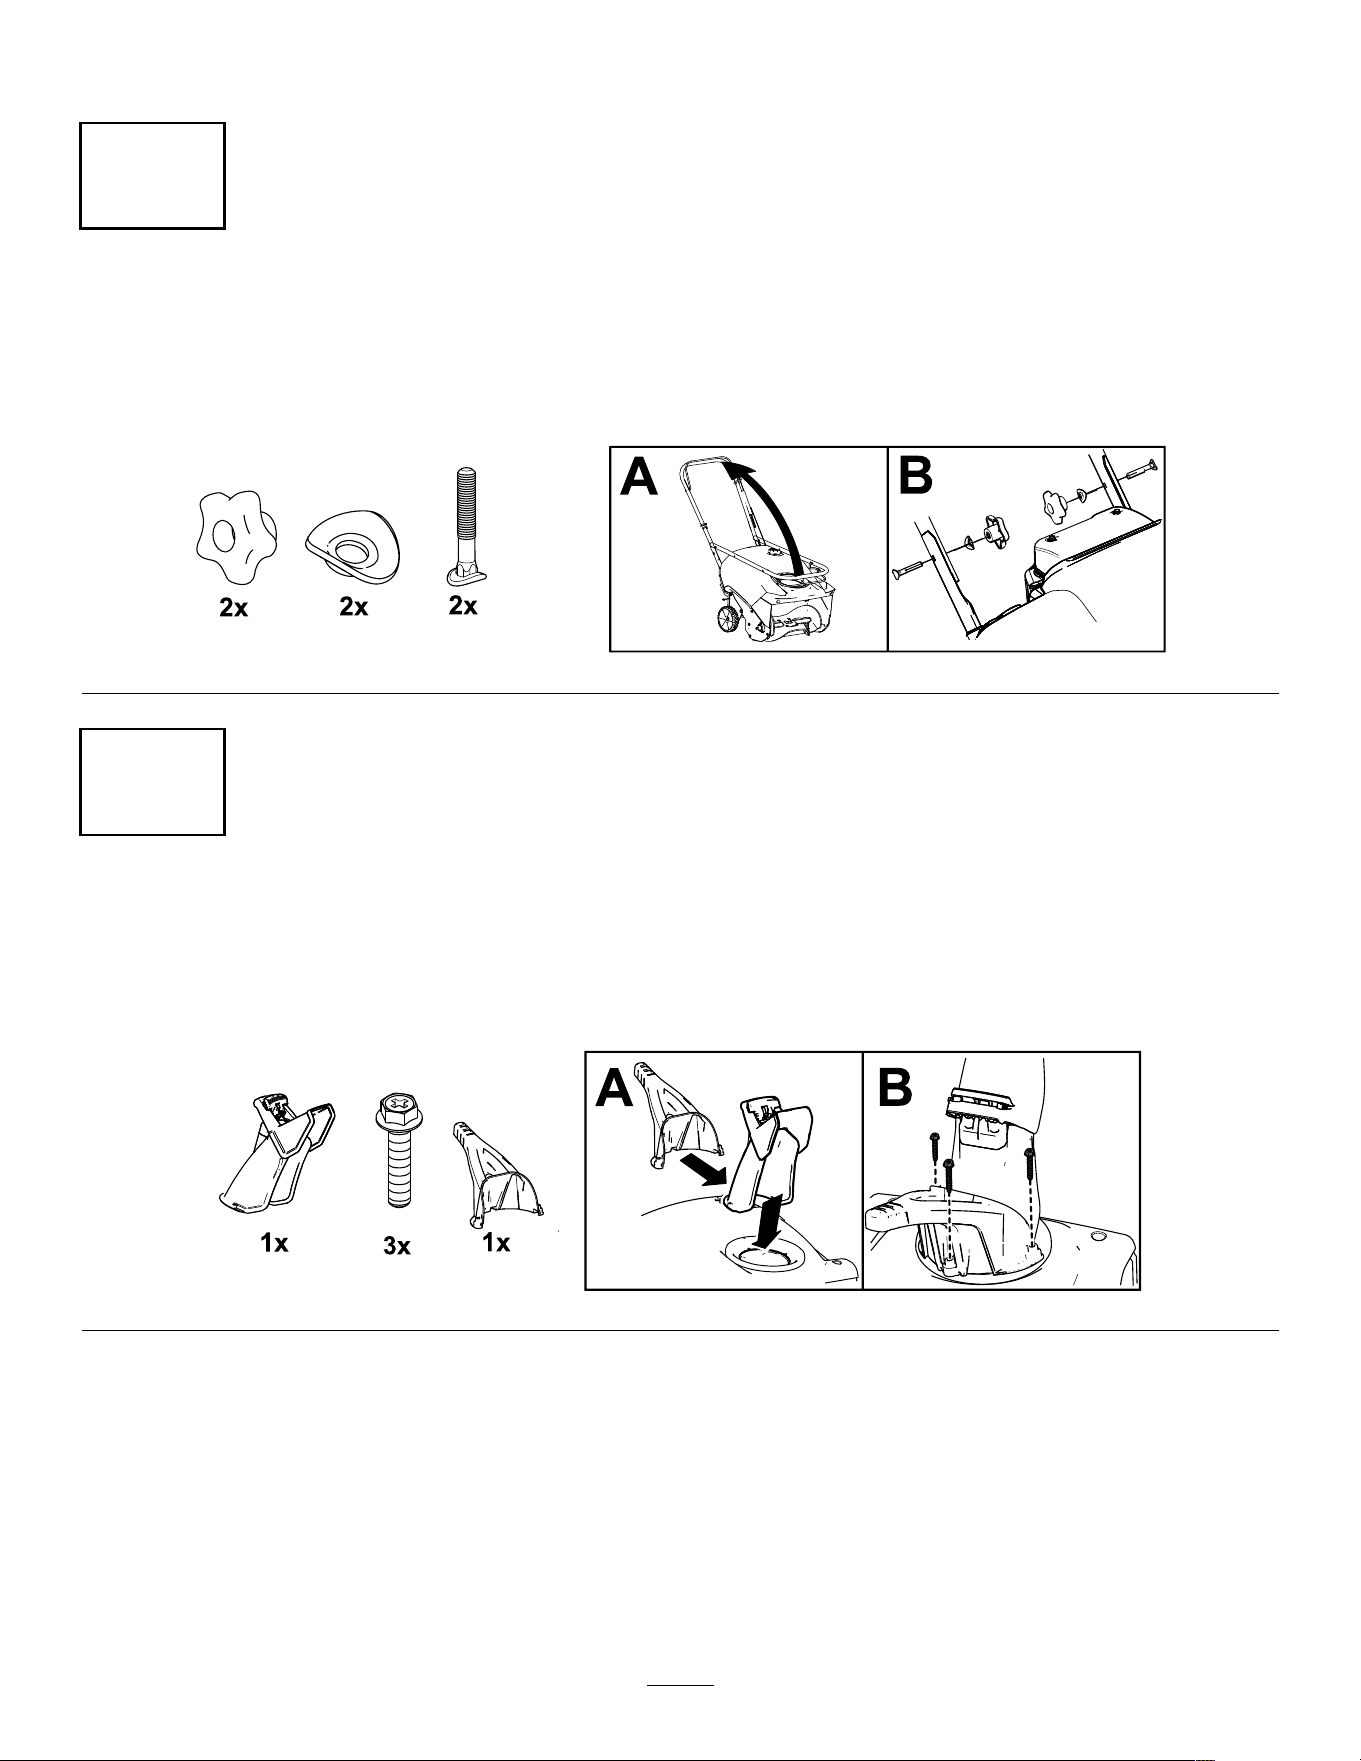
Setup
1
InstallingtheHandle
NoPartsRequired
Procedure
g385513
2
InstallingtheDischargeChute
NoPartsRequired
Procedure
g385514
5
3
InstallingtheRecoil-StartHandle
NoPartsRequired
Procedure
g253609
4
FillingtheEnginewithOil
NoPartsRequired
Procedure
g253610
6
5
AdjustingtheControlCable
NoPartsRequired
Procedure
RefertoCheckingandAdjustingtheControlCable(page15).
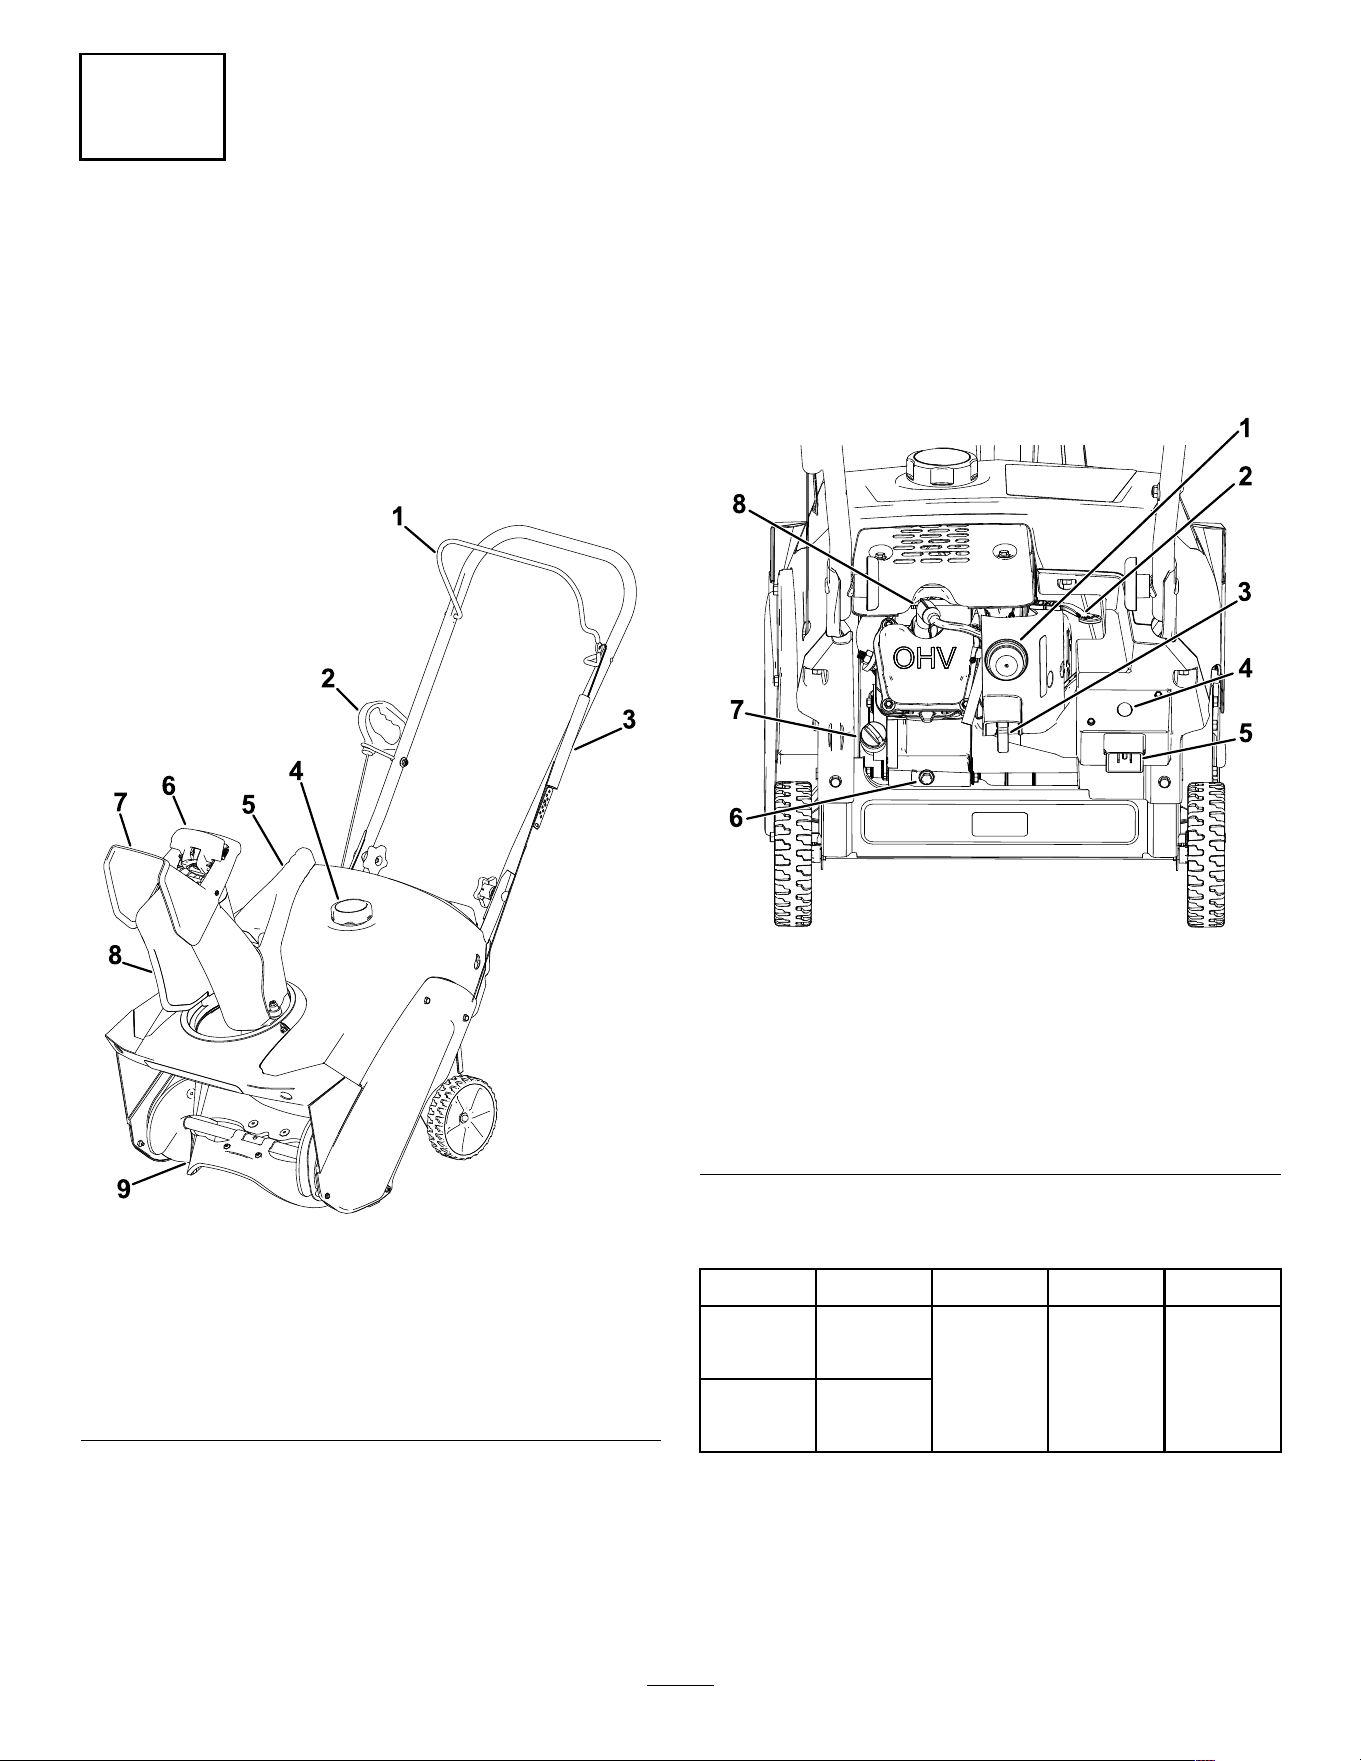
ProductOverview
g388294
Figure8
1.Controlbar
6.Chute-deectortrigger
2.Recoil-starthandle
7.Chutedeector
3.Springcover
8.Dischargechute
4.Fuel-tankcap9.Rotorblades
5.Chutehandle
g388306
Figure9
1.Primer
5.Plug-inforelectricstart
(electric-startmodelonly)
2.Chokelever6.Oil-drainplug
3.Key
7.Oil-llcap
4.Electric-startbutton
(electric-startmodelonly)
8.Sparkplug
Specications
ModelWeightLengthWidthHeight
24.5kg
38474
(55lb)94cm48cm114cm
26.8kg
38475
(59lb)
(37
inches)
(19
inches)
(45
inches)
Attachments/Accessories
AselectionofT oroapprovedattachmentsand
accessoriesisavailableforusewiththemachine
toenhanceandexpanditscapabilities.Contact
7

yourAuthorizedServiceDealerorauthorizedT oro
distributororgotowww.Toro.comforalistofall
approvedattachmentsandaccessories.
Toensureoptimumperformanceandcontinuedsafety
certicationofthemachine,useonlygenuineToro
replacementpartsandaccessories.Replacement
partsandaccessoriesmadebyothermanufacturers
couldbedangerous,andsuchusecouldvoidthe
productwarranty.
Operation
Note:Determinetheleftandrightsidesofthe
machinefromthenormaloperatingposition.
BeforeOperation
BeforeOperationSafety
GeneralSafety
•Forelectric-startmodelsonly:Useextension
cordsandreceptaclesasspeciedinthemanual.
Inspecttheelectricalcordbeforepluggingitinto
apowersource.Ifthecordisdamaged,replace
it.Unplugthepowercordwheneveryouarenot
startingthemachine.
•Wearappropriateclothing,includingeye
protection;longpants;substantial,slip-resistant
footwear;andhearingprotection.Tiebacklong
hair,securelooseclothing,anddonotwearloose
jewelry.
•Thoroughlyinspecttheareawhereyouwillusethe
machine,andremovealldoormats,sleds,boards,
wires,andotherforeignobjects.
•Ifashield,safetydevice,ordecalisdamaged,
illegible,ormissing,repairorreplaceitbefore
beginningoperation.Also,tightenanyloose
fasteners.
FuelSafety
Fuelisextremelyammableandexplosive.Areor
explosionfromfuelcanburnyouandothers.
•Topreventastaticchargefromignitingthefuel,
placethecontainerand/ormachineontheground
beforelling,notinavehicleoronanobject.
•Fillthefueltankoutdoorswhentheengineiscold.
Replacethefuelcapsecurelyandwipeupspills.
•Donothandlefuelwhensmokingoraroundan
openameorsparks.
•Storefuelinanapprovedfuelcontainer,outofthe
reachofchildren.
•Whenfuelisinthetank,tipthemachineonlyas
directedintheinstructions.
•Ifyouspillfuelonyourclothing,changeyour
clothingimmediately.
8
FillingtheFuelTank
•Forbestresults,useonlyclean,fresh(lessthan
30daysold),unleadedgasolinewithanoctane
ratingof87orhigher((R+M)/2ratingmethod).
•Oxygenatedfuelwithupto10%ethanolor15%
MTBEbyvolumeisacceptable.
•Donotuseethanolblendsofgasoline(such
asE15orE85)withmorethan10%ethanolby
volume.Performanceproblemsand/orengine
damagemayresultwhichmaynotbecovered
underwarranty.
•Donotusegasolinecontainingmethanol.
•Donotstorefueleitherinthefueltankorfuel
containersoverthewinterunlessyouuseafuel
stabilizer.
•Donotaddoiltogasoline.
Donotllabovethebottomofthefueltankneck
(Figure10).
g216203
Figure10
Important:Forbestresults,purchaseonlythe
quantityoffuelthatyouexpecttousein30days.
Otherwise,youmayusefuelstabilizer/conditioner
inthemachineatalltimestokeepthefuelfresh
longerwhenusedasdirectedbythefuel-stabilizer
manufacturer.
9
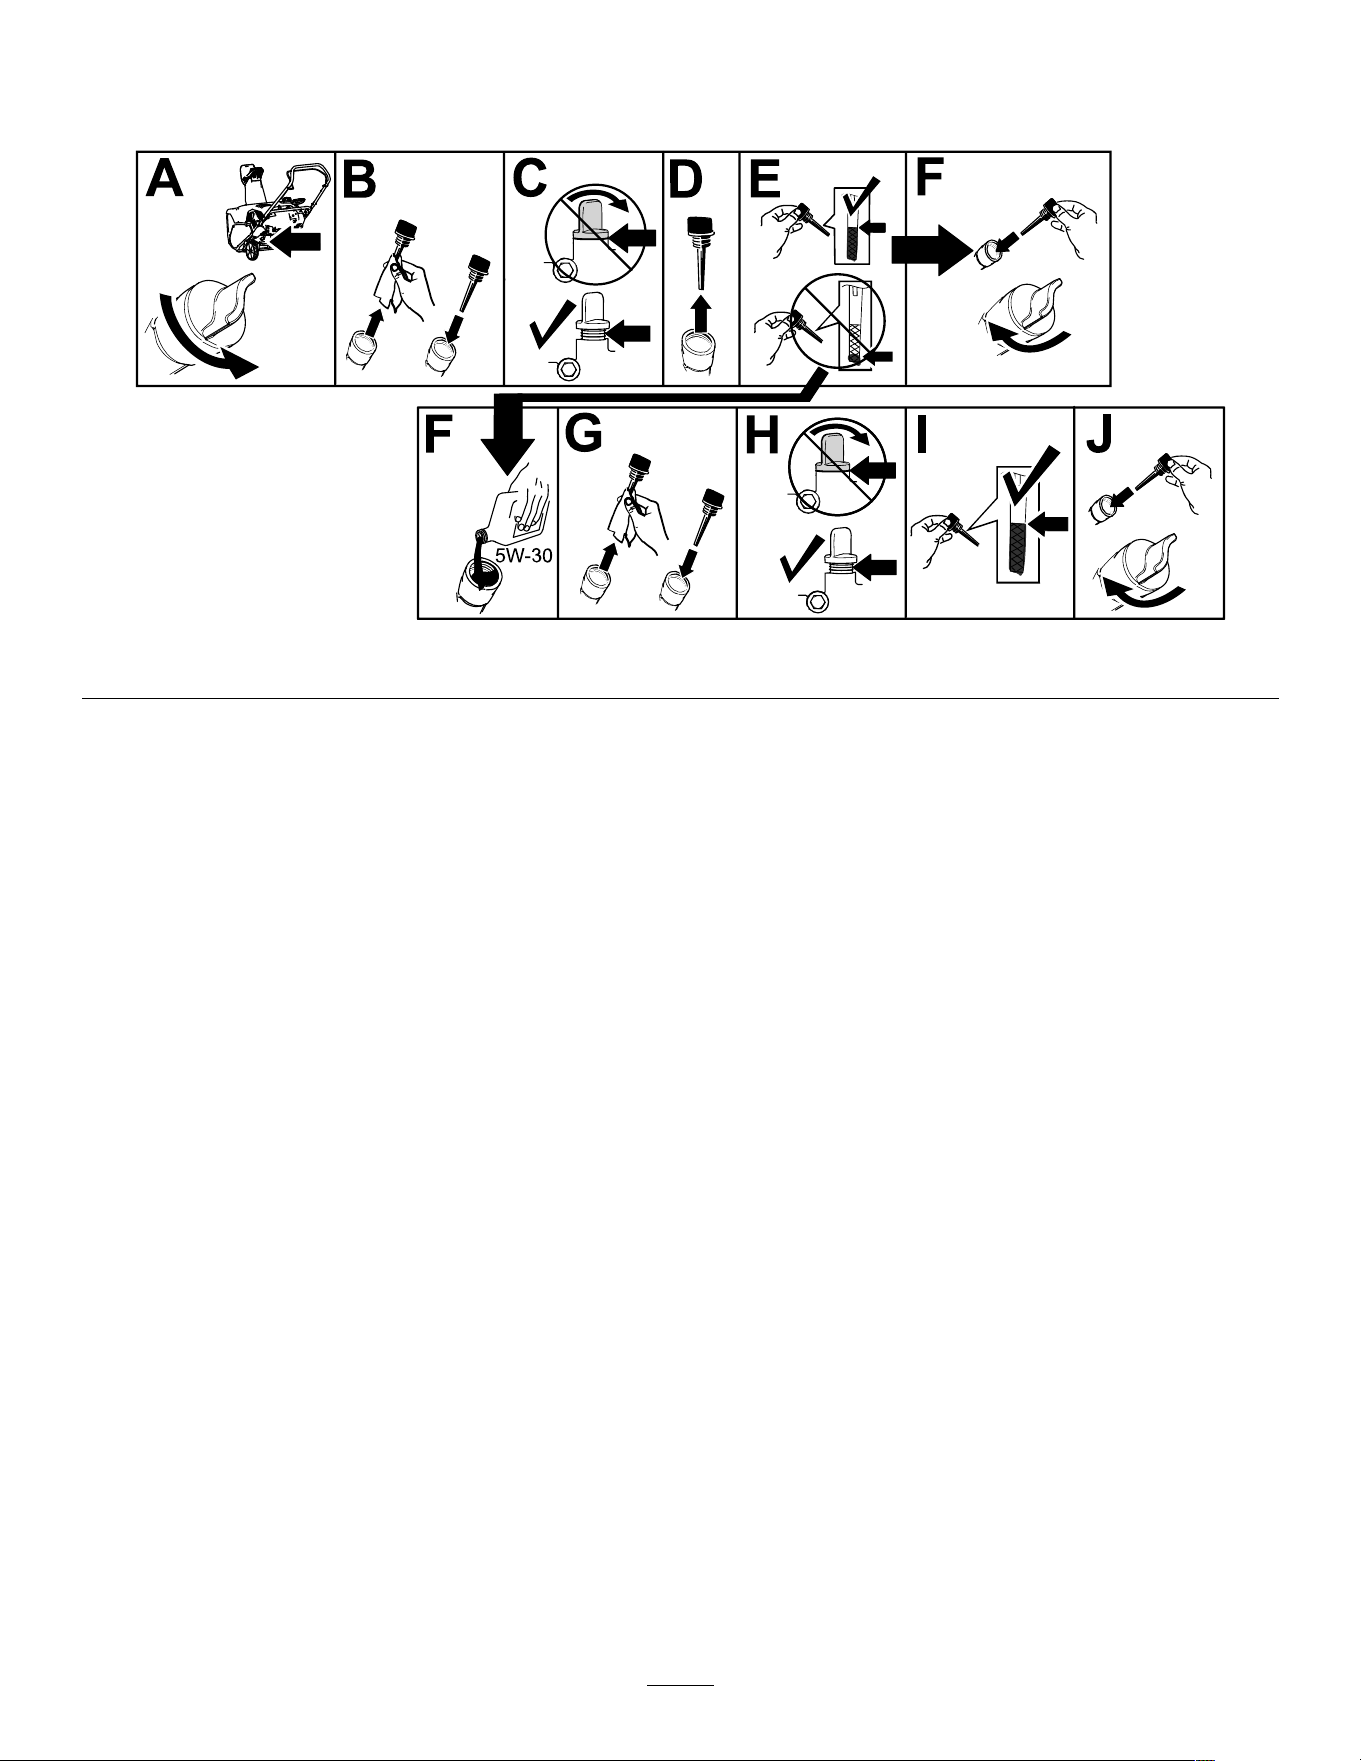
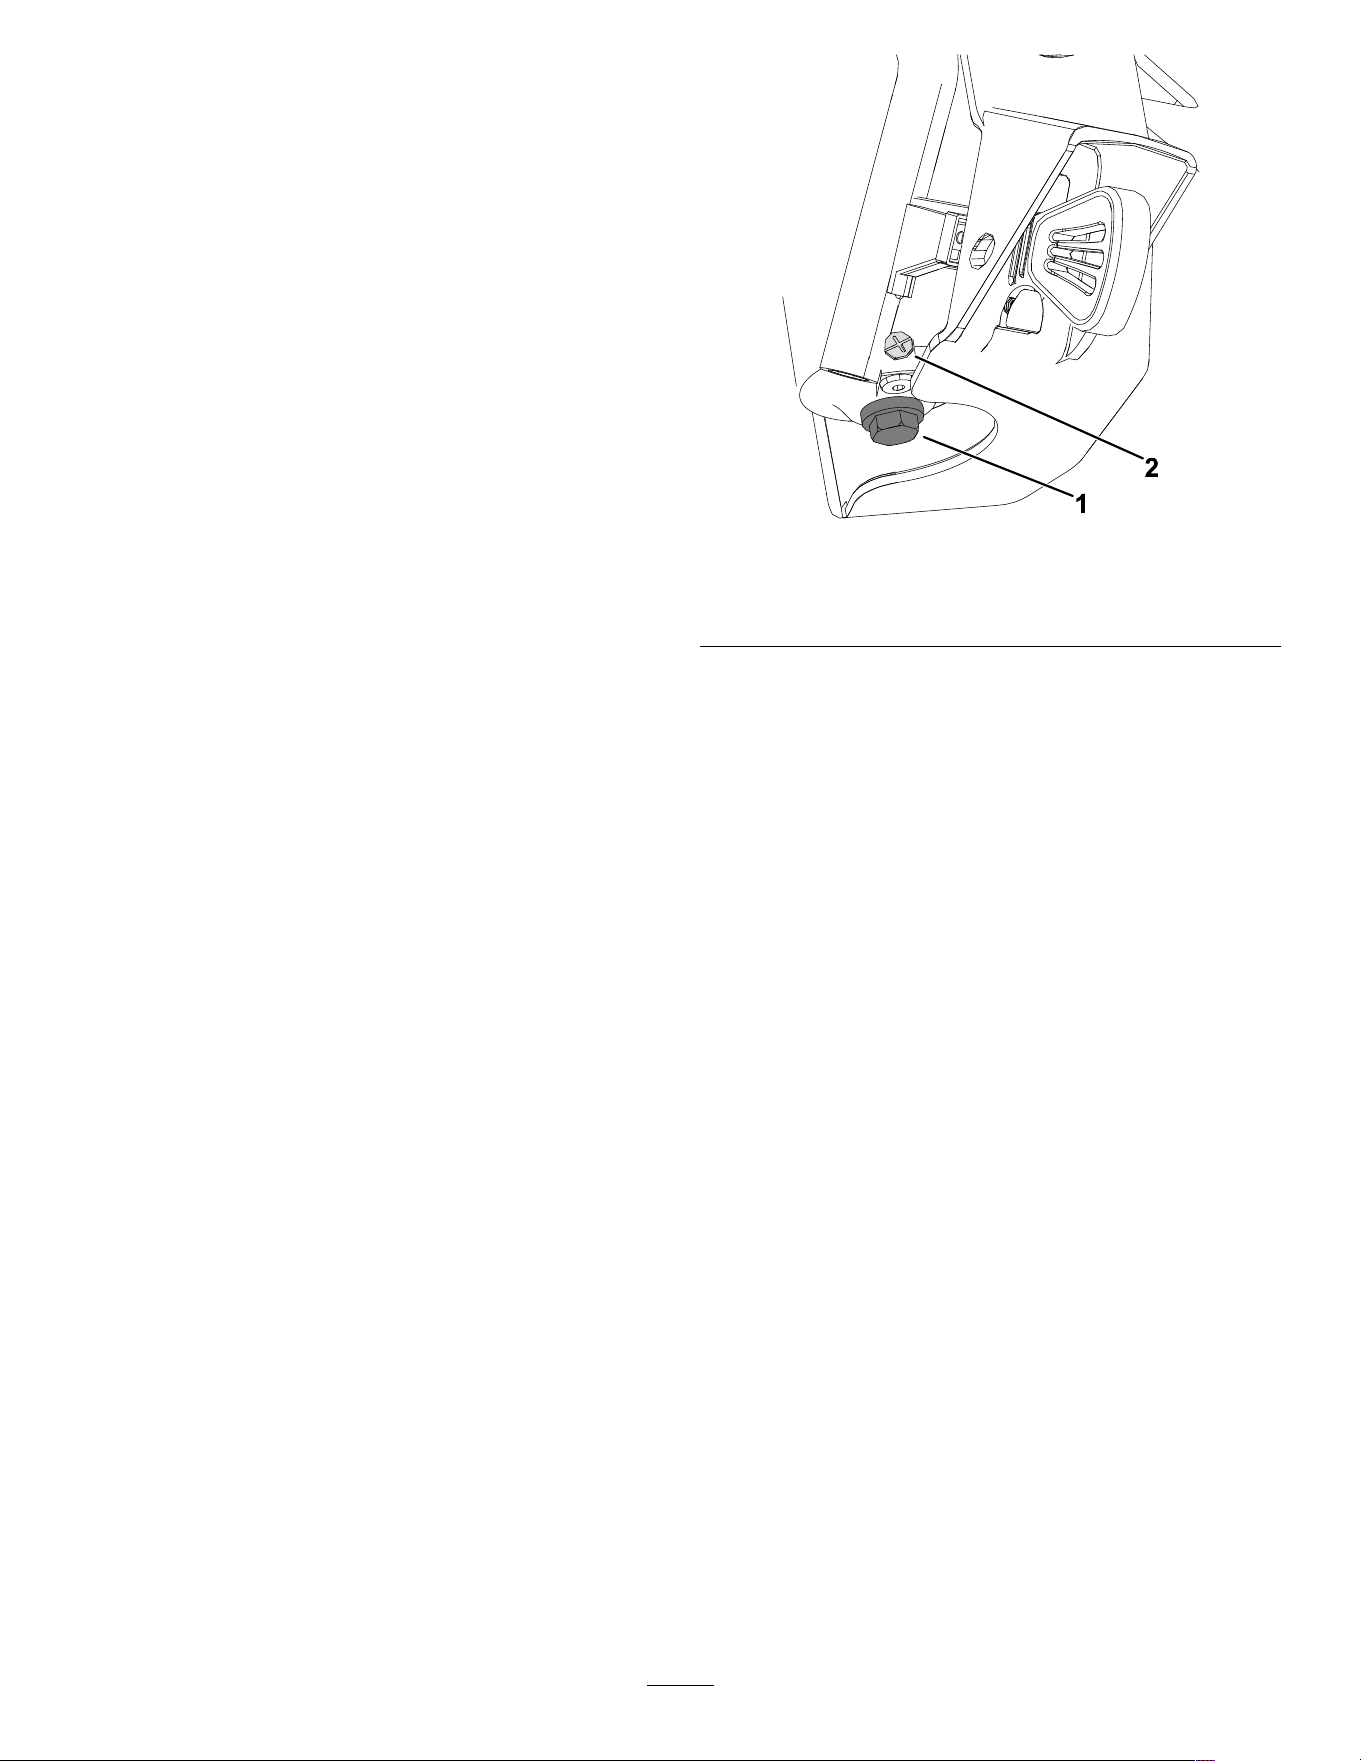
CheckingtheEngine-OilLevel
ServiceInterval:Beforeeachuseordaily
g293231
Figure11
DuringOperation
DuringOperationSafety
GeneralSafety
•Shutofftheenginebeforeuncloggingthe
machineandalwaysuseastickorthe
snow-cleanouttool(ifprovided).
•Staybehindthehandlesandawayfromthe
dischargeopeningwhileoperatingthemachine.
Keepyourface,hands,feet,andanyotherpart
ofyourbodyorclothingawayfrommovingor
rotatingparts.
•Neverdirectthedischargetowardpeopleorareas
wherepropertydamagecanoccur.
•Useyourfullattentionwhileoperatingthe
machine.Donotengageinanyactivitythat
causesdistractions;otherwise,injuryorproperty
damagemayoccur.
•Exercisecautiontoavoidslippingorfalling,
especiallywhenoperatingthemachineinreverse.
•Alwaysbesureofyourfooting,andkeeparm
holdonthehandles.Walk;neverrun.
•Exerciseextremecautionwhenoperatingthe
machineonaslope.
•Donotoperatethemachinewithoutgoodvisibility
orlight.
•Lookbehindandusecarewhenbackingupthe
machine.
•Whennotactivelyclearingsnow,disengagepower
totheauger.
•Exerciseextremecautionwhenoperatingthe
machineonwalksorroads.Stayalertforhidden
hazardsortrafc.
•Neverattempttomakeanyadjustmentswhile
theengineisrunning,exceptasdirectedinthe
instructions.
•Afterstrikingaforeignobject,shutofftheengine,
removethekey,andinspectthemachinefor
damage.Repairanydamagebeforestartingthe
machine.
•Ifthemachinestartstovibrateabnormally,shutoff
theengineandcheckimmediatelyforthecause.
•Donotruntheengineindoors;exhaustfumesare
dangerous.
•Donotoverloadthemachinecapacityby
attemptingtoclearsnowattoofastarate.
•Shutofftheenginewheneveryouleavethe
operatingposition,beforeclearingorunclogging
thecollector,rotor,ordischargechute,andwhen
makinganyrepairs,adjustments,orinspections.
10
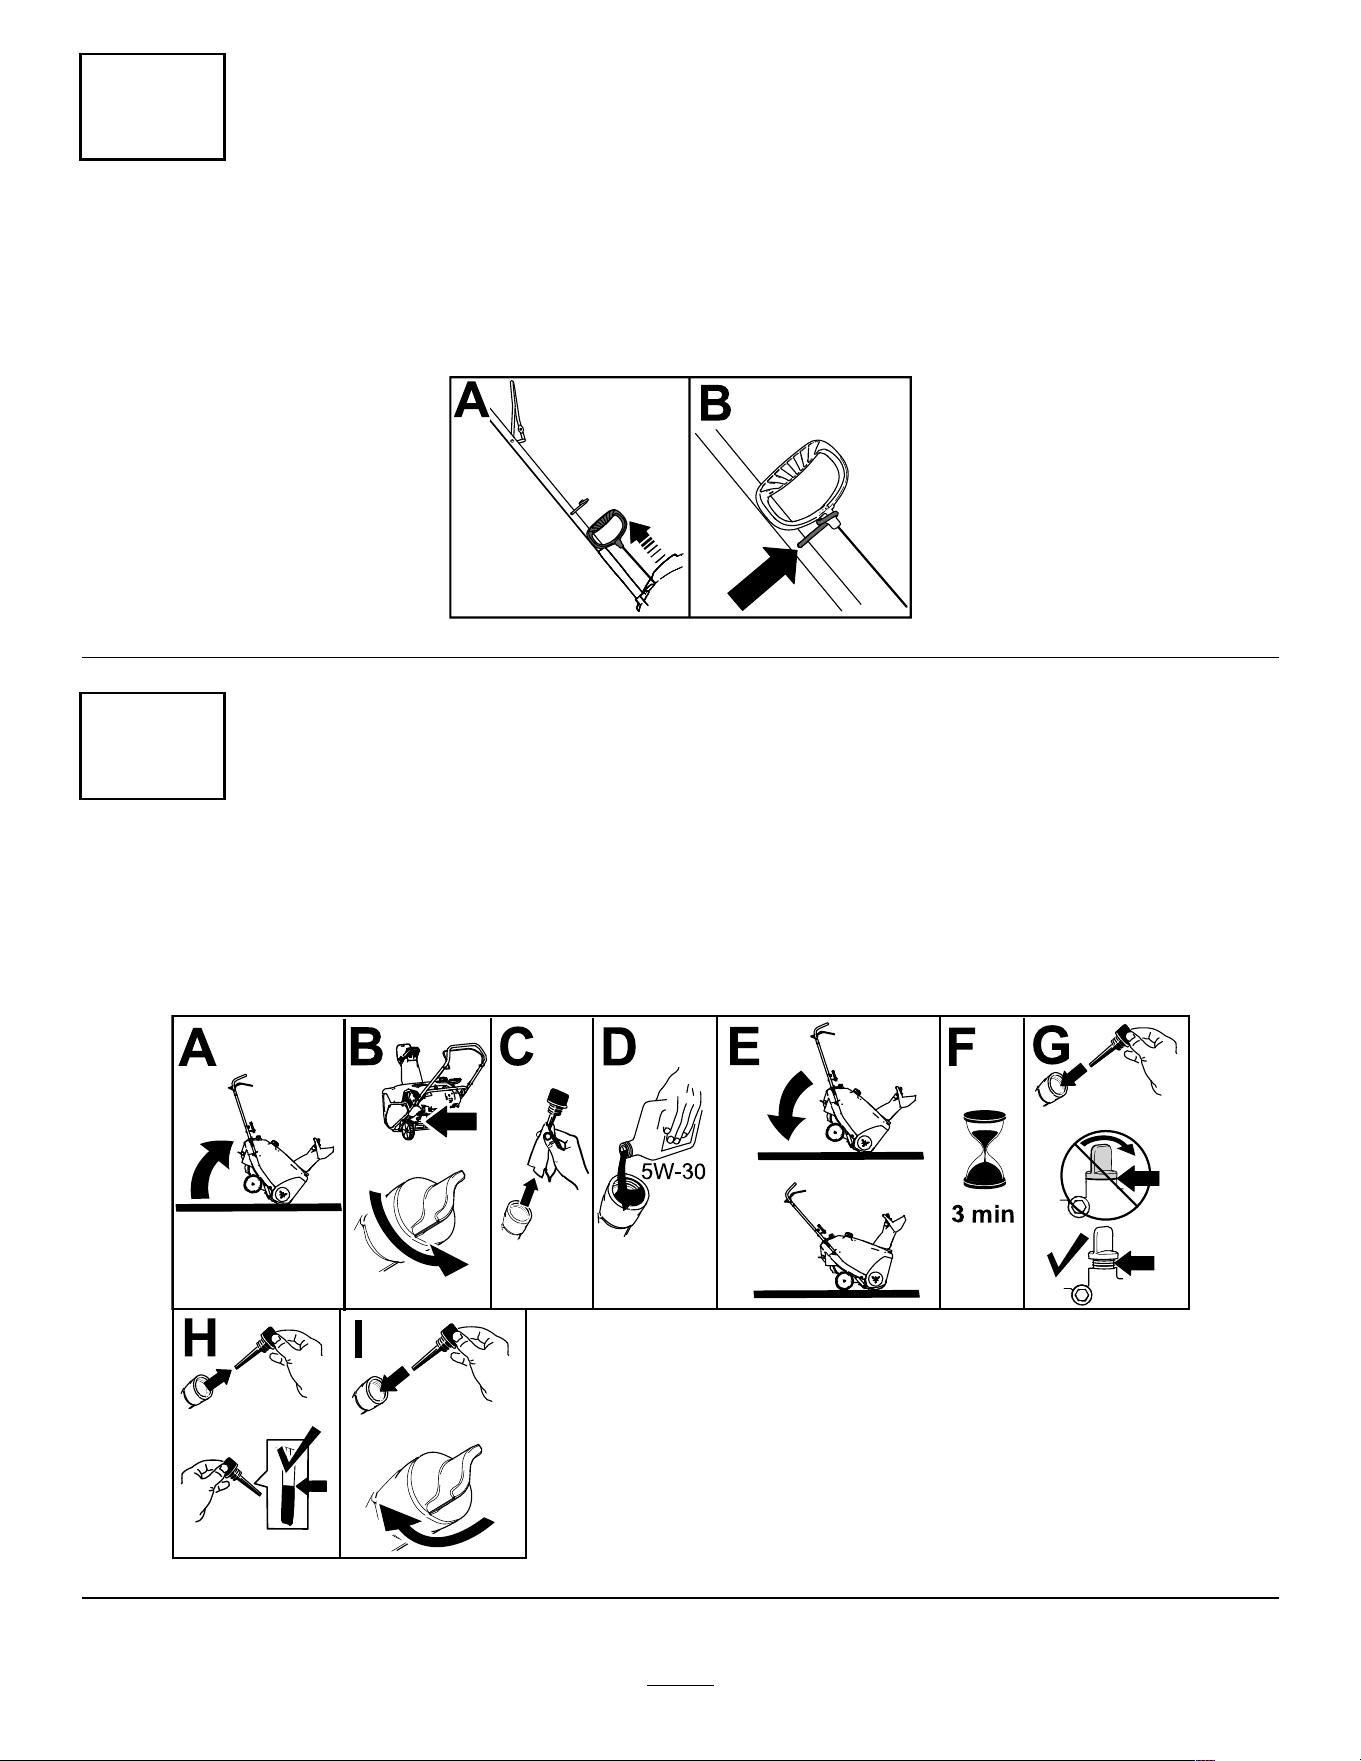
StartingtheEngine
Electric-StartModel
Note:Removeyourglovewhenyoupushintheprimersothataircannotescapefromtheprimerhole.
Important:Donotusetheprimerorthechokeiftheenginehasbeenrunningandishot.Excessive
primingmayoodtheengineandpreventitfromstarting.
Tousetheelectricstarter(electric-startmodelsonly),connectapowercordtotheelectric-startplug-inrst
andthentoagroundfaultcircuitinterrupter(GFCI)poweroutlet.UseonlyaUL-listed,16-gaugepowercord
recommendedforoutdoorusethatisnotlongerthan15m(50ft).
WARNING
Theelectricalcordcanbecomedamaged,causingashockorre.
Thoroughlyinspecttheelectricalcordbeforepluggingitintoapowersource.Ifthecord
isdamaged,donotuseit.Replaceorrepairthedamagedcordimmediately.Contactan
AuthorizedServiceDealerforassistance.
Important:Runtheelectricstarternomorethan10timesatintervalsof5secondson,then5seconds
off.Runningtheelectricstarterextensivelycanoverheatanddamageit.Iftheenginedoesnotstart
afterthisseriesofattempts,waitatleast40minutestoallowthestartertocoolbeforeattemptingto
startitagain.Iftheenginedoesnotstartafterthesecondseriesofattempts,takethemachinetoan
AuthorizedServiceDealerforservice.
CAUTION
Ifyouleavethemachinepluggedintoapowersource,someonecaninadvertentlystartthe
machineandinjurepeopleordamageproperty(electric-startmodelsonly).
Unplugthepowercordwheneveryouarenotstartingthemachine.
g388239
Figure12
11
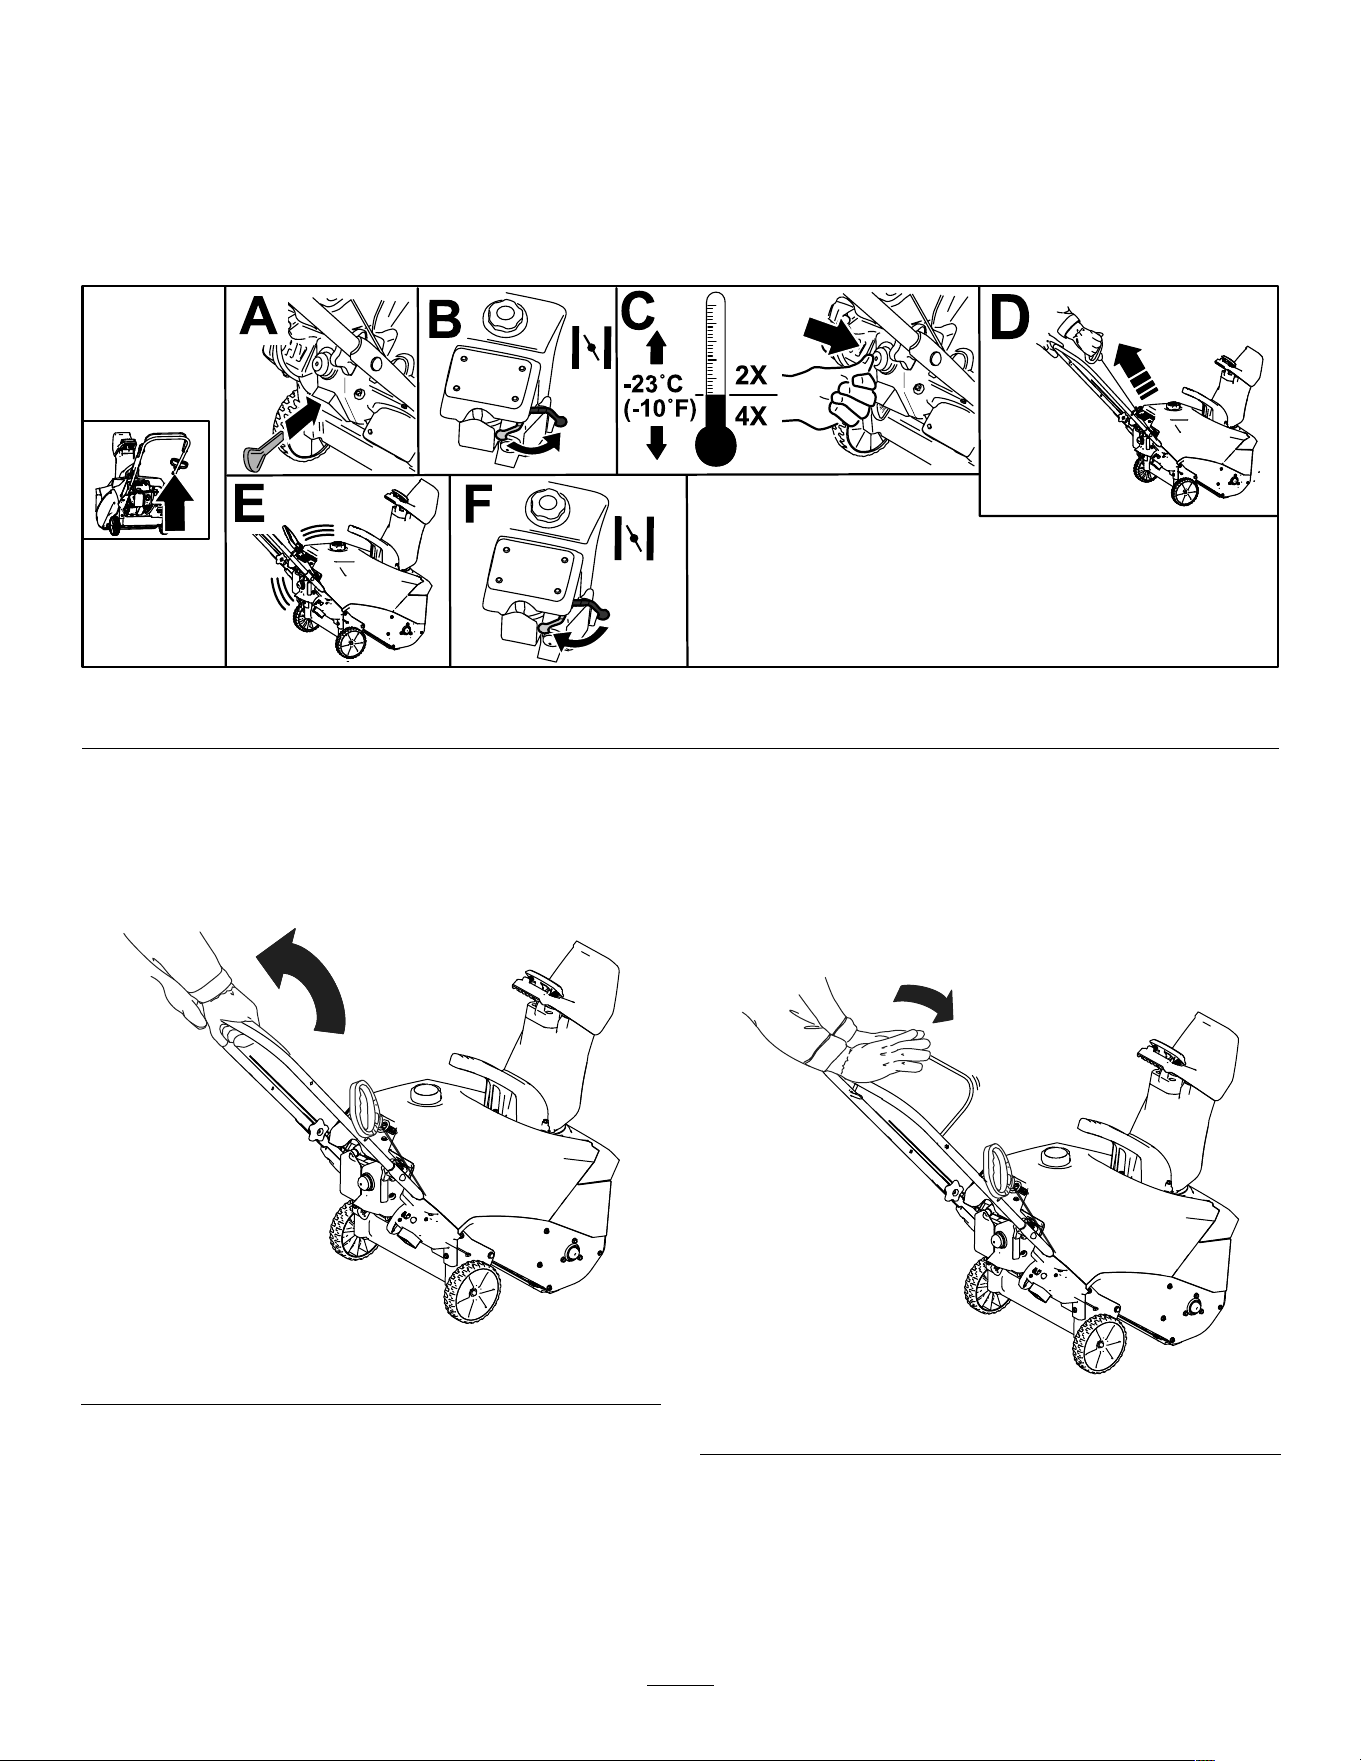
StandardModel
Note:Removeyourglovewhenyoupushintheprimersothataircannotescapefromtheprimerhole.
Important:Donotusetheprimerorthechokeiftheenginehasbeenrunningandishot.Excessive
primingmayoodtheengineandpreventitfromstarting.
Iftherecoilstarterdoesnotoperateproperly,itmaybefrozen.Thawoutthestarterbeforeattemptingto
startthemachine.
g388240
Figure13
EngagingtheRotorBlades
Toengagetherotorblades,holdthecontrolbar
againstthehandle(Figure14).
g388347
Figure14
DisengagingtheRotor
Blades
Todisengagetherotorblades,releasethecontrolbar
(Figure15).
g388350
Figure15
12
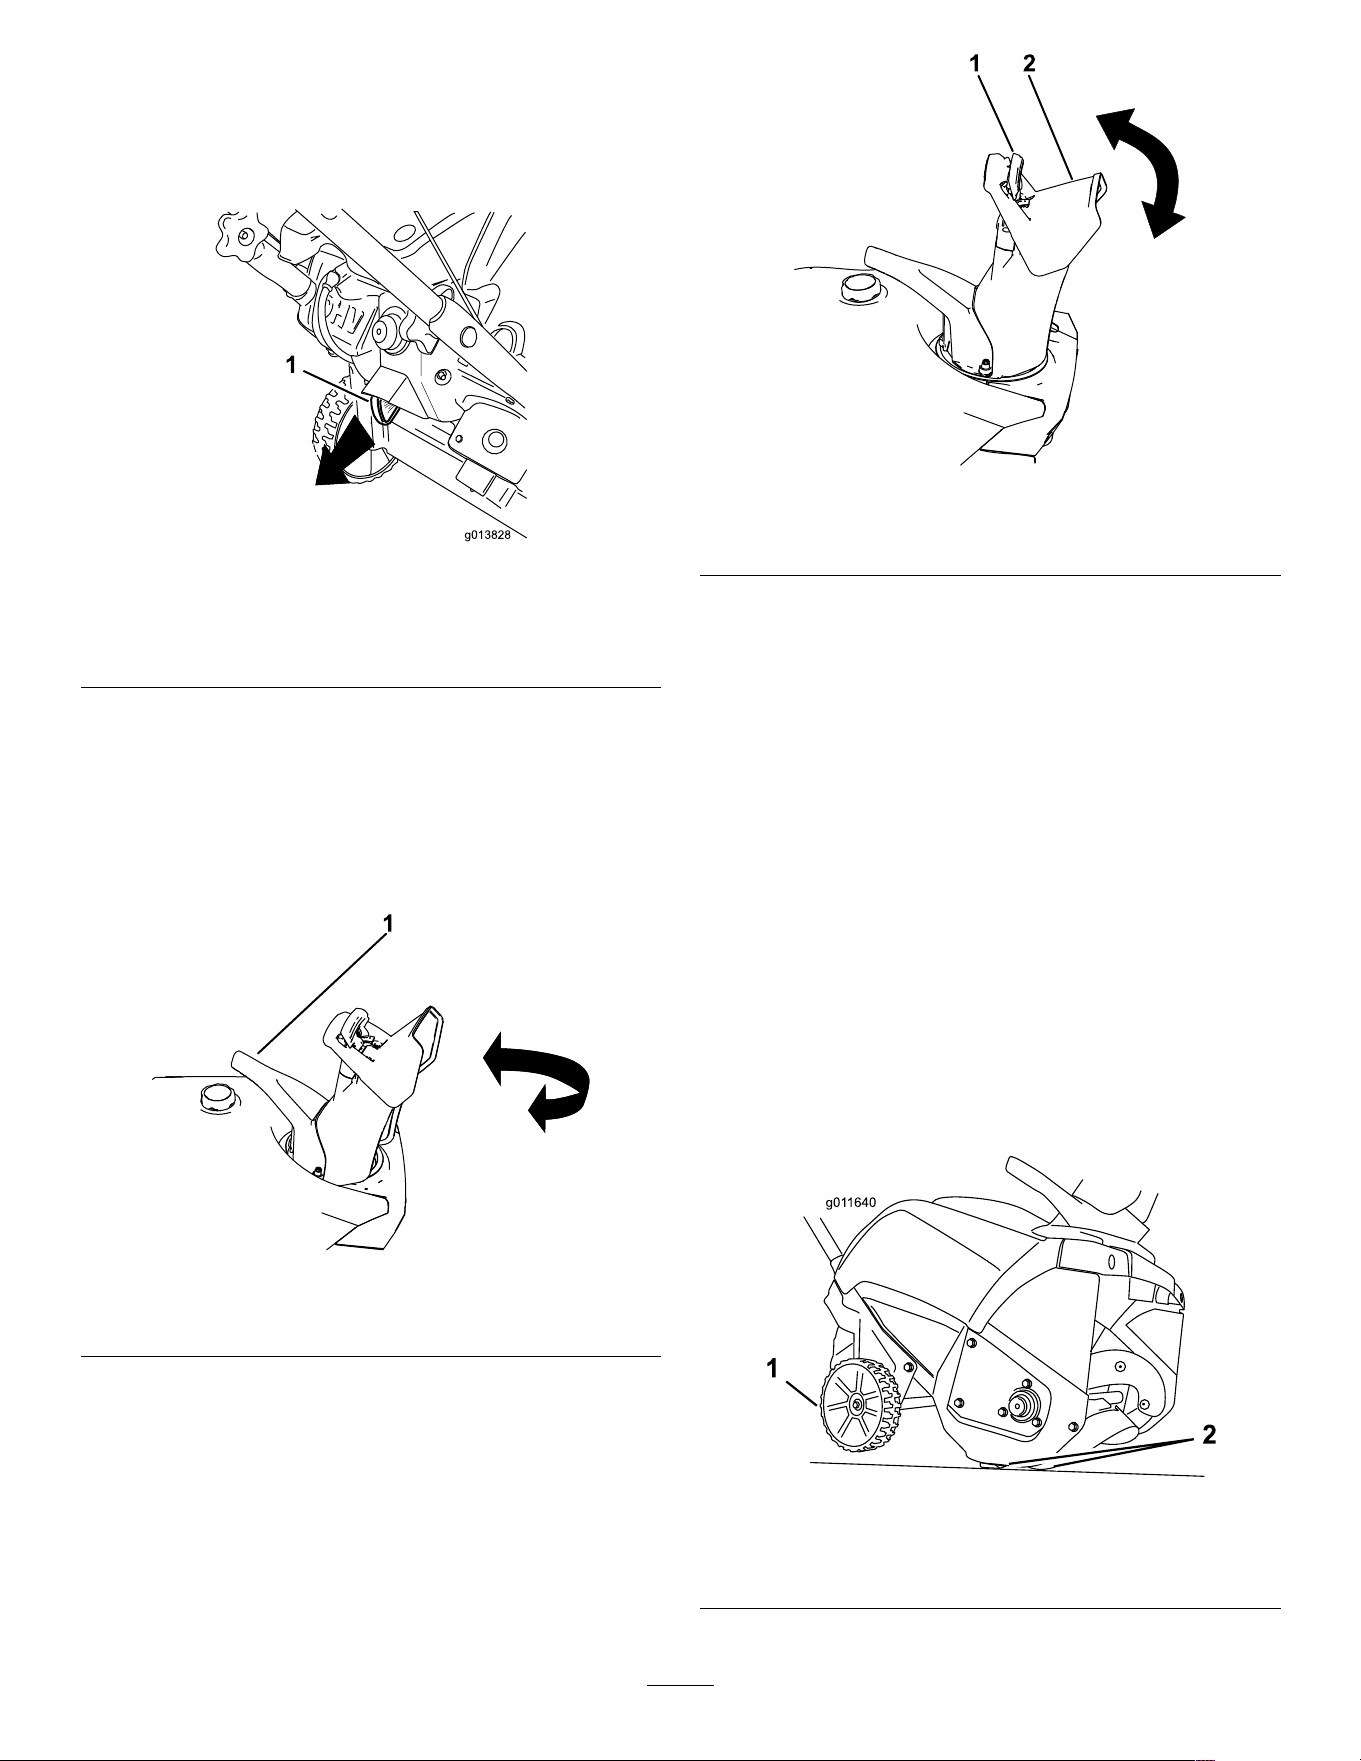
ShuttingOfftheEngine
Toshutofftheengine,pulltheignitionkeyoutward
untilitclicksintotheOFFposition(Figure16)ormove
thechokeleverfullytotheright(BofFigure13).
g013828
Figure16
1.Ignitionkey
AdjustingtheDischarge
ChuteandChuteDeector
Toadjustthedischargechute,movethechutehandle
asshowninFigure17.
g389211
Figure17
1.Chutehandle
Toraiseorlowertheangleofthechutedeector,
pressthetriggeronthechutedeectorandmovethe
chutedeectorupordown(Figure18).Releasethe
triggertolockthechutedeectorinplace.
g389212
Figure18
1.Trigger
2.Chutedeector
ClearingaClogged
DischargeChute
Toclearthechute:
•Shutofftheengine.
•Wait10secondstoensurethattherotorblades
havestoppedrotating.
•Alwaysuseaclean-outtool;neveruseyourhands.
Self-Propellingthe
Snowthrower
Liftthemachinehandleuntilthewheelsarejustoff
thegroundandthescraperandrotorbladestouchthe
ground.Themachinepropelsforward(Figure19).
g011640
Figure19
1.Wheelsofftheground2.Scraperandrotorblades
incontractwiththeground
13

Note:Byslightlyvaryingliftingforceonthehandle,
youcancontroltheforwardspeedofthemachine.In
heavysnow,pushforwardonthehandle,ifnecessary,
butletthemachineworkatitsownpace.Donotlift
thehandleanymorethannecessary,becausethe
scraperliftsoffthegroundandsnowescapesbehind
themachine.
OperatingTips
WARNING
Therotorbladescanthrowstones,toys,
andotherforeignobjectsandcauseserious
personalinjurytoyouorbystanders.
•Keeptheareatobeclearedfreeofall
objectsthattherotorbladescouldpickup
andthrow.
•Keepallchildrenandpetsawayfromthe
areaofoperation.
•Themachinemayleaverubbermarksonnew
brushedorlight-coloredconcrete.T estonan
inconspicuouslocationbeforeuse.
•Removethesnowassoonaspossibleafteritfalls.
•Overlapeachswathtoensurecompletesnow
removal.
•Dischargethesnowdownwindwheneverpossible.
•Ifthemachinedoesnotpropelitselfforwardon
slipperysurfacesorinheavysnow,pushforward
onthehandle,butallowthemachinetoworkat
itsownpace.
AfterOperation
AfterOperationSafety
GeneralSafety
•Neverstorethemachinewithfuelinthefuel
tankinsideabuildingwhereignitionsourcesare
present,suchashotwaterheaters,spaceheaters,
orclothesdryers.Allowtheenginetocoolbefore
storingthemachineinanyenclosure.
•Whenstoringthemachineformorethan30
days,refertoStorage(page20)forimportant
information.
•Runthemachineafewminutesafterthrowing
snowtopreventfreeze-upofthecollectorand
rotor.
PreventingFreeze-upafter
Use
•Lettheenginerunforafewminutestoprevent
movingpartsfromfreezing.Shutofftheengine,
waitforallmovingpartstostop,andremoveice
andsnowfromthemachine.
•Cleanoffanysnowandicefromthebaseofthe
chute.
•Rotatethedischargechuteleftandrighttofree
itfromanyicebuildup.
•Withthekeyremoved,pulltherecoil-starthandle
severaltimesorconnecttheelectricalcordto
apowersourceandthemachineandpushthe
electric-startbuttononcetopreventtherecoil
starterand/ortheelectricstarterfromfreezingup
(electric-startmodelsonly).
•Insnowyandcoldconditions,somecontrolsand
movingpartsmayfreeze.Donotuseexcessive
forcewhentryingtooperatefrozencontrols.Ifyou
havedifcultyoperatinganycontrolorpart,start
theengineandletitrunforafewminutes.
14

Maintenance
RecommendedMaintenanceSchedule(s)
MaintenanceService
Interval
MaintenanceProcedure
Afterthersthour
•Checkthecontrolcableandadjustitifnecessary.
•Checkforloosefastenersandtightenthemifnecessary.
Aftertherst2hours
•Changetheengineoil.
Beforeeachuseordaily
•Checktheengine-oillevelandaddoilifnecessary.
Yearly
•Checkthecontrolcableandadjustitifnecessary.
•InspecttherotorbladesandhaveanAuthorizedServiceDealerreplacetherotor
bladesandscraperifnecessary.
•Changetheengineoil.
•Servicethesparkplugandreplaceitifnecessary.
•Checkforloosefastenersandtightenthemifnecessary.
•HaveanAuthorizedServiceDealerinspectthedrivebeltandreplaceitifnecessary.
Yearlyorbeforestorage
•Preparethemachineforstorage.
MaintenanceSafety
Readthefollowingsafetyprecautionsbefore
performinganymaintenanceonthemachine:
•Beforeservicing,adjusting,orcleaningthe
machine,shutofftheengineandremovethe
key.Ifmajorrepairsareeverneeded,contactan
AuthorizedServiceDealer.
•Alwaysweareyeprotectionwhileperformingan
adjustmentorrepairtoprotectyoureyesfrom
foreignobjectsthatthemachinemaythrow.
•Checkallfastenersatfrequentintervalsforproper
tightnesstoensurethatthemachineisinsafe
workingcondition.
•Donotchangethegovernorsettingsontheengine.
PurchaseonlygenuineT ororeplacementparts
andaccessories.
MaintenanceSafety
Readthefollowingsafetyprecautionsbefore
performinganymaintenanceonthemachine:
•Shutofftheengine,removethekey,andwait
forallmovementtostopbeforeyouleavethe
operator’sposition.Allowthemachinetocool
beforeadjusting,servicing,cleaning,orstoringit.
•Alwaysweareyeprotectionwhileperformingan
adjustmentorrepairtoprotectyoureyesfrom
foreignobjectsthatthemachinemaythrow.
•Checkallfastenersatfrequentintervalsforproper
tightnesstoensurethatthemachineisinsafe
workingcondition.
•Donotchangethegovernorsettingsontheengine.
PurchaseonlygenuineT ororeplacementparts
andaccessories.
CheckingandAdjustingthe
ControlCable
CheckingtheControlCable
ServiceInterval:Afterthersthour—Checkthe
controlcableandadjustitif
necessary.
Yearly—Checkthecontrolcableandadjustit
ifnecessary.
Important:Youmustcheckandmayneedto
adjustthecontrolcablebeforeyouoperatethe
machineforthersttime.
Movethecontrolbarbacktowardthehandleto
removetheslackinthecontrolcable(Figure20).
15
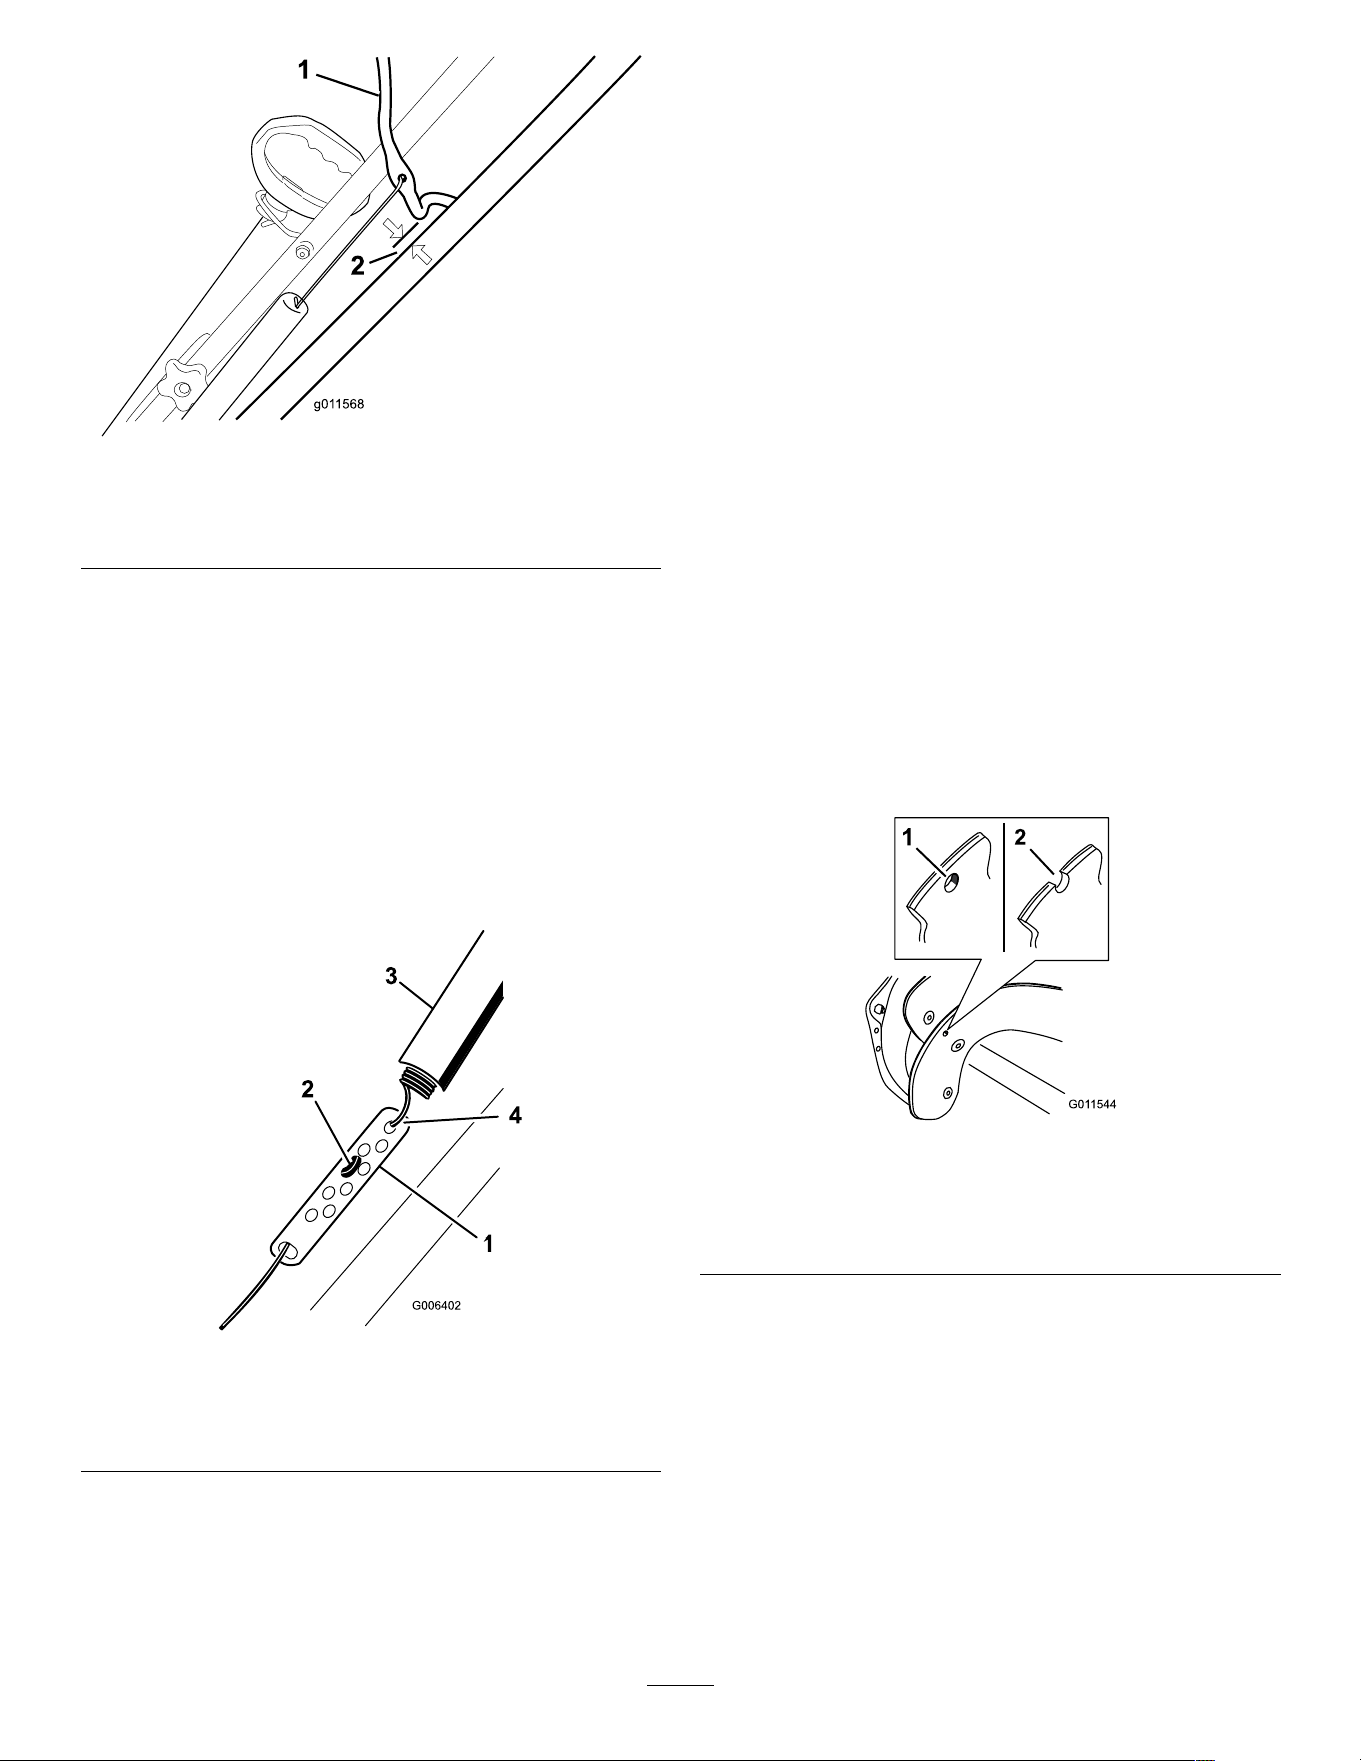
g011568
Figure20
1.Controlbar2.2to3mm(1/16to1/8
inch)
Note:Ensurethatagapof2to3mm(1/16to1/8
inch)existsbetweenthecontrolbarandthehandle
(Figure20).
Important:Thecontrolcablemustcontainsome
slackwhenyoudisengagethecontrolbarforthe
rotorbladestostopproperly.
AdjustingtheControlCable
1.Slideupthespringcoverandunhookthespring
fromtheadjusterlink(Figure21).
g006402
Figure21
1.Adjusterlink
3.Springcover
2.Z-tting
4.Unhookthespringhere.
Note:Youcanpulluptheadjusterlinkand
cabletomakeunhookingthespringeasier.
2.MovetheZ-ttingtoahigherorlowerholeon
theadjusterlinkasneededtoobtainthe2to3
mm(1/16to1/8inch)gapbetweenthecontrol
barandthehandle(Figure21).
Note:MovingtheZ-ttinghigherdecreasesthe
gapbetweenthecontrolbarandthehandle;
movingitlowerincreasesthegap.
3.Hookthespringtotheadjusterlinkandslidethe
springcoverovertheadjusterlink.
4.Checktheadjustment;refertoCheckingthe
ControlCable(page15).
Note:Thebeltmayslip(squeal)inwet
conditions;todryoutthedrivesystem,startthe
rotorandrunitwithoutaloadfor30seconds.
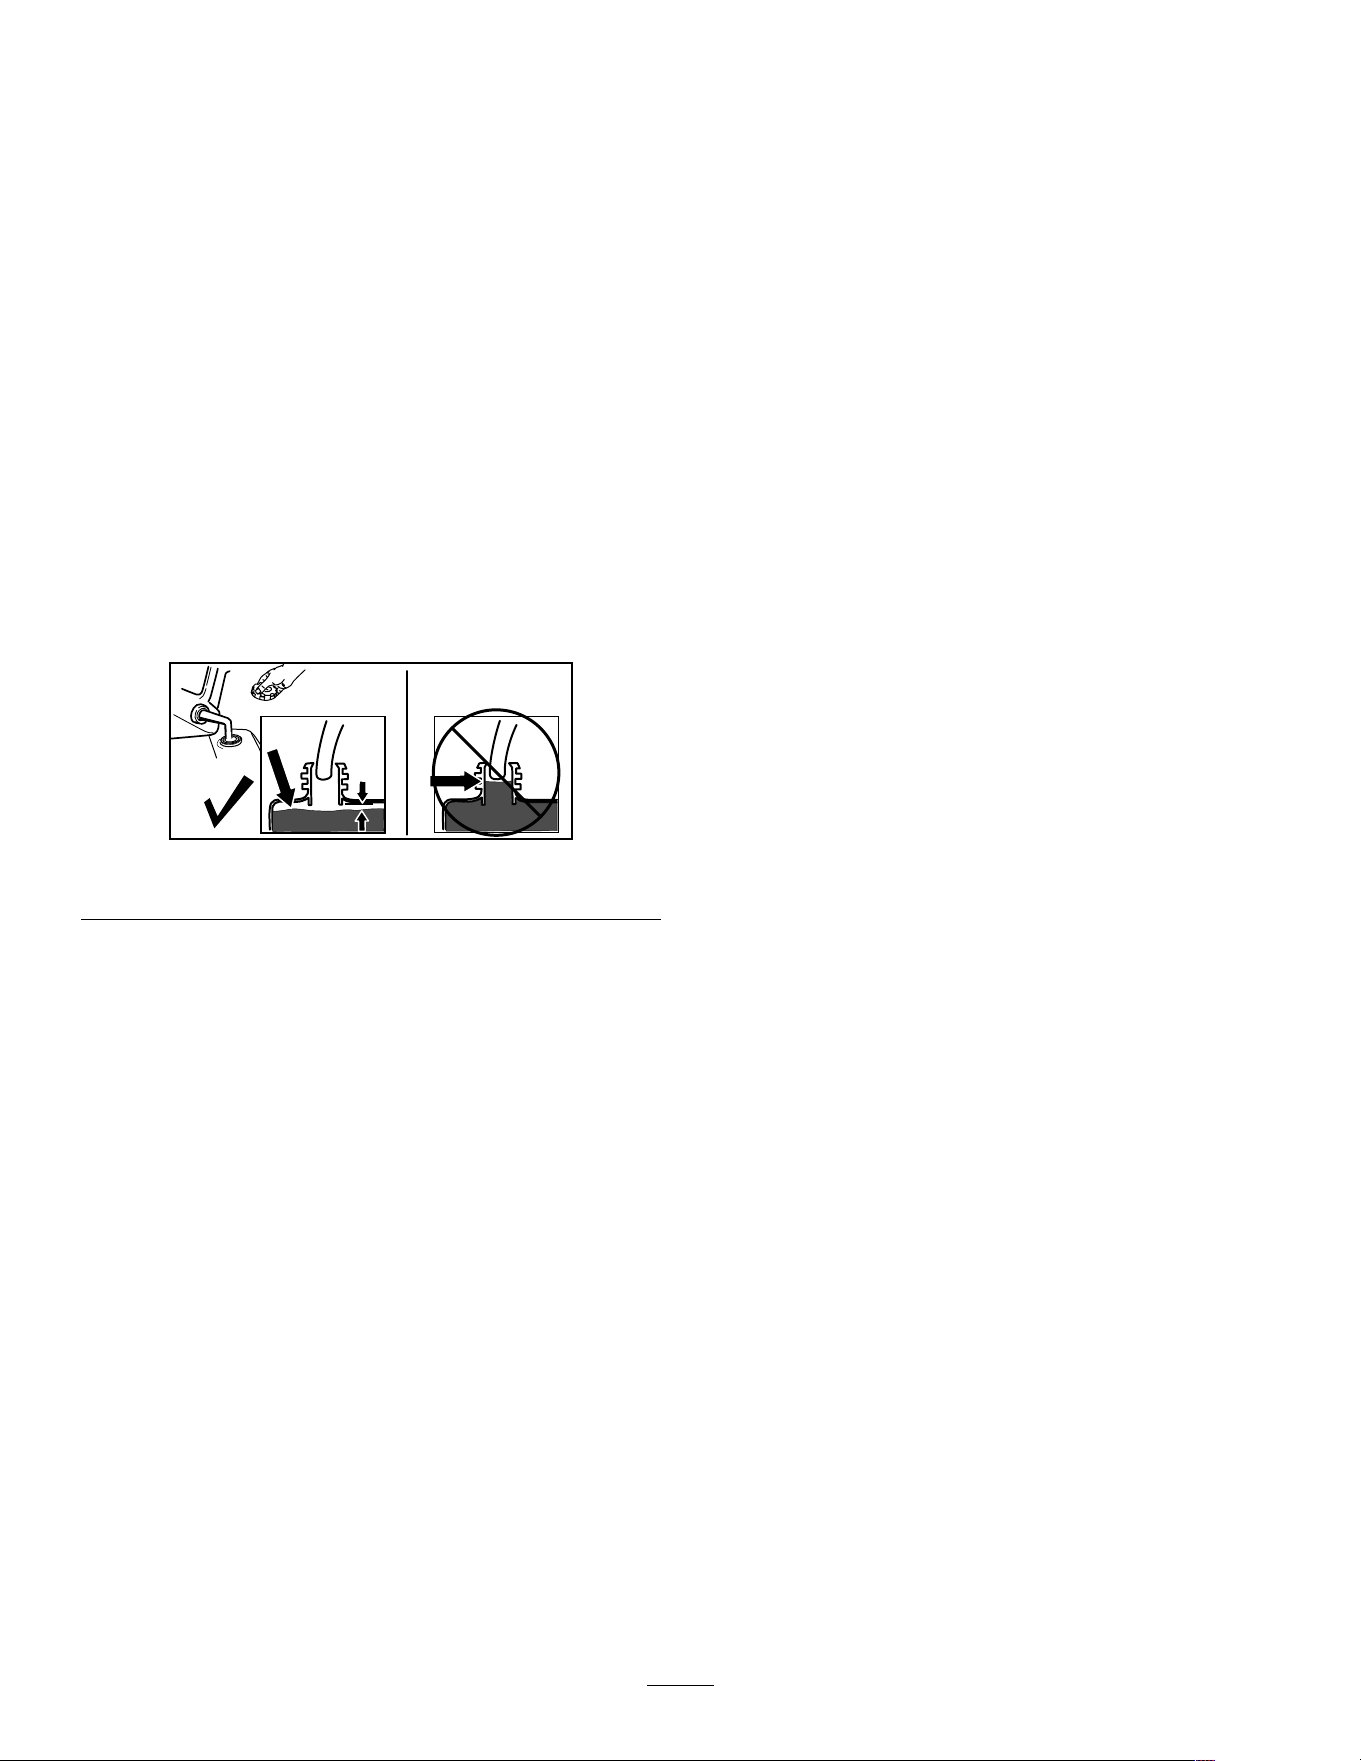
InspectingtheRotorBlades
ServiceInterval:Yearly—Inspecttherotorblades
andhaveanAuthorizedService
Dealerreplacetherotorbladesand
scraperifnecessary.
Beforeeachsession,inspecttherotorbladesfor
wear.Whenarotor-bladeedgehasworndownto
thewear-indicatorhole,haveanAuthorizedService
Dealerreplacetherotorbladesandthescraper
(Figure22).
g011544
Figure22
1.Thewear-indicatorholeis
intact;youdonotneedto
replacetherotorblades.
2.Thewear-indicatorholeis
exposed;replacetherotor
bladesandscraper.
ChangingtheEngineOil
ServiceInterval:Aftertherst2hours
Yearly
Ifpossible,runtheengineforafewminutesbefore
changingtheoiltowarmit.Warmoilowsbetterand
carriesmorecontaminants.
EngineOilSpecications
16
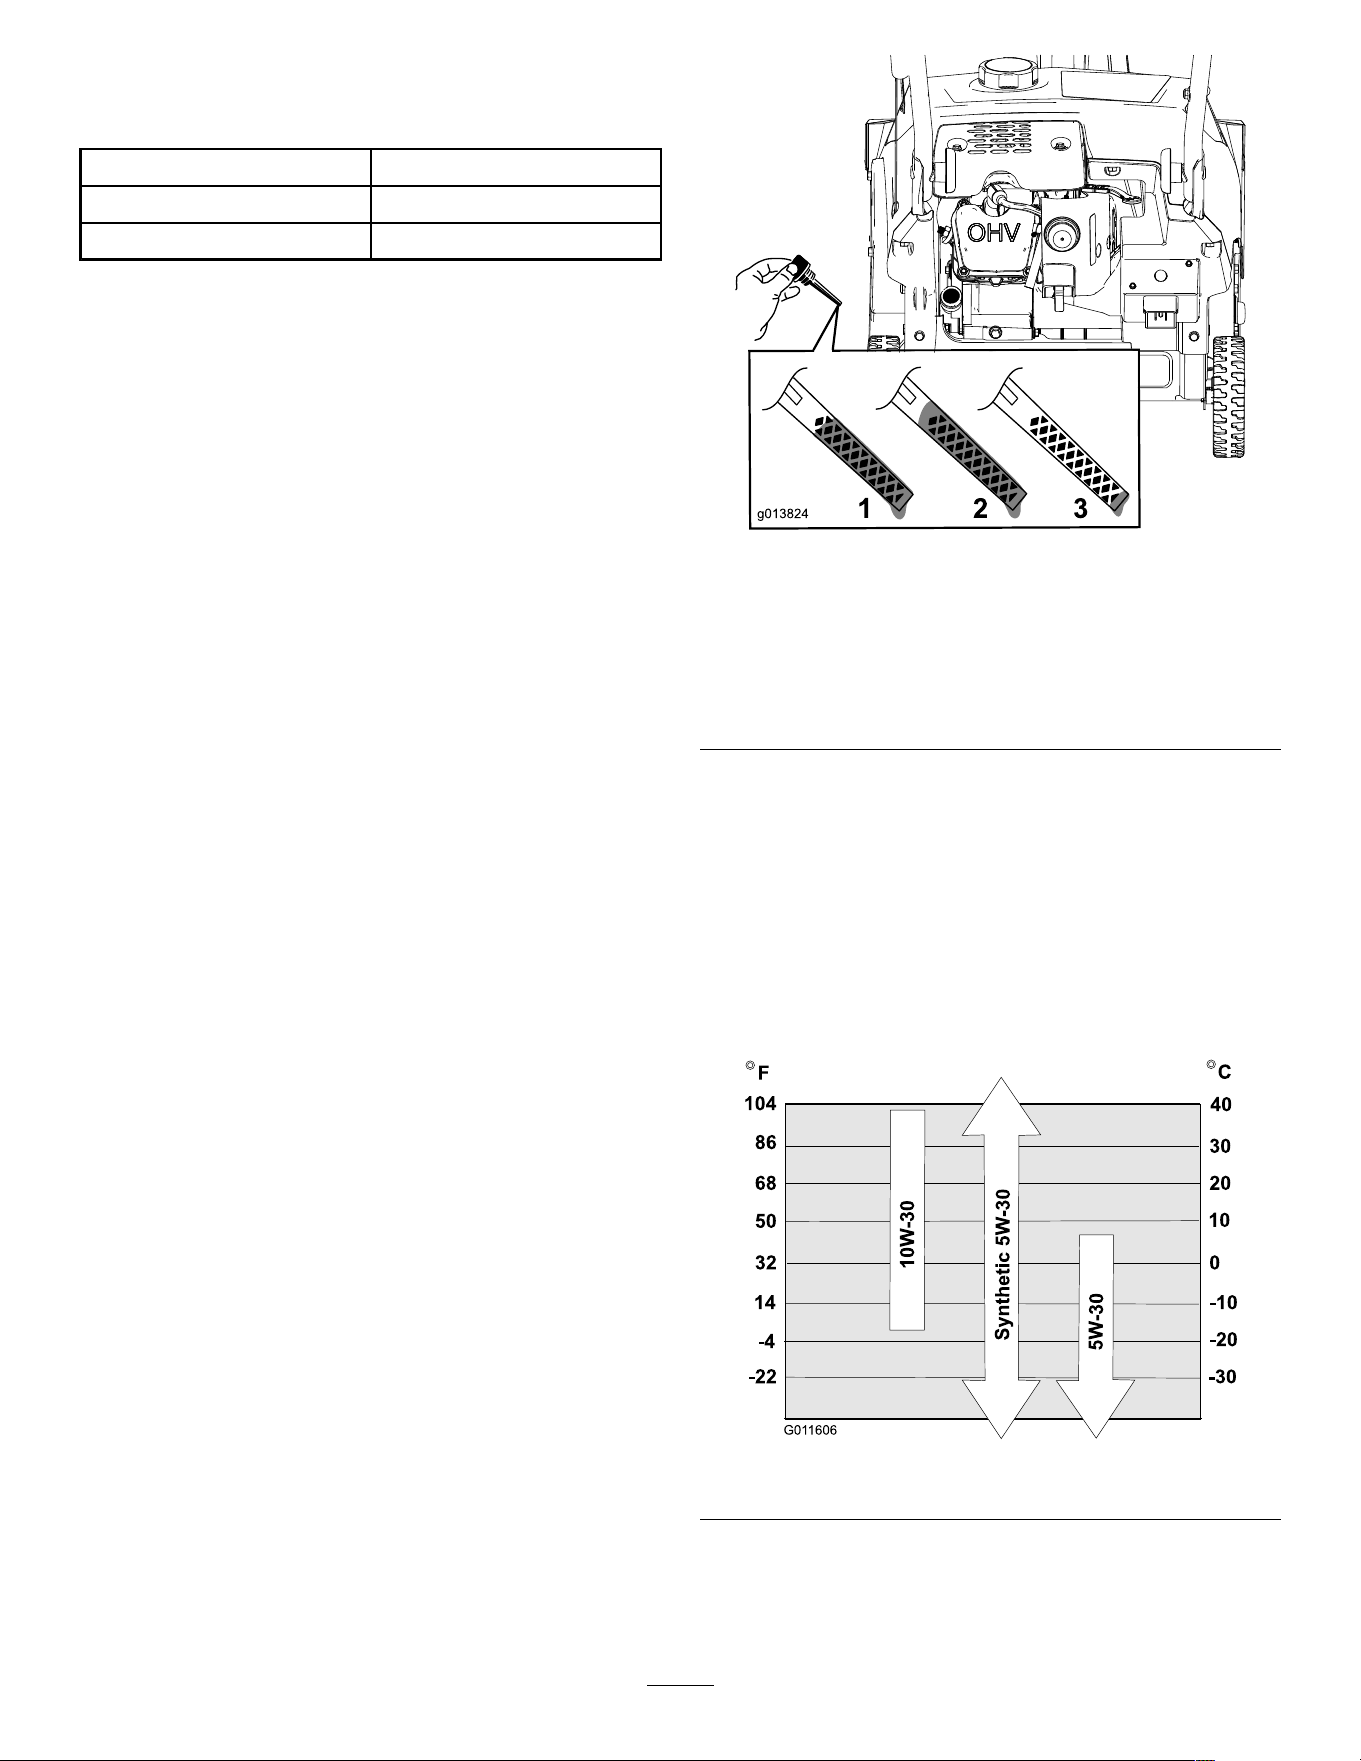
EngineOilSpecications(cont'd.)
Engineoilcapacity
0.35L(12oz)*
OilviscosityRefertoFigure24.
APIserviceclassicationSJorhigher
*Thereisresidualoilinthecrankcaseafteryoudrain
theoil.Donotpourtheentirecapacityofoilintothe
crankcase.Fillthecrankcasewithoilasdirectedin
thefollowingsteps.
1.Ensurethatthefueltankisnotoverlled(refer
toFigure7)andthatthefuelcapissecurelyin
place.
2.Movethemachinetoalevelsurface.
3.Placeanoil-drainpanundertheoil-drainplug
(Figure9),removetheoil-drainplug,andtipthe
machinebackward(handledown)halfwaytothe
groundtodraintheusedoilintotheoil-drainpan.
Important:Donottipthemachineallthe
waybacktotheground,orfuelmayleakout
ofthemachine.
4.Afterdrainingtheusedoil,returnthemachineto
theoperatingposition.
5.Installtheoil-drainplugandtightenitsecurely.
6.Cleanaroundtheoilll/dipstick(Figure9).
7.Unscrewthedipstickandremoveit.
8.Carefullypourabout3/4oftheenginecapacity
ofoilintotheoil-lltube.
Note:Todeterminetheproperoillevelonthe
dipstick,refertoFigure23.
g391186
Figure23
1.Theoillevelisatits
maximum.
3.Theoillevelistoo
low—addoiltothe
crankcase.
2.Theoillevelistoo
high—removeoilfrom
thecrankcase.
Note:Youmaytipthemachineforward(handle
up)alittletomakeaddingoileasier.Remember
toreturnthemachinetotheoperatingposition
beforecheckingtheoillevel.
Important:Donottipthemachineallthe
wayforwardontoitsnose,orfuelmayleak
outofthemachine.
UseFigure24toselectthebestoilviscosityfor
theoutdoortemperaturerangeexpected:
g011606
Figure24
9.Wait3minutesfortheoiltosettleintheengine.
10.Wipethedipstickcleanwithacleancloth.
17
11.Withthemachineintheoperatingposition,
insertthedipstickintotheoil-lltube,butdonot
screwitin,thenremovethedipstick.
12.Readtheoillevelonthedipstick.
•Iftheoillevelonthedipstickistoolow,
carefullypourasmallamountofoilinto
theoil-lltube,wait3minutes,andrepeat
steps10through12untiltheoillevelonthe
dipstickiscorrect.
•Iftheoillevelonthedipstickistoohigh,
draintheexcessoiluntiltheoillevelonthe
dipstickiscorrect.
Important:Iftheoillevelintheengineistoo
lowortoohighandyouruntheengine,you
maydamagetheengine.
13.Installthedipstickintotheoil-lltubesecurely.
14.Recycletheusedoilproperly.
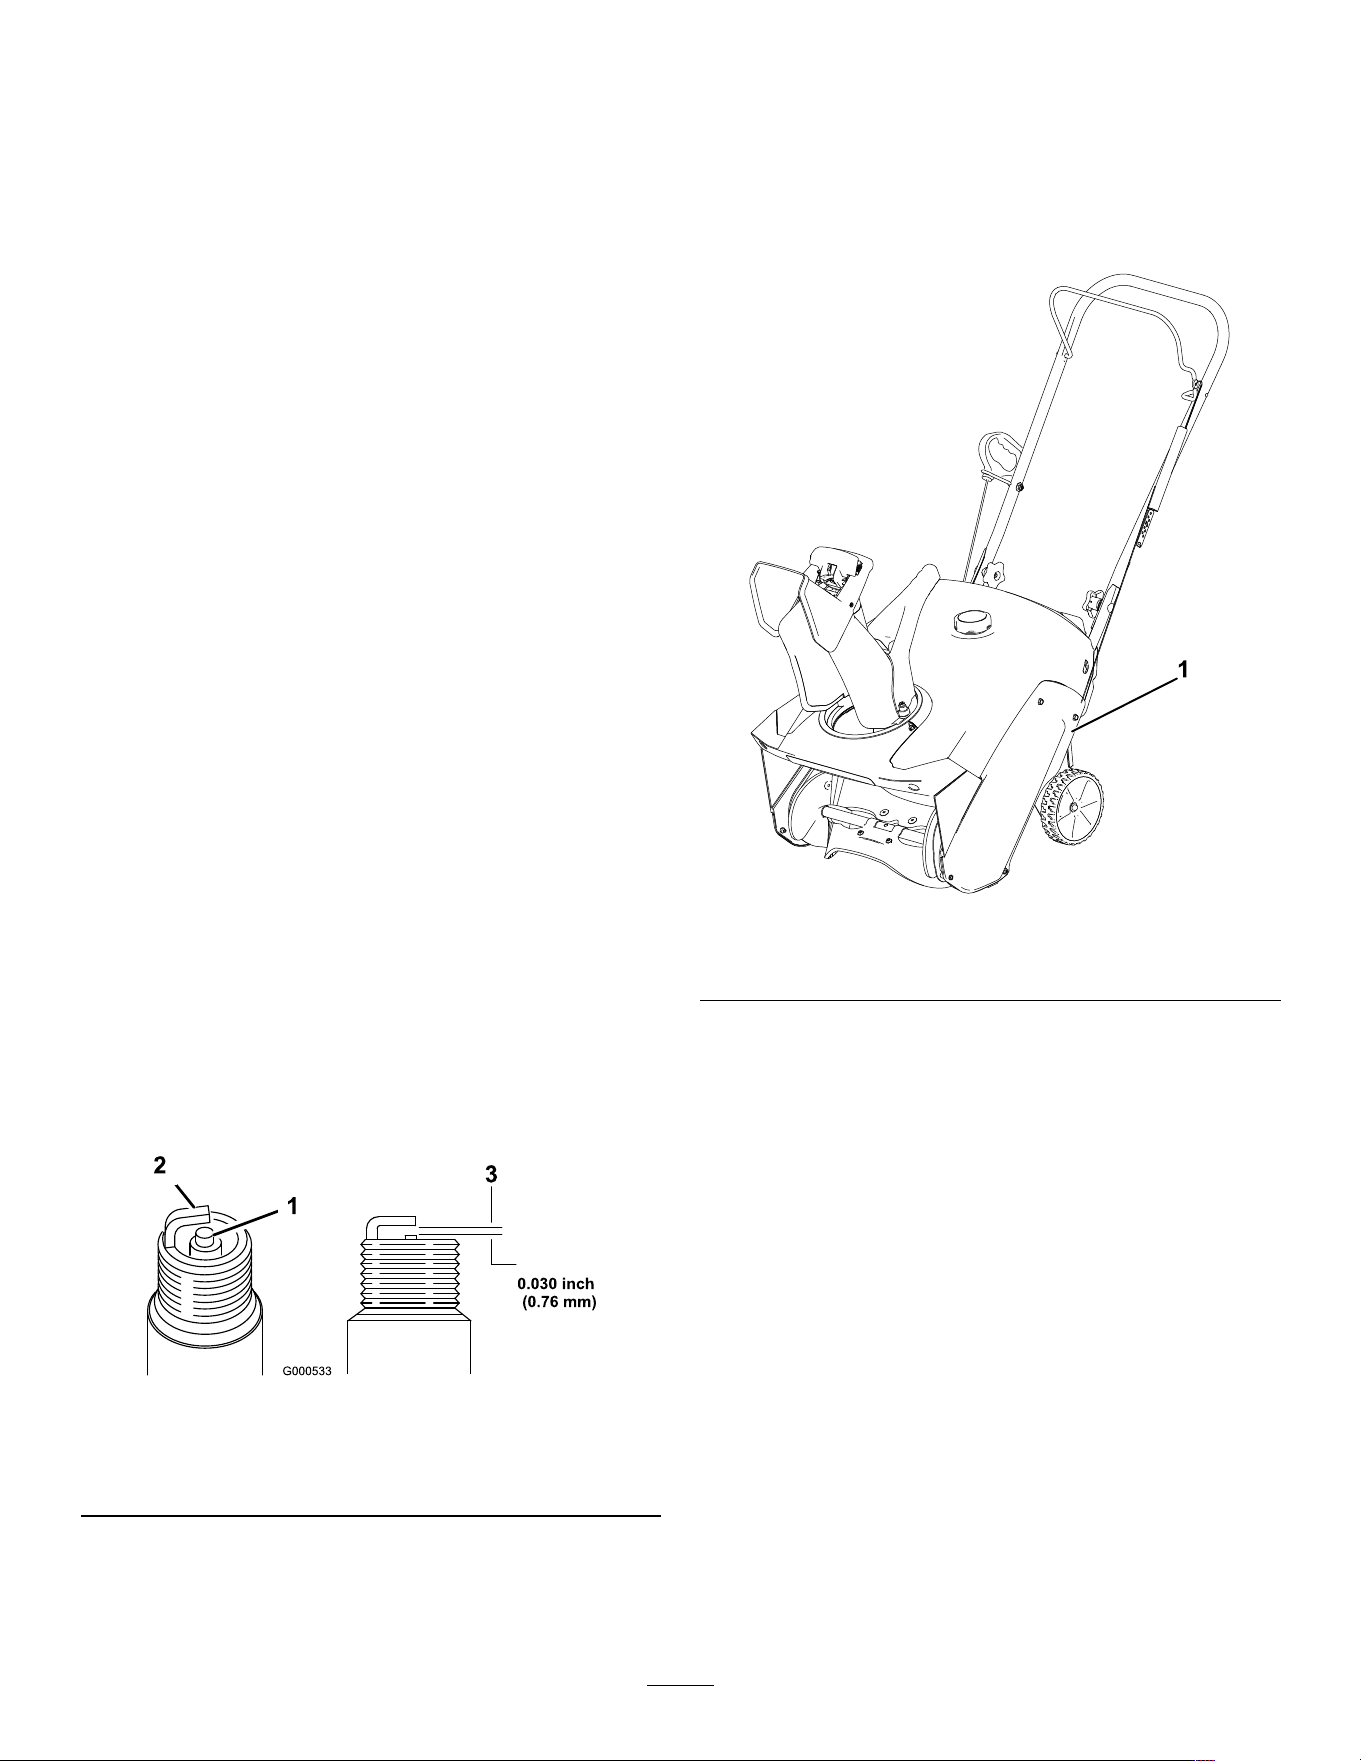
ServicingtheSparkPlug
ServiceInterval:Yearly—Servicethesparkplugand
replaceitifnecessary.
UseaT orosparkplug(PartNo.121-4199).
1.Shutofftheengineandwaitforallmovingparts
tostop.
2.Disconnectthewirefromthesparkplug(Figure
9).
3.Cleanaroundthesparkplug.
4.Removethesparkplugfromthecylinderhead.
Important:Replaceacracked,fouled,or
dirtysparkplug.Donotcleantheelectrodes
becausegritenteringthecylindercan
damagetheengine.
5.Setthegapontheplugto0.76mm(0.030inch)
asshowninFigure25.
g000533
Figure25
1.Center-electrodeinsulator3.Airgap(nottoscale)
2.Sideelectrode
6.Installthesparkplugandtorqueitto27to30
N∙m(20to22ft-lb).
7.Connectthewiretothesparkplug.
ReplacingtheDriveBelt
Ifdrivebeltbecomesworn,oil-soaked,excessively
cracked,frayed,orotherwisedamaged,replacethe
belt.
1.Removethe4boltsthatholdthedrive-beltcover
(Figure26)inplace.
g389213
Figure26
1.Drive-beltcover
Note:Thelowerfrontcornerofthedrive-belt
coverisfasteneddownwithasmallerbolt,a
washer,andalocknut.
2.Removethebeltfromtherotorpulley.
3.Pressdownontheidlerarmandremovethe
beltfrombetweenthetabontheidler-armbrake
andtherotorpulley.
Note:Thebeltguidefortheenginepulleyis
veryclosetothepulley,andthebeltmaynott
throughthegap.
4.Twistthebeltoutinfrontofthebeltguidesothat
thebeltiswedgedbetweenthebeltguideand
theenginepulley.
5.Insertascrewdriverintotheholeinthebelt
guideasshowninFigure27,andexthebelt
guidetowardtherotorpulleyenoughtopullthe
beltthroughthegap.
18
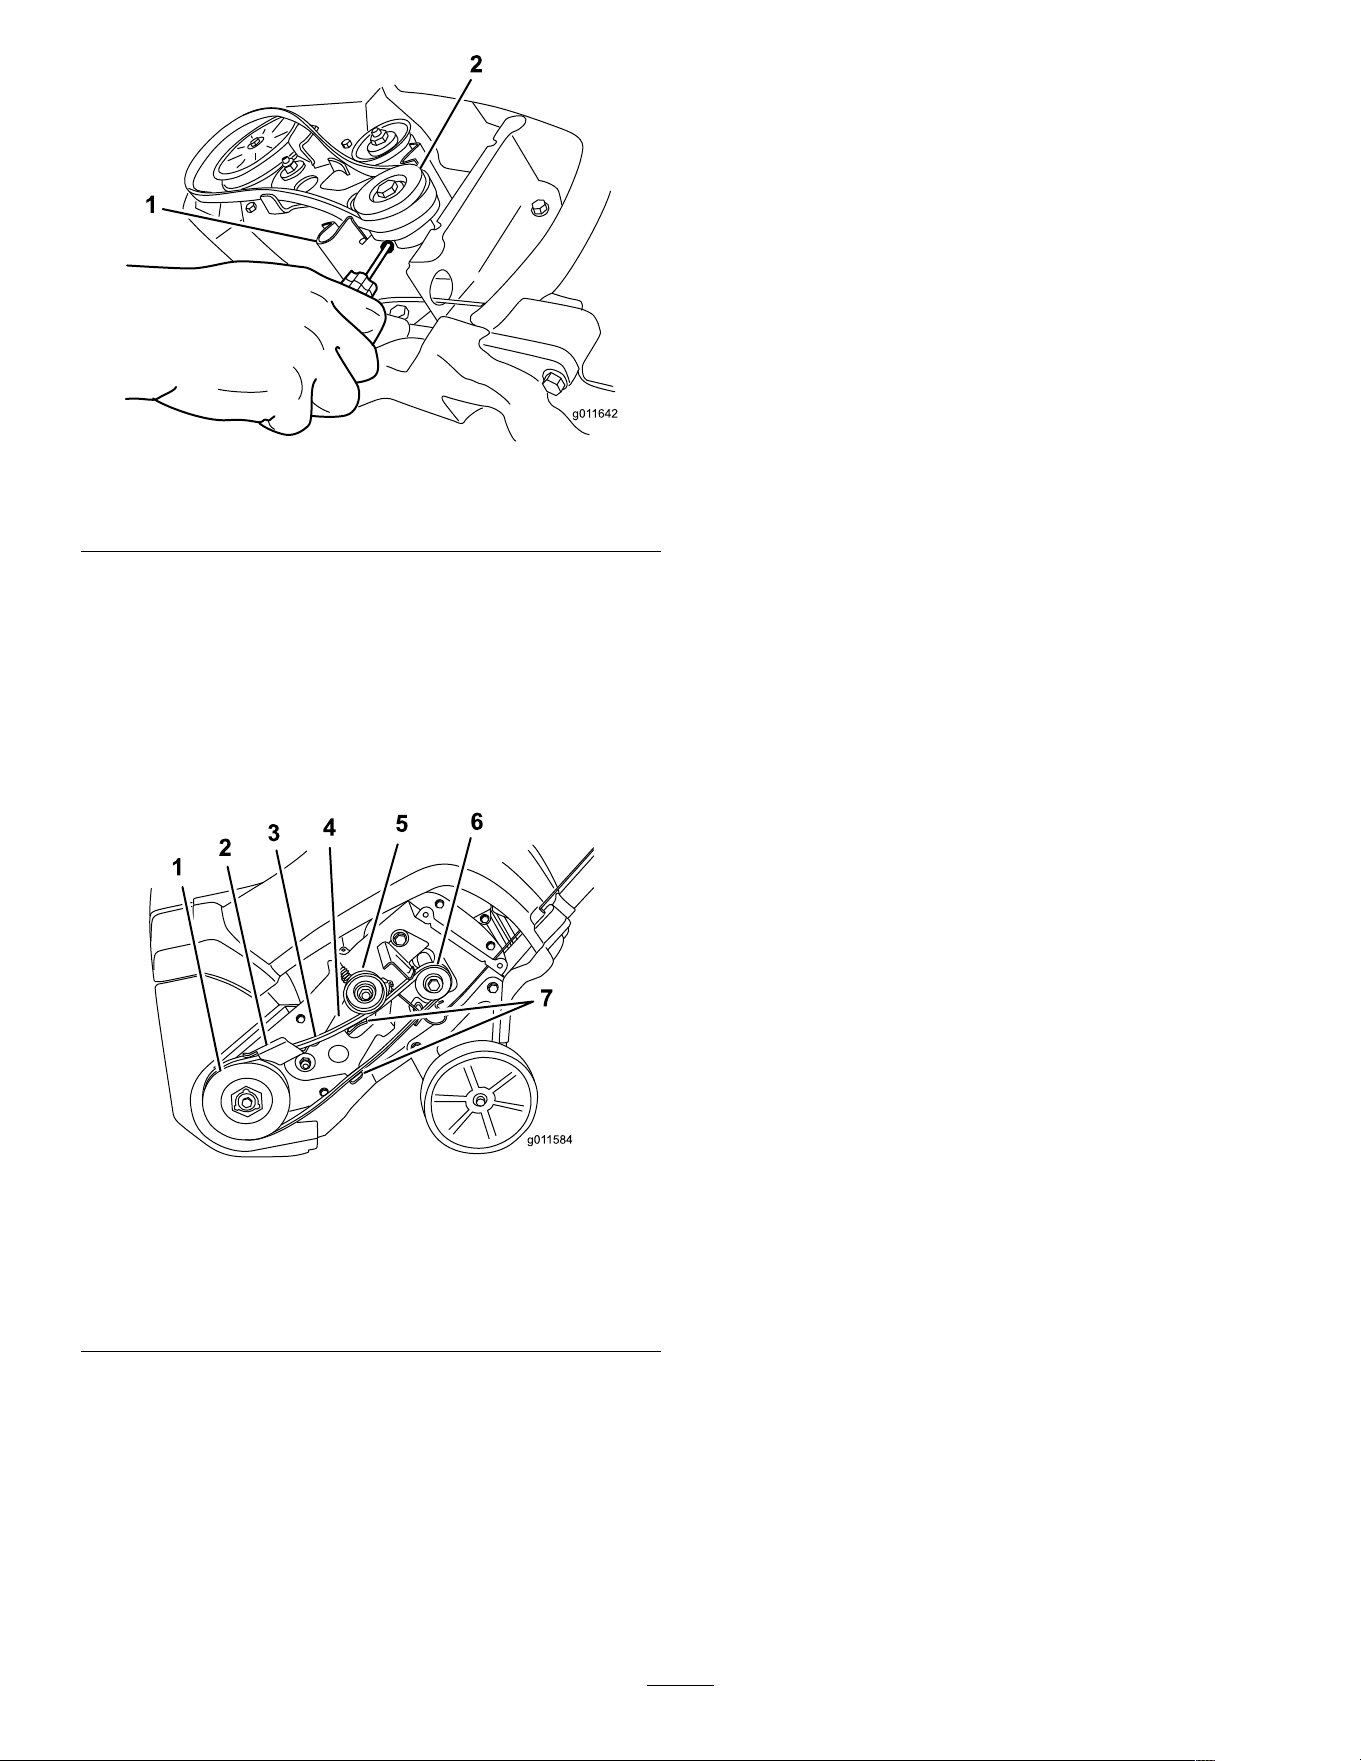
g011642
Figure27
1.Beltguide2.Enginepulley
Note:Donotdistortordamagethebeltguide.
6.Toinstallthenewdrivebelt,reversethesteps
above.
Important:Ensurethatyouinstallthedrive
beltsothatitsitsabovethe2tabsonthe
idlerarmandbelowtheidler-armbrake
(Figure28).
g011584
Figure28
1.Rotorpulley5.Idlerpulley
2.Idler-armbrake6.Enginepulley
3.Drivebelt7.Tabsontheidlerarm
4.Idlerarm
7.Installthedrive-beltcoverwiththefastenersthat
youremovedinstep1.
19
Storage
StorageSafety
•Shutofftheengine,removethekey,andwait
forallmovementtostopbeforeyouleavethe
operator’sposition.Allowthemachinetocool
beforeadjusting,servicing,cleaning,orstoringit.
•Donotstorethemachineinahouse(living
area),basement,oranyotherareawhereignition
sourcesmaybepresent,suchashotwaterand
spaceheaters,clothesdryers,furnaces,andother
appliances.
•Donottipthemachineeitherforwardorbackward
withfuelinthefueltank;otherwise,fuelmayleak
outofthemachine.
•Donotstorethemachinewithitshandletipped
downontotheground;otherwise,oilmayleakinto
theenginecylinderandontotheground,andthe
enginemaynotstart.
StoringtheMachine
1.Onthelastrefuelingoftheseason,addfuel
stabilizertofreshfuelasdirectedbythe
fuel-stabilizermanufacturer.
Important:Donotstorefuellonger
thanthatsuggestedbythefuel-stabilizer
manufacturer.
2.Runtheenginefor10minutestodistributethe
conditionedfuelthroughthefuelsystem.
3.Shutofftheengine,allowittocool,andsiphon
thefueltankorruntheengineuntilitshutsoff.
4.Starttheengineandrunituntilitshutsoff.
5.Chokeorprimetheengine,startitathirdtime,
andruntheengineuntilitdoesnotstart.
6.Drainthefuelfromthetankandcarburetorby
performingthefollowingsteps:
A.Loosenthefuel-tankcap.
B.Unscrew,butdonotremove,thesmall
screwonthesideofthecarburetorfuelbowl
(Figure29)untilthefuelbeginstodrain
fromthecarburetor.
Important:Donotremovethe
carburetorbowlboltonthebottomof
thecarburetor.
g391190
Figure29
1.Carburetorbowlbolt—do
notremove
2.Smallscrewoncarburetor
C.Waitforafewminutesuntilthefuelhas
drained,theninstallthefuelcapandtighten
thesmallscrewonthecarburetor.
Note:UseahandheldPhillips
screwdrivertotightenthecarburetor
screw.Overtighteningthescrewcouldstrip
itandcauseleaking.
7.Disposeofunusedfuelproperly.Recycleit
accordingtolocalcodes,oruseitinyour
automobile.
8.Whiletheengineisstillwarm,changetheengine
oil.RefertoChangingtheEngineOil(page16).
9.Removethesparkplug.
10.Squirt10ml(2tsp)ofoilintothespark-plughole.
11.Installthesparkplugbyhandandthentorqueit
to27to30N∙m(20to22ft-lb).
12.Withthekeyremoved,pulltherecoil-start
handleslowlytodistributetheoilontheinside
ofthecylinder.
13.Cleanthemachine.
14.Touchupchippedsurfaceswithpaintavailable
fromanAuthorizedServiceDealer.Sand
affectedareasbeforepainting,andusearust
preventativetopreventthemetalpartsfrom
rusting.
15.Tightenanyloosefasteners.Repairorreplace
anydamagedparts.
16.Coverthemachineandstoreitinaclean,dry
placeoutofthereachofchildren.Allowthe
enginetocoolbeforestoringthemachineinany
enclosure.
20

Notes:

Notes:

Notes:

CaliforniaProposition65WarningInformation
Whatisthiswarning?
Youmayseeaproductforsalethathasawarninglabellikethefollowing:
WARNING:CancerandReproductiveHarm—www.p65Warnings.ca.gov.
WhatisProp65?
Prop65appliestoanycompanyoperatinginCalifornia,sellingproductsinCalifornia,ormanufacturingproductsthatmaybesoldinorbroughtinto
California.ItmandatesthattheGovernorofCaliforniamaintainandpublishalistofchemicalsknowntocausecancer,birthdefects,and/orother
reproductiveharm.Thelist,whichisupdatedannually,includeshundredsofchemicalsfoundinmanyeverydayitems.ThepurposeofProp65isto
informthepublicaboutexposuretothesechemicals.
Prop65doesnotbanthesaleofproductscontainingthesechemicalsbutinsteadrequireswarningsonanyproduct,productpackaging,orliteraturewith
theproduct.Moreover,aProp65warningdoesnotmeanthataproductisinviolationofanyproductsafetystandardsorrequirements.Infact,the
CaliforniagovernmenthasclariedthataProp65warning“isnotthesameasaregulatorydecisionthataproductis‘safe’or‘unsafe.’”Manyofthese
chemicalshavebeenusedineverydayproductsforyearswithoutdocumentedharm.Formoreinformation,gotohttps://oag.ca.gov/prop65/faqs-view-all
.
AProp65warningmeansthatacompanyhaseither(1)evaluatedtheexposureandhasconcludedthatitexceedsthe“nosignicantrisklevel”;or(2)
haschosentoprovideawarningbasedonitsunderstandingaboutthepresenceofalistedchemicalwithoutattemptingtoevaluatetheexposure.
Doesthislawapplyeverywhere?
Prop65warningsarerequiredunderCalifornialawonly.ThesewarningsareseenthroughoutCaliforniainawiderangeofsettings,includingbutnot
limitedtorestaurants,grocerystores,hotels,schools,andhospitals,andonawidevarietyofproducts.Additionally,someonlineandmailorder
retailersprovideProp65warningsontheirwebsitesorincatalogs.
HowdotheCaliforniawarningscomparetofederallimits?
Prop65standardsareoftenmorestringentthanfederalandinternationalstandards.TherearevarioussubstancesthatrequireaProp65warning
atlevelsthatarefarlowerthanfederalactionlimits.Forexample,theProp65standardforwarningsforleadis0.5μg/day,whichiswellbelow
thefederalandinternationalstandards.
Whydon’tallsimilarproductscarrythewarning?
•ProductssoldinCaliforniarequireProp65labellingwhilesimilarproductssoldelsewheredonot.
•AcompanyinvolvedinaProp65lawsuitreachingasettlementmayberequiredtouseProp65warningsforitsproducts,butothercompanies
makingsimilarproductsmayhavenosuchrequirement.
•TheenforcementofProp65isinconsistent.
•CompaniesmayelectnottoprovidewarningsbecausetheyconcludethattheyarenotrequiredtodosounderProp65;alackofwarningsfora
productdoesnotmeanthattheproductisfreeoflistedchemicalsatsimilarlevels.
WhydoesToroincludethiswarning?
Torohaschosentoprovideconsumerswithasmuchinformationaspossiblesothattheycanmakeinformeddecisionsabouttheproductstheybuyand
use.Toroprovideswarningsincertaincasesbasedonitsknowledgeofthepresenceofoneormorelistedchemicalswithoutevaluatingthelevelof
exposure,asnotallthelistedchemicalsprovideexposurelimitrequirements.WhiletheexposurefromToroproductsmaybenegligibleorwellwithinthe
“nosignicantrisk”range,outofanabundanceofcaution,TorohaselectedtoprovidetheProp65warnings.Moreover,ifTorodoesnotprovidethese
warnings,itcouldbesuedbytheStateofCaliforniaorbyprivatepartiesseekingtoenforceProp65andsubjecttosubstantialpenalties.
RevA
