HZB-15NB/S

IMPORTANT SAFETY INSTRUCTI ONS…………………………………………………1
PREPARING YOUR ICE MAKER FOR USE
IMPORTANT SAFETY TIPS…………………………………………………………………….2-3
GETTING TO KN OW YOUR UNIT
………………………………………………………
………………………………………………………
..
..
4
4
OPERATING PROCEDURES & MAINTENANCE …………………………………...4-5
USING YOUR ICE MAKER
HOW TO START THE UNIT
………………………………………………………………….5
CLEAN ……………………………………………………………………………………….6
SYSTEM CLEANING/SANITIZING PROCEDURE ………………………………………….7-9
HOW TO OBTAIN THE ICE-CUBE
………………………………………………………….10
ICE SCOOP POSITION ……………………………………………………………………….10
TROUBLES H OOTING ……………………….…………………………………………..11
TECHNICA L PARAMETERS & CIRCUIT DIAGR A M
TECHNICAL PARAMETERS ………………………………………………………….12
CIRCUIT DIAGRAM ………………………………………………………………………..12
TABLE OF CONTENTS

3
DANGER – Risk Of Fire Or Explosion. Flammable Refrigerant Used. To Be
Repaired Only By Trained Service Personnel. Do Not Puncture Refrigerant Tubing.
CAUTION – Risk Of Fire Or Explosion. Flammable Refrigerant Used. Consult Repair
Manual/Owner’s Guide Before Attempting To Install or Service This Product. All Safety Precautions
Must be Followed.
CAUTION – Risk Of Fire Or Explosion. Dispose Of Property In Accordance With Federal Or Local
Regulations. Flammable Refri
gerant Used .
CAUTION-Risk Of Fire Or Explosion Due To Puncture Of Refrigerant Tubing;Follow Handling
Instructions Carefully. Flammable Refrigerant Used.
The ice maker should be installed in accordance with the safety standard for Refrigeration Systems,
ASHRAE15. The ice maker shall not be installed in corridors or hallways of public buildings.
If the unit with problem needs to be maintained, that replacing it with like components and that
servicing shall be done
by factory authorized service personnel, so as to minimize the risk of
possible ignition due to incorrect parts or improper service.
IMPORTANT:
The wires in this mains lead are colored in accordance with the following code:
Green or Green with a strip of yellow: Grounding
White: Neutral
Black: Live
To avoid a hazard due to instability of the appliance, it must be placed at a even or flat surface.
4
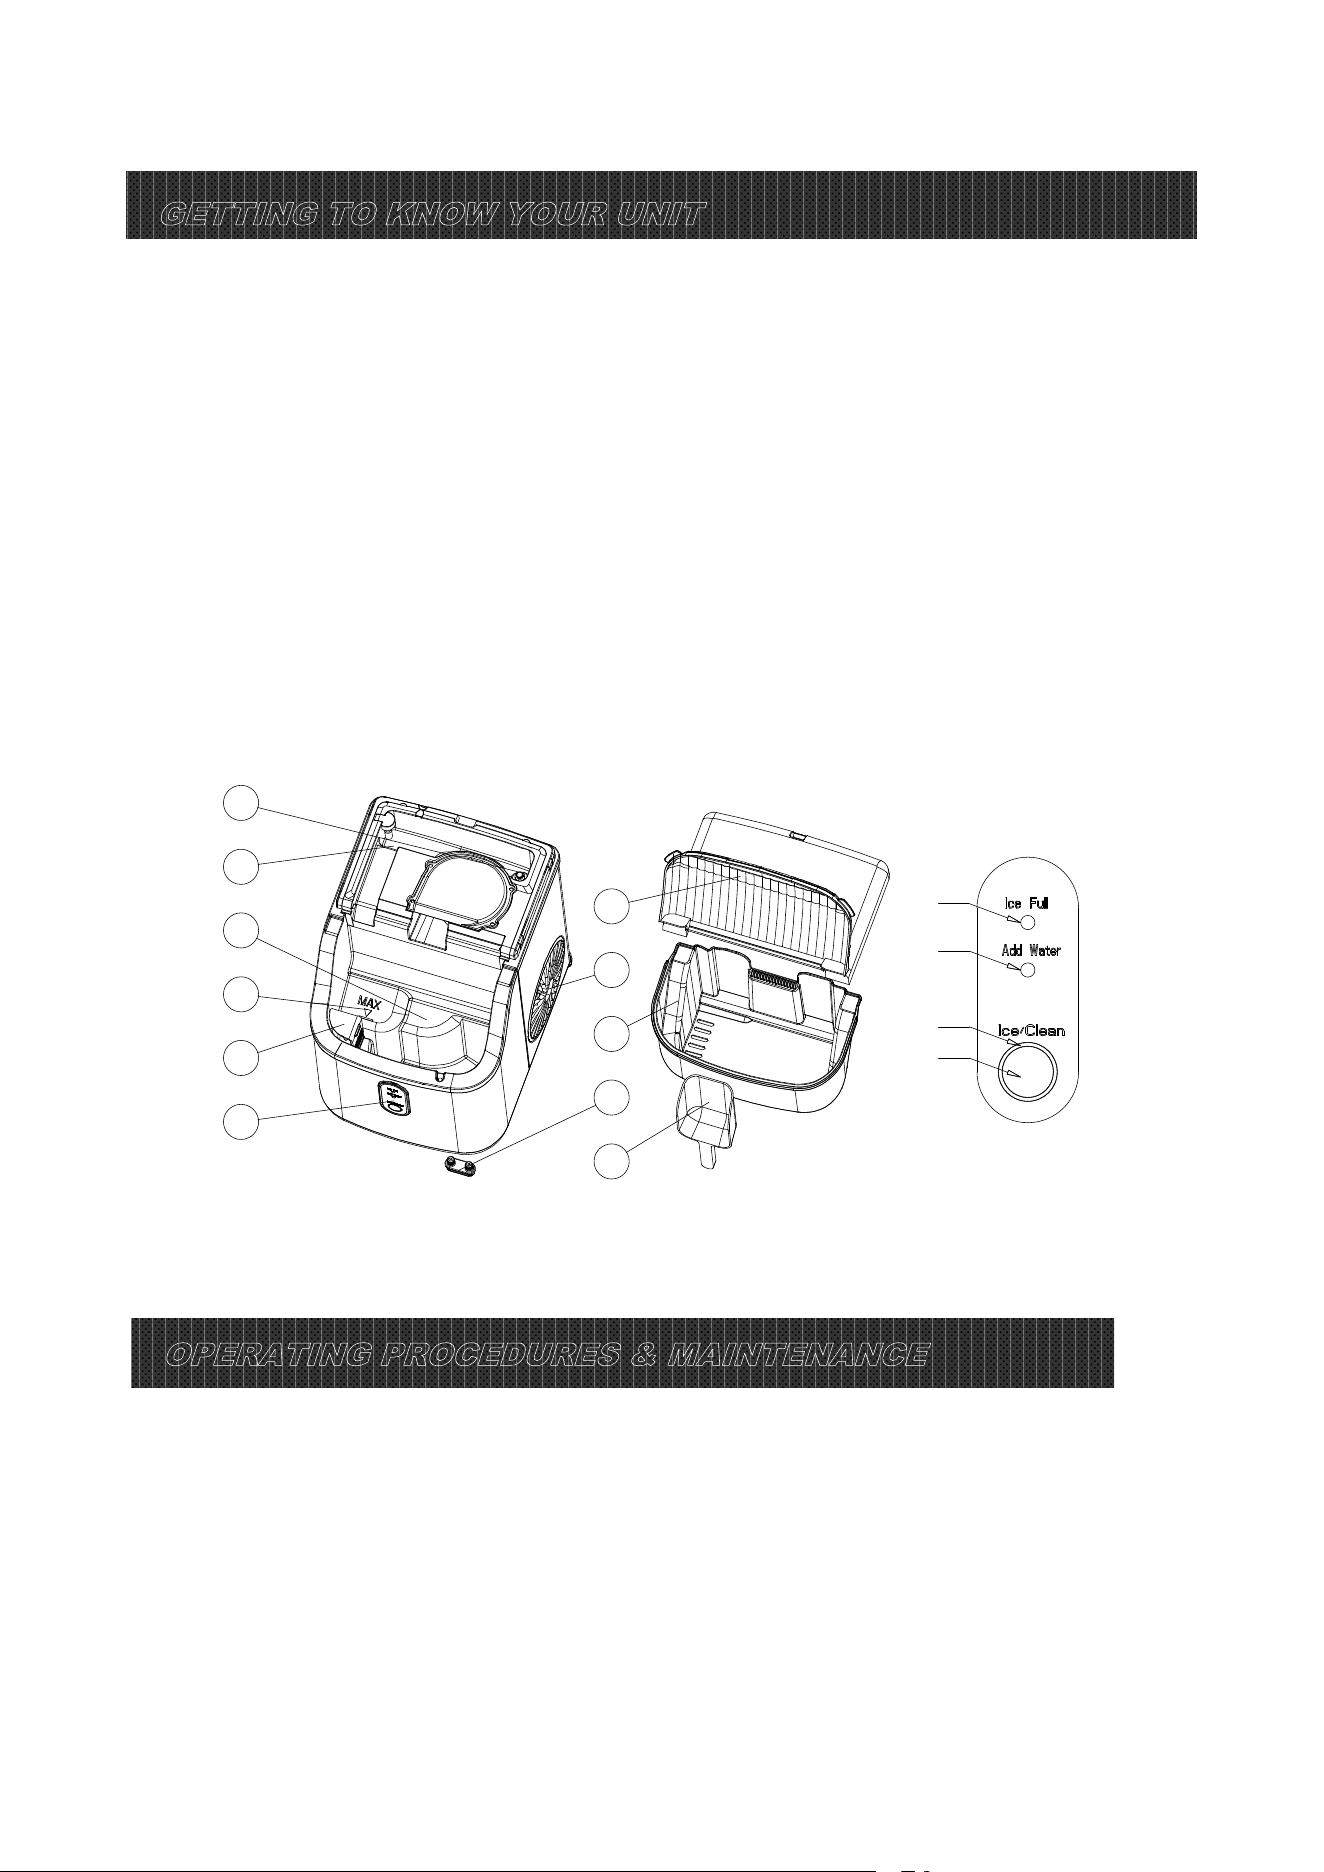
GETTING TO KNOW YOUR UNI T
1、Float switch;
2、Secondary water reservoir: It connects directly with the evaporator;
3、Water reservoir;
4、Maximum water level;
5、Filter;
6、Control Panel:
A. Ice-making and cleaning buttons;
B. Ring indicator light;
C. Water lack indicator light;
D. Ice full indicator light;
7、Top cover, removable from the top;
8、Hot Air outlet;
9、Ice basket;
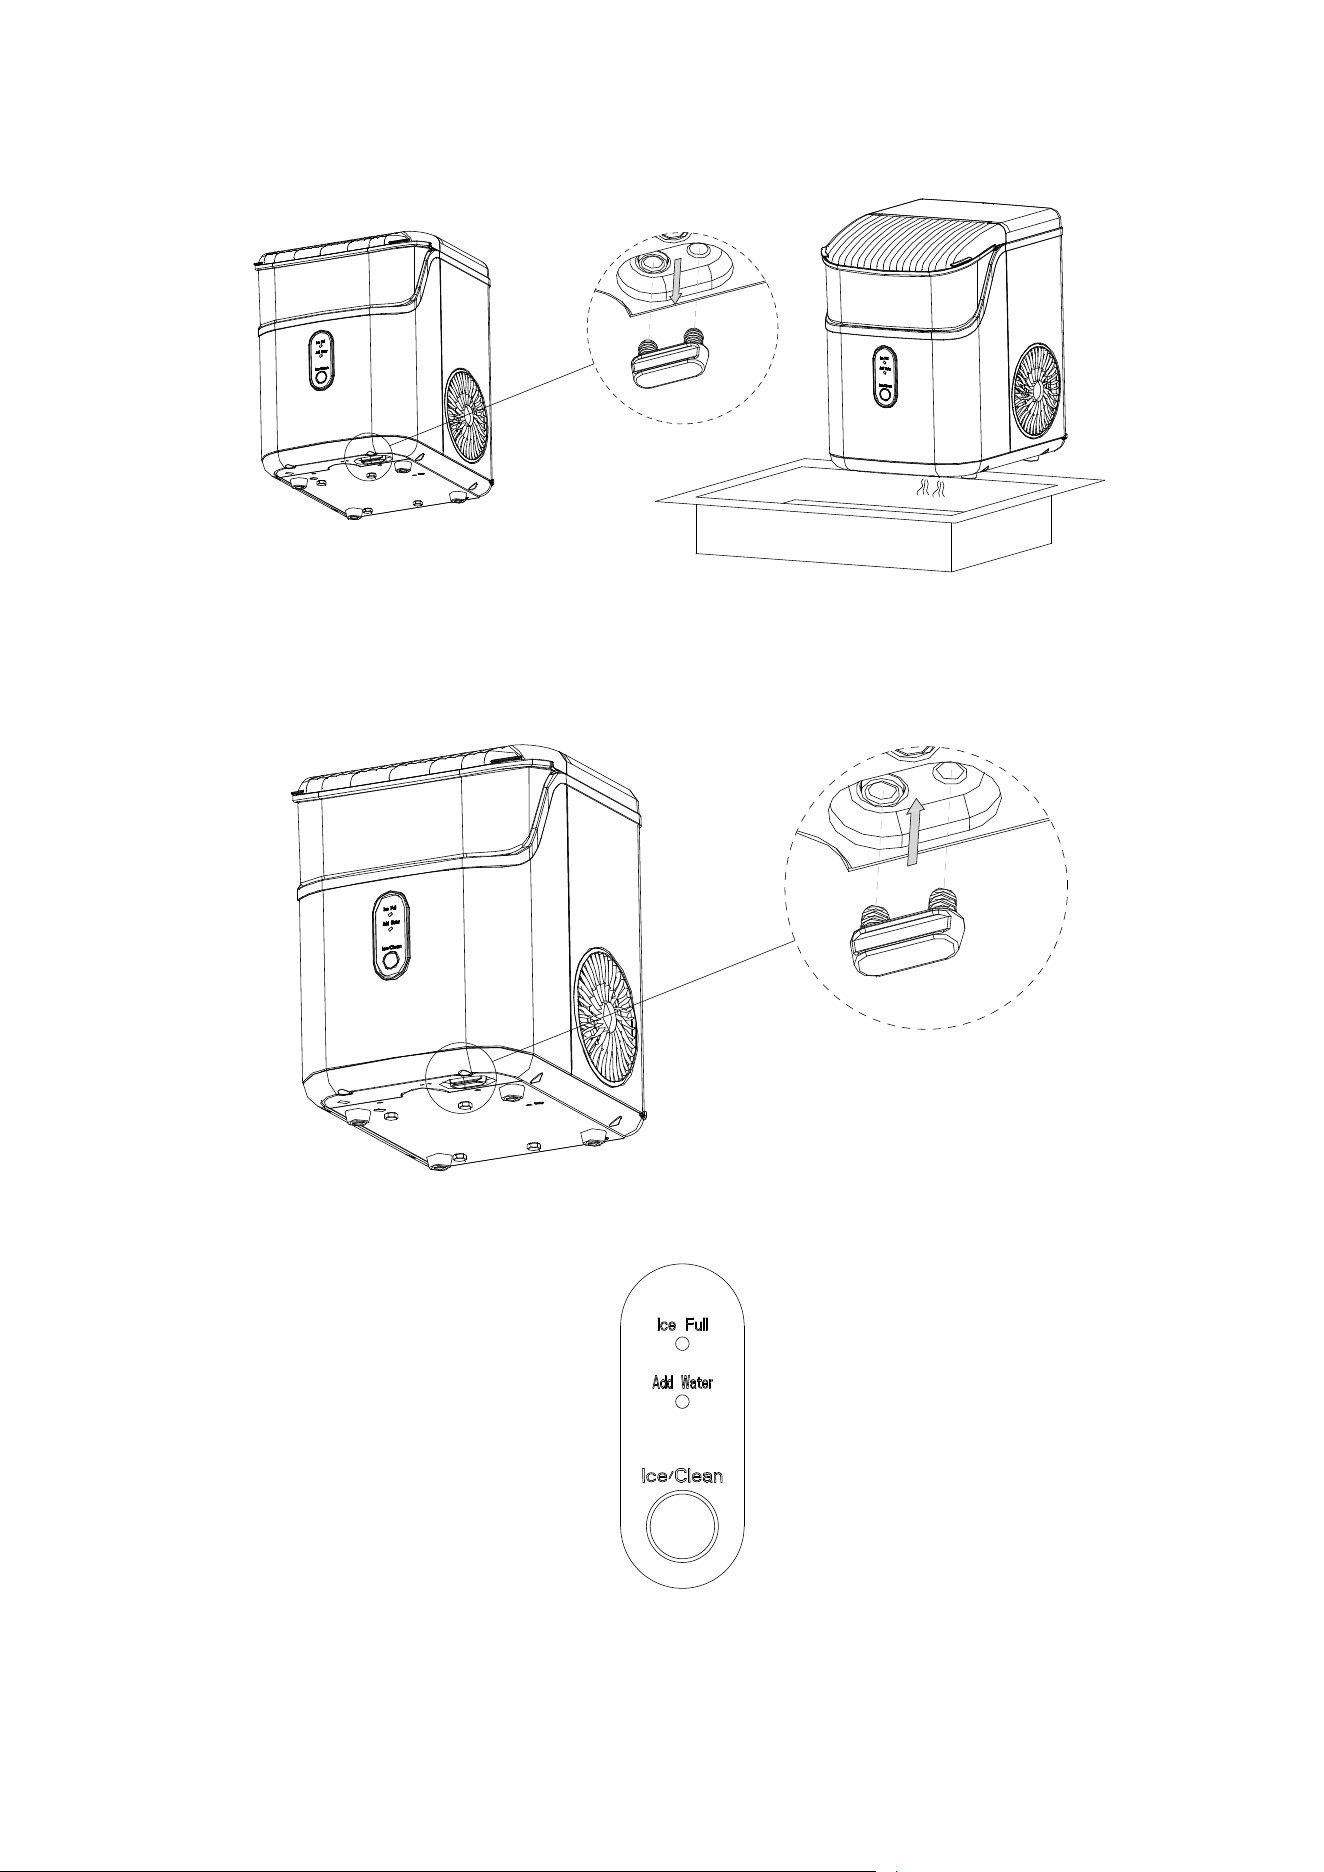
10、Water drain cap: at front btm side of the unit;
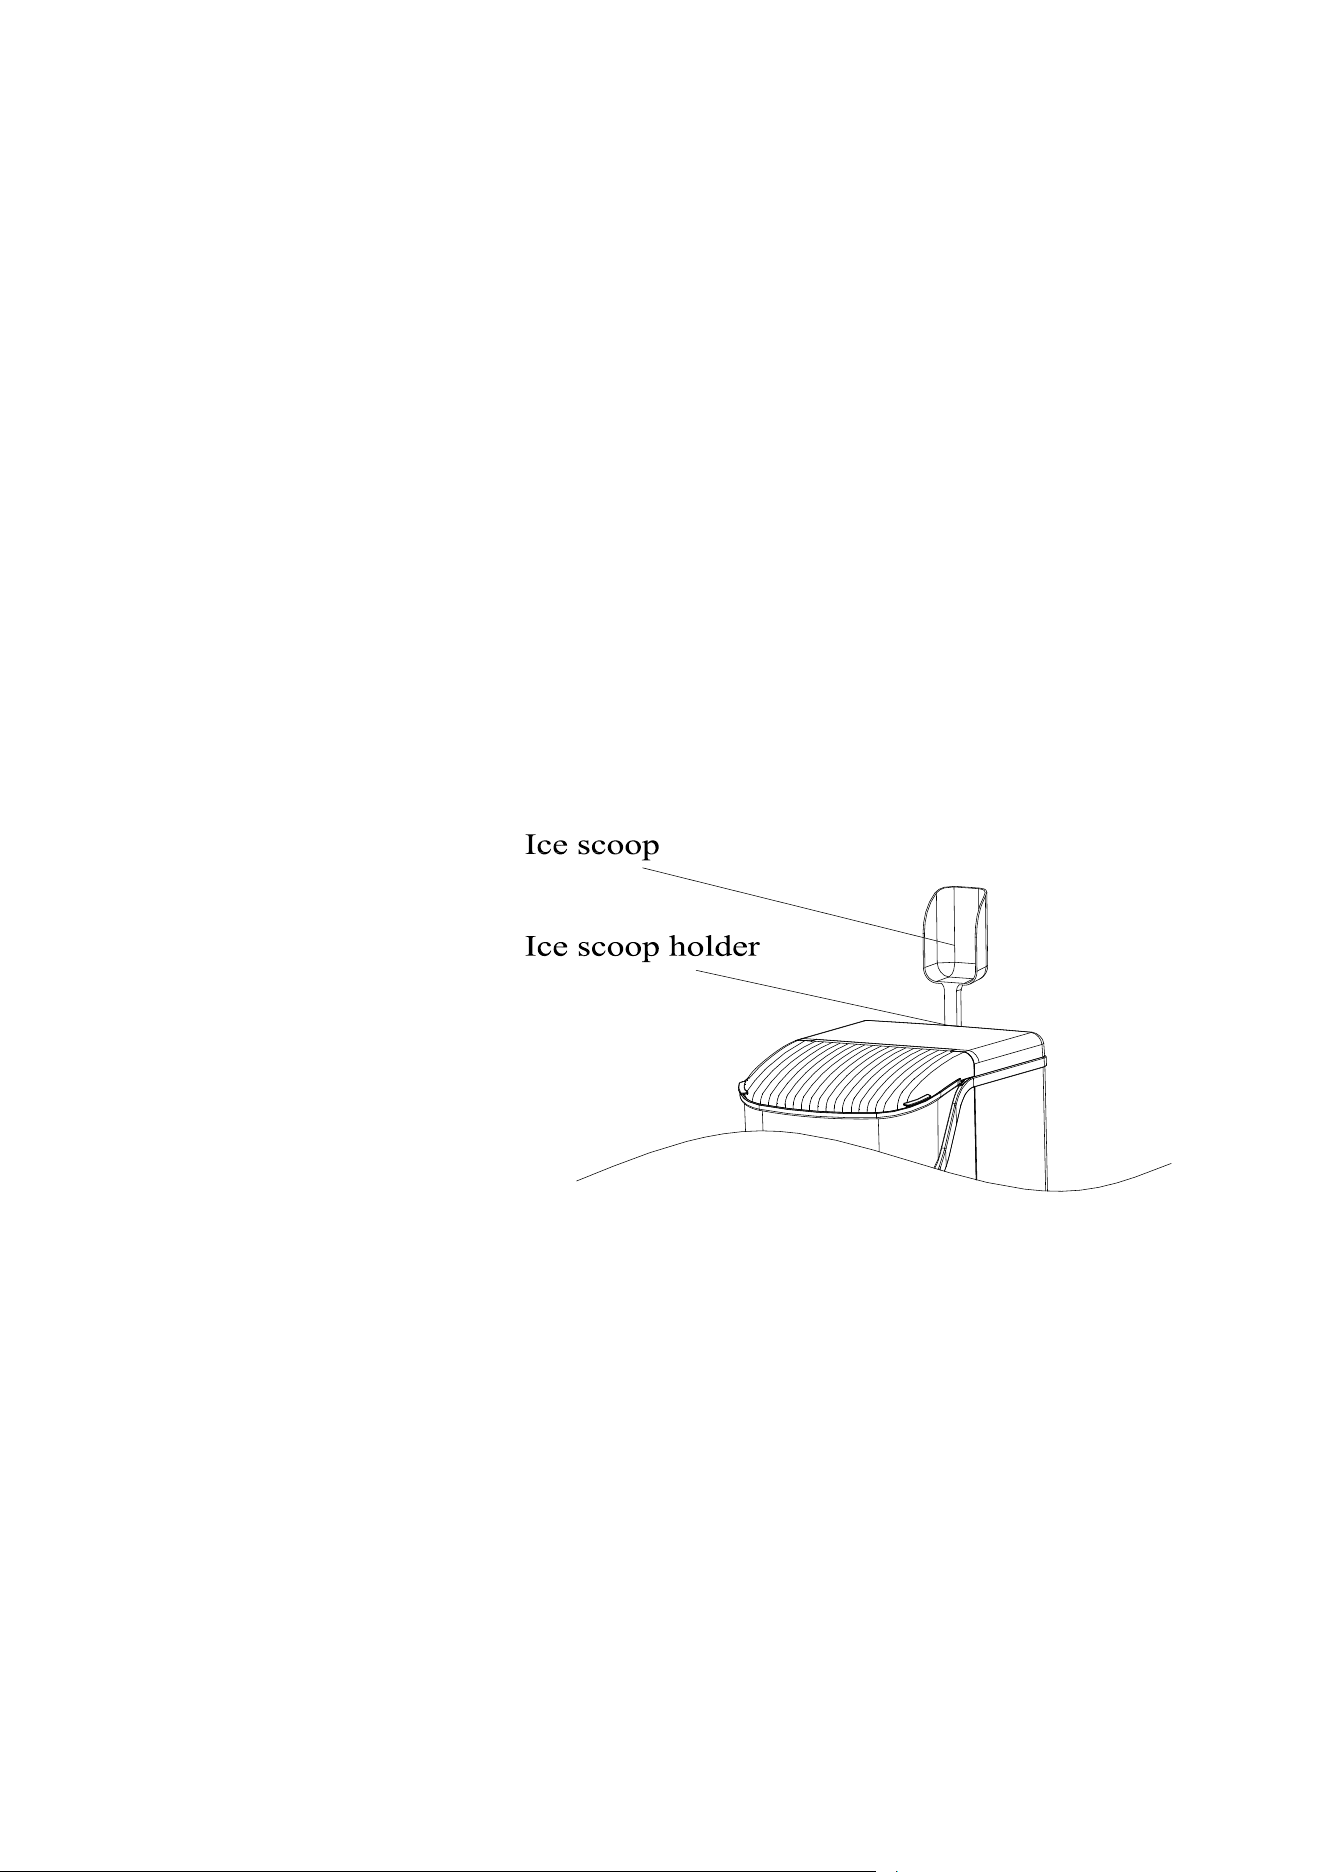
11、Ice scoop;
OPERATING P ROCEDURES & MAINTENANCE
1. Remove the exterior and interior packaging, and then check all the accessories are included. If any
parts are missing, please contact our customer service.
2. Remove all the tapes on the unit; take out the accessory parts inside.
3. Clean the interior with lukewarm water and a soft cloth.
4. Locate your ice maker on a level counter table far from direct sunlight and other sources of heat (i.e.:
stove, furnace, and radiator). Make sure that there is at least 6 inches between th
e back and sides of
your ice maker with the wall.
1
2
3
4
5
6
7
8
9
10
11
D
C
B
A

5
DANGER
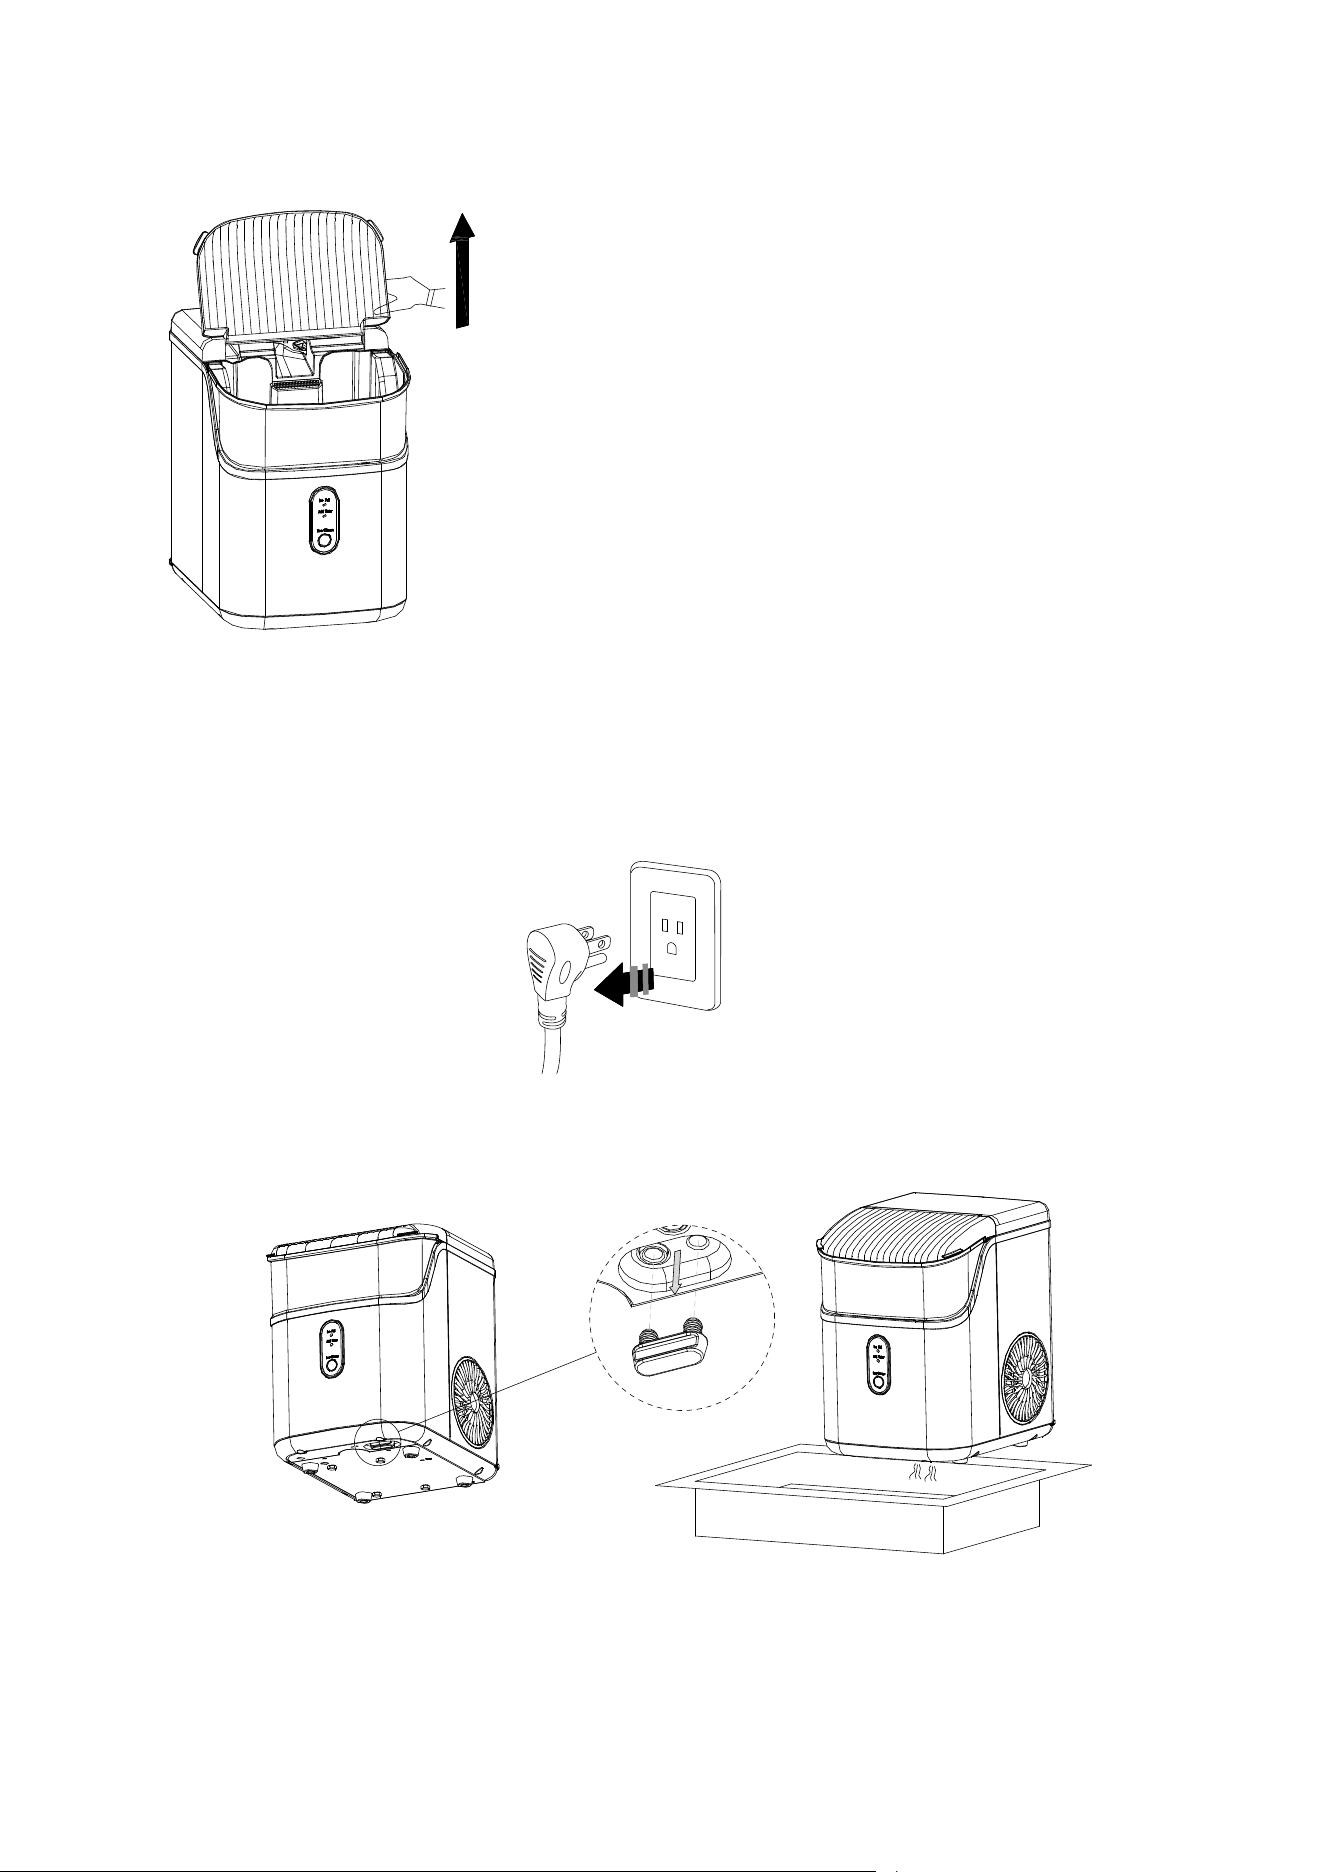
5. Allow 2 hours for the refrigerant fluid to settle down before plugging your ice maker in.
6. The power plug must be accessible directly.
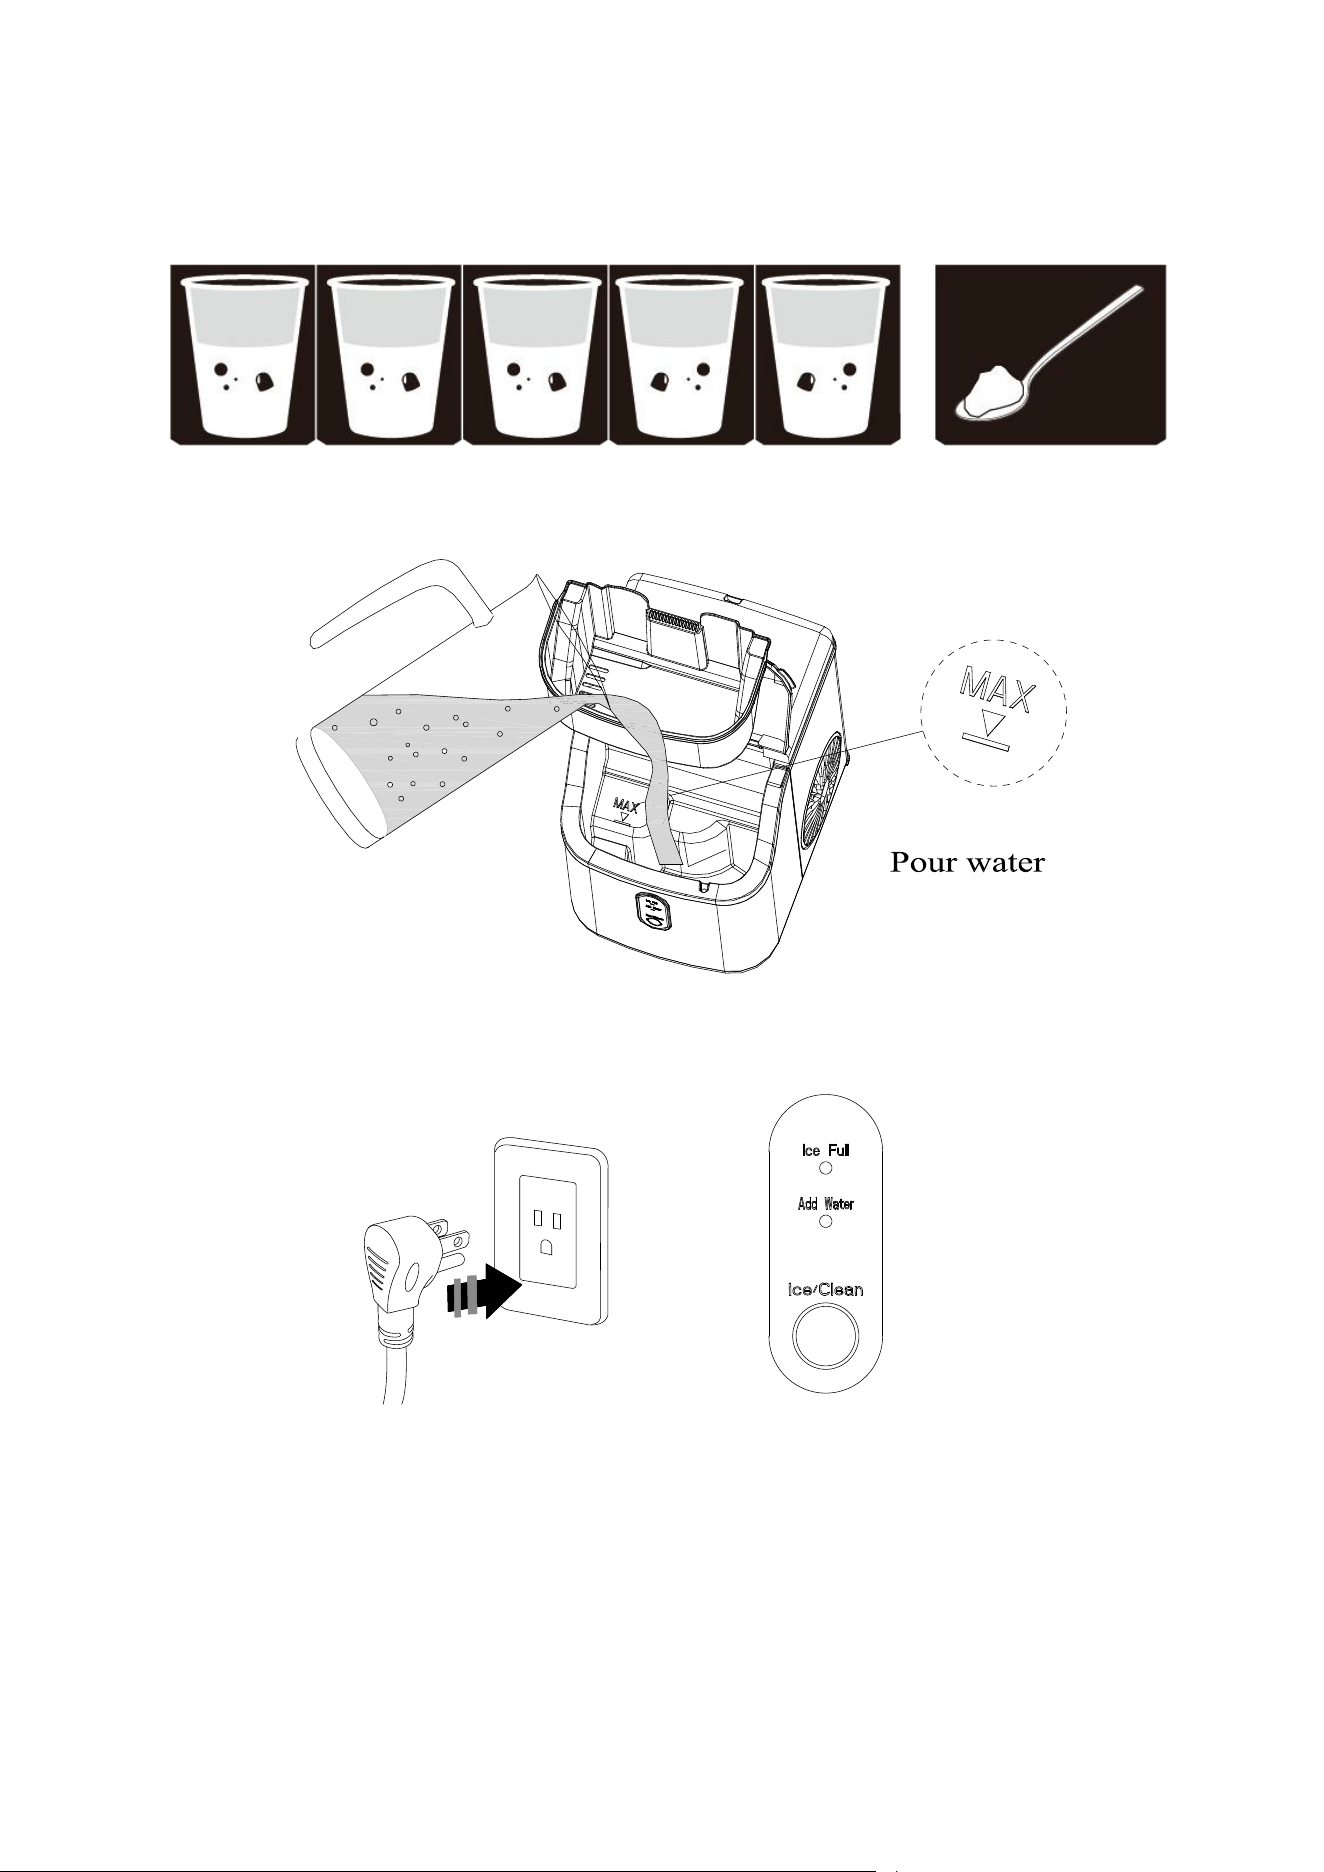
WARNING: Fill it with potable water only. Only use drinking water.
*Improper use of the grounded plug can result in the risk of electrical shock. If the power co r d
is damaged, please call our customer service.
1. This unit should be properly grounded for your safety. The power cord of this appliance is equipped
with a grounding plug which mate
s with standard grounding wall outlets to minimize the possibility of
electric shock.
2. Plug your appliance into an exclusive, properly installed, grounding wall outlet. Do not under any
circumstances; damage the grounding means of the plug. Any questions concerning power and/or
grounding should be directed toward a certified electrician.
3. This appliance requires a standard 110-120Volt, 60Hz electrical outlet with good grounding means.
Before using your ice mak
er, it is strongly recommended to clean it thoroughly.
Unplug the unit before cleaning or making any maintenance.
1. Take out the ice basket.
2. Clean the interior with diluted detergent, warm water and a soft cloth.
3. Then use the water to rinse the inside parts, and drain out the water by unplugging the drain cap on
the front bottom side.
4. The outside of the ice maker should be cleaned regularly with a mild detergent solution and warm
water.
5. Dry the interior and exterior wit
h a clean soft cloth.
6. When the machine is not to be used for a long time, drain water completely & dry the interior.
How to start the unit
1. Take out the ice basket, pour potable water into the water reservoir, 0.3 gallon of water at most at
USING YOUR ICE MAKER
one time.
2. Put back the ice basket.
6
3. Plug in and the ring indicator will red light on. If you press the "Ice /Clean" button, the machine will
start making ice; If long press the "Ice/Clean" button, it will do automatic cleaning.
CLEAN
For the first time, or the clean procedure has not been running for a long time, it is highly
recommended to run this procedure at first.
1. Before the cleaning procedure, please make sure the water drain cap has been inserted into the
appliance; otherwise it will not work properly.
2
. Press “Ice/Clean” button for 5 seconds, Ring indicator light flashes white, it will run cleaning
procedure for 15 minutes and automatically exit, press this button again during the cleaning
procedure, it will exit immediately.
3. After cleaning procedure, remove the top cover and the ice basket, rinse the main water reservoir
and the secondary water reservoir, then move the appliance to the edge of the desktop, make sure
that the appliance is placed steady, place a water
container under the appliance
,
remove drain cap
from the bottom, dirty water will drain into the water container, then reinsert the drain cap.
7
Change water in the water reservo ir every 24 hours to ensure a reasonable hygiene level. If
the unit isn’t to be used, drain all water & dry the water reservoir.
System Cleaning/Sanitizing Procedure
1.Unplug the nugget ice maker.
2.Take off the bottom drain cap and drain out the water to a sink.
See the figure below.
3.Produce a solution by diluting one teaspoon of household bleach with five cups of water
for daily cleaning.
For monthly cleaning of removing mineral deposits, please use the white vinegar instead of the
Tips: remove the top back cover by pulling up the front
transparent cover gently.
8
above water solution (and then plug in to turn on the “cleaning function” for about 5 minutes. After
that, unplug it again to leave the white vinegar in the unit more than 12hours).
4.Pour the solution into the water reservoir, up to the “MAX” water level. See the figure below.
5. Plug in the Nugget ice maker, press and hold the "Ice/Clean" button for 5 seconds to
initiate the cleaning process(15mins). See the figure below.
6. When the "Ice/Clean" indicator lights off, take off the drain cap and drain out the water to a sink.
9
7. Repeat the step 4 to 6 with fresh water for two more cycles to rinse the inside.
8. Replace the drain cap on the bottom. See the figure below.
9. When completed, fill the unit with fresh water and press the "Ice/Clean" button to start ice making
process. See the figure below.
10
How to obtain the ice-cube
1. Before we start making ice, please make sure the water drain cap has been inserted into the
appliance; otherwise it will not work properly.
2. Press “Ice/Clean” button , Ring indicator light flashes white,it begin to work, Press this button again,
it will stop making ice.
3. For the first time, or if the appliance has not been used for a long time, it is recommended to clean
this appliance before you start to make ice.
4. In the process of making ice, i
f the "Add water" indicator light is on, and the machine stops working, it
needs to add water. After adding water, please restart the machine; Otherwise, it needs to wait for a
long time and then automatically start making ice again. When the ice making machine is restarted,
the compressor will have a waiting time of 3 minutes.
5. When the machine is full of ice, it will automatically stop working. The "ice full" indicator light will be
on, and the ring indicator light will be whit
e. After the ice is removed, the machine starts working
automatically.
Ice scoop position
Put the scoop on the top back cover

11
PROBLEM POSSIBLE CAUSE SOLUTION
“Add Water ”
indicator turns on
Lack of Water.
Stop the ice maker, fill water, and
press “Ice/Clean” button again to
restart the unit.
“ICE FULL”
indicator turns on
There is too much ice.
Suggest you to obtain the
ice-cube.
No ice cube inside.
Remove the probable obstacle
inside or clean the inside wall of
the ice storage
Ring indicator light
flashes red
Ambient temperature or water
temperature in inner tank is too high.
Please run the ice maker below
90 Fahrenheit degree ambient
and pour colder water into tank.
Refrigerant liquid leakage.
Press the Ice/Clean button twice,
restart ice making program, if this
problem show up again, verify by
a qualified technician.
Cover motor is broken
Pipe in the cooling system is
blocked.
Making Ice too
slowly
Hot Air outlet has been blocked by
something.
Hot Air outlet must be guaranteed
to have more than 15 CM of
ventilation distance.
Water temperature in inner tank is
too high.
Water temperature requirement
between 45℉-90℉
Refrigeration system malfunctions.
Verify it by a qualified technician.
Water leakage
Drain plug not in place Put the drain plug in place.
Pipe Joint in the appliance may be
loose
Verify it by a qualified technician.
The seal has reached service life Verify it by a qualified technician.
TROUBLESH OOTING

12
Model
Model
HZB-15N
HZB-15N
B/S
B/S
Protection
Protection
Type
Type
I
I
Power
Power
115
115
V/
V/
6
6
0Hz
0Hz
Ice
Ice
Making
Making
Current
Current
2.7A
2.7A
Refrigerant
Refrigerant
R
R
600
600
a
a
/
/
16
16
g
g
Vesicant
Vesicant
C
C
5
5
H
H
10
10
Dimension
Dimension
287
287
x
x
220
220
x3
x3
22mm
22mm
TECHNICAL PARAMETERS
CIRCUIT DIAG R AM
TECHNICAL PARAMETERS & CIRCUIT DIAGRAM
-
-
+
+
GHG
CN2
COMP
PUMP
T1
FAN
KEY
L- N
Cover Mot or
+R- TPA+
J2
CN3
AW
MW
ELECTRICAL DIAGRAM
Overload
Protector
Start Relay
COMPRESSOR
POWER
Pump For
Water
DC Fan
Motor
WATER LEVEL
DETECTING SWITCH
Ice-Full Detector
SENSOR FOR AMBIENT TEMP

V1
