Scan to register
bellakitchenware.com
14 Egg cooker
Instruction Manual
Cuece 14 huevos
Manual de instrucciones
35109_35158_35159_35225_Bella_14EggCooker_IM_R8.indd 135109_35158_35159_35225_Bella_14EggCooker_IM_R8.indd 1 2024-05-30 2:47 PM2024-05-30 2:47 PM

2
35109_35158_35159_35225_Bella_14EggCooker_IM_R8.indd 235109_35158_35159_35225_Bella_14EggCooker_IM_R8.indd 2 2024-05-30 2:47 PM2024-05-30 2:47 PM

3
TABLE OF CONTENTS
IMPORTANT SAFEGUARDS ....................................................................................................................................................4
ADDITIONAL IMPORTANT SAFEGUARDS ........................................................................................................................5
WARNING! FOOD SAFETY HAZARD .................................................................................................................................5
NOTES ON THE PLUG ............................................................................................................................................................. 6
NOTES ON THE CORD............................................................................................................................................................ 6
PLASTICIZER WARNING ........................................................................................................................................................ 6
ELECTRIC POWER ..................................................................................................................................................................... 6
GETTING TO KNOW YOUR EGG COOKER .................................................................................................................... 7
BEFORE USING FOR THE FIRST TIME ................................................................................................................................ 7
OPERATING INSTRUCTIONS ................................................................................................................................................8
BOILED EGGS .............................................................................................................................................................................8
POACHED EGGS & OMELETTES ...................................................................................................................................... 8-9
COOKING EGGS ...................................................................................................................................................................... 9
USER MAINTENANCE INSTRUCTIONS ........................................................................................................................... 9
CLEANING INSTRUCTIONS ................................................................................................................................................. 9
STORING INSTRUCTIONS .................................................................................................................................................... 9
WARRANTY ...............................................................................................................................................................................10
ÍNDICE
MEDIDAS DE SEGURIDAD IMPORTANTES ...................................................................................................................... 11
OTRAS MEDIDAS DE SEGURIDAD IMPORTANTES ......................................................................................................12
¡ADVERTENCIA! RIESGOS A LA SEGURIDAD ALIMENTARIA. PAUTAS DE LA FDA SUGERIDAS .................12
NOTAS SOBRE EL ENCHUFE ............................................................................................................................................... 12
NOTAS SOBRE EL CABLE ......................................................................................................................................................13
ADVERTENCIA SOBRE EL PLASTIFICANTE .....................................................................................................................13
CORRIENTE ELÉCTRICA .........................................................................................................................................................13
CONOZCA SU CUECE DE HUEVOS .................................................................................................................................. 14
ANTES DEL PRIMER USO .......................................................................................................................................................14
INSTRUCCIONES DE USO ....................................................................................................................................................15
HUEVOS HERVIDOS ............................................................................................................................................................... 15
HUEVOS ESCALFADOS Y OMELETES ......................................................................................................................... 15-16
INSTRUCCIONES DE MANTENIMIENTO PARA EL USUARIO..................................................................................16
CÓMO COCINAR HUEVOS .................................................................................................................................................16
INSTRUCCIONES DE LIMPIEZA .................................................................................................................................... 16-17
INSTRUCCIONES DE GUARDADO .................................................................................................................................... 17
GARANTÍA ................................................................................................................................................................................. 18
35109_35158_35159_35225_Bella_14EggCooker_IM_R8.indd 335109_35158_35159_35225_Bella_14EggCooker_IM_R8.indd 3 2024-05-30 2:47 PM2024-05-30 2:47 PM

4
IMPORTANT SAFEGUARDS
WARNING: When using electrical appliances, basic safety precautions should
always be followed, including the following:
1. READ ALL INSTRUCTIONS BEFORE USING APPLIANCE.
2. Do not touch hot surfaces. Use handles or knobs. Use potholders when
removing lid or handling hot containers.
3. To protect against electrical shock do not immerse cord, plugs, or appliance in
water or other liquid.
4. This appliance is not intended for use by persons (including children) with
reduced physical, sensory or mental capabilities, or lack of experience and
knowledge, unless they have been given supervision or instruction concerning
use of the appliance by a person responsible for their safety.
5. Close supervision is necessary when any appliance is used by or near children.
6. Unplug from outlet when not in use and before cleaning. Allow to cool before
putting on or taking o parts.
7. Do not operate any appliance with a damaged cord or plug or aer the
appliance malfunctions, or has been damaged in any manner. Bring it to a
qualied technician for examination, repair or for electrical or mechanical
adjustment.
8. The use of accessory attachments not recommended by the appliance
manufacturer may cause injuries.
9. Do not use outdoors.
10. Do not let cord hang over edge of table or counter, or touch hot surfaces.
11. Do not place on or near a hot gas or electric burner, or in a heated oven.
12. Extreme caution must be used when moving an appliance containing hot oil or
other hot liquids.
CAUTION: To protect against damage or electric shock, do not cook in the
base. Cook fresh, whole eggs only in the boiling racks provided.
NOTE: Never operate Egg Cooker without water in the reservoir, or use a
liquid other than water for cooking purposes as this may damage the unit.
13. To disconnect, press the (O/l)
button, then remove plug from outlet.
14. Do not use appliance for other than intended use.
WARNING: Escaping steam. Use caution. Do not place face near steam vents.
WARNING: To avoid scalding, li to open lid carefully and allow water to drip
into the water reservoir.
CAUTION: The piercing pin on the underside of the water measuring cup is
very sharp. Use extreme caution when handling.
FOR HOUSEHOLD USE ONLY
SAVE THESE INSTRUCTIONS
35109_35158_35159_35225_Bella_14EggCooker_IM_R8.indd 435109_35158_35159_35225_Bella_14EggCooker_IM_R8.indd 4 2024-05-30 2:47 PM2024-05-30 2:47 PM

5
ADDITIONAL IMPORTANT
SAFEGUARDS
CAUTION HOT SURFACES: This appliance generates heat and escaping steam
during use. Proper precautions must be taken to prevent the risk of burns, res or
other injury to persons or damage to property.
1. A person who has not read and understood all operating and safety
instructions is not qualied to operate this appliance. All users of this appliance
must read and understand this instruction manual before operating or cleaning
this appliance.
2. If this appliance falls or accidentally becomes immersed in water, unplug it
from the wall outlet immediately. Do not reach into the water!
3. Do not leave this appliance unattended during use.
4. If this appliance begins to malfunction during use, immediately unplug the
cord. Do not use or attempt to repair a malfunctioning appliance!
5. The cord to this appliance should be plugged into a 120V AC electrical wall
outlet.
6. Do not use this appliance in an unstable position.
CAUTION: To protect against damage or electric shock, do not cook in the
base.
WARNING! FOOD SAFETY HAZARD
FDA GUIDELINES SUGGEST:
• Consuming raw or undercooked eggs may increase your risk of foodborne
illness.
• Thorough cooking is perhaps the most important step in making sure eggs are
safe. Cook eggs until both the yolk and the white are rm. Scrambled eggs
should not be runny.
• Foods containing eggs should be cooked to 160°F (72°C). Always use a food
thermometer to test.
• For recipes that call for raw or undercooked eggs, use pasteurized or fresh
organic eggs.
35109_35158_35159_35225_Bella_14EggCooker_IM_R8.indd 535109_35158_35159_35225_Bella_14EggCooker_IM_R8.indd 5 2024-05-30 2:47 PM2024-05-30 2:47 PM

6
NOTES ON THE PLUG
This appliance has a polarized plug (one blade is wider than the other). To reduce
the risk of electric shock, this plug will t in a polarized outlet only one way. If the
plug does not t fully into the outlet, reverse the plug. If it still does not t, contact a
qualied electrician. Do not modify the plug in any way.
NOTES ON THE CORD
A. A short power-supply cord (or detachable power-supply cord) is to be
provided to reduce the risk resulting from becoming entangled in or tripping
over a longer cord.
B. Longer detachable power-supply cords or extension cords are available and
may be used if care is exercised in their use.
C. If a long detachable power-supply cord or extension cord is used:
1. The marked electrical rating of the cord or extension cord should
be at least as great as the electrical rating of the appliance;
2. If the appliance is of the grounded type, the extension cord should
be a grounding-type3-wire cord; and
3. The longer cord should be arranged so that it will not drape over the
counter top or table top where it can be pulled on by children or tripped
over.
PLASTICIZER WARNING
CAUTION: To prevent Plasticizers from migrating to the nish of the counter top or
table top or other furniture, place NON-PLASTIC coasters or place mats between
the appliance and the nish of the counter top or table top. Failure to do so may
cause the nish to darken; permanent blemishes may occur or stains canappear.
ELECTRIC POWER
If the electrical circuit is overloaded with other appliances, your appliance may
notoperate properly. It should be operated on a separate electrical circuit from
other appliances.
35109_35158_35159_35225_Bella_14EggCooker_IM_R8.indd 635109_35158_35159_35225_Bella_14EggCooker_IM_R8.indd 6 2024-05-30 2:47 PM2024-05-30 2:47 PM

7
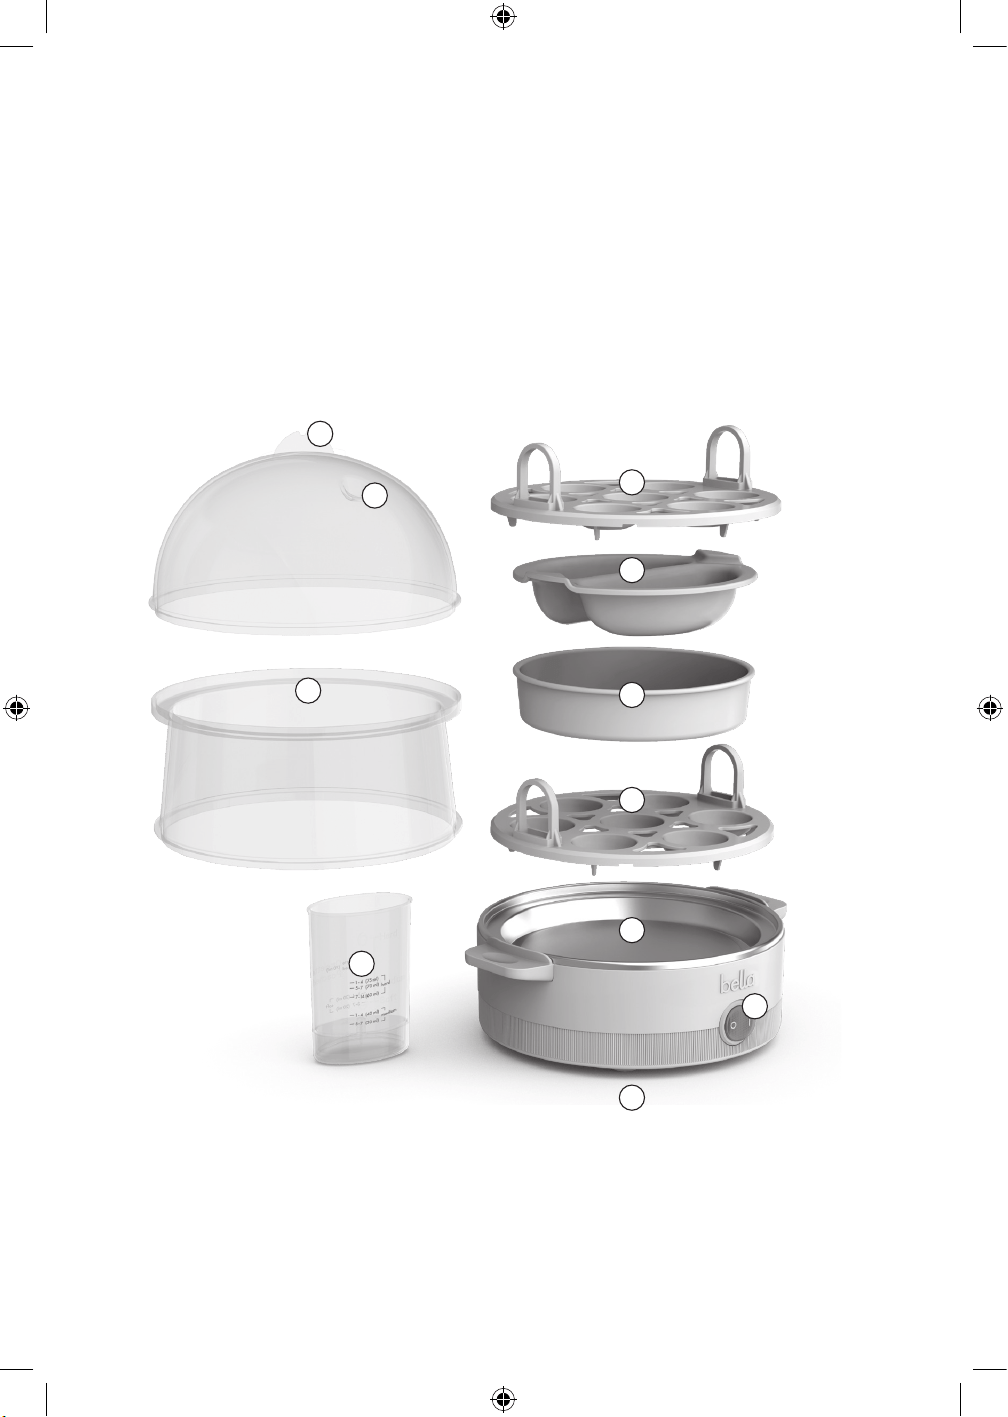
GETTING TO KNOW YOUR EGG COOKER
Product may vary slightly from illustration
1. Lid Handle
2. Lid with Steam Vents
3. Boiling Tray with Handle
4. Poaching tray with Handles
5. Extension shell
6. Omelet tray
7. Boiling Rack with Handles
8. Base with Water Reservoir
9. (O/l) switch with indicator light
10. Polarized Plug (not shown)
11. Water Measuring Cup with Piercing Pin
BEFORE USING FOR THE FIRST TIME
1. Carefully unpack all parts of your Egg Cooker. Set the base aside.
2. Wash lid, boiling rack, poaching tray, omelet tray and water measuring cup in warm, soapy water. Rinse and
dry thoroughly.
CAUTION: The piercing pin on the underside of the water measuring cup is very sharp. Use extreme caution
when handling.
3. Wipe the base’s water reservoir with a damp, non-abrasive cloth.
Figure 1
1
2
3
4
8
6
7
9
5
10
11
35109_35158_35159_35225_Bella_14EggCooker_IM_R8.indd 735109_35158_35159_35225_Bella_14EggCooker_IM_R8.indd 7 2024-05-30 2:47 PM2024-05-30 2:47 PM

8
OPERATING INSTRUCTIONS
IMPORTANT!
1. ONLY USE COLD EGGS. Eggs may be overcooked if they are not refrigerated until use.
2. Store eggs in their carton to assure freshness and to keep the yolks centered.
3. This Egg Cooker works best for large sized eggs. It may be necessary to adjust the amount the of water for
other sizes.
4. Always use cold water, preferably distilled or ltered to reduce mineral deposits.
5. Boiled eggs in their shells, may be kept refrigerated for up to 5 days.
BOILED EGGS
1. Place the Egg Cooker on a flat, clean surface.
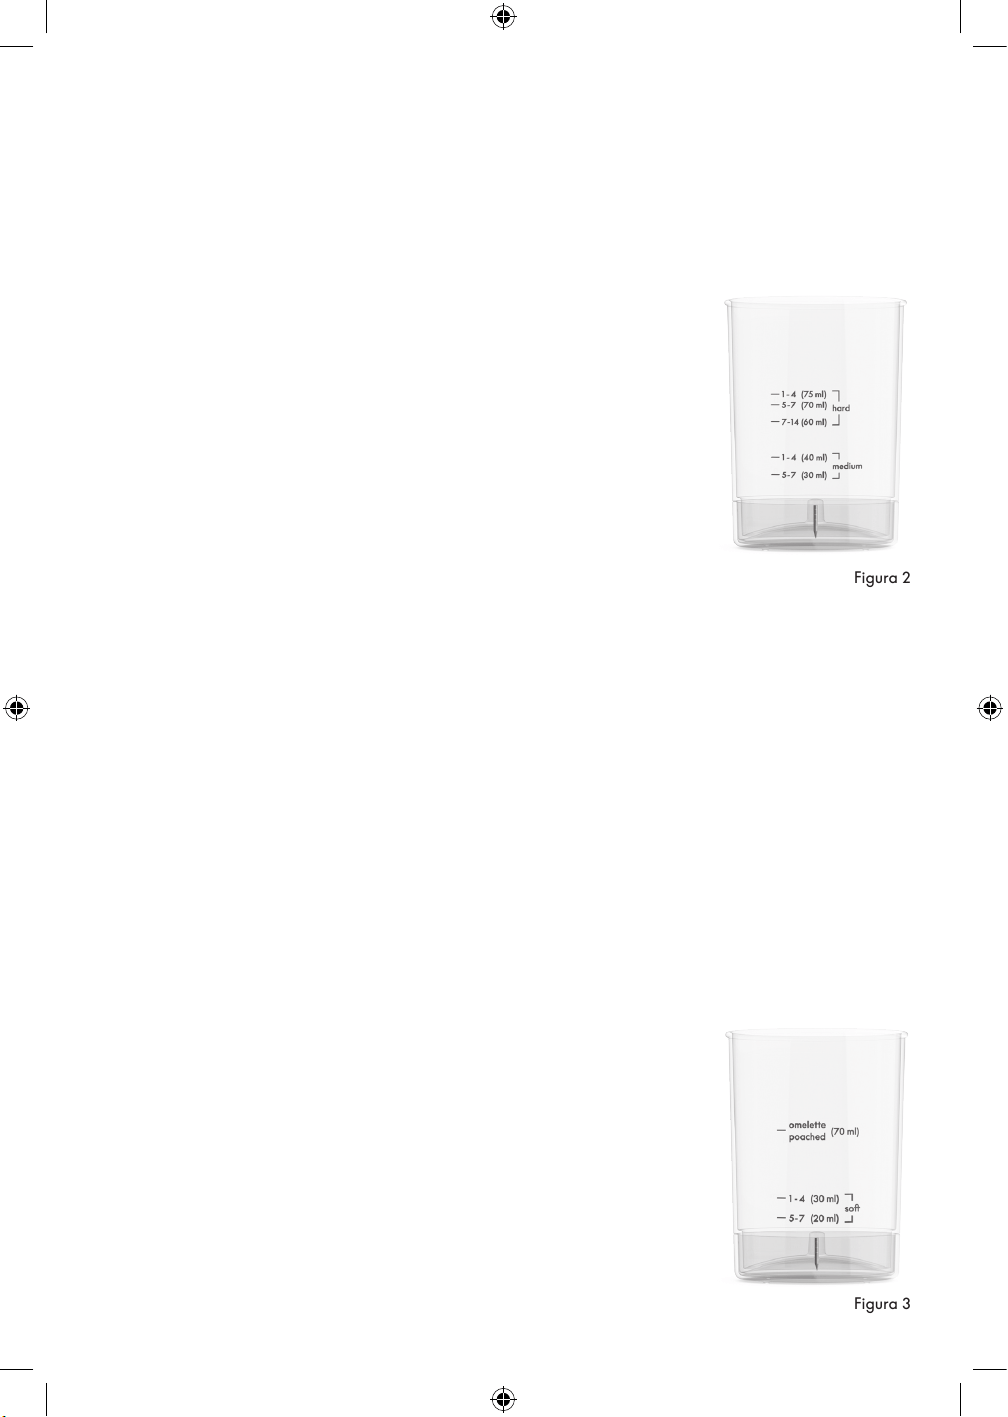
2. Using the water measuring cup, add cold water, preferably distilled or ltered,
to the designated SOFT, MEDIUM or HARD boiled mark (See Figure 2); then
pour into the base’s water reservoir.
NOTE: Always use cold water.
3. Center the boiling rack on top of the base.
4. To avoid broken boiled eggs, wash eggs rst, then pierce eggs using the pin on
the underside of the water measuring cup.
NOTE: Eggs will cook perfectly with or without piercing.
5. Place up to 14 eggs in the boiling rack, pierced side up. Add the lid.
6. Plug cord into a 120V AC outlet.
7. Press the (O/l) switch to turn the Egg Cooker ON. The water will begin to heat
and boil.
IMPORTANT: To ensure proper doneness, eggs must be LARGE sized and
COLD out of the refrigerator.
8. When the eggs are cooked and the water has evaporated, the unit will beep
indicating that the cooking process has nished.
9. Once cooking is nished, press the ON/OFF (0/I) switch to turn the egg cooker o. Then remove the plug from
wall outlet.
NOTE: Avoid unplugging the Egg Cooker during the cooking cycle. If unplugged, the Egg Cooker will turn back
on when plugged back the next time it is in use. The thermal sensor will detect no water in the reservoir, and will
shut o within 30 seconds.
IMPORTANT: When the unit turns o unplug it as the unit will be in a permanent ON/OFF cycle.
10. Immediately li lid carefully to avoid scalding, and allow water to drip into the water reservoir.
11. Using protective oven mitts or pot holders, use the side handles to carefully li the boiling rack up and o the
base. Rinse boiled eggs with cold water or place in an ice bath to stop cooking. Eggs can be peeled when they
are cool enough to handle. CAUTION: The unit and the escaping steam can cause burns or injuries. Precaution
must be taken when the unit is in operation or just done cooking
IMPORTANT: Unused shell-on boiled eggs may be refrigerated and used for up to 5 days.
12. To cook additional eggs repeat step 2 - 11.
13. To serve so or medium-cooked eggs out of their shell, use a knife to break the shell across the top. Use a small
teaspoon to enjoy the egg directly from the shell, or use toast strips to dip into the so yolk.
POACHED EGGS & OMELETTES
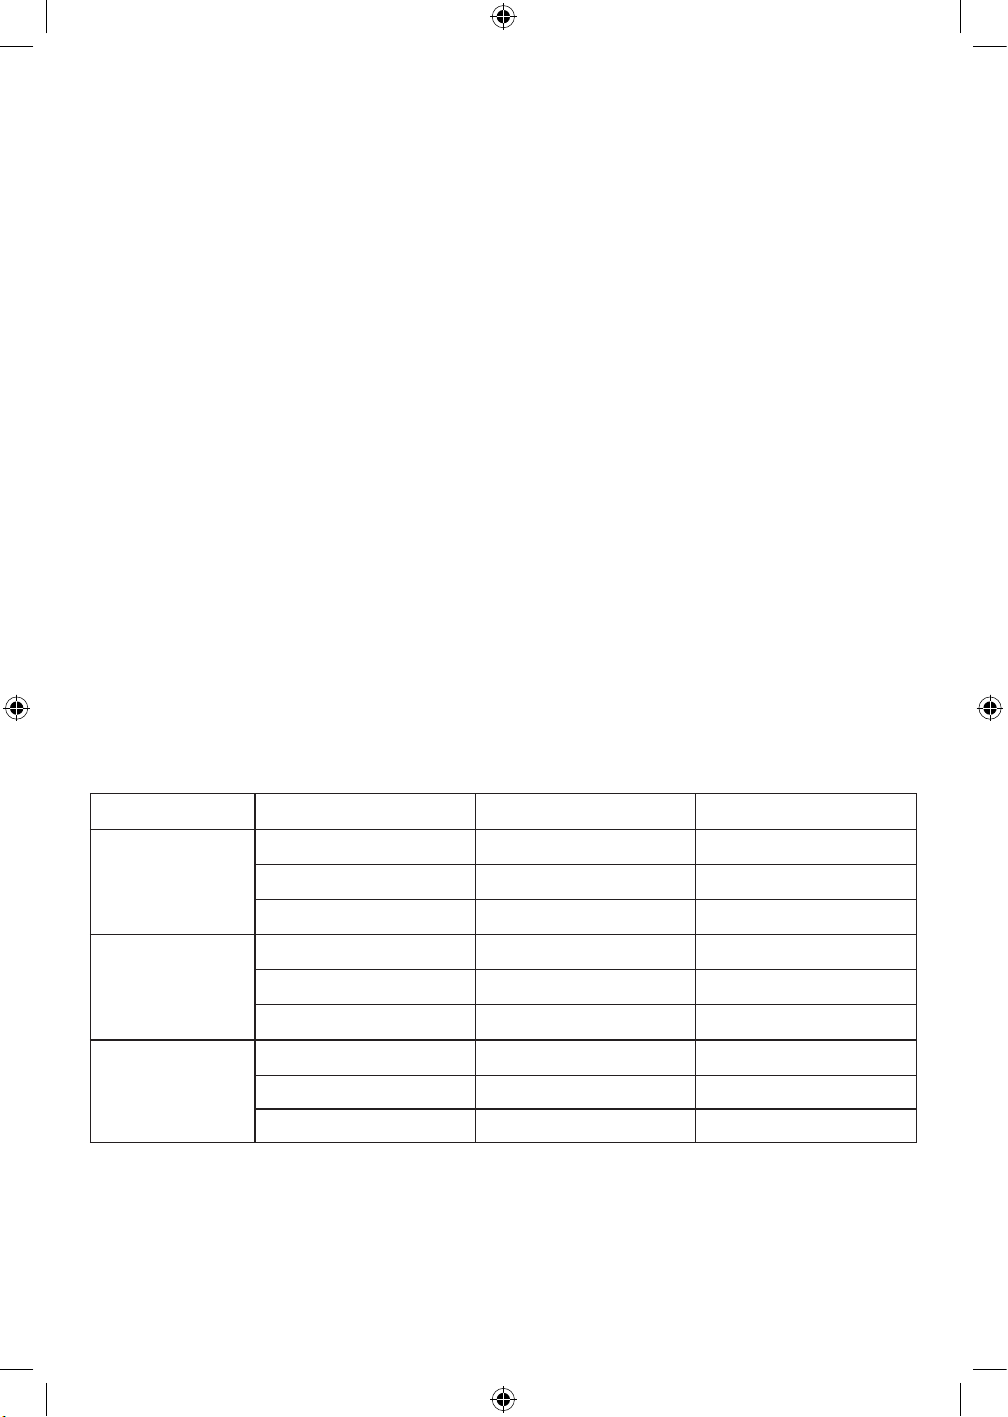
1. Using the water measuring cup, add cold water, preferably distilled or ltered, to the POACHED/OMELETTE
mark (See Figure 3); then pour into the base’s water reservoir.
NOTE: Always use cold water.
2. Center boiling rack on top of the base. Rest the poaching tray on top of the
boiling rack. (See Figure 1.)
CAUTION: Never place poaching or omelet tray directly onto Heating plate
3. Poach up to 2 eggs or prepare an omelettes in the trays. For best results you
can lightly butter or spray oil on trays.
4. Poached Eggs: Crack one egg at a time to add to each poaching section.
5. Omelettes: Whisk eggs, one at a time with your favorite add-ins: grated or
shredded cheese, small diced tomatoes, sausage crumbles, bacon bits, any
small diced cooked vegetables, even leovers!Carefully add to each poaching
section. DO NOT OVERFILL!
6. Plug cord into a 120V AC outlet.
7. Press the (O/l) switch to turn the Egg Cooker ON. The water will begin to heat
and boil.
Figure 2
Figure 3
35109_35158_35159_35225_Bella_14EggCooker_IM_R8.indd 835109_35158_35159_35225_Bella_14EggCooker_IM_R8.indd 8 2024-05-30 2:47 PM2024-05-30 2:47 PM
9
8. When the eggs are cooked and the water has evaporated, the unit will beep indicating that the cooking
process has nished.
9. Once cooking is nished, press the ON/OFF (0/I) switch to turn the egg cooker o. Then remove the plug from
wall outlet.
NOTE: Avoid unplugging the Egg Cooker during the cooking cycle. If unplugged, the Egg Cooker will turn back
on when plugged back the next time it is in use. The thermal sensor will detect no water in the reservoir, and will
shut o within 30 seconds.
IMPORTANT: When the unit turns o unplug it as the unit will be in a permanent ON/OFF cycle.
10. Immediately li lid carefully to avoid scalding, and allow water to drip into the water reservoir.
11. Using protective oven mitts or pot holders, use the top handle to carefully li the poaching tray up and o the
base.
12. Remove poached eggs/omelettes. Serve immediately.
COOKING EGGS
The cooking times listed below are guidelines on how long to cook eggs for desired doneness. The thermal sensor in the
Egg Cooker will automatically shut o when the water has completely evaporated and the eggs are done.
The Time Chart provided is for Medium to Large eggs. Jumbo or XL eggs will require additional water and time for the
Egg Cooker to achieve the desired cooking results.
For rmer Medium Eggs, allow the eggs to sit covered in the Egg Cooker for an additional 2-3 minutes before removing
them. For extra-rm hard boiled eggs, leave the eggs covered in the Egg Cooker for a few more minutes aer the beep
alert goes o.
USER MAINTENANCE INSTRUCTIONS
This appliance requires little maintenance. It contains no user serviceable parts. Do not try to repair it yourself. Any
servicing requiring disassembly other than cleaning, must be performed by a qualied appliance repair technician.
CLEANING INSTRUCTIONS
CAUTION: NEVER IMMERSE BASE UNIT OR CORD IN WATER OR OTHER LIQUID.
1. Always unplug and allow to cool completely before cleaning.
2. All Egg Cooker parts, with the exception of the base, may be cleaned in the top rack of a dishwasher. To clean
by hand, wash in warm, soapy water.
CAUTION: THE BASE UNIT IS EXTREMELY HOT AFTER USE. Allow base to cool completely before cleaning.
3. To remove mineral deposits, wipe the base’s water reservoir with a paper towel moistened with 1 tablespoon
distilled white vinegar. Rinse and dry thoroughly.
4. Wipe the exterior of the base with a so, slightly damp cloth or sponge. Never use abrasive cleansers or
scouring pads to clean the base, as they may damage the surfaces.
STORING INSTRUCTIONS
1. Never store the Egg Cooker while it is hot or wet. Make sure all parts are clean and dry before storing.
2. Store appliance in its box or in a clean, dry place.
3. To store, assemble with parts in place with the lid securely tted on top.
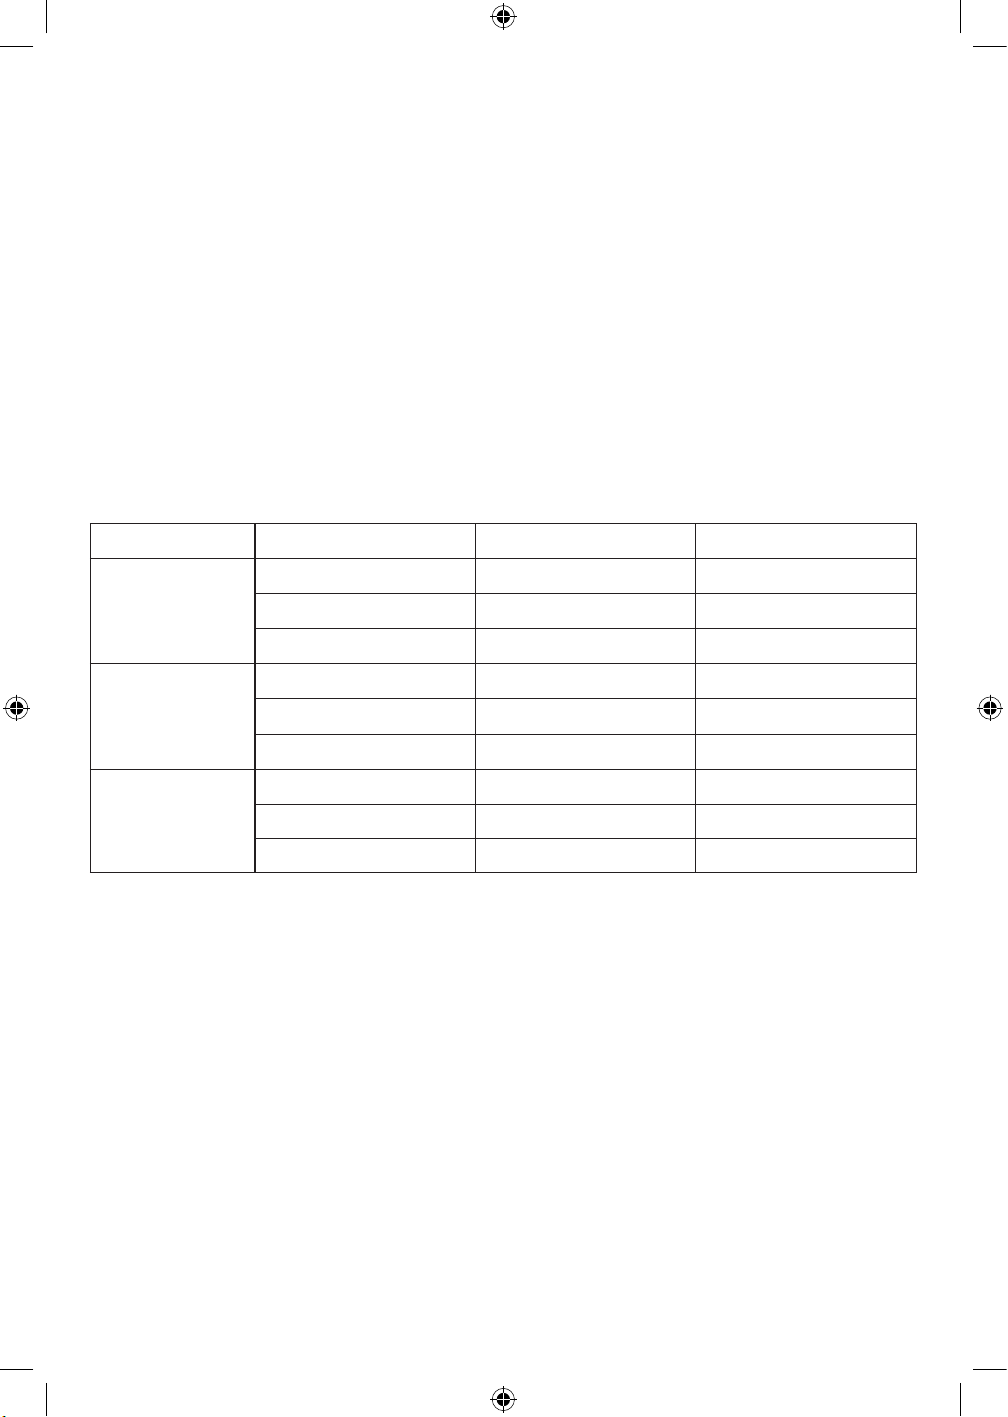
Doneness Number of Eggs Cook Time Water level (in ml)
So Boiled 1-4 eggs 9 mins 30 ml
5-7 eggs 11 mins 20 ml
7-14 eggs Not recommended -
Medium Boiled 1-4 eggs 11 mins 40 ml
5-7 eggs 14 mins 30 ml
7-14 eggs Not recommended -
Hard Boiled 1-4 eggs 17 mins 75 ml
5-7 eggs 20 mins 70 ml
7-14 eggs 24 mins 60 ml
35109_35158_35159_35225_Bella_14EggCooker_IM_R8.indd 935109_35158_35159_35225_Bella_14EggCooker_IM_R8.indd 9 2024-05-30 2:47 PM2024-05-30 2:47 PM

10
SENSIO Inc. hereby warrants that for a period of TWO YEARS from the date of purchase,
this product will be free from mechanical defects in material and workmanship, and
for 90 days in respect to non-mechanical parts. At its sole discretion, SENSIO Inc. will
either repair or replace the product found to be defective, or issue a refund on the
product during the warranty period.
The warranty is only valid for the original retail purchaser from the date of initial retail
purchase and is not transferable. Keep the original sales receipt, as proof of purchase is
required to obtain warranty validation. Retail stores selling this product do not have the
right to alter, modify, or in any way revise the terms and conditions of the warranty.
EXCLUSIONS:
The warranty does not cover normal wear of parts or damage resulting from any of the
following: negligent use of the product, use of improper voltage or current, improper
routine maintenance, use contrary to the operating instructions, disassembly, repair, or
alteration by anyone other than qualied SENSIO Inc. personnel. Also, the warranty
does not cover Acts of God such as re, oods, hurricanes, or tornadoes.
SENSIO Inc. shall not be liable for any incidental or consequential damages caused
by the breach of any express or implied warranty. Apart from the extent prohibited
by applicable law, any implied warranty of merchantability or tness for a particular
purpose is limited in time to the duration of the warranty. Some states, provinces or
jurisdictions do not allow the exclusion or limitation of incidental or consequential
damages, or limitations on how long an implied warranty lasts, and therefore, the
above exclusions or limitations may not apply to you. The warranty covers specic legal
rights which may vary by state, province and/or jurisdiction.
HOW TO OBTAIN WARRANTY SERVICE:
You must contact Customer Service at our toll-free number: 1-866-832-4843.
A Customer Service Representative will attempt to resolve warranty issues over the
phone. If the Customer Service Representative is unable to resolve the problem, you will
be provided with a case number and asked to return the product to SENSIO Inc. Attach
a tag to the product that includes: your name, address, daytime contact telephone
number, case number, and description of the problem. Also, include a copy of the
original sales receipt. Carefully package the tagged product with the sales receipt,
and send it (with shipping and insurance prepaid) to SENSIO Inc.’s address. SENSIO
Inc. shall bear no responsibility or liability for the returned product while in transit to
SENSIOInc.’s Customer Service Center.
LIMITED TWO-YEAR WARRANTY
LIMITED TWO-YEAR WARRANTY
35109_35158_35159_35225_Bella_14EggCooker_IM_R8.indd 1035109_35158_35159_35225_Bella_14EggCooker_IM_R8.indd 10 2024-05-30 2:47 PM2024-05-30 2:47 PM

11
MEDIDAS DE SEGURIDAD
IMPORTANTES
Cuando se usan artefactos eléctricos, se deben siempre seguir las precauciones
básicas de seguridad, incluso lo siguiente:
1. LEA TODAS LAS INSTRUCCIONES.
2. No toque las supercies calientes. Utilice las asas o los mangos. Use
agarraderas cuando toque la tapa o manipule recipientes calientes.
3. Para protegerse del riesgo de descarga eléctrica, no sumerja el cable,
el enchufe ni la unidad en agua ni en ningún otro líquido.
4. Este electrodoméstico no debe ser utilizado por personas (incluidos niños)
con capacidades físicas, sensoriales o mentales reducidas, o con falta de
experiencia y conocimientos, a menos que una persona responsable de su
seguridad les haya brindado supervisión o instrucciones sobre el uso de los
electrodomésticos.
5. Es necesario supervisar a los niños cuando usen un aparato o si éste se usa
cerca de ellos.
6. Desenchufe el electrodoméstico del tomacorriente cuando no esté en uso y antes
de limpiarlo. Deje que el aparato se enfríe antes de coloca o sacar piezas.
7. No opere ningún artefacto si el cable está dañado. No use este artefacto si
no funciona correctamente, si se cae o si se daña de alguna manera. de una
descarga eléctrica, nunca intente reparar la Parrilla de panini usted mismo.
Llévelo a un técnico calicado para su examen, reparación o ajuste eléctrico o
mecánico.
8. El uso de accesorios no recomendados o vendidos por el fabricante puede
causar fuego, descarga eléctrica o lesione.
9. No lo utilice en exteriores.
10. No permita que el cable cuelgue del borde de la mesa o encimera o toque
supercies calientes.
11. No coloque el aparato encima de, cerca de o en un quemador eléctrico o de
gases calientes, ni dentro una estufa encendida.
12. Se debe tener extrema precaución al mover un aparato que contenga aceite
caliente u otros líquidos calientes.
PRECAUCIÓN: Para proteger contra daños o descargas eléctricas, no cocine
en la base. Cocine los huevos frescos y enteros solo en las bandejas para
cocinar provistas.
NOTA: Nunca ponga en funcionamiento la cocina de huevos sin agua en el
tanque, o use un líquido que no sea agua para cocinar, ya que esto podría
dañar la unidad.
13. Para desconectar, presione el botón (O/l) button, luego quite el enchufe del
tomacorriente.
14. No use el aparato para otro uso que no sea el indicado.
PRECAUCIÓN: El pin de perforación en la parte de debajo de la taza de
agua está muy alado. Tenga mucho cuidado al manipularlo.
¡IMPORTANTE! Coloque la tapa con la salida vapor hacia la parte de atrás
para evitar quemaduras durante la cocción.
35109_35158_35159_35225_Bella_14EggCooker_IM_R8.indd 1135109_35158_35159_35225_Bella_14EggCooker_IM_R8.indd 11 2024-05-30 2:47 PM2024-05-30 2:47 PM

12
SOLO PARA EL USO DOMÉSTICO
GUARDE ESTAS INSTRUCCIONES
OTRAS MEDIDAS DE
SEGURIDAD IMPORTANTE
PRECAUCIÓN, SUPERFICIES CALIENTES: Este aparato emite calor y se escape el
vapor durante el uso. Se deben tomar las medidas necesarias para evitar riesgos
de quemaduras, incendios u otras lesiones a personas o daños a la propiedad.
1. Un usuario que no haya leído y comprendido todas las instrucciones de
funcionamiento y seguridad no está calicado para operar este aparato.
Todos los usuarios de este electrodoméstico deben leer y comprender este
manual de instrucciones antes de poner en funcionamiento o limpiar el
aparato.
2. Si este aparato se cae o se sumerge accidentalmente en el agua, desenchúfelo
de inmediato ¡No ponga la mano en el agua!
3. No deje este aparato desatendido durante el uso.
4. Si este aparato comienza a funcionar mal durante el uso, desenchufe el cable
inmediatamente. No utilice ni intente reparar el aparato que funciona mal.
5. El cable de este aparato debe ser enchufado a un tomacorriente de pared de
120V CA.
6. No utilice este aparato en una posición inestable.
PRECAUCIÓN: Para proteger contra daños o descargas eléctricas, no cocine
en la base.
¡ADVERTENCIA! RIESGOS A LA SEGURIDAD ALIMENTARIA.
PAUTAS DE LA FDA SUGERIDAS:
• El consumo de huevos crudos o poco cocidos aumenta el riesgo de
enfermedades transmitidas por los alimentos.
• La cocción completa es quizás el paso más importante para asegurarse de que
los huevos sean seguros. Cocine los huevos hasta que la yema y la clara estén
rmes
• Los alimentos que contienen huevos deben ser cocidos a 160°F (72°C). Siempre
use un termómetro para alimentos para examinar la cocción.
• Para recetas que requieran huevos crudos o poco cocidos, use huevos
orgánicos frescos o pasteurizados.
NOTAS SOBRE EL ENCHUFE
Este aparato tiene un enchufe polarizado (una hoja es más ancha que la otra).
Para reducir el riesgo de descarga eléctrica, este enchufe encaja en una toma de
corriente polarizada sólo de una manera. Si el enchufe no entra completamente
en el tomacorriente, invierta el enchufe. Si el enchufe no puede encajar en la toma
eléctrica, póngase en contacto con un electricista calicado. No modique el
enchufe de ninguna manera.
35109_35158_35159_35225_Bella_14EggCooker_IM_R8.indd 1235109_35158_35159_35225_Bella_14EggCooker_IM_R8.indd 12 2024-05-30 2:47 PM2024-05-30 2:47 PM

13
NOTAS SOBRE EL CABLE
A. Un cable corto de alimentación (o cable de alimentación desmontable) es
suministrado para reducir el riesgo de que se enreden o se tropiecen con un
cable más largo.
B. Cables de alimentación más largos y removibles o las alargadoras son
disponibles y se pueden utilizarlos si se ejerce cuidado.
C. Si un cable largo y removible o una alargadora sea usado:
1. La potencia eléctrica marcada del cordón o de la alargadora debe ser, por
lo menos, tan fuerte como la potencia eléctrica del aparato;
2. Si el aparato es del tipo con conexión a tierra, el cable o la alargadora
debe ser un enchufe de 3 hojas con conexión a tierra.
3. El cordón debe estar dispuesto de manera que no cuelga del borde de la
encimera o la mesa donde pueda ser tirado por niños o donde alguien se
tropiece involuntariamente con el cable.
ADVERTENCIA SOBRE LOS PLASTIFICANTES
PRECAUCIÓN: A n de evitar que los plasticantes se adhieran al acabado de la
encimera, la mesa u otro mueble, coloque un posafuentes o salvamanteles que
NO SEA DE PLÁSTICO entre el electrodoméstico y la supercie de la encimera
o mesa. Si no se hace esto, es posible que el acabado se oscurezca, se formen
marcas permanentes o aparezcan manchas.
CORRIENTE ELÉCTRICA
Si el circuito eléctrico está sobrecargado con otros artefactos, es posible que el
electrodoméstico no funcione correctamente. El electrodoméstico debe funcionar
en un circuito eléctrico separado de otros aparatos.
35109_35158_35159_35225_Bella_14EggCooker_IM_R8.indd 1335109_35158_35159_35225_Bella_14EggCooker_IM_R8.indd 13 2024-05-30 2:47 PM2024-05-30 2:47 PM
14
CONOZCA SU COCINA DE HUEVOS
El producto puede diferir levemente de las ilustraciones
1. Asa de la tapa
2. Tapa con oricios para vapor
3. Rejilla de coccion con asa
4. Bandeja de escalfado con asa
5. Carcasa de extensión
6. Bandeja para tortilla
7. Rejilla de coccion con asa
8. Reservorio de agua
9. Botón de encendido/apagado con luz indicadora
10. Enchufe polarizado (no se muestra)
11. Vaso medidor de líquido con punzón para huevos
ANTES DEL PRIMER USO
1. Desembale con cuidado todas las piezas del cuece huevos. Deje la base a un lado.
2. Lave con agua tibia y jabón la tapa, la rejilla de cocción, la bandeja de escalfado, la bandeja para tortilla y el
vaso medidor de líquido. Enjuague y seque bien.
PRECAUCIÓN: El punzón para huevos en la parte inferior del vaso medidor de líquido es muy alado. Tenga
mucho cuidado al manipularlo.
3. Limpie el depósito de agua de la base con un paño húmedo no abrasivo.
Figura 1
1
2
3
4
8
6
7
9
5
10
11
35109_35158_35159_35225_Bella_14EggCooker_IM_R8.indd 1435109_35158_35159_35225_Bella_14EggCooker_IM_R8.indd 14 2024-05-30 2:47 PM2024-05-30 2:47 PM
15
INSTRUCCIONES DE USO
IMPORTANTE
1. SOLO UTILICE HUEVOS FRÍOS. Los huevos pueden cocinarse en exceso si no se refrigeran hasta su uso.
2. Guarde los huevos en su caja para asegurar la frescura y para mantener las yemas centradas.
3. El cuecehuevos funciona mejor con huevos de tamaño grande. Para otros tamaños, es posible que se deba
ajustar la cantidad de agua.
4. Siempre use agua fría, preferiblemente destilada o ltrada para reducir los depósitos minerales.
5. Los huevos hervidos con cáscara se pueden mantener refrigerados hasta 5 días.
HUEVOS HERVIDOS
1. Coloque el cuecehuevos sobre una supercie plana y limpia.
2. Agregue agua fría con el vaso medidor de líquido, preferiblemente destilada
o ltrada, hasta la marca de hervido deseada SUAVE, MEDIANO o DURO
(consulte la Figura 2); luego viértala en el depósito de agua de la base.
1. NOTA: Siempre use agua fría.
2. Centre la rejilla de cocción en la parte superior de la base.
3. Para evitar que se rompan los huevos hervidos, primero lave los huevos y luego
perfórelos con el punzón en la parte inferior del vaso medidor de líquido.
4. NOTA: Los huevos se cocinarán perfectamente con o sin perforado.
5. Coloque hasta 14 huevos en la rejilla de cocción, con el lado perforado hacia
arriba. Coloque la tapa.
6. Enchufe el cable en una toma de corriente de 120 V CA.
7. Presione el botón de encendido/apagado para encender el cuecehuevos. El
agua comenzará a calentarse y luego a hervir.
IMPORTANTE: Para garantizar una cocción adecuada, los huevos deben ser
GRANDES y estar FRÍOS, recién sacados del refrigerador.
8. Cuando los huevos estén cocidos y el agua se haya evaporado, el aparato emitirá un pitido indicando que el
proceso de cocción ha nalizado.
9. Una vez nalizada la cocción, pulse el interruptor ON/OFF (O/l) para apagar la cocedora de huevos. A
continuación, desenchufe el aparato de la toma de corriente.
NOTA: Evite desenchufar la Cocedora de Huevos durante el ciclo de cocción. Si se desenchufa, la Cocedora
de Huevos volverá a encenderse cuando se vuelva a enchufar la próxima vez que se utilice. El sensor térmico
detectará que no hay agua en el depósito y se apagará en 30 segundos.
IMPORTANTE: Cuando la unidad se apague desenchúfela ya que la unidad estará en un ciclo permanente de
ENCENDIDO/APAGADO.
10. Inmediatamente levante la tapa con cuidado para evitar quemaduras y deje que el agua gotee sobre el
depósito.
11. Tome las asas laterales con manoplas o agarraderas protectoras para levantar con cuidado la rejilla de
cocción y retirarla de la base. Enjuague los huevos hervidos con agua fría o colóquelos en agua con hielo para
detener la cocción. Los huevos se pueden pelar cuando estén lo sucientemente fríos como para manipularlos.
PRECAUCIÓN: La unidad y el vapor que escapa pueden causar quemaduras o lesiones. Tenga precaución
cuando la unidad está en funcionamiento o acaba de cocinar
IMPORTANTE: Los huevos hervidos con cáscara sobrantes pueden refrigerarse y usarse hasta 5 días después.
12. Para cocinar huevos adicionales, repita los pasos 2-11
13. Para servir los huevos pasados por agua o mollet sin cáscara, use un cuchillo
para romper la parte superior de la cáscara. Use una cuchara pequeña para
disfrutar el huevo directamente de la cáscara o use tiritas de pan tostado para
sumergirlas en la yema blanda.
HUEVOS ESCALFADOS Y OMELETES
1. Agregue agua fría con el vaso medidor de líquido, preferiblemente destilada o
ltrada, hasta la marca de ESCALFADO/OMELET (consulte la Figura 3); luego
viértala en el depósito de agua de la base.
NOTA: Siempre use agua fría.
2. Centre la rejilla de cocción en la parte superior de la base. Coloque la bandeja
de escalfado sobre la rejilla de cocción. (Consulte la Figura 1).
3. Escalfe hasta 2 huevos o prepare un omelete con un solo huevo en la bandeja.
Para mejores resultados puede engrasar ligeramente las bandejas con
margarina o aceite vegetal
4. Huevos escalfados: Rompa un huevo por vez para agregarlos en cada sección
para tortilla.
Figura 2
Figura 3
35109_35158_35159_35225_Bella_14EggCooker_IM_R8.indd 1535109_35158_35159_35225_Bella_14EggCooker_IM_R8.indd 15 2024-05-30 2:47 PM2024-05-30 2:47 PM
16
5. Omeletes: Bata los huevos, uno por vez, junto con sus ingredientes favoritos: queso rallado o triturado, cubitos
pequeños de tomates, pedacitos de salchichas, trozos de tocino o cualquier verdura cocida cortada en cubitos,
¡incluso sobras de alimentos! Agregue los ingredientes cuidadosamente en cada sección de escalfado.
¡NO LAS LLENE DEMASIADO!
6. Enchufe el cable en una toma de corriente de 120 V CA.
7. Presione el botón de encendido/apagado para encender el cuecehuevos. El agua comenzará a calentarse y
luego a hervir.
8. Cuando los huevos estén cocidos y el agua se haya evaporado, el aparato emitirá un pitido indicando que el
proceso de cocción ha nalizado.
9. Una vez nalizada la cocción, pulse el interruptor ON/OFF (O/l) para apagar la cocedora de huevos. A
continuación, desenchufe el aparato de la toma de corriente.
NOTA: Evite desenchufar la Cocedora de Huevos durante el ciclo de cocción. Si se desenchufa, la Cocedora
de Huevos volverá a encenderse cuando se vuelva a enchufar la próxima vez que se utilice. El sensor térmico
detectará que no hay agua en el depósito y se apagará en 30 segundos.
IMPORTANTE: Cuando la unidad se apague desenchúfela ya que la unidad estará en un ciclo permanente de
ENCENDIDO/APAGADO.
10. Inmediatamente levante la tapa con cuidado para evitar quemaduras y deje que el agua gotee sobre el depósito.
11. Tome el asa de la tapa con manoplas o agarraderas protectoras para levantar con cuidado la bandeja de
escalfado y retirarla de la base.
12. Retire los huevos escalfados u omeletes y sírvalos inmediatamente.
INSTRUCCIONES DE MANTENIMIENTO PARA EL USUARIO
Este electrodoméstico necesita poco mantenimiento. No contiene piezas que el usuario pueda reparar. No intente
repararlo usted mismo. Cualquier mantenimiento que requiera el desarmado, aparte de la limpieza, debe ser realizado
por un técnico de reparación de electrodomésticos calicado.
CÓMO COCINAR HUEVOS
Los tiempos de cocción que se enumeran a continuación son una guia sobre cuánto tiempo cocinar los huevos para
que estén listos. El sensor termico de la unidad se apagará automáticamente cuando el agua se haya evaporado por
completo y el los huevos están listos.
La tabla de tiempo proporcionada es para huevos medianos a grandes. Los huevos Jumbo o XL requerirán agua y
tiempo adicional para que la Cuece huevos logre los resultados de cocción deseados.
Para obtener huevos medianos más rmes, deje que los huevos se asienten cubiertos en la olla durante 2-3 minutos
adicionales antes de retirarlos. Para huevos duros extra rmes, déjelos cubiertos en la olla por unos minutos más
después de que suene el pitido.
INSTRUCCIONES DE LIMPIEZA
PRECAUCIÓN: NUNCA SUMERJA LA BASE DE LA UNIDAD O EL CABLE EN AGUA U OTRO LÍQUIDO.
1. Antes de limpiar, siempre desenchúfela y deje que se enfríe completamente.
2. Todas las piezas del cuecehuevos, a excepción de la base, se pueden limpiar en la rejilla superior del
lavaplatos. Para limpiarlas a mano, lávelas con agua tibia y jabón.
PRECAUCIÓN: DESPUÉS DEL USO, LA BASE DE LA UNIDAD ESTARÁ EXTREMADAMENTE CALIENTE.
Deje que la base se enfríe completamente antes de limpiarla.
Nivel de cocción Cantidad de huevos Tiempo de cocción Nivel de agua (en ml)
Suave 1-4 huevos 9 mins 30 ml
5-7 huevos 11 mins 20 ml
7-14 huevos No recomendado -
Medio 1-4 huevos 11 mins 40 ml
5-7 huevos 14 mins 30 ml
7-14 huevos No recomendado -
Duro 1-4 huevos 17 mins 75 ml
5-7 huevos 20 mins 70 ml
7-14 huevos 24 mins 60 ml
35109_35158_35159_35225_Bella_14EggCooker_IM_R8.indd 1635109_35158_35159_35225_Bella_14EggCooker_IM_R8.indd 16 2024-05-30 2:47 PM2024-05-30 2:47 PM

17
3. Para eliminar los depósitos minerales, limpie el depósito de agua de la base con una toalla de papel
humedecida con 1 cucharada de vinagre blanco destilado. Enjuague y seque bien.
4. Limpie el exterior de la base con un paño o esponja suave y ligeramente húmeda. Nunca use limpiadores o
estropajos abrasivos para limpiar la base, ya que se pueden dañar las supercies.
INSTRUCCIONES DE GUARDADO
1. Nunca guarde el cuecehuevos mientras esté caliente o húmedo. Asegúrese de que todas las piezas estén
limpias y secas antes de guardarlo.
2. Guarde el electrodoméstico en su caja o en un lugar limpio y seco.
3. Para guardar, arme colocando las piezas en su lugar y sitúe la tapa en la parte superior de modo que quede
rme.
35109_35158_35159_35225_Bella_14EggCooker_IM_R8.indd 1735109_35158_35159_35225_Bella_14EggCooker_IM_R8.indd 17 2024-05-30 2:47 PM2024-05-30 2:47 PM

18
Mediante la presente, SENSIO Inc. garantiza que, durante el plazo de DOS AÑOS a partir
de la fecha de compra, este producto no presentará defectos mecánicos en el material ni
en la mano de obra, y durante 90 días, no los presentará en las piezas no mecánicas. A su
entera discreción, SENSIO Inc. reparará o reemplazará el producto que resulte defectuoso,
o emitirá un reembolso por el producto durante el plazo de garantía.
Esta garantía es válida únicamente para el comprador minorista original a partir de
la fecha de compra minorista inicial y no es transferible. Conserve el recibo de compra
original, ya que se exige una prueba de compra para obtener la validación de la garantía.
Las tiendas minoristas no tienen derecho a alterar, modicar ni corregir de ninguna manera
los términos y condiciones de la garantía.
EXCLUSIONES:
La garantía no cubre el desgaste normal de las piezas ni el daño ocasionado por
cualquiera de las siguientes causas: uso negligente del producto, uso de un voltaje
o corriente incorrectos, mantenimiento de rutina inadecuado, uso contrario al de las
instrucciones de funcionamiento, desarmado, reparación o alteración a cargo de personas
que no sean miembros del personal calicado de SENSIO Inc. Asimismo, la garantía no
cubre actos de la naturaleza, como incendios, inundaciones, huracanes o tornados.
SENSIO Inc. no asumirá responsabilidad por daños incidentales o resultantes
ocasionados por la violación de cualquier garantía expresa o implícita. Salvo en
la medida en que lo prohíban las leyes aplicables, cualquier garantía implícita de
comerciabilidad o aptitud para un propósito particular se limita temporalmente a la
duración de la garantía. Algunos estados, provincias o jurisdicciones no permiten la
exclusión ni la limitación de daños incidentales o resultantes, o limitaciones sobre la
duración de una garantía implícita y, por lo tanto, es posible que las exclusiones o
limitaciones mencionadas no le correspondan. La garantía cubre derechos legales
especícos que pueden variar de un estado, una provincia o una jurisdicción a otros.
CÓMO OBTENER EL SERVICIO DE GARANTÍA:
Debe comunicarse con el Servicio de atención al cliente a nuestro número telefónico gratuito:
1-866-832-4843. Un representante del Servicio de atención al cliente intentará resolver los
problemas referidos a la garantía por teléfono. Si este no puede resolver el problema, le
proporcionarán un número de caso y le solicitarán que devuelva el producto a SENSIO Inc.
Adhiera una etiqueta al producto que incluya: su nombre, dirección, número telefónico de
contacto durante el día, número de caso y descripción del problema. Además, incluya una
copia del recibo de compra original. Envuelva cuidadosamente el producto etiquetado con el
recibo de compra, y envíelo (con el envío y el seguro prepagados) a la dirección de SENSIO
Inc. SENSIO Inc. no asumirá obligación ni responsabilidad alguna por el producto devuelto
que esté en el trayecto hacia el Centro de servicio al cliente de SENSIO Inc.
GARANTÍA LIMITADA DE DOS AÑOS
35109_35158_35159_35225_Bella_14EggCooker_IM_R8.indd 1835109_35158_35159_35225_Bella_14EggCooker_IM_R8.indd 18 2024-05-30 2:47 PM2024-05-30 2:47 PM

19
35109_35158_35159_35225_Bella_14EggCooker_IM_R8.indd 1935109_35158_35159_35225_Bella_14EggCooker_IM_R8.indd 19 2024-05-30 2:47 PM2024-05-30 2:47 PM
Para preguntas o comentarios para el servicio de atención al cliente
1-866-832-4843 / help@bellahousewares.com
Hecho en China
For customer service questions or comments
1-866-832-4843 / help@bellahousewares.com
Made in China
Sensio Inc.
dba Made by Gather
TM
New York, NY 10016/USA
35109_35158_35159_35225 R8
35109_35158_35159_35225_Bella_14EggCooker_IM_R8.indd 2035109_35158_35159_35225_Bella_14EggCooker_IM_R8.indd 20 2024-05-30 2:47 PM2024-05-30 2:47 PM