Instruction Booklet
Model: DH2099
food dehydrator

IMPORTANT SAFEGUARDS
When using electrical appliances, basic safety precautions should
always be followed, including the following:
1. Read all instructions.
2. DO NOT touch hot surfaces.
3. To protect against electrical hazards, do not immerse cord, plugs,
or the appliance in water or any other liquid. Do not switch the
appliance ON if surfaces are wet.
4. Close supervision is necessary when any appliance is used by or
near children. Do not allow children to play with the appliance.
5. This appliance is not intended for use by persons (including children)
with reduced physical, sensory or mental capabilities or lack of
experience and knowledge, unless they have been given supervision
or instruction concerning the use of the appliance by a person
responsible for their safety.
6. Unplug from outlet when not in use and before cleaning. Allow to
cool before putting on or taking o parts and before cleaning the
appliance.
7. DO NOT operate any appliance with a damaged cord or plug or after
the appliance malfunctions, or has been damaged in any manner.
DO NOT open the main housing of the product for servicing. Return
appliance to Salton or an authorized service representative for
examination, servicing, repair or adjustment.
8. The use of accessories or attachments not recommended by Salton
may cause re, electric shock or injury.
9. DO NOT use outdoors.
10. DO NOT let cord hang over edge of table or counter, or touch hot
surfaces.
11. DO NOT place on or near a hot gas or electric burner, or in a heated
oven.
12. DO NOT pour liquids into the appliance. DO NOT immerse the
housing in water or any other liquid.
13. DO NOT use for other than intended use.
14. To disconnect, press the On/O Button , then unplug from the wall
outlet.
15. DO NOT operate near combustible or pressurized spray cans.
2

16. DO NOT leave unit unattended while in use for longer than the times
indicated in this instruction booklet.
17. DO NOT block the air vents in the Dehydrator Cover or at the back
of the appliance.
SAVE THESE INSTRUCTIONS
HOUSEHOLD USE ONLY
POLARIZED PLUG
This appliance has a polarized plug (one blade is wider than the other).
To reduce the risk of electric shock, this plug will t in a polarized outlet
only one way. If the plug does not t fully in the outlet, reverse the plug.
If it still does not t, contact a qualied electrician. Do not modify the
plug in any way.
INTRODUCTION
Your Salton Food Dehydrator provides an economical way to dehydrate
food. Dried food can be eaten as a snack or used in preparation of
meals. Follow the easy directions in this booklet to dehydrate fruits,
vegetables, meats and more. You will discover dierent tastes and
textures by drying dierent types of food. You can even use the
Dehydrator to dry owers for arrangements or potpourri.
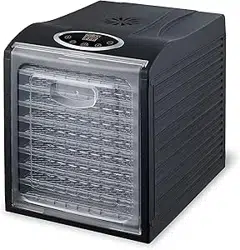
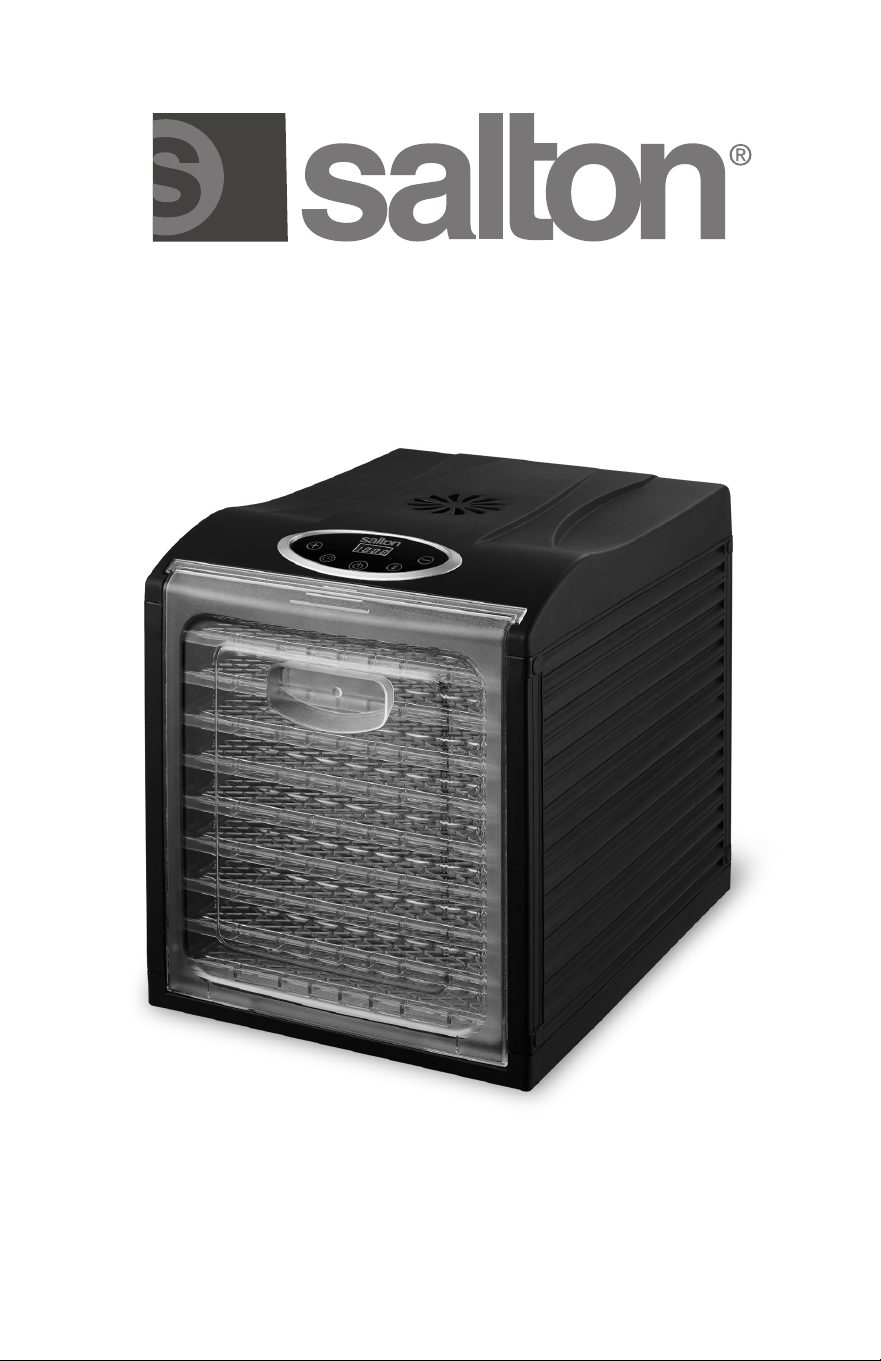
DESCRIPTION OF PARTS
1. Cover
2. Main Body
3. Air Inlet (Back of Unit)
4. Air Outlet
5. Control Panel
a) Display
b) Increase Time or
Temperature Button ( )
c) Time Button ( )
d) On/O Button ( )
e) Temperature Button ( )
f ) Decrease Time or
Temperature Button (
)
6. Dehydrator Trays (9)
7. Mesh Sheet
8. Fruit Roll-Up Tray
9. Door
3
7
9
6
2
5
41
3
8
b a f
d ec

BEFORE FIRST USE
1. Unpack and remove all parts and packaging materials from the
carton.
2. DO NOT plug the power cord into any outlet before reading the
instructions.
3. Wash the Dehydrator Trays, Door, Mesh Sheet and Fruit Roll-Up Tray
in warm soapy water. Rinse well and dry.
4. Wipe the Main Body with a damp cloth. NEVER IMMERSE THE
MAIN BODY IN WATER OR ANY OTHER LIQUID.
5. After cleaning for the rst time run the dehydrator for 30 minutes to
remove any manufacturing oils. Any smoke or smells during this
procedure are normal. Ensure there is proper ventilation.
HOW TO USE
1. Before using your Salton Food Dehydrator read this Instruction
Booklet.
2. Place the Main Body on a at, smooth heatproof surface.
3. Leave a minimum of 6” space at the back of the Main Body to allow
for air circulation from the fan.
4. Prepare the food according to its type (See the sections in the
following pages for fruits, vegetables, etc.).
5. Arrange food on the Dehydrator Trays. Food should be placed on
the Dehydrator Trays so the slices are not overlapping.
6. Slide the Dehydrator Trays into the Dehydrator.
7. Slide the Door from the top onto the tracks at the right and left of the
opening.
8. Plug into the 120V AC wall outlet.
9. Press the ON/OFF Button ( ) to turn on the Control Panel. The
default time of 10 hours and the default temperature of 160ºF will
show in the display.
10. To adjust the time press the Time Button ( ) then tap the
Increase ( ) or Decrease (
) Button to adjust the time in 30
minute increments or hold the + or – Button to change the time
faster.
NOTE: The time range is 30 minutes to 24 hours.
11.To adjust the temperature, press the Temperature Button ( )
then tap the Increase ( ) or Decrease (
) Button to adjust the
temperature in 5ºF increments or hold the + or – Button to change
the temperature faster.
NOTE: The temperature range is 95ºF to 160ºF.
12. During the dehydrating process, press the ON/OFF Button ( ) to
pause the program and adjust time or temperature, if needed.
4

13. When dehydrating is complete, press the ON/OFF Button ( ) to
cancel the program or to turn the unit o. The fan will continue to
run for a few seconds and the Display will signal ‘End.
14. Unplug from outlet.
15. Remove trays then place dehydrated food in containers or food
bags (See the Packing and Storage Section).
NOTE:
- Begin to check on food before the set dehydrating time is
complete.
- After the setting is complete and if there are some pieces not
completely dehydrated place them back into the Dehydrator and
set the program for an additional 30 minutes.
IMPORTANT NOTE:
DO NOT run the Dehydrator for longer than 36 hours. After 36 hours,
press the On/O Button ( ) , unplug then allow the Dehydrator to
cool for 2 hours.
TEMPERATURES FOR DRYING
Herbs 95-105ºF
Greens 105ºF
Bread 105-115ºF
Vegetables 120-130ºF
Fruits 130-140ºF
Meats/Fish 150-160ºF
Flowers 95-105ºF
SELECTING AND PREPARING FOODS FOR DEHYDRATION
All foods to be dried should be in good condition.
• Fruits:
Almost all fruits are suitable for drying but some require more drying
time than others. Check the guidelines in the Fruit Drying Chart .
Select fruits that are just ripe as they have the highest natural form of
sugar and are best for drying. Fruits that are not ripe may have a at,
bitter taste.
• Vegetables:
Choose vegetables that are fresh and tender without spoiled spots.
• Meat, poultry and sh:
Use fresh not frozen, with as little fat as possible.
5

FRUITS
Preparation and Pretreatment
1) Wash all fresh fruit thoroughly. Dry.
2) Remove any blemishes or spoiled spots.
3) Pit fruits such as cherries, apricots, prunes, etc.
4) Smaller fruits such as grapes may be dried whole.
5) Fruits that have been waxed to prevent moisture loss should always
be peeled. Peeling is optional with other fruits.
6) Most fruits dry best when sliced between (1/4”) 6mm and ½” (13mm).
7) Many of the light coloured fruits such as apples, pears, peaches,
etc. tend to darken during drying and storage. If desired, you can
prevent discoloration by pretreating fruit. Slice fruit directly into one
of the four following solutions:
a) Pineapple or lemon juice. Slice fruit directly into juice. Remove
fruit after 2 minutes. Drain and remove excess moisture by
placing on paper towels. Pat dry then place on Dehydrating Trays.
b) 1 tsp (5 ml) Sodium Bisulte in 1 quart/litre of water. Remove fruit
after 2 minutes. Drain and remove excess moisture by placing on
paper towels. Pat dry then place on Dehydrating Trays. NOTE:
Sodium Bisulte must be food-safe (USP) grade only.
c) 1 tbsp. (15 ml) ascorbic acid or citric acid powder, (found in most
pharmacies) and 2 quarts/litres of water. Remove fruit after 2
minutes. Drain and remove excess moisture by placing on paper
towels. Pat dry then place on Dehydrating Tray.
d) Syrup blanching: To achieve a sweeter tasting candied fruit, use
syrup blanching to retain the colour of fruit. Mix 1 cup (250 ml)
sugar, 1 cup (250 ml) white corn syrup and 2 cups (500 ml) water
in a large heavy saucepan. Add 1-1/2 lbs. (.7 kgs) of cut fruit.
Bring to a boil. Remove from heat and let stand (do not stir) about
35 minutes. Drain and lightly rinse with water. Remove excess
moisture by placing on paper towels. Pat dry then place on
Dehydrating Trays.
NOTE:
All foods to be dried should be in good condition.
• Fruits with tough skins (grapes, prunes, cherries, etc.) may be water
blanched. Dip fruits in boiling water for a few seconds to crack the
skins. This will allow moisture inside to surface more readily during
drying.
• Before drying pretreated or blanched food, remove any excess
moisture by placing the food on paper towels or clean cloths and pat
dry.
6

Fruit Drying Chart
Fruits should be dried at 130º - 140ºF
Exact dehydrating time varies greatly depending on several factors:
Type, size, quality of food, quantity placed on trays and personal
preference. Use the chart below as a guideline. Use the last page of the
booklet to write down your notes on the type of food, weight before and
after drying, total drying time and nal results. See Packing and Storage
section before storing.
FRUIT PREPARATION
TEXTURE
WHEN DRY
TIME
(Hrs)
Apples
Peel (if desired), core and
slice. Pretreat if desired.
Pliable 4-15
Apricots
Dry in halves or quarters.
Pretreat if desired.
Pliable 10-36
Bananas
Remove peel, cut into 1/8”
(3mm) slices.
Crisp 8-24
Berries
Leave berries whole or cut
strawberries in 3/8” (10mm)
slices. Pretreat if desired.
Blanch wax coated berries in
water bath for 1-2 minutes
Leathery &
crisp
8-24
Cherries
Pitting is optional. Stem
when ready to use. Cut in
half. Place skin side down
on tray.
Leathery &
sticky
6-36
Cranberries
Blanch in boiling water 1-2
minutes. Cut in half or chop.
Pliable 4-24
Grapes
(Raisins)
Remove stems. Blanch in
boiling water for 1-2 minutes.
Pliable 6-36
Kiwi
Peel, remove seeds and cut
into ¼” (6mm) slices.
Pliable 15-24
Lemons
Do not peel. Cut into ¼”
(6mm)slices. Grate when
ready to use.
Brittle 4-24
Mango
Peel, remove pit and cut into
¼” (6mm) slices.
Pliable 15-24
Nectarines
Peeling is not necessary. Cut
in half and remove pit. Cut in
1/4” (6 mm) slices.
Pliable 8-24
Oranges
Do not peel. Cut in ¼” (6mm)
slices and remove seeds.
Pliable 4-15
7

Papaya
Peel, remove seeds and cut
into ¼” (6mm) slices.
Pliable 15-24
Pears
Peel and/or pretreat if
desired. Slice in ¼” (6mm)
slices.
Pliable/
Leathery
4-24
Pineapple
Peel, remove core, cut into
¼” (6mm) slices. Pretreat if
desired.
Pliable 8-24
Plums
Cut in half, remove pit. Cut in
¼” (6mm) slices.
Leathery 6-24
Prunes
Blanch in water bath 1-2
minutes. Cut in half. Remove
pits. Place on tray in slices or
halves.
Pliable/
Sticky
10-36
Rhubarb Cut into 1” (25mm) lengths. Leathery 3-15
Watermelon
Cut into wedges or long
slices ¼” (6mm) thick.
Remove seeds and rind.
Pliable/
Sticky
8-20
To Make Fruit/Leather Roll-Ups
1. Puree fruit in a blender. The Fruit Roll-Up Tray holds approximately
1-1/2 to 2 cups (375 ml - 500 ml) of pureed fruit. Most fruits
are naturally sweet and do not require added sweeteners. The
amount of sweetener such as honey or sugar can be added and is
dependent on personal preference. Other avourings and spices
can be added such as ax seeds, dried coconut, dried raisins or
cranberries, nuts, cinnamon, nutmeg, etc. The options are endless,
use your imagination.
2. Pour onto the Fruit Roll-Up Tray so that the mixture is approximately
1/4” (6mm) thick. Smooth with a spoon.
3. Dry at 135ºF for about 4 to 12 hours. Fruit is dry when it is no longer
sticky to the touch.
8

VEGETABLES
Preparation and Pretreatment
1) Choose vegetables that are fresh and crisp.
2) Wash thoroughly and dry. Remove any blemishes or spoiled spots.
3) Whenever possible slice vegetables into ¼” (6mm) slices. For other
vegetables follow instructions in the drying chart.
4) As with fruits, pretreating of vegetables is optional. If you wish you
can pretreat vegetables to help retain colour, extend shelf life and
enhance nutritional value. Pretreat vegetables by blanching or
steam blanching as described below.
a) Blanching
Soak vegetables in boiling water for 1-2 minutes. Plunge into ice
cold water. Drain, place on paper towels and pat dry. Place on
Dehydrator Trays.
b) Steam Blanching
Bring a saucepan of water to the boil. Place vegetables in a
colander above the saucepan and cover. Plunge vegetables into
ice cold water. Drain, place vegetables on paper towels and pat
dry. Place on Dehydrator Trays.
c) Microwave Blanching
Microwave blanching leaves the vegetables with a brighter colour
than steam blanched vegetables.
Place a small amount of water in a shallow, microwave-safe
cooking dish. Refer to your microwave instructions for cooking
times. Use only 1/4 of the time suggested. Plunge vegetables
into ice cold water. Drain, place vegetables on paper towels and
pat dry.
Vegetable Drying Chart
Vegetables should be dried at 120º - 130ºF. Greens such as spinach
and kale should be dried at 105ºF. Exact dehydrating time varies greatly
depending on several factors: Type, size, quality of food, quantity
placed on trays and personal preference. Use the chart below as a
guideline. Use page 17 of the booklet to write down your notes on the
type of food, weight before and after drying, total drying time and nal
results. See Packing and Storage section before storing.
9

VEGETABLE PREPARATION
TEXTURE
WHEN DRY
TIME
(Hrs)
Artichokes
Cut hearts into 1/8" (3mm)
strips. Boil 5-8 minutes in
a mixture of 1 tbsp. (15ml)
lemon juice and 1 cup
(250ml) water.
Brittle 4-12
Asparagus Cut into 1” (25mm) pieces. Brittle 4-10
Beans, wax
and green
Cut into 1” (25mm) pieces.
Steam blanch. Stir beans on
tray once half dried to ensure
more even drying.
Brittle 4-15
Beets
Steam, remove tops, skin and
roots. Slice or dice into 1/4”
(6mm) pieces.
Brittle/dark
red
4-12
Broccoli
Separate into orets. Steam
until tender, 3-5 minutes.
Brittle 4-15
Brussel
Sprouts
Cut sprouts from stocks. Cut
in half lengthwise. Steam until
tender.
Brittle 4-16
Cabbage
Trim, then cut into 1/8” (3mm)
thick strips.
Leathery 4-10
Carrots
Slice or dice into 1/4” (6 mm)
pieces. Steam until tender
then place on trays.
Leathery 4-15
Cauliower
Separate into orets. Dip
into mixture of 2 litres/quarts
of water and 3 tbsp. (45 ml)
of salt for 2 minutes. Steam
until tender then place on
trays.
Leathery 4-15
Celery
Separate leaves and stalks.
Cut stalks into 1/4" (6mm)
slices. Place both on tray to
dry. Remove leaves rst they
dry faster.
Brittle 4-12
Chives Chop and spread on tray. Brittle 4-6
Corn
Remove husks and silks.
Steam on cob until tender.
Cut from cob and spread on
tray. Use the Mesh Sheet
or cheese cloth to prevent
kernels from falling through
tray. To ensure even drying,
stir several times.
Brittle 4-16
10

11
Cucumbers
Pare and cut into 1/8" (3mm)
slices.
Leathery 4-15
Eggplant
Peel then slice 1/4" - 1/2" (6 –
12mm) thick
Leathery 4.-15
Garlic
Separate into cloves.
Remove outer skin, slice,
then place to dry. Grind
when ready to use.
Brittle 4-12
Greens-
spinach,
turnip, chard,
kale
Wash very thoroughly, trim
stems. Steam until wilted.
Very brittle 4-10
Mushrooms
Choose young mushrooms.
Gently brush to remove dirt.
Slice 10mm 3/8" (10mm)
thick, dip in lemon juice to
retain white colour.
Leathery 5-12
Okra
Choose young okra. Wash,
trim pods, cut into ¼” (6mm)
circles.
Leathery 4-10
Onions,
Leeks
Remove tops, bottoms and
skin. Cut into ½” (12mm)
slices or chunks. Use
cheesecloth to prevent falling
through tray. Stir while
drying.
Brittle 5-12
Parsley
Tear into small pieces. Chop
once dried.
Brittle 2-4
Parsnips
Slice or dice into ¼” (6mm)
pieces. Steam until tender.
Leathery 4-12
Peas
Use tender young peas.
Shell. Blanch until tender.
Stir during drying.
Brittle 4-12
Peppers,
sweet, green,
red
Cut in half. Remove seeds,
cut into ¼” (6mm) strips.
Leathery 4-12
Peppers, hot
Wear rubber gloves while
handling. Place whole
pepper on trays to dry.
Leathery 4-16
Potatoes
No need to peel potatoes.
Slice or dice into ¼” (6mm)
pieces. Steam until tender.
Brittle 4-16

12
Rutabagas
Slice thin or dice into ¼”
(6mm) pieces. Steam until
tender.
Leathery 10-16
Squash/
summer
Do not peel. Wash and trim.
Slice into ¼” (6mm) thick
pieces.
Leathery 4-16
Tomatoes
Remove stems. Remove skin
by dipping in boiling water.
Halve or slice into ¼” (6mm)
pieces.
Leathery 6-20
Turnips
Slice thin or dice into ¼”
(6mm) pieces. Steam until
tender
Leathery 24-36
Zucchini Slice 1/8" (3mm) thick. Leathery 24-36
HERBS
Preparation
1. Rinse herbs and shake o excess water.
2. Pat dry with paper towels.
3. Remove any discoloured leaves. Do not remove the stalk or stem.
4. Place the Mesh Sheet on one of the Dehydrator Trays. Spread herbs
loosely on Mesh Sheet.
NOTE: The Mesh Sheet can also be used to prevent small food
pieces such as cranberries and grapes from falling through once
dried.
5. Slide the Tray into the Dehydrator.
6. Make sure that the herbs are totally dry then remove the stems and
leaves.
Herb Drying Chart
Herbs should be dried at 95º - 105ºF. Exact dehydrating time varies
greatly depending on several factors: Type, size, quality of food,
quantity placed on trays and personal preference. Use the chart below
as a guideline. Use page 17 of the booklet to write down your notes on
the type of food, weight before and after drying, total drying time and
nal results. See Packing and Storage section before storing.

HERB/ SPICE PREPARATION TIME (Hrs)
Basil Wash, place leaves on trays. 4-6
Chives Wash, slice into desired lengths 6-8
Ginger Slice, place onto trays 6-8
Mint Wash, place whole stems on trays 6-8
Oregano Wash, place whole stems on trays 6-8
Parsley Wash, place whole stems on trays 4-6
Thyme Wash, place whole stems on trays 4-6
MEAT, CHICKEN AND FISH
Preparation
IMPORTANT NOTE:
Meat or sh should be dried at 150º - 160ºF Beef or sh do not need
to be cooked prior to dehydrating but it is recommended that turkey or
chicken be cooked.
1.Trim excess fat from meat and slice. Cut meat across the grain for
more tender jerky. Slice meat between 1/8” x ¼” (3mm – 6mm) thick.
If meat is slightly thicker, increase the marinating time. It is important
that the marinade permeate the meat thoroughly.
NOTE: The thinner the cut of meat the shorter the drying time.
2. Marinate for approximately 6-8 hours in the refrigerator. (See
marinade recipes below)
3. Dry meat in an uninterrupted drying cycle for 8-10 hours until it cracks
when bent.
Beef Jerky
1 lb. (450 g) Steak, sliced 1/8” (3 mm) thick
Marinade:
1/2 cup (125 ml) Soya Sauce
2 tbsp. (30 ml) Worcestershire sauce
2 tsp. (10 ml) Brown sugar
1 clove Garlic, minced
1/2 tsp. (3 ml) Salt
Pepper, to taste
Combine marinade ingredients. Add the meat and marinate for 6-8 hours,
in the refrigerator. Drain meat and place on Trays. Dry for approximately
8 - 10 hours. Meat will be bendable and pliable when ready.
13

Spicy Jerky Marinade
2 tsp. (10 ml) each Chili powder, garlic powder, pepper, onion
powder, salt
1 tsp. (5 ml) Brown sugar
1/2 tsp. (3 ml) Cayenne pepper
1 cup (250 ml) Water
2 lbs. (900 g) Lean meat, sliced 1/8” (3 mm)
Mix all ingredients except meat. Add meat and marinate for 6 - 8 hours
in the refrigerator. Dry for approximately 8 - 10 hours. Meat will be
bendable and pliable when ready.
FLOWERS
Preparation
Flowers should be dried at 95º - 105º F. The times suggested below
are only a guideline.
Whole Flowers:
1. Cut owers when they are dry and cool. Choose owers that are
only half open as full bloom owers will lose their petals.
2. Position owers on the Trays. Remember that if a stem or stalk is
bent on the Tray it will remain bent when dry.
3. Dry for 8-10 hours until owers are brittle.
Flower Petals:
1. To make potpourris spread petals loosely on the Trays.
2. Dry for approximately 5 hours.
3. Store the petals in decorative containers or sachet bags and tie
with a ribbon. NOTE: You can sprinkle the petals with spices like
powdered cinnamon, whole cloves, a bit of dried rosemary or mint
for variety. Keep the container closed until all of the fragrances have
blended.
PACKING & STORAGE
• Wait until cool before packing food in storage containers. Pack food
in clean, dry, air- tight containers. Glass jars or freezer bags make
good containers. When using plastic bags ensure that excess air
is removed. When using other containers pack food as tightly as
possible without crushing to eliminate excess air space.
• Label and date all foods.
• Packaged foods (except meats & chicken) can be stored in a dry,
dark place, the cooler the better. Food that is not going to be eaten
within a few days should be stored in the refrigerator or freezer to
14

extend the shelf life. Light and heat cause the deterioration process
to accelerate.
• Store meats or chicken in the refrigerator or freezer.
• If storing foods in the freezer, be sure to use containers or bags that
are designed for freezer storage. See the ‘Packing & Storage’ section.
• Dehydrated food should be checked about once a month for signs of
moisture or mold.
• If stored properly, the shelf life for fruits and vegetables is
approximately 1 year. Meat is 3 months.
REHYDRATING
Fruits are usually eaten in their dried form but can be rehydrated to
use for pies, sauces, baby food, etc. Most vegetables need to be
rehydrated except when used in soups, stews, etc.
Both fruits and vegetables can be rehydrated by soaking, boiling,
steaming or adding directly into your recipe. Do not add sugar or salt
to the water as this will slow down the rehydrating process.
Soaking
Soak fruits in the refrigerator for a few hours until they reach desired
consistency. Use enough water to barely cover the fruit. One cup of
dried fruits will yield about two cups of rehydrated fruit.
Soak vegetables in covered saucepan in unsalted water for 2 - 10 hours.
Use water that has been used for rehydrating in your recipes. One cup
of dried vegetables will yield about two cups or rehydrated vegetables.
Boiling
• Place 1 cup (250 ml) of dehydrated fruits into 1 cup (250 ml) of water.
Simmer until tender. NOTE: If using fruits for pie, the mixture may
need to be thickened.
• Place 1 cup (250 ml) of vegetables into 1 cup (250 ml) of boiling water.
Set aside and let soak for 5 to 20 minutes. Time depends on the type
of vegetable. After soaking, use the vegetables for soups, stews or
casseroles.
Steaming
• Fruits can be softened by steaming for about three to ve minutes.
• Vegetables can be steamed until cooked. Time depends on the kind
and size of vegetables.
15

Boiling
• Simply add the vegetables to the desired recipe. Be sure to add
enough extra water to suciently re-hydrate the dried produce.
HELPFUL HINTS
1. If the Dehydrator has been stored for some time, wash and clean
before using. Then run for 30 minutes before adding food.
2. Fresh vegetables and fruits are best for Dehydrating. Canned goods
do not dehydrate as well.
3. Vegetables and fruits should always be cleaned before preparation
and pretreatment.
4. Always prepare and pretreat fruits and vegetables as instructed in
this booklet.
CARE AND CLEANING
1. Once all food is dehydrated, press the On/O Button to turn o the
Dehydrator.
2. Unplug from the wall outlet and allow the Dehydrator to cool before
cleaning.
3. Wash the Dehydrator Trays, Door, and Trays in warm soapy water.
You can use a soft brush on the Trays, if necessary. Rinse and dry.
4. Wipe the Main Body with a soft slightly damp cloth or sponge.
NOTE: DO NOT allow water or any other liquid to the enter Main
Body. DO NOT use abrasive cleansers on any part of the appliance.
5. All other servicing, except cleaning, should be performed by an
authorized service representative.
16

NOTES:
Type of
Food
Size
Total
Quantity
Weight
Per Tray
Dehydrating
Time
17

18
A short supply cord is provided to reduce the hazards of becoming
entangled in or tripping over a long cord. Extension cords may be used
if care is exercised in their use. If an extension cord is used, the marked
electrical rating of the detachable power-supply cord or extension cord
should be at least as great as the electrical rating of the appliance. If
the appliance is of the grounded type, the extension cord should be a
grounded 3-wire cord. The extension cord should be arranged so that
it will not drape over the counter top or table top, where it can be pulled
on by children or tripped over.
This warranty does not include the cost of shipping, which is to be borne by the
customer.
LIMITED WARRANTY
**The original sales receipt is the only acceptable proof of purchase**
Salton Appliances (1985) Corp. warrants that this appliance shall be free from defects
in material and workmanship for a period of one (1) year from the date of original
purchase. Salton Appliances (1985) Corp., at its sole discretion during this warranty
period, will repair or replace a defective product or issue a refund. Any refund to the
purchaser will be at a pro-rated value based on the remaining period of the warranty.
All liability is limited to the amount of the purchase price. This warranty covers normal
domestic usage and does not cover damage which occurs in shipment or failure
which results from alteration, accident, misuse, abuse, glass breakage, neglect,
improper maintenance, use contrary to the operating instructions or commercial use.
This warranty is not available to retailers or other commercial purchasers or owners.

TO OBTAIN PROMPT WARRANTY SERVICE:
Contact one of our many Service Centers found on our website
www.salton.com/customer-care
or
Securely package and return the appliance to us. Please enclose:
• Original proof of purchase
• The completed form below with a $12.50 Return Shipping & Handling
fee – either a cheque, money order or credit card (A personal cheque
will delay return shipping by 2-3 weeks)
For added protection, we suggest that you use an insured delivery
service with tracking information when returning your product. Salton
Canada will not be held responsible for in-transit damage or for
packages that are not received.
Name
Address
City Prov/State Postal/Zip Code
Daytime Phone No. Email
Product defect:
Type of payment Cheque/Money Order □ Visa □ MasterCard □
Name on card Expiry Date CSV No
Card No.
To contact our Customer Service Department:
SALTON CANADA Telephone: 514-685-3660
Dollard-des-Ormeaux, Quebec H9B 2J5 Fax: 514-685-8300
Canada www.salton.com
