
01
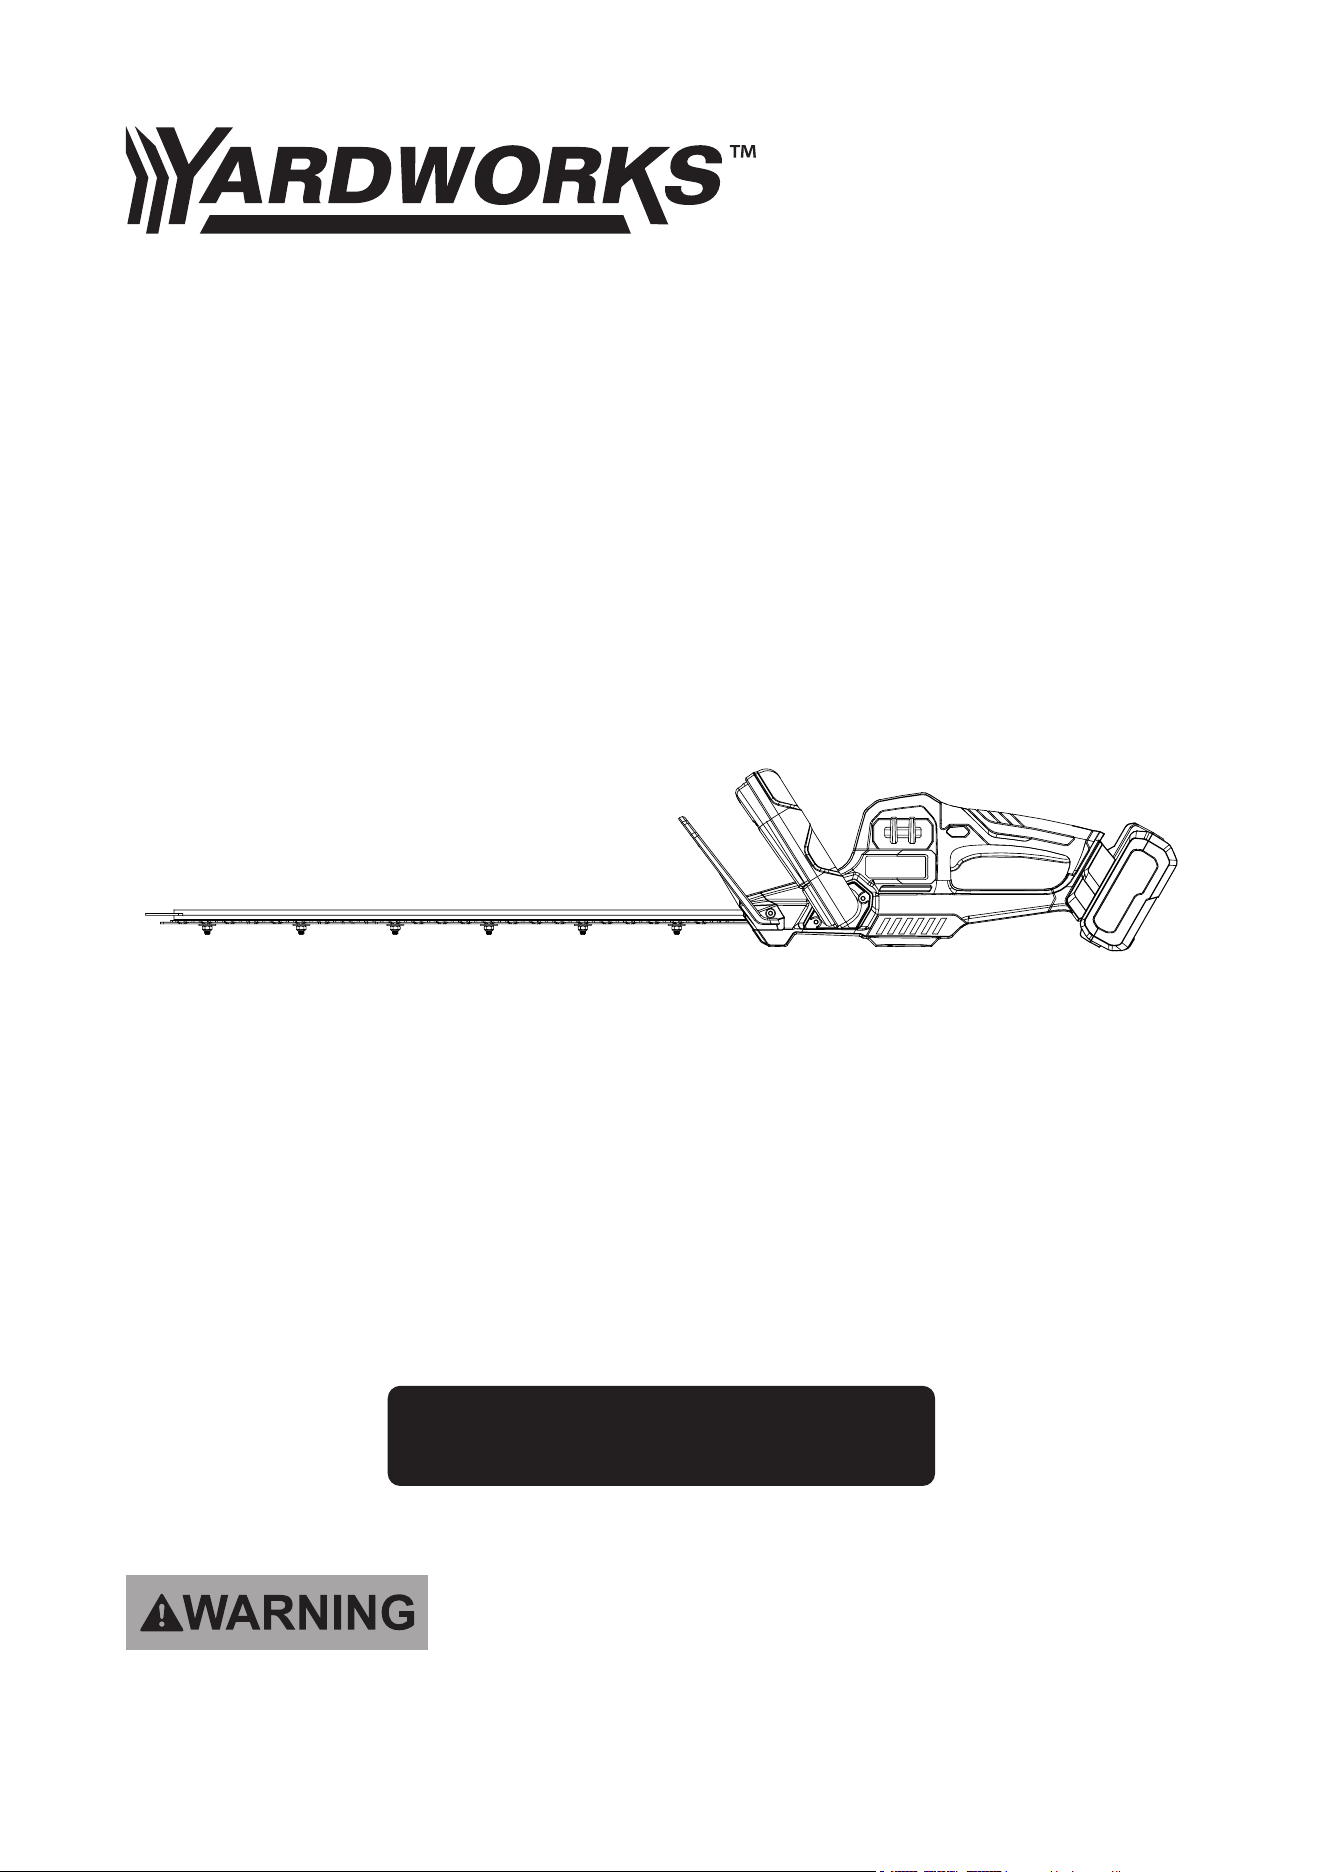
20V CORDLESS HEDGE TRIMMER
267-1546
TOLL-FREE HELPLINE: 1-888-497-7273
Read this operator manual before using this product. Failure to do so can result in serious injury. SAVE THIS
MANUAL
OPERATOR’S MANUAL

02
TABLE OF CONTENTS
READ ALL INSTRUCTIONS!
WARNING:
Some dust created by power sanding, sawing, grinding, drilling and other construction activities
contains chemicals known to the state of California to cause cancer, birth defects or other repro-
ductive harm. Some examples of these chemicals are:
Lead from lead-based paints,
Crystalline silica from bricks and cement and other masonry products, and
Arsenic and chromium from chemically - treated lumber.
Your risk from these exposures varies, depending on how often you do this type of work. To reduce your
exposure to these chemicals: work in a well-ventilated area, and work with approved safety equipment,
such as those dust masks that are specially designed to lter out microscopic particles.
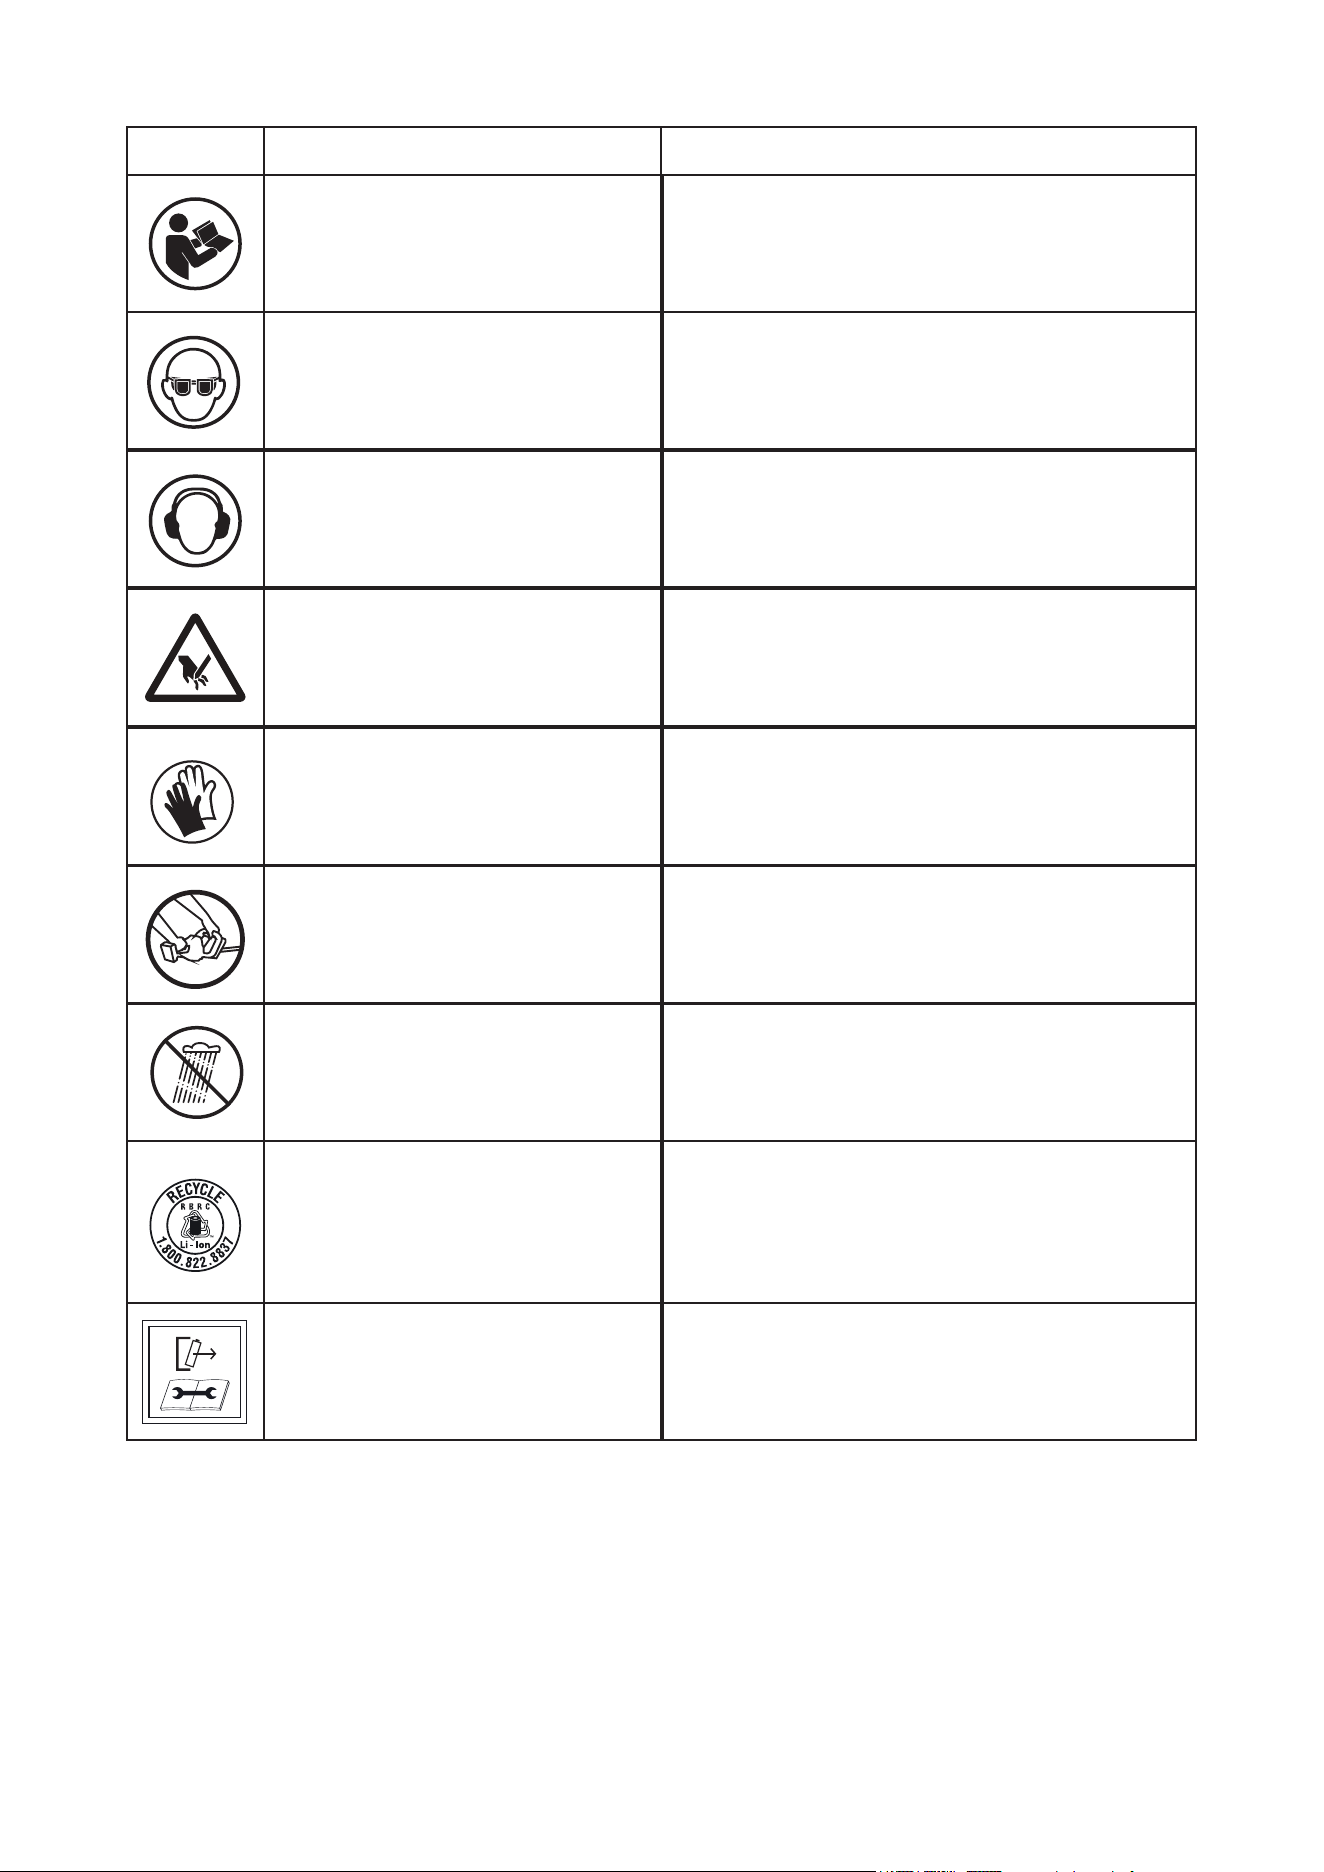
SAFETY SYMBOLS
The purpose of safety symbols is to attract your attention to possible danger. The safety symbols and the
explanations with them deserve your careful attention and understanding. The symbol warnings do not,
by themselves, eliminate any danger. The instruction and warnings they give are no substitutes for proper
accident prevention measures.
The following signal words and meanings are intended to explain the levels of risk associated with this
product.
WARNING
CAUTION
WARNING
DANGER
SYMBOL SYMBOL
Indicates a hazardous situation, which, if not avoided, could result in injury.
Indicates a hazardous situation, which, if not avoided, could result in injury.
Indicates a hazardous situation, which, if not avoided, could result in injury.
(Without Safety Alert Symbol) Indicates information considered important.
MEANING
.....................................................................................................................2
..................................................................................................4
.....................................................................................................................7
...........................................................................................................8
...........................................................................................................................10
............................................................................................................................10
.......................................................................................................................12
.................................................................................................................14
.............................................................................................................................15
Safety symbols
Important safety Instrucions
Know your tool
Charging your battery
Unpacking
Operation
Maintenance
Troubleshooting
Warranty
03
Read Operator’s manual
Wear Eye Protection
Wear Ear Protection
Danger- Keep Hands Away from
Blades
Wear Protective Gloves
Operate With Two Hands
Wet Conditions Alert
Recycle Symbol
To reduce the risk of injury, user must read and
understand operator’s manual before using this
product.
Always wear safety goggles or safety glasses
with side shields and a full face shield when oper-
ating this product.
Noise may damage your hearing. Always wear
hearing protection(ear plugs or ear mus) to pro-
tect your hearing.
Contact with blade will result in serious personal
injury.
Wear non-slip, heavy-duty protective gloves when
handling the blades.
Hold and operate the hedge trimmer properly with
both hands.
WARNING! Do not expose the unit to rain or wet
conditions.
This product uses lithium-ion(Li-ion) batteries.
Local, state, or federal laws may prohibit disposal
of batteries in ordinary trash. Consult your local
waste authority or information regarding available
recycling and/or disposal options.
SYMBOL DESCRIPTION MEANING
WARNING
Disconnect battery before maintenance.

04
IMPORTANT SAFETY INSTRUCTIONS
WARNING:
When using power tool, basic safety precautions should always be followed to reduce the risk of re,
electric shock, and personal injury, including the following:
FOR ALL POWER TOOLS
1) Avoid Dangerous Environment – Do not use power tools in damp or wet locations.
2) Do not Use in Rain.
3) Keep Children Away - All visitors should be kept at a distance from work area.
4) Dress Properly - Do not wear loose clothing or jewelry. They can be caught in moving parts. Use of
rubber gloves and substantial footwear is recommended when working outdoors. Wear protective hair
covering to contain long hair.
5) Use Safety Glasses - Always use face or dust mask if operation is dusty.
6) Use Right Tool - Do not use tool for any job except that for which it is intended.
7) Do not Force Appliance - It will do the job better and with less likelihood of a risk of injury at the rate for
which it was designed.
8) Do not Overreach – Keep proper footing and balance at all times.
9) Stay Alert - Watch what you are doing. Use common sense. Do not operate appliance when you are tired.
10) Store Idle Power tools Indoors - When not in use, power tools should be stored indoors in dry, and high
or locked-up place - out of reach of children.
11) Maintain Appliance with Care - Keep cutting edge sharp and clean for best performance and to reduce
the risk of injury. Follow instructions for lubricating and changing accessories. Keep handles dry, clean,
and free from oil and grease.
12) Check Damaged Parts - Before further use of the appliance, a guard or other part that is damaged
should be carefully checked to determine that it will operate properly and perform its intended function.
Check for alignment of moving parts, binding of moving parts, breakage of parts, mounting, and any
other condition that may aect its operation. A guard or other part that is damaged should be properly
repaired or replaced by an authorized service center unless indicated elsewhere in this manual.
FOR ALL BATTERY – OPERATED GARDENING POWER TOOLS
1. Prevent unintentional starting. Ensure the switch is in the o position before connecting to battery pack,
picking up or carrying the appliance. Carrying the appliance with your nger on the switch or energizing
appliance that have the switch on invites accidents.
2. Disconnect the battery pack from the appliance before making any adjustments, changing accessories,
or storing appliance. Such preventive safety measures reduce the risk of starting the appliance acciden-
tally.
3. Recharge only with the charger specied by the manufacturer. A charger that is suitable for one type of
battery pack may create a risk of re when used with another battery pack.
4. Use power tools only with specically designated battery packs. Use of any other battery packs may cre-
ate a risk of injury and re.
5. When battery pack is not in use, keep it away from other metal objects, like paper clips, coins, keys, nails,
screws or other small metal objects, that can make a connection from one terminal to another. Shorting
the battery terminals together may cause burns or a re.
6. Under abusive conditions, liquid may be ejected from the battery; avoid contact. If contact accidentally
occurs, ush with water. If liquid contacts eyes, additionally seek medical help. Liquid ejected from the
battery may cause irritation or burns.
7. Do not use a battery pack or appliance that is damaged or modied. Damaged or modied batteries may
exhibit unpredictable behavior resulting in re, explosion or risk of injury.
8. Do not expose a battery pack or appliance to re or excessive temperature. Exposure to re or tempera-
ture above 266°F may cause explosion.
9. Follow all charging instructions and do not charge the battery pack or appliance outside of the tempera-
ture range specied in the instructions. Charging improperly or at temperatures outside of the specied
range may damage the battery and increase the risk of re.
10. Have servicing performed by a qualied repair person using only identical replacement parts. This will
ensure that the safety of the product is maintained.

05
11. Do not modify or attempt to repair the appliance or the battery pack (as applicable) except as indicated in
the instructions for use and care.
ADDITIONAL SAFETY RULES FOR HEDGE TRIMMER
1. Know your power hedge trimmer. Read the instruction manual carefully. Learn the hedge trimmer’s appli-
cations and limitations, as well as the specic potential hazards related to this hedge trimmer. Following
this rule will reduce the risk of electric shock, re, or serious injury.
2. Do not allow the hedge trimmer to be used as a toy. Close attention is necessary when used by or near
children.
3. Use only as described in this manual. Use only manufacturer’s recommended attachments.
4. If the hedge trimmer is not working as it should, has been dropped, damaged, left outdoors, or dropped
into water, return it to a service center.
5. Do not handle the charger, including charger plug, or charger terminals with wet hands.
6. Do not put any object into any openings. Do not use with any opening blocked; keep openings free of
dust, lint, hair, and anything that may reduce air ow.
7. Keep hair, loose clothing, ngers, and all parts of body away from openings and moving parts. Loose
clothes, jewelry, or long hair can be drawn into air vents.
8. Secure long hair above shoulder level to prevent entanglement in moving parts.
9. Use extra care when trimming on stairs.
10. Do not operate hedge trimmers in explosive atmospheres, such as in the presence of ammable liquids,
gases, or dust. Hedge trimmers create sparks which may ignite the dust or fumes.
11. Do not leave hedge trimmer unattended when the battery is inserted. Remove the battery when the
hedge trimmer is not in use and before servicing.
12. Do not use on a ladder, rooftop, tree, or other unstable support. Stable footing on a solid surface enables
better control of the hedge trimmer in unexpected situations.
13. Release the trigger and verify the motor is o before removing the battery pack.
14. Do not use the hedge trimmer if switch does not turn it on or o. Hedge trimmer that cannot be controlled
with the trigger is dangerous and must be repaired.
15. Do not attempt to clear clogs from the unit without rst removing the battery.
16. Protect your hearing. Wear hearing protection during extended periods of operation. Following this rule
will reduce the risk of serious personal injury.
17. Check the work area before each use. Remove all objects such as rocks, broken glass, nails, wire, or
string which can be thrown by or become entangled in the machine.
18. Do not point the hedge trimmer blade in the direction of people or pets.
19. Never run the unit without the proper equipment attached. Always ensure that the hedge trimmer blade is
installed.
20. Never use the hedge trimmer near res or hot ashes. Use near res or ashes can spread res and result
in serious injury and/or property damage.
21. Never use hedge trimmer to spread chemicals, fertilizers, or any other toxic substances. Spreading these
substances could result in serious injury to the operator or bystanders.
22. Never place the hedge trimmer on any surface, except a hard, clean surface when the engine is
running. Gravel, sand, and other debris can be picked up by the air inlet and thrown at the operator or
bystanders, causing possible serious injuries.
23. If situations occur that are not covered in this manual, use care and good judgment. Contact the Custom-
er Service Center for assistance

06
SAFETY WARNINGS FOR BATTERY PACK AND CHARGER
1. Do not dismantle, open or shred battery pack.
2. Do not expose battery pack to heat or re. Avoid storage in direct sunlight. The cells may explode. Check
with local codes for possible special disposal instructions.
3. 3.Do not short-circuit a battery pack. Do not store battery packs haphazardly in a box or drawer where
they may short-circuit each other or be short-circuited by other metal objects. When battery pack is not
in use, keep it away from other metal objects, like paper clips, coins, keys, nails, screws or other small
metal objects, that can make a connection from one terminal to another. Shorting the battery terminals
together may cause burns or re.
4. Do not subject battery pack to mechanical shock.
5. Observe the plus (+) and minus (–) marks on the battery back and equipment and ensure correct use.
6. Keep battery pack out of the reach of children.
7. Always purchase the battery pack recommended by the device manufacturer for the equipment.
8. Keep battery pack clean and dry.
9. Wipe the battery pack terminals with a clean dry cloth if they become dirty.
10. Battery pack needs to be charged before use. Always use the correct charger and refer to the manufac-
turer’s instructions or equipment manual for proper charging instructions.
11. Do not leave battery pack on charge when not in use.
12. After extended periods of storage, it may be necessary to charge and discharge the battery pack several
times to obtain maximum performance.
13. Battery pack gives its best performance when it is operated at normal room temperature 68 °F ± 41°F
14. Use only the battery pack in the application for which it was intended.
15. Remove the battery pack from the equipment when not in use.
16. Dispose of properly.
17. Do not handle the charger, including charger plug, or charger terminals with wet hands.
18. Do not charge the battery pack outdoors, in rain, or in wet locations.
Save these instructions. Refer to them frequently and use them to instruct others who may use this
tool. If you lend this tool to someone else, also lend these instructions to them to prevent misuse of
the product and possible injury.
07
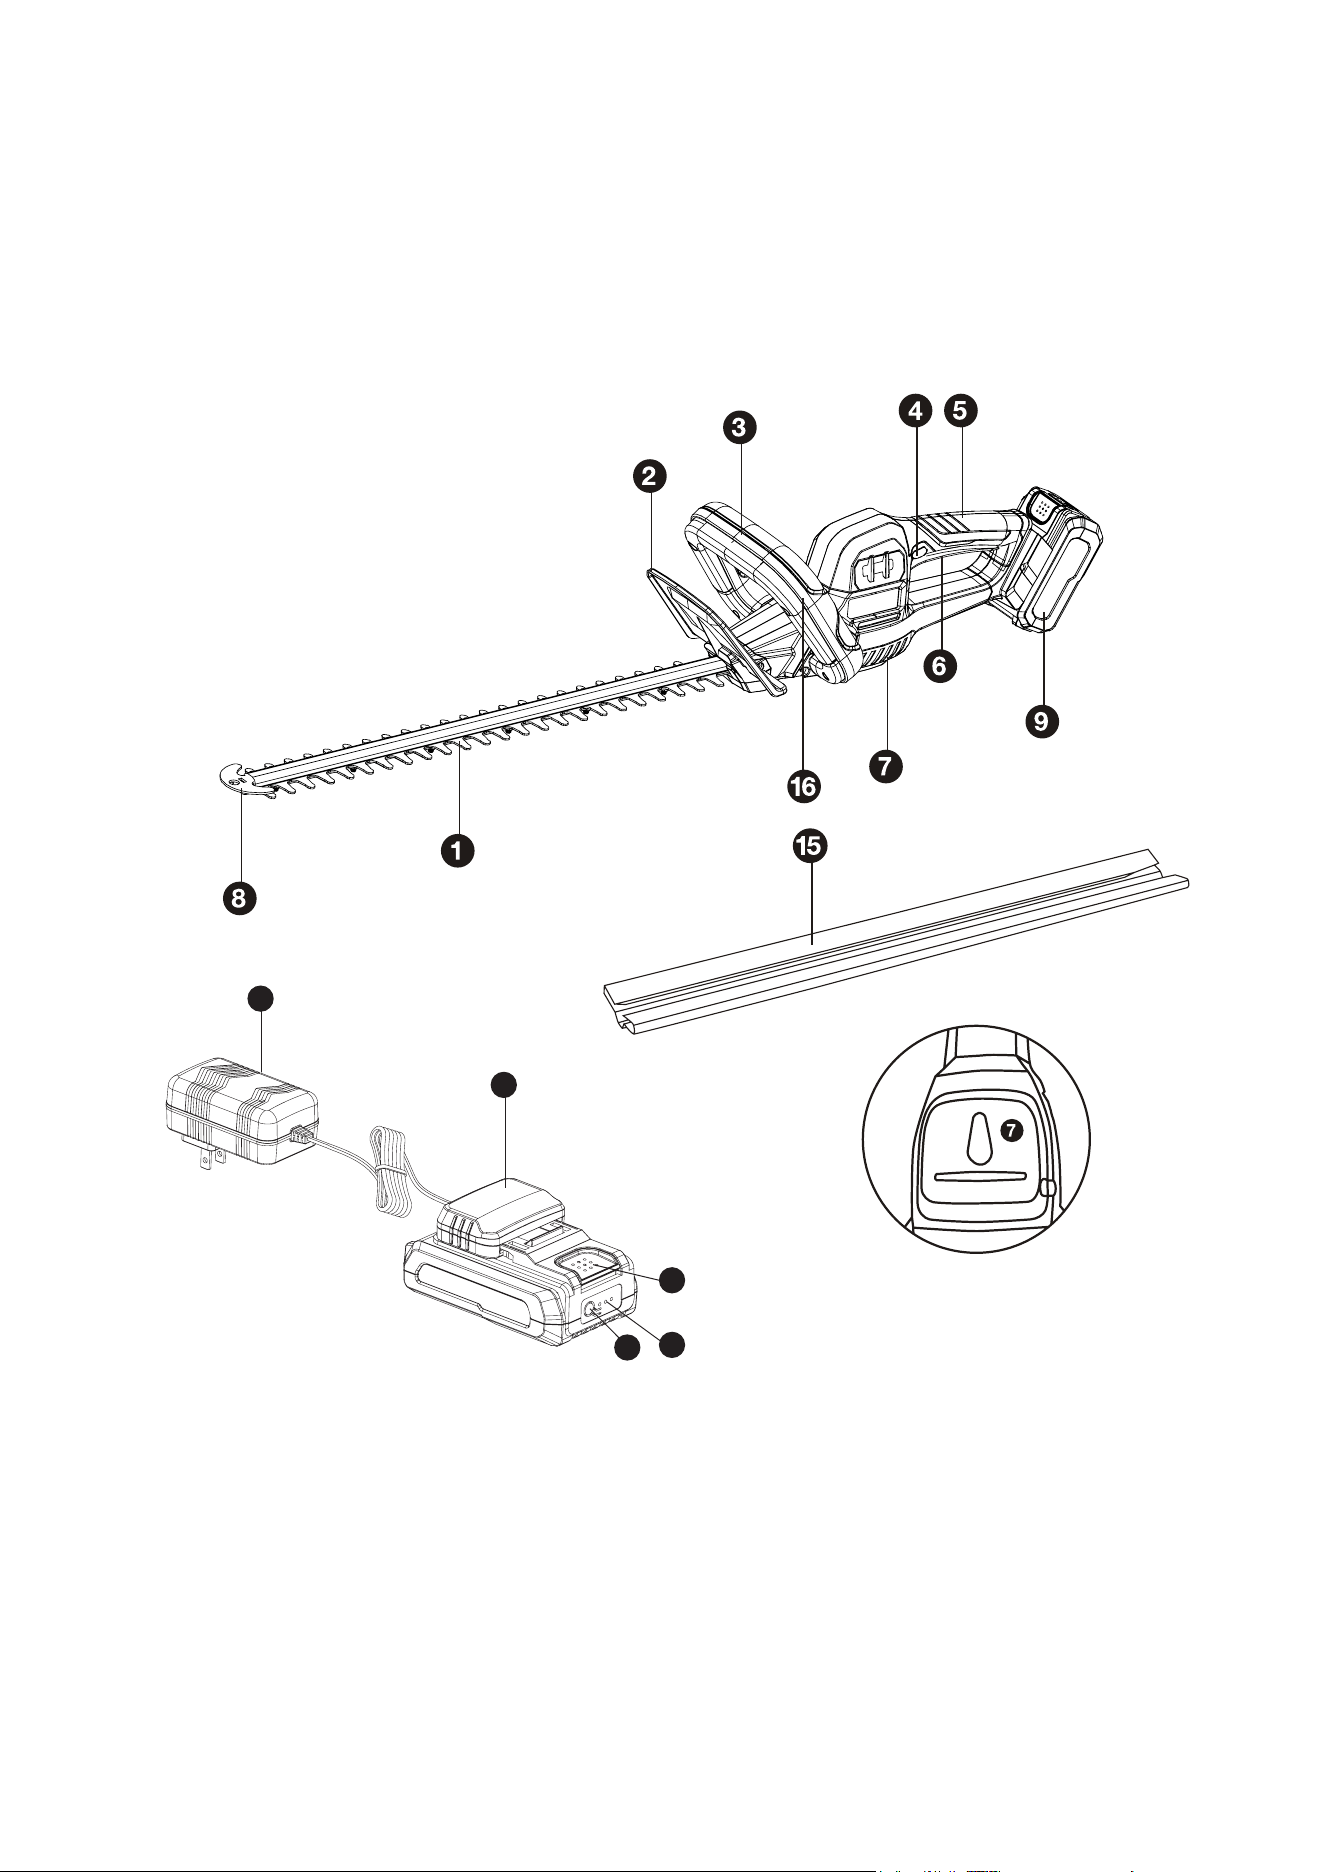
KNOW YOUR TOOL
Read the operator’s manual carefully before operating your cordless hedge trimmer. Compare the illustration
below to the actual unit in order to familiarize yourself with the location of the various controls and adjust-
ments. Save this manual for future reference.
1. Blade
2. Hand Guard
3. Front Handle
4. Lock O Button
5. Rear Handle
6. On/O Trigger
7. Hang Hole
8. Blade Tip Guard With Hang Hole
9. Battery Pack
10. Charging Indicator Light
11. Battery Pack Release Button
12. Battery Power Indicator Light
13. Battery Power Button
14. Charger
15. Blade Cover
16. Front Handle Switch
10
14
11
12
13

08
SKU No.
Model No.
Voltage
Cutting Length
Cutting Capacity
No Load Speed
Battery
Charger
Charger Rating
Charging Time(Approx.)
Part Name
Hedge Trimmer
Blade Cover
2.0 Ah Battery
2 A Charger
Operator’s Manual
267-1546
EGT040075
20V
20”
0.625”
2700 SPM
2.0 Ah
(267-3206/D01102700/D01104300/EBP000182)
2 A
(267-3205/ECA000159)
Input: 100-120V~, 50-60Hz 60W
Output: Max 21.2V, 2 A
About 70 mins
Quantity
1pc
1pc
1pc
1pc
1pc
TECHNICAL DATA
PACKING LIST
LED Indicator
3 lights on
2 lights on
1 light on
1 light ashing
Battery Charge Level/Working Conditions
70%<Charge Level≤100%
40%<Charge Level≤70%
10%<Charge Level≤40%
Charge Level ≤10%
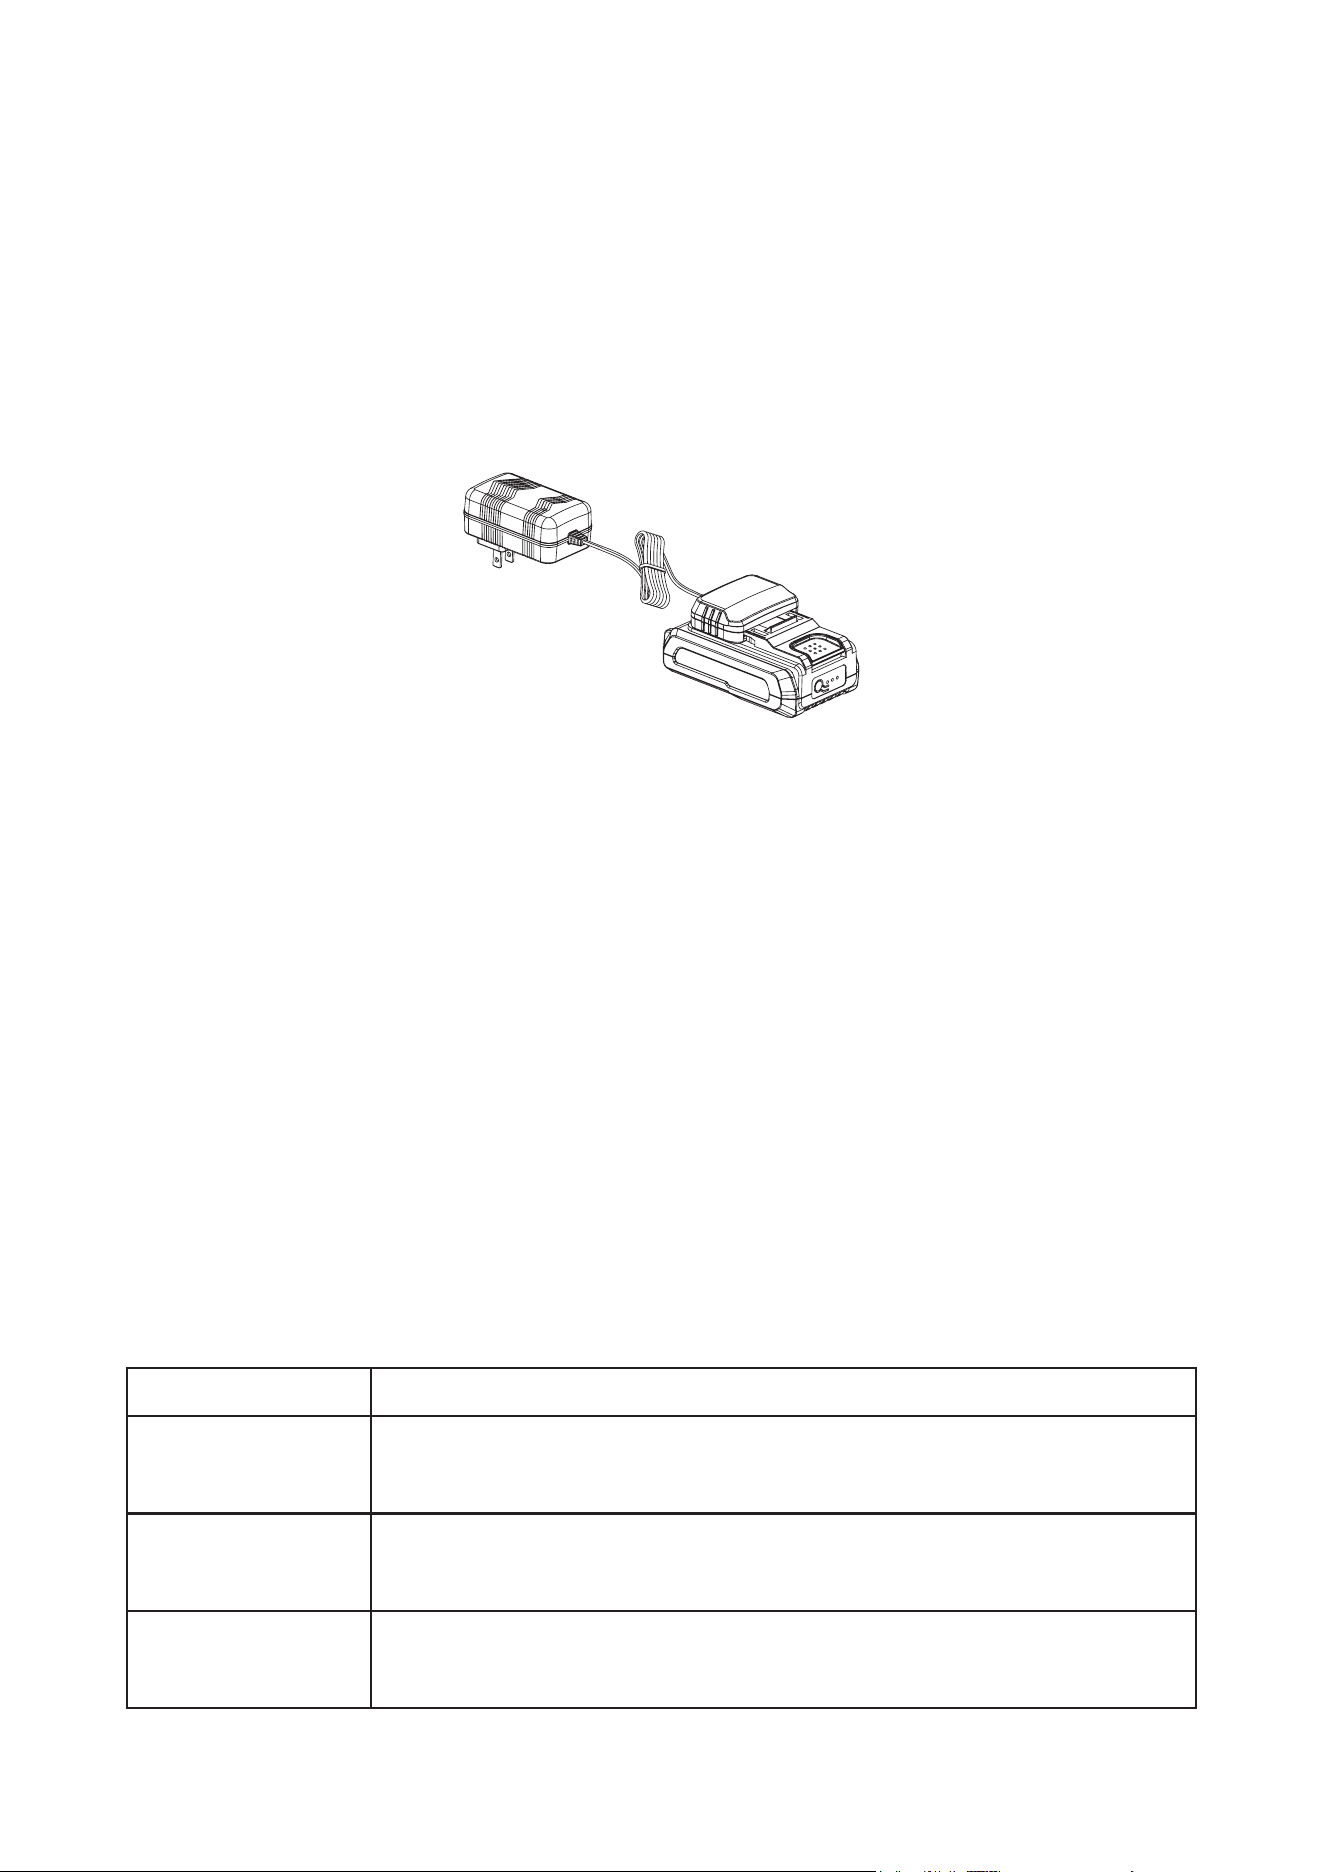
CHARGING YOUR BATTERY
BATTERY INDICATOR
The battery pack is equipped with a push button for checking the charge level. Simply press the push button
to read o the battery charge level from the LEDs of the battery indicator.
WARNING:
Do not use the charger outdoors or expose it to wet or damp conditions. Water entering the charger
will increase the risk of electric shock.
09
CHARGING YOUR BATTERY
NOTICE:
Lithium-Ion battery packs are shipped partially charged. Before using it the rst time, fully charge
the battery pack.
NOTICE:
You can only charge one battery at a time with the charger provided.
a. Connect the charger to the power supply (120V~60Hz). The green charging indication LED will turn on
indicating that the charger is working correctly.
b. Align the raised ribs of the battery pack with the battery-mounting slots in the charger; slide the battery
pack down onto the charger.The red charging LED will turn on.
c. When the battery is inserted properly,the green light will quickly ash to indicate that the battery is
charging.The red light on the charger will turn on.
d. When the green light (both on charger and battery)stays on,the battery is fully charged.
NOTICE:
●
The battery pack will fully charge if left on the charger, but it will not overcharge. If the battery
pack remains on the charger for one month or more, it will drop to a lower charge capacity. If this
occurs, re-install the battery pack on the charger to recharge it fully.
● A signicantly reduced run time after fully charging the battery pack indicates that the battery is
near the end of its usable life and must be replaced.
● The charger may warm during charging. This is part of the normal operation of the charger.
Charge in a well-ventilated area.
● If the LED ashes when the battery pack button is pressed without charging, it indicates that the
battery pack is malfunctioning or defective. In this case, do not attempt to charge the battery pack.
● If the battery pack is completely discharged and no LEDs flash when it is connected to the
charger, this also indicates a malfunctioning battery pack. In this case, do not attempt to charge
the battery pack.
CHARGER LED INDICATOR TABLE
Possible Reason
•No load charging –There’s no battery inserted in the charger.
•Normal charging – The battery is being charged.
•Fully charged – The battery is fully charged and the charging process is nished.
Indication
•Red Light – O
•Green Light – On
•Red Light – On
•Green Light – O
•Red Light – O
•Green Light – On
Use the table below to determine charger light patterns and possible causes. For all other issues, please ask
the helpline for help.
10
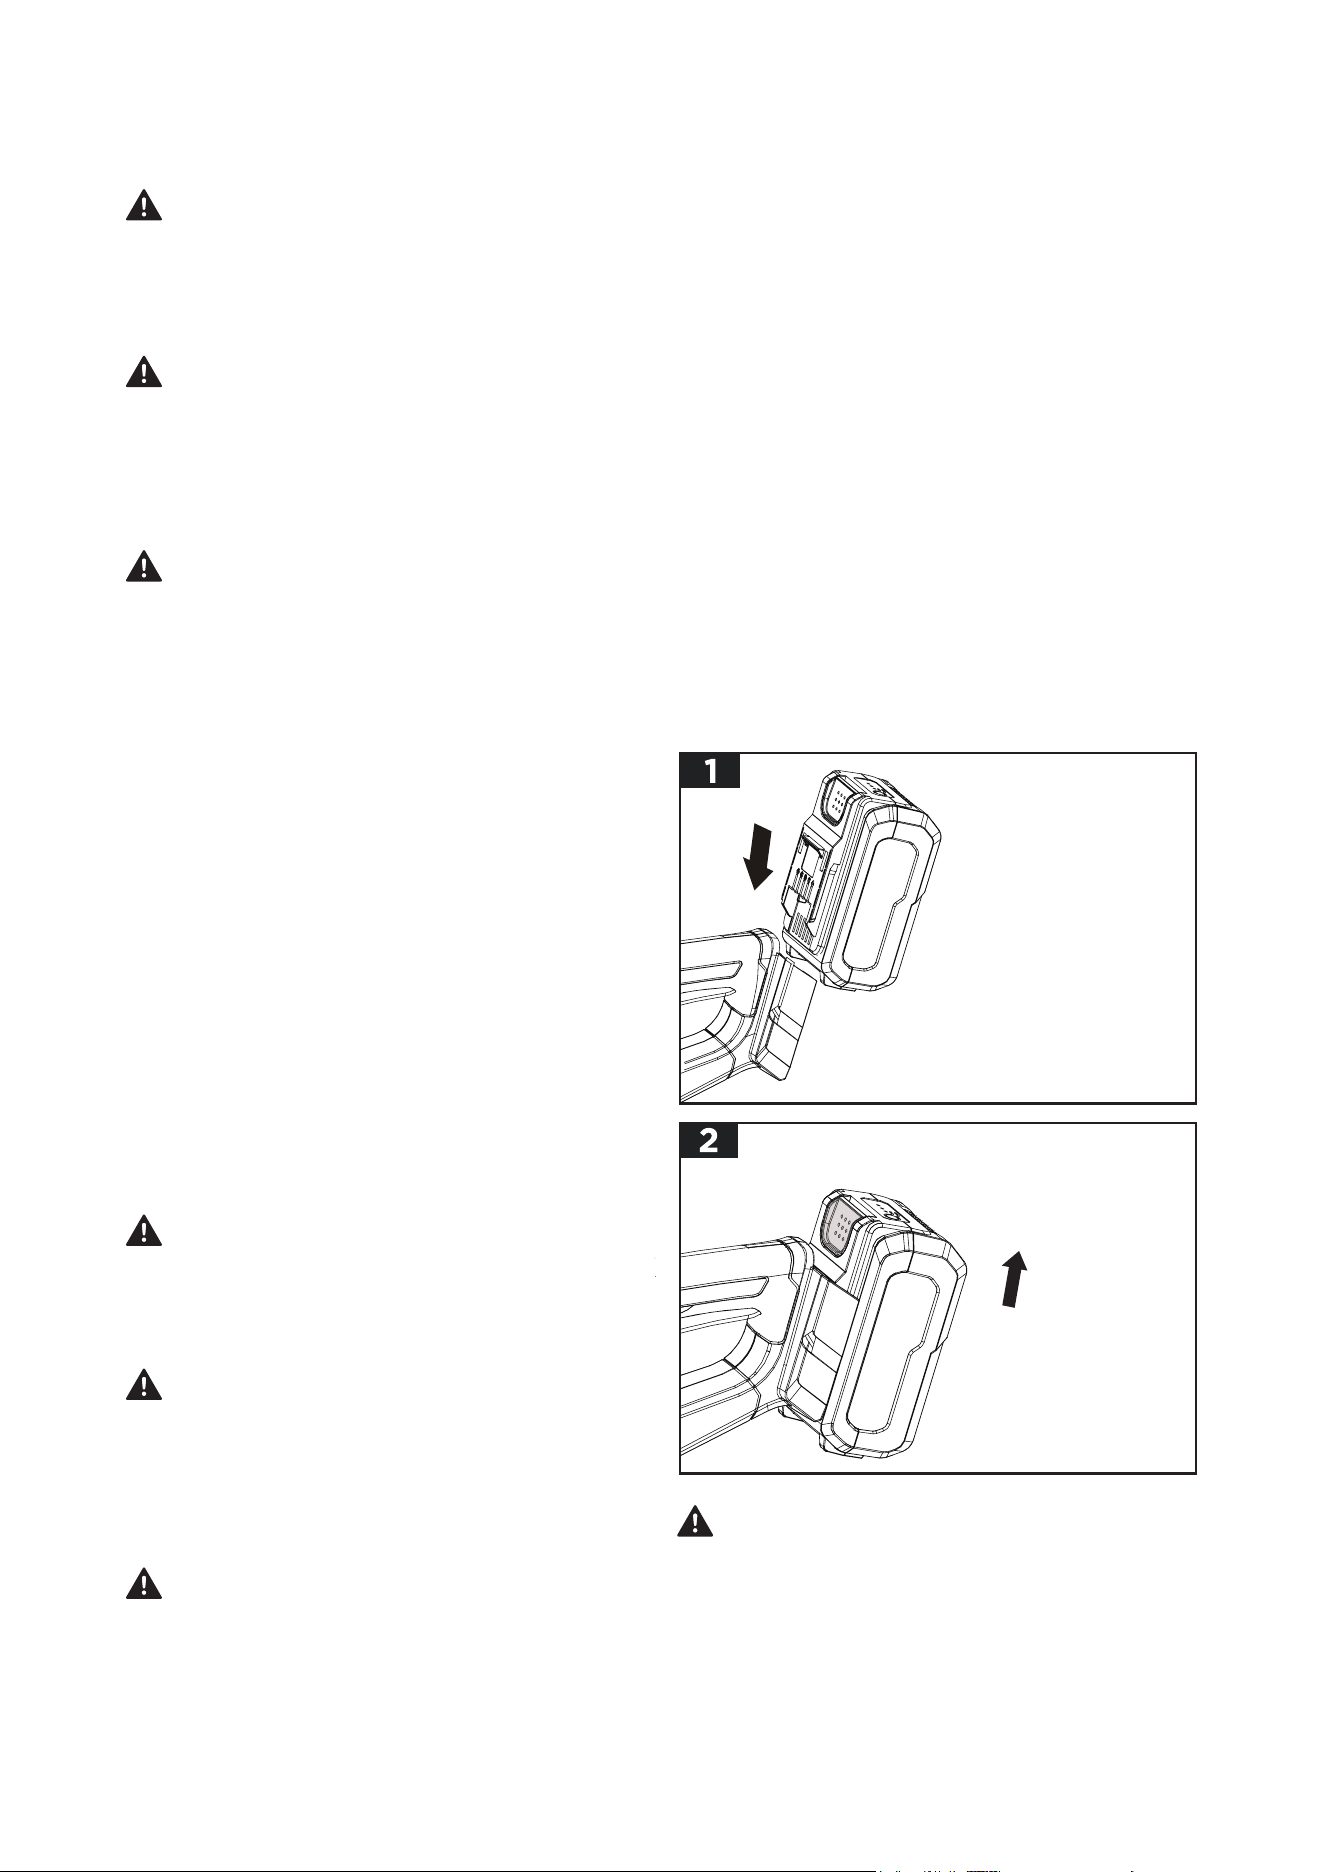
OPERATION
TO INSTALL REMOVE BATTERY
PACK(Fig.1 & 2)
WARNING:
If any parts are damaged or
missing,do not operate this product until the
parts are replaced. Use of this product with
damaged or missing parts could result in serious
personal injury.
WARNING:
Do not allow familiarity with
this product to make you careless. Remember
that a careless fraction of a second is sucient
to inict serious injury.
WARNING:
Always be aware of the location
of your feet and children or pets around you when
pressing the battery release button. Serious injury
could result if the battery pack falls. NEVER remove
the battery pack at a high location.
NOTICE: Make sure that the latch on the hedge
trimmer snaps into place and the battery pack is
secured to the tool before beginning operation.
WARNING:
Always wear eye protection
with side shields marked to comply with ANSI
Z87.1, along with hearing protection. Failure to
do so could result in objects being thrown into
your eyes and other possible serious injuries.
WARNING:
Do not use any attachments or
accessories not recommended by the manufac-
turer of this product. The use of attachments
or accessories not recommended can result in
serious personal injury.
NOTICE
: Before each use, inspect the entire
product for damaged, missing, or loose parts,
such as screws, nuts, bolts, caps, etc. Tighen
securely all fasteners and caps and do not
operate this product until all missing or damaged
parts are replaced.
WARNING:
Do not attempt to modify this
product or create accessories not recommended
for use with this hedge trimmer. Any such alter-
ation or modication is misuse and could result
in a hazardous condition leading to possibly
serious personal injury
WARNING:
Always remove the battery
pack from the product when you are assembling
parts, making adjustments cleaning, or when the
product is not in use.
UNPACKING
a. This product doesn’t requires assembly.
b. Carefully remove the product from the box. Make
sure that all items listed in the Know Your Tool
Section are included.
c. Inspect the tool carefully to make sure that no
breakage or damage occurred during shipping.
d. Do not discard the packing material until you
have carefully inspected and satisfactorily oper-
ated the tool.
e. If any parts are damaged or missing please con-
tact Customer Service center.
a. Align the ribs of the battery pack with the mount-
ing slots in the hedge trimmer’s battery port.
b. Press the battery pack downwards until it snaps
into position.
C. Press the battery release button and remove
battery from the hedge trimmer.
11
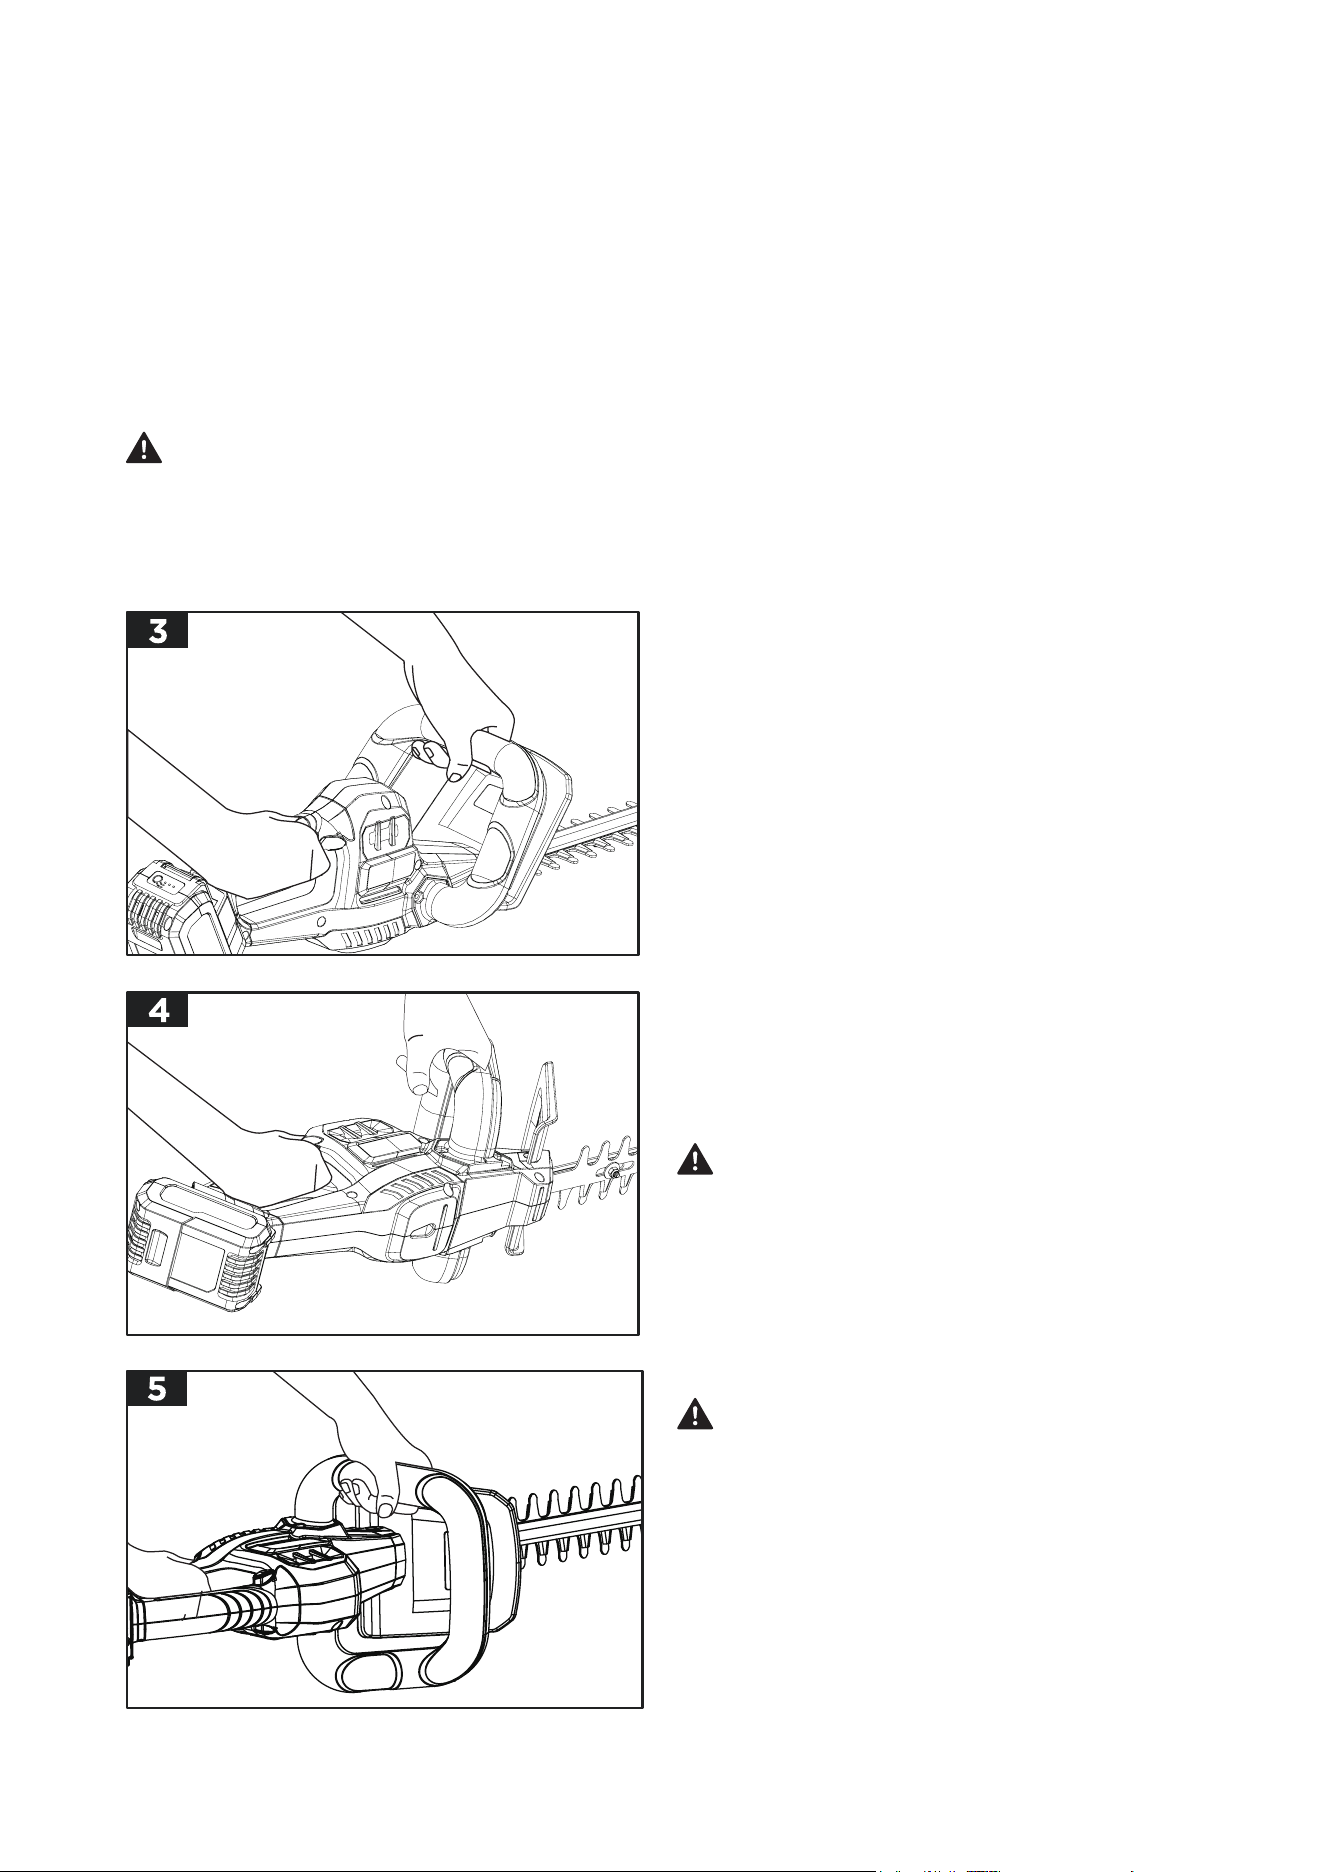
HOLDING THE HEDGE TRIMMER(Fig. 3,
4 & 5)
To Start The Hedge Trimmer(Fig.6)
WARNING:
Always keep both hands on the
hedge trimmer handles. Never hold shrubs with
one hand and operate the hedge trimmer with the
other. Failure to heed this warning may result in
serious injury.
WARNING:
Always remove the battery pack
from the hedge trimmer during work breaks and
after nishing work.
WARNING:
If the blade jams on any electri-
cal cord or line, DO NOT TOUCH THE BLADE! IT
CAN BECOME ELECTRICALLY LIVE AND VERY
DANGEROUS. Continue to hold the hedge
trimmer by the insulated rear handle or lay it
down and away from you in a safe manner.
Disconnect the electrical service to the dam-
aged line or cord before attempting to free
the blare from the line or cord. Failure to heed
this warning will result in serious personal
injury or possible death.
Before Starting the Hedge Trimmer:
To Stop The Hedge Trimmer
a. The hedge trimmer has both a front and rear
handle. With the blade directed away from you,
hold the unit by both handles.
b. The switch lever in the front handle can be acti-
vated on any of the three sides, giving you many
choices for a comfortable grip when performing
cutting operations.
a. Install the battery pack.
b. Grasp the front and rear handles rmly, and trig-
ger the switch on the front handle.
c. Press hand hold the lock o button, then squeeze
the trigger switch to start the hedge trimmer. Re-
lease the lock o button and continue to squeeze
the trigger for continued operation.
START / STOP THE HEDGE
TRIMMER
TIPS FOR OPERATING HEDGE
TRIMMER
a. Make sure you have a secure and balance foot-
ing. Stand upright and hold the hedge trimmer in
a relaxed position.
b. Remove the blade guard.
c. Make sure the cutting blade is not touching the
ground or any other objects.
d. Hold the unit with both hands: one hand on the
rear handle and one hand on the front handle.
a. Move the hedge trimmer away from cutting area,
and then release the trigger switch to stop the
hedge trimmer.
12
a. Before starting the hedge trimmer maintain
proper footing and balance and do not overreach.
Wear safety goggles,non-skid footwear and
rubber gloves. Hold the unit with both hands with
the cutting blades directed away from you. Always
use the hedge trimmer properly.
b. Keep from trimming too much at one time. This
can cause the blades to bind and slow, reducing
the cutting eciency.
c. Do not force the hedge trimmer through heavy
shrubbery. This can cause the blades to bind and
slow down. If the blades slow down, reduce the
pace of your work.
d. When trimming new growth,use a wide sweep-
ing action, so that the stems are fed directly into
the cutting blade. Older growth will have thicker
stems and will be trimmed most easily by using a
sawing movement.
e. Always cut stems or twigs that are less than
0.625” thick. Use a non-powered hand saw or
pruning saw to trim large stems.
a. Use a soft brush to remove debris from all air
intakes and cutting blade.
b. To remove pitch and other sticky residue spray
the blades with resin solvent. Run the motor
briey so that the solvent is event distributed.
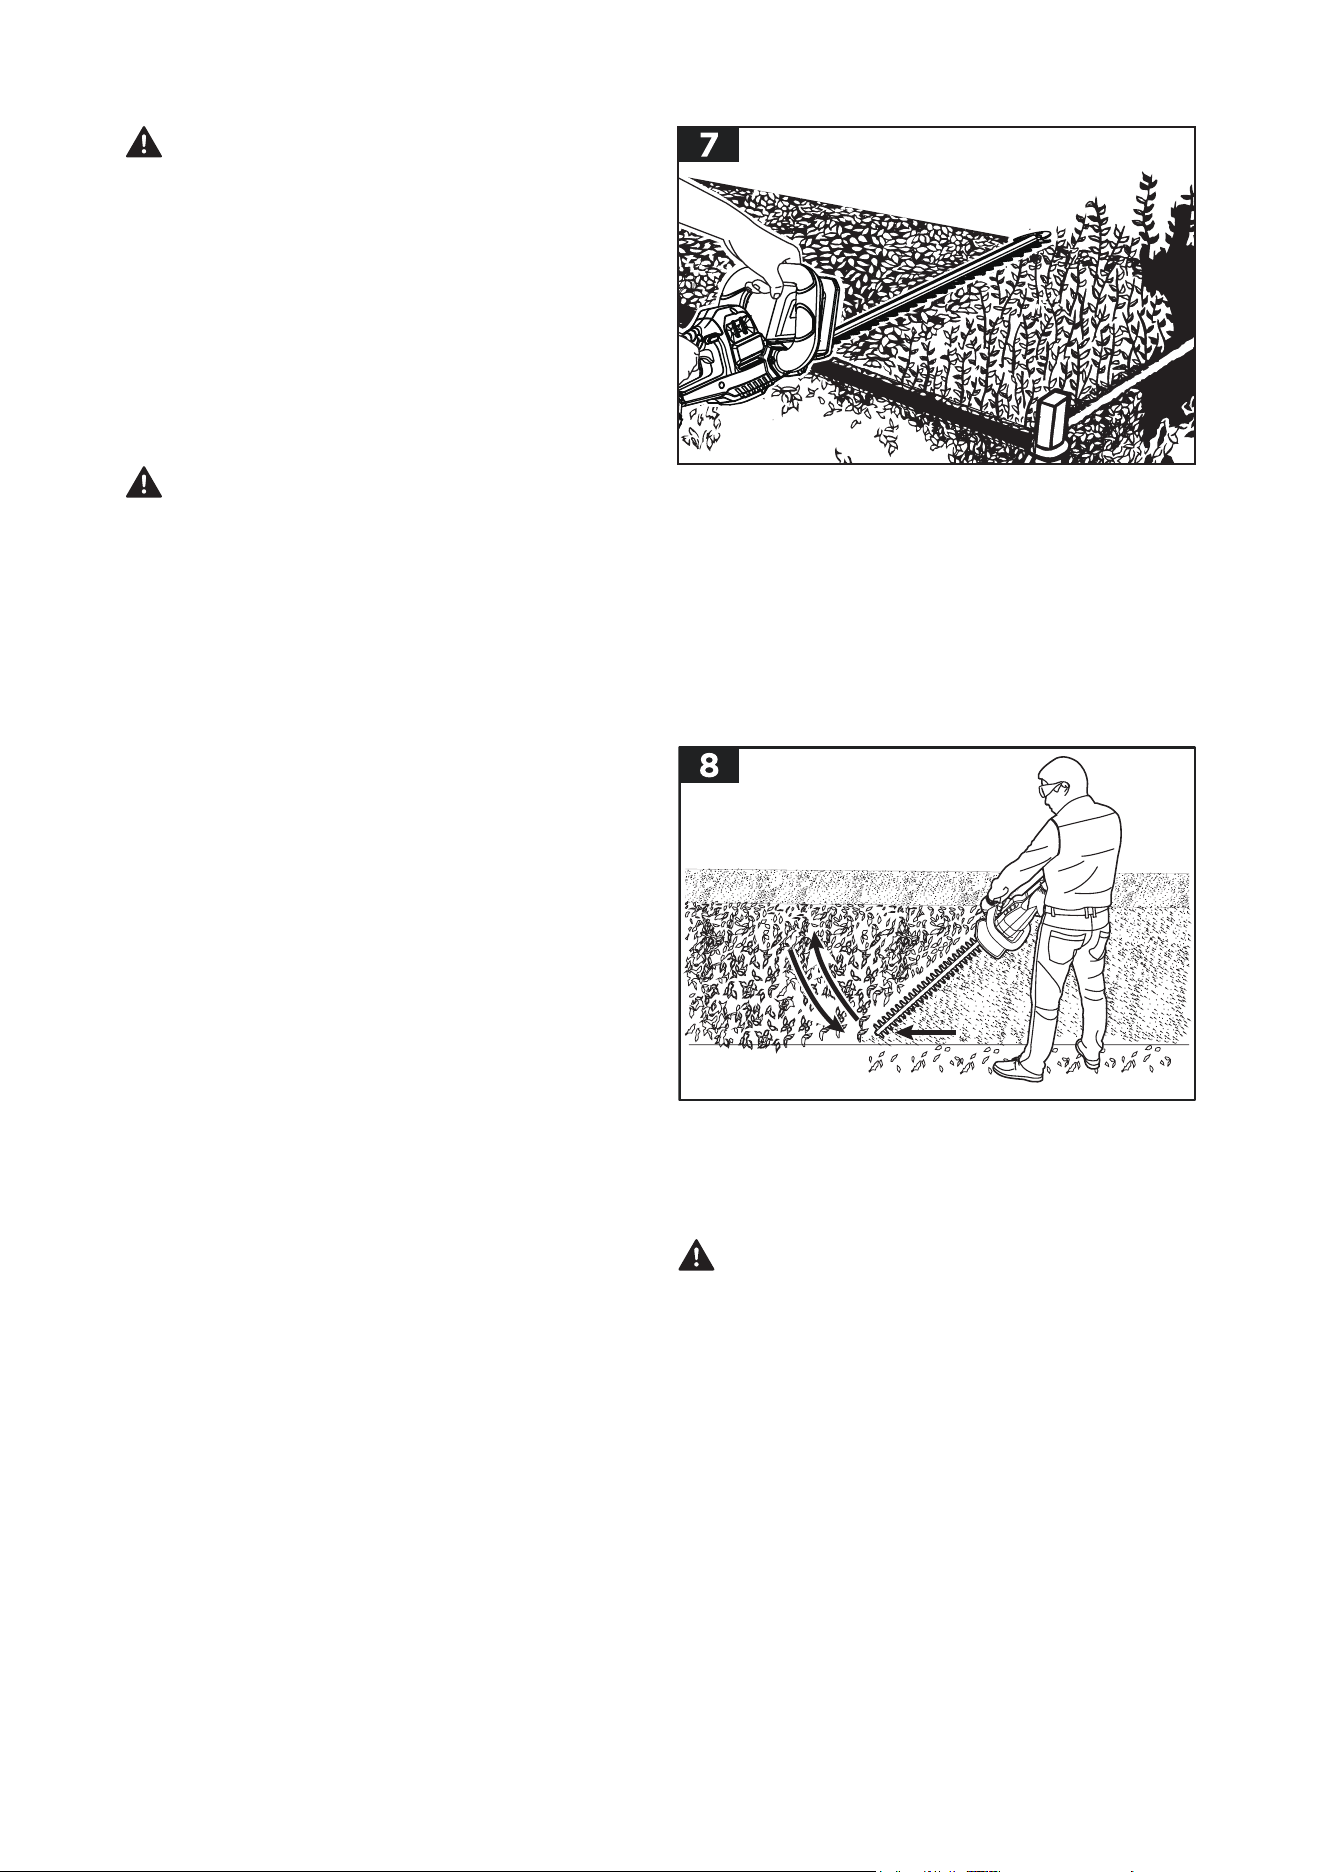
Use a wide sweeping motion. A slight downward
tilt of the cutting blades in the direction of motion
gives the best cutting results. If desired, you
can use a string to help guide you as you cut
your hedge level. Decide how high you want the
hedge. Then, stretch a piece of string along the
hedge at this height. Trim the hedge just above
this guide line.
When trimming the sides of the hedge begin at
the bottom and cut upwards. Trim the side of a
hedge so that it will be slightly narrower at the
top. This shape will expose more of the hedge,
resulting in a more uniform growth.
WARNING:
To prevent serious personal
injury, keep hands away from blades. Do not
attempt to remove cut material or hold ma-
terial to be cut when the blades are moving.
Make sure that the blades are moving. Make
sure that the blades have totally stopped and
the battery pack is removed before clearing
jammed material from blades. Do not grasp the
exposed cutting blades or cutting edges when
picking up or holding the unit.
WARNING:
Clear the area to be cut before
each use. Remove all objects, such as cords,
lights, wire, or string which can become entangled
in the cutting blade and create a risk of serious
personal injury.
TOP CUTTING (Fig. 7)
SIDE CUTTING (Fig. 8)
MAINTENANCE
WARNING:
When servicing, use only
identical replacement parts. Use of any
other parts may create a hazard or cause
product damage. To ensure safety and reli-
ability, all repairs should be performed by a
qualified service technician.
CLEANING
13
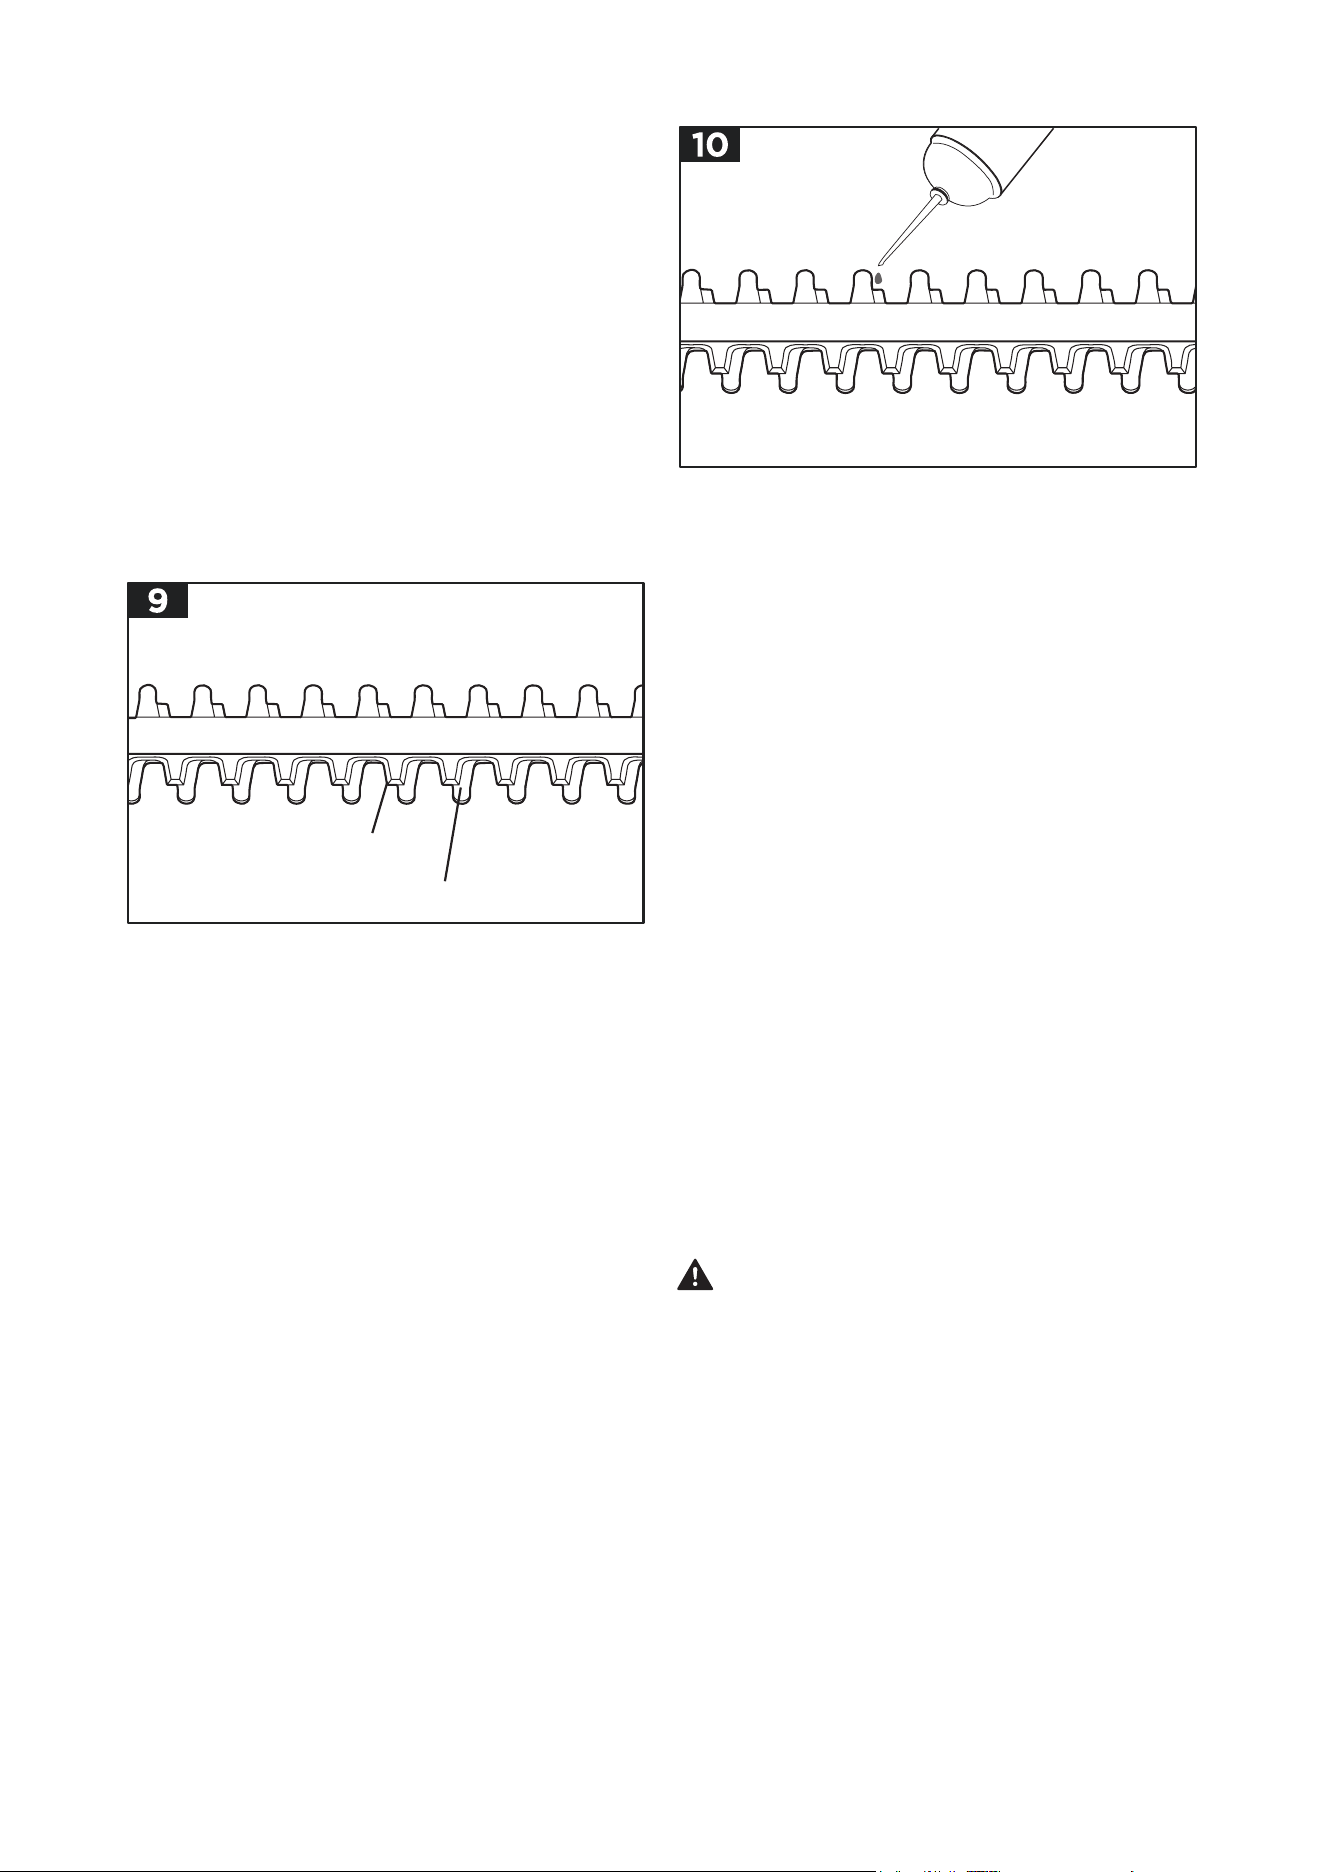
For best operation and longer blade life, lubricate
the hedge trimmer blade with lightweight machine oil
before and after each use.
c. Wipe the surface with a dry cloth.
d. Never use water for cleaning your trimmer. Avoid
using solvents when cleaning plastic parts. Most
plastics are susceptible to damage from various
types of commercial solvents. Use clean clothes
to remove dirt, dust, oil, grease, etc.
a. Remove the battery pack from the hedge trimmer.
b. Lay the hedge trimmer on a at surface. Apply a
lightweight machine oil along the edge of the top
blade. If you will be using the hedge trimmer for
an extended period, it is advisable to stop, remove
the battery, and oil the blade during use.
a. Always place the blade cover on the blade before
storing or transporting the hedge trimmer. Use
caution to avoid the sharp teeth of the blade.
b. Clean the hedge trimmer thoroughly before storing.
c. Store the hedge trimmer indoors, in a dry place
that is inaccessible to children.
d. Keep away from corrosive agents such as garden
chemicals and deicing salts.
a. Start and stop your hedge trimmer until the cutter
blade and the guard are slightly oset as shown
in
(Fig.9).
This will allow clearance for the le
between cutter teeth and guard teeth.
b. Remove the battery pack from your hedge trimmer.
c. Clamp the blade assembly in a vise and le the
exposed cutting surface of each cutter tooth.
Remove as little material as possible Be sure to
retain the original angle of each tooth when ling.
d. Remove the hedge trimmer from the vise; restart
it and stop it to expose the unsharpened edges
of the blade teeth.
e. Remove the battery pack and repeat the sharp-
ening procedure above.
WARNING:
Blades are sharp. When handling
the blade assembly wear non- slip, heavy-duty
protective gloves. Do not place your hand or ngers
between blades or in any position where they
could get pinched or cut. NEVER touch blades or
service the unit with battery pack installed.
LUBRICATING THE BLADE ( Fig.10)
CUTTER TOOTH
GUARD TOOTH
SHARPENING THE BLADE
TRANSPORTING AND STORING
THE HEDGE TRIMMER
NOTICE
: Do not operate your hedge trimmer
with dull or damaged cutting blades. This may
cause overload and will give unsatisfactory
cutting results.
NOTICE:
Do not oil while the hedge trimmer is
running.

14
TROUBLESHOOTING
SolutionPossible CauseProblem
Attach the battery pack to the hedge trimmer.
The battery pack is not
attached to the hedge trimmer.
No electrical contact between
the trimmer and battery.
The battery pack is depleted.
The battery pack or
hedge trimmer is too hot.
Remove battery, check contacts and reinstall the
battery pack.
Charge the battery pack.
Cool the battery pack and hedge trimmer until the
temperature drops below 152°F (67°C).
The lock o button and trigger
are not depressed simultane-
ously.
The blade is jammed
Dry or corroded blades.
Blades or blade support is
bent
Bent or damaged teeth.
Loose blade bolts.
Depress the lock o button and hold it, then depress
the trigger to turn on the hedge trimmer.
Remove the battery pack from the tool, remove the
obstruction carefully, then reinsert the battery and
restart the tool.
Lubricate the blades, following the section
"LUBRICATING THE BLADE" in this manual.
Replace with a new blade or support. Contact
Customer Service Center for blade or support
replacement service.
Replace with a new blade. Contact Customer Service
Center for blade replacement service.
Tighten the blade bolts. Using a hex. wrench, turn the
bolt(M5) clockwise to tighten.
Hedge trimmer
doesn't work.
Excessive
vibration or
noise.
a. Protect the battery against moisture and water.
b. Store the battery only within a temperature range from 41°F
(5℃ )
to 104°F
(40 ℃ )
. As an example, do not
leave the battery in a vehicle or in the hedge trimmer in direct sunlight.
c. Clean the ventilation slots of the battery occasionally with a soft, clean and dry brush. A considerably
shortened operating time after charging is an indication that the battery is exhausted and must be re-
placed.
d. If you do not use the product for a long time, please charge and discharge the battery pack once every 6
months.
STORING THE BATTERY

15
CopyrightAll Rights Reserved
OWNER’SMANUAL
20-Volt Lithium-ion Cordless Hedge Trimmer
With (1) 20-Volt 2.0Ah Lithium-ion Batter
y
.
YARDWORKS WARRANTYPOLIC
SKU#
267-1546
Y
Two(2) year limited warranty on allYardworks 20Vlithium ionpower toolsfromdateofpurchasewhenusedfor personal,
household, or family use.
Two(2) year limited warranty on allYardworks 20Vlithium ionbatteries andchargersfromdateofpurchasewhenusedfor
personal,household,orfamily use.
Warrantydoesnot includerepairs necessarydue to operator’s abuseornegligence(includingoverloading theproduct beyond
capacity or immersioninwater),orthe failure to assemble,operate,maintainorstore theproduct accordingtothe instructions in
theowner’s manual
Warranty voided if used forcommercialor industrial purposes or anyother improper useasdetermined by Yardworks.
.
This warrantydoesnot cover
Wear items, includingbut notlimited to -drive belts&gears, tines, cuttingblades, mowerblades, saw chains,mulching
blades,blowerfans, spoolcovers, trimmerline, blower andvacuumtubes,guide bars,highpressurehoses,wheels, handles,
augers,wornbags, powercables, andother itemssubject to wear over time.
Wear on batteries, includingbut not limited to –drops,wearand breakage on charger, exposure to extremetemperature
swings (hot or cold),battery left on chargertoo long,battery left unchargedfor toolong, andmisuseorabuse of thebattery.
This warrantydoesnot coverdamage caused by cold,heat, rain,excessivehumidityorother environmental extremes.
This warrantydoesnot covernormal deterioration of theexteriorfinishornormalwearand tear on theproductsincluding,but not
limitedtoscratches,cracks, dents, or damage caused by outsidechemicals.
This warrantyisnot transferable andonlyappliestonew products sold directly from an authorized retailer.Thiswarrantydoesnot
applytoany product, neworused, purchasedthrough unauthorized third-party channels.For informationonauthorized dealers,
contactour customer supporthotline at 1-888-497-7273(Mon-Fri 8am-5pmEst)
Anyincidental, indirect or consequentialloss, damage,orexpense that mayresult from anydefectormalfunction of theproductsi
s
notcovered by thewarranty.
Thewarrantydoesnot includeinstallation, assembly or normal adjustmentsexplained in theowner’s manual.The expenseofde-
livering theproduct to thevendorand theexpense of returningthe product or replacement partstothe ownerisnot coveredbythe
warranty.
Additional Warranty Limitations
Some states do notallow theexclusionorlimitationonhow long an impliedwarrantylasts,sothe abovelimitationmay notapply to
you. Products sold damagedorincomplete, sold
as is,orsoldasreconditioned arenot coveredunder the warranty.
Damage or liabilitycausedbyshipping, improper handling, improper assembly,incorrect voltage, improper wiring,impropermainte-
nance, improper modification or theuse of accessories and/or attachmentsnot specifically recommendedisnot coveredbythis
warranty.
Proofofpurchase, original datedsales receipt, must accompanyall warranty claims.
Mon-Fri at 1-888-497-7273
For claims go to Menardsor callour customer support hotline from 8am-5pm EST,
In acontinuedcommitmenttoimprove quality, theManufacturer reserves theright to
make componentchanges or design changes when necessary.

16
