
- 01 -
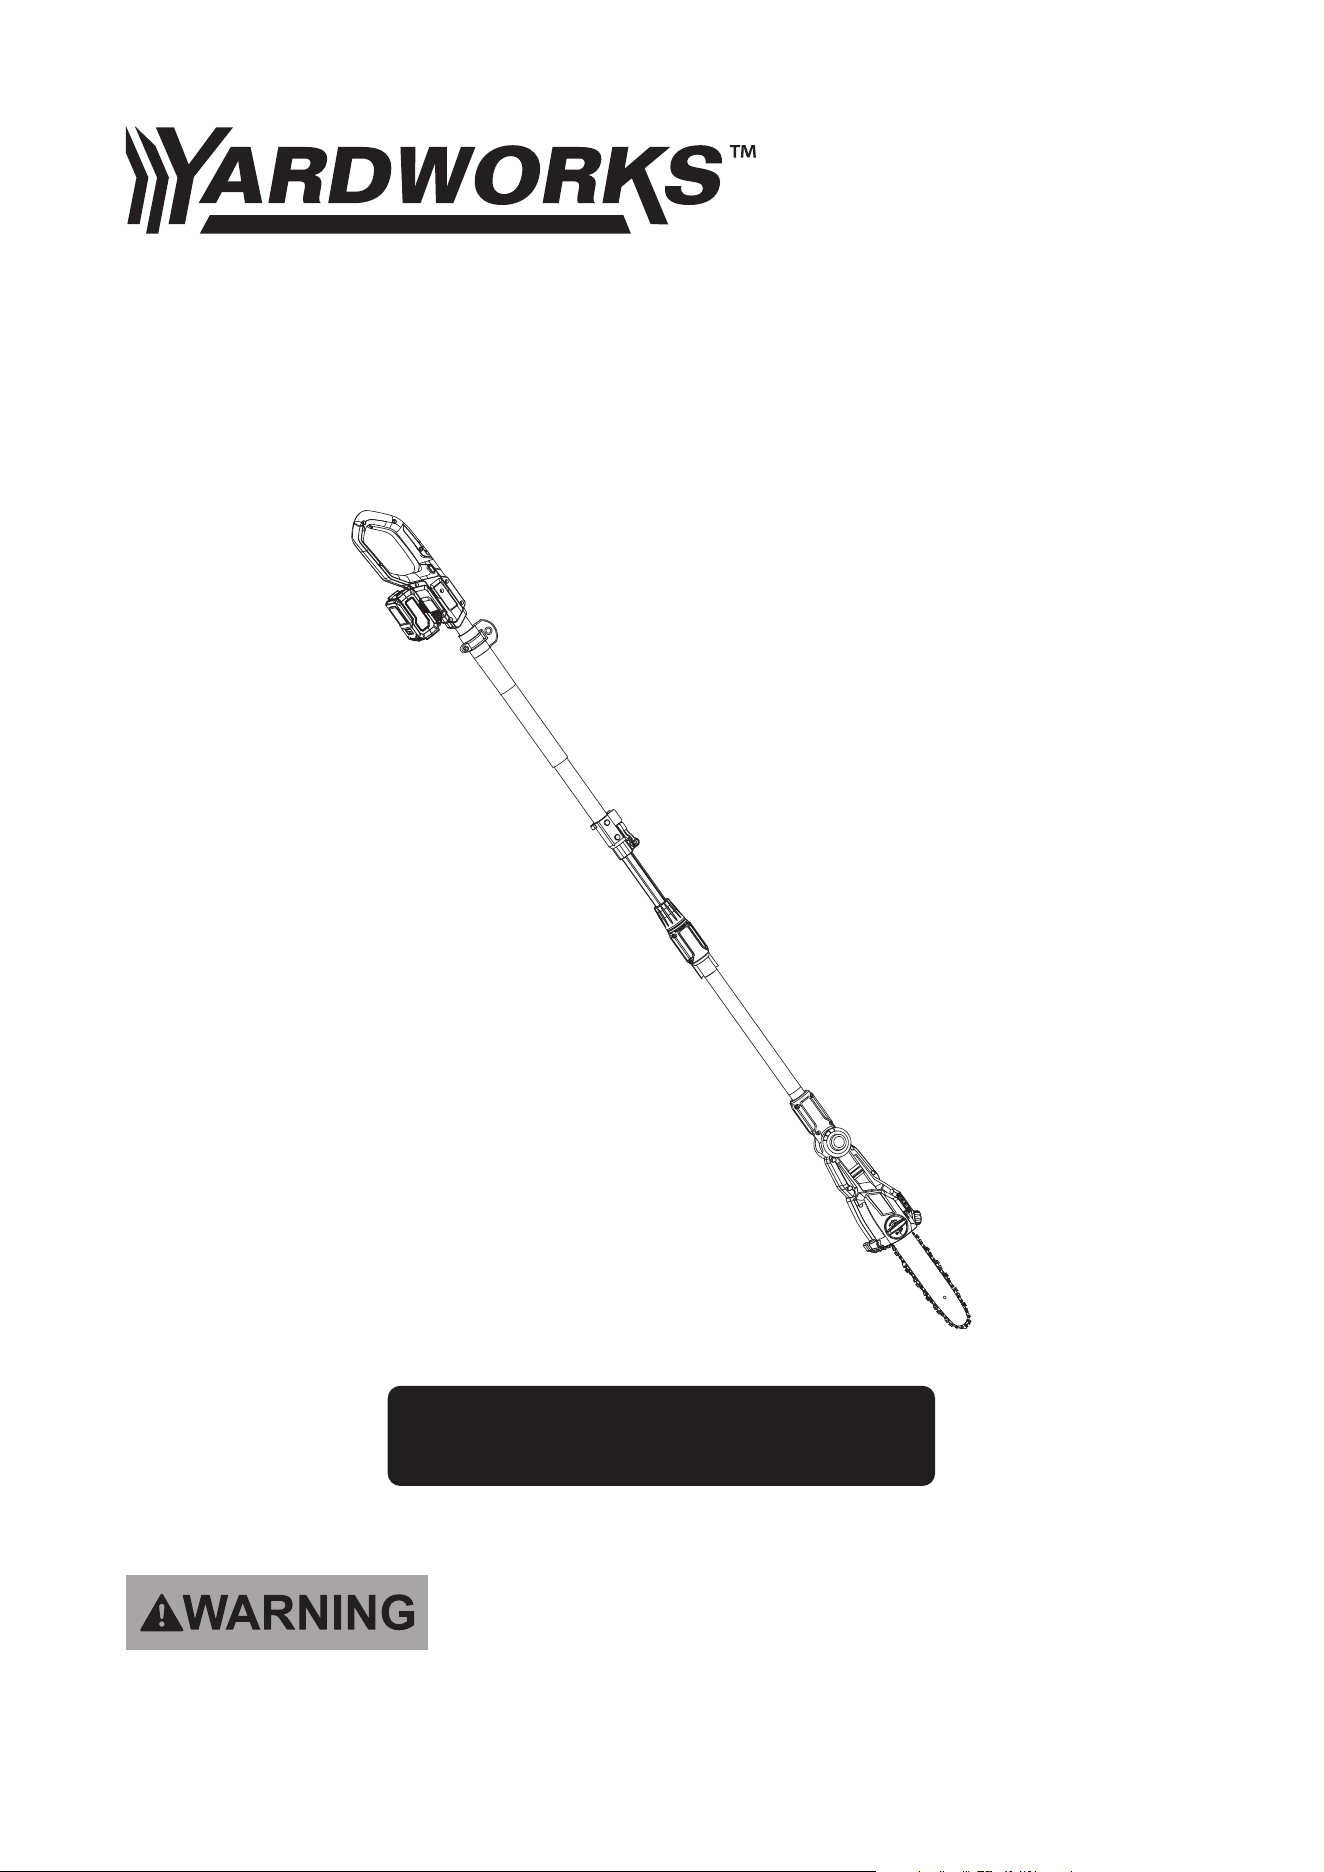
20V Cordless Pole Saw
239-1575
TOLL-FREE HELPLINE: 1-888-497-7273
Read this operator manual before using this product. Failure to do so can result in serious injury. SAVE THIS
MANUAL
OPERATOR’S MANUAL
- 02 -
TABLE OF CONTENTS
Some of the following symbols may be used on this product. Please study them and learn their meaning.
Proper interpretation of these symbols will allow you to operate the product better and safer.
READ ALL INSTRUCTIONS!
WARNING:
Some dust created by power sanding, sawing, grinding, drilling and other construction activi-
ties may contain chemicals known to the state of California to cause cancer, birth defects or other
reproductive harm. Some examples of these chemicals are:
Lead from lead-based paints,
Crystalline silica from bricks and cement and other masonry products, and
Arsenic and chromium from chemically - treated lumber.
Your risk from these exposures varies, depending on how often you do this type of work. To reduce your
exposure to these chemicals: work in a well-ventilated area, and work with approved safety equipment,
such as those dust masks that are specially designed to lter out microscopic particles.
SAFETY SYMBOLS
The purpose of safety symbols is to attract your attention to possible danger. The safety symbols and the
explanations with them deserve your careful attention and understanding. The symbol warnings do not,
by themselves, eliminate any danger. The instruction and warnings they give are no substitutes for proper
accident prevention measures.
The following signal words and meanings are intended to explain the levels of risk associated with this
product.
WARNING
CAUTION
WARNING
DANGER
SYMBOL SYMBOL
Indicates a hazardous situation, which, if not avoided, could result in injury.
Indicates a hazardous situation, which, if not avoided, could result in injury.
Indicates a hazardous situation, which, if not avoided, could result in injury.
(Without Safety Alert Symbol) Indicates information considered important, but
not related to a potential injury (e.g. messages relating to property damage).
MEANING
SAFETY SYMBOLS
IMPORTANT SAFETY INSTRUCTIONS
KNOW YOUR TOOL
CHARGING YOUR BATTERY
ASSEMBLY
OPERATION
MAINTENACE
STORAGE
TROUBLE SHOOTING
WARRANTY
..............................................................................................................................
02
.............................................................................04
..........................................................................................................07
............................................................................................09
.........................................................................................................................10
......................................................................................................................15
....................................................................................................................17
..........................................................................................................................19
......................................................................................................20
.......................................................................................................................21
- 03 -
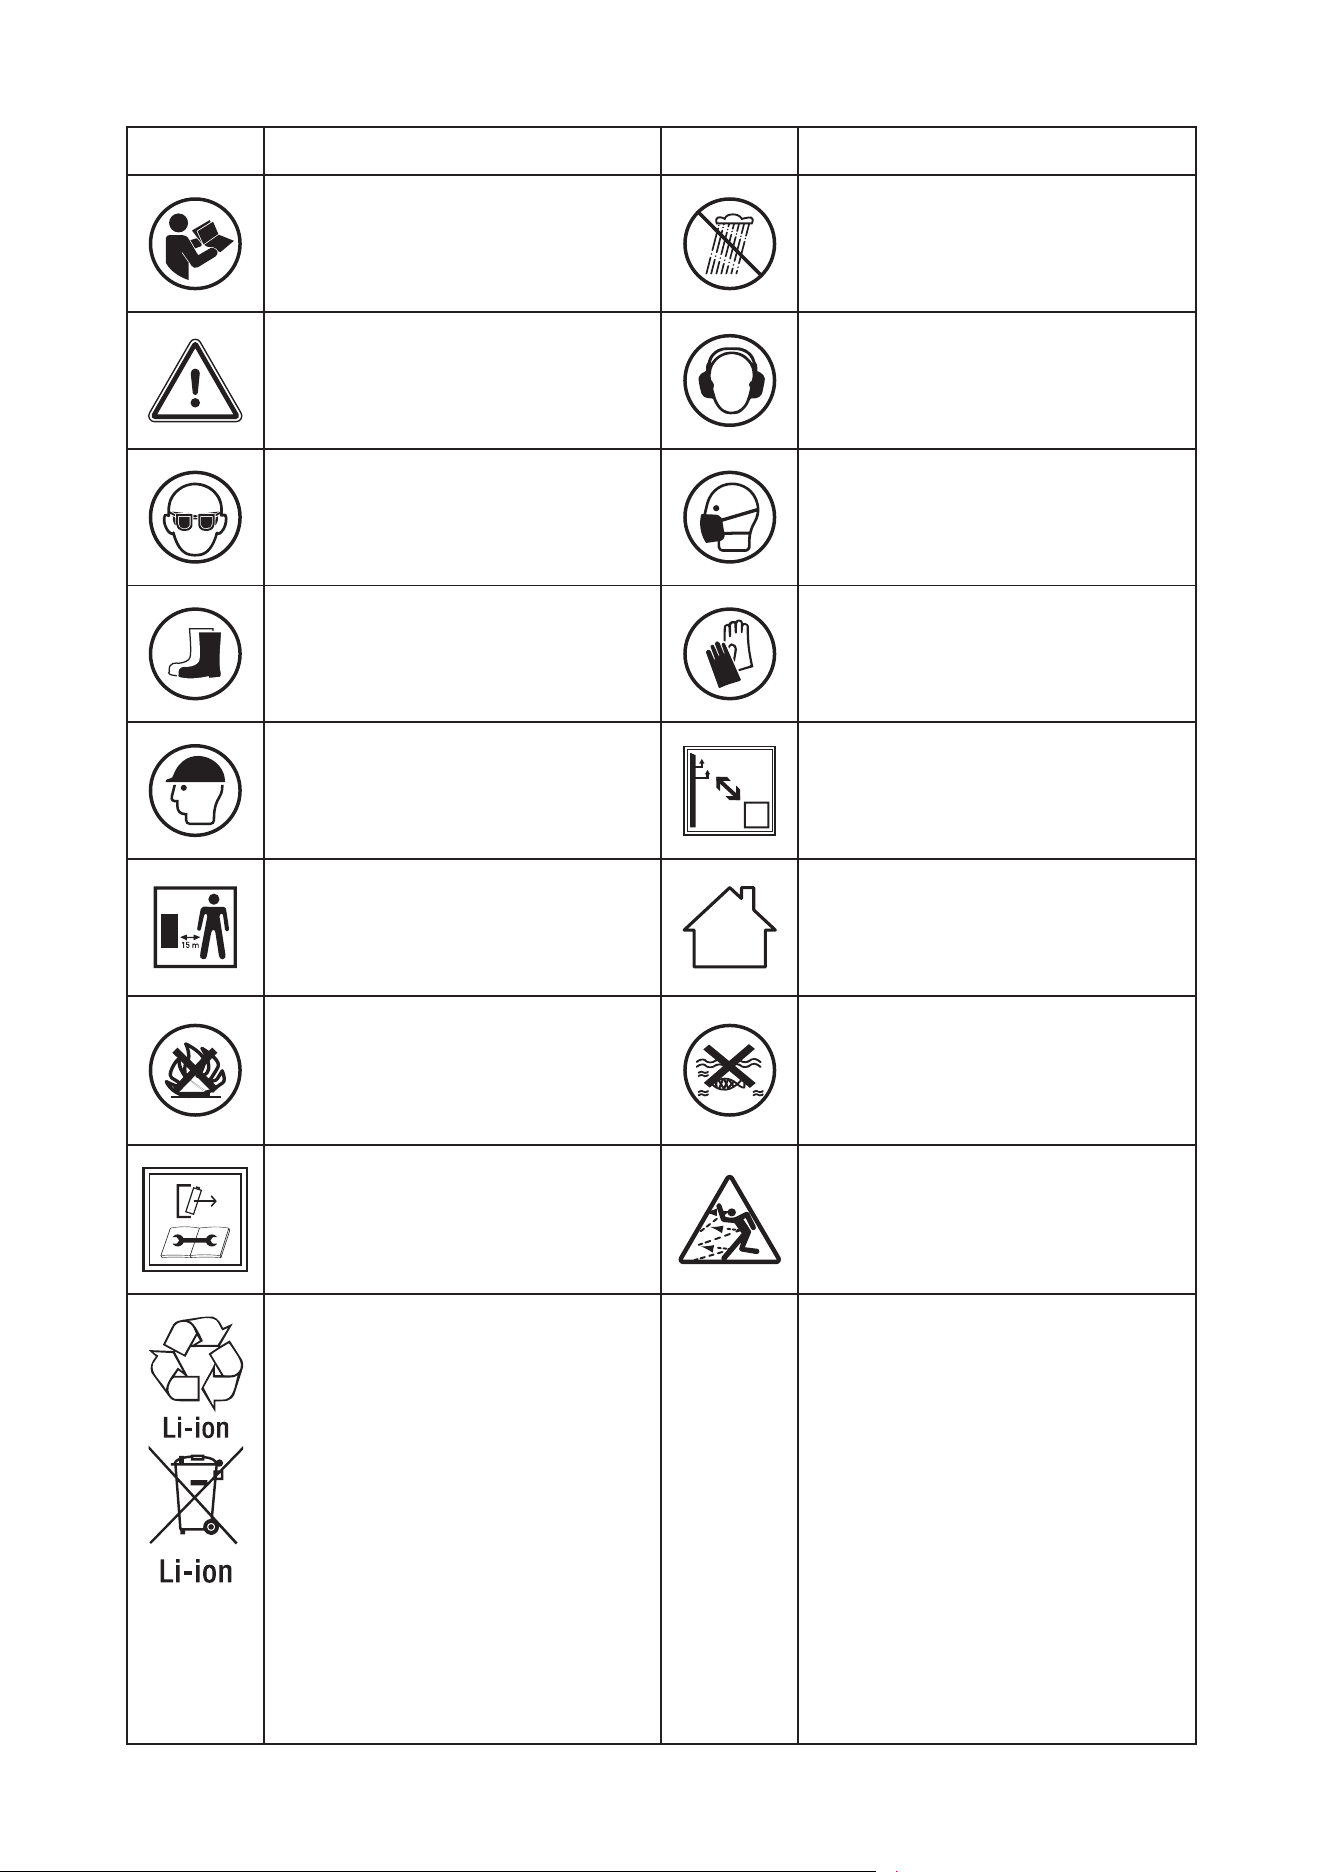
To reduce the risk of injury, user must
read instruction manual
Do not expose to rain.
SYMBOL SYMBOLDESCRIPTION DESCRIPTION
SAFETY ALERT
– indicate a precau-
tion, a warning or a danger.
Wear safety footwear
Wear head protection
WARNING!
Keep all persons,
especially children and domestic
animals, at a safe distance of at least
15m, when operating the pole saw.
Do not burn the battery pack.
Wear hearing protection.
Wear dust maskWear eye protection.
Wear protective gloves
Warning of danger from overhead
electric-power lines
Indoor use only. Only use battery
charger indoors.
Batteries may enter water cycle if
disposed of improperly, which can be
hazardous to the ecosystem. Do not
dispose of old batteries as unsorted
municipal waste.
Li-ion battery. This product has been
marked
with a symbol relating to ‘separate
collection’
for all battery packs and battery pack.
It will
then be recycled or dismantled in
order to
reduce the impact on the environment.
Battery packs can be hazardous for
the
environment and for human health
since they
contain hazardous substances.
Disconnect battery before
maintenance.
Thrown objects can ricochet
and result in person al injury or
property damage.

- 04 -
IMPORTANT SAFETY INSTRUCTIONS
WARNING:
Only use the accessories that are provided with this product or the accessories approved by
yardworks . Use other accessories might increase the risk of injury. Follow the instructions in this
manual to properly use the accessories.
WARNING:
This product can expose you to chemicals including lead and Di(2-ethylhexyl) phthalate (DEHP)
which are known to the State of California to cause cancer and birth defects or other reproductive
harm. For more information go to www.P65Warnings.ca.gov.
WARNING:
Read all safety warnings and instructions. Failure to follow the warnings and instructions may result
in electric shock, re and/or serious injury.
FOR ALL POWER TOOLS
1) Avoid Dangerous Environment - Don’t use power tools in damp or wet locations.
2) Don’t Use In Rain.
3) Keep Children Away - All visitors should be kept at a distance from work area.
4) Dress Properly - Do not wear loose clothing or jewelry. They can be caught in moving parts. Use of
rubber gloves and substantial footwear is recommended when working outdoors. Wear protective hair
covering to contain long hair.
5) Use Safety Glasses - Always use face or dust mask if operation is dusty.
6) Use Right Appliance - Do not use appliance for any job except that for which it is intended.
7) Don’t grasp the exposed cutting blades or cutting edges when picking up or holding the power tool.
8) Don’t Force power tool - It will do the job better and with less likelihood of a risk of injury at the rate for
which it was designed.
9) Don’t Overreach - Keep proper footing and balance at all times.
10) Stay Alert - Watch what you are doing. Use common sense. Do not operate power tool when you are
tired.
11) Store Idle power tools Indoors - When not in use, power tools should be stored indoors in dry, and high or
locked-up place - out of reach of children.
12) Maintain power tool With Care - Keep cutting edge sharp and clean for best performance and to reduce
the risk of injury. Follow instructions for lubricating and changing accessories.Keep handles dry, clean,
and free from oil and grease.
13) Check Damaged Parts - Before further use of the power tool, a guard or other part that is damaged
should be carefully checked to determine that it will operate properly and perform its intended function.
Check for alignment of moving parts, binding of moving parts, breakage of parts, mounting, and any other
condition that may aect its operation. A guard or other part that is damaged should be properly repaired
or replaced by an authorized service center unless indicated elsewhere in this manual.
FOR ALL BATTERY - OPERATED GARDENING POWER TOOLS
1. Prevent unintentional starting. Ensure the switch is in the o-position before connecting to battery pack,
picking up or carrying the power tool. Do not carry the battery-operated power tool with nger on switch.
Carrying the power tool with your nger on the switch or energizing power tool that have the switch on
invites accidents.
2. Disconnect the battery pack from the power tool before making any adjustments, changing accessories,
or storing power tool. Such preventive safety measures reduce the risk of starting the power tool
accidentally.
3. Recharge only with the charger specied. A charger that is suitable for one type of battery pack may
create a risk of re when used with another battery pack.
4. Use power tools only with specically designated battery packs. Use of any other battery packs may
create a risk of injury and re.
5. When battery pack is not in use, keep it away from other metal objects, like paper clips, coins, keys, nails,
screws or other small metal objects, that can make a connection from one terminal to another. Shorting
the battery terminals together may cause burns or a re.
6. Under abusive conditions, liquid may be ejected from the battery;avoid contact. If contact accidentally
occurs, ush with water. If liquid contacts eyes, additionally seek medical help. Liquid ejected from the

- 05 -
battery may cause irritation or burns
7. Do not use a battery pack or power tool that is damaged or modied. Damaged or modied batteries may
exhibit unpredictable behavior resulting in re, explosion or risk of injury.
8. Do not expose a battery pack or power tool to re or excessive temperature. Exposure to re or
temperature above 266°F may cause explosion.
9. Follow all charging instructions and do not charge the battery pack or power tool outside of the
temperature range specied in the instructions. Charging improperly or at temperatures outside of the
specied range may damage the battery and increase the risk of re.
10. Have servicing performed by a qualied repair person using only identical replacement parts. This will
ensure that the safety of the product is maintained.
11. Do not modify or attempt to repair the power tool or the battery pack (as applicable) except as indicated
in the instructions for use and care.
POLE SAW SAFETY WARNINGS
WARNING:
Do not operate near electrical power lines. The unit has not been designed to provide protection
from electric shock in the event of contact with overhead electric lines. Consult local regulations for
safe distances from overhead electric power lines and ensure that the operating position is safe and
secure before operating the pole saw.
a. Keep all parts of the body away from the saw chain. Make sure the switch is o when clearing jammed
material. Saw chain continues to move after the switch is turned o. A moment of inattention while
operating the pole saw may result in serious personal injury.
b. Carry the pole saw by the handle with the saw chain stopped. When transporting or storing the pole saw,
always t the saw chain cover. Proper handling of the pole saw will reduce possible personal injury from
the saw chain.
c. Hold the pole saw by insulated gripping surfaces only, because the saw chain may contact hidden wiring.
A saw chain contacting a “live” wire may make exposed metal parts of the pole saw “live” and could give
the operator an electric shock.
d. Keep cable away from cutting area. During operation the cable may be hidden in shrubs and can be
accidentally cut by the saw chain.
e. Do not use the pole saw in bad weather conditions, especially when there is a risk of lightning. This
decreases the risk of being struck by lightning.
f. To reduce the risk of electrocution, never use near any electrical power lines. Contact with or use near
power lines may cause serious injury or electric shock resulting in death.
g. Always use two hands when operating the pole saw. Hold the pole saw with both hands to avoid loss of
control.
h. Always use head protection when operating the pole saw overhead. Falling debris can result in serious
personal injury.
SAFETY WARNINGS FOR BATTERY PACK AND CHARGER
1. Do not dismantle, open or shred battery pack.
2. Do not expose battery pack to heat or re. Avoid storage in direct sunlight. The cells may explode. Check
with local codes for possible special disposal instructions.
3. Do not short-circuit a battery pack. Do not store battery packs haphazardly in a box or drawer where they
may short-circuit each other or be short-circuited by other metal objects. When battery pack is not in use,
keep it away from other metal objects, like paper clips, coins, keys, nails, screws or other small metal
objects, that can make a connection from one terminal to another. Shorting the battery terminals together
may cause burns or re.
4. Do not subject battery pack to mechanical shock.
5. Observe the plus (+) and minus (–) marks on the battery back and equipment and ensure correct use.
6. Keep battery pack out of the reach of children.
7. Always purchase the battery pack recommended by the device manufacturer for the equipment.
8. Keep battery pack clean and dry.
9. Wipe the battery pack terminals with a clean dry cloth if they become dirty.
10. Battery pack need to be charged before use. Always use the correct charger and refer to the
manufacturer’s instructions or equipment manual for proper charging instructions.
11. Do not leave battery pack on prolonged charge when not in use.
12. After extended periods of storage, it may be necessary to charge and discharge the battery pack several
times to obtain maximum performance.
13. Battery pack gives its best performance when it is operated at normal room temperature (68 F° ± 41F°).

- 06 -
14. Use only the battery pack in the application for which it was intended.
15. Remove the battery pack from the equipment when not in use.
16. Dispose of properly.
17. Do not handle the charger, including charger plug, or charger terminals with wet hands.
18. Do not charge the battery pack outdoors, in rain, or in wet locations.
Save these instructions. Refer to them frequently and use them to instruct others who may use this
tool. If you lend this tool to someone else, also lend these instructions to them to prevent misuse of
the product and possible injury.
- 07 -
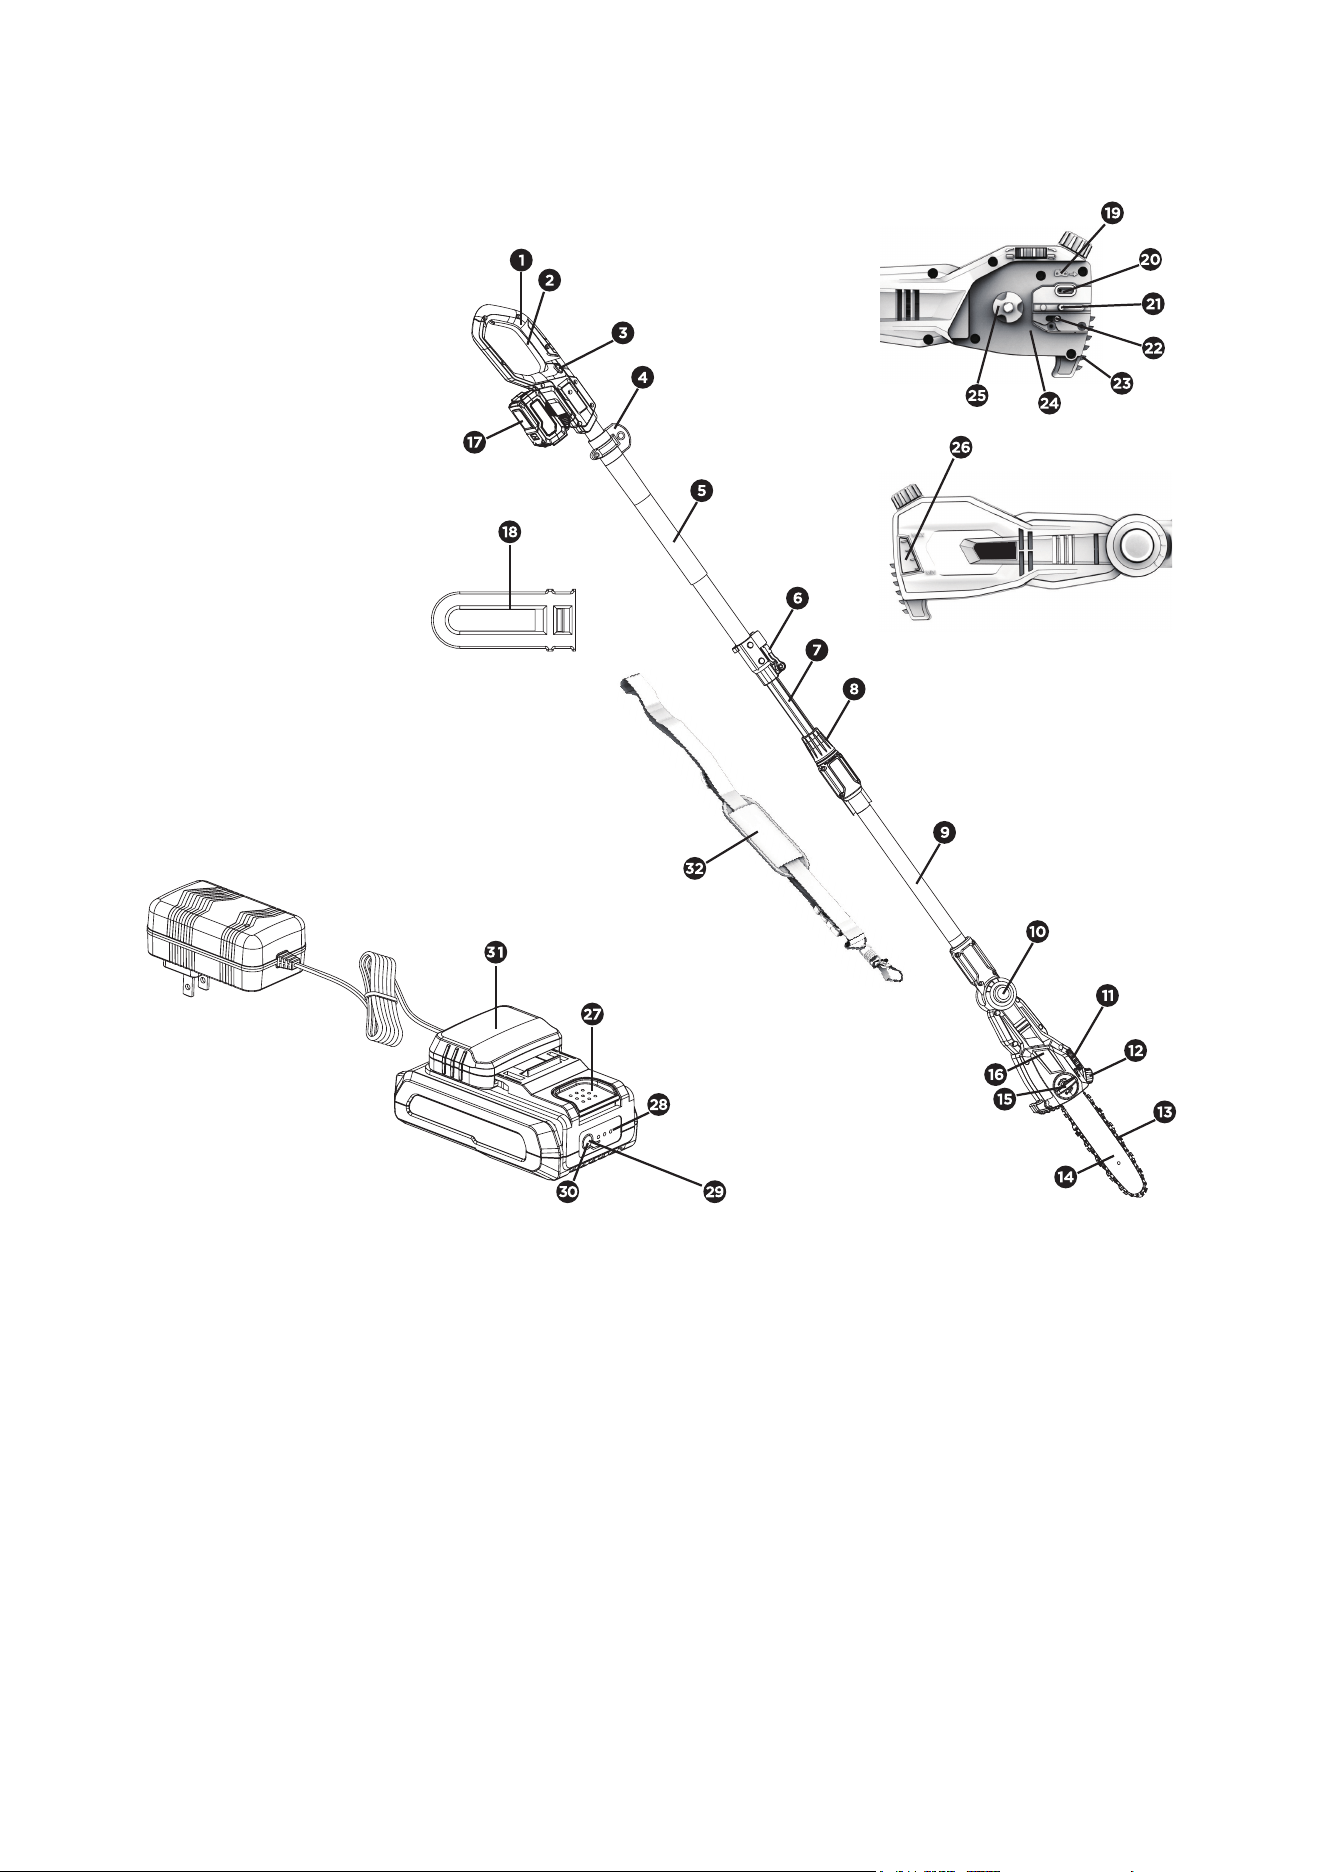
KNOW YOUR TOOL
1. Rear handle
2. Lock o button
3. On/o switch
4. Shoulder strap seating bracket
5. Soft grip area/lower shaft
6. Extension pole clamping lever
7. Extension pole
8. Shaft locking sleeve
9. Upper shaft
10. Saw head adjustment knob
11. Chain tensioning knob
12. Oiler cap
13. Saw chain
14. Guide bar
15. Chain cover locking knob
16. Chain cover
17. Battery pack
18. Bar and chain sheath
19. Chain direction symbol
20. Oil outlet
21. Fastening bar bolt
22. Tension pin
23. Bumper spike
24. Bar pad
25. Drive sprocket
26. Oil level window
27. Battery pack release button
28. Battery power indicator light
29. Battery power button
30. Charging indicator light
31. Charger
32. Shoulder strap
33. Bar tensioning plate (Fig. 6)

- 08 -
SKU No.
Model No.
Voltage
No-load motor speed
Bar length
Chain speed
Oiler capacity
Chain pitch
Number of chain drive links
Chain gauge
Cutting
2.0 Ah Battery (D01104300 / D01102700)
1.5 A Charger (D02204100 / ECA000137-001)
Bar
Chain
Bar and chain sheath
Shoulder strap
2391575
EGT050004
20V D.C.
19000/min
8”
14.7f/s
65ml
3/8”
33
0.05”
Up to 30 Cuts Per Charger (Full 2.0AH to cut Dia
2.3" Wood) .
1pc
1pc
1pc
1pc
1pc
1pc
ACCESSORIES
TECHNICAL DATA
Battery pack
Charger
Charger Rating
Charging Time (Approx.)
2.0 Ah (D01104300 / D01102700)
1.5 A (D02204100 / ECA000137-001)
Input: 120V~60Hz
Output: 20V, 1.5A
120mins
- 09 -
LED Indicator
3 lights on
2 lights on
1 light on
1 light ashing
Battery Charge Level/Working Conditions
70%<Charge Level≤100%
40%<Charge Level≤70%
10%<Charge Level≤40%
Charge level ≤10%
CHARGING YOUR BATTERY
BATTERY INDICATOR
The battery pack is equipped with a push button for checking the charge level. Simply press the push button
to read o the battery charge level from the LEDs of the battery indicator:
CHARGING YOUR BATTERY
WARNING:
Do not use the charger outdoors or expose it to wet or damp conditions. Water
entering the charger will increase the risk of electric shock.
NOTICE:
Lithium-Ion battery packs are shipped partially charged. Before using it the rst time, fully charge
the battery pack.
NOTICE:
You can charge two batteries at the same time with the charger provided.
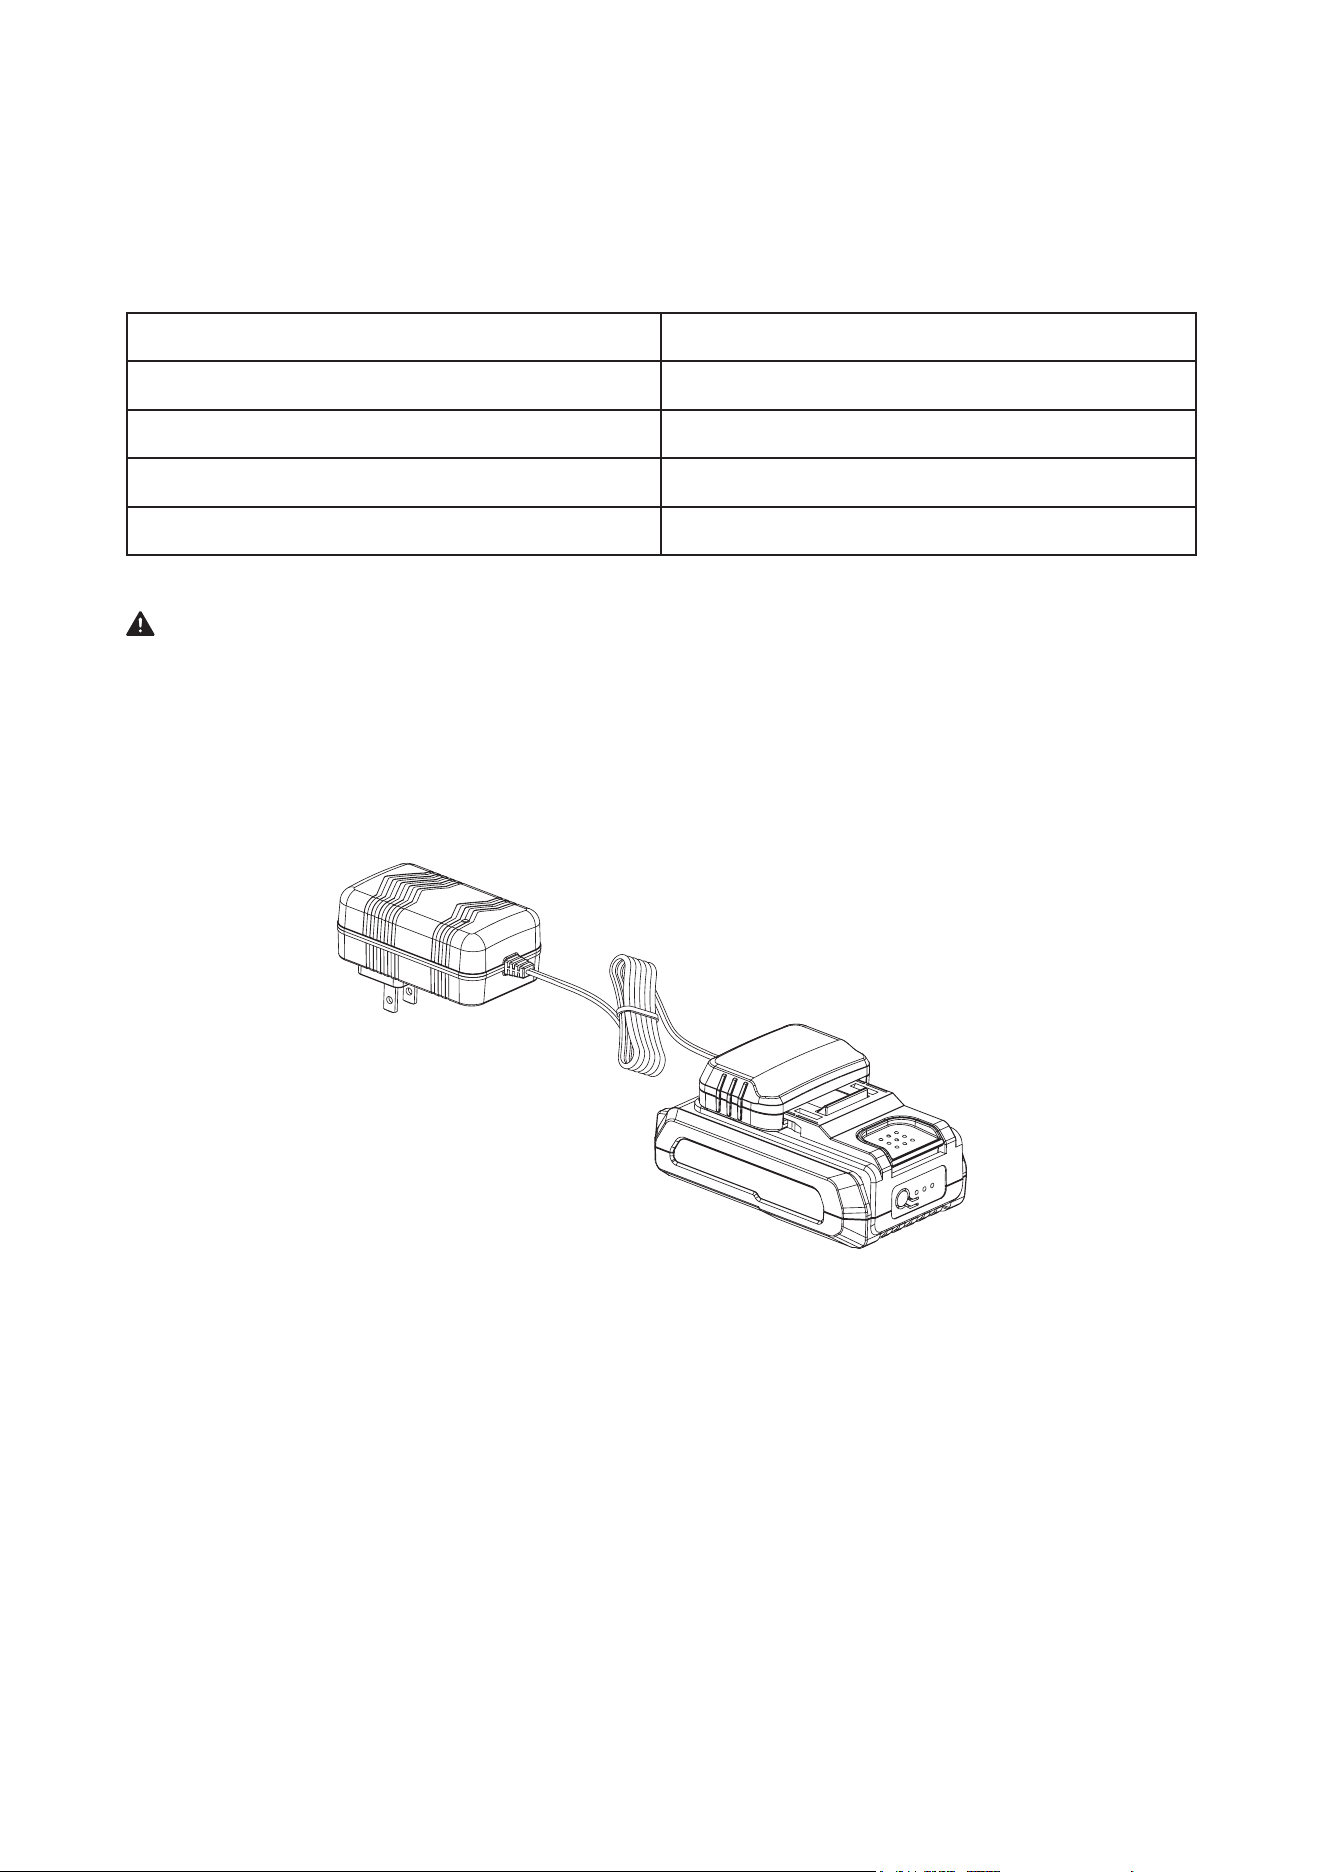
a. Connect the charger to the power supply (120V~60Hz). The red charging indication LED will shine,
indicating that the charger is working correctly.
b. Align the raised ribs of the battery pack with the battery-mounting slots in the char- ger; slide the battery
pack down onto the charger.
c. When the battery is inserted properly, the green light will slowly ash to indicate that the battery is
charging. The red light will turn o.
d. When the green light stays on, the battery is fully charged.
NOTICE:
● The battery pack will fully charge if left on the charger, but it will not over-charge. If the battery pack
remains on the charger for one month or more, it will drop to lower charge capacity. If this occurs, re-
install the battery pack on the charger to recharge it fully.
● A signicantly reduced run time after fully charging the battery pack indicates that the batteries are near
the end of their usable life and must be replaced.
● The charger may warm during charging. This is part of the normal operation of the charger. Charge in a
well-ventilated area.
- 10 -
Possible Reason
No load charging –There’s no battery inserted in the charger.
Indication
• Red Light – O
• Green Light – On
• Red Light – On
• Green Light – O
• Red Light – O
• Green Light – On
CHARGER LED INDICATOR TABLE
Use the table below to determine charger light patterns and possible causes. For all other issues, please ask
the helpline for help.
ASSEMBLY
WARNING:
To prevent accidental starting that could cause
serious personal injury, always remove the battery
pack from the tool when assembling parts.
WARNING:
Do not attempt to modify this tool or create
accessories not recommended for use with this
tool. Any such alteration or modification is misuse
and could result in a hazardous condition leading to
serious injury.
WARNING:
Do not attempt to start the tool before it has been
completely assembled.
WARNING:
Always wear heavy-duty work gloves when handling
the saw chain.
UNPACKING
◆
This product requires assembly.
◆
Remove all the items from the carton. Make sure
that all items listed in the parts list are included.
◆
Inspect the product carefully to make sure that no
breakage or damage occurred during shipping.
◆
Do not discard the packing material until you
have carefully inspected and satisfactorily
operated the tool.
◆
If any parts are damaged or missing, please
return the tool to the place of purchase.
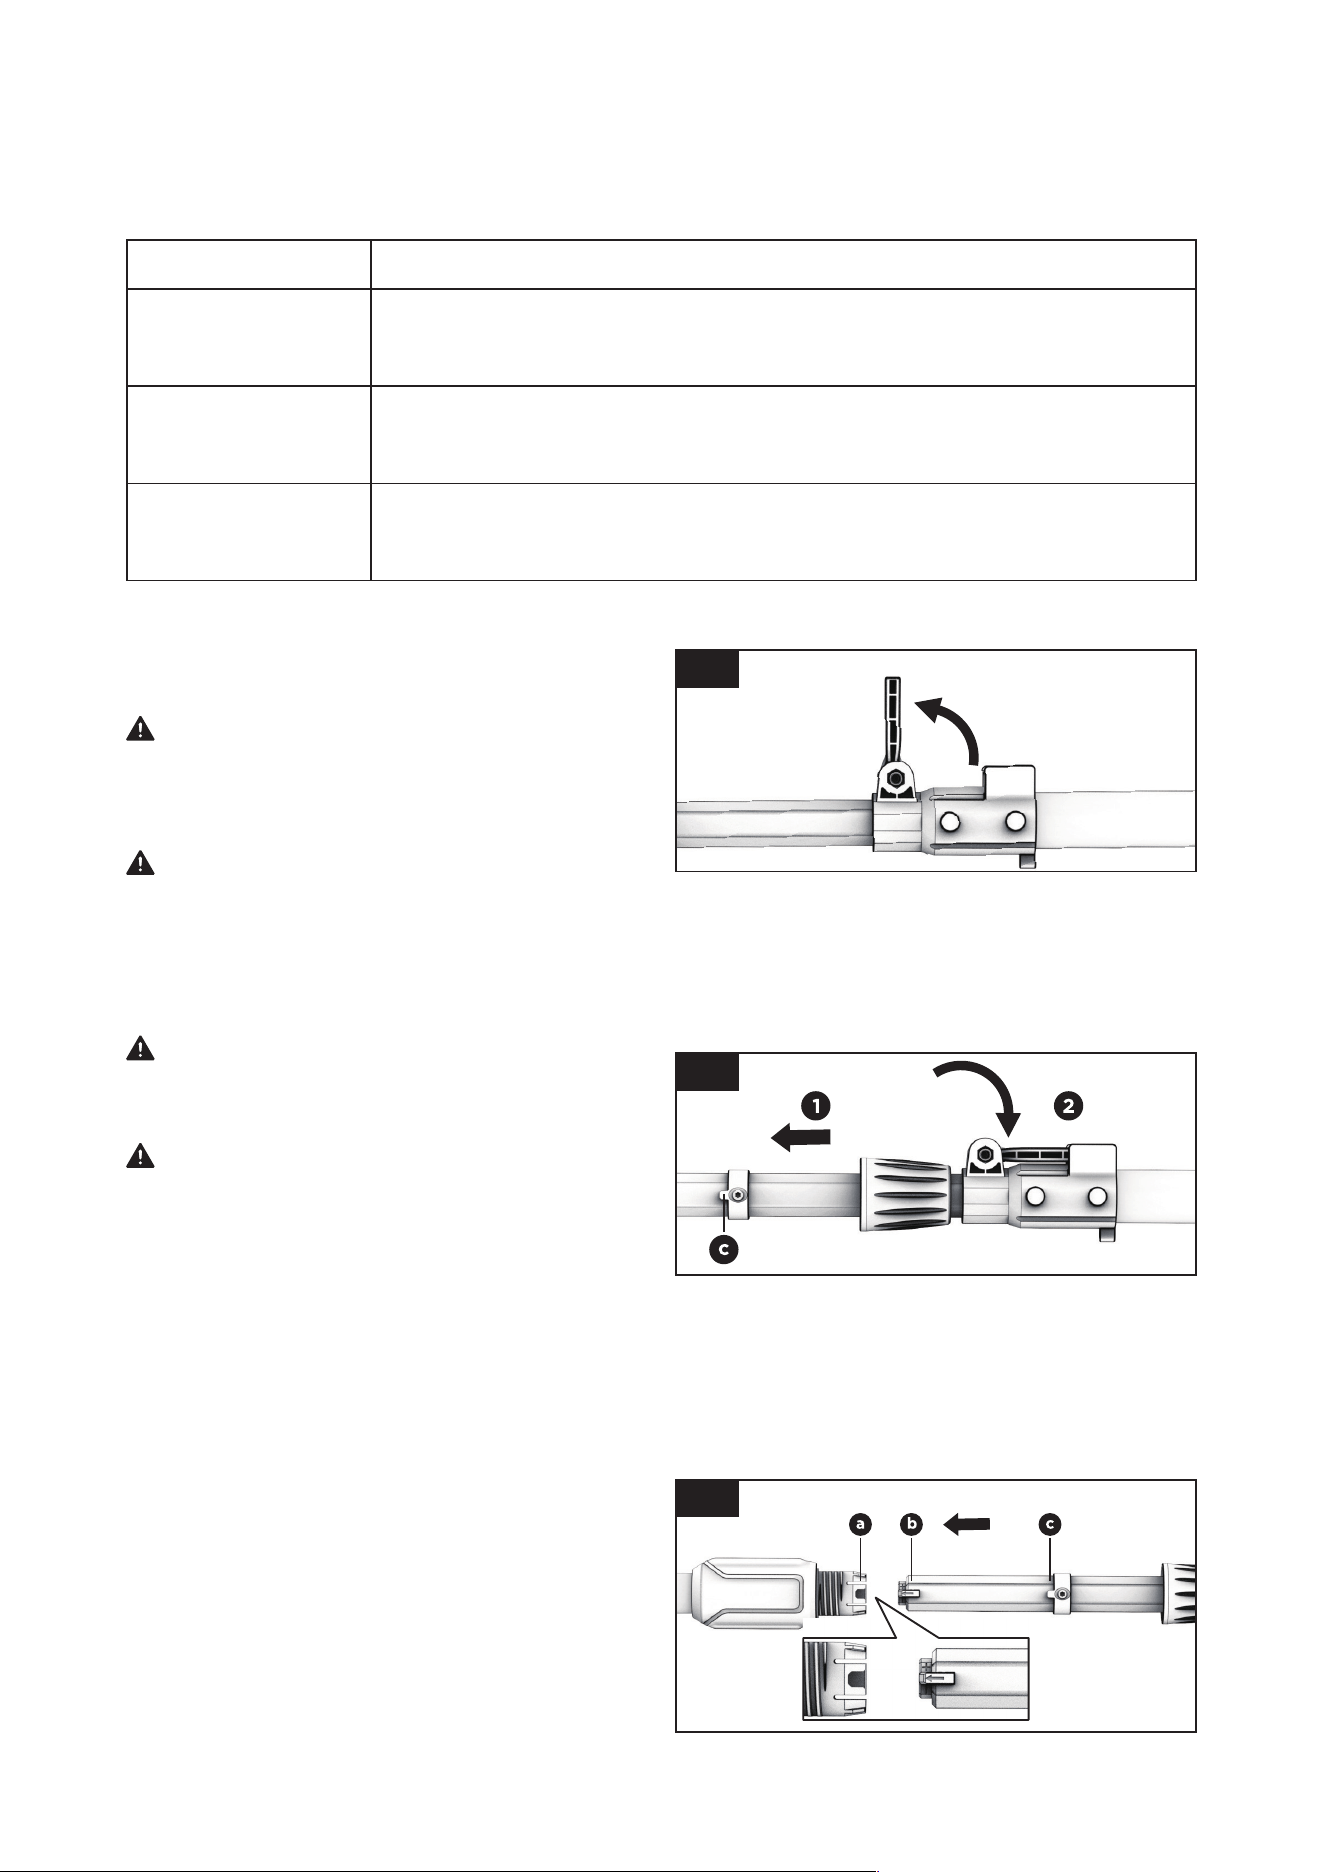
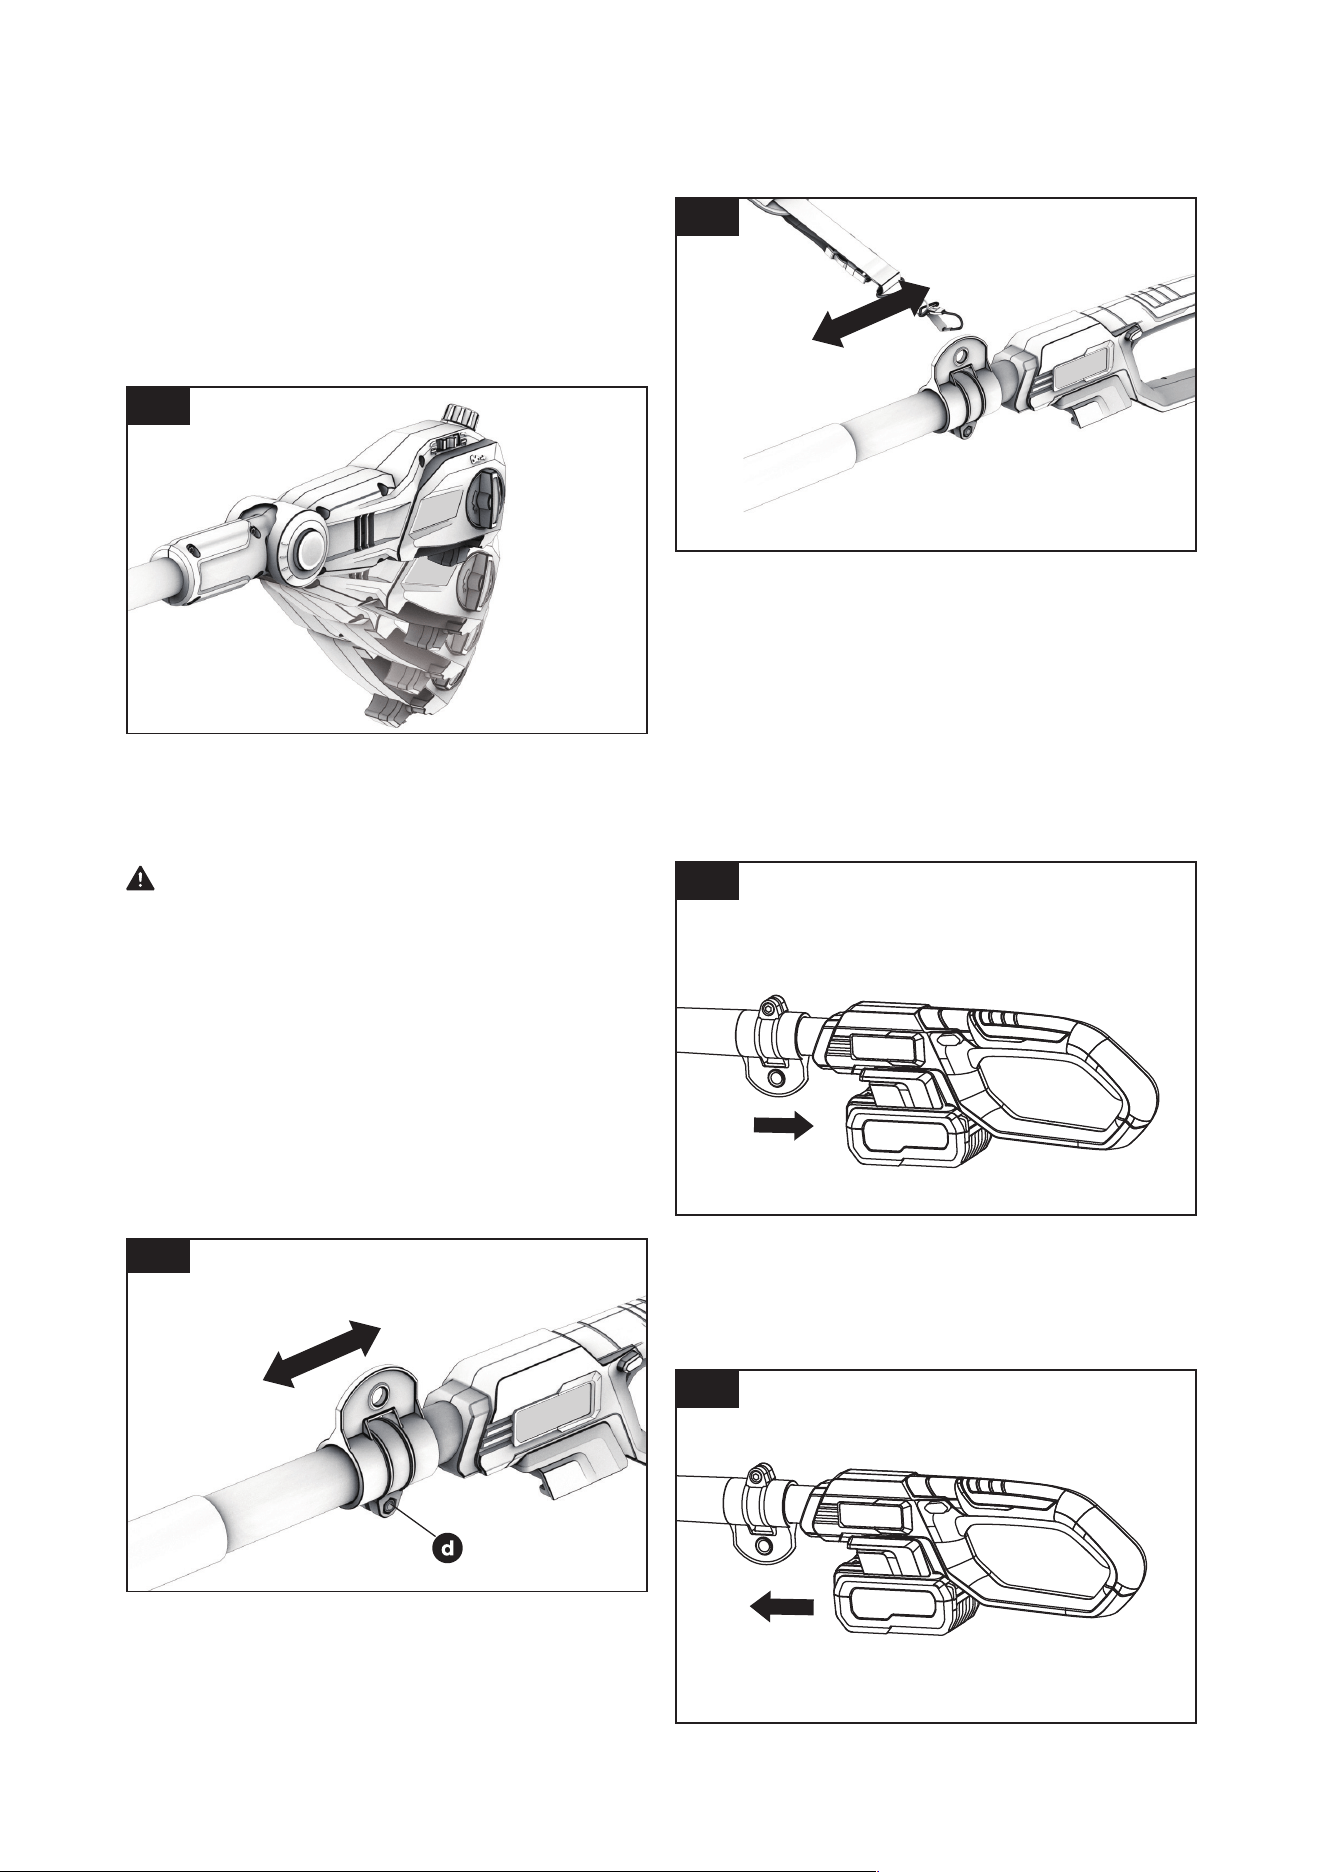
CONNECTING THE SHAFTS
1. Place the lower shaft (with handle) and the
upper shaft (with saw head) on a solid, level
surface. Open the extension pole clamping lever
positioned on lower shaft to loosen the extension
pole.
(Fig. 1)
2. Pull the inner extension pole out in order to
expose the raised small square (c) as shown in
(Fig. 2)
. Close the extension pole clamping lever
to lock the extension pole in place to prevent the
extension pole from moving while assembling.
3. Align the upper shaft with the lower shaft by
lining up the notch (a), the raised rectangle with
an arrow (b) and raised small square (c) in a
straight line.
(Fig. 3)
Then insert the lower shaft
(with handle) into the upper shaft (with saw
head) to the end.
3
2
Normal charging – The battery is being charged.
Fully charged – The battery is fully charged and the charging process is nished.
1

- 11 -
4. Firmly rotate the shaft locking sleeve clockwise
until the shafts are locked in place.
(Fig. 4)
NOTICE: After assembly, try to pull the two
shafts apart to ensure the shafts are connected
rmly. Make sure the shafts are locked in place
securely before operation.
5. To disconnect the shafts, rotate the shaft locking
sleeve counter-clockwise to loosen, and pull the
lower shaft (with handle) out from the upper shaft
(with saw head).
BAR AND CHAIN ASSEMBLY
NOTICE: Before rst use: Soak saw chain in bar
and chain oil (not included) overnight.
6. Place the pole saw on a suitable at surface with
the chain cover facing upwards. Remove the
chain cover by turning the chain cover locking
knob in a counterclockwise direction.
(Fig. 5)
a. Use only the listed or recommended chain and
bar for assembly.
b. Slide the chain in the slot around the guide bar.
Ensure the chain is in correct running direction
by comparing it to the chain icon on the guide
bar, or referring to the chain direction symbol
found on the bar pad. Ensure the bar tensioning
plate is facing outward.
(Fig. 6)
c. Fit the chain onto the drive sprocket, and make
sure the fastening bar bolt on the bar pad t into
the keyway of the opening on the guide bar, and
the tension pin on the bar pad t into the lower
oil hole (A) on the guide bar.
(Fig. 7, 8)
d. Assure all parts are seated properly and hold
chain and guide bar in a level position. Make
sure the drive links are fully seated in the drive
sprocket
(Fig. 9)
, avoiding a kink as shown in
Fig. 10. If kink occurs, pick up on the chain at the
guide bar just ahead of the kink and then pull the
kink out.
NOTICE: Chain should rotate freely and be free
of kinks.
4
5
6
7
- 12 -
e. Fit the chain cover and tighten the chain cover by
turning the chain cover locking knob clockwise
until it is tight.
(Fig. 11)
WARNING:
The chain is not yet tensioned. Tensioning the
chain applies as described under “TENSIONING
CHAIN”. The chain now needs to be checked for
tension rst.
CHECKING SAW CHAIN TENSION
WARNING:
Removing the battery pack before checking
chain tension.
1. While wearing heavy-duty gloves, use your index
nger and thumb to carefully grab the saw chain
in the middle section under the guide bar.
2. Pull the chain away from the guide bar.
(Fig. 12)
3. The chain should snap back against the guide
bar. The chain should t snugly in the groove of
the guide bar, yet you should still be able to slide
the chain along the guide bar by hand.
4. There should be no sagging between the guide
bar and chain on the underside of the guide bar.
4. Fully tighten the chain cover locking knob by
turning it clockwise.
5. Double check the tension following the steps
above in chapter CHECKING SAW CHAIN
TENSION.
NOTICE: The chain is properly tensioned if the
drive link/links remain within the rail of the guide
bar while the chain is pulled away from the guide
bar.
TENSIONING CHAIN
NOTICE:
New saw chains will stretch. Check the chain tension
frequently when first used and tighten when the
chain becomes loose around the guide bar.
WARNING:
● Removing the battery pack before adjusting
saw chain tension.
● Cutting edges on chain are sharp. Use pro-
tective gloves when handling chain.
● Maintain proper chain tension always. A
loose chain will increase the risk of kickback.
A loose chain may jump out of guide bar
groove. This may injure operator and damage
bar. A loose chain will cause chain, bar, and
sprocket to wear rapidly.
1. Place the pole saw on any suitable at surface.
2. Loosen the chain cover locking knob by turning it
counter-clockwise.
3. Scroll the chain tensioning knob to the left to
increase chain tension. If you need to decrease
the chain tension, scroll the chain tensioning
knob to the right.
(Fig. 13)
9
10
11
12
13
- 13 -
NOTICE: The chain will stretch while cutting and
lose proper tension. Always pay attention to the
chain tension while working.
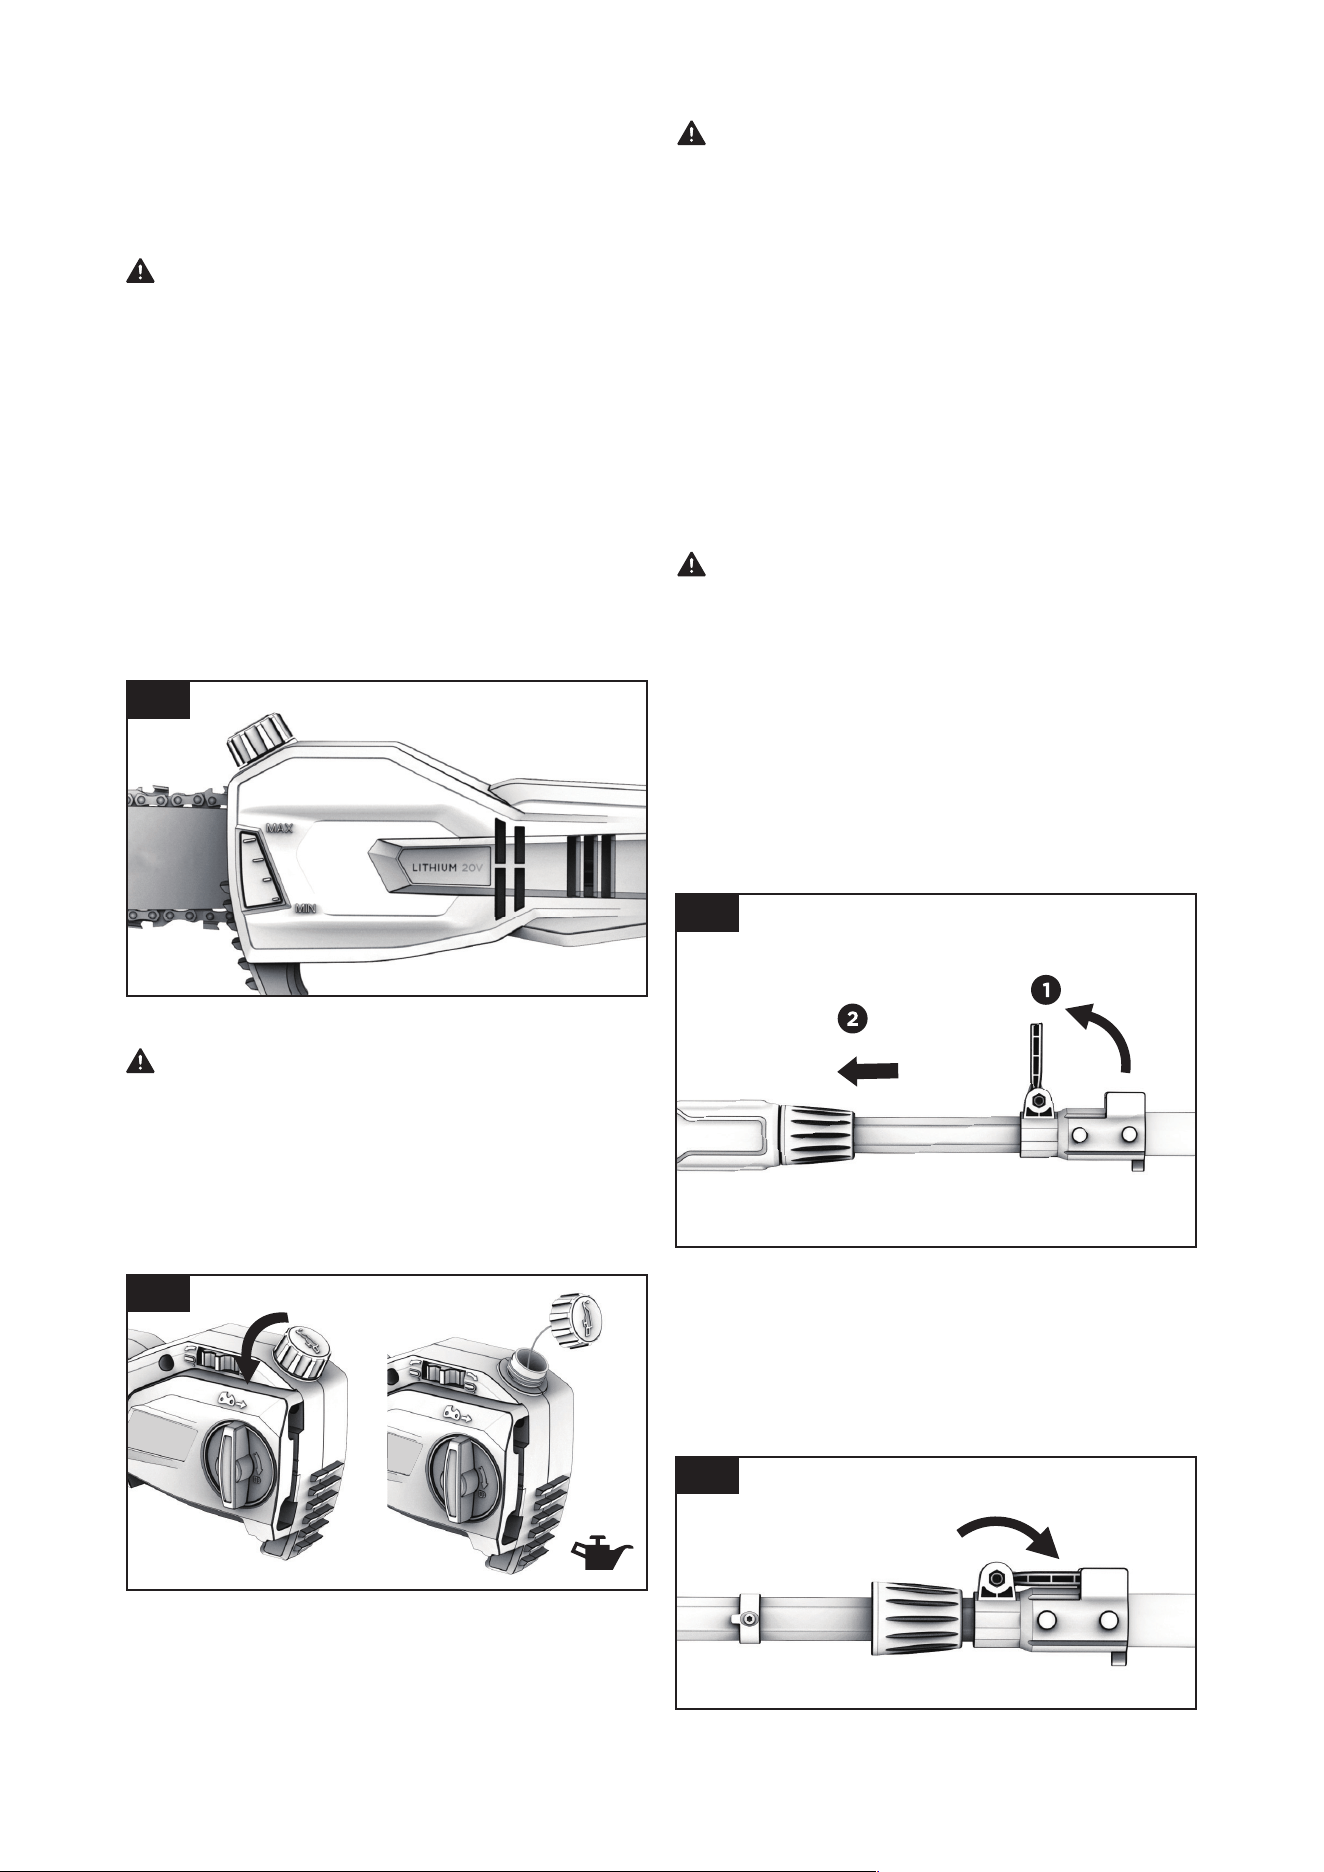
LUBRICATION
WARNING: The pole saw is not lled with oil.
It is essential to ll with oil before use. Never
operate the pole saw without chain oil or at an
empty oiler level, as this will result in extensive
damage to the product.
NOTICE: Chain life and cutting capacity depend
on optimum lubrication. Fill the oiler with proper
amount of oil before each use, and the oiler will
automatically oil the chain.
CHECKING OIL LEVEL
Check the oil level from the oil level window prior to
each starting and regularly during operation.
(Fig.
14)
You should ll the oiler when the oil level reaches
MIN mark.
FILLING OILER
WARNING: Removing the battery pack before
lling the oiler.
1. Set pole saw on any suitable surface with oiler
cap facing upward.
2. Clean area around the oiler cap with cloth and
unscrew the cap by turning it counter-clockwise.
(Fig. 15)
3. Add bar and chain oil until oiler is full.
WARNING: To allow venting of the oiler, small
breather channels are provided between the oiler
cap and the strainer, to prevent leakage, and en-
sure machine is left in a horizontal position when
not in use.
It is important to use only the recommended
standard bar and chain oil to avoid damage to
the pole saw. This can be found at the location
where you purchased this saw or your local
hardware store. Never use recycled/old oil. Use
of non approved oil will void the warranty.
Do not swallow. If swallowed, call a physician
immediately. Keep out of reach of children. Store
away from heat or open ame.
ADJUSTING THE POLE LENGTH
WARNING: ALWAYS stop the machine and
remove the battery pack before making any ad-
justment.
You can adjust the pole length according to your
working situation. This pole saw has a telescoping
extension pole assembled inside that can be
extended from 83 inches (fully retracted) to 102
inches (fully extended).
1. With the pole saw parallel to the ground, open
the extension pole clamping lever to loosen the
extension pole. Pull the inner extension pole out.
(Fig. 16)
14
16
2. Adjust the extension pole to a suitable length
as required. Close the extension pole clamping
lever to secure the extension pole in place.
(Fig.
17)
NOTICE: Only extend pole to minimum length
required to reach branch that is being cut.
4. Avoid dirt or debris entering oiler, ret the oiler
cap and tighten by turning clockwise until hand
tight.
17
15
- 14 -
ADJUSTING THE HEAD ANGLE
The saw head of this pole saw can be adjusted to
4 different angles: -45°, -22.5°, 0°, 22.5° for your
choice.
Depress the saw head adjustment knob located at
both sides on the saw head to loosen the saw head.
Then you can rotate the saw head to your desired
position.
(Fig. 18)
Release the saw head adjustment
knob when the saw head is set to the required angle.
NOTICE:
Failure to properly secure the pole saw
head may result in personal injury and/or property
damage.
WARNING: Always ensure the saw head is
securely locked! Do not attempt to use the pole
saw with the head in any other position or un-
locked!
ATTACHING THE SHOULDER STRAP
For ecient, comfortable and safe work, the shoulder
strap is necessary to be attached on the pole saw.
1. Change the location of the shoulder strap seating
bracket if required. Loosen the hex bolt (d) and
move the shoulder strap seating bracket to a
suitable position. Re-tighten the hex bolt (d).
(Fig.
19)
2. Clip the shoulder strap onto the hole of the
shoulder strap seating bracket.
(Fig. 20)
INSTALLING OR REMOVING THE
BATTERY PACK
To install:
Slide the battery pack into the port in front of the
handle. Push to the end with a sucient force until
the battery pack clicks to lock in place.
(Fig. 21)
NOTICE: The battery can only be installed in one
way.
To remove:
Depress the battery pack release buttons at both
side and hold them, then pull the battery pack out
from the port.
(Fig. 22)
18
19
20
21
22
- 15 -
OPERATION
WARNING: Do not allow familiarity with this
product to make you careless. Remember that
a careless fraction of a second is sucient to
inict serious injury.
WARNING: Do not use any attachments or
accessories not recommended by the manufac-
turer of this product. The use of attachments
or accessories not recommended can result in
serious personal injury.
WARNING:
● Wear necessary personal protective equip-
ment (PPE) such as ANSI-approved safety
goggles, head protection and steel-toed
boots during use.
● Avoid kickback. Do not touch guide bar tip to
any object. Tip contact may cause guide bar
to move suddenly upward and backward.
● NEVER operate the pole saw with one hand.
ALWAYS hold the pole saw with both hands.
Do not stand directly under branch being cut.
● Only stand on xed, secure and level surface.
Do not stand on a ladder or other support.
● Do not operate within 50 feet of electrical
lines.
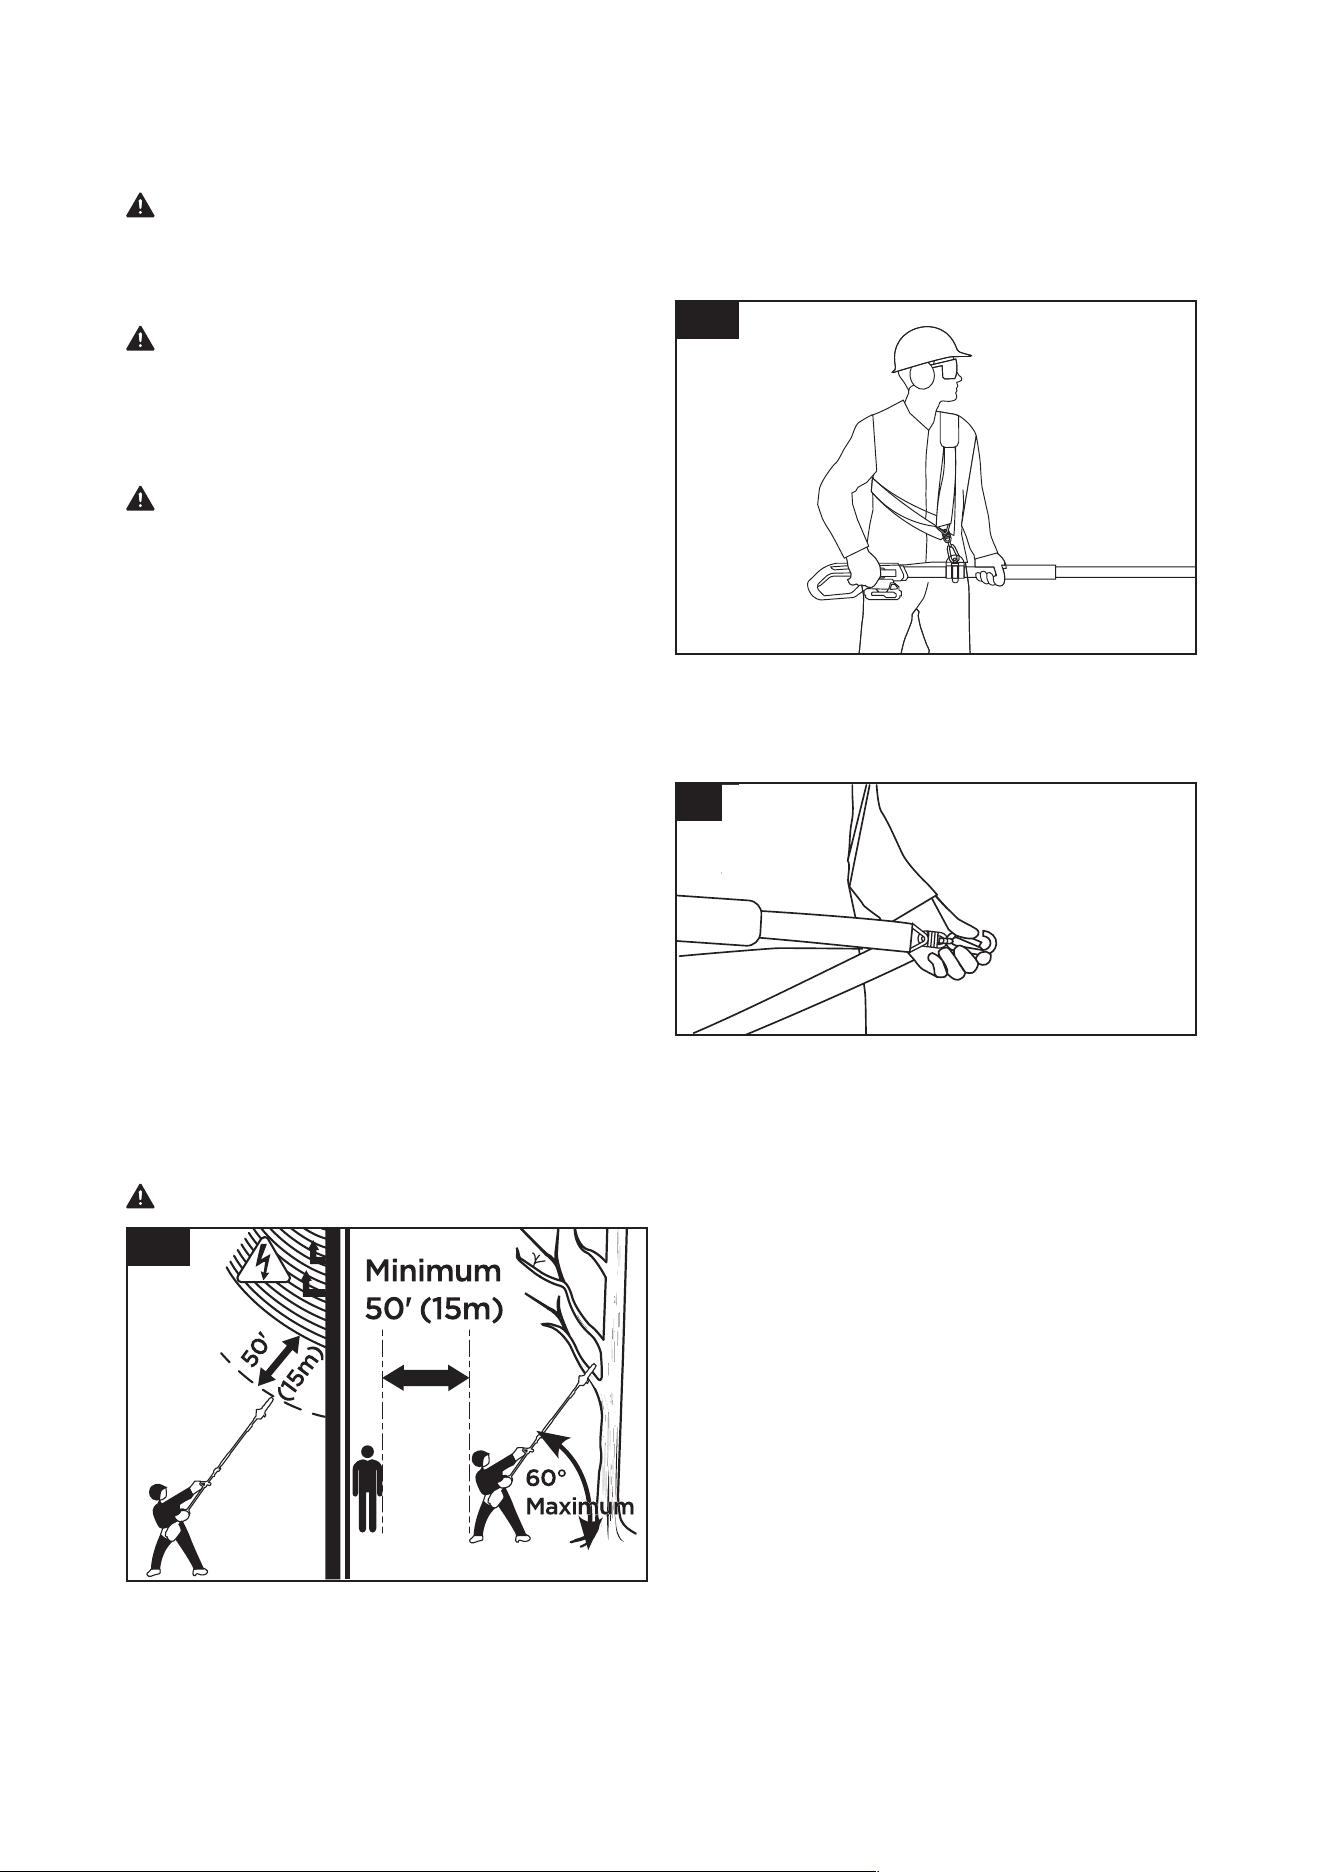
HOLDING THE POLE SAW
Balance your weight with both feet on solid
ground. Your body should always be to the left of
the chain line. Firmly grip the pole saw with both
hands at all times during operation, one hand to
grip the rear handle tightly and the other hand to
grip the soft grip area on the lower shaft. Always
hold the pole saw at an angle of max. 60° from
the horizontal level.
(Fig. 23)
WARNING: Do not over reach.
USING THE SHOULDER STRAP
The shoulder strap helps to balance the pole saw
and distribute the weight of the pole saw across the
body, increasing comfort for extended use.
23
Attaching the shoulder strap correctly before starting
the pole saw.
● Wear the shoulder strap over the head and the
shoulder opposite the hand holding on/o switch.
● Adjust the shoulder strap length so that the clip
is about the same height as the hip
(Fig. 24).
24
● This shoulder strap is equipped with a quick-
release mechanism that can be operated with
one hand.
(Fig. 25)
25
STARTING/STOPPING THE POLE SAW
Before every use:
a. Check oil level, add oil as necessary.
b. Run the pole saw for several minutes.
c. Stop motor and remove battery pack. Let the
chain cool, then check the chain tension and
adjust chain tension as necessary.
d. Make sure saw chain is sharp and the automatic
oiler is distributing oil.
During every use:
a. Check tension often during the rst half hour of
use and periodically during use. Adjust chain
tension as necessary.
b. Check oil level every 10 minutes of use. Fill oiler
when oil level reaches MIN mark.
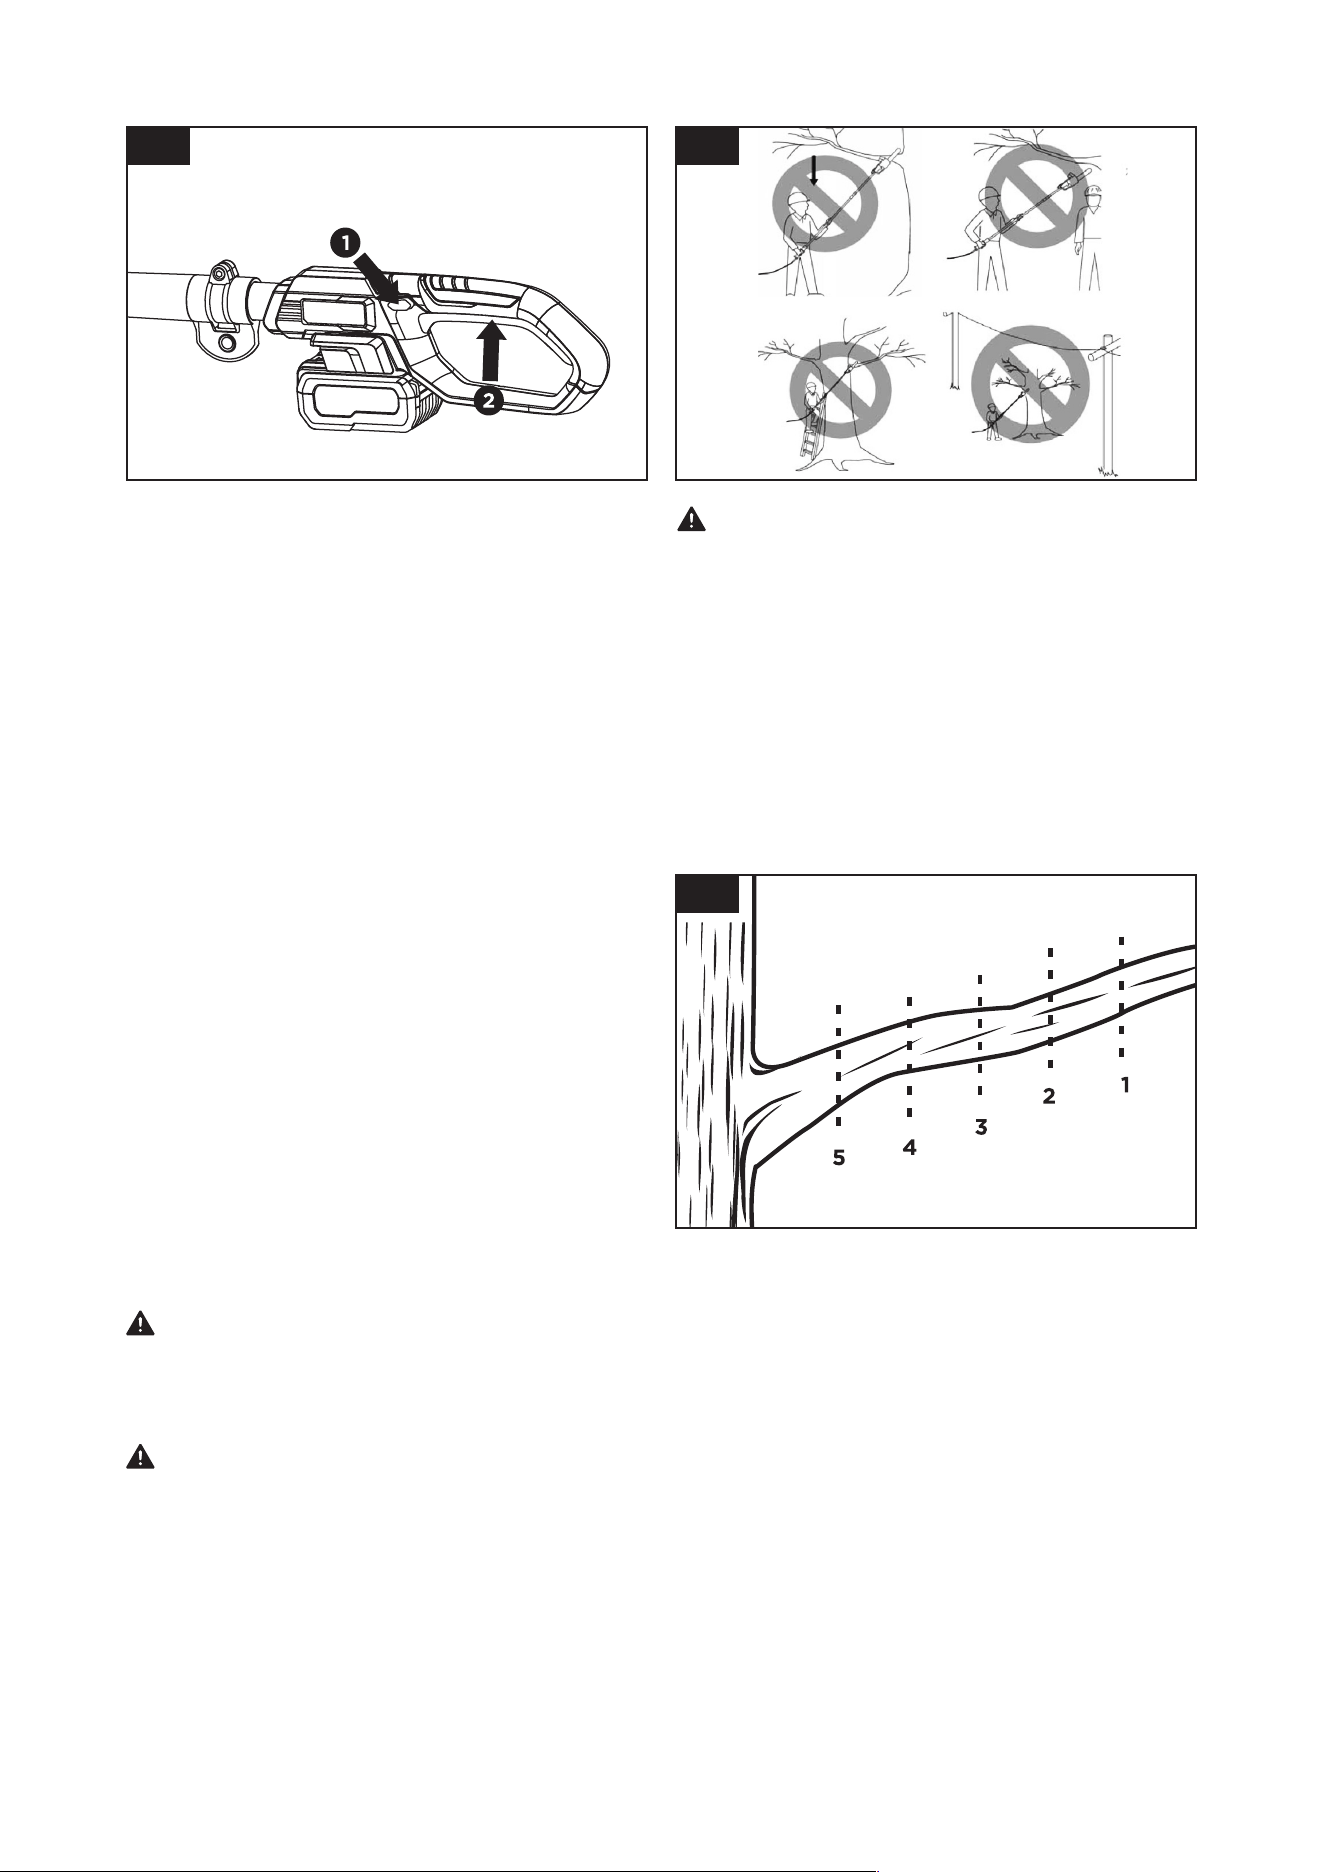
To start the pole saw:
Depress the lock-o button, then fully press the
on/o switch and hold in this position. With the
pole saw running, the lock-o button can be
released.
(Fig. 26)
- 16 -
To stop the pole saw:
For switching o, release the on/o switch.
STARTING CUTTING
1. Install the battery pack and ll the oiler. Use both
hands to rmly grip the pole saw and divide your
weight evenly with both feet on solid ground.
2. Start the pole saw. Make sure saw is running at
full speed before starting a cut.
3. Cut lower branches rst to allow the top branches
more room to fall.
4. When starting a cut, place moving chain against
wood. Hold the pole saw rmly in place to
avoid possible bouncing or skating (sideways
movement) of saw.
5. Guide the pole saw using light pressure. Do not
force the pole saw. The motor will overload and
can burn out. It will do the job better and safer at
the rate for which it was intended.
6. Use caution when reaching end of cut. The pole
saw/s weight may change unexpectedly as it
cuts free from the wood. Remove the pole saw
from a cut with saw running at full speed. Stop
the pole saw by releasing on/o switch. Make
sure chain has stopped before setting the pole
saw down.
7. Keep practicing on scrap logs in a secure
working area until you are comfortable, using a
uid motion and a steady cutting rate.
WARNING: To prevent serious injury, if
branch starts to fall, causing the saw to bind,
leave the saw and get away from where the saw
and branch are likely to fall immediately.
WARNING: Do not stand directly below a
branch being cut. Keep bystanders far away,
especially children. Do not stand on a ladder or
other type of unstable support while using the
tool. Do not use the tool near cable, electrical
power or telephone lines. Keep 50ft (15m) away
from all power lines. (Fig. 27)
WARNING: Do not operate the pole saw with
arms fully extended or attempt to saw in areas
which are dicult to reach.
CUTTING THIN BRANCHES
Thin branches can be cut off with a single cut. To
prevent the branch from slivering and buckling, cut
the branch o in several pieces.
CUTTING LONG BRANCHES (Fig. 28)
1. Make rst cut 4” to 6” from end of branch.
2. Make next cuts 4” to 6” from the previous cuts,
working toward the trunk.
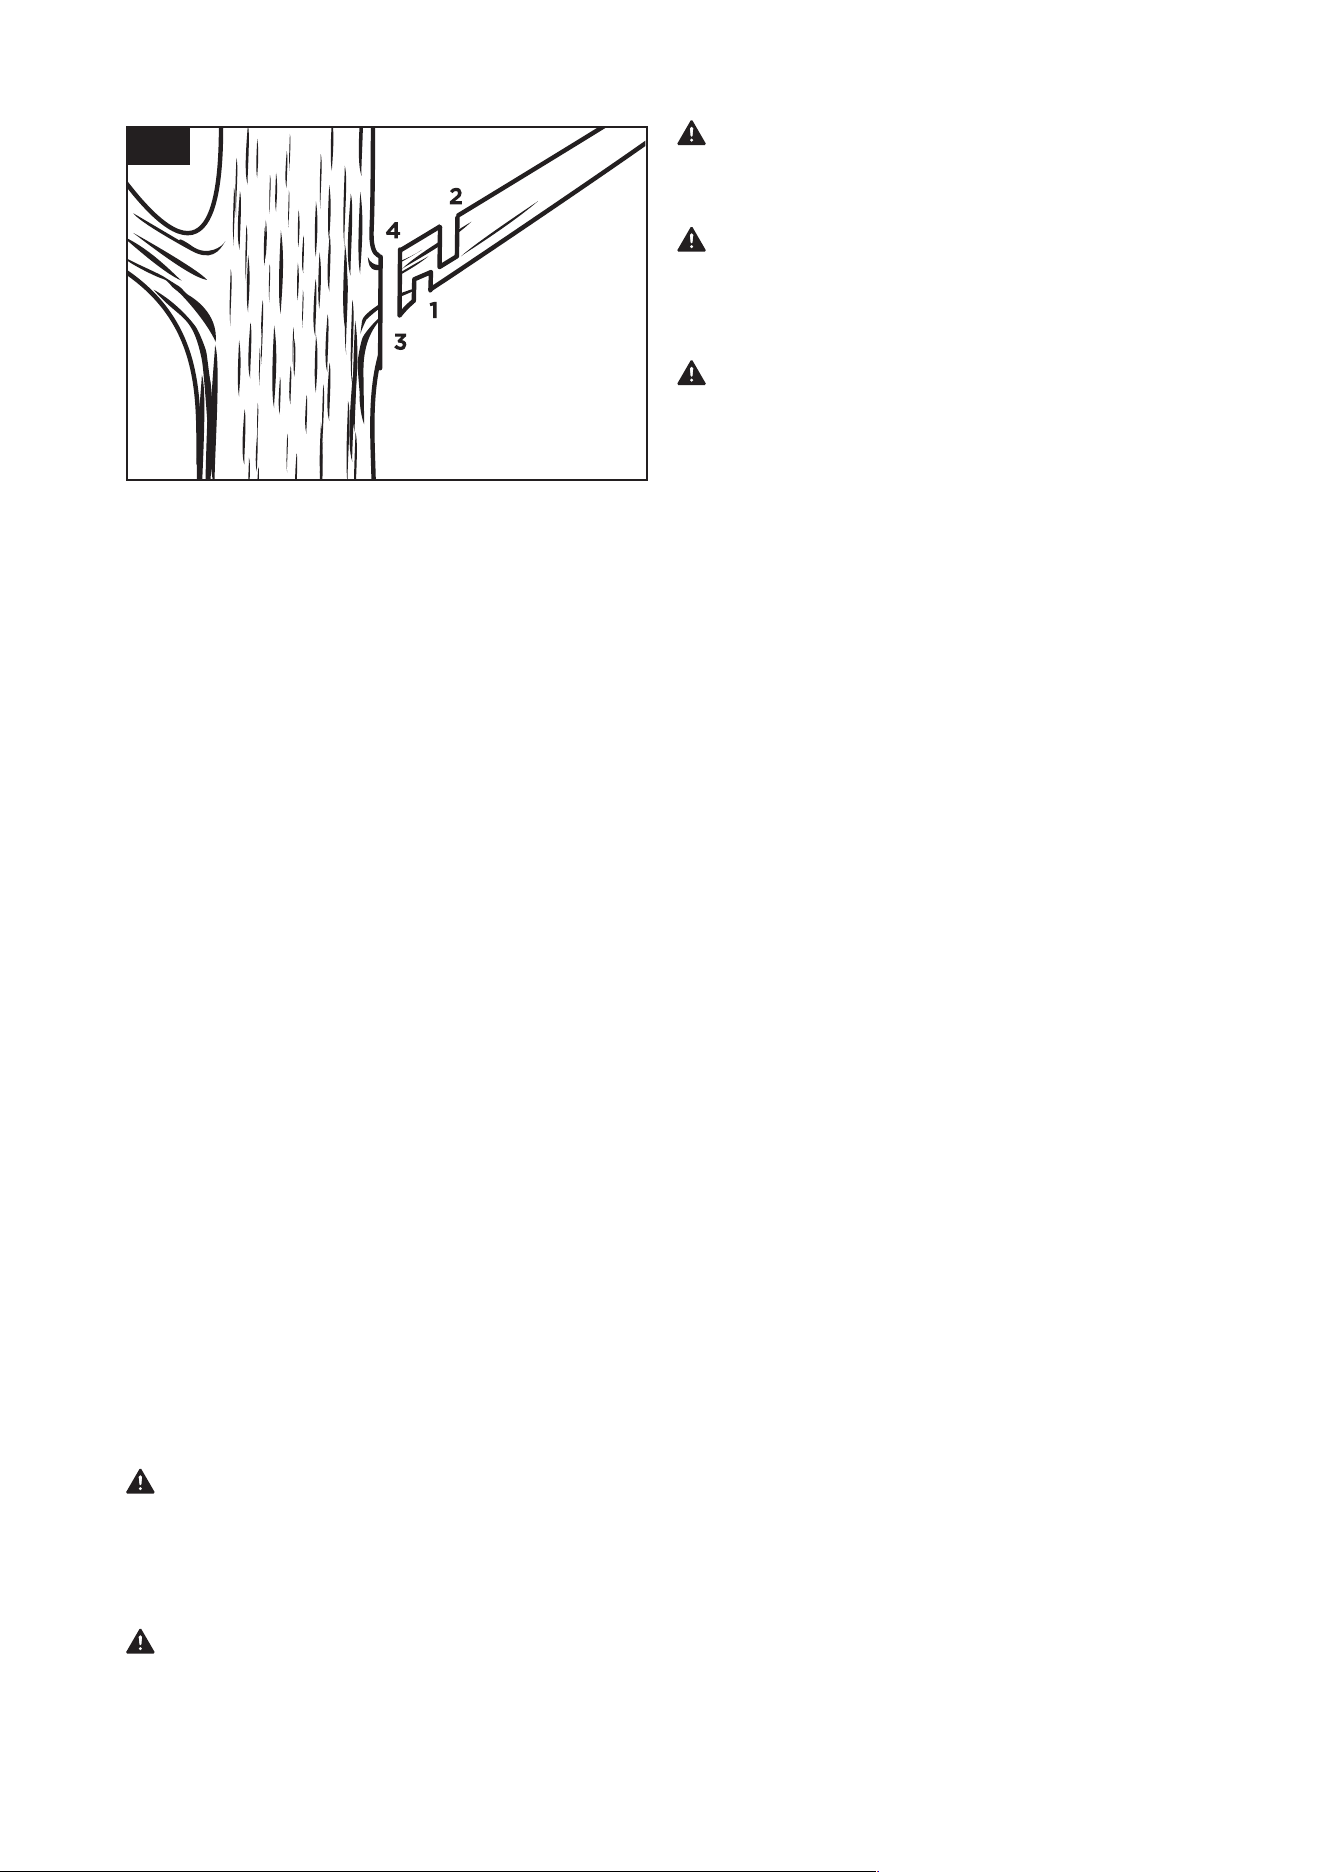
CUTTING THICK BRANCHES (Fig. 29)
While cutting thick branches, make sure your footing
is rm. Keep feet apart. Divide your weight evenly on
both feet. Follow directions below.
1. Make Cut 1 six inches from tree trunk on
underside of limb. Use top of guide bar to make
this cut. Cut 1/3 through diameter of branch.
2. Move two to four inches away from Cut 1. Make
Cut 2 from the top. Continue to cut until you cut
the branch o.
3. Make Cut 3 as close to tree trunk as possible on
underside of limb stub. Use top of guide bar to
make this cut. Cut 1/3 through diameter of stub.
4. Make Cut 4 directly above third cut. Cut down to
meet third cut. This will remove limb stub.
27
28
26
- 17 -
KICKBACK SAFETY DEVICES ON THIS
SAW
This saw has a low-kickback chain and reduced
kickback Guide Bar. Both items reduce the chance of
kickback. However, kickback can still occur with this
saw.
The following steps will reduce the risk of kickback.
● Use both hands to grip the tool while saw is
running. Use rm grip. Thumbs and ngers must
wrap around saw handles.
● Keep all safety items in place on saw. Make sure
they work properly.
● Do not overreach.
● Keep solid footing and balance at all times.
● Stand slightly to the left side of saw. This keeps
your body from being in direct line with chain.
● Do not let guide bar nose touch anything when
chain is moving.
● Never try cutting through two branches at same
time. Only cut one branch at a time.
● Do not bury the guide bar nose or try plunge cut
(boring into wood using guide bar nose).
● Watch for shifting of wood or other forces that
may pinch chain.
● Use extreme caution when reentering a previous
cut.
● Use only the low-kickback chain and guide
bar that were supplied with this pole saw or
recommended.
● Never use a dull or loose chain. Keep chain
sharp with proper tension.
MAINTENACE
WARNING: When servicing, use only iden-
tical replacement parts. Use of any other parts
may create a hazard or cause product damage.
To ensure safety and reliability, all repairs should
be performed by a qualied service technician.
WARNING: To prevent serious personal inju-
ry, remove the battery pack from the tool before
servicing, cleaning, changing add-on attach-
ments or removing material from the unit.
29
WARNING: For the user’s safety, worn or
damaged parts must be replaced. Replace with
original replacement parts only.
WARNING: To prevent serious injury from ap-
pliance failure, do not use damaged equipment.
If abnormal noise or vibration occurs, have the
problem corrected before further use.
WARNING: After use, return the extension
pole to original position (fully retracted). other-
wise the extension pole will be spring loaded.
GENERAL MAINTENANCE TIPS
1. Do not attempt to repair the machine unless
you have the proper tools and instructions for
disassembly and repair of the machine.
2. Check bolts, screws and fasteners at frequent
intervals for proper tightness to ensure that the
machine is in safe working condition.
3. BEFORE EACH USE, inspect the general
condition of the appliance. Check for:
● loose hardware,
● misalignment or binding of moving parts,
● cracked or broken parts,
● dull or damaged saw chain and
● any other condition that may aect its safe
operation.
4. BEFORE EACH USE, tension saw chain and ll
the oiler.
CLEANING
Regular cleaning and maintenance of your pole
saw will ensure eciency and prolong the life of the
product.
● After each use, scrape debris loose from inside
chain cover and around drive sprocket, and then
wipe with clean and dry cloth.
● Never wet or spray water on the machine. Do not
immerse tool in liquid.
● Do not use any detergents or solvents as these
could cause irreparable damage to the pole saw.
Chemicals can destroy the plastic parts.
● Clean outside surfaces with a clean, dry cloth.
SAW MAINTENANCE
Follow maintenance instructions in this manual.
Proper cleaning and maintenance of chain and guide
bar can reduce the chance of kickback. Inspect and
maintain saw after each use. This will increase the
service life of your saw.
NOTICE: Even with proper sharpening, risk of
kickback can increase with each sharpening.
- 18 -
MAINTENANCE AND STORAGE
1. Remove the battery pack
● When not in use
● Before moving from one place to another
● Before servicing
● Before changing accessories or attachments,
such as saw chain and guide bar.
2. Inspect pole saw before and after each use.
Check saw closely if guide bar or other part has
been damaged. Check for any damage that may
aect operator safety or operation of saw. Check
for alignment or binding of moving parts. Check
for broken or damaged parts. Do not use pole
saw if damage aects safety or operation. Have
damage repaired by authorized service center.
3. Maintain pole saw with care.
● Never expose saw to rain or direct moisture.
● Keep chain sharp, clean, and lubricated for
better and safer performance.
● Follow steps outlined in this manual to sharpen
chain.
● Keep handles dry, clean, and free of oil and
grease.
● Keep all screws and nuts tight.
4. When servicing, use only identical replacement
parts.
5. When not in use, always store pole saw
● in a high or locked place, out of children’s reach
● in a dry place
● with bar and chain sheath in place
Bar Maintenance
To maximize bar life, the following bar maintenance
is recommended.
The bar rails that carry the chain should be cleaned
before storing the tool or if the bar or chain appear to
be dirty.
The rails should be cleaned every time the chain is
removed.
To clean the Bar rails:
1. Remove chain cover and bar and chain. (see
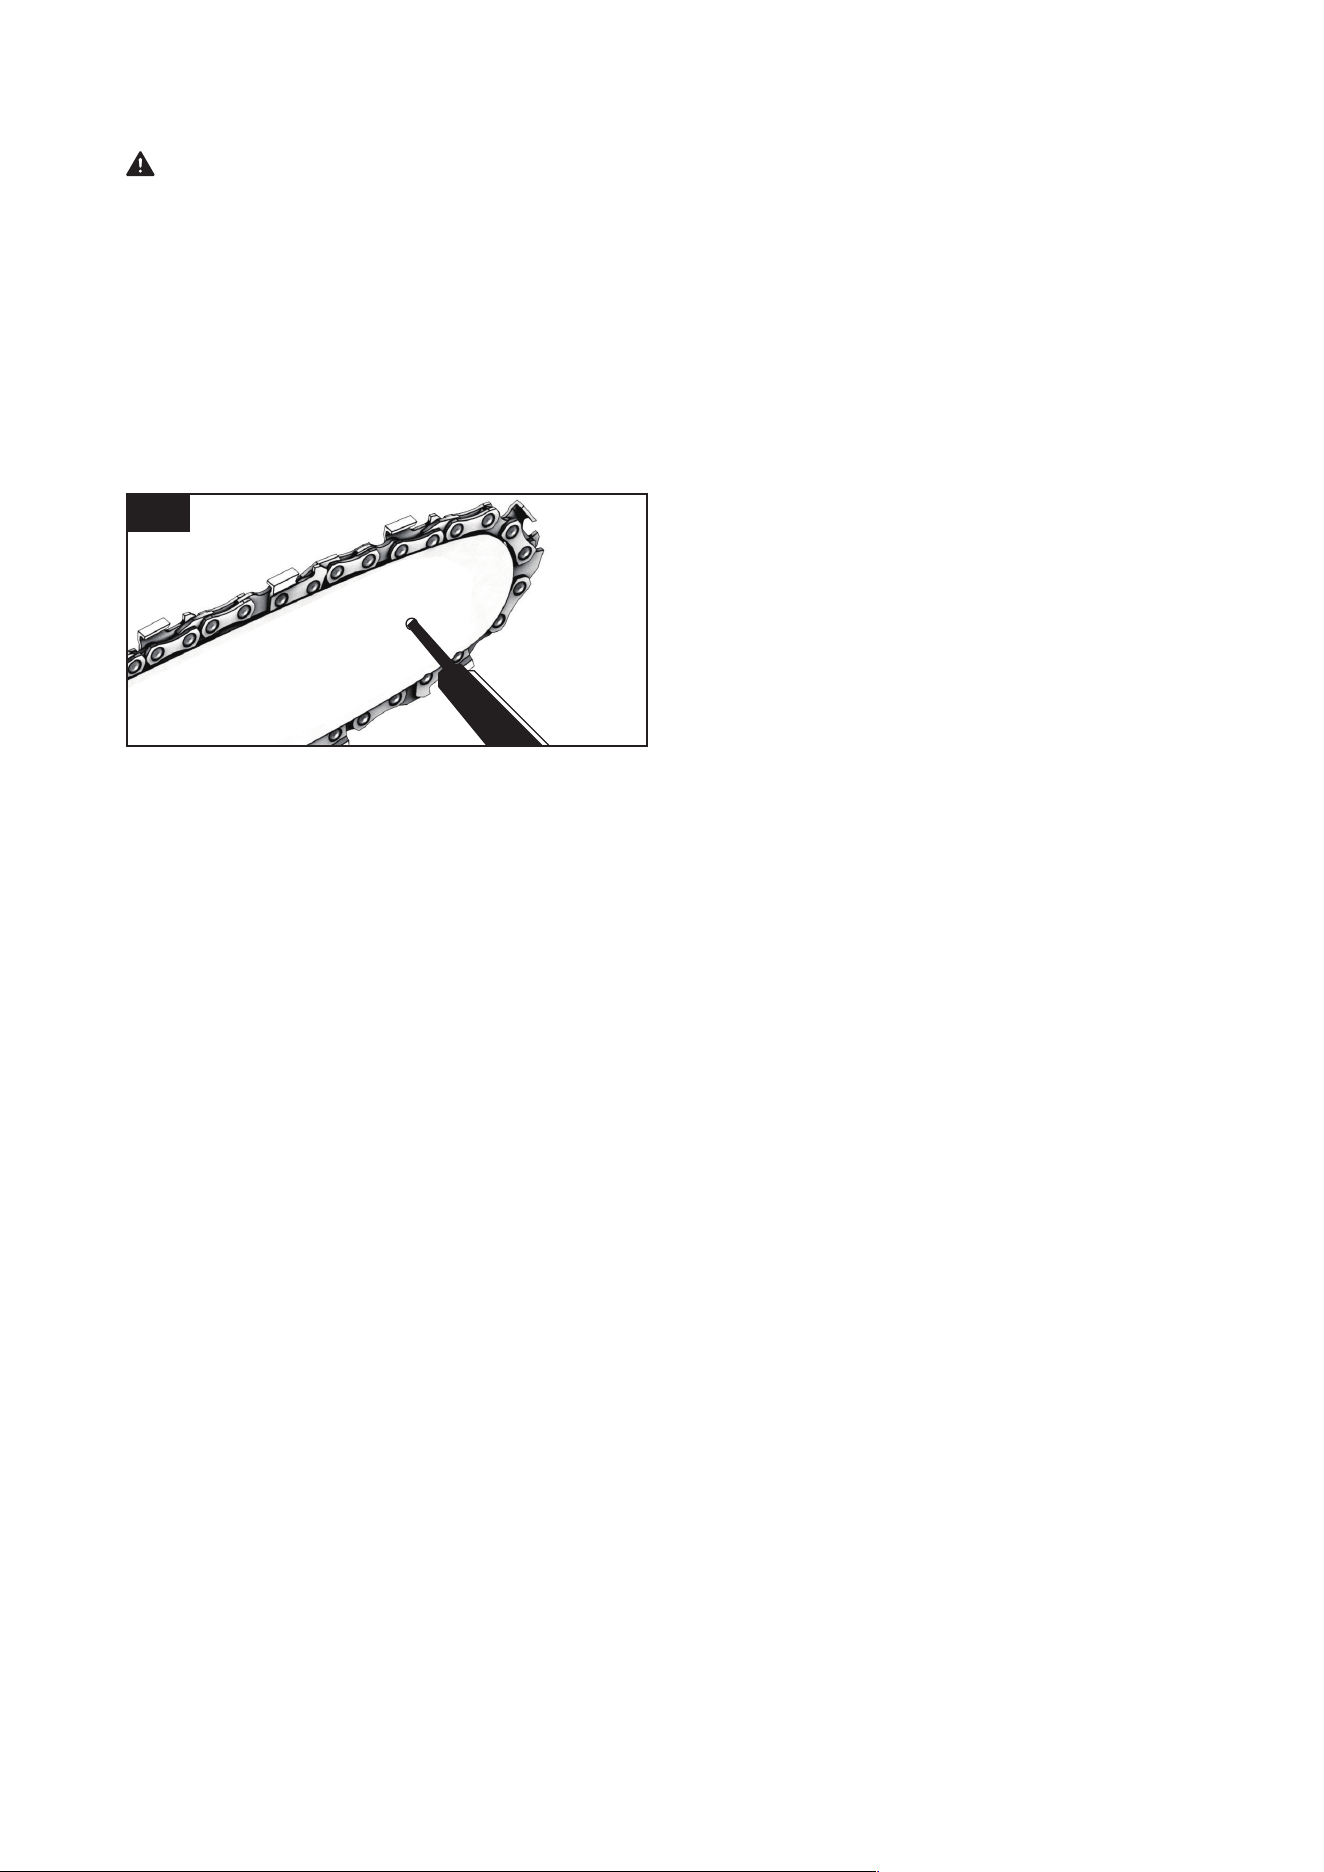
section BAR AND CHAIN ASSEMBLY )
2. Using a wire brush, screwdriver or similar tool,
clear the residue from the inner groove of the bar
(Fig. 30).
Conditions which require chain and guide bar
maintenance:
● Saw cuts to one side or at an angle.
● Saw has to be forced through the cut.
● Inadequate supply of oil to the bar and chain.
Check the condition of the guide bar each time the
chain is sharpened. A worn guide bar will damage
the chain and make cutting dicult.
After each use, remove the battery pack, clean all
sawdust from the guide bar and sprocket hole.
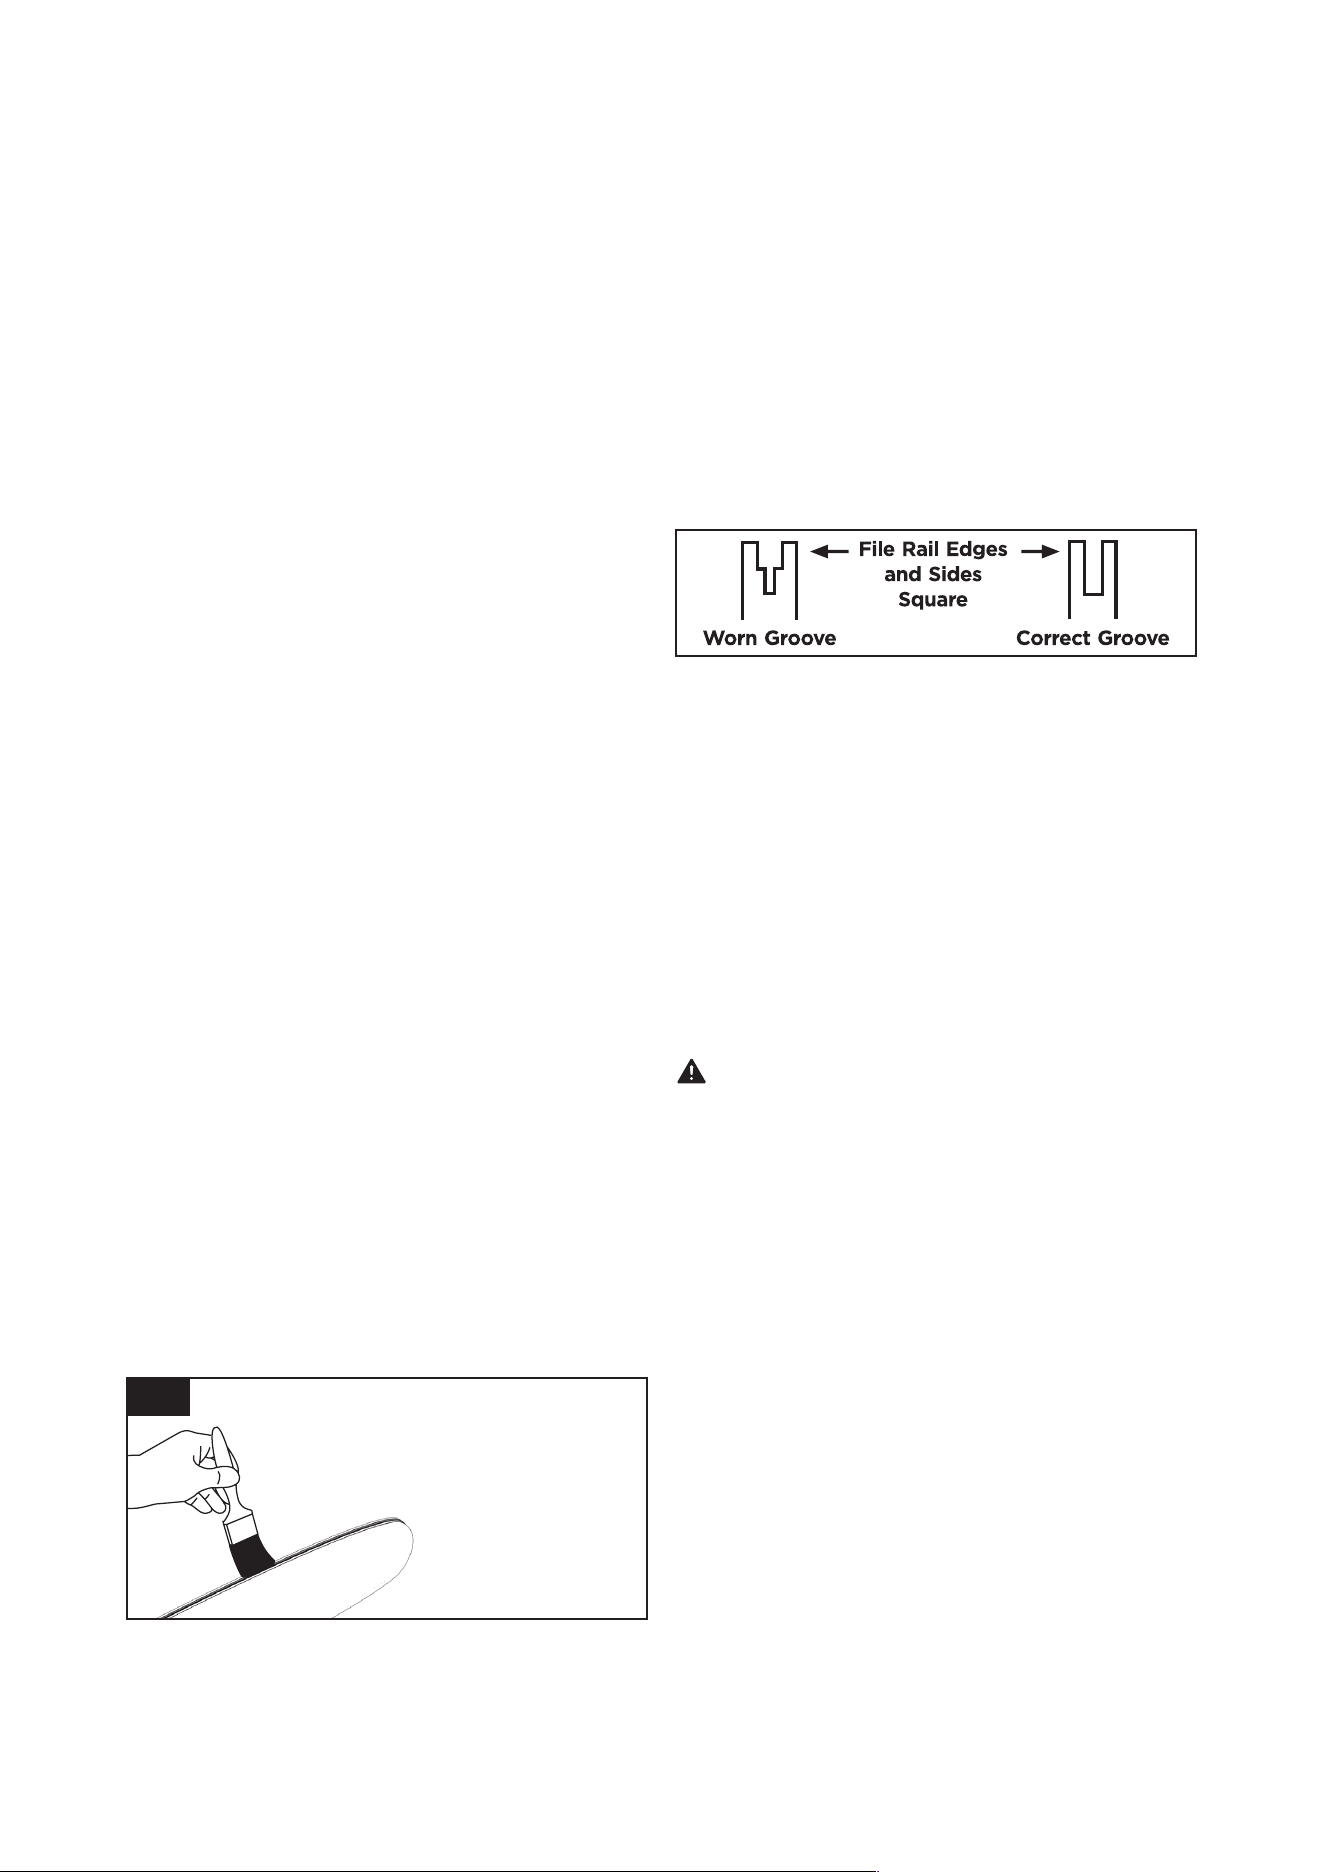
When rail top is uneven, use a flat file to restore
square edges and sides.
Replace the guide bar when the groove is worn, the
guide bar is bent or cracked, or when excess heating
or burring of the rails occurs. If replacement is
necessary, use only the guide bar specied for your
saw in the repair parts list.
Replacing Bar & Chain
Replace chain when cutters are too worn to sharpen
or when chain stops. Only use replacement chain
noted in this manual.
Inspect guide bar before sharpening chain. A worn
or damaged guide bar is unsafe. A worn or damaged
guide bar will damage chain. It will also make cutting
harder.
SHARPENING SAW CHAIN
WARNING: Remove the battery pack before
servicing. Severe injury or death could occur
from electrical shock or body contact with mov-
ing chain. Cutting edges on chain are sharp. Use
protective gloves when handling chain.
Keep chain sharp. Your saw will cut faster and more
safely. A dull chain will cause undue sprocket, Guide
Bar, chain, and motor wear. If you must force chain
into wood and cutting creates only sawdust with few
large chips, chain is dull. Have the cutters sharpened
by a qualied technician.
30
3. Make sure to clean oil passages thoroughly.
- 19 -
LUBRICATE SPROCKET
WARNING: Wear heavy duty gloves when
performing any maintenance or service to this
tool. Always remove the battery pack before per-
forming any service or maintenance on this tool.
NOTICE: It is not necessary to remove the
chain or bar when lubricating the guide bar
sprocket.
1. Clean the bar and sprocket.
2. Using a grease gun, insert the tip of the gun
into the lubrication hole and inject grease until it
appears at the outside edge of the sprocket tip.
(Fig. 31)
STORAGE
Pole saw:
1. Examine the cordless pole saw thoroughly for
worn, loose or damaged parts. Should you need
to repair or replace a part, contact Customer
Service Center for assistance.
2. Remove the battery. Allow the motor to cool and
clean the pole saw before storing.
3. Store the tool with its chain and bar in the sheath
indoors at room temperature in a locked, dry,
well-ventilated place out of the reach of children
to prevent unauthorized use and damage.
Battery and charger:
1. Do not expose your battery pack or charger to
water, rain or allow them to get wet. This could
permanently damage the charger and the battery
pack. Do not use oil or solvents to clean or
lubricate your battery pack as the plastic casing
can become brittle and crack, causing a serious
risk of injury.
2. Store the battery pack and charger at room
temperature away from moisture. Do not store
in damp locations where corrosion of terminals
may occur. As with other battery pack types,
permanent capacity loss can result if the
pack is stored for long periods of time at high
temperatures (over 120°F/49°C).
3. For longer service life of battery packs, recharge
the battery pack every month when not in use.
For Battery tools
The ambient temperature range for the use
and storage of tool and battery is 0°C-45°C
(32°F-113°F).
The recommended ambient temperature range
for the charging system during charging is
10°C-40°C (50°F-104°F). While charging, the
battery and charger should be placed in a cool,
dry indoor place with good ventilation.
31
3. To rotate the sprocket pull the chain by hand
until the ungreased side of the sprocket is in
line with the grease hole. Repeat the lubrication
procedure.

- 20 -
The following table gives checks and actions that you can perform if your machine does not operate correctly.
If these do not identify/remedy the problem, contact your service agent.
WARNING! Switch o the machine and remove the battery packs prior to any troubleshooting.
SolutionPossible CauseProblem
TROUBLE SHOOTING
Make sure the battery is fully inserted.
Motor does not
start
Charge the battery.Battery depleted.
Allow the battery warm up.Battery too cold.
Depress the lock o button rst, and then press th e
on/o switch.
Lock-o button not depressed.
Contact the service center for replacing.On/o switch defective.
Remove the battery pack, remove the chain cover and
clean out the debris.
Debris in bar groove or in
chain cover.
Check chain tension and re-tension the chain.Chain tension too tight
Re-assemble the chain and bar.
Chain does not engage with
drive sprocket.
Replace chain.Chain damaged.
Place the machine in a cool, ventilated place to cool it
down.
Over heating
Applying relatively less pressure while cutting.
Applying too much pressure
while cutting.
Contact service center.
Loose connection.
Contact service center.
Internal wiring defective.
Contact service center.
On/O switch defective
Rell oil.
No oil in oiler.
Clean oil passage outlet.
Oil passage clogged.
Rell oil.
No oil in oiler.
Clean oil passage outlet.
Oil passage clogged.
Adjust chain tension.
Chain is over tensioned.
Sharpen chain or replace.
Dull chain.
Adjust chain tension.
Chain tension too loose.
Sharpen chain or replace.
Dull chain.
Replace chain.
Reassemble with chain in correct direction.
Chain worn out.
Chain teeth are facing in the
wrong direction.
Battery not installed well.
Motor runs, but
chain does not
rotate
Pole saw
operates
intermittently
Dry chain
Chain or bar
overheats.
Pole saw
rips, vibrates,
does not saw
properly.

- 21 -
OWNER’S MANUAL
20-Volt Lithium-ion Cordless Pole Saw
With (1) 20-Volt 2.3Ah Lithium-ion Battery
Copyright All Rights Reserved
SKU# 239-1575
YARDWORKS WARRANTY POLICY
● Two (2) year limited warranty on all Yardworks 20V lithium ion power tools from date of purchase when used for
personal, household, or family use.
● Two (2) year limited warranty on all Yardworks 20V lithium ion batteries and chargers from date of purchase
when used for personal, household, or family use.
● Warranty voided if used for commercial or industrial purposes or any other improper use as determined by
Yardworks.
● Warranty does not include repairs necessary due to operator’s abuse or negligence (including overloading the
product beyond capacity or immersion in water), or the failure to assemble, operate, maintain or store the product
according to the instructions in the owner’s manual.
● This warranty does not cover
♢
Wear items, including but not limited to - drive belts & gears, tines, cutting blades, mower blades, saw chains,
mulching blades, blower fans, spool covers, trimmer line, blower and vacuum tubes, guide bars, high pressure
hoses, wheels, handles, augers, worn bags, power cables, and other items subject to wear over time.
♢
Wear on batteries, including but not limited to – drops, wear and breakage on charger, exposure to extreme
temperature swings (hot or cold), battery left on charger too long, battery left uncharged for too long, and
misuse or abuse of the battery.
● This warranty does not cover damage caused by cold, heat, rain, excessive humidity or other environmental
extremes.
including, but not limited to scratches, cracks, dents, or damage caused by outside chemicals.
● This warranty is not transferable and only applies to new products sold directly from an authorized retailer. This
warranty does not apply to any product, new or used, purchased through unauthorized third-party channels. For
information on authorized dealers, contact our customer support hotline at 1-888-497-7273 (Mon-Fri 8am-5pm Est)
● Any incidental, indirect or consequential loss, damage, or expense that may result from any defect or malfunction
of the products is not covered by the warranty.
● The warranty does not include installation, assembly or normal adjustments explained in the owner’s manual. The
expense of de- livering the product to the vendor and the expense of returning the product or replacement parts to
the owner is not covered by the warranty.
Additional Warranty Limitations
Some states do not allow the exclusion or limitation on how long an implied warranty lasts, so the above limitation may
not apply to you. Products sold damaged or incomplete, sold ―as is, or sold as reconditioned are not covered under the
warranty.
Damage or liability caused by shipping, improper handling, improper assembly, incorrect voltage, improper wiring,
recommended is not covered by this warranty.
Proof of purchase, original dated sales receipt, must accompany all warranty claims. For claims go to M e n a r
d s or call our customer support hotline from 8am-5pm EST,
Mon-Fri at 1-888-497-7273
In a continued commitment to improve quality, the Manufacturer reserves the right to
make component changes or design changes when necessary.

- 22 -

- 23 -

- 24 -