
April 2023
QSG1_A_EN
@ReolinkTech https://reolink.com
58.03.001.0313
ReolinkGoPTUltra
Quick Start Guide
English English1 2
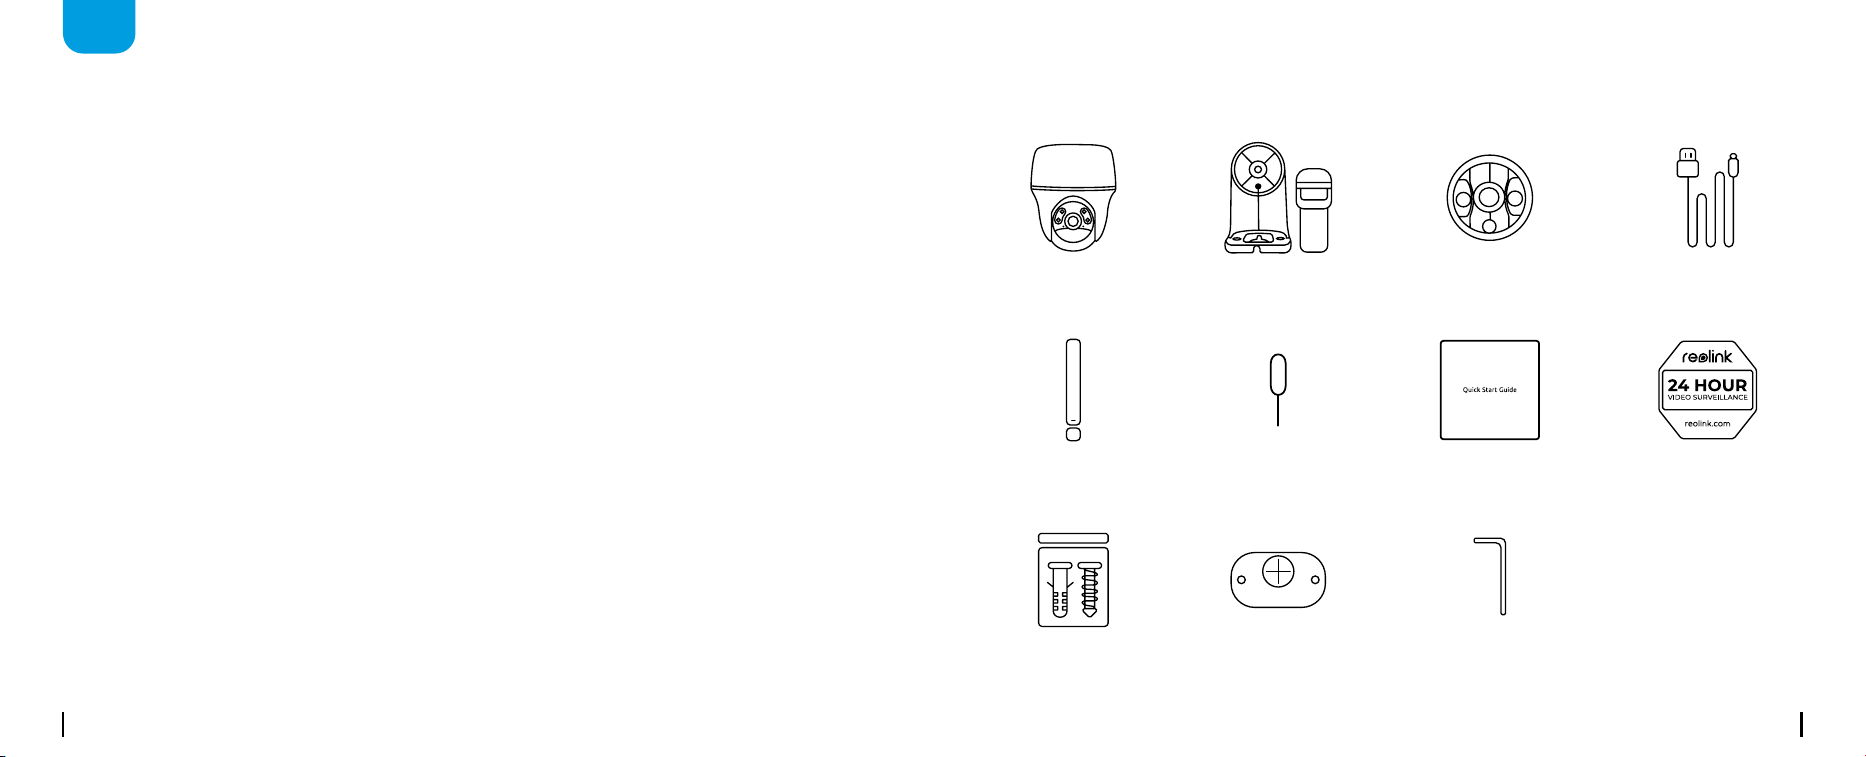
What's in the Box
EN
Content
What’s in the Box ·············································································2
Camera Introduction ·········································································3
Set up the Camera ···········································································4
Charge the Camera ·········································································10
Install the Camera ···········································································11
Safety Instructions of Battery Usage (For Battery-Powered Cameras) ·························16
Troubleshooting ·············································································17
Specifications ···············································································18
Notification of Compliance ··································································18
Camera
Quick Start Guide Surveillance Sign
Pack of Screws Mounting Template Hex Key
Camera Bracket USB-C Cable Mount Base
Antenna Reset Needle
English English3 4
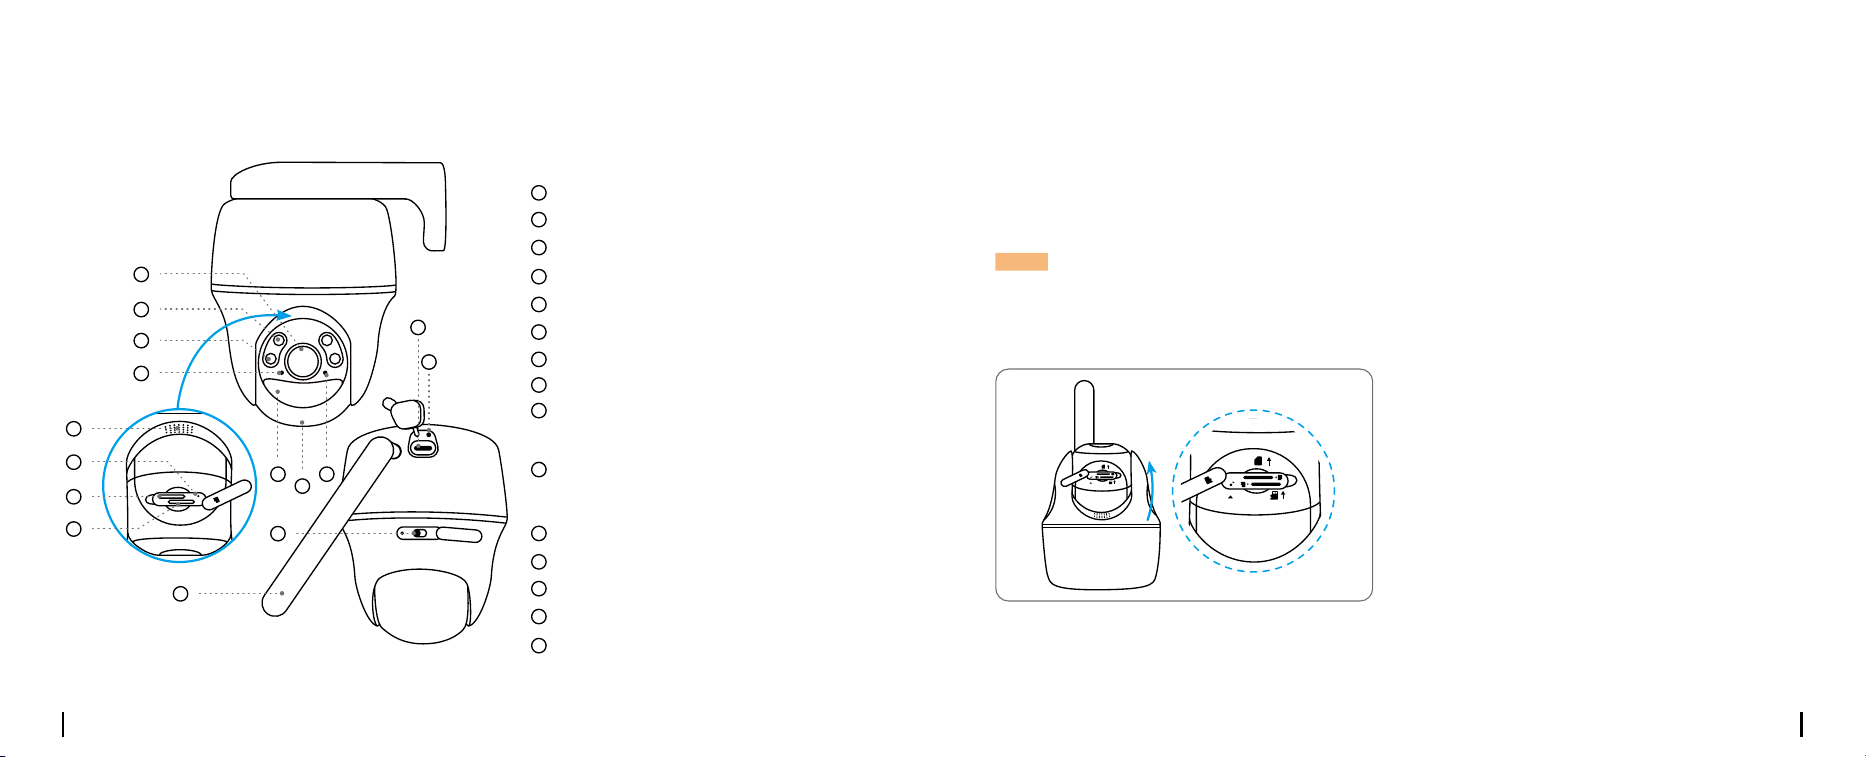
Set up the CameraCamera Introduction
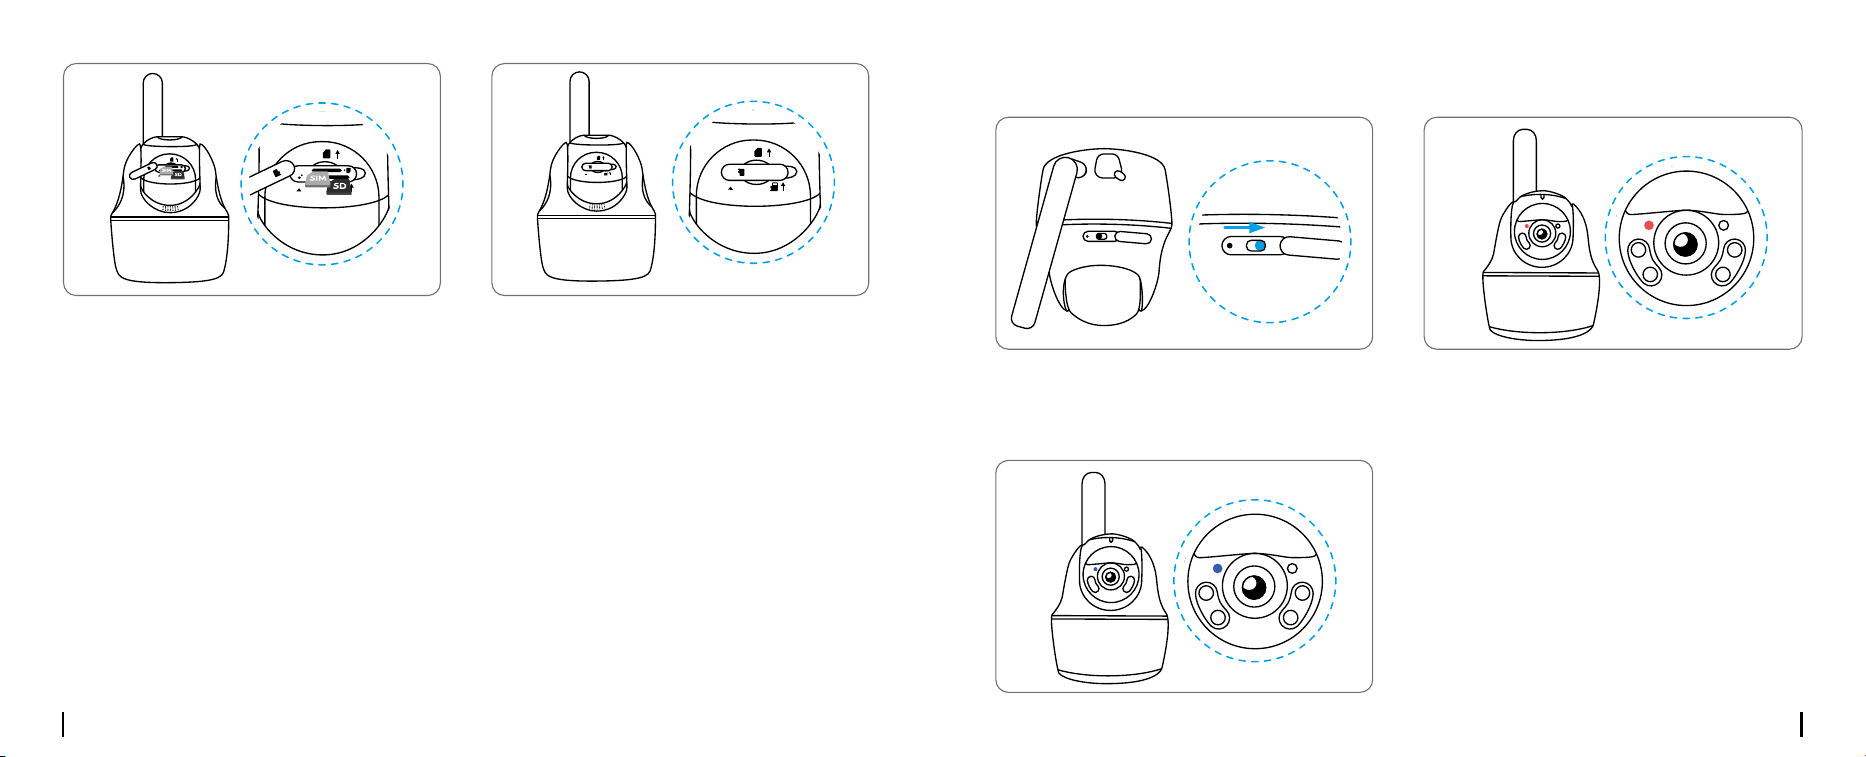
Activate SIM Card for the Camera
Insert the SIM Card
• Choose a Nano SIM card that supports WCDMA and FDD LTE.
• Some SIM cards have a PIN code. You may use your smartphone to disable the PIN first.
Rotate the camera lens, and remove the rubber cover.
NOTE: Do not insert the IoT or M2M SIM into your smartphone.
OFFON
POWER
RST
MicroSD
RST
MicroSD
Nano SIM
OFF
OPEN
ON
POWER
MicroSD
RST
MicroSD
Nano SIM
RST
MicroSD
RST
MicroSD
Nano SIM
MicroSD
RST
MicroSD
Nano SIM
RST
MicroSD
RST
MicroSD
Nano SIM
RST
MicroSD
RST
MicroSD
Nano SIM
OFFON
POWER
OFF
ON
POWER
MicroSD
OFF
ON
POWER
MicroSD
OFF
ON
POWER
MicroSD
Lens
Power Switch
Nano SIM Card Slot
IRLEDs
Antenna
Spotlight
Charging Port
Daylight Sensor
Battery Status LED
Built-in PIR Sensor
Built-in Mic
StatusLED
Speaker
Reset Hole
Micro SD Card Slot
* Press for more than five seconds to
restore the device to default settings.
* Rotate the camera’s lens to find the
reset hole and the SD card slot.
1
12
11
2
13
3
14
4
15
5
6
7
8
9
10
4
8
10
11
9
3
2
1
13
12
5 7
14
15
6
English English5 6
Insert the SIM card.
* The SIM card slot is above the SD card slot. When inserting the SIM card in, remember that the
gold contacts shall face down and you need to push the trimmed corner inside the camera.
* The SD card slot is below the SIM card slot. When inserting the SD card in, remember that gold
contacts shall face up.
With these done, press the rubber cover firmly
for better waterproof performance.
With the SIM card inserted, you can turn on
the camera.
Wait a few seconds and a red light will
be on and solid for a couple of seconds.
Then, it will go out.
A blue LED will ash for a few seconds and
then go solid before going out. You will hear a
voice prompt “Network connection succeeded”,
which means the camera has been successfully
connected to the network.
OFFON
POWER
RST
MicroSD
RST
MicroSD
Nano SIM
OFF
OPEN
ON
POWER
MicroSD
RST
MicroSD
Nano SIM
RST
MicroSD
RST
MicroSD
Nano SIM
MicroSD
RST
MicroSD
Nano SIM
RST
MicroSD
RST
MicroSD
Nano SIM
RST
MicroSD
RST
MicroSD
Nano SIM
OFFON
POWER
OFFON
POWER
RST
MicroSD
RST
MicroSD
Nano SIM
OFF
OPEN
ON
POWER
MicroSD
RST
MicroSD
Nano SIM
RST
MicroSD
RST
MicroSD
Nano SIM
MicroSD
RST
MicroSD
Nano SIM
RST
MicroSD
RST
MicroSD
Nano SIM
RST
MicroSD
RST
MicroSD
Nano SIM
OFFON
POWER
OFFON
POWER
RST
MicroSD
RST
MicroSD
Nano SIM
OFF
OPEN
ON
POWER
MicroSD
RST
MicroSD
Nano SIM
RST
MicroSD
RST
MicroSD
Nano SIM
MicroSD
RST
MicroSD
Nano SIM
RST
MicroSD
RST
MicroSD
Nano SIM
RST
MicroSD
RST
MicroSD
Nano SIM
OFFON
POWER
OFFON
POWER
RST
MicroSD
RST
MicroSD
Nano SIM
OFF
OPEN
ON
POWER
MicroSD
RST
MicroSD
Nano SIM
RST
MicroSD
RST
MicroSD
Nano SIM
MicroSD
RST
MicroSD
Nano SIM
RST
MicroSD
RST
MicroSD
Nano SIM
RST
MicroSD
RST
MicroSD
Nano SIM
OFFON
POWER
OFFON
POWER
RST
MicroSD
RST
MicroSD
Nano SIM
OFF
OPEN
ON
POWER
MicroSD
RST
MicroSD
Nano SIM
RST
MicroSD
RST
MicroSD
Nano SIM
MicroSD
RST
MicroSD
Nano SIM
RST
MicroSD
RST
MicroSD
Nano SIM
RST
MicroSD
RST
MicroSD
Nano SIM
OFFON
POWER
Register the SIM Card
English English7 8
NOTE: You may also run into the following situations:
1
Voice Prompt
“SIM card cannot be
recognized”
“The SIM card is locked
with a PIN.
Please disable it”
“Not registered on
network. Please activate
your SIM cardand check
the signal strength”
“Network connection
failed”
“Data call failed. Please
confirm your cellular data
plan is available or import
the APN settings”
Camera Status
Camera cannot recognize
this SIM card.
Your SIM card has a PIN.
Camera fails to register to
the operator network.
Camera fails to connect
to the server.
The SIM card has run out
of data or APN settings
are not correct.
Solutions
1. Check if the SIM card is facing
the reverse direction.
2. Check if the SIM card is not fully
inserted and insert it again
Put the SIM card into your mobile
phone and disable the PIN.
1. Check whether your card is
activated or not. If not,
please call your operator
to activate the SIM card.
2. The signal is weak at the current
position. Please move the camera
to a location with better signal.
3. Check if you are using the
correctversion of the camera.
The camera will be in Standby
mode and reconnect later.
1. Please check whether the
data plan for the SIM card
is still available.
2. Import the correct APN
settings to the camera.
2
3
4
5
Set up the Camera on the Phone
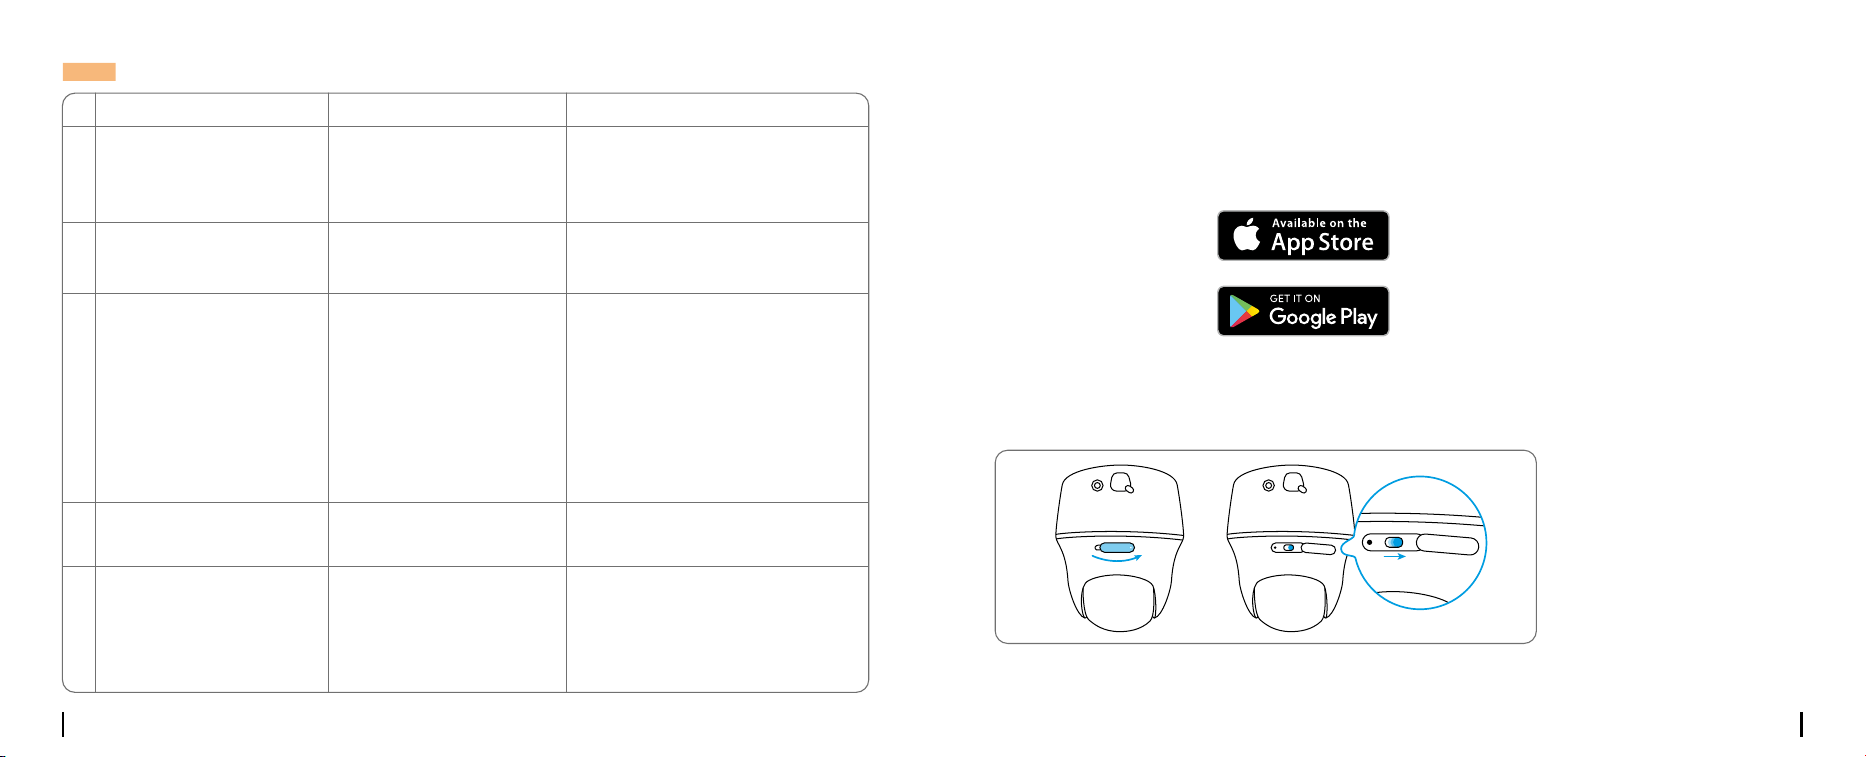
Step 1 Scan to download the Reolink App from the App Store or Google Play store.
Step 2 Turn on the power switch to power on the camera.
OFF
ON
POWER
POWER
OFF
ON
POWER
English English9 10
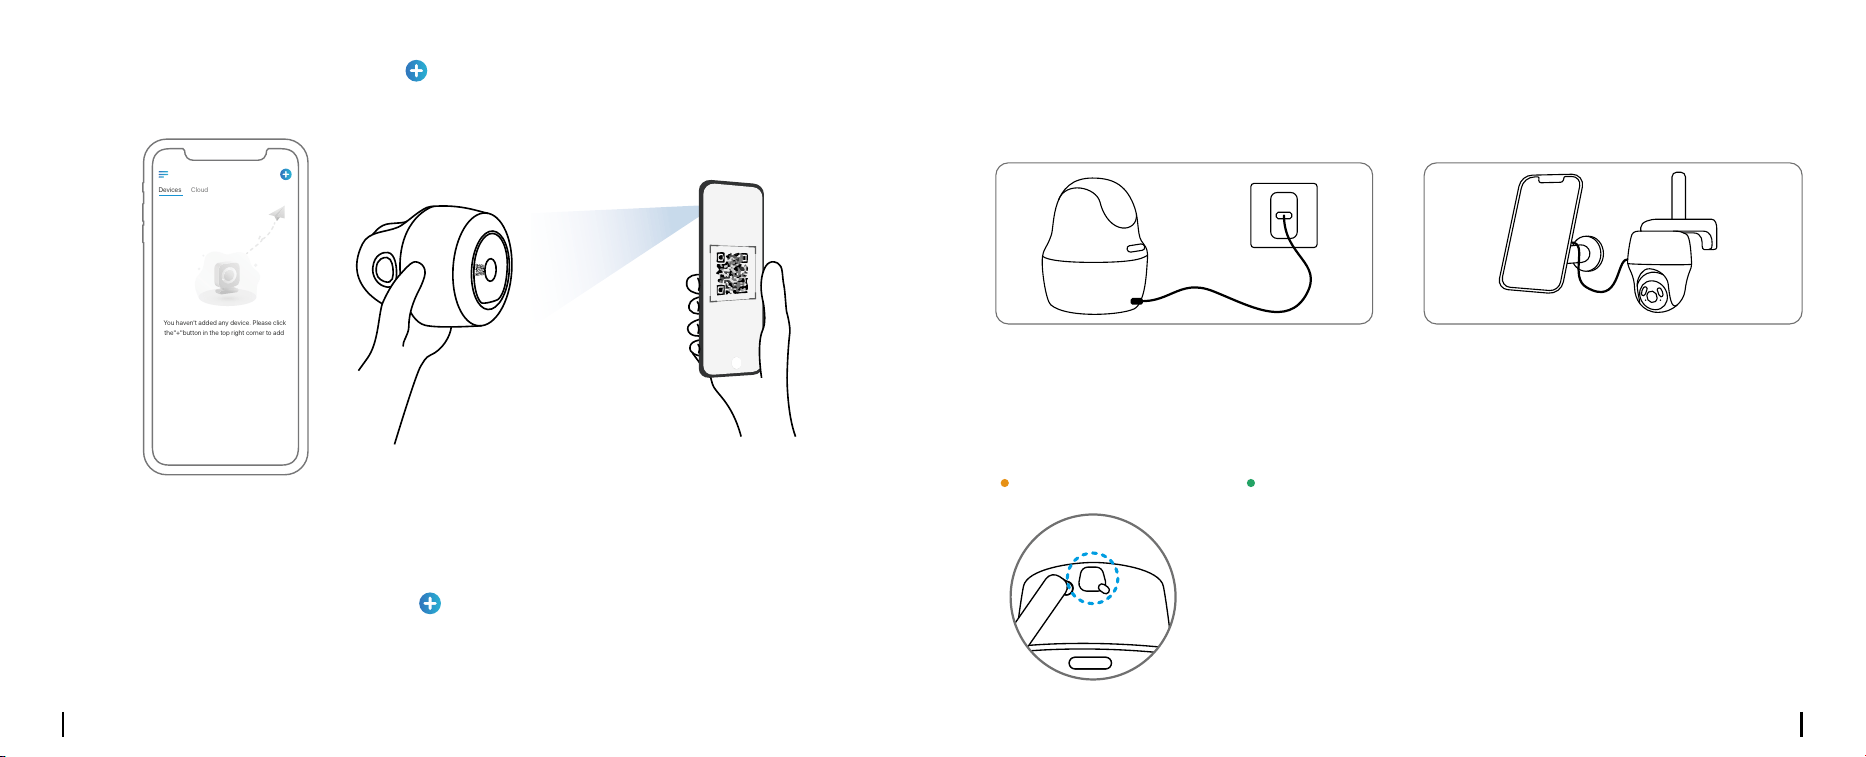
Step 3 Launch the Reolink App, click the “ ” button in the top right corner to add the camera.
Scan the QR code on the device and follow the onscreen instructions to finish initial setup.
Step 2 Launch the Reolink Client, click the “ ” button, input the UID code of the camera to add it
and follow the onscreen instructions to finish initial setup.
Step 1 Download and install the Reolink Client: Go to https://reolink.com > Support > App&Client.
Set up the Camera on PC (Optional)
Devices
Cloud
You haven't added any device. Please click
the"+"button in the top right corner to add
Charge the Camera
Charge the battery with a power adapter.
(not included)
Charge the battery with the Reolink Solar Panel
(not included if you only purchase the camera).
For better weatherproof performance, please
always cover the charging port with the rubber
plug after charging the battery.
OFFON
POWER
RST
MicroSD
RST
MicroSD
Nano SIM
OFF
OPEN
ON
POWER
MicroSD
RST
MicroSD
Nano SIM
RST
MicroSD
RST
MicroSD
Nano SIM
MicroSD
RST
MicroSD
Nano SIM
RST
MicroSD
RST
MicroSD
Nano SIM
RST
MicroSD
RST
MicroSD
Nano SIM
OFFON
POWER
OFFON
POWER
RST
MicroSD
RST
MicroSD
Nano SIM
OFF
OPEN
ON
POWER
MicroSD
RST
MicroSD
Nano SIM
RST
MicroSD
RST
MicroSD
Nano SIM
MicroSD
RST
MicroSD
Nano SIM
RST
MicroSD
RST
MicroSD
Nano SIM
RST
MicroSD
RST
MicroSD
Nano SIM
OFFON
POWER
Orange LED: charging Green LED: Fully charged
Charging Indicator:
It’s recommended to fully charge the battery before mounting the camera outdoors.
OFFON
POWER
RST
MicroSD
RST
MicroSD
Nano SIM
OFF
OPEN
ON
POWER
MicroSD
RST
MicroSD
Nano SIM
RST
MicroSD
RST
MicroSD
Nano SIM
MicroSD
RST
MicroSD
Nano SIM
RST
MicroSD
RST
MicroSD
Nano SIM
RST
MicroSD
RST
MicroSD
Nano SIM
OFFON
POWER
English English11 12
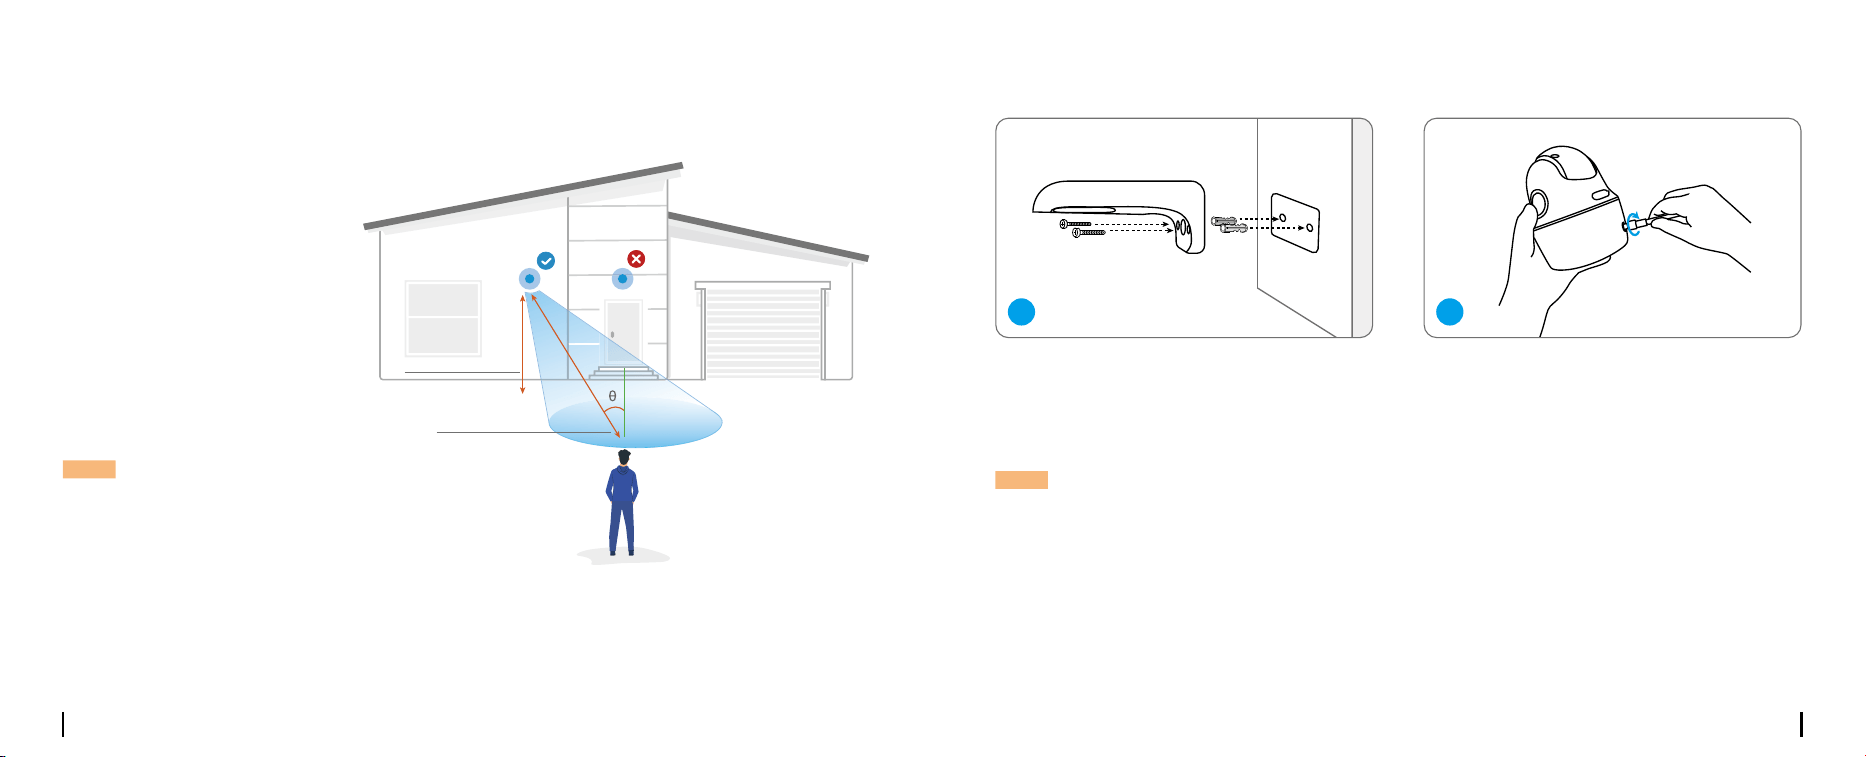
Install the Camera
• For outdoor use, the camera
MUST be installed upside down for
better waterproof performance
and better PIR motion sensor’s
eciency.
• Install the camera 2-3 meters
(7-10 ft) above the ground. This
height maximizes the detection
range of the PIR motion sensor.
• For better motion detection
performance, please install the
camera angularly.
NOTE: If a moving object approaches the
PIR sensor vertically, the camera may fail
to detect motion.
Drill holes in accordance with the
mounting hole template and screw the
camera bracket to the wall.
NOTE: Use the drywall anchors included in the package if needed.
Mount the Camera to Wall
Install the antenna to the camera.
1
2
Mounting Height:
2-3 Meters
PIR Detection Distance:
2-10 Meters
English English13 14
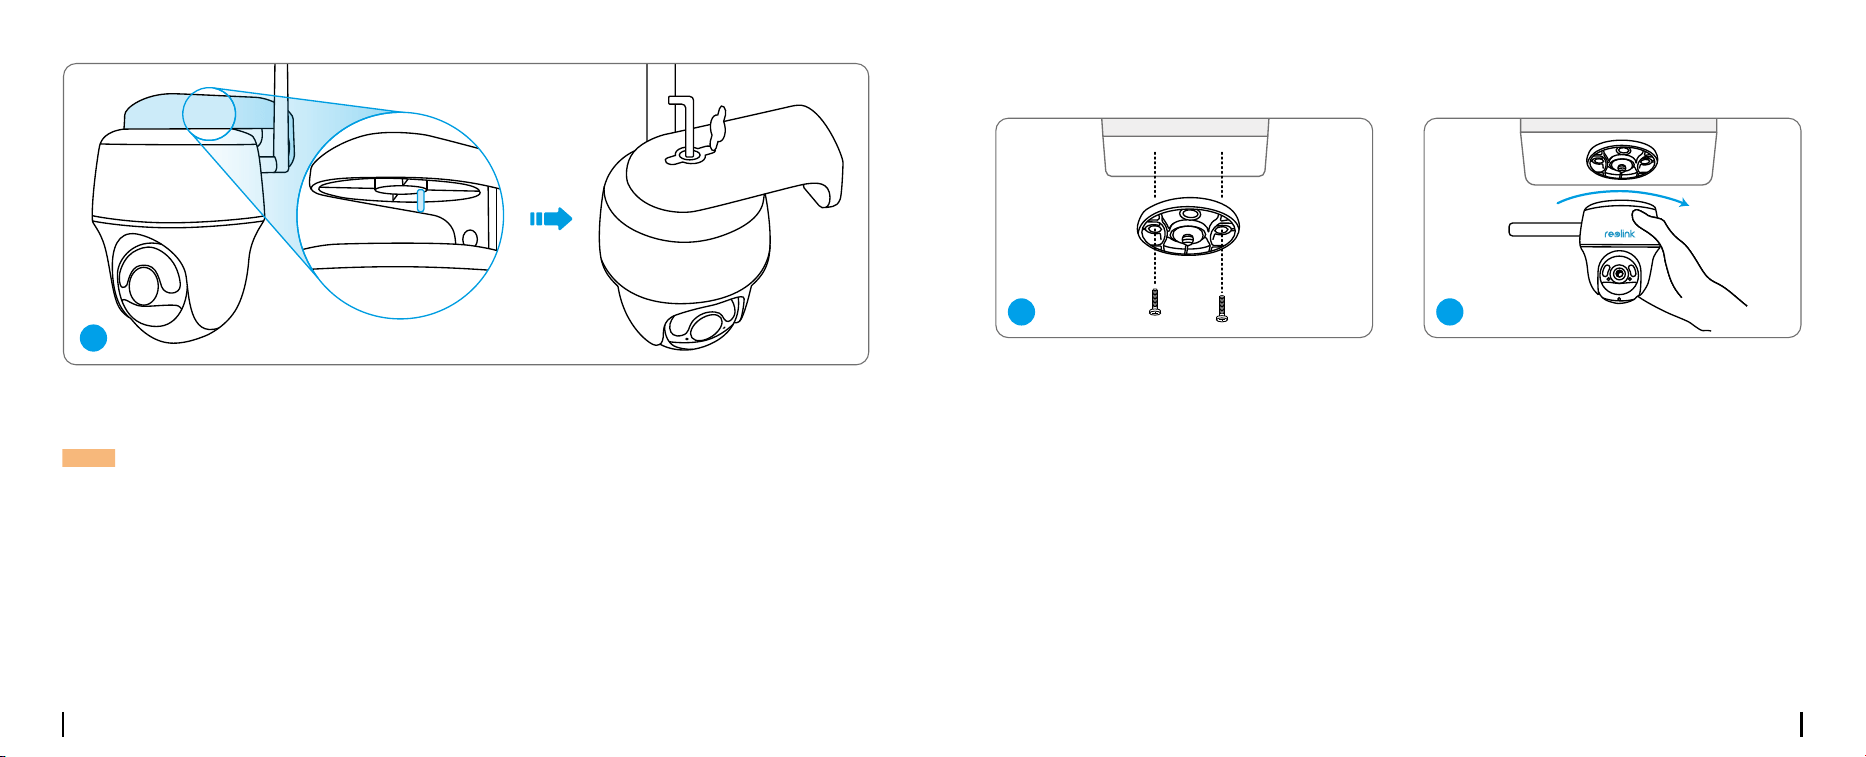
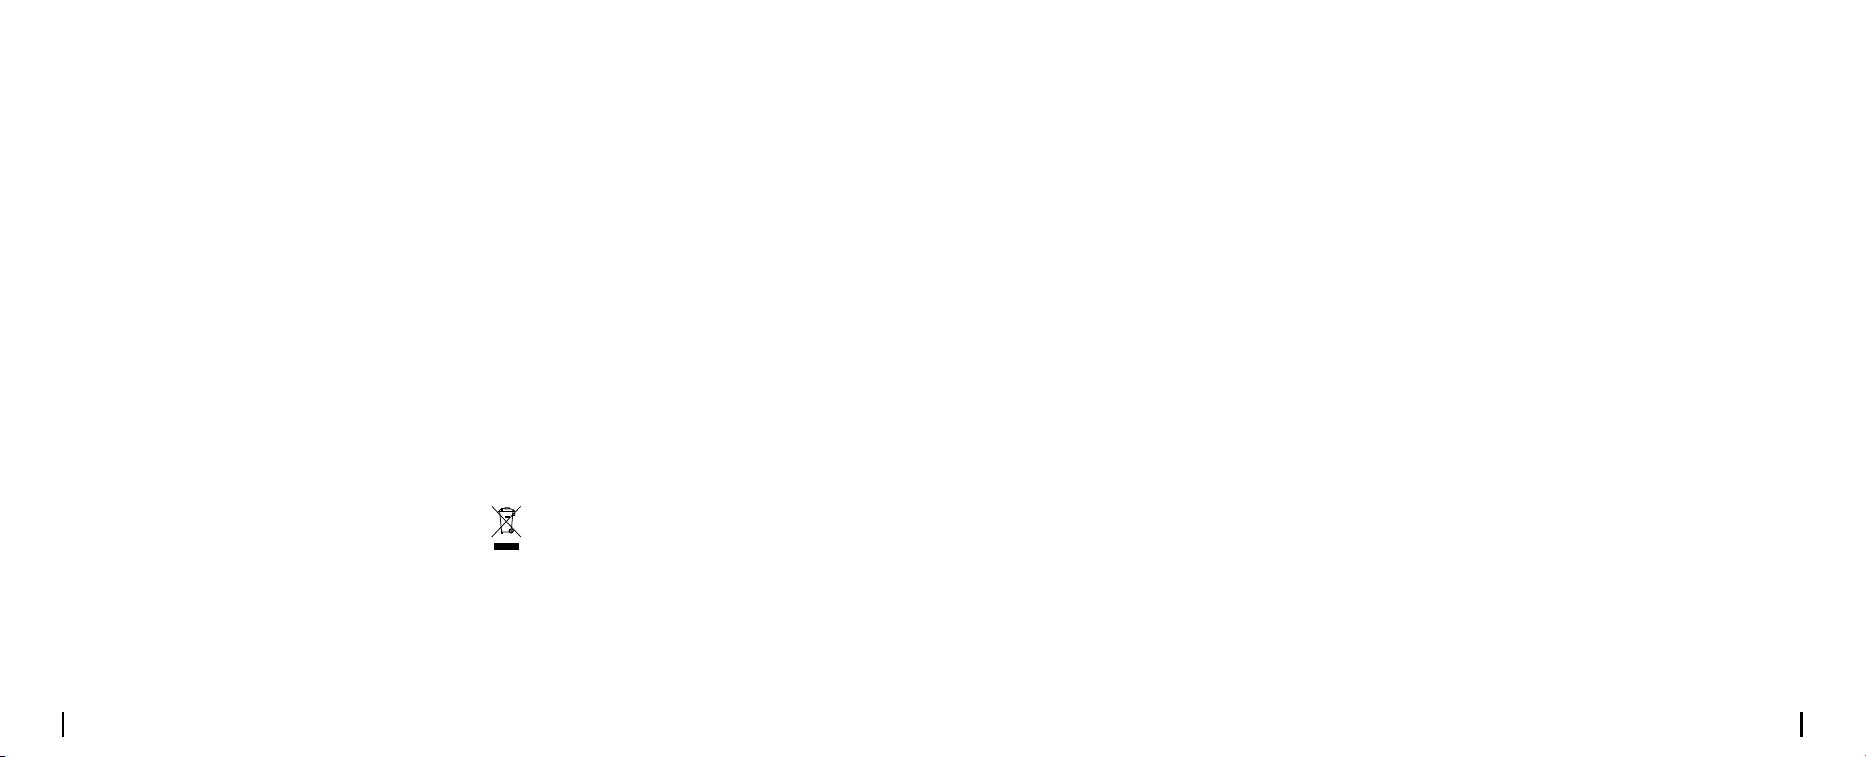
Mount the Camera to Ceiling
Install the mount base to the ceiling. Align the camera with the bracket and turn the camera unit
clockwise to lock it in position.
1
2
Align the white hole on the camera top with the white hollow screw on the bracket. Use a wrench
and a hex head screw provided to secure the camera into place. Then cover the rubber plug.
NOTE: For better 4G connection, it is recommended to install the antenna upward or horizontally.
3
English English15 16
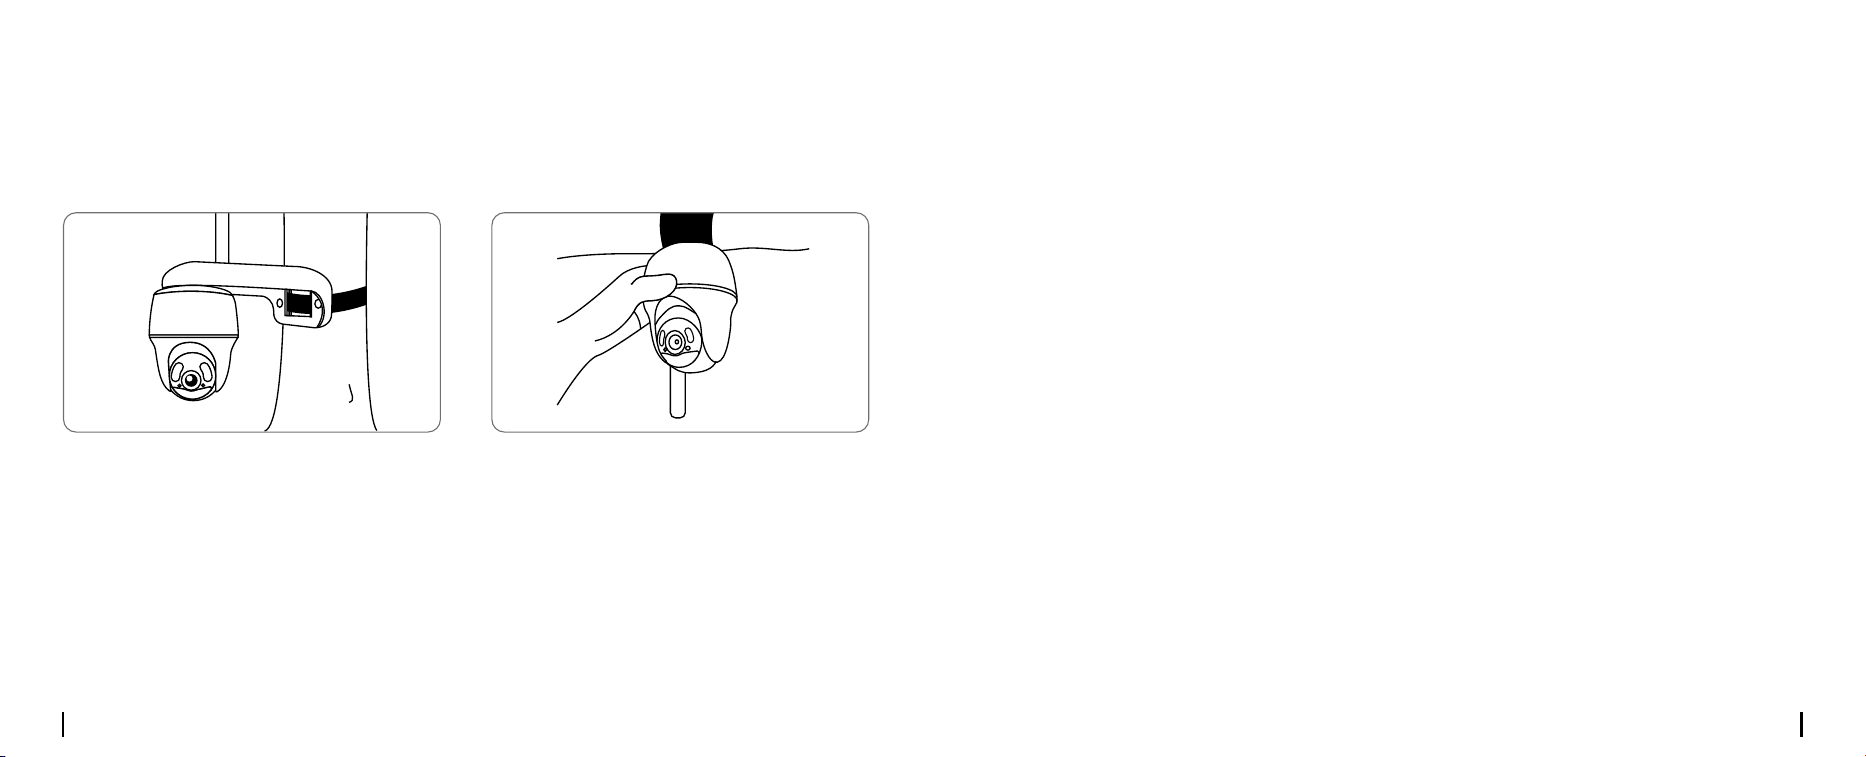
You are allowed to strap the camera to a tree with both the camera barcket & mount base.
Thread the provided strap to the plate and fasten it to a tree. Next, attach the camera to the
plate and you are good to go.
Install the Camera with Loop Strap
Safety Instructions of Battery Usage
(For Battery-Powered Cameras)
The camera is not designed for running 24/7 at full capacity or around-the-clock live streaming.
It’s designed to record motion events and to live view remotely only when you need it. Learn useful
tips on how to extend the battery life in this post:
https://support.reolink.com/hc/en-us/articles/360006991893
1. If the battery is built-in, do not remove it from the camera.
2. Charge the rechargeable battery with a standard and high-quality DC 5V battery charger or
Reolink solar panel. Do not charge the battery with solar panels from any other brands.
3. Charge the battery when temperatures are between 0°C and 45°C and always use the battery
when temperatures are between -10°C and 55°C.
4. Keep the charging port dry, clean and free of any debris and cover the USB charging port with
the rubber plug when the battery is fully charged.
5. Do not charge, use or store the battery near any ignition sources, such as fire or heaters.
6. Do not use the battery if it gives o an odor, generates heat, becomes discolored or deformed,
or appears abnormal in any ways. If the battery is being used or charged, turn o the power
switch or remove the charger immediately, and stop using it.
7. Always follow the local waste and recycle laws when you get rid of the used battery.

English English17 18
Troubleshooting
If your camera is not turning on, please apply
the following solutions:
• Make sure you’ve turned the power button
on.
• Charge the battery with a DC 5V/2A power
adapter. When the green light is on, the
battery is fully charged.
If these won’t work, please contact Reolink
Support.
If you fail to receive any push notifications
when motion is detected, try the following
solutions:
• Make sure the push notification has been
enabled.
• Make sure the PIR schedule is set up
properly.
• Check the network connection on your
phone and try again.
• Make sure the camera is connected to the
Internet. If the LED indicator under the camera
lens is solid red or ickering red, it means that
your device disconnects from the Internet.
• Make sure you’ve enabled Allow Notifications
on your phone. Go to the System Settings on
your phone and allow Reolink App to send
push notifications.
If the PIR sensor fails to trigger any kind of
alarm within the covered area, try the
following solutions:
• Make sure that the PIR sensor or the camera
is installed in the right direction.
• Make sure the PIR sensor is enabled or the
schedule is set up properly and running.
• Check the sensitivity settings and make sure
it’s set up properly.
Camera is not Powering On
Unable to Receive Push
Notications
PIR Sensor Fails to Trigger Alarm
Reolink declares that this product is in compli-
ance with Radio Equipment Regulations 2017
and Electromagnetic Compatibility Regula-
tions 2016.
Operating Temperature:
-10°C to 55°C (14°F to 131°F)
Size: 98 x 112 mm
Weight (Battery included): 496g
For more specifications, visit
https://reolink.com/.
Notication of
Compliance
UKCA Declaration of Conformity
If these won’t work, please contact Reolink
Support.
Specications
Reolink declares that this device is in com-
pliance with the essential requirements and
other relevant provisions of Directive 2014/53/
EU and Directive 2014/30/EU.
CE Declaration of Conformity
This device complies with Part 15 of the FCC
Rules. Operation is subject to the following
two conditions: (1) this device may not cause
harmful interference, and (2) this device must
accept any interference received, including
interference that may cause undesired opera-
tion.
NOTE: This equipment has been tested and
found to comply with the limits for a Class B
digital device, pursuant to Part 15 of the FCC
Rules. These limits are designed to provide
reasonable protection against harmful in-
terference in a residential installation. This
equipment generates, uses and can radiate
radio frequency energy and, if not installed
and used in accordance with the instructions,
may cause harmful interference to radio
communications. However, there is no guar-
antee that interference will not occur in a
FCC Compliance Statements
• Make sure the battery is working.
• Reset the camera and try again.
If these won’t work, please contact Reolink
Support.
English English19 20
This marking indicates that this product
should not be disposed with other household
wastes.throughout the EU. To prevent possible
harm to the environment or human health
from uncontrolled waste disposal, recycle it
responsibly to promote the sustainable reuse
Correct Disposal of This Product
This equipment complies with FCC radiation
exposure limits set forth for an uncontrolled
environment. This equipment should be in-
stalled and operated with minimum distance
20cm between the radiator and your body.
This equipment complies with IC RSS-102 ra-
diation exposure limits set forth for an uncon-
trolled environment. This equipment should be
installed and operated with minimum distance
20 cm between the radiator and your body.
This device contains licence-exempt transmit-
ter(s)/receiver(s) that comply with Innovation,
Science and Economic Development Canada’s
licence-exempt RSS(s). Operation is subject to
the following two conditions:
(1) This device may not cause interference.
(2) This device must accept any interference,
including interference that may cause unde-
sired operation of the device.
FCC Radiation Exposure statement
ISED Radiation Exposure statement
ISED Compliance Statements
particular installation. If this equipment does
cause harmful interference to radio or televi-
sion reception, which can be determined by
turning the equipment o and on, the user is
encouraged to try to correct the interference
by one or more of the following measures:
• Reorient or relocate the receiving antenna.
• Increase the separation between the equip-
ment and receiver.
• Connect the equipment into an outlet on a
circuit dierent from that to which the receiver
is connected.
• Consult the dealer or an experienced radio/
TV technician for help.
Caution: Changes or modifications not ex-
pressly approved by the party responsible for
compliance could void the user’s authority to
operate the equipment.
If you need any technical help, please visit our
ocial support site and contact our support
team before returning the products,
https://support.reolink.com
Technical Support
of material resources. To return your used
device, please use the return and collection
systems or contact the retailer where the
product was purchased. They can take this
product for environmentally safe recycling.
This product comes with a 2-year limited
warranty that is valid only if purchased from
Reolink Ocial Store or a Reolink authorized
reseller. Learn more:
https://reolink.com/warranty-and-return/.
Limited Warranty
Use of the product is subject to your
agreement to the Terms of Service and
Privacy Policy at reolink.com. Keep out of
reach of children.
Terms and Privacy
