
@ReolinkTech https://reolink.com
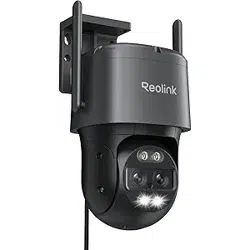
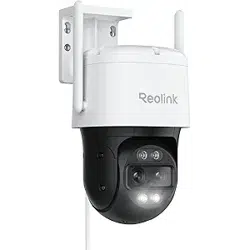
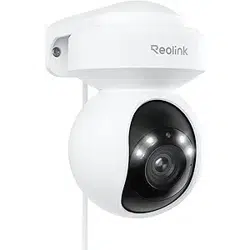
Apply to: E1 Outdoor Pro
Operational Instruction
EN/DE/FR/IT/ES
April 2023
QSG1_A
58.03.006.0012
Technical Support
If you need any technical help, please visit our ocial support site and contact our support
team before returning the products, https://support.reolink.com.
Technische Unterstützung
Wenn Sie Hilfe brauchen, kontaktieren Sie bitte Reolink Support Team zuerst, bevor Sie Ihre
Bestellung zurücksenden. Meiste Fragen oder Probleme können von unserem Online Support
Center beantwortet und gelöst werden: https://support.reolink.com.
Support technique
Si vous avez besoin d’aide, veuillez contacter Reolink avant de retourner votre produit. La
plupart des questions peuvent être répondues via notre centre de support en ligne à l’adresse
https://support.reolink.com.
Supporto Tecnico
Se avete bisogno di aiuto, le chiediamo gentilmente di contattare Reolink prima di restituire
il prodotto. La maggior parte delle domande può essere risolta tramite il nostro centro di
assistenza online all’indirizzo https://support.reolink.com.
Soporte técnico
Si necesita ayuda, comuníquese con Reolink antes de devolver su producto. La mayoría de las
preguntas se pueden responder a través de nuestro centro de soporte en línea en
https://support.reolink.com.
REOLINK INNOVATION LIMITED
FLAT/RM 705 7/F FA YUEN COMMERCIAL BUILDING 75-77 FA YUEN
STREET MONG KOK KL HONG KONG
CET PRODUCT SERVICE SP. Z O.O.
UK REP
EC REP
CET PRODUCT SERVICE LTD.
Ul. Dluga 33 102 Zgierz, Polen
Beacon House Stokenchurch Business Park, Ibstone Rd,
Stokenchurch High Wycombe, HP14 3FE, United Kingdom

English English1 2
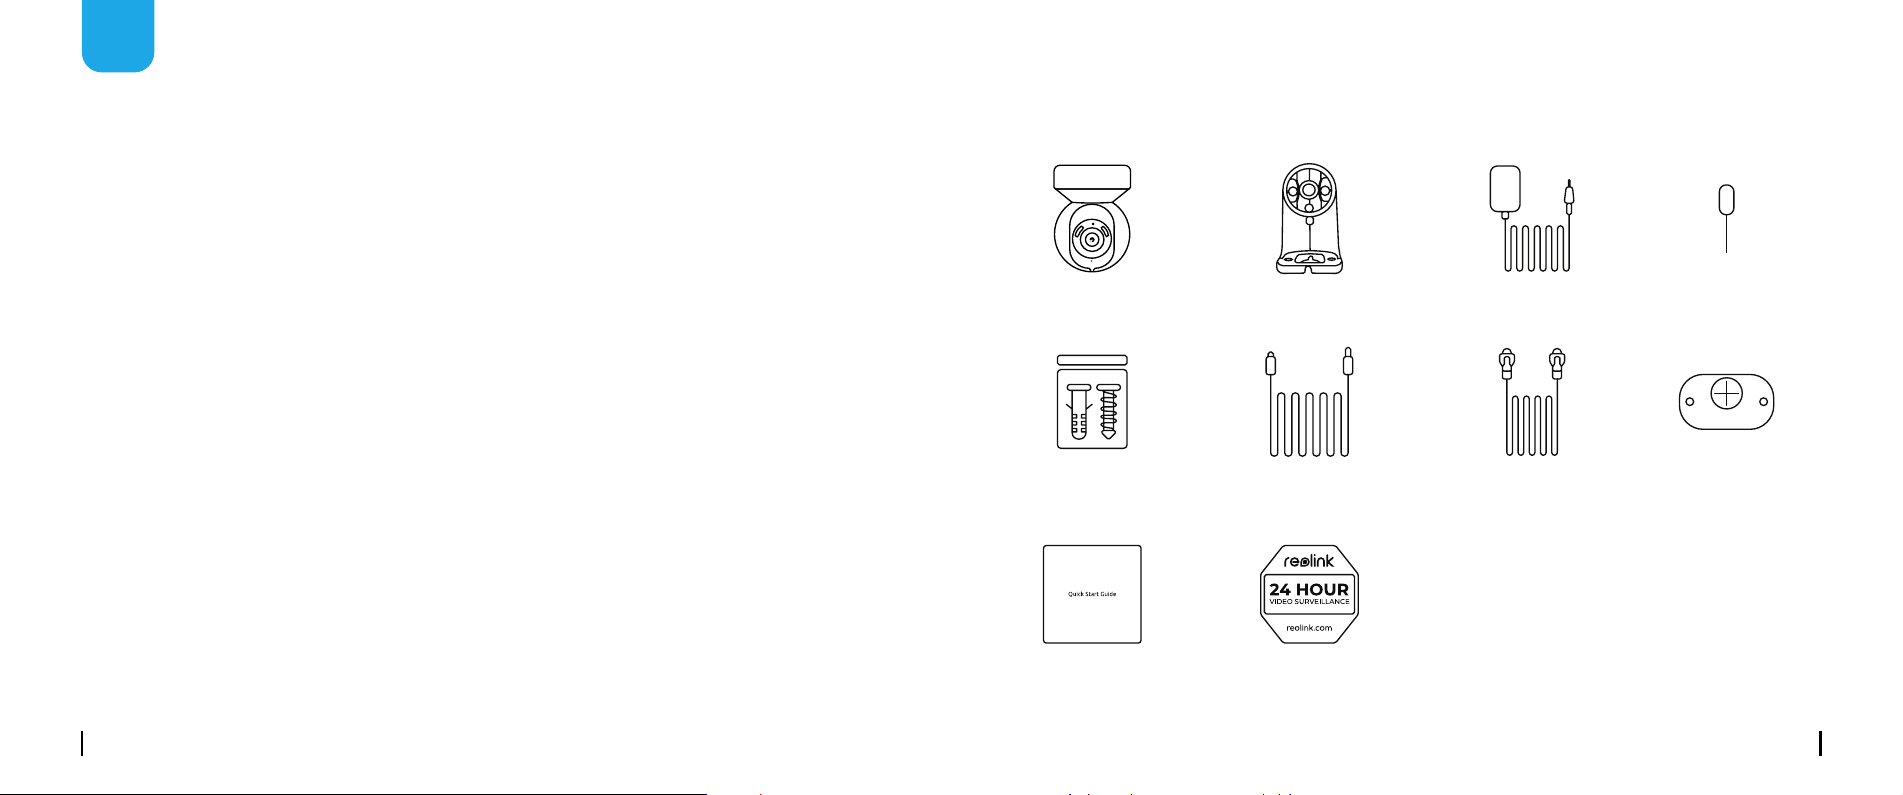
What's in the Box
EN
Content
What’s in the Box ············································································2
Camera Introduction ········································································3
Set up the Camera ··········································································4
Install the Camera ···········································································7
Troubleshooting ·············································································10
Specications ··············································································10
Notication of Compliance ··································································10
Camera
1m
Network Cable
Mounting
Template
Quick
Start Guide
Surveillance
Sign
Camera Bracket Reset NeedlePower Adapter
Pack of Screws 4.5m Power
Extension Cable

English English3 4
Devices
Cloud
You haven't added any device. Please click
the"+"button in the top right corner to add
1
2
3
“click”
“click”
open close
M
ic
ro
S
D
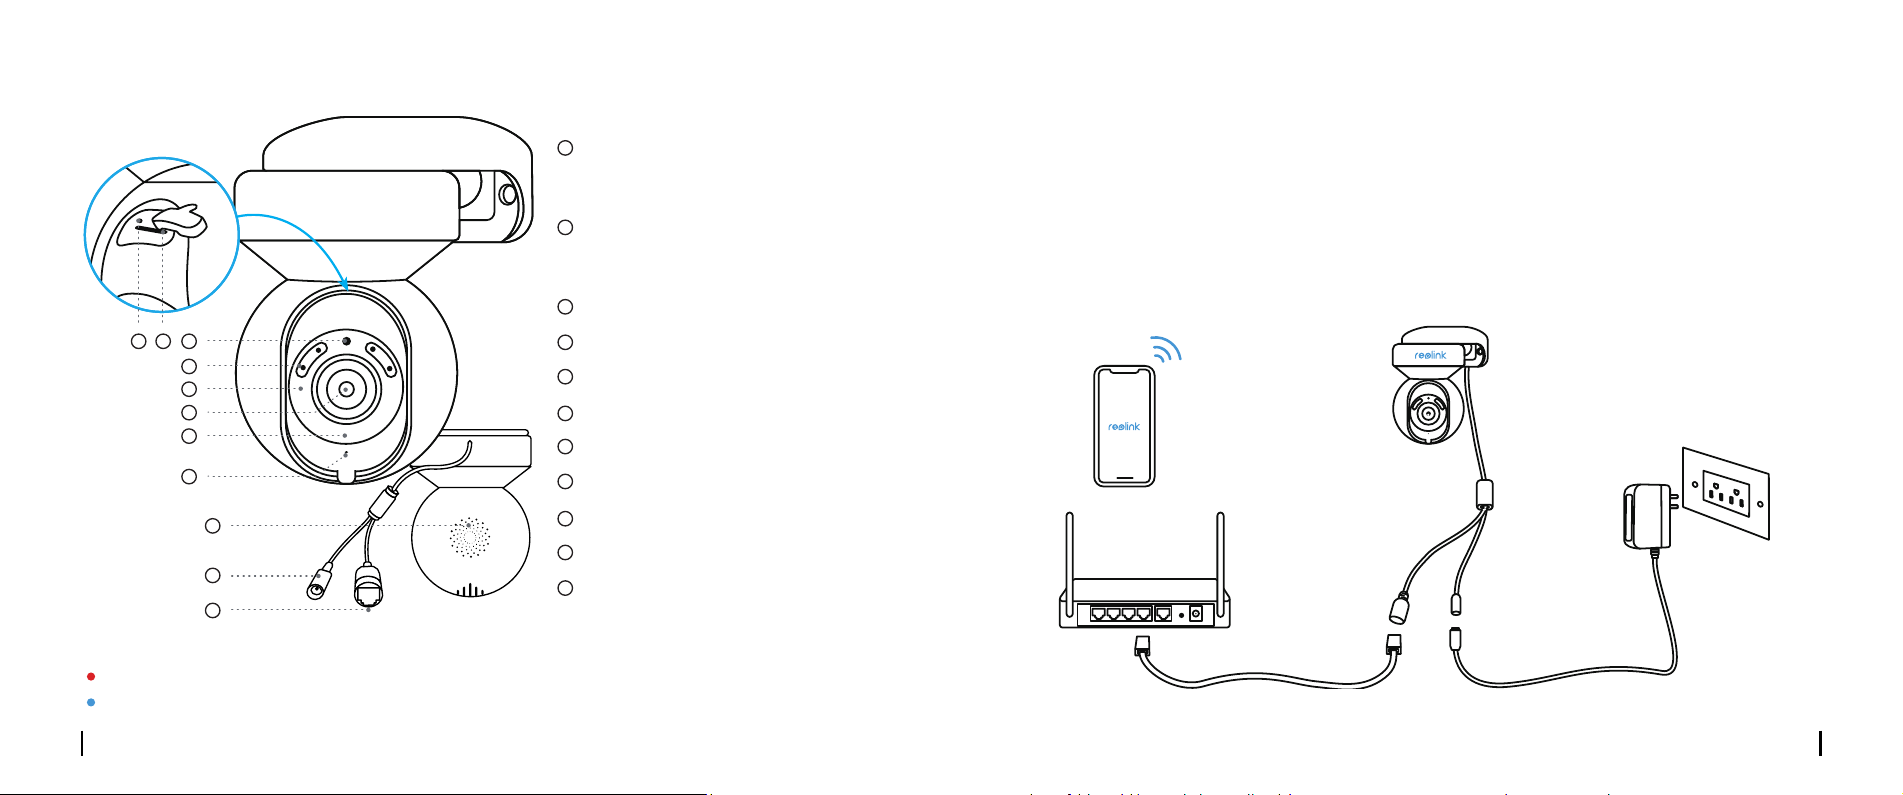
Camera Introduction
Reset Button
Micro SD Card Slot
Daylight Sensor
Spotlight
Infrared Lights
Lens
Status LED
Built-in Mic
Speaker
Power Cable
Network Cable
* Press for more than ve seconds to
restore the device to default settings.
* Rotate the lens to nd the
reset button and the SD card slot.
3
4
5
8
9
10
11
7
6
1
1
2
3
4
5
6
7
8
9
10
11
2
Set up the Camera
Wired Setup
It is recommended that the initial setup be completed with the Ethernet cable. You may follow the
steps below to set up your camera.
Step 1 Connect the camera to a LAN port on your router with an Ethernet cable.
Step 2 Use the power adapter provided to power on the camera.
Your Smart Device
Power Cable
Camera
Power Adapter
Network Cable
Router
Dierent states of the status LED:
Red Light: WiFi connection failed Blinking: Standby status
Blue Light: WiFi connection succeeded On: Working status
English English5 6
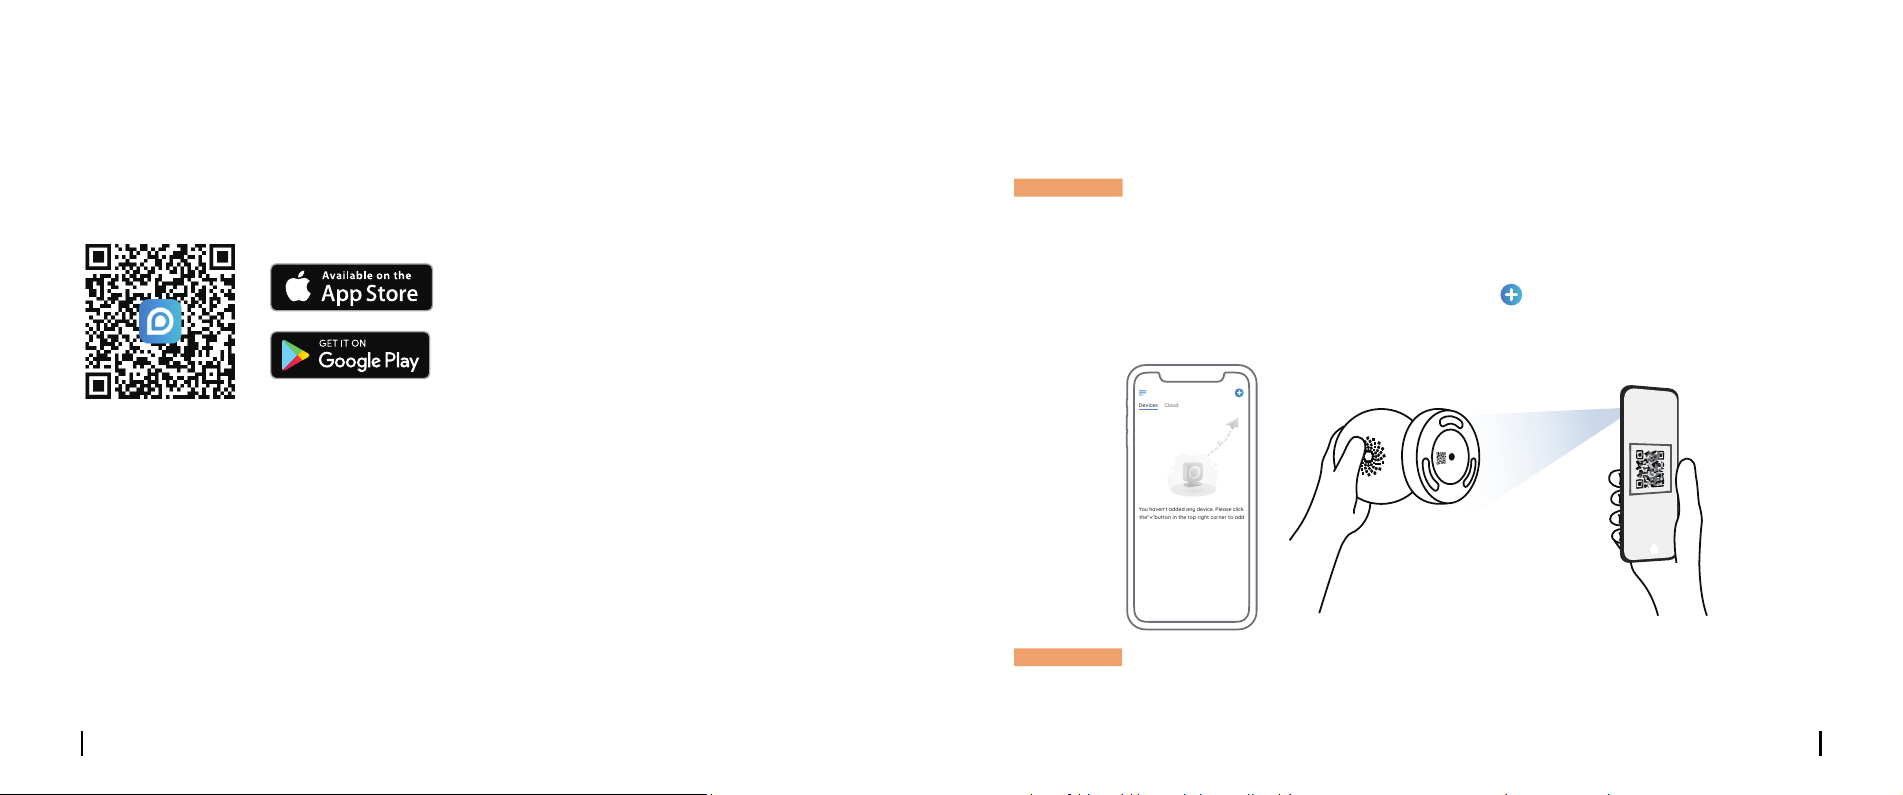
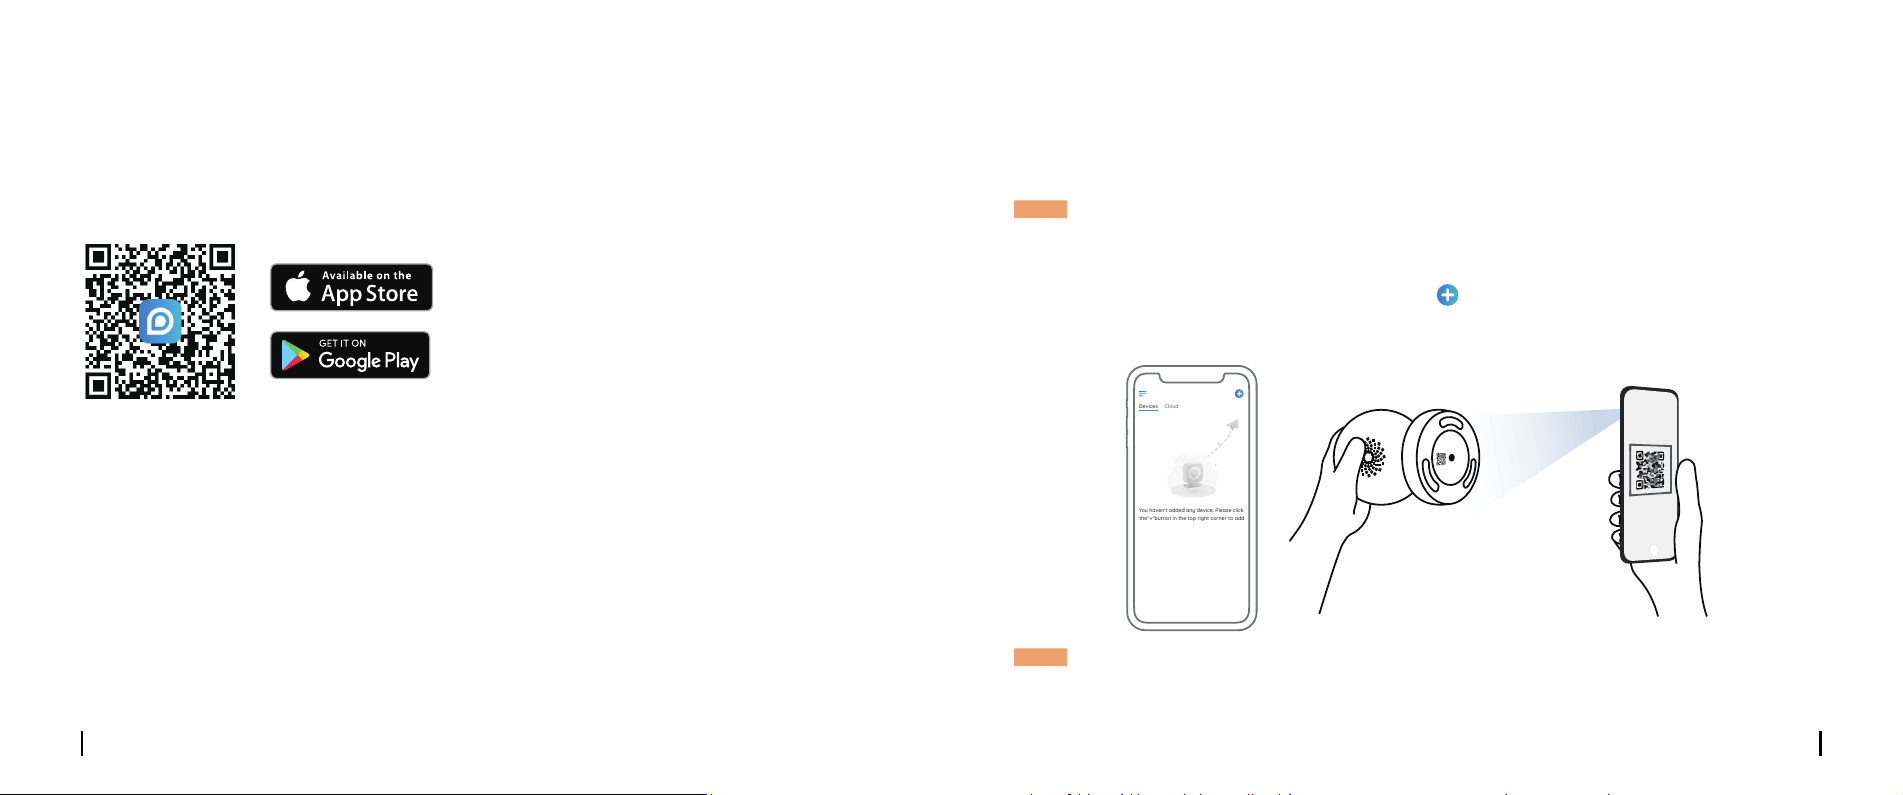
• On Smartphone
• On PC
Scan to download the Reolink App.
Download path of the Reolink Client: Go to https://reolink.com > Support > App & Client.
Step 3 Download and Launch the Reolink App or Client software, and follow the onscreen
instructions to nish initial setup.
If you set up Camera without the Ethernet cable, you may follow the steps below.
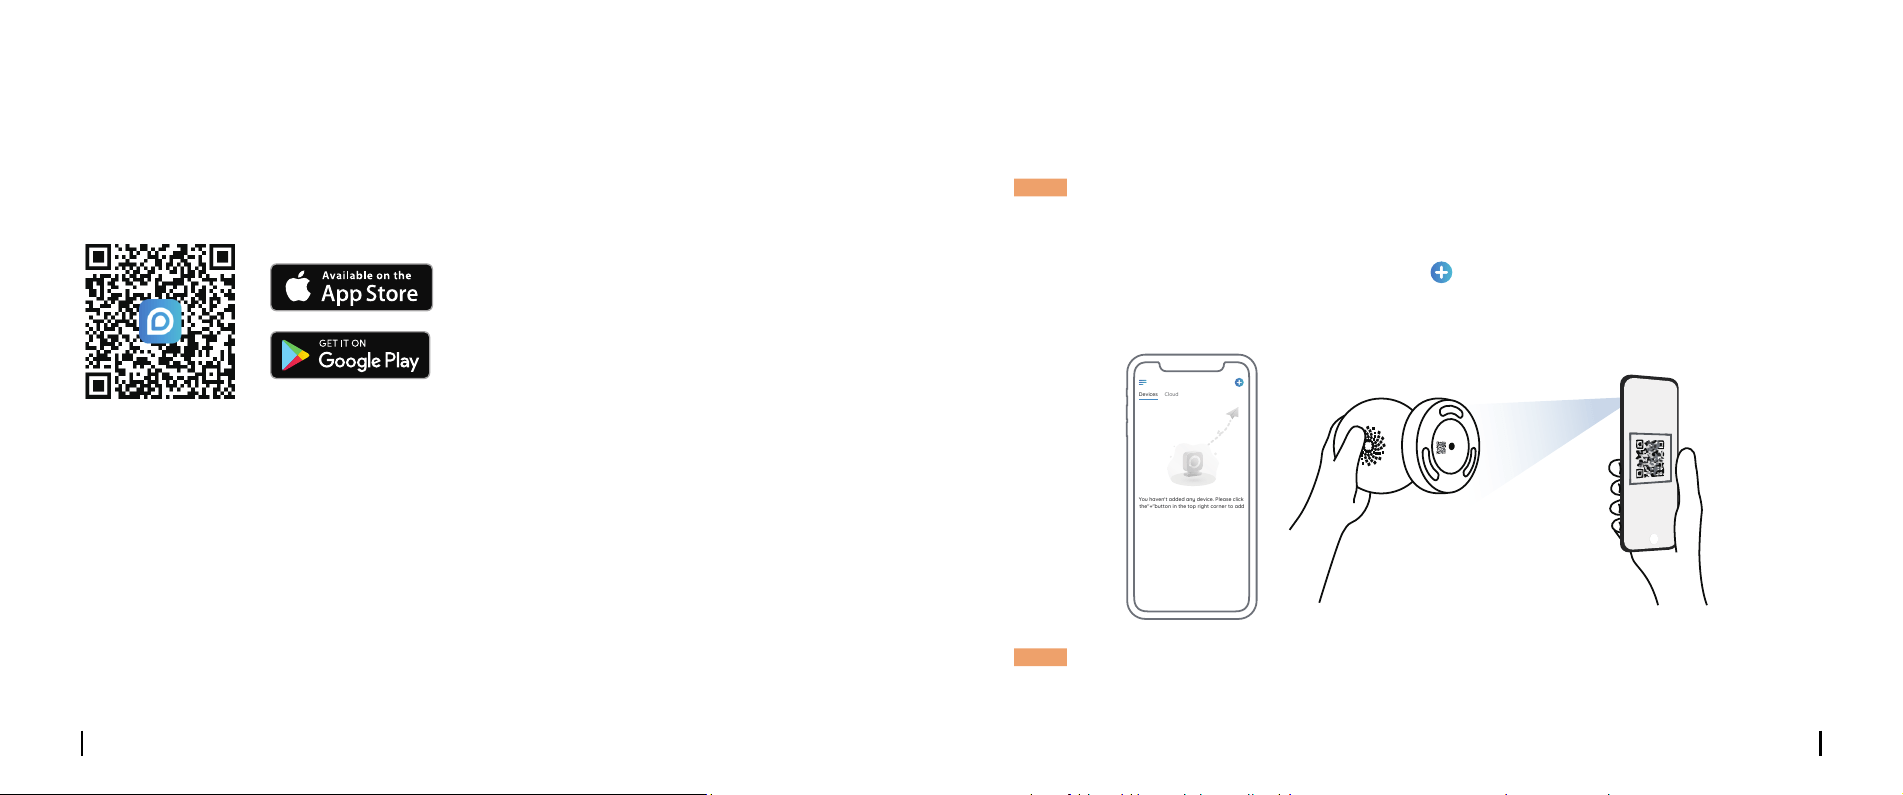
Wireless Setup
Step 1 Use the power adapter provided to power on the camera.
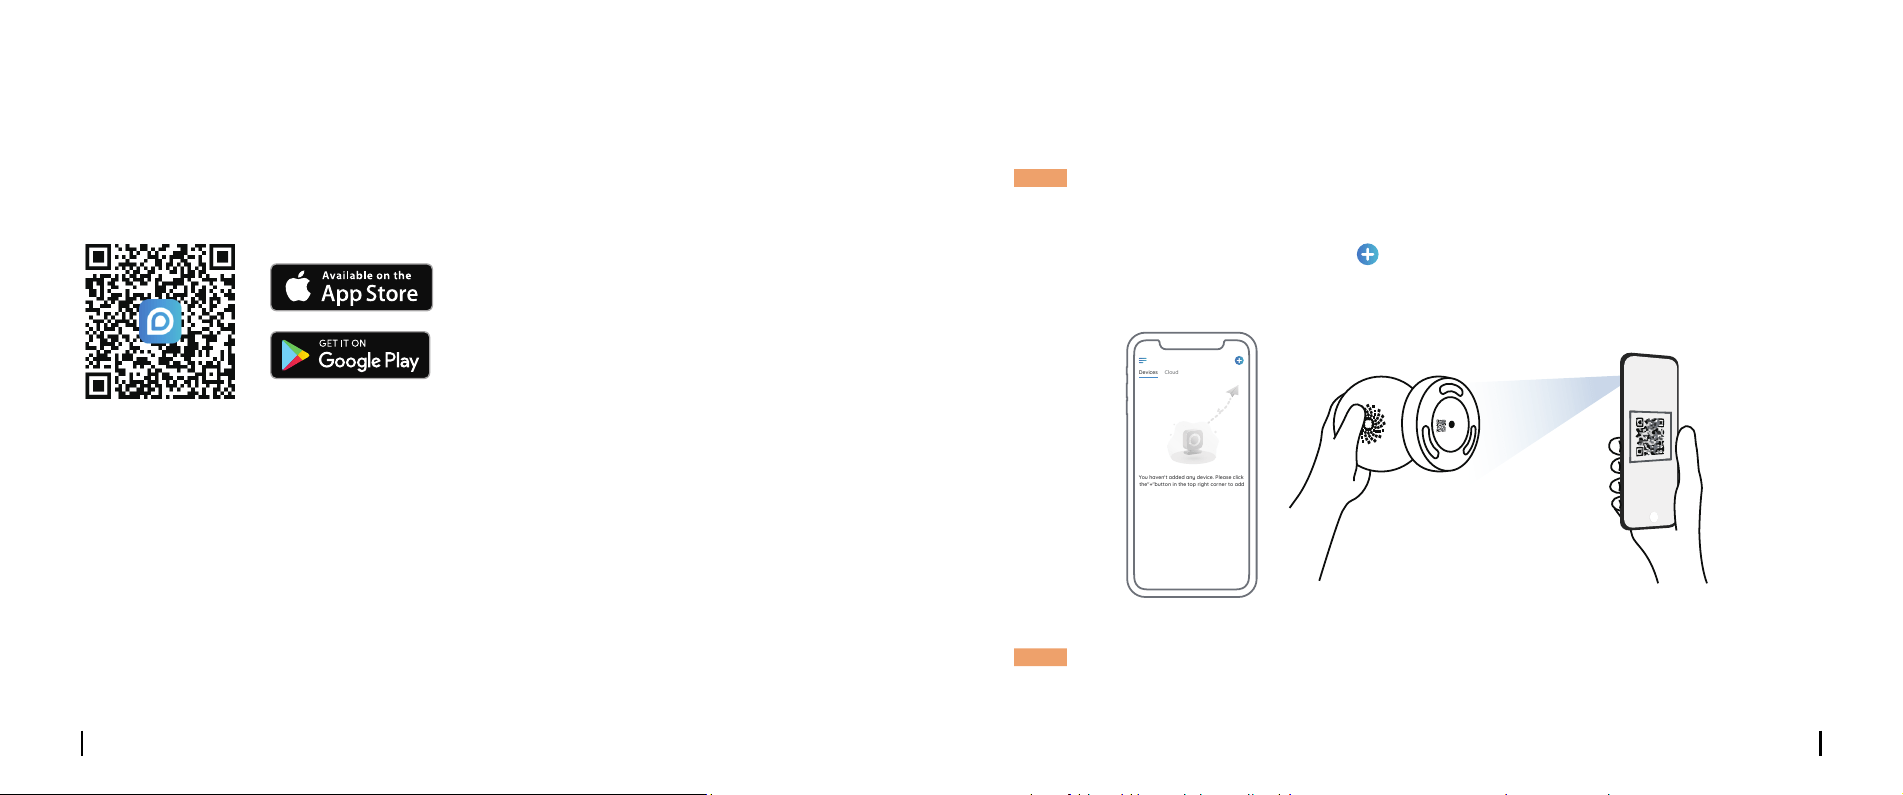
Step 2 Launch the Reolink App, click the “ ” button in the top right corner to add the camera.
Scan the QR code on the device and follow the onscreen instructions to nish initial setup.
NOTE: If you access the camera via the Reolink Client, you may click the Add Device icon and
choose the UID option to enter the UID of your camera. The UID is on the camera body
(right below the QR code).
NOTE: This device supports 2.4 GHz and 5 GHz Wi-Fi networks. It is recommended to connect the
device to 5 GHz Wi-Fi for a better network experience.
Devices
Cloud
You haven't added any device. Please click
the"+"button in the top right corner to add
1
2
3
“click”
“click”
open close
English English7 8
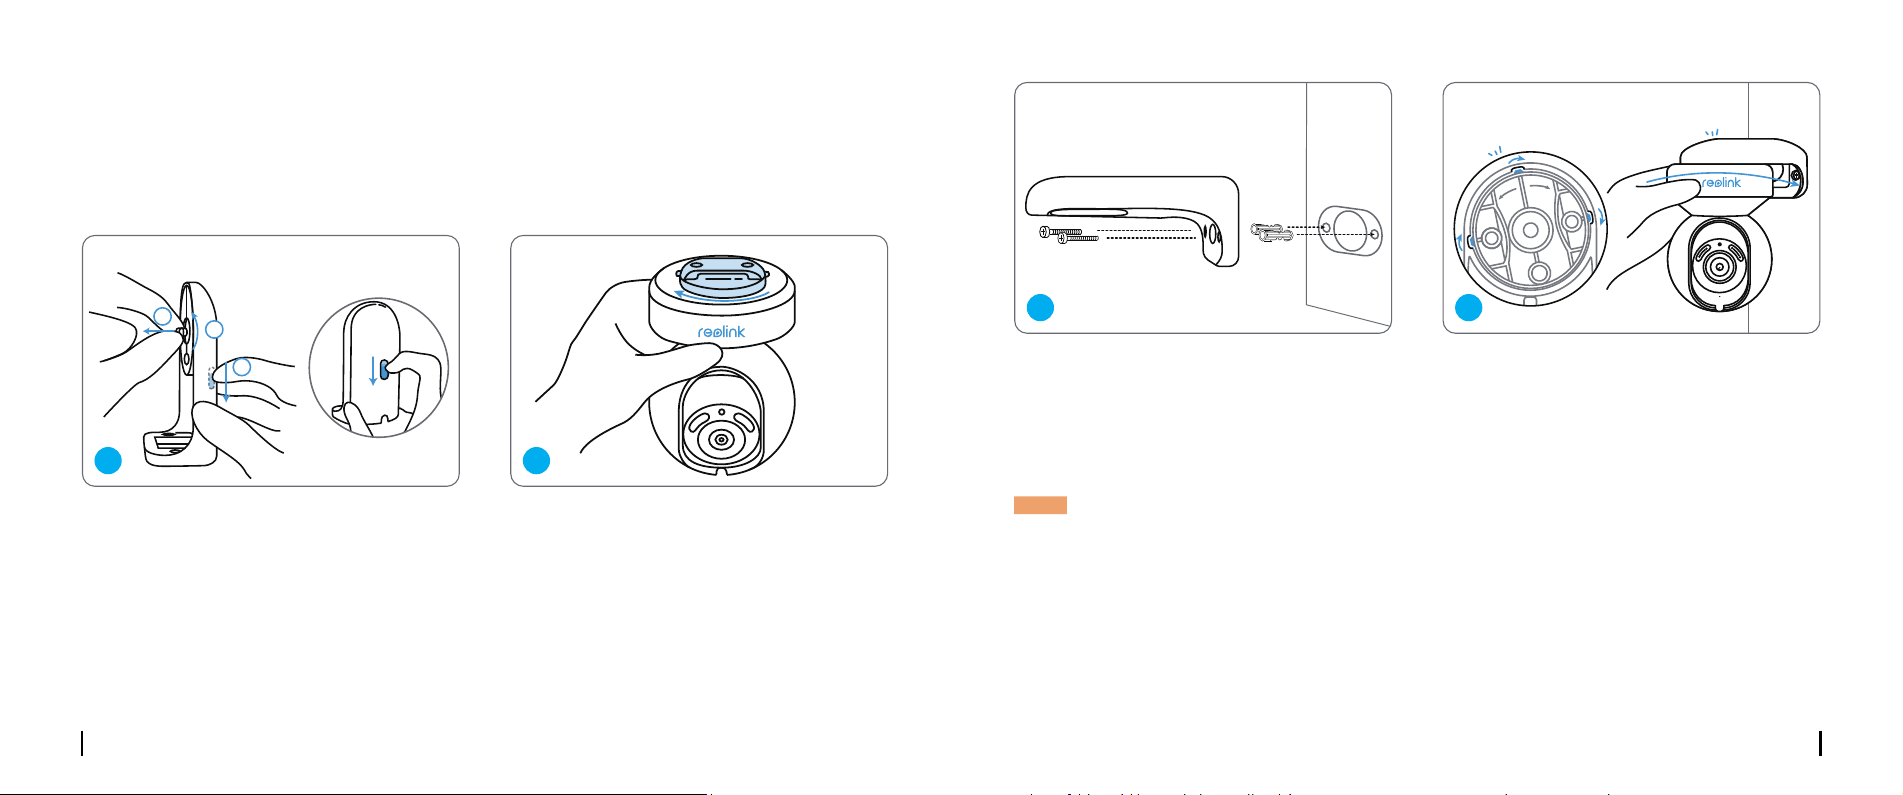
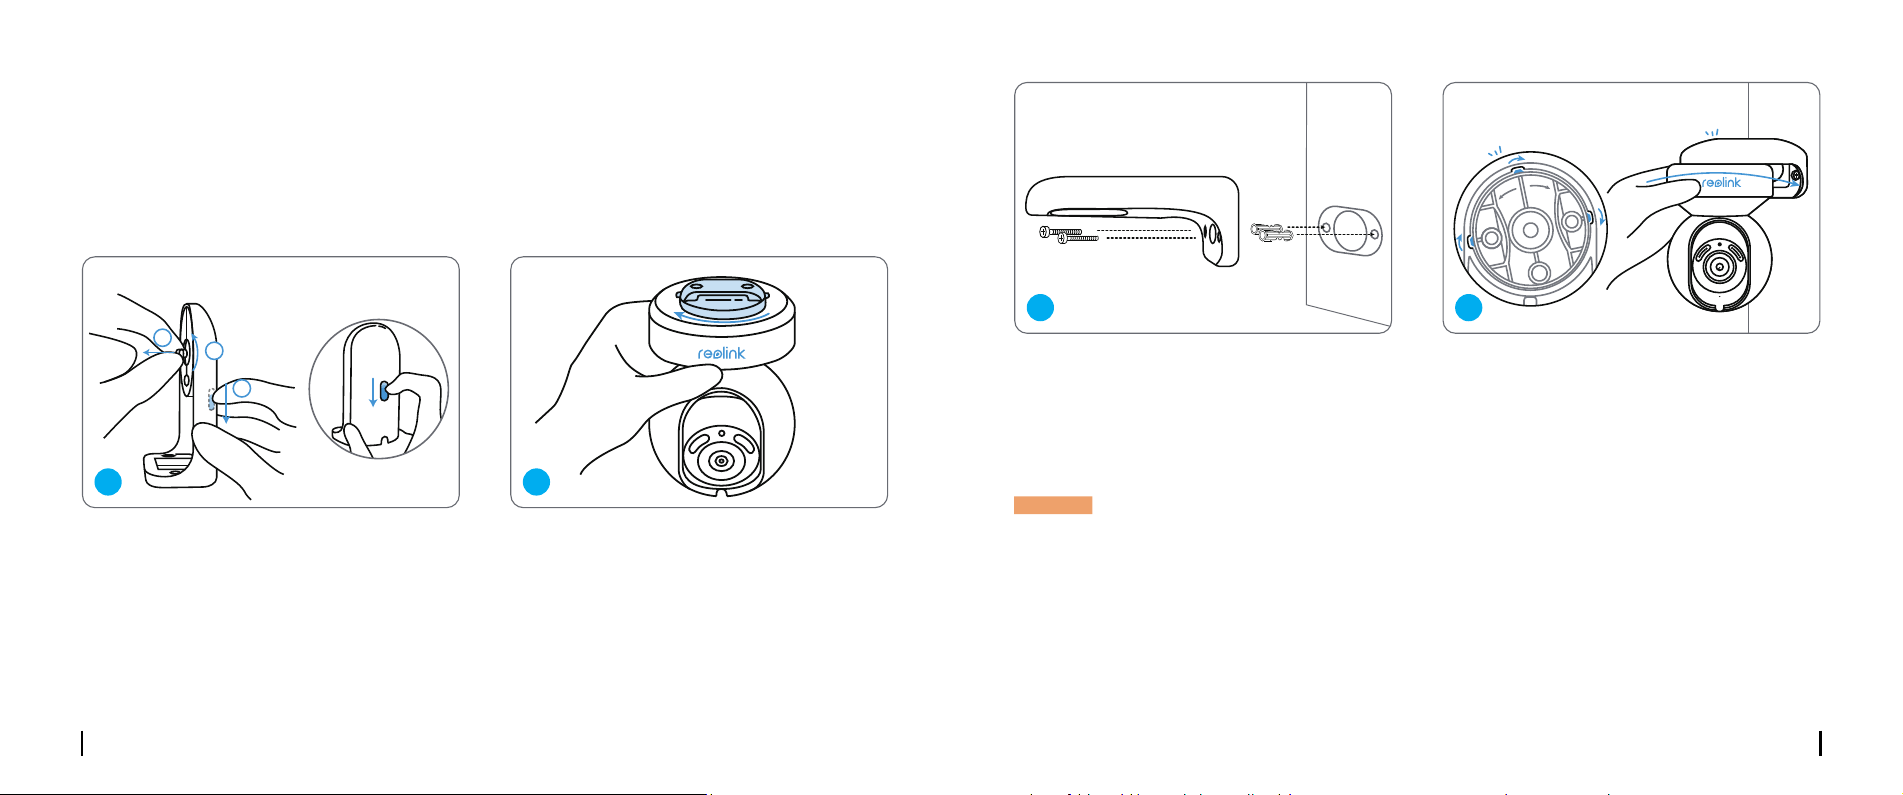
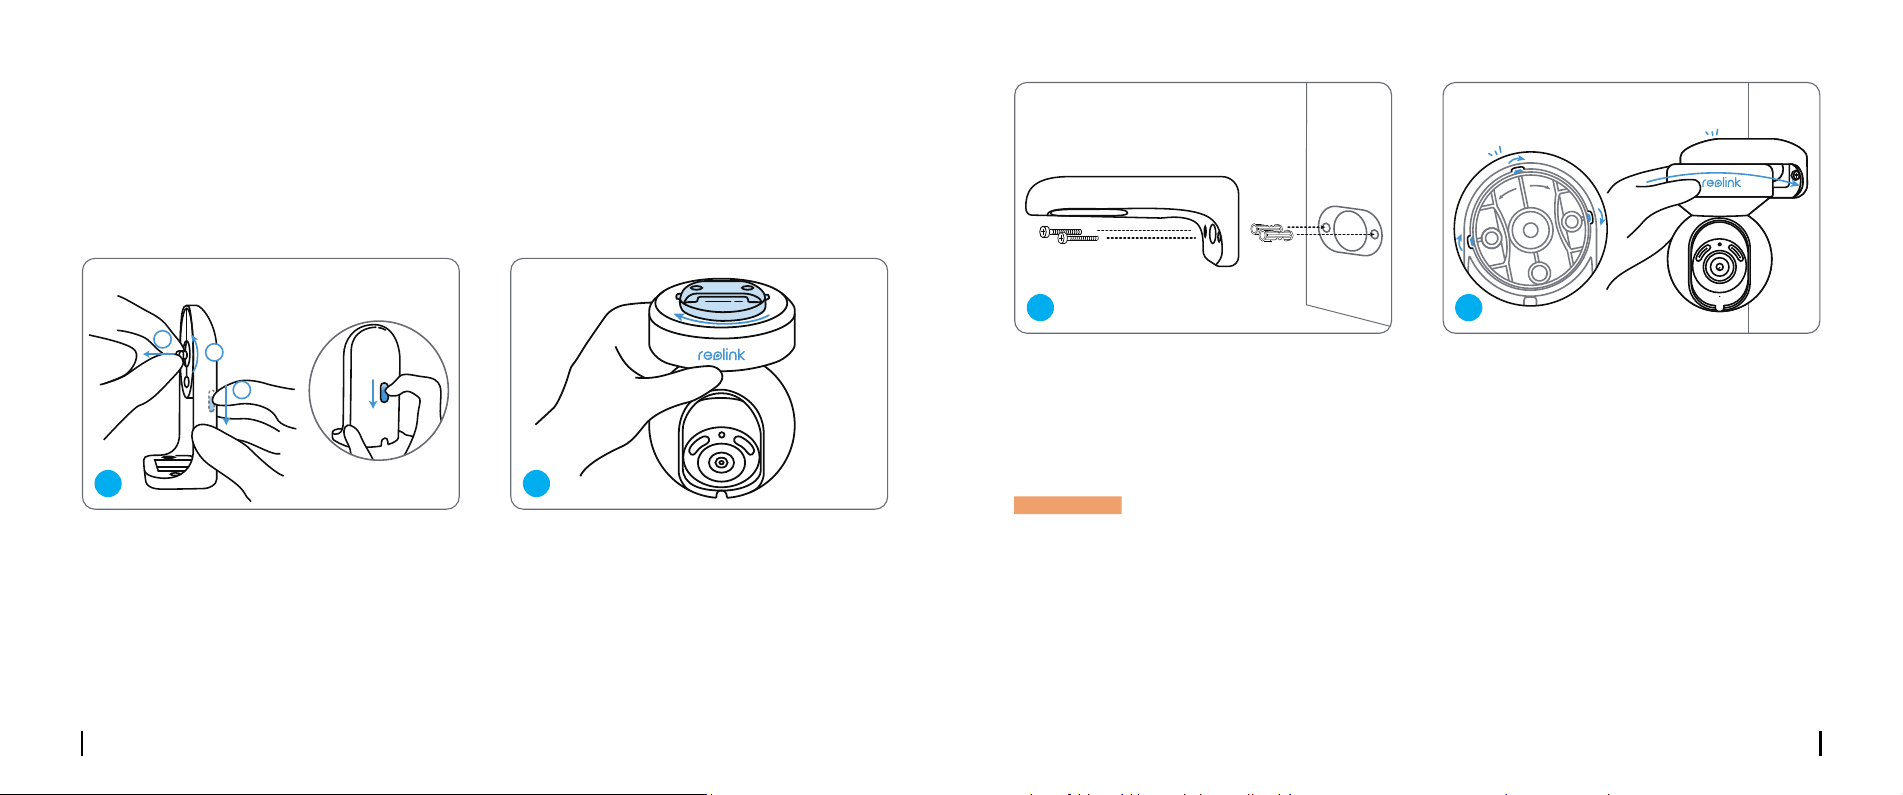
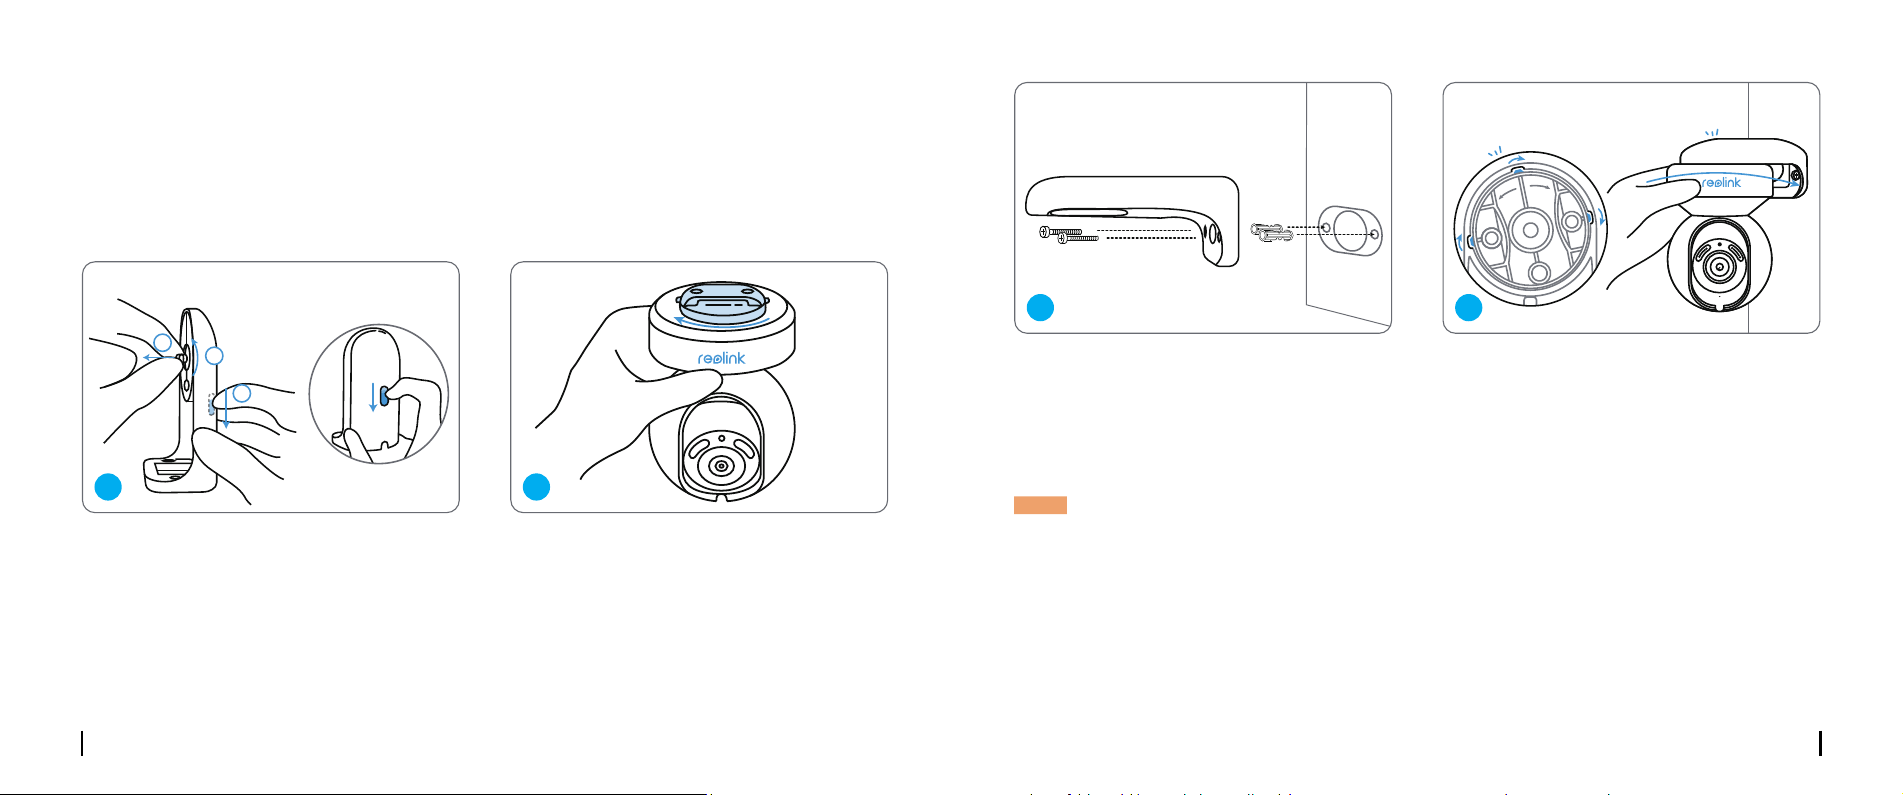
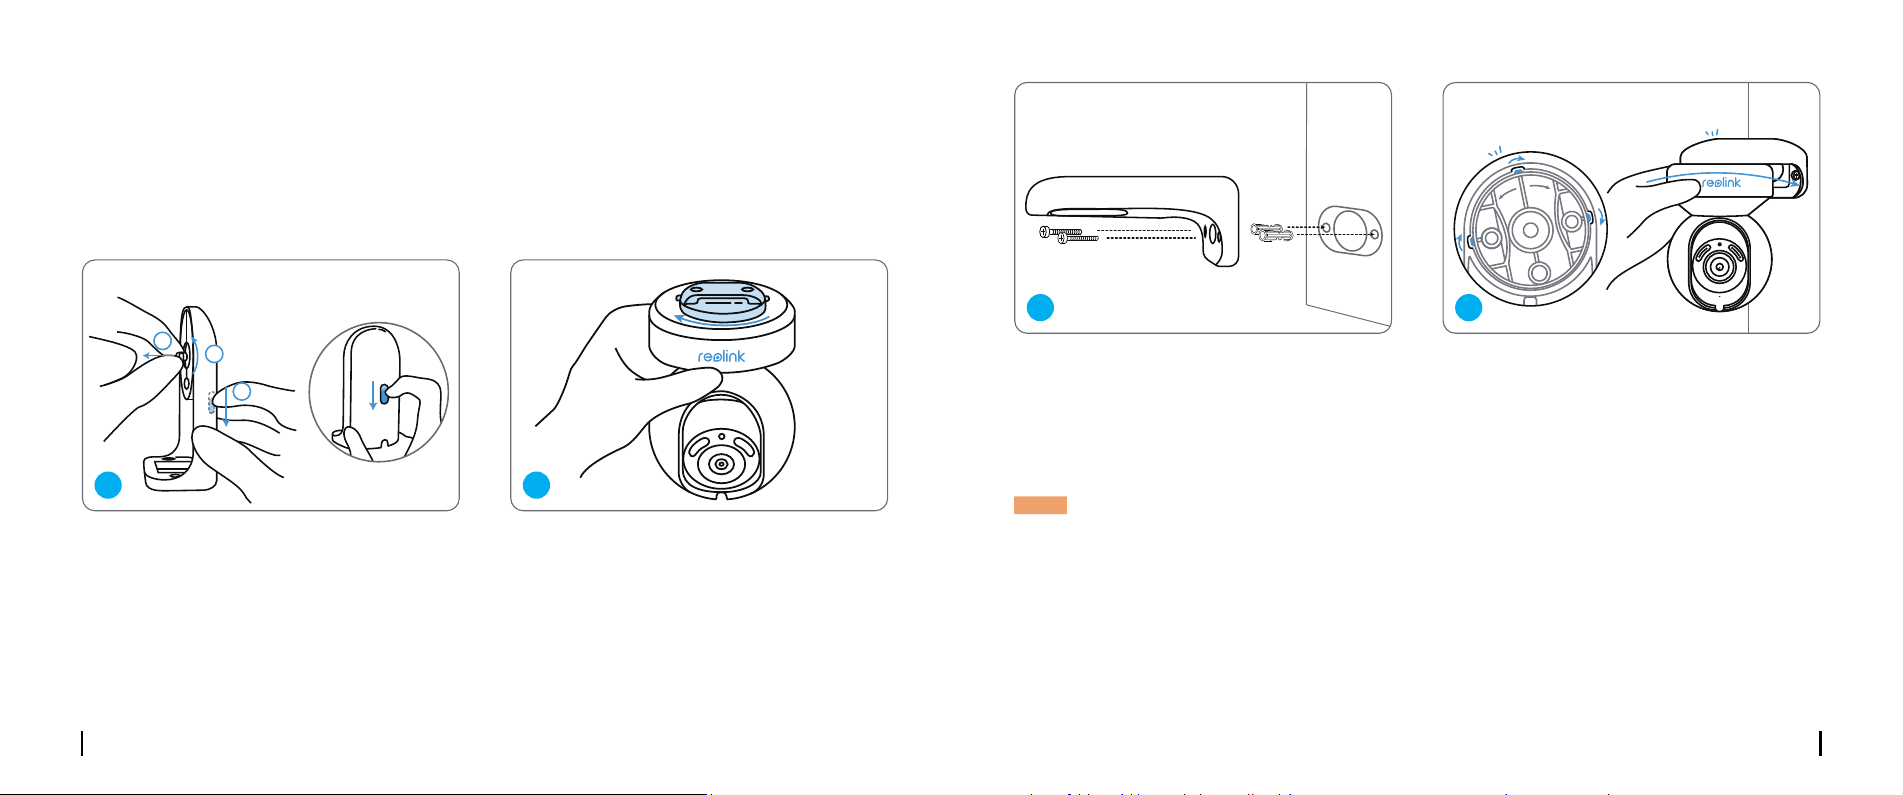
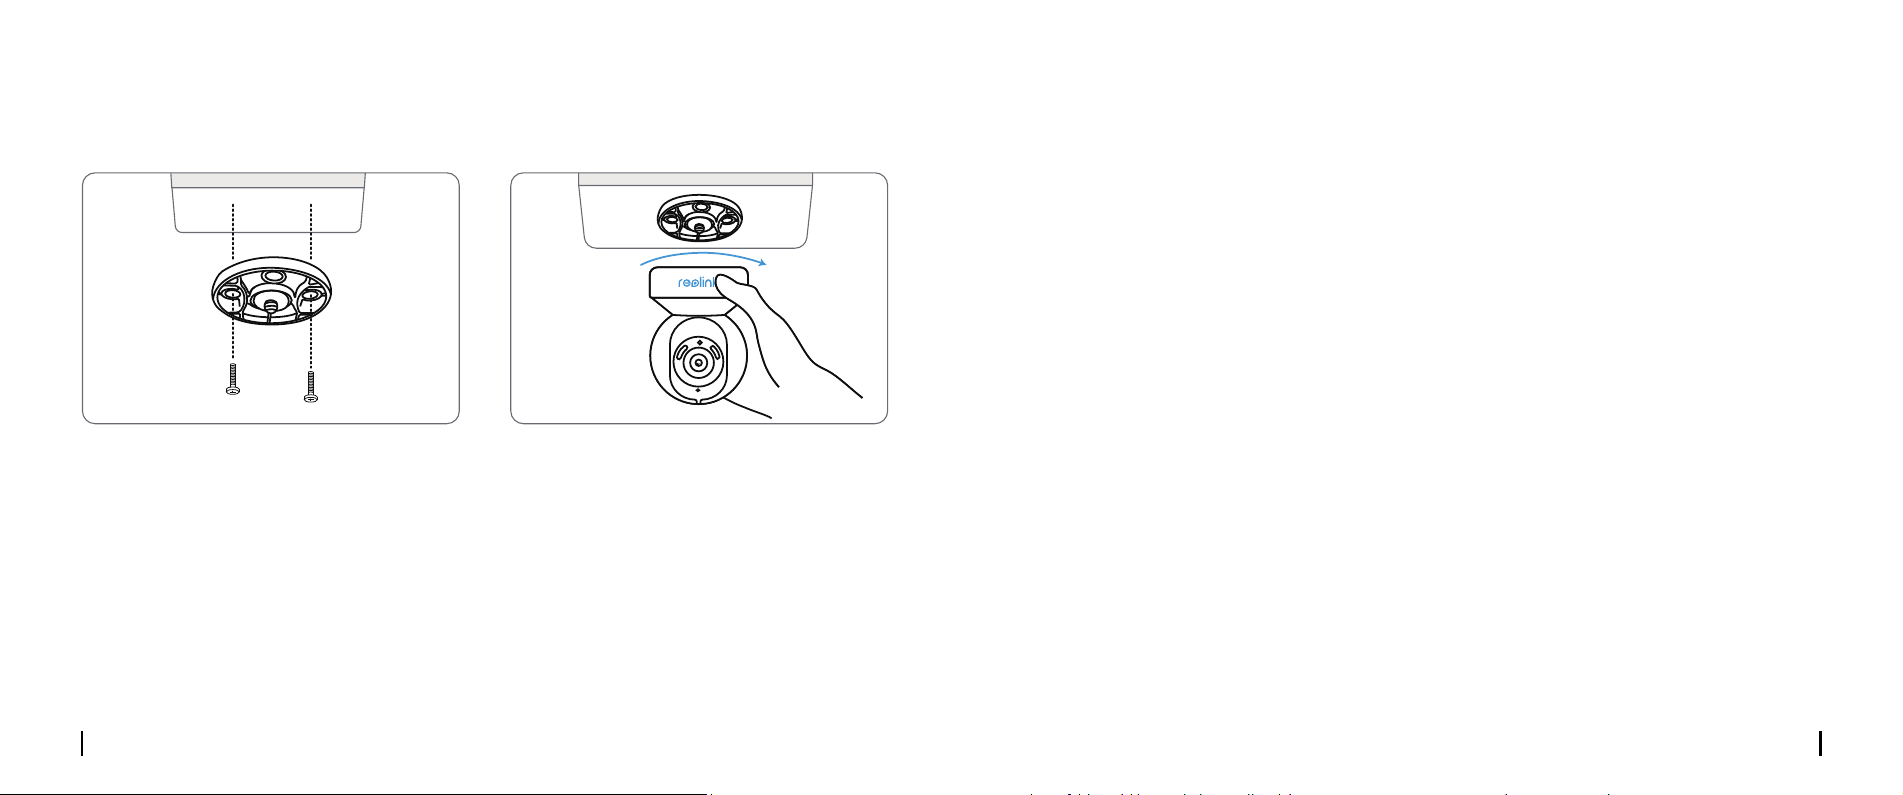
Install the Camera
Mount the Camera to the Wall
For outdoor use, the camera must be installed upside down for better waterproof performance.
Pull the button of the security mount and
unscrew the bracket to separate the two
parts.
Screw the bracket to the bottom of the camera.
Devices
Cloud
You haven't added any device. Please click
the"+"button in the top right corner to add
1
2
3
“click”
“click”
open close
Devices
Cloud
You haven't added any device. Please click
the"+"button in the top right corner to add
1
2
3
“click”
“click”
open close
1 2
Drill holes in accordance with the mounting
template and screw the security mount to
the wall.
Choose a proper direction of the camera
and then align the bracket to the security
mount and lock the camera in place by
turning anti-clockwise.
Devices
Cloud
You haven't added any device. Please click
the"+"button in the top right corner to add
1
2
3
“click”
“click”
open close
Devices
Cloud
You haven't added any device. Please click
the"+"button in the top right corner to add
1
2
3
“click”
“click”
open close
NOTE: Use the drywall anchors included in the package if needed.
3 4
English English9 10
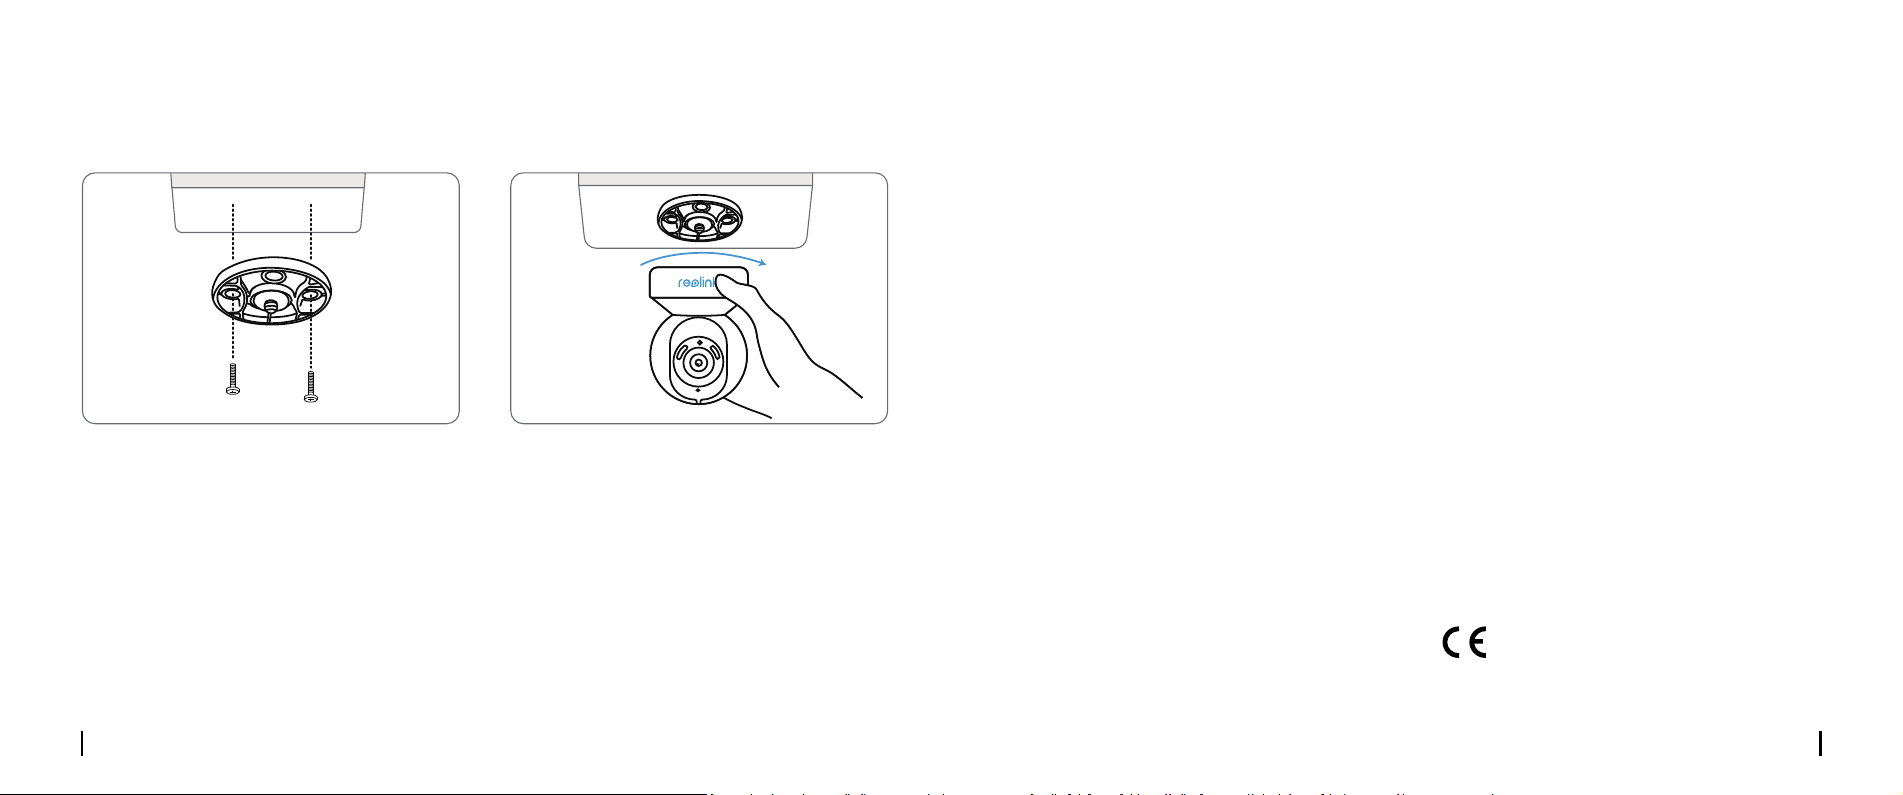
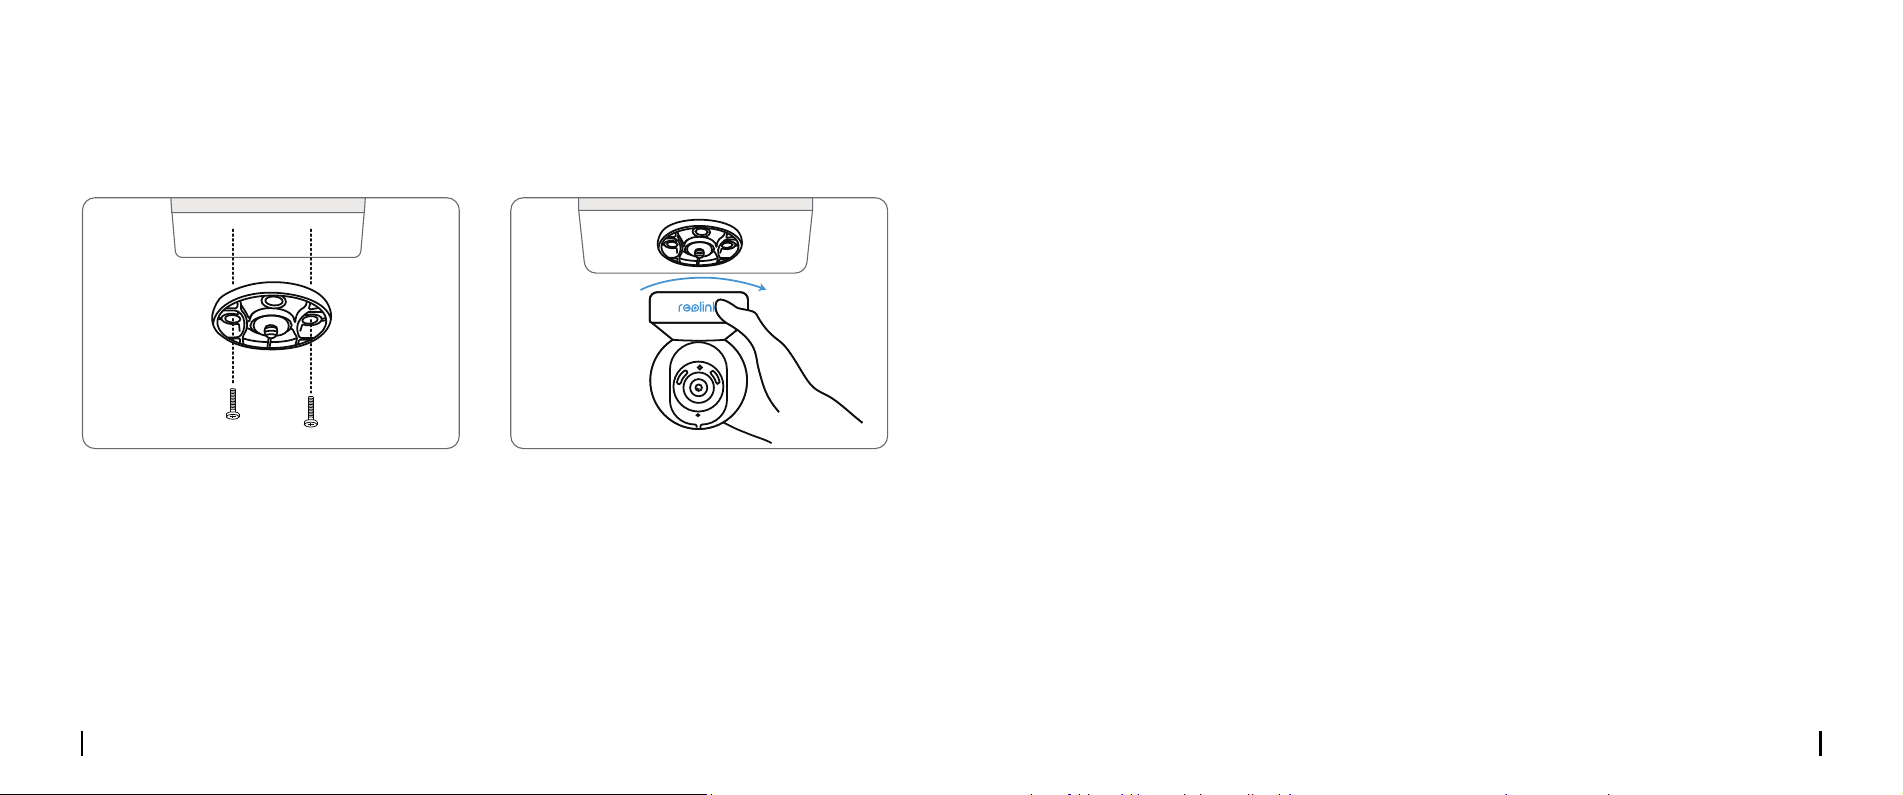
Mount the Camera to the Ceiling
Pull the button of the security mount and unscrew the ceiling bracket from the mount.
Install the bracket to the ceiling. Align the camera with the bracket and turn the camera unit
clockwise to lock it in position.
Devices
Cloud
You haven't added any device. Please click
the"+"button in the top right corner to add
1
2
3
“click”
“click”
open close
Devices
Cloud
You haven't added any device. Please click
the"+"button in the top right corner to add
1
2
3
“click”
“click”
open close
Troubleshooting
Specications
Camera is Not Powering on
WiFi Connection Failed During Initial
Setup Process
If your camera is not powering on, please try
the following solutions:
• Plug the camera into another outlet.
• Use another 12V power adapter to power on
the camera.
If these won’t work, please contact Reolink
Support.
If the camera failed to connect to WiFi, please
try the following solutions:
• Please ensure your have entered the correct
WiFi password.
• Put your camera close to your router to
ensure a strong WiFi signal.
• Change the encryption method of the WiFi
network to WPA-PSK/WPA2-PSK/WPA3-PSK
(safer encryption) on your router interface.
• Change your WiFi SSID or password and
make sure that SSID is within 31 characters
and password is within 64 characters.
• Set your password using only the characters
on the keyboard.
If these won’t work, please contact Reolink
Support.
Operating Frequency: 2.4/5GHz Dual-band
Operating Temperature:
-10°C to 55°C (14°F to 131°F)
Size: 85×118 mm
Weight: 395g
For more specications,please visit
https://reolink.com/
Notication of
Compliance
Reolink declares that this device is in
compliance with the essential requirements
CE Declaration of Conformity
English English11 12
and other relevant provisions of Directive
2014/53/EU and Directive 2014/30/EU.
Reolink declares that this product is in
compliance with Radio Equipment
Regulations 2017 and Electromagnetic
Compatibility Regulations 2016.
UKCA Declaration of Conformity
This device complies with Part 15 of the FCC
Rules. Operation is subject to the following
two conditions: (1) this device may not cause
harmful interference, and (2) this device must
accept any interference received, including
interference that may cause undesired
operation.
NOTE: This equipment has been tested and
found to comply with the limits for a Class B
digital device, pursuant to Part 15 of the FCC
Rules. These limits are designed to provide
reasonable protection against harmful in-
terference in a residential installation. This
equipment generates, uses and can radiate
radio frequency energy and, if not installed
and used in accordance with the instructions,
FCC Compliance Statements
may cause harmful interference to radio
communications. However, there is no guar-
antee that interference will not occur in a
particular installation. If this equipment does
cause harmful interference to radio or televi-
sion reception, which can be determined by
turning the equipment o and on, the user is
encouraged to try to correct the interference
by one or more of the following measures:
• Reorient or relocate the receiving antenna.
• Increase the separation between the equip-
ment and receiver.
• Connect the equipment into an outlet on a
circuit dierent from that to which the receiver
is connected.
• Consult the dealer or an experienced radio/
TV technician for help.
Caution: Changes or modications not ex-
pressly approved by the party responsible for
compliance could void the user’s authority to
operate the equipment.
This equipment complies with FCC radiation
exposure limits set forth for an uncontrolled
environment. This equipment should be in-
This device contains licence-exempt transmit-
ter(s)/receiver(s) that comply with Innovation,
Science and Economic Development Canada’s
licence-exempt RSS(s). Operation is subject to
the following two conditions:
(1) This device may not cause interference.
(2) This device must accept any interference,
including interference that may cause unde-
sired operation of the device.
FCC Radiation Exposure statement
ISED Compliance Statements
This equipment complies with IC RSS-102 ra-
diation exposure limits set forth for an uncon-
trolled environment. This equipment should be
installed and operated with minimum distance
20 cm between the radiator and your body.
NOTE: Operation of 5150-5250 MHz is restrict-
ed to indoor use only in Canada.
This marking indicates that this product
should not be disposed with other household
wastes.throughout the EU. To prevent possible
harm to the environment or human health
from uncontrolled waste disposal, recycle it
responsibly to promote the sustainable reuse
of material resources. To return your used
device, please use the return and collection
systems or contact the retailer where the
product was purchased. They can take this
product for environmentally safe recycling.
ISED Radiation Exposure statement
Correct Disposal of This Product
stalled and operated with minimum distance
20cm between the radiator and your body.
This product comes with a 2-year limited
warranty that is valid only if purchased from
Reolink Ocial Store or a Reolink authorized
reseller. Learn more:
https://reolink.com/warranty-and-return/.
Limited Warranty
English13
Use of the product is subject to your
agreement to the Terms of Service and
Privacy Policy at reolink.com. Keep out of
reach of children.
Terms and Privacy
OPERATING FREQUENCY :
(the maximum transmitted power)
2.4GHz: (For 2.4GHz camera only):
2412MHz--- 2472MHz( EIRP < 20 dBm )
5GHz:
5150MHz--- 5250MHz( EIRP < 23 dBm)
5745MHz--- 5825MHz( EIRP < 14 dBm )
WiFi Operating Frequency
The functions of Wireless Access
Systems including Radio Local
Area Networks(WAS/RLANs) within
the band 5150-5350 MHz for this device
are restricted to indoor use only within all
European Union countries (BE/BG/CZ/DK/
DE/EE/IE/EL/ES/FR/HR/ IT/CY/LV/LT/
LU/HU/MT/NL/AT/PL/PT/RO/SI/SK/FI/
SE/TR/N O/CH/IS/LI/UK(NI)
Deutsch Deutsch15 16
Lieferumfang
DE
Katalog
Lieferumfang ···············································································16
Über die Kamera ············································································17
Einrichten der Kamera ······································································18
Installation der Kamera ·····································································21
Fehlersuche ·················································································24
Spezikationen ··············································································24
Konformitätserklärung ······································································25
Kamera
1m
Netzwerkkabel
Montageschablone
Schnellstart-
Leitfaden
Überwachungs
-aufkleber
Kamerahalterung Reset-NadelNetzadapter
Schraubenpack 4,5m Strom-
Verlängerungskabel

Deutsch Deutsch17 18
Devices
Cloud
You haven't added any device. Please click
the"+"button in the top right corner to add
1
2
3
“click”
“click”
open close
M
ic
ro
S
D
Über die Kamera
Reset-Taste
MicroSD-Kartenslot
Tageslichtsensor
Spotlight
IR-LEDs
Objektiv
Status-LED
Einbau-Mikrofon
Lautsprecher
Stromkabel
Netzwerkkabel
* Zurück auf Werkseinstellungen:
Reset-Taste über 5s drücken.
*Das Objektiv drehen, um die Reset-
Taste und den SD-Kartenslot zu
nden.
3
4
5
8
9
10
11
7
6
1
1
2
3
4
5
6
7
8
9
10
11
2
Einrichten der Kamera
Verkabeltes Setup
Es wird empfohlen, die Ersteinrichtung mit dem Netzwerkkabel durchzuführen. Gehen Sie wie folgt
vor, um Ihre Kamera einzurichten.
Schritt 1 Schließen Sie die Kamera über ein Netzwerkkabel an einen LAN-Port Ihres Routers an.
Schritt 2 Verwenden Sie den mitgelieferten Netzadapter, um die Kamera einzuschalten.
Ihr Smart Device
Stromkabel
Kamera
Netzdapter
Netzwerkkabel
Router
Verschiedene Zustände der Status-LED:
Rotes Licht: WLAN-Verbindung fehlgeschlagen Blinkt: Standby-Status
Blaues Licht: WLAN-Verbindung erfolgreich Ein: in Betrieb
Deutsch Deutsch19 20
• Auf Smartphone
• Auf PC
Scannen & Reolink App herunterladen
Download-Pfad für Reolink Client: https://reolink.com > Support> App & Client.
Schritt 3 Laden Sie Reolink App oder Client Software herunter, starten Sie es und folgen Sie
den Anweisungen auf dem Bildschirm, um die Ersteinrichtung abzuschließen.
Wenn Sie die Kamera ohne das Netzwerkkabel einrichten, können Sie die folgenden Schritte
ausführen.
Kabelloses Setup
Schritt 1 Verwenden Sie den mitgelieferten Netzadapter, um die Kamera einzuschalten.
Schritt 2 Starten Sie die Reolink App, klicken Sie auf die Schaltäche “ “ in der oberen rechten
Ecke, um die Kamera hinzuzufügen. Scannen Sie den QR-Code auf dem Gerät und folgen Sie den
Anweisungen auf dem Bildschirm, um die Ersteinrichtung abzuschließen.
HINWEIS: Wenn Sie über den Reolink Client auf die Kamera zugreifen, können Sie auf das Symbol
Gerät hinzufügen klicken und die Option UID wählen, um die UID Ihrer Kamera einzugeben. Die UID
bendet sich auf dem Kameragehäuse (direkt unter dem QR-Code).
HINWEIS: Dieses Gerät unterstützt 2,4 GHz und 5 GHz WLAN. Es wird empfohlen, das Gerät mit
5GHz WLAN zu verbinden, um eine bessere Netzwerkerfahrung zu erhalten.
Devices
Cloud
You haven't added any device. Please click
the"+"button in the top right corner to add
1
2
3
“click”
“click”
open close
Deutsch Deutsch21 22
Installation der Kamera
Montage an der Wand
Beim Außeneinsatz muss die Kamera für bessere Wasserdichtigkeit mit dem Kopf nach unten
installiert werden.
Ziehen Sie den Knopf der Sicherheitshalterung
und schrauben Sie die Halterung ab, um die
beiden Teile zu trennen.
Schrauben Sie die Halterung an der Unterseite
der Kamera fest.
Devices
Cloud
You haven't added any device. Please click
the"+"button in the top right corner to add
1
2
3
“click”
“click”
open close
Devices
Cloud
You haven't added any device. Please click
the"+"button in the top right corner to add
1
2
3
“click”
“click”
open close
1 2
Bohren Sie Löcher gemäß der
Montageschablone und schrauben Sie die
Sicherheitshalterung an die Wand.
Wählen Sie die richtige Ausrichtung der
Kamera, richten Sie dann die Halterung
an der Sicherheitshalterung aus und
verriegeln Sie die Kamera durch Drehen im
Uhrzeigersinn.
Devices
Cloud
You haven't added any device. Please click
the"+"button in the top right corner to add
1
2
3
“click”
“click”
open close
Devices
Cloud
You haven't added any device. Please click
the"+"button in the top right corner to add
1
2
3
“click”
“click”
open close
HINWEIS: Verwenden Sie bei Bedarf die im Lieferumfang enthaltenen Trockenbauanker.
3 4
Deutsch Deutsch23 24
Montage an der Decke
Ziehen Sie den Knopf der Sicherheitshalterung und schrauben Sie den Deckensockel von der
Halterung ab.
Bringen Sie den Sockel an der Decke an. Richten Sie die Kamera an dem Sockel aus und drehen
Sie die Kameraeinheit im Uhrzeigersinn, um sie zu xieren.
Devices
Cloud
You haven't added any device. Please click
the"+"button in the top right corner to add
1
2
3
“click”
“click”
open close
Devices
Cloud
You haven't added any device. Please click
the"+"button in the top right corner to add
1
2
3
“click”
“click”
open close
Fehlersuche
Spezikationen
Kamera lässt sich nicht einschalten
WLAN-Verbindung während der ersten
Einrichtung fehlgeschlagen
Wenn Sie die Kamera nicht einschalten
können, versuchen Sie bitte die folgenden
Lösungen:
• Schließen Sie die Kamera an eine andere
Steckdose an.
• Verwenden Sie einen anderen 12V
Netzadapter, um die Kamera einzuschalten.
Bleibt es ungelöst, kontaktieren Sie bitte
Reolink Support.
Wenn die Kamera keine Verbindung zum
WLAN herstellen kann, versuchen Sie bitte die
folgenden Lösungen:
• Bitte vergewissern Sie sich, dass Sie das
richtige WLAN-Passwort eingegeben haben.
• Stellen Sie Ihre Kamera in die Nähe Ihres
Routers, um ein starkes WLAN-Signal zu
gewährleisten.
• Ändern Sie die Verschlüsselungsmethode
des WLAN-Netzwerks auf WPA2-PSK/WPA-
PSK
(sicherere Verschlüsselung) auf der
Schnittstelle Ihres Routers.
• Ändern Sie Ihre WLAN SSID oder Ihr
Passwort und stellen Sie sicher, dass die SSID
nicht länger als 31 Zeichen und das Passwort
nicht länger als 64 Zeichen ist.
• Bestimmen Sie Ihr Passwort nur mit den
Zeichen auf der Tastatur.
Bleibt es ungelöst, kontaktieren Sie bitte
Reolink Support.
Betriebsfrequenz: 2,4/5GHz Dualband
Betriebstemperatur:
-10°C bis 55°C (14°F bis 131°F)
Größe: 85×118 mm
Gwicht: 395g
Für weitere Spezikationen, besuchen Sie bitte
https://reolink.com/
Deutsch Deutsch25 26
Reolink erklärt, dass dieses Gerät den
wesentlichen Anforderungen und anderen
relevanten Vorschriften der Richtlinie
2014/53/EU und der Richtlinie 2014/30/EU
entspricht.
CE-Konformitätserklärung
Konformitätserklärung
Reolink erklärt, dass dieses Produkt den
Bestimmungen von Electromagnetic
Compatibility Regulations 2016 und Electrical
Equipment Safety Regulations 2016 entspricht.
Das Gerät erfüllt die Anforderungen von Teil
15 der FCC Vorschriften. Der Betrieb unterliegt
den zwei Bedingungen: (1) Das Gerät darf
keine schädlichen Interferenzen verursachen,
und (2) das Gerät muss alle empfangenen In-
terferenzen akzeptieren, inkl. Interferenzen, die
unerwünschten Betrieb verursachen können.
HINWEIS: Dieses Gerät wurde getestet und
entspricht den Grenzwerten für ein digitales
UKCA-Konformitätserklärung
FCC-Konformitätserklärung
Gerät der Klasse B gemäß Teil 15 der FCC
Vorschriften. Diese Grenzwerte sind so aus-
gelegt, dass sie einen angemessenen Schutz
gegen schädliche Störungen bei der Instal-
lation in Wohngebieten sicherstellen. Dieses
Gerät erzeugt und verwendet Hochfrequen-
zenergie und kann diese ausstrahlen. Wenn es
nicht gemäß den Anweisungen installiert und
verwendet wird, kann esschädliche Störungen
im Funkverkehr verursachen. Es kann jedoch
nicht garantiert werden, dass bei einer bes-
timmten Installation keine Störungen auftre-
ten. Wenn dieses Gerät Störungen des Radio
oder Fernsehempfangs verursacht, was durch
Ein- und Ausschalten des Geräts festgestellt
werden kann, sollte der Benutzer versuchen,
die Störungen durch eine oder mehrere der
folgenden Maßnahmen zu beheben:
• Richten Sie die Empfangsantenne neu aus
oder stellen Sie sie um.
• Vergrößern Sie den Abstand zwischen dem
Gerät und dem Epfänger.
• Schließen Sie das Gerät an eine Steckdose
eines anderen Stromkreises an als den, an den
der Empfänger angeschlossen ist.
• Wenden Sie sich an den Händler oder einen
erfahrenen Radio- / TV-Techniker, um Hilfe zu
erhalten.
Achtung: Änderungen oder Modikationen, die
nicht ausdrücklich von der für die Konformität
verantwortlichen Partei genehmigt sind, kön-
nen Berechtigung des Benutzers zum Betrieb
des Gerätes aufheben.
Dieses Gerät entspricht den FCC-Strahlenex-
positionsgrenzwerten, die für eine unkontrol-
lierte Umgebung festgelegt sind. Dieses Gerät
muss mit einem Mindestabstand 20cm von
dem Radiator und Ihrem Körper installiert und
betrieben werden.
FCC-Erklärung zur Strahlungsexposition
Dieses Gerät enthält lizenzbefreite(n) Sender/
Empfänger, die den lizenzbefreiten RSS(s)
von Innovation, Science and Economic De-
velopment Canada entsprechen. Der Betrieb
unterliegt den folgenden zwei Bedingungen:
(1) Dieses Gerät darf keine Störungen
verursachen.
(2) Dieses Gerät muss alle Interferenzen
akzeptieren, einschließlich Interferenzen, die
einen unerwünschten Betrieb des Geräts
verursachen können.
ISED-Konformitätserklärung
Dieses Gerät entspricht den IC
RSS-102-Grenzwerten für die Strahlenbelas-
tung in einer unkontrollierten Umgebung.
Dieses Gerät muss mit einem Mindestabstand
20cm von dem Radiator und Ihrem Körper
installiert und betrieben werden.
HINWEIS: Der Betrieb von 5150-5250 MHz ist
in Kanada nur für den Einsatz in Innenräumen
zugelassen.
ISED-Erklärung zur Strahlungsexposition
Das Zeichen bedeutet, dass das Produkt in der
ganzen EU nicht mit anderen Haushaltsab-
fällen entsorgt werden darf. Um mögliche
Schäden für die Umwelt oder die menschliche
Gesundheit zu vermeiden, recyceln Sie es
am besten auf eine geeignete Weise. Um Ihr
Altgerät zurückzugeben, nutzen Sie bitte die
Rückgabe- und Sammelsysteme oder wen-
den Sie sich an den Händler, bei dem Sie das
Produkt gekauft haben. Dort kann man das
Produkt einem umweltgerechten Recycling
zuführen.
Richtige Entsorgung
Deutsch27
Nutzen des Produkts unterliegt Ihrer
Zustimmung zu den AGB und der
Datenschutzrichtlinie auf reolink.com.
Halten Sie es von Kindern fern.
Datenschutz & AGB
BETRIEBSFREQUENZ
(die maximale Sendeleistung)
2.4GHz: (Nur für 2,4GHz WLAN Kamera):
2412MHz--- 2472MHz( EIRP < 20 dBm )
5GHz:
5150MHz--- 5250MHz( EIRP < 23 dBm)
5745MHz--- 5825MHz( EIRP < 14 dBm )
WLAN Betriebsfrequenz
Dieses Produkt wird mit einer eingeschränkten
2-Jahres-Garantie geliefert, die nur gültig ist,
wenn es im oziellen Reolink-Shop oder bei
einem autorisierten Reolink-Händler gekauft
wurde. Mehr:
https://reolink.com/warranty-and-return/.
Begrenzte Garantie
Die Funktionen von drahtlosen
Zugangssystemen einschließlich
lokaler Funknetze (WAS/RLANs)
innerhalb des Bandes 5150-5350 MHz
für dieses Gerät sind in allen Ländern
der Europäischen Union auf den
Innenraumbetrieb beschränkt. (BE/BG/CZ/
DK/DE/EE/IE/EL/ES/FR/HR/IT/CY/LV/
LT/LU/HU/MT/NL/AT/PL/PT/RO/SI/SK/
FI/SE/TR/N O/CH/IS/LI/UK(NI)

Français Français29 30
Contenu de la Boîte
FR
Table des Matières
Contenu de la Boîte ·········································································30
Présentation de la caméra ···································································31
Installation de la caméra ····································································32
Installation de la caméra ····································································35
Dépannage ·················································································38
Caractéristiques ·············································································38
Notication de Conformité ···································································39
Caméra
Câble réseau 1m Gabarit de montage
Guide de
démarrage rapide
Panneau de
surveillance
Support
de caméra
Remise à zéro
de l’aiguille
Adaptateur de
courant
Paquet de vis Câble de rallonge
électrique

Français Français31 32
Devices
Cloud
You haven't added any device. Please click
the"+"button in the top right corner to add
1
2
3
“click”
“click”
open close
M
ic
ro
S
D
Présentation de la caméra
Bouton de réinitialisation
Fente pour carte Micro SD
Détecteur de lumière du jour
Projecteur
infrarouge
Lentille
LED d’état
Micro intégré
Haut-parleur
d’alimentation
Câble d’alimentation
* Appuyez sur cette touche pendant
plus de cinq secondes pour rétablir
les paramètres par défaut de
l’appareil.
* Tournez l’objectif pour trouver la
bouton de réinitialisation et le
réceptacle de la carte SD.
3
4
5
8
9
10
11
7
6
1
1
2
3
4
5
6
7
8
9
10
11
2
Installation de la caméra
Conguration laire
Il est recommandé de procéder à la conguration initiale à l’aide du câble Ethernet. Vous pouvez
suivre les étapes ci-dessous pour congurer votre caméra
Étape 1 Connectez la caméra à un port LAN de votre routeur à l’aide d’un câble Ethernet.
Étape 2 Utilisez l’adaptateur d’alimentation fourni pour mettre la caméra sous tension.
Votre Appareil intelligent
Câble d’Énergie
Caméra
Adaptateur
Câble Réseau
Routeur
Diérents états de la LED d’état :
Lumière rouge : Échec de la connexion WiFi Clignotant : État de veille
Lumière bleue : Connexion WiFi réussie Allumé : État de fonctionnement
Français Français33 34
• Sur Smartphone
• Sur PC
Scanner pour télécharger l’application Reolink.
Chemin de téléchargement du client Reolink : Allez sur https://reolink.com > Support > App &
Client.
Étape 3 Téléchargez et lancez le logiciel Reolink App ou Client, et suivez les instructions à
l’écran pour terminer la conguration initiale.
Si vous installez la caméra sans le câble Ethernet, vous pouvez suivre les étapes ci-dessous.
REMARQUE : Cette caméra prend en charge les réseaux Wi-Fi de 2,4 GHz et de 5 GHz. Il est
recommandé de connecter l’appareil au réseau Wi-Fi 5 GHz pour une meilleure expérience du
réseau.
Étape 1 Utilisez l’adaptateur d’alimentation fourni pour mettre la caméra sous tension.
Étape 2 Lancez l’application Reolink, cliquez sur le bouton “ “ dans le coin supérieur droit
pour ajouter la caméra. Scannez le code QR sur l’appareil et suivez les instructions à l’écran pour
terminer la conguration initiale.
Conguration sans l
REMARQUE : Si vous accédez à la caméra via le client Reolink, vous pouvez cliquer sur l’icône
Ajouter un périphérique et choisir l’option UID pour entrer l’UID de votre caméra. L’UID se trouve
sur le boîtier de la caméra (juste en dessous du code QR).
Devices
Cloud
You haven't added any device. Please click
the"+"button in the top right corner to add
1
2
3
“click”
“click”
open close
Français Français35 36
Installation de la caméra
Fixation de la caméra au mur
Pour une utilisation en extérieur, la caméra doit être installée à l’envers pour une meilleure
étanchéité.
Tirez sur le bouton du support de sécurité
et dévissez le support pour séparer les deux
parties.
Visser le support au bas de l’appareil.
Devices
Cloud
You haven't added any device. Please click
the"+"button in the top right corner to add
1
2
3
“click”
“click”
open close
Devices
Cloud
You haven't added any device. Please click
the"+"button in the top right corner to add
1
2
3
“click”
“click”
open close
1 2
Percez des trous conformément au gabarit
de montage et vissez le support de sécurité
au mur.
Choisissez une direction appropriée pour
la caméra, puis alignez le support sur la
monture de sécurité et verrouillez la caméra
en le tournant dans le sens inverse des
aiguilles d’une montre.
Devices
Cloud
You haven't added any device. Please click
the"+"button in the top right corner to add
1
2
3
“click”
“click”
open close
Devices
Cloud
You haven't added any device. Please click
the"+"button in the top right corner to add
1
2
3
“click”
“click”
open close
REMARQUE : Utilisez les chevilles pour cloisons sèches incluses dans l’emballage si nécessaire.
3 4

Français Français37 38
Fixation de la caméra au plafond
Tirez sur le bouton du support de sécurité et dévissez le support de plafond du support.
Installez le support au plafond. Alignez la caméra sur le support et tournez l’unité caméra dans le
sens des aiguilles d’une montre pour la verrouiller en position.
Devices
Cloud
You haven't added any device. Please click
the"+"button in the top right corner to add
1
2
3
“click”
“click”
open close
Devices
Cloud
You haven't added any device. Please click
the"+"button in the top right corner to add
1
2
3
“click”
“click”
open close
Dépannage
Caractéristiques
La caméra ne s’allume pas
Échec de la connexion WiFi pendant la
procédure d’installation initiale
Si votre caméra ne s’allume pas, essayez les
solutions suivantes :
• Branchez la caméra sur une autre prise.
• Utiliser un autre adaptateur de 12V pour
mettre la caméra sous tension
Si cela ne fonctionne pas, veuillez contacter le
service d’assistance de Reolink.
Si la caméra ne parvient pas à se connecter
au réseau WiFi, essayez les solutions suivant-
es :
• Veuillez vous assurer que vous avez saisi le
bon mot de passe WiFi.
• Placez votre caméra à proximité de votre
routeur an d’obtenir un signal WiFi puissant.
• Changez la méthode de cryptage du réseau
WiFi en WPA-PSK/WPA2-PSK/WPA3-PSK
(cryptage plus sûr) sur l’interface de votre
Fréquence de fonctionnement : 2.4/5GHz
Double Bande
Température de fonctionnement :
De -10°C à 55°C (14°F à 131°F)
Taille : 85×118 mm Poids : 395g
Pour plus d’informations, veuillez consulter le
site https://reolink.com/
routeur.
• Changez le SSID ou le mot de passe de votre
WiFi et assurez-vous que le SSID ne dépasse
pas 31 caractères et que le mot de passe ne
dépasse pas 64 caractères.
• Dénissez votre mot de passe en utilisant
uniquement les caractères du clavier.
Si cela ne fonctionne pas, veuillez contacter le
service d’assistance de Reolink.
Français Français39 40
Reolink déclare que ce dispositif est conforme
aux exigences essentielles et aux autres dispo-
sitions pertinentes de la directive 2014/53/UE
et de la directive 2014/30/UE.
Déclaration de conformité CE
Notication de
Conformité
Reolink déclare que ce produit est conforme
aux Radio Equipment Regulations 2017 et aux
Electromagnetic Compatibility Regulations
2016.
Cet appareil est conforme à la partie 15 des
règles de la FCC. Son fonctionnement est
soumis aux deux conditions suivantes : (1) cet
appareil ne doit pas causer d’interférences
nuisibles, et (2) cet appareil doit accepter
toute interférence reçue, y compris les in-
terférences susceptibles de provoquer un
fonctionnement indésirable.
Déclaration de conformité de l’UKCA
Déclarations de conformité FCC
Remarque : Cet équipement a été testé et
déclaré conforme aux limites imposées aux
appareils numériques de classe B, conformé-
ment à la partie 15 des règles de la FCC. Ces
limites sont conçues pour fournir une pro-
tection raisonnable contre les interférences
nuisibles dans une installation résidentielle.
Cet équipement génère, utilise et peut émettre
des fréquences radio et, s’il n’est pas installé
et utilisé conformément aux instructions,
peut causer des interférences nuisibles aux
communications radio. Cependant, il n’y a
aucune garantie que des interférences ne se
produiront pas dans une installation par-
ticulière. Si cet appareil provoque des inter-
férences nuisibles aux communications radio
ou télévisées, il est possible qu’il ne soit pas
installé ou utilisé conformément aux instruc-
tions. L’utilisateur est encouragé à essayer de
corriger l’interférence par une ou plusieurs
des mesures suivantes :
• Réorienter ou déplacer l’antenne de récep-
tion.
• Augmenter la séparation entre les équipe-
ments
et le récepteur.
• Branchez l’appareil sur une prise de cou-
rant située sur un circuit diérent de celui sur
lequel le récepteur est branché.
• Consultez le revendeur ou un technicien
radio/télévision expérimenté pour obtenir de
l’aide.
Attention : Les changements ou modications
ne sont pas ex Le fait de ne pas être approu-
vé par la partie responsable de la conformité
peut annuler l’autorité de l’utilisateur à faire
fonctionner l’équipement.
Cet appareil est conforme aux limites d’expo-
sition aux radiations xées par la FCC pour
un environnement non contrôlé. Cet appareil
doit être installé et utilisé avec une distance
minimale de 20 cm entre le radiateur et votre
corps.
Déclaration d’exposition aux radiations
de la FCC
Cet appareil contient un (des) émetteur(s)/
récepteur(s) exempté(s) de licence qui est
(sont) conforme(s) au(x) CNR exempté(s)
de licence du ministère de l’Innovation, des
Sciences et du Développement économique
du Canada. Le fonctionnement est soumis aux
deux conditions suivantes :
(1)Cet appareil ne doit pas provoquer d’inter-
férences.
(2)Cet appareil doit accepter toute inter-
férence, y compris les interférences suscepti-
bles d’entraîner un fonctionnement non désiré
de l’appareil.
Déclarations de conformité ISED
Cet équipement est conforme aux limites
d’exposition aux rayonnements IC RSS-102
établies pour un environnement non contrôlé.
Cet équipement doit être installé et utilisé
avec une distance minimale de 20 cm entre le
radiateur et votre corps.
REMARQUE : l’utilisation de la fréquence
5150-5250 MHz est limitée à l’intérieur des
bâtiments au Canada. restricted to indoor use
only in Canada.
Déclaration d’exposition aux
rayonnements de l’ISED
Français41
L’utilisation du produit est soumise à l’ac-
ceptation des conditions d’utilisation et de la
politique de condentialité de reolink.com.
Tenir hors de portée des enfants.
Conditions d’utilisation et protection de
la vie privée
Ce produit est assorti d’une garantie limitée de
2 ans qui n’est valable que s’il est acheté dans
la boutique ocielle de Reolink ou auprès d’un
revendeur agréé par Reolink. Pour en savoir
plus :
https://reolink.com/warranty-and-return/.
Ce marquage indique que ce produit ne doit
pas être éliminé avec les autres déchets
ménagers dans toute l’UE. Pour éviter que
l’élimination incontrôlée des déchets ne nuise
à l’environnement ou à la santé humaine,
recyclez-les de manière responsable an de
promouvoir la réutilisation durable des res-
sources matérielles. Pour retourner votre ap-
pareil usagé, veuillez utiliser les systèmes de
retour et de collecte ou contacter le détaillant
où le produit a été acheté. Il pourra prendre
en charge ce produit pour le recycler dans le
respect de l’environnement.
Garantie limitée
Élimination correcte de ce
produit

Italiano Italiano43 44
Cosa c’è nella scatola
IT
Content
Cosa c’è nella scatola ·······································································44
Introduzione alla telecamera ································································45
Congurazione della telecamera ·····························································46
Installazione della telecamera ·······························································49
Risoluzione dei problemi ·····································································52
Speciche tecniche ··········································································52
Avviso di conformità ········································································53
Telecamera
Cavo di rete da 1m Modello di montaggio
Guida rapida Cartello di
sorveglianza
Staa per
telecamera
Ago di resetAdattatore
Confezione di viti Cavo di estensione
da 4,5 m
Italiano Italiano45 46
Devices
Cloud
You haven't added any device. Please click
the"+"button in the top right corner to add
1
2
3
“click”
“click”
open close
M
ic
ro
S
D
Introduzione alla telecamera
Pulsante di reset
Slot per scheda Micro SD
Sensore di luce diurna
Faretto
Lente per luci a infrarossi
Obiettivo
LED di stato
Microfono
Altoparlante
Cavo di alimentazione
Cavo di rete
* Premere per più di cinque secondi
per ripristinare le impostazioni
predenite del dispositivo.
* Ruotare l’obiettivo per trovare il
pulsante di reset e lo slot per la
scheda SD.
3
4
5
8
9
10
11
7
6
1
1
2
3
4
5
6
7
8
9
10
11
2
Congurazione della telecamera
Congurazione cablata
Si consiglia di completare la congurazione iniziale con il cavo Ethernet. Per congurare la
telecamera è possibile seguire la procedura descritta di seguito.
Step 1 Collegare la telecamera a una porta LAN del router con un cavo Ethernet.
Step 2 Utilizzare l’adattatore di alimentazione in dotazione per accendere la telecamera.
Il dispositivo smart
Cavo di
alimentazione
Telecamera
Adattatore
Cavo di
alimentazione
Router
Diversi stati del LED:
Luce rossa: Connessione WiFi fallita Lampeggiante: Stato di standby
Luce blu: Connessione WiFi riuscita Acceso: In funzionamento
Italiano Italiano47 48
• Da Smartphone
• Da PC
Scansionare per scaricare l’App Reolink.
Percorso di download del client Reolink: Accedere a https://reolink.com > Supporto > App & Client.
Step 3 Scaricare e avviare il software Reolink App o Client e seguire le istruzioni sullo
schermo per completare la congurazione iniziale.
Se si congura la telecamera senza il cavo Ethernet, è possibile seguire la procedura descritta di
seguito.
NOTA: Questo dispositivo supporta le reti Wi-Fi a 2,4 GHz e 5 GHz. Si consiglia di collegare il
dispositivo alla rete Wi-Fi a 5 GHz per una migliore esperienza di rete.
Step 1 Utilizzare l’adattatore di alimentazione in dotazione per accendere la telecamera.
Step 2 Avviare l’App Reolink, fare clic sul pulsante “ ” nell’angolo in alto a destra per
aggiungere la telecamera. Scansionare il codice QR sul dispositivo e seguire le istruzioni sullo
schermo per completare la congurazione iniziale.
Congurazione wireless
NOTA: Se si accede alla telecamera tramite il client Reolink, è possibile fare clic sull’icona Aggiungi
dispositivo e scegliere l’opzione UID per inserire l’UID della telecamera. L’UID si trova sul corpo
della telecamera (proprio sotto il codice QR).
Devices
Cloud
You haven't added any device. Please click
the"+"button in the top right corner to add
1
2
3
“click”
“click”
open close
Italiano Italiano49 50
Installazione della telecamera
Montaggio della telecamera a parete
Per l’uso all’esterno, la telecamera deve essere installata capovolta per ottenere
migliori prestazioni di impermeabilità..
Tirare il pulsante del supporto di sicurezza e
svitare la staa per separare le due parti.
Avvitare la staa alla parte inferiore della
telecamera.
Devices
Cloud
You haven't added any device. Please click
the"+"button in the top right corner to add
1
2
3
“click”
“click”
open close
Devices
Cloud
You haven't added any device. Please click
the"+"button in the top right corner to add
1
2
3
“click”
“click”
open close
1 2
Praticare i fori secondo la sagoma di
montaggio e avvitare il supporto di sicurezza
alla parete.
Scegliere la direzione corretta della
telecamera, quindi allineare la staa
al supporto di sicurezza e bloccare la
telecamera in posizione ruotando in senso
antiorario.
Devices
Cloud
You haven't added any device. Please click
the"+"button in the top right corner to add
1
2
3
“click”
“click”
open close
Devices
Cloud
You haven't added any device. Please click
the"+"button in the top right corner to add
1
2
3
“click”
“click”
open close
NOTA: Se necessario, utilizzare i tasselli per cartongesso inclusi nella confezione.
3 4

Italiano Italiano51 52
Montaggio della telecamera al sotto
Tirare il pulsante del supporto di sicurezza e svitare la staa a sotto dal supporto.
Installare la staa al sotto. Allineare la telecamera alla staa e ruotare l’unità della telecamera
in senso orario per bloccarla in posizione.
Devices
Cloud
You haven't added any device. Please click
the"+"button in the top right corner to add
1
2
3
“click”
“click”
open close
Devices
Cloud
You haven't added any device. Please click
the"+"button in the top right corner to add
1
2
3
“click”
“click”
open close
Risoluzione dei problemi
Speciche tecniche
La telecamera non si accende
Connessione WiFi fallita durante il
processo di congurazione iniziale
Se la telecamera non si accende, provare le
seguenti soluzioni:
• Collegare la telecamera a un’altra presa di
corrente.
• Utilizzare un altro adattatore di alimentazi-
one da 12 V per accendere la telecamera.
Se queste soluzioni non funzionano, c
ontattare l’assistenza Reolink.
Se la telecamera non riesce a connettersi al
WiFi, provare le seguenti soluzioni:
• Assicurarsi di aver inserito la password WiFi
corretta.
• Avvicinare la telecamera al router per ga-
rantire un segnale WiFi forte.
• Cambiare il metodo di crittograa della rete
WiFi in WPA-PSK/WPA2-PSK/WPA3-PSK (crit-
tograa più sicura) sull’interfaccia del router.
Frequenza operativa: 2,4/5GHz Dual-band
Temperatura di funzionamento:
Da -10°C a 55°C (da 14°F a 131°F)
Dimensioni: 85×118 mm Peso: 395 g
Per ulteriori speciche, visitare il sito https://
reolink.com/
• Modicare l’SSID o la password WiFi e assi-
curarsi che l’SSID sia compreso tra 31 caratteri
e che la password non superi i 64 caratteri.
• Impostare la password utilizzando solo i
caratteri della tastiera.
Se non funzionano, contattare l’assistenza
Reolink.
Italiano Italiano53 54
Reolink dichiara che questo dispositivo è
conforme ai requisiti essenziali e alle altre
disposizioni pertinenti della direttiva
2014/53/UE e della direttiva 2014/30/UE.
Dichiarazione di conformità CE
Avviso di conformità
Reolink dichiara che questo prodotto è
conforme alle Radio Equipment Regulations
2017 e alle Electromagnetic Compatibility
Regulations 2016.
Questo dispositivo è conforme alla Parte 15
delle norme FCC. Il funzionamento è soggetto
alle due condizioni seguenti: (1) il dispositivo
non può causare interferenze dannose e (2)
deve accettare qualsiasi interferenza ricevu-
ta, comprese quelle che possono causare un
funzionamento indesiderato.
Nota: Questa apparecchiatura è stata testata
Dichiarazione di conformità UKCA
Dichiarazioni di conformità FCC
ed è risultata conforme ai limiti previsti per
i dispositivi digitali di Classe B, ai sensi della
Parte 15 delle norme FCC. Questi limiti sono
concepiti per fornire una protezione ragionev-
ole contro le interferenze dannose in un’in-
stallazione residenziale. Questa apparecchia-
tura genera, utilizza e può irradiare energia in
radiofrequenza e, se non installata e utilizzata
secondo le istruzioni, può causare interferenze
dannose alle comunicazioni radio. Tuttavia,
non è possibile garantire che non si verichino
interferenze in una particolare installazione.
Se questa apparecchiatura causa interferen-
ze dannose alla ricezione radiotelevisiva, che
possono essere determinate spegnendo e
riaccendendo l’apparecchiatura, l’utente è
invitato a cercare di correggere l’interferenza
adottando una o più delle seguenti misure:
• Riorientare o riposizionare l’antenna
ricevente.
• Aumentare la distanza tra l’apparecchiatura
e il ricevitore.
• Collegare l’apparecchio a una presa di
corrente su un circuito diverso da quello a cui
è collegato il ricevitore.
• Consultare il rivenditore o un tecnico esperto.
Attenzione: Cambiamenti o modiche non
Questa apparecchiatura è conforme ai limiti
di esposizione alle radiazioni FCC stabiliti per
un ambiente non controllato. Questa
apparecchiatura deve essere installata e
utilizzata a una distanza minima di 20 cm
tra il radiatore e il corpo.
Dichiarazione di esposizione alle
radiazioni FCC
approvati dalla parte responsabile della
conformità possono invalidare l’autorizzazione
dell’utente all’uso dell’apparecchiatura.
Questo dispositivo contiene trasmettitori/
ricevitori esenti da licenza che sono conformi
agli RSS esenti da licenza di Innovation,
Science and Economic Development Canada.
Il funzionamento è soggetto alle due
condizioni seguenti:
(1) Il dispositivo non deve causare
interferenze.
(2) Il dispositivo deve accettare qualsiasi
interferenza, comprese quelle che possono
causare un funzionamento non desiderato del
dispositivo.
Dichiarazioni di conformità ISED
Questa apparecchiatura è conforme ai limiti
di esposizione alle radiazioni IC RSS-102
stabiliti per un ambiente non controllato.
Questa apparecchiatura deve essere
installata e utilizzata a una distanza minima
di 20 cm tra il radiatore e il corpo.
NOTA: Il funzionamento dei 5150-5250 MHz è
limitato all’uso in interni in Canada.restricted
to indoor use only in Canada.
Dichiarazione di esposizione alle
radiazioni ISED
Questo marchio indica che questo prodotto
non deve essere smaltito insieme ad altri riuti
domestici.in tutta l’UE. Per evitare possibili
danni all’ambiente o alla salute umana dovuti
allo smaltimento incontrollato dei riuti, rici-
clateli in modo responsabile per promuovere
il riutilizzo sostenibile delle risorse materiali.
Per restituire il dispositivo usato, utilizzare i
sistemi di restituzione e raccolta o contattare
il rivenditore presso il quale è stato acquistato
il prodotto. Il prodotto potrà essere riciclato in
modo sicuro per l’ambiente.
Smaltimento corretto di questo
prodotto

Italiano55
L’uso del prodotto è soggetto all’accettazione
dei Termini di servizio e dell’Informativa sulla
privacy su reolink.com. Tenere fuori dalla
portata dei bambini.
Termini e privacy
FREQUENZA DI FUNZIONAMENTO:
(the maximum transmitted power)
2.4GHz: (For 2.4GHz camera only):
2412MHz --- 2472MHz ( EIRP < 20 dBm )
5GHz:
5150MHz --- 5250MHz ( EIRP < 23 dBm )
5745MHz --- 5825MHz ( EIRP < 14 dBm )
Frequenza WiFi
Questo prodotto viene fornito con una garan-
zia limitata di 2 anni, valida solo se acquistato
presso il negozio uciale Reolink o un riven-
ditore autorizzato Reolink. Per saperne di più:
https://reolink.com/warranty-and-return/.
Garanzia limitata
Le funzioni dei sistemi di accesso senza
fili, comprese le reti locali radio (WAS/
RLAN), all’interno di banda 5150-5350
MHz per questo dispositivo sono limitate
all’uso in interni in tutti i paesi dell’Unione
Europea (BE/BG/CZ/DK/ DE/EE/IE/EL/ES/
FR/HR/ IT/CY/LV/LT/ LU/HU/MT/NL/AT/
PL/PT/RO/SI/SK/FI/ SE/TR/N O/CH/IS/LI/
UK(NI)

Español Español57 58
Contenido de la caja
ES
Índice
Contenido de la caja ········································································58
Presentación de la cámara ··································································59
Congurar la cámara ·······································································60
Instalar la cámara ··········································································63
Solución de problemas ······································································66
Especicaciones ············································································66
Noticación de cumplimiento ································································67
Cámara
Cable de red de 1 m Plantilla de montaje
Guía de inicio
rápido
Señal de vigilancia
Soporte de cámara Aguja de
restablecimiento
Adaptador de
corriente
Paquete de tornillos Cable alargador de
corriente de 4,5 m

Español Español59 60
Devices
Cloud
You haven't added any device. Please click
the"+"button in the top right corner to add
1
2
3
“click”
“click”
open close
M
ic
ro
S
D
Presentación de la cámara
Botón de restablecimiento
Ranura para tarjeta micro SD
Sensor de luz diurna
Foco
Luces infrarrojas
Objetivo
LED de estado
Micrófono incorporado
Altavoz
Cable de alimentación
Cable de red
* Pulse durante más de cinco
segundos para restablecer la
conguración predeterminada del
dispositivo.
* Gire el objetivo para encontrar el
botón de restablecimiento y la ranura
para tarjetas SD.
3
4
5
8
9
10
11
7
6
1
1
2
3
4
5
6
7
8
9
10
11
2
Congurar la cámara
Conguración por cable
Se recomienda que la conguración inicial se realice con el cable Ethernet. Puede seguir los
siguientes pasos para congurar su cámara.
Paso 1 Conecte la cámara a un puerto LAN de su rúter con un cable Ethernet.
Paso 2 Utilice el adaptador de corriente suministrado para encender la cámara.
Su dispositivo inteligente
Cable de alimentación
Cámara
Adaptador de
corriente
Cable de red
Rúter
Diferentes estados del LED de estado:
Luz roja: Conexión WiFi fallida Parpadea: Estado de espera
Luz azul: Conexión WiFi correcta On: Estado de funcionamiento
Español Español61 62
• En el teléfono inteligente
• En la computadora
Escanee para descargar la App Reolink.
Ruta de descarga del Client Reolink: Vaya a https://reolink.com > Soporte > App & Client.
Paso 3 Descargue e inicie el software App o Client Reolink y siga las instrucciones que
aparecen en pantalla para nalizar la conguración inicial.
Si congura la cámara sin el cable Ethernet, puede seguir los pasos que se indican a continuación.
NOTA: Este dispositivo admite redes WiFi de 2,4 GHz y 5 GHz. Se recomienda conectar el
dispositivo a una red WiFi de 5 GHz para disfrutar de una mejor experiencia de red.
Paso 1 Utilice el adaptador de corriente suministrado para encender la cámara.
Paso 2 Inicie la App Reolink, haga clic en el botón “ ” en la esquina superior derecha para
añadir la cámara. Escanee el código QR en el dispositivo y siga las instrucciones en pantalla para
nalizar la conguración inicial.
Conguración inalámbrica
NOTA: Si accede a la cámara a través del Client Reolink, puede hacer clic en el icono Agregar
dispositivos y elegir la opción UID para introducir el UID de su cámara. El UID se encuentra en el
cuerpo de la cámara (justo debajo del código QR).
Devices
Cloud
You haven't added any device. Please click
the"+"button in the top right corner to add
1
2
3
“click”
“click”
open close
Español Español63 64
Instalar la cámara
Montar la cámara en la pared
Para uso en exteriores, la cámara debe instalarse al revés para un mejor rendimiento a prueba de
agua.
Tire del botón del soporte de seguridad y
desenrosque el soporte para separar las dos
partes.
Atornille el soporte a la parte inferior de la
cámara.
Devices
Cloud
You haven't added any device. Please click
the"+"button in the top right corner to add
1
2
3
“click”
“click”
open close
Devices
Cloud
You haven't added any device. Please click
the"+"button in the top right corner to add
1
2
3
“click”
“click”
open close
1 2
Taladre los agujeros de acuerdo con la
plantilla de montaje y atornille el soporte de
seguridad a la pared.
Elija una dirección adecuada de la cámara
y, a continuación, alinee el soporte con la
montura de seguridad y bloquee la cámara
en su sitio girando en sentido contrario a las
agujas del reloj.
Devices
Cloud
You haven't added any device. Please click
the"+"button in the top right corner to add
1
2
3
“click”
“click”
open close
Devices
Cloud
You haven't added any device. Please click
the"+"button in the top right corner to add
1
2
3
“click”
“click”
open close
NOTA: Utilice los anclajes para paneles de yeso incluidos en el paquete si es necesario.
3 4
Español Español65 66
Montar la cámara en el techo
Tire del botón del soporte de seguridad y desenrosque el soporte de techo del soporte.
Instale el soporte en el techo. Alinee la cámara con el soporte y gire la unidad de la cámara en el
sentido de las agujas del reloj para bloquearla en su posición.
Devices
Cloud
You haven't added any device. Please click
the"+"button in the top right corner to add
1
2
3
“click”
“click”
open close
Devices
Cloud
You haven't added any device. Please click
the"+"button in the top right corner to add
1
2
3
“click”
“click”
open close
Solución de problemas
Especicaciones
La cámara no se enciende
La conexión WiFi falla durante el
proceso de conguración inicial
Si su cámara no se enciende, pruebe las sigui-
entes soluciones:
• Enchufe la cámara a otra toma de corriente.
• Utilice otro adaptador de corriente de 12 V
para encender la cámara.
Si no funciona, póngase en contacto con el
servicio de asistencia de Reolink.
Si la cámara no puede conectarse a la red
WiFi, pruebe las siguientes soluciones:
• Asegúrese de haber introducido la con-
traseña
contraseña WiFi correcta.
• Coloque la cámara cerca del rúter para
asegurar una señal WiFi fuerte.
• Cambie el método de encriptación de la
red WiFi a WPA-PSK/WPA2-PSK/WPA3-PSK
(encriptación más segura) en la interfaz de su
rúter.
• Cambie su SSID o contraseña WiFi y
asegúrese de que el SSID tiene menos de 31
caracteres y la contraseña menos de 64 car-
acteres.
• Establezca su contraseña utilizando sólo los
caracteres del teclado.
Si esto no funciona, póngase en contacto con
el soporte de Reolink.
Frecuencia de funcionamiento: 2,4/5 GHz
doble banda
Temperatura de funcionamiento:
-10°C a 55°C (14°F a 131°F)
Tamaño: 85×118 mm
Peso: 395 g
Para más especicaciones, visite
https://reolink.com/
Español Español67 68
Reolink declara que este dispositivo cumple
con los requisitos esenciales y otras disposi-
ciones pertinentes de la Directiva 2014/53/EU
y la Directiva 2014/30/EU.
Declaración de conformidad CE
Noticación de
cumplimiento
Reolink declara que este producto cumple
el Reglamento de Equipos Radioeléctricos
de 2017 y el Reglamento de Compatibilidad
Electromagnética de 2016.
Este dispositivo cumple con la parte 15 de las
Reglas FCC. La operación está sujeta a las
siguientes dos condiciones: (1) Este dispositivo
no puede causar interferencias perjudiciales;
y (2) este dispositivo debe aceptar cualquier
interferencia recibida, incluyendo interferen-
cia que pueda causar un funcionamiento no
deseado.
Declaración de conformidad UKCA
Declaración de cumplimiento de la FCC
NOTA: Este dispositivo ha sido probado y
cumple con los límites para un dispositivo
digital clase B, conforme a la parte 15 de las
Reglas FCC. Estos límites están diseñados
para proporcionar una protección razonable
contra interferencias dañinas en las insta-
laciones residenciales. Este equipo genera,
utiliza y puede irradiar energía de radiofre-
cuencia y si no se instala y utiliza de acuerdo
con las instrucciones, puede causar interfer-
encias perjudiciales a las comunicaciones por
radiofrecuencia. Sin embargo, no hay ninguna
garantía de que no habrá interferencias en
una instalación determinada. Si el equipo
causa interferencia dañina a la recepción de
radio o televisión, lo cual se puede determi-
nar encendiendo y apagando el aparato, se
recomienda al usuario que intente corregir la
interferencia por uno o más de las siguientes
medidas:
• Reoriente o reubique la antena receptora.
• Aumente la separación entre el equipo y el
receptor.
• Conecte el equipo a un tomacorriente de
un circuito distinto al que está conectado el
receptor.
• Consulte al distribuidor o un técnico experi-
mentado en radio/ TV para obtener ayuda.
Cualquier cambio o modicación no expresa-
mente aprobado por la parte responsable por
el cumplimiento podría anular la autoridad del
usuario para operar este dispositivo.
Este equipo cumple con los límites de ex-
posición a la radiación de la FCC establecidos
para un entorno no controlado. Debe insta-
larse y operar con una distancia mínima de
20 cm entre el radiador y su cuerpo.
Declaración de advertencia de RF
de la FCC
Este dispositivo contiene transmisor(es)/
receptor(es) que cumplen con la(s) norma(s)
RSS de exención de licencia de Innovation,Sci-
enceandEconomicDevelopmentCanada.
La operación está sujeta a las siguientes dos
condiciones:
(1) Este dispositivo no puede causar interfer-
encias.
(2) este dispositivo debe aceptar cualquier
interferencia recibida, incluyendo interferen-
cia que pueda causar un funcionamiento no
deseado.
Declaración de conformidad de la ISED
Este equipo cumple con los límites de ex-
posición a la radiación RSS-102 de IC estab-
lecidos para un entorno no controlado. Debe
instalarse y operar con una distancia mínima
de 20 cm entre el radiador y su cuerpo.
NOTA: El funcionamiento de 5150-5250 MHz
está restringido al uso en interiores sólo en
Canadá.
Declaración de exposición a la radiación
ISED
Esta marca indica que este producto no debe
ser desechado con otros residuos domésticos
en toda la UE. Para evitar posibles daños al
medio ambiente o a la salud humana cau-
sados por el desecho incontrolado de resid-
uos, recíclelo de manera responsable para
promover la reutilización sostenible de los
recursos materiales. Para devolver su disposi-
tivo ya usado, por favor, acuda a sistemas de
devolución y recogida o contacte al minorista
del cual compró el producto. Puede reciclarlo
de forma ecológica.
Desecho correcto del producto

Español69
El uso del producto está sujeto a la acepta-
ción de los Términos de Servicio y la Política
de Privacidad en reolink.com. Mantenga el
producto fuera del alcance de los niños.
Frecuencia de funcionamiento :
(La potencia máxima transmitida)
2,4 GHz: (Solo para cámara 2,4 GHz):
2412MHz--- 2472MHz( EIRP < 20 dBm )
5 GHz:
5150MHz--- 5250MHz( EIRP < 23 dBm)
5745MHz--- 5825MHz( EIRP < 14 dBm )
Frecuencia de funcionamiento de WiFi
Este producto tiene una garantía limitada de
2 años que solo es válida si se adquiere en la
tienda ocial de Reolinko en un distribuidor
autorizado de Reolink. Descubra más en :
https://reolink.com/warranty-and-return/.
Garantía limitada
Las funciones de los sistemas de
acceso inalámbrico, incluidas las redes
de área local radioeléctricas (WAS/
RLAN) dentro de la banda 5150-5350 MHz
para este dispositivo están restringidas al uso
en interiores únicamente dentro de todos los
países de la Unión Europea (BE/BG/CZ/DK/
DE/EE/IE/EL/ES/FR/HR/IT/CY/LV/LT/LU/
HU/MT/NL/AT/PL/PT/RO/SI/SK/FI/SE/TR/
N O/CH/IS/LI/UK(NI).
Términos y Privacidad