
USER MANUAL
MERACH AIR ROWING MACHINE
Questions or Concerns?
IMPORTANT!
Please read all details before use, and keep this user manual for future reference.
PLEASE CONTACT US BEFORE THE RETURN: Mon-Fri,9:00 am-5:00 pm PST/PDT
POWEREDBY
MODEL: MR-R11

WHO WE ARE
Our customers aren’t just important; their health, fitness, and pure enjoyment for live is at
the core of everything we do at MERACH. From innovative fitness research and cutting-
edge product development, to our exceptional purchasing & after-sales service, we are our
customers’ life-long partner in crafting a better fitness future.
Through quality fat-burning & muscle-building fitness equipment such as our quality rowing
machines and exercise bikes, plus our innovative MERACH APP, and digital courses, we give
the opportunity and support to all to pursue their health and fitness goals and discover a
new way of healthy living.
Welcome to MERACH
Join the MERACH Fitness Community on Facebook
facebook.com/groups/merachfitness
Join
Explore fitness courses
merachfit.com/blogs/courses
Explore
Enjoy weekly, featured courses
made exclusively by our in-house fitness instructor
Enjoy
THANK YOU FOR YOUR PURCHASE!
(We hope you love your new rowing machine as much as we do.)
WARRANTY REGISTRATION
Please register your warranty to keep yourself protected !
Email your item model to
register@merach.com
Register your warranty via
merachfit.com/pages/warranty
If purchased outside US/Canada: To register your product warranty, contact your
local distributor.
For details regarding product warranty or if you have questions or problems with
your product, please contact your local distributor.

FAQ
SELF-SERVICE CUSTOMER SUPPORT FAQ
4. Purchased it six months ago, I want to return it but can't find the return window.
What should I do?
Great after-sales service including 12-month exchange or return,
support@merach.com, or Amazon live chat.
3. I just received the parcel today, but it doesn't come with accessories.
You'll get twice the price refund of the accessories if the missing accessories
don't affect your user experience. Or you can contact us for a refund or free
accessories via the after-sales email service.
1. The outer package was broken, which makes me worried that the product may
be damaged.
Please contact us via the after-sales email to ask for FREE return /replacement
in time.
2. This was the first time l bought your product, is there a user manual or tutorial
video available?
A detailed user manual is included in the package and you can also watch the
installation video by scanning the QR code on the packaging.
5. Where can I get your latest product information and related promotions?
Search our products on Amazon or visit our Facebook, Twitter, TikTok, Instagram
@merachfit, and also you can send us the product list you're interested in and
ask if there is any discount.
Contact us by support@merach.com
CONTENTS
This device contains a radio transmitter module with type approval code
Please read the entire manual carefully before installing and using
the machine, and save it for further use.

SAFETY INSTRUCTIONS
SAFETY INSTRUCTIONS
Please keep this manual in a safe place for future reference.
The overall performance of the machine and all moving parts must be checked
regularly to ensure the safety of the machine.
This machine is only for home use. The Maximum user weight is 350lbs/158kg and
maximum user height of 195cm/6.7 feet.
Please check all screws and nuts are properly tightened before using the machine.
Always keep children and pets away from the machine. The machine is for adult use
only.
The safe use of the machine can only be guaranteed if the regular maintenance and
repairs of undertaken, and worn out and broken parts are changed.
Please use this machine on stable and horizontal ground level, and put a protective
layer on the floor or carpet to prevent a floor from damaging. Make sure the distance
between the machine and each obstacle is at least 2.0 ft (0.6m).
Please wear sports clothes, sports shoes, or other proper clothes. Loose-fitting
clothing is not recommended, as loose clothing may get caught in the machine,
hindering operation and possibly causing an injury.
Please always pay attention to your body signals, improper use of the machine may
affect your health. If you experience any symptoms (including headache, chest pain,
irregular heartbeat, shortness of breath, dizziness, or any discomfort), stop exercising
immediately and consult your physician, get the permission before training again.
Please consult your physician to determine if you have any medical or physical
conditions that could put your health and safety at risk or prevent you from using the
equipment properly. Your physician's advice is essential if you are taking medication
that affects your heart rate, blood pressure, or cholesterol level.
Safe and effective training can only be achieved if the machine is properly assembled,
properly maintained and used. Make sure all users are familiar with all warnings and
precautions of this machine.
01
Keep the children away from the machine. The equipment is not for children to use or
play with. They can injure themselves accidentally.
Please follow the instructions in this manual to use this machine. Please stop
using and operating immediately when you find any defective parts or hear any
abnormal sound. Make sure all issues are resolved before using it again.

SAFETY INSTRUCTIONS
Do not store the machine in a place exposed to direct sunlight, wind and rain,
or with high humidity. If needed, please pack the machine to keep children away
from touching or playing with it.
Care & Maintenance
For long-term use of this machine, please wipe the dust regularly. Do not water it
directly, or wipe with gasoline, abrasive powder, etc. Otherwise, it might cause
cracks on the parts or main body, electric shock or fire. Please use Dilute neutral
detergent for maintenance.
Please understand that for the consumable parts, the wear and tear may also occur
even with proper maintenance.
Please check if there’s rust or cracks after long-term storage.
02
Before starting any training, please consult your physician, especially
for those who are over 35 years old or with pre-existing health
conditions. Please read all instructions before using the machine.
If the moving parts are damaged, please do not use the machine until the parts are
repaired.
This machine is not for professional medical treatment.
This product is only for family use.
The Rowing Machine is a non-speed related training equipment.
Slide Rail: Before sitting on the machine, please firstly check if the seat wheels and
slide rail for dust and foreign bodies. Little small things will obstruct the seat wheels
and slide rails and damage their surface. The slide rails must be checked for debris
before each use and cleaned regularly.
Fasteners: The bolts need to be checked for tightness at the end of the first month
after use and every 12 months.
Placement: When storing your rowing machine vertically, choose a suitable location.
Choose a flat surface to use your rower on to avoid shaking and premature wear.
Precautions before Use :
When lifting or moving the training equipment, pay attention to safety. If necessary,
use the correct operating methods or seek assistance from others.
When storing upright, make sure to place the training equipment against a wall or
on a fixed surface. Also, position it in a safe location away from children to prevent
any potential injuries from falling.
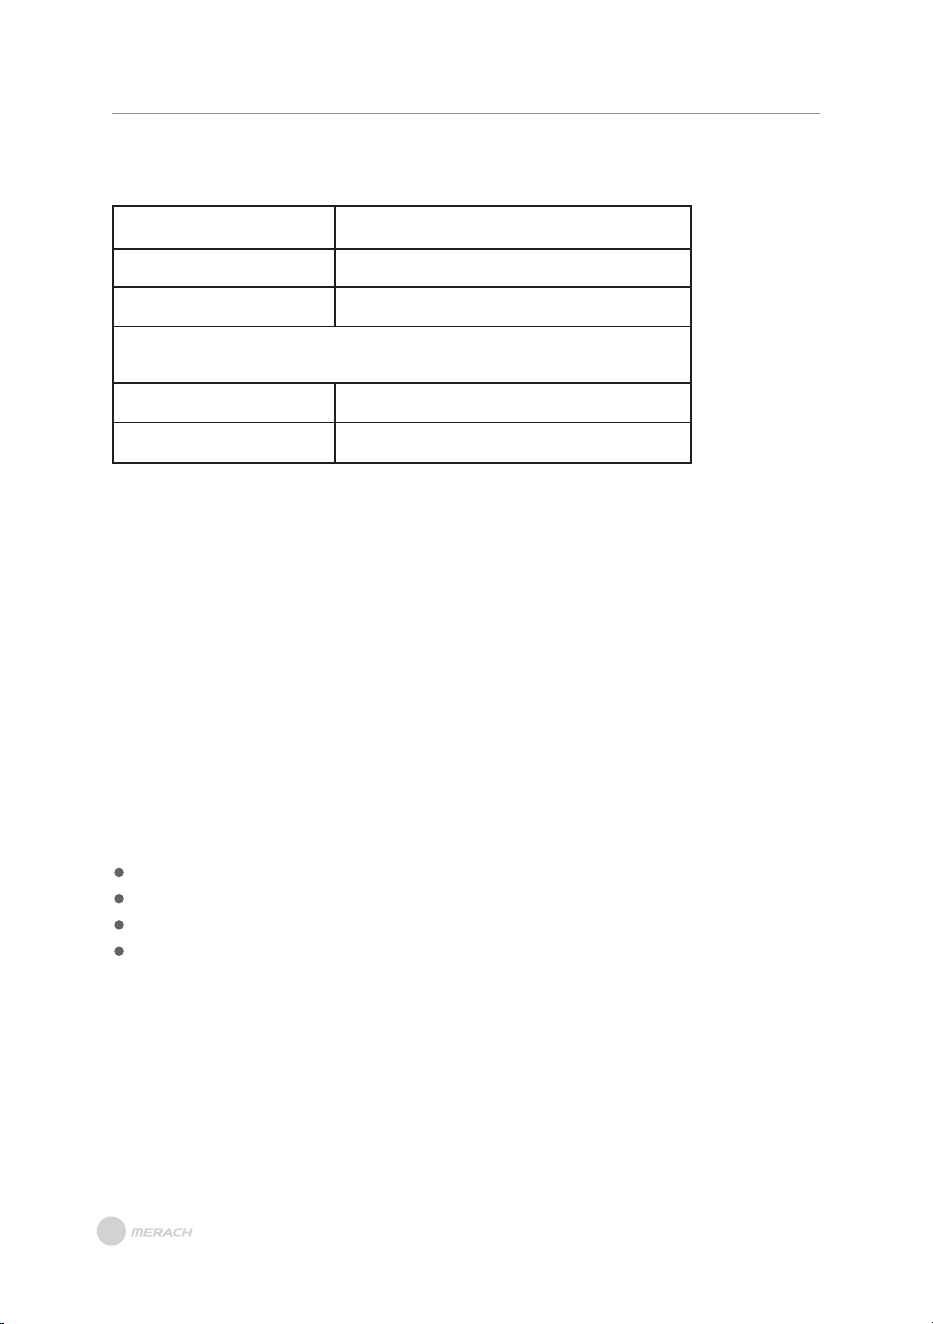
Model:
Name:
Resistance:
Power:
Max Load:
Dimensions:
Net Weight:
MR-R11
MERACH Air Rowing Machine
10 Lexel Air Resistance
AA Battery x 2
350lbs/158kg
L95.3*W24*H40.2inch / L2420*W610*H1020mm
73.4lbs/33.3kg
SPECIFICATIONS
SPECIFICATIONS
03
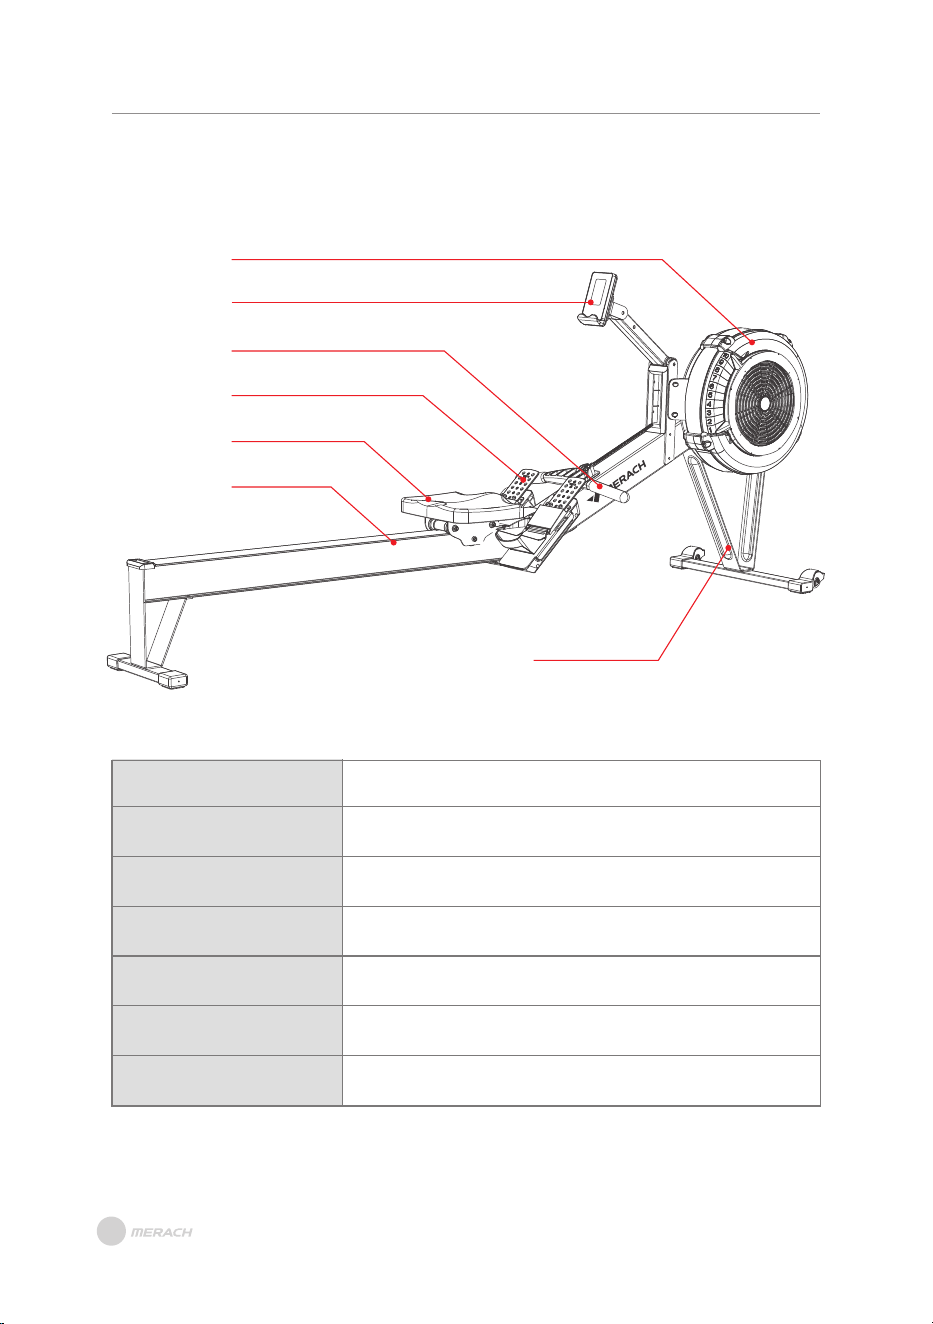
Mian Frame
Monitor
Pulling Handle
Support Plate
Adjustable Foot Pedal
Cushion
Silde Raile
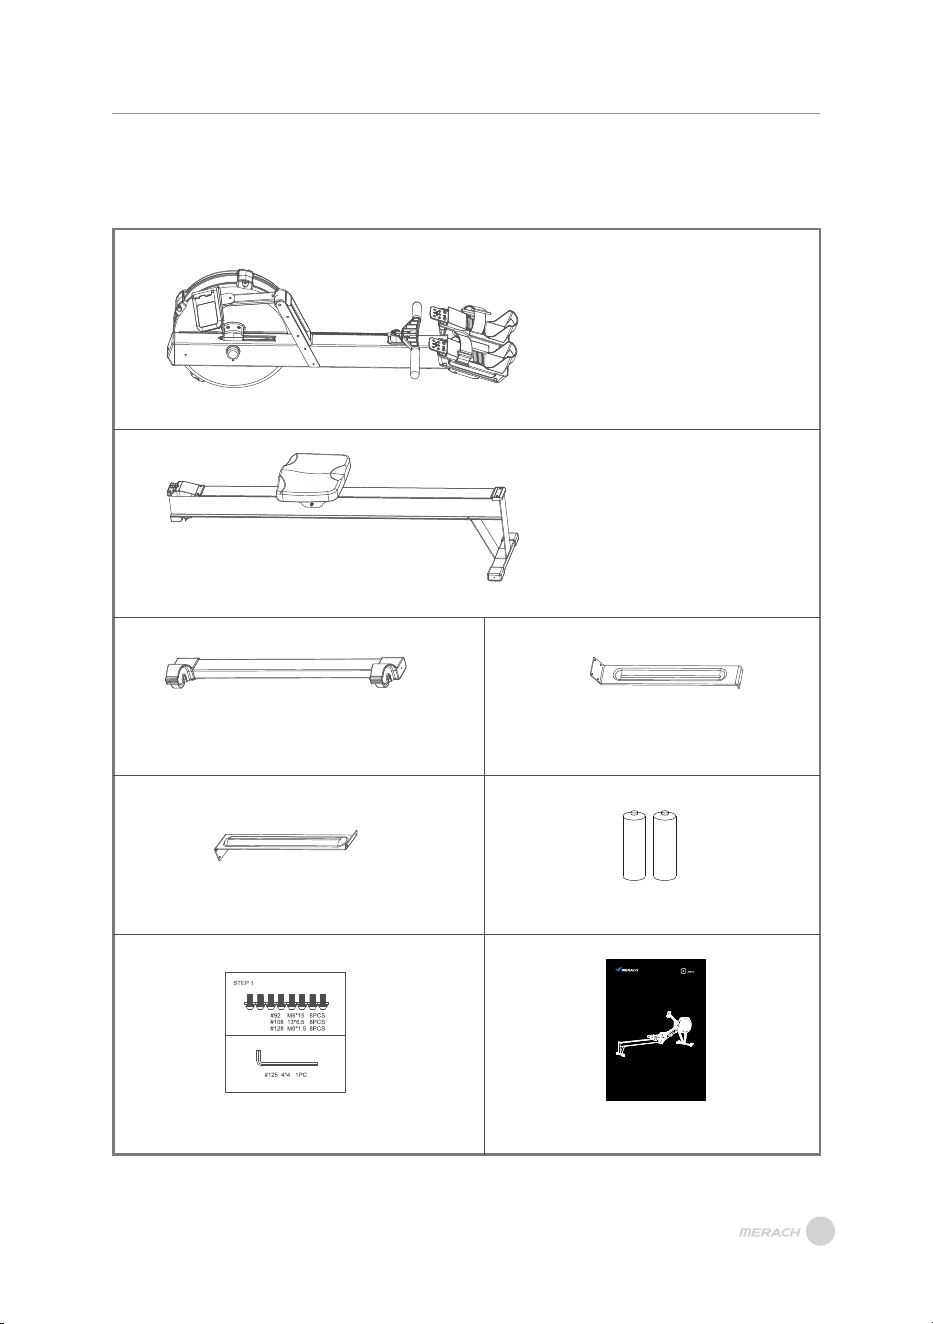
Please check if all parts and accessories are in the package firstly.
PARTS & ACCESSORIES LIST
PARTS & ACCESSORIES LIST
04
#1 Main Frame x1
#11 Silde Rail x1
#2 Front Foot Tube x1
#3 Long Support Plate x1
#4 Short Support Plate x1
AA Battery x2
Screw&Kit x1
User Manual x1
USER MANUAL
MERACH AIR ROWING MACHINE
Questions or Concerns?
IMPORTANT!
Please read all details before use, and keep this user manual for future reference.
PLEASE CONTACT US BEFORE THE RETURN: Mon-Fri,9:00 am-5:00 pm PST/PDT
POWEREDBY
MODEL: MR-R11

PARTS TOOL LIST
PARTS TOOL LIST
STEP1
#92 Flat Head Hexagon Socket ScrewsM16*15 x4
#108 Flat Waser13*6.5 x4
#128 Spring WasherM6*1.5 x4
#125 Allen Key4*4 x1
#125 Allen Ke
STEP2
#92 Flat Head Hexagon Socket ScrewsM16*15 x4
#108 Flat Waser13*6.5 x4
#128 Spring WasherM6*1.5 x4
y4*4 x1
05
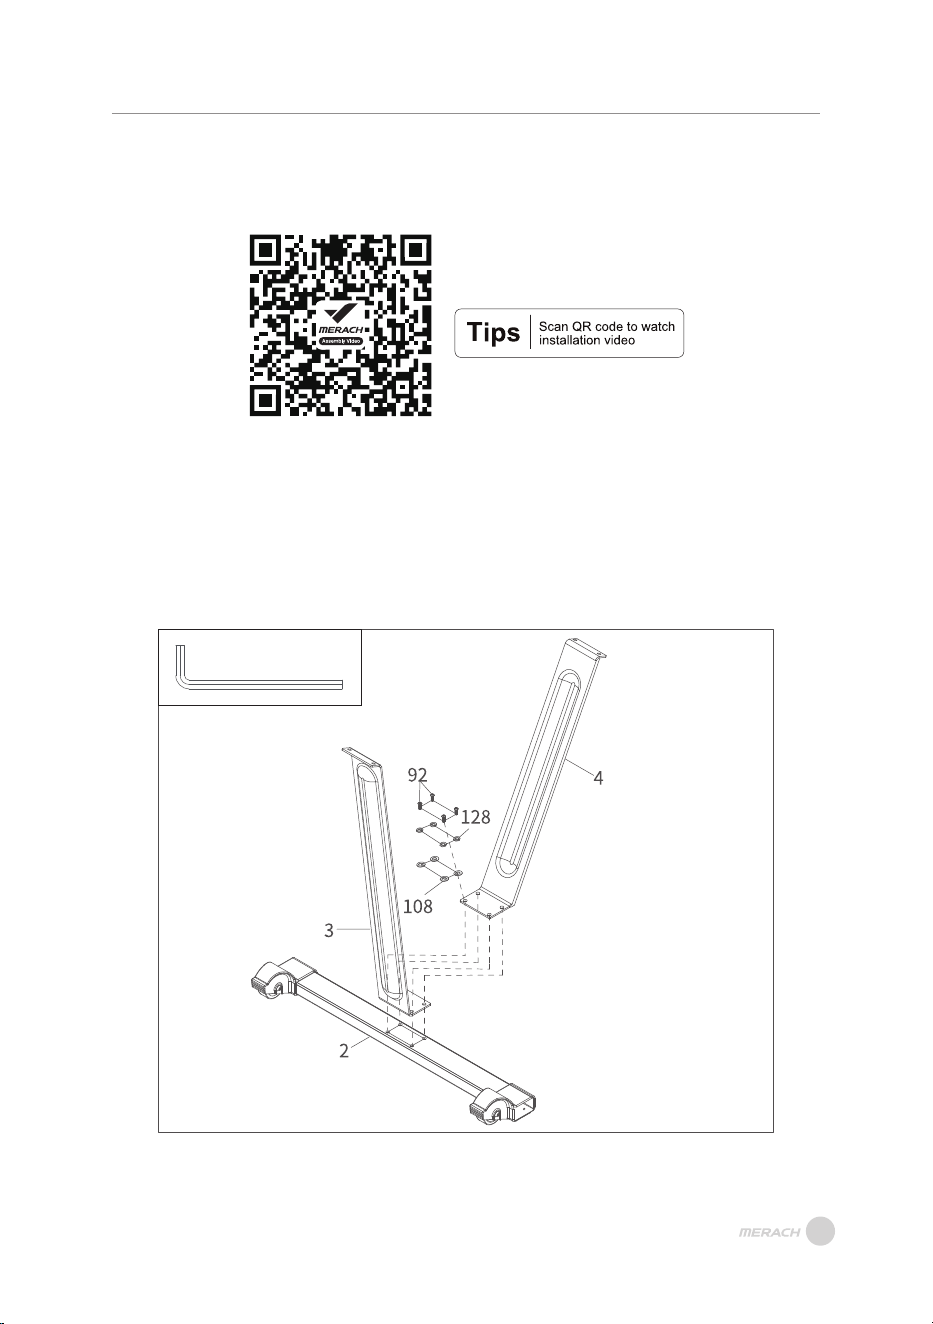
A. Assemble the Long Support Plate(#3) and Short Support Plate(#4) on the Front Foot
Tube(#2) with four Flat Head Hexagon Socket Screws(#92), Flat Waser(#108) and
Spring Washer(#128).
NOTE: Please note that the order of the Long Support Plate(#3) and Short Support
Plate(#4).
Step 1:
INSTALLATION GUIDE
INSTALLATION GUIDE
#125 Allen Key4*4 x1
06
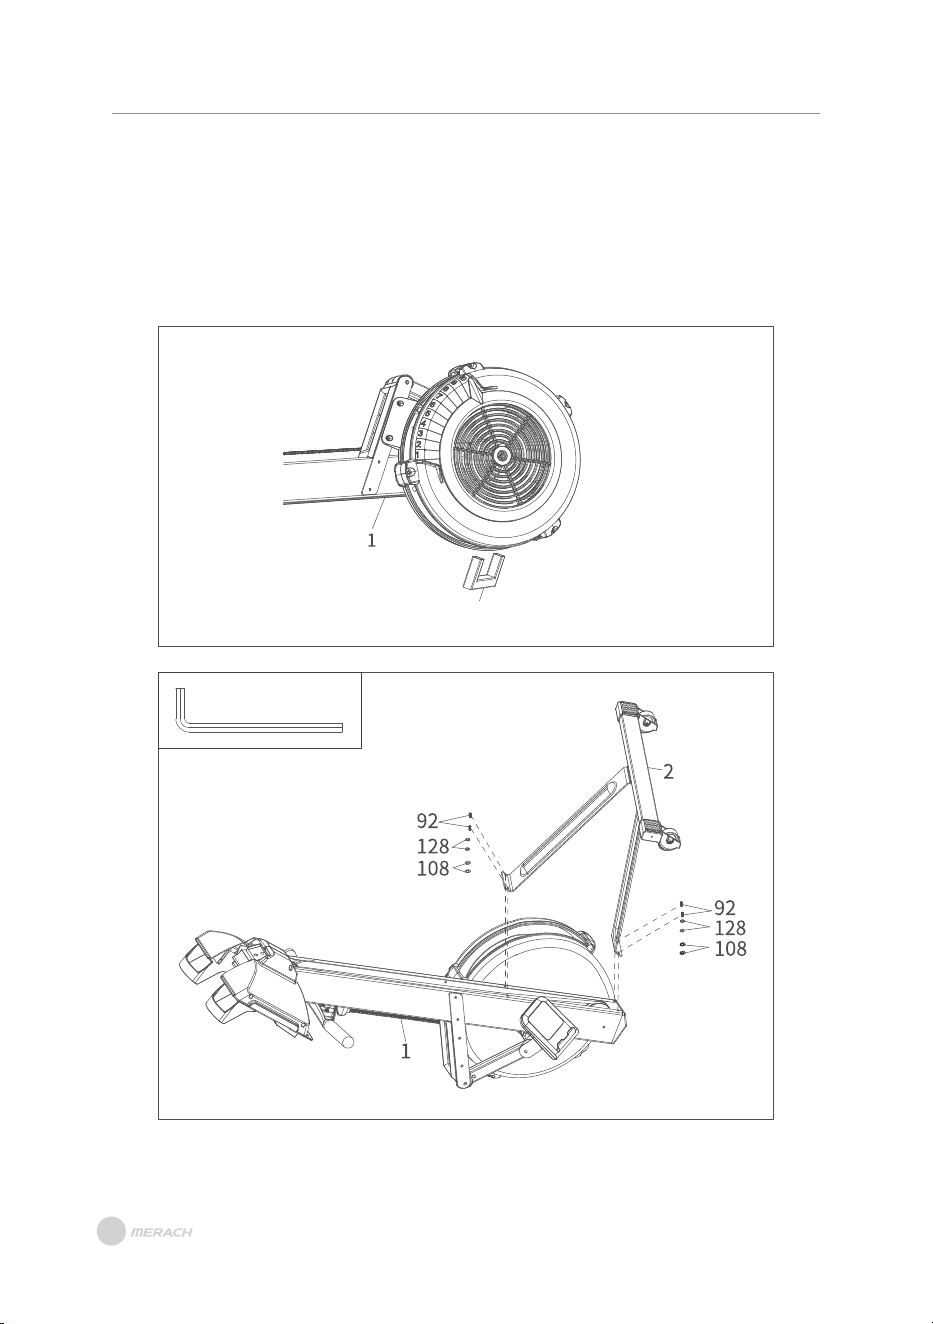
A. As shown in Figure A, remove the packaging auxiliaries tube from the fan of Main
Frame(#1).
B. Assemble the Front Foot Tube(#2) on the Main Frame(#1) with four Flat Head
Hexagon Socket Screws(#92), Flat Waser(#108) and Spring Washer(#128).
NOTE: The wheel of front foot tube is forward.
Step 2:
INSTALLATION GUIDE
Packaging auxiliaries tube
#125 Allen Key4*4 x1
Figure A
Figure B
07
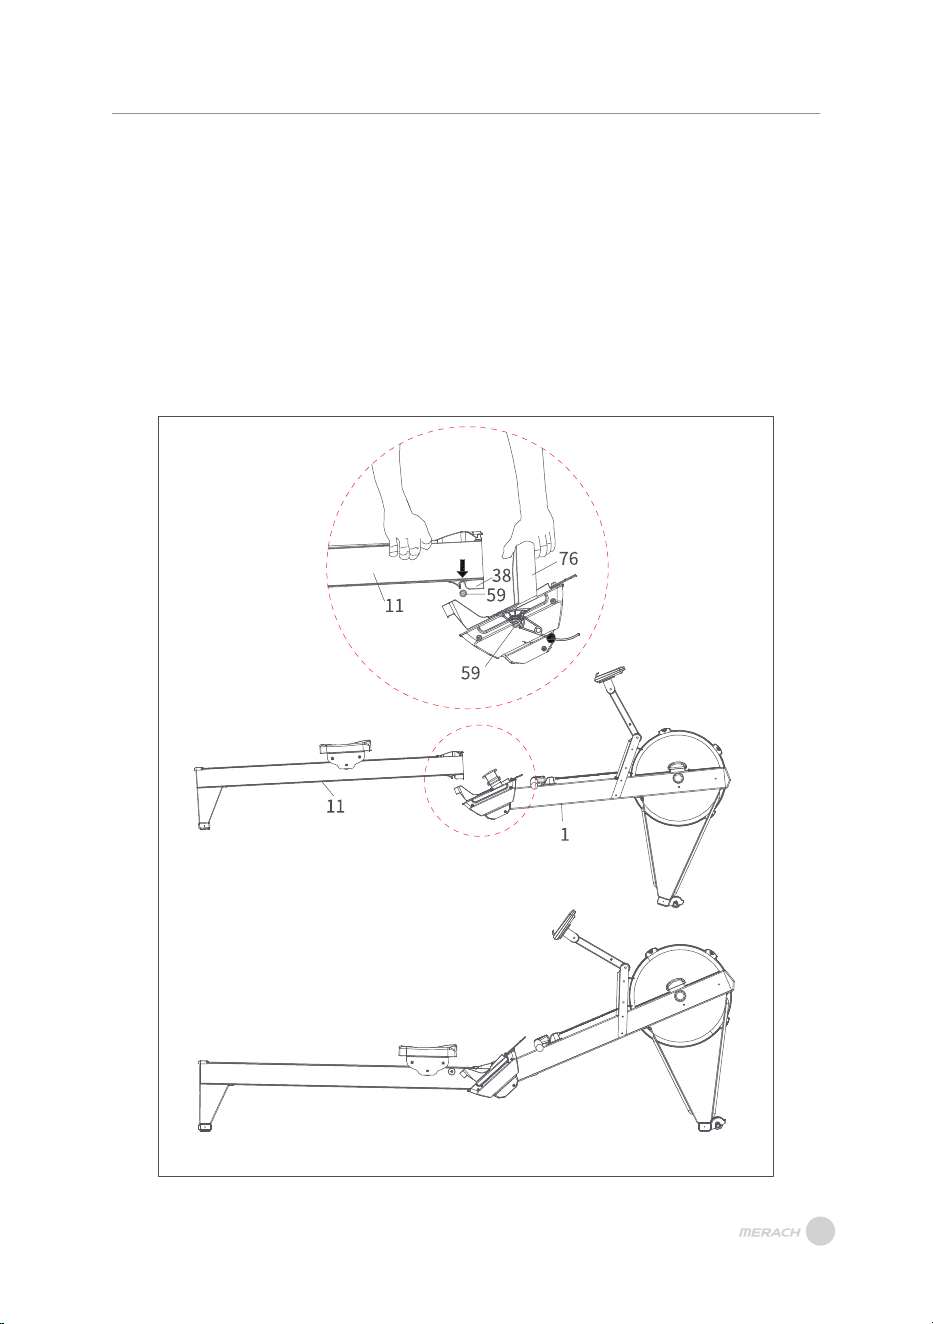
A. As shown in Figure A, one people catch the Pedal Webbing(#76) of Main Frame(#1)
to lift it up with both hands. B. Other one raise the Silde Rail(#11) up.
C. Align the bottom groove of the Track Lower Cover(#38) on the Silde Rail(#11) with the
Connecting Axle(#59) of main frame between the foot pedals.
D. Apply force downward to complete the assembly as shown in Figure B.
NOTE:
·Disconnecting or connecting the Silde Rail(#11) requires at least two people.
·To prevent injuries, keep fingers and hands away from the folding mechanism.
Step 3:
INSTALLATION GUIDE
Figure A
Figure B
08
PRODUCT OPERATION GUIDE
PRODUCT OPERATION GUIDE
09
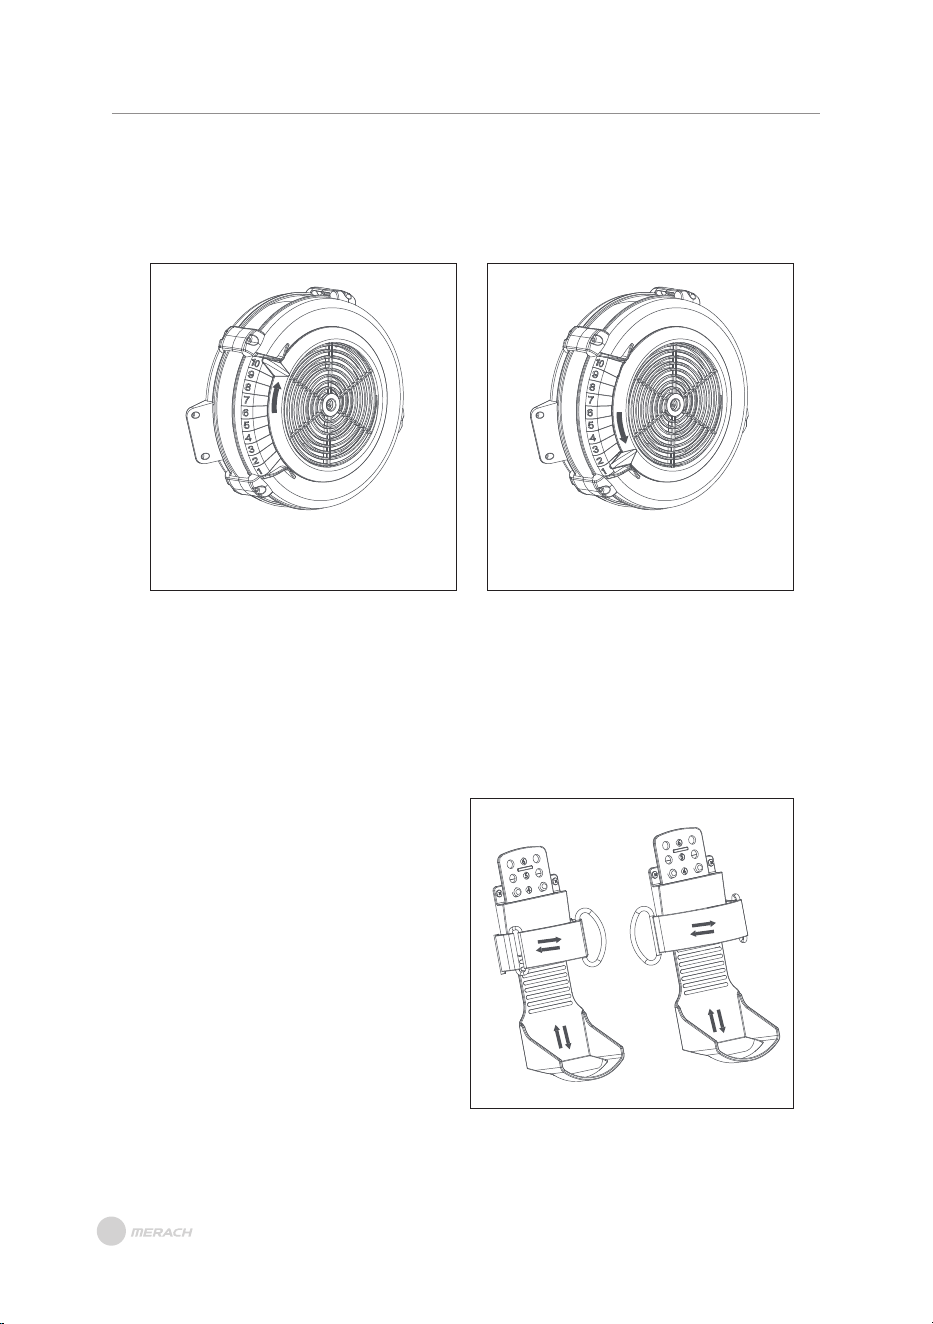
Adjust the wind resistance and control the speed by toggling the mesh adjustment piece.
Tilt upward to increase resistance
and slow down the speed.
Tilt downward to decrease
resistance and speed up.
The higher the number, the greater the resistance;
The lower the number, the lower the resistance.
Wind Wheel Adjustment
There are various positions for placing your feet. Before starting your training, please
adjust the foot pedals correctly.
Foot Pedal Adjustment
A. Open the Velcro, release the foot strap,
and place your feet through the strap
onto the foot pedal.
B. Adjust the height of the foot pedal up
or down until the heel is supported,
and the strap is positioned at the
widest part of your foot.
C. Tighten the strap and secure the
Velcro in place.

PRODUCT OPERATION GUIDE
After disassembling the silde rail and main frame, store them in a place near a wall, away
from children and pets. (Figure A)
NOTE: During transportation or storage, place the tail end of the slide rail facing
downwards to avoid injury.
Storage Instructions
When transporting or storing, please refer to figures a, b, c for placement, and be
cautious as the seat cushion may slide off.
Transportation and Storage
Figure A Figure B
Figure a Figure b Figure c
10
INSTRUCTION OF MONITOR
INSTRUCTION OF MONITOR
11
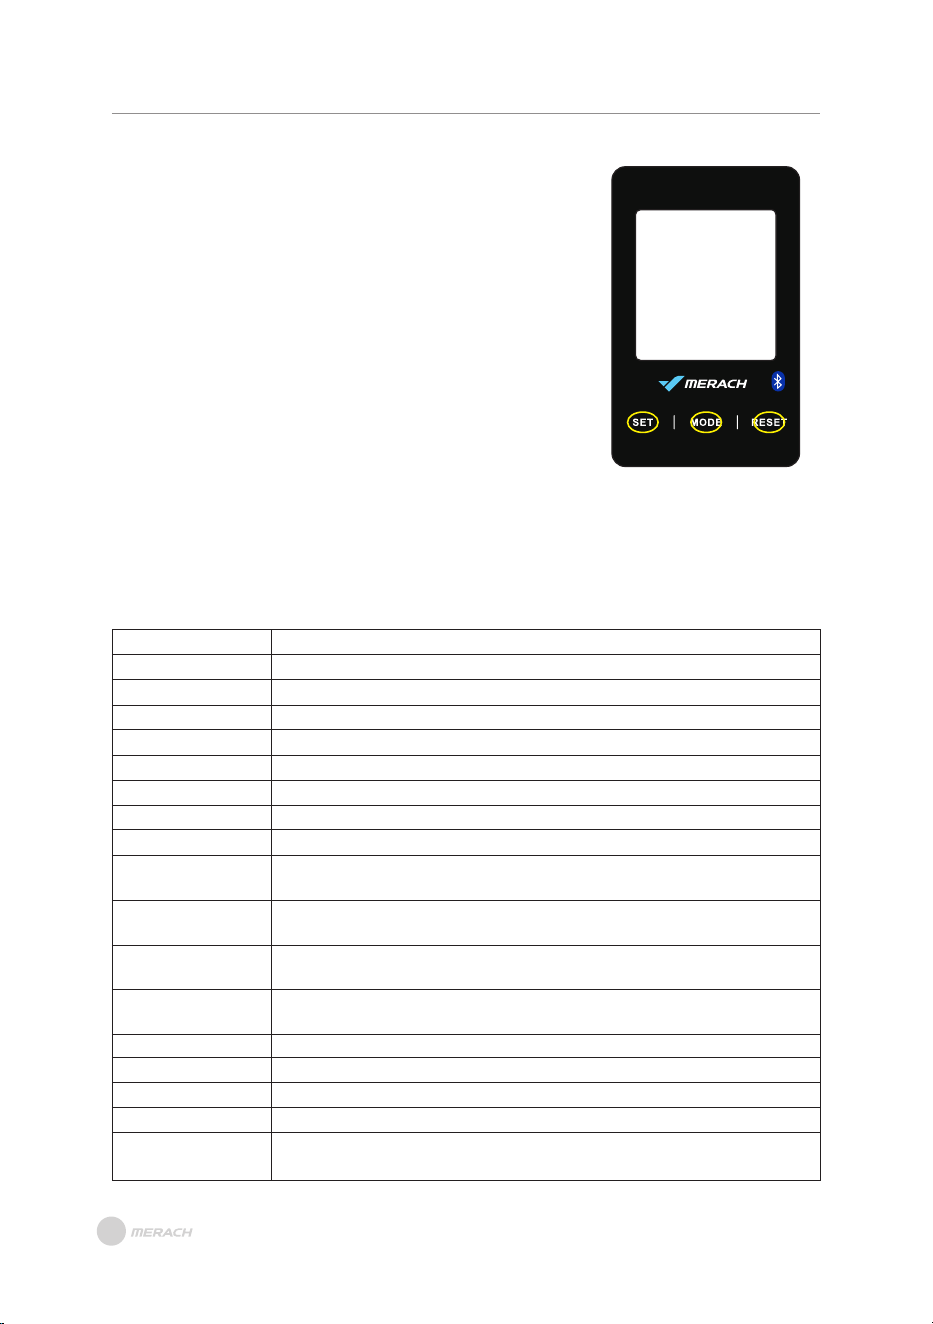
SET: Press once to increase by one; long press for rapid
setting increase.
MODE:
1. Used for function confirmation and setting confirmation.
2. Acts as a pause button in Exercise Mode.
RESET:
1. In function selection mode, returns to the previous
function.
2. In setting mode, clears the current setting value.
3. In pause mode, returns to the standby interface.
4. Long press for 3 seconds performs a complete reset, clearing all current exercise
data except for the TOTAL STROKES value.
Button Functions
The TOTAL STROKES value is automatically cleared when the power is disconnected.
Function Descriptions
TIME:
TIME/500m:
DIST:
CAL:
SPM:
STROKES:
TOTAL STROKES:
WATT:
PULSE:
Manual Program:
INTERVAL 20-10:
INTERVAL 10-20:
INTERVAL CUSTOM:
TARGET TIME:
TARGET DISTANCE:
TARGET CALORIES:
TARGET STROKES:
TARGET PULSE:
Displays the user's exercise time(0:00~99:00).
Shows the time required for the user to row 500 meters.
Displays the exercise distance(0 ~ 9990).
Shows the calories burned(0 ~ 9990).
Displays the strokes per minute.
Shows the number of strokes in exercise session.
Displays the cumulative total number of strokes.
Shows the real-time power output during exercise.
Monitors the user's heart rate during exercise(0-30~240BPM).
When not in any specific mode, acts as a manual program when RPM
signal is detected.
Intermittent exercise mode with 20 seconds of exercise followed by 10
seconds of rest.
Intermittent exercise mode with 10 seconds of exercise followed by 20
seconds of rest.
Intermittent exercise mode where the user can set their own exercise and
rest durations.
User-set exercise time.
User-set exercise distance.
User-set calorie goal.
User-set strokes goal.
User-set target heart rate. (The machine itself does not include a heart
rate monitor.)

12
INSTRUCTION OF MONITOR
1. Power On
After the electronic display is powered on (or by pressing MODE/RESET for 3 seconds), a
2-second BUZZER beep, and a 2-second full LCD display, the device enters standby mode.
Instructions for Use
4. Exercise Pause Screen
A. During exercise, pressing the MODE key pauses all calculations on the electronic display,
and the PULSE shows real-time heartbeat values (Figures Four-Five).
B. While paused, pressing the MODE key resumes counting. Pressing the RESET KEY
during pause returns to the standby screen. If no key is pressed or the exercise is not
resumed within 4 minutes, the display returns to the standby screen.
3. Exercise Completion Screen
A. After completing exercise, the meters display "STOP" blinking. The electronic display
shows the exercise completion values, cycling through the window for 5 seconds,
displaying real-time pulse values.
B. Under the exercise completion screen, pressing the MODE KEY allows another
exercise session.
C. Under the exercise completion screen, pressing the RESET KEY returns to the standby
screen.
D. If no key is pressed or exercise is not resumed within 4 minutes, the display returns to
the standby screen.
2. Standby Mode
A. After powering on, the electronic display enters standby mode, cycling through
MANUAL, INTERVAL, TARGET, TIME, TIME/500m, DISTANCE, CALORIE, PULSE, SPM,
WATT, TOTAL STROKES, STROKES in SCAN mode, displaying each for 1 second.
B. In standby mode, if no key is pressed, no RPM signal is received, and no heartbeat
signal is input, the device enters sleep mode after 4 minutes.
5. VR Adjusting Display Screen
A. In standby and exercise modes, press the SET
button to enter the resistance display screen.
The display shows the current resistance value
"LEVEL 01~10" (LEVEL 01). The resistance
value will change as VR is adjusted (LEVEL 05).
Press the SET key again to exit the resistance
adjustment screen and return to the standby or
exercise screen.
B. In the exercise screen, enter resistance
adjustment without affecting exercise
functionality. Exercise values continue counting.
LEVEL 01 LEVEL 05
13
INSTRUCTION OF MONITOR
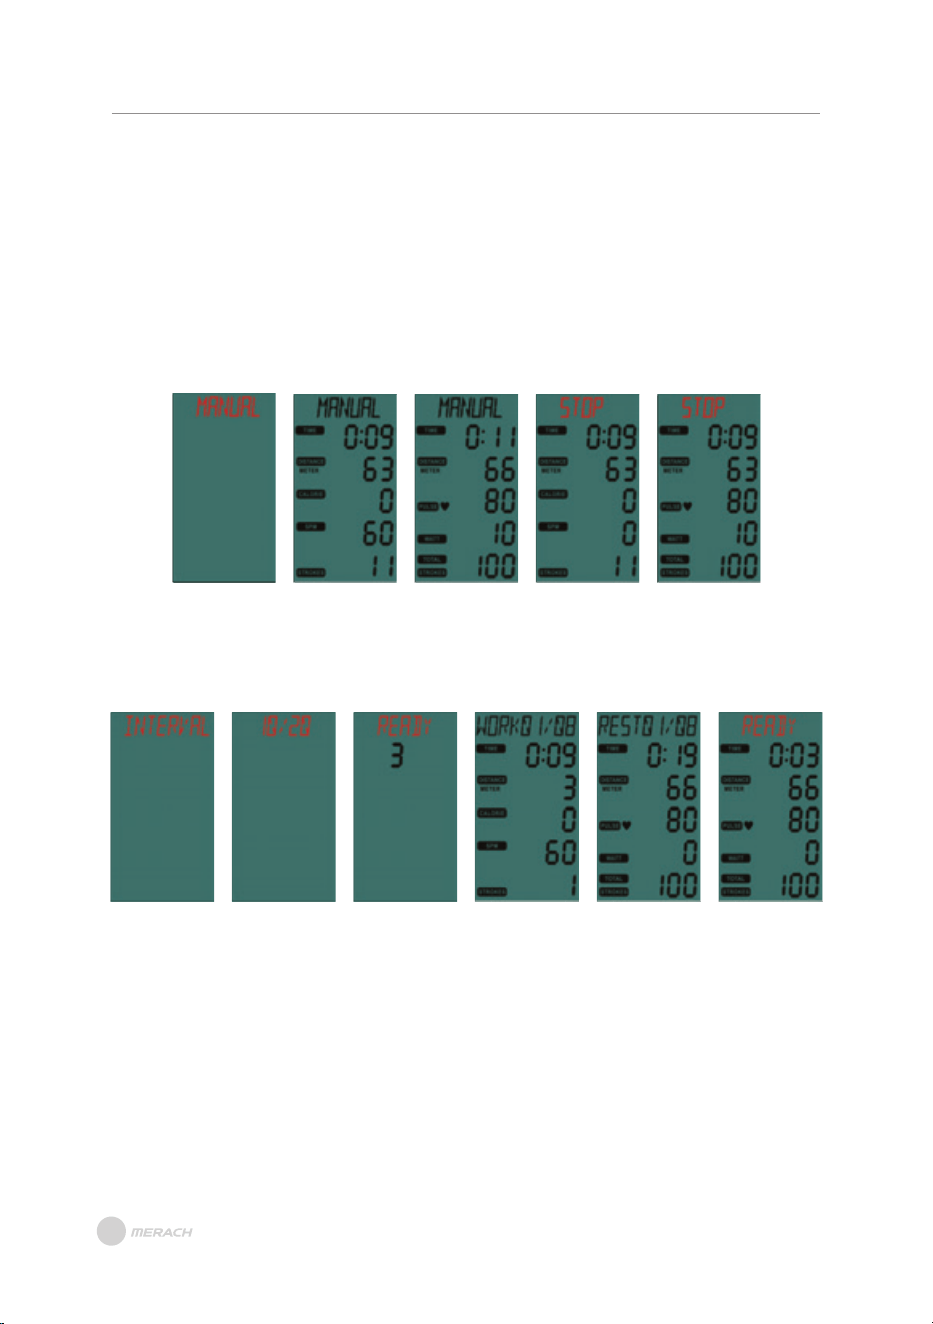
6. MANUAL
A. When in standby, immediately enter MANUAL function upon RPM signal input
(Figure 2 to 3).
B. Alternatively, in standby mode, press the MODE button twice to activate the MANUAL
function.
C. All values start counting display based on calculation values, and in a shared window,
the display switches every 5 seconds (Figure 2 to 3).
D. During exercise execution, if no keys are pressed and no signals are input, enter
standby mode after 4 minutes.
Figure 1 Figure 2 Figure 3 Figure 4 Figure 5
7. INTERVAL
In standby mode, press the MODE KEY, and press SET to switch and select the INTERVAL
function (Figure 6). Press the MODE KEY to enter the INTERVAL function selection.
Figure 6 Figure 7 Figure 8 Figure 9 Figure 10 Figure 11
(1) INTERVAL 10/20
A. Press SET to switch and select 10/20 (Figure 7). Press MODE KEY to start the 10/20 function;
"READY" blinks, and the TIME window displays a 3-second countdown (Figure 8).
B. After READY for 3 seconds, the display shows "WORK 01/08" (Figure 9), TIME starts counting down
for 10 seconds. All values start counting display based on calculation values, and in a shared
window, the display switches every 5 seconds.
C. The display shows "REST 01/08" (Figure 10), TIME starts counting down for 20 seconds. All values
start counting display based on calculation values, and in a shared window, the display switches
every 5 seconds. In the last 3 seconds, the display shows "READY" blinking (Figure 11).
INSTRUCTION OF MONITOR
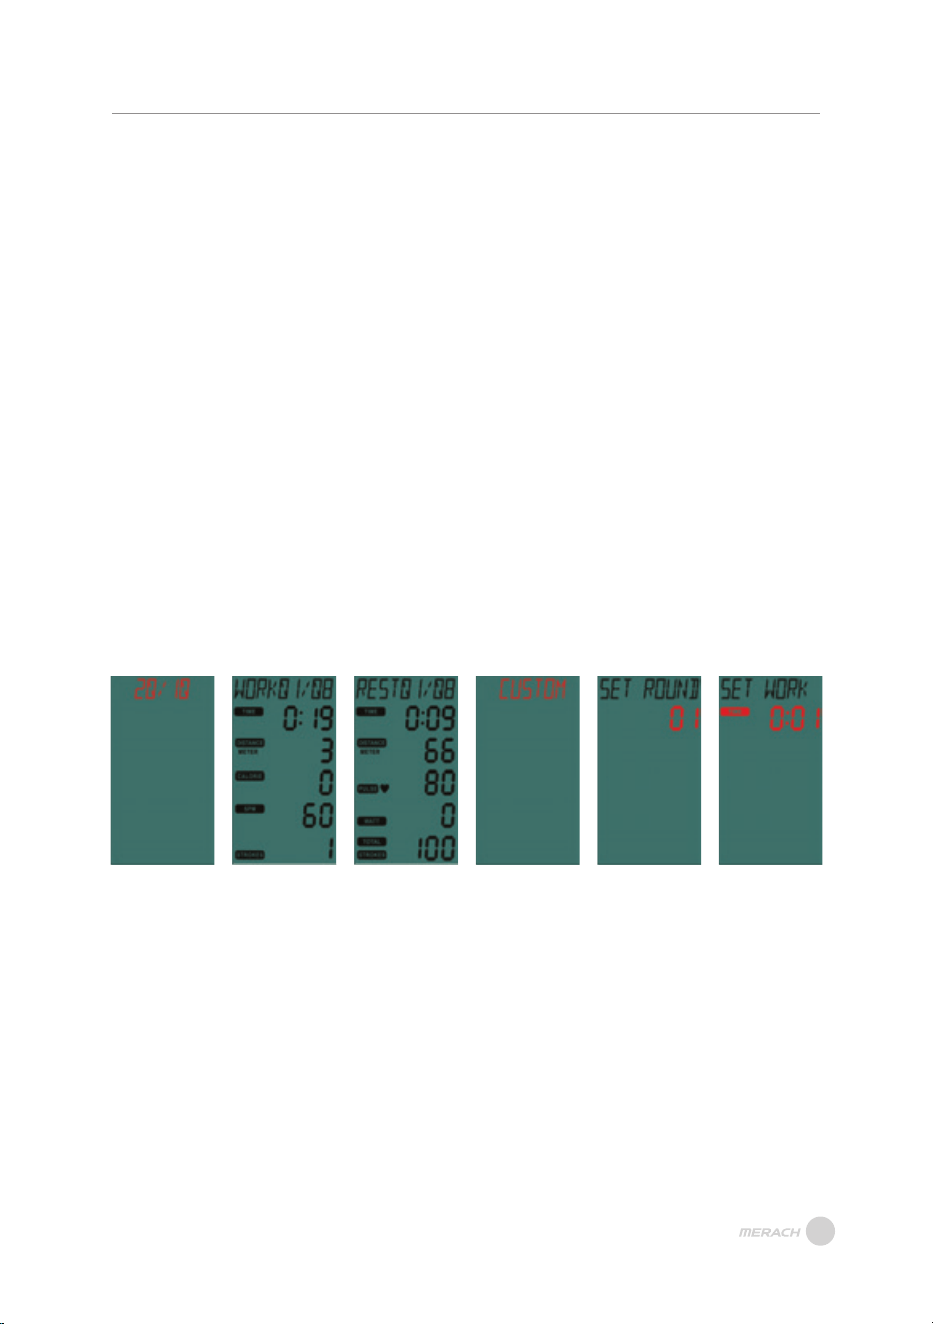
(2) INTERVAL 20/10
A. Switch to select the 20/10 function (Figure 12). Press MODE KEY to start the 20/10 function LCD
screen (display shows "READY" blinking), TIME window displays a 3-second countdown, and the
buzzer sounds for 0.5 seconds every second.
B. After READY for 3 seconds, the display shows "WORK 01/08," and TIME starts counting down for
20 seconds (Figure 13). All values start counting display based on calculation values, and in a
shared window, the display switches every 5 seconds.
C. The display shows "REST 01/08," and TIME starts counting down for 10 seconds (Figure 14). All
values start counting display based on calculation values, and in a shared window, the display
switches every 5 seconds. In the last 3 seconds, the display shows "READY" blinking.
D. Steps C and D continue to repeat in a cycle, with each cycle counting adding 1, until the display
shows "WORK 08/08" after the 8th cycle, entering the end screen, and the buzzer sounds for
0.5 seconds.
E. During the execution of WORK function, enter standby mode 4 minutes after no keys are pressed
and no signals are input.
F. The REST function does not enter SLEEP due to no keys being pressed or signals being input.
(3) INTERVAL CUSTOM
A. Switch to select the CUSTOM function; the display shows CUSTOM blinking. Press the MODE KEY
to enter the CUSTOM setting function (Figure 15).
B. The display shows "SET ROUND," and the TIME window displays 01 blinking (Figure 16). Press SET
to set the ROUND; the ROUND setting range is 01~99 and can be cyclically set. After pressing
MODE KEY, the buzzer sounds for 0.5 seconds and enters the next option setting.
C. The display shows "SET WORK," and the TIME window displays 0:05 blinking. Press SET to set
WORK TIME; the WORK TIME setting range is 0:05~10:00 and can be cyclically set. After pressing
MODE KEY, the buzzer sounds for 0.5 seconds and enters the next option setting (Figure 17).
D. Steps C and D continue to repeat in a cycle, with each cycle counting adding 1, until the display
shows "WORK 08/08" after the 8th cycle, entering the end screen.
E. During the execution of WORK function, enter standby mode 4 minutes after no keys are pressed
and no signals are input.
F. The REST function does not enter SLEEP due to no keys being pressed or signals being input.
Figure 12 Figure 13 Figure 14 Figure 15 Figure 16 Figure 17
14
15
INSTRUCTION OF MONITOR
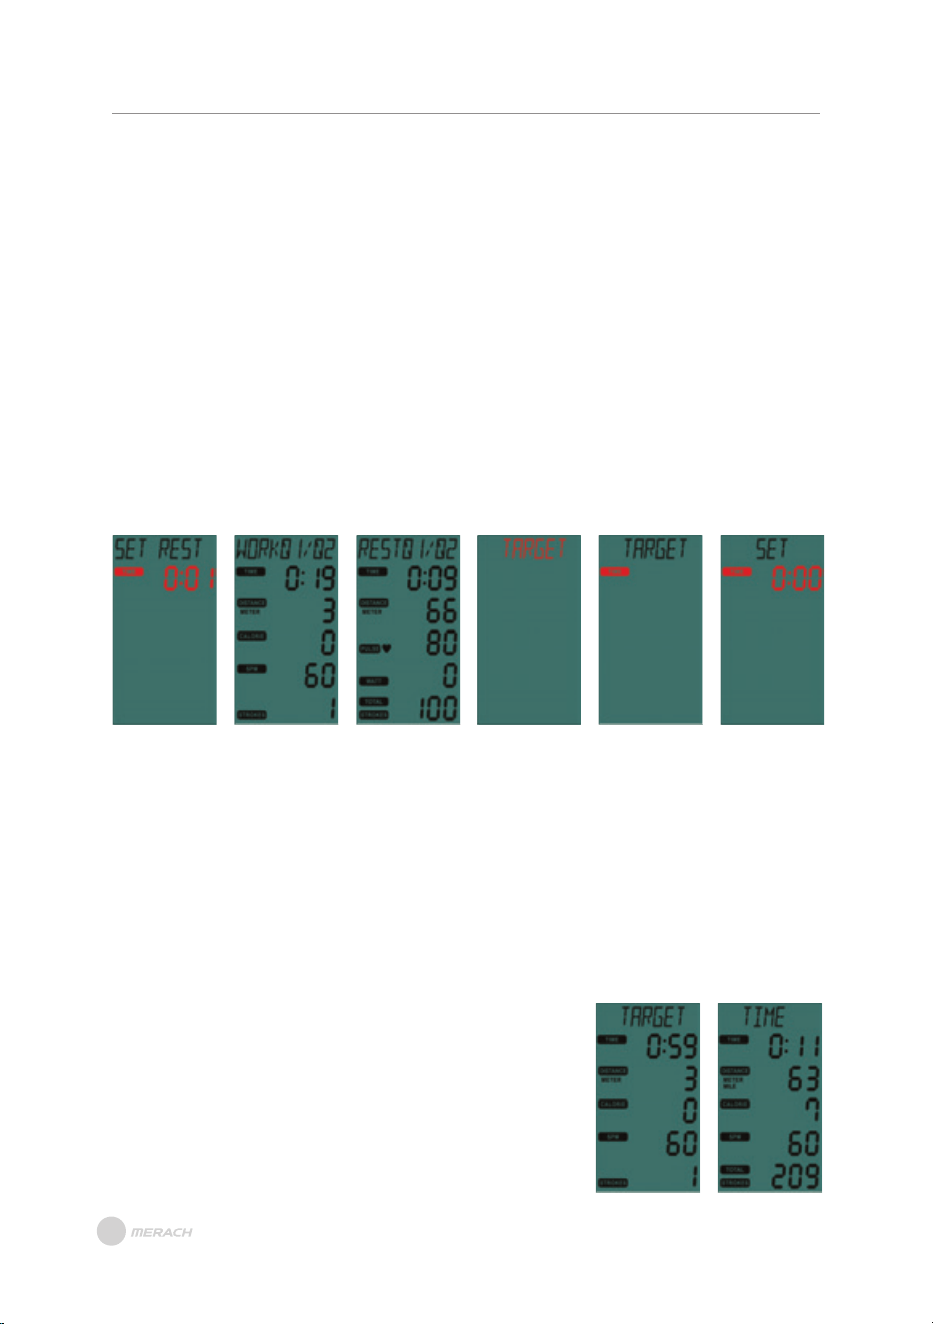
D. The display shows "SET REST," and the TIME window displays 0:05 blinking. Press SET to set REST
TIME; the REST TIME setting range is 0:05~10:00 and can be cyclically set. After pressing MODE
KEY, enter the exercise screen (Figure 18).
E. The LCD screen shows "READY" blinking, and the TIME window displays a 3-second countdown,
with the buzzer sounding for 0.5 seconds every second.
F. After 3 seconds of READY, the display shows "WORK 01/XX," and TIME starts counting down
according to the WORK set time. All values start counting display based on calculation values,
and in a shared window, the display switches every 5 seconds (Figure 19 to Figure 20).
G. The display shows "REST 01/XX," and TIME starts counting down according to the REST set time.
All values start counting display based on calculation values, and in a shared window, the display
switches every 5 seconds. In the last 3 seconds, the display shows "READY" blinking.
H. Steps C and D continue to repeat in a cycle, with each cycle counting adding 1, until the display
shows "WORK XX/XX" after the XX th cycle, entering the end screen.
I. During the execution of WORK function, enter standby mode 4 minutes after no keys are pressed
and no signals are input.
J. The REST function does not enter SLEEP due to no keys being pressed or signals being input.
Figure 18 Figure 19 Figure 20
8. TARGET:
In standby mode, press the MODE KEY, and press SET to switch and select the TARGET
function; the display shows TARGET blinking (Figure 21). Press the MODE KEY to enter
the INTERVAL function selection.
(1) TARGET TIME:
A. Switch to select the TARGET TIME function (Figure 22). Press MODE KEY to start the TIME setting
function.
B. The display shows "SET" constantly lit, and the TIME window blinks 0:00 (Figure 23). Press SET to
set the target time, with a range of 0:00 to 99:00, cyclically set. Press MODE KEY to confirm and
enter exercise mode.
C. The LCD screen shows "TARGET" and "TIME" interactively for
two seconds (Figure 24 to Figure 25), and all values start
counting display based on calculation values, with the display
switching every 5 seconds.
Figure 21 Figure 22 Figure 23
Figure 24 Figure 25
INSTRUCTION OF MONITOR
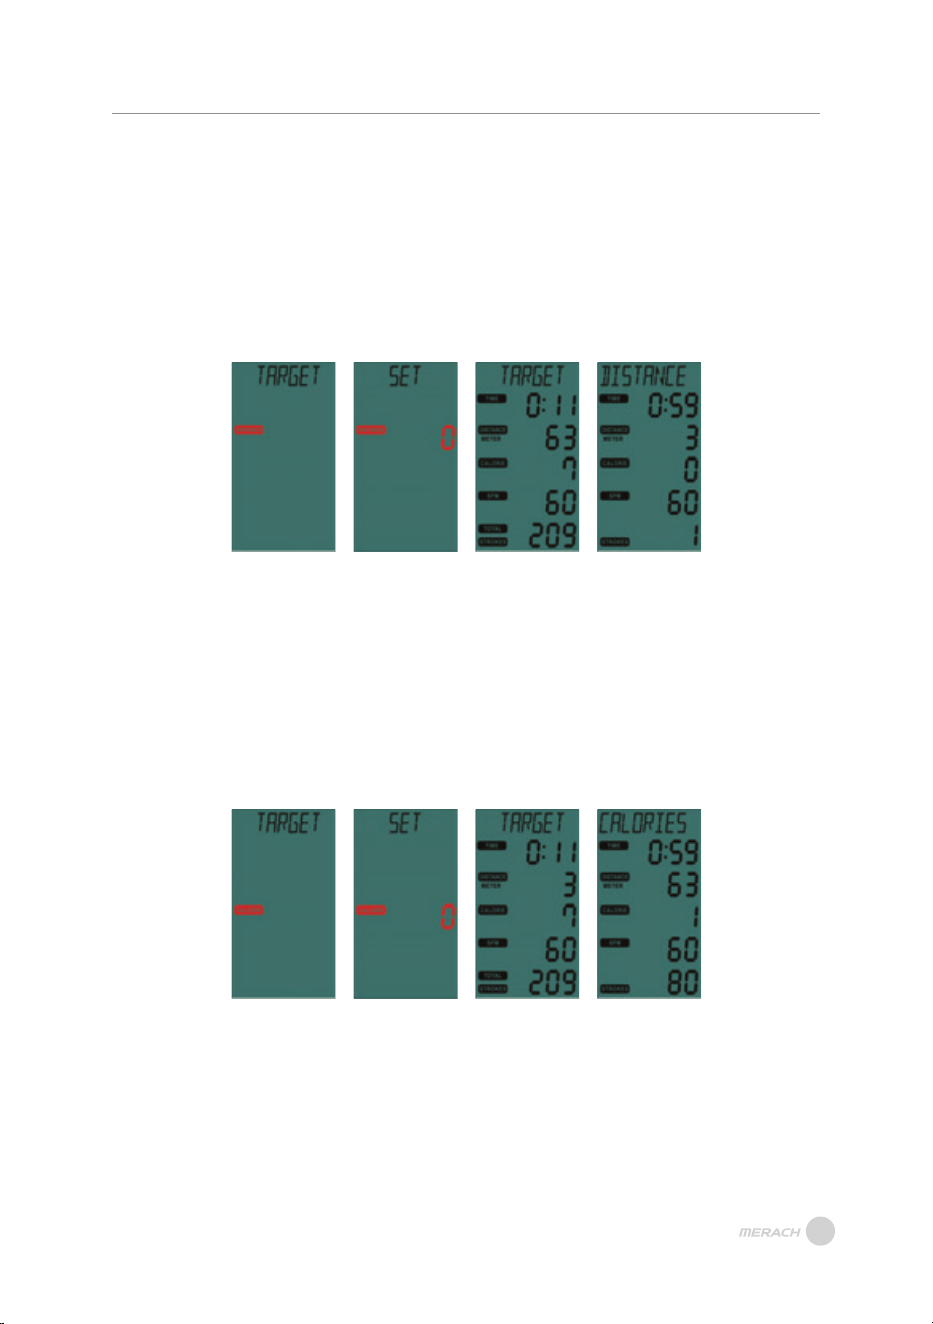
(2) TARGET DISTANCE:
A. Switch to select the TARGET DISTANCE function; the display shows TARGET constantly lit, and the
DISTANCE window blinks (Figure 26). Press MODE KEY to start the DISTANCE setting function.
B. The display shows "SET" constantly lit, and the DISTANCE window blinks 0 (Figure 27). Press SET
to set the target distance, with a range of 0 to 9990, cyclically set. Press MODE KEY to confirm;
the buzzer sounds for 0.5 seconds and enters exercise mode.
C. The LCD screen shows "TARGET" and "DISTANCE" interactively for two seconds (Figure 28 to
Figure 29), and all values start counting display based on calculation values, with the display
switching every 5 seconds.
Figure 26 Figure 27 Figure 28 Figure 29
(3) TARGET CALORIES:
A. Switch to select the TARGET CALORIES function; the display shows TARGET constantly lit, and the
CALORIES window blinks (Figure 30). Press MODE KEY to start the CALORIES setting function.
B. The display shows "SET" constantly lit, and the CALORIES window blinks 0 (Figure 31). Press SET
to set the target CALORIES, with a range of 0 to 9990, cyclically set. Press MODE KEY to confirm
and enter exercise mode.
C. The LCD screen shows "TARGET" and "CALORIES" interactively for two seconds (Figure 32 to
Figure 33), and all values start counting display based on calculation values, with the display
switching every 5 seconds.
Figure 30 Figure 31 Figure 32 Figure 33
16
17
INSTRUCTION OF MONITOR
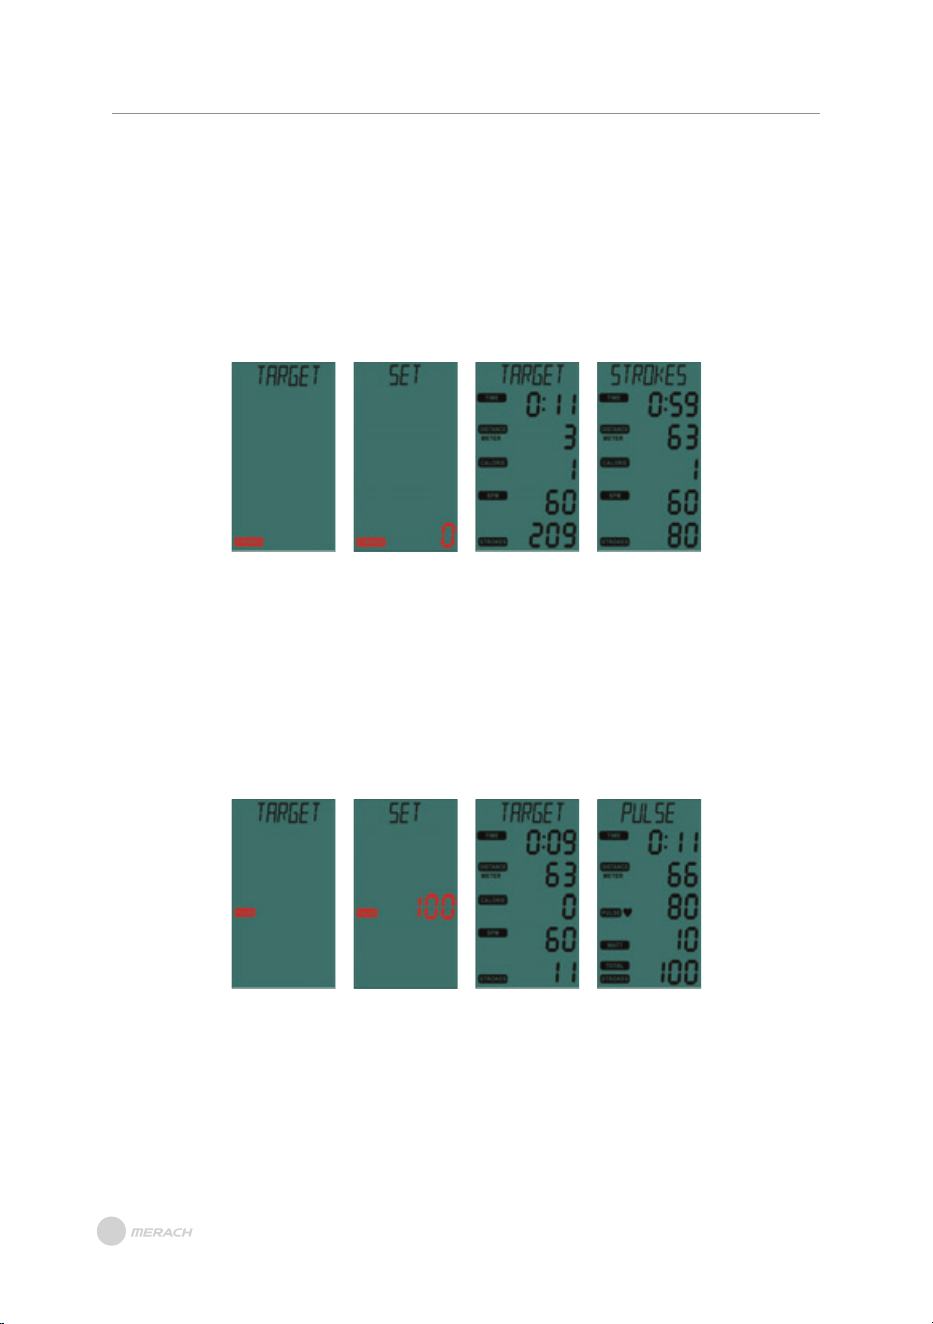
(5) TARGET PULSE:
A. Switch to select the TARGET PULSE function; the display shows TARGET constantly lit, and the
PULSE window blinks (Figure 38). Press MODE KEY to start the PULSE setting function.
B. The display shows "SET" constantly lit (Figure 39), and the PULSE window displays the preset
value 100, blinking. Press SET to set the target PULSE, with a range of 30 to 230, cyclically set.
Press MODE KEY to confirm and enter exercise mode.
C. The LCD screen shows "TARGET" and "PULSE" interactively for two seconds (Figure 40 to Figure 41),
and all values start counting display based on calculation values, with the display switching every
5 seconds.
(4) TARGET STROKES:
A. Switch to select the TARGET STROKES function; the display shows TARGET constantly lit, and the
STROKES window blinks (Figure 34). Press MODE KEY to start the STROKES setting function.
B. The display shows "SET" constantly lit (Figure 35), and the STROKES window blinks 0. Press SET
to set the target STROKES, with a range of 0 to 9990, cyclically set. Press MODE KEY to confirm
and enter exercise mode.
C. The LCD screen shows "TARGET" and "STROKES" interactively for two seconds (Figure 36 to
Figure 37), and all values start counting display based on calculation values, with the display
switching every 5 seconds.
Figure 34 Figure 35 Figure 36 Figure 37
Figure 38 Figure 39 Figure 40 Figure 41

18
INSTRUCTION OF MONITOR
1. In standby mode, press "MODE+RESET" for 3 seconds to enter VR Calibration Mode.
2. The TIME window displays "L", and the DISTANCE window shows the current actual VR
AD value (Figure 42). Adjust the VR to the first segment and press the ENTER key to
confirm.
VR Calibration Mode:
Figure 42 Figure 43
3. After confirming the VR value for the first segment, the TIME window displays "H",
and the DISTANCE window shows the current actual VR AD value (Figure 43). Adjust
the VR to the highest segment and press the ENTER key to confirm.
4. After setting the VR values for the first segment and the highest segment, the
electronic display will restart, dividing the set values into 10 equal segments.

Download and use of MERACH
1. To download the MERACH app, scan the QR code or search "MERACH" in the Apple
App Store® or Google Play Store.
Our customer can get a 180-day MERACH membership. Please contact us through
support@merach.com after receiving the product to get an exclusive redemption
code. Please include your order ID and MERACH app Username.
2. Open the MERACH app. Log In or Sign Up.
3. Follow the in-app instructions to set up your device.
MERACH APP Download APP Connection Guide
Download and use of KINOMAP
1. To download the Kinomap app, scan the QR code or search "Kinomap" in the
Apple App Store® or Google Play Store.
2. Open the Kinomap app. Log In or Sign Up.
3. Select the corresponding fitness equipment
4. Turn on Bluetooth, and choose Merach.
5. Select the type of machine, and find the Model.
6. Start training and explore different workout methods.
APP SETUP INSTRUCTION
APP SETUP INSTRUCTION
19
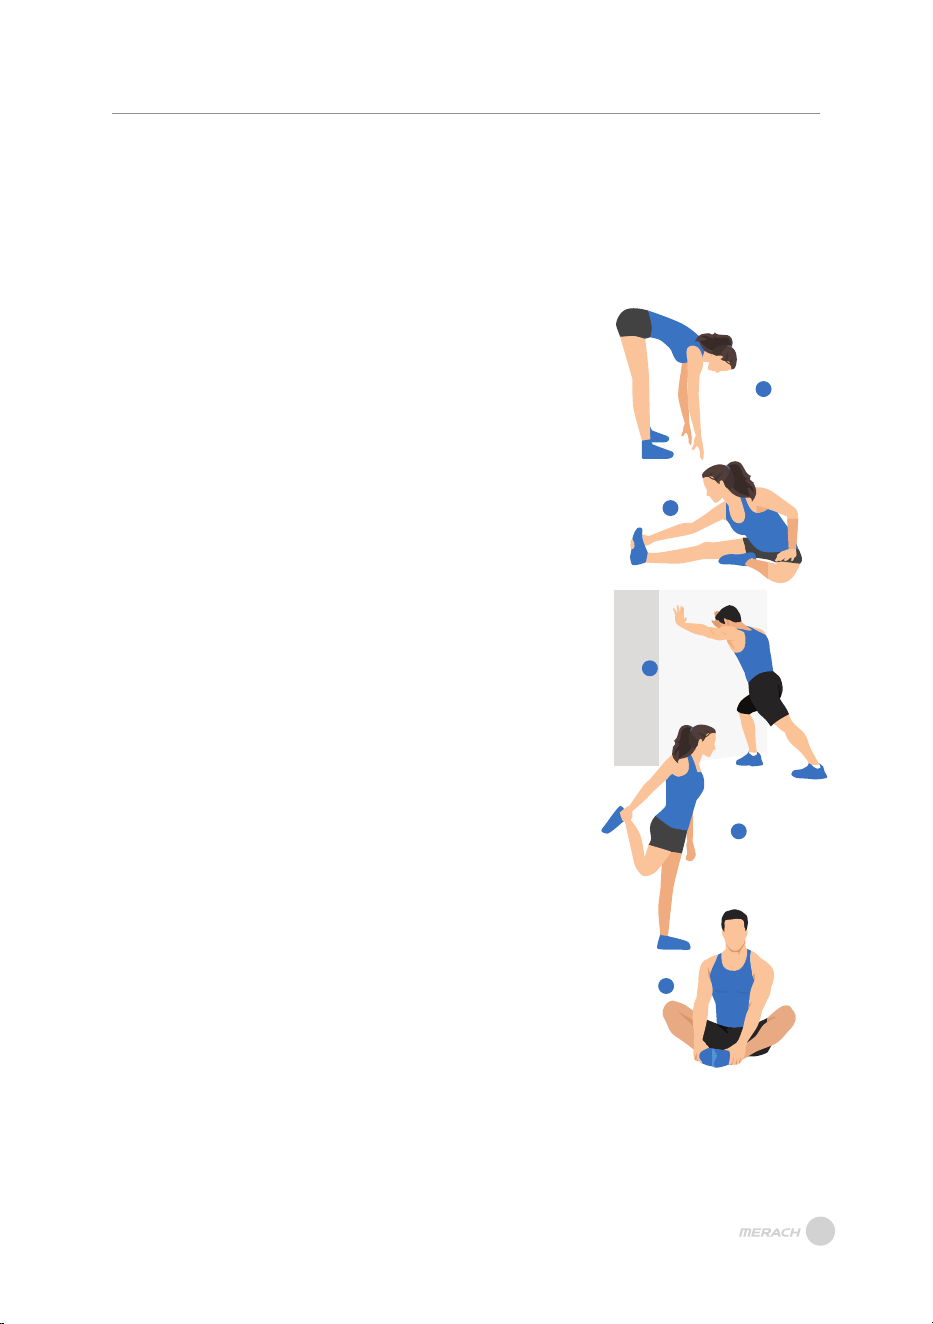
1. Stretch down
2. Seated hamstring stretch
Sit with one leg straight. Bring the other leg in so that it is
snug on the inside of the straightened leg. Try to touch your
feet with your hand's toe. Hold for 10-15 seconds, then relax.
Repeat 3 times for each leg (see Figure 2).
3. Calf and Achilles tendon stretch
4. Quadriceps stretch
Reach back with your right hand, grab your right foot and
slowly pull it toward your hips until you feel the muscles in
the front of your thigh tense. Hold for 10-15 seconds, then
relax. Repeat 3 times for each leg (see Figure4).
5. Sartorius (inner thigh muscle) stretch
Sit with your feet facing each other and your knees facing
out. Grab your feet with both hands and pull toward your
groin. Hold for 10-15 seconds, then relax.
Repeat 3 times(see Figure5).
Bend your knees slightly, slowly bend your body forward,
relax your back and shoulders, and try to touch your toes
with your hands. Hold for 10-15 seconds, then relax.
Repeat 3 times (see Figure 1).
1
2
3
4
5
Do stretches before exercising. Warm muscles are easier to stretch, so start
with a 5-10 minute warm-up, then do some stretches shown below - 5 times,
10 seconds or more per leg. Do it again after the workout.
Stand with both hands against the wall or a tree, put one
foot behind another. Keep the back leg straight and your
heel on the ground, lean toward a wall or a tree. Hold for
10-15 seconds, then relax. Repeat 3 times for each leg
(see Figure 3).
WARM-UP
WARM-UP
Note: This machine is full body training equipment, please follow the
above steps to warm up.
20
WARRANTY INFORMATION
WARRANTY INFORMATION
Terms & Policy
Product Name
Model
Default Warranty Period
For your own reference, we strongly recommend that you record
your order number and date of purchase.
Date of Purchase
Serial Number
This warranty does not apply to the following situations:
All expressed and implied warranties, including the warranty of merchantability,
are limited to the period of the limited warranty.
The MERACH products are premium in material, craftsmanship, and service. MERACH
1-year limited warranty is effective from the date of purchase.
MERACH will replace defective products based on eligibility. Refunds are available to
the original purchasers of our products within the first 30 days of purchase. This warranty
extends only to personal use, doesn’t apply to the commercial, rental, or any other uses
for which the product is not intended for. There are no warranties other than the
warranties expressly set forth with each product.
Damage due to abuse, accident, alteration or vandalism.
Improper or inadequate maintenance.
Damage in return transit.
Unsupervised use by children under 18 years old.
MERACH and its subsidiaries are only responsible for damages caused by the intended
use or as instructed in the user manual. Some states do not allow this exclusion or
limitation of incidental or consequential losses, so the above disclaimer may not apply
to you. This warranty gives you specific legal rights and you may also have other rights,
which may vary from state to state.
MERACH AIR ROWING MACHINE
MR-R11
12 Months
This warranty is non-transferable. MERACH is not responsible for any damages, losses
or inconveniences caused by equipment's failure, user's negligence, user's abuse, or
improper operation that does not follow the included user manual.
21

Additional 12-month Warranty:
You can enjoy an additional 12-month warranty. Just active your warranty by sending the
product's model name via register@merach.com, or log onto merachfit.com/pages/
warranty and enter your order number (i.e. Amazon) within the first 14 days of purchase
to register your new product for the extended warranty. If you are unable to provide the
order number for your product, please type a short note in the order number field along
with the date you received your product.
Defective Products & Returns:
Customer Support
Your satisfaction is our goal! Should you encounter any issues or have any questions
about your new product, feel free to contact our Customer Support Team via
support@merach.com
*Please have your Order ID and serial number (usually on the equipment) ready
before contacting Customer Support.
Should your product prove defective within the specified warranty period, please contact
the Customer Support via support@merach.com with your invoice and order number.
DO NOT dispose of your product before contacting us. Once our Customer Support team
has approved your request, please return the product with a copy of your invoice and
order number.
WARRANTY INFORMATION
TikTok's shop Exclusive after-sales: service@merach.com
22

Customer Service: support@merach.com
Official Website: merachfit.com
@Merachfit
@merach
