
MERACH
R28
PANTONE 2394 C
划船机说明书
尺寸:148*210mm
(本⻚不打印)
USER MANUAL
MERACH WATER ROWING MACHINE
POWERED BY
Model: MR-R28
Questions or Concerns?
IMPORTANT!
Please read all details before use, and keep this user manual for future reference.
PLEASE CONTACT US BEFORE THE RETURN: Mon-Fri,9:00 am-5:00 pm PST/PDT
Phone: 1- (877) 3563730 Mon-Fri 8am-5pm (PST)

c%?ĀcĀLĀĀ
?ÍÀĀÍÄʳ¬ÀÄĀrÀģÊĀ£ÍÄÊĀ¬½³ÀÊrÊąĀÊÀĀr§ÊăĀÊÄÄăĀrĀ½ÍÀĀ£³Þ¬ÊĀ³ÀĀ§×ĀÄĀrÊĀ
ÊĀ ³ÀĀ ³Ā ×ÀÞÊĀ ØĀ ³Ā rÊĀ 8L%ĂĀ À³¬Ā ³×rÊ×Ā ÊÄÄĀ ÀÄrÀĀ rĀ ÍÊÊē
Ā½À³ÍÊĀĀק³½¬ÊăĀĀʳĀ³ÍÀĀݽʳr§Ā½ÍÀrÄĀĬĀrÊÀēÄr§ÄĀÄÀ×ăĀØĀrÀĀ³ÍÀĀ
ÍÄʳ¬ÀÄģĀ§ē§³Ā½rÀÊÀĀĀÀrÊĀrĀ~ÊÊÀĀÊÄÄĀÍÊÍÀĂĀĀĀ
UÀ³ÍĀ¿Ír§ÊÞĀrÊē~ÍÀĀĬĀ¬Íħē~ͧĀÊÄÄĀ¿Í½¬ÊĀÄÍĀrÄĀ³ÍÀĀ¿Ír§ÊÞĀÀ³ØĀ
¬rÄĀrĀÝÀÄĀ~¥ÄăĀ½§ÍÄĀ³ÍÀĀĀ³×rÊ×Ā8L%ĀIIăĀĀrĀÊr§Ā³ÍÀÄÄăĀØĀ×Ā
ÊĀ³½½³ÀÊÍÊÞĀrĀÄͽ½³ÀÊĀʳĀr§§ĀʳĀ½ÍÀÄÍĀÊÀĀr§ÊĀrĀÊÄÄĀ³r§ÄĀrĀij×ÀĀrĀ
ØĀØrÞĀ³Ār§ÊÞĀ§×Ă
c§³¬ĀʳĀ8L%
0³ĀÊĀ8L%Ā ÊÄÄĀ³¬¬ÍÊÞĀ³Ā r~³³¥
r~³³¥Ă³¬ďÀ³Í½Äď¬ÀrÊÄÄ
0³
ݽ§³ÀĀÊÄÄĀ³ÍÀÄÄ
¬ÀrÊĂ³¬ď~§³Äď³ÍÀÄÄ
ݽ§³À
£³ÞĀØ¥§ÞăĀrÊÍÀĀ³ÍÀÄÄ
¬rĀݧÍÄקÞĀ~ÞĀ³ÍÀĀē³ÍÄĀÊÄÄĀÄÊÀÍʳÀ
£³Þ
U%91Āi?XĀ ?LĀi?XLĀIXL%Pć
ĘcĀ³½ĀÞ³ÍĀ§³×ĀÞ³ÍÀĀØĀÀ³ØĀ¬rĀrÄĀ¬ÍĀrÄĀØĀ³Ăę
cLL9UiĀL!'PULU'?9
I§rÄĀÀÄÊÀĀÞ³ÍÀĀØrÀÀrÊÞĀʳĀ¥½ĀÞ³ÍÀħĀ½À³ÊÊĀć
¬r§ĀÞ³ÍÀĀʬĀ¬³§Āʳ
ÀÄÊÀī¬ÀrĂ³¬
LÄÊÀĀÞ³ÍÀĀØrÀÀrÊÞĀ×r
¬ÀrÊĂ³¬ď½rÄďØrÀÀrÊÞ
'Ā½ÍÀrÄĀ³ÍÊÄĀXPďrrrĄĀU³ĀÀÄÊÀĀÞ³ÍÀĀ½À³ÍÊĀØrÀÀrÊÞăĀ³ÊrÊĀÞ³ÍÀĀ
§³r§ĀÄÊÀ~ÍʳÀĂ
³ÀĀÊr§ÄĀÀrÀĀ½À³ÍÊĀØrÀÀrÊÞĀ³ÀĀĀÞ³ÍĀr×Ā¿ÍÄʳÄĀ³ÀĀ½À³~§¬ÄĀØÊĀ
Þ³ÍÀĀ½À³ÍÊăĀ½§rÄĀ³ÊrÊĀÞ³ÍÀĀ§³r§ĀÄÊÀ~ÍʳÀĂĀ

)$4
P3 ēPLb'ĀXPU?8LĀPXII?LUĀ K
ðĂĀIÍÀrÄĀÊĀÄÝĀ¬³ÊÄĀr³ăĀ'ĀØrÊĀʳĀÀÊÍÀĀÊĀ~ÍÊĀrĩÊĀĀÊĀÀÊÍÀĀسØĂĀ
crÊĀijͧĀ'Ā³ĉ
!ÀrÊĀrÊÀēÄr§ÄĀÄÀ×Ā§ÍĀíîē¬³ÊĀÝrĀ³ÀĀÀÊÍÀăĀ
Äͽ½³ÀÊī¬ÀrĂ³¬ăĀ³ÀĀ¬rã³Ā§×ĀrÊĂ
ïĂĀ'Ā£ÍÄÊĀÀ×ĀÊĀ½rÀ§ĀʳrÞăĀ~ÍÊĀÊĀ³ÄĩÊĀ³¬ĀØÊĀrÄijÀÄĂ
i³Íĩ§§ĀÊĀÊØĀÊĀ½ÀĀÀÍĀ³ĀÊĀrÄijÀÄĀĀÊĀ¬ÄÄĀrÄijÀÄĀ
³ĩÊĀrÊĀÞ³ÍÀĀÍÄÀĀݽÀĂĀ?ÀĀÞ³ÍĀrĀ³ÊrÊĀÍÄĀ³ÀĀrĀÀÍĀ³ÀĀÀĀ
rÄijÀÄĀ×rĀÊĀrÊÀēÄr§ÄĀ¬r§ĀÄÀ×Ă
íĂĀUĀ³ÍÊÀĀ½r¥rĀØrÄĀ~À³¥ăĀØĀ¬r¥ÄĀ¬ĀسÀÀĀÊrÊĀÊĀ½À³ÍÊĀ¬rÞĀ
~Ār¬rĂ
I§rÄĀ³ÊrÊĀÍÄĀ×rĀÊĀrÊÀēÄr§ÄĀ¬r§ĀʳĀrÄ¥Ā³ÀĀ LĀÀÊÍÀĀďÀ½§r¬ÊĀ
ĀʬĂ
îĂĀUÄĀØrÄĀÊĀÀÄÊĀʬĀ§Ā~³ÍÊĀÞ³ÍÀĀ½À³ÍÊăĀÄĀÊÀĀrĀÍÄÀĀ¬rÍr§Ā³ÀĀÊÍʳÀr§Ā
׳Ār×r§r~§ĉ
ĀÊr§ĀÍÄÀĀ¬rÍr§ĀÄĀ§ÍĀĀÊĀ½r¥rĀrĀÞ³ÍĀrĀr§Ä³ĀØrÊĀÊĀ
ÄÊr§§rʳĀ׳Ā~ÞĀÄrĀÊĀKLĀ³Ā³ĀÊĀ½r¥rĂ
ñĂĀcÀĀrĀ'ĀÊĀÞ³ÍÀĀ§rÊÄÊĀ½À³ÍÊĀ³À¬rʳĀrĀÀ§rÊĀ½À³¬³Ê³Äĉ
PrÀĀ³ÍÀĀ½À³ÍÊÄĀ³Ā¬rã³Ā³ÀĀ×ÄÊĀ³ÍÀĀ r~³³¥ăĀUØÊÊÀăĀU¥U³¥ăĀ'ÄÊrÀr¬Ā
ī¬ÀrÊăĀrĀr§Ä³ĀÞ³ÍĀrĀÄĀÍÄĀÊĀ½À³ÍÊĀ§ÄÊĀÞ³ÍĩÀĀÊÀÄÊĀĀrĀ
rÄ¥ĀĀÊÀĀÄĀrÞĀijÍÊĂ
³ÊrÊĀÍÄĀ~ÞĀ Äͽ½³ÀÊī¬ÀrĂ³¬

This device contains a radio transmitter module with type approval code
FCC ID: 2A6QWMR-BLE001 IC: 29678- MRBLE001 HVIN: MRBLE001
Please read the entire manual carefully before installing and using
the machine, and save it for further use.
CONTENTS
Safety Instructions..........................................................................1
Specifcation.....................................................................................3
Parts & Accessories List.................................................................4
Installation Guide.............................................................................5
Product Operation Guide.................................................................8
Instruction of Monitor.....................................................................10
Instructions for Replacing the Battery...........................................11
APP Setup Instruction.....................................................................12
Warm-up..........................................................................................13
Rowing posture guide....................................................................14
Troubleshooting..............................................................................15
Maintenance Guide........................................................................16
Warranty Information.....................................................................17

SAFETY INSTRUCTIONS
SAFETY INSTRUCTIONS
Please keep this manual in a safe place for future reference.
It is very important to read the entire manual thoroughly before installing and using
the machine. Safe and effective training can only be achieved if the machine is prop-
erly assembled, properly maintained and used. Make sure all users are familiar with
all warnings and precautions of this machine.
Please consult your physician to determine if you have any medical or physical cond-
itions that could put your health and safety at risk or prevent you from using the eq-
uipment properly. Your physician's advice is essential if you are taking medication
that affects your heart rate, blood pressure, or cholesterol level.
Please always pay attention to your body signals, improper use of the machine may
affect your health. If you experience any symptoms (including headache, chest pain,
irregular heartbeat, shortness of breath, dizziness, or any discomfort), stop exercising
immediately and consult your physician, get the permission before training again.
Always keep children and pets away from the machine. The machine is for adult use only.
Please use this machine on stable and horizontal ground level, and put a protective
layer on the floor or carpet to prevent a floor from damaging. Make sure the distance
between the machine and each obstacle is at least 2.0 ft (0.6m).
Please check all screws and nuts are properly tightened before using the machine.
The safe use of the machine can only be guaranteed if the regular maintenance and
repairs of undertaken, and worn out and broken parts are changed.
Please follow the instructions in this manual to use this machine. Please stop using
and operating immediately when you find any defective parts or hear any abnormal
sound. Make sure all issues are resolved before using it again.
Please wear sports clothes, sports shoes, or other proper clothes. Loose-fitting clot-
hing is not recommended, as loose clothing may get caught in the machine, hindering
operation and possibly causing an injury.
This machine is only for home use. The Maximum user weight is 400lbs/180kg.
01
This machine is not for professional medical treatment.
This product is only for consumer use.

SAFETY INSTRUCTIONS
The overall performance of the machine and all moving parts must be checked regularly to
ensure the safety of the machine.
If the moving parts are damaged, please do not use the machine until the parts are repaired.
Keep the children away from the machine. The equipment is not for children to use or play
with. They can injure themselves accidentally.
This appliance can be used by children aged from 13 years and above and persons with re-
duced physical, sensory or mental capabilities or lack of experience and knowledge if they
have been given supervision or instruction concerning use of the appliance in a safe way
and understand the hazards involved.
Children shall not play with the appliance.
Cleaning and user maintenance shall not be made by children without supervision.
Do not store the machine in a place exposed to direct sunlight, wind and rain, or with
high humidity. If needed, please pack the machine to keep children away from touch-
ing or playing with it.
Please check if there’s rust or cracks after long-term storage.
Please understand that for the consumable parts, the wear and tear may also occur
even with proper maintenance.
For long-term use of this machine, please wipe the dust regularly. Do not water it di-
rectly, or wipe with gasoline, abrasive powder, etc. Otherwise, it might cause cracks
on the parts or main body, electric shock or fire. Please use Dilute neutral detergent
for maintenance.
Care & Maintenance
02
Before starting any training, please consult your physician, especially
for those who are over 35 years old or with pre-existing health condit-
ions. Please read all instructions before using the machine.

MR-R28
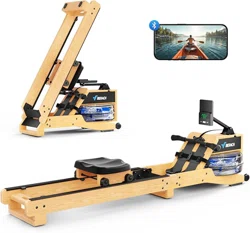
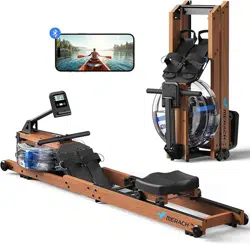
MERACH Water Rowing Machine
1-6 Level(Water Resistance)
AAA Battery x2
400lbs/180kg
72.6*17.3*28.0inch/1845*440*710mm
51.4lbs/23.3kg
SPECIFICATIONS
SPECIFICATIONS
03
Model:
Name:
Resistance:
Power:
Max Load:
Product Dimensions:
Net Weight:

Check if all parts and accessories are in the package.
PARTS & ACCESSORIES LIST
PARTS & ACCESSORIES LIST
04
Main Frame Left Slide Rail
Right Slide Rail
Seat Cushion Assembly
Monitor
Rear Connecting
Plate Assembly
Screws & Kits
User Manual
AAA Battery x2
Water Purifi
cation
Track
Connecting Plate
Water Absorber
Tablet
Handle Seat
Step 1
M8- 8PCS
M6* 50-4P CS
Step 2
S4- 1PC
S5- 1PC
S13 S14 S17- 1PC
S17
S14
S13
M8* 40-8P CS
M6* 15-2P CS
Ha rd wa re Package
USER MANUAL
MERACH WATER ROWING MACHINE
POWERED BY
Model:M R-R28
Questions or Concerns?
IMPORTANT!
Please read all details before use, and keep this user manual for future reference.
PLEASE CONTACT US BEFORE THE RETURN: Mon-Fri,9:00 am-5:00 pm PST/PDT
Phone: 1- (877) 3563730 Mon-Fri 8am-5pm (PST)
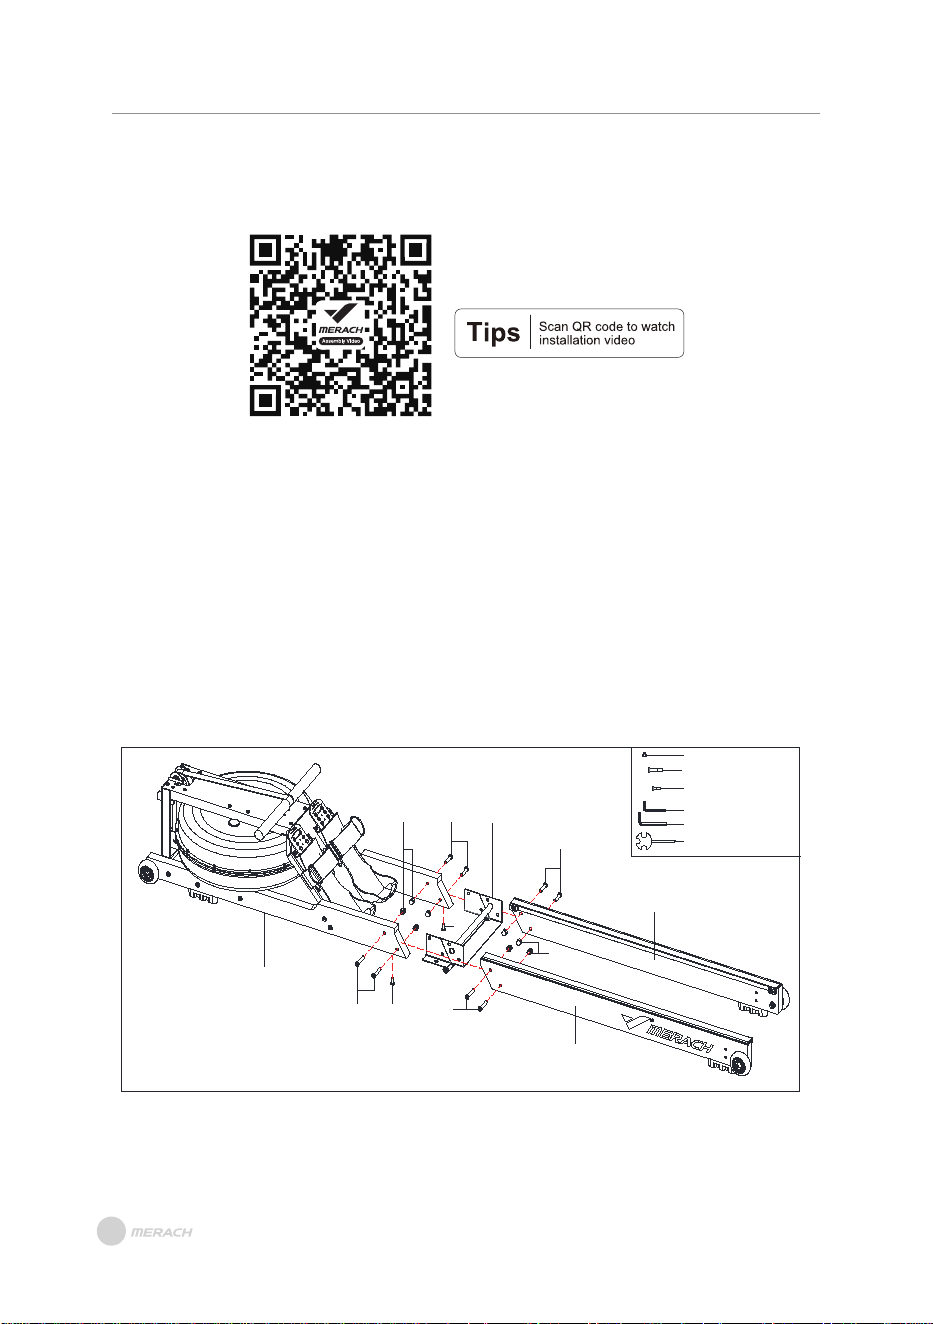
INSTALLATION GUIDE
INSTALLATION GUIDE
05
Step 1: Connecting Rails
A. Use the Allen Wrench (27), Cross Wrench (91), Hexagonal Flat Head Screw (67), and
Cap Nut (86) to tighten the Main Frame (A), the Rear Connecting Plate Assembly (F),
the Left Slide Rail (B), and the Right Slide Rail (C).
B. Use the Allen Wrench (90) and Hexagonal Flat Head Screw (63) to tighten the Main F
rame (A) and the Rear Connecting Plate Assembly (F).
C. Tighten all nuts.
Note: When connect the rails, lift the Main Frame (A) up for easy to align the screws hole
of Slide Rail.
86
67
63
A
67
F
67
67
86
63
B
C
#86 Cap Nut M8 8PCS
#67 Hexagonal Flat Head
Screw M8*40 8PCS
#63 Hexagonal Flat Head S
crew M6*15 2PCS
#90 Allen Wrench S4 1PCS
#27 Allen Wrench S5 1PCS
#91 Cross Wrench S13 S14
S17 1PCS
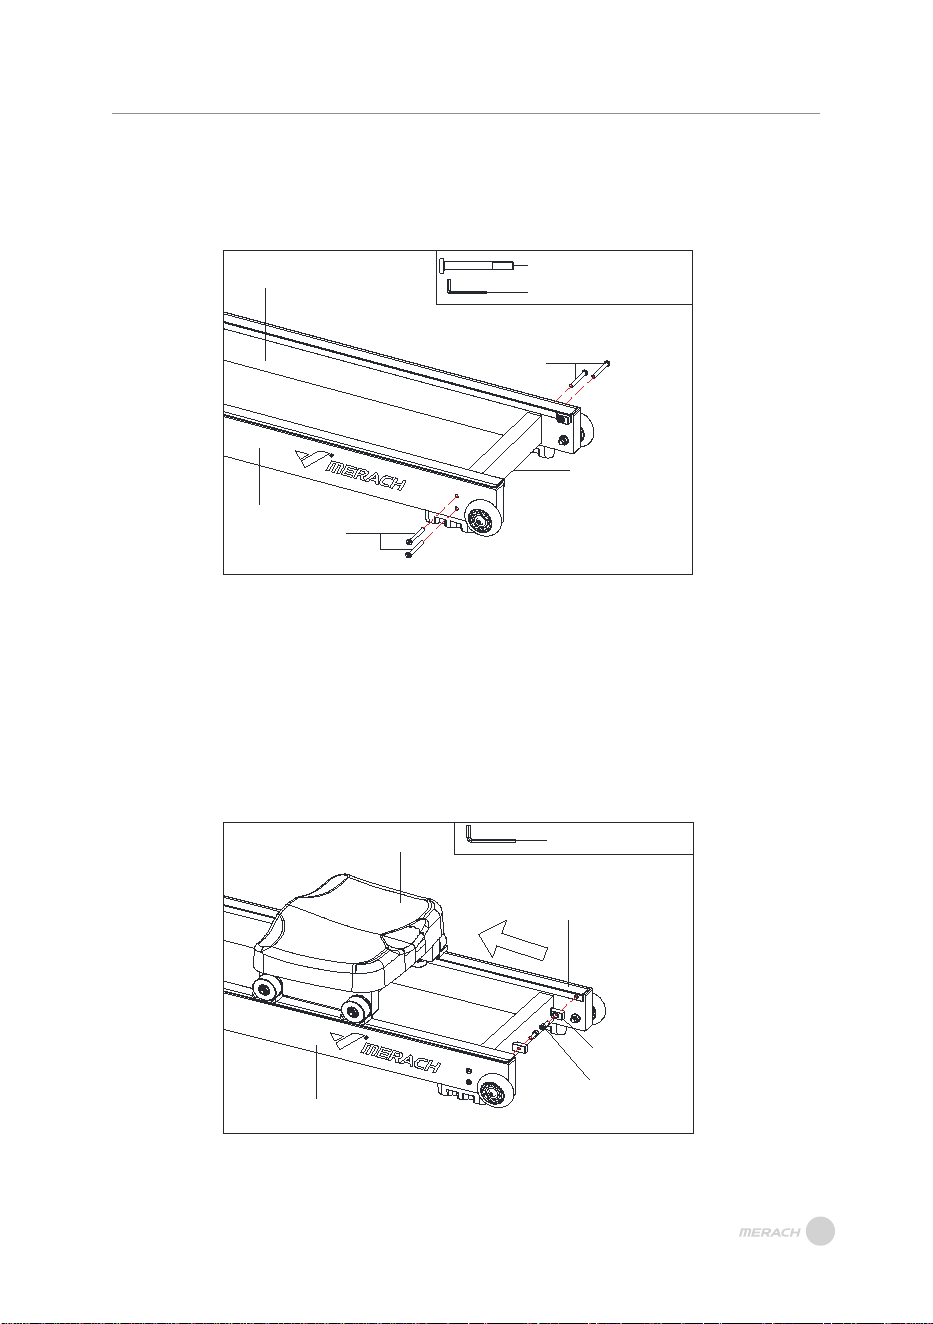
Step 2: Assemble the Track Connecting Plate
Use the Allen Wrench (90) and Hexagonal Flat Head Screw (62) to assemble the Left
Slide Rail (B), the Right Slide Raily (C) and the Track Connecting Plate (4).
Step 3: Installing the Seat Cushion Assembly
A. Use an Allen Wrench (27) to remove the pre-installed Seat Stopper (30) and the He-
xagon Socket Head Screw (68) from the Left Slide Rail (B) and the Right Slide Raily (C).
B. Push the Seat Cushion Assembly (D) in the direction of the arrow, and then tighten
the Seat Stopper (30) and the Hexagon Socket Head Screw (68).
INSTALLATION GUIDE
06
62
62
04
C
B
30
68
B
C
D
#62 Hexagonal Flat Head Screw
M6*50 4PCS
#90 Allen Wrench S4 1PCS
#27 Allen Wrench S5 1PCS
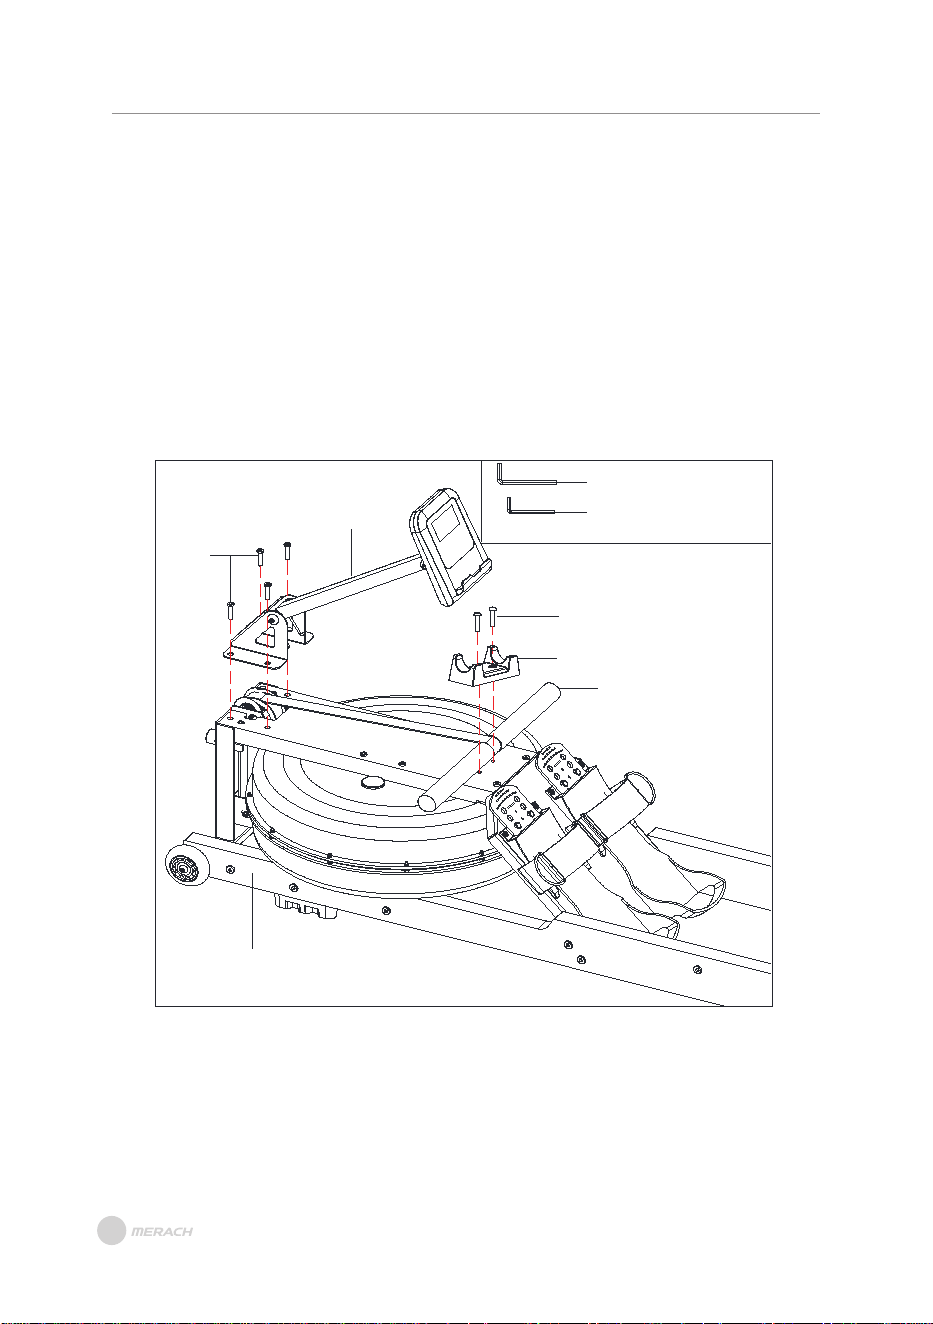
Step 4: Install the Monitor
A. Use the Allen Wrench (27) to remove the pre-installed Hexagonal Pan Head Screw
(69) from the Main Frame (A).
B. Use the Allen Wrench (90) to remove the pre-installed Hexagonal Flat Head Screw
(83) from the Main Frame (A).
C. Use the Allen Wrench (27) and the Hexagonal Pan Head Screws (69) to install the
Handle Seat (29) on the Main Frame (A), and place the Handle Tube (12) on the Handle
Seat (29).
D. Use the Allen Wrench (90) and Hexagonal Flat Head Screws (83) to install the Monitor
(E) on the Main Frame (A).
INSTALLATION GUIDE
69
29
12
A
83
E
#27 Allen Wrench S5 1PCS
#90 Allen Wrench S4 1PCS
07
PRODUCT OPERATION GUIDE
PRODUCT OPERATION GUIDE
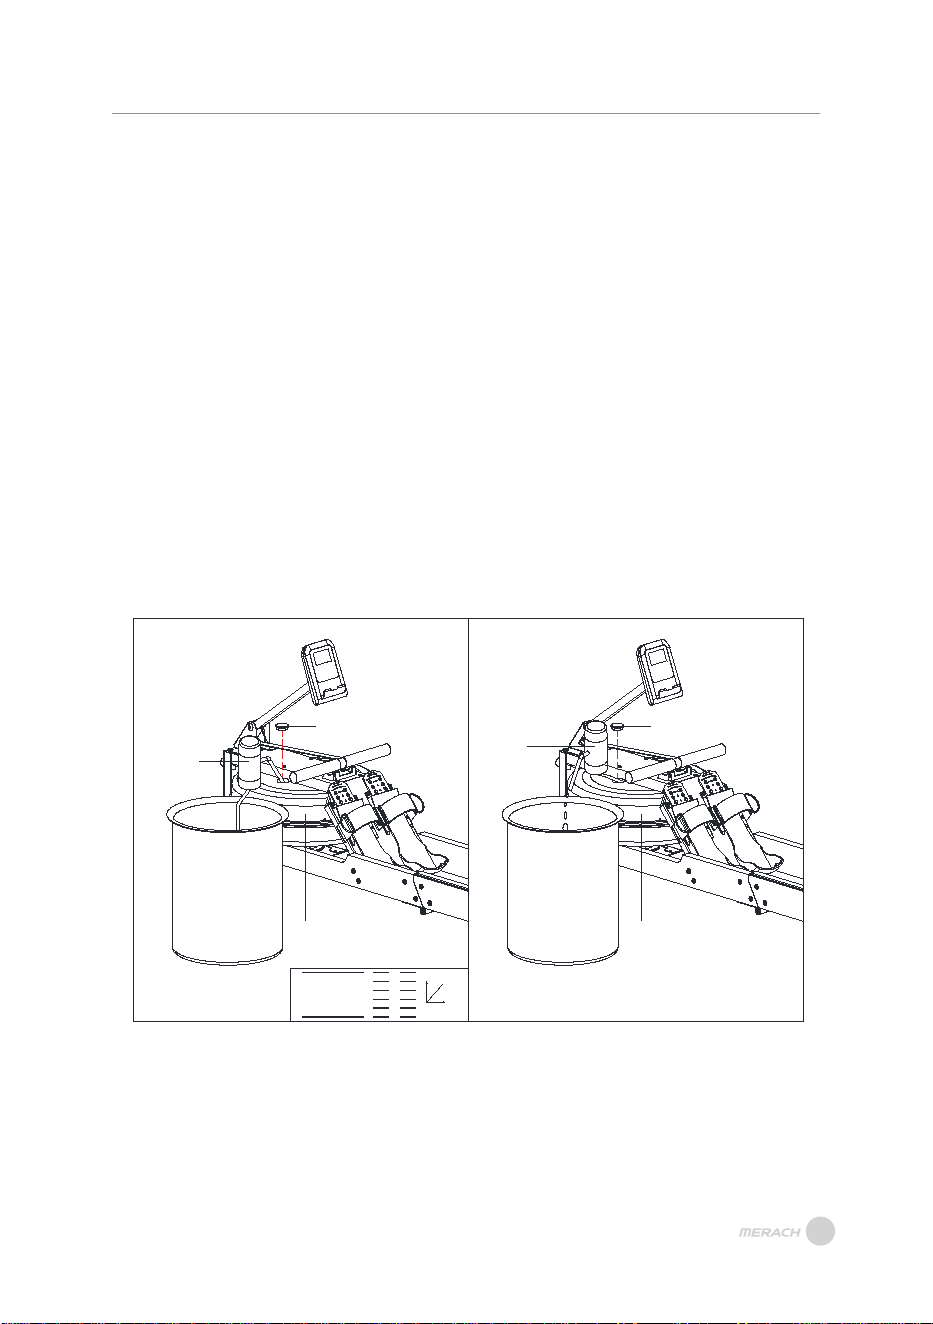
Water Regulation InstructionF
1. Remove the plug from the water tank.
2. Water Filling: Insert the water pump head into the water tank, then insert the water
pipe into the bucket. Refer to the numerical scale on the side of the water tank to mea-
sure the water level in the tank (as shown in Figure A).
3. Water Drawing: Place a bucket next to the machine, and use the water pump to draw
water from the tank into the bucket (as shown in Figure B).
4. Insert the plug back into the top water tank, and use a dry cloth to wipe dry any water
stains around the tank.
·Notes: Please ensure the electric water pump is fully charged before use.
·Only non-distilled water should be poured into the water tank, along with adding water
purification tablets. Do not use low-quality purification tablets or bleach to avoid dam-
aging the water tank.
·Add water purification tablets every 6 months or as needed. If the water quality beco-
mes very turbid, please replace the water in the tank.
·The water drained from the tank is not suitable for reuse and should be treated as
wastewater.
Water Level Scale:
·The water level scale is on the side of the water tank. The maximum water filling level is
marked by 6 levels. Do not exceed this numerical line.
·Resistance depends on the amount of water in the tank (1 level of water represents the
l
owest resistance, while 6 levels of water represent the highest resistance).
08
1
2
3
4
5
6
MAX FILL
MIN. FILL
RESIS.
L
E
VEL
WATER LEVEL
R E S I S T A N C E
26
35
36
26
35
36
Figure A Figure B
09
PRODUCT OPERATION GUIDE
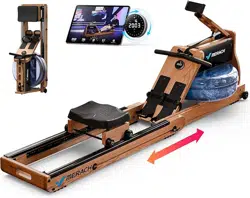
Product Storage
1. Move the Seat Cushion Assembly (D) to the position shown in the figure (to prevent
the seat cushion assembly from falling down quickly when the product is folded, which
may damage the product).
2. Adjust the Monitor (E) in the direction of the arrow so that it is flat against the Main
Frame (A).
3. Hold the Rear Connecting Plate Assembly (11) tightly with your hands and slowly pull
it up as indicated by the red arrow.
D
11
Product Movement
1. First move the Seat Cushion Assembly (D) to the position shown in the figure (to pre-
vent the Seat Cushion Assembl from falling quickly when the product is folded and da-
maging the product).
2. Turn the Monitor (E) in the direction of the arrow to make it flat against the Main Frame (A).
3. Hold the Left and Right Slide Rail (B/C) tightly with your hands, lift them up slowly, and
move them to the required position.
E
D
B/C
E
A
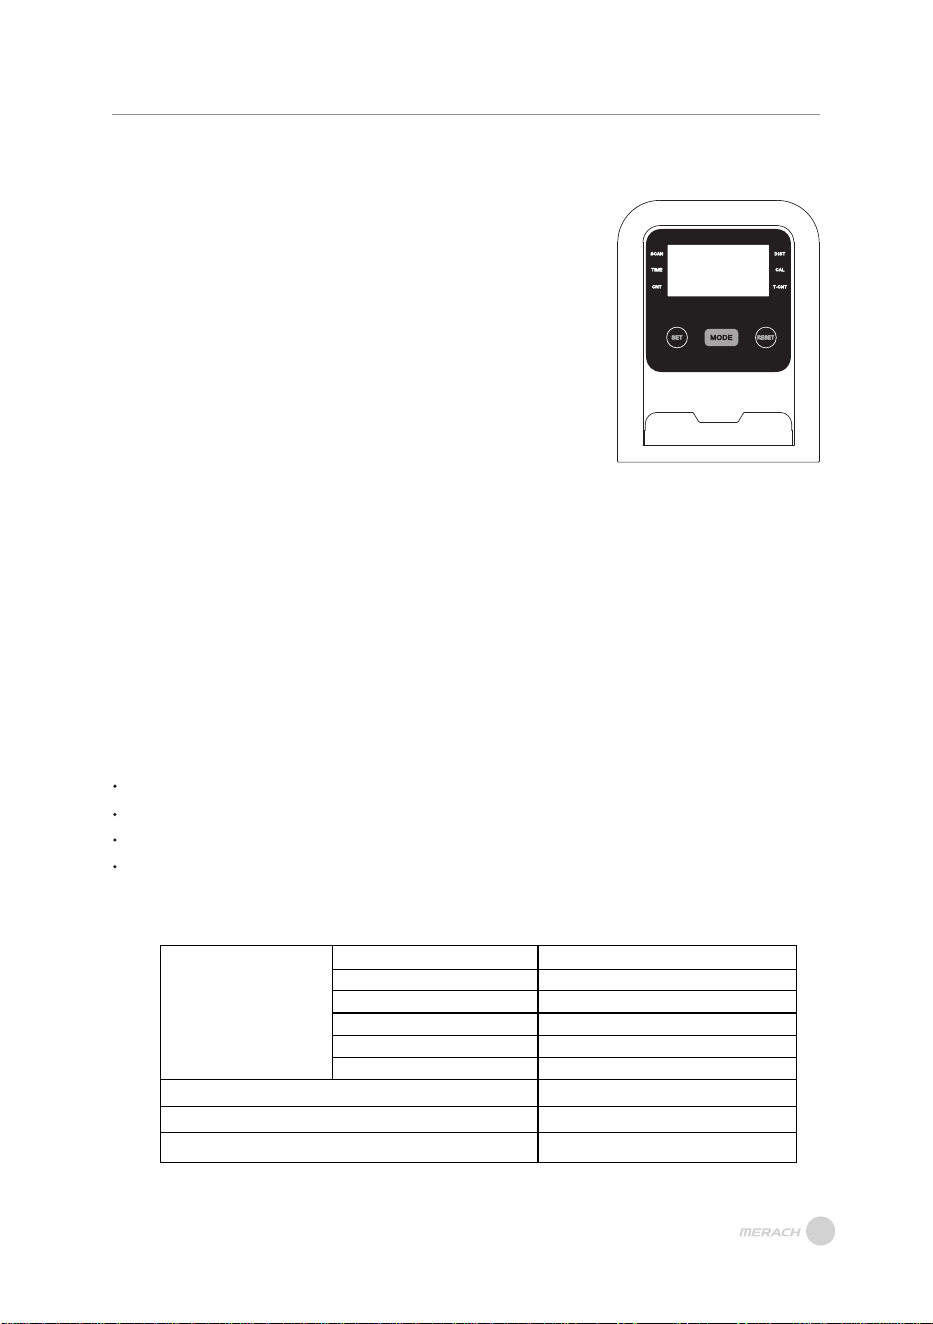
INSTRUCTIONS OF MONITOR
INSTRUCTIONS OF MONITOR
1. SCAN:
Press“MODE” button until “SCAN” appears,
monitor will rotate through all the 5 functions
FUNCTION AND OPERATIONS:
SPECIFICATIONS:
FUNCTIONAL BUTTONS:
MODE
FUNCTION
- Push down for selecting functions.
If the long time holds down MODE
button down for resetting time, count
and calories.
AUTO SCAN
TIME
COUNT
T.COUNT
CALORIES
DIST
BATTERY TYPE
OPERATING TEMPERATURE
STORAGE TEMPERATURE
Every 6 seconds
00:00’~99:59’
0-9999
0-9999
0.0~999.9Kcal
0-99.99
2pcs of SIZE –AAA or UM –4
0°C ~ +40°C
-10°C ~ +60°C
2.TIME:
Count the total time from exercise start to end.
3. CNT:
Accumulate the steps while exercising.
4. DIS T:
The current status of the traveled distance is displayed.
5 . CAL:
Count the total calories from exercise start to end.
6.T -CNT:
Display the steps you have exercised.
NOTE
If the display is faint or shows no figures, please replace the batteries.
The monitor will automatically shut off if there is no signal received after 4 minutes .
The monitor will be auto-powered on when starting to exercise push button w/signal in.
The monitor will automatically start calculating when you start to exercise and will stop
calculating when you stop exercising for 4 seconds .
:
10
11
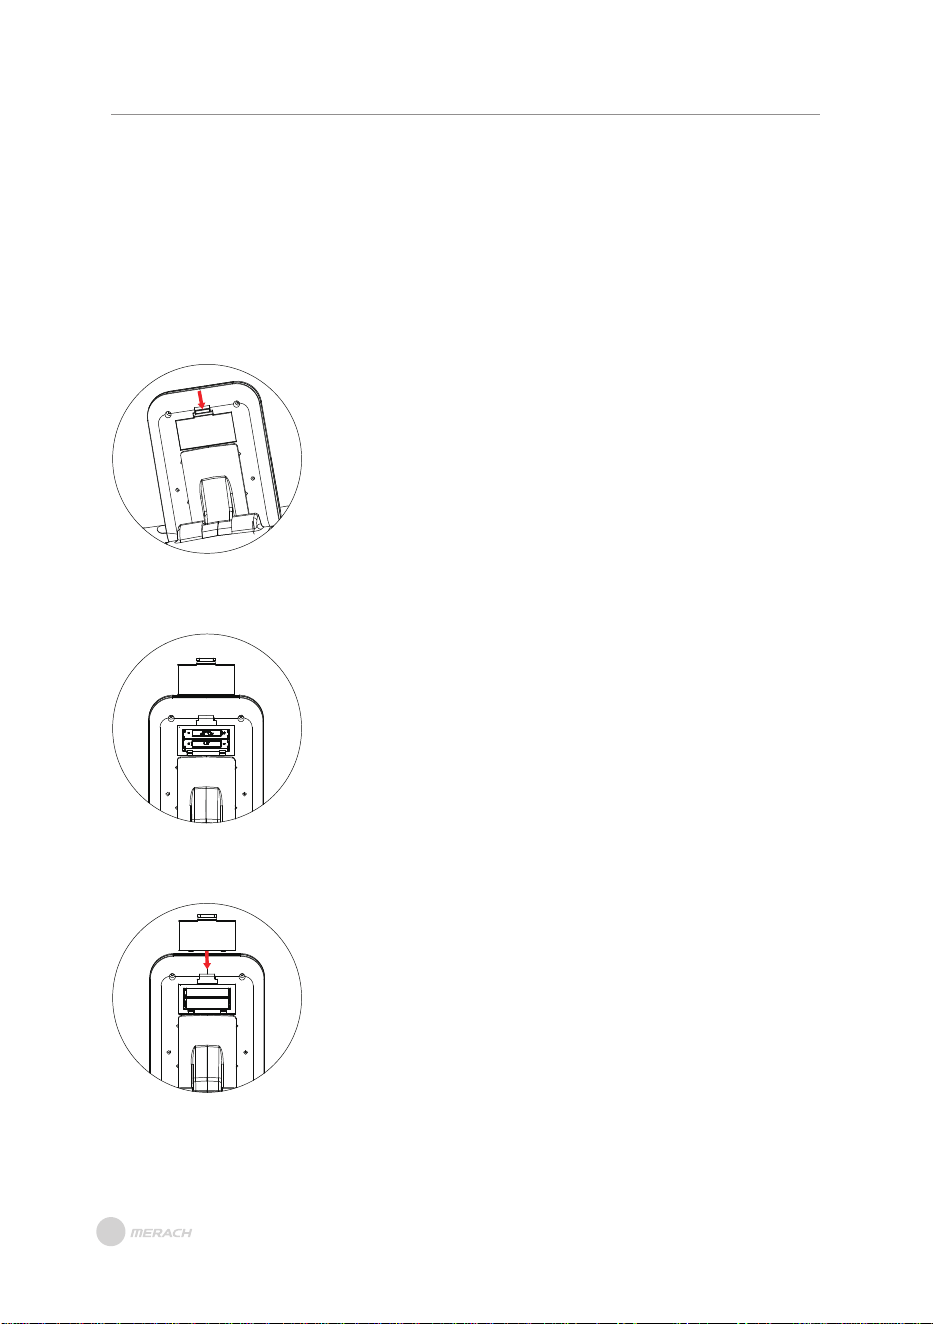
INSTRUCTIONS FOR REPLACING THE BATTERY
Step 1:
On the back of the monitor, find the position shown
on the right, press the battery cover buckle downward
(in the direction of the arrow), and pull it out slightly.
Step 2:
After removing the battery cover, install the battery.
Please pay attention to the installation position as
shown in the picture on the right and install it correctly.
Step 3:
Gently replace the battery cover into the electronic
watch in the direction shown on the right, and push
it inwards to complete the installation.
PLEASE NOTE: The device is equipped with 2 trial AAA batteries that have passed
MSDS certification. These batteries may not provide the same life as standard batteries.
In order to ensure a functioning, please replace them in time.
INSTRUCTIONS FOR REPLACING
THE BATTERY

Download and use of MERACH
1. To download the MERACH app, scan the QR code or search "MERACH" in the Apple
App Store® or Google Play Store.
Our customer can get a 180-day MERACH membership. Please contact us through
support@merach.com after receiving the product to get an exclusive redemption
code. Please include your order ID and MERACH app Username.
2. Open the MERACH app. Log In or Sign Up.
3. Follow the in-app instructions to set up your device.
MERACH APP Download APP Connection Guide
Download and use of KINOMAP
1. To download the Kinomap app, scan the QR code or search "Kinomap" in the
Apple App Store® or Google Play Store.
2. Open the Kinomap app. Log In or Sign Up.
3. Select the corresponding fitness equipment
4. Turn on Bluetooth, and choose Merach.
5. Select "Rowing machine", and find your “MRK-R28-XXXX”
6. Start training and explore different workout methods.
APP SETUP INSTRUCTION
APP SETUP INSTRUCTION
12
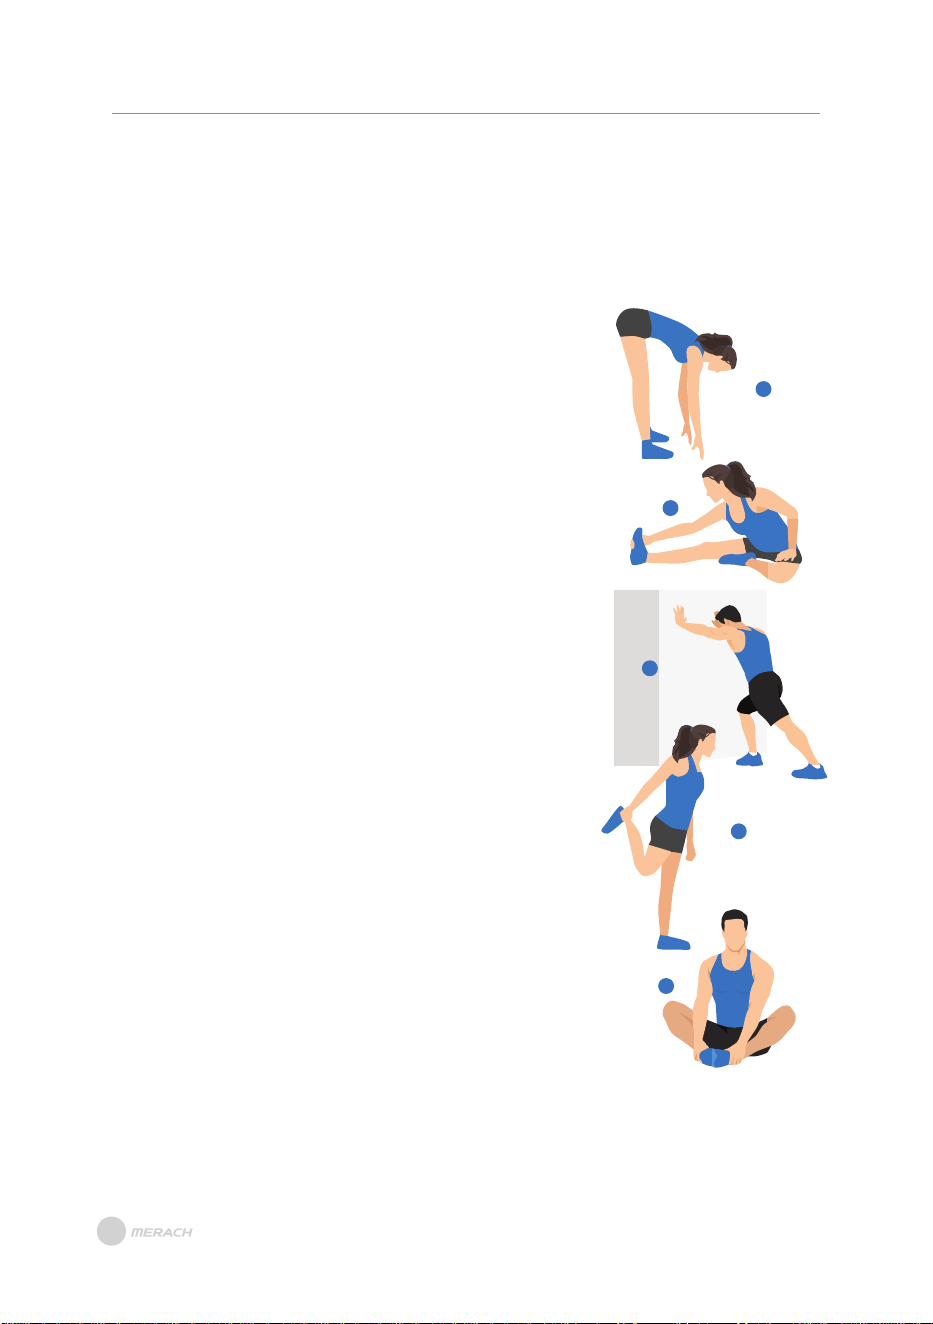
1. Stretch down
2. Seated hamstring stretch
Sit with one leg straight. Bring the other leg in so that it is
snug on the inside of the straightened leg. Try to touch your
feet with your hand's toe. Hold for 10-15 seconds, then relax.
Repeat 3 times for each leg (see Figure 2).
3. Calf and Achilles tendon stretch
4. Quadriceps stretch
Reach back with your right hand, grab your right foot and
slowly pull it toward your hips until you feel the muscles in
the front of your thigh tense. Hold for 10-15 seconds, then
relax. Repeat 3 times for each leg (see Figure4).
5. Sartorius (inner thigh muscle) stretch
Sit with your feet facing each other and your knees facing
out. Grab your feet with both hands and pull toward your
groin. Hold for 10-15 seconds, then relax.
Repeat 3 times(see Figure5).
Bend your knees slightly, slowly bend your body forward,
relax your back and shoulders, and try to touch your toes
with your hands. Hold for 10-15 seconds, then relax.
Repeat 3 times (see Figure 1).
1
2
3
4
5
Do stretches before exercising. Warm muscles are easier to stretch, so start
with a 5-10 minute warm-up, then do some stretches shown below - 5 times,
10 seconds or more per leg. Do it again after the workout.
Stand with both hands against the wall or a tree, put one
foot behind another. Keep the back leg straight and your
heel on the ground, lean toward a wall or a tree. Hold for
10-15 seconds, then relax. Repeat 3 times for each leg
(see Figure 3).
WARM-UP
WARM-UP
Note: This machine is full body training equipment, please follow the above steps to
warm up.
13
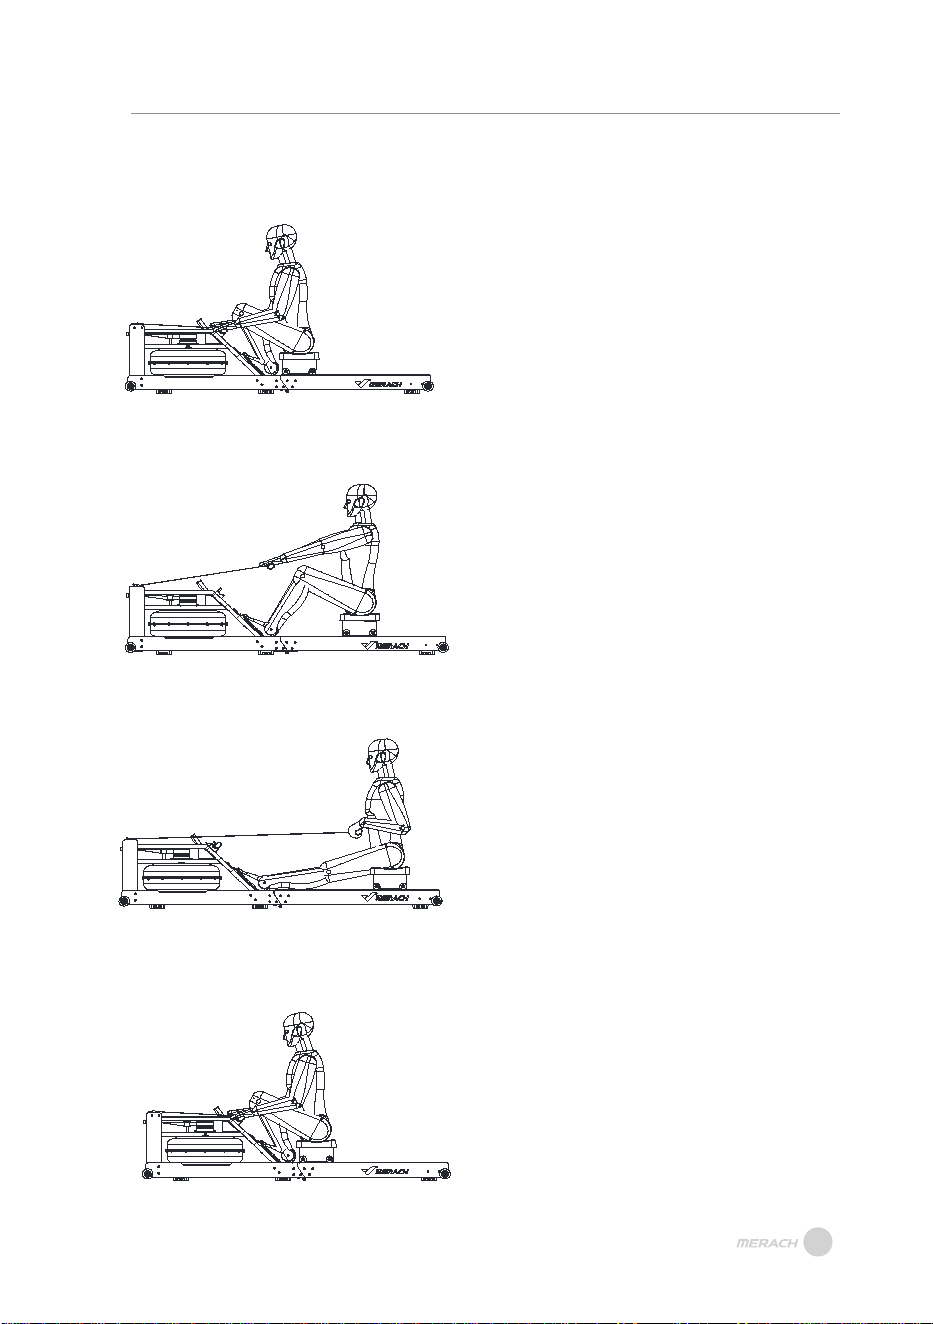
INSTRUCTIONS FOR USING THE ROWING
The Catch
Keep your wrists flat and grip the handle.
Place your feet on the footrests and
slightly lean forward. Keep your back and
ROWING POSTURE GUIDE
arms straight.
The Drive
Begin by using your leg. Press through
the foot pedals with your posture firm and
upright. When your legs almost reach full
extension, start to pull the handle.
The Finish
Pull the handle to the space between the
chest and navel.
The Recovery
Reverse the motion and return to the
starting point. Then repeat.
14
TROUBLESHOOTING
TROUBLESHOOTING
What should be done
when the monitor is
on but not tracking
workout data?
Make sure one of the console cables on the back of the console
The rowing machine is still malfunctioning. Please contact
is connected.
Customer Support.
Check whether other members are connectedto Bluetooth at the
same time. If so, unbind and rconnect.
The rowing machine is still malfunctioning. Please contact
Customer Support.
You can apply some car polishing wax on belt.
The rowing machine is still malfunctioning. Please contact
Customer Support.
Check whether the handle falls off during the movement. The
belt may be stuck in the pulley groove. Adjust the belt to the
center of the pulley.
The rowing machine is still malfunctioning. Please contact
Customer Support.
Check whether the left and right foot straps are tight enough.
Check whether the fixing screw of the middle pedal shaft at
the bottom of the middle of the machine is tight enough.
The rowing machine is still malfunctioning. Please contact
Customer Support.
What should be done
when the rower can
not be connectted to
the APP?
What should be done
when there is noise
in rowing?
What should be done
when feeling no
rowing resistance?
What should be done
when the pedals
wobble or the straps
are loose?
15

If you are a fitness enthusiast, then it's essential to keep your fitness equipment
in good condition for optimal performance and longevity. Here are some crucial
maintenance steps to follow:
Keep the Equipment Clean:
It's crucial to maintain cleanliness by wiping down the surfaces with a mild cleaner,
especially the parts that come into frequent contacts, such as the handles, seat, and rail.
Avoid using acidic or alkaline cleaners, and refrain from using water or cleaners on the
digital display screen. Pay extra attention to the slide rail ensuring it remains clean and
is running smoothly.
Regularly Check Moving Parts:
Regularly inspect the moving parts such as the arms, wheels, pedals, etc., to ensure they
are functioning smoothly and free of damage. If you notice any malfunctions, get them
repaired as soon as possible, and regularly lubricate the moving parts to keep them
running smoothly.
Inspect Electronic Components:
Regularly inspect the electronic components, such as the display screen, wires, and
sensors, to ensure they are in good condition. If you notice any damage or malfunctions,
contact the MERACH TEAM.
Check and Tighten Hardware:
Regularly check the hardware such as screws and bolts, for looseness and tighten them
as needed. Regular use of the equipment can cause vibrations that may loosen parts
over time, so tightening them regularly will keep your equipment in top condition.
By following these maintenance steps, you can ensure your fitness equipment remains
in excellent condition and prolong its life span for many workouts to come.
If you notice any wear and tear on your machine during your regular inspection that may
require replacement, please contact us at support@merach.com.
MAINTENANCE GUIDE
MAINTENANCE GUIDE
16
WARRANTY INFORMATION
WARRANTY INFORMATION
Terms & Policy
Product Name
Model
Default Warranty Period
For your own reference, we strongly recommend that you record
your order number and date of purchase.
Date of Purchase
Serial Number
This warranty does not apply to the following situations:
All expressed and implied warranties, including the warranty of merchantability,
are limited to the period of the limited warranty.
The MERACH products are premium in material, craftsmanship, and service. MERACH
1-year limited warranty is effective from the date of purchase.
MERACH will replace defective products based on eligibility. Refunds are available to
the original purchasers of our products within the first 30 days of purchase. This warranty
extends only to personal use, doesn’t apply to the commercial, rental, or any other uses
for which the product is not intended for. There are no warranties other than the
warranties expressly set forth with each product.
MERACH and its subsidiaries are only responsible for damages caused by the intended
use or as instructed in the user manual. Some states do not allow this exclusion or
limitation of incidental or consequential losses, so the above disclaimer may not apply
to you. This warranty gives you specific legal rights and you may also have other rights,
which may vary from state to sta
Damage due to abuse, accident, alteration or vandalism.
Improper or inadequate maintenance.
Damage in return transit.
Unsupervised use by children under 13 years old.
te.
MERACH WATER ROWING MACHINE
MR-R28
12 Months
This warranty is non-transferable. MERACH is not responsible for any damages, losses
or inconveniences caused by equipment's failure, user's negligence, user's abuse, or
improper operation that does not follow the included user manual.
17

cLL9UiĀ'9 ?L8U'?9
ʳr§Āíîē¬³ÊĀcrÀÀrÊÞĄ
i³ÍĀrĀ£³ÞĀrĀrʳr§Āíîē¬³ÊĀØrÀÀrÊÞĂĀ0ÍÄÊĀrÊ×ĀÞ³ÍÀĀØrÀÀrÊÞĀ~ÞĀÄĀÊĀ
½À³ÍÊĩÄĀ¬³§Ār¬Ā×rĀÀÄÊÀī¬ÀrĂ³¬ăĀ³ÀĀ§³Ā³Ê³ĀĀ¬ÀrÊĂ³¬ď½rÄď
ØrÀÀrÊÞĀrĀÊÀĀÞ³ÍÀĀ³ÀÀĀͬ~ÀĀĘĂĂĀ¬rã³ęĀØÊĀÊĀÀÄÊĀíðĀrÞÄĀ³Ā½ÍÀrÄĀ
ʳĀÀÄÊÀĀÞ³ÍÀĀØĀ½À³ÍÊĀ³ÀĀÊĀÝÊĀØrÀÀrÊÞĂĀ'ĀÞ³ÍĀrÀĀÍr~§ĀʳĀ½À³×ĀÊĀ
³ÀÀĀͬ~ÀĀ³ÀĀÞ³ÍÀĀ½À³ÍÊăĀ½§rÄĀÊÞ½ĀrĀijÀÊĀ³ÊĀĀÊĀ³ÀÀĀͬ~ÀĀ§Ār§³Ā
ØÊĀÊĀrÊĀÞ³ÍĀÀ×ĀÞ³ÍÀĀ½À³ÍÊĂ
Ê×ĀIÀ³ÍÊÄĀĬĀLÊÍÀÄĄ
ÍÄʳ¬ÀĀPͽ½³ÀÊ
i³ÍÀĀÄrÊÄrʳĀÄĀ³ÍÀĀ³r§ćĀP³Í§ĀÞ³ÍĀ³ÍÊÀĀrÞĀÄÄÍÄĀ³ÀĀr×ĀrÞĀ¿ÍÄʳÄĀ
r~³ÍÊĀÞ³ÍÀĀØĀ½À³ÍÊăĀ§ĀÀĀʳĀ³ÊrÊĀ³ÍÀĀÍÄʳ¬ÀĀPͽ½³ÀÊĀUr¬Ā×rĀĀ
Äͽ½³ÀÊī¬ÀrĂ³¬
I§rÄĀr×ĀÞ³ÍÀĀ?ÀÀĀ'ĀrĀÄÀr§Āͬ~ÀĀĘÍÄÍr§§ÞĀ³ĀÊĀ¿Í½¬ÊęĀÀrÞĀ
ĀĀĀ~³ÀĀ³ÊrÊĀÍÄʳ¬ÀĀPͽ½³ÀÊĂ
P³Í§ĀÞ³ÍÀĀ½À³ÍÊĀ½À³×ĀÊ×ĀØÊĀÊĀĽĀØrÀÀrÊÞĀ½À³ăĀ½§rÄĀ³ÊrÊĀ
ÊĀÍÄʳ¬ÀĀPͽ½³ÀÊĀ×rĀÄͽ½³ÀÊī¬ÀrĂ³¬ĀØÊĀÞ³ÍÀĀ׳ĀrĀ³ÀÀĀͬ~ÀĂĀ
?Ā9?UĀĽ³ÄĀ³ĀÞ³ÍÀĀ½À³ÍÊĀ~³ÀĀ³ÊrÊĀÍÄĂĀ?Ā³ÍÀĀÍÄʳ¬ÀĀPͽ½³ÀÊĀÊr¬Ā
rÄĀr½½À³×ĀÞ³ÍÀĀÀ¿ÍÄÊăĀ½§rÄĀÀÊÍÀĀÊĀ½À³ÍÊĀØÊĀrĀ³½ÞĀ³ĀÞ³ÍÀĀ׳ĀrĀ
³ÀÀĀͬ~ÀĂ
U¥U³¥ĀP³½ĀݧÍÄ×ĀrÊÀēÄr§ÄĄĀÄÀ×ī¬ÀrĂ³¬
íēĀĘôóóęĀïñòïóïìĀ8³ē ÀĀôr¬ēñ½¬ĘIPUęĀ
³ÀĀI³ĀPͽ½³ÀÊĄĀ
íô

!8ÀrÊ
ī¬Àr
ÍÄʳ¬ÀĀPÀץĀÄͽ½³ÀÊī¬ÀrĂ³¬Ā
?r§Āc~ÄÊĄĀ¬ÀrÊĂ³¬
³ÊrÊĀXÄĄĀíēĀĘôóóęĀïñòïóïìĀ8³ē ÀĀôr¬ēñ½¬ĘIPUę