
USER MANUAL
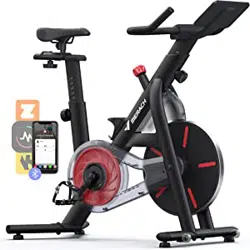
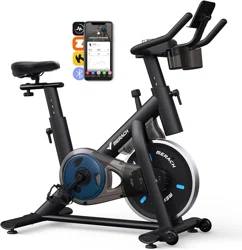
MERACH MR-S26 EXERCISE BIKE
Questions or Concerns?
IMPORTANT!
Please read all details before use, and keep this user manual for future reference.
PLEASE CONTACT US BEFORE THE RETURN: Mon-Fri,9:00 am-5:00 pm PST/PDT
POWEREDBY

WHO
WE ARE
Our customers aren’t just important; their health, fitness, and pure enjoyment for live
is at the core of everything we do at MERACH. From innovative fitness research and
cutting-edge product development, to our exceptional purchasing & after-sales service,
we are our customers’ life-long partner in crafting a better fitness future.
Through quality fat-burning & muscle-building fitness equipment such as our quality
rowing machines and exercise bikes, plus our innovative MERACH APP, and digital
courses, we give the opportunity and support to all to pursue their health and fitness
goals and discover a new way of healthy living.
Welcome to MERACH.
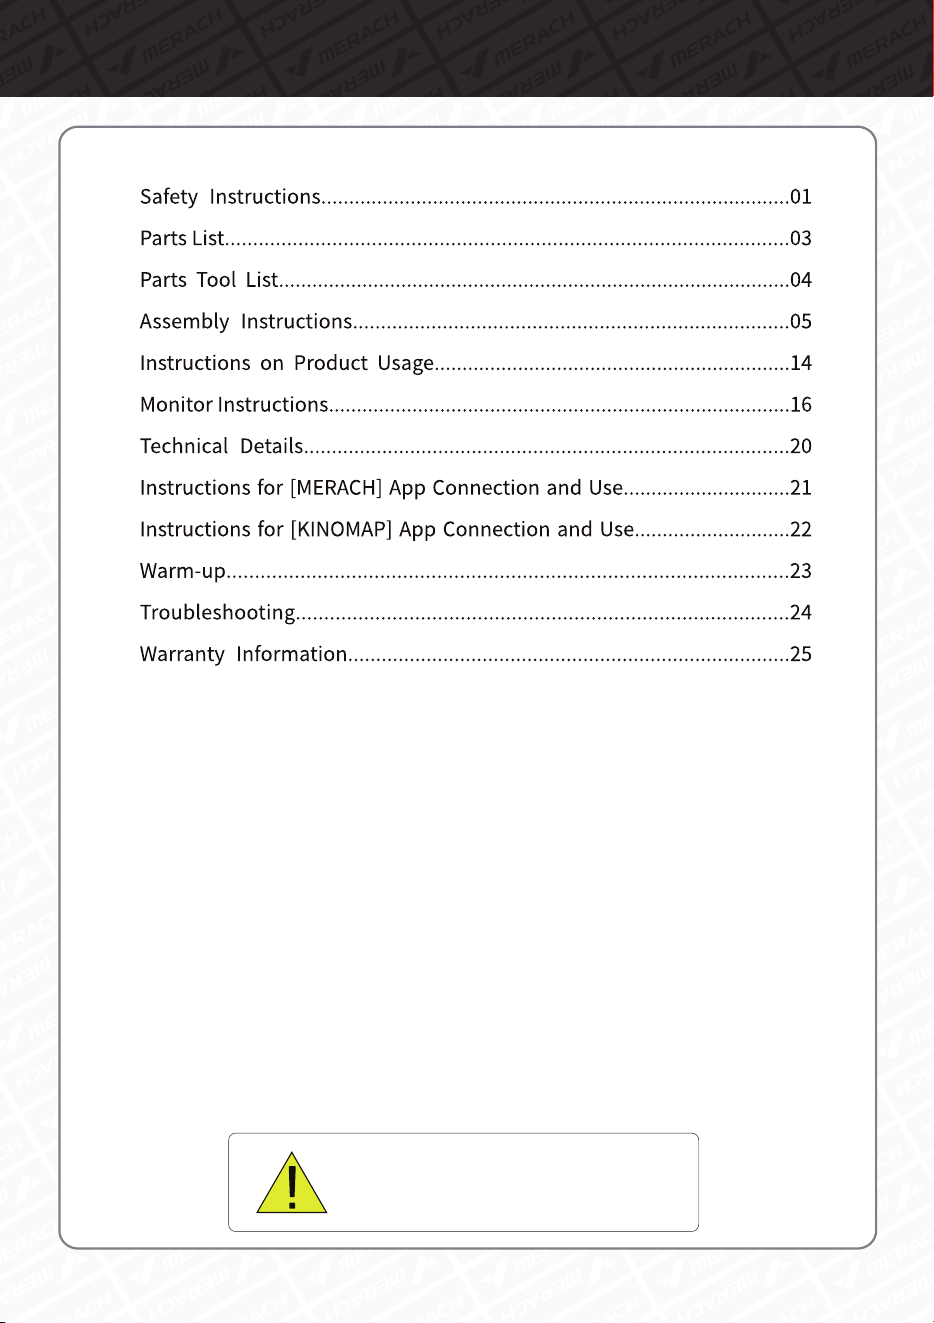
Contents
This device contains a radio transmitter module with type approval code
FCC ID:2A6QWMR-BLE001 IC:29678- MRBLE001 HVIN: MRBLE001
Please read the entire manual carefully
before installing and using the bike, and
save for further use.

01
Please keep this manual in a safe place for future reference.
It is very important to read the entire manual thoroughly before installing and using
the machine. Safe and effective training can only be achieved if the machine is
properly assembled, properly maintained and used. Make sure all users are familiar
with all warnings and precautions of this machine.
Please consult your physician to determine if you have any medical or physical
conditions that could put your health and safety at risk or prevent you from using
the equipment properly. Your physician's advice is essential if you are taking
medication that affects your heart rate, blood pressure, or cholesterol level.
Please always pay attention to your body signals, improper use of the machine may
affect your health. If you experience any symptoms (including headache, chest pain,
irregular heartbeat, shortness of breath, dizziness, or any discomfort), stop
exercising immediately and consult your physician, get the permission before
training again.
Always keep children and pets away from the machine. The machine is for adult use
only.
Please use this machine on stable and horizontal ground level, and put a protective
layer onthe floor or carpet to prevent a floor from damaging. Make sure the distance
between the machine and each obstacle is at least 2.0 ft (0.6m).
Please check all screws and nuts are properly tightened before using the machine.
The safe use of the machine can only be guaranteed if the regular maintenance and
repairs of undertaken, and worn out and broken parts are changed.
Please follow the instructions in this manual to use this machine. Please stop using
and operating immediately when you find any defective parts or hear any abnormal
sound.Make sure all issues are resolved before using it again.
Please wear sports clothes, sports shoes, or other proper clothes. Loose-fitting
clothing is not recommended, as loose clothing may get caught in the machine,
hindering operation and possibly causing an injury.
This machine is only for home use. The Maximum user weight is 270 lbs.
Safety Instructions
This machine is not for professional medical treatment.
This product is only for family use.
The overall performance of the machine and all moving parts must be checked
regularly to ensure the safety of the machine.
If the moving parts are damaged, please do not use the machine until the parts
are repaired.
Keep the children away from the machine. The equipment is not for children to use
or play with. They can injure themselves accidentally.
Care & Maintenance
Do not store the machine in a place exposed to direct sunlight, wind and rain,
or with high humidity. If needed, please pack the machine to keep children away
from touching or playing with it.
Please check if there’s rust or cracks after long-term storage.
Please understand that for the consumable parts, the wear and tear may also occur
even with proper maintenance.
For long-term use of this machine, please wipe the dust regularly. Do not water it
directly, or wipe with gasoline, abrasive powder, etc. Otherwise, it might cause
cracks on the parts or main body, electric shock or fire. Please use Dilute neutral
detergent for maintenance.
Before starting any training, please consult your physician,
especially for those who are over 35 years old or with
pre-existing health conditions. Please read all instructions
before using the machine.
02
Safety Instructions
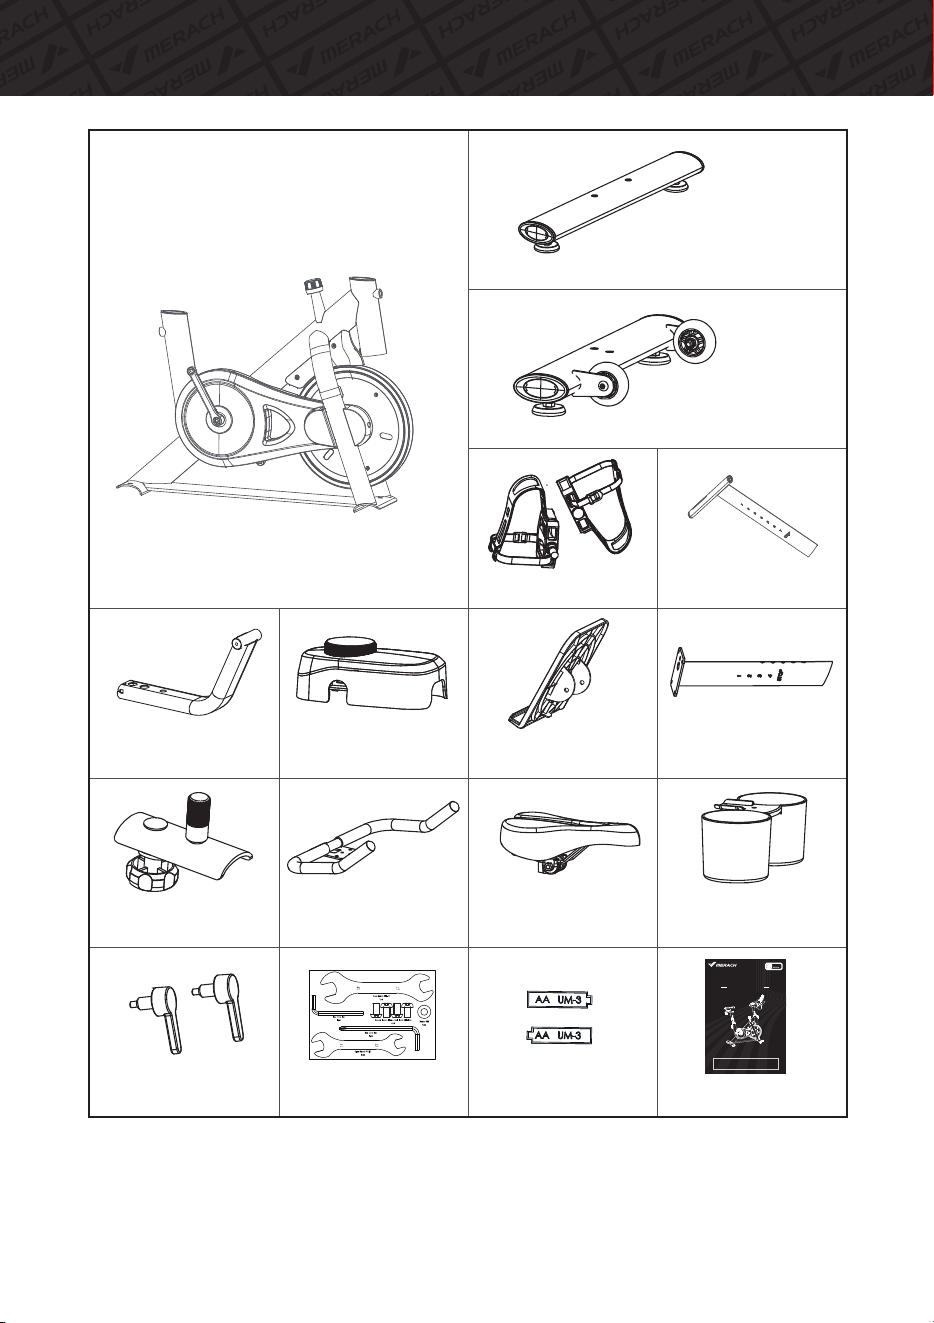
Parts List
03
1.MainFrame
3.SeatSlider
Assembly
4.HandlebarPost
5.Handlebar
6.RearFootStabilizer
7.FrontFootStabilizer
8.IPADHolder
SupportTube
9.Seat
11.IPADHolder
16.BottleHolder
29.L-shapePop
pinKnob*2
4056.Pedals*2
98.Monitor
DecorationCover
Screwkit
Instructionmanual
USER MANUAL
MERACH MR-S26 EXERCISE BIKE
Questions or Concerns?
IMPORTANT!
Please read all details before use, and keep this user manual for future reference.
PLEASE CONTACT US BEFORE THE RETURN: Mon-Fri,9:00 am-5:00 pm PST/PDT
POWEREDBY
Batteries
SeatPost
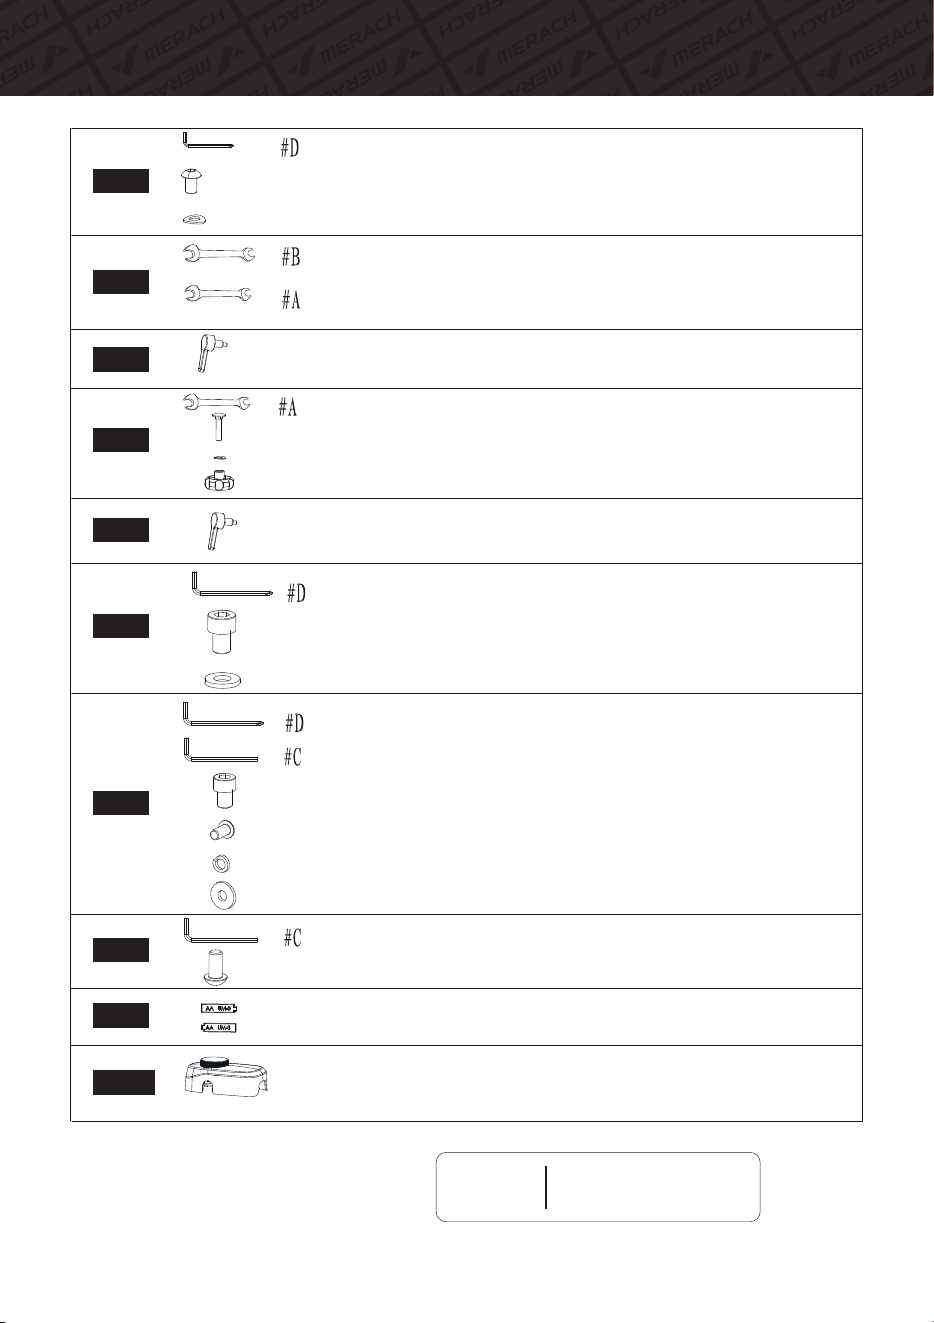
PartsToolList
04
Tips
Scan QR code to watch
installation video
#6AllenKeywithPhillipsscrewdriverheadx1
HexagonSocketCheeseHeadScrewM10*16x4
WasherΦ10x4
#17-#19OpenWrenchx1
#13-#15OpenWrenchx1
L-shapePopPinKnobx1
#13-#15OpenWrenchx1
CarriageBoltx1
Washerx1
LockKnobx1
L-shapePopPinKnobx1
#6AllenKeywithPhillipsscrewdriverheadx1
HexagonSocketCheeseHeadScrewx4
Washerx4
#6AllenKeywithPhillipsscrewdriverheadx1
#5AllenKeyx1
Hexagonsocketheadcapscrewx2
Hexagonsocketflatroundheadscrewx2
ElasticPadx2
Washerx2
#5AllenKeyx1
Hexagonsocketflatroundheadscrewx2
AABatteryx2
MonitorwithDecorationCoverx1
Step1
Step2
Step3
Step4
Step5
Step6
Step7
Step8
Step9
Step10
Assembly Instructions
05
TakeoutToolD-AllenKey,4×HexagonsocketflatroundheadscrewsM10*16(35)
and4×WasherΦ10(36)fromToolkit.
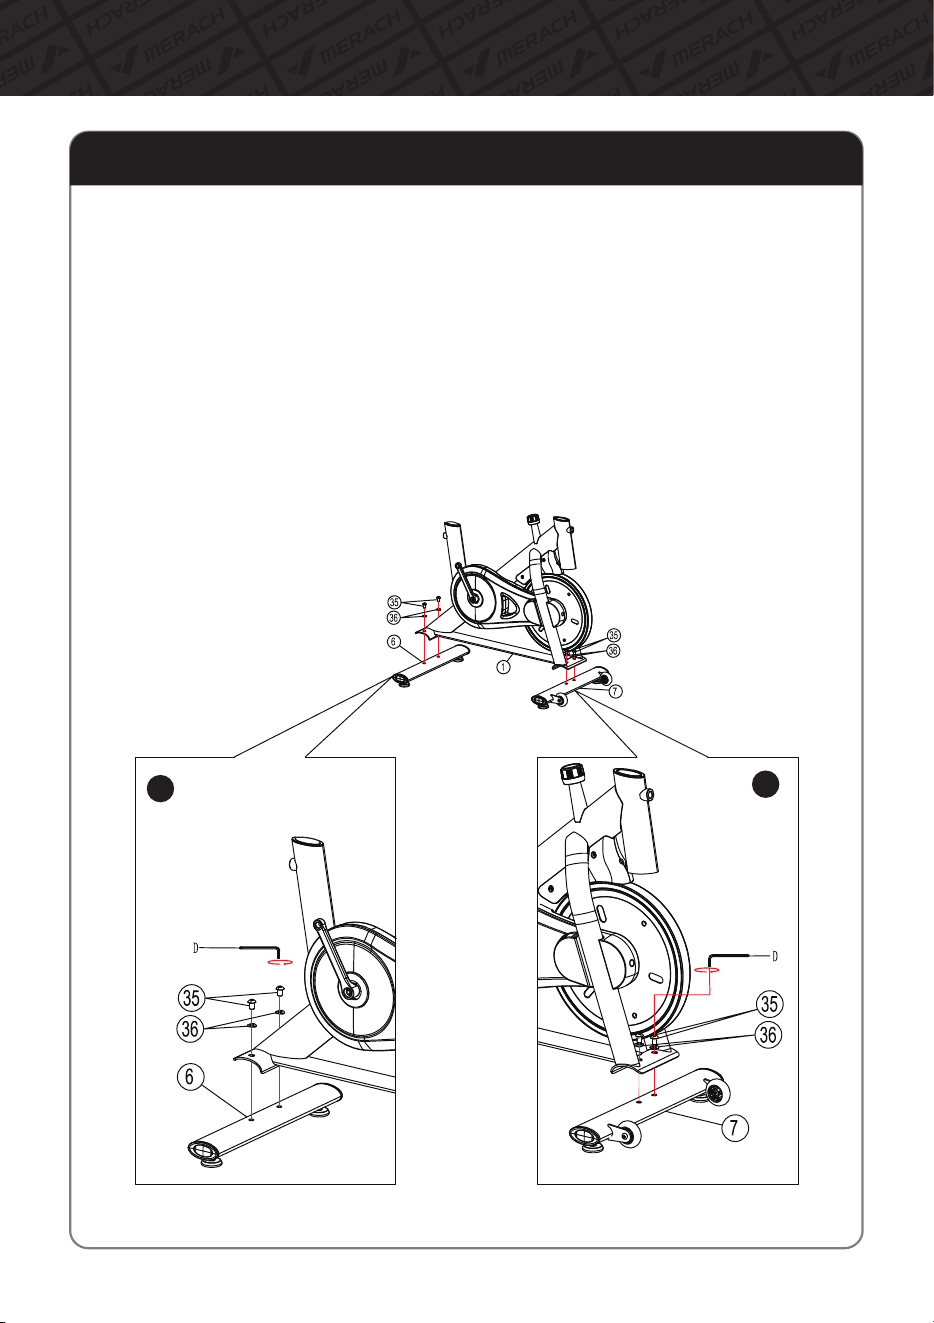
Step1:InstallFrontandRearStabilizer
PlacetheRearStabilizer(6)asshowninthefigureandalignitwiththefixingholeson
theframe.SecureittotheframewithToolD,Hexagonsocketflatroundheadscrew
M10*16(35)andtheWasherΦ10(36).
A
A:
PlacetheFrontStabilizer(7)asshowninthefigureandalignitwiththefixingholeson
theframe.SecureittotheframewithToolD,Hexagonsocketflatroundheadscrew
M10*16(35)andtheWasherΦ10(36).
B:
B
Assembly Instructions
06
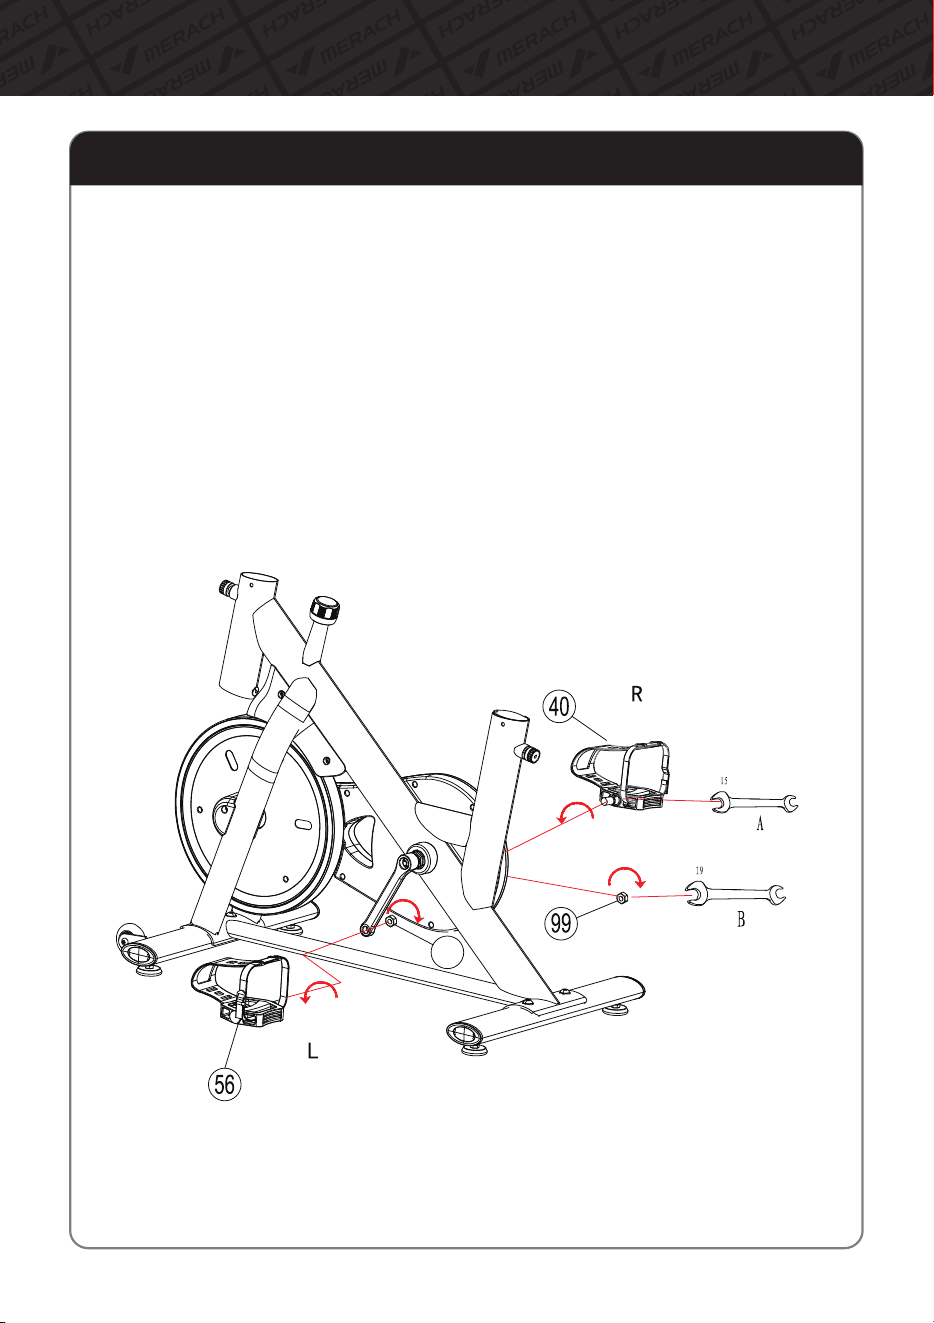
Step2:InstallLeft&RightPedal
1.RemovetheleftHexagonalnut(102)ontheleftpedal(56)andtherightHexagonalnut
(99)ontherightpedal(40)respectivelywithToolB#19andputthemaside.
2.Installtheleftpedal(56)byverticallyaligningitwiththeleftcrankhole.Rotatetheleft
pedal(56)3turnsbyhandinthedirectionshowninthefigure(towardsthedirectionof
theflywheel),andthenlockthepedalwiththeToolA#15.
3.Finally,installtheremovedHexagonalnut(99)backontothepedalwithToolB#19.
4.Installtherightpedal(40)inthesameway.Notethatthedirectionoftighteningisall
towardtheflywheel.
102
Assembly Instructions
07
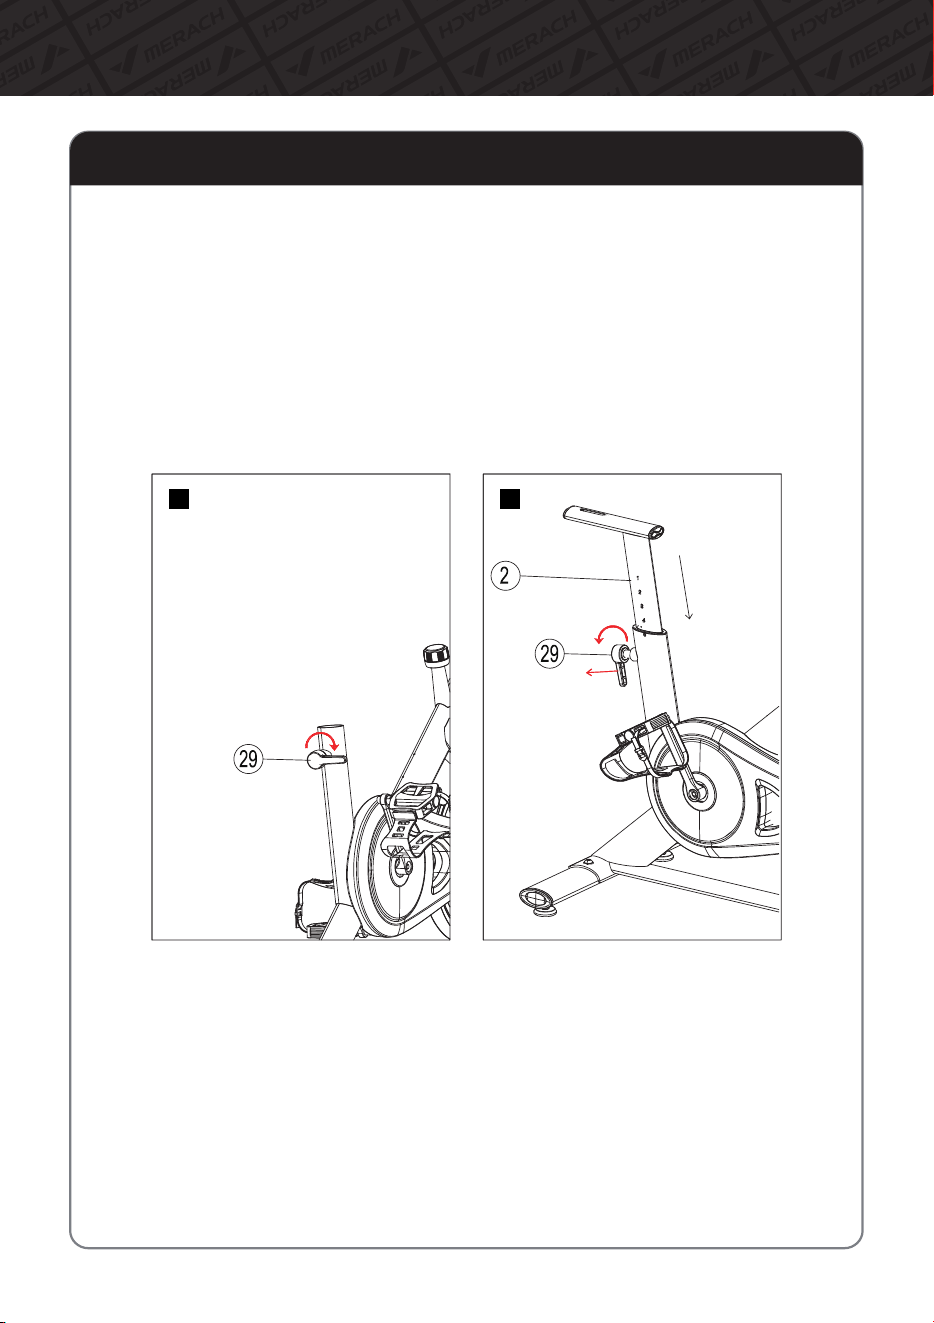
Step3:InstallSeatPost
1.Asshowninthepicture,lightlyturntheknob(29)3turnstofixitontheframe.(FigureA)
2.Holdthehandleoftheknob(29)withonehandandpullitout,andputtheseatcushion
upperandloweradjustmenttube(2)intotheframewiththeotherhand.Adjustittothe
appropriateheightandthenrotatetheknob(29)tolocktheadjustmenttube.(FigureB)
A
B
PARTS LISTAssembly Instructions
08
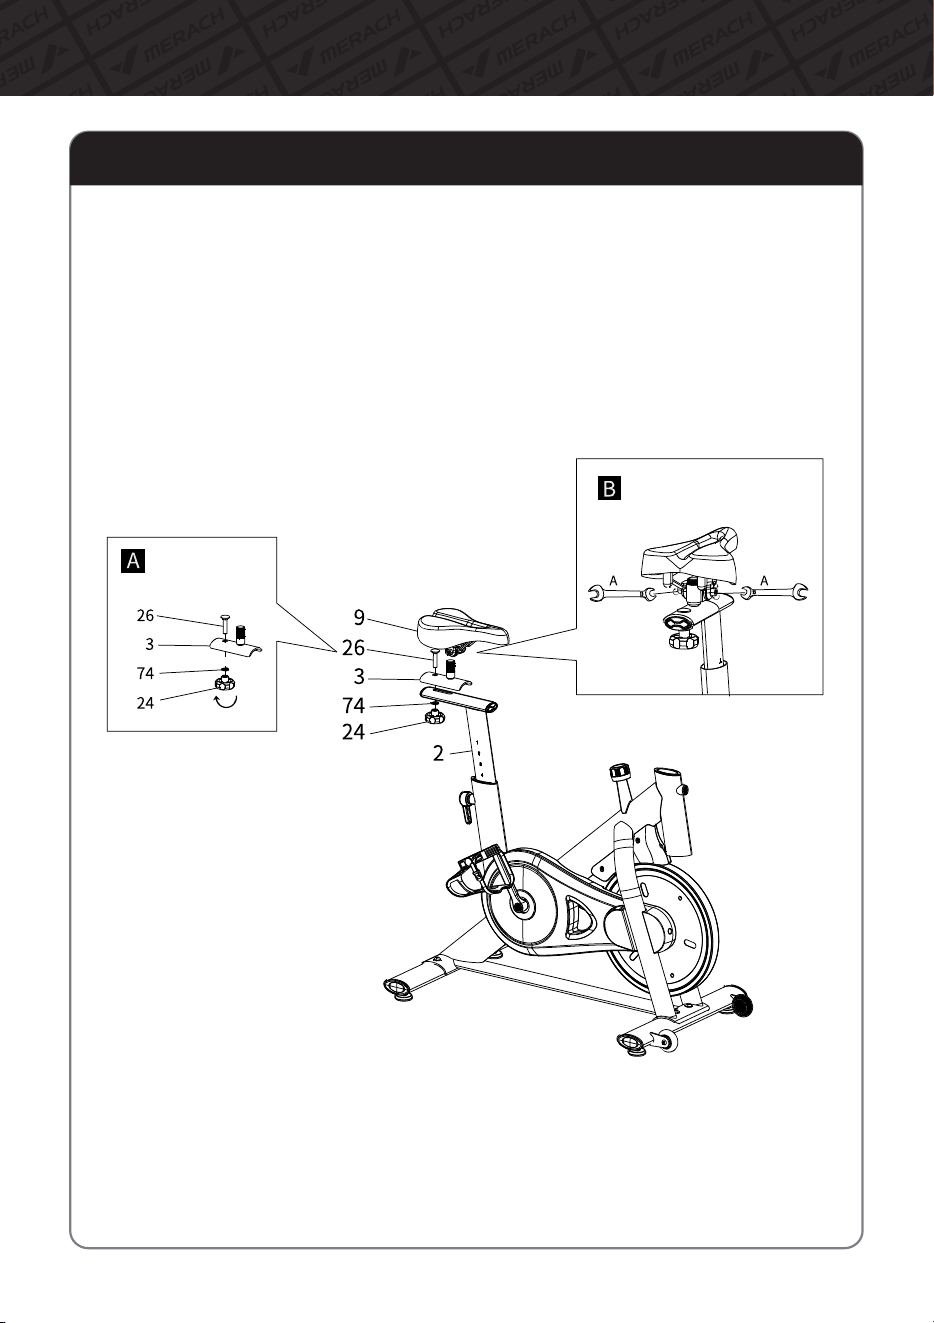
Step4:InstallSeatSliderandSeat
1.TakeoutSeatSliderAssemblyfromtheinnerpackage.RemovetheCarriagescrew(26),
Washer(74)andLockKnob(24)andputthemaside(FigureA).
2.PlaceassembledSeat(9)andSeatSlider(3)ontheSeatPost(2),andthenusecarriage
screw(26)&Washer(74)&LockKnob(24)tolockit.
3.Refertofigureasbelow,placeSeat(9)ontoSeatSlider(3).Thenlockthenutsonboth
sidesoftheseatbyToolA#13.Makesurethefrontoftheseatisfacingstraightahead
whenlocking(FigureB).

PARTS LISTAssembly Instructions
Step5:InstallSensorMiddleWireandHandlebarPost
09
1.TakeoutL-shapePoppinKnob(29)frominner
packageandrotate3turnstofixittotheframe.
2.Thenuntiethesteelwirefixedatthebottomof
theHandlebarPost(4).SecuretheSensorMiddle
Wire(95)withtheendofthesteelwire.
3.Pulltheuppermostendofthesteelwiretodrive
theSensorMiddleWire(95)throughouttheinside
oftheHandlebarPost(4)tothetopandholditin
place.
4.HoldtheKnob(29)Handleandpullitoutward,
whileinstallingtheHandlebarPost(4)intotheMain
Frame(1)totheproperposition.Androtatethe
knob(29)tolocktheHandlebarPost(4).

PARTS LISTAssembly Instructions
Step6:InstallHandlebar
10
1.PullthesteelwiretobringtheSensor
middlewire(95)connectorpassesthrough
theslotinthecenteroftheHandlebar
mountingpiece.
2.PlaceHandlebar(5)onHandlebarPost(4)
asshown.Makesuretheholesarealigned.
SecuretheHandlebar(5)totheHandlebar
Post(4)asshowninthefigurebyusing
ToolD#6,Hexagonsocketheadcap
screws(10)andWashers(17).
Removethe4×HexagonSocketHeadCapScrew(10)andWasher(17)andputthemaside
forusing.

Assembly Instructions
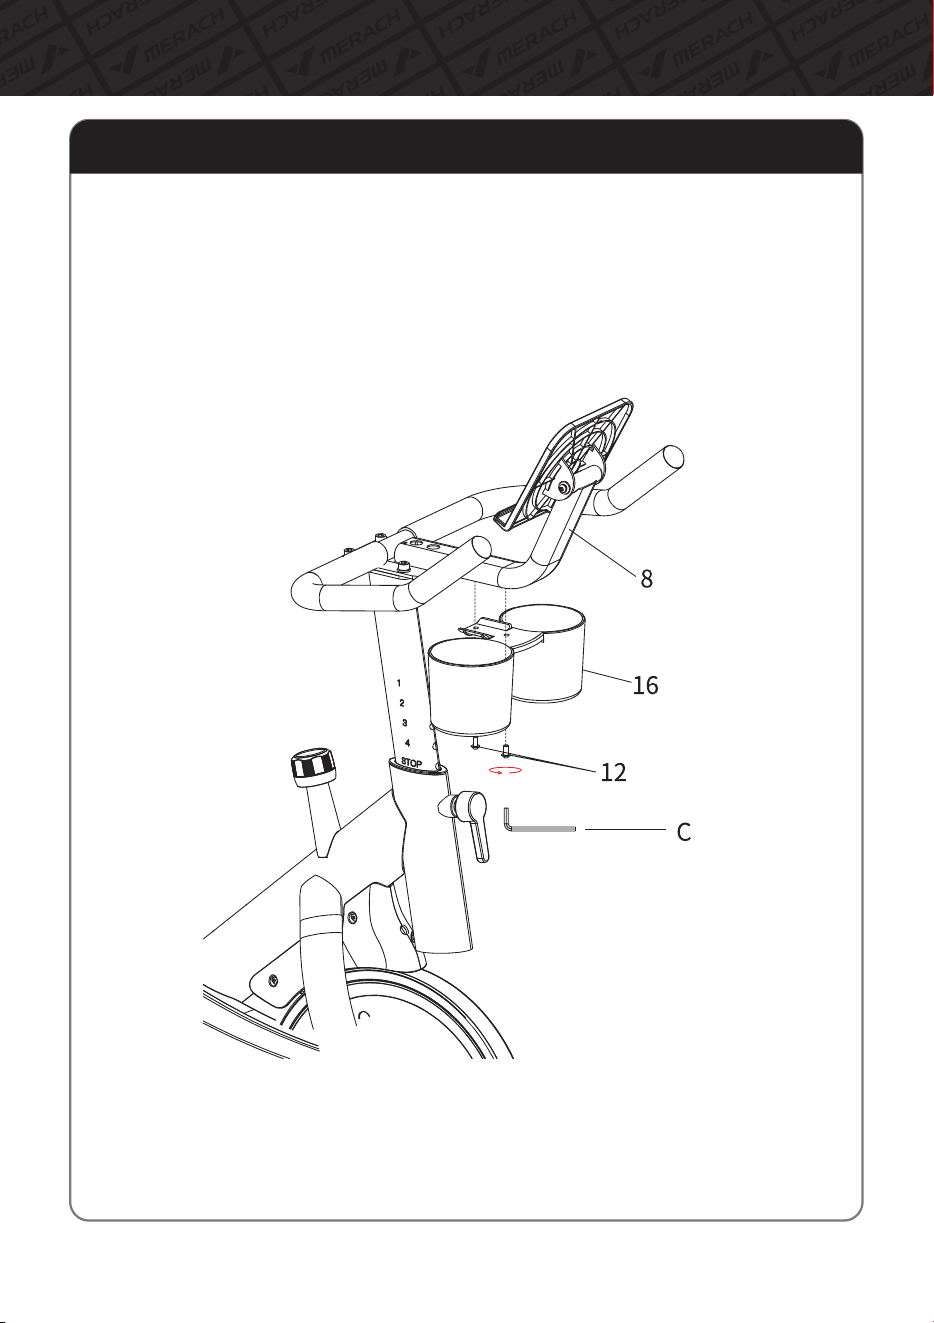
Step7:InstallIPADHolderSupportTubeandIPADHolder
11
1.TakeouttheIPADHolderSupportTube(8)fromtheinnerpackage,andremovethe
2×Hexagonsocketheadcapscrews(10)onthetubeandthe2×Hexagonsocketflat
roundheadcapscrews(12)atthebackwardofthetubeandputthemaside.
2.PlacetheIPADHolderSupportTube(8)ontheHandlebar(5).ThenlockitbyusingTool
DandHexagonsocketheadcapscrews(10).
3.Thenremovethe2×Hexagonsocketheadcapscrews(12),2×ElasticPad(13)and
2×washers(14)fromthetopoftheIPADHolderSupportTube(8)withToolC.
4.AligntheholesinthebackoftheIPADHolder(11)withtheholesonthetopoftheIPAD
HolderSupportTube(8).ThensecureitbyusingToolCandHexagonsocketheadcap
screws(12),Elasticpad(13),andWashers(14)asshowninthefigure.
PlacetheSensorMiddle
Wire(95)intotheslot
behindtheIPADHolder
SupportTube(8)tohold
itinplace,andthenuntie
anddiscardthesteelwire.
Assembly Instructions
12
Step8:InstallBottleHolder
AlignthescrewholesontheBottleholder(16)withthescrewholesontheIPADHolder
SupportTube(8).ThentightentheBottleholderbyusingtheremovedHexagonSocket
HeadFlatRoundHeadScrew(12)inStep7andToolC.

Assembly Instructions
13
Step9:InstallBatteries
Removethebackcoverbyhand(FigureA),thenpreparethebatteries(FigureB)andinstall
two2Abatteries(FigureC).Andinstallthebackcovertocompletethebatteryinstallation
(FigureD)
FigureA FigureB FigureC FigureD
Step10:InstalltheMonitorDecorationCover
PlugthewirefromthebackwardoftheMonitor Decoration Cover(98)andtheSensor
wire(95)comingoutoftheHandlebar(5).ThensnaptheMonitor Decoration Cover(98)
ontotheHandlebar.
Installationiscomplete.Checkallmountingscrewsandmakesuretheyaretightened.
14
Instructions on Product Usage
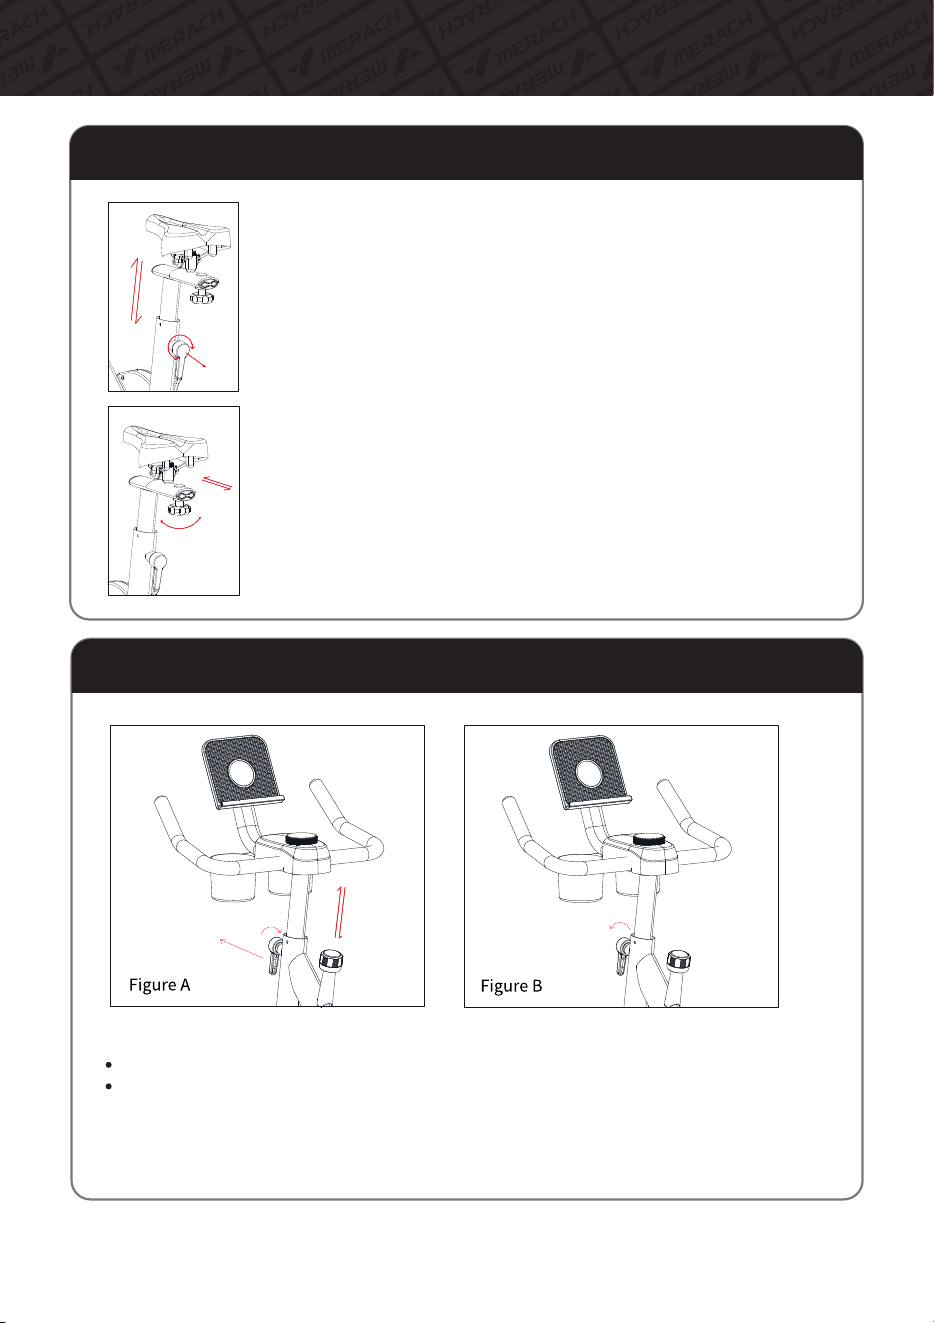
Adjustmentmethodofcushion
Upanddownadjustmentmethod
Turnthecushioncolumnknobwithonehand,loosenitslightlyandpullout
ward.Grabthecushionwithotherhand,andpullitup(ordown).Slightly
movethesaddlecolumnupanddownafteradjustingtothedesiredposition,
loosenthespringtorestoreittoitsoriginalposition(theknobisalreadyin
theholdofthecushioncolumnwhenyouheara"clicking"sound),andthen
retightentheknob.
Frontandrearadjustmentmethod
Loosentheknobatthebottomofthesaddleandslidethesaddlebackand
forth.Tightentheknobafteradjustingtothedesiredposition.
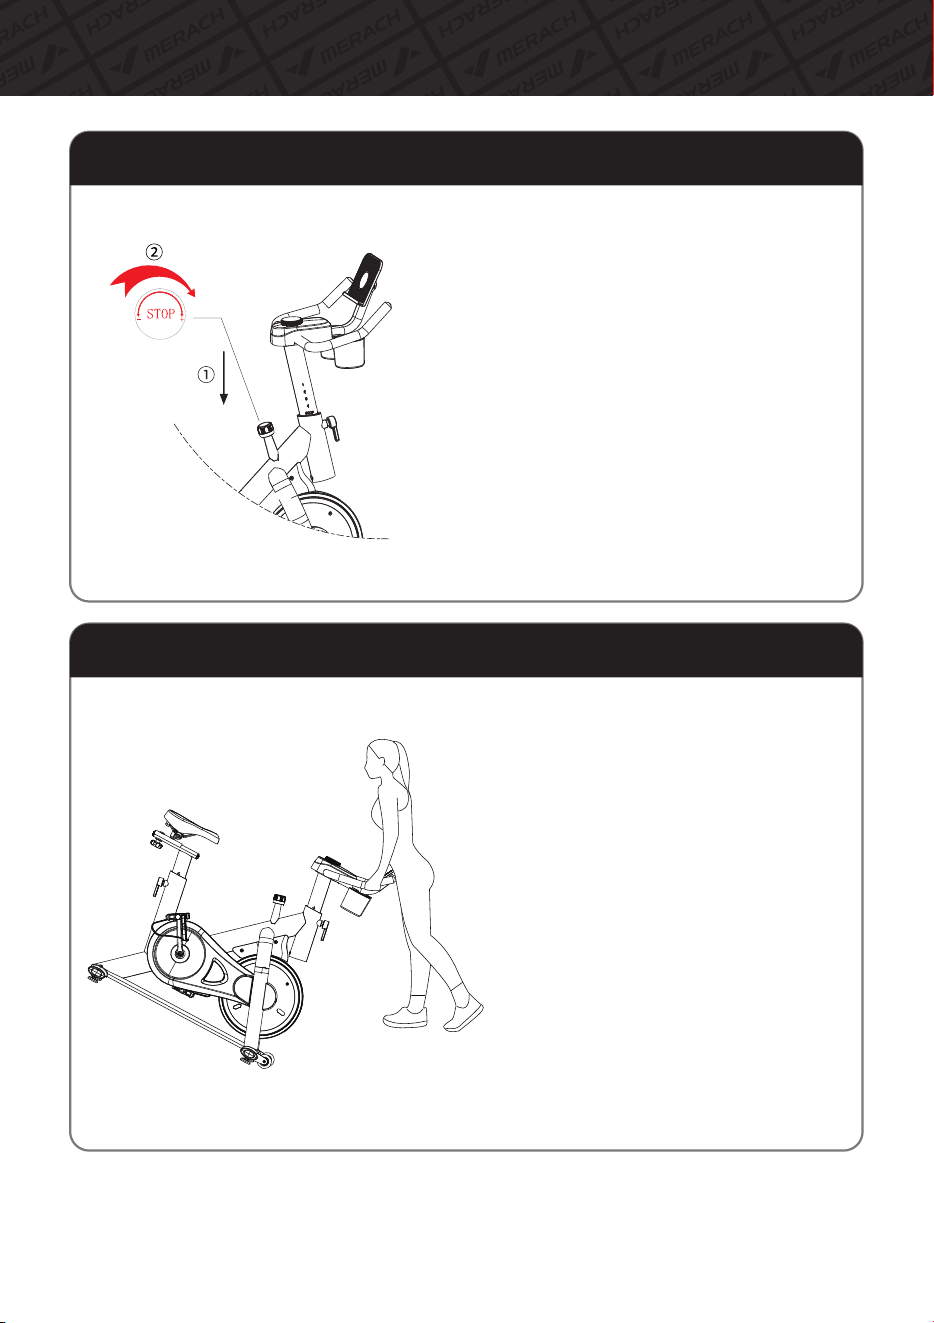
Adjustmentofhandrailheight
Youcanadjustthehandrailheightaccordingtoyourheight.
Rotatethepullpin,loosenitandputitoutwardtomovethehandrailcolumnupanddown(FigureA).
Afteradjustingtotheappropriateheight,pleasealignthepullpinandtheholeofthehandrail
column,andtightenitbyturningclockwise(FigureB).
Ifthehandlelevercannotbemovedupanddownsmoothly,youcanapplythelubricatingoil.
Pleasenotethatyourhandsmaygetdirtyifyoutouchthemdirectly.
15
Instructions on Product Usage
1.Aboutemergencystop
Theflywheelandthepedalofthedynamic
bicyclebelongtothelinkagestate.Ifthe
flywheeldoesnotstoprotating,thepedals
willnotstoprotating.Itisdangeroustoleave
thepedalswhilethepedalsarerotatingorto
takeyourfootoffthepedalsimmediately.
Ifyouneedtostopthepedalsinanemergency,
pleasepressthebrakeknobdownwarduntil
themotorizedbikestops.
Emergencystopandusemethodofbrakes
Machinehandlinginstructions
Whenmovingtheproduct,holdthefrontof
thehandleandpushitdownsothatthe
movingwheelsoftheforefoottubecompletely
touchtheground.
Forwomenandtheelderly,itiseasiertohold
thefrontlegtubewithyourfeetandpress
downonthefrontofthesteeringwheel.
Afterliftingup.themovementbecomes
simple.Themethodisthesamewhenputting
itdown,firstfixthefrontlegtubewithyour
feetbeforeputtingitdown.
2.Howtousebrakes
Incaseyouwanttostopafterreachingacertain
movementspeed,youcanputyourhandonthe
knobandpushitdowntograduallyaddresistance
tothewheelsandfinallystopthebike.

16
MonitorInstructions
1.MainDisplayInstruction
NO.
Project Display Description
1
Display
Button
Instruction
TargetMode
2
3
1.Displayexercisedata:"Time,""Speed,"
"Distance,""Calories,""Power,""Cadence.
2.DisplayBluetoothconnectionstatus.
3.Displayinbothmetricandimperialunits.
4.Thepaneltouchbuttonservesasthesettings
function.
5.Theshuttleknobfunctionstoswitchdisplay
modesduringoperationandtoadjustsettings
whenneeded.
1.TouchButton:
a)Shortpresstocyclethroughdifferentfunction
displays.
b)Longpressfor2secondstocleardataand
enterthesettingsmode.
c)Inthesettingsmode,shortpresstotoggle
betweendifferentsettingitems.
2.ShuttleKnob:
a)Inthesettingsmode,itisusedtoadjustthe
targetvaluesforvariousitems.
b)Intheworkingmode,ittogglesthedisplay
ofdifferentitems.
1.Afterpoweringonthebattery,it
automaticallyentersthesettingsmode.
2.Inastationarystate,pressthetouchbutton
for2secondstoenterthesettingsmode.
3.Short-pressthetouchbuttontotoggle
betweensettingitems,androtatetheshuttle
knobtoadjustthesettingvalues.
4.Inthesettingsmode,thecorrespondingitem
willflashtoindicateit'sselected.
5.Thesequenceforsettingsisasfollows:
Time->Distance->Calories.
6.Thetimesettingvalueis1minute,the
distancesettingvalueis0.5kilometers,and
thecaloriesettingvalueis1calorie.
7.Oncethegoalisset,startingexercisewill
directlyenterthegoalmode.Ifnogoalisset,
startingexercisewillenterfreemode.

17
MonitorInstructions
1.MainDisplayInstruction
NO.
Project Display Description
Switch
Mode
Lock
Mode
Sleep
Mode
4
6
1.Eachdataitemrotatesevery3seconds.
2.Iconsflashtoindicatedisplaychanges.
3.Themainwindowdisplaysnumbersina
carouselfor"Time,""Speed,""Distance,"
"Calories,""Power,"and"Cadence."
4.TheBluetoothindicatorlightshowsthe
Bluetoothconnectionstatus,withitbeinglit
whenconnectedandoffwhendisconnected.
1.Rotatetheshuttleknobleftorrighttoswitch
betweendisplaymodesandlockinthedatayou
need.
2.Themainwindowcanbelockedtodisplay
"Time,""Speed,""Distance,""Calories,""Power,"
and"Cadence."
3.Atthispoint,theiconsremainfixedonthe
display.
4.TheBluetoothindicatorlightshowsthe
Bluetoothconnectionstatus,beinglitwhen
connectedandoffwhendisconnected.
8.Inthegoalmode,thesetitemsworkina
positivecountmanner.Whenthegoalvalueis
reached,therewillbea"DIDI"soundalert,and
itwillautomaticallystop.
9.Afterstoppingexerciseingoalmode,a
2-secondtouchisrequiredtoresetthedatato
zerobeforestartingexerciseagain.
10.Ifthegoalvaluesarenotcleared,thecontrol
panelwillcontinuetooperateingoalmode
indefinitely.
11.Ifthetargetvalueisnotcleared,thecomputer
willkeeprunningintargetmode.
1.After3minutesofinactivity,thesystem
entersasleepmodewiththedisplayturnedoff.
2.Detectionofmotionorrotationoftheknob
canbothwakeitup.
5

18
2.OperationInstruction
Figure1 Figure2 Figure3
Figure4 Figure5 Figure6
1.Themainwindowdefaultdisplayscarouselnumbersinthefollowingorder:"Time,"
"Speed,""Distance,""Calories,""Power,""Cadence"(Figures 1,2,3,4,5,6),switching
every3seconds.
2.Byusingtheshuttleknobtotheleft/right,youcanfixthedisplayofthecorresponding
functioniteminthefollowingorder:Carousel->Time->Speed->Distance->Calories->
Power->Cadence.
3.Incarouselmode,therespectivefunctionindicatoriconswillflash.Infixeddisplaymode,
thecorrespondingfunctionindicatoriconswillremainsteady.
4.Inanystate,holdingdownthetouchbuttonfor2secondswillresetthedatatozeroand
enterthesettingsmode.
5.Inthesettingsmode,ashortpressofthetouchbuttonwillswitchbetweensettingitems,
androtatingtheshuttleknobwillsetthetargetvalues.
6.Goalmode:Whentargetvaluesareset,thecontrolpaneloperatesingoalmode.
7.Freemode:Whennotargetvaluesareset,thecontrolpaneloperatesinfreemode.
8.Note:Toreturnthecontrolpaneltofreemode,itisnecessarytoresetalltargetvaluesto
zerointhesettingsmode.Otherwise,itwillcontinuetooperateingoalmode.
MonitorInstructions

19
3.DataDisplayDescription
MonitorInstructions
ItemNo. Item Displaywindow Displayinstructions
1
2
3
4
5
6
7
Speed
Time
Distance
Calories
Bluetooth
icon
00:00~99:59
Startsaftermotionisdetectedand
stops4saftermotionisstopped
Range0.0~99.9mph
Range0.0~999.9mile
Range0.0~9999Kcal
15Kcal/Miles
Range0~999
Range0-199
ICONDisplay:BluetoothConnected
NotDisplay:BluetoothNotConnected
Technical Details
ResistanceAdjustment:
ModelName:
Max.UserWeight:
ItemWeight:
ItemDimensionsLxWxH:
20
Manual
MR-S26
270lbs
28.8kg(63.5lbs)
42.6*19.3*48.6inch(1083*490*1234mm)

21
Instructions for [MERACH] App Connection and Use
DownloadanduseofMERACH
1.TodownloadtheMERACHapp,scantheQRcodeorsearch"MERACH"intheApple
AppStore®orGooglePlayStore.
Ourcustomercangeta180-dayMERACHmembership.Pleasecontactusthrough
support@merach.comafterreceivingtheproducttogetanexclusiveredemption
code.PleaseincludeyourorderIDandMERACHappUsername.
*
2.OpentheMERACHapp.LogInorSignUp.
3.Followthein-appinstructionstosetupyourdevice.
MERACH APP Download APP Connection Guide

Instructions for [KINOMAP] App Connection and Use
22
DownloadanduseofKINOMAP
1.TodownloadtheKinomapapp,scantheQRcodeorsearch"Kinomap"inthe
AppleAppStore®orGooglePlayStore.
2.OpentheKinomapapp.LogInorSignUp.
3.Selectthecorrespondingfitnessequipment
4.TurnonBluetooth,andchooseMERACH.
5.Select"Exercisebike",andfindyour"MRK-S26-XXXX".
6.Starttrainingandexploredifferentworkoutmethods.

Warm-up
23
1. Stretch down
2. Seated hamstring stretch
Sit with one leg straight. Bring the other leg in so that it is snug
on the inside of the straightened leg. Try to touch your feet with
your hand's toe. Hold for 10-15 seconds, then relax.
Repeat 3 times for each leg (see Figure 2).
3. Calf and Achilles tendon stretch
4. Quadriceps stretch
Reach back with your right hand, grab your right foot and
slowly pull it toward your hips until you feel the muscles in the
front of your thigh tense.Hold for 10-15 seconds, then relax.
Repeat 3 times for each leg (see Figure4).
5. Sartorius (inner thigh muscle) stretch
Sit with your feet facing each other and your knees facing out.
Grab your feet with both hands and pull toward your groin.
Hold for 10-15 seconds, then relax.
Repeat 3 times(see Figure5).
Bend your knees slightly, slowly bend your body forward,
relax your back and shoulders, and try to touch your toes
with your hands. Hold for 10-15 seconds, then relax.
Repeat 3 times (see Figure 1).
1
2
3
4
5
Do stretches before exercising. Warm muscles are easier to stretch, so start with a
5-10 minute warm-up, then do some stretches shown below - 5 times, 10 seconds
or more per leg. Do it again after the workout.
Stand with both hands against the wall or a tree, put one foot
behind another. Keep the back leg straight and your heel on the
ground, lean toward a wall or a tree. Hold for 10-15 seconds,
then relax. Repeat 3 times for each leg (see Figure 3).

Troubleshooting
24
Problem
Possible Solution
Turn the knob clockwise to increase resistance and counterclockwise to
decrease resistance.
How to adjust gear?
What to do when the
handle shakes slightly?
Check whether the connecting screws of the handle and the front
column tube are firmly fixed.
Check if the retaining knob is locked.
What to do when the
machine shakes
during use?
Check whether the front and rear foot tubes are fastened enough.
What to do when
pedals loose?
Following the setup instruction, to check whether the left and right
pedals are locked on the first step.
Following the setup instruction, to check whether the inner fixing nut
of the second stage of setting up the pedal is locked.
What to do when the
whole machine is
slightly tilted?
Check whether the four adjusting foot pads at the bottom of the front
and rear foot tubes are on the same plane.
Adjust and rotate the raised foot pads parallel to the floor.
What to when the
monitor does not
display?
Check whether the positive and negative electrodes of the battery are
installed correctly.
Rreplace the battery with a new one.

25
Terms & Policy
Product Name
Model
Default Warranty Period
For your own reference, we strongly recommend that you record
your order number and date of purchase.
Date of Purchase
Serial Number
This warranty does not apply to the following situations:
All expressed and implied warranties, including the warranty of
merchantability, are limited to the period of the limited warranty.
The MERACH products are premium in material, craftsmanship, and service. MERACH 1-year
limited warranty is effective from the date of purchase.
MERACH will replace defective products based on eligibility. Refunds are available to the original
purchasers of our products within the first 30 days of purchase. This warranty extends only to
personal use, doesn’t apply to the commercial, rental, or any other uses for which the product is
not intended for. There are no warranties other than the warranties expressly set forth with each
product.
This warranty is non-transferable. MERACH is not responsible for any damages, losses or
inconveniences caused by equipment's failure, user's negligence, user's abuse, or improper
operation that does not follow the included user manual.
Damage due to abuse, accident, alteration or vandalism.
Improper or inadequate maintenance.
Damage in return transit.
Unsupervised use by children under 18 years old.
MERACH and its subsidiaries are only responsible for damages caused by the intended use or
as instructed in the user manual. Some states do not allow this exclusion or limitation of incidental
or consequential losses, so the above disclaimer may not apply to you. This warranty gives you
specific legal rights and you may also have other rights, which may vary from state to state.
MERACH Exercise Bike
MR-S26
12 Months
Warranty Information

Customer Service: [email protected]
Official Website: merachfit.com
@merachfit
@Merachfit
@Merachfit
@Merachfit