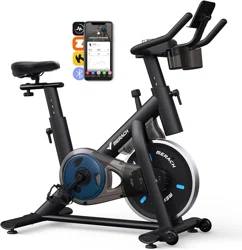
USER MANUAL
MERACH MR-S02 EXERCISE BIKE
Questions or Concerns?
IMPORTANT!
Please read all details before use, and keep this user manual for future reference.
PLEASE CONTACT US BEFORE THE RETURN: Mon-Fri,9:00 am-5:00 pm PST/PDT
[email protected] | (213) 672-2298
POWEREDBY

WHO
WE ARE
Our customers aren’t just important; their health, fitness, and pure enjoyment for live
is at the core of everything we do at MERACH. From innovative fitness research and
cutting-edge product development, to our exceptional purchasing & after-sales service,
we are our customers’ life-long partner in crafting a better fitness future.
Through quality fat-burning & muscle-building fitness equipment such as our quality
rowing machines and exercise bikes, plus our innovative MERACH APP, and digital
courses, we give the opportunity and support to all to pursue their health and fitness
goals and discover a new way of healthy living.
Welcome to MERACH

Safety Instructions.....................................................................................01
Product Overview......................................................................................03
Parts List...................................................................................................04
Assembly Instructions...............................................................................06
Precautions for Use..................................................................................14
Adjustment Instructions.............................................................................15
MERACH APP Setup................................................................................18
KINOMAP APP Setup...............................................................................19
Warm-up...................................................................................................20
.......Troubleshooting.................................................................................. 21
Warranty Information.................................................................................22
This device contains a radio transmitter module with type approval
code FCC ID ENTIFIER: 2A6QWMR-BLE001.
Please read the entire manual carefully
before installing and usingthe bike, and
save for further use.
Contents

Safety Instructions
01
Please properly keep this manual in a safe place for future reference.
It is very important to read the entire manual thoroughly before installing and using
the machine. Safe and effective training can only be achieved if the machine is
properly assembled, properly maintained and used. Make sure all users are familiar
with all warnings and precautions for this machine.
Please consult your physician to determine if you have any medical or physical
conditions that could put your health and safety at risk or prevent you from using
the equipment properly. Your physician's advice is essential if you are taking
medication that affects your heart rate, blood pressure, or cholesterol level.
Please always pay attention to your body signals, improper use of the machine may
affect your health. If you experience any symptoms (including headache, chest pain,
irregular heartbeat, shortness of breath, dizziness, or any discomfort), stop
exercising immediately and consult your physician for permission before retraining.
Always keep children and pets away from the machine. The machine is for adult
use only.
Please use this machine on stable and horizontal level ground, and put a protective
layer on the floor or carpet to prevent floor damage. Make sure the distance
between the machine and each obstacle should be at least 1.6 ft (0.5m).
safetyPlease check all screws and nuts are tightened for before using the machine.
The safe use of the machine can only be guaranteed by regular maintenance and
repairs of vulnerable, worn and broken parts.
Please follow the instructions in this manual to use this machine. Please stop using
and operating immediately when you find any defective parts or abnormal sound.
Make sure all issues are resolved before get back to use again.
Loose-fitting Please wear sports clothes, sports shoes, or other proper clothes.
clothing is not recommended, as loose clothing may get caught somewhere in the
machine, hindering operation and possibly causing injury.
This machine is only for home use. The Maximum user weight is 330lbs.

02
This machine is not for professional medical treatment.
This product is only for family use, and the rating is HC class.
The overall performance of the machine and all moving parts must be checked
regularly as to ensure the safety of the product.
If the moving parts are damaged, please do not use until the parts are repaired.
The product is not children's toys, parents and other guardians should know their
responsibilities, because children's playful and adventurous inwardness might
lead to some unexpected accidents.
Care & Maintenance
Do not store the machine in a place exposed to direct sunlight, wind and rain,
or with high humidity. Besides, if needed, please pack the machine to keep
children away from touching or playing with the machine.
Please check if there’s rust or cracks after long-term storage.
Please understand for the consumable parts, the wear and tear may also
occur deterioration even with proper maintenance.
For long-term use of this machine, please wipe the dust regularly. Do not water
it directly, or wipe with gasoline, abrasive powder, etc. Otherwise, it might cause
cracks on the parts or main body, electric shock or fire. Please use Dilute
neutral detergent for maintenance.
Before starting any training, please consult your physician,
especially for those who are over 35 years old or with
pre-existing health conditions. Please read all
instructions before using the machine.
Safety Instructions
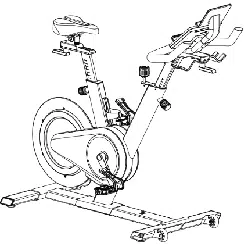
Product Overview
03

04
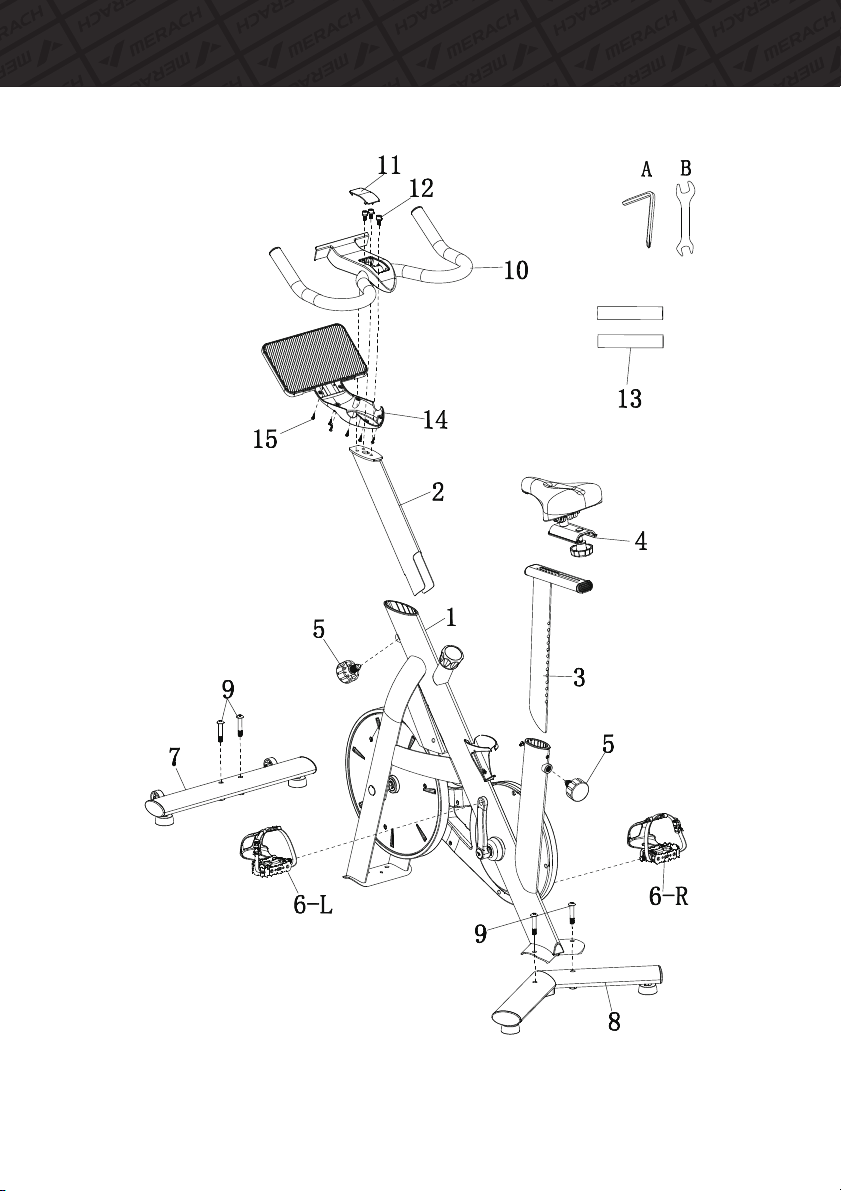
Parts List
NO Parts Name Spec. QTY
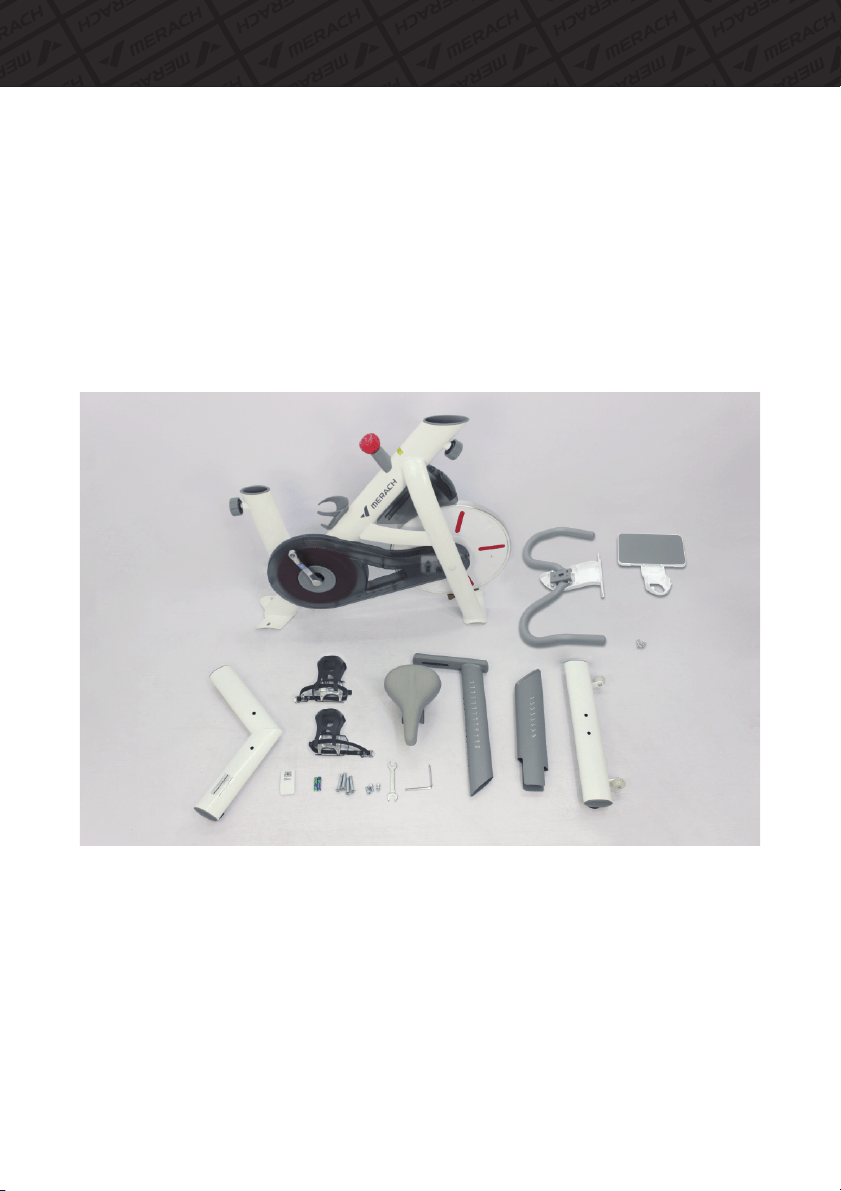
05
Parts List
06
A S S E M B L YI N S T R U C T I O N SA S S E M B L YI N S T R U C T I O N S
Assembly Instructions
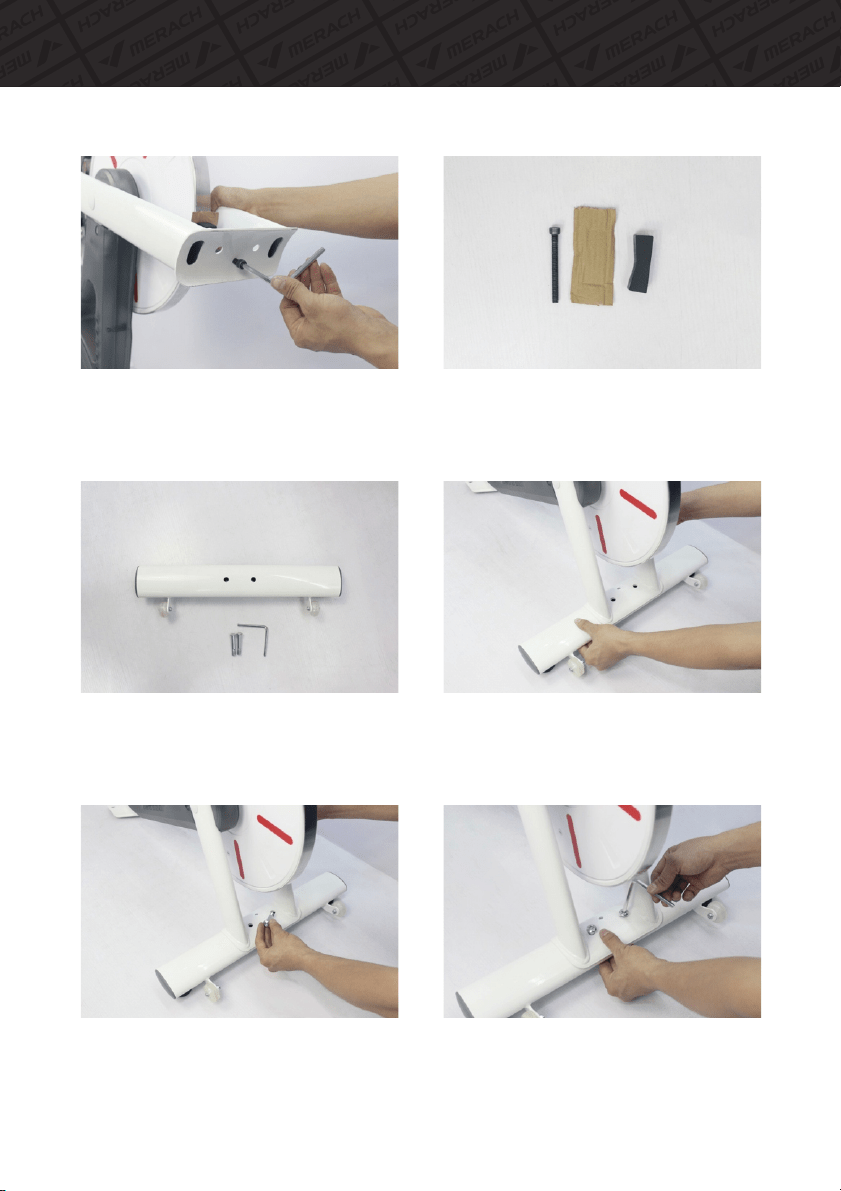
1.Remove the wheel chock bolt locked on
the main frame with A: Allen Key.
2.Place the wheel chock, protective paper
and bolt aside.
(Please store them in a bag as spare)
3.Prepare #7 Front Stabilizer, two #9
Screws and A: Allen Key. 4.Align the holes on #7 Front Stabilizer
and the front bracket on the #1 Main
Frame.
5.Insert two #9 Screws into the holes. 6.Tighten and secure the two #9 Screws
with A: Allen Key.
07
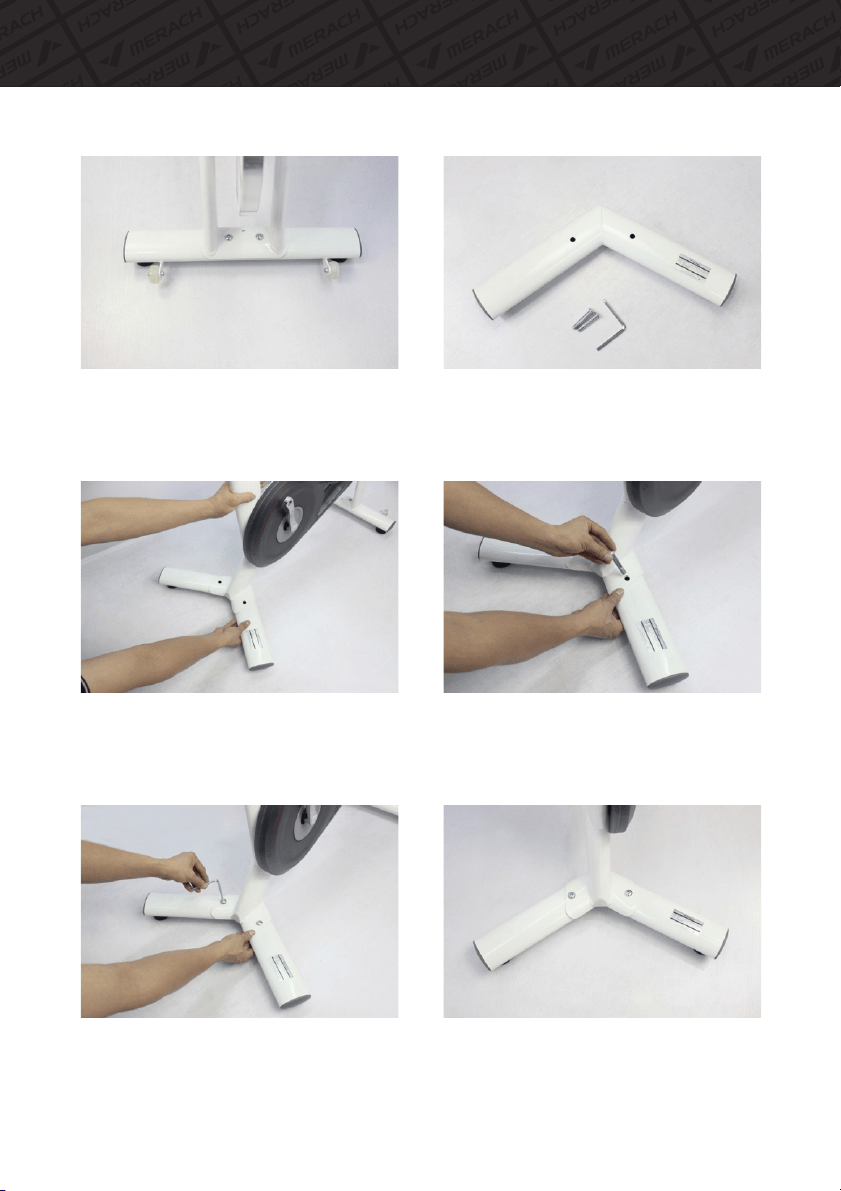
7.Complete assembly of #7 Front Stabilizer. 8.Prepare #8 Rear Stabilizer, two #9 Screws
and A: Allen Key.
9.Align the holes on #8 Rear Stabilizer and
the rear bracket on the #1 Main Frame.
10.Insert two #9 Screws into the holes.
11.Tighten and secure the two #9 Screws
with A: Allen Key.
12.Complete the assembly of #8 Rear
Stabilizer.
Assembly Instructions
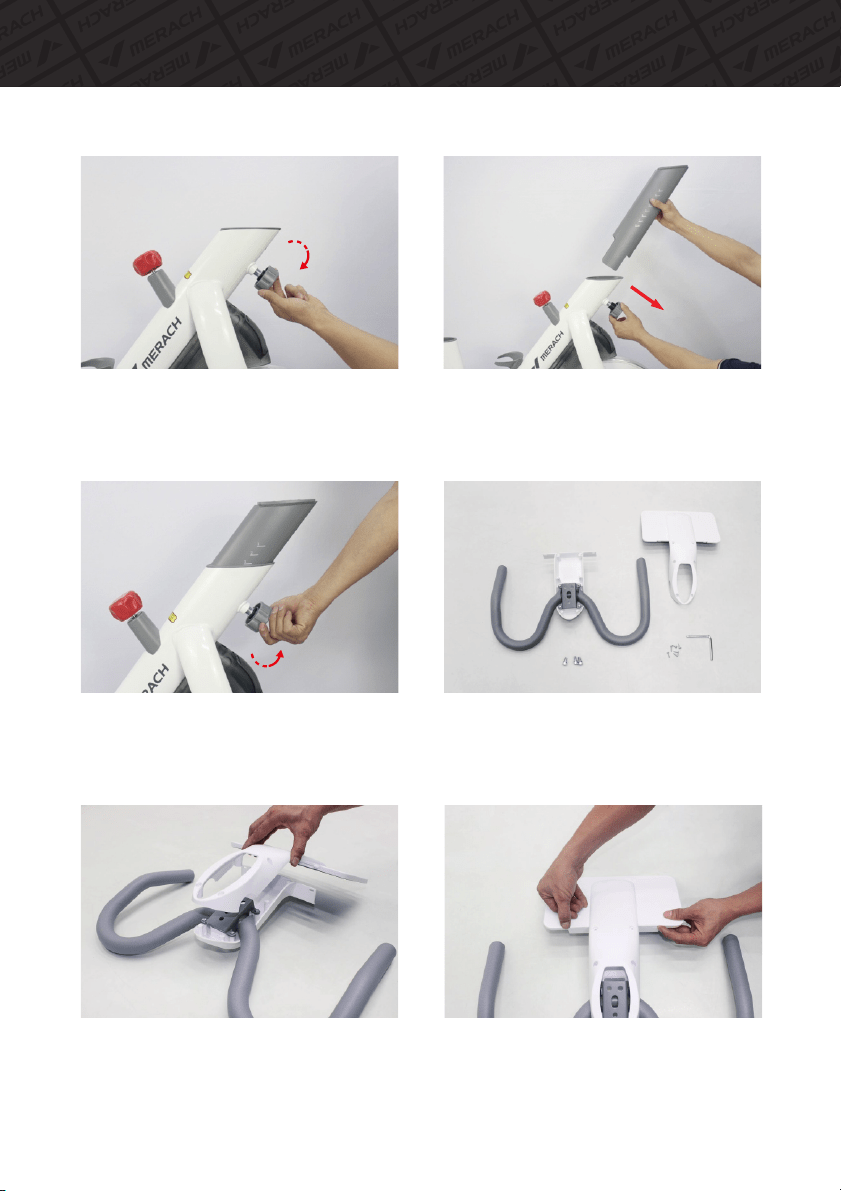
08
13.Loosen the #5 Knob pre-locked on the
#1 Main Frame, then pull it outward.
14.Pull the #5 Knob outward with one hand,
then insert the #2 Handlebar Post to
#1 Main Frame with the other hand.
15.Align the #5 Knob to an adjustment hole
in #2 Handlebar Post and then tighten
this knob.
16.Prepare #10 Handlebar, #14 Handlebar
Back Cover,six #15 Screws , three # 12
Screws and A: Allen Key.
Assembly Instructions
17. Clamp # 14 Handlebar Back Cover into
the # 10 Handlebar.
18.Make sure the two clasps are closed.
09
21.Make sure three #12 Screws are all
tightened.
22.Prepare #11 Decorative Cover.
23.Click in the #11 Decorative Cover to the
#10 Handlebar.
24.Complete the assembly of #10 Handlebar.
Assembly Instructions
19. Lock the six screws with tool A. 20.Align the Handlebar to the #1 Main Frame.

10
27.Align the #5 Knob to an adjustment hole
in #3 Seat Post and then tighten this knob.
28.Prepare #4 Seat, and remove the knob
and the washer as the photo shown.
29.After removing the knob and the washer. 30.Put the #4 Seat onto #3 Seat Post.
Assembly Instructions
25.Loosen the #5 Knob pre-locked on the
#1 Main Frame, then pull it outward.
26.Pull the #5 Knob outward with one hand,
then insert the #3 Seat Post to #1 Main
Frame with the other hand.
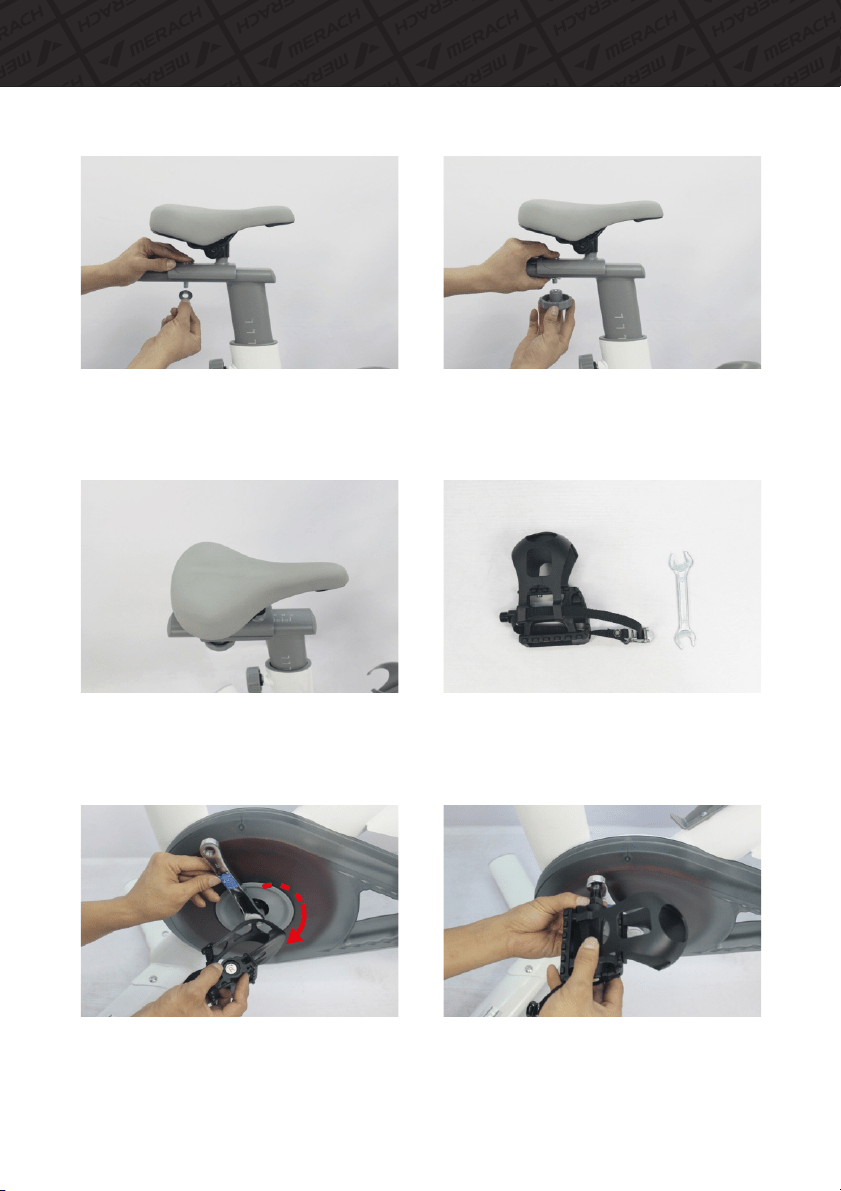
11
33.Make sure the #4 Seat will not wobble. 34.Prepare #6-R Right Pedal and
B: Open-end Wrench 14-15.
35.Make sure to match the #6-R Right Pedal
and the right crankarm (both marked R).
36.Screw the #6-R Right Pedal clockwise by
hand onto the right crankarm (at least 3 laps)
Assembly Instructions
31.Then install the washer on the bolt on
the #4 Seat.
32.Tighten the knob onto #4 Seat.
12
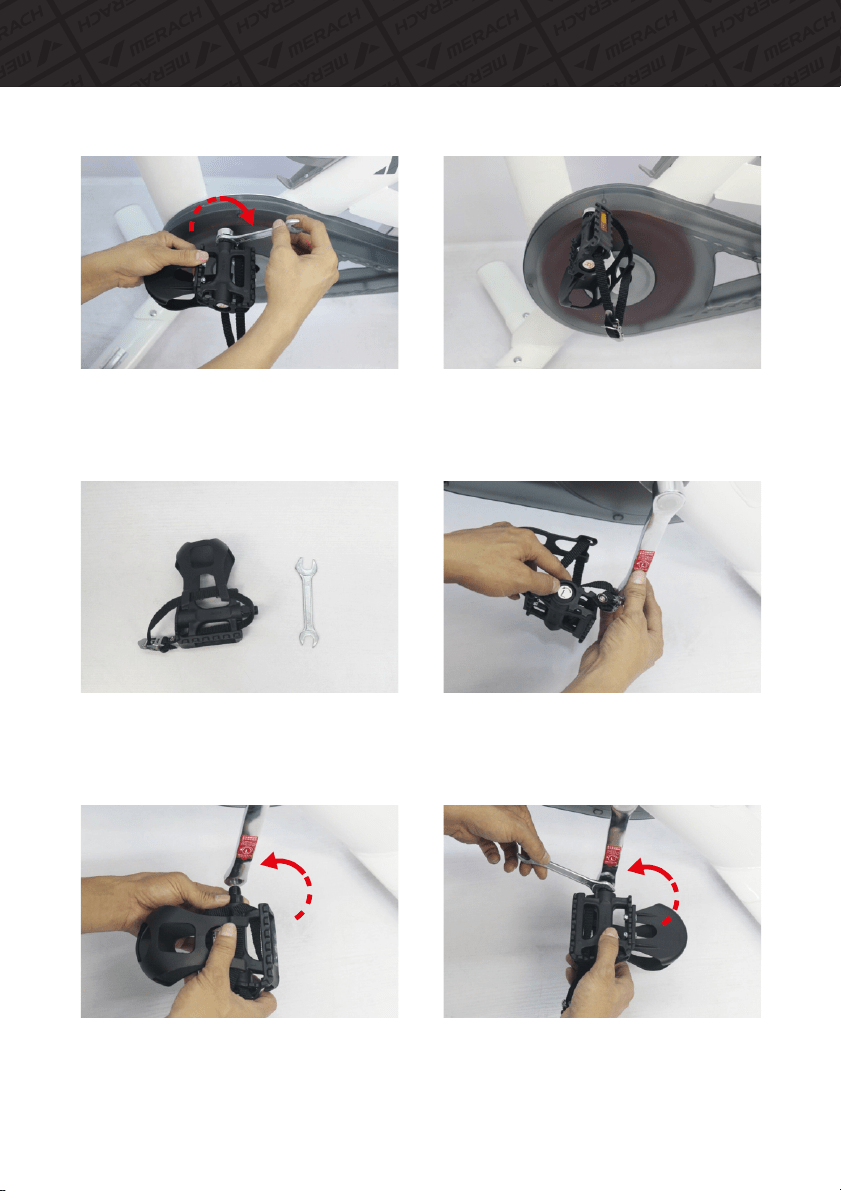
39.Prepare #6-L Left Pedal B: Open-end and
Wrench 14-15.
40.Make sure to match the #6-L Left Pedal
and the left crankarm (both marked L).
41.Screw the #6-L Left Pedal counterclockwise
by hand onto the left crankarm (at least 3 laps)
42.Tighten the #6-L Left Pedal with the 15 end
of B: Open-end Wrench 14-15, make sure
it's fully tightened.
Assembly Instructions
37.Tighten the #6-R Right Pedal with the 15
end of B: Open-end Wrench 14-15,
make sure it’s fully tightened.
38.Complete the assembly of #6-R Right
Pedal.
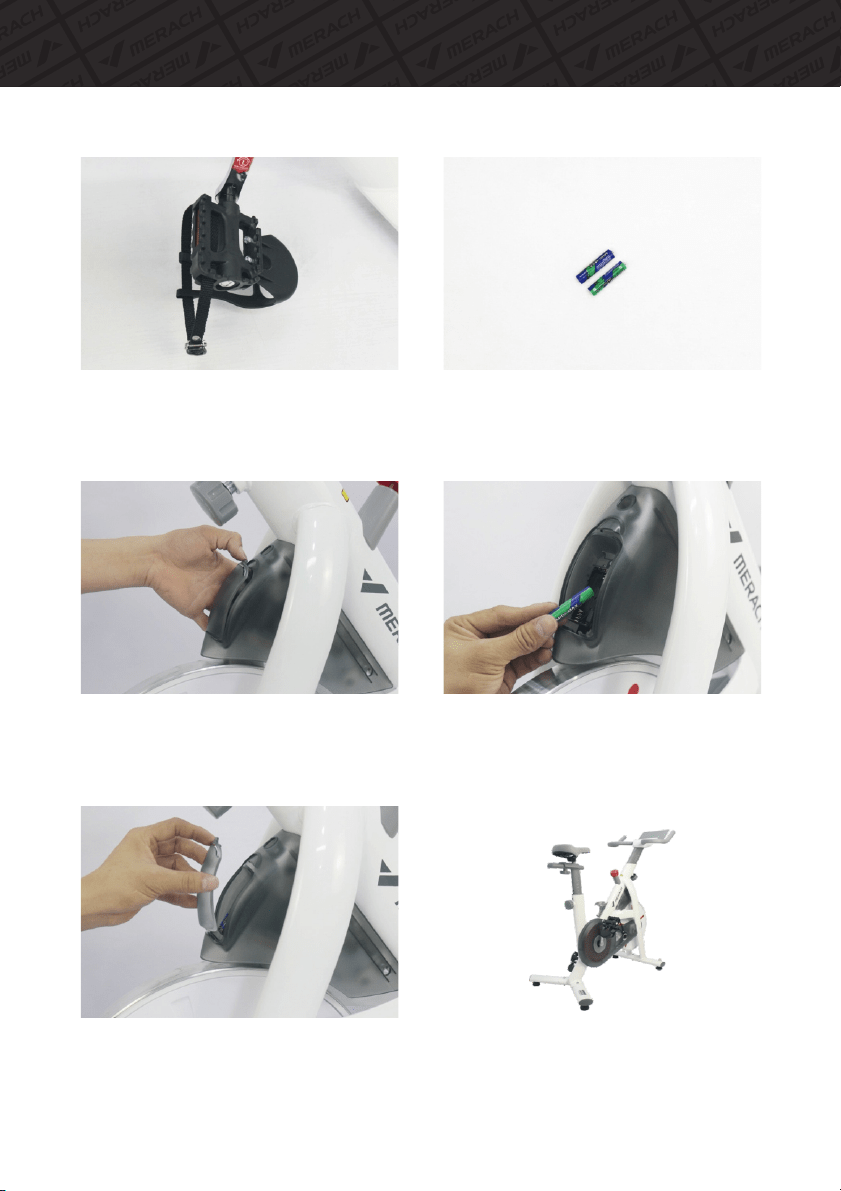
13
45.Remove the battery compartment door.46 Batteries (No. 7) .Install two #13 AAA
according to the correct polarity.
47.Install the battery compartment door back
and make sure it's clicked properly. 48.Complete assembly.
Assembly Instructions
43.Complete the assembly of #6-L Left Pedal 44.Prepare two #13 AAA Batteries (No. 7).
14
Precautions for Use
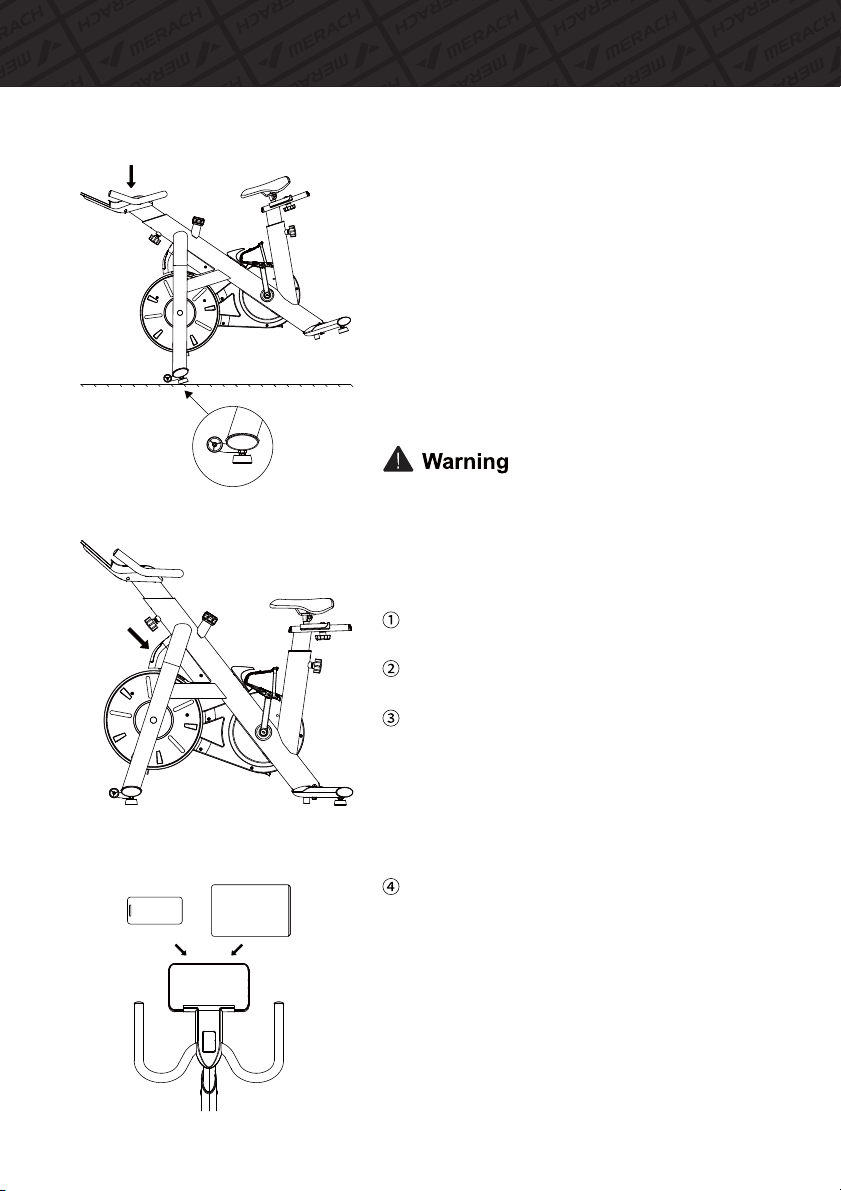
Transport tips:
Press the #10 Handlebar downwards to land the
transport wheels of the #7 Front Stabilizer on the
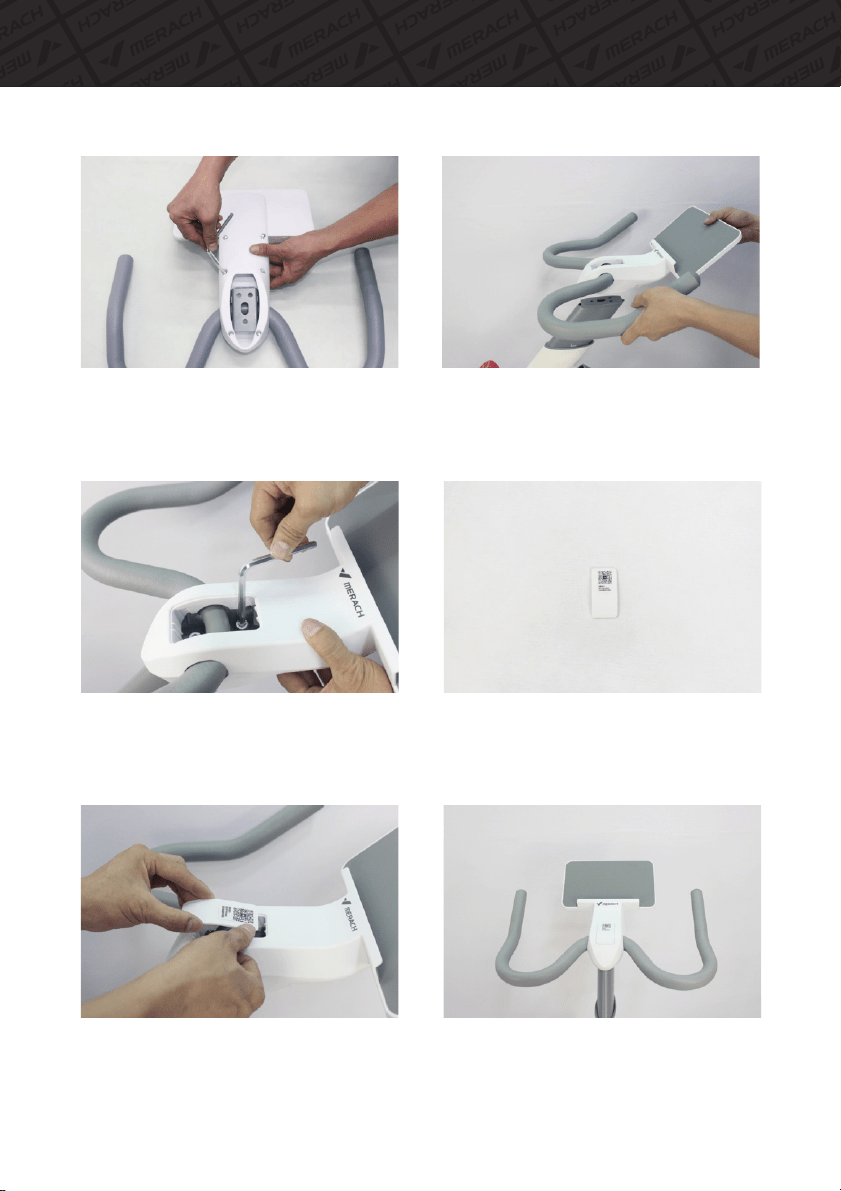
ground to move the bike.
Battery compartment door is on the flywheel
(location as photo shown)
Place the two AAA batteries on the correct
battery installation polarity.
When the bike is searching for Bluetooth
connection the Bluetooth indicator light will
start to flash. The Bluetooth indicator light
will turn into a steady light when connected
to the App on your phone or tablet. The
Bluetooth indicator light will change to
sleeping mode after 3 minutes of inactivity.
After using for a period of time, if the Bluetooth
indicator light does not light or poor Bluetooth
connection, please replace the AAA batteries.
Tablet Holder Adjustment
You cab place your tablet or smart phone on
the tablet holder.
PLEASE NOTE: This device comes with two
MSDS certified AAA trial batteries. The service
life of these batteries may be the same as that
of standard batteries. To ensure normal
operation, please replace them in time.
15
Adjustment Instructions
You can adjust your bike as a normal road bike, which you can have the correct postures and
make sure your muscles can get proper training. Make small adjustments, then pedal the bike
to test the effect.
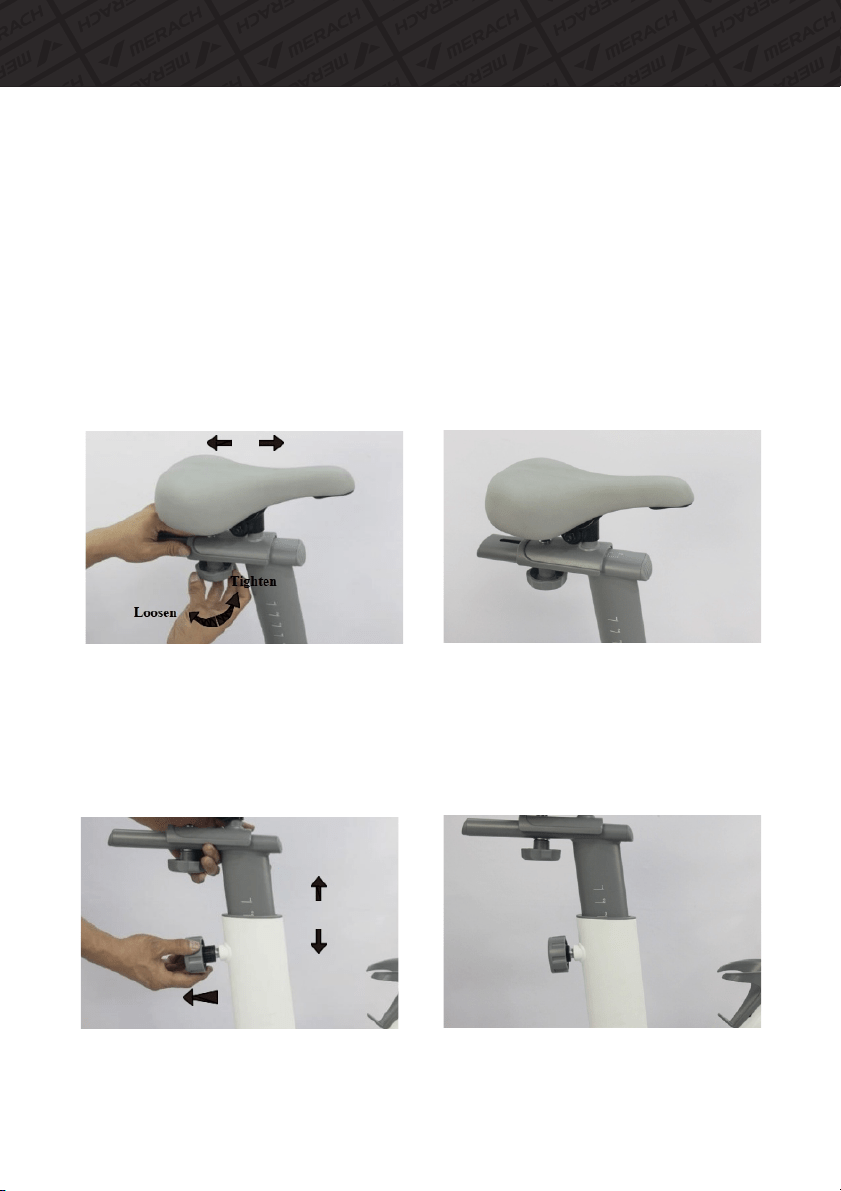
You can adjust your seat to the most comfortable angle. Firstly, you can adjust the seat in back
and forth or adjust the height of the seat post to make yourself more comfortable to use the bike.
① Adjust the seat in back and forth: Loosen the knob counter-clockwise 1-2 laps, and move the
seat to the proper position then tighten the knob clockwise.
I-Seat Adjustment
② Adjust the seat height: Loosen the knob counter-clockwise 2-3 laps, then pull the knob
outwards, and use the other hand to move the seat post to the proper height then tighten the
knob clockwise.
(CAUTION: Do not exceed the MAX mark printed on the seat post while adjusting the
height)
16
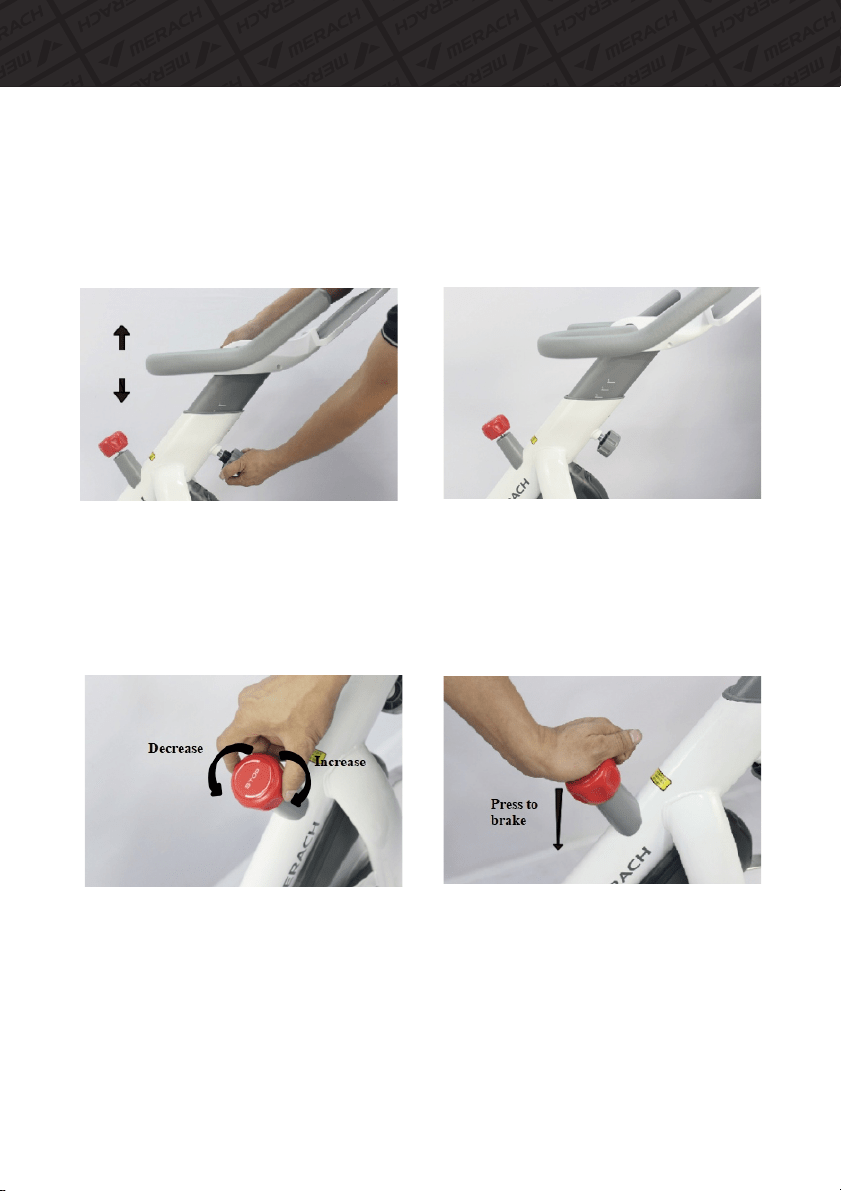
Loosen the knob counter-clockwise 2-3 laps, then pull the knob outwards, and use the other
hand to move the handlebar post to the proper height then tighten the knob clockwise.
II-Handlebar Adjustment
(CAUTION: Do not exceed the MAX mark printed on the seat post while adjusting the height)
You can increase and decrease the resistance by turning the knob as the arrow shows. You can
adjust the resistance based on your needs to achieve the best effect of exercise. If an urgent stop
is needed, please press down the knob to brake, it can stop the flywheel from spinning.
Unpressed to release the knob.
Brake Resistance Knob
Adjustment Instructions
17
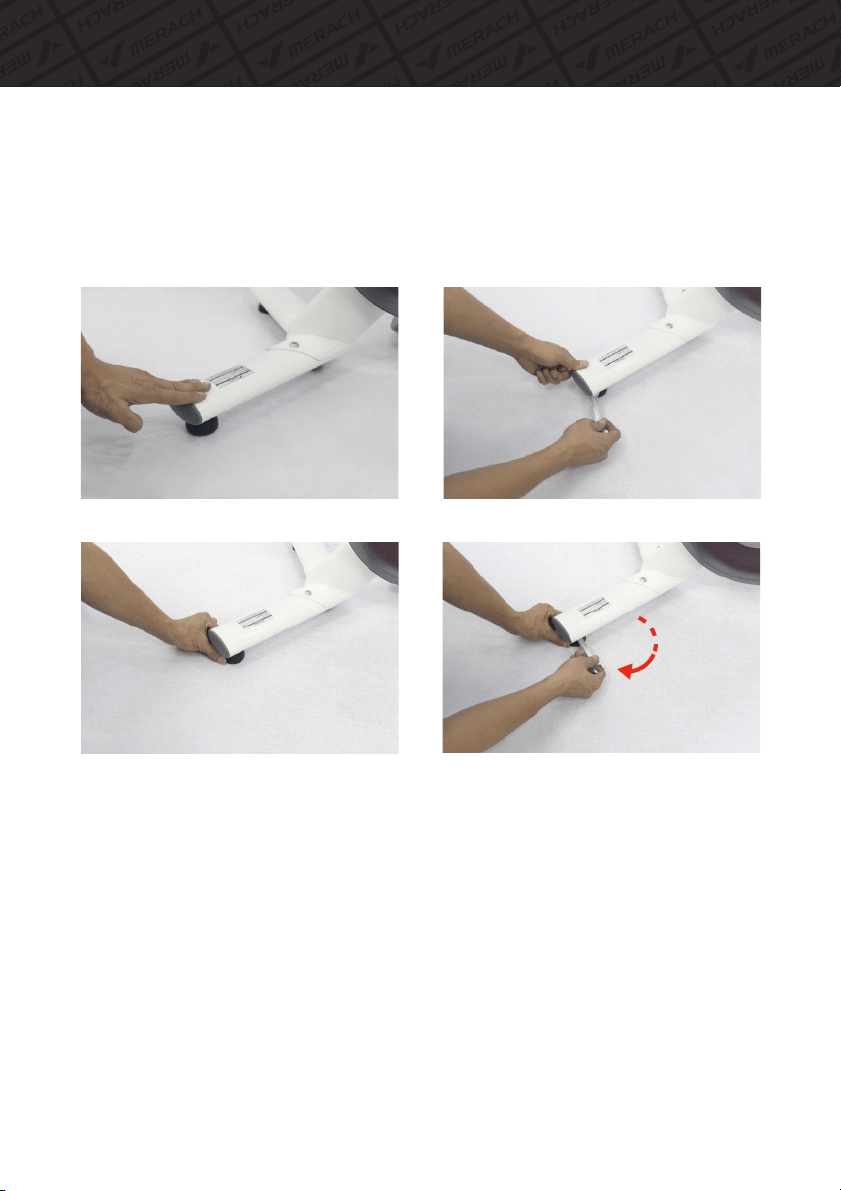
If the bike wobbles during use, please adjust the 4 foot-pads on the front and rear stabilizers.
Firstly, use the 14 end of the B: Open-end Wrench 14-15 to loosen the nut clockwise, adjust the
foot-pads until the bike is stable, and then use the 14 end of the B: Open-end Wrench 14-15 to
tighten the nut.
Leveling Adjustment
Adjustment Instructions

18
MERACH APP Setup
Download and use of MERACH
1. To download the MERACH app, scan the QR code or search "MERACH" in the Apple
App Store® or Google Play Store.
Our customer can get a 180-day MERACH membership. Please contact us through
[email protected] after receiving the product to get an exclusive redemption
code. Please include your order ID and MERACH app Username.
*
2. Open the MERACH app. Log In or Sign Up.
3. Follow the in-app instructions to set up your device.
MERACH APP Download APP Connection Guide
Note:
1. Using the MERACH app allows you to get free workout courses and access additional
functions and features.
2. Coaching courses are only available in English.
USING YOUR ROWING MACHINE

19
1. To download the Kinomap app, scan the QR code or search "Kinomap" in the
Apple App Store® or Google Play Store.
2. Open the Kinomap app. Log In or Sign Up.
3. Select the corresponding fitness equipment
4. Turn on Bluetooth, and choose FTMS.
5. Select "Exercise bike", and find your "MRK-S02-XXXX".
6. Start training and explore different workout methods.
KINOMAP APP Setup
Warm-up
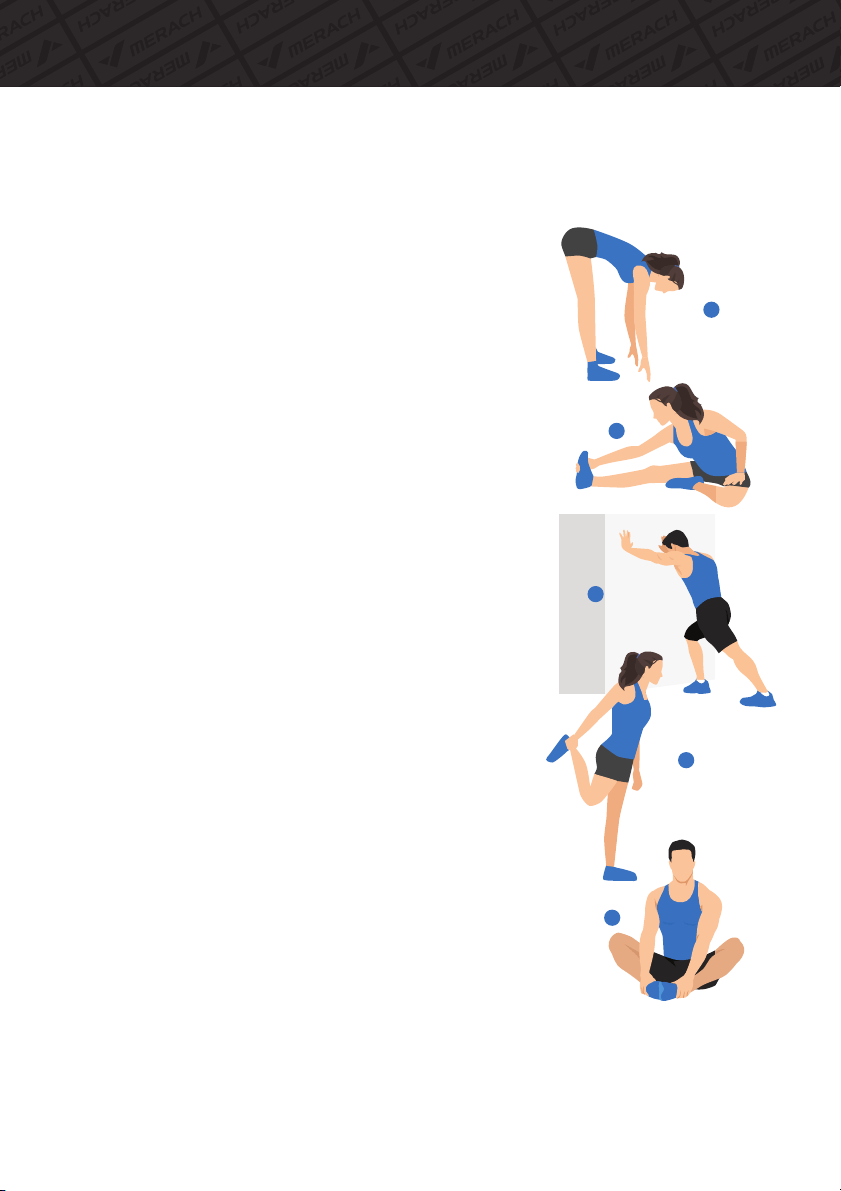
20
Do stretches before exercising. Warm muscles are easier to stretch, so start with a
5-10 minute warm-up, then do the stretch as follows - 5 times, 10 seconds or more
per leg. Do it again after the workout.
1. Stretch down
2. Seated hamstring stretch
Sit with one leg straight. Bring the other leg in so that it is snug
on the inside of the straightened leg. Try to touch your feet with
your hand's toe. Hold for 10-15 seconds, then relax.
Repeat 3 times for each leg (see Figure 2).
3. Calf and Achilles tendon stretch
Stand with both hands against the wall or tree, one foot behind.
Keeping your back legs upright and your heels on the ground,
lean toward a wall or tree. Hold for 10-15 seconds, then relax.
Repeat 3 times for each leg (see Figure 3).
4. Quadriceps stretch
Reach back with your right hand, grab your right foot and
slowly pull it toward your hips until you feel the muscles in the
front of your thigh tense.Hold for 10-15 seconds, then relax.
Repeat 3 times for each leg (see Figure4).
5. Sartorius (inner thigh muscle) stretch
Sit with your feet facing each other and your knees facing out.
Grab your feet with both hands and pull toward your groin.
Hold for 10-15 seconds, then relax.
Repeat 3 times(see Figure5).
Bend your knees slightly, slowly bend your body forward,
relax your back and shoulders, and try to touch your toes
with your hands. Hold for 10-15 seconds, then relax.
Repeat 3 times (see Figure 1).
1
2
3
4
5

Troubleshooting
21
Problem Possible Solution
Turn the knob clockwise to increase resistance and counterclockwise to
decrease resistance. The resistance of the bicycle is adjustable with
infinitely variable speed and multiple gears.
How to adjust gear?
What to do when the
handle shakes slightly?
Check whether the connecting screws of the handle and the front
column tube are firmly fixed.
Check if the retaining knob is locked.
What to do when the
machine shakes
during use?
Check whether the front and rear foot tubes are fastened enough.
What to do when
pedals loose?
Following the setup instruction, to check whether the left and right
pedals are locked on the first step.
Following the setup instruction, to check whether the inner fixing nut
of the second stage of setting up the pedal is locked.
Why there is abnormal
noise when riding with
maximum resistance?
When riding with maximum resistance, the contact between the brake
block and the wheel will produce abnormal noise. Turn the resistance
knob one or two turns counterclockwise will eliminate the abnormal
noise. Our engineers would not recommend customers to use the
bike at maximum resistance for a long time.
What to do when the
whole machine is
slightly tilted?
Check whether the four adjusting foot pads at the bottom of the front
and rear foot tubes are on the same plane.
Adjust and rotate the raised foot pads parallel to the floor.

Warranty Information
22
Terms & Policy
Product Name MERACH Exercise Bike
Model MR-S02
Default Warranty Period 12 Months
For your own reference, we strongly recommend that yourecord
your order number and date of purchase.
Date of Purchase
Serial Number
This warranty does not apply to the following situations:
All expressed and implied warranties, including the warranty of
merchantability, are limited to the period of the limited warranty.
The MERACH products are premium in material, craftsmanship, and service. MERACH fit
1-year limited warranty, they are effective from the date of purchase.
MERACH will replace defective products based on eligibility. Refunds are available to the
original purchasers of our products within the first 30 days of purchase. This warranty
extends only to personal use instead of commercial, rental, or any other uses for which
the product is not intended for. Each product has no other warranties other than the
already provided warranties.
This warranty is non-transferable. MERACH is not responsible for any damages, losses or
inconveniences caused by equipment's failure, user's negligence, user's abuse, or improp-
er operation that does not follow the included user manual.
Damage due to abuse, accident, alteration or vandalism.
Improper or inadequate maintenance.
Damage in return transit.
Unsupervised use by children under 18 years old.
MERACH and its subsidiaries are only responsible for damages caused by the intended use or
as instructed in the user manual. Some states do not allow this exclusion or limitation of
incidental or consequential losses, so the above disclaimer may not apply to you. This
warranty gives you specific legal rights and you may also have other rights, which may vary
from state to state.

Memo