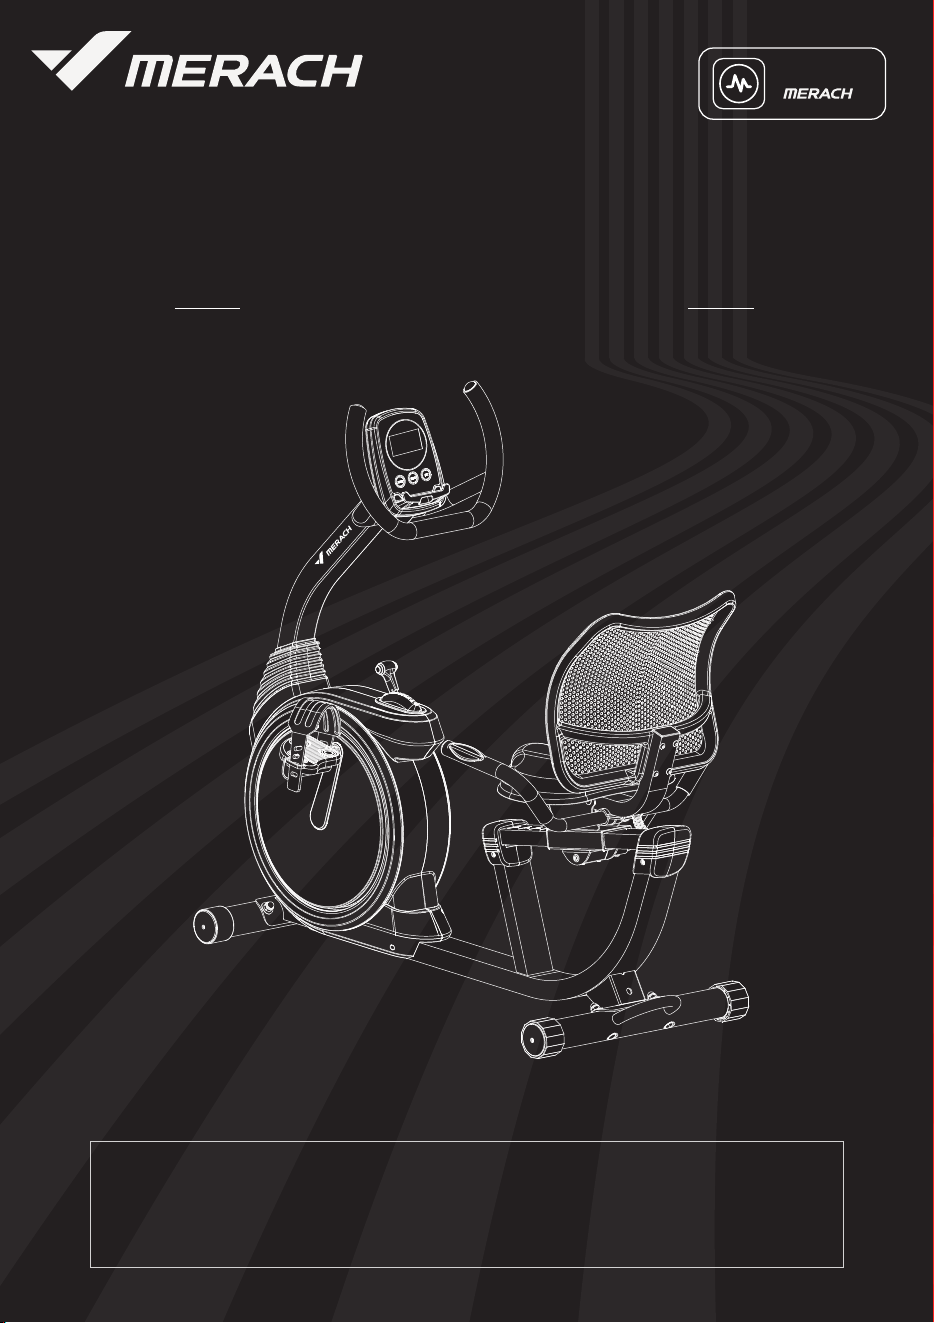
USER MANUAL
MERACH MR-S19 RECUMBENT BIKE
Questions or Concerns?
IMPORTANT!
Please read all details before use, and keep this user manual for future reference.
PLEASE CONTACT US BEFORE THE RETURN: Mon-Fri,9:00 am-5:00 pm PST/PDT
POWEREDBY

WHO
WE ARE
Our customers aren’t just important; their health, fitness, and pure enjoyment for live
is at the core of everything we do at MERACH. From innovative fitness research and
cutting-edge product development, to our exceptional purchasing & after-sales service,
we are our customers’ life-long partner in crafting a better fitness future.
Through quality fat-burning & muscle-building fitness equipment such as our quality
rowing machines and exercise bikes, plus our innovative MERACH APP, and digital
courses, we give the opportunity and support to all to pursue their health and fitness
goals and discover a new way of healthy living.
Welcome to MERACH

Safety Instructions......................................................................................01
Parts List.....................................................................................................03
Parts Tool List.............................................................................................04
Assembly Instructions................................................................................05
Product Usage Instructions.......................................................................13
Instructions for the Monitor.......................................................................16
Technical Details........................................................................................19
MERACH APP SETUP..............................................................................20
Warm-up.....................................................................................................21
Troubleshooting..........................................................................................22
Warranty Information..................................................................................23
This device contains a radio transmitter module with type approval code
FCC ID:2A6QWMR-BLE001 IC:29678- MRBLE001 HVIN: MRBLE001
Please read the entire manual carefully
before installing and using the bike, and
save for further use.
Contents

Please keep this manual in a safe place for future reference.
It is very important to read the entire manual thoroughly before installing and using the
machine. Safe and effective training can only be achieved if the machine is properly
assembled, properly maintained and used. Make sure all users are familiar with all warnings
and precautions of this machine.
Please consult your physician to determine if you have any medical or physical conditions
that could put your health and safety at risk or prevent you from using the equipment properly.
Your physician's advice is essential if you are taking medication that affects your heart rate,
blood pressure, or cholesterol level.
Please always pay attention to your body signals, improper use of the machine may affect
your health. If you experience any symptoms (including headache, chest pain, irregular
heartbeat, shortness of breath, dizziness, or any discomfort), stop exercising immediately
and consult your physician, get the permission before training again.
Always keep children and pets away from the machine. The machine is for adult use only.
Please use this machine on stable and horizontal ground level, and put a protective layer on
the floor or carpet to prevent a floor from damaging. Make sure the distance between the
machine and each obstacle is at least 1.6 ft (0.5m).
Please check all screws and nuts are properly tightened before using the machine.
The safe use of the machine can only be guaranteed if the regular maintenance and repairs
of undertaken, and worn out and broken parts are changed.
Please follow the instructions in this manual to use this machine. Please stop using and
operating immediately when you find any defective parts or hear any abnormal sound.
Make sure all issues are resolved before using it again.
Please wear sports clothes, sports shoes, or other proper clothes. Loose-fitting clothing is
not recommended, as loose clothing may get caught in the machine, hindering operation
and possibly causing an injury.
This machine is only for home use. The maximum user weight is 330lbs.
01
Safety Instructions

This machine is not for professional medical treatment.
This product is only for family use.
The overall performance of the machine and all moving parts must be checked
regularly to ensure the safety of the machine.
If the moving parts are damaged, please do not use the machine until the parts
are repaired.
Keep the children away from the machine. The equipment is not for children to use
or play with. They can injure themselves accidentally.
Care & Maintenance
Do not store the machine in a place exposed to direct sunlight, wind and rain,
or with high humidity. If needed, please pack the machine to keep children away
from touching or playing with it.
Please check if there’s rust or cracks after long-term storage.
Please understand that for the consumable parts, the wear and tear may also occur
even with proper maintenance.
For long-term use of this machine, please wipe the dust regularly. Do not water it
directly, or wipe with gasoline, abrasive powder, etc. Otherwise, it might cause
cracks on the parts or main body, electric shock or fire. Please use Dilute neutral
detergent for maintenance.
Before starting any training, please consult your physician,
especially for those who are over 35 years old or with
pre-existing health conditions. Please read all
instructions before using the machine.
02
Safety Instructions
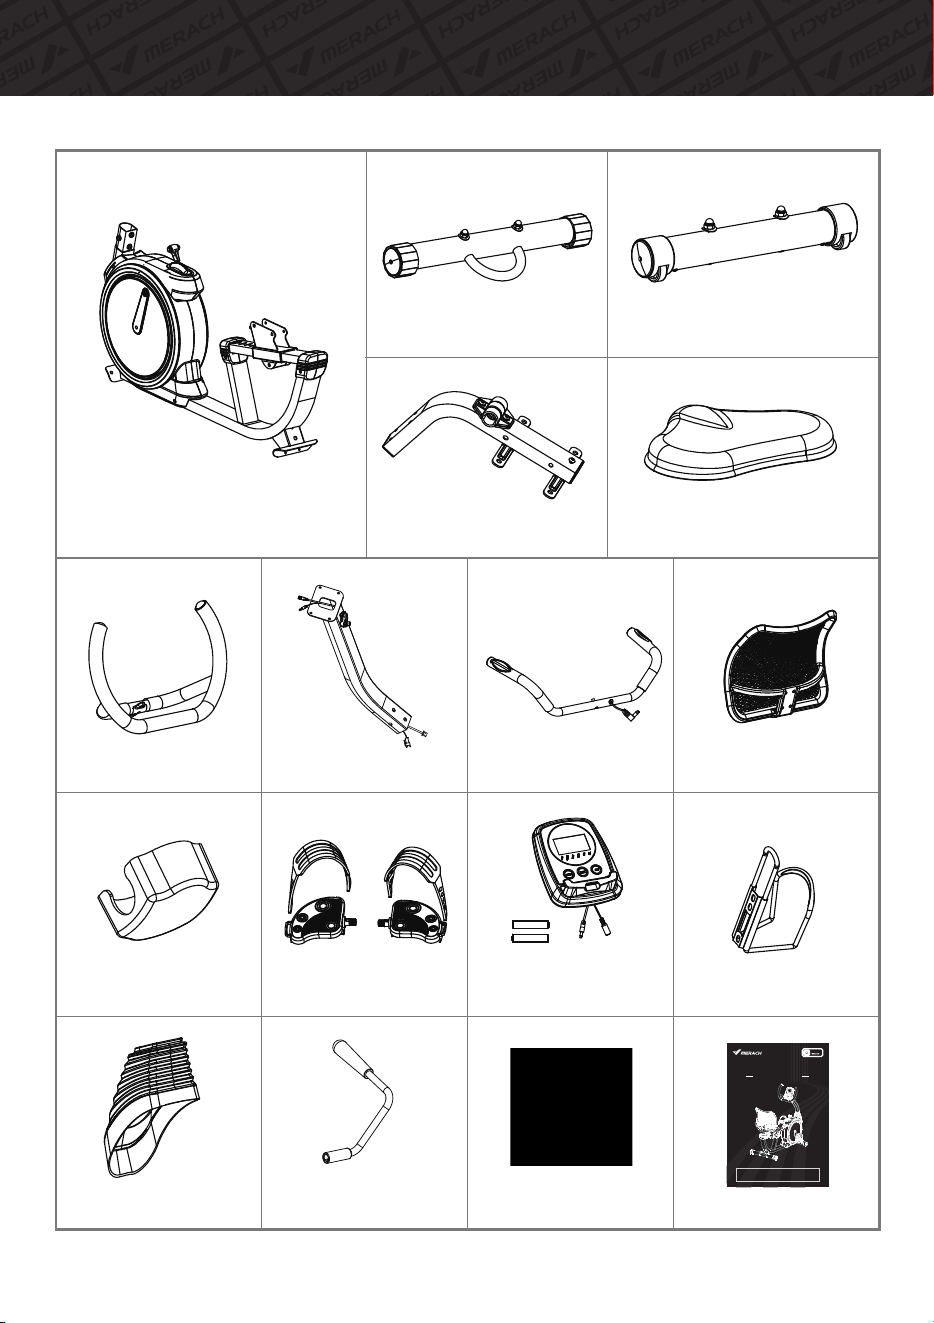
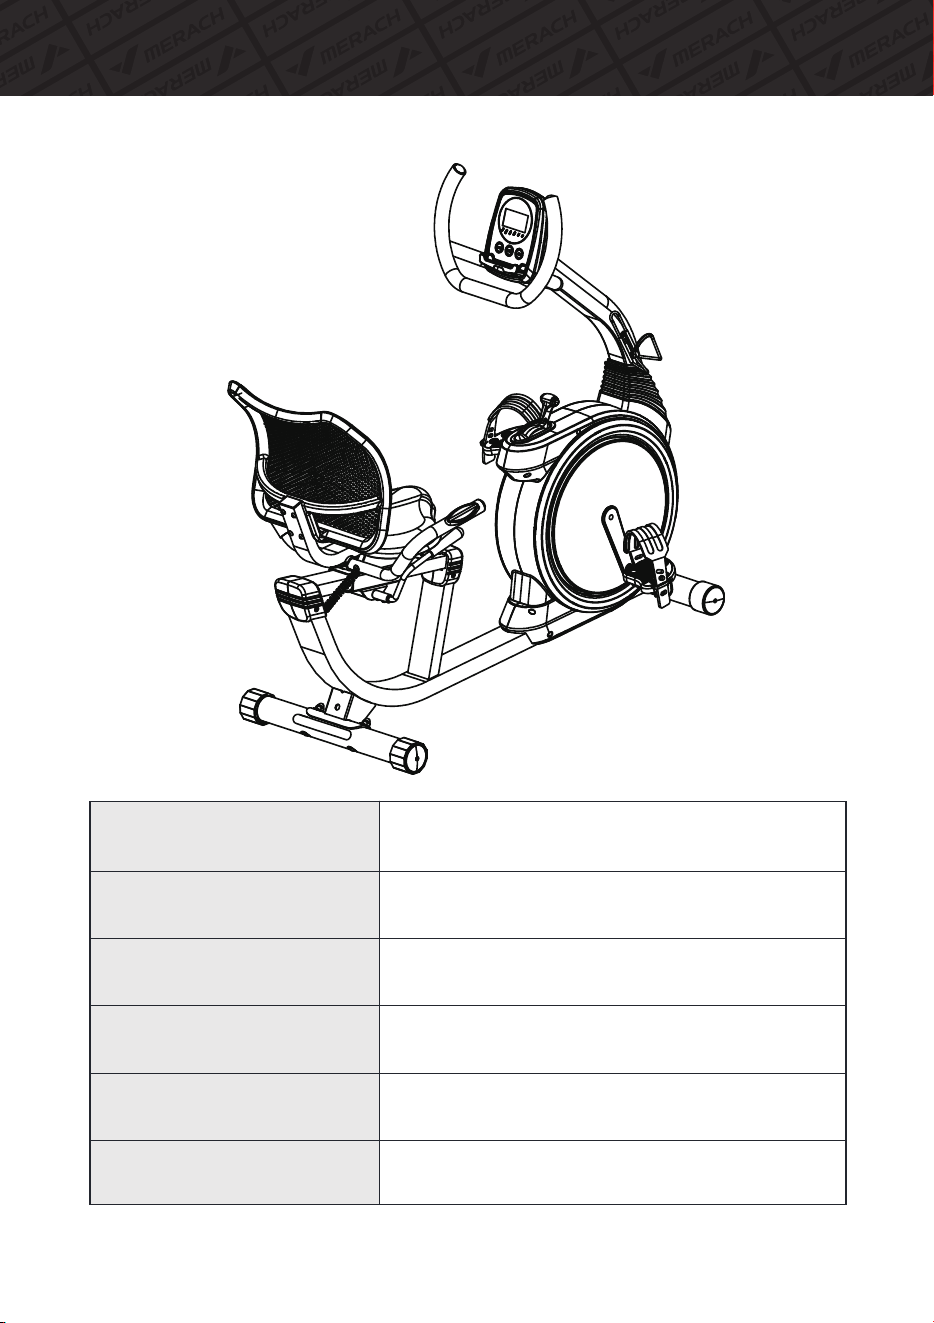
#8MainFrameX1
#21FrontFootTubeX1
#22RearFootTubeX1
#18BackrestSupportX1
#10SeatCushionX1
#9HandrailX1
#5HandlebarPostX1
#15RearHandleX1
#26BackrestX1
#1MonitorX1
AABatteryX2
#7DecorativeCoverX1
#4HandlebarCapX1
#27BottleCageX1
#20RRightPedalX1
#20LLeftPedalX1
#25SeatCushion
AdjustmentLeverX1
UserManualX1
Screwkitx1
03
Parts List
USER MANUAL
Questions or Concerns?
IMPORTANT!
Please read all details before use, and keep this user manual for future reference.
PLEASE CONTACT US BEFORE THE RETURN: Mon-Fri,9:00 am-5:00 pm PST/PDT
[email protected] | (213) 672-2298
MERACH MR-S08 RECUMBENT BIKE
POWEREDBY
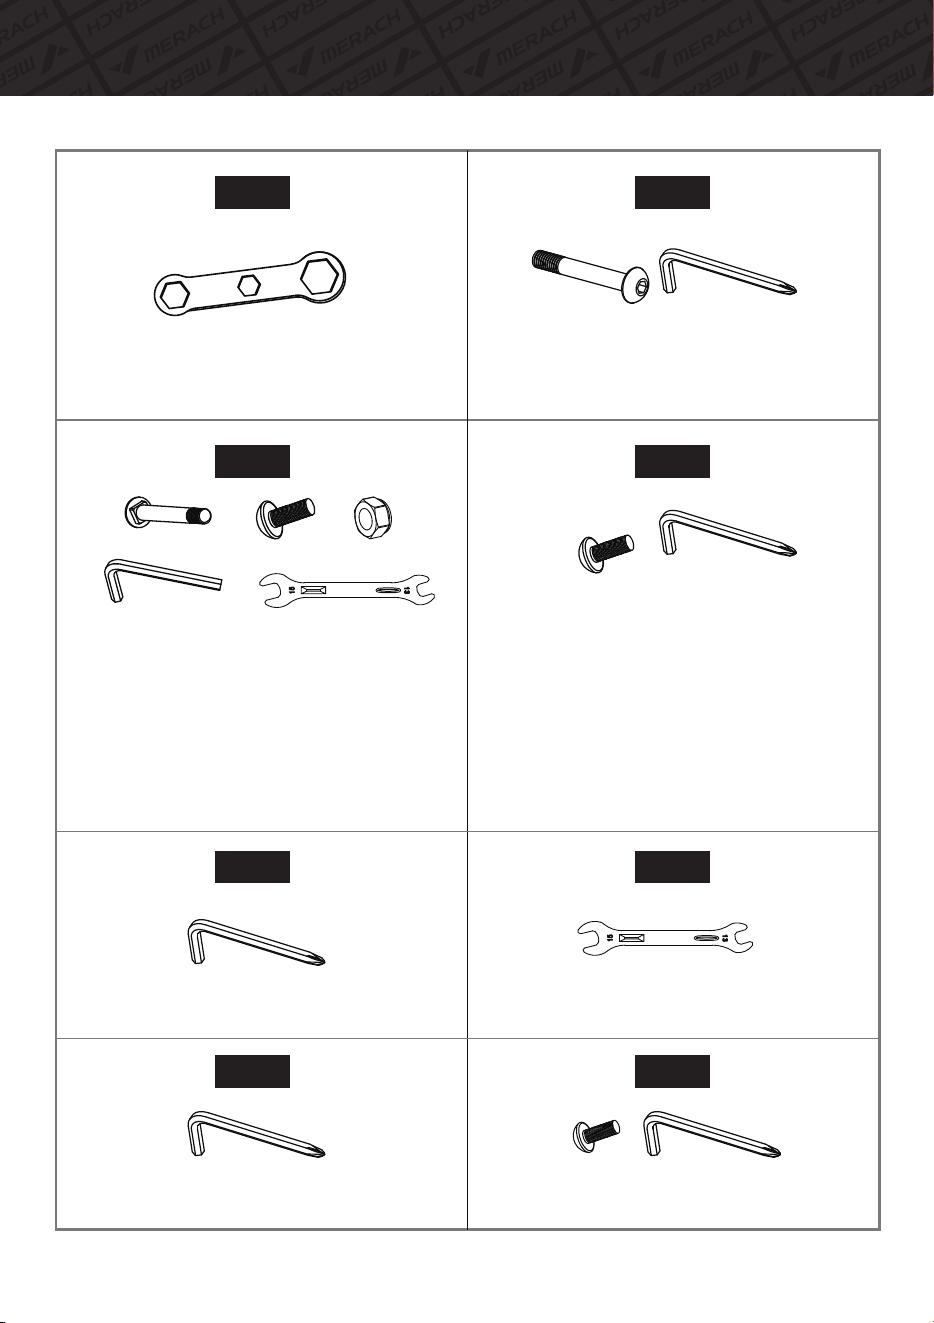
Pleasecheckifallthepartsandtoolsareinthepackage.
Step1 Step2
Step3 Step4
04
Parts Tool List
#CClosed-endSpannerX1
#14Pan-headHexagonSocketSetScrews
M6*45X4
#11BoltsM8*66X2
#12PanHeadHexagonSocketFullToothScrews
M6*13X5
#13NutsM8X2
#AAllenKeyX1
#DOpenSpannerX1
#12PanHeadHexagonSocketFullToothScrews
M6*13X2
#BCrossHexagonWrenchX1
#BCrossHexagonWrenchX1
#DOpenSpannerX1
#28CrossRecessedPanHeadScrewsM5*13X2
#BCrossHexagonWrenchX1
Step5 Step6
Step7 Step8
#BCrossHexagonWrenchX1
#BCrossHexagonWrenchX1
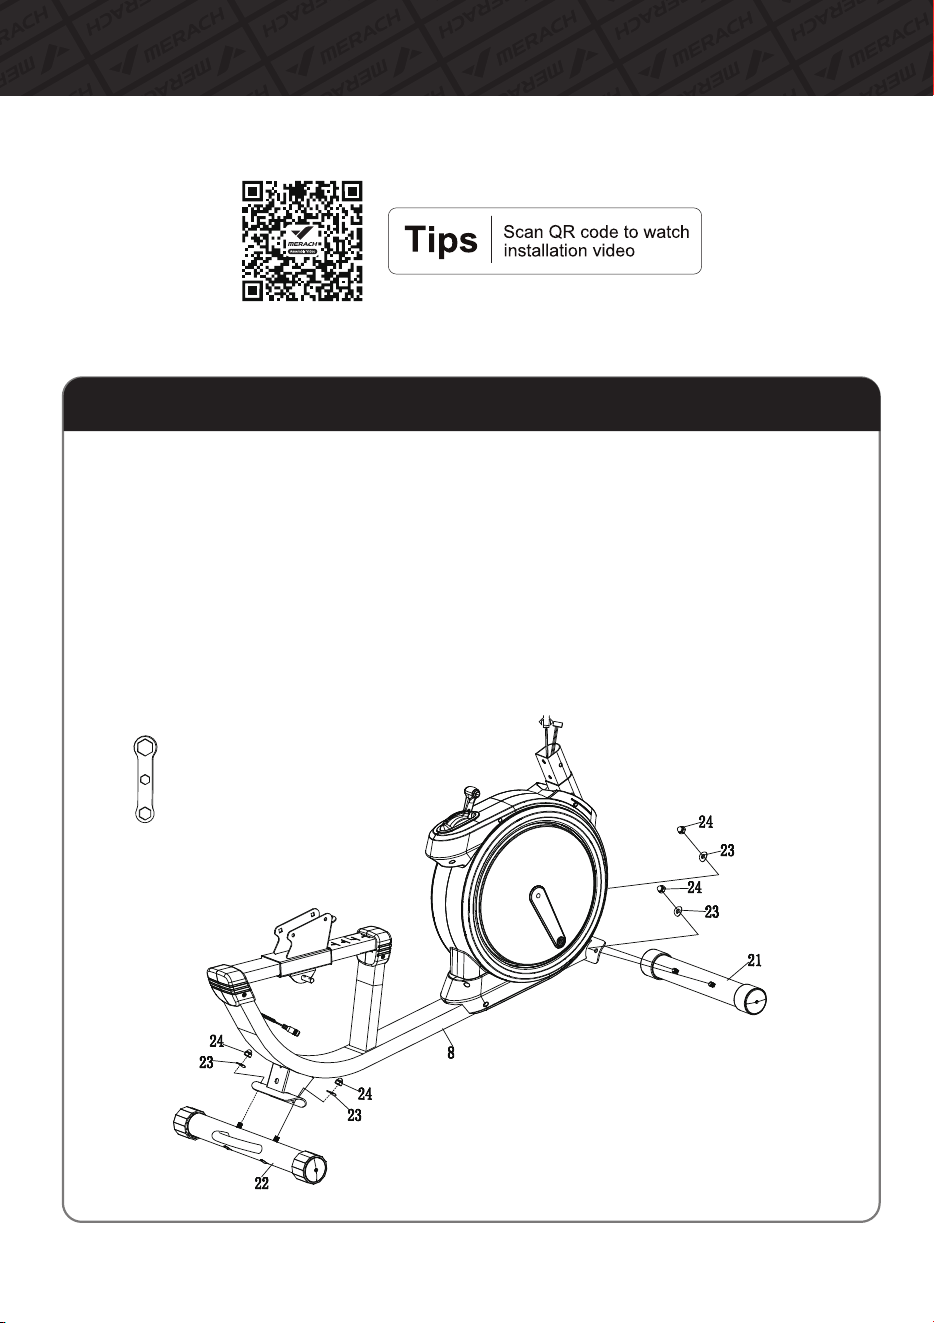
A.Removepre-assembledCuredWasher(#23)andCapNuts(#24)fromtheFrontFoot
Tube(#21)andRearFootTube(#22).
B.Use4CuredWasher(#23)and4CapNuts(#24)toinstallFrontFootTube(#21)andRear
FootTube(#22)ontoMainFrame(#8)bytheClosed-endSpanner#C).
Note:Pleaseensurethebothtubesareinstalledonthecorrectpositionasshownbelow.
C.TightenCapNuts(#24)atthebothfoottubes.
Note:TheCuredWasher(#23)andCapNuts(#24)ispre-assembledontothefoottube.
05
AssemblyInstructions
Step1:InstalltheFootTubes
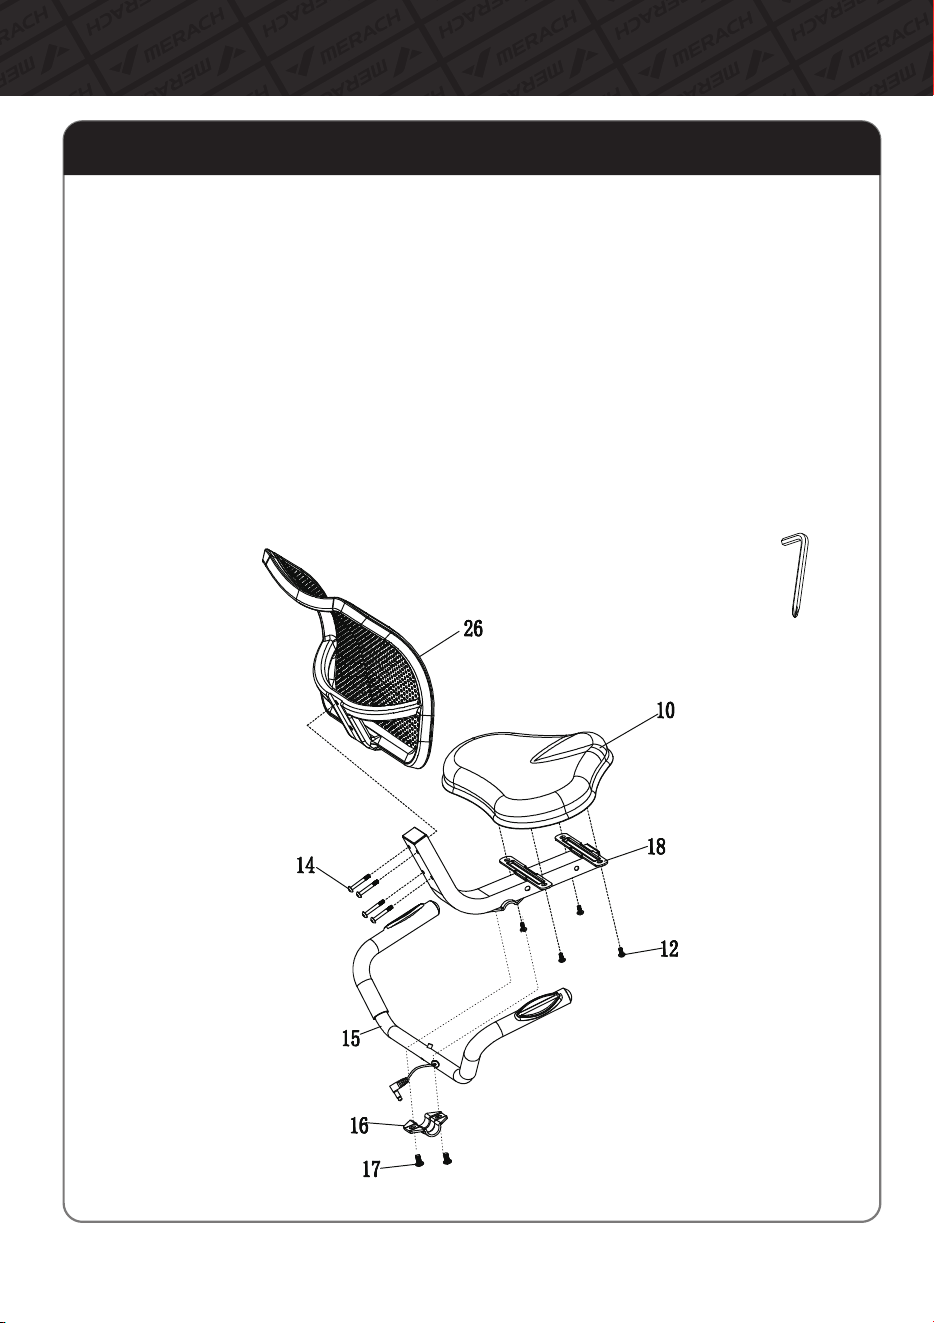
Step2:LocktheBackCushionandRearHandle
A.AttachtheSeatCushion(#10)totheBackrestSupport(#18)withPanHeadHexagonSocket
FullToothScrews(#12)bytheAllenKey(#A).
B.AttachtheBackrest(#26)totheBackrestSupport(#18)withPan-headHexagonSocketSet
Screws(#14)bytheAllenKey(#A).
C.AttachtheRearHandle(#15)totheBackrestSupport(#18)withSeatHandleHook(#16)and
PanHeadHexagonSocketFullToothScrews(#17)bytheCrossHexagonWrench(#B).
Note:The2PanHeadHexagonSocketFullToothScrews(#17)ispre-assembledontotheSeatHandle
Hook(#16).
Note:TheRearHandle(#15)isrotatable(maximum90degrees)fortheusertoseatinto
cushioneasily.
06
AssemblyInstructions
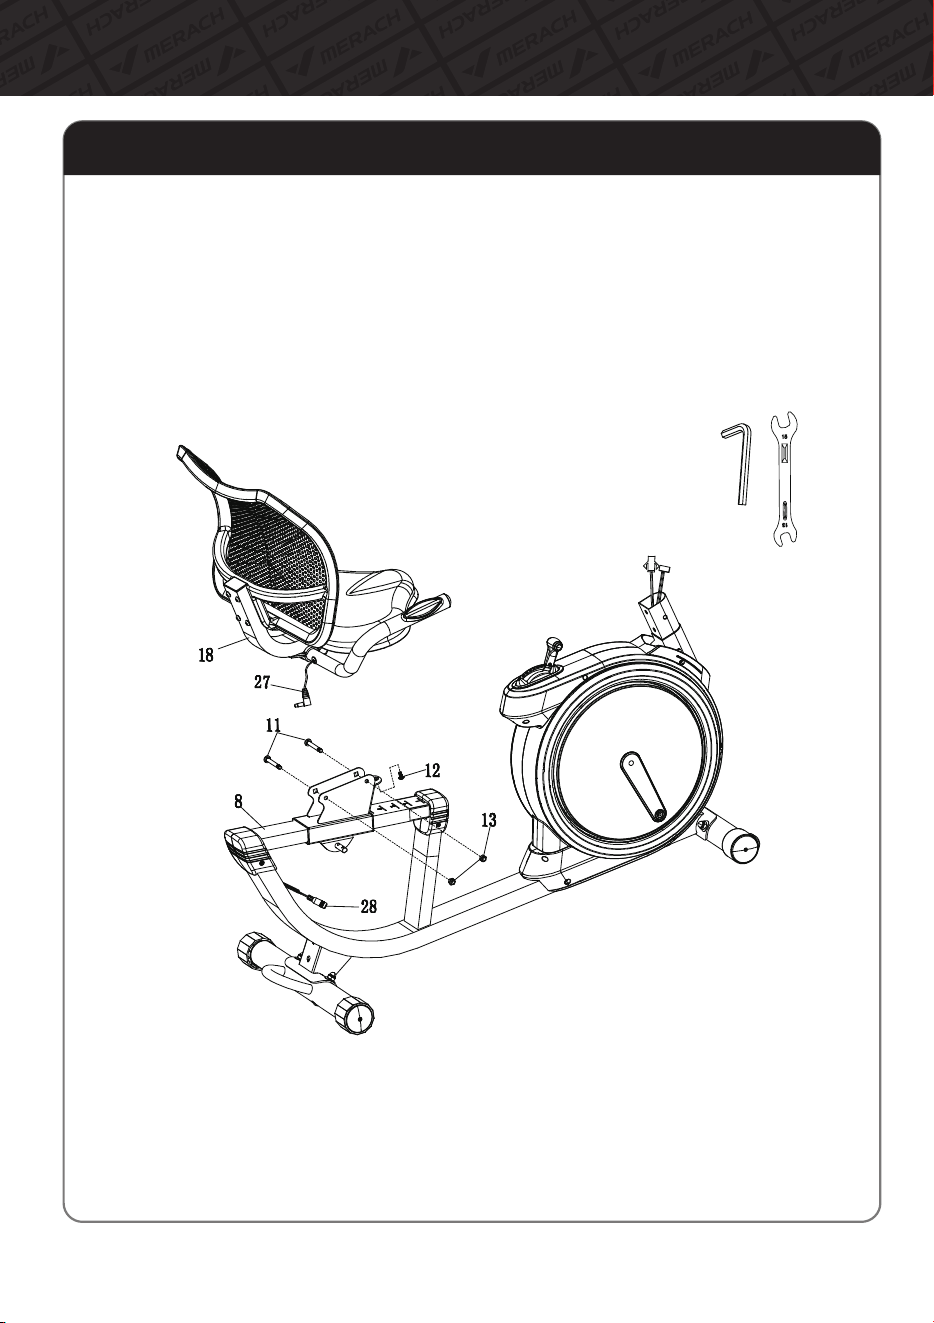
Step3:InstalltheSeatSettotheMainFrame
A.AttachtheBackrestSupport(#18)totheseatsliderontheMainFrame(#8)withPanHead
HexagonSocketFullToothScrews(#11),Nuts(#13)andBolts(#12)fromthebottomeofthes
eatslider.AndthentightenitwithOpenSpanner(#D).
Note:Pleaseunscrewthepre-assembled1PanHeadHexagonSocketFullToothScrews(#12)
fromtheBackrestSupport(#18)firstly.
B.ConnecttheHandleWire(#27)totheHandleChipTrunk(#28).
07
AssemblyInstructions
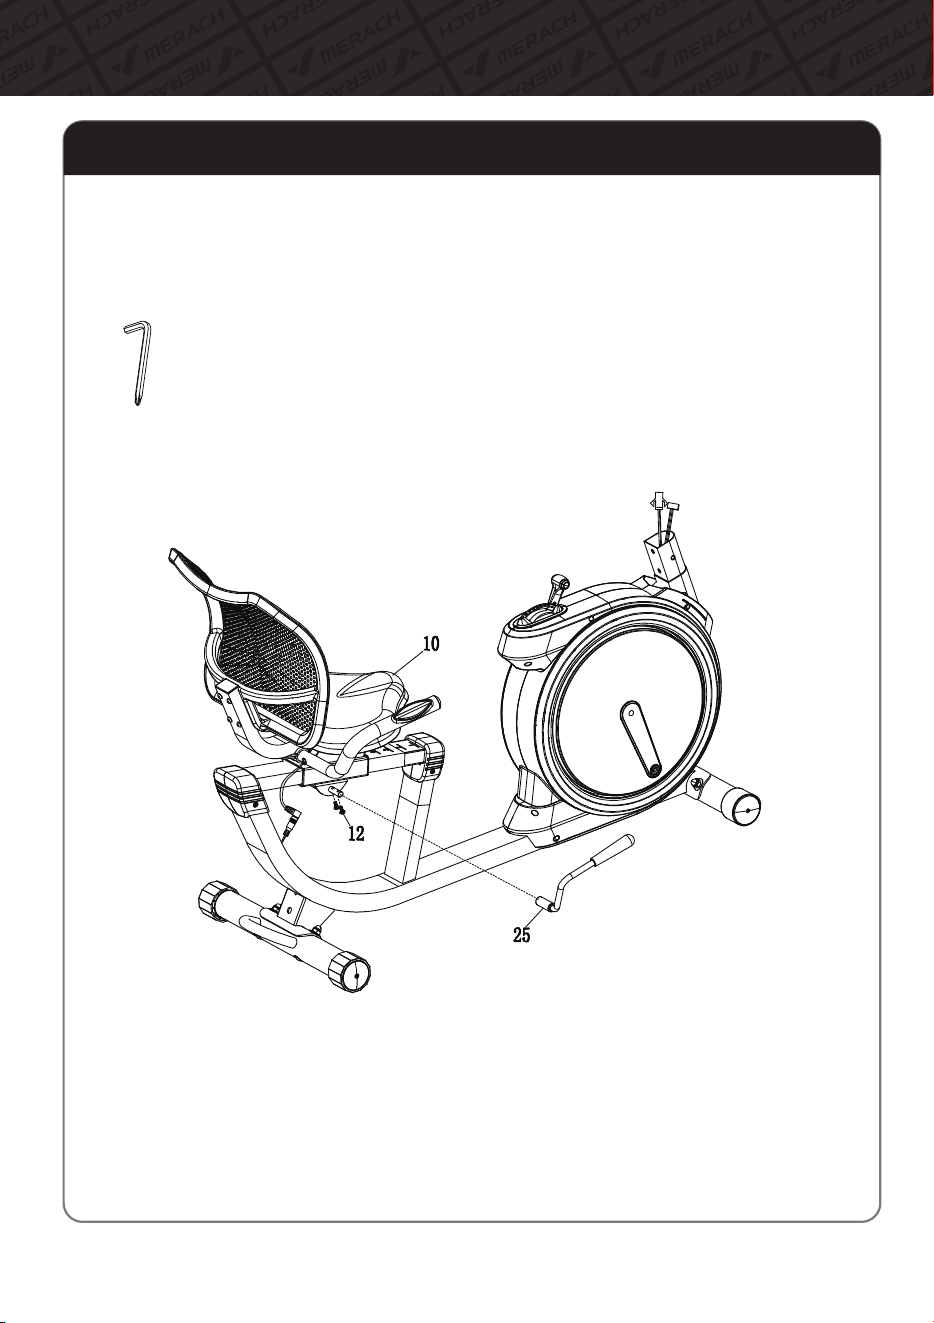
Step4:InstalltheSeatCushionAdjustmentLever
08
AssemblyInstructions
A.SlidertheSeatCushionAdjustmentLever(#25)ontotheLeverConnectLocatedunderthe
Seat(#10)andsecurewithBolts(#12)andCrossHexagonWrench(#B).
Note:TheBolts(#12)ispre-assembledontheMainFrame(#8).
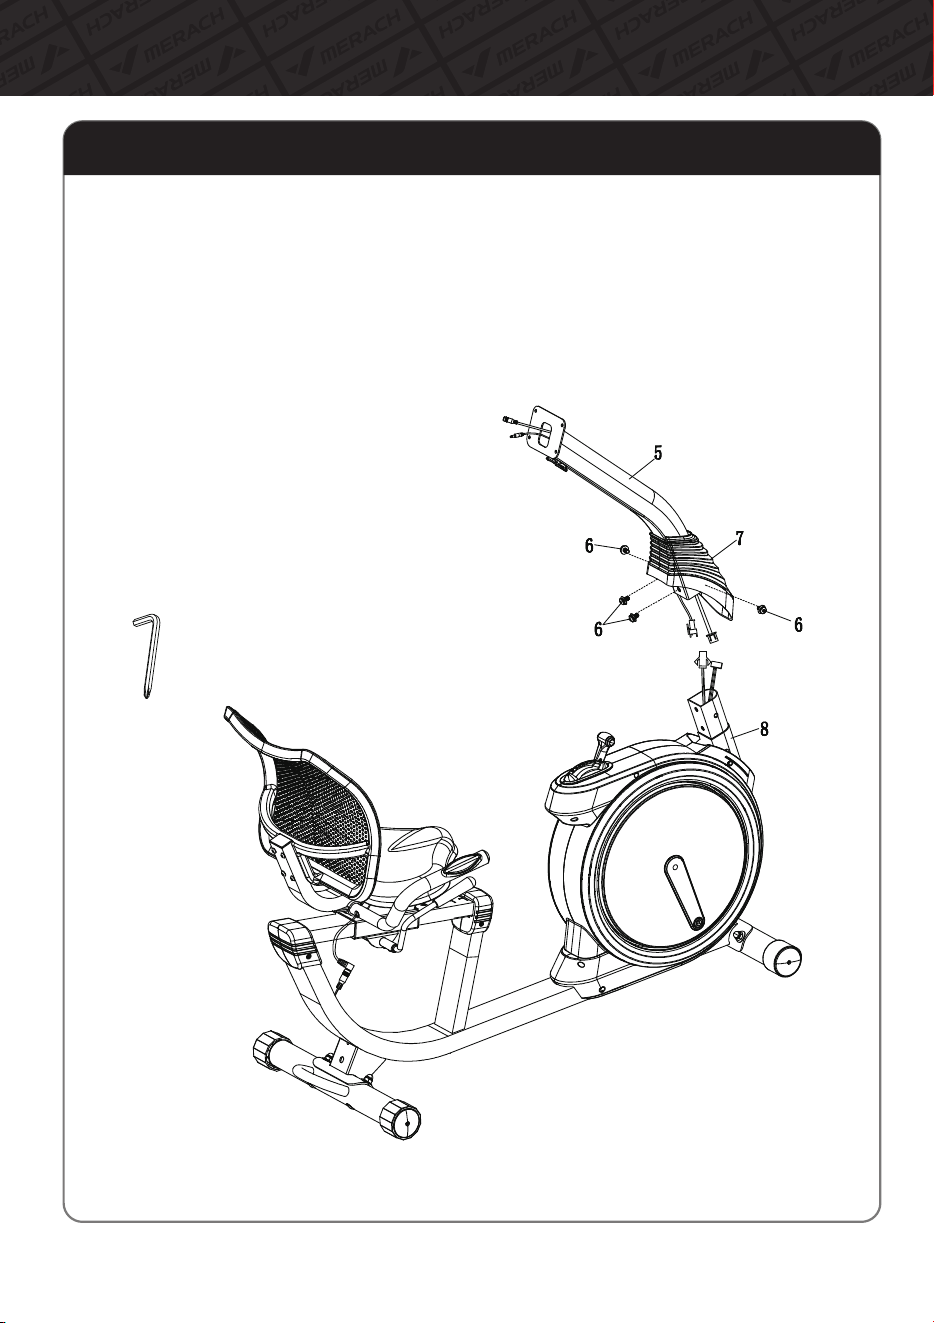
Step5:InstalltheSupportTube
09
AssemblyInstructions
A.SlidetheDecorativeCover(#7)ontheSupportTube(#5)asshownintheillustrationbelow.
B.ConnecttheMiddleMeterWireontheSupportTube(#5)totheLowerMeterWireonthe
MainFrame(#8).
C.ConnectthePulseSensorWireontheSupportTube(#5)tothePulseSensorWireonthe
MainFrame(#8).
D.InserttheSupportTube(#5)ontotheMain
Frame(#8)andsecureitwithBolts(#6)and
CrossHexagonWrench(#B).
E.SlidetheDecorativeCover(#7)
downtocoverthebolts.
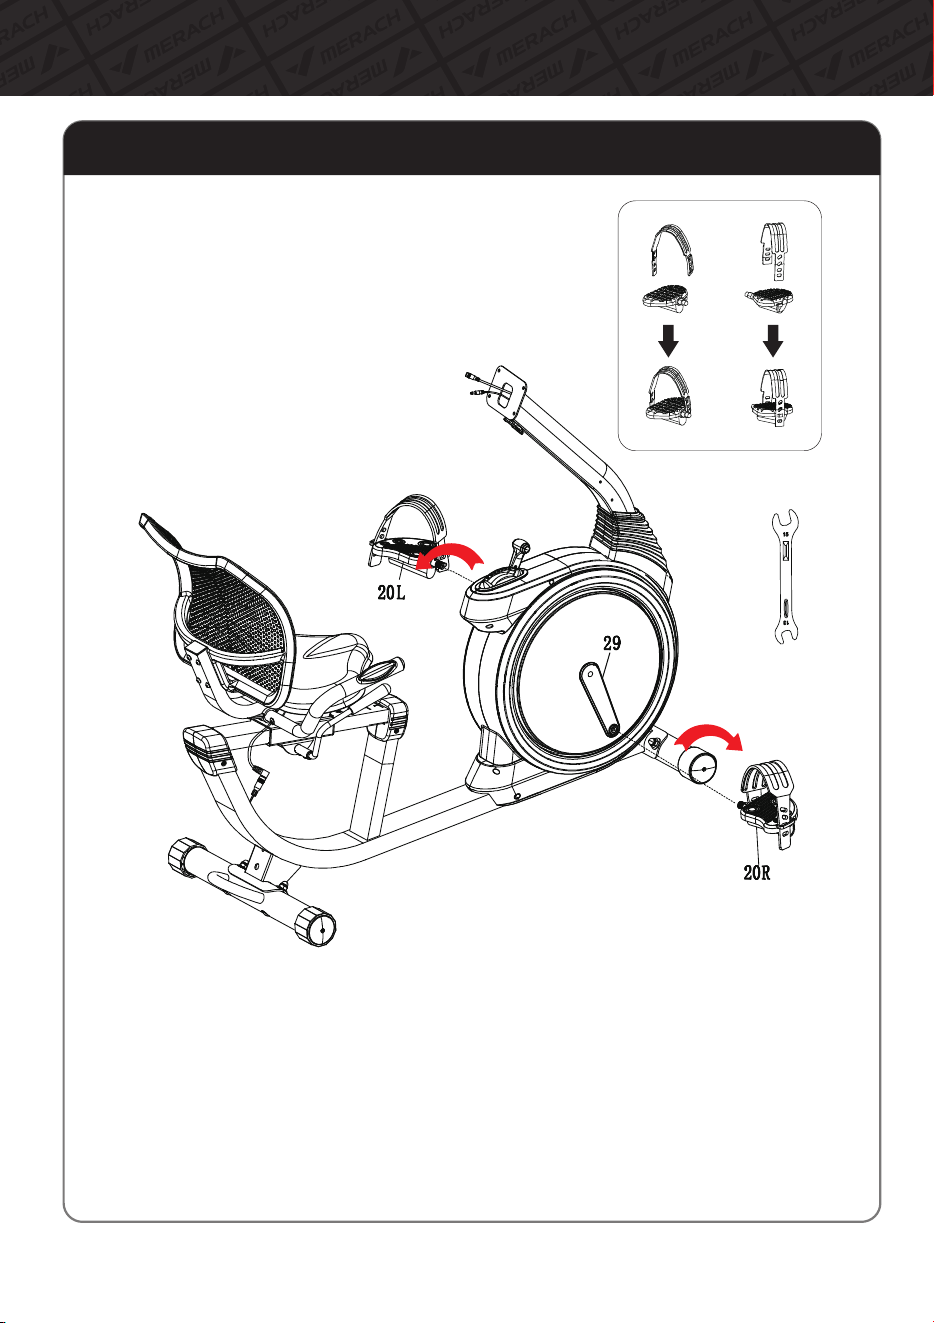
Step6:InstallthePedals
A.Assembletheleftandrightpedals(#20L)and(#20R)
withthestrapsasshowninFigure.
B.Locktheleftandrightpedals(#20L)and(#20R)
onthecrank(#29)respectively.
10
AssemblyInstructions
LeftPedal:AligntheLeftPedal(#20L)withtheLeftCrankArmat90degrees.Insertpedalinto
crankarm,thenturnpedalcounter-clockwiseastightlyasyoucanbyhand.Tightenand
securewithOpenSpanner(#D).
RightPedal:AligntheRightPedal(#20R)withtheRightCrankArmat90degrees.Insertpedal
intocrankarm,thenturnpedalclockwiseastightlyasyoucanbyhand.Tightenandsecure
withOpenSpanner(#D).
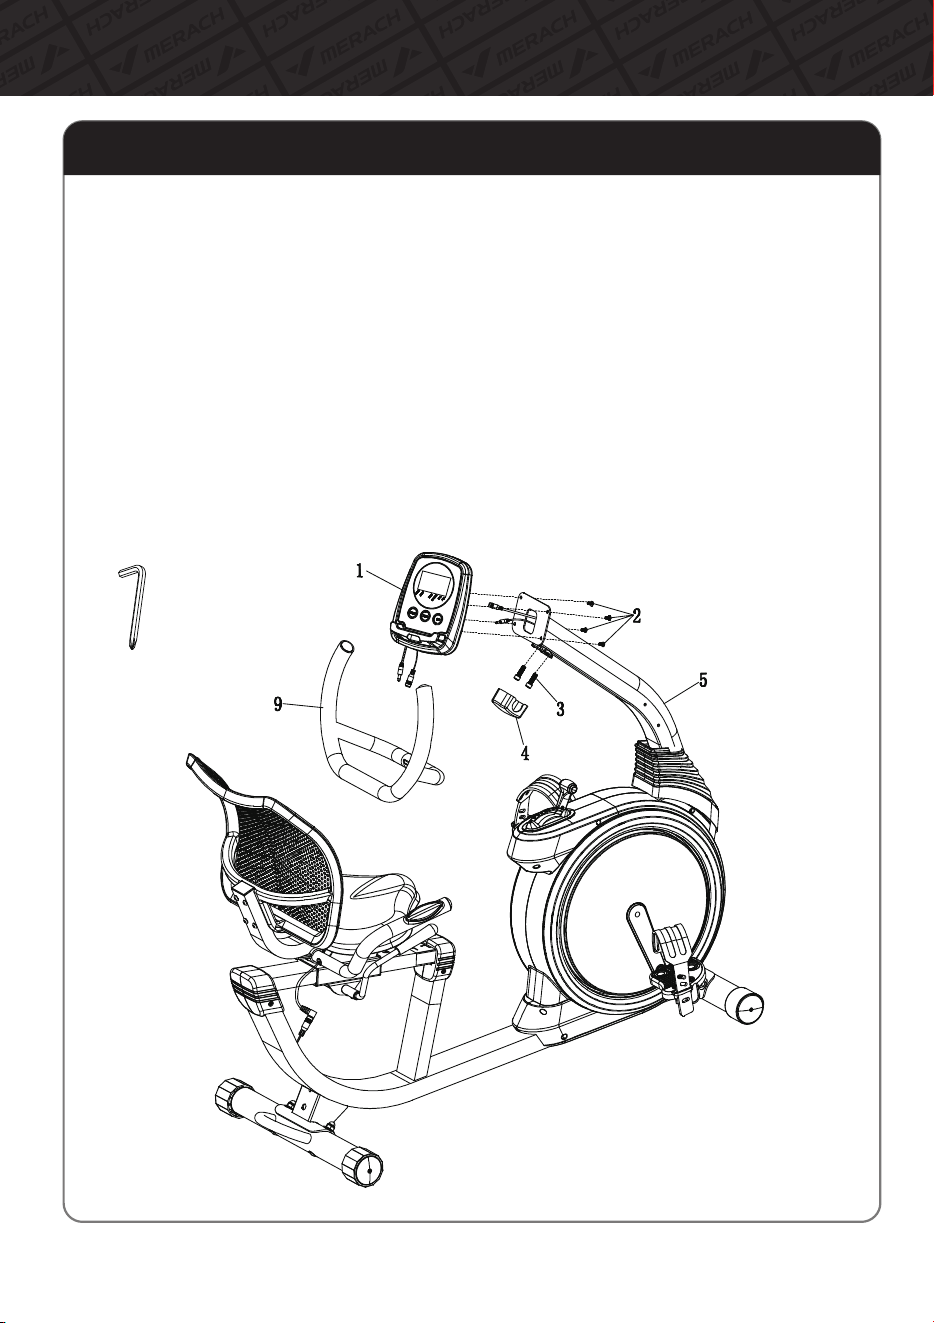
Step7:InstalltheHandlebarandtheMonitor
A.AttachtheHandlebar(#9)totheSupportTube(#5)withBolts(#3).Clipthe
HandlebarCap(#4)ontotheHandlebar(#9)tocovertheBolts(#3).
B.PlugtheMiddleMeterWireontheSupportTube(#5)andthePulseSensorWireinto
theconnectingwiresoftheMonitor(#1),andpushtheexcesswiresbackinto
theSupportTube(#5).
C.AttachtheMonitor(#1)totheplateontheSupportTube(#5)withBolts(#2)and
CrossHexagonWrench(#B)
NOTE:PleasebecarefulnottodamagethewireswhenattachingtheMonitor(#1),and4Bolts(#2)
arepre-assembledontothebackofMonitor(#1).
11
AssemblyInstructions
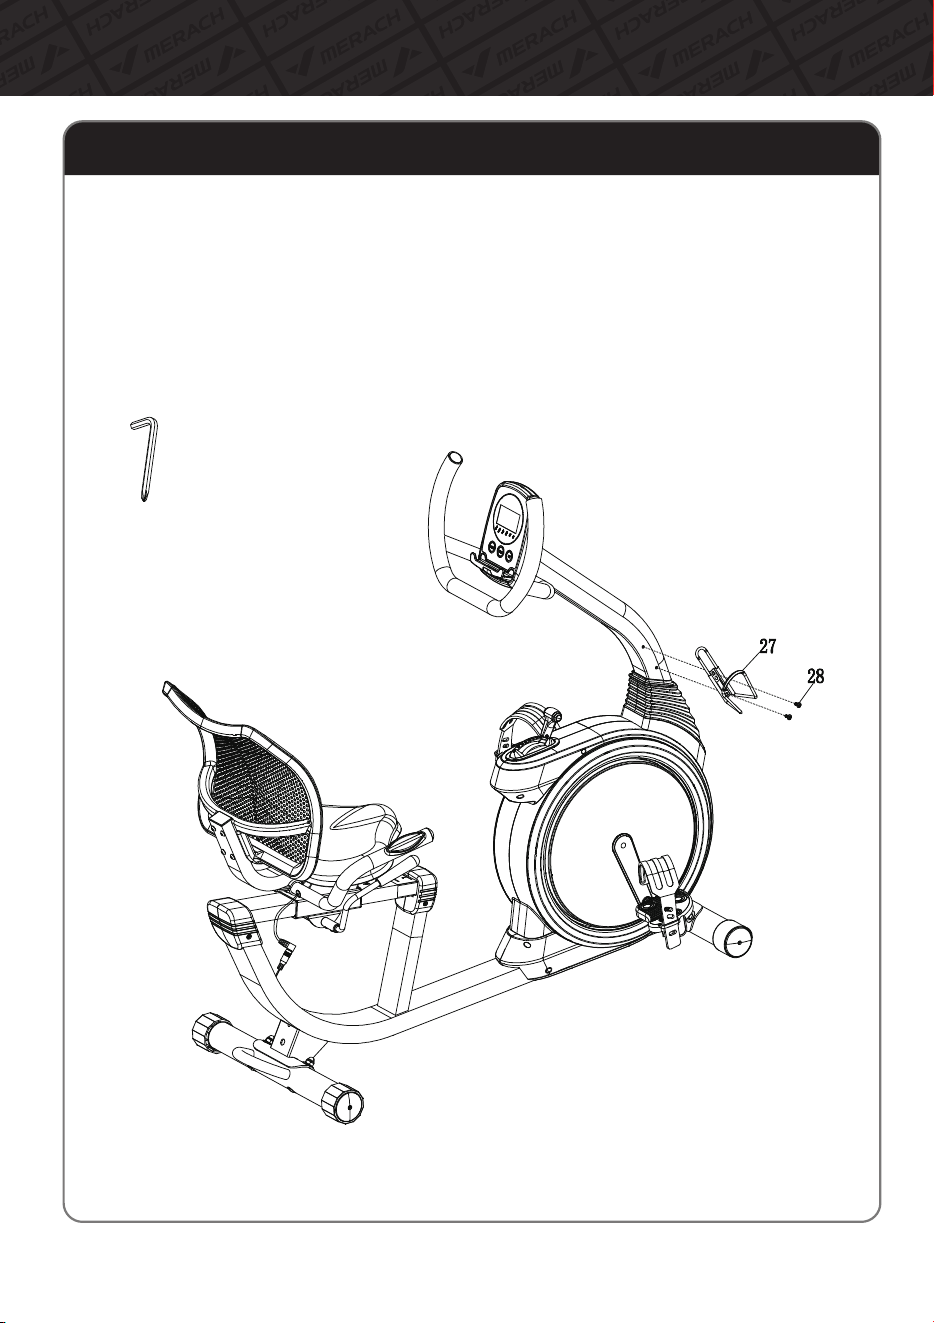
Step8:Fixthebottlecage
A.UsetheCrossHexagonWrench(#B)totightentheBottleCage(#27)withCrossRecessed
PanHeadScrews(#28)tolackontheHandlebarPost(#5).
12
AssemblyInstructions
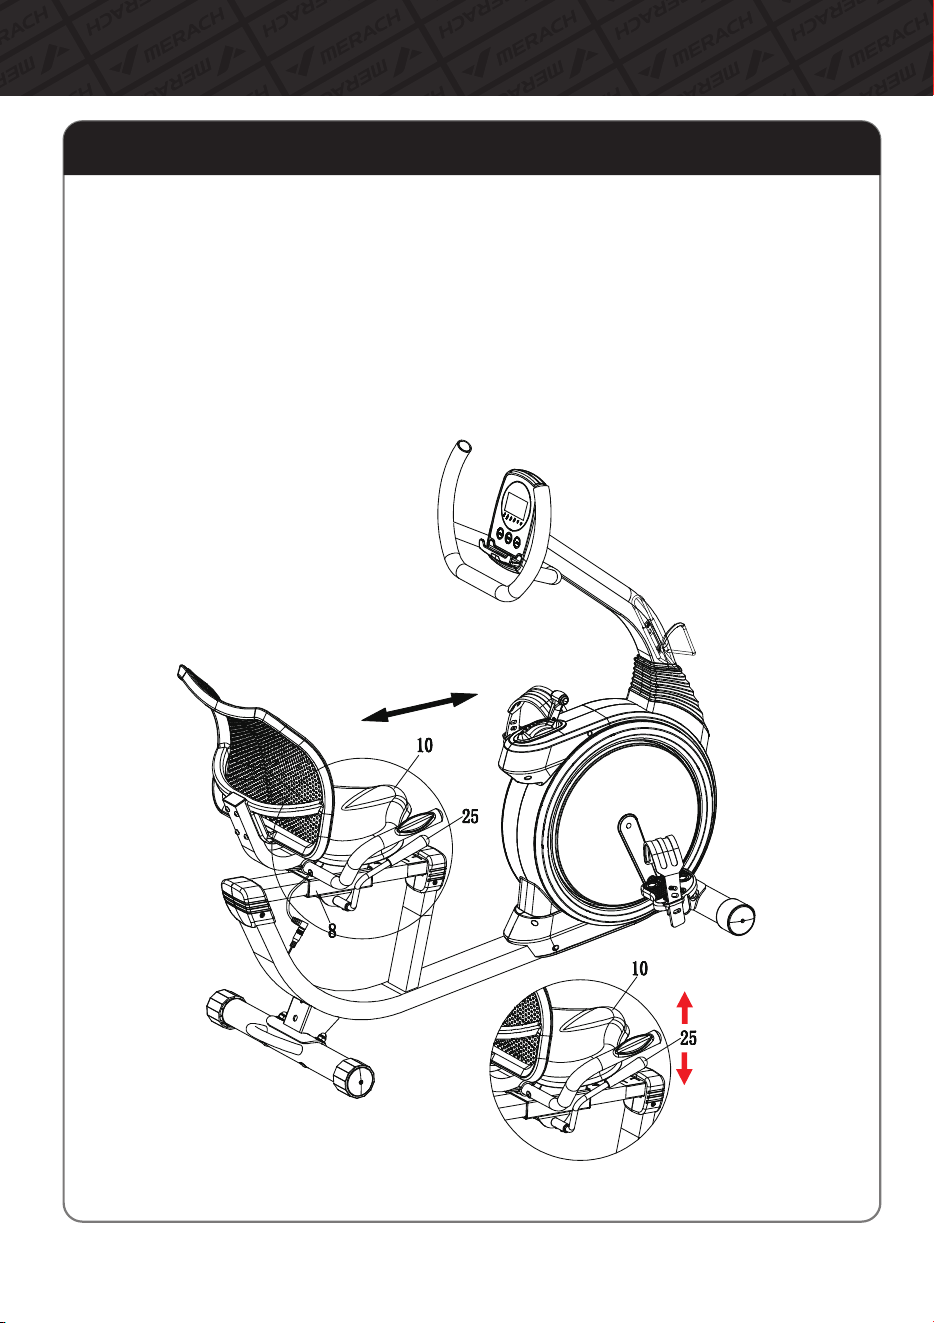
SeatCushionAdjustmentInstructions
A.CarrytheSeatCushionAdjustmentLever(#25)up,andthenmovetheSeatCushion(#10)
backorforthtochooseasuitablepositionforusers.
B.PresstheSeatCushionAdjustmentLever(#25)downcompletely.
13
ProductUsageInstructions

ResistanceAdjustmentInstructions
AdjusttheResistanceGearHandletochangethegearofbikeasshown.
Pullthegearhandlebacktoincreaseresistance
(Thenumber8representsthemaximumresistance);
Pushthegearhandleforwardtodecreaseresistance
(Thenumber1representstheminimumresistance).
MachineMovementInstructions
DragbackandforthbygraspingthecurvedhandleofRearFootTube(#22)withyourhand
andthefrontfoottube(#21)touchingtheground.
14
ProductUsageInstructions
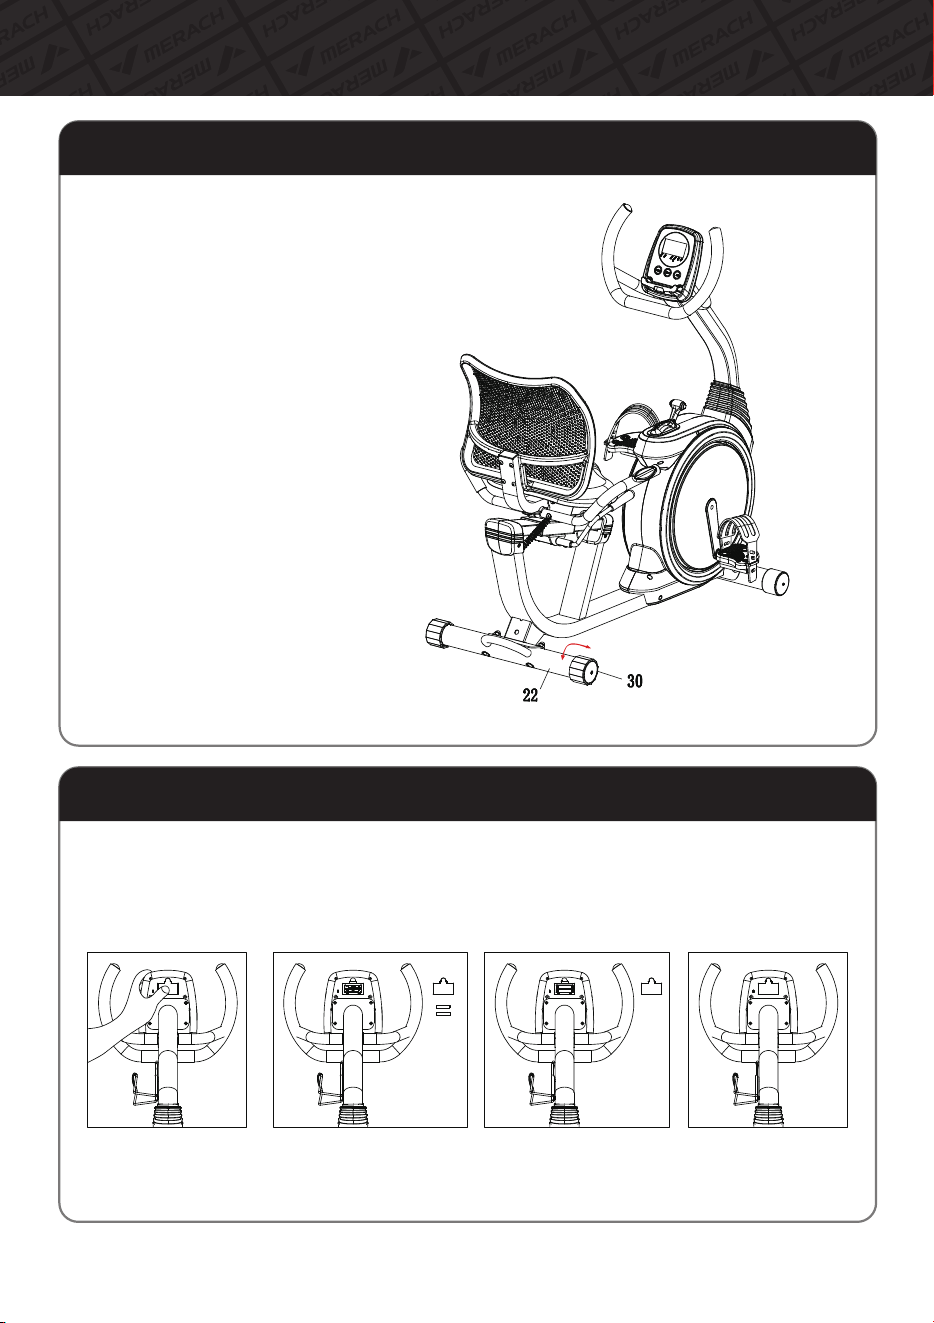
RearFootTubeAdjustmentInstructions
Pleaseadjustthetwelveeccentricfootsleeve(#30)
ontherearfoottube(#22)asneededtomake
theexercisebikestablewithoutshaking.
BatteriesInstallationInstructions
Removethebackcoverbyhand(FigureA),thenpreparethebatteries(FigureB),
theninstalltwobatteries,coverthebackcover(FigureC),andthebattery
assemblyiscompleted(FigureD).
A B C D
15
ProductUsageInstructions
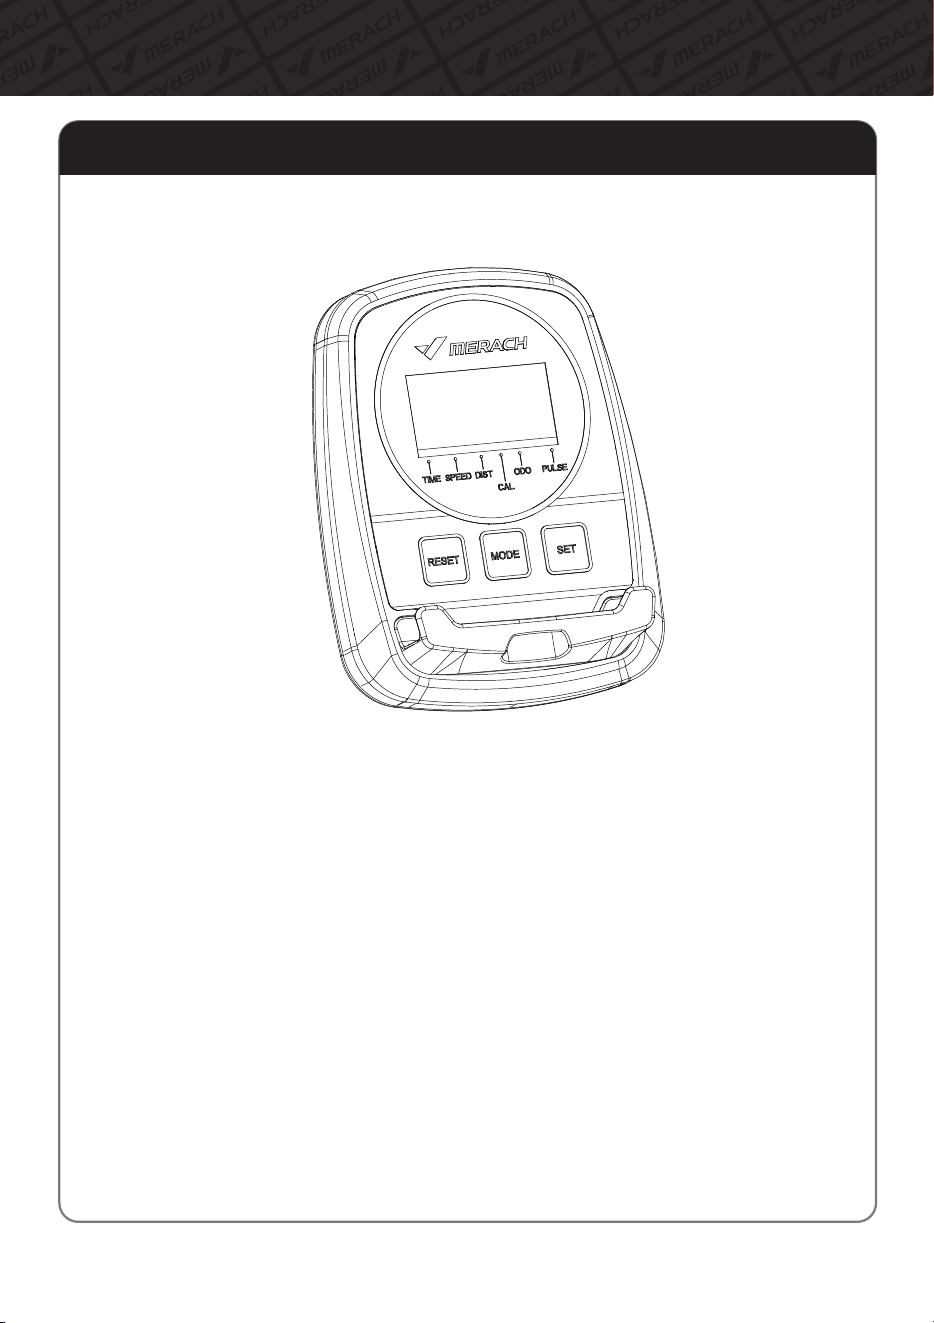
FunctionalButtons:
MODE:Pushdownforselectingfunctions.
(IfthelongtimeholdsdownMODEbuttonwillturncompletely0.)
SET:Tosetthevaluesoftime,distance,pulseandcalorieswhennotinscanmode.
RESET:Pushdownforresettingtime,distanceandcalories.
Thecurrentdatachangeis0.IfthelongtimeholdsdownRESET,besidestheODOposition,
thematerialwillturncompletely0.
16
InstructionofMonitor

Function and Operations :
1.SCAN:
Press"MODE"buttonuntil"SCAN"appears,monitorwillrotatethroughallthe5~6functions.
Time,speed,distance,calorie,ODOandpulse.Eachdisplaywillbehold6seconds.
2.TIME:
(1)Countthetotaltimefromexercisestarttoend.
(2)Press"MODE"buttonuntil"TIME"appears,press"SET"buttontosetexercisetime.
Whenthe"SET"iszero,themonitorwillalarm10seconds.
3.SPEED:
Displaycurrentspeed.
4.DIST:
(1)Countthedistancefromexercisestarttoend.
(2)Press"MODE"buttonuntil"DIST"appears,press"SET"buttontosetexercisedistance.
Whenthe"SET"iszero.
5.CALORIES:
(1)Countthetotalcaloriesfromexercisestarttoend.
(2)Press"MODE"buttonuntil"CAL"appears,press"SET"buttontosetexercisecalories.
Whenthe"SET"iszero,themonitorwillalarm10seconds.
6.ODO:
Thetotaldistancethatthisfunctionreferstofrombatterycapacityperiodruns.
7.PULSERATE:
PressMODEbuttonuntil"PULSE"appears.Beforemeasuringyourpulserate,pleaseplacethe
palmsofyourhandsonbothofyourcontactpadsandthemonitorwillshowyourcurrent
heartbeatrateinbeatsperminute(BPM)ontheLCDafter6~7seconds.
Remark:Duringtheprocessofpulsemeasurement,becauseofthecontactjamming,the
measurementvaluemaybehigherthanthevirtualpulserateduringthefirst2~3seconds,
thenwillreturntonormallevel.Themeasurementvaluecannotberegardedasthebasis
ofmedicaltreatment.
8.ALARM:
Thecomputerwill"Beep"whenpress"MODE","SET"and"RESET"buttons.
9.AUTOON/OFF&AUTOSTART/STOP:
Withoutanysignalfor4minutes,thepowerwillturnoffautomatically.Aslongasthewheel
isinmotionorpressanybutton,themonitorisinaction.
17
InstructionofMonitor

FUNCTION
AutoScan
Time
CurrentSpeed
TripDistance
TotalDistance
(ODO)
Calories
PulseRate
BatteryType
OperatingTemperature
StorageTemperature
Every6seconds
0:00-99:59
Maximumspeed999.9km/h
0.00〜9999( ML)KM
0.0〜9999( ML)KM
0.0〜9999Kcal
40〜240BPM
2pcsofsize-AAorUM-3
0℃〜+40℃
-10℃〜+60℃
1.Ifthedisplayisfaintorshowsnofigures,pleasereplacethebatteries.
2.Themonitorwillautomaticallyshutoffifthereisnosignalreceivedafter4minutes.
3.Themonitorwillturnonautomaticallyafterrestartingtheexerciseorpressingthe
button.
4.Themonitorwillautomaticallystartcalculatingwhenyoustarttoexerciseandwill
stopcalculatingwhenyoustopexercisingfor4seconds.
NOTE:
18
InstructionofMonitor
ResistanceMechanism:
ModelName: MR-S19
MaximumUserWeight:
ItemWeight:
ItemDimensions:
Magnetic
330lbs
85.32lbs/38.7kg
48.03*23.62*46.46inch/1220*600*1180mm
50.2*11.1*24.6inch/1275*282*625mm
ItemPackageDimensions:
19
TechnicalDetails

MERACH APP SETUP
Download and use of MERACH
1.TodownloadtheMERACHapp,scantheQRcodeorsearch"MERACH"intheAppleApp
Store®orGooglePlayStore.
Ourcustomercangeta180-dayMERACHmembership.Pleasecontactusthrough
support@merach.comafterreceivingtheproducttogetanexclusiveredemption
code.PleaseincludeyourorderIDandMERACHappUsername.
*
2.OpentheMERACHapp.LogInorSignUp.
3.Followthein-appinstructionstosetupyourdevice.
20
MERACH APP Download
APP Connection Guide

KINOMAP APP SETUP
Download and use of KINOMAP
1.TodownloadtheKinomapapp,scantheQRcodeorsearch"Kinomap"inthe
AppleAppStore®orGooglePlayStore.
2.OpentheKinomapapp.LogInorSignUp.
3.Selectthecorrespondingfitnessequipment
4.TurnonBluetooth,andchooseMerach.
5.Select“ RecumbentBike",andfindyour"MR-S19-XXXX".
6.Starttrainingandexploredifferentworkoutmethods.
11
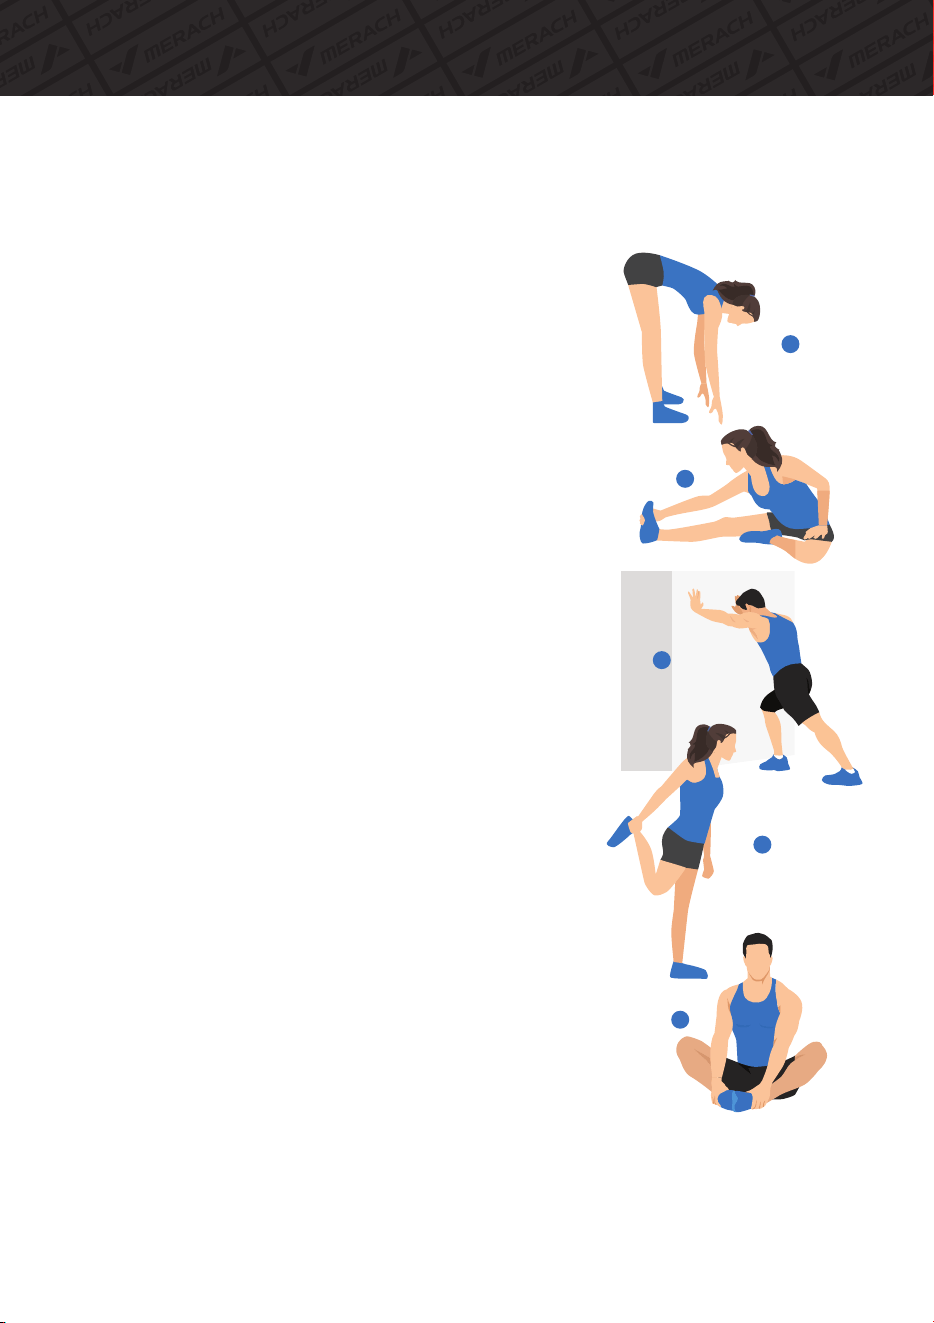
Warm-up
1.Stretchdown
2.Seatedhamstringstretch
Sitwithonelegstraight.Bringtheotherleginsothatitissnug
ontheinsideofthestraightenedleg.Trytotouchyourfeetwith
yourhand'stoe.Holdfor10-15seconds,thenrelax.
Repeat3timesforeachleg(seeFigure2).
3.CalfandAchillestendonstretch
4.Quadricepsstretch
Reachbackwithyourrighthand,grabyourrightfootand
slowlypullittowardyourhipsuntilyoufeelthemusclesinthe
frontofyourthightense.Holdfor10-15seconds,thenrelax.
Repeat3timesforeachleg(seeFigure4).
5.Sartorius(innerthighmuscle)stretch
Sitwithyourfeetfacingeachotherandyourkneesfacingout.
Grabyourfeetwithbothhandsandpulltowardyourgroin.
Holdfor10-15seconds,thenrelax.
Repeat3times(seeFigure5).
Bendyourkneesslightly,slowlybendyourbodyforward,
relaxyourbackandshoulders,andtrytotouchyourtoes
withyourhands.Holdfor10-15seconds,thenrelax.
Repeat3times(seeFigure1).
1
2
3
4
5
Dostretchesbeforeexercising.Warmmusclesareeasiertostretch,sostartwitha
5-10minutewarm-up,thendosomestretchesshownbelow-5times,10seconds
ormoreperleg.Doitagainaftertheworkout.
Standwithbothhandsagainstthewalloratree,putonefoot
behindanother.Keepthebacklegstraightandyourheelonthe
ground,leantowardawalloratree.Holdfor10-15seconds,
thenrelax.Repeat3timesforeachleg(seeFigure3).
21

Troubleshooting
Problem
Monitornodatadisplay
Checkwhetherthebatteriesareinstalledcorrectly.
Howtoadjustgear?
Pullthegearhandlebacktoincreaseresistanceandpush
thegearhandleforwardtodecreaseresistance.
Theresistanceofitemsisavailablewith8gears.
Whattodowhenthehandle
shakesslightly?
Loosepedalswhileriding
Checkwhethertheconnectingscrewsofthehandleand
thefrontcolumntubearefirmlyfixed.
PossibleSoultion
Replacethebatteries.
Checkwhetherthefrontandrearfoottubesare
fastenedenough.
22
Iftherecumbentbikeisstillmalfunctioning,please
contactCustomerSupport(seepage24)
Iftherecumbentbikeisstillmalfunctioning,please
contactCustomerSupport(seepage24)
Iftherecumbentbikeisstillmalfunctioning,please
contactCustomerSupport(seepage24)
Iftherecumbentbikeisstillmalfunctioning,please
contactCustomerSupport(seepage24)

Terms & Policy
Product Name
Model
Default Warranty Period
For your own reference, we strongly recommend that you record
your order number and date of purchase.
Date of Purchase
Serial Number
This warranty does not apply to the following situations:
All expressed and implied warranties, including the warranty of
merchantability, are limited to the period of the limited warranty.
The MERACH products are premium in material, craftsmanship, and service.
MERACH 1-year limited warranty is effective from the date of purchase.
MERACH will replace defective products based on eligibility. Refunds are available to the original
purchasers of our products within the first 30 days of purchase.
This warranty extends only to personal use and doesn’t apply to commercial, rental, or any other
uses for which the product is not intended for.
There are no warranties other than the warranties expressly set forth with each product.
This warranty is non-transferable. MERACH is not responsible for any damages, losses, or
inconveniences caused by equipment failure, user negligence, user abuse, or improper operation
that does not follow the included user manual.
Damage due to abuse, accident, alteration or vandalism.
Improper or inadequate maintenance.
Damage in return transit.
Unsupervised use by children under 18 years old.
MERACH and its subsidiaries are only responsible for damages caused by the intended use or as
instructed in the user manual. Some states do not allow this exclusion or limitation of incidental or
consequential losses, so the above disclaimer may not apply to you. This warranty gives you
specific legal rights and you may also have other rights, which may vary from state to state.
MERACH RECUMBENT BIKE
MR-S19
12 Months
23
Warranty Information

Customer Service: [email protected]
Official Website: merachfit.com
@merachfit
@Merachfit
@Merachfit
@Merachfit