User 's manual
V1 1 2 3 4 5
6 7 8 9 10 11
12
18 19 20
13 14 15 16 17
Product Safety Information
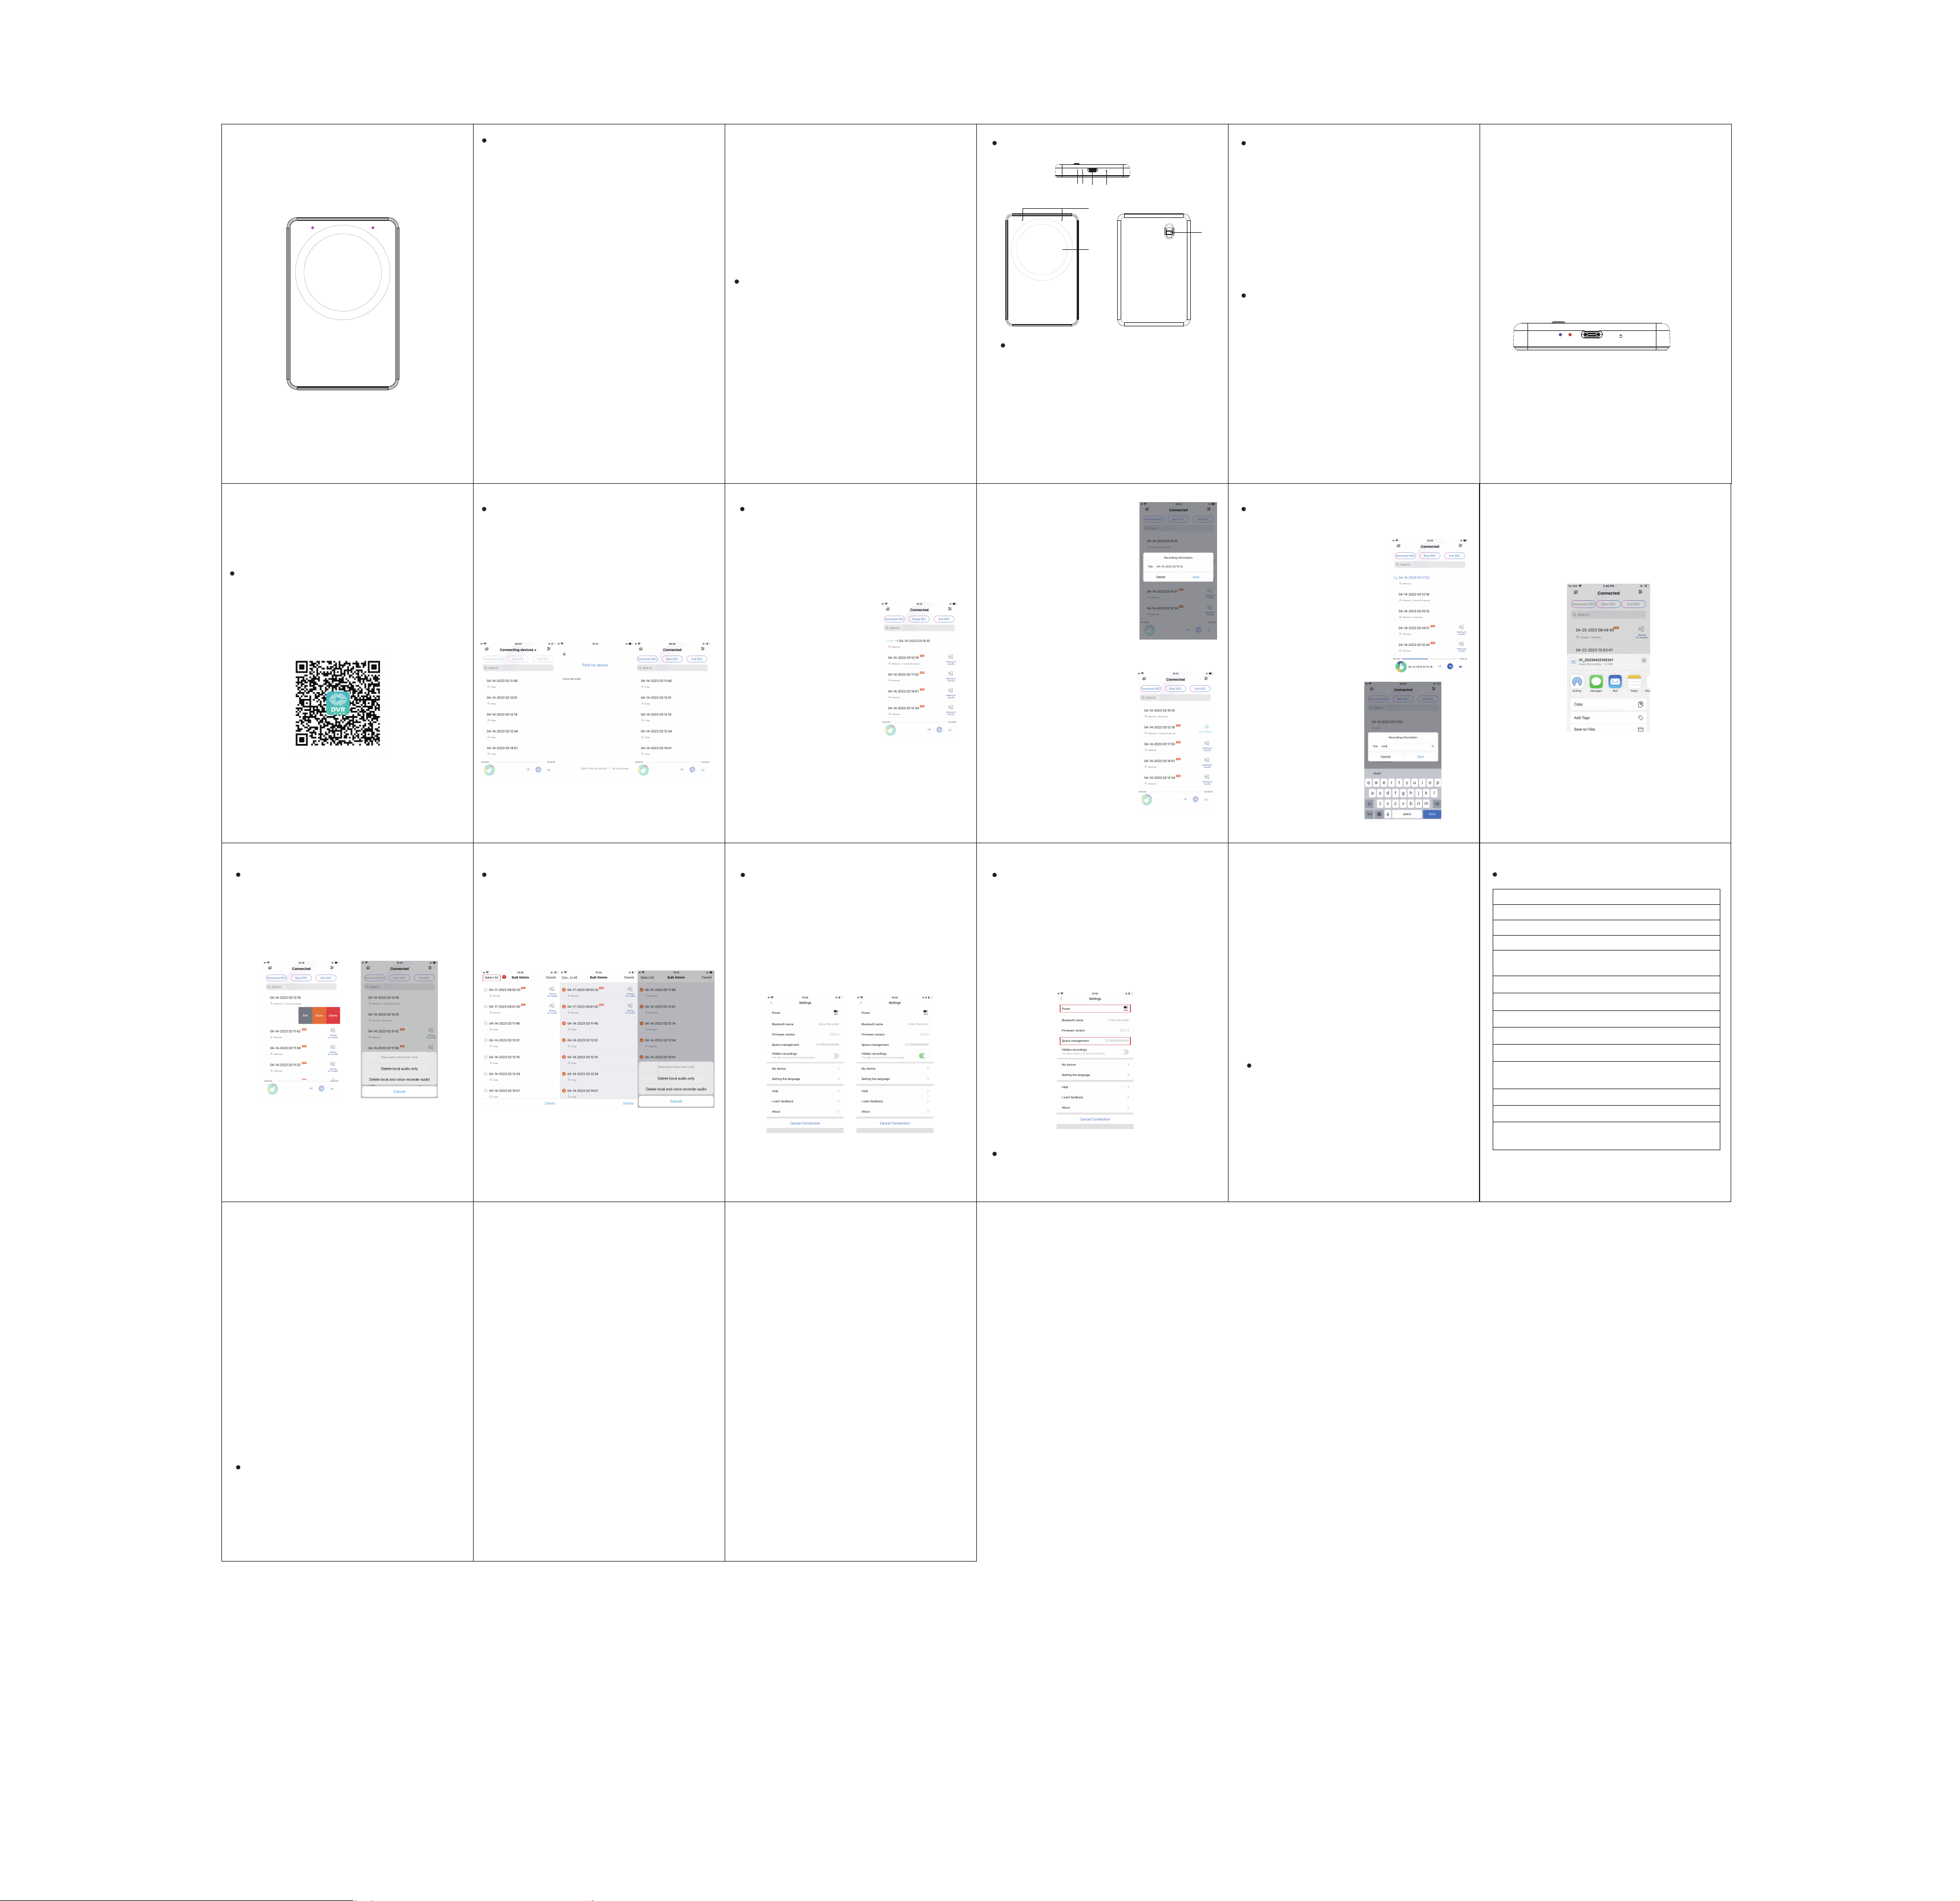
APP Download and Installation
Bluetooth Connection Voice Recording
Batch Deletion
Hidden Recording Setting Menu
Charging
Statement
Connecting to a Computer
Technical Specifications:
File Deletion
Warranty Statement:
Playback and Management
of Recorded Files
Accessories
Accessories
Key Function
Indicator Light Explanation
Power On/Off
(1) This device does not come with a power
adapter. When charging, please use a power
adapter that has obtained CCC certification and
meets relevant standards.
(6) Dispose of the device, battery, and related
accessories in accordance with local regulations.
Do not dispose of them as household waste.
This product includes the following host and
accessories. If there are any missing items upon
purchase, please contact your local dealer.
(1) Power On: Push the power switch button to the
ON position, the device power indicator light will
stay on and then turn into a flashing blue light. The
recorder will power on and enter the recording
mode.
(2) Power Off: In the power on state, push the
power switch button to the OFF position, all
indicator lights will go off, and the recorder will
power off.
1. Power On: Push the power switch button to the
ON position, the power indicator light will stay on in
red for 3 seconds and then turn off.
2. Power Off: Push the power switch button to the
OFF position, all indicator lights will go off.
3. Recording Mode: After powering on, the power
indicator light will turn off in red, and the recording
indicator light will flash in blue.
4. Bluetooth Connected: In recording mode, when
the recorder is connected to an app, the recording
will automatically stop, and the power indicator light
will stay on, indicating that the device is connected
to the app.
5. Saving Recording: Power off and all indicator
lights will go off, indicating that the recorder has
saved the recording and powered off.
6. Low Battery Warning: When the battery level is
below 10%, the power indicator light will flash in
red. When the battery level is below the threshold,
the device will power off automatically.
7. Charging: When the device is being charged by
connecting to a charger, the power indicator light
will stay on in red. After charging is complete, the
power indicator light will turn off in red.
This recorder can be used independently or paired
with the "DVR Link" app via Bluetooth. Scan the QR
code below with WeChat or QQ to download the
DVR Link app, or search for "DVR Link" in the app
store and follow the instructions to install it.
Support IOS/Android system
Note: The appearance picture is subject to the
actual product
Note: The above accessories are subject to change.
Please refer to the actual items in the package for
accuracy.
1.Host - 1 unit
2.User manual and warranty certificate -1 copy
3.USB cable - 1 piece
⑴ Microphone
⑵ Magnetic ring
⑶ Power switch
⑷ Recording indicator light
⑸ Power Indicator light
⑹ USB interface
⑺ Reset switch
Warning: The battery (battery pack or combination
battery) should not be exposed to environments
with excessive heat such as sunlight or open
flames.
Note: Incorrect battery replacement may result in
explosion. Only use batteries of the same or
equivalent type for replacement.
(2) Please use this device within the temperature
range of 0℃-35℃, and store the device and
accessories within the temperature range of -20℃
to +45℃. Operating the device in environments with
temperatures that are too high or too low may
cause device malfunctions.
(3) Please do not expose the device to high
temperatures or place it near heat-emitting devices
such as sunlight, heaters, microwaves, ovens, or
water heaters.
(4) When charging is complete or not needed,
disconnect the charger from the device and unplug
the charger from the power outlet.
(5) The device is equipped with a non-removable
built-in battery. Do not attempt to replace the battery
yourself to avoid damaging the device.
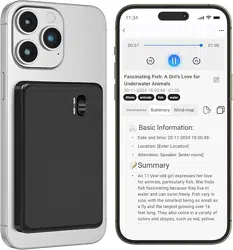
When the recording pen is in the power-on state,
log in to the "DVR Link" APP on your phone, click
the "Connect Device+" button in the top menu bar,
search for the device and connect it via Bluetooth.
After successful Bluetooth connection, the
"Connected" status will be displayed in the top
menu bar of the APP, and the red power indicator
light on the recording pen will stay on, indicating
successful connection.
1. Recording initiated on the pen: When the
recording pen is not connected to the APP, after
power-on, the red power indicator light goes off and
the blue recording indicator light flashes, indicating
that the recording pen has entered the recording
state.
3. Ending recording: When the
recording pen is not connected
to the APP, turn off the power
switch to shut down and save
the recording. When the
recording pen is connected to
the APP, click the "Stop
Recording" button in the top
menu bar of the APP, and the
APP will prompt whether to
save the file. Click "Save" to
save the current recording file.
1. Playback of recorded
files: Saved recorded files
can be directly played on
the app. Click on the audio
file saved on the app to
start playing the current
recorded file.
3. Audio Sharing: While playing or stopping an
app audio file, swipe left to bring up the menu,
choose "share," and share the current recorded
file with your friends via mainstream media such
as Facebook, Twitter or Instagram.
In the app, you can directly delete local and
recorded files on the recording pen. Find the file
you want to delete, swipe left to bring up the
menu, choose "delete," and select "delete local
audio only" or "delete local and recorded audio."
Please be sure to back up the data by yourself
during use. The company is not responsible for
any loss or damage to personal data caused by
software or hardware errors, product repairs,
battery replacement, or other unexpected
circumstances, nor is it responsible for any other
indirect losses caused by this. At the same time,
we cannot control the user's possible misunder-
standing of this manual. Therefore, the company
will not be responsible for any accidental damage
that may occur during the use of this manual, and
will not be responsible for third-party claims
caused by the use of the product. (The local
system software will occupy a part of the capacity
space, and it is normal to have a little difference
from the nominal capacity)
1.The warranty period is within one year from the
date of purchase. During the warranty period, if
the product fails due to normal use according to
the user manual and attached label, the user can
receive free repair services.
2. During the warranty period, if the user needs
to request warranty services for the product,
please send email to us through the Amazon
order you purchased and tell us the specific
problem about your voice recorder, we will
always help you until your problem is solved.
4. Our company's product series have undergone
strict inspections before leaving the factory, and
we provide users with high-performance products
and after-sales services.
3.The following circumstances are not within the
scope of free warranty services:
(1)Exceeding the warranty period;
(2)The machine structure has been artificially
damaged due to user disassembly;
(3)Damage caused by improper maintenance or
use by the user, such as dampness, impact, high
or low voltage, excessively cold or hot environ-
ments, water ingress, etc.;
(4)The product still has a malfunction after being
repaired by a non-authorized repair center of the
company;
(5)No warranty card or purchase invoice is
available; the warranty card has been tampered
with or does not match the repaired machine;
(6)Failure or damage caused by reasons such as
dropping, moving or transportation, not related to
product quality after purchase;
(7)Damage caused by force majeure events such
as lightning strikes, floods, fires, earthquakes,
etc.;
(8)Random accessories are not covered by the
warranty.
On the app, click the top menu bar's upper-left
file selection button to bring up the batch deletion
menu option. After clicking, you can batch select
the files you want to delete, and then choose to
"delete local audio only" or "delete local and
recorded audio."
The device can be set to hide and turn off the
recording indicator light. Click the top menu bar's
upper-right menu button to enter the settings
menu, find the "Hidden Recording" switch, set
the switch to the "on" position, and the recording
indicator light will be hidden. At this time, when
recording, all indicator lights on the recording pen
will be off.
While the recording pen is connected to the APP,
you can view the real-time battery and memory
usage status, as well as the firmware version.
Click the menu button at the top right corner of
the menu bar to enter the setting menu, where
you can view the battery level, memory space,
and firmware version of the recording pen.
Insert the small end of the USB cable (included in
the package) into the USB port of the recording
pen and the large end into the USB port of a
computer or charger. The red power indicator
light will stay on continuously to indicate that the
recording pen is in charging mode. It takes about
4 hours to fully charge the battery.
Note: The charger used must meet the following
specifications. Any damage caused by using a
charger that does not meet these requirements
will be deemed as man-made damage by the
company.
Input: AC 110-240V 50/60Hz Max:150mA
Output: DC 5V/1A
Insert the small end of the USB cable (included in
the package) into the USB port of the recording
pen and the large end into the USB port of a
computer. The recording pen will enter the USB
mode, and you can use the computer to access
and organize the files in the recording pen's
memory. To exit the USB mode, remove the
removable disk using the normal method to
prevent data loss.
2. Editing of recorded file
names: In the app's
recorded file list, find the
recorded file you need to
edit, swipe left to bring up
the menu, choose "edit,"
and edit the current
recorded file's name.
4. Synchronizing recording files
after recording: For recordings
made when the recording pen
and the APP are not connected,
when they are connected
again, the recording files will be
automatically transferred to the
APP. Click "Waiting for
Transfer" to transfer the
recording audio to the APP.
2. Recording initiated on
the APP: When the
recording pen is connected
to the APP, click the "Start
Recording" button in the
top menu bar, and the
recording pen enters the
recording mode. The APP
enters the recording state
at the same time.
1. Dimensions: 60×22×16MM
2. CPU: ATS2837, dual-core 240MHZ
3. Bluetooth: dual-mode Bluetooth 5.0
4. Mobile System: Android 5.0 or above / IOS 9.0 or above
6. USB Interface: TYPE C 10PIN USB2.0
7. Memory: 64GB
8. Battery: 3.7V/2500MAH polymer battery
9. Battery Recording Time: about 55 hours
10. Charging Time: about 4 hours to fully charge
12. Recording Format: WAV/OPUS
13. Working Temperature: -10℃→ 55℃
14. Supported Operating Systems: WINDOWS
XP/VISTA/WINDOWS 10
5. Mobile Magnetic Attraction: supports magnetic attraction
for iPhone 12 and above
11. Memory Recording Time: 64G about 400 hours
单页尺寸100*70mm
1
4 5 6 7
2
3
