Digital Voice Recorder
Manual - V53(EN)
Digital Voice Recorder
Please read carefully before using the voice recorder,
most problems can be avoided!
Due to the time lag of 8~12 hours, we will reply
as soon as possible within 24 hours of weekday.
Please understand. (✿◠‿◠)
After-sales Email: vivaniir@163.com

Digital Voice Recorder
Caution
Please do not format this machine on your compu
ter:Its memory format only supports FAT32. Onc
e it is formatted in exFAT/NTFS/APFS on your c
omputer, the system will be not compatible and ca
use problems such as not working, not charging, n
ot being recognized by your computer, etc.
If you have changed the memory to the wrong for
mat accidentally, please contact us or Google: Ho
w to convert memory to FAT32

Digital Voice Recorder
Catalog
1.Product description .........................................1
1.1 Voice recorder ........................................1
1.2 Wire control ........................................... 2
1.3 Indicator light .........................................3
2.Steps to use ...................................................... 4
2.1 First charge ............................................ 4
2.2 Set the date-time on computer ............... 6
2.3 One key recording/saving ...................... 9
2.4 Listen by earphones ............................. 10
2.5 Connect to computer to play ................11
2.6 Connect to Andriod phone ...................13
2.7 If the connction to computer/phone fails?14
3. Settings([MRECSET]) .................................16
3.1 Route ....................................................16
3.2 How to set on Windows/Mac PC? .......18
3.3 Explanation .......................................... 20
4. Specifications ................................................24
5.Questions and answers ................................. 26
E-Manual(5 language) ..................................... 30
Cautions ............................................................ 31
Warranty and Service ......................................32
Digital Voice Recorder
1
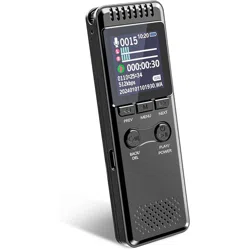
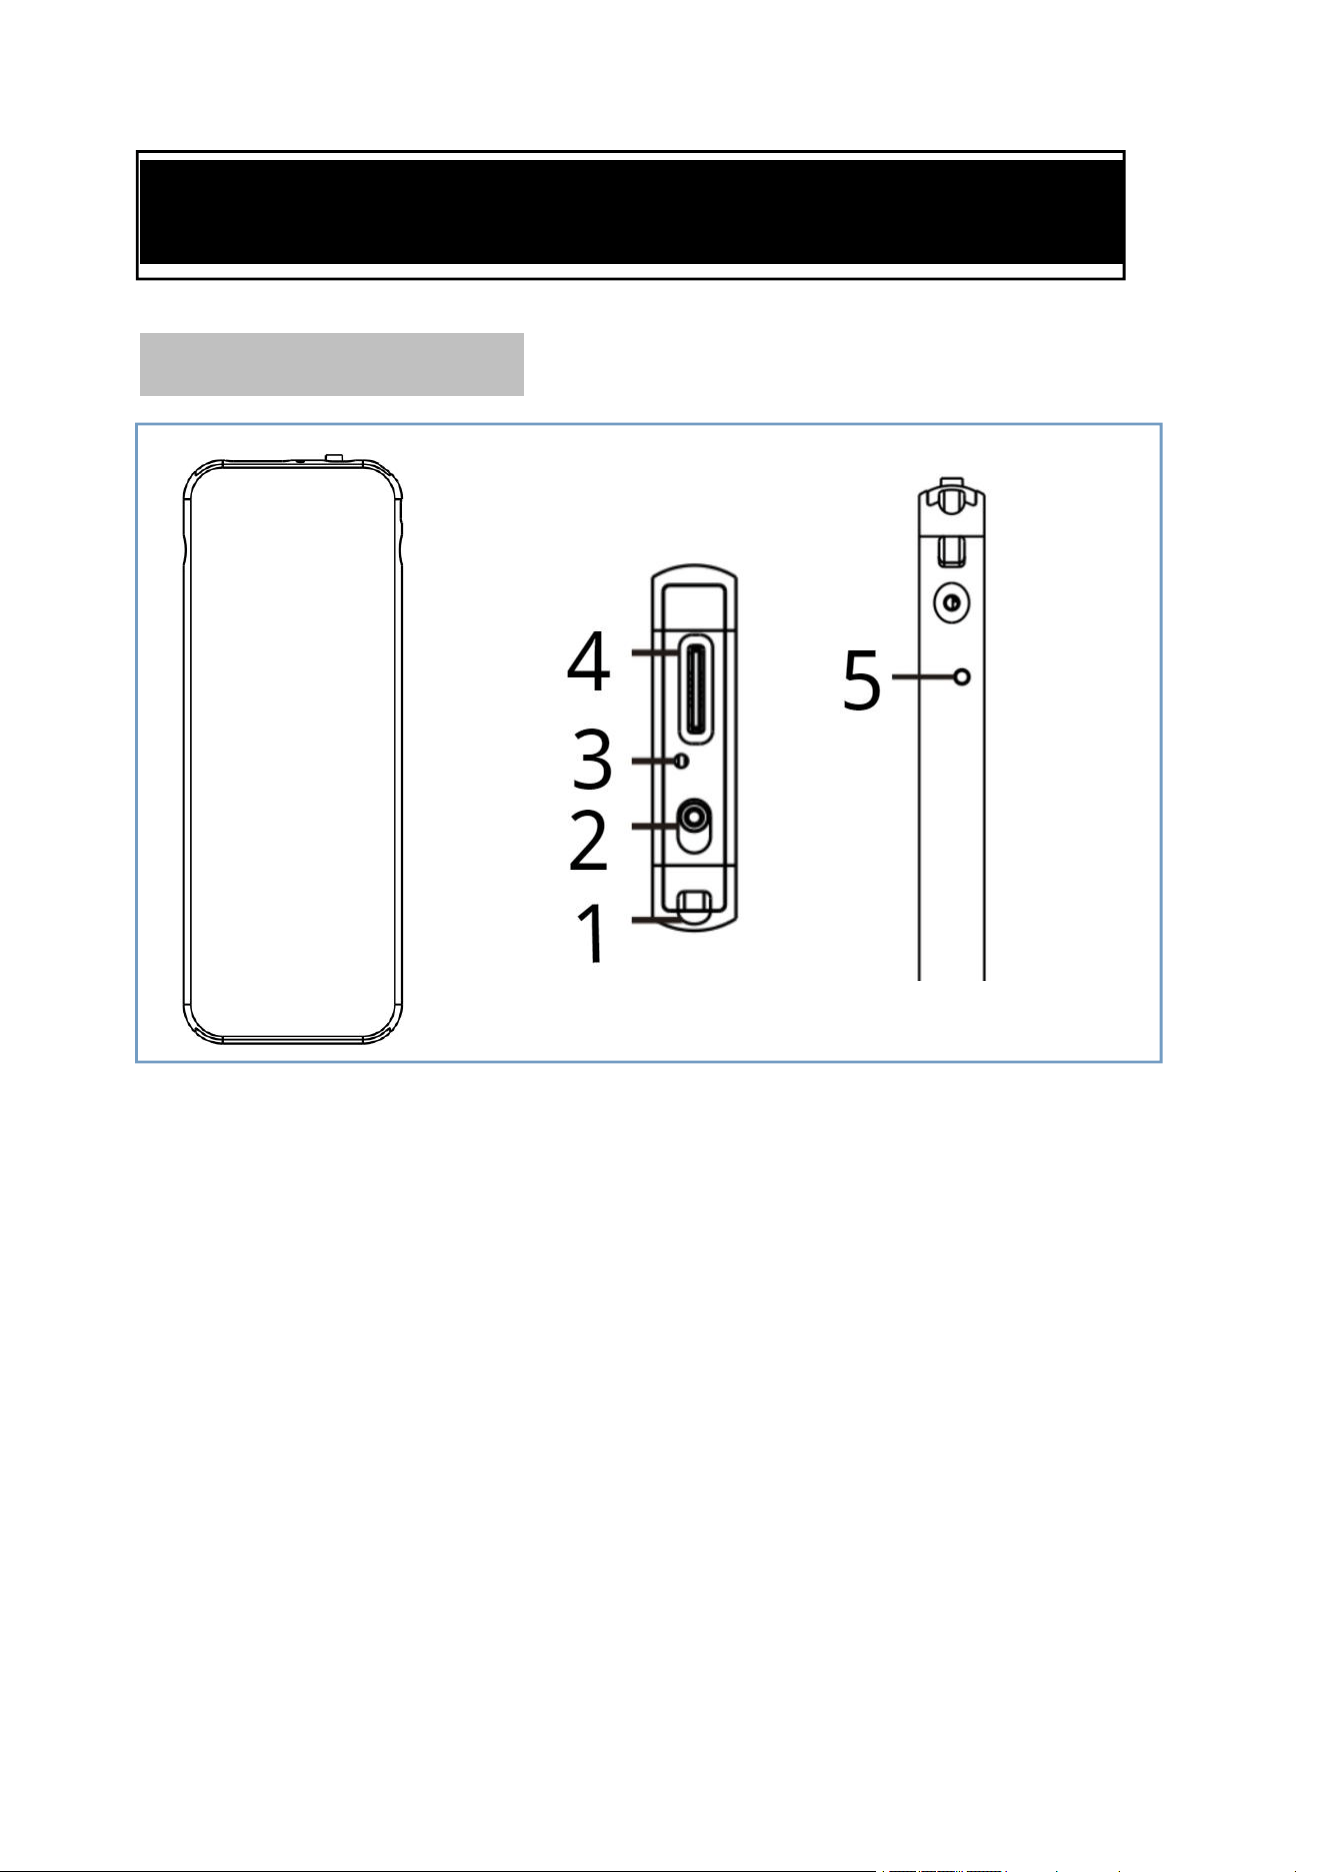
1.Product description
1.1 Voice recorder
1. Lanyard hole
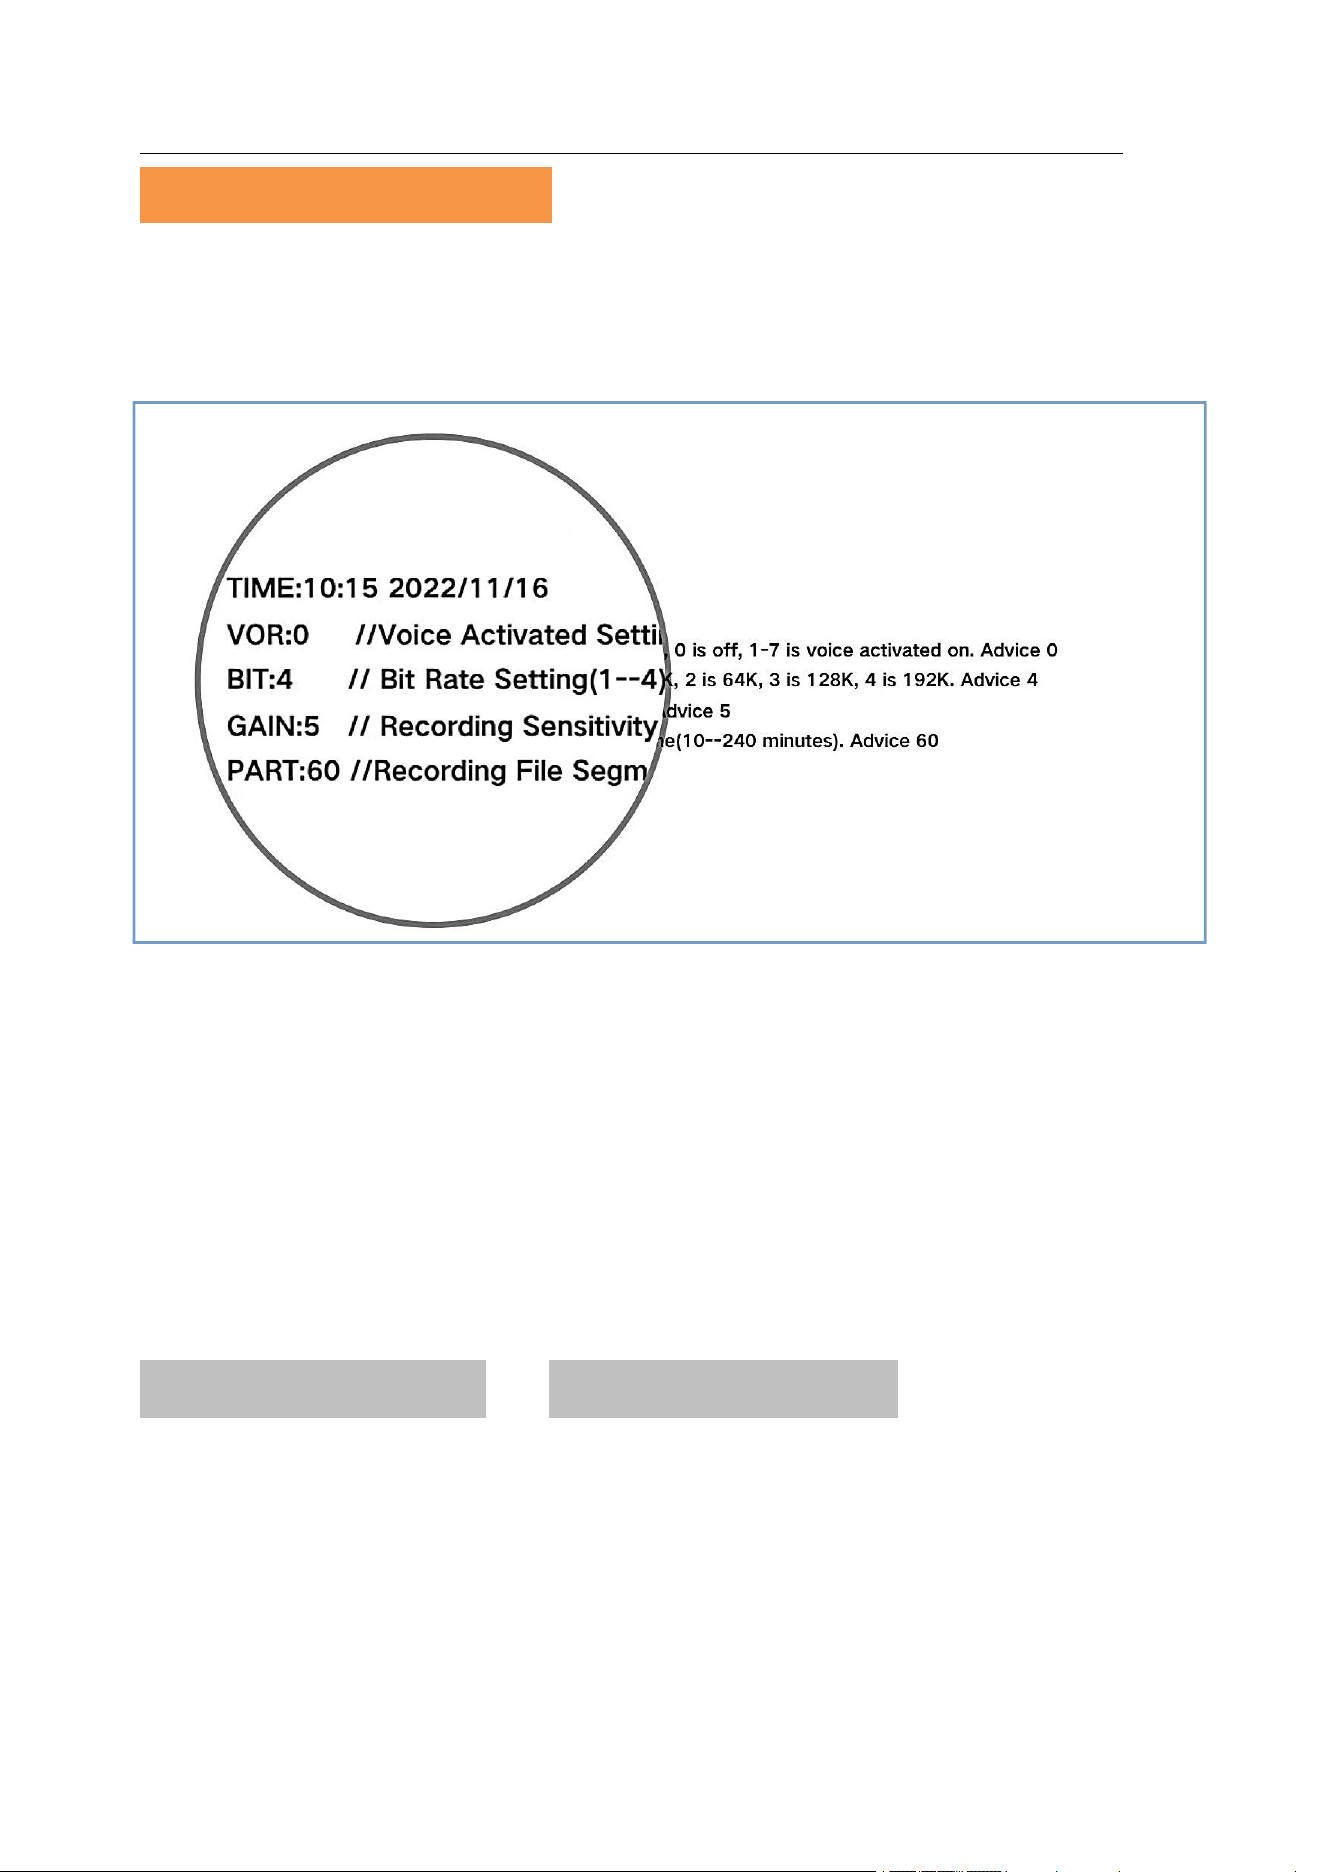
2. Power/ Recording button:
(ON) power on / record
(OFF) power off / save
3. Indicator light hole
4. Type-C port/earphone jack
5. Reset: if the machine crashes, reset by it
Digital Voice Recorder
2
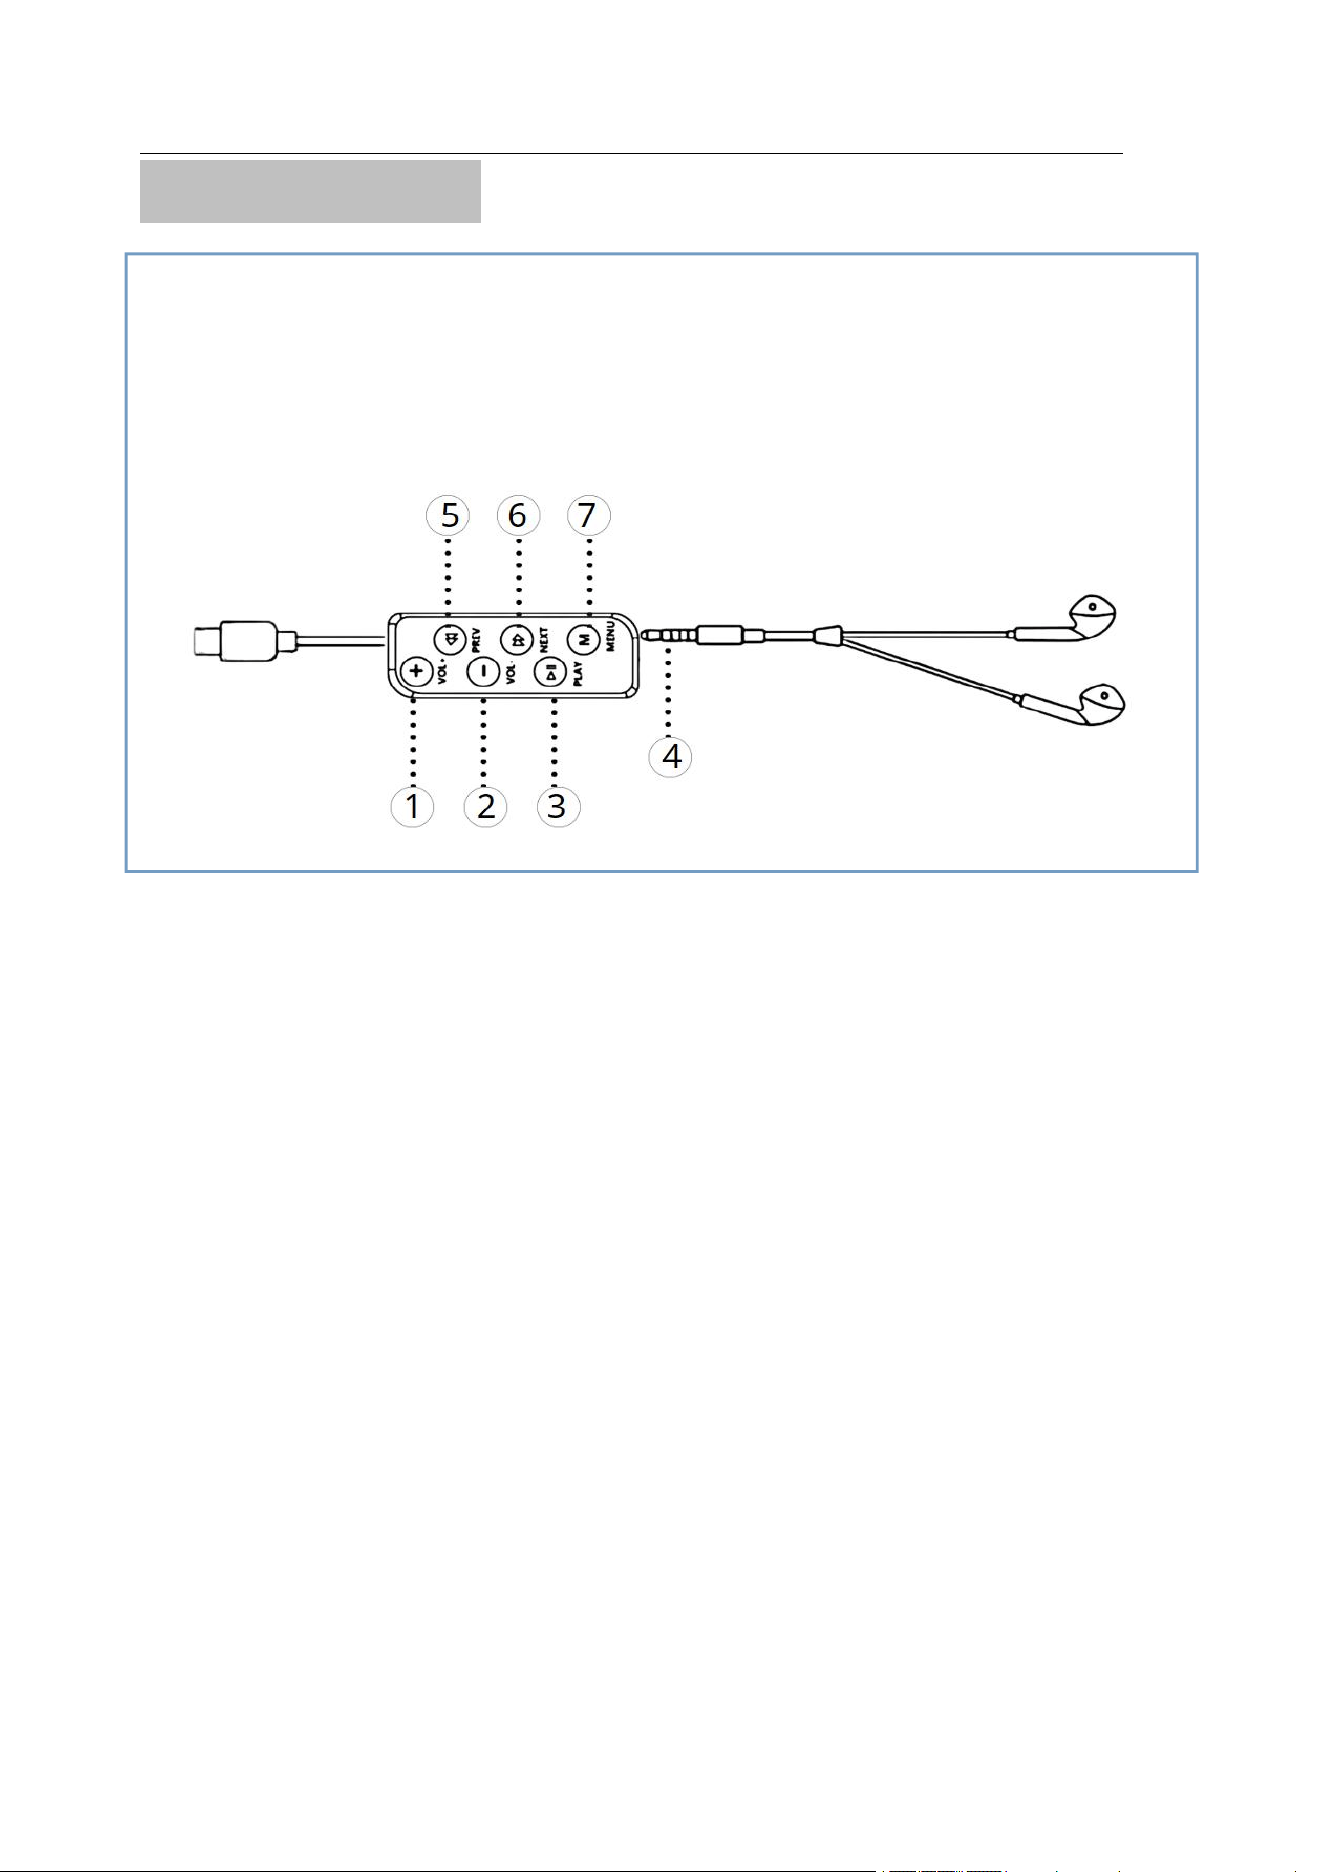
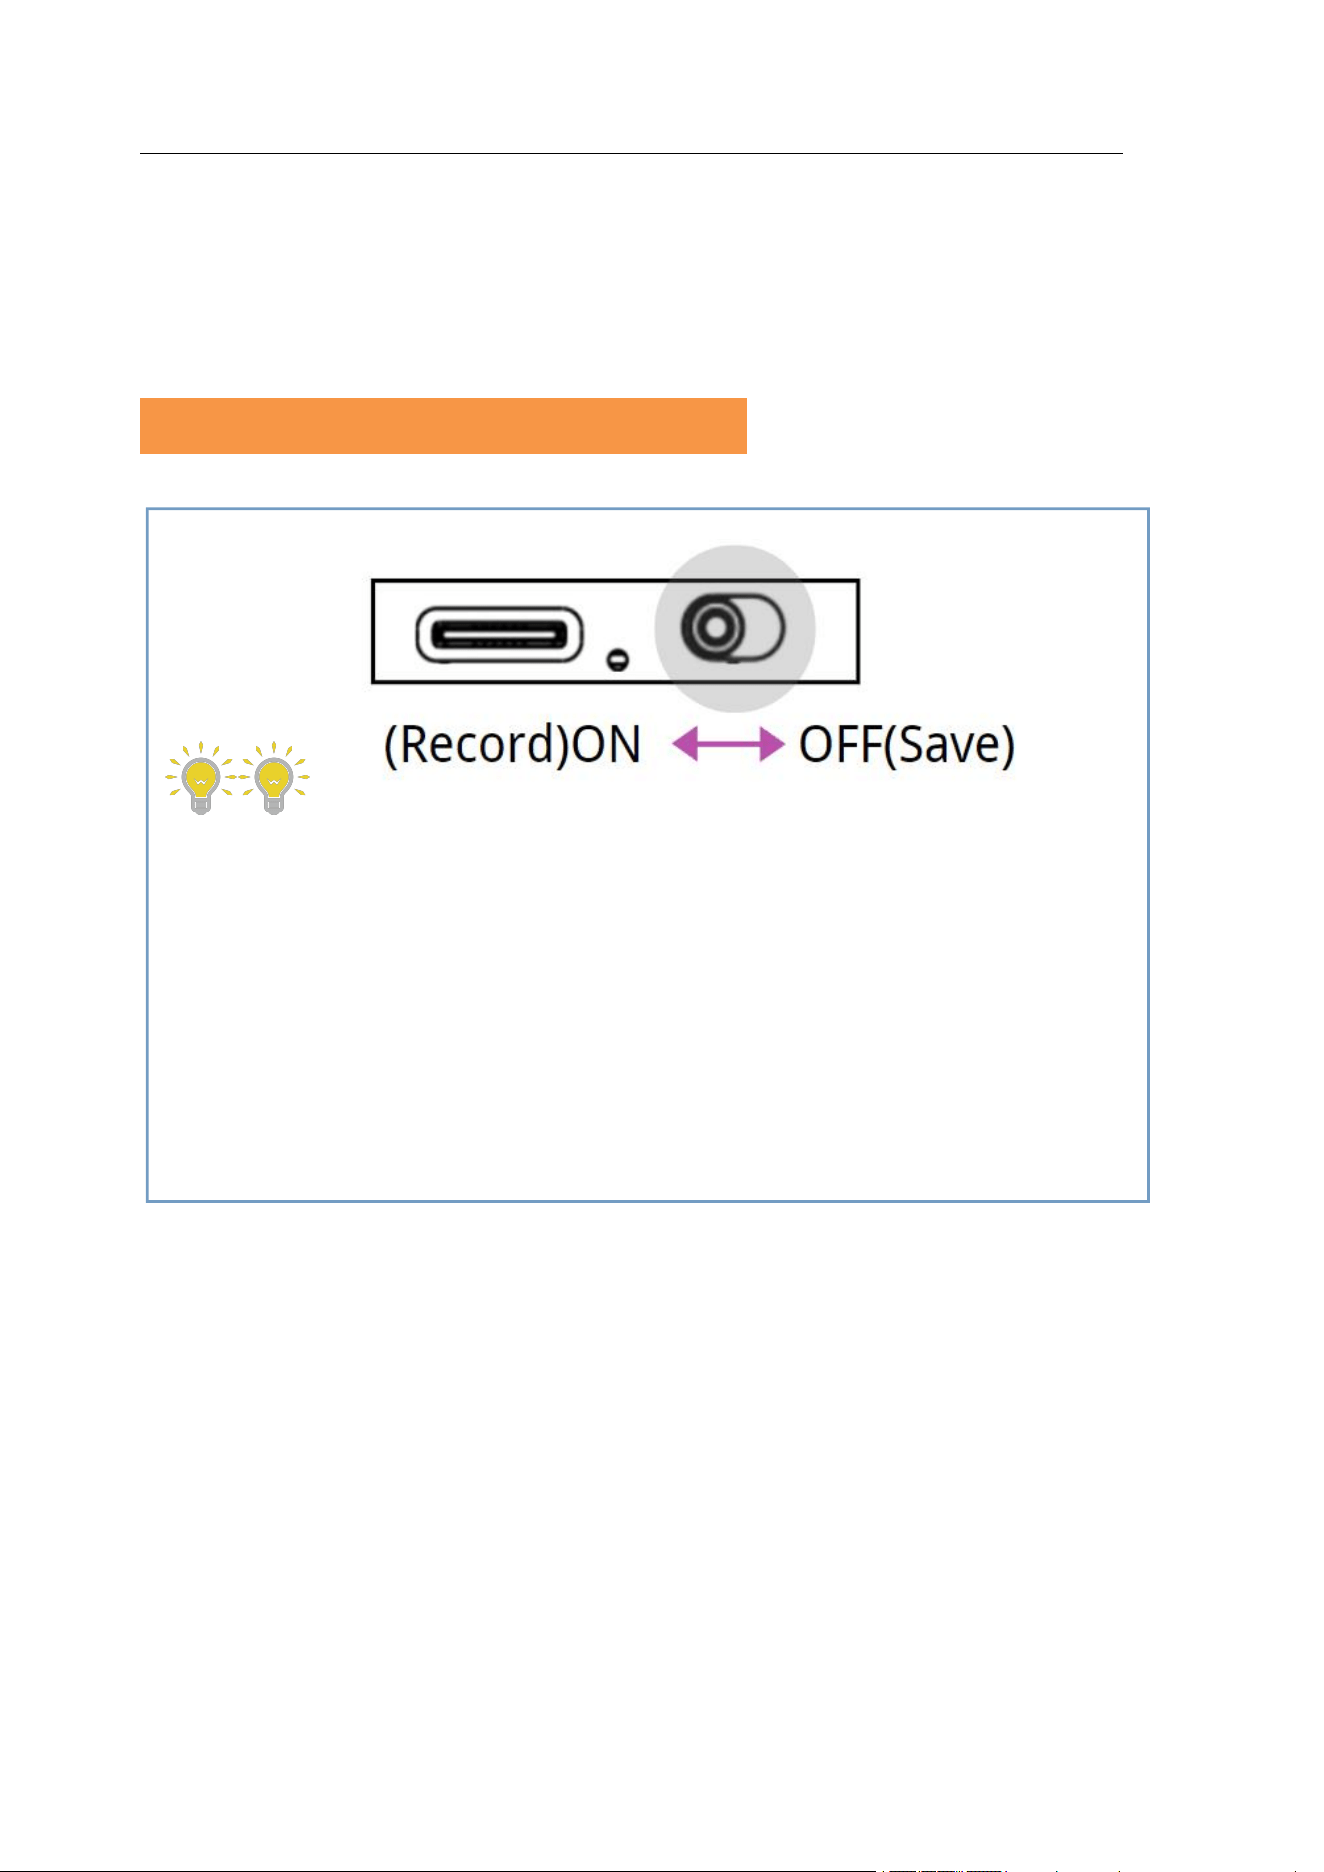
1.2 Wire control
①
Volume +
②
Volume -
③
Play/Pause
④
Headphone jack
⑤
Previous song (short press)/Fast rewind (long
press)
⑥
Next song (short press)/Fast forward (long
press)
⑦
Switch button(Recording and mp3 muisc files
in separate folders : press to switch between MP3
/ recording files
)
Note: Fast forward/rewind only in the playing
mode
This is a wire control, not the machine itself. Please
look for it in the package. If lost, please contact us
Digital Voice Recorder
3
1.3 Indicator light
Turn on
Blue-red light on for 1 second, red
light flashes 3 times
During
recording
No indicator flashes
Turn off
The blue-red indicator flashes once
Charging
When charging, Blue-red light for
one second, red light flashes three
times, blue-red light for one
second,then red light always
on.When it is fully charged, the
blue light is always on
Record while
charging
When it is not fully charged, red
light is always on.When it is fully
charged, the blue light is always on
Low power
Blue-red light flashes three times
then automatically shuts down
Earphone
playback
Blue indicator flashes
Fast forward /
Fast rewind
When playing, long press / to
fast forward/fast rewind, the red
indicator flashes rapidly
Digital Voice Recorder
4
2.Steps to use
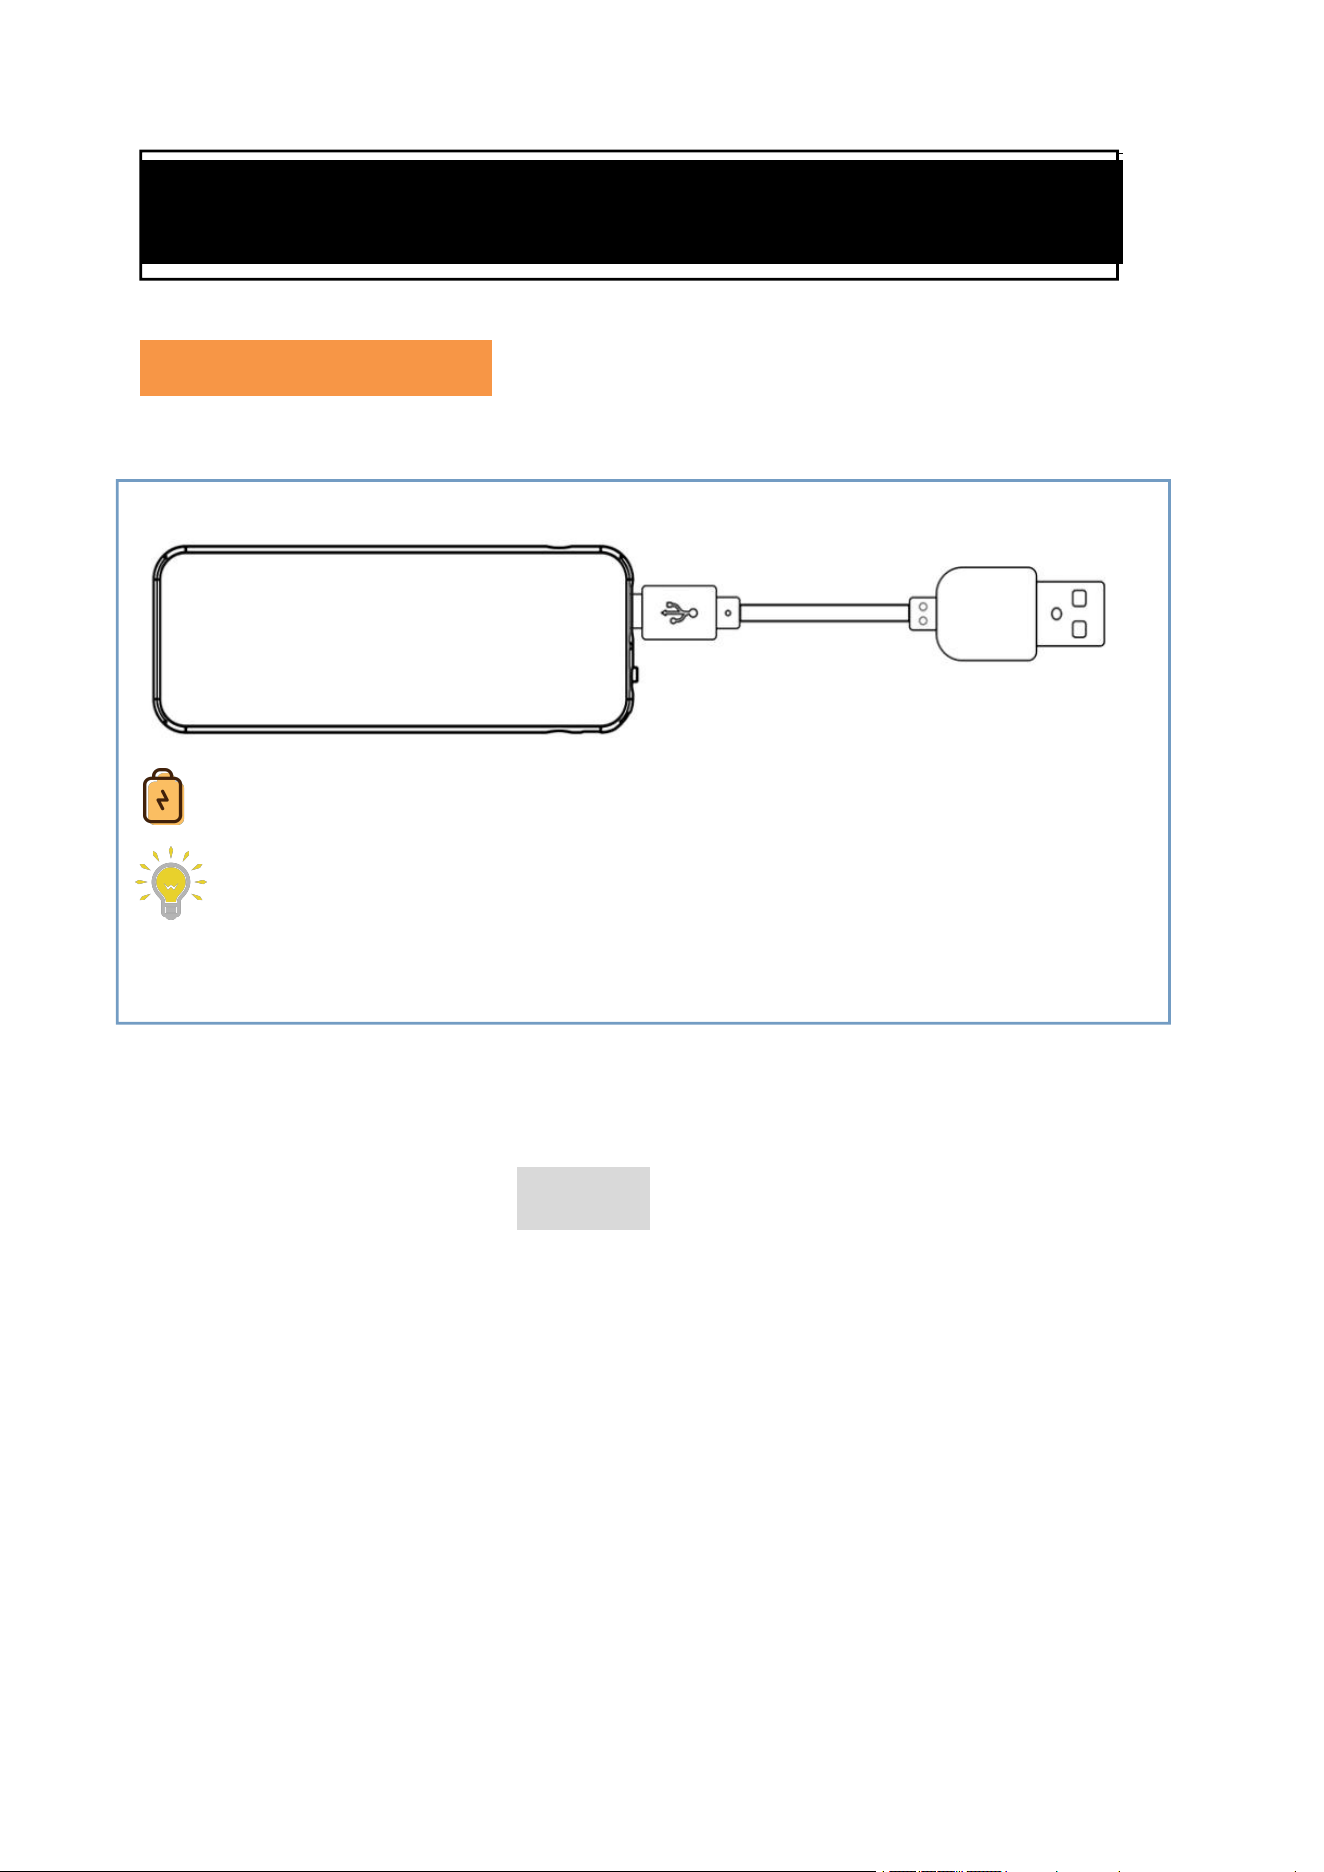
2.1 First charge
Please charge it before use.
Note:
①
Turn off the power during charging
②
Please use a 5V/1A professional usb wall
charger to charge. Charging directly on the
computer is not recommended as it can be slow.
③
If the battery is used up after a long time
without charging, you may need to re-synchronize
the time of the recorder with the time of the
computer.
Charging time: 2.5 hours
Red light stays on when charging, and blue
light stays on after full charge.

Digital Voice Recorder
5
Recording while charging
Correct steps:
If you turn it on first and then connect the USB
wall charger to charge, it will charge and record at
the same time.
Wrong steps:
Open the recording after connecting the USB
charger to charge, which will only charge and not
continue recording.
Note: Connecting any device (computer, wire
control+earphone, cell phone, etc.) during
recording will interrupt the recording.
When it is not fully charged, red light is
always on.When it is fully charged, the blue light
is always on
Digital Voice Recorder
6
2.2 Set the date-time on computer
Note:
①
Be sure to turn off the recorder before
connecting to the computer. Do not press any
buttons on the recorder when connecting, wait a
few seconds
②
If you have accidentally deleted the
[MRECSET] file, please contact us to send you
the attachment.
③
When changing other parameters in the
[MRECSET] file, be sure to change the latest date
and time at the same time.
Recording file names will be named with the date
and time. So before recording, please connect to the
computer to set the correct date-time.
For example, the recording file name is:
R20220607-093030.WAV
meaning: 07/06/2022, 09:30:30
Digital Voice Recorder
7
For Windows computers:
①
Turn off recorder first, connect Windows
computer and enter: [USB DISK] →
[MRECSET]
②For example, If the correct date-time is:
December 01, 2022 at 10:30
Modify and save the number after Time from
10:15 2022/11/16 to 10:30 2022/12/01
(Do not change spaces and symbols other than
Arabic numerals)
③Disconnect from the computer and restart the
recorder to take effect
(There is a video tutorial QR code in page 18)
Digital Voice Recorder
8
For Mac computers
①
Turn off recorder first, connect Mac computer
and enter: [USB DISK] → [MRECSET]
②Copy the [MRECSET] file to the Mac
desktop and changes on the Mac desktop.
③
Save the file after completing the changes.
For example, If the correct date-time is:
December 01, 2022 at 10:30
Modify and save the number after Time from
10:15 2022/11/16 to 10:30 2022/12/01
(Do not change spaces and symbols other than
Arabic numerals)
④Move the original [MRECSET] file from the
[USB DISK] to the Trash. Copy the modified
[MRECSET] file to the USB DISK
Digital Voice Recorder
9
⑤Disconnect from the computer and restart the
recorder to take effect.
(There is a video tutorial QR code in page 19)
2.3 One key recording/saving
Note:
①
Do not connect the wire control or other
devices during recording, otherwise it will
interrupt the recording.
②
The voice recorder should be kept at least
30cm away from the sound source, otherwise it is
likely to produce a burst of sound.
ON: Start recording - (Blue-red light on for 1
second, red light flashes 3 times)
OFF: Save the recording-(The Blue-red light
flashes once)
No indicator light during recording
Digital Voice Recorder
10
2.4 Listen by earphones
During audio listening via headphones, if
playback is paused with no other operation, it will
automatically switch off after approximately 5
minutes. Please press the power button to switch
it on again.
.Note:
If the voice recorder does not play automatically,
press [PLAY] key to start playing the audio.
Connect the wire control and earphones, then turn
on recorder, and the recorder will automatically
playback the audio
Digital Voice Recorder
11
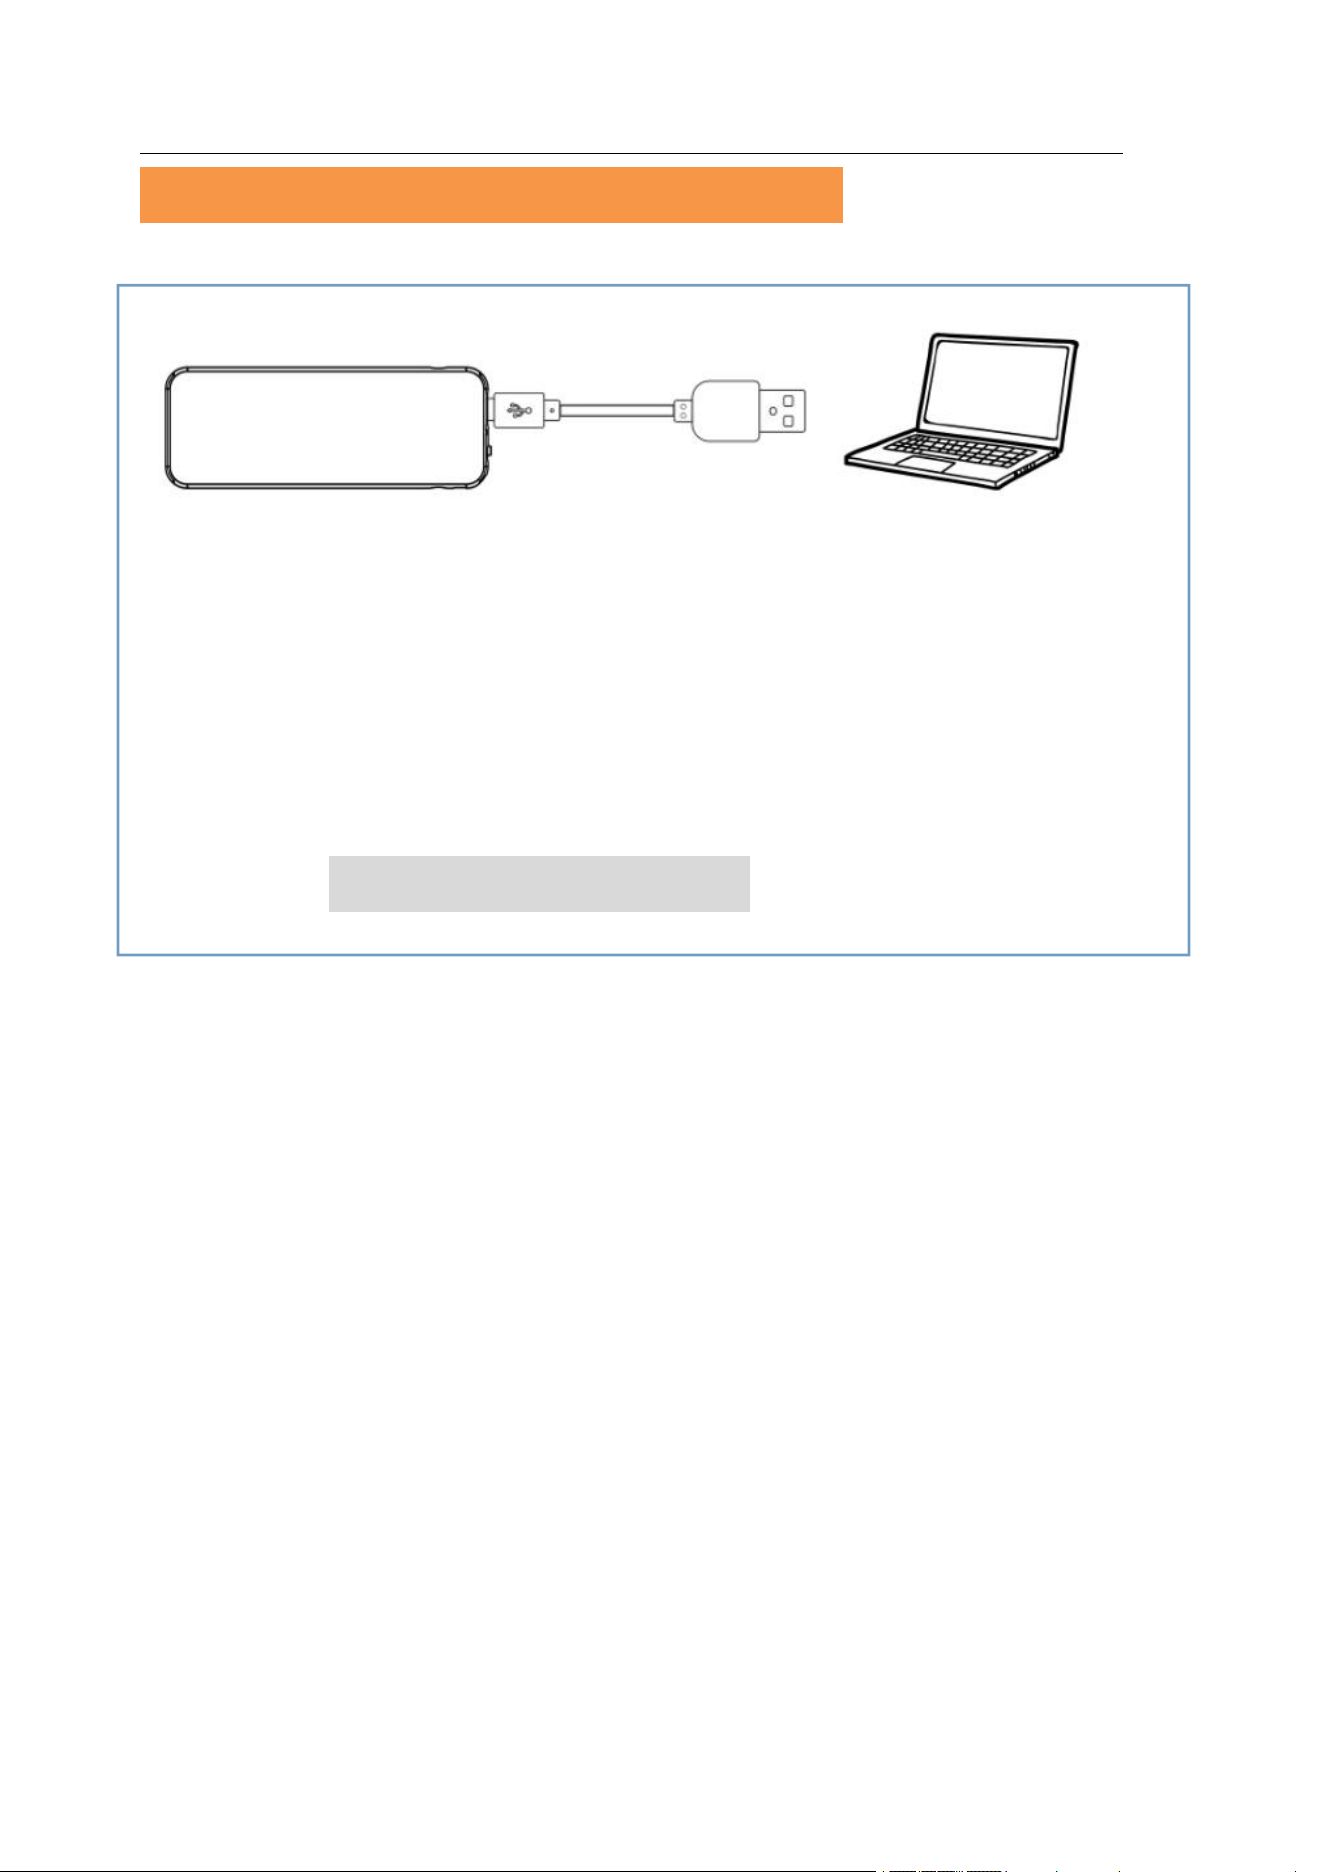
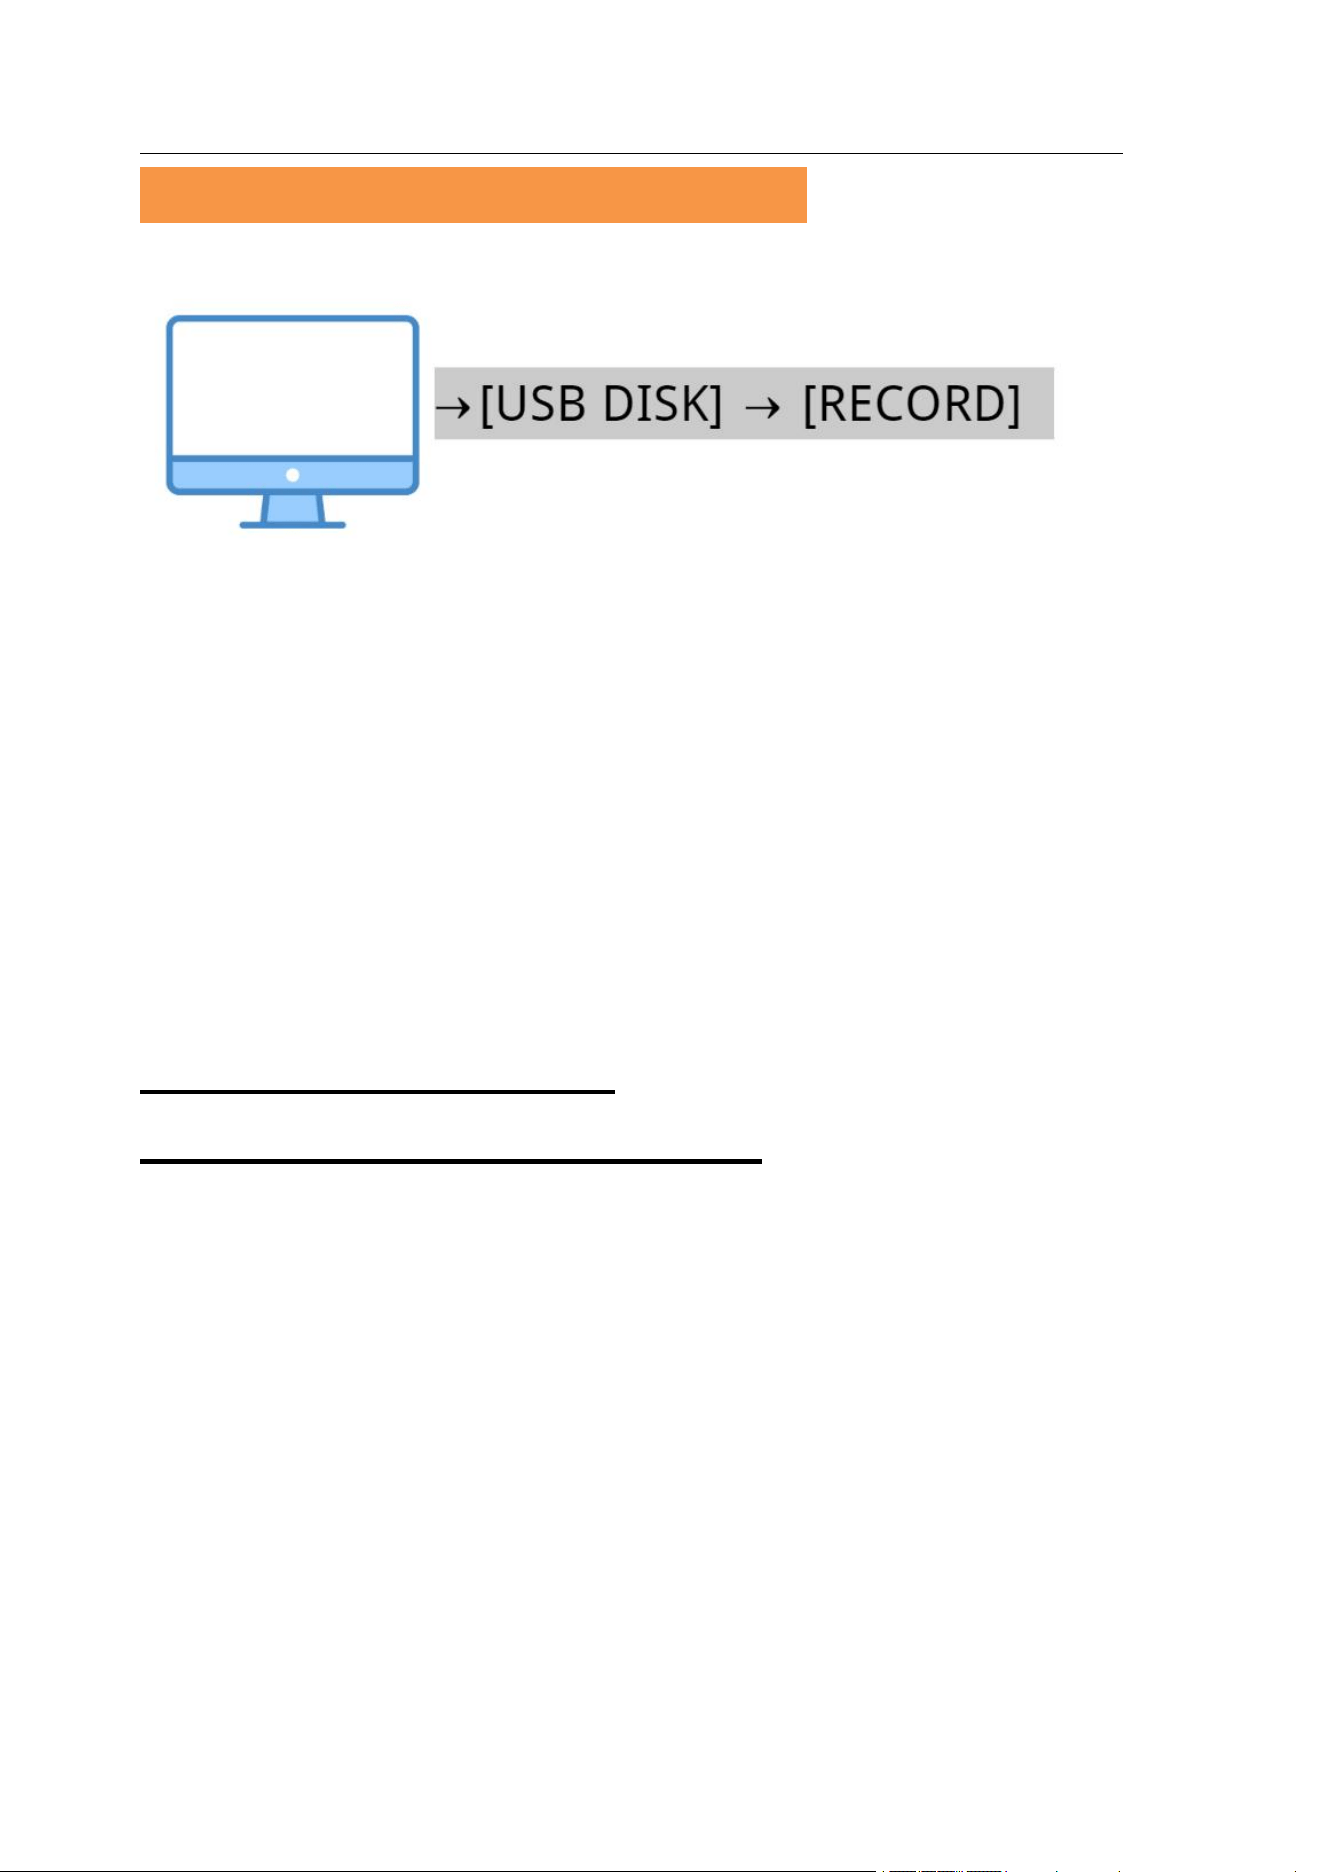
2.5 Connect to computer to play
Make sure to switch off the recorder first before
connecting to the computer. Do not press any
buttons on the recorder while connecting. Wait a
few seconds, then double click to open [USB
DISK] - [RECORD] and select the file you want
to play.
①On MAC computers: Can play directly
②On Windows computers: Need to use
"Windows Media Player" or other players to play.
(Because the recording format is "WAV", the
GROOVE player that comes with Windows 10
computer system does not support the playback of
WAV format.)
Digital Voice Recorder
12
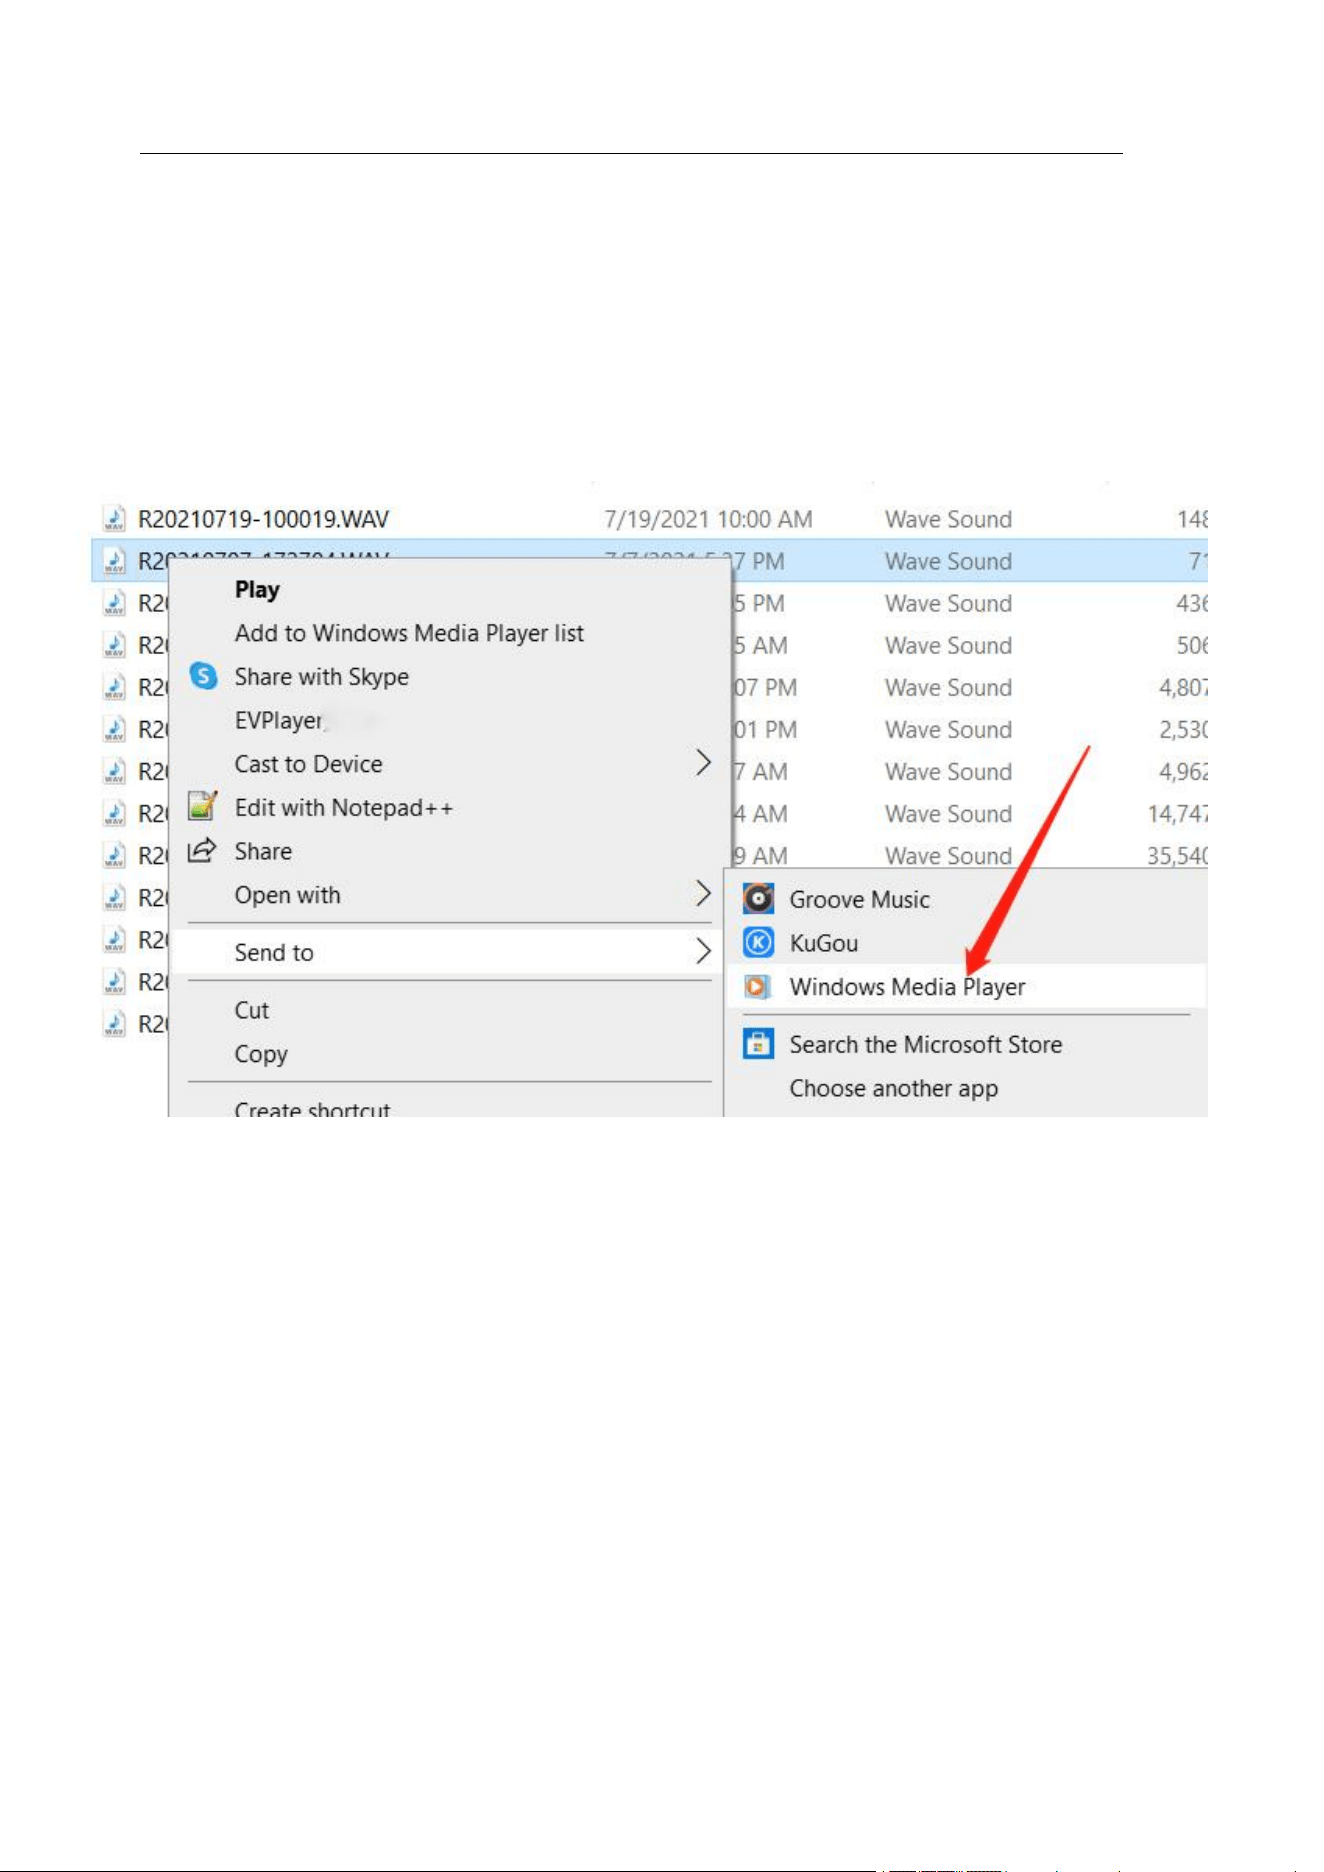
Select [Windows Media Player] for playback:
[USB DISK]-[RECORD]-[Open with]-[Windows
Media Player / QuickTimePlayer / Music /
Audacity]
Digital Voice Recorder
13
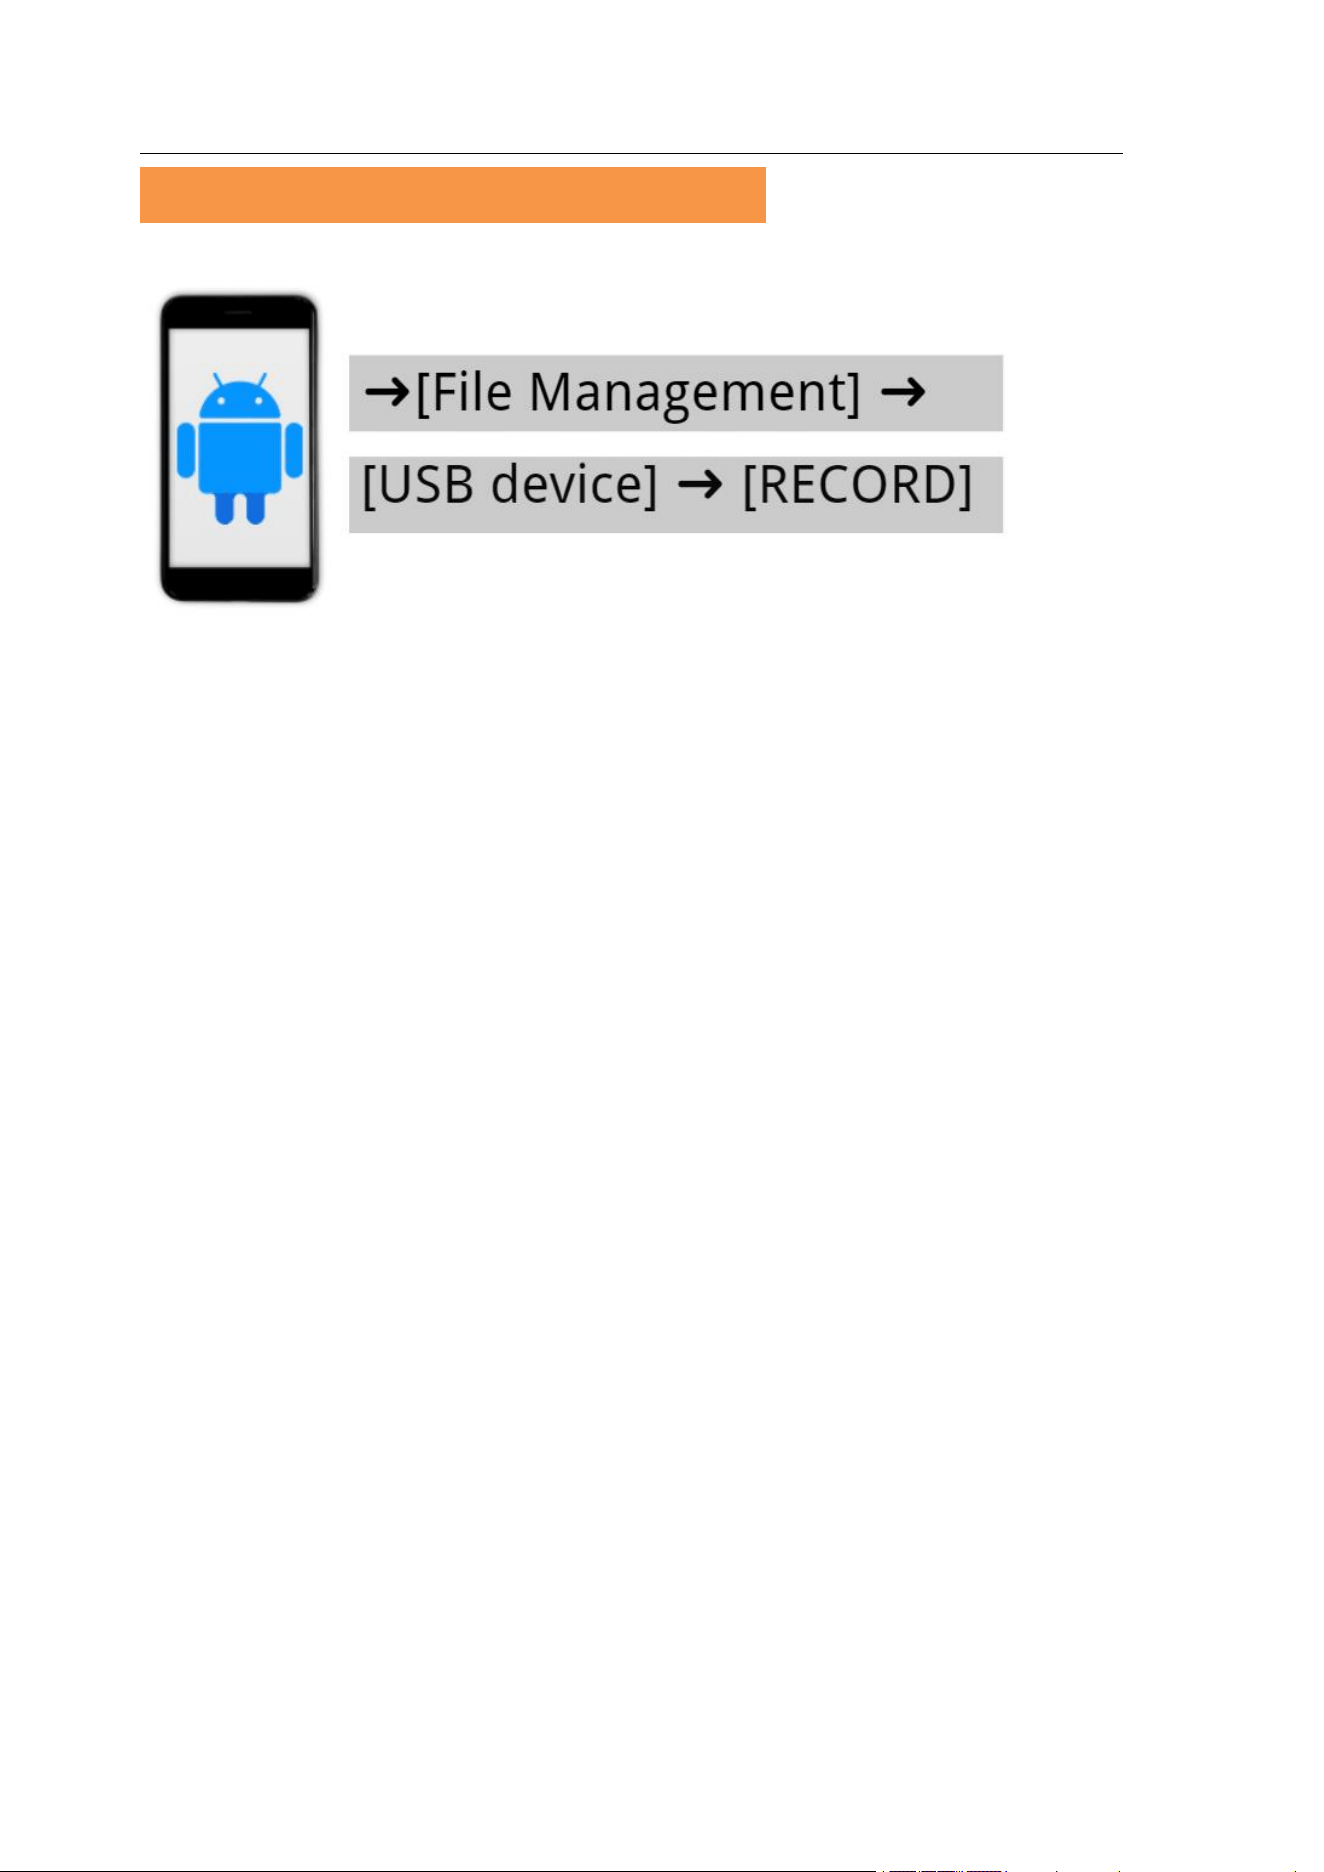
2.6 Connect to Andriod phone
Check turn on the OTG function of your Android
phone first, then connect the voice recorder in the
off state with the OTG adapter (sold separately),
(Turn off the recorder without pressing any
buttons), and find [File Management] ➜ [USB
Device] ➜ [RECORD] on your phone
Note: Since each Android device model is
different, we can't guarantee that all devices can
be connected via OTG!

Digital Voice Recorder
14
2.7 If the connction to computer/phone fails?
1). Before connecting the recorder to a
computer/phone, turn off the recorder. When
connect, please place the recorder smoothly, do
not press any buttons.
2). Try to wait longer: 20 ~ 30 seconds (because
the computer system and driver version by itself,
the reading of large memory also takes a while)
3). Please use the original USB cable or a data
cable that can be used to transfer data (some data
cables can only be used for charging).
4). Restart the computer/phone or recorder
5). If the cable in the package does not connect
successfully, please connect with a different cable
to rule out cable problems.
6).The computer lacks drivers causing it to not re
cognize any devices, please Google: download co
mputer drivers
7). Android Phone:
Make sure the OTG function is turned on.
[Settings] - Searching for "OTG or USB", turn on
Digital Voice Recorder
15
the OTG function and allow other devices to
connect. (As each Android device model is
different, you can Google search or ask the phone
manufacturer for the exact method to turn on the
OTG function)
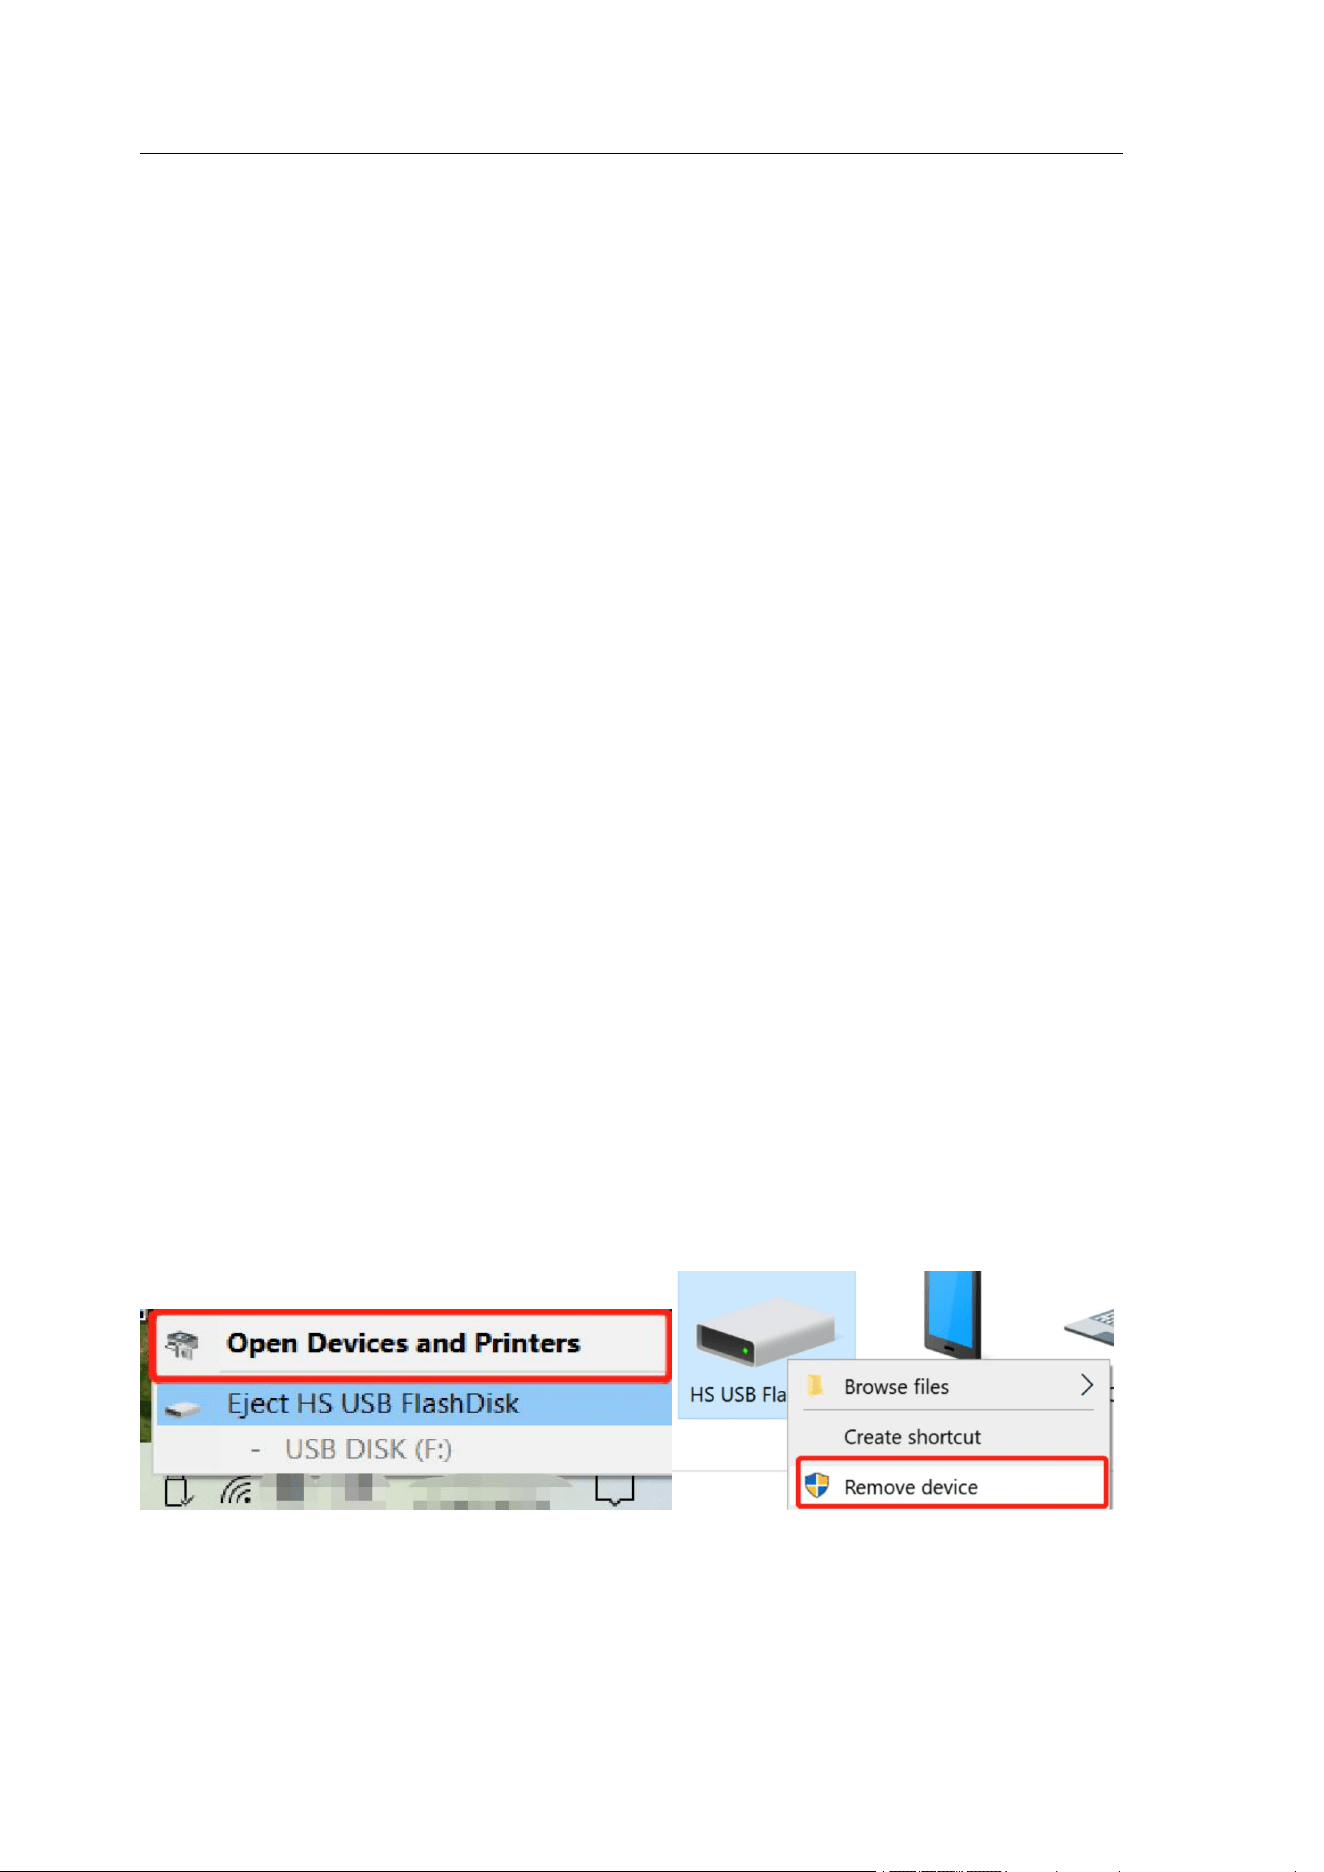
8). PC:
(1) MAC user: please replace the USB-C adapter
(2)Change the computer to change the connection
port and try again
(3) Check if the USB DISK identifier appears on
my computer. Click "USB Disk Identifier" in the
lower right corner of the desktop - [Open Devices
and Printers] - [Devices] - right click [HS USB
FlashDisk] - [Remove Device] and then connect
to the computer.
Digital Voice Recorder
16
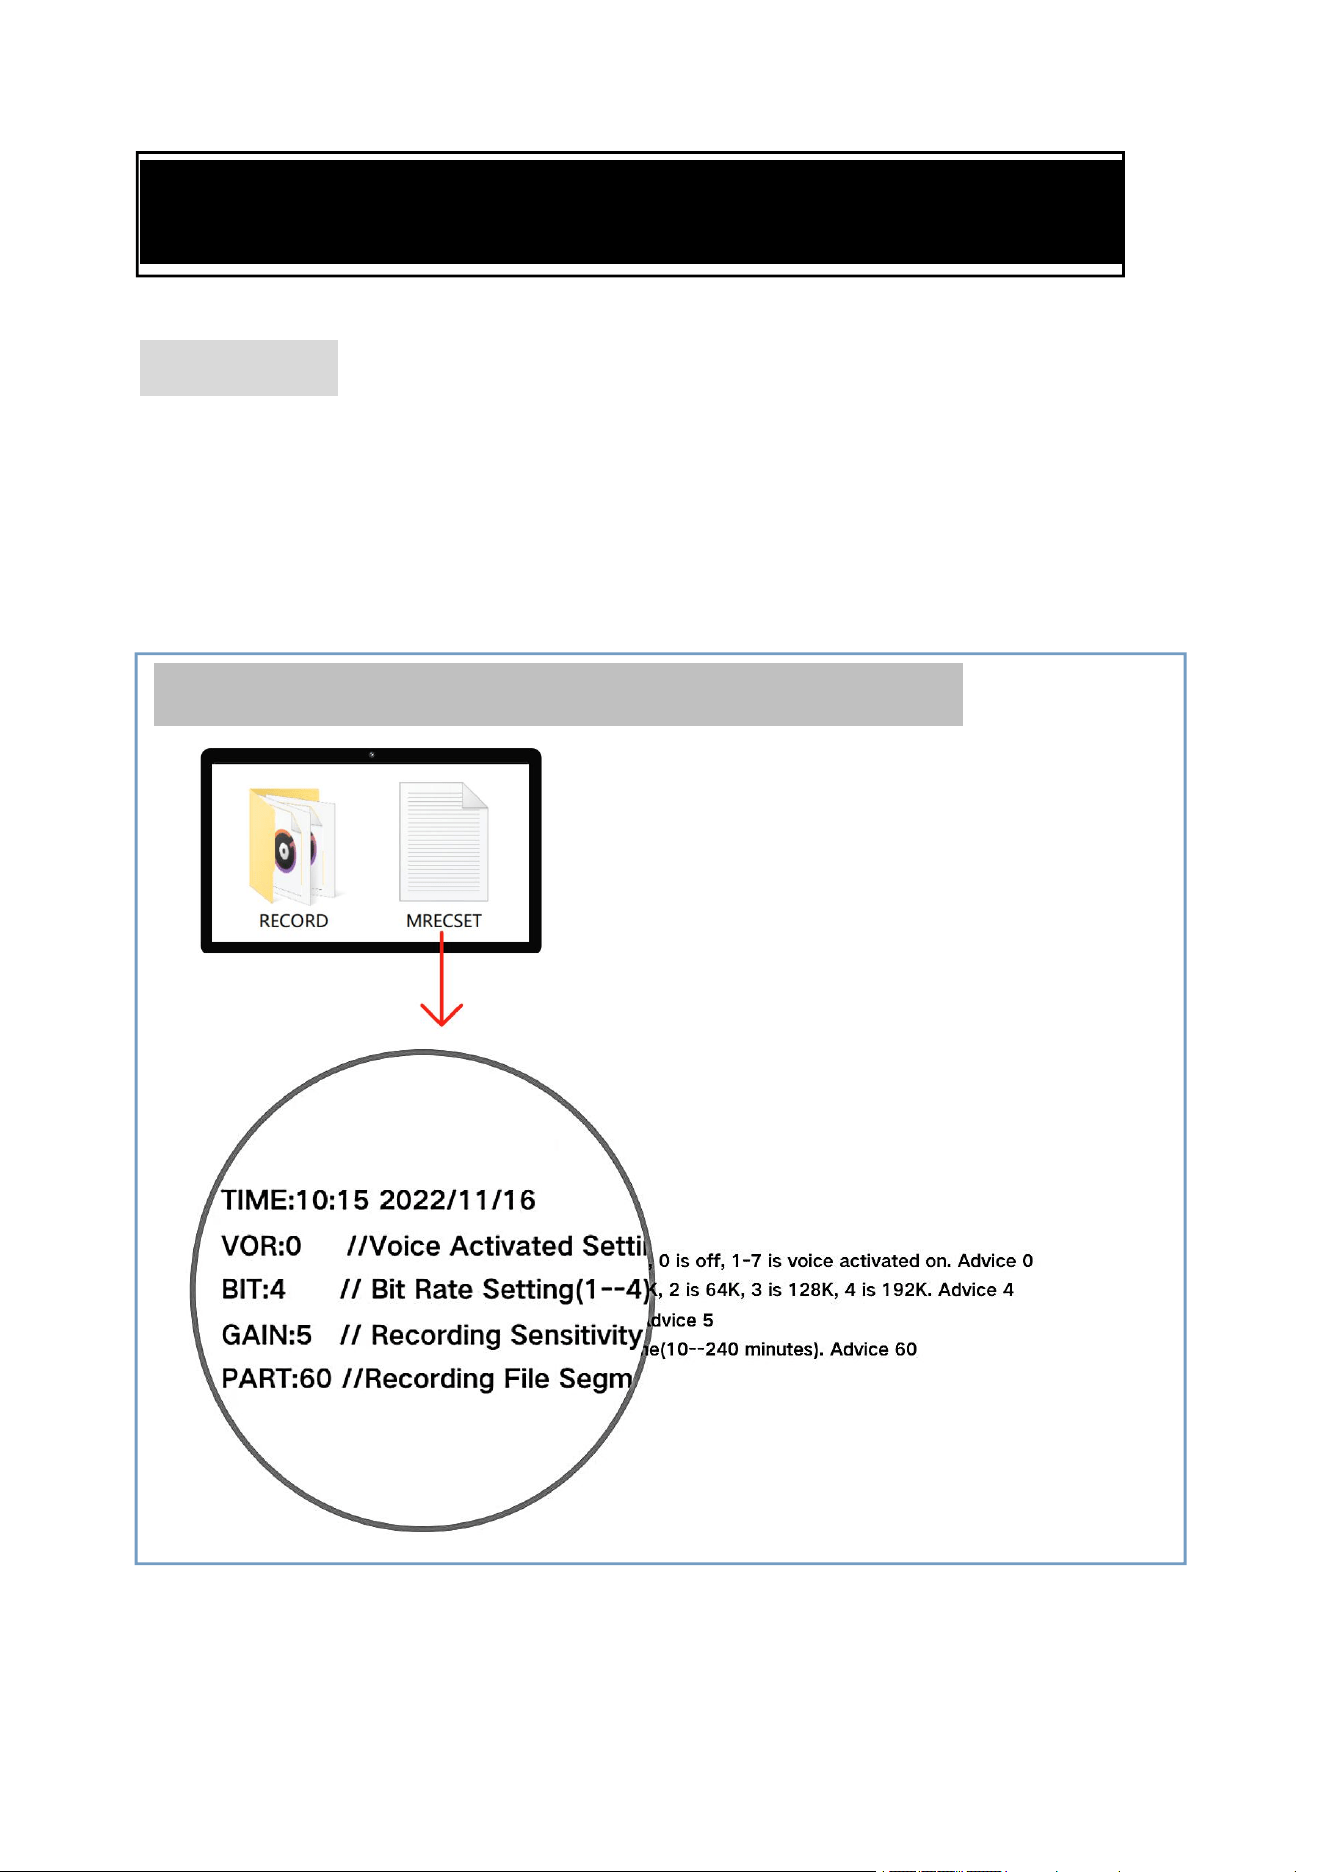
3. Settings([MRECSET])
3.1 Route
Be sure to turn off the recorder before connecting
to the computer. Do not press any buttons on the
recorder when connecting, wait a few seconds.
ROUTE: [USB DISK] ➝ [MRECSET]

Digital Voice Recorder
17
Note:
①
The above parameters are the best
parameters obtained from the test, so do not
change them except for the TIME.
②
Do not delete the [MRECSET] file. After
deletion, all parameters will return to factory
settings.
Digital Voice Recorder
18
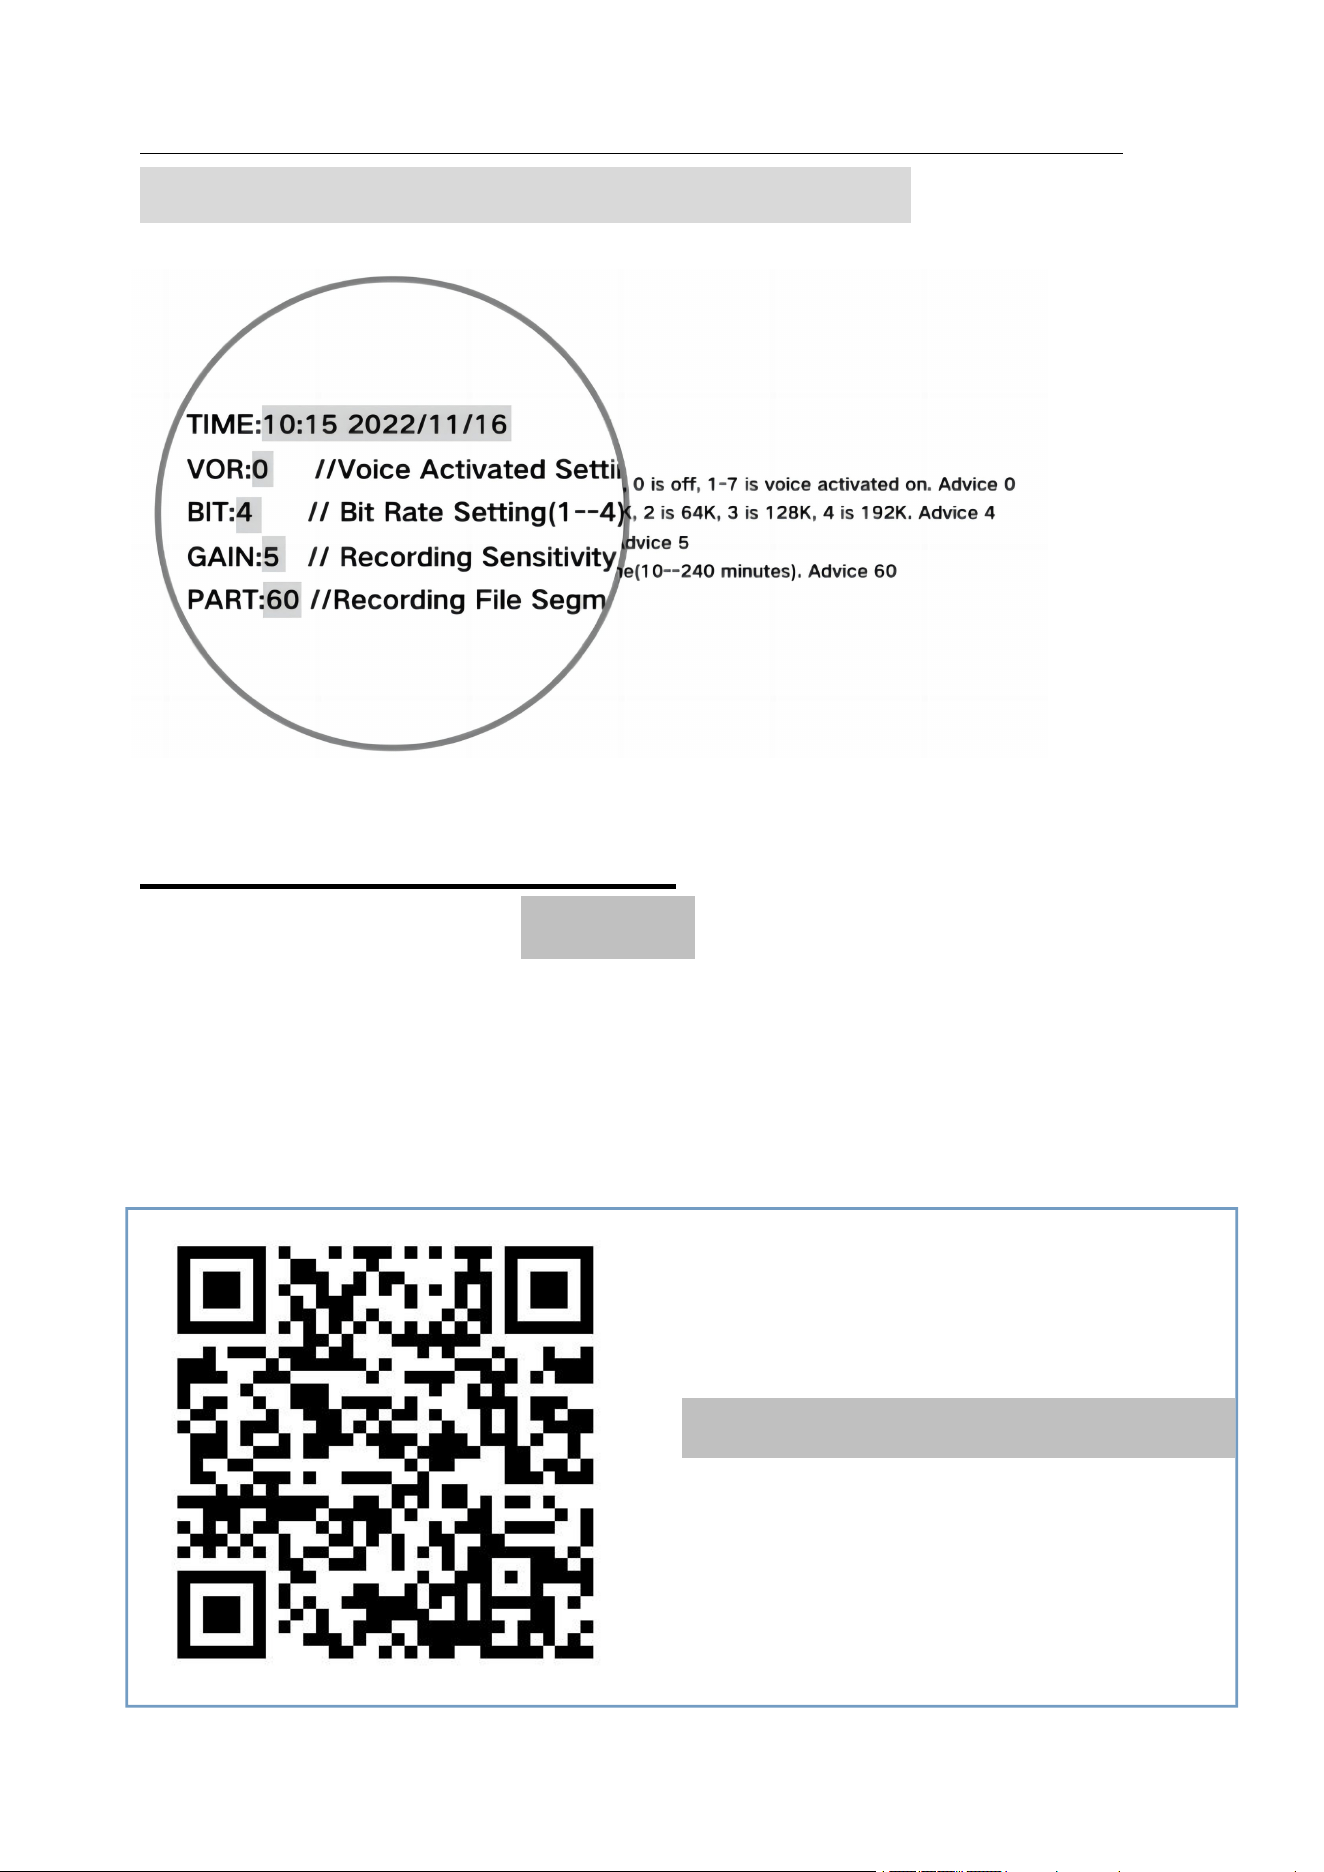
3.2 How to set on Windows/Mac PC?
On windows computer: You can only modify
the numbers in the gray box. Click save, and then
restart the recorder to finish the setting easily.
(Please do not modify the other numbers outside
the gray box, or it may not work)
Video tutorials for setting
Windows computer
Digital Voice Recorder
19
On MAC computer: Copy the entire
[MRECSET] file to the desktop, modify and save
the parameters in the desktop [MRECSET] file
and put it back into the recorder. (You can only
modify the numbers in the gray box.)
Delete the old [MRECSET] file from the recorder.
Finally restart the recorder and it will take effect.
(Only the numbers in the gray boxes can be
changed, please do not use any other numbers,
otherwise it may not work).
(Mac users can refer to page 8)
Video tutorials for setting
Mac computer
Digital Voice Recorder
20
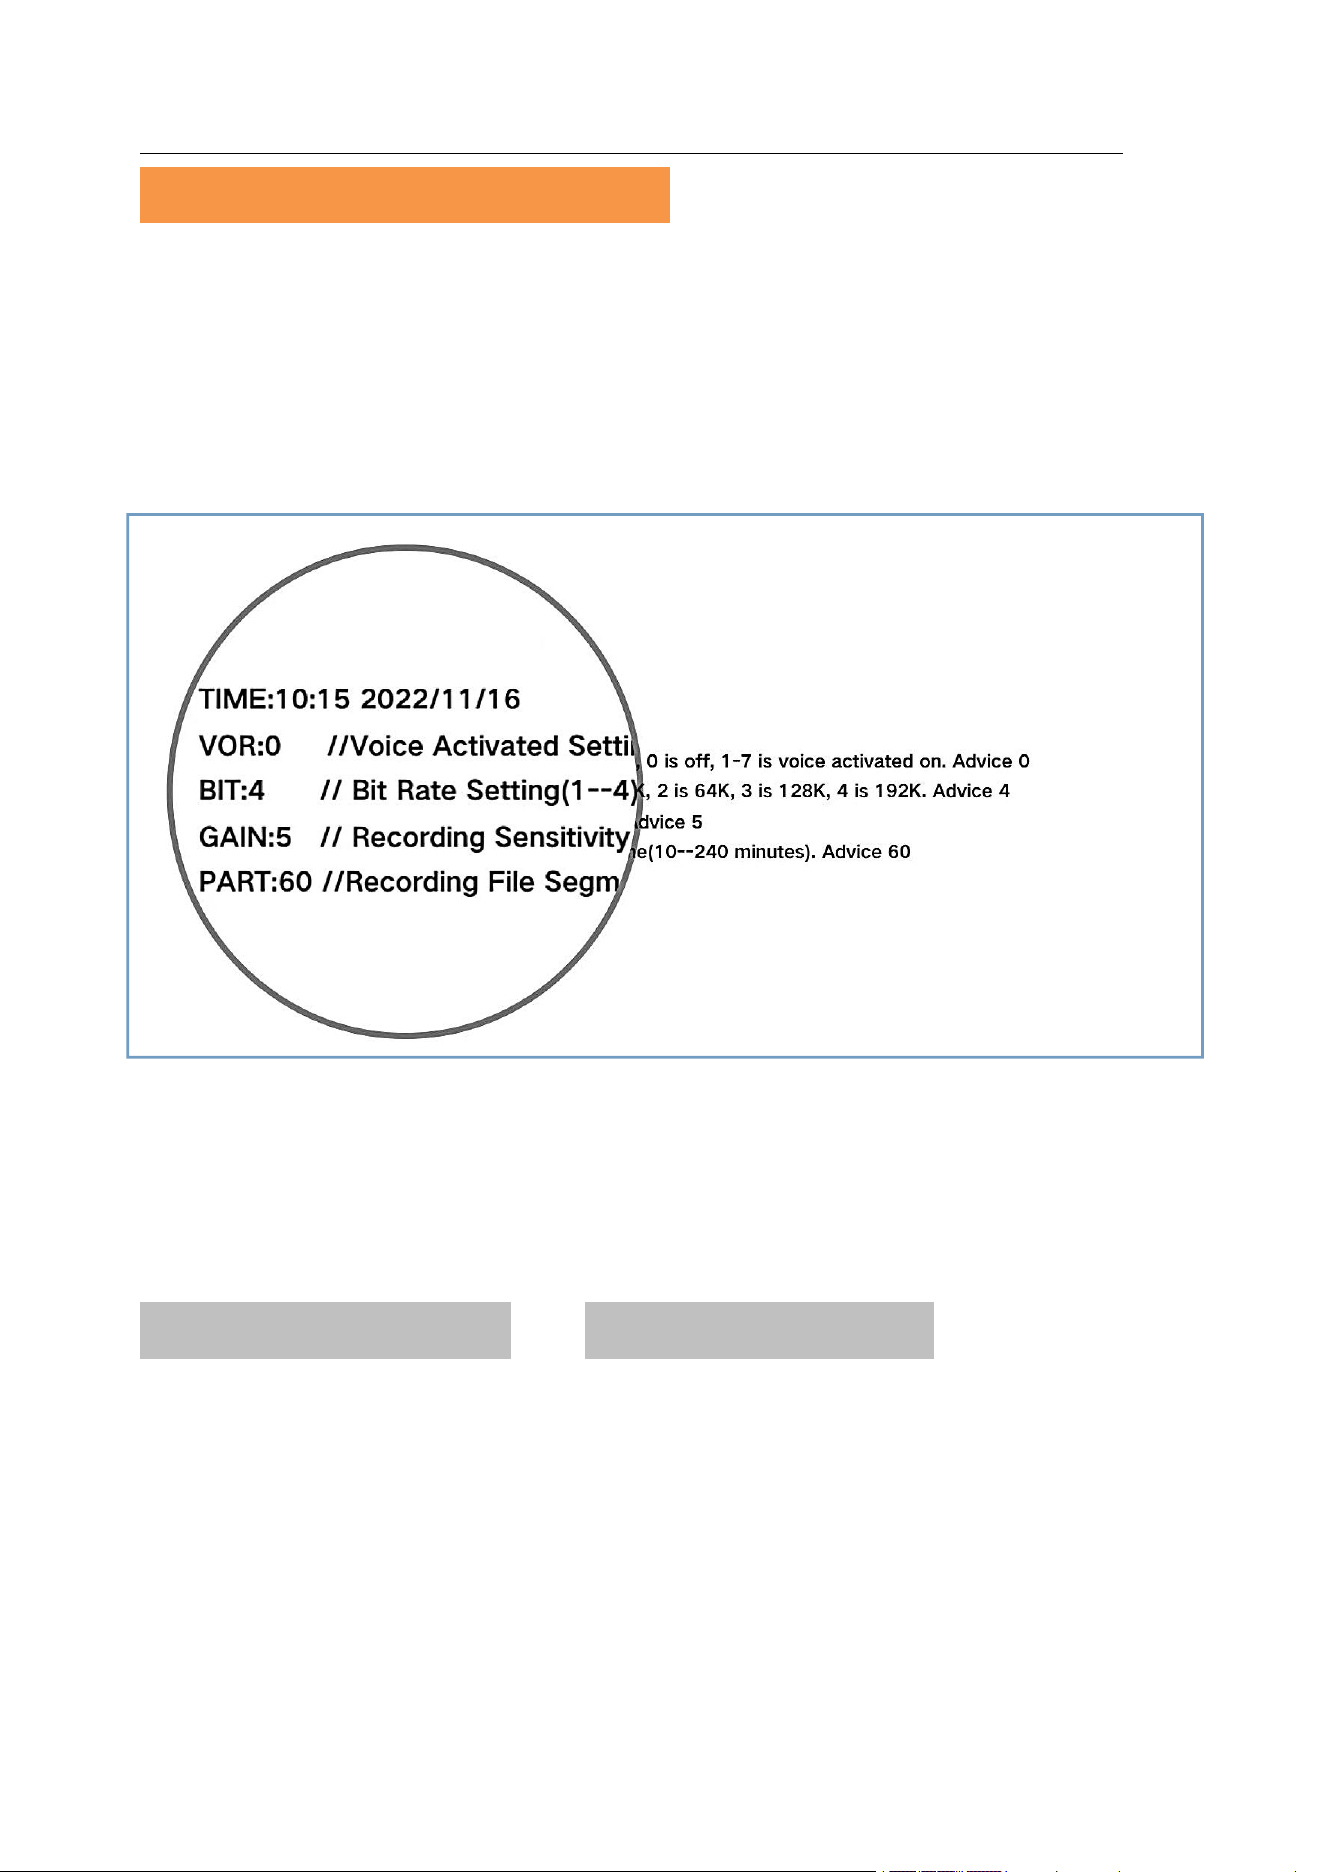
3.3 Explanation
①
TIME(Date&Time Setting)
This is date-time settings, After setup, the
recording file name will be named with date and
time.
Please refer to Catalog 2.2 (Page 6~8) for time
setting.
②
VOR(Voice Activation)
VOR:0
// Voice Activated Setting (0--7), 0 is
off, 1-7 is voice activated on. Advice 0
Modifiable digital range: 0~7, default: 0
0: Turned off voice activation (factory default)
1~7: Means turn on voice activation.
●If you need to turn on the voice activation, it
is recommended to set the number to 1 or 2 .
●The smaller the number, the higher the decibel
value required to activate the recording;
conversely, a low decibel value will activate the
recorder and may record noise.
●When voice activation is turned on, slide the

Digital Voice Recorder
21
recorder's recording button to ON, which will
record in voice activated mode.
●Do not use voice activation on important
occasions, and it will not record when the sound
decibel is too low, so as not to possibly miss
important recordings.
●If you cannot record after turning on voice
activation, please turn off voice activation.
Q: How to judge the voice activation function
is on?
A: If the recording file name starts with "V", it
means the Vor setting has been successfully
turned on. For example:
V20200630-013747.WAV

Digital Voice Recorder
22
③
BIT(Bit Rate)
BIT:4
//Bit Rate Setting(1--4), 1 is 32K, 2 is
64K, 3 is 128K, 4 is 192K. Advice 4
Modifiable digital range: 1~4, default: 4
●The higher the bit rate, the more memory and
power it consumes.
●Only 4 (192kbps) is recommended, not
recommended to change it.
④GAIN(Recording Sensitivity)
GAIN:5
// Recording Sensitivity (1--7).
Advice 5
Modifiable digital range: 1~7, default: 5
●The default setting is 5, which is not
recommended to be changed.
●The larger the number, the higher the sensitivity
and the greater the background noise of the
recording.
●If set to 1, the sensitivity level is too low and
some recordings will be missed, and if set to 7,
the sensitivity level is too high, resulting in
capturing very fine sounds and thus noise

Digital Voice Recorder
23
⑤
PART(Segment Recording)
PART:60
//Recording File Segmented
Time(10--240 minutes). Advice 60
Modifiable digital range: 10~240, default: 60
60: By default 60 , the recorder automatically
saves every 1 hours for data protection
10~240: 10~240 minutes
●This feature allows you to split large files or
files with long recording times, making them
easier to manage.
●Default 1 hours split once, change the number
to change the split length (can be changed
between 10-240). Example. 120 - 2 hours; 60 - 1
hour.
●After splitting, unnecessary files can be deleted
to save memory.
Digital Voice Recorder
24
4. Specifications
Dimensions
75*28*6mm/ 3*1.1*0.2in
Weight
22g/0.8oz (The actual shall
prevail)
Battery capacity
400 mAh
Battery specification
3.7V/402043
Charging current/ voltage
5V/1A
Charge time
2.5 hours
Built-in memory
32GB-128GB(FAT32)
Recording format
WAV
Music format
MP3/WMA/WAV
Support system
Windows/Mac/Android
USB interface
Type C
Material
High quality aluminum alloy
Operating temperature
20 to 110℉/ -5 to 4℃
Recording sampling rate
48kHz
Bit rate(Default)
192 kbps
Digital Voice Recorder
25
Package Contents
•Digital Voice Recorder x 1
•Data Cable x 1
•Wire Control x 1
•User Manual x 1
Memory Usage
Note: The above recording time is the maximum
recording time of the machine storage capacity,
not the continuous recording time by the battery.
(For reference only, the actual test may deviate)

Digital Voice Recorder
26
5.Questions and answers
Q1: Can't record?
1. Check if the storage space is full and delete
some recording files after backup
2. Recording is not possible when the recorder is
connected to a computer, mobile phone or
headphones (recording is terminated when these
devices are connected during recording). If you
want to record, disconnect from the recorder and
turn it on again
Q2: If PC / Phone connection fails?
Please refer to page 14~15: If PC/Phone
connection fails?
Q3: How to reduce noise?
1. Place the recorder stably and avoid rubbing it
against other objects, such as hands, clothing, etc.
2.Away from sources of noise (e.g. air
conditioning, typing, or subtle noise that may be

Digital Voice Recorder
27
generated by running computers)
3.The recorder should be at least 30cm away from
the sound source, otherwise it is likely to produce
a bursting sound
4. If the recording environment is very noise,
please understand there will be extra noise in your
recording.
Advice: Record in a quiet environment
Q4: Can't listen after connecting earphones?
1. Make sure the earphone has been inserted,
make sure the recorder is turned off before
inserting the earphone
2. Make sure there is a recording file in the
recorder
3. The sound may be too low, you can increase
the volume appropriately
4. The file being played is not supported by the
recorder(only supports MP3/WMA/WAV
formats)

Digital Voice Recorder
28
Q5: Can't fast forward/rewind?
Fast forward/rewind is only possible during
playback
Q6: Why is the actual storage space of this
recorder not up to the advertised storage
space?
A: All memory manufacturers in the world
produce the memory according to 1000 MB = 1
GB, while the computer recognizes the recorder
according to 1024 MB = 1 GB. At the same time,
the system software also takes up part of the
storage space, so the actual capacity is smaller
than the indicated capacity. This problem exists in
the memory of all electronic products
Q7: I lost my earphone and remote control.
Where can I get a new one?
A: Don’t worry about it, please contact us as soon
as possible, and we will solve your problem
quickly.

Digital Voice Recorder
29
Q8: Does the recorder have a built-in speaker?
A: No, recording files can be played back via
headphones, computer or android phone
Q9: Does it support recording while
charging?
A: Yes. If you turn on the recording first and then
connect the USB wall charger to charge, it will
charge and record at the same time.
Q10: What if this product does not meet my
expectations?
If this product does not meet your expectations or
have any product problems please send us an
email to tell us, we will reply you as soon as
possible within 24 hours to give you the most
satisfactory solution. After-sales mailbox:
vivaniir@163.com
Digital Voice Recorder
30
E-Manual(5 language)
English
Deutsch
Español
Français
Italiano

Digital Voice Recorder
31
Cautions
1. Children should not be allowed to play with the
recorder alone. Do not drop or allow your device to
collide with hard objects. Otherwise, it may cause data
loss or other hardware damage of the recorder.
2. Do not clean the recorder with chemical reagents or
cleaning reagents, which will damage the shell of the
recorder and corrode it.
3. It is recommended not to us this recorder when
driving a motor vehicle or riding a bicycle. Please
ensure driving safety.
4. Please back up the important files in the recorder in
time. No one can guarantee the absolute security of the
data. If data loss occurs, the files will be difficult to
recover.
5. Do not overload the charger. Do not allow the
charging cable to be squeezed by heavy objects for a
long time. Keep your device away from combustibles
when charging, in order to avoid fire.
6. In order to prevent electric shock, do not pull out
the charger with wet hands.
Digital Voice Recorder
32
Warranty and Service
If a product is damaged or broken within one year,
we will replace it with a new product free of
charge. The warranty does not cover loss of
products due to customer's negligence.
Order number
After-sales Email
(For after-sales only)
vivani[email protected]
Date of purchase
Warranty Period
1 year from the date of
purchase
We are sorry, but we do not provide support by
calling us. We apologize for the inconvenience,
but you can contact us by e-mail and we will
respond quickly and as detailed as possible.
(When contacting us, please provide your
shopping platform and order number).