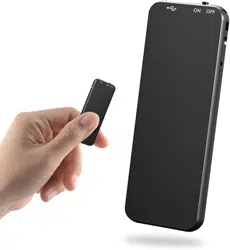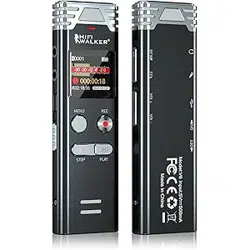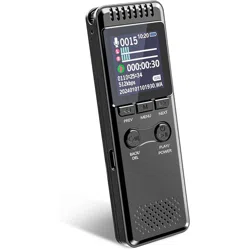

Digital Voice Recorder
V30(EN)
Digital Voice Recorder Manual
Please read carefully before using the voice recorder,
most problems can be avoided!

Digital Voice Recorder
Catalog
1. Product appearance .............................................. 1
2. Steps to use (Quick help) ...................................... 3
2.1 Charge............................................................... 3
2.2 Power on/off......................................................4
2.3 Enter menu ........................................................ 5
2.4 Set your language and date-time ....................... 6
2.5 Record/Save ...................................................... 7
2.6 Select recording/music file ................................8
2.7 Play/Pause ......................................................... 9
2.8 Fast forward/rewind ........................................ 10
2.9 Back/Delete/Delete all .....................................11
2.10 A-B repeat ..................................................... 12
2.11 Voice activation ............................................. 13
2.12 Reset button ...................................................14
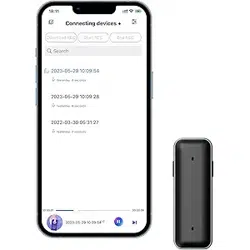
3. Playback on computer ........................................ 15
4. Menu .....................................................................16
4.1 Play mode ........................................................16
4.2 Recording settings ...........................................17
4.3 System settings ................................................21
4.4 File browsing ...................................................24
4.5 Sound settings ................................................. 24

Digital Voice Recorder
4.6 Delete .............................................................. 24
4.7 Delete all ......................................................... 24
4.8 Exit .................................................................. 24
5. Technical specifications .......................................25
6. QA&Warm Tips (Must view!) ........................... 28
E-Manual(6 Language) ...........................................35
Cautions ................................................................... 36
Warranty and Service .............................................37
* Hi friends, if you encounter any problems or
questions in the process of using the recorder,
please contact us on the shopping platform
we will respond quickly within 24 hours.
Amazon: [Order History] - [Seller] - [Ask a
Question]

1
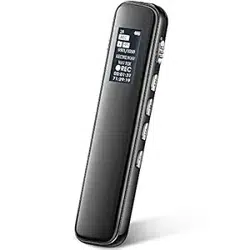
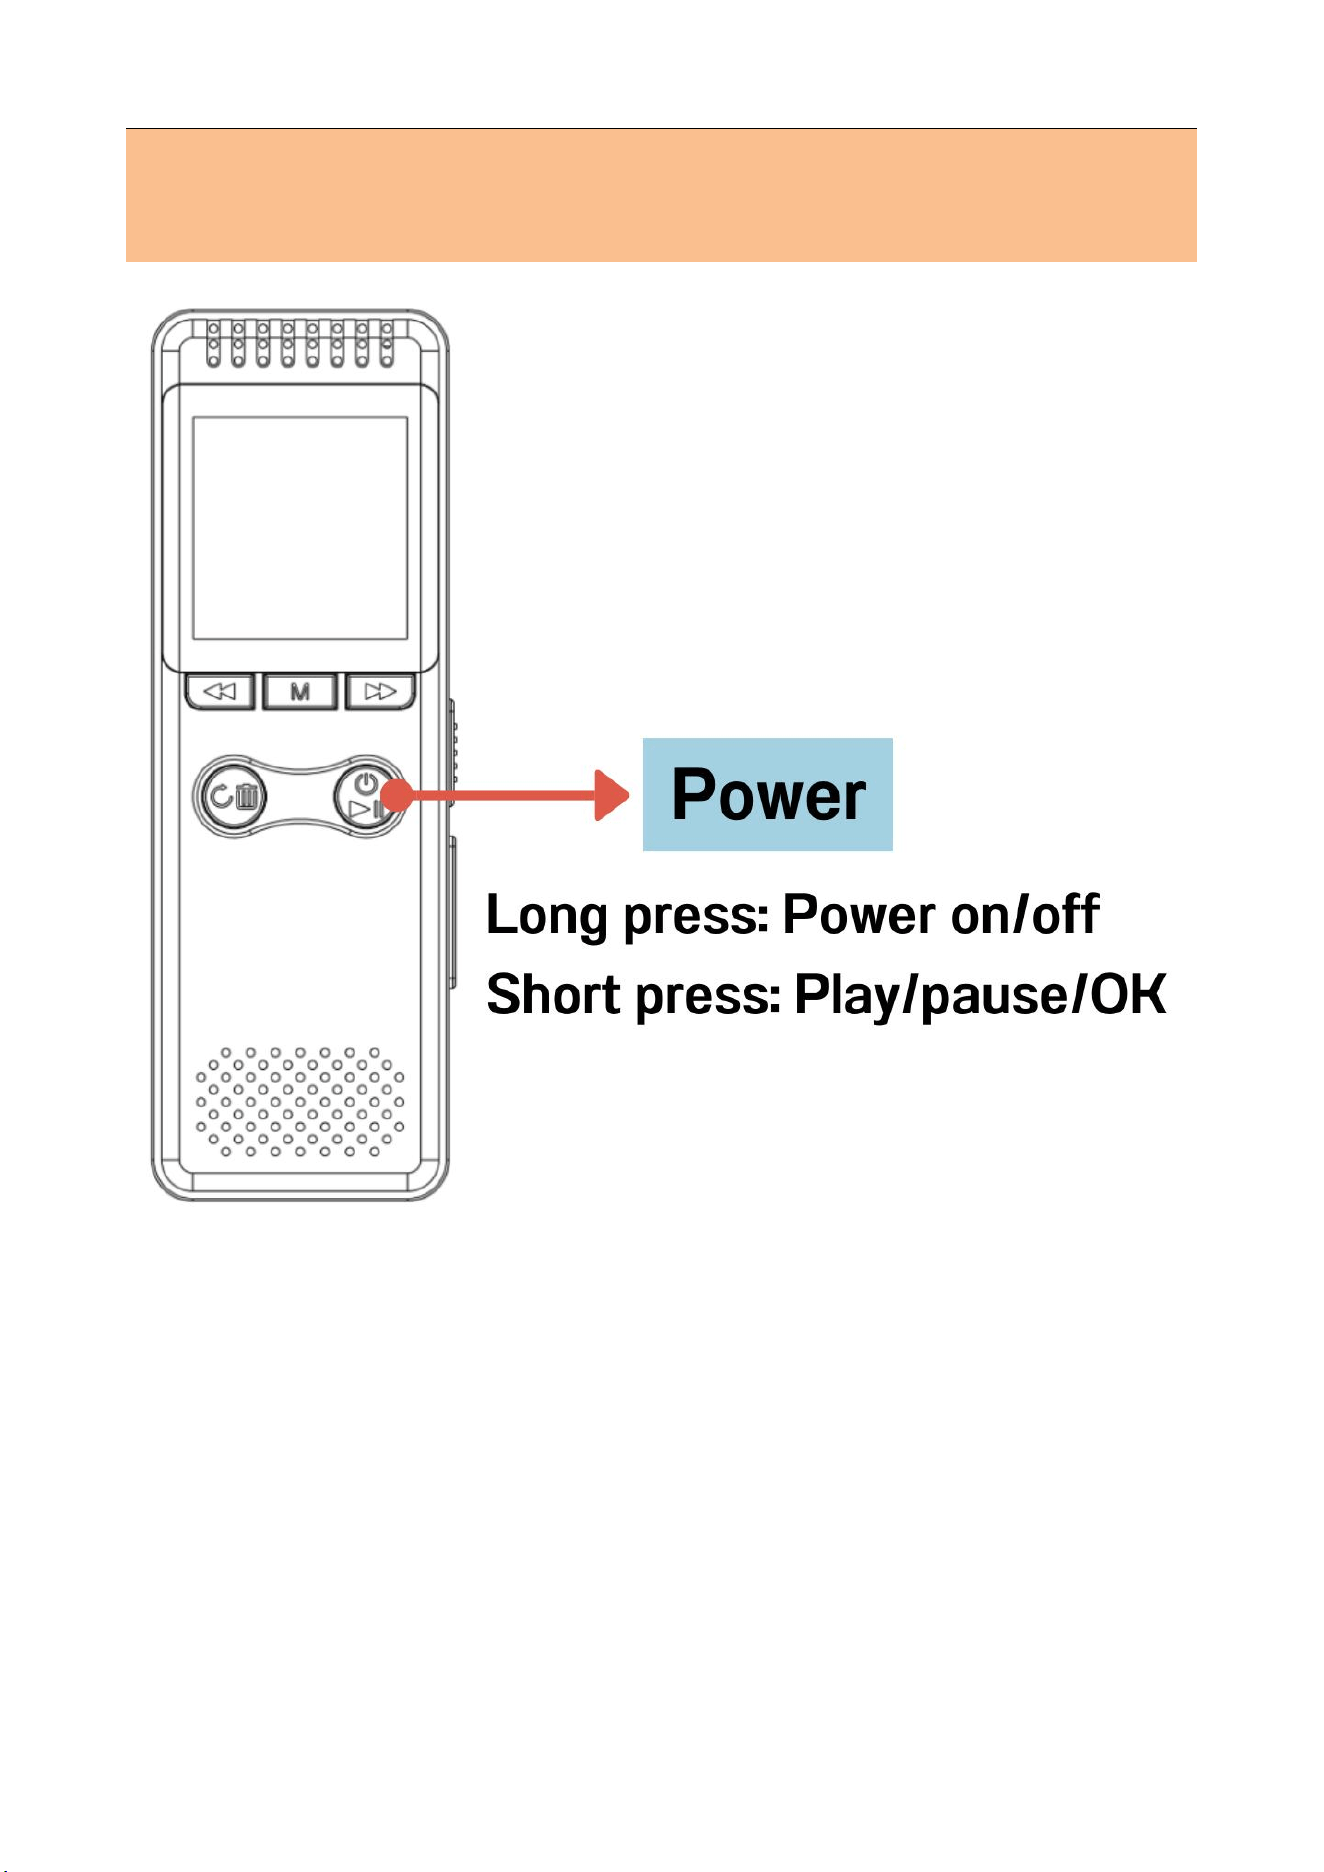
1. Product appearance
① Push up/down to Record/Save
② "+": Volume up ③ "-" : Volume down
④ Lanyard hole ⑤ Display screen
⑥ Previous song : short press to switch the

2
previous song. When playing, long press to fast
rewind
⑦ Back / Long press to delete: When in the menu,
short press to return to the previous level. While
playing, short press to stop playing and return to the
audio starting point. Long press to bring up the delete
option
⑧ Speaker hole ⑨ Audio input hole
⑩ 3.5mm earphone jack: Connect headphones /
audio cable
⑪ Indicator light
⑫ Next song : Short press to switch to the next
song. When playing, long press to fast forward
⑬ Menu M Button: Long press to enter the settings
menu. When pause/stop playing, short press to switch
music files and recording files
⑭ Power/Play/Pause/OK:
Long press to turn on/off
Short press to play/pause/OK
⑮ Reset button: In case of a crash situation, reset by
this button (Don't worry: it won't delete any files.)
⑯ USB Type-C jack: Charge or data transmission
3
2. Steps to use (Quick help)
2.1 Charge
Charging interface
USB Type-C
Battery capacity
1100mAh
Charging time
4 Hours
When charging: The battery symbol is scrolling,
indicating that it is charging.
Fully charged: The battery symbol is not moving
when the battery is fully charged.
Note: When the power is low, please use a
professional USB wall charger to charge in time
If you charge directly on the computer, the charging
speed will be very slow, and the full charge time will
become very long
4
2.2 Power on/off
After power on, without any operation 30 seconds,
it will automatically backlight; 120 seconds later,
it will automatically shut down.
You can enter the menu: (System
settings--backlight timer) to set backlight / off
time
5
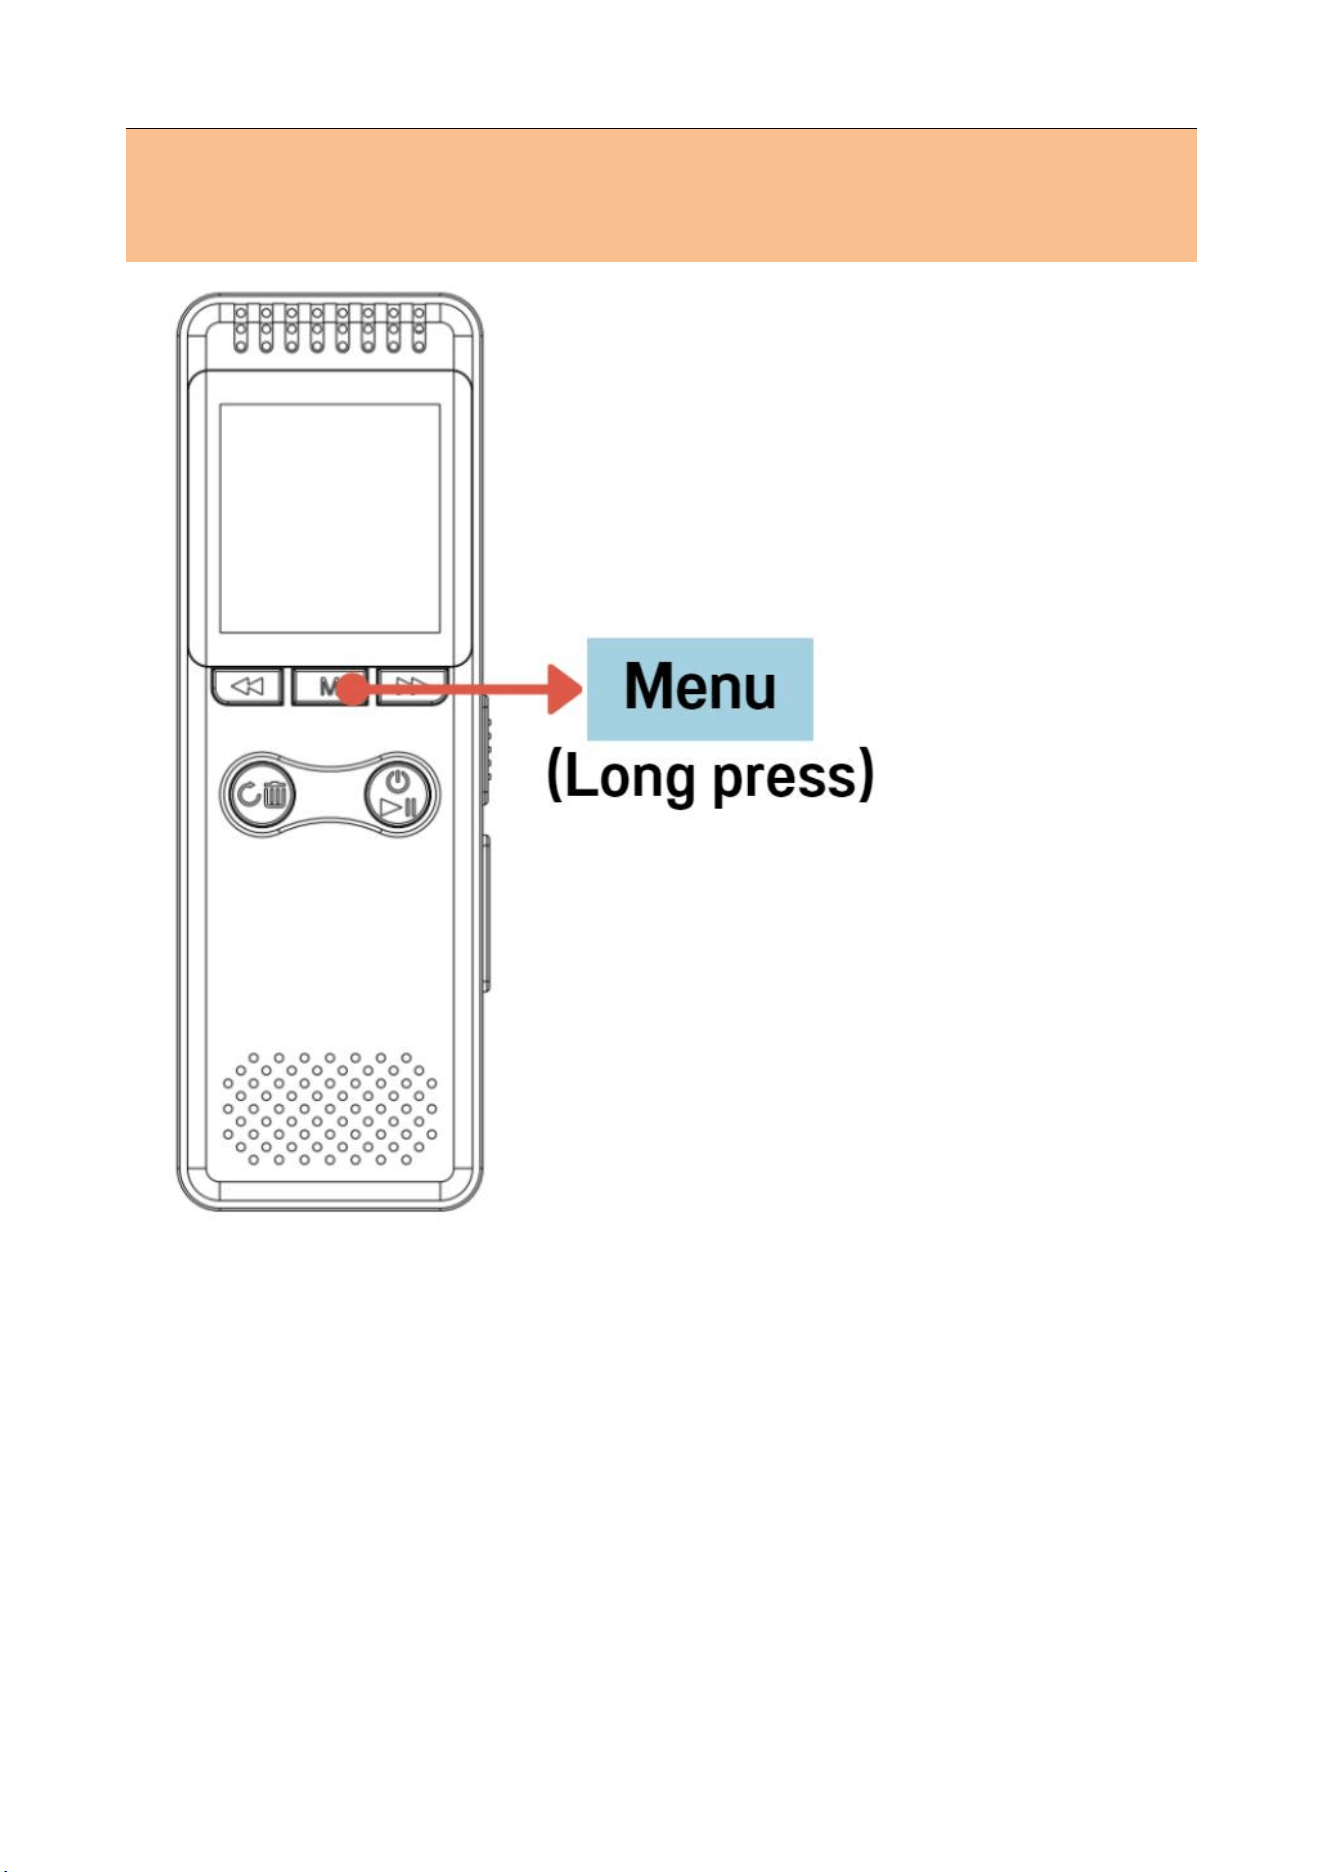
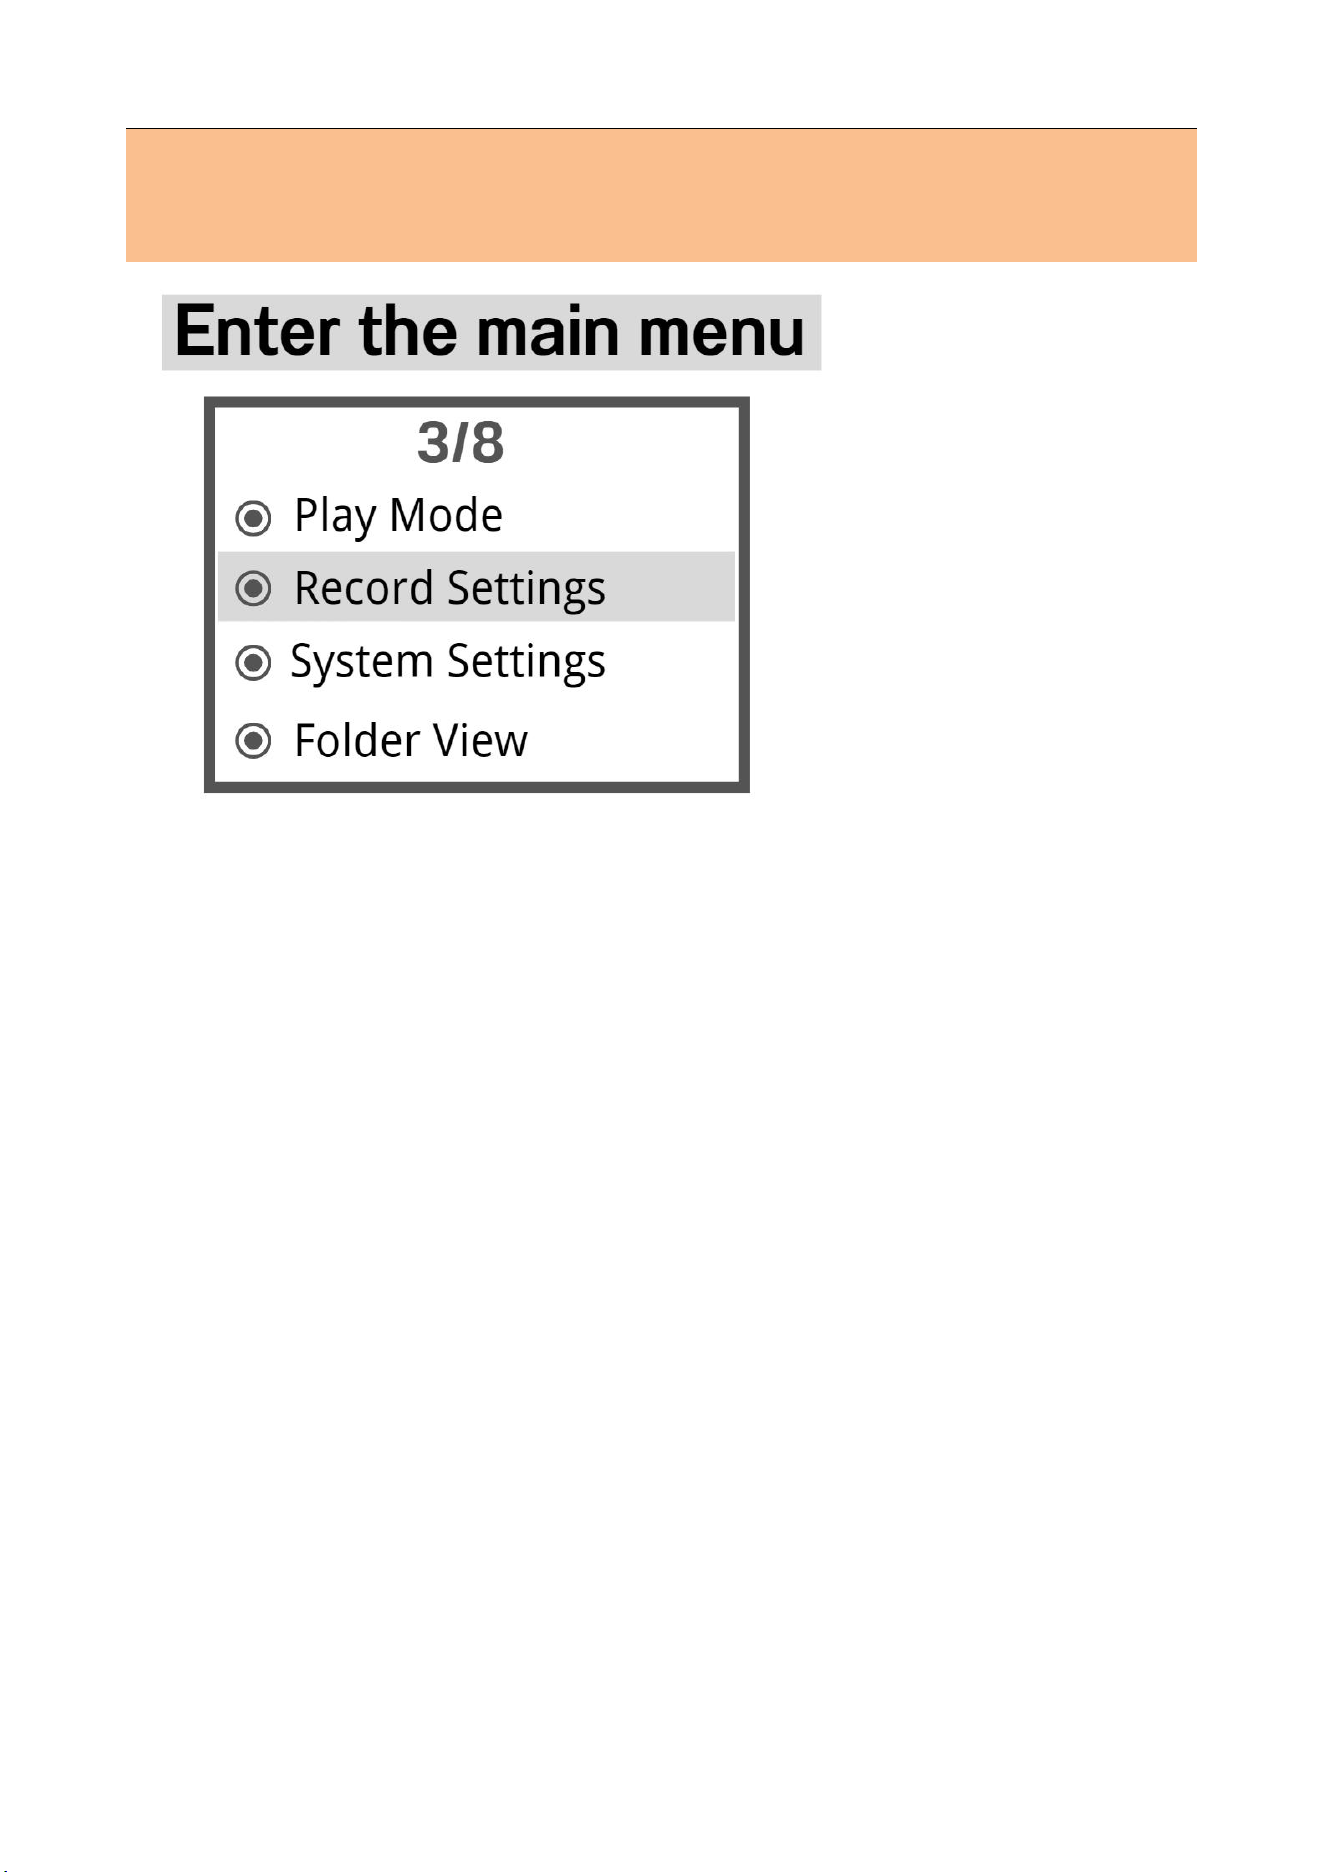
2.3 Enter menu
Please long press M to enter the menu settings
Please short press the “PLAY/POWER” key to
save the changes, and then exit
6
2.4 Set your language and date-time
The recording files are named after the date and
time of the recording
Recommend that: set the correct language and
date-time before recording.
7
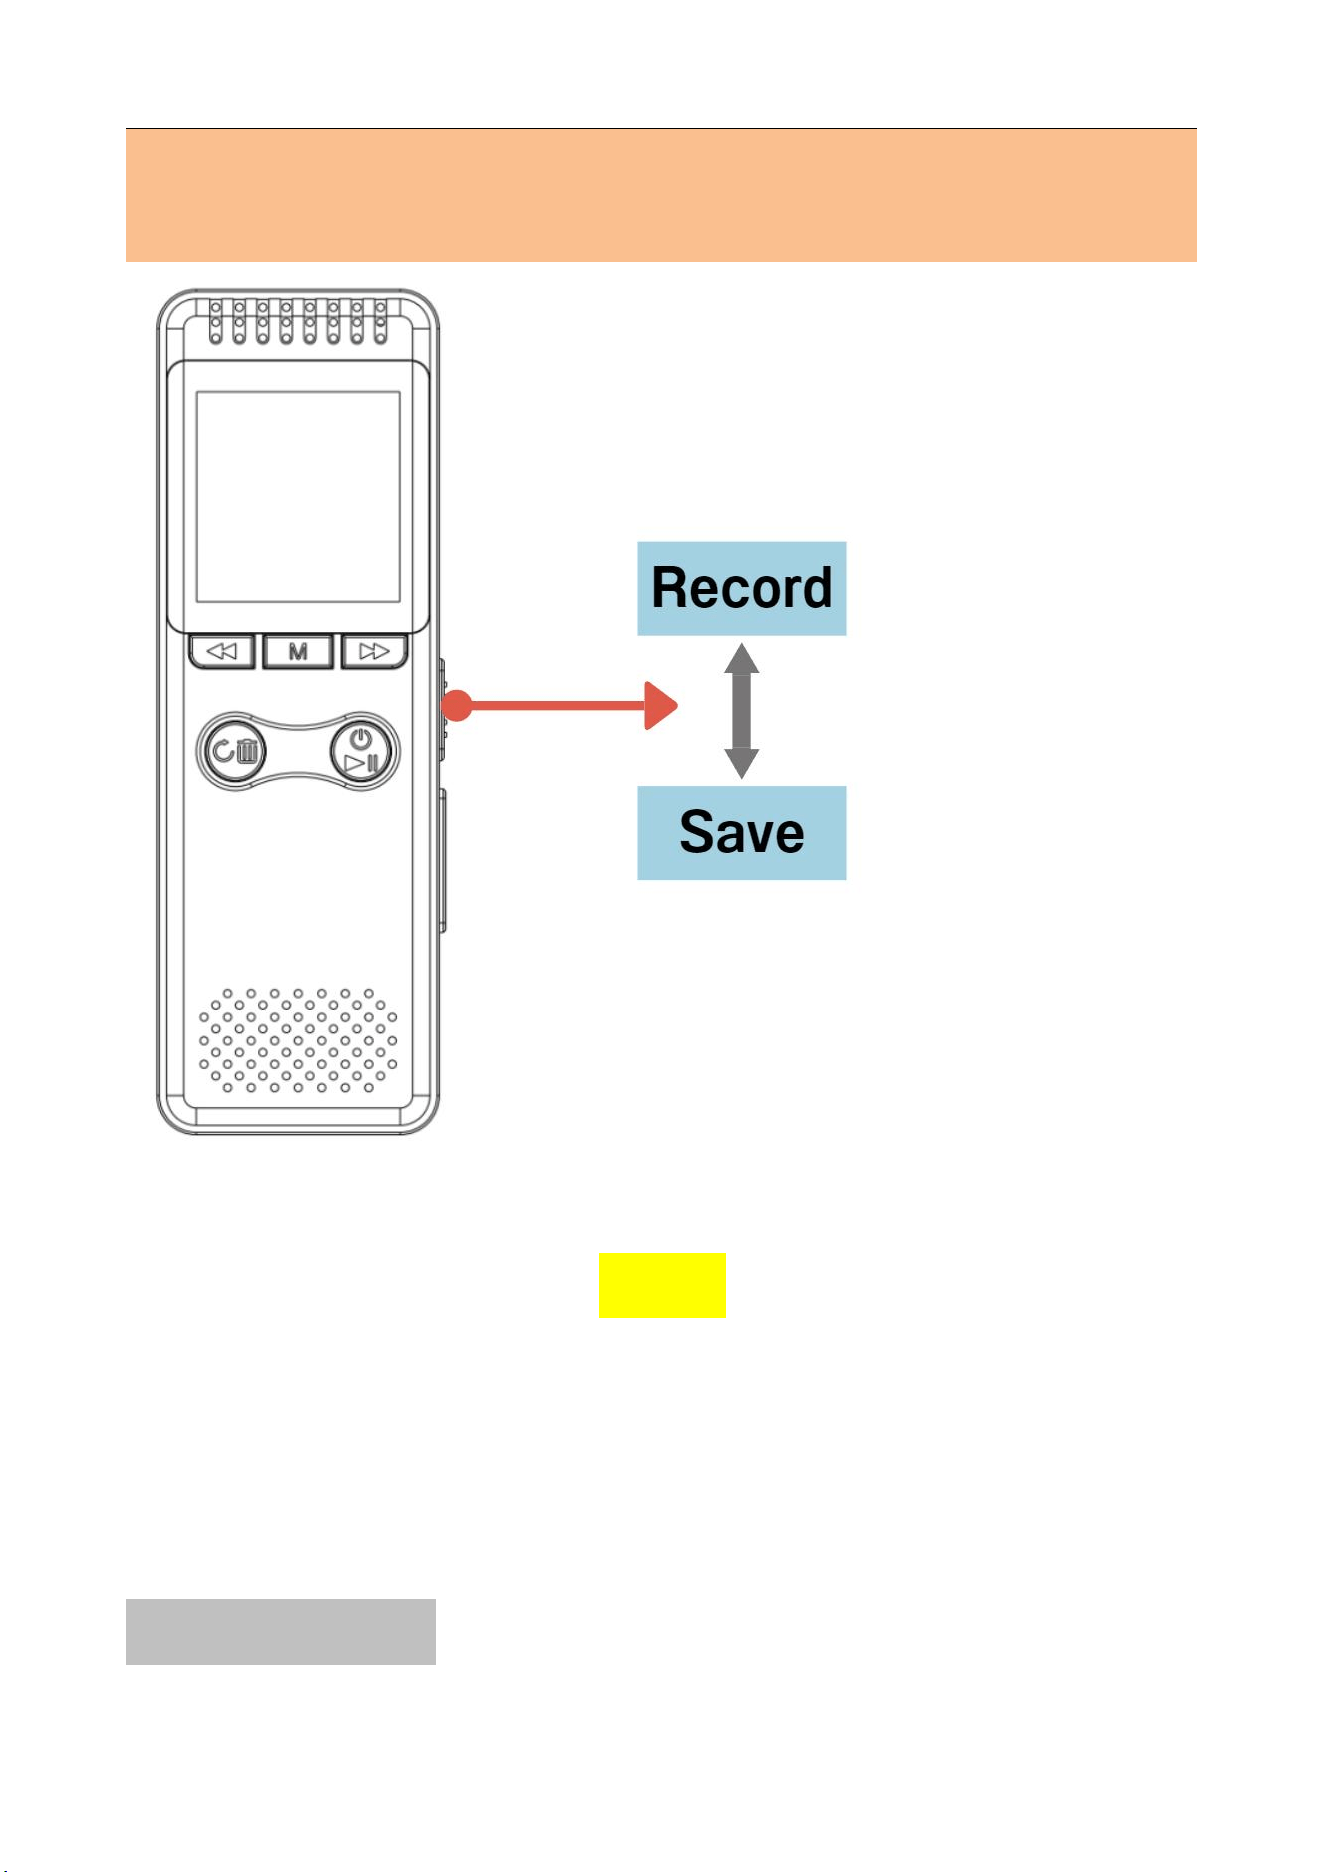
2.5 Record/Save
There is a default light when recording, you
can turn it off in the menu (Recording settings
- Recording indicator - OFF)
In the power-on/off state, you can quickly record
with one click swipe
While recording, press the “PLAY” button to
pause/resume recording
8
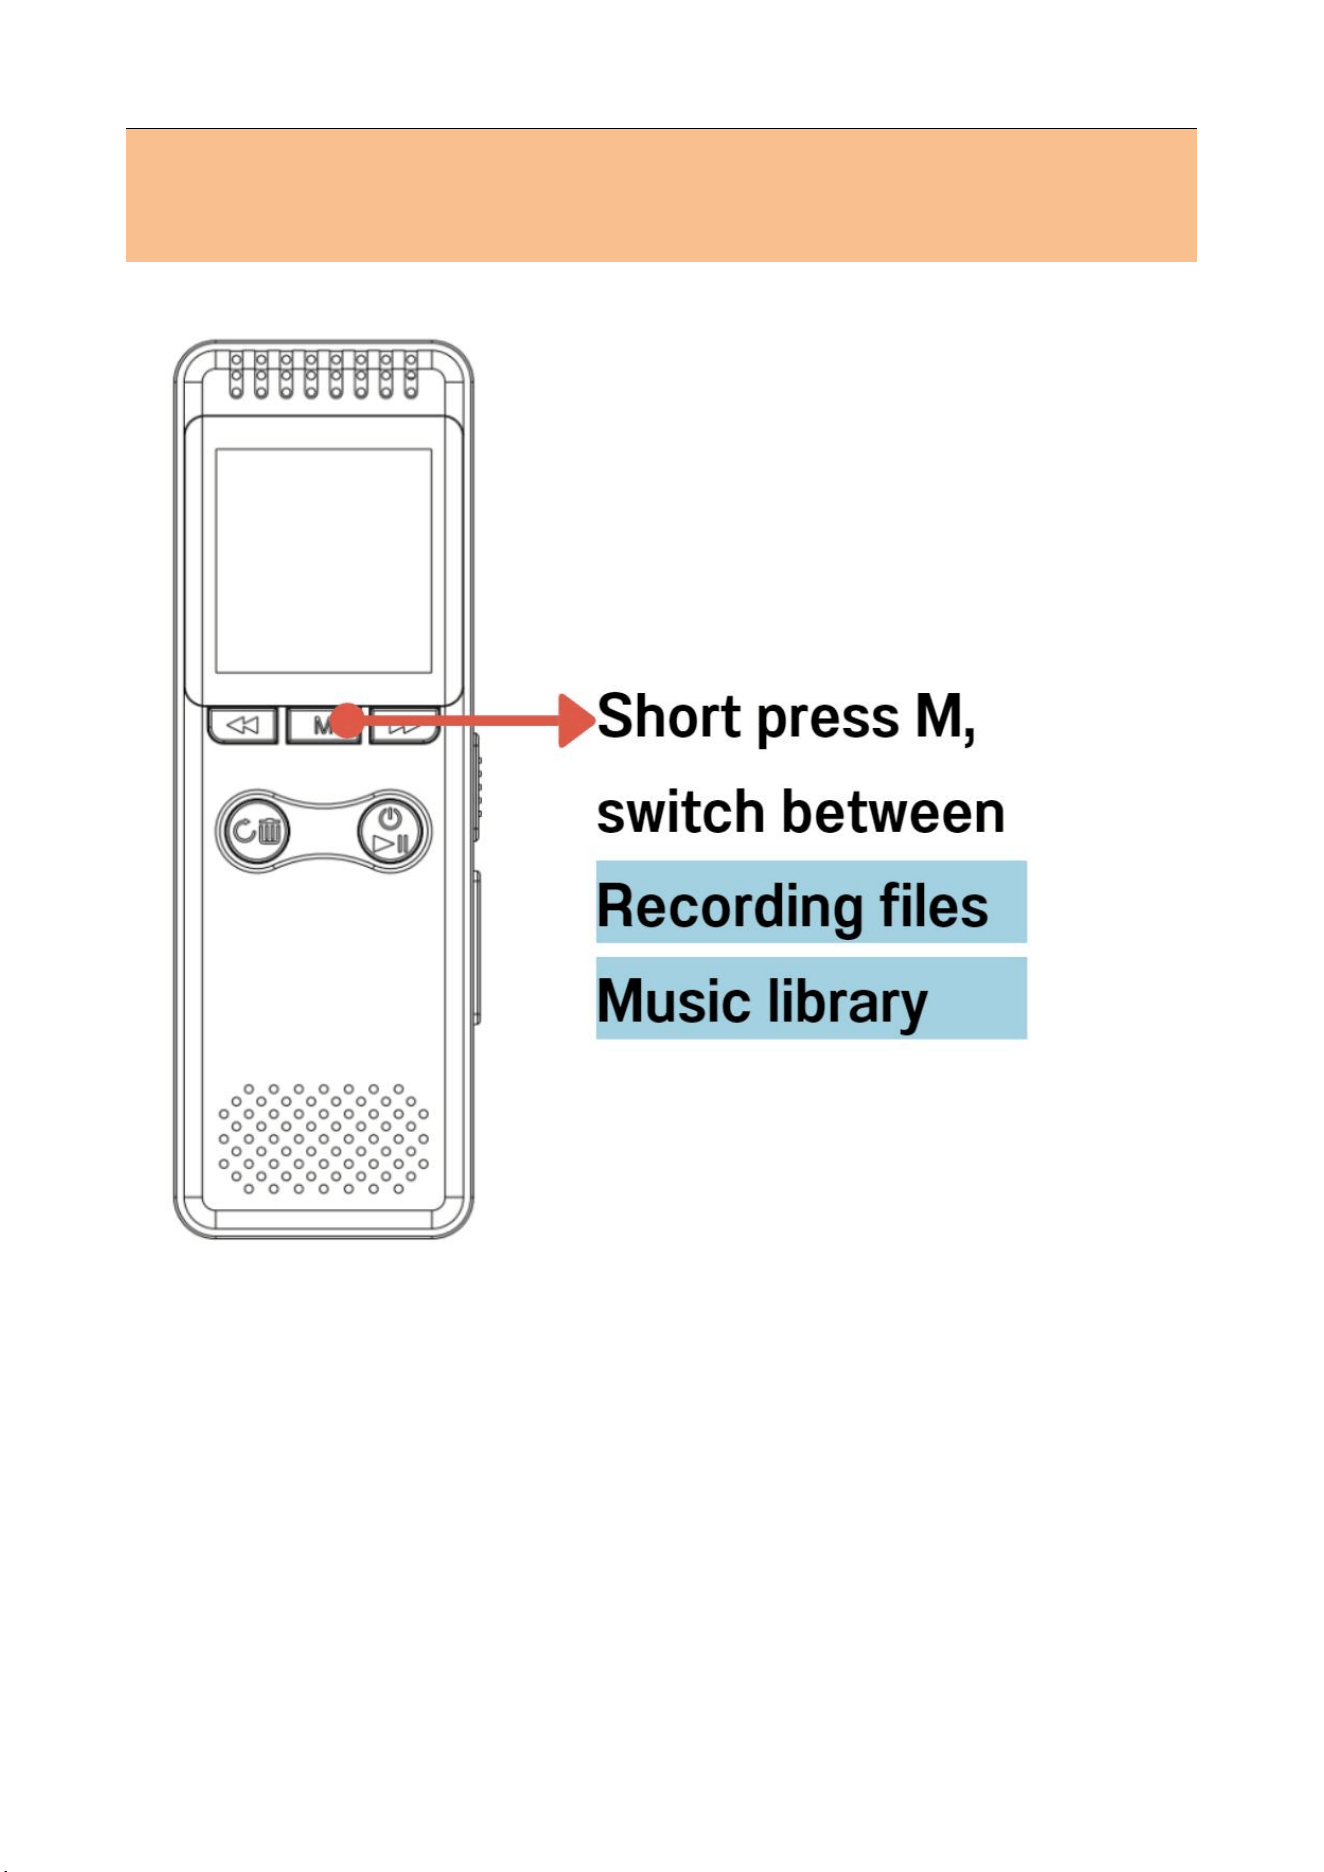
2.6 Select recording/music file
Before playing, press M briefly and switch freely
to the recording file or music file to find the file
you need.
9
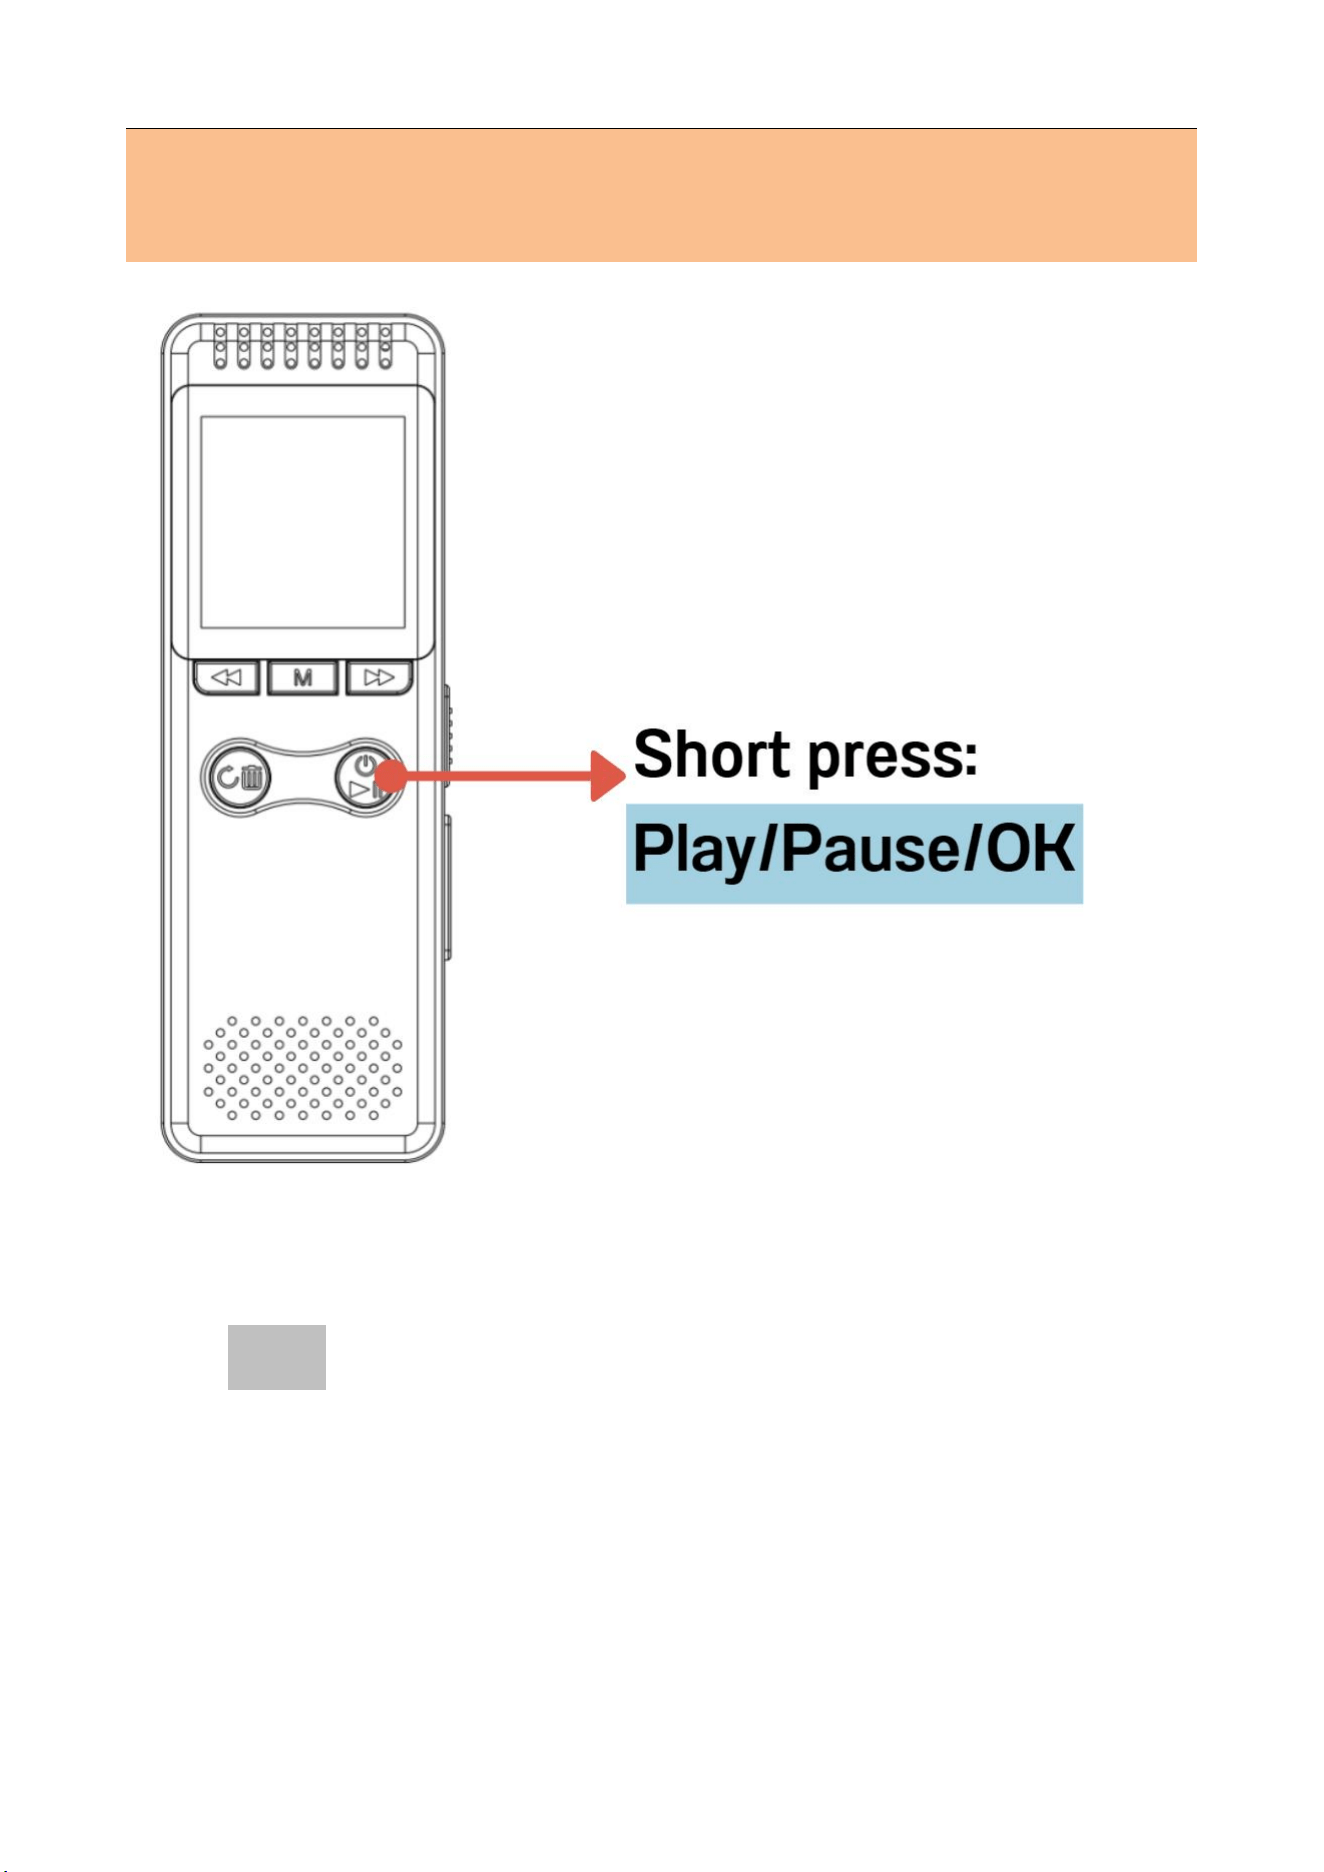
2.7 Play/Pause
First find the recording or mp3 files, then press
the “play” button to play
10
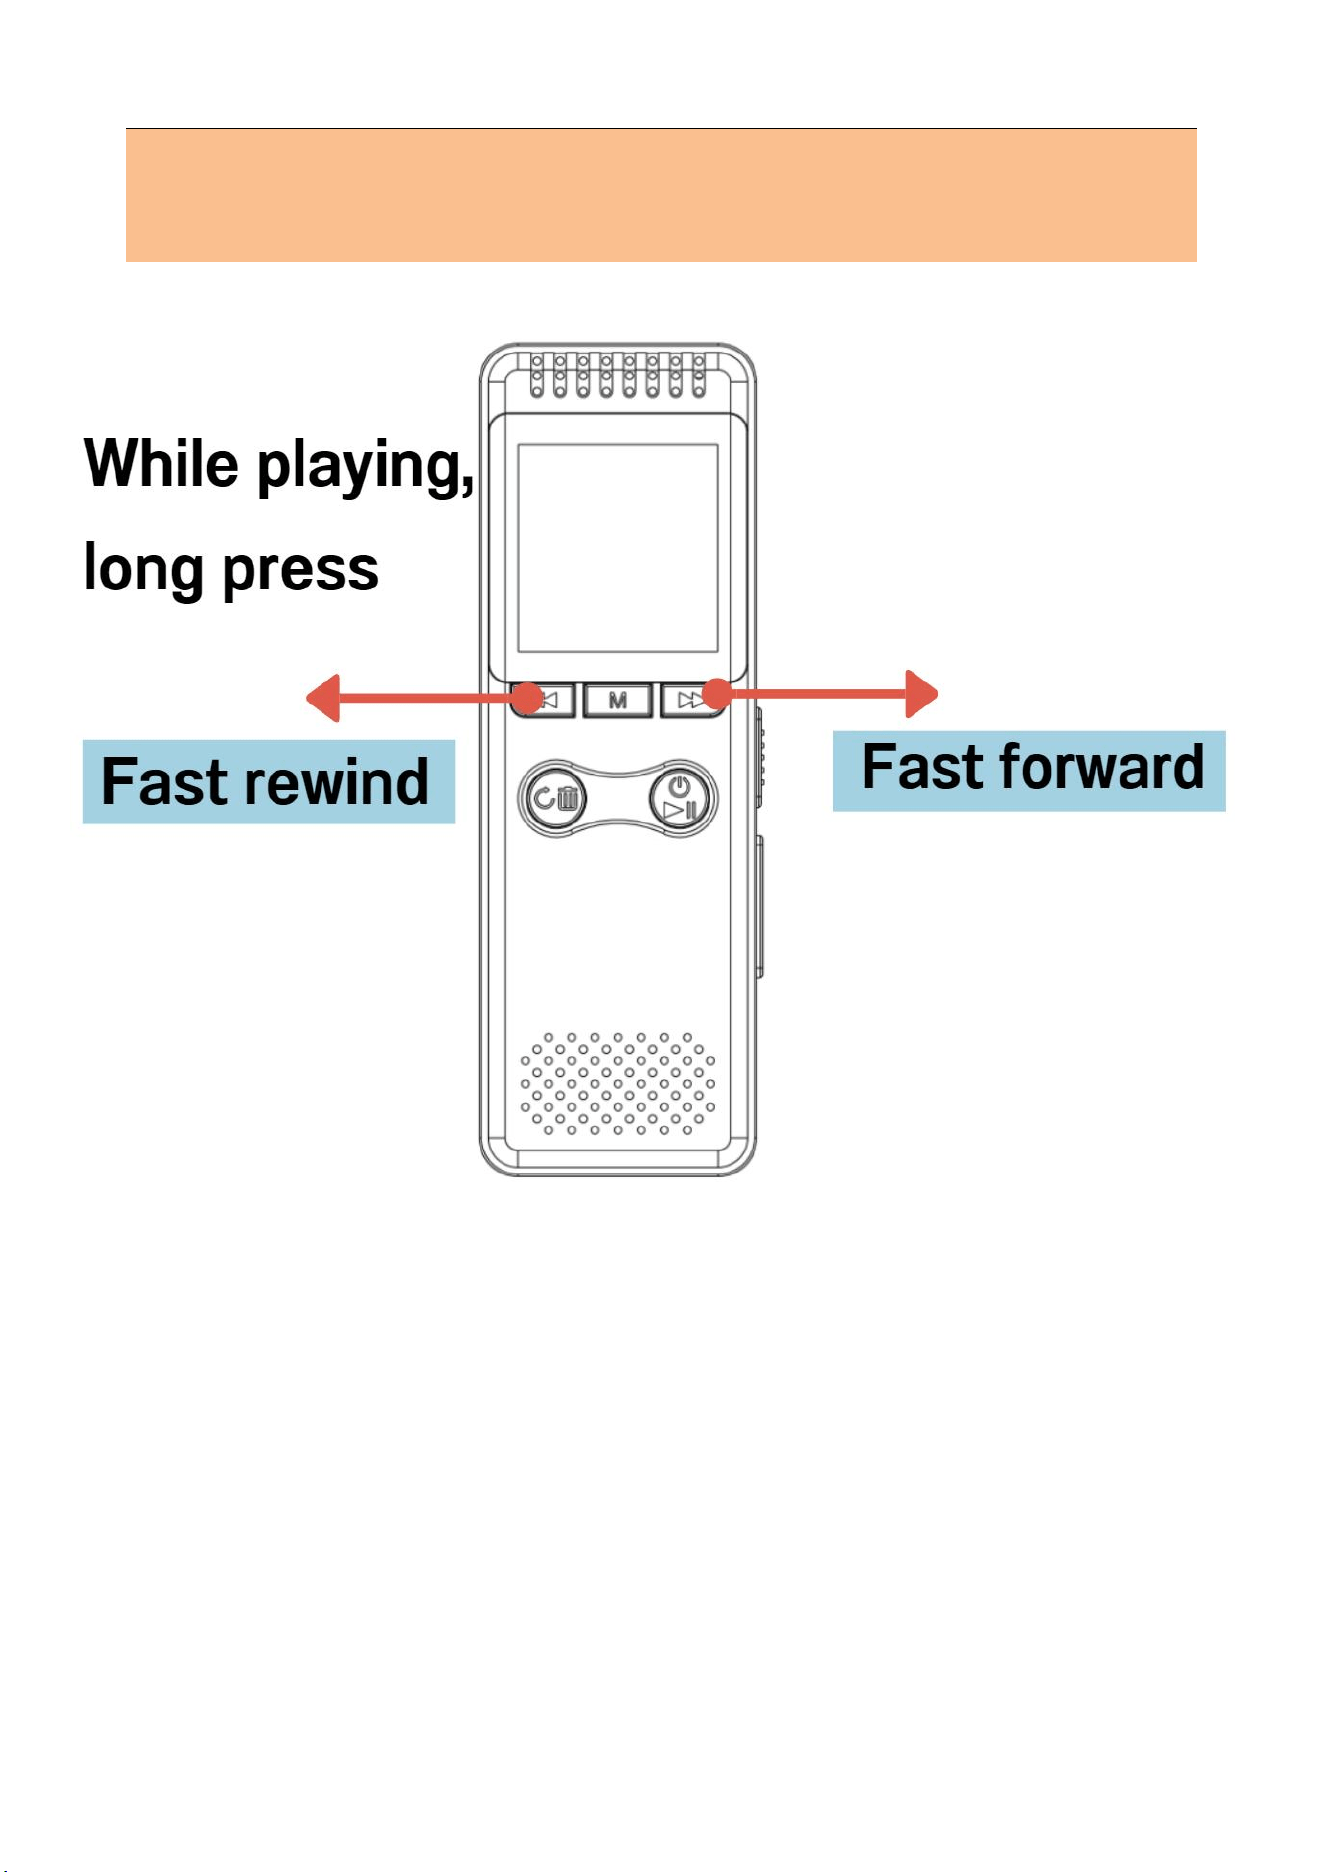
2.8 Fast forward/rewind
Fast forward/fast rewind is only possible in the
playback state
11
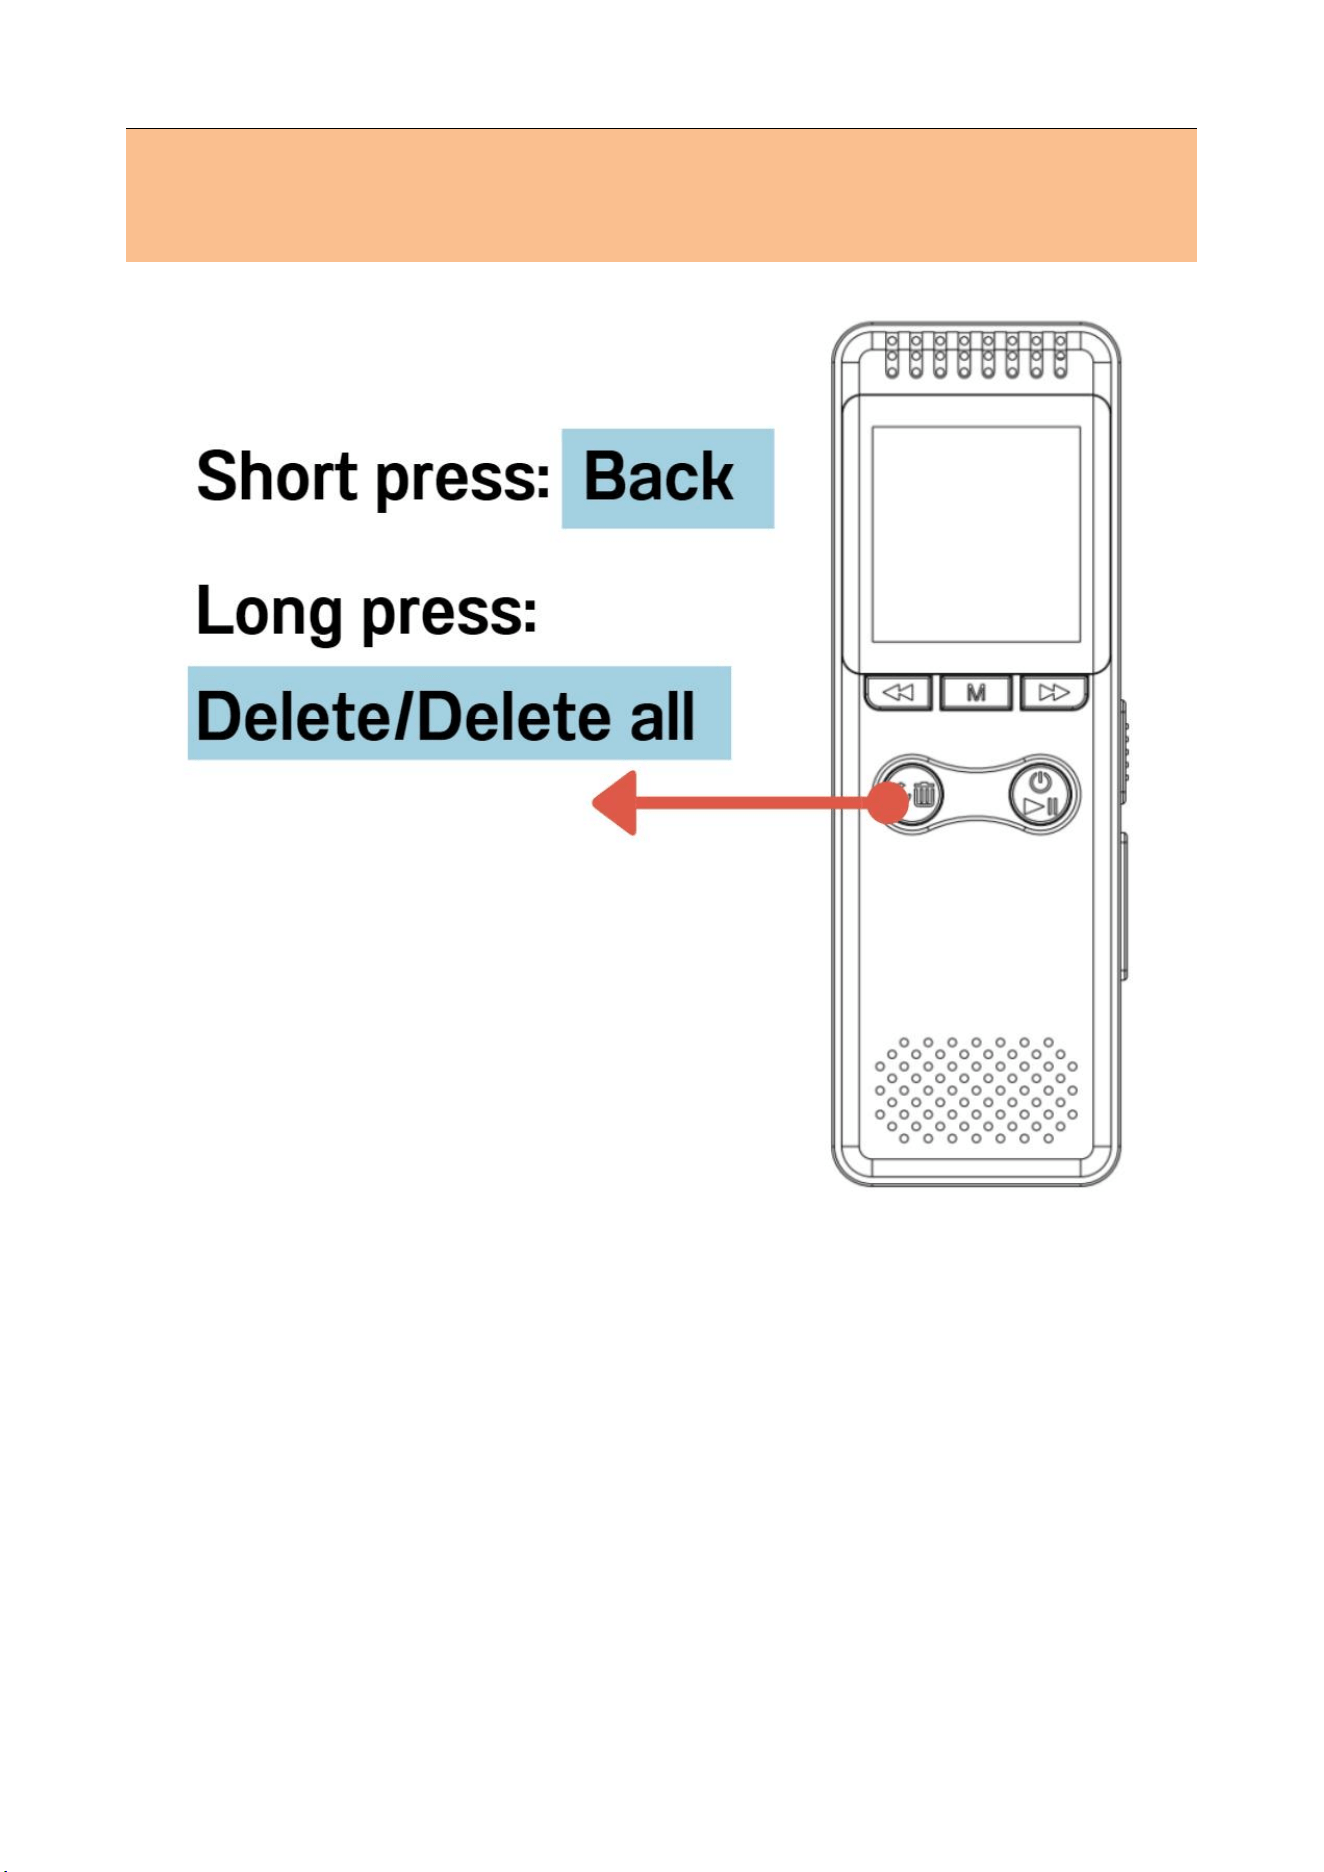
2.9 Back/Delete/Delete all
Select the recording or mp3 files, long press the
key screen will display (delete/delete all)
Note: Delete with caution, once deleted you
cannot retrieve the file
12
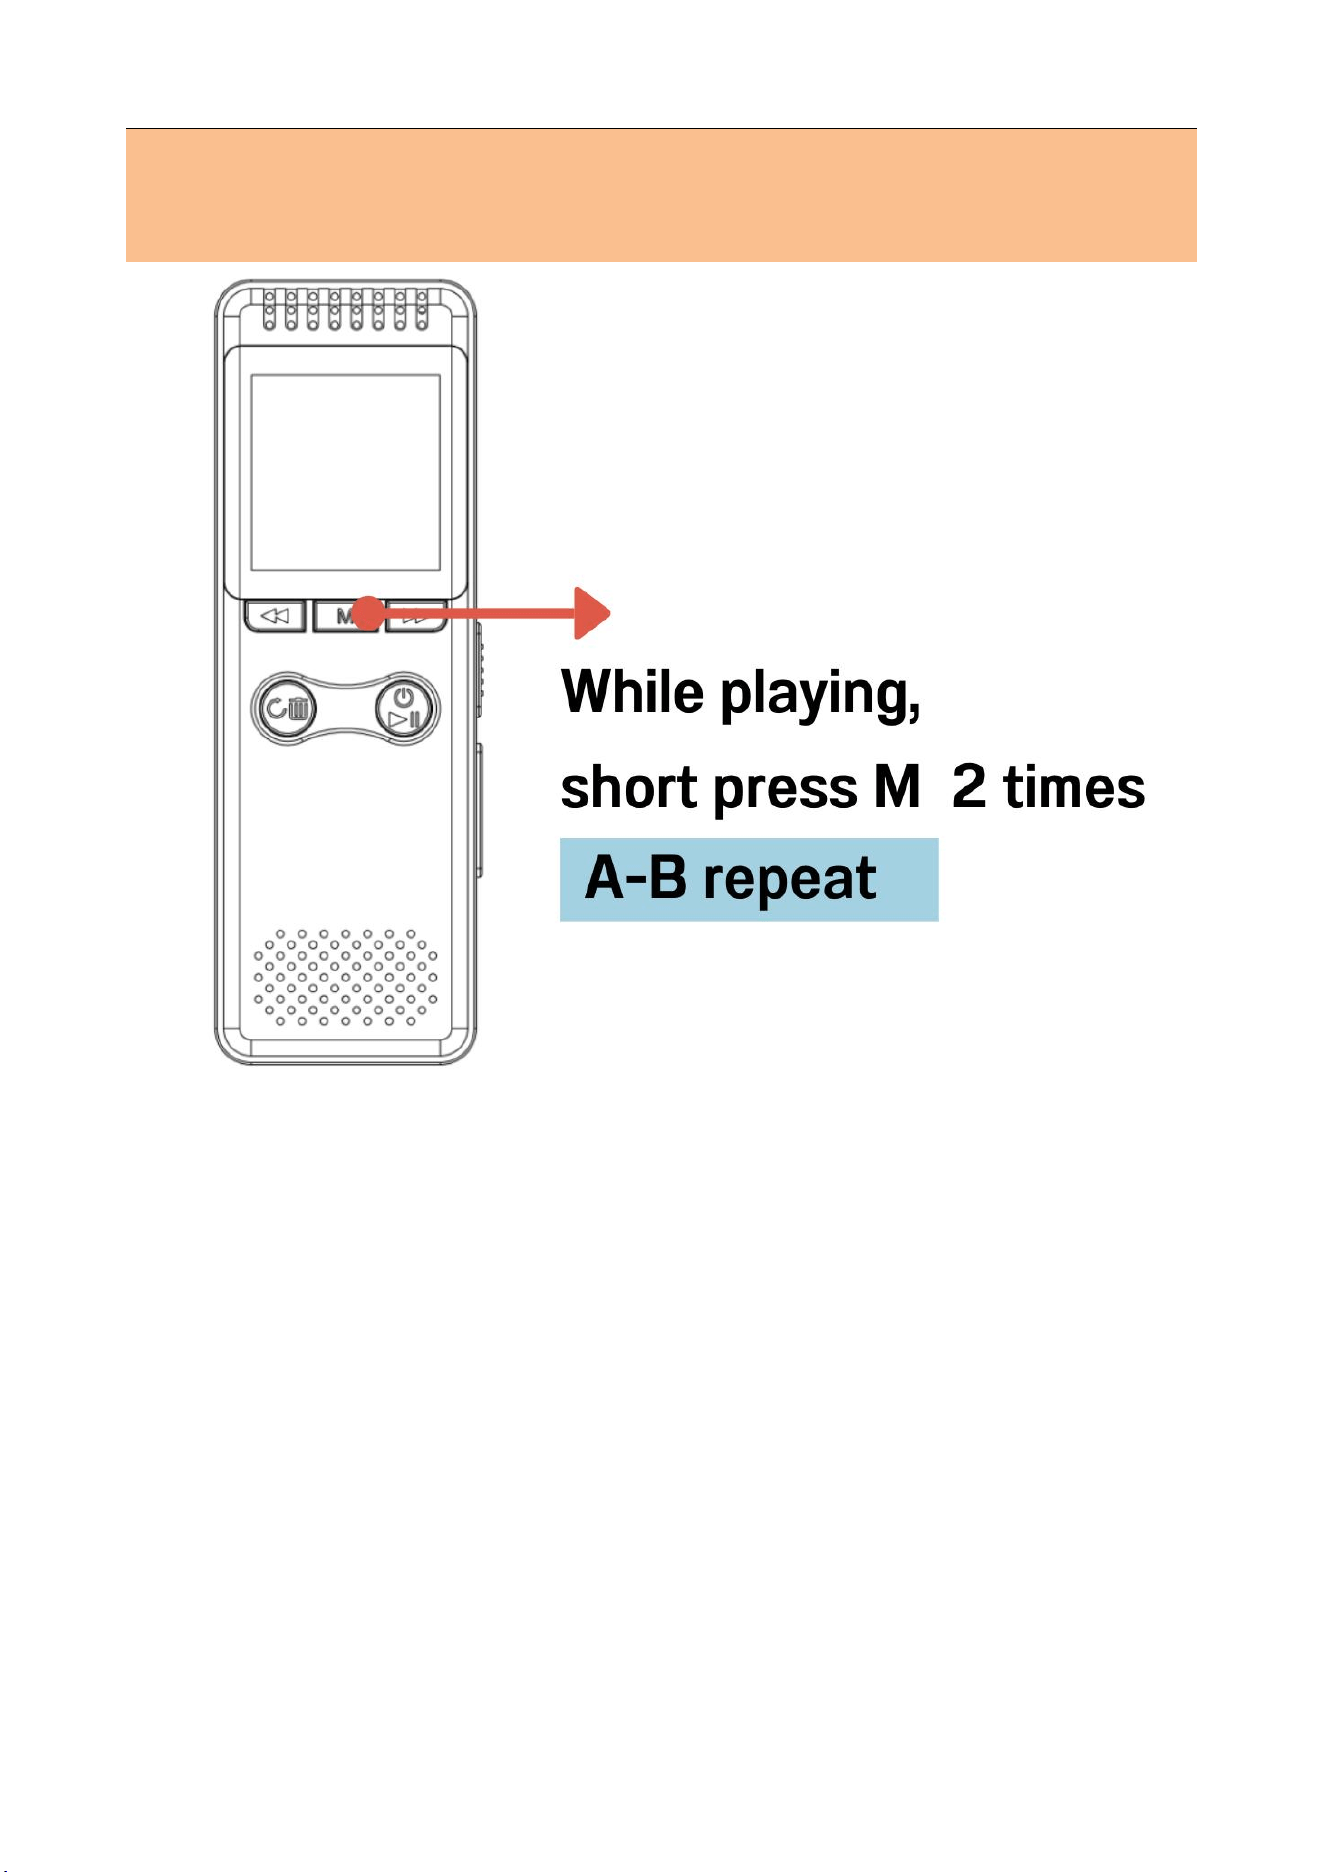
2.10 A-B repeat
In the state of playing files:
① short press the "M" key once, the screen "B"
in the flashing, that this is the start of the repeat
section
② Short press "M" key again to determine the
end of the repeat section, and start to repeat the
playback in the A-B interval
③ Short press the "M" key again to exit the A-B
repeat mode.
13
2.11 Voice activation
Voice activation is turned off by default and you
need to enter the main menu to turn it on:
Step 1: Turn on voice activation, path: Enter the
main menu- [Recording Settings] - [AVR mode] -
[AVR on/off] - [AVR ON]
Step 2: Slide up the recorder with one key to turn
on recording
NOTE: After turning on voice activation, low
decibel sounds may be missed, so please turn on
this feature with caution. It is not recommended
to use in critical environments
14
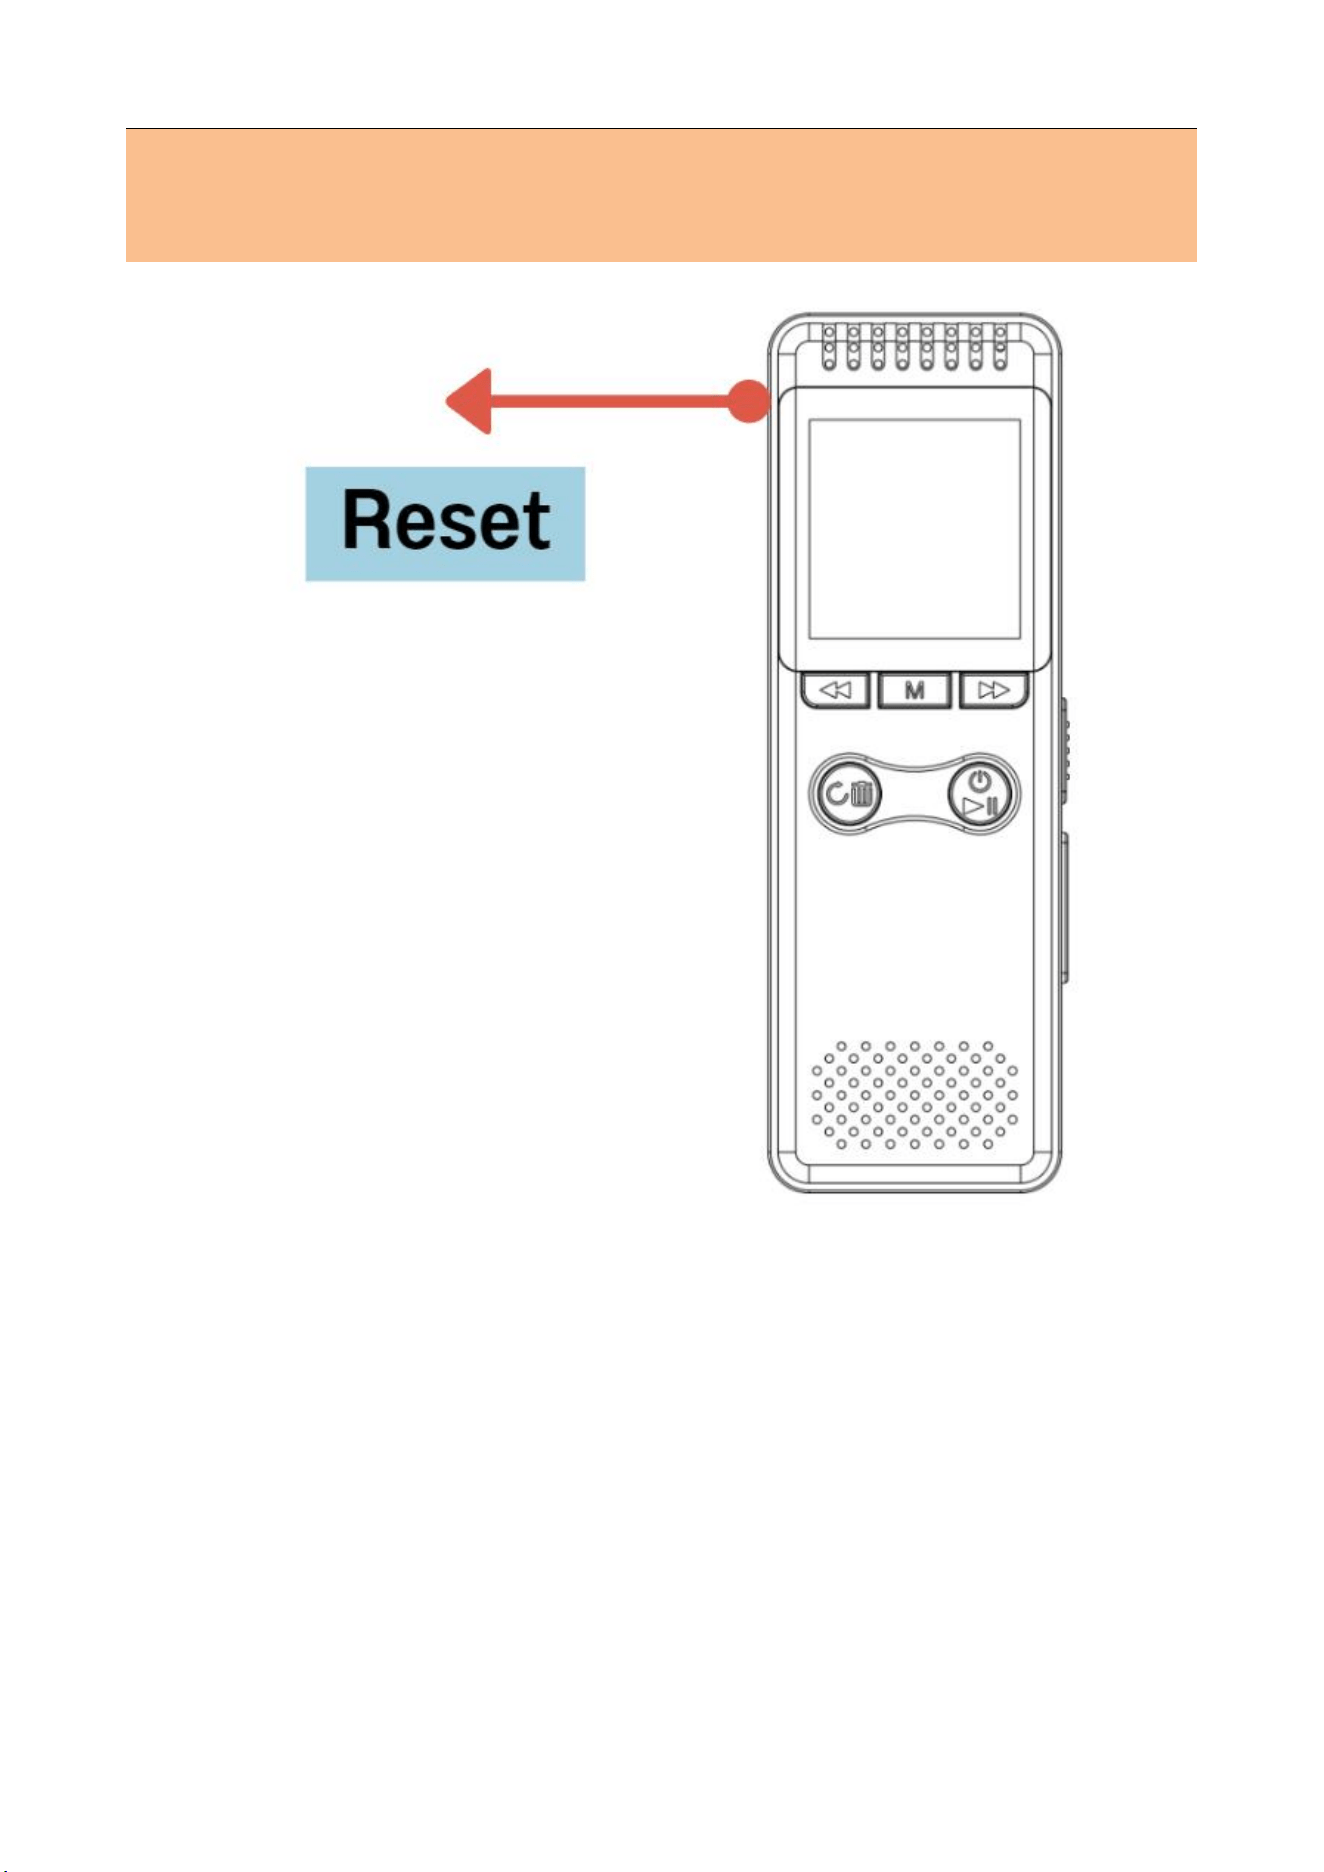
2.12 Reset button
If there is a dead/unable to connect to the
computer or other situations, you can try the reset
button. Please rest assured: it will not delete any
files
15
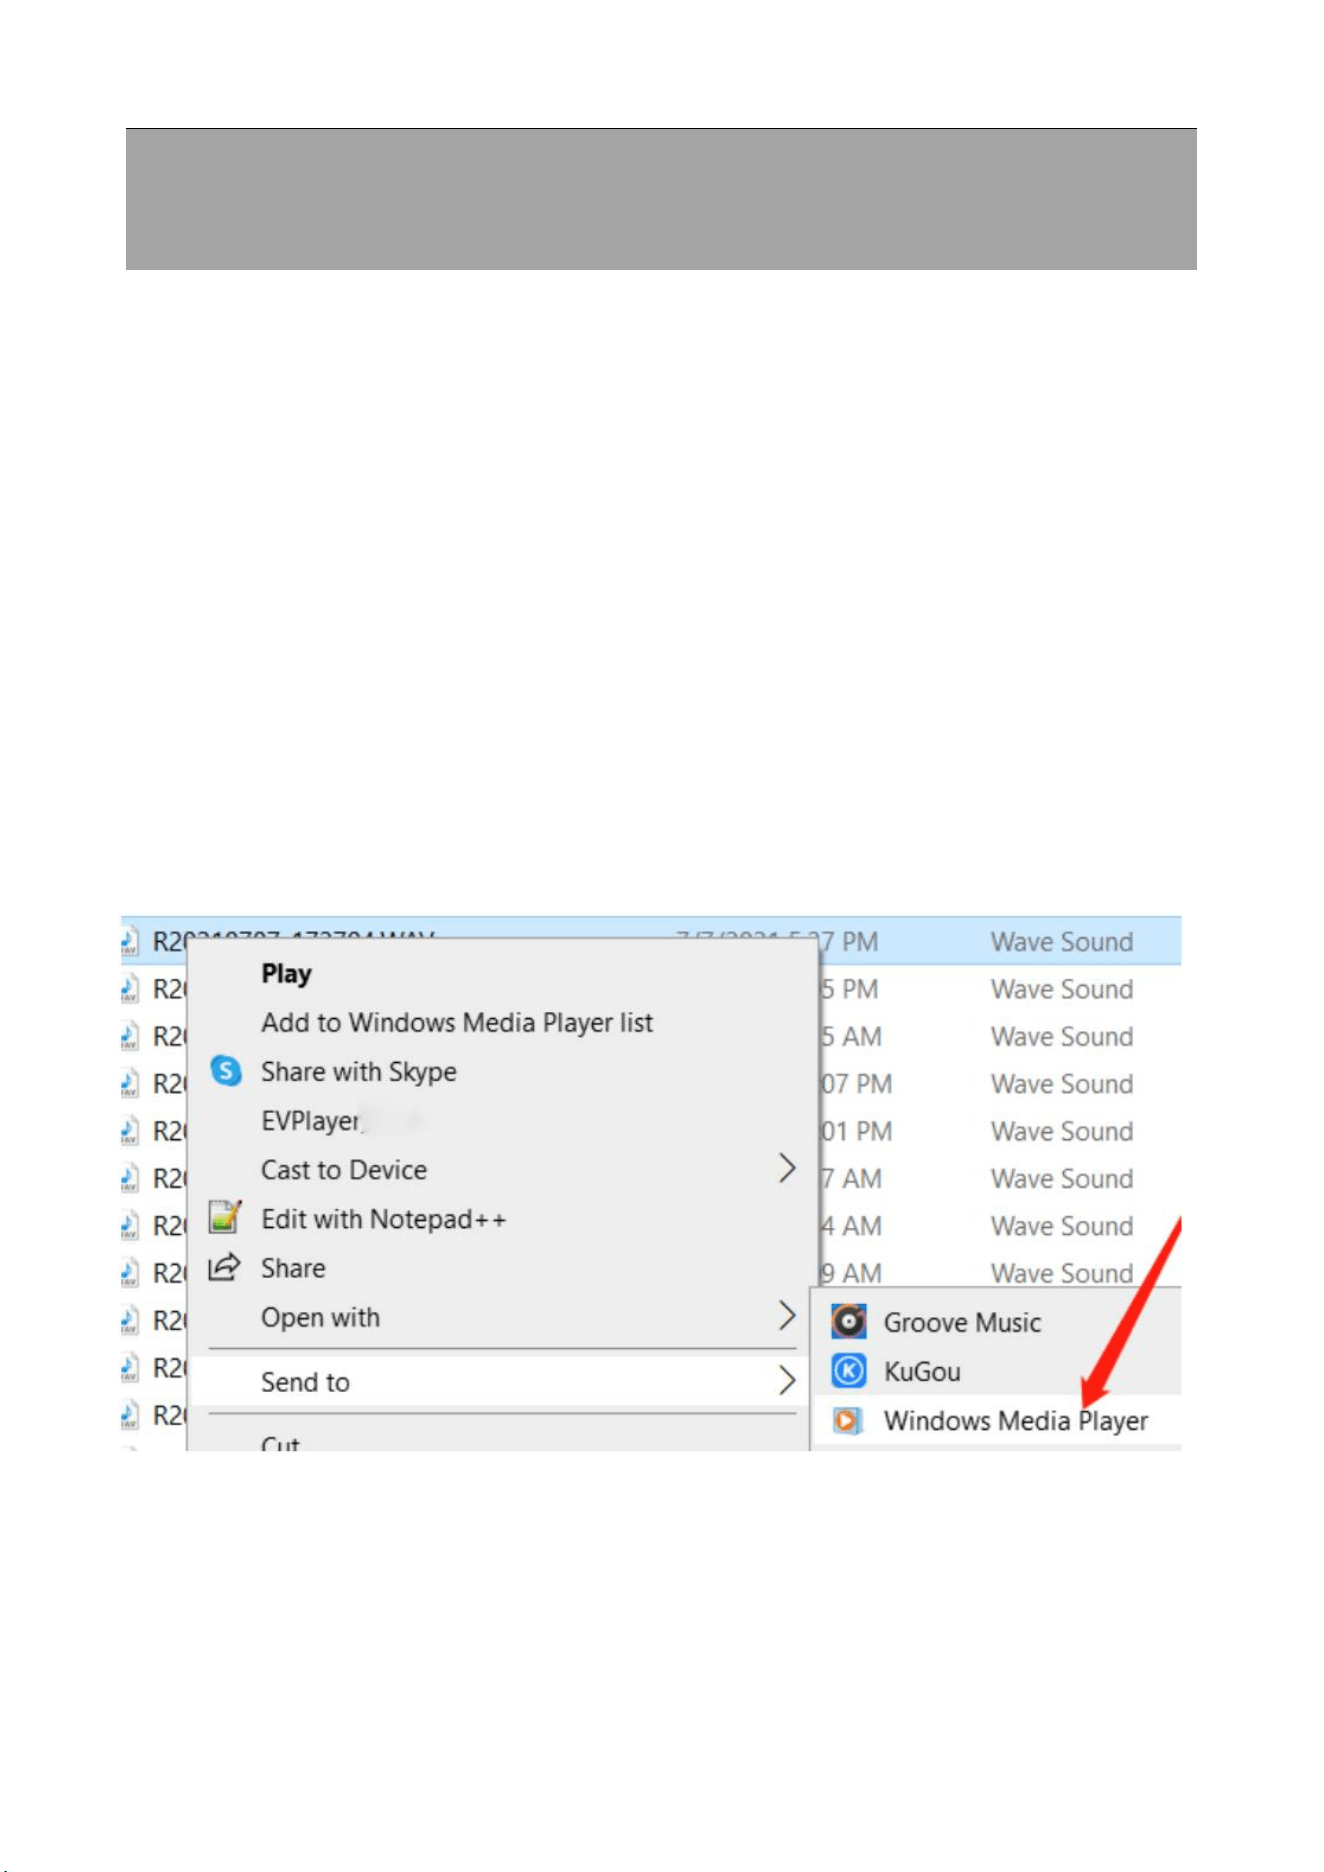
3. Playback on computer
Turn off the power to the recorder before
connecting.Please place it smoothly and then connect
to the computer without pressing any button
,
and wait
a few more seconds.
Enter [USB DISK]-[RECORD]-Click the recording to
play directly.
If the computer cannot play the recording
,
Please
use“Windows Media Player” or other player to play.

16
4. Menu
Press and hold “MENU” key: to enter the menu
settings
Switch menus via the previous and next song keys and
short press the “PLAY” key to save the changes, and
then exit
4.1 Play mode
Play mode
You can select Shuffle/Repeat All/Repeat 1/Single
Play, short press "PLAY" button to confirm to save the
setting, then the playback file will be played
according to your setting playback mode.
A-B repeat
In the state of playing files:
① short press the "M" key once, the screen "B" in the
flashing, that this is the start of the repeat section
② Short press "M" key again to determine the end of
the repeat section, and start to repeat the playback in
the A-B interval
③ Short press the "M" key again to exit the A-B
repeat mode.
17
4.2 Recording settings
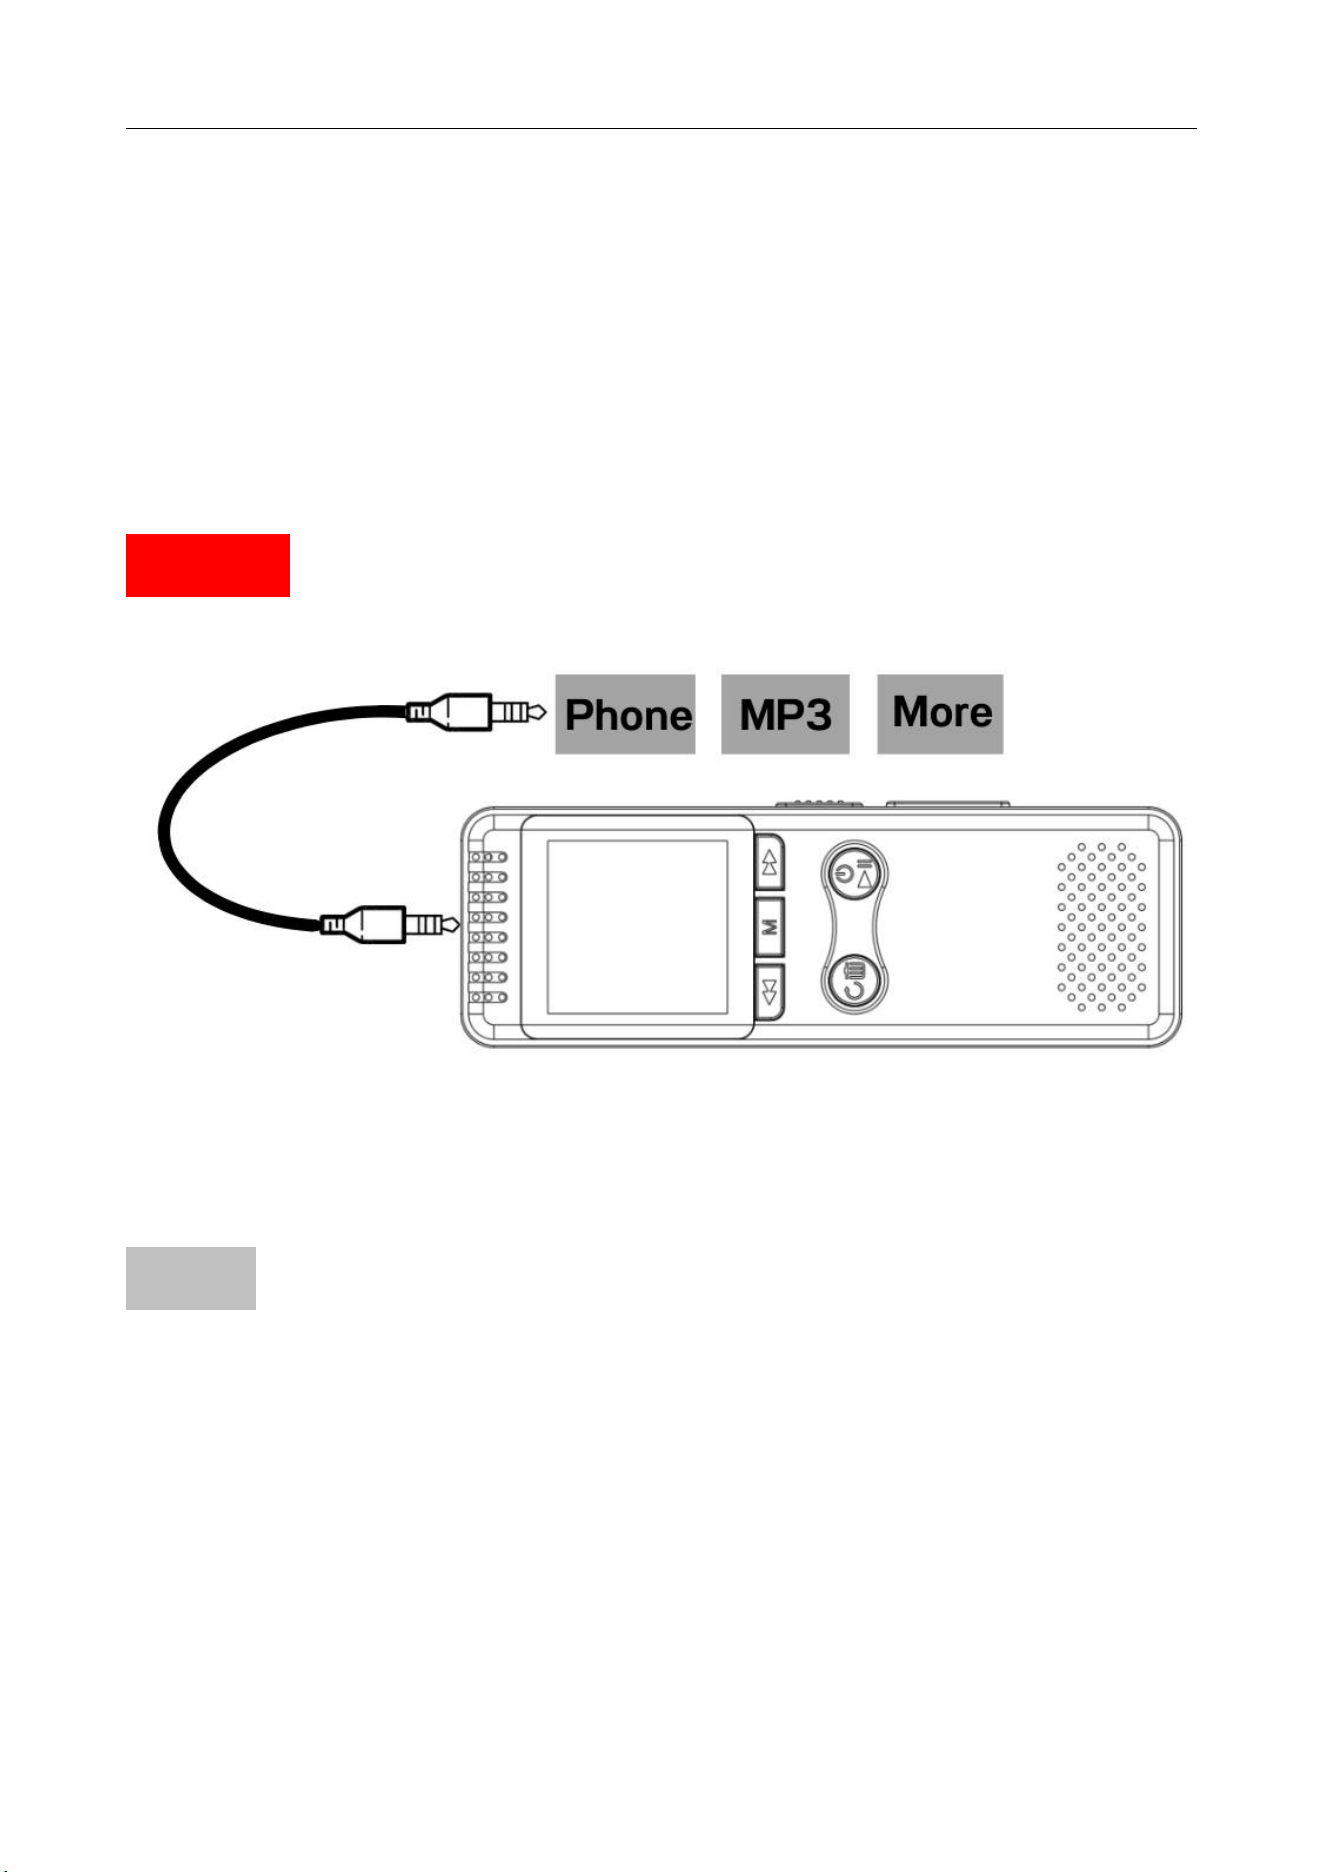
①
Recording from:Microphone/Line in
[Default:Microphone]
Microphone: Normal recording mode
Line-in :
Connect external devices via 3.5mm audio cable, such
as mobile phones, MP3, etc. Direct audio to recording
NOTE 3.5mm Audio Cable needs to be purchased
separately.

18
② Recording format
③ Set rec bitrate:
Default: 512kbps/WAV
(No change recommended)
WAV
256kbps~1536kbps
MP3
32kbps~128kbps
The higher the bit rate of the recording file: the more
memory and the more power consumption.
Note: It is not recommended to set the recording
format to MP3.
④
Recording sensitivity [Default: 3]
(No change recommended)
The higher the number, the higher the recording
sensitivity.
But the sensitivity is too high resulting in capturing
very subtle sounds and thus creating noise.
Too low will result in missing some recording.
⑤
Segmented recording [Default: OFF]
After turning on, every 0/30/60/90/120 minutes...
Auto save recording

19
⑥ AVR mode [Default: OFF]
Voice activation function: When the voice activation
function is switched on, slide the record button to
"ON" with one touch.
Start recording: it will automatically sense the
surrounding sound, when the surrounding sound
reaches a certain standard, it will automatically record,
automatically suspend the recording when below the
standard.
NOTE After turning on voice activation, low decibel
sounds may be missed, so please turn on this feature
with caution. It is not recommended to use in critical
environments
Voice activated sensitivity:[Default: 2]
*No change recommended
The higher the voice activation sensitivity level the
higher the sensitivity (i.e. the recorder is able to
record very small sounds), to avoid excessive noise it
is recommended that the sensitivity be set at around 3

20
⑦ Recording monitor [Default: OFF]
After setting to on, plug in the headphones at this time
you can listen to the content being recorded.
⑧ Recording indicator [Default: ON]
When recording, with light/without light
⑨ Noise reduction settings [Default: 3]
(No change recommended)
⑩ Timed recording [Default: OFF]
If you need timed recording, please turn on timed
recording, then select the start and end time, and
finally determine the period.
HH MM: Hour Minute
Once :this time only
Daily :Every day
Work day:Monday to Friday

21
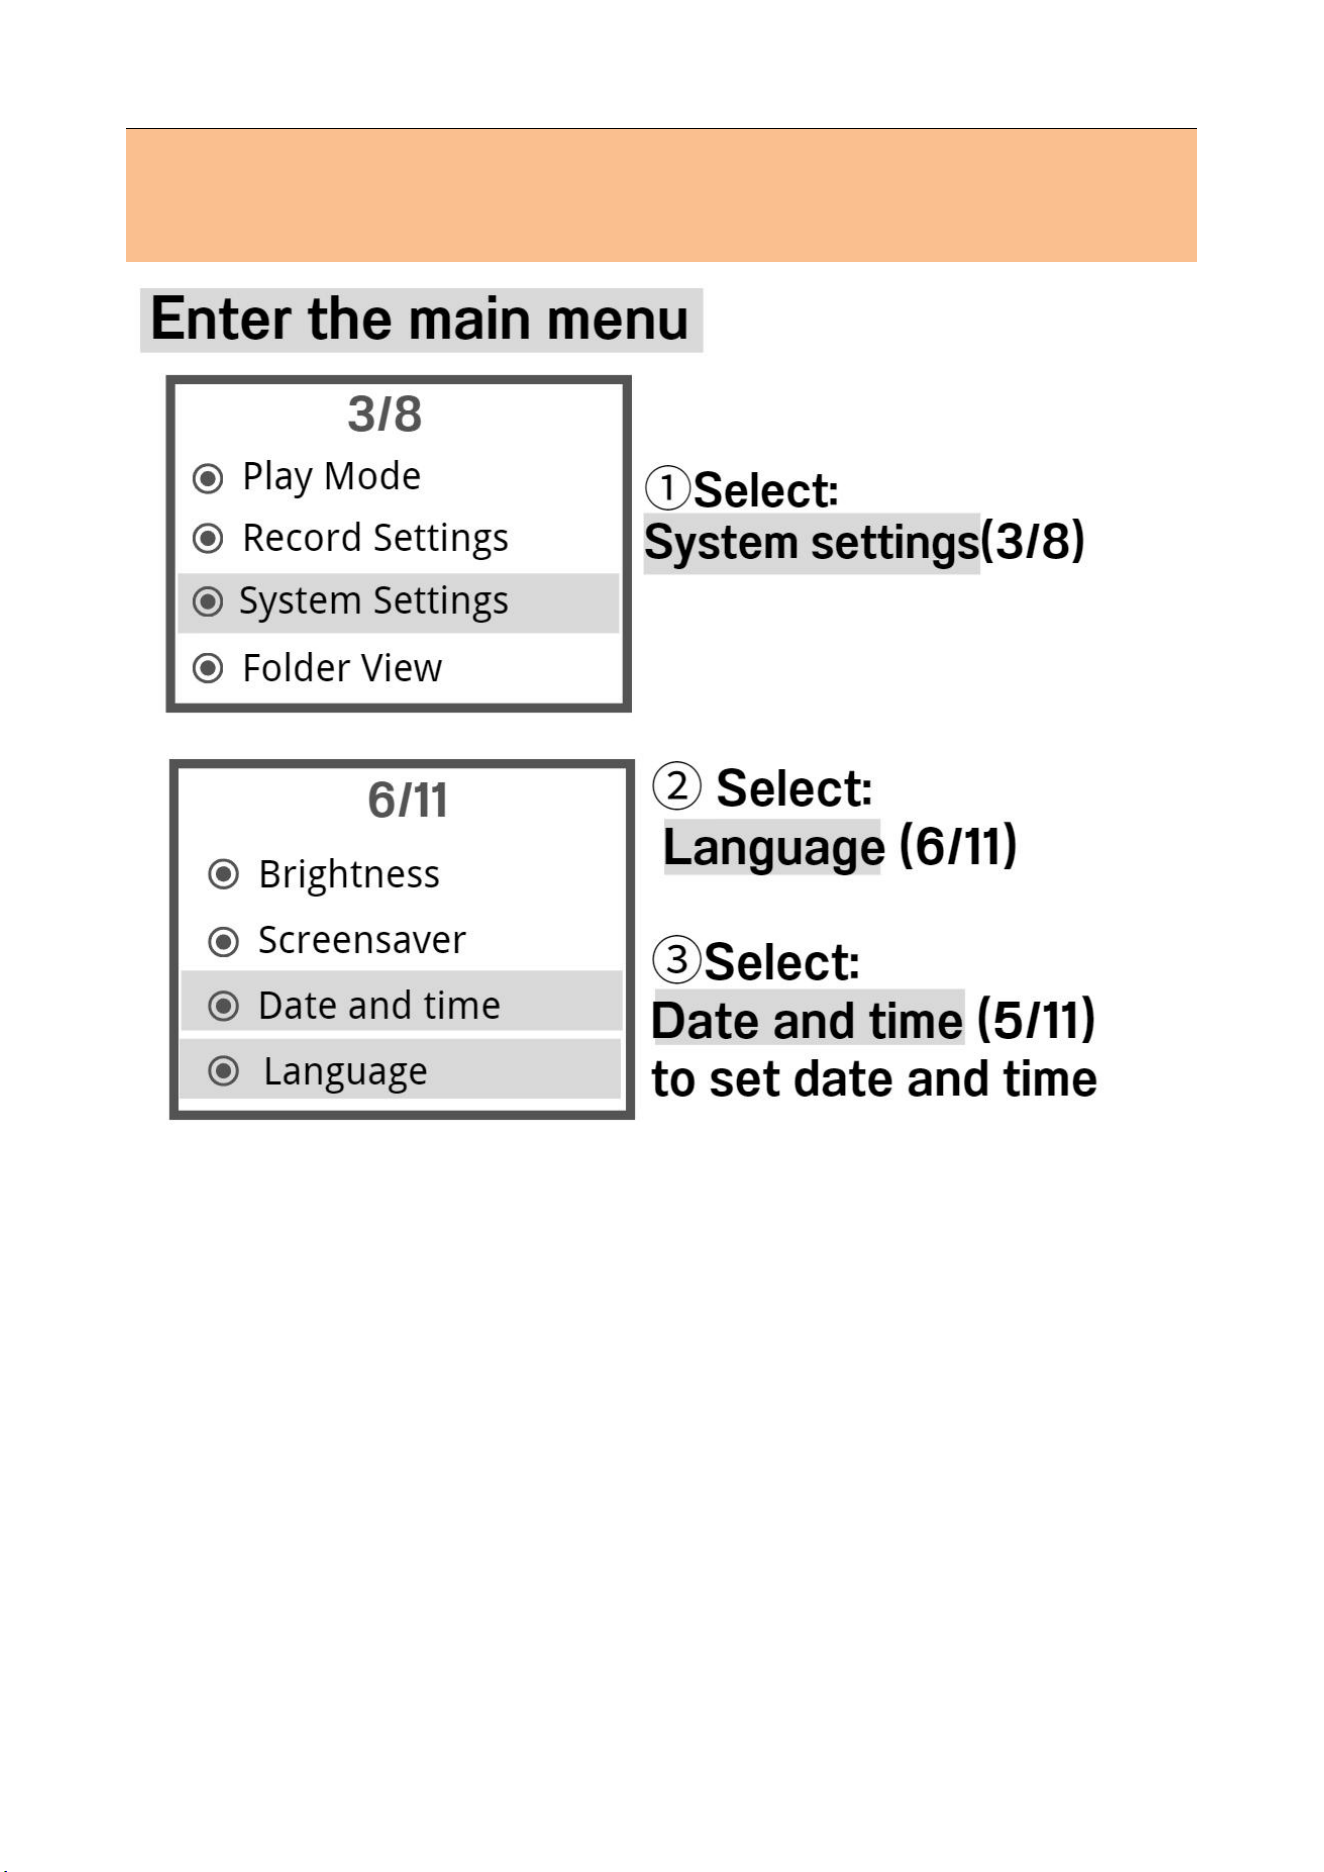
4.3 System settings
①
Sleep timer
Power saving [Default: 2 Mins]
2 minutes without any operation automatically shut
down, power saving.
Set timer shutdown [Default: 0 Mins]
0 means turn off this function, if set to 10, it means
the machine will shut down automatically after 10
minutes.
②
Backlight timer
Automatic backlighting after 30 seconds without any
operation by default
③ Brightness
④ Screensaver

22
⑤ Date and time
Indicate respectively:
Year-Month-Day-Hour-Minute
⑥ Language
⑦ Password settings
Password switch [Default: OFF]
Set password:
Original password: 00 00 00
If you forget your password, please enter (18 18 18)
and press and hold the button "Back" for over 3
seconds to crack it
NOTE After enabling this function, every time you
power on or connect to the computer, you need to
enter the password before you can use the machine.

23
⑧ Information
Reasons for the difference between actual and
displayed memory: Because of binary differences,
plus the system software also takes up some of the
storage space. Please Google for more
⑨ Format device
NOTE Please backup the data in the recorder in
advance, all files in the recorder will be deleted after
formatting.
*Can be connected to a PC for formatting (i.e. click
"USB DISK" to format)
*Do not shut off the device during disk format, or
disk error
⑩ Reset
Reset to factory settings, rest assured: no files will be
deleted.
⑪ Exit

24
4.4 File browsing
4.5 Sound settings
①
Equalizer
②Variable speed playback:You can listen to recorded
files faster/slower, which is good for language
learning
4.6 Delete: Delete a single file
4.7 Delete all
Delete all files
NOTE after deleting files, they cannot be recovered,
please use this function carefully
Quick delete method: Select the recording or mp3
files, press and hold "BACK"button, the screen will
show (delete/delete all)
4.8 Exit

25
5. Technical specifications
Model
V30
Material
Premium aluminium alloy
Noise reduction te
chnology
PCM & Professional recording
chips
Power Supply
Method
Built-in rechargeable lithium
polymer battery
Dimension
108mm×36mm×11mm
4.3×1.4×0.4 in
(Exactly as per actual)
Display Screen
1.42 inch
Display Resolution
128*128
Weight
92g / 3.25oz
Memory
8GB - 64GB
Recording Format
WAV /MP3
Rec Bitrate
32kbps~1536kbps

26
Music Format
MP3/WMA/WAV/FLAC/APE/
OGG
Interface Type
Type-C 2.0
Earphone Jack
3.5mm
Support System
Windows/Mac Computer
Operating
Temperature
20 to 110℉
Battery
1100 mAh
Battery
Specifications
3.7V/423282
Charging Time
4 Hours
Packing list:
1*Digital Voice Recorder
1*USB Cable
1*Manual
27
Memory usage
The following times are the maximum recording times
that can be stored in memory, not battery operating
times (h-Hour, d-Day)
WAV-Bitrate
Storage
Length
(16GB)
Storage
Length
(32GB)
Storage
Length
(64GB)
1536kbps
24h
48h
96h
1024kbps
36h
72h
144h
768kbps
48h
96h
192h
512kbps
72h
144h
288h
256kbps
142h
284h
568h
MP3-Bitrate
Storage
Length
(16GB)
Storage
Length
(32GB)
Storage
Length
(64GB)
128kbps
282h
564h
47d
64kbps
560h
1120h
93d
32kbps
1112h
2224h
185d

28
6. QA&Warm Tips (Must
view!)
Warm Tips
①
The factory default settings are the best settings
after several tests by the factory technicians, if not
necessary, it is recommended not to change.
②
After receiving the product, please set the time to
the local date.
③
Factory default: 2 minutes without any operation
the machine will shut down automatically, of course
you can reset the power-saving auto shutdown time.
④
When connecting to the computer, to prevent file
loss or damage during transmission, please do not
accidentally interrupt the connection.
⑤
Back up your data to the computer as often as
possible. This will protect your files and save
recording space.

29
QA
Q1: Why is the actual storage space of this
recorder not up to the advertised storage space?
All memory manufacturers in the world produce the
memory according to 1000 MB = 1 GB, while the
computer recognizes the recorder according to 1024
MB = 1 GB. At the same time, the system software
also takes up part of the storage space, so the actual
capacity is smaller than the nominal capacity. This
problem exists in the memory of all electronic
products.
Q2: Disk Error?
Cut off its power when format device didn’t
completed, so it lost system firmware. Please connect
computer to format. Or switch on first, then try
"Reset button".
Q3: Can't shut down?
When the recorder is charging, or connected to
computer, it will not accept any instructions.(It's
normal)Or switch on first, then try "Reset button".

30
Q4: Format Error?
The recordings time length is less than 5 seconds, like
0 second recordings file.
Audio files format are not supported, please select
MP3/WMA/WAV/FLAC/APE/OGG format audio.
Q5: Over record?
Connect to computer to delete files.
Q6: Why does the response speed of this product
become slower?
A: Because after long time use or frequent file
deletion, the internal flash memory may become
fragmented (similar to hard disk fragmentation),
which may cause the speed to slow down. Solution:
Formatting the flash memory with professional
software may solve the problem well. If the MP3 file
inside the unit is corrupted, it will also slow down the
speed.

31
Problem
Solution
Can't
record?
1. Check if the battery is exhausted and
charge it in time.
2. Check if the storage space is full and
delete some recording files after backup.
3. Recording is not possible when the
recorder is connected to a computer, mobile
phone or headphones (recording is
terminated when these devices are connected
during recording), if you want to record,
disconnect from the recorder and turn it on
again.
4. The recorder automatically ignores low
decibel sounds when voice activation is
switched on.
Can't find
recording
in the
recorder?
1. Short press menu button to switch music
to wav recording folder.
2. It may be a disk error, please check the
recording file on computer.
32
Unable to
playback or
Fast
forward/
rewind
1. Audio files are not supported, please
select:MP3/WMA/WAV/FLAC/APE/OGG
format audio.
2. If playback fails on a windows computer,
please use [Windows Media Player] for
windows to play it
3. Fast forward/rewind can only be done
during playback, but not during pause
Reduce
noise
1. Turn off voice activation when not
needed.
2. Place the recorder smoothly to avoid
friction with other objects, such as hands,
clothing, etc.
3. Away from sources of noise (e.g. air
conditioning, typing, or subtle noise that
may be generated by running computers)
4. Speak at least 30 cm away from the
microphone of the recorder, otherwise it is
easy to produce popping sound.
5. If the recording environment is very
noisy, can not avoid the noise, please
understand.

33
Failed to
connect to
computer
1. Before connecting the recorder to a
computer, turn off the recorder. When
connecting to a computer, please place the
recorder smoothly, do not press any
buttons.
2. Please go directly to the file manager of
this computer and see if there is a USB
DISK for the recorder in the USB DISK list
3. Long poke the product's reset button
with a needle
4. Reboot the computer and recorder
5. If you are a MAC user, please replace the
type-c adapter
6. Replace the jack, or change the computer
and cable
7. Please use the original USB cable or a
data cable that can be used to transfer data
(some data cables can only be used for
charging)
8. If the password is set, please enter the
correct password when connecting to the
computer.
9. Restart the computer or recorder.
10. Check if the USB DISK identifier
appears on my computer. Click "USB Disk
Identifier" in the lower right corner of the
desktop - [Open Devices and Printers] -
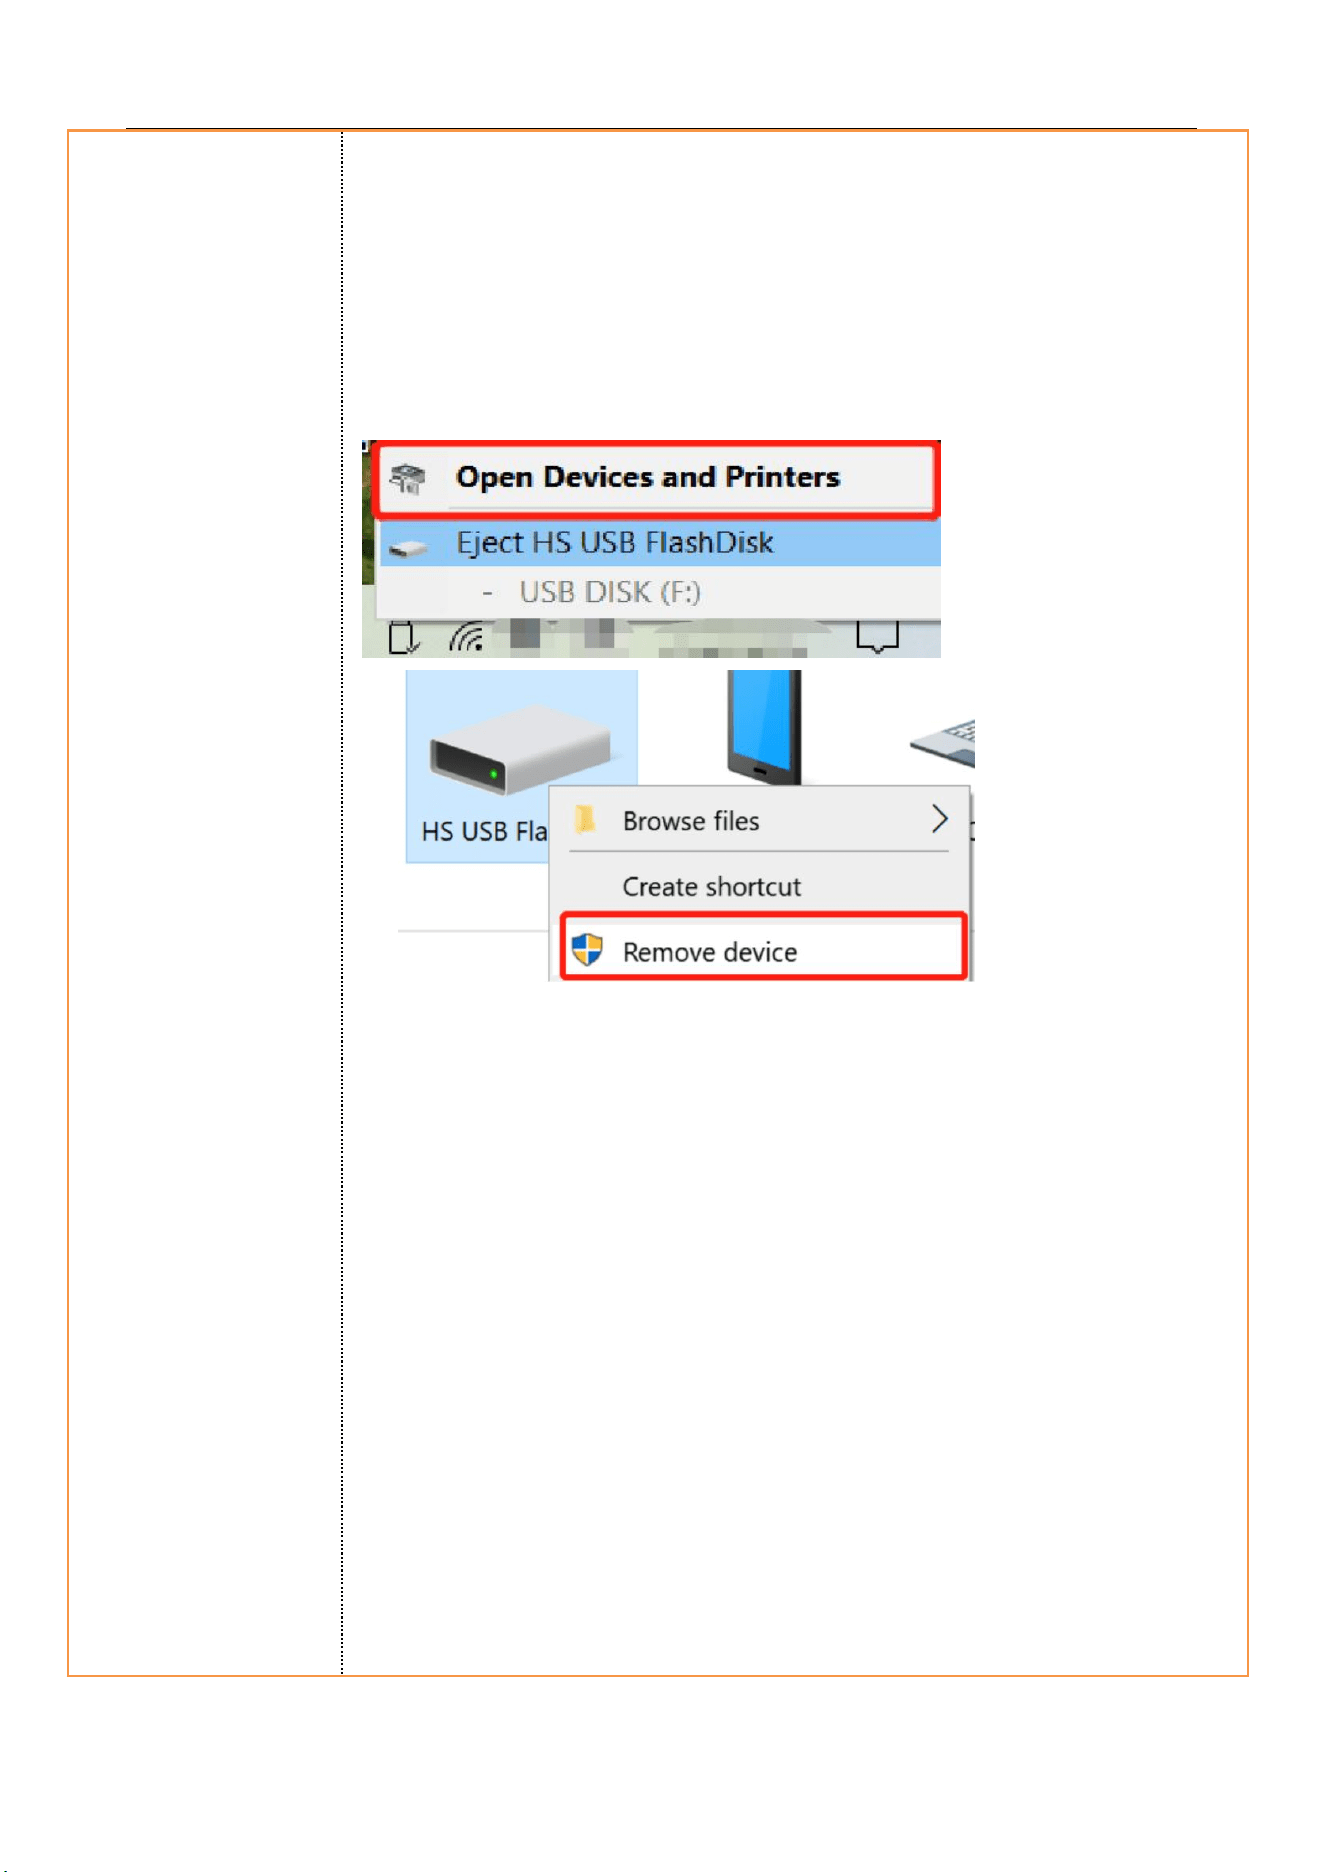
34
[Devices] - right click [HS USB FlashDisk]
- [Remove Device] and then connect to the
computer.
35
E-Manual(6 Language)
Deutsch
English
Español
Français
Italiano
日本語

36
Cautions
1. Children are forbidden to play the recorder alone,
and do not fall and collide with hard objects,
otherwise it may cause data loss or other hardware
damage of the recorder.
2. Do not clean the recorder with chemical reagents
or cleaning reagents, which will damage the shell of
the recorder and corrode it.
3. It is recommended not to use this recorder when
driving a motor vehicle or riding a bicycle. Please
ensure driving safety.
4. Please back up the important files in the recorder in
time. No one can guarantee the absolute security of
the data. If data loss occurs, the files will be difficult
to recover.
5. It is forbidden to use overload charger or the
charging cable is squeezed by heavy objects for a long
time, keep away from combustibles when charging, in
order to avoid fire.
6. It is forbidden to pull out the charger with wet
hands to prevent electric shock.
37
Warranty and Service
If a product is damaged or broken within one year, we
will replace it with a new product free of charge. The
warranty does not cover loss of products due to
customer's negligence.
Order number
Contact Email
vivaniir3[email protected]
Date of purchase
Warranty Period
1 year from the date of
purchase
We are sorry that we do not provide support by calling
us. We apologize for the inconvenience, but you can
contact us by e-mail and we will respond quickly and
as detailed as possible. (When contacting us, please
provide your shopping platform and order number).