L57 Instruction

1
The detailed instruction please download at
http://blog.evistr.com/down
Any questions,get support from,
Thank you!
Support@evistr.com;
or http://blog.evistr.com
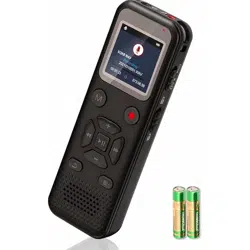
2
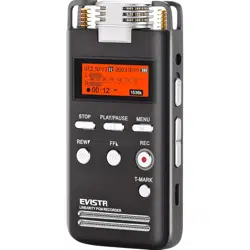
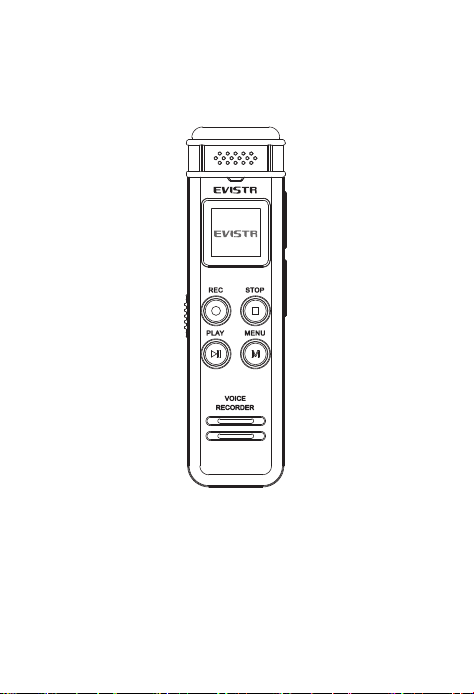
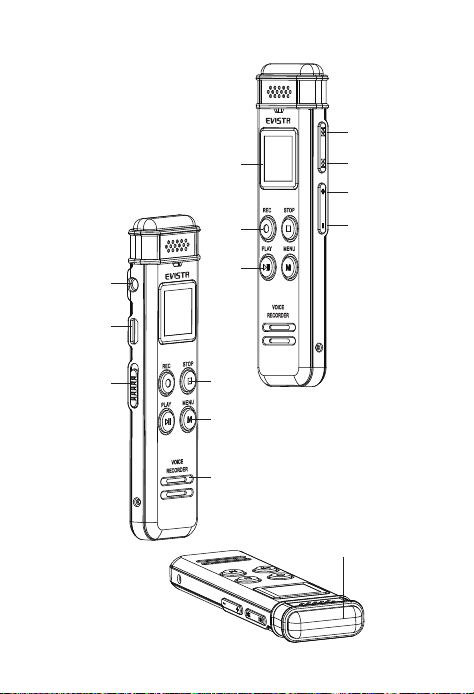
KeysSchematic
Built-in MIC
Speaker
Mode(Menu)
ON/OFF
switch
USB Hole
STOP
/SAVE
Play/
Pause
REC
Vol-
Vol+
Next/FF
Pre./
REW
Screen
Earphone
Built-in MIC
Speaker
Mode(Menu)
ON/OFF
switch
USB Hole
STOP
/SAVE
Play/
Pause
REC
Vol-
Vol+
Next/FF
Pre./
REW
Screen
Earphone

3
Catalog
1.Turn on
2.Turn off
3. Record
4. Record settings
5. Play
6. Play setting
7. Delete
8. System setting
9. Device Storage
10.Technique Parameter
4
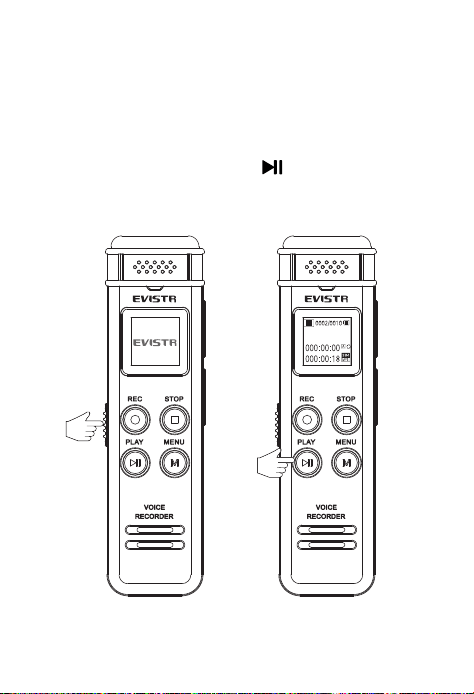
1.Turn on:
Push the "ON/OFF"
①
switch to "ON"(As
figure A);If Power switch already at“ON”
position, Long press②“ ” key,then goes
to Play Interface(As figure B )
A B
The Fame.mp3
①
②
5
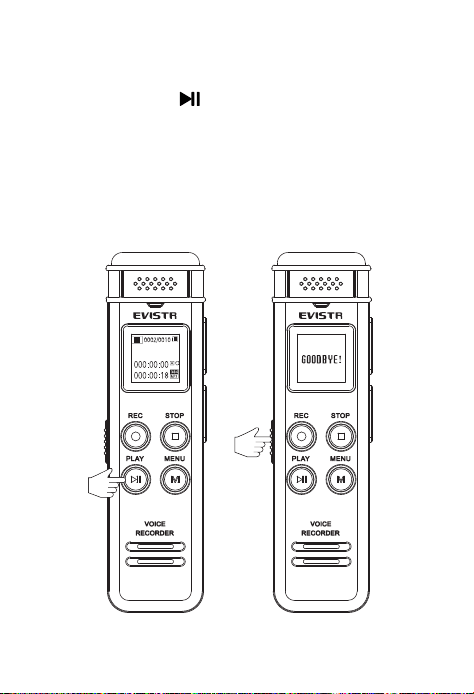
2.Turn off:
Long press the “”① for 3 seconds,the screen
will shows "GOODBYE!"(As figure B),the device is
turned off.
Push the "ON/OFF"② switch to "OFF",the voice
recorder will cut off the power.
A B
The Fame.mp3
①
②

6
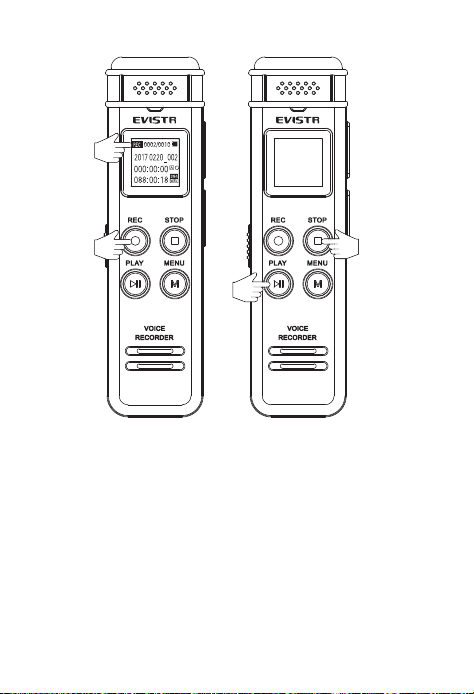
3.Recording:
(1) Turn on the device,short press the ①"REC"
button begin recording. The screen wills shows
the recording timing running and the LED light
will be flashing(As figure A).
(2)The device in the recording state,short press
the "PLAY"① button to pause recording;short
press the "PLAY "① button again to continue
recording.
(3)Short press the "STOP" button to end
recording,the screen will shows "Saved!".
(As figure B).
7
A
B
Note:The recorded file will named with the date
you recorded such as 20170621-001.wav
Saved...
①
②
③
④

8
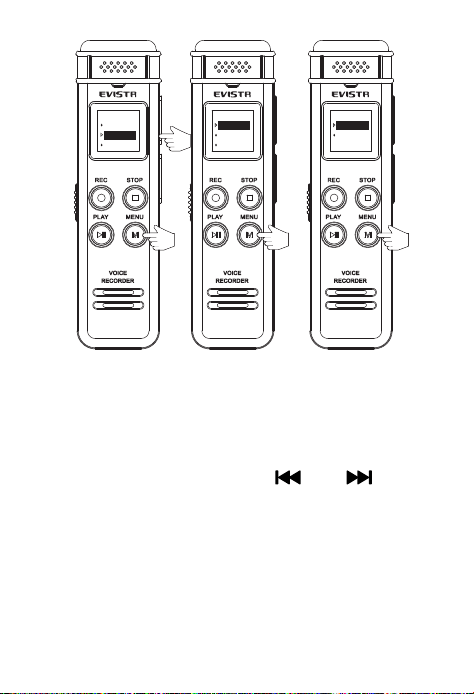
4.Record settings:
1. Record Quality Setting
In the status of stop recording (not pause),
short-press the ①“M” button to enter the
“MENU OPTION” first, and then press the②
“ ” or “ ”Select “Record Setting” (As
figure A)
Press ③“M” enter it, and select “Record
Quality” (As figure B)
Press ③ “ M ” enter it, and select the
recording quality you like such as “32kpbs” or
“384kpbs”
And press “M”, confirm your selection (As
figure C).
9
A
B C
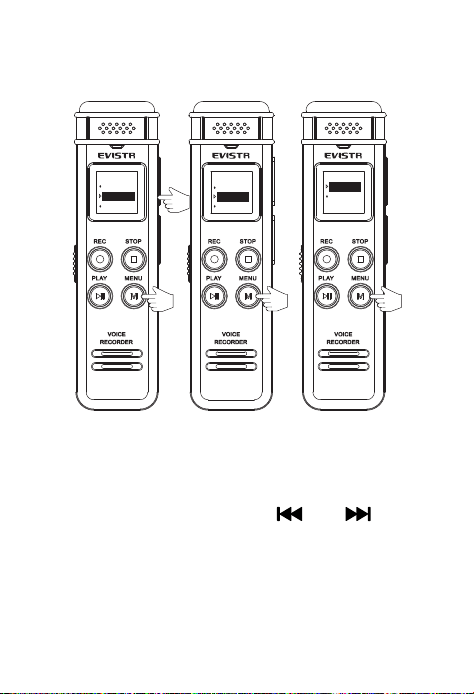
2. Recording Indicator Light: in the status of
stop recording; short press①“M” enter “Menu
Setting” and then press ②“”or“”select
“Record Setting” (As figure A)
Press ③“M”enter it,select“rec light”, press
③“M” enter it(As figure B),
Select“ c lose”or“o pe n”a nd t he n pre ss ④“M”
192K BPS
384K BPS
①
②
③
④
Local folder
record seting
setting
Record quality
rec light
mic sensitivity
menu menu menu
10
confirm your selection ( As figure C)。Now the
recording indicator will ON/OFF as the setting
A
B
C
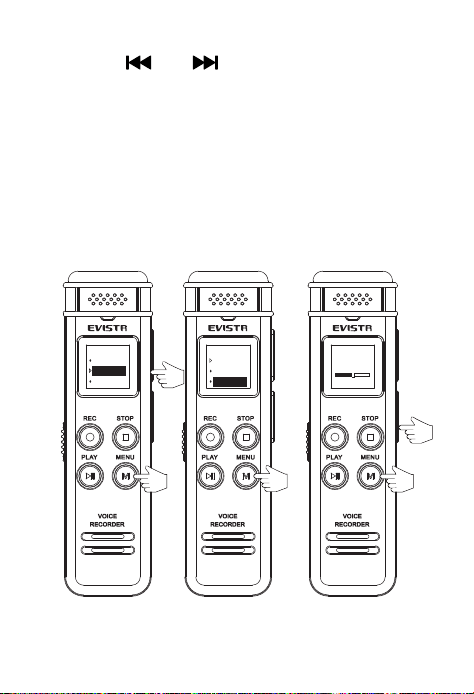
3.MIC Sensitivity select:in the status of pause
or stop recording; short press①“M”enter
“MENU”and then press ②“”or“”select
“record setting” (As figure A)
Press ③“M”enter it,select“MIC sensitivity”
and then press ③“M”again enter it (As figure B)
①
②
③
④
Record quality
rec light
mic sensitivity
closelity
openg
menu menu
Local folder
record seting
setting
menu
11
Press ④“”or“”select from 0-7 level, and
then press ⑤“M”confirm your selection(the
higher level, it records longer distance but more
noise; the lower level, it records shorter distance,
but less noise; you could plug your headphone
and monitor your recording effect)
A B C
①
②
③
④
⑤
〈4〉
Record quality
rec light
mic sensitivity
menu
Local folder
record seting
setting
menu
12
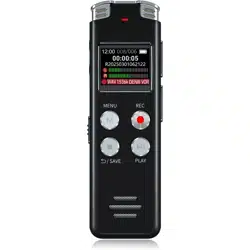
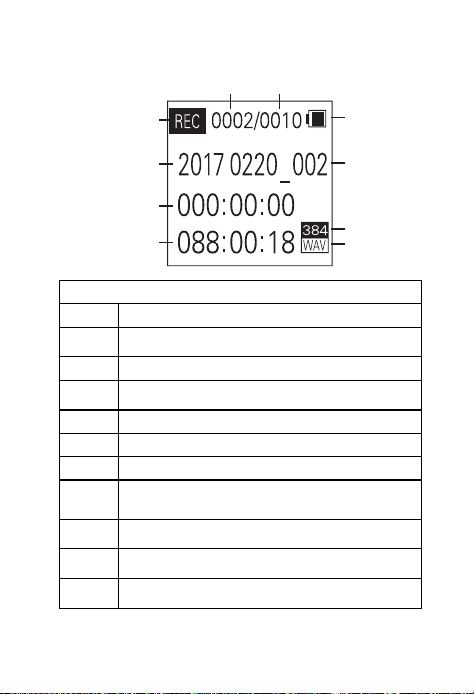
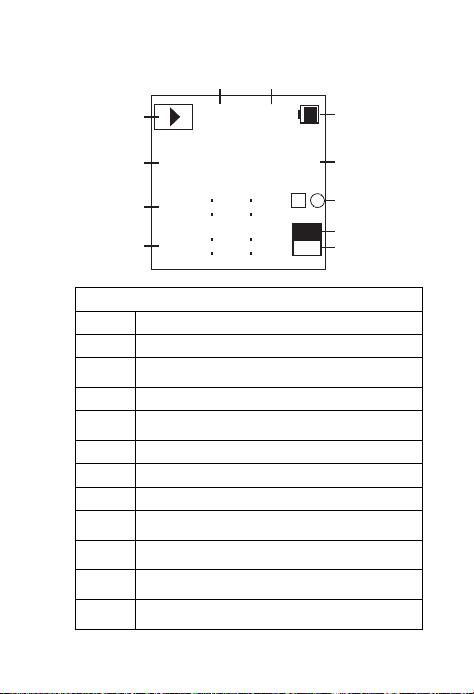
4.Recording LCD display
Recording mode
No Name
1
Battery Icon
2 Current recordings file name
3
Current File Bit Rate
4 Current File Format
5 Remaining Space Time
6 Current Recording Time
7
Current recordings file name
8
REC/Play/Pause State Display
9
Current File Sequence
10
Total Number of Files
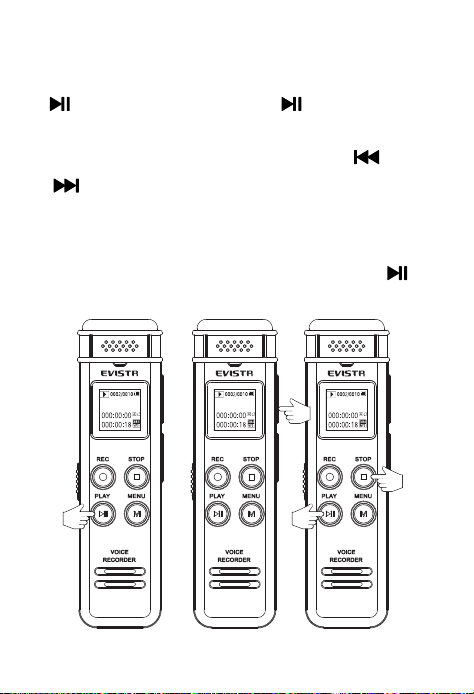
5.Playback:
1
2
3
4
5
6
7
8
9 10
13
In recordings file or music mode,press ①
“ ” p l a y i n g ,a n d p r e s s ①“ ”a g a i n , p a u s e
play(As figure A);
In the status of playing, press ②“ ”or
“ ”switch to next/previous track(As figure
B);
At standby or pause status,press ③“■”it
could switch between recording and music
mode,at the stop or pause status,press ④“”
it will start to play currently file(As figure C)。
A
B
C
The Fame.mp3
The Fame.mp3The Fame.mp3
①
②
③
④
14
Playing LCD display
Music mode
No Name
1 Battery icon
2
Current music file name
3 Current Repeat Mode
4
Current File Bit Rate
5 Current File Format
6 Current File Total-Time
7 Current File Play Time
8
Current music file name
9
Play/Pause State Display
10
Current File Sequence
11
Total Number of Files
0002/0010
000 00 00
000 00 18
A
MP3
384
1
2
3
4
5
6
7
8
9
10 11
The Fame.mp3

15
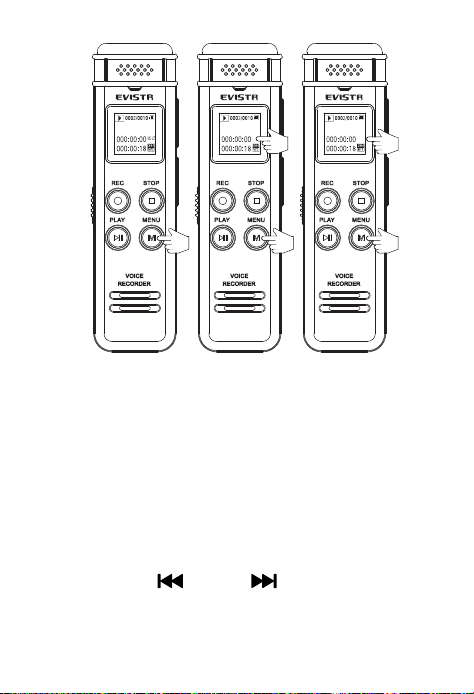
6. Playback Setting:
A-B repeat Function:In the playing status,
long press ①“M”,set start point“A”, (As figure
A)
And now the screen will display ②“B”and
flash,and then long press ③“M” again,it will
set the end repeat end point“B” (As figure B)
Now the screen will display ④“A-B”and stop
flash,the device will repeat playing between
“A” and“B”,and press ⑤“M”again, cancel
A-B repeat (As figure C)
16
A B C
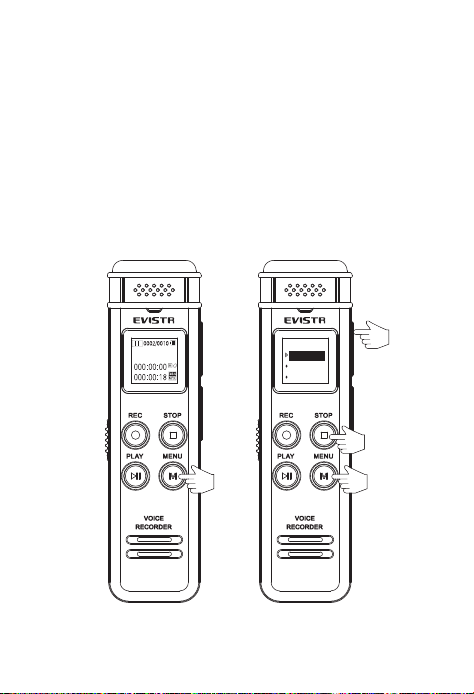
7. Delete:
At the status of stop, long press ①“M”enter
delete menu(as figure A)
Screen will display “Delete file”, ”Delete all”,
“Exit”
Press ②“ ” or “ ”select it; press ③
“M”again, confirm selection and delete file(the
The Fame.mp3
The Fame.mp3
The Fame.mp3
A- A-B
①
②
③
④
⑤
17
more file you delete, the long time it needs,do
not shut down the device during delete file or it
will cause damage to files in the recorder) (as
figure B)
Cancel DELETE, press④“■”cancel it, and
return the main interface(as figure B)
A B
The Fame.mp3
①
②
③
④
Delete file
Delete all
Exit
menu

18
8. System Setting:
System Time: Once set, the time will be
remember; When the battery is exhausted, it will
reset to default time, you will to set date and
time again
Backlight: the display backlight could be set
at :0-30 seconds.
Language: the device built-in multiple
language, English, German, French, Italian,
Spanish, Japanese etc.
Format Device: entering format device, Press
“REW”or “FF”select “OK”or “Cancel”;
If you need format the device, select “ok”,
and press “MENU”,confirm it, device will be
format
If NOT, select “Cancel”, or Press“STOP”cancel
it
19
NOTE: format device, it will erase all data on
the device, Please backup!
Factory Settings: select factory settings,
Press “MENU”enter it, Press “REW”or “FF”,
select “Ok”or “Cancel”
Select “ok”, and press “MENU”, confirm
selection, device will restore factory settings
Press “STOP” or select “Cancel” to cancel
it
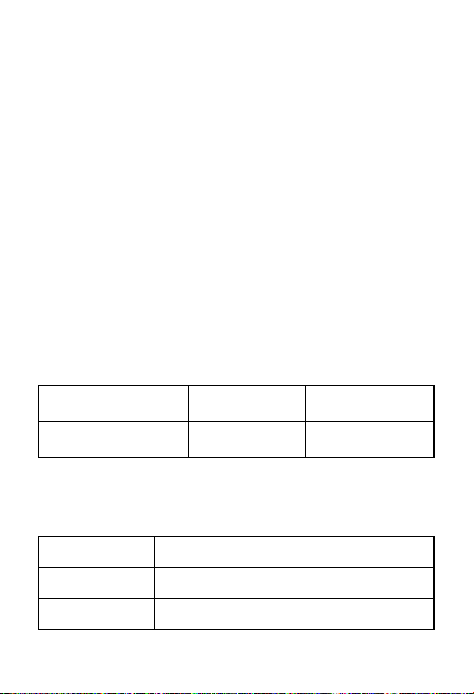
9.Device Storage : (8GB)
WAV Format
384Kbps 32Kbps
Storage Time 2760Mins 33600Mins
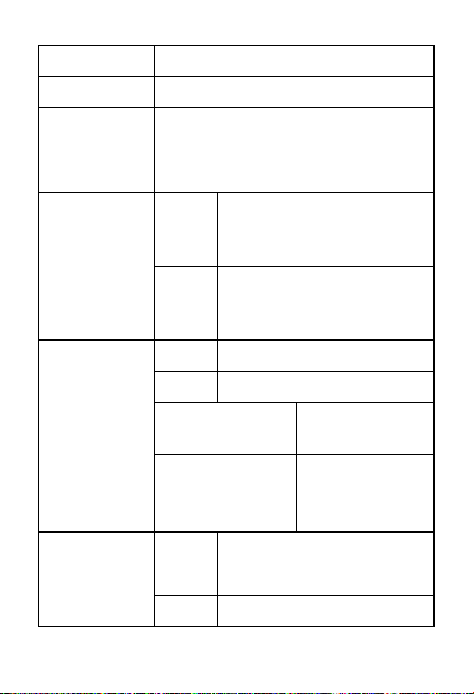
10. Technique Parameter
Dimension 101X27X10.8MM
Display LCD Display (96*64, negative)
USB USB 2.0 High Speed
20
Memory 8GB
Battery 3.7V/230MAH Polymer Battery
8GB
Memory
PCM Pulse Code Modulation for
about 46.5 hours
Music
MP3
8KHz–48KHz
8Kbps–320Kbps
WM
A
32KHz–48KHz
48Kbps–192Kbps
Record
PCM 384Kbps
HQ 192Kbps
SP Standard
128Kbps
LP Long Time
32Kbps, 64
Kbps
Earphone
Output
Max.
Out
10Mw
+10mW(32Ohm)
FR 20Hz~20KHz

21
SNR >80dB
Dist 0.05%
Temperatur -5 to 40℃
Supported
System
Windows 98 Second Edition/
Millennium Edition/2000/XP/
Windows 7
The manual content is subject to its newest
version; It is sorry, we cannot notice it.
Trouble Shooting Guide
1)No Recordings
If there is no recordings, or you have deleted all
recordings in your voice recorder, when you
open your voice recorder, you will see “ no
recordings” or “ NOT RECORD” on the screen.
Don’t worry, you could just go ahead to press
REC or M (menu) or STOP to switch to Music
folder as your wish

22
2)Format Error
Format Error, this usually happens from 2 aspect:
A.During recording, directly push down the
POWER BUTTON to OFF position, that will cause
file damage, before switch off your voice
recorder, you need to press STOP save the
recordings first
B.Computer do not support the .wav file. The
recordings were saved as .wav format. For
WINDOWS 10 or MAC user may encounter with
this issue. Don’t worry
You could download the free VLC Media Player
to solve this issue
http://www.videolan.org/vlc/
3)How to connect to computer
Use the attached cable connect to your
computer, or your android phone cable
If you failed connect it to your computer, you
could contact us, support@evistr.com we will

23
help you solve it, or you could do some trouble
shooting, according our next chapter said
Or you could go to the simple way, just change a
new socket or new cable. Because this issue
usually happens like you failed connect your
flash drive to your computer, they are the same
issues.
4)Cannot find my recordings in the recorder
This mainly because when you open the voice
recorder, it reads the MUSIC folder, you could
long press STOP switch back to music folder
Or you could connect it to your computer to
check whether there is recordings in your
recorder
5)How to open voice activated function
Go to system setting, find record setting, enter
it , select AVR mode, open AVR mode, and press
M confirm it.

24
Now press REC, you will see VOR on the screen,
it means you have successfully set voice
activated recording function
6)Press REC, it not recording
First check, the recording light blink or not
Second, can you see VOR on the screen
If so, it means you have open the voice activated
recording function, during this setting, it will
only records when high enough decibels sound
detected, you could go to record setting, find
AVR sensitivity, and adjust it. It helps
But we suggest you could close the AVR mode, if
you do not want this function
7)Why it is only playing 16 seconds each
recordings / music
This is because you enter Intro playback mode, it

25
will playback 16 seconds of each file
At the status of playback, you could press M
(menu), find Repeat, enter it
Select Repeat All or other mode, press M (menu),
confirm your setting
NOTE: it must during playing, press M (MENU),
then you could enter playback setting
8)Why it playback in random
Same way to solve this issues as issue 7
9)How to use the A-B repeat function
During playback, long press M, you will see A on
the screen, and B is blink, it selected the start
point
Long press M again, select point B
Now it will playback between Point A to B

26
10)The recording is noise
Don’t recording near computer, electric fans, air
conditioner, sound bar that will easily cause
noise, the recorder will pickup this statics noise
11)It suddenly shows delete file
At the status of stop recording or playing, when
you long press M (menu), it will enter delete
mode. So when you see this information, you
should be mistakenly enter delete mode, press
FF/REW to select exit, or don’t do any operation,
it will return back to normal screen. If you
selected YES, and press M, all your files will be
deleted! Be ware of this.
12)Screen shows NOT RECORD! I could do
nothing
When you see this, it is because you have
deleted all recordings in your recorder. So it will

27
shows NOT RECORD! At this moment, you just
need to press REC, to record a new recording,
that will be OK, at this status, many buttons will
not work, it is normal, because no file.
13) Space is full
When space is full, you could connect to your
computer, and copy out your recordings, and
save it to your computer, and then delete all the
recordings in your voice recorder.
The voice recorder has a limited storage at 8GB,
so after a while of using, it may be full of storage,
you need to back up it on your computer
We will regular update our E-book, based on our
customer feedback. We hope to get more
interaction from your side, and let us know more
we could do, you could visit more of this
information from our website:
http://blog.evistr.com/